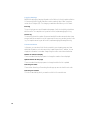
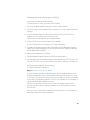
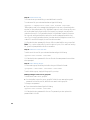
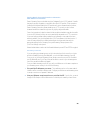
1
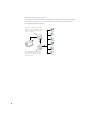
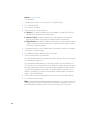
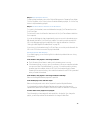
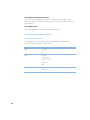
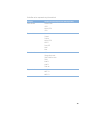
About Darwin
Streaming Server
K Apple Computer, Inc
© 2001 Apple Computer, Inc. All rights reserved.
Under the copyright laws, this publication may not be copied, in whole or in part, without the written consent of Apple.
The Apple logo is a trademark of Apple Computer, Inc., registered in the U.S. and other countries. Use of the
"keyboard" Apple logo (Option-Shift-K) for commercial purposes without the prior written consent of Apple may
constitute trademark infringement and unfair competition in violation of federal and state laws.
Apple, the Apple logo, Mac, Macintosh, and QuickTime are trademarks of Apple Computer, Inc., registered in the
U.S. and other countries.
Copyright © 1995-2001 The Apache Group. All rights reserved.
UNIX is a registered trademark in the United States and other countries, licensed exclusively through X/Open
Company, Ltd.
Windows is a registered trademark of Microsoft Corporation.
Contents
What Is Darwin Streaming Server? 5
Viewing Streamed Media: How It Works 6
Who Should Use Darwin Streaming Server? 6
Before You Set Up Darwin Streaming Server 7
Sample Setup for Live Video 8
Setting Up Darwin Streaming Server for the First Time 9
Streaming Server Settings 11
General Settings 11
Logging Settings 12
Connected Users 12
Streaming Server Strategies and Tips 13
Preparing Live Media for Streaming 13
Preparing Stored Media for Streaming 13
Using Playlists to Broadcast Prerecorded Audio or Video 15
Inside Darwin Streaming Server 18
Compatible File Formats 18
Controlling Access to Streamed Media 20
Getting Media Through Firewalls or Networks With Address Translation 23
Setting Up a Relay 24
Solving Problems With Darwin Streaming Server 27
Using Darwin Streaming Server With Windows NT and Windows 2000 Server 29
Installing the Server Package 29
Server Configuration File 30
Removing Darwin Streaming Server 30
Restoring Darwin Streaming Server 30
3
Broadcasting Playlists With Windows NT and Windows 2000 Server 30
Access Control Passwords 30
4
1
Darwin Streaming Server
What Is Darwin Streaming Server?
Darwin Streaming Server (DSS) is a technology that lets you deliver media over the Internet
in real time. With streaming, your users can tune in to broadcasts of live or prerecorded
media, or they can view prerecorded media on demand. Users see streamed media as soon
as it reaches the computer; they don’t have to wait to download files.
Here are some of the key features of Darwin Streaming Server:
m Skip Protection, available when streaming clients are using QuickTime 5, protects streams
from disruptions and congestion on the Internet, resulting in higher quality.
m Two schemes of authentication, Digest and Basic, provide flexibility in controlling access
to protected media.
m The playlists feature lets you easily stream a set of media files as if it were a live broadcast.
This can be ideal for creating and managing a virtual radio station.
m Web-based administration allows you to easily configure and monitor your streaming
server both locally and remotely.
m A relay allows you to set up a hierarchy of several layers of servers to broadcast streams to
a virtually unlimited number of clients.
5
Viewing Streamed Media: How It Works
Darwin Streaming Server streams can be viewed by both Macintosh and Windows users using
QuickTime Player (which is available for free on Apple’s Web site) or any other application
that supports QuickTime. Streams can also be set up so that users can view them from within
a Web browser when the QuickTime Plugin is installed.
When a user starts to play streamed media through a Web page , the QuickTime Plugin
sends a request to the server.
When a user uses QuickTime Player to view multimedia on demand , the client computer
sends a request for the server to play the multimedia file. The server looks for the hinted
movie file, and if it’s found, sends the media to the client computer.
When a user tunes in to a live broadcast, the Darwin streaming client (for example,
QuickTime Player) sends a request to the Darwin Streaming Server. The server looks for a
Session Description Protocol (SDP) file, and if it’s found, begins to send the media to the
client computer. An SDP file contains information about the format, timing, and authorship
of the live broadcast. SDP files are created by broadcast software on the computer that
captures the live media, but the SDP file must be copied to the streaming server before the
media can be broadcast.
When a user tunes in to a prerecorded broadcast, a similar process happens: the server
looks for an SDP file. In this case, an SDP file is created automatically when you start
broadcasting playlists. If the SDP file isn’t created on the streaming server, it must be copied
to the streaming server before the prerecorded media can be broadcast.
Who Should Use Darwin Streaming Server?
Anyone interested in delivering either audio or video over the Internet in real time should
use Darwin Streaming Server. For example, you can use QuickTime Streaming to:
m create a 24-hour-a-day Internet radio station
m broadcast live events such as concerts, company meetings, and school assemblies
m create a distance learning Web site, with video of lectures available on demand
6
Before You Set Up Darwin Streaming Server
Before you set up Darwin Streaming Server, be aware of the streaming server requirements
listed here:
Client computer requirements
m Any computer that has QuickTime 4 or later installed can view media streamed by Darwin
Streaming Server. While not required, QuickTime 5 is recommended.
You can download QuickTime client software from the QuickTime Web site at
www.apple.com/quicktime
Server requirements
Darwin Streaming Server source code is currently available on the following platforms:
m Mac OS X
m Linux (RedHat 6.2, Intel)
m Solaris 7 (SunOS 5.7)
m FreeBSD 3.5 (Intel)
m Windows 2000 /NT (Service Pack 5)
Note: When installed on a Unix platform, Darwin Streaming Server 3.0 stores some of its
binaries in the /usr/local/sbin/ directory. However, this path may not be included in your
shell’s default $PATH variable. You should add this path to your shell’s environment settings.
Otherwise, you need to type the full path to the file when starting up any of these binaries
(for example, /usr/local/sbin/StreamingProxy, or /usr/local/sbin/DarwinStreamingServer).
Live broadcasting requirements
You need the following equipment to stream live audio or video:
m Recording equipment for audio, video, or both.
m A computer that has broadcast software and a video or audio capture card installed. You
can also use a computer with a FireWire connection. You use this computer to capture
and encode live audio or video and then broadcast it to your streaming server.
7
Sample Setup for Live Video
The illustration below shows a setup for streaming live video and audio. (Most video cameras
have a built-in microphone.) You can stream audio only using a microphone, mixer, and
other appropriate audio equipment.
A computer captures and encodes
video and audio. The encoded signal
is sent to a Darwin Streaming Server
over an IP network.
A computer with Darwin Streaming
Server software sends the signal to
client computers who tune in with
QuickTime Player.
8
Setting Up Darwin Streaming Server for the First Time
To set up and manage Darwin Streaming Server, you use the Web-based Streaming Server
Admin program. You must use Streaming Server Admin from a computer capable of running
Netscape Navigator, Netscape Communicator, or Microsoft Internet Explorer, versions 4.5
or later.
Step 1: Open Streaming Server Admin
To open Streaming Server Admin:
1
Open a Web browser.
2
Enter the URL for Streaming Server Admin on your server (make sure you add the colon and
the port number, 1220).
For example:
http://www.myserver.com:1220
Replace “www.myserver.com” with the name of your server.
3
Type the streaming server administrator ID and password in the Login and Password text
fields, then click Submit. The ID is “streamingadmin” and the default password is “default”.
The Streaming Server Admin Web page appears and provides a quick snapshot of the server's
status. Click Status, Settings, or Logs at the top of the page to administer those areas.
To get help when using Streaming Server Admin, click the question mark.
Step 2: Choose Your Streaming Server Settings
To change the settings for the streaming server:
1
Click Settings.
2
Click General Settings, Logging Settings, or Playlists Settings.
3
Make the changes you want and click Submit.
For more information on the available settings, see “Streaming Server Settings” on page 11.
Step 3: Set Up a Web Page to Show Streamed Media (Optional)
You can embed streamed media in a Web page. If you do this, viewers can use any Web
browser to view the media by entering the URL of the Web page.
For example, users might enter this URL:
http://www.mywebpage.com/
In this case, “www.mywebpage.com” would be replaced by the DNS name of your Web site.
9
Setting Up a Web Page With Streamed Media
To embed streaming media in a Web page, you use the HTML EMBED tag. For complete
documentation on the features and use of the EMBED tag, go to www.apple.com/quicktime/
products
The following example code places a graphical link to a movie, “sample.mov,” on a Web page.
( You can rename the Sample Movie that comes with QuickTime and use it for the example.)
When a user clicks the link, the movie will start streaming in QuickTime Player.
<HTML>
<BODY>
This is a sample use of the EMBED tag.<BR>
<EMBED SRC="http://my.webserver.com/linkimage.mov" width="150"
height="64" href="rtsp://my.streamingserver.com/sample.mov"
target="QuickTimePlayer">
</BODY>
</HTML>
The URL specified in the SRC attribute is a link to a still image, “linkimage.mov,” that serves
as the link to the streaming movie. The width and height attributes specify the width and
height of the image area. The HREF attribute is the URL for the streaming movie that will start
playing when the image is clicked.
You can also let users view streaming media from a Web page by creating a reference movie
that contains a streaming track with an RTSP URL that points to the media on your streaming
server. You store the reference movie in the same directory as your Web site and include a
link to the reference movie on your Web page. For more information on creating a reference
movie, go to developer.apple.com/quicktime/quicktimeintro/tools/index.html and look for
the MakeRefMovie tool under “WebMaster Tools.”
A reference movie can simply be a text file with a “.mov” filename extension (such as
“ref.mov”). The format for the contents of the file is as follows:
rtsptext rtsp://my.streamingserver.com/sample.mov
10
Streaming Server Settings
General Settings
Movies directory
Any hinted media in the movies directory you specify is available for streaming. This includes
m individual files
m directories that contain files
m links to media located elsewhere
The default location of the Movies Directory is /usr/local/movies/.
Authentication scheme
Choose between Basic or Digest. By default, the server uses the more secure Digest
authentication. However, Digest authentication requires that users connect with Quicktime 5
or later. Basic authentication is less secure than Digest but is compatible with earlier versions
of QuickTime.
Streaming on port 80
Choose whether you want to serve media streams on HTTP port 80. If you need to serve
streams past firewalls, you may need to enable streaming on port 80. Enabling HTTP
streaming on port 80 does not prevent HTTP streaming on other ports. However, it can
interfere with HTTP traffic on port 80 if you’re providing Web service on the same server
(see “Streaming on Port 80” on page 23 for additional information).
Maximum number of connections
When the maximum number of connections is reached, users who try to connect see a
message that the server is busy (error 453). Make sure you balance available bandwidth, the
size of the media files being served, and the number of clients tuning in to the broadcast.
Maximum throughput
This is the maximum throughput of the server. If the maximum throughput is reached, no
one else can connect. Users who try to connect see a message that the server is busy (error
453). Keep in mind that the Darwin Streaming Server may share throughput with other
devices on your network.
Streaming server administrator’s password
Enter the streaming server administrator’s login password. Confirm by entering the login
password again on the next line. The default password is “default” you can change it to
whatever you like.
11
Logging Settings
Adjust these settings by changing information in the fields or clicking the preferred button.
You can specify that the log be reset after a certain number of days or after it reaches a
certain size in kilobytes (KB). The changes you make take effect when you click Submit.
Error log
The error log shows error and informational messages. Use this to troubleshoot problems
with the server. The complete error log can be found in /var/streaming/logs/Error.log.
Access log
The access log shows the number of times each media file has been accessed, when it was
accessed, and who accessed it since the log was reset. Access errors are also reported in the
log. The complete access log can be found in /var/streaming/logs/StreamingServer.log.
Connected Users
In this pane, you can view a list of clients connected to your streaming server, and view
additional information, such as the movie they’re watching and their IP address. You can
display the information in a number of ways using the screen controls described below.
Number of entries to display
Choose a number from the pop-up menu to change the number of users displayed.
Update interval for this page
Choose a number from the pop-up menu to change how often the list is updated.
Selecting sort order
Choose either Ascending or Descending from the pop-up menu to select the sort order.
Selecting sort column
Click the column label by which you want to sort the list of connected users.
12
Streaming Server Strategies and Tips
Preparing Live Media for Streaming
To stream live audio or video, you need to do the following:
1
Set up your broadcast software following the instructions that came with it.
2
Connect the audio or video equipment to the computer you’re using to capture and encode
the signal.
3
Use your broadcast software to create a Session Description Protocol (SDP) file on the
computer you use to capture and encode the live signal.
See the instructions that came with your broadcast software.
4
Copy the SDP file to your Darwin Streaming Server computer.
Be sure to copy the file into the directory you’re using for streaming.
5
If you want the streamed media to show on a Web page, set up the Web page by using the
EMBED tag or creating a separate QuickTime reference movie (see “Setting Up a Web Page
With Streamed Media” on page 10).
6
Make sure the streaming server is started.
7
Start the broadcast software following the instructions that came with it.
8
Tell users how to view the streamed media by providing them with an RTSP URL to your SDP
file, or an HTTP URL to the QuickTime reference movie that you placed on your Web server.
Preparing Stored Media for Streaming
To prepare stored media for streaming:
Step 1: Add Hint Tracks to Your Media
Hint tracks contain information the streaming server needs to stream the media properly.
Most authoring applications let you export media as a hinted QuickTime movie. If you have
QuickTime Pro, you can also hint a movie using QuickTime Player. QuickTime Pro is available
for both Mac OS and Windows computers. Check the QuickTime Web site for information on
system requirements and installation instructions.
Each track in a media file must have its own hint track. For example, a movie with one
audio and one video track must have two hint tracks: one for the audio track and one for
the video track.
When you use QuickTime Player to export a movie as a hinted movie, QuickTime adds the
appropriate number of hint tracks automatically.
13
To export a QuickTime movie as a hinted movie:
1
Open QuickTime Player on a Mac OS or Windows computer. ( You must have QuickTime Pro
to do this.)
2
Open the media file you want to hint.
3
Choose Export from the File menu.
4
Choose “Movie to Hinted Movie” from the pop-up menu, then type a new filename.
5
Click Options in the export dialog box.
6
Select Optimize Hints For Server. This is optional. It improves the server’s ability to stream to
more clients but can double the size of the file.
7
Click OK.
8
Click Save.
Step 2: Copy the Media File to Your Darwin Streaming Server
Be sure to copy the file into the directory you’re using for streaming.
Streaming Media Files With Multiple Sources
QuickTime movies often consist of content from several media files. For example, a video
clip might be combined with music from one or more CD tracks. When you export a
QuickTime movie, you should make it a “self-contained” file so that it includes all the source
media. This improves server performance.
To stream movies that are not self-contained, in addition to hinting, you must
m copy all the files needed by the movie to the same folder or directory
m store all the files in the directory on your server that you specified as the Movies
Directory in Darwin Streaming Admin
14
Using Playlists to Broadcast Prerecorded Audio or Video
You can create a virtual “radio station” or video broadcast by setting prerecorded QuickTime
media files to play in a specified order (a playlist). Setting up a series of playlists and clicking
the Play button for each one broadcasts the media to the Darwin Streaming Server, which
sends the media to viewers in the sequence you set up (random or ordered). Although the
media is prerecorded, it appears to viewers as a live broadcast. All viewers see the same
media being played when they tune in to the broadcast.
To broadcast media, you need to do the following:
Step 1: Prepare QuickTime Media and a Reference Movie File
You can broadcast any media that the Darwin Streaming Server is capable of streaming.
To prepare the media, do the following:
m Use the same number of tracks and the same types of tracks for each movie in the playlist.
Be sure all the media files contain compatible media types. For example, all audio tracks
should use the same encoding, compression, and bit rate. All video tracks should also use
the same encoding, compression, and bit rate.
m Format the media in each file in the same way. For example, use the same frame size for
each file that contains a video track.
m Be sure each item is a hinted QuickTime movie.
To prepare a reference movie:
m Usually you specify the first media file in a playlist as the reference movie. However, you
can author a separate reference movie.
m If you author a separate reference movie, it must be a hinted QuickTime movie that
contains the same number of tracks, type of tracks, encoding, compression, and bit rate
used in the actual media files.
15
Step 2: Create a Playlist
To create playlists:
1
In Streaming Server Admin, click Settings, then click Playlists Settings.
2
Click Create New Playlist.
3
Enter a name for the playlist.
4
Use the pop-up menu to set a play mode:
m Sequential: the media is broadcast in the order it appears in the playlist file. When the
last media file is done playing, the broadcast stops.
m Sequential Looped: the media is broadcast in the order it appears in the playlist file.
When the last media file is done playing, the playlist repeats in the same order.
m Weighted Random: the media is broadcast in random order using the weights you specify
in step 7 to determine how often an item plays. The media continues to play in random
order until you stop the broadcast.
5
If you want the server to record information about the broadcast (including error messages)
in the log file, click Enable Logging.
6
Click Add/Remove Items to add movie files to your playlist.
7
Set the order and weight of your media files.
You can broadcast the media in the playlist sequentially or randomly, either once through the
list or repeatedly through the list.
If you broadcast the media randomly, you can specify a “weight” for each media file in the
list. The weight, which is a number from 1 to 10, determines how often an item plays. Media
files that are weighted as 10 play more often than media files weighted with lower numbers.
( You place the weight after the movie name.) The default weight for a media file is 10. In
addition to using weights, you can prevent a media file from playing again until a specified
number of other media files play.
16
8
Set the number of items that must play before other items in the list repeat (if weighted).
9
Click Submit to save your playlist.
Note: Hinted media files and playlists can be stored anywhere on your server, not just in the
designated Movies Directory. Hinted media files stored outside of the movies directory can
be broadcast as part of a playlist, but are not directly accessible by QuickTime clients.
Step 3: Start Broadcast Service
To start and stop broadcasts, return to the Playlists Settings pane in Streaming Server Admin.
Click the Play button in the Controls column to start broadcasting a playlist, or click the Stop
button to stop broadcasting a playlist.
Step 4: Tell Users How to Connect to the Broadcast
To connect to the broadcast, users need software that can play QuickTime media, such as
QuickTime Player.
For best results, users should have the latest version of the QuickTime software installed on
their computers.
If you set up a Web page to show streamed media, users can connect to a broadcast using a
Web browser that has the QuickTime Plugin installed. You need to provide users with the
URL for the Web page and properly embed the link to play the media when clicked (see
“Setting Up a Web Page With Streamed Media” on page 10).
If users tune in to the broadcast using QuickTime Player, you need to provide them with the
URL for the SDP file that connects to the playlist broadcast.
Solving Problems With Playlists
If you enable logging, you can use the log file to troubleshoot problems that occur during
the broadcast.
If the media in the playlist is not being broadcast:
m Check Streaming Server Admin to make sure the streaming server is running.
m If the streaming server is running, open ProcessViewer on the server computer and make
sure a process called “PlaylistBroadcaster” is running. If it is and the media is not being
broadcast, stop the broadcast, delete the SDP file for the broadcast from the Darwin
Streaming Server movies directory, then restart the broadcast. A new SDP file is generated
when you restart the broadcast.
If the media in the playlist is not being broadcast randomly:
Make sure the Weighted Random play mode is specified.
If the media plays once and then stops:
Make sure the play mode is set to either Sequential Looped or Weighted Random.
If you broadcast the playlist as Weighted Random and set a value other than zero for
repeated items, make sure the number is less than the number of media files in the playlist.
If some media in the playlist is not played:
Check the weight you have assigned to each media file in the playlist. If you change the
playlist, you must stop and start the broadcast for the changes to take effect.
17
If the media isn’t streaming correctly:
Be sure the content, format, and encoding of the media is the same for all files in the
playlist. Also, be sure users have the latest version of the QuickTime software installed on
their computers.
If streaming is slow:
Be sure each media file is a hinted movie optimized for the server.
Inside Darwin Streaming Server
Compatible File Formats
You can stream these media files using Darwin Streaming Server for playback with
QuickTime Player, as long as the media is hinted:
18
Category
Formats
Video
QuickTime
AVI
Audio
AIFF/AIFC
SoundDesigner II
System 7 Sound
µLaw (AU)
WAV
MIDI
Karaoke MIDI
Standard MIDI
Media files can be compressed using these methods:
Category
Compression-decompression method (codec)
Preferred video
Sorenson Video
H.263
Motion JPEG A
H.261
Supported video
Animation
Cinepak
Graphics
Motion JPEG B
MPEG-1
Photo JPEG
Video
None
Preferred audio
MP3
QDesign Music codec
QUALCOMM Pure Voice
DVI 4:1
ALaw 2:1
µLaw 2:1
16-bit raw
Supported audio
IMA 4:1
MACE 3:1
MACE 6:1
19
Controlling Access to Streamed Media
Darwin Streaming Server comes with an authentication module, QTSSAccessModule, which
you can use to control client access to streamed media files. Two schemes of authentication
are supported: Basic and Digest. By default, the server uses the more secure Digest
authentication.
The QTSSAccessModule, in addition to controlling access to streamed media, also lets you
control playlist access and administrator access to your streaming server. It does not control
access to media streamed from a relay server. Authentication for relayed media must be set
up by the administrator of the relay server.
The QTSSAccessModule is built into Darwin Streaming Server, so it is always enabled.
What Clients Need to Access Protected Media
Users must have QuickTime 5 or later to access a media file for which Digest authentication
is enabled. If your Darwin Streaming Server is set up to use Basic authentication, users need
QuickTime 4.1 or later. Users must enter their user name and password to view the media
file. Users who try to access a media file with an earlier version of QuickTime installed will
see the error message “401: Unauthorized.”
Setting Up Access Control
For access control to work, an access file must be present in the directory you selected as
your Movies Directory. If an access file is not present in the Darwin Streaming Server movies
directory, all clients are allowed access to the media in the directory.
To set up access control, you must do all of the following:
m create an access file
m create a user file
m add users to the file
You can also create a group file, but it’s optional.
Step 1: Create an Access File
An access file is a text file called “qtaccess” that contains information about users and groups
who are authorized to view media in the directory in which the access file is stored. The
directory you use to store streamed media can contain other directories, and each directory
can have its own access file. When a user tries to view a media file, the server checks for an
access file to see whether the user is authorized to view the media. The server first looks for
an access file in the directory where the media file is located. If an access file is not found, it
looks for it in the enclosing directory. The first access file that's found is used to determine
whether the user is authorized to view the media file.
Note: The access file for Darwin Streaming Server works similarly to the Apache Web server
access file.
20
You can create an access file with any text editor. The filename must be qtaccess and the file
must follow this format:
AuthName <message>
AuthUserFile <user filename>
AuthGroupFile <group filename>
require user <username1> <username2>
require group <groupname1> <groupname2>
Anything not in angled brackets is a keyword. Anything in angled brackets is information
you supply.
m “Message” is text your users see when the login window appears. It’s optional.
If your message contains any white space (such as a space character between terms),
make sure you enclose the entire message in quotation marks.
m “User filename” is the path and filename of the user file. The default is
/etc/streaming/qtusers.
m “Group filename” is the path and filename of the group file. The default is
/etc/streaming/qtgroups. A group file is optional. If you have a lot of users you may
find it easier to set up one or more groups, then enter the group names, rather than
list each user.
m “Username” is a user who is authorized to log in and view the media file. The user’s name
must be in the user file you specified. You can also specify “valid-user,” which designates
any valid user.
m “Groupname” is a group whose members are authorized to log in and view the media file.
The group and its members must be listed in the group file you specified.
Additional user tags
This section describes additional tags you can add to the qtaccess file.
m “valid-user”
“Valid-user” is any user defined in the qtusers file.
The statement “require valid-user” specifies that any authenticated user in the qtusers file
can be given access to the media files. If this tag is used, the server will prompt users to
enter an appropriate user name and password to view the media.
m “any-user”
“Any-user” allows users to view media without being authenticated. If the statement
“require any-user” is used, any user can have access; no name or password is required.
21
Step 2: Create a User File
To let users access your media files, you must add them to a user file.
To create a user file, open a terminal window and type the following:
qtpasswd -c <authentication realm> <user filename> <user-name>
“Authentication realm” is the message that is displayed to client users in the authentication
window. For Basic authentication, if the “AuthName” keyword is used in the access file, users
will see the realm listed in the access file; if the keyword is not present, users will see the
realm from the user file. For Digest authentication, the “AuthName” keyword in the access
file is ignored, and the authentication realm in the user file is always presented to client
users. If you’re using Digest authentication, the realm cannot be changed once a user file is
created. If it needs to be changed, the user file must be recreated.
You'll be asked to enter a password for the user. A file is created with the user you specified.
Note: The -c option creates a file. You use this option only once; if it is used for an existing
file, you will be prompted before the file is overwritten.
Step 3: Add Users to the User File
To add a user to the user file, open a terminal window and type the following:
qtpasswd <user filename> <user-name>
You’ll be asked to enter a password for the user. Re-enter the same password a second time
when prompted.
Step 4: Add or Delete Groups
You can create a group file with any text editor as long as it follows this format:
<groupname>: <user-name1> <user-name2> <user-name3>
To add or delete a group, simply edit the group file you set up.
Making changes to the user or group file
To delete a user from a user or group file:
m Use a text editor to open the user or group file. Delete the user name and encrypted
passwords line from the user file; delete the user name from the group file.
To change a user password:
m Open a terminal window and type the following:
qtpasswd <user filename> <user-name>
You’ll be asked to enter a password for the user. The password you enter replaces the
password that's in the file.
22
Getting Media Through Firewalls or Networks
With Address Translation
Darwin Streaming Server sends data using User Datagram Protocol (UDP) packets. Firewalls
designed to protect information on a network often block UDP packets. Client computers
located behind a firewall that blocks UDP packets can’t receive streamed media. However,
Darwin Streaming Server also allows streaming over HTTP connections, which allows
streamed media to be viewed through even very tightly configured firewalls.
Some client computers located on networks that use address translation may also be unable
to receive UDP packets, but they can receive media that’s streamed over HTTP connections.
If users are having problems viewing media through a firewall or via a network that uses
address translation, they should upgrade their QuickTime software to the latest version. If
users still have problems, their network administrator should provide them with the
appropriate settings for the Streaming Proxy and Streaming Transport panes of the
QuickTime Settings control panel.
Network administrators can also set their firewall software to permit RTP and RTSP throughput.
Streaming on Port 80
If you are setting up a streaming server on the Internet and you think some of your clients
are behind firewalls that only allow Web traffic, you should enable streaming on port 80.
Once you do so, the Darwin Streaming Server accepts connections on port 80, the default
port for Web traffic, and QuickTime clients will be able to connect to your streaming server
even if they are behind a Web-only firewall.
Once you enable streaming on port 80, you can’t run a Web server on the same computer as
your streaming server unless you do one of the following:
1
Set up multiple IP addresses on your server: These addresses can be on the same network
interface card or on multiple interface cards. Configure your Web server and streaming server
to accept connections on separate IP addresses.
2
Have your Web server accept connections on a port other than 80: If you do this, you must
change all URLs that point to the Web server to include the port number you have chosen.
23
Setting Up a Relay
Media streams are sent from a server to a client computer in one of two basic ways:
m Unicast is a one-to-one transmission. Each client computer that tunes in to a stream
receives its own stream.
m A multicast stream is sent to a group address. This means several client computers can
tune in to the same stream.
A relay listens to an incoming broadcast (either unicast or multicast) and forwards, or relays,
that broadcast to one or more destination addresses (the broadcast can be relayed as either.
unicast or multicast as well). You can set up your server to relay multiple broadcasts at the
same time. Relays take advantage of multicasting, or streaming data to multiple destinations
at the same time. They’re an efficient way to send high bandwidth data, such as multimedia,
when you have a large number of users who want the same data.
A relay can be used to implement a large broadcast involving several tiers of streaming
servers. For example, if you are expecting 3,000 clients to watch a live broadcast, and you
want to use five different servers to handle the load, you can have your broadcasting
application send the broadcast to a streaming server that acts as a relay. The relay can then
forward one copy of the broadcast to each of the five streaming servers.
In addition, a relay can be used to take advantage of IP multicast. Multicast is an Internet
technology that allows a single copy of a stream to be viewed by any number of clients,
saving lots of bandwidth. However, each router between the client and server must have IP
multicast enabled, and multicast is disabled on some Internet routers.
If multicast is enabled on the network where your broadcast is taking place (a corporate or
campus intranet, for example), a relay can be used to take an incoming unicast and relay it as
a multicast. The resulting multicast can then be viewed by any client that “tunes into” the
stream. The relay can also be used to take an incoming multicast and relay it as a unicast. This
is useful if multicast is not deployed over your entire network.
24
Sample setup for relaying a live broadcast
A computer captures and encodes video and
audio using third-party broadcast software. The
encoded signal is sent to a Darwin Streaming
Server over an IP network.
Source
(192.168.1.1)
The destination computers receive the
relayed signal and send it to client computers.
Destination
(192.168.1.3)
Relay
(192.168.1.2)
A computer with Darwin Streaming Server relays
the signal to several destinations (using the IP
addresses and ports as specified in the
example file below).
Destination
(192.168.1.4)
Client computers tune
in to the broadcast.
Setting Up a Relay Configuration File
You set up a relay by creating a relay configuration file and copying it to the /etc/streaming
directory. The easiest way to create a relay configuration file is to edit the sample file
provided with your streaming server software. The path and filename for the sample file is /
etc/streaming/streamingrelay.conf
A relay source and one or more relay destinations are part of a unit. Information about a relay
destination must immediately follow information about a relay source. You can have more
than one unit in a configuration file.
The following example has one source and two destinations.
Although the relay_source and relay_destination lines are each split over two
lines in the example, each must be on one line in your configuration file.
Important
Example relay configuration file:
relay_source "in_addr=192.168.1.1 src_addr=192.168.1.2 in_ports=5000
5002 5004 ttl=15"
relay_destination "dest_addr=192.168.1.3 out_addr=192.168.1.2
dest_ports=6980 6982 6984"
relay_destination "dest_addr=192.168.1.4 out_addr=192.168.1.2
dest_ports=10010 10012 10014 ttl=15"
25
These are the keywords and values that can appear in the relay configuration file.
Keyword
Value
relay_source
Followed by these keywords and an appropriate value for each
keyword: in_addr, src_addr, in_ports, ttl
in_addr
Input IP address. If the source broadcast is a multicast, this is the
multicast IP address. If the source broadcast is a unicast, this
must be one of the IP addresses on the source computer.
src_addr
IP address of source (optional)
in_ports
Port number of the RTP streams in the source broadcast. These
must be even numbers. The number of input ports should match
the number of output ports; make sure port numbers are unique
and don’t overlap.
ttl
Time-to-live value (if it’s a multicast source). A time-to-live value
is used with multicasts to specify the number of times a media
stream can be passed from one router to another before the
stream is no longer transmitted.
The value can be any number between 0 and 255. A value of 1
reaches client computers on the local area network. The larger
the number, the farther the multicast packets will travel.
relay_destination
Followed by these keywords and an appropriate value for each
keyword: dest_addr, out_addr, dest_ports, ttl
dest_addr
Destination IP address (unicast or multicast) of the relay
out_addr
IP address of the interface on which to send out multicast
packets (optional). If not set explicitly, the output interface is
chosen automatically.
dest_ports
Port numbers of the RTP streams in the destination relay. These
must be even numbers. The number of output ports should
match the number of input ports; make sure port numbers are
unique and don’t overlap. Use unassigned port numbers starting
with 5000 and above.
include
Followed by a path and filename for a relay configuration file
If you enter a string that includes spaces in any configuration file, you must enclose the string
in quotation marks. For example, “My Streaming Server” instead of My Streaming Server.
26
Turning a Relay On or Off
To turn off a relay, delete or rename the relay configuration file from the /etc/streaming
directory. Then stop and restart the Darwin Streaming Server.
To turn on a relay, create or copy a relay configuration file to the /etc/streaming directory.
Then stop and restart the Darwin Streaming Server.
Solving Problems With Darwin Streaming Server
If Streaming Server Admin is not responding:
Verify that the streamingadminserver.pl script is running. If not, open a terminal window and
switch to the root administrator by typing “su root” and then the administrator password.
Then start the Streaming Server Admin process by typing “streamingadminserver.pl” into a
terminal window.
If the server doesn’t start up or quits unexpectedly:
m Check the error log.
m Make sure the DarwinStreamingServer file is in the /usr/local/sbin/ directory.
If the streaming server computer crashes or the streaming server computer
is restarted:
m Once the computer has started up, you need to restart any playlists, even if the Streaming
Server Admin indicates they are playing.
m Make sure the Darwin Streaming Server is running before you restart the playlists.
If media files do not stream properly:
m Check the error log.
m Make sure the movie file is supported by Darwin Streaming Server. Check the list of
compatible file formats on page 18.
m Try streaming a sample movie to see if the server can stream it. A sample movie is
included with the server.
If the server streams the sample movie, the problem may be with the way your movie file
is prepared. Recreate the movie.
If the sample movie doesn’t stream, the problem may be with the server computer or
the network.
m Try hinting the movie again with the Optimize Hints For Server option selected.
m Check streaming server activity and, if necessary, reduce the maximum number of
connections or throughput.
m If the problem occurs on a Mac OS client computer, open the TCP/IP control panel on the
client computer and make sure MacIP is not selected.
27
m If the problem occurs on a client computer, make sure the user has the appropriate
settings in the Streaming Proxy and Streaming Transport panes of the QuickTime Settings
control panel. The administrator for the client computer’s network should be able to
provide the correct settings.
m If you are reflecting more than one live stream, make sure each stream uses a separate
UDP port. Otherwise, client computers will show a message with error 500. You set up
ports in the relay configuration file.
m Make sure the client software supports the file format being broadcast.
m Check the structure of the URL.
If streaming service is slow:
m If you are streaming QuickTime movies, make the movies self-contained using your
authoring application, and make sure hinting is optimized for streaming services.
m Reduce the maximum number of connections or the throughput.
m Turn off other services.
m Place media files on other hard disks to improve server performance.
Because Darwin Streaming Server can use only one movies directory, you need to create
links from the Movies Directory you selected in Streaming Server Admin to the media files
on other hard disks.
If users can’t see the live streamed media:
m Make sure you are capturing a signal from the audio or video equipment into the
computer you’re using for capture and encoding.
m Make sure the SDP file is located in the movies directory on your streaming server.
28
Using Darwin Streaming Server With Windows NT and
Windows 2000 Server
There are some differences in the way you use Darwin Streaming Server with Microsoft
Windows NT and Windows 2000 Server. These differences are summarized here.
Installing the Server Package
To install Darwin Streaming Server:
1
Unzip the server package.
2
Double-click the install script, named “Install.bat”.
The install script installs the server software and associated files in the following directory on
the server computer:
c:\Program Files\Darwin Streaming Server\
Inside this directory, you'll find these files:
Name
Description
DarwinStreamingServer.exe
Server executable
PlaylistBroadcaster.exe
PlaylistBroadcaster executable
qtpasswd.exe
Command-line utility that lets you generate password files for
access control
StreamingLoadTool.exe
Default StreamingLoadTool executable
StreamingLoadTool.cfg
Default StreamingLoadTool configuration file
streamingserver.cfg
Default server configuration file
streamingrelay.cfg
Default relay configuration file
StreamingServerModules\
Directory containing QTSS API modules
Movies\
Media directory
29
Server Configuration File
Darwin Streaming Server comes with a default configuration file for Windows NT and
Windows 2000 Server. The file system paths in this configuration file are in Windows NT
format. Because Windows NT path formats are different from those on UNIX systems, a
configuration file from a UNIX Darwin Streaming Server will not work on Windows NT.
The default streaming server configuration file is installed in this directory:
c:\Program Files\Darwin Streaming Server\streamingserver.cfg
The spaces must be present, and the directory delimiters must be backslashes (\).
Note that in the Windows NT configuration file, you must specify directory paths, and if they
have spaces, you must enclose them in quotation marks. For example:
movie_folder "c:\program files\darwin streaming server\movies\"
Case is not important in NT directory or filenames, but the spaces are.
Removing Darwin Streaming Server
To remove Darwin Streaming Server:
At the command line, type the following:
DarwinStreamingServer -r
Restoring Darwin Streaming Server
To restore Darwin Streaming Server:
At the command line, type the following:
DarwinStreamingServer -I
Broadcasting Playlists With Windows NT and Windows 2000 Server
Each playlist you broadcast using the Playlists feature needs its own dedicated command
prompt window to run as a process.
The -list and -stop commands are not supported within Darwin Streaming Server on NT.
Access Control Passwords
Passwords created using the qtpasswd.exe utility are not encrypted. Keep the password file
in a secure location.
30