1
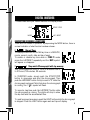
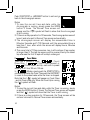
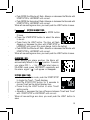
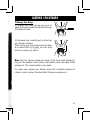
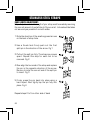
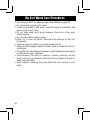
Automat
Chronogr
Digital w
Analogue
Day / Da
Strap ch
Adjusting
Recomm
Warrant
2
INDEX
Automatic Mechanical watches
Chronograph
Digital watches
Analogue / Digital watches Day / Date / Date 24 Hour / Time watches
Strap changing Instructions
Adjusting Stainless steel straps
Recommended usage table & testing
Warranty and care procedures
Page 5
Page 7
Page 9
Page 15
Page 19
Page 21
Page 22
Page 24
Page 26
3
GETTING TH
Automatic
There are
1.You can
approxim
2.You can
We recom
the watch
NOTE :
* When yo
4
AUTOMATIC MECHANICAL WATCHES
A B
Crown
GETTING THE WATCH STARTED
Automatic mechanical watches do not require a battery.
There are 2 methods of starting your watch.
1.You can wind the watch turning the crown in a clockwise direction
approximately 15 times. Make sure you don’t over wind it.
2.You can also wind your watch by swinging your arm.
We recommend you 1st wind the watch to get it started and then by wearing
the watch you will continue to give power to the watch.
NOTE :
* When you take your watch off the power reserve is approx 24 to 36 hours.
SETTING THE TIME
Pull the crown out to position B.
Turn the hour/minute hands in a clockwise direction to set the time.
WARNING!
For your watch to be properly sealed, the crown must be fully pushed in.
Never pull the crown out when the watch is in water or is wet.
5
6
CHRONOGRAPH
Minute hand
Hour hand
Chronograph
Minute hand
(sub dial)
Second hand
Chronograph
Second hand
(sub dial)
24 Hour hand
(sub dial)
Button A
Crown
Button B
Date
Minute hand
Chronograph
Second hand
24 Hour hand
(sub dial)
Button A
Hour hand
Chronograph
Minute hand
(sub dial)
Small Second
hand
(sub dial)
Crown
Button B
Date
SETTING PROCEDURE
Time setting
Before setting the time ensure all chronograph hands are in the 12 o’clock position.
Pull the crown out to the 2nd click position, change the time, push crown back
in fully.
Date setting
Pull the crown out to the 1st click position, change the date, push crown back
in fully.
NOTE: Do not set the date calendar between 9:00p.m. and 1:00a.m. Otherwise, it
may not change properly.
It is necessary to adjust the date on the first day after a 30-day month and
February.
HOW TO USE THE CHRONOGRAPH (STOPWATCH)
The chronograph is able to measure time in 1/1 second increments up to 59
minutes and 59 seconds.
Measuring time with the chronograph.
1.The chronograph can be started and stopped each time button “A” is pressed.
2.Pressing button “B” will reset the chronograph second and minute hands to the
zero position once the chronograph is stopped.
WARNING!
For your watch to be properly sealed, the crown must be fully pushed in.
Never pull the crown out when the watch is in water or is wet.
7
8
DIGITAL WATCHES
* Please make sure your watch matches the display shown.
LIGHT
START / STOP
MODE
LAP / RESET
DESCRIPTION OF MODES & FUNCTIONS
There are FIVE modes of operation. By depressing the MODE button, there is
a visual indication of what function has been chosen.
[
] Normal Time:
The display shows hour in 24hr Military time or in AM & PM,
minute, second, month, date and day of week.
To enable or disable key tone when in [TIME 1] mode
press the LAP/RESET repeatedly and the (KEY) symbol
will appear or disappear.
[
] Stop watch (Chronograph) with lap memory:
Your chronograph will count in 100th of a second from 0
to 23 hours, 59 minutes, 59 seconds.
In [CHRONO] mode, simply push the START/STOP
button to commence and stop the chronograph. Then
push the LAP/RESET button firmly to reset to “0” while the
chronograph is stopped. Note that when the chronograph
is running, the (
) symbol will flash.
To record a Lap-time push the LAP/RESET button while
the chronograph is running. The digits will stop to show
the lap-time and the accumulated time.
To recall previous lap memory push the LIGHT button while the chronograph
is stopped. Push the LIGHT button again and next lap will display.
9
Push START/STOP or LAP/RESET button to exit and go
back to the chronograph screen.
Notes:
1.To view the current time and date, while the
chronograph is running, simply press the MODE
button 3 times. The Normal Time screen will
appear and the (
) symbol will flash to show that the chronograph
is still running.
2.If there is no key operation for 30 seconds, The chronograph screen will
be exit and returned to Normal Time screen automatically.
3.The chronograph screen will display the accumulated time in
Minutes, Seconds and 1/100 Seconds until the accumulated time is
less than 1 hour, after which the screen will display Hours, Minutes
and Seconds.
4.There are total of 10 lap memories. Lap L will be shown if lap number
is larger than 9. The last lap memory will be overwritten by the latest
lap whereas the first 9 laps will be kept unchanged.
[
] Timer Mode:
There are 3 modes of timer: (
) Count
Down-Stop, (
) Count Down-Repeat or
(
) Count Down- and Up, each with a preset
value up to 23 hrs, 59 min, 59 sec.
In (
) Modes, simply push the START/STOP to
commence and stop the Timer. Then push the LAP/RESET
to reset to the preset value while the timer is stopped.
Note that the (
) symbol will appear on Count Down
- and Up Timer mode only. When the Count Up is running
the ( ) symbol will flash.
Notes:
1.To view the current time and date, while the Timer is running, simply
press the MODE button 2 times. The Normal Time screen will appear
and the (
) symbol will show that the Timer is still running.
2.If there is no key operation for 30 seconds, the Timer screen will be
exit and returned to Normal Time screen automatically.
10
ronograph
screen will
3.A chime sounds for 30 seconds if the Timer is counted down
to 0 normally.
4.If preset value is less than 1 minute, and count-down repeat is
selected, a chime sounds for 1 second only each time the Timer is
counted down to 0.
5.The Timer will be stopped and reset automatically with a chime
sounds for 30 seconds, if it is counted up to the maximum (23 hrs,
59min, 59sec).
d time in
ed time is
s, Minutes
[
] Alarm Mode:
By choosing a time, an alarm will sound each day at
the preset time. The alarm is a strong chime and can
be immediately shut off by pushing any button or will
automatically shut off after 30 seconds.
ap number
the latest
There are 4 independent daily alarms. Press the
START/STOP button to select the alarm.
ng, simply
will appear
ng.
een will be
Notes : If there is no key operation for 30 seconds, The Alarm screen will
be exit and returned to Normal Time screen automatically.
DUAL TIME FUNCTION:
This function is very useful should you travel away from
home to another time zone.
In the [TIME] mode, simply push the START/STOP to toggle
the Time1 / Time2 displays. Then hold the START/STOP
button for 2 seconds to choose the default display time.
LIGHT FUNCTION:
In any MODE you can simply push the LIGHT button and the whole screen
will light up and stay on for 3 seconds.
If auto light function is ON, the whole screen will light up and stay on
for 3 seconds if any key is pressed.
SETTING INSTRUCTIONS
All instructions start from ( TIME 1 ) Normal Time mode. Use the MODE
button to find the function you wish.(Note: You have 30 seconds to complete
each setting, if longer is taken the watch automatically returns to the prior
setting and you must start again.)
11
SETTING NORMAL TIME AND DATE:
• Press firmly the LIGHT button to enter the time setting.
• Auto light function will be set first. Select ON/OFF with
START/STOP or LAP/RESET until correct.Select ON and
the ( AEL ) will appear.
• Push MODE to set the chime. Select ON/OFF with
START/STOP or LAP/ RESET until correct. Select ON
and the ( ) will appear.
• Push MODE to set the 12/24 format. Select 12-HR (normal AM/PM
time display) or 24-HR (military time display) with START/STOP or
LAP/RESET until correct.
• Push MODE to set the Hour. Advance or decrease the Hour with START/
STOP or LAP/RESET until correct. (For quick change, hold in the button)
• Push MODE to set the Minute. Advance or decrease the Minute with
START/STOP or LAP/RESET until correct.
• Push MODE to set the Seconds. Advance or decrease the Seconds with
START/STOP or LAP/RESET until correct.
• Push MODE to set the Year. Advance or decrease the Year with
START/ STOP or LAP/RESET until correct.
• Push MODE to set the order of month and day (
) display. Select
(
) or (
) with START/STOP or LAP/ RESET until correct.
• Push MODE to set the Month. Advance or decrease the Month with
START/STOP or LAP/RESET until correct.
• Push MODE to set the Day. Advance or decrease the Day with
START/ STOP until correct.
When all new settings are done, you must push the LIGHT button to save.
[
] SETTING TIMER:
• From Normal Time mode push the MODE button
2 times.
• Press firmly the LIGHT button. The Timer-Type will
flash.Select [
] Count Down-Stop,[
]
] Count Down - and
Count Down-Repeat or [
Up with START/STOP or LAP/RESET until correct.
• Push MODE the Hour will flash. Advance or decrease the Hour with
START/STOP or LAP/RESET until correct. (For quick change, hold in
the button)
12
• Push MODE the Minute will flash. Advance or decrease the Minute with
START/STOP or LAP/RESET until correct.
• Push MODE the Seconds will flash. Advance or decrease the Seconds with
START/STOP or LAP/RESET until correct.
When all new settings are done, you must push the LIGHT button to save.
al AM/PM
T/STOP or
ith START/
he button)
Minute with
conds with
Year with
play. Select
il correct.
Month with
Day with
n to save.
Hour with
ge, hold in
[
] SETTING ALARM TIME:
• From Normal Time mode push the MODE button
3 times.
• Press the START/STOP button to select the alarm
to be set.
• Press firmly the LIGHT button. The Hour will flash.
Advance or decrease the Hour with START/STOP or
LAP/RESET until correct (For quick change, hold in the button)
• Push MODE the Minute will flash. Advance or decrease the Minute with
START/STOP or LAP/RESET until correct.
When all new settings are done, you must push the LIGHT button to save.
ALARM ON / OFF:
When setting your alarm anytime, the Alarm will
automatically default to the (
) position. To switch
your alarm OFF ( - - ) (or ON again later) when in
[ALARM] mode press LAP/RESET repeatedly and
the alarm signal (
) will appear or disappear.
SETTING DUAL TIME:
• In the Normal Time mode, push the START/STOP
to toggle the Time1 / Time2 displays.
• Hold the START/STOP button for 2 seconds to
choose Time2 as the default display time.
• Press firmly the LIGHT button to enter Time2
setting mode.
• Advance or decrease the time difference between Time2 and Time1
with START/STOP or LAP/RESET until correct.
When all new settings are done, you must push the LIGHT button to
save.
13
* Please m
DESCRIPTIO
TIME, DAT
ANALOGUE
To change
1. Pull the
2. Turn the
3. Push th
For your
Neve
In Normal
• Press SL
the digit
14
Light Funct
• In any M
push the
3 second
ANALOGUE DIGITAL WATCHES
* Please make sure your watch matches the display shown.
Light/Reset
Start/Stop
A B
Crown
Mode
Sleep
DESCRIPTION OF MODES & FUNCTIONS
TIME, DATE, ALARM, STOPWATCH AND LIGHT
ANALOGUE TIME
To change time
1. Pull the crown out fully.
2. Turn the hands to the exact time.
3. Push the crown back in.
WARNING!
For your watch to be properly sealed, the crown must be fully pushed in.
Never pull the crown out when the watch is in water or is wet.
In Normal Time mode
• Press SLEEP button to ON/OFF
the digital display screen.
Light Function
• In any MODE you can simply
push the LIGHT button and the whole screen will light up and stay on for
3 seconds.
15
Setting Normal Time and Date.
In Normal Time Mode
• Press the MODE button three times and you will then be
in the normal time setting screen.
• The Seconds will be flashing, push START/STOP to set
the seconds to zero.
• Push LIGHT/RESET the Hour will be flashing, push
START/STOP to set the Hour.(You can select 12HR or
24HR format). If you set 12HR format make sure you set the hour to
the correct time ie PM “P”.
• Push LIGHT/RESET the Minutes will be flashing, push START/STOP to
set the Minutes.
• Push LIGHT/RESET the Month will be flashing, push START/STOP to
set the Month.
• Push LIGHT/RESET the Date will be flashing, push START/STOP to set
the Date.
• Push LIGHT/RESET the Day will be flashing, push START/STOP to set
the Day.
• Push MODE to finish the setting.
• Note: Due to this watch having no year setting function it means the
calendar will never expire, but it also means, on leap year March 1st, you
need to correct the day.
Setting The Daily Alarm
In Normal Time Mode
• Press the MODE button twice to enter the daily
alarm mode.
• Push LIGHT/RESET the Hour will be flashing, push
START/STOP to set the Hour. The alarm on indicator
” will automatically appear. If you are using 12HR
“
format make sure you set your alarm to the correct
time ie PM “P”.
• Push LIGHT/RESET the Minutes will be flashing, push START/STOP to
set the Minutes.
• Push LIGHT/RESET to finish the setting.
• Push MODE to exit daily alarm mode.
• NOTE: In Daily Alarm mode you can Push START/STOP to turn on or off
” and daily alarm “
”.
the hourly chime “
16
he hour to
T/STOP to
T/STOP to
TOP to set
TOP to set
Chronograph Mode. (Stopwatch)
In Normal Time Mode
• Press the MODE button once to enter the chronograph
mode.
• Push START/STOP to start the chronograph.
• Push START/STOP to stop the chronograph.
• Push LIGHT/RESET to reset the chronograph to zero.
Using the Chronograph Lap Function.
In Normal Time Mode
• Press the MODE button to enter the chronograph mode.
• Push START/STOP to start the chronograph.
• Push LIGHT/RESET to stop the chronograph’s 1st Lap.
• Push LIGHT/RESET to restart the chronograph and it will have continued
the count and now will display the full time elapsed.
• Push START/STOP to completely stop the chronograph.
• Push LIGHT/RESET to reset the chronograph to zero.
means the
ch 1st, you
T/STOP to
n on or off
17
18
DAY / DATE / DATE 24 HR / TIME WATCHES
To Change time:
1.Pull crown out fully to point C.
2.Turn crown to move hands to the correct time.
3.Push crown back in fully to point A.
NOTE :
* Make sure you have correctly set A.M. / P.M.
before setting the time. When the day changes
over, it is A.M.(Day changes over between
0:00 a.m. and 5:30 a.m. or little later) Check
A.M. / P.M. by the 24 hour hand.
To Change Date: (If applicable)
1.Pull crown out to point B;
2.Turn crown clockwise to current date (For some
models, please turn counterclockwise.)
3.Push crown back in fully to point A. The Date will
automatically change just before midnight.
NOTE :
* Do not set the date between the hours 9:00 p.m.
and 0:30a.m. The date may not change correctly
the next day.
To Change Day: (If applicable)
1.Pull crown out to point B;
2.Turn crown counterclockwise to current day (For
some models, please turn clockwise.)
3.Push crown back in fully to point A. The Day will
automatically change just before midnight.
WARNING!
For your watch to be properly sealed, the crown must be fully pushed in.
Never pull out the crown when your watch is in water or is wet.
19
20
LEATHER / PU STRAPS
To Change Your Strap:
To change your watch strap use a pin or
paperclip to gently push the solid pins through
the case pin holes.
At the same time, carefully pull on the strap
until the bar releases.
When fitting your new strap ensure the bars
are seated well by tugging on both ends
before you wear your watch.
Note: Rip Curl leather straps are made of the finest oiled leather for
long life. But despite other’s claims, real leather cannot be made 100%
waterproof. Don’t wear leather in any water.
For water use, replace your leather strap with a suitable waterproof
rubber or velcro strap, Stainless Steel Straps are waterproof.
21
STAINLESS STEEL STRAPS
BAND LENGTH ADJUSTMENT:
Major Adjustments to the length of your strap must be made by removing
the correct amount of metal links to fit your wrist. Links should be taken
out as evenly as possible from both sides.
1.Note the direction of the small engraved arrows
on the back of strap links.
2.Use a thumb tack firmly push out the first
split-pin in the direction of the arrow. Fig.1
3.Pull out the split pin fully. The strap now comes
apart. Repeat this step for each link to be
removed. Fig.2
4.Now align the two ends of the strap and replace
the pin in the opposite direction of the arrow.
Be sure to note the correct end of the split pin
to insert. Fig.3
5.Firmly press the pin back into place using a
hard object. Next lightly tap the pin fully into
place. Fig.4
Repeat steps 2 to 5 on other side of band
22
y removing
d be taken
Minor adjustments:
After the correct fit has been achieved final adjustments or changes
can be made as follows:
1.Use a thumb tack slowly insert into the spring bar hole at the clasp.
(fig. 5) Join will release.
2.Move the spring bar to the desired hole for the perfect fit. (fig. 6). Be
sure to align both ends of the spring bar in the same set of holes.
Fig.5
Fig.6
23
Recommended Usage Table & Testing
100M / 330ft - Suitable for Water Sports. eg. Surfing, Snorkelling, Swimming, Water Skiing.
200M / 660ft - Suitable for Water Sports. eg. Surfing, Snorkelling, Swimming, Water Skiing, Scuba Diving to standard legal depths.
Rip Curl watches are tested to the highest industry standards with
the best Swiss pressure testing equipment and are purpose built for
Surfing!
NOTE: All Industry standards watch testing is done to an overpressure
situation in a static laboratory environment and does not signify a diving
depth. See recommended usage table.
Due to the fact that Surfing is in no way a static sport there are influences
that can effect a watches ability to keep water out. eg : Frequent
temperature changes, salt water and big wipeouts can diminish the
longevity of the watches rubber seals.
To keep your watch in peak condition for Surfing we recommend every 24
months you have your watch seals replaced and fully tested at the Rip Curl
Watch Service Centre. (See page 29 for contact details.)
RIP CURL PTY. LTD. assumes no responsibility for any loss, or any claims
by third parties that may arise through the use of this watch.
24
g
ng, ng, rd legal 25
Rip Curl Watch Care Procedures
• Only use your watch for approved sports as detailed on page 24.
• Do not operate buttons under water.
• If watch is exposed to salt water, rinse thoroughly in freshwater and
wipe dry with a soft cloth.
• Do not clean watch with spray cleaners, thinners or other such
volatile agents.
• Do not wear leather bands in water.
• Never try to open the watch. Have batteries changed by Rip Curl
technicians.
• Avoid exposing your watch to extreme temperatures.
• Should moisture appear inside the watch, have it checked by Rip Curl
technicians.
• Though Rip Curl watches are produced to high standards avoid dropping
the watch and rough treatment.
• Avoid exposing the watch to gasoline, cleaning solvents, aerosol
sprays, paint etc as chemical reactions with such agents will destroy
seals, case and finish.
• Avoid magnetic fields as they may effect the time keeping of your
watch.
26
e 24.
water and
ther such
y Rip Curl
by Rip Curl
d dropping
s, aerosol
ill destroy
ng of your
FIVE YEAR LIMITED WARRANTY
See reverse for USA warranty info.
For warranty service please send you watch DIRECTLY to Rip Curl by
certified mail. See page 29 for contact details.
NOTE: This warranty is void if the watch is opened by anyone other than
the Rip Curl Watch Service Centre.
Five Years on Movements from the date of purchase.
(NOTE : A Movement is the part inside the Watch that makes it work, but
it does not include the Crown, sometimes called the Winder)
Two Years on Waterproof from the date of purchase.
(NOTE : We recommend all Watches be serviced, resealed and tested
for waterproofness every 2 years as heat, salt and other elements will
diminish waterproofness over time. Have this done at the Rip Curl Watch
Service Centre and we will then issue a new warranty for another 2 years.
Cost for the service and resealing will be given upon request.)
One Year on Batteries from the date of purchase.
(NOTE : Rip Curl’s watch warranty service centre can replace all
batteries and at the same time will reseal and test the watch functions
and waterproofness. We will then issue a new one year warranty on the
new battery,waterproofness and workmanship. Cost for battery changing
will be given upon request.)
Not covered by any warranty is the glass, band and case. Also not covered
is damage caused by general wear and tear or any accidental damage.
All warranty claims MUST be sent with a purchase receipt clearly showing
the purchase date.
The warranty book is not proof of purchase without a purchase receipt.
eg. A purchase receipt is the cash register receipt or your credit card
statement.
NOTE : Rip Curl reserves the right to repair or replace, with an equivalent
style, any warranty watch.
27
FIVE YEAR LIMITED WARRANTY
For warranty service please send you watch DIRECTLY to Rip Curl. See
below for details.
NOTE: This warranty is void if the watch is opened by anyone other than the
Rip Curl Watch Service Centre.
Five Years on Movements from the date of purchase.
(NOTE : A Movement is the part inside the Watch that makes it work, but it
does not include the Crown, sometimes called the Winder)
Two Years on Water resistance from the date of purchase.
NOTE : We recommend all Watches be serviced, resealed, and tested for
water resistance every 2 years, as heat, salt, and other elements will diminish
water resistance over time. Have this done at the Rip Curl Watch Service
Center, and we will then issue a new warranty for another 2 years. (Cost
for the service and resealing to be provided upon request.)
One Year on Batteries from the date of purchase.
(NOTE : Rip Curl’s watch warranty service centre can replace all batteries
and at the same time will reseal and test the watch functions and water
resistance. We will then issue a new one year warranty on the new
battery,water resistance and workmanship. Cost for battery changing will
be given upon request.)
Not covered by any warranty is the glass, band and case. Also not covered is
damage caused by general wear and tear or any accidental damage.
All warranty claims MUST be sent with a purchase receipt clearly showing
the purchase date.
The warranty book is not proof of purchase without a purchase receipt.
eg. A purchase receipt is the cash register receipt or your credit card
statement.
NOTE : Rip Curl reserves the right to repair or replace, with an equivalent
style, any warranty watch.
28
Warranty and Service Enquires :
Australia
Rip Curl Pty Ltd
Watch Service Centre
101 Surfcoast Hwy,
Torquay, Vic. 3228
Tel: 03 5261 0022
Fax: 03 5261 4700
Hours: 9am to 5.30 pm Mon-Fri E.S.T.
Email: [email protected]
New Zealand
Rip Curl NZ
Tenancy 1, Ground Floor,
Neilsen Building,
129 Hurstmere Road,
Takapuna, Auckland 0622
New Zealand
Phone: 09 477 2685
Fax: 09 4759752
Hours: 8.30am – 5.00pm Mon – Fri
Email: [email protected]
Brazil
RC BRAZIL LTDA
Assistência Tecnica: Relógios,Roupa de
Borracha, Óculos
Av. Miguel Estefano, 4544 - Enseada
Guarujá / SP - Brasil
CEP: 11440-534
Tel.: (13) 2101-0546,2101-0547 ou 2101-0548
Fax: (13) 2101-0510
Horário:
Segunda à Sexta feira das 9:00 às 18:00 horas.
E-mail: [email protected]
Peru
The Search SAC
Calle Las oropendolas 329
San Isidro
Lima- Peru
Tel: 2196400
Email: [email protected]
[email protected]
Contact: Juan Segala.
USA
Rip Curl USA
Watch Service Center
3030 Airway Ave
Costa Mesa, CA 92626
USA
Tel: 714 422 3642
Fax: 714 422 3602
Hours: 9am to 5:30pm MON-FRI
Email: [email protected]
Europe
Rip Curl Europe
Watch repair & technical centre,
407 Avenue de la Tuilerie,
40150 Hossegor.
France
Tel : +33 558 417 818
Fax: +33 558 417 809
Email : [email protected]
Thailand
Rip Curl (Thailand)
13/16 Vipavadeerangsit Rd.
Tungsonghong, Laksi
Bangkok, Thailand, 10210
Phone : +662 9549738-42
Fax : +662 9549743
Email : [email protected]
Canada
Rip Curl
130-2155 Dollarton Hwy
North Vancouver, BC V7H 3B2
Canada
Phone: 604-987-2875
Fax: 604-987-2805
Toll Free Phone: (866) 407-7433
Email:[email protected]
29
Portugal
Ourtime
Watch Lab, Lda
Rua Dr. Barbas de Albuquerque,
N.°13 Vila de Rei
2670-678 Bucelas
Phone: (+351) 219 681 296
Fax: (+351) 219 693 619
Email: [email protected]
Chile
RIP CHILE S.A.
San Ignacio, 1101, 3 Piso
Centro Empresarial
Buena Ventura Quilicura
Santiago, Chile
Tel: 562-387 75 00
Fax: 562-387 75 30
Email: [email protected]
Indonesia
Rip Curl Indonesia
Watch Service Centre
Jl. Sunset Road 69
Kuta, Bali
Indonesia 80361
Tel. 62 361 754455 ext 401
Fax. 62 361 751745
Email : [email protected]
Spain
Rip Curl Europe
Watch repair & technical centre,
407 Avenue de la Tuilerie,
40150 Hossegor.
France
Tel : +33 558 417 818
Fax: +33 558 417 809
Email : [email protected]
South Africa
Rip Curl South Africa
232 Matthews Meyiwa (Stamfordhill Road)
Durban, 4001, South Africa
Tel: +2731 3128968
Fax: +2731 3039440
Email: [email protected]
Malaysia
Wicked Wave Sdn Bhd
No. 12 Jalan PJU 3/49
Sunway Damansara Technology Park
47810 Petaling Jaya
Selangor
Malaysia
Tel: (603) 7880 3821
Fax: (603) 7880 3822
Argentina
Cristobal Colon
Watch Service Centre
Saenz Valiente 2248
(1640) Martinez,
Buenos Aires - Argentina
Tel/Fax: 11 4717 0256 – 11 4717 6033
Email: [email protected]
England
Watch Service Centre
407 av. de la Tuilerie
40150 HOSSEGOR
FRANCE
Tel : +33 558 417 818
Fax : +33 558 417 809
Email : [email protected]
*Check RIPCURL.COM for more world wide service centre details.
30
TO BE RETURNED WITH ANY
WARRANTY CLAIM
NOTE: For any warranty claim proof of purchase must be
attached. ie) sales receipt or credit card statement clearly
showing the date of purchase.
Senders Name:
e,
Return Address:
ope.com
Contact Phone:
BH
AH
Email:
FAX
Brief description of fault:
31
A-U-S3