1
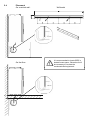
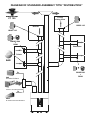
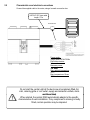
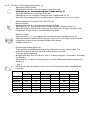
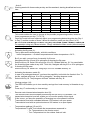
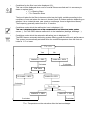
CTB - 275 Ecowatt
IDEO
Installation Manual
Before manipulating this device, disconnect the electricity supply.
During normal operation, never stop the ventilation system.
General Information
High-performance heat recovery dwelling unit
1
Introduction
This manual is destined for use with the IDEO 275 Ecowatt high
high-performance
performance heat recovery unit and its
peripheral fittings (conduits, inlets, regulators…).
Its aim is to provide the maximum information and safety during installation, set-up and use.
As our products are in constant evolution, Soler & Palau reserves the right to modify this manual without
prior notification.
1.2
Guarantee and civil liability
Guarantee
The IDEO 275 Ecowatt heat recovery unit is guaranteed for three years from the date of purchase. This
guarantee includes free supply of spare parts.
This guarantee does not cover:
Assembly and disassembly expenses
Any breakdowns which according to Soler & Palau are due to poor installation
installation, manipulation
manipulation, negligence
or accident.
Any breakdowns occurring after manipulation or repair by third parties without the authorisation of Soler &
Palau.
To return a faulty part, the user should first contact the installer.
Civil liability
The IDEO 275 Ecowatt has been designed for ventilation systems that enable the renewal of air in private
homes. Soler & Palau will not be held liable for damage produced by:
Misuse,
Normal wear and tear of components,
Non-observance of the instructions contained in this manual regarding safety, use and start-up,
The use of components not supplied by Soler & Palau,.
1.3 Safety
General safety rules
The IDEO 275 Ecowatt heat recovery unit has been designed to be incorporated into a ventilation
system.
After installation, there should be no safety, health or environmental hazards, in compliance with EC
regulations. This is also valid for the rest of the products used in the installation.
The following general instructions are important :
Follow the safety instructions to avoid any damage to the fans or harm to people
The technical characteristics of this manual must not be modified
The motor fans must not be modified
The motor fans must be connected to a single-phase 230 VAC / 50 Hz electricity supply
p
with EC regulations,
g
, the IDEO 275 Ecowatt heat recoveryy must be
For the installation to be in compliance
connected to the electricity supply in compliance with current regulations.
The device must be installed in such a manner that, in normal operating conditions, there is no risk of
contact with moving and/or live parts.
The IDEO 275 Ecowatt complies with regulations on electrical devices.
Before any intervention on the device, always disconnect it from the electrical power supply.
Always use the right tools.
Only use the device for the purpose it was designed for
for.
2
Technical information
2.1 General definition
The IDEO 275 Ecowatt provides optimum ventilation for a room with a minimum loss of energy. It
extracts air from spaces such as (Bathroom/s,
(Bathroom/s WC,
WC kitchen and washroom/s or shower room/s
room/s, and
supplies fresh air into the main rooms (Living rooms, bedroom/s, office, …).
The fresh and extracted airflows are separated and filtered. Only the energy from the extracted air is
transferred to the new fresh air introduced. Thanks to IDEO 275 Ecowatt ’s high efficiency heat
exchanger, performance can reach up to 95 %.
Condensation may occur at the moment of exchange, with the introduction of fresh air. This is
recovered in a container for condensate, which should be connected to a waste water drain.
Thanks to its 100 % by-pass, the IDEO
O 275
2 Ecowatt enables you to cool your home in the summer.
2.2 Description of the IDEO-HR
Antenna
D 160/150mm
Filter access cover
Remote control module
User manual access cover
New fresh air inlet:
The conduit from the outside is connected here.
To avoid condensation, it is recommended to use insulated conduits.
The new fresh air inlet should be fitted sufficiently far from any source of strong
contamination (Trees, combustion fumes, roads …).
Supply fresh air into the building:
The conduit blowing fresh reheated air into the building is connected here.
To avoid thermal losses
losses, it is recommended to use insulated tubes for moving the
warmed air.
Extracting air from the building:
The building’s air extraction conduit is connected here.
To avoid thermal losses and optimise the performance of the installation, it is
recommended
d d to
t use insulated
i
l t d ttubes
b ffor moving
i th
the warm air.
i
Discharge extracted air to outside:
The conduit for discharging the extracted air from the building to the outside is
connected here.
This conduit must be hermetic and thermally insulated to avoid condensation
both on the inside and outside.
By-pass:
On having avoided the heat exchanger, the system of the by-pass 100 % of the
IDEO 275 Ecowatt allows the introduction of the fresh air in the night without
being warmed by the warm air accumulated in the house during the day. This
system works automatically or can be forced manually (See chapter 2-6-b).
Without By-pass
functioning
With By-pass
functioning
2.3
Dimensions
Central unit:
Weight: 51 Kg
Remote controls:
Programmable module
Kitchen boost
2.4
Placement
On a vertical wall:
On the floor:
Wall bracket
It is recommended to locate IDEO in
heated house space. Otherwise it will
be necessary to insulate the
condensate drain pipework..
On the floor: An specific kit option
Support
It is recommended to locate IDEO in heated house space. Otherwise it will be
necessary to insulate the condensate drain pipework
pipework.
Tube cover:
4x
4x
DIAGRAM OF STANDARD ASSEMBLY TYPE “DELIVERY”
Outlet roof caps
CT 150
Kitchen
BDOP 125
BDOP 80
Toilets
Air intake plenum
Or
PAP
Air intake D150
Or
Living/sitting
Li
i / itti room
&
Bedrooms
PAF 150
Circular Air intake wall hoods
Or
PAST
Air intake roof D150
10 spigots distributor
DIAGRAM OF STANDARD ASSEMBLY TYPE “DISTRIBUTION”
Outlet roof caps
Living/
sitting room
CT 150
Kitchen
BDOP 125
BDOP 125
+
BDOP D80
+
RD80
Bedrooms
Toilets
BAR
+
Or
PAP
Air intake D150mm
Or
PAF 150
Circular Air intake D150mm
Or
PAST
Air intake roof hoods D150mm
BDOP D80
+
RD80
2.5
Characteristics and electrical connections
Connect the supplied cable to the mains, using a hermetic connection box.
H05VV-F-5G1 type cable
Length 1.2 m
Connection box
Electrical panel
Power supply:
Single phase 230VAC-50Hz
Electrical protection:
3A
Maximum power:
190 Watts
Max. ambient temperature:
50º C
Max. temperature of flows:
45º C
Do not start the central until all the ducts are all completely fitted (Air
inlet, retaining grille or roof outlet, supply and extraction outlets, ducts
and filters fitted)
When started, the central IDEO automatically adapts to the specific
characteristics of each installation. If any component is missing or badly
fitted, normal operation may be impaired.
.2.3
Controlling the IDEO 275 Ecowatt
The IDEO 275 Ecowatt can be controlled from:
• A button that enables the boost flow for the kitchen to be timed in ½-hour steps.
Service life with normal usage (average 3 times a day) is estimated to be about 4 and a half years. For each
operation, a red signal will light up for a few seconds to indicate battery life.
The button uses one CR2032 type battery.
• The programming module is located on the front of the machine
machine. This remote control can also be located on a wall
or placed on table or other furniture.
The remote control module is in permanent communication with the IDEO central unit . Service life with normal use
(consultation by the user 5 times a day on average) is estimated at about 4 years. Battery status can be viewed
directly on the screen (Reference 10). The module uses two AA – 1.5 V – LR6 batteries.
2.2.a . Description of the programming module:
5
2
1
6
7
8
9
3
10
4
11
14
12
17
20
16
19
15 13
1 – Adjustment mode using the clock
2 – Programming
P
i mode
d (A
(Automatic
t
ti 1 – Automatic
A t
ti 2 – Manual)
M
l)
3 – Day of the week
4 – Programming period
5 – Ventilation speed (small or large flow)
6 – By-pass
7 – Defrost mode
8 – Absence mode
9 – Transmission/reception level
10 – Battery level
11 – Default mode
12 – Change filter
13 – Instant energy saving
14 – Energy saving in KW per month
15 – Outdoor temperature in degrees centigrade (in the fresh air inlet)
16 – Indoor temperature in degrees centigrade (in the module)
17– Value display (Hour, flow, kilowatts…)
17
18 – Validation key
19 – Move right key
20 – Move left key
18
2.2.b . Functions of the programming module: (1)
•
Adjustment using the clock:
Navigate with keys 19 or 20 to pictogram 1 showing a clock.
Select with key 18
18. The pictogram will flash
flash. Validate with key 18
18.
Adjust the desired hour using keys 19 and 20.
Validate with key 18. Pictogram 3 (day) will flash. Validate with key 18.
Adjust the day, knowing that the succession can be destined from 1 to 7 on any day.
Airflow adjustment (From 90 m3/h to 275 m3/h): (5)
Minimum airflow:
Navigate with keys 19 or 20 to pictogram 4 showing flows.
Select with key 18. The pictogram of the first fan will flash. Validate with key 18.
Adjust the minimum desired flow using keys 19 and 20 in 5 m3/h steps, according to the
configuration of your house (in compliance with the table).
•
Maximum airflow:
Validate with key 18
18. The pictogram with two fans will flash
flash. Validate with key 18
18.
3
Adjust the maximum desired flow using keys 19 and 20 in 5 m /h steps, according to the
configuration of your house (following the table show below).
Validate with key 18.
•
Programming module options (2):
There are two pre-established programming modes and one user-chosen mode. The
modes are to past to the minimum airflow at the maximum airFlow.
To access the desired mode:
Navigate with keys 19 or 20 to Auto 1, Auto 2 or Manu pictogram . (Automatic 1, Automatic
2 or Manual)
Select with key 18. Select On/Off using keys 19 or 20. Validate the chosen programming
with key 18.
- Auto 1:
Working week with two meals per day, three in the weekend, but starting breakfast two
hours later.
Day
T1
T2
T3
Start
Finish
Start
Finish
Start
Finish
Monday
6:30
7:30
-
-
19:30
20:30
Tuesday
6:30
7:30
-
-
19:30
20:30
Wednesday
6:30
7:30
-
-
19:30
20:30
Thursday
6:30
7:30
-
-
19:30
20:30
Friday
6:30
7:30
-
-
19:30
20:30
Saturday
8:30
9:30
12:00
13:00
19:30
20:30
Sunday
8:30
9:30
12:00
13:00
19:30
20:30
- Auto 2:
Working week with three meals per day and the weekend, starting breakfast two hours
later.
T1
Day
T2
T3
Start
Finish
Start
Finish
Start
Finish
Monday
6:30
7:30
12:00
13:00
19:30
20:30
Tuesday
6:30
7:30
12:00
13:00
19:30
20:30
Wednesday
6:30
7:30
12:00
13:00
19:30
20:30
Thursday
6:30
7:30
12:00
13:00
19:30
20:30
Friday
6:30
7:30
12:00
13:00
19:30
20:30
Saturday
8:30
9:30
12:00
13:00
19:30
20:30
Sunday
8:30
9:30
12:00
13:00
19:30
20:30
- Manu:
This mode enables the user to choose all the possible programming modes, limited to
three programmes per day (T1-T2-T3).
Once this mode has been selected, adjust your programming determining the day (Day 1
to Day 7) and the number of times it blows at maximum power per day (from 0 to 3).
All movements
t and
d changes
h
are d
done using
i kkeys 19 and
d 20
20, and
d th
the validation
lid ti with
ith kkey18.
18
For operation using only «Boost cuisine». Simply validate the Manu mode (without carrying
out hour adjustments).
•
Activating the By-pass (6):
The by-pass works automatically, with this conditions:
p
> Outdoor temperature
p
and Indoor temperature
p
> 24ºC ,
- Indoor temperature
But if you wish, you can force it manually for 8 hours.
Navigate with keys 19 and 20 to pictogram 6 showing the By-pass.
Select with key 18. Select ON using keys 19 or 20. Validate with key 18. You can disable
the forced by-pass mode at any time. To do this, Navigate with keys 19 or 20 to pictogram
6 showing the By-pass.
Select with key 18
18. Select OFF using keys 19 or 20
20. Validate with key 18
18.
•
Activating the absence mode (8):
In case of a prolonged absence, you have the possibility to diminish the fresh air flow. To
do this, navigate with keys 19 or 20 to pictogram 7 showing absence mode.
Select with key 18. The pictogram will flash. Validate with key 18.
•
Viewing savings (14):
The IDEO-HR enables you to view monthly savings from heat recovery in kilowatts at any
time.
Press key 17 continuously to view savings.
•
Remote control transmission/reception level (9):
The remote control communicates permanently with the IDEO 275 Ecowatt.
Ecowatt The
transmission/reception level will enable you to know the quality of this signal.
If this is zero, you have the possibility of changing to a more powerful module.
Transmission level with a standard antenna: 150 metres in an open space
Transmission level with an optional antenna: 200 metres in an open space
•
Temperature readings (15 and 16):
Temperatures Tin and Tout indicate the temperatures measured in:
- Tin: Temperature on the remote control.
- Tout: Temperature into the outdoor fresh air inlet.
•
Conditions for the filter icon to be displayed (12):
This icon will be displayed when one or several filters are soiled and it is necessary to
clean or replace them.
9 F1 = Blowing filters
9 F 2= Extraction filters
The time it takes for the filter to become soiled can be highly variable according to the
conditions of use and where the house is located (level of outdoor pollution depending on
whether it is an industrial area, near roads or motorways, forest or agricultural areas).
The frequency generally varies from 6 to 12 months.
•
Conditions under which the malfunction icon is displayed (11):
This icon is displayed when one of the components is out of service (motor
(motor, probe
probe,
sensor...). Or if the IDEO detects malfunction in the installation (leakage, blockage…).
•
Conditions under which the automatic defrosting icon is displayed (7):
The IDEO has an automatic defrosting system offering good and economic performance.
This system is automatically activated when the outside temperature from the fresh air
intake is 1º C or lower.
Tº e < 1ºc
No
Yes
Intake Air= 100%
Intake Air = 50%
2 minutes
2 minutes
Tºe
T
e <1
1ºc
c
No
Yes
Intake Air= 25%
Air Intake = 100%
2 minutes
i t
2 minutes
Tºe < 1ºc
No
Intake Air = 100%
2 minutes
Yes
Intake Air = 15%
2 minutes
Tºe = Temperature on the extraction after the heat exchanger
.