1
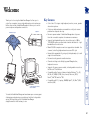
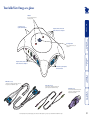
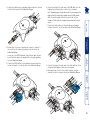
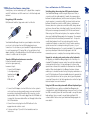
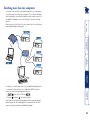
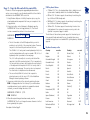
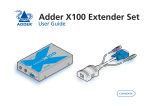
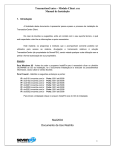
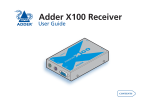
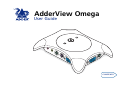
AdderView Omega 1 2 User Guide Everyday use Switching between computers ................................................... 7 Basic switching options .......................................................... 7 Hotkeys ................................................................................... 7 Indications ............................................................................... 7 Other switching options ........................................................ 8 Switching audio separately ............................................... 8 Using channel isolation mode........................................... 8 Using lock (password protection) mode .......................... 8 Using autoscanning mode................................................. 8 Solving problems Getting assistance ..................................................................... 18 Troubleshooting ........................................................................ 18 FCC statement ........................................................................... 19 European EMC directive 89/336/EEC ........................................ 19 Warranty .................................................................................... 19 Connecting your AdderView Omega ......................................... 4 Location tips ........................................................................... 4 Non-standard connections (RS232, AT and USB) .................. 4 Standard connection procedure ............................................ 4 USB keyboard and mouse connections ................................. 6 Issues and limitations for USB connections ...................... 6 Making connections Configuration .............................................................................. 9 Entering, using and exiting configuration mode ................. 9 Configuration options .......................................................... 10 Automatic screen saver ................................................... 10 Hotkey combinations ....................................................... 10 Autoscanning computer selection .................................. 10 Autoscanning dwell timing ............................................. 11 Mouse third button selection ......................................... 11 Mouse speed timing adjustment .................................... 11 Miscellaneous functions .................................................. 11 Setting and using a password .............................................. 12 Hot plugging and mouse restoration ...................................... 13 Which restore setting do I use? ........................................... 13 Switching more than two computers ...................................... 14 Software upgrades and keyboard emulations ........................ 15 Stage A - Download the upgrade files ................................ 15 Stage B - Create a startup diskette ...................................... 15 Stage C - Copy the files and edit the control file ............... 16 Stage D - Reconnect the AdderView Omega and reboot .. 17 Key features ................................................................................. 2 Your AdderView Omega at a glance ......................................... 3 Special features Welcome Contents 1 Welcome Computer 1 Computer 2 • Control two PCs using a single keyboard, monitor, mouse, speaker set and microphone. • Continuous keyboard and mouse emulation on all ports ensures problem free computer boot-up. • No mains power needed – AdderView Omega draws its power from the connected computers for maximum convenience. • Supports high bandwidth monitors at resolutions up to 2048 x 1536 @ 85Hz with an excellent video transfer characteristic – high bandwidth and low distortion. • Mixed PS2/USB computer connections supported as standard - the common (controlling) keyboard and mouse are PS/2 style. • Unique flash upgrade facility, using only the keyboard port, to add support for new features. • Password security prevents unauthorized use. • Channel switching controlled by top panel Omega button, keyboard or mouse. • Supports all common mouse models, including wheel mice such as the Microsoft® IntelliMouse. • Compatible with all major software including Windows® 3.x, 95, 98, Me, NT, 2000, XP, DOS, Unix, Linux (all versions), OS/2, Novell ®, Mac® OS and Sun® OS. • Compatible with PC’s, laptops, RS6000, Alpha ®, SGI, Mac® (USB) and Sun ® (USB). AdderView Omega Key features Thank you for choosing the AdderView Omega. It allows you to control two computers using a single keyboard, monitor and mouse. Unlike other switches, AdderView Omega also allows you to switch your microphone and speaker connections. To create the AdderView Omega we have drawn upon our many years of designing and producing our professional switches for large data centers. We hope that you will find AdderView Omega straightforward to install and easy to use. Common keyboard, monitor, mouse and audio 2 Your AdderView Omega at a glance Connections to your speakers and microphone Indicators Show you which computer is currently selected Keyboard, monitor, mouse and audio connections to computer 2 1 The Omega button Press to change between your computers 2 Keyboard, monitor, mouse and audio connections to computer 1 Audio cable set* (x 2) These link your computer’s microphone and speaker ports to the AdderView Omega * Note: Depending on the purchased package, the cable sets and USB adaptors may, or may not, be included with the AdderView Omega. USB adaptor* (x 2) These allow the AdderView Omega to be connected to computers that use USB keyboard and mouse links KVM cable set* (x 2) These link your computer’s keyboard, video and mouse ports to the AdderView Omega Connections to your keyboard, monitor and mouse 3 e sid el 1) t f n Le han (c ide ) t s nel 2 h Rigchan ( d en eo m d, vide) o r s tt Bo yboa mou e & k ( Non-standard connections (RS232, AT and USB) • RS232 mouse connections (9-pin D-Type plug) are NOT supported by your AdderView Omega. • AT keyboards (5-pin DIN style plug) are supported by your AdderView Omega, however, a standard ‘AT style to PS/2 converter’ will need to be used – These converters may be purchased from Adder Technology Ltd. • USB keyboards and mice may NOT be connected to your AdderView Omega. However, your AdderView Omega can itself be attached to the USB port of a computer and then a standard keyboard and mouse can be used to control that system – please refer to the section ‘USB keyboard and mouse connections’. Location tips Before connecting your AdderView Omega, first decide where you will position it: • AdderView Omega can be located on your desk, on the floor or can even be attached to a wall or desk side using Velcro strips (not supplied). • There is no need for a power socket as a small amount of power is taken from the keyboard ports of your computers. • You do not necessarily need to have constant access to the Omega button (located on the top panel) because, if you wish, you can change channels using your keyboard or mouse. s) nd aker e e p To & sp c i (m Within these connection instructions, the following terms are used to refer to the four sides of your AdderView Omega. You can choose to connect your AdderView Omega in any order, however, we suggest the following: 1 Switch off both of your computers. If it is not possible to switch off a computer (due to it running software that cannot be interrupted) your AdderView Omega may be connected while the system is running. This is called ‘hot plugging’ and before starting you should read the section ‘Hot plugging and mouse restoration’. 2 Connect the cables from your keyboard, mouse and monitor to the three sockets at the bottom end of the AdderView Omega. Note: For ease of recognition the cable set plugs and AdderView Omega sockets are color matched. Alternatively, on the underside of the AdderView Omega, each socket is labeled with an appropriate icon. Your computer(s) may or may-not use equivalent markings: Monitor (video) Blue Keyboard Purple Mouse or Mid green Speaker or SPK Light green Microphone or MIC Pink Connecting your AdderView Omega Standard connection procedure Making connections 4 8 Connect the plugs at the other end of the Audio cable set to the microphone and speaker sockets on your computer. 9 Now repeat steps 5 to 8 for the second computer, using the channel 2 sockets on the right side of your AdderView Omega. 4 Decide which of your two computers will connect to channel 1 – the sockets for this channel are located on the left side of the AdderView Omega. Locate one of the KVM (Keyboard, Video, Mouse) cable sets and one of the Audio cables sets supplied with (or bought separately for) your AdderView Omega. 5 Connect the KVM cable set to the keyboard, mouse and monitor sockets of channel 1 (on the left side) of the AdderView Omega. 6 Connect the plugs at the other end of the KVM cable set to the keyboard, mouse and monitor sockets on your computer. Note: Depending upon the age and model of your computer, the plug and socket colors and/or symbols may not exactly match. Also, the sockets may be at the front, rear or sides of your computer. Check with your computer documentation if you are unsure. 7 Connect the Audio cable set to the microphone and speaker sockets of channel 1 (on the left side) of the AdderView Omega. 3 Connect the cables from your speakers and microphone to the two sockets at the top end of the AdderView Omega. 5 USB plug USB socket and symbol Your AdderView Omega includes two special adaptors which allow you to use it with systems that use USB keyboard and mouse connections. You can then use your standard PC keyboard and mouse to control any pairing of PC, laptop, Mac or Sun workstation. Each adaptor attaches to the keyboard plug of the KVM cable set and then connects to a USB socket on the system. To make a USB keyboard and mouse connection Follow the standard connection instructions given previously, however at step 6: i Connect the USB adaptor to the keyboard plug (purple plug with logo) on the KVM cable set. ii Connect the USB adaptor to a free USB socket on the system. In such cases the mouse plug usually remains unconnected and all mouse data is transferred through the USB connection, via the keyboard cable. Note: If the mouse plug (from the KVM cable set) is connected, then mouse data will be sent through it rather than the USB connection. iii Connect the monitor plug from the KVM cable set to the appropriate video socket as usual. iv Continue with steps 7, 8 and 9 of the standard connection instructions. Recognizing a USB connection USB (Universal Serial Bus) plugs and sockets look like this: Switching delays when using two USB connected systems Your AdderView Omega contains a single USB processor that, in conjunction with the cable adaptor(s), handles the communication between the keyboard/mouse, and the connected system(s). When a single computer is connected via USB, the channel switchover time between that and the second (non-USB) system is instantaneous. However, when two systems are connected via USB, during channel switchover, there will be a short delay (roughly 2 seconds) while the USB processor rearranges (enumerates) itself for the new channel. When using two USB-connected systems, the computers will detect when your AdderView Omega makes the changeover. The computer being switched to will automatically enumerate itself - this process usually takes between 2 and 5 seconds, during which time the computer will indicate on screen that it is busy. Certain operating systems are sensitive to interruption during this process, so your AdderView Omega employs a 5 second ‘guard delay’. The guard delay rejects any subsequent channel switching requests until the enumeration process is complete, thus ensuring reliable switching. Support for extra keys and country codes on Sun keyboards As supplied, your AdderView Omega supports all of the keys of a standard PS/2 keyboard, however, certain Sun workstation keyboards contain extra function keys. You can add support for these using special driver software that is available for download from the Adder website. When downloaded into the Omega, the driver software enables you to simulate the extra Sun keys using key combinations on your PS/2 style keyboard. The downloadable drivers also generate the country code that informs the Sun system, which type of keyboard is connected. Please refer to the flash upgrade section within the Special features chapter for more information. Using two USB connected systems with different keyboard types The single USB processor within your AdderView Omega can be configured for a single USB keyboard type at any one time. If you have two USB connected systems that cannot be made to accept the same keyboard type, then you need to use an Adder intelligent USB converter cable. Please contact your AdderView Omega supplier for more details. Some systems, such as certain laptop PC’s, Apple Mac computers and Sun® workstations use USB connections to link their keyboards and mice. ® ® Issues and limitations for USB connections USB keyboard and mouse connections 6 Hotkeys The and the keys, when used in combination, are known as ‘Hotkeys’. They signal to the AdderView Omega that you wish to talk to it (using the keyboard) rather than the computer. The AdderView Omega’s standard hotkeys are set at manufacture to be the and keys. However, you may find that the standard hotkeys interfere with other devices or software used with your computer(s). In such cases, you can change the hotkeys to a different combination of two keys, such as and or even a single key such as the right button. Please refer to the ‘Configuration’ section within the ‘Special features’ chapter for more information. Note: Within the switching instructions that follow, the hotkeys are shown as and . If you change the hotkey settings, remember to replace these with the chosen new hotkeys. There are three main ways to switch between the computers attached 2 to your AdderView Omega: • Omega button – Press and release this button to change channels. • Keyboard keys – Use key combinations 1 to change channels – the most basic combination is . Please refer to the ‘Hotkeys’ section below. • Mouse buttons – Use the buttons of a three-button mouse (or a mouse with a scroll wheel) to change channels – the most basic combination is: • Press and hold the central mouse button (or the scroll wheel), press the left mouse button and then release both. Whichever of the above methods that you use, the AdderView Omega will change the keyboard, mouse, monitor and audio links from one computer to the other. The relevant channel indicator on the AdderView Omega will light and will flicker whenever you type or use the mouse. Basic switching options Switching between computers Your AdderView Omega has two 2 indicators and these are used during normal use to show which 1 channel is currently in use. However, to identify other conditions, these indicators (sometimes in conjunction with the keyboard indicators) may show the following: • No AdderView Omega indicators lit – Either both computers are switched off, or channel isolation mode is selected (this is achieved ). by pressing • One AdderView Omega indicator lit – Normal operation, shows the selected channel. • One AdderView Omega indicator lit but intermittently flickering off – Normal operation, shows the selected channel and that information is being received for it from the keyboard and/or mouse. • One AdderView Omega indicator lit or flickering and the other indicator flashing briefly every few seconds – Normal operation, the lit/flickering channel is currently selected for keyboard video and mouse, however, audio is switched to the other channel (signified by the occasionally flashing indicator). • One AdderView Omega indicator flashes on intermittently - The AdderView Omega is in automatic screen saver mode. The AdderView Omega will automatically ‘wake up’ and activate the video as soon as it senses any keyboard or mouse activity. • Both AdderView Omega indicators lit – Configuration mode. The keyboard indicators show the progress of configuration information being entered – please refer to the ‘Configuration’ section in the ‘Special features’ chapter. • Both AdderView Omega indicators slowly and regularly flashing alternately (keyboard indicators also flash alternately) – Keyboard and mouse are password protected – please refer to the ‘Using a password’ section in the ‘Special features’ chapter. • Both AdderView Omega indicators slowly and regularly flashing in unison – Flash upgrade mode. The AdderView Omega is waiting for data download to begin or complete. Everyday use Indications 7 To resume normal (combined KVM and audio) operation: • Select a channel in the normal manner using either the Omega button, the keyboard or the mouse. Using channel isolation mode Channel isolation mode allows you to quickly blank the screen and isolate the keyboard, mouse and audio channels from both computers. If your monitor has a power save mode, then your AdderView Omega’s channel isolation action should cause it to automatically enter a low power sleep state. Note: An automatic screen saver mode is also available that will prompt your monitor to enter sleep mode after a set period of keyboard or mouse activity (the audio channel remains open). Please refer to the ‘Configuration’ section in the ‘Special features’ chapter. To enter channel isolation mode: • Using the keyboard – press . The screen will go blank and both AdderView Omega channel indicators will go dark. To resume normal operation: • Select a channel in the normal manner using either the Omega button, the keyboard or the mouse. To enter lock (password protection) mode: . The screen will go blank • Using the keyboard – press and the AdderView Omega and keyboard indicators will begin flashing alternately. To resume normal operation (if a password has been set): • Using the keyboard – enter the password and then press Enter (Return). If the entered password matches the one stored within the AdderView Omega, then all functions are reconnected to the channel that was last active. The monitor should awake from its sleep mode. To resume normal operation (if a password has not been set): • Select a channel in the normal manner using either the Omega button, the keyboard or the mouse. To switch channels, but leave the audio channel unchanged: • Using the keyboard – press • Using the mouse – press and hold the central mouse button (or the scroll wheel), press the right mouse button and then release both. Sometimes you may wish to hear the audio channel from one of your computers while using the other, for instance, when playing a CD while working on the other system. Switching audio separately Lock mode offers the same screen blanking and channel isolation as the screen saver mode. In addition, a password must be entered before normal operation may continue. To use this feature, you first need to set a password – please refer to the ‘Setting and using a password’ section in the ‘Special features’ chapter. Note: An automatic screen blanking mode is also available that will prompt your monitor to enter sleep mode after a set period of keyboard or mouse activity. Please refer to the ‘Configuration’ section in the ‘Special features’ chapter. Using autoscanning mode Autoscanning mode allows you to switch between channels automatically and display the video and audio output of each for a set period of time. This function may be useful if you need to intermittently monitor the progress of your two computers. You can choose a time to view each channel (the dwell time) from two to sixty seconds. The preset dwell time is 2 seconds, to change this please refer to the ‘Configuration’ section in the ‘Special features’ section. To enter autoscanning mode: . Using the set dwell time • Using the keyboard – press (two seconds as standard), your AdderView Omega will begin to switch between the computers connected to the two channels. In addition to the basic switching options (mentioned previously), your AdderView Omega offers various extra switching modes to meet your various requirements. Using lock (password protection) mode Other switching options To resume normal operation: • Autoscanning mode will breakout and remain set to the current channel as soon as any input is sensed on the keyboard or mouse. 8 Special features To enter and use configuration mode: 1 Press and hold the Omega button for roughly five seconds until both of the AdderView Omega indicators light as well as all three of the keyboard indicators (‘Num Lock’, ‘Caps Lock’ and ‘Scroll Lock’). Your AdderView Omega is now ready to accept new configuration options. l rol ScLock 2 ps CaLock 1 m NuLock l rol ScLock l rol ScLock l rol ScLock N Loc To exit from configuration mode: 1 Within configuration mode, enter your options (as outlined previously) until all three keyboard indicators light once more. 2 Using the keyboard, press and then press . On your keyboard, the three indicators will return to their normal states and on the AdderView Omega, only the currently selected channel indicator will light. Entering, using and exiting configuration mode 2 Using the keyboard, press the first letter of the required configuration option, for instance . On your keyboard, the ‘Scroll Lock’ indicator will darken, leaving the ‘Num ps Lock’ and ‘Caps Lock’ indicators lit – this CaLock m indicates that a configuration option NuLock number is now required. 3 Using the keyboard, press the number of the required configuration option, for instance . On your keyboard, the ‘Caps Lock’ indicator will darken, leaving only the ps ‘Num Lock’ indicator lit – this indicates CaLock m that you need to confirm the NuLock configuration option that you just typed. 4 Using the keyboard, press . On your keyboard, all three of the indicators light once again – this indicates that you may enter another configuration ps CaLock option, set a password or exit. um k You can alter the way that your AdderView Omega operates to suit your requirements. This is done using the Configuration mode and you can affect the following settings: • Automatic screen blanking – blanks your monitor after a selectable period of inactivity. • Hotkey combinations – change the keys used to initiate channel switching. • Automatic scanning modes – switches between your computers at a set rate. • Mouse settings – determine how your mouse operates. • Miscellaneous settings, restore and reset functions. • Password – allows you to lock the keyboard and mouse. Configuration 9 These configuration options allow you to blank the screen after a set period of time has elapsed since the keyboard or mouse were last used. Power saving monitors can sense the screen blanking action and change to sleep mode. The currently selected audio remains unaffected. B1 Screen blanking feature disabled (default setting). B2 Blank screen after 1 minute of inactivity. B3 Blank screen after 2 minutes of inactivity. B4 Blank screen after 4 minutes of inactivity. B5 Blank screen after 8 minutes of inactivity. B6 Blank screen after 12 minutes of inactivity. B7 Blank screen after 16 minutes of inactivity. B8 Blank screen after 20 minutes of inactivity. Automatic screen saver Autoscanning computer selection These configuration options allow you to determine how the autoscanning feature chooses which computer to view. WARNING - When switching between different video sources, some CRT (Cathode Ray Tube) type monitors will operate an internal mechanical relay at every switchover - this can be heard as a mechanical ‘click’. To avoid damaging the mechanical contacts of such relays, do not operate autoscan for long periods with these types of monitors. L1 Autoscanning mode is not enabled at power on. L2 Reserved. L3 Autoscanning mode is invoked automatically from startup. To set configuration options (a quick summary): 1 Enter configuration mode (press and hold the Omega button for five seconds). 2 Type the letter of the option. 3 Type the number of the option. 4 Press Enter (Return). 5 Enter another option or exit from configuration mode (press and then ). These configuration options allow you to determine which keyboard buttons are used as the hotkeys to initiate channel switching and other AdderView Omega features. H1 Hotkey combination is CTRL + ALT + command key (default setting). H2 Hotkey combination is CTRL + SHIFT + command key. H3 Hotkey combination is ALT + SHIFT + command key. H4 Hotkey combination is RIGHT ALT + command key. H5 Hotkey combination is LEFT ALT + RIGHT ALT + command key. H6 Hotkey combination is LEFT CTRL + LEFT ALT + command key. H7 Hotkey combination is RIGHT CTRL + RIGHT ALT + command key. H8 No hotkey combination enabled. When selected, the AdderView Omega channels may be switched using the Omega button, a three-button mouse or autoscanning mode. This section lists all of the configuration options that you can use to alter the operation of your AdderView Omega. A full description of how to use configuration mode is given above, here is a quick summary: Hotkey combinations Configuration options 10 Mouse third button selection These configuration options allow you to determine whether the third (or the scroll wheel) button of a three button mouse should be used for channel switching or reserved only for functions on the computer(s). U1 Use the third mouse button to initiate AdderView Omega channel switching. When selected, the third button is not available for use with computer applications (default setting). U2 Do not use the third mouse button to initiate channel switching. When selected, the AdderView Omega channels may be switched using the Omega button, the keyboard or autoscanning mode. Miscellaneous functions These configuration options contain a mixture of functions, from discovering the AdderView Omega internal software (firmware) revision, to restoring mouse function, to resetting all configuration changes. Note: These functions use the letter ‘F’. As with all of the other configuration options, press the letter and then the number, i.e. F and then 1 – not the ‘F1’ function key. F1 Declare the AdderView Omega firmware version. When selected, the version number will be sent to the currently selected computer – ensure that a suitable application is running (such as a notepad or word processor) so that the version number may be displayed on screen. F5 Restore PS/2 mouse operation to the currently selected computer that has ceased to respond to mouse movement. Note: Before using this function, please refer to the section ‘Hot plugging and mouse restoration’ F6 Restore IntelliMouse mouse operation to the currently selected computer that has ceased to respond to mouse movement. Note: Before using this function, please refer to the section ‘Hot plugging and mouse restoration’ F8 RESET all configuration options to the default settings. P Initiates password setting mode. Please refer to the ‘Using a password’ section. E Exits configuration mode and returns your AdderView Omega to normal operation. These configuration options allow you to overcome a rare timing problem caused by certain mouse, computer and switch combinations. The problem can occur when the mouse driver software and computer are over-sensitive to timing changes within the information from the mouse. Adding a switch, such as the AdderView Omega, can cause slight timing changes that result in the on-screen mouse pointer responding very slowly. Choosing the L6 option helps to counteract the rare problem that is known to occur in combinations such as an HP Vectra running later versions of Windows NT, using a Logitech mouse driver and a Logitech mouse. L5 Do not adjust mouse speed timings (default setting). L6 Adjust mouse speed timings to solve response problems. These configuration options allow you to determine how long the autoscanning feature dwells at each computer when scanning between them. T1 Dwell at each computer for 2 seconds before switching to the next port (default setting). T2 Dwell at each computer for 5 seconds before switching to the next port. T3 Dwell at each computer for 7 seconds before switching to the next port. T4 Dwell at each computer for 10 seconds before switching to the next port. T5 Dwell at each computer for 15 seconds before switching to the next port. T6 Dwell at each computer for 20 seconds before switching to the next port. T7 Dwell at each computer for 30 seconds before switching to the next port. T8 Dwell at each computer for 60 seconds before switching to the next port. Mouse speed timing adjustment Autoscanning dwell timing 11 Setting and using a password If you forget your password: 1 Switch off both computers (or temporarily remove the keyboard connections from both computers). 2 Switch on one of the computers (or reconnect a keyboard connection) while holding down the Omega button on the top panel of your AdderView Omega. After five seconds both AdderView Omega indicators will flash in unison. Release the Omega button and then press it again and hold it down until until both indicators light. Your AdderView Omega will now be in Configuration mode. 3 Using the keyboard, press the letter and then press the Enter (Return) key. Both AdderView Omega indicators will remain lit and now on the keyboard, only the Num Lock indicator will be lit. 4 Enter a new password as described previously. When complete, press the letter and then press the Enter (Return) key. To resume normal operation: • Using the keyboard – enter the password and then press Enter (Return). If the entered password matches the one stored within the AdderView Omega, then all functions are reconnected to the channel that was last active. The monitor should awake from its sleep mode. To enter lock (password protection) mode: • Using the keyboard – press . The screen will go blank and the AdderView Omega and keyboard indicators will begin flashing alternately. To set/change a password: 1 Press and hold the Omega button for roughly five seconds until both of the AdderView Omega indicators light as well as all three of the keyboard indicators (‘Num Lock’, ‘Caps Lock’ and ‘Scroll Lock’). Your AdderView Omega is now ready to accept new configuration options. 2 Using the keyboard, press and then press the Enter (Return) key. Both AdderView Omega indicators will remain lit and now on the keyboard, only the Num Lock indicator will be lit. 3 Using any keys on the keyboard (except , , or ) type your new password (up to a maximum of 40 keystrokes). As you type each character the Scroll Lock indicator will flash on and off. Note: Unlike some computer passwords, the AdderView Omega stores a sequence of keypresses as its ‘Password’. This means that the exact sequence of key presses must be matched to unlock it. Keys such as Home and Caps Lock may be part of the sequence. Upper and lower case characters are classed equally for use within passwords. 4 When the complete password has been entered, press the Enter (Return) key. Now all three keyboard indicators will light once more. 5 Press and then . On your keyboard, the three indicators will return to their normal states and on the AdderView Omega, only the currently selected channel indicator will light. Your AdderView Omega allows you to protect your computers from unauthorized access using password protection. Using a simple keypress combination you can isolate the keyboard, mouse, monitor and audio from both systems until the correct password is entered. Important: AdderView Omega password protection offers basic surface-level protection against unauthorized users. By resetting the AdderView Omega unit or reconnecting the keyboard directly to a computer it is possible to overcome this level of protection. For high level security you should consider using other forms of protection. 12 To restore mouse operation when hot plugging: 1 Carefully connect your AdderView Omega to the keyboard, mouse, monitor, audio and the two systems. 2 Use the Omega button to select the channel of the system affected by hot plugging. 3 Press and hold the Omega button for roughly five seconds until both of the AdderView Omega indicators light as well as all three of the keyboard indicators. 4 Using the keyboard, enter the appropriate restore function code: • PS/2 – press • IntelliMouse – press 5 To exit configuration mode, press . 6 Move the mouse a short distance and check for appropriate onscreen cursor movement. If the mouse cursor darts eratically around the screen, then cease moving the mouse. This is an indication that the chosen restore function is incorrect. Try again using the other restore function. Note: The restore functions predict the likely mouse resolution settings but may not restore the exact speed or sensitivity settings that were originally set. Recognizing an Intellimouse driver Before hot plugging your AdderView Omega (or afterwards using only keyboard control), access the Windows Control Panel and select either the Mouse option (on Windows NT, 2000 and XP) or the System option (on Windows 95, 98, ME). Look for the name of the driver, which will usually include the words PS/2 or Intellimouse. Recognizing an Intellimouse-style mouse The Intellimouse format was introduced to support, among other features, the scroll wheel function. If your mouse has a scroll wheel, then it is likely to support the Intellimouse format. If you have a Microsoft mouse, then it will usually state that it is an Intellimouse on its underside label. The general rule is that unless both the mouse and the driver are both Intellimouse compatible then you need to restore the mouse as ‘PS/2’. It is strongly recommended that you switch off both of your computers before attempting to connect them to your AdderView Omega. However, if this is not possible then you need to ‘hot plug’ your AdderView Omega while power is still applied to the system (or systems). There is not normally a danger of damage to the systems, however, when mouse communications are interrupted, often they fail to reinitialize when reconnected. Your AdderView Omega provides a feature to reinstate mouse communications once the necessary connections have been made. There are two main types of data formats used by current PC mice, these are the older ‘PS/2’ format and the more recent ‘IntelliMouse®’ format introduced by Microsoft. These use slightly different data arrangements and it is important to know which type was being used before you hot-plugged the AdderView Omega. The previous setting depends both on the type of mouse and the type of driver as various combinations of PS/2 and Intellimouse are possible. Using the incorrect restore function may produce unpredictable results and require the system to be rebooted. Which restore setting do I use? Hot plugging and mouse restoration 13 In common with our professional switching products, you can expand its use and switch more than two computers. This is called ‘cascading’ and is achieved by connecting the keyboard, video and mouse ports of the AdderView Omega to one of the channels of another switching product. When you use our switches in this way, channel selection is performed by an extended keyboard sequence. Switching more than two computers For instance, to select channel two of your AdderView Omega when it is connected to the fourth port of an AdderView GEM (a four port switch), you would use the keyboard sequence: 1 then, while still holding 2 Release and press , then release all keys. Note: Because the AdderView Omega does not use a power supply, it must always be the last switching device in a cascade. For the same reason, you cannot cascade two AdderView Omegas. 4 3 2 1 14 To download the files 1 Access the Adder Technology Ltd website (www.adder.com), enter the Support section. Choose the upgrade option that best suits your requirements and download it to your system. 2 Decompress the downloaded file. Depending on the chosen option, there will be a collection of suitable files. As a minimum, there should be the following files: • AUTOEXEC.BAT – directs the computer to run the driver update and firmware upgrade programs. • AVOMxxx.EXE – this is the upgrade program that causes upgrade data to be sent to the AdderView Omega from your PC. • AVOMxxx.HEX – this file contains the code to be downloaded into the AdderView Omega by the avomxxx.exe program. • OMEGAUSB.EXE – this program causes the USB driver data to be sent to the AdderView Omega from your PC. • A keyboard definition file that has the extension .S19, such as: STANxxx.S19, OFFxxx.S19, SUNxxx.S19 and NPROxxx.S19. Where xxx is the upgrade version number. To create a startup disk in Windows 95/98/Me 1 Insert a formatted diskette into the floppy disk drive. 2 Select ‘Start’, then ‘Settings’ and then ‘Control Panel’. 3 Double click on the ‘Add/Remove Programs’ icon. 4 Select the ‘Startup Disk’ tab. 5 Click ‘Create Disk’ and follow the instructions. To create a startup disk in Windows 95/98 (alternative method) 1 Insert a diskette into the floppy disk drive. 2 Right mouse click on the ‘3½ Floppy (A:)’ icon and select ‘Format’. 3 Select the ‘Full format’ option and ensure that the ‘Copy system files’ box is checked. 4 Select ‘Start’ to format the disk. To create a startup disk from MS-DOS or a DOS window within Windows 95/98 1 Insert a diskette into the floppy disk drive and check that the drive is configured as drive A (it usually is). 2 At the DOS prompt (C:\>) type: To create a startup disk in Windows XP 1 Insert a diskette into the floppy disk drive. 2 Select ‘Start’ and then ‘My Computer’. 3 Right mouse click on the ‘3½ Floppy (A:)’ icon and select ‘Format’. 4 Check the ‘Create an MS-DOS startup disk’ box and select ‘Start’. Stage A - Download the upgrade files For this stage you will need a 3½ floppy diskette that is either blank or has existing contents that are no longer required. The write protect tab must be moved to the ‘unprotected’ position. Depending on your operating system, use one of the following to create a startup disk: The internal software of your AdderView Omega can be upgraded to fulfill two main functions: • Utilize the latest AdderView Omega features and functionality, • Emulate particular styles of USB keyboards so that extra keys may be supported. Keyboard styles supported include the Microsoft® Office keyboard, the Microsoft® Natural Pro keyboard and Sun ® workstation keyboard. Additionally for Sun® systems, the converter cable can be made to declare a country code. To perform such changes, you need to carry out the following stages: • Stage A Download upgrade files from the Adder website. • Stage B Create a startup diskette. • Stage C Copy the files and edit the control file. • Stage D Reconnect the AdderView Omega and reboot your PC. Stage B - Create a startup diskette FORMAT A: /S and follow the instructions given by DOS. Now please follow Stage C. Software upgrades and keyboard emulations Now please follow Stage B. 15 OMEGAUSB STAN101 /C21 REM AVOM141 4 When all required changes have been made, save the AUTOEXEC.BAT file. Do not change the name otherwise it will not be recognized by the system. Now please follow Stage D. Keyboard country codes Country Arabic Belgian Canadian-Bilingual Canadian-French Czech Republic Danish Finnish French German Greek Hebrew Hungary International (ISO) Italian Japan (Katakana) Korean Latin American Netherlands/Dutch Norwegian nn code 01 02 03 04 05 06 07 08 09 0A 0B 0C 0D 0E 0F 10 11 12 13 Country Persian (Farsi) Poland Portuguese Russian Slovakian Spanish Swedish Swiss/French Swiss/German Switzerland Taiwan Turkish-Q UK US Yugoslavia Turkish-F Reserved Not supported nn code 14 15 16 17 18 19 1A 1B 1C 1D 1E 1F 20 21 22 23 24-FF 00 • The first line relates to the USB keyboard that you wish to emulate to one (or both) of the connected systems. There are two parts to the line which perform these functions: The STAN101.S19 entry sends a new keyboard profile (in this case the standard driver with a version number 1.01). A list of keyboard profiles is provided on the next page. The /C21 suffix optionally sets a country code that will be reported to the USB-connected system(s). This is required only for Sun workstation systems, which require the country layout of the keyboard to be reported. A full list of country codes is provided on the next page. The country code is not required for other kinds of computers and can be removed. • The second line (AVOM141) instructs the computer to download a version (in this case v1.41) of the AdderView Omega’s internal operating software. 3 If necessary, inhibit either of the options by prefixing the term REM to the appropriate line. For instance, if you wish declare a new keyboard and country code but not upgrade the internal software, you would change the entires to be: • STANxxx.S19 - This is the standard driver that is suitable for most systems and is loaded by default into the AdderView Omega. • OFFxxx.S19 - This driver supports the extra keys found along the top of Microsoft Office keyboards. • NRPOxxx.S19 - This driver supports the extra keys found along the top of Microsoft Natural Pro keyboards. • SUNxxx.S19 - This driver supports the extra keys found on Sunstyle keyboards. Sun systems also require a conuty code to be specified - see previous page for details. The last three of these drivers provide support for the extra keys of these specialist keyboards and allow you to emulate them using combination key presses on a standard PS/2 style keyboard, as detailed opposite. OMEGAUSB STAN101.S19 /C21 AVOM141 USB keyboard drivers In order to choose the appropriate upgrade/keyboard emulation options, you now need to copy the downloaded files to the diskette and then edit the AUTOEXEC.BAT control file. 1 Using Windows Explorer or the My Computer option, copy the downloaded and decompressed files from your computer to the floppy diskette. 2 Using a text editor, such as Notepad or Wordpad, open the AUTOEXEC.BAT file on the floppy diskette (A:). The file will contain command lines similar to those shown here: Stage C - Copy the files and edit the control file 16 Stage D - Reconnect the AdderView Omega and reboot 1 Using one of the KVM cable sets, connect the keyboard port from channel 1 of your AdderView Omega to the keyboard socket of the computer from which you will run the upgrade (your AdderView Omega may already be connected in this manner). Disconnect the keyboard connection from the other computer to channel 2 or alternatively, switch off the other computer. The tables below provide equivalent keypresses on a standard PC (PS/2style) keyboard that emulate special keys found on Apple or Sun keyboards. 2 On the computer from which you will run the upgrade, ensure that its BIOS settings will allow it to boot from the floppy diskette drive, rather than booting immediately from the hard drive. 3 With the upgrade diskette installed in the drive, switch off the computer. On your AdderView Omega, hold down the Omega button while you switch on the computer. As soon as the two indicators on the AdderView Omega begin to flash, release the Omega button and allow the computer to boot from the floppy diskette and automatically perform the flash upgrade. The upgrade process should take no more than two to three minutes and a progress indicator will be displayed on screen. Once the upgrade is complete, your AdderView Omega will change into normal operation and only the channel one indicator will be lit. 4 Reconnect your AdderView as usual. PS/2 keyboard Apple keyboard PS/2 keyboard Sun keyboard Left Ctrl Left Control Left Win Start ( ) Left Alt Right Alt or Alt Graph Left Command ( ) Left Option (alt) Right Option (alt) Right Win Start ( ) Right Ctrl Windows Application key Right Command ( ) Right Control No equivalent No equivalent On / off key Right-[Ctrl] [F1] Right-[Ctrl] [F2] Right-[Ctrl] [F3] Right-[Ctrl] [F4] Right-[Ctrl] [F5] Right-[Ctrl] [F6] Right-[Ctrl] [F7] Right-[Ctrl] [F8] Right-[Ctrl] [F9] Right-[Ctrl] [F10] Right-[Ctrl] [1] Right-[Ctrl] [2] Right-[Ctrl] [3] Right-[Ctrl] [4] Right-[Ctrl] [H] Stop Again Props Undo Front Copy Open Paste Find Cut Mute Volume Volume + Power* Help * Certain PS/2 keyboards have a power key which will be mapped to perform the same function for a Sun system. Keypress equivalents Link the channel 1 keyboard port to the keyboard socket of the PC that will be used to run the upgrade Temporarily disconnect the channel 2 keyboard connector, or switch off the second system. 17 • Email – [email protected] • Fax in the UK: in the US: 01954 780081 +1 888 275 1117 • Phone in the UK: in the US: 01954 780044 +1 888 275 3337 Troubleshooting If you experience problems when installing or using your AdderView Omega, please check through this section for a possible solution. If your problem is not listed here and you cannot resolve the issue, then please refer to the ‘Getting assistance’ section. Keyboard hotkey combinations have no effect • Check that the keyboard hotkeys have not been changed. Enter Configuration mode and change the hotkey setting to the default. Then retry switching channels using the keyboard. Keyboard does not function or functions intermittently. Num Lock indicator does not always respond to the Num Lock button. • Some older keyboards were designed for use with specific computers and are not truly PS/2 compatible. These are not common but if you experience problems, try another keyboard. Mouse causes channel to change • Some cheaper mice are not compatible with the AdderView Omega and can lose data which can cause the channels to change unexpectedly (if mouse switching of channels is enabled). If you experience this problem, change the mouse to use a Microsoft, Logitech, IBM, Compaq or Hewlett Packard type. Ensure that you are using a Microsoft compatible mouse driver on your PC. Some other manufacturer’s drivers may switch the mouse to use a proprietary mouse data format not supported by the AdderView Omega. If you have unplugged and re-connected a mouse to the AdderView Omega, then ensure that you use the restore mouse feature covered in the ‘Hot plugging and mouse restoration’ section in the ‘Special features’ chapter. Mouse jumps around the screen after disconnecting the mouse cable or powering down the AdderView Omega • If you have unplugged and re-connected a computer mouse link then the mouse data format may be out of synchronization with that required by the computer. Try using the restore mouse feature (F6 - IntelliMouse version) covered in the ‘Hot plugging and mouse restoration’ section in the ‘Special features’ chapter. Mouse pointer moves very slowly across the screen • Certain computer, mouse and mouse driver combination cause mistiming problems. First change the mouse driver to a Microsoft type, then try using the ‘Mouse speed timing adjustment’ covered within the ‘Configuration’ section in the ‘Special features’ chapter. • Adder Technology website – www.adder.com Check the Support section of our website for the latest solutions and driver files. If you are still experiencing problems after checking the list of solutions in the Troubleshooting section then we provide a number of other solutions: Getting assistance Solving problems Mouse cursor does not move on screen • Ensure that the mouse and computer are both correctly connected to AdderView Omega. • Ensure that your software is configured to accept a Microsoft compatible mouse of the type that you have connected (PS/2 or IntelliMouse). • When you move the mouse check that the AdderView Omega channel indicator flashes: • If the indicator does not flash - the AdderView Omega is not receiving data from the mouse. Check the mouse connection or, if possible, try a different mouse. • If the indicator does flash but the on screen pointer does not move – the computer is not responding. Check the connection to the computer. Use the restore mouse feature covered in the ‘Hot plugging and mouse restoration’ section in the ‘Special features’ chapter. 18 Adder Technology Ltd warrants that this product shall be free from defects in workmanship and materials for a period of two years from the date of original purchase. If the product should fail to operate correctly in normal use during the warranty period, Adder will replace or repair it free of charge. No liability can be accepted for damage due to misuse or circumstances outside Adder’s control. Also, Adder will not be responsible for any loss, damage or injury arising directly or indirectly from the use of this product. Adder’s total liability under the terms of this warranty shall in all circumstances be limited to the replacement value of this product. © 2003 Adder Technology Limited All trademarks are acknowledged. Release 1.2 February 2003 Part No. ADD0046/1 European EMC directive 89/336/EEC This equipment has been tested and found to comply with the limits for a class B computing device in accordance with the specifications in the European standard EN55022. These limits are designed to provide reasonable protection against harmful interference. This equipment generates, uses and can radiate radio frequency energy and if not installed and used in accordance with with the instructions may cause harmful interference to radio or television reception. However, there is no guarantee that harmful interference will not occur in a particular installation. If this equipment does cause interference to radio or television reception, which can be determined by turning the equipment on and off, the user is encouraged to correct the interference with one or more of the following measures: (a) Reorient or relocate the receiving antenna. (b) Increase the separation between the equipment and the receiver. (c) Connect the equipment to an outlet on a circuit different from that to which the receiver is connected. (d) Consult the supplier or an experienced radio/TV technician for help. Warranty This equipment has been tested and found to comply with the limits for a Class B digital device, pursuant to part 15 of the FCC Rules. These limits are designed provide reasonable protection against harmful interference in a residential installation. This equipment generates, uses and can radiate radio frequency energy and, if not installed and used in accordance with the instructions, may cause harmful interference to radio communications. However, there is no guarantee that interference will not occur in a particular installation. If this equipment does cause harmful interference to radio or television reception, which can be determined by turning the equipment off and on, the user is encouraged to try to correct the interference by one or more of the following measures: • Reorient or relocate the receiving antenna. • Increase the separation between the equipment and receiver. • Connect the equipment into an outlet on a circuit different from that to which the receiver is connected. • Consult the dealer or an experienced radio/TV technician for help. Modifications not expressly approved by the manufacturer could void the user’s authority to operate the equipment under FCC rules. Adder Technology Limited, Technology House, Trafalgar Way, Cambridge, CB3 8SQ, United Kingdom Tel: +44 (0)1954 780044 Fax: +44 (0)1954 780081 Adder Corporation, 29 Water Street, Newburyport, MA 01950, United States of America Tel: +1-888-932-3337 Fax: +1-888-275-1117 FCC statement 19