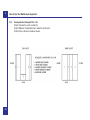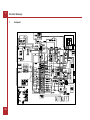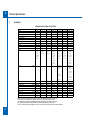
1
Owners Handbook
2008 Motorhomes
3
4
1.3 User Payload
Loading
2.1 Roof Racks
2.2 Roof Loading
2.3 Bicycle Racks
Before Moving Off
Pulling Off
4
MOTORHOME HANDLING
1
2
Best Practice
Speed Limits
5
SITE ARRIVAL
1
2
3
Check Site Regulations
Selecting A Pitch
Lateral Leveling (Side To Side)
6
GETTING STARTED
8
ELECTRICAL SYSTEM
1
Electricity
1.1 Power Supply Charger
1.2 12v Systems
Generator/Charger
Electricity Mains Supply
Connecting To Mains Supply on
Arrival at Site
Disconnecting Mains Supply
When Leaving Site
Overseas Electrical Connection
1
12v Power Supply
1.1 Battery Installation
1.2 Battery Maintenance
1.3 Generators / Charger
230v Power Supply
2.1 Mains Unit
2.2 Resetting The RCD
2.3 230V Mains Equipment
Typical Consumption
Figures
Contents
2
1
WELCOME & INTRODUCTION
1.1 End Of Life Vehicle Directive
1.2 Explorer Group Technical
Approvals
2
GENERAL SAFETY
1
Please Read Before Using Your
New Motorhome
Proper And Safe Use Of Storage
Areas In Motorhomes
Ventilation
3.1 High-Level Ventilation
3.2 Low-Level Ventilation
3.3 Ventilation in Separate
Bedrooms
3.4 Gas Dispersal Holes
Fire Safety
4.1 Fire Extinguishers
4.2 In Case Of Fire
4.3 Fire Retardant Foams
2
3
4
3
PREPARING FOR THE ROAD
1
Motorhome Weights Explained
1.1 Mass in Running Order
1.2 Maximum Technically
Permissible Laden Mass
2
3
4
5
6
7
8
Gas Supply
7.1 Connection
7.2 Gas Regulator
7.3 High Pressure Gas Hoses
Water System
8.1 Filling Your Fresh Water
Tank
8.2 Waste Water Tank
8.3 Draining Down Your Water
System
7
GAS SAFETY ADVICE
1
2
Facts About LPG
Awning Spaces, LPG and
Appliance Exhaust
LPG Gas Systems
3
2
Contents
AVANTGARDE AND AUTOQUEST, AUTOCIRRUS AND CALYPSO HANDBOOK 2008
01
Contents
3
4
Automatic Charging System
Maximum Bulb Ratings For
Internal Lights
9
HOW TO USE YOUR
MOTORHOMES EQUIPMENT
1
Avantgarde / Autoquest
Electrical Control Panels
1.1 Gauge
1.2 Switches
1.2.1 Pump
1.2.2 Water
1.2.3 AUX/VEH
1.3 Indicator Lights
1.3.1 RUN
1.3.2 WASTE
Autocirrus / Calypso Control
Panel
2.1 Dip-Switch Position
Cooking Equipment
3.1 Gas Hob
3.2 Duplex Grill And Oven
Avantgarde / Autoquest
Only
3.2.1 Using The Oven
3.3 Midi Prima Gas Oven
Autocirrus / Calypso
Refrigerator Operation
2
3
4
02
4.1
Avantgarde / Autoquest
Fridge
4.1.1 Gas operation
4.2 Autocirrus / Calypso
Fridge.
4.2.1 Gas operation
4.2.2 230V Operation All
Fridges
4.2.3 12V Operation All Fridges
5 Water Heater Operation
5.1 Gas operation
5.2 230V Operation
6 Space Heater Operation
6.1 Gas Operation
6.2 Electric Operation
6.3 Fan Operation Autocirrus /
Calypso (Option On
Avantgarde / Autoquest)
7 Battery Charger
8 Smoke Detector
9 Thetford Cassette Toilet
9.1 Preparing The Toilet For Use
9.2 Emptying The Toilet
10 Air Conditioning - Blizzard 1500
Air Conditioning Unit
(Optional Extra On Autocirrus /
Calypso)
11 Rooflights
11.1
The Omivent (12v)
Rooflight Autocirrus /
Calypso
11.2 The Heki 2 Autocirrus /
Calypso (Option On
Avantgarde /Autoquest)
11.2.1 To Open To The Tilted
Position:
11.2.2 To Open In The
Intermediate Position:
11.2.3 To Open In The
Ventilation Position:
11.2.4 Closing The Blinds:
11.2.5 Opening The Blinds:
11.3 Mini Heki
11.4 Standard MPK Rooflight
12 Windows
12.1 Polyplastic Window
Opening
12.2 Seitz Window Opening
13 Blinds & Flyscreens
13.1 Blinds
13.2 Flyscreens
13.3 Door Flyscreen (If Fitted)
14. Taps
14.1 Kitchen Taps
14.2 Washroom Taps And
Showers
15 Exterior Doors Retainers
16 Internal Doors
16.1 Toilet / Washroom Doors
16.2 Other Internal Doors
17 Magnetic Catches
18 Sprung Hinges
19 TV Aerial
19.1 Status 315 Omni
Directional Aerial (Where
Fitted)
20 FM Radio Connections
21 How To Make Up Your Beds
21.1 Avantgarde And Autoquest
100 – 130
21.2 Avantgarde And Autoquest
120 – 140
21.3 Avantgarde And Autoquest
150
21.4 Avantgarde And Autoquest
180
21.5 Autocirrus And Calypso
220
21.6 Over Cab Double Bed
10 SECURITY
1
2
3
Serial Number
Motorhome Theft
Microtag©
4
5
Explorer Protect – Autowatch
650 Motorhome Alarm System
(Optional Extra)
4.1 Basic Operation Arming the
System
4.2 Disarming the System
4.3 Panic Alarm
4.4 Emergency Disarm.
4.5 Silent Arm and Disarm.
4.6 Sensors
4.7 Passive Infra Red Sensor
4.8 Enhanced Features Arming
The System In "At Home"
Mode.
4.9 Arming the System in Test
or Buzz Mode
Additional Security
11 CARE OF YOUR MOTORHOME
1
2
3
4
5
6
7
8
Exterior Body Shell
Glass Fibre Reinforced Plastic
(GRP)
Acrylic Windows
Window Blinds & Flyscreens
ABS - Wheel Spats & Panels
Interior Walls
Furniture
Carpets, Upholstery And
9
10
11
12
13
14
Curtains
Washroom And Handbasin
Fittings
Shower Trays
Water Systems
11.1 Water Containers
11.2 Internal Water Systems
Truma Space Heater
Thetford Toilet
Changing A Wheel
Contents
AVANTGARDE AND AUTOQUEST, AUTOCIRRUS AND CALYPSO HANDBOOK 2008
12 STORAGE
1
2
3
Storage For Long Periods
Motorhome Covers
Power Drain
13 WARRANTY
1
2
3
4
3-Year Manufacturer's Warranty
Parts Covered By This Warranty
for Years 1 - 3
Specific Exclusions for Years
2&3
Conditions Attached To The
Warranty
14 CODE OF PRACTICE WATER INGRESS
1
2
The Code
Conditions Attached To the Code
03
Contents
3
4
5
6
Customer Obligation - Servicing
Mains Electrics
Spare Parts
Remedial Work
15 MOTORHOME CONSTRUCTION
- MAIN COMPONENTS
1
2
Body Shell
Windows
16 EQUIPMENT LIST
1
2
Autoquest / Avantgarde
Autocirrus / Calypso
17 ELECTRICAL DRAWINGS
1
2
3
4
Autoquest
Avantgarde
Autocirrus
Calypso
18 TECHNICAL SPECIFICATIONS
1
2
3
4
Autoquest
Avantgarde
Autocirrus
Calypso
19 GENERAL QUESTIONS
04
20 GLOSSARY
21 ANNUAL HABITATION SERVICE
RECORDS
22 MOTORHOME RETAILER
SPECIALS
WELCOME & INTRODUCTION
Thank you for choosing a
motorhome manufactured by The
Explorer Group.
Before you drive off, please
familiarise yourself with the
motorhome and read this owners’
handbook. This will help you to
obtain the maximum pleasure from
your vehicle and avoid endangering
yourself and others.
Additional information and detailed
appliance instruction manuals are
also contained in your Owner's
Information Pack.
Your new Explorer Group
motorhome has been designed as a
recreational vehicle and is intended
for recreational use only. It is not
intended for business use or for
permanent habitation. The Explorer
Group accepts no liability if the
motorhome is used for any purpose
other than recreational/holiday use.
Please Note: All Explorer Group
motorhomes are classified as Grade
2 and therefore meet with the
thermal insulation and heat levels
for specific climatic conditions as
specified within the British and
European Standard BS EN 1646
part 1.
By following the instructions
provided in this handbook and
maintaining your motorhome in a
first class roadworthy condition, you
are sure to have many years of
carefree use. To ensure the very
best quality and reliability all
motorhome designs and new
developments are rigorously tested.
Therefore the Explorer Group Ltd
will accept no liability or uphold the
warranty if the motorhome is altered
or modified in such a way that
would adversely affect the reliability.
IMPORTANT
in all correspondence, it can be
found stamped on a plate fixed next
to the motorhome door. It is also
found within the engine
compartment marked in blue ink.
Your Explorer Group motorhome
serial number can also be found on
the NCC certificate that can be
found within your Owner’s
Information Pack.
Welcome & Introduction
1
AVANTGARDE AND AUTOQUEST, AUTOCIRRUS AND CALYPSO HANDBOOK 2008
There is also a Peugeot serial
number on the chassis cab or pillar,
which should be quoted in any
communications with Peugeot.
Changing market and supply
situations may prevent us from
maintaining the exact specification
details in this guide and we
therefore reserve the right to alter
specifications as materials and
conditions demand and supply an
alternative.
Enjoy your new motorhome.
The Explorer Group serial number of
your motorhome should be quoted
05
1
Welcome & Introduction
1.1 End Of Life Vehicle
Directive
Your new motorhome fully complies
with the European Directive on the
End of Life Vehicles. In order to
obtain information on how to
dispose of your motorhome at the
end of its life please visit the
Peugeot website. The Peugeot
website contains full details on all
Peugeot products together with
details of their environmental and
recycling policies. The site address
is www.peugeot.co.uk.
1.2 Explorer Group Technical
Approvals
In order to ensure your new
motorhome is safe to use the
Explorer Group are members of and
have been inspected by the
following bodies.
National Caravan Council (NCC)
who operate a certification scheme
to ensure compliance with the
European safety standards for
motorhomes.
06
National Inspection Council for
Electrical Installation and
Contracting (NICEIC) who carry out
an annual inspection of the Explorer
Group electrical installations within
motorhomes.
The Council for Registered Gas
Installers (CORGI) who carry out
annual inspections to ensure that
the gas installation installed by the
Explorer Group fully comply with all
relevant regulations and standards.
The Explorer Group is an ISO
9001:2000 approved manufacturer
certified by SGS Limited
All the designated passenger seats
fitted in you new motorhome have
been tested and approved by the
Vehicle Certification Agency (VCA)
as being fully compliant with the
relevant European Directives.
PLEASE NOTE
Explorer Group Motorcaravan model
year.
The Explorer Group model year
starts on the 1st September and
runs to the 31st of August.
Therefore a 2008 model motorhome
would have been manufactured
between the dates 1st September
2007 and the 31st August 2008.
1
WELCOME & INTRODUCTION
AVANTGARDE AND AUTOQUEST, AUTOCIRRUS AND CALYPSO HANDBOOK 2008
7
2
General Safety
GENERAL SAFETY
1. Please Read Before Using Your
New Motorhome
In order for you to get the most out
of your new Explorer Group
motorhome it is necessary for you
to be aware of the following:
(i) Do not obstruct ventilators (See
Safety Section - Ventilation)
(ii) Inspect the flexible gas hose
regularly for deterioration and renew
as necessary, with approved type,
as and in any case no later than the
expiry date stated on the hose.
(iii) It is recommended that you
provide a dry powder fire
extinguisher complying with ISO
7165 of at least 1KG capacity by the
exit door and a fire blanket next to
the cooker. Ensure you read the
'advice to occupier label' fitted to
your motorhome.
(iv) Never use portable cooking or
heating equipment inside your
motorhome. Do not use your fitted
cooking equipment as heating at
08
any time.
(v) Never allow modification to your
gas or electrical system unless
qualified persons carry them out. A
CORGI registered gas fitter should
carry out all modification to the gas
system. Any modifications carried
out on the electrical system should
be carried out by an electrician on
the roll of the NICEIC or be a
member of the ECA.
(vi) Never exceed your motorhome’s
Maximum Technical Permissible
Laden Mass.
(vii) Never exceed the front or rear
axle maximum load as specified by
the Peugeot weight plate under the
bonnet.
(viii) Please ensure extra care when
young children use high level bunks
and always use the safety net
provided.
(ix) Turn off all gas appliances and
turn off the gas supply before
driving your motorhome.
(x) Do not leave children under 14
years of age unattended in your
motorhome.
(xi) Ensure the main gas tap is in the
off position before setting off on any
journey.
(xii) Only those seats designated for
traveling should be occupied when
the motorhome is in motion.
(xiii) Please note that motorhomes
are covered by the new seat belt
regulations, which came into force
in October 2006. These require
children that are under 12 years old
and also under 135cm in height to
be seated in either child seats or on
bolster cushions.
2. Proper And Safe Use Of Storage
Areas In Motorhomes
The storage areas provided in your
motorhome are designed solely for
the purpose of carrying personal
possessions; these areas must not
be used:
• As a habitation area (e.g.
living, sleeping or cooking).,
• To carry passengers, animals
or livestock.,
• For the installation (or use)
of any LPG gas operated
appliances, (unless supplied
fitted by the manufacturer).
• For carrying LPG gas bottle
cylinders, (unless designated by
the manufacturer).
• (To carry any flammable liquids,
(unless properly stored, sealed
and secured).
• For the operation of an
electrical generator.
• In such a way that the loading
exceeds the payload limit, as
defined by the manufacturer.
• Such that the weight
distribution of the vehicle
means non-compliance with the
vehicle axle loads.
Care must be taken to ensure that
exterior doors are closed, locked
and that all possessions are
properly stored and secured before
setting off on any journey.
3
Ventilation
All motorhomes manufactured by
The Explorer Group are ventilated at
both high and low level in
accordance with BS EN 721 Safety
Ventilation. The fixed ventilation
points fitted in your motorhome
must not be blocked under any
circumstances as your safety may
depend upon them. It is advisable
that the fixed ventilation points are
checked and cleaned (where
necessary) on a regular basis.
area ventilation. These roof
skylights should be cleaned annually
by use of a small brush to remove
any dust that may have
accumulated around the mesh
fitted. On some roof skylights the
mesh can be easily removed to aid
cleaning. On fan-assisted roof
skylights it is essential that the fan
is switched off prior to cleaning
General Safety
2
AVANTGARDE AND AUTOQUEST, AUTOCIRRUS AND CALYPSO HANDBOOK 2008
3.2 Low-Level Ventilation
The vents built into the step by the
main entrance door provide lowlevel ventilation. These vents
should be kept clear and cleaned
regularly using soapy water.
3.1 High-Level Ventilation
This is always provided by fixed
ventilation within the fitted roof
skylight. All roof skylights fitted by
Explorer Group provide fixed free
09
2
General Safety
3.3 Ventilation in Separate
Bedrooms
In motorhomes with separated
sleeping areas, separate ventilation
is required and is provided via a roof
skylight at high level and a ventilator
at low level within a bed box.
3.4 Gas Dispersal Holes
All appliances and gas unions have
a gas dispersal hole nearby. It is
essential that these are not blocked
or made ineffective.
4
Fire Safety
4.1 Fire Extinguishers
It is recommended that a 1 kg (2lb)
minimum capacity dry powder fire
extinguisher be carried inside your
motorhome at all times. Fat pan
fire must not have an extinguisher
aimed at it, but must be smothered
with a fire blanket.
4.2 In Case Of Fire
(i) Get everyone out of the
motorhome as quickly as possible
10
using whichever exit is quickest
including windows. Do not stop to
collect any personal items.
(ii) Raise the alarm. Call the fire
brigade.
(iii) Turn off gas container valve if
safe to do so.
4.3 Fire Retardant Foams
Under the requirements of the
Consumer Protection Act 1987, the
manufacturer has a responsibility to
ensure that their product is as safe
as possible. With this in mind all
motorhomes are equipped with
either Combustion Modified High
Resilient (CMHR) foam cushions or
sprung mattresses. These foams
are very much safer from a fire point
of view than those previously used.
In addition all upholstery is made of
fire retardant fabric.
this page is intentionally blank
3
Preparing for the Road
PREPARING FOR THE ROAD
Before venturing out on to the road
with your motorhome, it is important
that you prepare correctly.
food, crockery, cutlery, clothing,
bedding, gas cylinders, and water in
the water tank and toilet etc.
2
Motorhome Weights Explained
1.1 Mass in Running Order
The weight of your motorhome as it
leaves the factory, as new with
standard fixtures and fittings, plus
an allowance for the driver of 75kgs
and the mass of the fuel when the
tank is 100% full.
1.2 Maximum Technically
Permissible Laden Mass
Loading
It should be noted that even weight
distribution is a major factor in
making your motorhome an easy
and pleasant vehicle to drive. Care
should therefore be taken in
balancing the load, ensuring that
heavy items are well spaced and are
in as low a position as possible, for
example, low cupboards and bed
boxes.
The maximum mass the vehicle can
be when fully laden for use on the
road.
12
Some models of motorhomes are
fitted with a roof rack and ladder as
standard. Care is needed when
using this facility. We recommend
you exercise extreme caution when
loading and unloading.
CAUTION
Do not allow children to climb onto
the roof. Do not exceed the stated
maximum load. Items fitted other
than standard equipment will
deplete the payload stated in this
handbook e.g. generators.
2.2 Roof Loading
1.3 User Payload
The load margin (payload), this
represents the difference between
the Mass in Running Order and the
Maximum Technically Permissible
Laden Mass. It shows the maximum
weight that can be loaded into your
motorhome, covering items such as
2.1 Roof Racks
IMPORTANT
Do not exceed recommended
maximum loading for your
motorhome.
All motorhomes have a specially
designed roof rack system fitted or
available as an optional extra. The
roof of each motorhome is
strengthened to accommodate the
roof rack, however, the strengthened
area only relates to that contained
within the roof rack area, and to
step beyond this area may cause
damage to the roof.
Please Note: The roof rack is
capable of withstanding a maximum
weight of 12 stone/76kgs. Static
roof loading or top box loading
should be limited to a maximum of
76kgs including contents, or the
limit set by the top box
manufacturer, whichever is the lower
figure.
WARNING
Under NO circumstances walk on
the over cab roof section
Before venturing out on to the road
with your motorhome, it is important
that you prepare correctly.
Roof loads should be evenly
distributed and securely fastened,
but care must be taken not to overtighten straps or ropes to the point
where roof rails or brackets may
become distorted, particularly as
during braking and cornering, forces
exerted by straps or ropes are
greatly increased.
It is also worth noting that when
carrying heavy or large objects on
the roof, the vehicles handling may
change due to the resultant
displacement of the centre of gravity
and the increased area exposed to
the wind.
2.3 Bicycle Racks
Fitting a bicycle rack to the rear
panel of a motorhome will affect
how weight is distributed. There are
restraints to be aware of with such
fitments.
held responsible for problems
related to a bicycle rack fitted by a
third party. A copy of the rear panel
drawing must be obtained from The
Explorer Group to ensure correct
fixing points are located.
Preparing for the Road
3
AVANTGARDE AND AUTOQUEST, AUTOCIRRUS AND CALYPSO HANDBOOK 2008
We would advise you to carry a
maximum of 75kgs on the bicycle
rack provided this does not exceed
the bicycle racks own weight limit.
The motorhome must also be
balanced to take into account the
new weight distribution. Weight
must be distributed evenly.
Bicycle racks are not standard fit or
supplied as an optional extra by The
Explorer Group. Explorer cannot be
13
3
Preparing for the Road
BEFORE MOVING OFF
Whenever making a journey with
your motorhome, either setting off
on holiday or returning home, it is
good practice to run through this
simple checklist.
(i) Close and secure all cupboards
and drawers and check for any
loose articles.
(ii) Do not store tins, bottles, etc. in
overhead lockers.
(iii) Close and secure all windows
and roof lights.
(iv) Leave all curtains and blinds
open to aid visibility.
(v) Check that gas cylinders are
securely fastened and that the valve
on the gas cylinder is turned off.
Also ensure that the gas locker door
is securely fastened.
(vi) Turn off all gas appliances.
(vii) Switch off 240volt supply at
source; disconnect mains cable and
store in an appropriate place.
(viii) Check that the battery is secure
and that the battery box lid is
fastened.
14
(ix) Ensure the fridge is on 12V
operation and door lock is set.
(Note: the electrical relays will allow
the fridge to be run on the vehicle
battery when the engine is running.)
(x) Remove any external fresh water
connections etc.
(xi) Make sure any heavy articles are
stored in accordance with the
loading procedure. Tables should
also be made secure.
(xii) Lock the motorhome exterior
door (remember to take out your
keys).
(xiii) Check your external rear view
mirrors and adjust if necessary.
(xiv) Check the step is put away
before moving off.
(xv) Your new Explorer Group
motorhome has been designed to
carry passengers in designated
passenger seats only. The fitting of
a 3-point seat belt can identify these
seats. Any seat not fitted with a 3point seat belt is not designated as
a passenger seat.
(xvi) You are strongly recommended
not to carry passengers unless they
are seated in a designated
passenger seat.
(xvii) Check that the water heater
cowl cap has been secured on the
external vent.
Pulling Off
• Engage the clutch smoothly.
• Avoid wear and tear on clutch
and transmission by taking
extra care.
• Change gears smoothly.
• Try not to jerk the clutch.
poor visibility reduce your
speed.
• High-sided vehicles can cause
air buffeting so extra care must
be taken when passing or being
passed. Leave as much space
as possible when overtaking
these types of vehicles.
• When reversing, rear visibility
can be difficult. Ensure there
are no obstructions or ask
someone to assist in guiding
you back.
MOTORHOME HANDLING
1 Best Practice
To gain the most enjoyment and
ensure a long life for your
motorhome, the following should be
observed:
• Do not bump kerbs with
wheels.
• When passing other vehicles
allow more than the normal
clearance.
• Allow longer to get up speed to
pass. Do not suddenly swing
out.
• Carry out all manoeuvers as
smoothly as possible.
• Use the nearside wing mirror to
check your motorhome has
cleared when overtaking.
• Slow down and take care when
driving over raised speed
bumps, 'sleeping policemen' or
when embarking/ disembarking
ferries.
• In high or cross winds, traveling
downhill or in conditions of
2.
4
Motorhome Handling
AVANTGARDE AND AUTOQUEST, AUTOCIRRUS AND CALYPSO HANDBOOK 2008
Speed Limits
Be sure to observe all statutory
speed limits and adapt your speed
to take account of prevailing
weather and road conditions.
15
5
Site Arrival
SITE ARRIVAL
1
Check Site Regulations
On arrival at a campsite, you should
always check the site regulations.
This will help avoid any unnecessary
conflict with site management and
other site users.
2
level placed 'across' the motorhome
floor.
Selecting A Pitch
Leveler Jack - Place the leveler
jack, folded flat, in front of the wheel
that is to be raised to level the axle.
Drive the motorhome onto the
leveler jack and adjust the height
until the spirit level shows that the
motorhome is laterally level.
Carefully select where you wish to
place your motorhome. The site
should be as level as possible,
preferably not under or near trees,
well drained and away from possible
boggy areas. Consider how you will
move the motorhome when it is time
to leave the site. On sloping ground
it is better to pitch facing downhill,
especially during wet weather.
3
Lateral Leveling (Side To Side)
A quick glance at your pitch should
tell you if you are likely to need side
to side leveling i.e. leveling across
the axle. On uneven ground lateral
leveling is accomplished by the use
of a leveler jack or ramp and a spirit
16
Place a spirit level parallel to the
axle or just inside the motorhome
door. It helps to have two people at
this point. One should drive the
motorhome very slowly forward
moving the wheel up the ramp, and
the other should indicate when the
spirit level bubble is in the middle.
Ramp - Reverse onto your pitch
about a foot further back than you
wish to end up. Then place the
leveling ramp in front of the wheel
that needs to be raised.
Whichever method you use, once
level, apply the motorhome
handbrake and chock the
motorhome wheel if necessary.
this page is intentionally blank
6
Getting Started
You have arrived at your destination
and now want to start to enjoy your
new Explorer Group motorhome.
The following is a step-by-step
guide to connecting your services
and getting everything in your
motorhome working.
site supply the automatic Power
Supply/Charger will charge the
leisure battery and power the 12V
systems. When the ignition is
switched on the 12V system in the
motorhome is automatically
switched off, car power is supplied
to the refrigerator and battery
charging is in operation.
1 Electricity
2 Generator/Charger:
GETTING STARTED
1.1 Power Supply Charger
Your motorhome is fitted with a
power supply/charger. This will
charge the motorhome leisure
battery when fitted and also power
the 12V systems in your
motorhome. It is recommended that
you always carry a leisure battery.
The Charger is fully automatic and
will not overcharge the leisure
battery.
1.2 12v Systems:
Your motorhome is fitted with an
automatic system for selection of
power. When connected to the 230V
18
When connecting to a generator,
always switch off the RCD, start the
generator and allow running for a
few minutes to stabilize. When this
has happened, switch the RCD to
the ON position.
3 Electricity Mains Supply
Your motorhomes main electrical
installation is designed to run on
230V at 50 hertz AC supply.
4 Connecting To Mains Supply
on Arrival at Site
Before connecting the motorhome
installation to the mains supply,
check that:
(i) The mains supply is suitable for
your installation and appliances, i.e.
whether it is AC or DC and whether
it is at the correct Voltage and
frequency.
(ii) Your motorhome is properly
earthed. Never accept a supply from
a socket outlet or plug having only
two pins, or from a lighting outlet.
(iii) Any residual current device
(earth leakage circuit breaker) in the
mains supply to the motorhome has
been tested within the last month. In
case of doubt, consult the site
owner or their agent.
(iv) Make sure that the switch at the
site supply point is off and that all
electrical equipment in the
motorhome is switched off by
ensuring your motorhome mains
isolating switch on the MCB is in
the 'OFF' position.
(v) Once the above checks have
been made remove any cover to the
electricity inlet provided on the
motorhome, and insert the female
connector of the flexible orange
supply cable as shown.
(vi) Locate the site supply and
remove any cover from the socket
outlet provided at the supply point.
Insert the male plug at the other end
of the flexible orange supply cable.
Switch on the main switch at the
site supply point (if appropriate).
(vii) Place any surplus cable under
the motorhome. Ensure that the
surplus cable is not coiled up as it
could overheat.
(viii) The MCB main electricity
supply switch should be put in the
'ON' position.
(ix) Check the RCD is working by
pressing the test button. Once
pressed all electrical lights and
appliances should cease to operate.
Reset, and then check the electrical
system is operational.
(x) Finally in order to get your 12V
system operational, ensure the
master 12V switch is in the on
position.
5 Disconnecting Mains
Supply When Leaving Site
(i) Switch 'OFF' at the motorhome
mains isolating switch.
(ii) Remove the male plug from the
site supply.
(iii) Disconnect the female plug from
the motorhome and store the cable
in an appropriate locker.
6 Overseas Electrical Connection
Please Note: Connection to a
mains Voltage supply OVERSEAS
requires particular attention. Care
must be taken when connecting
supplies abroad since the supplies
can be of REVERSE POLARITY.
Getting Started
6
AVANTGARDE AND AUTOQUEST, AUTOCIRRUS AND CALYPSO HANDBOOK 2008
The significance of REVERSE
POLARITY is that when equipment
is switched off, it may not be
electrically isolated. The only
certain way of making equipment
safe is to unplug it.
A means of checking the polarity of
the mains supply when overseas is
recommended. There are available
several proprietary makes of
equipment for the purpose.
If it can be achieved, it is preferable
to connect live to live, and neutral to
neutral to maintain full electrical
protection.
CHECK all motorhome equipment is
set-up to accept the site supply
before actually switching on.
19
6
Getting Started
7 Gas Supply
Your motorhome is designed to
operate using either propane or
butane liquefied petroleum gas at
30M/bar. Gas can be obtained from
your motorhome dealer. Your
motorhome is designed to accept a
maximum 2 x 7kg Calor gas bottles.
7.1
Space Heater
Refrigerator
Connection
Make sure that heating and cooking
appliances and gas cylinders are
switched off.
Each gas appliance is connected to
its own gas isolation tap. These are
identified on the tap via a label.
Below is a key to identify each label.
To operate the tap the arrow on the
tap shows the direction of flow for
the gas. The arrow should be
pointing towards the appliance for
the appliance to operate. There will
be a small label next to the bank of
taps under the cooker, which is also
reproduced to the right:
20
Water Heater
Cooking Appliance
Hob
Gas On/Off
7.2
Gas Regulator
Your new Explorer Group
motorhome has been fitted with a
fully approved gas regulator
designed to operate at a gas
pressure of 30Mbar. Your regulator
is fitted with a test point, which is
accessed via the inlet at the side of
the regulator. This access point is
only for carrying out gas pressure
tests and should not be used for
any other purpose.
CAUTION
It is strongly recommended that only
CORGI approved gas fitters carry
out any work on your motorhomes
gas installation.
7.3
High Pressure Gas Hoses
You should only connect to this
regulator using an approved highpressure hose of length not
exceeding 450mm from the gas
cylinder to the regulator. These
approved high-pressure hoses are
available from your Explorer Group
Retailer. These hoses are connected
using screw thread fittings, which
will make a seal if connected and
tightened using a spanner. Once the
hose is securely connected turn on
the gas tap above the regulator,
then turn on the gas bottle to allow
gas to flow into the motorhome.
In order to make all your
motorhomes gas appliances
operational it is necessary to open
each appliance gas tap as detailed
in 6.1 above. All your gas
appliances should now be
operational. Instructions on how to
use each appliance are detailed
later in your handbook.
WARNING
Aerosols and highly flammable
liquids must not be stored in the
compartment behind, or adjacent to,
any gas appliance. Some industrial
LPG appliances operate at high
pressure and require a ‘high
pressure’ regulator. This often has
an adjusting handle on it. NEVER
use such a regulator on a
motorhome.
Ventilation holes must be clear at all
times.
8 Water System
8.1
Filling Your Fresh Water
Tank
Your new Explorer Group
motorhome will be fitted with a
45litre fresh water tank. In order to
fill the water tank firstly remove the
water filler cap identified by a blue
label then the tank can be filled
using both the 12v power supply
and the pump provided in your kit
box or by using a direct hose pipe.
Please not take care not to over fill
your tank it is advised that someone
monitors the water level in the tank
while filling is in progress.
8.2 Waste Water Tank
Getting Started
6
AVANTGARDE AND AUTOQUEST, AUTOCIRRUS AND CALYPSO HANDBOOK 2008
Your new Explorer Group
motorhome is also fitted with a
45litre waste water tank all waste
water excluding the toilet waste will
run into the waste water tank. The
level of water in the tank can be
monitored using the control panel.
Opening the grey waste outlet
provided on the outside of the
motorhome empties the tank. Open
the tap when the outlet is over a
drain and the water will run out of
the tank.
8.3 Draining Down Your Water
System
(i) It is essential that you drain down
your motorhome water system when
it is not in use. This is most
important during winter months to
protect against frost damage
21
6
Getting Started
(ii) Disconnect the water pump and
switch off power supply.
(iii) Remove the water heater fuse
from the switch spur and store in a
safe place.
(iv) Open the safety drain valve on
the water heater located next to the
water heater.
(v) Open all taps and remove all
plugs from sinks and showers.
Lever operated taps should have
the lever put into the up and central
position.
(vi) Open both the blue and grey
drain outlets on the outside of your
motorhome.
(vii) Adjust the level of the
motorhome to ensure that the drain
outlet is at the lowest point of the
motorhome. This will aid the flow of
water to ensure all water is drained
off.
After 30 minutes level the
motorhome and prepare it for
storage if necessary.
22
this page is intentionally blank
7
Gas Safety Advice
GAS SAFETY ADVICE
In the event of a suspected gas leak
the gas must be turned off using the
isolation valve on the gas bottle. A
competent gas fitter should then
check the system before it is used /
reused.
Awning Spaces, LPG and
Appliance Exhaust
(See Index – Ventilation)
There is no danger of pollution of an
enclosed awning space from the
LPG exhaust from a refrigerator
venting into it. Space heaters may
produce sufficient exhaust to pollute
the awning space, if it is totally
enclosed, from a general comfort,
smell and hygiene point of view. In
extreme cases there could be a
build up of carbon dioxide to a
dangerous level. Motorhome owners
are advised to allow some fresh air
circulation in the awning space
when such appliances are in use.
1
Facts about LPG
Please Note: Ventilation holes must
• LPG is not poisonous.
• Bi-products are harmless.
• LPG is dangerous if all air and
oxygen is excluded.
• LPG has been given a smell
by the manufacturer in order
to identify leaks.
• The gas is heavier than air
and therefore sinks to the
lowest point.
be clear at all times.
Regularly check flexible gas hose,
joints and connections for tightness.
Finally, make sure that each gas
appliance is working efficiently to
the recommendations of the
appliance manufacturers.
24
2
3
LPG Gas Systems
The Explorer Group does not
recommend the use of any external
cylinders. All cylinders in use should
be within the gas locker provided. If
you wish to utilise a larger cylinder
and have this outside the gas locker
then the connecting hose must not
exceed 750mm.
It is recommended that no
flammable material is stored or
placed with 300mm of any open
flame. Your attention is also drawn
to the fact that the surface of the
space heater in your motorhome will
get hot when in use. You are
advised not to use any additional
gas appliances outside your
motorhome unless it is a gas
barbecue connected via the
barbecue point supplied with your
motorhome.
Please ensure that you have read
the operating instructions for each
gas appliance contained in your
Owners Information Pack. Please
ensure that any gas hose left
unconnected is protected from dirt
or other foreign bodies entering the
hose.
this page is intentionally blank
8
Electrical System
ELECTRICAL SYSTEM
1 12v Power Supply
1.1 Battery Installation
Your motorhome will be fitted with a
BCA Leisure or a CBE charging and
power distribution unit.
If you wish to install a leisure battery
please ensure that it is placed on the
battery tray supplied with your
motorhome. Then place the tray in
the battery locker fitted to the side of
your motorhome. Connect the
battery to the clamp fittings
connected to the connection leads
within the battery box.
The Explorer Group recommends
that you use sealed for life leisure
batteries of a minimum rating off 40
ampere-hours at 20 hours discharge
rate.
1.2
Battery Maintenance
Your leisure battery should be
maintained in accordance with the
manufacture’s instructions. For
information on the automatic
26
charging system in your motorhome
please refer to ‘Automatic Charging
System’ in the index.
Do not charge your leisure battery
with any charger other than that
supplied. Failure to comply may
cause damage to your battery. If you
remove your leisure battery, ensure
that it is not placed on a cold surface
as the battery will deteriorate more
rapidly than if stored at a suitable
temperature
1.3
Generators / Charger
All electrical equipment fitted in your
new motorhome can be run from
either a controlled generator or
charger whose output is maintained
between 11volts and 14volts.
At least once every 3 years, the
motorhome electrical installation
should be inspected and tested, and
a report on its condition obtained, as
prescribed in British Standard
BS7671.
2 230vPower Supply
2.1
Mains Unit
The Mains Unit replaces the
conventional fuse box. Similar, but
larger ones are often fitted in new
houses. The unit, normally located in
the wardrobe, gives overloads and
earth leakage protection for the 230V
electrical supply in your motorhome.
For normal operation all switches on
the unit need to be in the ON
position. The switches on the left of
the unit are known as MCB’s
(miniature circuit breakers). These
take the place of the conventional
fuse but are more convenient. In the
event of a fault the MCB ‘trips’ i.e.
automatically moves to the OFF
position. After elimination of the fault
the MCB can be re-set by switching
to the ON position (against the
spring pressure in an upwards
direction). If an earth fault develops,
or a person was to touch a live piece
of equipment, the leakage of current
to earth should immediately
operatethe RCD (residual current
device) and ‘trip’ the main switch, to
the OFF position. This switch can
only be re-set after elimination of the
fault.
Please Note: In case of difficulty,
consult an approved electrical
installation contractor (who may be
the local electricity board). It is
dangerous to attempt modifications
and additions yourself.
CAUTION
Lamp holder-plugs (bayonet- cap
adaptors) should not be used under
any circumstances.
operation of all of the 230V mains
electrical equipment may not be
possible. A typical UK site mains
hook-up point provides a maximum
output of 16 amps and on some
continental sites the available output
may be as low as 5 amps. If your
loading exceeds the site supply it
may trip the site circuit breaker.
Please check the available mains
output with your site operator. The
following items need to be added
together if used simultaneously.
2.3 230V Mains Equipment
Typical Consumption
Figures:
2.2 Resetting the RCD
To re-set, operate the switch as for
MCB’s. Periodically, the RCD should
be checked by operating the test
button marked ‘T’. The unit should
immediately switch to the OFF
position. If the unit does not switch
off then a qualified electrician should
be consulted. If the unit does switch
off, the test is complete and the
switch can be re-set restoring the
supply back to normal.
Please Note: Simultaneous
•
•
•
•
•
•
•
Refrigerator 0.50 amps
Charger 0.50 amps
Water heater 3.9 amps
Blown air heaters 8.5 amps
Colour TV 2.50 amps
Microwave 4.00 amps
Air conditioning 4.00 amps
3 Automatic Charging System
The battery charger will operate
automatically when the motorhome
is connected to the mains outlet on a
motorhome site. The 12V system,
with the exception of the 12V
refrigerator and battery charging, will
not operate when the motorhome is
connected to the driving vehicle.
CHECK all motorhome equipment is
set-up to accept the site supply
before actually switching on.
4
Electrical System
8
AVANTGARDE AND AUTOQUEST, AUTOCIRRUS AND CALYPSO HANDBOOK 2008
Maximum Bulb Ratings for
Internal Lights
Type
of
Light
12V Fluorescent Lumo
12V Fluorescent Crown
12V Zoe eyeball Lights
12V Nova Halogen
Downlighter
230V Wall lights
Maximum
Bulb
Rating
9 watt
9 watt
10 watt
10 watt
20 watt
Please Note: Ensure that you only
replace a blown bulb with one of the
same rating. Never replace a bulb
with one with a higher rating. You
should ensure that when fitted, no
bulb is in contact with the surface of
the lamp or shade.
27
9
How to Use Your Motorhomes Equipment
HOW TO USE YOUR
MOTORHOMES EQUIPMENT
Within this section of your
motorhomes handbook we will give
you brief details on how to operate
all of the motorhomes equipment
from the gas cooking equipment to
the window blinds. For further
details on the major equipment
within your motorhome please read
the individual appliance instructions
contained with your user information
pack.
Please Note: Before attempting to
use any gas equipment please
ensure that the gas bottle is
connected securely to the
motorhomes regulator via a high
pressure gas hose and the bottle
valve is in the on position. Also
ensure the appliance isolation
valves are in the on position as
shown in the gas system section.
Please Note: Before attempting to
use any electrical appliance please
28
ensure that you have connected the
mains connection cable to a mains
hook up and that the mains isolation
switch is in the on position.
1
Avantgarde / Autoquest
Electrical Control Panels
The control panel consists of a
gauge, three switches and two
indicator lights.
the sink taps. Should the pump
keep cutting in and out during the
night, then turning the pump switch
off will disconnect the 12-volt
supply to the pump. As the external
pump works independently of the
pump switch, this can still be used
with the pump switch in the off
position.
1.2.2 Water
1.1 Gauge
The gauge will normally show the
voltage in the vehicle or auxiliary
battery depending on the position of
the AUX/VEH change over switch.
The gauge can also show the water
level in the inboard water tank (see
Water Switch).
1.2 Switches
The three switches are;
1.2.1 Pump
The Pump switch acts as a master
switch for the internal water system.
When the switch is on the internal
water pump will provide water for
Pressing and holding the ‘Water’
switch will cause the gauge to show
the water level in the fresh water
tank. Releasing the switch causes
the gauge to return to showing the
voltage.
1.2.3 AUX/VEH
When the switch is in the ‘VEH’
position the motorhome 12-volt
system is powered from the vehicle
battery. When it is in the ‘Aux’
position it is powered from the
motorhomes auxiliary battery or the
12- volt charger/power supply if the
motorhome is connected to a 230volt supply.
It is recommended that the
motorhome be used in the ‘VEH’
position sparingly as prolonged use
without running the engine can
flatten the vehicle battery.
1.3.2 WASTE
This is the red indicator light. When
the onboard waste tank is becoming
full and requires emptying this light
will come on. Once the tank is
empty the light will go out.
2
Autocirrus / Calypso Control
Panel
The control panel functions are as
listed below:
1.3 Indicator Lights
There are two indicator lights on the
control panel;
1.3.1 RUN
This is the green indicator light.
When the pump switch is on and
the pump is running this light should
be on. When the pump is not
running the light should not be on.
Please Note: This indicator only
works with the internal pump.
1. Test button used to check both
internal and external temperature
and to set the clock.
2. Test button used to check the
voltage of the leisure battery (B2),
car battery (B1) and to set the clock.
3. Test button used to check the
level in % of the drink water tank
and to set the clock.
4. Awning light switch, it turns off
when ignition is on.
5. The Main switch
6. Water pump switch
7. Lights main switch.
8. Digital display of the required test
9. It shows the starting up of the
battery parallel when the engine is
started.
10. It shows the car (B1) battery
test, the blinking means run down
battery alarm.
11. It shows the leisure (B2) battery
test, the blinking means run battery
alarm.
12. It shows the battery recharging
through engine alternator.
13. It shows the test or alarm
batteries together with the symbols
10 or 11.
14. It shows the connection to the
230v net.
15. It shows that the minimal
voltage device has switched on.
16. It shows the drink water test
tank, the blinking means empty tank
alarm.
17. The blinking means full waste
water tank alarm.
How to Use Your Motorhomes Equipment
9
AVANTGARDE AND AUTOQUEST, AUTOCIRRUS AND CALYPSO HANDBOOK 2008
29
9
How to Use Your Motorhomes Equipment
18. It shows the unit of measure:
U=Volt, I=internal temperature,
E=external temperature.
Please Note: The clock is supplied
from the leisure battery (B2). Should
B2 be disconnected, the clock is
able to keep working, without
visualization, for about 2 weeks.
2.1
Dip-Switch Position
Attention: Do not change the
position as shown in illustration
below.
3 Cooking Equipment
WARNINGS
(i) All pans should be mounted
centrally over the burners, even
when cooling, to protect adjacent
walls.
(ii) Do not lower the glass cover until
hob has cooled down.
30
(iii) Glass lids may shatter when
heated. Turn off all burners and grill
before shutting the lid. The glass
cover should be raised when
operating the grill.
(iv) Accessible parts may be hot
when the grill and oven are in use.
Young children should be kept
away.
(v) Do not use grill or oven as a
space heater.
3.1
seconds to ensure that the flame
failure device is heated up enough
to operate.
Burner controls
3.2
Ignitor button
Duplex Grill and Oven
Avantgarde / Autoquest only
Gas Hob
(i) Turn the individual gas tap for the
burner you wish to light.
(ii) Depress the ignition button,
which can be found on the front of
the oven next to the oven control,
while depressing the gas tap. The
depressing of the gas tap overrides
the flame failure device fitted to the
burner. If the burner fails to light
within 20 seconds then release the
gap tap and wait 30 seconds before
trying again.
(iii) Once the burner lights it will be
necessary to keeps the tap
depressed for about 5 to 10
(i) Ensure gas cylinder/supply is
connected and turned on. In the
event of a gas smell turn off at gas
cylinder/mains and contact supplier.
(ii) To light the grill open door, push
in the control knob and turn to full
rate. The burner can be ignited by
depressing the ignition button,
which is located on the fascia.
Ignition must be carried out with the
door open, and if the burner has not
lit within 15 seconds the control
knob should be released and the
grill left for at least 1 minute before
a further attempt to ignite the
burner.
(iii) On first use of the grill, it should
be heated for about 20 minutes to
eliminate any residual factory
lubricants that might impart
unpleasant smells to the food being
cooked. A non-toxic smoke may
occur when using for the first time
so open any windows and turn on
mechanical ventilators to help
remove the smoke.
(iv) Although the grill does heat up
quickly, it is recommended that a
few minutes preheat be allowed.
IMPORTANT
The grill MUST only be used with
the door open.
The heat deflector below the fascia
should be pulled out prior to lighting
the grill. Never adjust the heat
deflector position without using
hand protection – i.e. oven gloves.
(v) Flame Failure Device (FFD): the
grill burner is fitted with a flame
sensing probe, which will
automatically cut off the gas supply
in the event of the flame going out.
In the event of the burner flames
being accidentally extinguished, turn
off the burner control and do not
attempt to re-ignite the burner for at
least one minute.
(vi)
It is normal for the flames
on this burner to develop yellow tips
as it heats up, particularly on
Butane.
(vii)
A reversible grill pan trivet
enables the correct grilling height to
be achieved. Fast Toasting trivet in
high position. Grilling Sausages
trivet in high position. Grilling
Steak/Bacon trivet in high position.
Grilling Chops, etc trivet in low
position.
(viii)
Slow Grilling trivet removed
To turn off: turn the control knob
until the line on the control knob is
aligned with the dot on the control
panel. Always make sure the control
knob is in the off position when you
have finished grilling.
3.2.1 Using The Oven
(i) Ensure gas cylinder/supply is
connected and turned on. In the
event of a gas smell turn off at gas
cylinder/mains and contact supplier.
(ii) To light the oven open door, push
in the control knob and turn to gas
mark 9. The burner can be ignited
by depressing the ignition button,
which is located on the fascia.
Ignition must be carried out with the
door open, and if the burner has not
lit within 15 seconds the control
knob should be released and the
oven left for at least 1 minute before
a further attempt to ignite the
burner.
(iii) Place the oven shelf in the
required position and close the door.
Set control knob to approximately
gas mark 5 and heat the oven for
about 30 minutes to eliminate any
residual factory lubricants that might
impart unpleasant smells to the
meals being cooked. A non-toxic
smoke may occur when using for
the first time so open any windows
and turn on mechanical ventilators
to help remove the smoke.
(iv) Although the oven does heat up
How to Use Your Motorhomes Equipment
9
AVANTGARDE AND AUTOQUEST, AUTOCIRRUS AND CALYPSO HANDBOOK 2008
31
9
How to Use Your Motorhomes Equipment
quickly, it is recommended that a 10
minutes preheat be allowed. The
oven should be up to full
temperature in about 15-20mins.
(v) To turn off: turn the control knob
until the line on the control knob is
aligned with the dot on the control
panel.
(vi) The shelf has been designed to
allow good circulation at the rear of
the oven and are also fitted with a
raised bar to prevent trays or dishes
making contact with the back of the
oven. To remove a shelf, pull
forward until it stops, raise at front
and remove.
The handle design allows removal or
insertion whilst the pan is in use.
Always remove the handle when the
pan is in use.
3.3
Midi Prima Gas Oven
Autocirrus / Calypso
(Option on Avantgarde
/Autoquest)
(i) Turn the gas oven control knob to
maximum then depress the knob
while pressing the electronic ignitor
button. If the oven does not light
within 20 seconds turn off the
control knob and wait for 30
seconds before trying again.
(ii) Once the oven is lit it will be
necessary to keep the control knob
depressed for 5 to 10 seconds to
ensure the flame failure device is
heated up enough to operate.
4 Refrigerator Operation
CAUTION
When the motorhome is on the road
the refrigerator should only be
operated from the vehicle battery
and not by means of the bottled
gas.
The refrigerator can be run on 230V
or LP gas whilst stationary.
Changing between these modes of
operation is carried out by means of
the controls shown on the relevant
control panel on the refrigerator.
CAUTION
Only use one source of energy at a
time.
NOTE:
The refrigerator should
not be operated on LP gas whilst
being towed or when on a petrol
station forecourt.
IMPORTANT
The pan supplied with the appliance
is multi functional, for use either
whilst grilling or when using the
oven.
32
Oven control knob
4.1
Avantgarde / Autoquest
Fridge.
4.1.1
Gas operation
Open the fridge door and locate the
viewing port in the bottom left hand
side of the fridge. Turn the fridge
control knob, on the left hand side
of the fridge, onto gas as shown by
the flame symbol. Turn the gas
control knob, on the right hand side
of the fridge, to maximum i.e. all the
way clockwise. Now depress the
gas control knob and a clicking
should be heard. When the gas
ignites a flame will be seen within
the viewing port inside the fridge. If
the fridge fails to light after 5
attempts release the gas control
knob and wait for 30 seconds
before trying again.
Energy selector switch
4.2
Thermostat Knob
Autocirrus / Calypso
Fridge.
4.2.1
Gas operation
(i) Turn the main refrigerator control,
to the left of the refrigerator, onto
the gas setting the green light next
to the gas setting should illuminate.
(ii) Ensure the gas control, to the
right of the refrigerator is in the
maximum position.
(iii) If the burner has not lit the green
light will flash to indicate that the
gas has failed to light. If this occurs
then turn the refrigerator control to
off and then try again.
Energy selector switch
Thermostat Knob
Please Note: If the refrigerator is
being used for the 1st time in a
while then it may take a couple of
attempts to purge the gas pipes of
air before the refrigerator lights on
gas.
4.2.2 230V Operation All
Fridges
(i) Ensure that the motorhome is
connected to a mains hook up and
that the mains control panel is
switch on.
(ii) Turn the refrigerator control knob,
located on the left of the
refrigerator, to the mains position as
indicated by the plug symbol. The
refrigerator should start to operate
on mains.
4.2.3 12V Operation All Fridges
Turn the refrigerator control knob to
the 12V position as indicated by the
battery symbol. Please note that
this function is only available when
the motorhome is connected via the
12n and 12s plugs to a driving
vehicle.
How to Use Your Motorhomes Equipment
9
AVANTGARDE AND AUTOQUEST, AUTOCIRRUS AND CALYPSO HANDBOOK 2008
5 Water Heater Operation
5.1 Gas operation
(i) Ensure that the water heater has
been filled with water and that the
outside flue cover has been
removed.
(ii) Using the Ultrastore control
33
9
How to Use Your Motorhomes Equipment
knob, turn the dial to the desired
temperature setting then turn the
outer ring to the flame position.
(iii) Once the Ultrastore is switched
on a green light is visible within the
switch and the unit will now try and
ignite.
(iv) If within approximately 10
seconds, the Ultrastore fails to
ignite then a red failure light will also
appear. If this happens wait 30
seconds before trying again.
5.2 230V Operation
Simply depress the Electrical switch
fitted next to the gas control to the
230V position. This will turn on the
water heaters electrical element. It is
imperative that there is water in the
heater whenever the Gas or Electric
is switched on.
34
6 Space Heater Operation
6.1
Gas Operation
(i) Turn the gas control on top of the
heater to the desired setting and
depress the knob.
(ii) Keeping the control knob
depressed look into the viewing
window and see if the gas ignites. If
you have an automatic ignitor then
you should hear it ticking and
eventually see the pilot light. If
however you have Piezo ignition
then you will have to manually
depress the ignitor repeatedly until
you see the pilot light.
(iii) Once the pilot light is lit keep the
control knob depressed for a further
20 seconds to allow the
thermocouple to operate.
(iv) If the heater fails to ignite please
wait 20 seconds for trying again.
6.2 Electric Operation
(i) Simply depress the main switch
on the Ultraheat control panel to the
230V position.
(ii) Then set the power rating you
require on the panel at either 500w
1000w or 2000w.
Electric control
6.3
Fan Operation Autocirrus /
Calypso (Option on
Avantgarde / Autoquest)
Fan Control
Gas Control
The blown air function of the space
heater is controlled by the three-
position switch on top of the heater.
(i) Position 0 is off.
(ii) Position A operates the fan in
automatic mode. In this position the
fan will only run when there is
sufficient heat to require the air to
be circulated.
(iii) The third Position will operate
the fan at all times.
(iv) The speed of the fan is
controlled by the number position
set with 5 being the fastest speed
and 1 being the lowest.
7 Battery Charger
The battery charger for the
motorhome battery will
automatically switch on when the
motorhome is connected to a mains
supply. The battery charger will also
provide a 12V supply to the
motorhome when a battery is not
connected. Please note that the
battery charger fitted is designed to
keep your battery charged and is
not designed for charging up a flat
battery.
8 Smoke Detector
cassette toilet.
9.1 Preparing the Toilet for
Use
The motorhome smoke detector will
become active once the 9V battery
that should be supplied with the
smoke detector is connected. The
smoke detector fitted to your
motorhome has an alarm pause
mode that will reduce the sensitivity
of the alarm for a short period to
allow for cooking within the
motorhome. The alarm pause mode
is activated by pressing the button
marked HUSH on the smoke
detector. While the detector is in the
pause mode the detector will beep
once per minute to alert that the
alarm pause mode is activated.
9 Thetford cassette toilet
(i) Open the access door on the
outside of your motorhome.
(ii) Rotate the waste tank emptying
spout 90 degrees and remove the
water filling extension (you will find it
positioned beneath the handle
closest to the emptying spout).
(iii) Rotate the water fill funnel
outwards, remove the cap and place
the extension on the water fill
funnel. Add the stated amount of
Thetford fresh water additive to the
water tank. This ensures a better
and cleaner flush and keeps the
water in the flush tank fresh.
(iv) Fill the water tank with clean
water. Warning: keep water level
below the top of the water-filling
funnel.
(v) Remove the extension and return
to its original position on the waste
tank.
How to Use Your Motorhomes Equipment
9
AVANTGARDE AND AUTOQUEST, AUTOCIRRUS AND CALYPSO HANDBOOK 2008
Your motorhome is fitted with a
35
9
How to Use Your Motorhomes Equipment
Please Note: Depending on the
space between the door and waste
tank, this extension part may also
be fixed on the door with a hook.
(vi) Then screw the cap back onto
the water filling funnel and push
back inwards towards the side of
the flush water tank.
Please Note: 150 ml of water will
remain in the water fill funnel when
the water tank is empty.
9.2
Emptying The Toilet
(i) Open outer locker door and
release bottom or base catch
securing cassette.
(ii) Remove cassette, ensuring the
flap is in the closed position (it is
useful to use a trolley for taking
waste tanks to the disposal point).
(iii) Take the cassette to a chemical
toilet waste disposal point; remove
cap and place safely away from
emptying point.
(iv) Press air release button near
handle before you tilt the tank to
36
empty contents.
(v) Rinse well and then leave some
water in and replace cap.
(vi) When you get back to your
motorhome, add chemical solution
as instructed. Replace cap and fold
arm away.
(vii) Slide back into locker until catch
locks.
(viii) Close and lock door.
to the blue section. To reduce the
cool air, turn towards the red sector.
(v) Push button '3' to switch OFF
(release to OFF position).
(vi) To adjust airflow direction pull
down the front brown vent from a
small flap located in its centre.
For further information please refer
to the appliance instructions
supplied in your owners information
pack.
ATTENTION!
10 Air Conditioning - Blizzard 1500
Air Conditioning Unit
(Optional Extra On Autocirrus /
Calypso)
Starting and Function Selection:
(i) Internal temperature control
thermostat.
(ii) Two speed fan switch.
(iii) ON button (push to ON position).
(iv) To increase the cooling from the
unit, turn the red/blue control knob
Never obstruct the air inlets and
outlets. The air conditioning
compressor runs during the
refrigerating phase, if switched on
and off at once it may get damaged.
Therefore it is very important to wait
at least 3 minutes before attempting
to switch it on again.
WARNING
Never place your hands or other
objects within the air inlet openings.
11 Rooflights
Your motorhome is fitted with at
least one type of the following roof
lights.
11.1
The Omivent (12v)
Rooflight Autocirrus /
Calypso
The Omivent is a double-glazed roof
light constructed from a synthetic
ultra-violet screened material. Its
side-operating mechanism allows a
completely free central opening with
built-in fixed ventilation when
closed. It operates as an extractor
fan and air intake fan.
Please Note: Do not change the
direction of the fan unless it has
been switched off ‘O’ position and
the blades have stopped rotating.
11.2
The Heki 2 Autocirrus /
Calypso (Option On
Avantgarde /Autoquest)
11.2.1 To Open To The Tilted
Position:
(i) Press the knob in the toggle
catches on either side of the
rooflight and turn through approx.
90°.
(ii) Grasp the metal bar in the
middle, snap it out of its holder,
swivel down and press the rooflight
upwards. (The rooflight is held by
the two gas springs after approx.
150mm).
(iii) Swivel the metal bar towards the
rooflight and snap into its holder.
(iv) To close the rooflight, proceed
with steps (i to iii) in reverse order.
11.2.2 To Open In The
Intermediate Position:
(i) Open the toggle catches on either
side of the rooflight.
(ii) Grasp the metal bar in the
middle; snap it out of its holder,
swivel down and press the rooflight
outwards. (Rooflight is opened
automatically after approx. 150mm
by the two gas springs.)
(iii) Open both fasteners and swivel
the metal strap toward the
intermediate position and pull the
rooflight down until the metal strap
is stopped by the fasteners.
(iv) To close, proceed with steps (i to
iii) in reverse order.
11.2.3
To Open In The
Ventilation Position:
(i) Open the toggle catches on either
side of the rooflight.
(ii) Using both hands on the two
toggle catches, press the rooflight
up about 2cm and fasten the toggle
catches in the corresponding
setting.
(iii) To close, proceed with steps (i ii) in reverse order.
How to Use Your Motorhomes Equipment
9
AVANTGARDE AND AUTOQUEST, AUTOCIRRUS AND CALYPSO HANDBOOK 2008
11.2.4 Closing The Blinds:
(i) Take hold of the end rod (without
rocker) in the recessed grip and
engage in the opposite end rod
(with rocker).
37
9
How to Use Your Motorhomes Equipment
(ii) Select the required position
(blackout/ flyscreen) by moving both
joined end rods together.
•Remove any snow/ice or dirt
before opening the roof.
•Do not open when it rains or
when there is a strong wind.
CAUTION
In extremely bright sunshine, the
blackout blind must only be closed
two-thirds, and the rooflight must be
set in the continuous airing position.
11.2.5 Opening The Blinds:
(i) Move blind (end rod with rocker)
right to the outside.
(ii) Hold the recessed grip with one
hand; with the other hand, press the
rocker and move the blind back (do
not let it recoil).
CAUTION
•Do not stand on the acrylic
rooflight.
•Close HEKI 2 completely
before moving off.
•Do not leave your Motorhome
when HEKI 2 is open.
•Please consult your supplying
dealer if you have any
problems or defects.
38
When opening or closing the door
flyscreen use the finger grip
provided.
12 Windows
11.3 Mini Heki
The Mini Heki roof light will generally
be fitted in washroom areas. The
operation is similar to that of the
Midi Heki Roof light. Add wording
for midi.
11.4 Standard MPK Rooflight
The MPK 400 x 400 rooflight is
generally fitted in washroom areas.
(i) Lowering the flyscreen then
pressing the black control rod in
towards the centre of the rooflight.
(ii) Then while the rods are
depressed, push upwards to open
the rooflight.
13.3 Door Flyscreen (If Fitted)
The exterior door flyscreen can be
opened or closed from both inside
and outside of the Motorhome and
does not restrict door openings.
Your motorhome will be fitted with
Polyplastic opening windows for the
Avantgarde / Autoquest and Seitz
opening windows for the Autocirrus
and Calypso.
12.1 Polyplastic Window
Opening
(i) In order to open the Polyplastic
window it is only necessary to move
the catch upwards and release the
catch from the backing plate.
(ii) The Polyplastic window should
remain in the open position once
opened, however if it does not then
tighten the friction control on the
window stays to increase the
holding force.
(iii) The Polyplastic window is also
fitted with a night ventilation
position where the catch is set to
the centre position on the backing
plate; in this position it may be
possible for rain to enter the
motorhome in adverse conditions.
12.2 Seitz Window Opening
In order to open the Seitz window
you must depress the button on the
catch before moving the catch.
Failure to do so will lead to the
catch breaking
13 Blinds & Flyscreens
13.1 Blinds
(i) Pull blind down by its centre
catch. Do not pull down by one side
of the blind. This will inevitably lead
to problems.
(ii) Do not allow blinds to spring
back freely. Always control them by
hand.
13.2 Flyscreens
(i) To operate the flyscreen, either
pulls the screen fully down, fully up
or across, dependant on type of
window fitted, and clip into place on
the blind/frame.
(ii) To release, unclip from the
blind/frame. If a cross bar is fitted,
gently pull the crossbar downwards
towards you and allow the tension
of the spring to roll up the flyscreen.
(iii) Where a crossbar is not fitted,
disconnect from the blind catch and
release gently.
(iv) It is recommended that blinds
are not in the closed position whilst
the motorhome is moving.
Operation
14. Taps
CAUTION
14.1 Kitchen Taps
Your new motorhome will be fitted
with a Reich mixer tap.
For correct operation of the tap
swivel the spout to the desired
position over the sink. Lift the
control lever to activate the pump
and allow water to flow
simultaneously. To adjust the
temperature, swivel the lever to the
left to increase the temperature and
to the right to reduce the
temperature.
The water temperature could be
very high so do not lift the lever with
the tap turned to the full left
position.
For winter storage and to prevent
frost damage the tap swivel must be
left in the centre up position.
How to Use Your Motorhomes Equipment
9
AVANTGARDE AND AUTOQUEST, AUTOCIRRUS AND CALYPSO HANDBOOK 2008
14.2 Washroom Taps And
Showers
Your motorhome will be supplied
with either a vanity mixer tap or
separate shower mixer, or with a
combined mixer tap with retractable
shower head.
39
9
How to Use Your Motorhomes Equipment
15 Exterior Doors Retainers
The exterior door can be secured to
the side of the motorhome by
pushing the door retainer into the
spring clip.
To comply with European
Standards, the exterior door lock
must not be replaced with a double
dead lock.
Operation
The mixer tap and shower mixer are
operated in the same manner as the
kitchen tap by lifting the control
lever to activate the pump and
swiveling the lever left or right to
determine the temperature.surface.
PLEASE NOTE
A. The water temperature could be
very high so do not lift the lever with
the tap turned to the full left
position.
B. For winter storage and to prevent
frost damage the tap swivel must be
left in the centre up position.
40
16 Internal Doors
16.1 Toilet / Washroom Doors
Toilet / washroom doors are fitted
with a level lock, which is operated
by pushing the lever down. The level
is spring-loaded and will return to
the closed position upon release. It
is recommend that the lever is
always used when the closing the
door.
Toilet / Washroom Doors.
16.2 Other Internal Doors
Other internal doors such as the
wardrobe and table storage locker
are fitted with a 2-position button
lock. Push the button to lock the
door and the button should remain
flush with the door. Push the button
again to release and the button
should then protrude from the door
surface.
Other Internal Doors
set to the normal "NML" position
(Switch up).
(iii) Turn on your television set and
tune in. This may be necessary at all
new locations.
17 Magnetic Catches
Magnetic catches work on contact
with the metal plate on the rear of
the door. Simply close the door until
the magnet engages and holds the
metal plate. Pulling the door
towards you with a moderate force
will be sufficient to disengage the
magnetic catch and open the door.
20 FM Radio Connections
19 TV Aerial
Your new motorhome may be fitted
with a 315 Status TV aerial
19.1 Status 315 Omni
Directional
Aerial (Where Fitted)
18 Sprung Hinges
Overhead lockers will use sprung
hinges. These are suitably strong
enough when closed to securely
retain the door and prevent it from
opening in transit. Pulling the handle
towards you with moderate force is
sufficient to open the locker door
and hold it in the open position.
To operate your 315 omni directional
TV aerial follow the procedure
outlined below
(i) Switch ON the power pack and
the red LED will illuminate
(ii) Check the gain control switch is
The Status aerial is designed to
receive FM radio when connected to
a car-style radio.
(i) This will require a coaxial car
radio plug, a coaxial plug and a
length of coaxial cable, which are
available from your local motorhome
retailer.
(ii) Assemble the cable and plugs
and route the cable from the power
pack to the radio.
(iii) Insert the plug into the back of
the radio and into the TV-FM socket
of the power pack.
How to Use Your Motorhomes Equipment
9
AVANTGARDE AND AUTOQUEST, AUTOCIRRUS AND CALYPSO HANDBOOK 2008
Please Note: For information on the
Entertainment equipment provided
in your motorhome please refer to
the instruction manuals provided in
your Owners information pack.
41
9
How to Use Your Motorhomes Equipment
22Thetford cassette toilet
Your caravan is fitted with a bench or
rotatable cassette toilet.
22.1
Rotatable toilet
Preparing the Toilet for Use
Open the access door on the outside
of your caravan.
Rotate the waste tank emptying spout
90 degrees and remove the water
filling extension (you will find it
positioned beneath the handle closest
to the emptying spout).
Rotate the water fill funnel outwards,
remove the cap and place the
extension on the water fill funnel. Add
the stated amount of Thetford fresh
water additive to the water tank. This
ensures a better and cleaner flush and
keeps the water in the flush tank fresh.
Fill the water tank with clean water.
Warning: keep water level below the
top of the water filling funnel.
Remove the extension and return to
its original position on the waste tank.
Please Note: Depending on the
space between the door and waste
42
tank, this extension part may also
be fixed on the door with a hook.
(vi) Screw the cap back onto the
water filling funnel and push back
inwards towards the side of the flush
water tank.
Please Note: 150 ml of water will
remain in the water fill funnel when
the water tank is empty.
22.2
Emptying the Toilet
Open outer locker door and release
bottom or base catch securing
cassette.
Remove cassette, ensuring the flap is
in the closed position (it is useful to
use a trolley for taking waste tanks to
the disposal point).
Take the cassette to a chemical toilet
waste disposal point, remove cap and
place safely away from emptying point.
Press air release button near handle
before you tilt the tank to empty
contents.
Rinse well and then leave some water
in and replace cap.
When you get back to your caravan,
add chemical solution as instructed.
Replace cap and fold arm away.
Slide back into locker until catch locks.
Close and lock door.
For further information please refer to
the appliance instructions supplied in
your owners information pack.
22.3 BENCH TOILET
Preparing the toilet for use
1. Open the access door on the
outside of your caravan.
2. Rotate the waste tank emptying
spout 90 degrees and remove the
water filling extension (you will find it
positioned beneath the handle closest
to the emptying spout).
3. Rotate the water fill funnel
outwards, remove the cap and place
the extension on the water fill funnel.
Add the stated amount of Thetford
fresh water additive to the water tank.
This ensures a better and cleaner
flush and keeps the water in the flush
tank fresh.
4. Fill the water tank with clean water.
Warning: keep water level below the
top of the water filling funnel.
its original position on the waste tank.
5. Remove the extension and return to
its original position on the waste tank.
Note: depending on the space
between the door and waste tank,
this extension part may also be
fixed on the door with a hook.
Screw the cap back onto the water
filling funnel and push back inwards
towards the side of the flush water
tank.
Note: 150 ml of water will remain in the
water fill funnel when the water tank is
empty.
6. Remove the waste tank by pulling
the safety catch upwards.
7. Pull the waste tank outward to the
stop. Tip it slightly and take the tank
fully out.
8. Place the tank upright and turn the
emptying spout upwards.
9. Remove the cap, with the
measuring cup inside, from the
emptying spout and pour the stated
quantity of toilet fluid into the waste
tank. This avoids unpleasant smells in
the waste tank and keeps the inside
of the waste tank clean. Next add
approximately 2 litres of water enough to ensure that the bottom of
the waste tank is covered. Screw the
cap back onto the emptying spout.
Turn the emptying spout back to its
original position.
N.B.: The emptying spout
measuring cap is supplied in the
same packaging as this manual.
Warning! Never add toilet fluid via
the valve blade or via the toilet
bowl.
10. Slide the waste tank back into its
original position via the access door.
Note ! Never use force if you cannot
get the tank back into place easily.
This may cause serious damage.
11. Make sure that the waste tank is
secured with the safety catch. Shut
the access door and lock it.
USE
12. Run water into the bowl by
pressing the flush knob briefly or open
the valve blade by turning the handle
anti-clockwise. Your Thetford toilet is
now ready for use.
13. After use, open the valve blade (if
still closed) by turning the handle anticlockwise. Flush the toilet by pressing
the flush knob for several seconds.
Close the valve blade after use.
Note! Do not leave water in the
bowl if the toilet is not being used.
This does not help to reduce
unpleasant smells and only leads to
flooding.
Important Warning Notice! Please
do not travel with water in the flush
tank of your toilet. Failure to adhere
to this notice may result in water
damage to your caravan.
EMPTYING
The waste tank has a capacity of 19
litres and must be emptied at the latest
when the red light in the level display
lights up. The indicator lamp will light up
when the waste tank can still take about
2 litres, which is about 3 uses. It is
advisable to empty the waste tank
earlier.
Note! Do not allow the waste tank
to become too full.
How to Use Your Motorhomes Equipment
9
AVANTGARDE AND AUTOQUEST, AUTOCIRRUS AND CALYPSO HANDBOOK 2008
43
1
How to Use Your Motorhomes Equipment
14. Make sure that the valve blade is
closed. Open the access door located
outside the vehicle. Pull the safety
catch upwards and remove the waste
tank.
15. Remove the water filling extension
first to avoid it getting lost during
emptying of the waste tank.
16. Stand the waste tank upright (Pullout handle at the top, wheels at the
bottom). Press the handle down and
move it away from the waste tank until
it snaps out of its locked position.
17. Pull the handle up and wheel the
waste tank to an authorized waste
dump.
18. Push the handle back. Turn the
emptying spout upwards and remove
the cap from the spout. Hold the waste
tank by the upper handle with one
hand, while placing your other hand by
the rear handle so that during emptying
you can operate the vent plunger with
your thumb. To empty the tank without
splashing, depress the vent plunger
while emptying the tank.
After emptying, flush the tank
thoroughly with water. Also clean the
valve blade with water.
44
Note! The vent plunger should only
be pressed once the emptying spout
is pointing downwards!
19. If required make the toilet ready for
use once again. Return the water filling
extension to its original position on the
waste tank.
Slide the waste tank into the toilet and
close the access door.
Please note that Thetford
recommend not to travel with water
in the flush tank of the C400 bench
cassette toilet.
When entirely necessary, up to 2 litres
can be added to the flush tank giving
you enough water for 2 flushes. Having
less than 2 litres of water in the flush
tank will not cause any damage to the
toilet or the Motorhome.
Please be aware that travelling with
more than 2 litres of water in the flush
tank can cause water damage to both
the toilets compartment and to the
Motorhome itself as water can escape
from around the flushing mechanism.
This is due to the fact that the flushing
mechanism is used as the entry point
for anyone needing to carry out
maintenance procedures and is
therefore not water tight.
How To Make Up Your Beds
21.1
Avantgarde And Autoquest 100 – 130
Step 1 Remove all cushions from the front and rear facing seats
Step 2 Pull out the bed slats located between 1 and 2 and fully extend as shown
Step 3 Place cushions as shown in the diagram.
9
How to Use Your Motorhomes Equipment
AVANTGARDE AND AUTOQUEST, AUTOCIRRUS AND CALYPSO HANDBOOK 2008
45
9
How to Use Your Motorhomes Equipment
21.2
Avantgarde And Autoquest 120 – 140
Step 1 Remove the centre cushion (5)
Step 2 Slide out the bed slats from under the centre seat
Step 3 Place cushions on beds as shown.
46
21.3
Avantgarde And Autoquest 150
Step 1 Remove cushion (5)
Step 2 Slide out the bed slats from under the rear seat (1)
Step 3 Place cushions on beds as shown.
9
How to Use Your Motorhomes Equipment
AVANTGARDE AND AUTOQUEST, AUTOCIRRUS AND CALYPSO HANDBOOK 2008
47
9
How to Use Your Motorhomes Equipment
21.4
Avantgarde And Autoquest 180
FRONT DINETTE
Step 1- Remove all cushions from the front and rear facing seats
Step 2- Pull out the bed slats located between 1 and 2 and fully extend as shown
Step 3- Place cushions as shown in the diagram.
REAR
Step 1- Remove the centre cushion (7)
Step 2- Slide out the bed slats from under the centre seat
Step 3- Place cushions on beds as shown
48
21.5
Autocirrus And Calypso 220
Step 1 Remove the centre cushion (5)
Step 2 Slide out the bed slats from under the centre seat.
Step 3 Place cushions on beds as shown.
1
How to Use Your Motorhomes Equipment
AVANTGARDE AND AUTOQUEST, AUTOCIRRUS AND CALYPSO HANDBOOK 2008
Drawings are for illustration purposes only and are not to scale
49
10
How to Use Your Motorhomes Equipment
21.6
Over Cab Double Bed
If your new motorhome has an over
cab bed fitted then in order to put
the bed into the sleeping position
simply pull down on the ladder
fixing the bed will come down to a
horizontal position and the gas
struts will lock in place.
Over cab bed in the up position
Over cab bed in the down position
50
SECURITY
Theft deterrent, prevention and
security of your motorhome is taken
very seriously at The Explorer
Group. That is why we have
provided a combination of standard
features and optional extras
designed to deter and prevent
thieves from stealing your property.
And in the unlikely event that they
should succeed, aid the
identification and speedy recovery
of your property to assist in the
prosecution of the thief.
1
2
Motorhome Theft
The theft of a motorhome can occur
in the most unlikely circumstances,
from a motorway service area, even
from an owner’s driveway. Secure all
windows and doors when your
motorhome is unoccupied, even if
only for a short length of time.
3
will also help lead to the successful
prosecution of the thief and the
recovery of your stolen valuables.
Security
10
Security
Microtag©
Serial Number
Record your motorhome serial
number (which can be found
stamped on a plate fixed beneath
the motorhome door or pillar), and
your cab chassis serial no. (which
can be found on a plate under the
bonnet). Make a note of this number
in the space provided at the front of
this handbook and make a separate
note of the number to keep safe at
home.
Supplied as standard with every
Explorer Group motorhome,
MicroTag© is an innovative and
technologically advanced property
tracing system that can be easily
applied to all your valuables.
Marking your property with
Microdots not only deters theft, but
51
10
Security
Why Use Microdots? – In order for
the Police to successfully prosecute,
it is necessary to identify the true
owner of stolen property. Marking
your property with Microdots is the
easiest way to ensure your
valuables are quickly identified. You
can Microdot all kinds of property
against theft including your touring
motorhome, motor vehicles,
televisions, bicycles, jewellery, in
fact anything of value to you, that
will also be of value to a thief.
In the event of theft the police can
locate the MicroDot by using an
ultra violet light. The MicroDots are
then read using a MicroDot reader,
or a conventional microscope. Each
MicroDot is laser etched with a
freephone helpline and your own
unique number which is registered
on the International Security
Register which is manned 24 hours
a day, 365 days a year.
Please consult the instructions
provided inside the Microtag box.
52
Each motorhome alarm is installed
with a Passive Infrared Detector
(PIR), a wireless sensor that detects
movement in the motorhome and
transmits a radio signal to the alarm
module. If the alarm is on the siren
will sound. Additional sensors can
be purchased from your retailer to
enhance security. See section below
for operation or consult the
manufacturers instructions provided
in the Owners Information Pack.
4.1
4 Explorer Protect – Autowatch 650
Motorhome Alarm System
(Optional Extra)
Manufactured by Autowatch, The
Explorer Protect system is designed
to give years of trouble free
operation. Made with only the
highest quality components and
using state of the art technology
you can be assured that your
motorhome has the best electronic
protection available.
Each motorhome alarm is installed
Basic Operation Arming the
System
(i) Briefly press (large) arm/disarm
button.
(ii) Single chirp.
(iii) Awning light illuminates for 30
seconds.
(iv) Settling time of 15 seconds
before responding to triggers.
(v) Single intermittent flash of status
LED (every 2 seconds).
(vi) All sensors triggered will result in
siren sounding for 30 seconds, or
until reset by pressing the
arm/disarm button.
4.2 Disarming the System
(i) Briefly press the (large) arm/disarm
button.
(ii) Double chirp.
(iii) Awning light illuminates briefly on
and off and then on again for 30
seconds.
(iv) LED off.
4.3 Panic Alarm
Press and hold the small panic
button on the transmitter for two
seconds.
(ii) The siren will sound for thirty
seconds, unless reset by pressing
any of the transmitter buttons.
4.4 Emergency Disarm.
(i) Insert the touch-key briefly into the
socket. The alarm will turn off.
4.5 Silent Arm and Disarm.
(i) Press the small button briefly
followed by a press on the
arm/disarm button.
(ii) The alarm will arm/disarm without
chirps.
4.6 Sensors
Each motorhome alarm is installed
with a Passive Infrared Detector
(PIR).
Additional sensors can be purchased
from your dealer to enhance security.
4.7 Passive Infra Red Sensor
The wireless PIR sensor will detect
movement in the motorhome and
transmit a radio signal to the alarm
module, if the alarm is on the siren
will sound.
4.8 Enhanced Features Arming
The System In "At Home"
Mode.
In the ‘at home’ mode, any sensor
that is programmed to be isolated,
such as the PIR sensor will not
trigger the alarm. Arm as normal
followed by a second press on the
arm/disarm button within 2 seconds.
Normal "on" tone followed by "at
home" tone indicating isolation is
active. There will then be a Settling
time of 15 seconds before the alarm
responds to any triggers. Armed in
the isolation mode will be indicated
by a double flash intermittently of the
LED. The "at home" sensors will be
isolated; other sensors will trigger the
siren for 30 seconds.
Security
10
AVANTGARDE AND AUTOQUEST, AUTOCIRRUS AND CALYPSO HANDBOOK 2008
4.9
Arming the System in Test
or Buzz Mode
In the buzz mode the siren will sound
a short tone when a sensor is
triggered instead of sounding for 30
seconds. It is advisable to test all the
sensors
5 Additional Security
Consider fitting any device that might
deter or prevent intrusion by thieves.
For example: A wheel lock will
prevent driving of the motorhome
and removal of the wheel.
FREE CRIME PREVENTION advice
about securing your motorhome,
protecting your valuables, property
marking, either at home or whilst on
site, can be obtained from the Crime
Prevention Officer through your local
Police Station.
53
11
Care of your Motorhome
CARE OF YOUR MOTORHOME
2
This section of the guide is devoted
to the care, cleaning and general
preservation of your motorhome in
order to retain its showroom
condition.
GRP components need to be
washed, waxed and taken care of
like a car. Chemicals and dirt can
collect during storage, and the gel
coat can be stained or marked
when chemicals combine with rain
or dew. Most stains or marks can be
removed with mild dishwashing
detergent, but more stubborn marks
may require a (fine grit) rubbing
compound such as T-cut. To help
keep your GRP components looking
almost like new, it is wise to wash
the parts monthly (or more
frequently) using mild dishwashing
detergent, but avoid using strong
alkaline (e.g. trisodium phosphate)
or acidic cleaners or abrasives.
Waxing the components once or
twice a year with a good grade
paste wax will help to maintain the
colour and finish.
1
Exterior Body Shell
The exterior painted body shell of
your motorhome, usually the side
walls, is acrylic finished aluminium,
which is extremely durable and easy
to clean. It is recommended you first
wash off any caked dirt and mud
with cold water then use a
proprietary brand wash and wax
shampoo and rinse with plenty of
cold water.
CAUTION
Under no circumstances should an
abrasive or harsh cleaner be used.
Do not use a pressure washer as
this can disturb mastic seals.
3
Glass Fibre Reinforced Plastic
(GRP)
Acrylic Windows
Your motorhome is fitted with
shatter resistant acrylic windows. To
54
preserve their clarity and
unblemished transparency it is
essential that the following cleaning
instructions are strictly adhered to:
Road grit, dust, sand, flies, lime tree
secretions, bird droppings etc.,
should be washed off using plenty
of cold water do not use a sponge
to clean off heavy dirt deposits. Any
remaining dirt should be washed off
using a soft cloth and warm water.
Under NO circumstances should
any abrasive cleaning agents,
household detergents or proprietary
cleaning fluids be used. Wash the
window again using only cold water
and dry off with chamois leather.
Please Note: Should scratches
appear on the acrylic windows
these can often be removed with an
acrylic polish. E.g. ICI Perspex
polish. Gentle polishing with a liquid
metal polish, i.e. Brasso may also
have the desired effect – consult
your retailer BEFORE attempting to
remove any but the slightest
scratch.
4
Window Blinds & Flyscreens
To clean the blinds and flyscreens,
moisten a soft cloth or sponge with
a small amount of water and mild
soap suds and gently wipe dirt off.
Allow to dry before retracting, failure
to due this could result in mildew
forming.
5
ABS - Wheel Spats & Panels
To preserve the appearance of all
ABS panels and fittings road grit,
dust, sand, flies, lime tree
secretions, bird droppings etc.,
should be washed off using plenty
of cold water. Any remaining dirt
should be washed off using a soft
cloth and warm water. Under NO
circumstances should any abrasive
cleaning agents, household
detergents or proprietary cleaning
fluids be used. Wash the ABS
material again using only cold water
and dry off
6
Interior Walls
Your motorhome interior walls will only
require a wipe over with a damp cloth,
using a mild detergent, to keep them
in a ‘showroom’ condition.
7
Furniture
Treat your motorhome furniture as
you would the furniture in your
home. Polish wood surfaces
sparingly with a good quality wax or
spray polish. Use a damp cloth to
clean Melanate laminated surfaces.
8 Carpets, Upholstery And
Curtains
Vacuum clean carpets and
upholstery to ensure a long life,
marks on cushions can be removed
using a mild upholstery shampoo
with the minimum of water. Curtains
should be dry cleaned only.
9
Washroom And Handbasin
Fittings
These should be cleaned using a
non abrasive household cleaner.
Always put the cold water into the
hand basin before adding the hot in
order to preserve the finish of the
thermoplastic formed basin.
Please Note: Under no
circumstances should alcohol, spirit
or solvent-based liquids be used on
GRP or ABS plastic panels as these
substances may react with the
material and cause visible damage.
10 Shower Trays
Only clean your shower tray using
soap and water. Do not use
chemical based cleaning agents as
this may attack the material of the
tray.
Care of your Motorhome
11
AVANTGARDE AND AUTOQUEST, AUTOCIRRUS AND CALYPSO HANDBOOK 2008
11 Water Systems
The water systems, and in particular
storage tanks, in motorhomes are
susceptible to contamination by
bacteria if care is not taken with
their use and cleaning. The
symptoms caused by bacterial
contamination are not purely limited
to gastro-intestinal diseases, but
may also manifest themselves as
ear, nose, throat, and eye or skin
infections. It is therefore important
55
11
Care of your Motorhome
that you carry out the following
procedure prior to using the
motorhome each time, even if you
boil or filter all water you use for
drinking.
Please Note: If your motorhome is
not going to be used for an
extended period of time it is
recommend that you disconnect the
vehicle battery to prevent the
battery from discharging.
11.1 Water Containers
(i) All water remaining in any water
container should be disposed of so
that the container is empty.
(ii) The outside of external water
contains should be thoroughly
cleansed and washed down to
remove any dirt, dust or other
contaminant. Water at a suitably hot
temperature containing an
appropriate detergent is
recommended for this purpose.
Water should then be put into the
container, swirled round, and then
emptied out.
56
(iii) All containers should then be
totally filled with water containing an
appropriate disinfectant / sterilizing
solution and allowed to stand for
the recommended contact time (e.g.
Milton for 15 minutes).
(iv) The solution should be emptied
from the container.
(v) The opening of the any container
should be cleaned thoroughly with
an appropriate pre-prepared wipe
impregnated with a disinfectant /
sterilizing solution.
(vi) External containers should be
inverted whilst stored overnight (if
possible).
(vii) Containers must be filled with
mains water only and mains water
only should be used for the above
cleaning procedure.
(viii) On no account should garden
hoses be used to fill water tanks.
11.2 Internal Water Systems
(i) Drain down the system. (Open all
taps to allow air in, enabling the
system to drain quickly.) See Index –
Draining Down The Water System.
(ii) Remove any water filters fitted,
and replace with a short length of
hose or empty filter cartridge (this
will ensure the filter is not affected
by the disinfectant / sterilizing
solution).
(iii) Fill the system by using the
pump with a disinfectant / sterilizing
solution. (Check that the solution at
full strength appears at all
taps/showers). Allow to stand for
the recommended period of time.
(iv) Drain the system down
completely.
(v) Thoroughly clean the outside of
all taps/connectors with a cloth
soaked in the disinfectant /
sterilizing solution.
(vi) Flush the system through with
clean drinking water until no traces
of disinfectant / sterilizing solution
can be detected at any tap.
(vii) Replace the filter. Suitable
sterilizing chemicals are available
from your Explorer Group Retailer,
accessory shop, chemists, or homebrew shops. It is not, however,
recommended to use bleach or
sodium metabisulphide.
12 Truma Space Heater
Please Note: Your Truma Space
Heater front is now attached using 2
screws. These screws must be
removed prior to removal of the
Space Heater front. These screws
can be seen when looking into the
fire through the air vents.
19 Thetford Toilet
WARNING
Cold Weather Use – To prevent
freezing during cold weather use,
add antifreeze to the toilet system
fresh water tank. Use a non-toxic
(propylene glycol) type of antifreeze.
Refer to chart on container to obtain
level of protection.
Warmer Weather Use – In warmer
weather or longer intervals between
emptying the waste tank you may
require additional toilet fluid. Use
only Thetford toilet fluid to achieve
the best results.
CAUTION
• Never add toilet fluid directly
into toilet bowl.
• Do not use strong household
detergents or cleaners that
contain chlorine, solvents or
acid contents.
• High Altitude and Hot Weather
Use – with large temperature
differences and changing
heights during driving, pressure
can start to build up in the
waste holding tank, causing
contents to splash upward
upon opening the valve blade if
opened too fast.
14 Changing A Wheel
jacking point (see Peugeot vehicle
handbook).
(v) Jack up the motorhome until the
wheel for removal is just off the
ground.
(vi) Remove the wheel nuts and
remove the wheel.
(vii) Fit spare wheel and reverse the
above procedure.
(viii) Tighten wheel nuts in
accordance with the Peugeot
handbook instructions.
Care of your Motorhome
11
AVANTGARDE AND AUTOQUEST, AUTOCIRRUS AND CALYPSO HANDBOOK 2008
WARNING:
Ensure the wheel is of the
same construction and size as the
one that has been removed.
(i) Ensure handbrake is applied and
chock the wheel diagonally opposite
the wheel to be removed.
(ii) Remove the hub cap. (If
applicable)
(iii) Use wheel brace to slacken off
wheel nuts on the wheel to be
changed.
(iv) Position jack at the appropriate
57
12
Storage
1
Storage For Long Periods
If your motorhome is to be stored
for any length of time, especially
over the winter period, the following
operations are recommended:
(i) Remove all linens, blankets,
cushions, clothes, mattresses, etc.
that could be affected by damp
conditions
(ii) Clean the motorhome inside and
out as detailed in the previous
section
(iii) Drain the water system (see
index).
(iv) Ensure all windows, roof lights
and doors are correctly fastened.
Check fixed ventilation apertures are
not obstructed
(v) Check that the site you have
chosen to store the motorhome is
open, fairly high and dry and if
possible not exposed to gales etc. If
this proves impossible it is
recommended that the motorhome
chassis is anchored to the ground.
(vi) Jack up the motorhome (use
58
bottle or screw jack), so that the
wheels are clear of the ground.
Support the motorhome axle with
wooden blocks, axle stands or
similar so that when the jacks are
removed the wheels remain clear of
the ground. Cover the tyres to
prevent deterioration.
(vii) Release the handbrake.
(viii) Removing the wheels reduces
the risk of motorhome theft.
2
Motorhome Covers
Covers may be used to protect your
new Explorer Group motorhome
provided that the cover used is of a
breathable type. Ensure that any
sharp objects are removed e.g. the
point of a status omni-directional
aerial, and that the cover is well tied
down. Your motorhome must be
ventilated every 4 to 6 weeks if it is
to be stored with a cover in place.
3
Power Drain
In order to reduce any drain on your
Leisure Battery while your
motorhome is being stored you
should ensure that the main control
switch on the refrigerator is set to
the 0 position
Please Note: If you have the
Explorer Protect alarm fitted and
you disconnect the leisure battery
the alarm will run off the back-up
battery for approximately 2 weeks.
Should the motorhome be stored for
a prolonged period of time it is
strongly recommended that the
motorhome is fully serviced before
the commencement of use. Your
retailer will ensure that your
motorhome is safe, secure and
ready for your enjoyment.
this page is intentionally blank
13
Warranty
WARRANTY
1 3-Year Manufacturer's Warranty
Subject to the following conditions,
your motorhome is supplied with a
manufacturer's warranty for 3 years
from the original date of purchase,
at no additional cost to you the
customer. We sincerely hope you
will never have cause to complain
about your motorhome. However, if
you do have a problem then please
contact your Retailer so they can
report this through our warranty
system. We are confident they will
do their utmost to resolve any
problems to your complete
satisfaction. The Retailer from
whom the motorhome is purchased
is liable for warranty repairs. Any
other approved Retailer or Service
Centre may carry out work at his
own convenience and/or discretion,
but is not obliged to do so.
2 Parts Covered By This Warranty
for Years 1 -
Subject to the specific exclusions in
60
years 2 and 3 set out below all
original components of the
motorhome, including permanently
fitted equipment, forming part of the
manufacturer's original
specification.
3 Specific Exclusions for Years
2&3
Tyres, batteries, plastic windows,
glass, exterior paint work, bright
work and all similar trim and finish,
soft furnishings, carpets and floor
coverings.
Entertainment/communication
systems and connected equipment.
Adjustment of blinds, hinges,
catches, stays and doors.
Replacement of bulbs, fluorescent
tubes, fuses and electrical
connections; GRP, ABS and PVC
products, wheel spats and shower
trays. Natural movement of internal
doors and furniture. Normal wear
and tear/servicing items and other
components subject to routine
maintenance.
4 Conditions Attached To The
Warranty:
(i) The duration of the warranty is 36
months from the original date of
purchase.
(ii) That the original construction of
the motorhome has not been
tampered with or repaired other
than by Explorer Group or an
approved Retailer or Service Centre.
(iii) That an "annual" habitation
service, damp and safety check has
been carried out by an approved
Retailer or Service Centre. The first
and second services are due 60
days either side of the anniversary
of the original date of purchase.
The interval between services must
not exceed 14 months. The third
service must be on or before the
anniversary date of the original
purchase.
(iv) That original VAT service
invoices are retained as proof that
annual service and inspections have
been carried out.
(v) No work should be commenced
under the terms of the warranty
unless prior authorization is
obtained from Explorer Group.
(vi) Explorer Group reserves the
right to inspect the motorhome
before any work commences.
(xii) No liability will be accepted for
damage caused by fair wear and
tear, wilful damage, negligence,
abnormal working conditions,
intrusion of foreign or harmful
matter, overheating, freezing, failure
to follow Explorer Group
instructions, misuse or alteration or
repair of the motorhome without
The Explorer Group prior approval.
(xiii) Motorhomes covered by this
warranty shall not be put out to hire,
reward, or any other commercial use
or used in any timed race.
(xiv) That the motorhome shall be
used only for its ordinary and
intended purpose and shall not be
subjected to any condition which
could reasonably be foreseen to
cause or result in damage or
excessive wear and tear.
(xv) That no liability arises from this
warranty for transport costs to and
from the place of remedial work or
consequential cost relating to
transportation. No liability arises
out of this warranty for any indirect,
special or consequential loss or
damage (whether for loss of profit,
use, contract, goodwill, or
otherwise), costs, expenses or other
claims for compensation howsoever
arising.
(xvi) No liability will be accepted for
any accidental or fire damage or any
loss incurred by accident or fire.
(xvii) The unexpired period of the 3year warranty is transferable to
second and subsequent owners
during the 3-year period. The new
owner should contact Explorer
Group within 3 months of their
purchase, with proof of ownership,
service history and their payment of
£30 to have their details recorded in
our database.
This warranty shall be governed and
construed in accordance with the
laws of England and the parties
irrevocably submit to the exclusive
jurisdiction of the courts of England.
Warranty
13
AVANTGARDE AND AUTOQUEST, AUTOCIRRUS AND CALYPSO HANDBOOK 2008
Please Note: In order to maintain
your Peugeot warranty you will be
required to fulfil their warranty
requirements, as detailed in your
Peugeot handbook
Please Note: This warranty does
not affect the purchaser's statutory
rights.
61
14
Code of Practice - Water Ingress
CODE OF PRACTICE - WATER
INGRESS
At Explorer we want our customers
to be sure that, in buying one of our
motorhomes, you are buying the
very best. We would like you to
continue to believe this for a long
time after you have made your
purchase.
We are confident that our new
motorhomes, built with innovative
manufacturing techniques and
tested materials, make water
ingress concerns unnecessary.
We are so confident of our new
motorhomes that we follow a 'Code
of Practice' which gives certain
guarantees to our customers, both
consumers and Retailers, of
financial reimbursement for remedial
work costs should problems occur.
1 The Code
The code applies to all new Explorer
Group products manufactured after
1st September 1998.
All owners with documentary proof
62
of annual services by an approved
Explorer Group Retailer or Service
Centre will be paid in full for the
costs of remedial work due to water
ingress. This is valid for up to 5
years from the original date of
purchase of a new product.
Unless the motorhome has a full
service history, the owner will be
required to contribute to the costs
of remedial work for water ingress
damage depending upon the age of
the motorhome and work required.
Each case will be examined on its
own merit. Explorer will decide the
amount of contribution towards the
remedial work costs.
Owners exchanging their current
Explorer Group model for a new
Explorer Group model will not have
the value of their part exchange
reduced due to potential water
ingress issues, providing that there
is documentary evidence that the
motorhome has been annually
serviced and that it is less than 5
years old.
2
Conditions Attached To the
Code
(i) Work may only be undertaken
after approval by Explorer
(depending upon individual
circumstances).
(ii) Explorer will pay the costs of
remedial work, only after approved
work has been carried out.
(iii) The Code is not retrospective.
3
Customer Obligation - Servicing
It is a condition of your warranty
that your motorhome must have an
"annual" habitation service, damp
and safety check and this should be
carried out by an Explorer Group
approved Retailer or Service Centre,
in accordance with NCC guidelines.
Proof of this will be required in the
event of a warranty claim.
Please Note: Failure to do so will
invalidate your warranty.
The first service is due 60 days
either side of the anniversary of the
original date of purchase. The
interval from purchase date to the
first service and the intervals
between services must not exceed
14 months. Years 3 and 5 must be
on or before the anniversary date of
the original purchase.
Your motorhome requires servicing
for safety, efficiency and to protect
the investment you have made.
Whether the motorhome is used for
short trips or continental long range
touring, regular servicing is
necessary and will ensure continued
enjoyment of your motorhome.
Your Retailer or Service Centre will
carry out your service using the
latest techniques and equipment (a
list of the items to be inspected,
tested and adjusted appears on the
Service Vouchers in this handbook),
and should provide you with the
service document as proof of
regular maintenance.
As with motor vehicle service
documents, not only will the proof
of regular servicing enhance your
motorhome resale value, but in the
unlikely event of any defect
appearing at some later date - a
properly serviced and documented
motorhome history will enable your
Retailer to rapidly assess and where
appropriate, carry out the necessary
remedial work.
4 Mains Electrics
It is recommended that you have
your mains electrical system
inspected by an NICEIC approved
contractor every 3 years.
5 Spare Parts
Should you require any replacement
parts for your motorhome it is
necessary that you contact the
Retailer from whom you purchased
the motorhome or any Explorer
Group approved Retailer and give
the following information, which will
help in identifying the required
component:
(i) Model and make of motorhome
(ii) Explorer VIN number
(iii) Description of required part
(iv) Photograph, size or diagram of
required part
Please Note: All parts must be
ordered and supplied through an
approved Retailer.
6 Remedial Work
The Explorer Group together with its
suppliers is continually undertaking
extensive research into testing,
remedial work procedures and
materials such as sealants,
adhesives, gaskets and tapes.
Therefore, if for any reason your
new motorhome is damaged or
requires remedial work then only an
approved Explorer Group Retailer or
Service Centre should undertake
such work.
Code of Practice - Water Ingress
14
AVANTGARDE AND AUTOQUEST, AUTOCIRRUS AND CALYPSO HANDBOOK 2008
All such work should be undertaken
using only approved Explorer Group
genuine parts recommended sealant
and following Explorer Group
procedures. Explorer will also
undertake to supply certain
specialist repairers with the
necessary spare parts. In this case,
your selected repairer must contact
the Aftersales Department with all
enquiries.
63
15
Motorhome Construction - Main Components
MOTORHOME CONSTRUCTION MAIN COMPONENTS
The following is a brief description
of the main components used in
your motorhome. More
comprehensive descriptions can be
found in the equipment
manufacturers literature held in the
Owner's Information Pack.
1 Body Shell
Motorhome bodies are constructed
from the highest quality materials.
The fully insulated floor is
constructed from a timber frame
with plywood and insulation
laminated together for strength. The
walls comprise an insulated foam
sandwich having pre-coated
aluminium exterior surface and vinyl
coated plywood interior finish.
Wooden framing is positioned within
the sandwich to add strength. The
very latest 'state of the art' presses
are employed to produce the
extremely well insulated, robust, yet
lightweight sections.
64
2 Windows
Windows are all of a double glazed
acrylic construction and the door
frames are extruded aluminium.
WARNING
On NO account should screw
threads longer than 5/8th inch
(15mm) be permitted to enter the
shell sandwich (from inside). Ensure
that all screws are of the selftapping type. No screw or any
other object should be permitted to
enter the ceiling of your new
motorhome.
this page is intentionally blank
16
EQUIPMENT LIST
Equipment List
1 Autoquest / Avantgarde
Refrigerator
Heater
Water Heater
Sink And Drainer
Oven
Hob
Taps Kitchen
Shower Equipment
Water Filter / Pump
12v Fluorescent
12v Reading Down Lights
Control Panels
Electrical Fittings
Toilet
Cassette Blinds
66
DOMETIC RM7270
TRUMA S3002 PIEZO
TRUMA ULTRASTORE
SPACE SAVING ARGENT STAINLESS STEEL
SPINFLO DUPLEX
SPINFLO 3 BURNER HOB
REICH PELIKAN
REICH CHROME
SUBMERSIBLE TWIN
LUMO & CROWN
ZOE EYEBALL HALOGEN
BCA
PDL
C402 CASSETTE
SEITZ SERIES 2000
Equipment List
2 Autocirrus / Calypso
Refrigerator
Heater
Internal Blown Air
Water Heater
Sink And Drainer
Microwave
Oven
Hob
Taps Kitchen
Shower Equipment
Taps Vanity
Water Filter / Pump
Lights 12v Fluorecent
Lights 12v Reading Down Lights
Lights 12v Halogen
Control Panels
Electrical Fittings
Toilet
DOMETIC RM7271
TRUMA ULTRAHEAT AUTO
NEW TRUMA PUSH FIT RAPID INSTALATION
TRUMA ULTRASTORE
SPACE SAVING ARGENT STAINLESS STEEL
BCA
SPINFLO MIDI
SPINFLO 3 BURNER HOB
REICH TREND
REICH CHROME
REICH TREND CHROME
SUBMERSIBLE TWIN
LUMO & CROWN
ZOE EYEBALL HALOGEN
NOVA
CBE PC 200
CBE
THETFORD ROTATABLE WITH ELECTRONIC FLUSH
16
Equipment List
AVANTGARDE AND AUTOQUEST, AUTOCIRRUS AND CALYPSO HANDBOOK 2008
67
17
Electrical Drawings
1
68
Autoquest
2
Avantgarde
17
Electrical Drawings
AVANTGARDE AND AUTOQUEST, AUTOCIRRUS AND CALYPSO HANDBOOK 2008
69
17
Electrical Drawings
3
70
Autocirrus
4
Calypso
17
Electrical Drawings
AVANTGARDE AND AUTOQUEST, AUTOCIRRUS AND CALYPSO HANDBOOK 2008
71
18
Technical Specifications
1
Autoquest
AUTOQUEST 2008 TECHNICAL SPECIFICATIONS
Model
Base Vehicle
100
115
120
130
140
150
180
Peugeot 330 SWB
Peugeot 330 SWB
Peugeot 330 SWB
Peugeot 333 MWB
Peugeot 333 MWB
Peugeot 333 MWB
Peugeot 335 MLWB
4/3
2/1
2 /1
5/3
Exterior Length mm / feet
5706 / 18'9"
5706 / 18'9"
5842 / 19'2"
6170 / 20'3"
6295 / 20'8"
6295 / 20'8"
7210 / 23'7"
Overall width including wing mirrors mm / feet
2690 / 8'10"
2690 / 8'10"
2690 / 8'10"
2690 / 8'10"
2690 / 8'10"
2690 / 8'10"
2690 / 8'10"
2890 / 9'6"
2770 / 9'1"
2770 / 9'1"
2890 / 9'6"
2890 / 9'6"
2890 / 9'6"
2890 / 9'6"
2074 / 6'9"
2074 / 6'9"
2074 / 6'9"
2074 / 6'9"
2074 / 6'9"
2074 / 6'9"
2074 / 6'9"
215/70 R15C 109 S
215/70 R15C 109 S
215/70 R15C 109 S
215/70 R15C 109 S
215/70 R15C 109 S
215/70 R15C 109 S
225/75 R15C 112S
No. of Berths / Designated Passenger Seats (Exc Driver)
4/1
4/1
6/5
Overall Body Width mm / feet
Overall Height mm / feet
Maximum Headroom mm / feet
Interior Width mm / feet
Tyre Size
Tyre Pressure Kpa / Psi
Front
Rear
Bed Sizes
Option 1
410 / 60
450 / 65
410 / 60
410 / 60
410 / 60
450 / 65
450 / 65
O/CAB DOUBLE
1 x DOUBLE
1 x DOUBLE
O/CAB DOUBLE
2050 x 1200
2074 x 1361
2074 x 1365
2050 x 1200
6'8" x 3'11"
6'10" x 4'6"
6'2" x 4' 6"
410 / 60
450 / 65
450 / 65
O/CAB DOUBLE
2050 x 1200
410 / 60
450 / 65
O/CAB DOUBLE
2050 x 1200
450 /65
2050 x 1200
6'8" x 3'11"
6'8" x 3'11"
6'8" x 3'11"
6'8" x 3'11"
1 x DOUBLE
1 x DOUBLE
1 x DOUBLE
1 x DOUBLE
1 x DOUBLE
1870 x 1210
1870 x 1210
2074 x 1820
2070 x 1270
1980 x 1260
6'2" x 4'0"
6'10" x 6'0"
6'9" x 4'2"
6'2" x 4'0"
6'6" x 4'
1 x SINGLE
1 x DOUBLE
1820 x 700
2050 x 1370
6'0" x 2'3"
Bed Sizes
410 / 60
O/CAB DOUBLE
Option 2
6'8" x 4'6"
O/CAB DOUBLE
O/CAB DOUBLE
2050 x 1200
2050 x 1200
6'8" x 3'11"
6'8" x 3'11"
1 x DOUBLE
1980 x 1260
2 x SINGLE
6'6" x 4'
1820 x 700
1 x DOUBLE
2050 x 1370
6'0" x 2'3"
Maximum Front Axle Weight
kgs / cwt
1600 / 31.43
1600 / 31.43
1600 / 31.43
1750 / 34.38
1750 / 34.38
1900 / 37.32
2000 / 39.28
Maximum Rear Axle Weight
kgs / cwt
1650 / 32.41
1650 / 32.41
1650 / 32.41
1900 / 37.32
kgs / cwt
2000 / 39.28
2000 / 39.28
2000 / 39.28
2000 / 39.28
2000 / 39.28
2000 / 39.28
2000 / 39.28
M.T.P.L.M.
kgs / cwt
3000 / 58.93
3000 / 58.93
3000 / 58.93
3300 / 64.82
3300 / 64.82
3300 / 64.82
3500 / 68.75
Mass in Running Order
kgs / cwt
2548 / 50.05
2527 / 49.6
2526 / 49.6
2665 / 52.35
2670 / 52.44
2614 / 51.35
2872 / 56.41
Essential Habitation Equipment
110 / 2.16
110 / 2.16
110 / 2.16
110 / 2.16
kgs / cwt
225 / 4.42
75 / 1.47
75 / 1.47
225 / 4.42
75 / 1.47
75 / 1.47
375 / 7.36
kgs / cwt
452 / 8.88
473 / 9.29
474 / 9.31
635 / 12.47
630 / 12.38
686 / 13.48
628 / 12.33
Optional Equipment payload
kgs / cwt
20 / 0.39
210 / 4.13
210 / 4.13
188 / 3.69
342 / 6.72
398 / 7.81
13 / 0.25
Note 4: Care should be taken when loading your Motorhome in order to ensure that you don not exceed either the Front or Rear axle maximum weight
110 / 2.16
110 / 2.16
kgs / cwt
Conventional Load
Maximum User Payload
The Mass in Running Order includes a tolerance for material variances.
Maximum User Payload includes Essential Habitation Equipment, Personal Effects, Optional Equipment and the Conventional Load.
Note 1: Please take care to ensure that you have allowed for the masses of all items you intend to carry in the motorcaravan.
Note 2: Warning under no circumstances must the Maximum Technical Permissible Laden Mass of the motorcaravan be exceeded.
Note 3. All data is calculated using metric weights and measurements. The imperial figures quoted are conversions thereof.
72
1850 / 36.33
Maximum Towing limit
110 / 2.16
1900 / 37.32
6'8" x 4'6"
1750 / 34.38
2
Avantgarde
AVANTGARDE 2008 TECHNICAL SPECIFICATIONS
Model
Base Vehicle
100
115
120
130
140
150
180
Peugeot 330 SWB
Peugeot 330 SWB
Peugeot 330 SWB
Peugeot 333 MWB
Peugeot 333 MWB
Peugeot 333 MWB
Peugeot 335 MLWB
4/3
2/1
2 /1
5/3
Exterior Length mm / feet
5706 / 18'9"
5706 / 18'9"
5842 / 19'2"
6170 / 20'3"
6295 / 20'8"
6295 / 20'8"
7210 / 23'7"
Overall width including wing mirrors mm / feet
2690 / 8'10"
2690 / 8'10"
2690 / 8'10"
2690 / 8'10"
2690 / 8'10"
2690 / 8'10"
2690 / 8'10"
2890 / 9'6"
2770 / 9'1"
2770 / 9'1"
2890 / 9'6"
2890 / 9'6"
2890 / 9'6"
2890 / 9'6"
2074 / 6'9"
2074 / 6'9"
2074 / 6'9"
2074 / 6'9"
2074 / 6'9"
2074 / 6'9"
2074 / 6'9"
215/70 R15C 109 S
215/70 R15C 109 S
215/70 R15C 109 S
215/70 R15C 109 S
215/70 R15C 109 S
215/70 R15C 109 S
225/75 R15C 112S
No. of Berths / Designated Passenger Seats (Exc Driver)
4/1
4/1
6/5
Overall Body Width mm / feet
Overall Height mm / feet
Maximum Headroom mm / feet
Interior Width mm / feet
Tyre Size
Tyre Pressure Kpa / Psi
Front
Rear
Bed Sizes
Option 1
410 / 60
450 / 65
410 / 60
410 / 60
410 / 60
410 / 60
450 / 65
450 / 65
410 / 60
450 / 65
450 / 65
1 x DOUBLE
1 x DOUBLE
O/CAB DOUBLE
O/CAB DOUBLE
O/CAB DOUBLE
O/CAB DOUBLE
2050 x 1200
2074 x 1361
2074 x 1365
450 / 65
2050 x 1200
2050 x 1200
2050 x 1200
2050 x 1200
6'8" x 3'11"
6'10" x 4'6"
6'2" x 4' 6"
6'8" x 3'11"
6'8" x 3'11"
6'8" x 3'11"
6'8" x 3'11"
1 x DOUBLE
1 x DOUBLE
1 x DOUBLE
1 x DOUBLE
1 x DOUBLE
1870 x 1210
1870 x 1210
2074 x 1820
2070 x 1270
6'2" x 4'0"
6'10" x 6'0"
6'9" x 4'2"
6'2" x 4'0"
1980 x 1260
6'6" x 4'
1 x SINGLE
1 x DOUBLE
1820 x 700
2050 x 1370
6'0" x 2'3"
Bed Sizes
410 / 60
450 / 65
O/CAB DOUBLE
Option 2
Technical Specifications
18
AVANTGARDE AND AUTOQUEST, AUTOCIRRUS AND CALYPSO HANDBOOK 2008
6'8" x 4'6"
O/CAB DOUBLE
O/CAB DOUBLE
2050 x 1200
2050 x 1200
6'8" x 3'11"
6'8" x 3'11"
1 x DOUBLE
1980 x 1260
6'6" x 4'
2 x SINGLE
1 x DOUBLE
1820 x 700
2050 x 1370
6'0" x 2'3"
Maximum Front Axle Weight
kgs / cwt
1600 / 31.43
1600 / 31.43
1600 / 31.43
1750 / 34.38
1750 / 34.38
1900 / 37.32
6'8" x 4'6"
1750 / 34.38
1850 / 36.33
1900 / 37.32
2000 / 39.28
Maximum Rear Axle Weight
kgs / cwt
1650 / 32.41
1650 / 32.41
1650 / 32.41
1900 / 37.32
Maximum Towing limit
kgs / cwt
2000 / 39.28
2000 / 39.28
2000 / 39.28
2000 / 39.28
2000 / 39.28
2000 / 39.28
2000 / 39.28
M.T.P.L.M.
kgs / cwt
3000 / 58.93
3000 / 58.93
3000 / 58.93
3300 / 64.82
3300 / 64.82
3300 / 64.82
3500 / 68.75
Mass in Running Order
kgs / cwt
2548 / 50.05
2527 / 49.6
2526 / 49.6
2665 / 52.35
2670 / 52.44
2614 / 51.35
2872 / 56.41
Essential Habitation Equipment
kgs / cwt
110 / 2.16
110 / 2.16
110 / 2.16
110 / 2.16
110 / 2.16
110 / 2.16
110 / 2.16
Conventional Load
kgs / cwt
225 / 4.42
75 / 1.47
75 / 1.47
225 / 4.42
75 / 1.47
75 / 1.47
375 / 7.36
Maximum User Payload
kgs / cwt
452 / 8.88
473 / 9.29
474 / 9.31
635 / 12.47
630 / 12.38
686 / 13.48
628 / 12.33
Optional Equipment payload
kgs / cwt
20 / 0.39
210 / 4.13
210 / 4.13
188 / 3.69
342 / 6.72
398 / 7.81
13 / 0.25
The Mass in Running Order includes a tolerance for material variances.
Maximum User Payload includes Essential Habitation Equipment, Personal Effects, Optional Equipment and the Conventional Load.
Note 1: Please take care to ensure that you have allowed for the masses of all items you intend to carry in the motorcaravan.
Note 2: Warning under no circumstances must the Maximum Technical Permissible Laden Mass of the motorcaravan be exceeded.
Note 3. All data is calculated using metric weights and measurements. The imperial figures quoted are conversions thereof.
Note 4: Care should be taken when loading your Motorhome in order to ensure that you don not exceed either the Front or Rear axle maximum weight
73
18
Technical Specifications
3
Autocirrus
AUTOCIRRUS 2008 TECHNICAL SPECIFICATIONS
Model
220
Peugeot 333 MWB
Base Vehicle
2/1
No. of Berths / Designated Passenger Seats (Exc Driver)
6369 / 20'11"
Exterior Length mm / feet
2770 / 9'1"
Overall width including wing mirrors mm / feet
Overall Body Width mm / feet
Overall Height mm / feet
2810 / 9'4"
Maximum Headroom mm / feet
1975 / 6'6"
2224 / 7'3"
Interior Width mm / feet
215/70 R15C 109 S
Tyre Size
Tyre Pressure Kpa / Psi
Front
Tyre Pressure Kpa / Psi
Rear
Bed Sizes
Option 1
410 / 60
450 / 65
1 Double
2220mm x 1365mm
7'4" x 4'6"
Bed Sizes
Maximum Front Axle Weight
Option 2
kgs / cwt
1750 / 34.38
Maximum Rear Axle Weight
kgs / cwt
1900 / 37.32
Maximum Towing limit
kgs / cwt
2000 / 39.28
M.T.P.L.M.
kgs / cwt
3300 / 64.82
Mass in Running Order
kgs / cwt
2876 / 56.49
Essential Habitation Equipment
kgs / cwt
110 / 2.16
Conventional Load
kgs / cwt
75 / 1.47
Maximum User Payload
kgs / cwt
424 / 8.32
Optional Equipment payload
kgs / cwt
155 / 3.04
The Mass in Running Order includes a tolerance for material variances.
Maximum User Payload includes Essential Habitation Equipment, Personal Effects, Optional Equipment and the Conventional Load.
Note 1: Please take care to ensure that you have allowed for the masses of all items you intend to carry in the motorcaravan.
Note 2: Warning under no circumstances must the Maximum Technical Permissible Laden Mass of the motorcaravan be exceeded.
Note 3. All data is calculated using metric weights and measurements. The imperial figures quoted are conversions thereof.
Note 4: Care should be taken when loading your Motorhome in order to ensure that you don not exceed either the Front or Rear axle maximum weight
74
4
Calypso
CALYPSO 2008 TECHNICAL SPECIFICATIONS
Model
220
Peugeot 333 MWB
Base Vehicle
2/1
No. of Berths / Designated Passenger Seats (Exc Driver)
6369 / 20'11"
Exterior Length mm / feet
2770 / 9'1"
Overall width including wing mirrors mm / feet
Overall Body Width mm / feet
Overall Height mm / feet
2810 / 9'4"
Maximum Headroom mm / feet
1975 / 6'6"
2224 / 7'3"
Interior Width mm / feet
215/70 R15C 109 S
Tyre Size
Tyre Pressure Kpa / Psi
Tyre Pressure Kpa / Psi
Bed Sizes
18
Technical Specifications
AVANTGARDE AND AUTOQUEST, AUTOCIRRUS AND CALYPSO HANDBOOK 2008
Front
Rear
Option 1
410 / 60
450 / 65
1 Double
2220mm x 1365mm
7'4" x 4'6"
Bed Sizes
Option 2
Maximum Front Axle Weight
kgs / cwt
Maximum Rear Axle Weight
kgs / cwt
1900 / 37.32
Maximum Towing limit
kgs / cwt
2000 / 39.28
M.T.P.L.M.
kgs / cwt
3300 / 64.82
Mass in Running Order
kgs / cwt
2876 / 56.49
Essential Habitation Equipment
kgs / cwt
110 / 2.16
Conventional Load
kgs / cwt
75 / 1.47
Maximum User Payload
kgs / cwt
424 / 8.32
Optional Equipment payload
kgs / cwt
155 / 3.04
1750 / 34.38
The Mass in Running Order includes a tolerance for material variances.
Maximum User Payload includes Essential Habitation Equipment, Personal Effects, Optional Equipment and the Conventional Load.
Note 1: Please take care to ensure that you have allowed for the masses of all items you intend to carry in the motorcaravan.
Note 2: Warning under no circumstances must the Maximum Technical Permissible Laden Mass of the motorcaravan be exceeded.
Note 3. All data is calculated using metric weights and measurements. The imperial figures quoted are conversions thereof.
Note 4: Care should be taken when loading your Motorhome in order to ensure that you don not exceed either the Front or Rear axle maximum weight
75
19
General Questions
GENERAL QUESTIONS
Q. I Require Technical Or Other
Information, Who Can Help Me?
Q: Where Can I Obtain Your Latest
Brochure?
A. The majority of information you
require is available through your
Explorer Group Retailer.
A: Our latest brochures are available
from Approved Retailers or can be
viewed and printed from the
download section on our website
www.explorer-group.co.uk.
A request form can also be
completed should you wish to
receive a printed copy of our latest
brochures.
Q: Why Is the Handbook Not
Specific To My Model?
A: Many of the components used in
the manufacture of our motorhomes
are identical throughout our model
ranges, so we produce a generic
handbook, which covers all models
manufactured for that season. If the
literature supplied with your
motorhome does not answer your
question then please contact your
Retailer for further assistance.
76
Q - Can You Tell Me The Second
Hand Price Of My Motorhome?
A - As a manufacturer we are not
involved in the second hand market.
You should contact a Retailer, The
Camping and Caravanning Club
and/or The Caravan Club. They
should be able to give some
indication of market value.
Q: Can I Fit A Bicycle Rack/Top
Box/Air Conditioning To My
motorhome?
A: It may be possible to fit
accessories to your motorhome but
this will depend upon the internal
construction of the roof/walls and
whether they can support the
weight of the accessory. If it is
possible your Retailer will be able to
advise you, (or alternatively they will
obtain confirmation and a drawing
where necessary, from The Explorer
Group). Please note that weight of
any accessories will reduce your
User Payload allowance.
Q: My Interior Lights Are Not
Working, What Do I Do?
A: It is possible that all of the 230V
mains electrical equipment may not
be operated simultaneously. Check
fuses, battery connections and
power supply (master light switch).
Refer to your Retailer for further
assistance.
PLEASE NOTE: The internal lights in
your motorhome will not operate
whilst the motorhome engine is
running.
Q: Where Can I Get Spare Parts For
My Motorhome?
A: Retailers will be able to source
most parts you require. For details
of your nearest Explorer Group
Retailer please refer to our Find A
Retailer section on our website, or
call 01207 699 000 for assistance.
Q. How Many Years Will Spare
Parts Be Available For My
Motorhome?
A. The Explorer Group will
endeavour to supply spare parts for
a motorhome, for at least 8 years
from new.
Q. Why Don't You Stock Parts At
The Explorer Group Factory?
A. Due to the volume of models we
produce it is not possible for us to
maintain stock levels of every
individual component used in our
manufacturing process. We do
stock commonly requested items,
but some items must be made to
order
A: Your supplying Retailer is obliged
to undertake your warranty work.
However, any approved Explorer
Group Retailer or Service Centre
can undertake the work, but this is
at their discretion. We will also
accept services completed by a
NCC approved company, but they
will not be able to undertake
warranty work if they are not
approved by Explorer Group.
Q. I Am Having Trouble Booking My
Motorhome in For Its Service, In
Line With The Requirements. What
Timescale Is Acceptable?
A. Where an original part is no
longer available, whenever possible
we will suggest a suitable alternative
if it is available.
A. We will allow a delay of 60 days
after your service is due, but
subsequent annual services should
still be undertaken as close as
possible to the anniversary of the
original date of purchase. Except
for 3rd and 5th services that must
be on or before the anniversary of
the original date of purchase.
Q: Who Can Service My
Motorhome?
Q. I Have A Problem With My
motorhome, Who Can Help Me?
Q. What If The Parts Are No Longer
Available?
A. We would always recommend
that you contact your supplying
Retailer. Your local Explorer Group
Retailer or Explorer Group Approved
Service Centre may be able to
assist. An inspection can then take
place and the necessary course of
action agreed.
General Questions
19
AVANTGARDE AND AUTOQUEST, AUTOCIRRUS AND CALYPSO HANDBOOK 2008
Q. I Am Unhappy With The Service
I Have Received From My
Retailer/Service Centre, Where Do I
Go From Here?
A. We would recommend that you
write to your Retailer/Service
Centre, detailing your problems and
requirements, requesting a response
explaining how they will resolve your
complaint. A copy of your letter can
also be forwarded to The Explorer
Group Customer Services
Department, quoting the serial
number of your motorhome and the
name of the Retailer/Service Centre.
Please be assured that we will
assist your Retailer/Service Centre
in resolving any problems.
77
20
Glossary
GLOSSARY
number of people a motorhome can
accommodate for sleeping.
ABS - plastic
Acrylonitrile Butadiene Styrene
Plastic the material used for most of
the large plastic components within
your motorhome.
Blown Air Heating
A method of heating the living
quarters of a motorhome by use of
a fan pushing air out through a
number of outlets.
Actual Laden Weight
This is the total weight of the
motorhome when loaded ready for
use by the end user.
Aquaroll
Brand name used generically for a
water container that rolls so you
don’t need to lift it.
Battery Charger
This is required to keep a leisure
battery charged. Most motorhomes
include a charging facility that
operates via the mains hook-up,
and also has the ability to recharge
from the tow car’s alternator while
traveling.
Berth(s)
Sleeping place - Refers to the
78
Bunk Bed
This is a sleeping place, usually
higher up than a conventional bed.
Often (but not always) this can be
folded or removed to provide
additional living space.
Butane
Is a form of Liquefied Petroleum
Gas (LPG) that normally comes in
blue cylinders. This type of gas is
most commonly used in the UK,
although a switch to propane is
advised in severely cold weather
conditions.
Cassette Blind
This is a roller blind that is fitted as
part of the window assembly, often
along with a flyscreen, thus giving a
neat installation.
Cassette Toilet
A form of chemical toilet found in
modern motorhomes, where the
waste holding tank can be accessed
and emptied from outside.
Control Panel
Used as the description for the
panel of electrical switches and
gauges governing 12V and mains
electricity systems.
Dinette
This is a popular style of seating
arrangement where two seats or
settees face each other across a
table.
Campingaz
Earth Leakage Circuit Breaker
(ELCB)
This is the trade name of Butane
gas.
ELCB Earth leakage circuit breaker
– see residual current device (RCD)
End Kitchen
provision for fresh water supply and
waste water disposal, in addition to
mains electricity and in some cases
TV aerial connection.
laden to its maximum, as defined by
the manufacturer. See also MTPLM.
A common term used to describe
floor plans that put the kitchen
across the rear, usually adjacent to a
motorhome door on one side and
washroom on the other.
Gas Cylinder
Essential Habitation Equipment
This is a portable, pressurized
container for the storage at LPG.
Is Glass-reinforced plastic, but more
commonly known as glass fibre (not
fibre glass, which is a
trade name
Gas Cylinder Locker
Handbook
Is the compartment on the
motorhome for the storage of gas
cylinders.
This is an owner’s manual, a guide
to the workings of your motorhome.
Those items and fluids required for
the safe and proper functioning of
the equipment for habitation as
defined by the manufacturer of the
motorhome. This includes items
such as the leisure battery and gas
cylinders, plus water contained in
the water heater etc.
Flyscreens
Mesh fittings for windows doors and
roof vents, to keep out insects etc.
GRP
Glossary
20
AVANTGARDE AND AUTOQUEST, AUTOCIRRUS AND CALYPSO HANDBOOK 2008
Hardstanding
Gas Drop out Holes
These are not Part of the ventilation.
LPG is heavier than air, so holes
through the floor below gaspowered appliances allow any
leakage of gas to exit the habitation
area.
This is a pitch which has a hard
surface made of gravel, asphalt,
concrete etc, instead of grass.
Hook-Up
This is a facility on a pitch for
connection to mains electricity.
Free-Standing Table
This is a table that, because of its
leg design, can be used inside or
outside.
Grey Water
Ingress
This is the waste water from
sink/shower.
Full Service Pitch
Gross Vehicle Weight (GVW)
Usually meaning water ingress, a
possible problem where water
seeps in at the joins, usually as a
result of worn sealant.
This is a pitch that has individual
This is the weight of the vehicle
79
20
Glossary
Jack
LPG
This is a device for raising the
vehicle so that a wheel can be
changed.
Liquid Petroleum Gas, i.e. butane or
propane.
L-Shaped
Kerb Weight
This is the empty weight of a motor
vehicle as defined by the
manufacturer.
This is a term where the seating
area of a motorhome is indeed Lshaped.
Mains Hook-Up
Layout
This is the Interior design and
details where furniture units are
placed in relation to each other.
Leisure Battery
This supplies the power for the
motorhome electrical systems and
is sometimes called an auxiliary
battery.
Leveling
The process of ensuring that a
motorhome is level when sited on a
pitch. It is important for comfort and
also to ensure the correct
functioning of the fridge and water
systems.
80
This is a site facility where you can
plug into a mains electricity supply.
MTPLM - Maximum Technically
Permissible Laden Mass
The technical maximum permissible
laden weight of the motorhome, this
must not be exceeded.
National Caravan Council
The only trade association
representing manufacturers, retailers
and suppliers within the caravan
and motorhome industry.
Optional Equipment Payload
Maximum User Payload
This is the maximum payload
available for the user including
essential habitational equipment.
The payload provided by the
Explorer Group for any factory fitted
options that may be available.
Owners’ Club
MIRO - Mass In Running Order
Weight of the motorhome equipped
to the manufacturer’s standard
specification. Therefore the
condition in which it leaves the
factory. Note that this does not
include any part of the user payload,
including the essential habitation
equipment.
This is a group of people who
usually own the same brand of
caravan or motorhome and enjoy
meeting up for rallies.
Payload
The amount you can put into a
motorhome. Specifically the
difference between the
Maximum Technical Permissible
Laden Mass (MTPLM) and the Mass
In Running
Order (MIRO).
PDI
This is an inspection undertaken by
the Retailer prior to handover to the
customer.
pressure of gas being released from
the cylinder.
Road Lights
This is a Type of heating equipment
for the living quarters. Modern units
fitted offer gas and mains-operation.
The external lights used while the
vehicle is traveling.
Speed Rating
Roof Lights - See Roof Vent.
Pitch
Roof Vent
A designated area of a caravan site
allocated for the use of one outfit.
Most sites will be arranged with
defined pitches.
Is an opening unit in the ceiling that
lets in ventilation and light, these
vary in size, but the best ones will
have integral blinds and flyscreens
and are also called rooflights.
Propane
Gas used in colder conditions and is
usually supplied in red cylinders.
RCD
This is a residual current device and
is part of the electrical system that
will ‘trip’ if there is an electrical fault.
Semi-Rigid Pipe work
Is water pipes made of a semi rigid
plastic and are infinitely preferable
to cheaper convoluted piping which
can act as a trap for germs and
smells.
Slats
Gas Regulator
Safety device fitted between the gas
cylinder and the gas system of a
motorhome, which controls the
Space Heater
Sometimes used for beds and can
improve ventilation to mattress
cushions.
Glossary
20
AVANTGARDE AND AUTOQUEST, AUTOCIRRUS AND CALYPSO HANDBOOK 2008
This is the maximum speed at which
a tyre may be used, as marked on
its sidewall.
SMMT
Society of Motor Manufacturers and
Traders.
Torque Wrench
A form of spanner used to set nuts
and bolts to a specified degree of
tightness.
It is recommended for adjustment of
wheel fixings on motorhomes.
User Payload
The weight of all items carried in the
motorhome.
U-Shaped Settee
Usually a reference to seating that
literally is ‘U’ shaped.
81
20
Glossary
Vehicle Kerb weight
The weight of the tow car often
indicated in the manufacturers
specifications.
VIN - Vehicle Identification Number
This is a unique serial identification
number for a vehicle. All Cars and
motor motorhomes should carry a
VIN. Motorhomes are not obliged to,
but most of those sold in recent
years in the UK.
Warranty
Are the terms and conditions that
spell out your rights with regard to
servicing, repair or replacement of
parts as provided by the
manufacturer.
Wild Camping
Term used for staying overnight
away from a site. Illegal in many
countries, but permission may be
granted by individual landowners.
82
this page is intentionally blank
21
Annual Habitation Service Records
ANNUAL HABITATION SERVICE RECORDS
ANNUAL SERVICE RECORD
MOTORHOME MODEL ________________________________________________________________________________________________________
VEHICLE IDENTIFICATION NUMBER_______________________________________________________________ YEAR______________________
84
1st SERVICE
2nd SERVICE
3rd SERVICE
DATE:
DATE:
DATE:
RETAILERS STAMP:
RETAILERS STAMP:
RETAILERS STAMP:
I/We certify that an annual service has been
carried out in accordance with the
manufacturers’ and National Caravan
Council recommendations.
I/We certify that an annual service has been
carried out in accordance with the
manufacturers’ and National Caravan
Council recommendations.
I/We certify that an annual service has been
carried out in accordance with the
manufacturers’ and National Caravan
Council recommendations.
4th SERVICE
5th SERVICE
6th SERVICE
DATE:
DATE:
DATE:
RETAILERS STAMP:
RETAILERS STAMP:
RETAILERS STAMP:
I/We certify that an annual service has been
carried out in accordance with the
manufacturers’ and National Caravan
Council recommendations.
I/We certify that an annual service has been
carried out in accordance with the
manufacturers’ and National Caravan
Council recommendations.
I/We certify that an annual service has been
carried out in accordance with the
manufacturers’ and National Caravan
Council recommendations.
7th SERVICE
8th SERVICE
9th SERVICE
DATE:
DATE:
DATE:
RETAILERS STAMP:
RETAILERS STAMP:
RETAILERS STAMP:
I/We certify that an annual service has been
carried out in accordance with the
manufacturers’ and National Caravan
Council recommendations.
I/We certify that an annual service has been
carried out in accordance with the
manufacturers’ and National Caravan
Council recommendations.
I/We certify that an annual service has been
carried out in accordance with the
manufacturers’ and National Caravan
Council recommendations.
10th SERVICE
11th SERVICE
12th SERVICE
DATE:
DATE:
DATE:
RETAILERS STAMP:
RETAILERS STAMP:
RETAILERS STAMP:
I/We certify that an annual service has been
carried out in accordance with the
manufacturers’ and National Caravan
Council recommendations.
I/We certify that an annual service has been
carried out in accordance with the
manufacturers’ and National Caravan
Council recommendations.
I/We certify that an annual service has been
carried out in accordance with the
manufacturers’ and National Caravan
Council recommendations.
13th SERVICE
14th SERVICE
15th SERVICE
DATE:
DATE:
DATE:
RETAILERS STAMP:
RETAILERS STAMP:
RETAILERS STAMP:
I/We certify that an annual service has been
carried out in accordance with the
manufacturers’ and National Caravan
Council recommendations.
I/We certify that an annual service has been
carried out in accordance with the
manufacturers’ and National Caravan
Council recommendations.
I/We certify that an annual service has been
carried out in accordance with the
manufacturers’ and National Caravan
Council recommendations.
Annual Habitation Service Records
21
AVANTGARDE AND AUTOQUEST, AUTOCIRRUS AND CALYPSO HANDBOOK 2008
85
22
Motorhome Retailer Specials
BASE MODEL
RETAILER SPECIAL NAME
Avantgarde
Avantgarde
Avantgarde
Magnum
Suntor
Sunseeker
Autoquest
Autoquest
Autoquest
Autoquest
Suntor
Sunseeker
Firestorm
Sunstyle
Please Note: All Explorer Group motorhome retailer specials are based on our current base models. For details on
the equipment fitted and how to operate them please check under the base model details in the main part of this
handbook, for example if you have purchased a Firestorm then the space heater fitted will be operated in the same
manner as the space heater fitted in the standard Autoquest.
86
Notes
Notes
Notes
Notes
Explorer House, Delves Lane, Consett. Co Durham. DH8 7PE
Tel : 01207 699000 Fax : 01207 6999001 Web : www.explorer-group.co.uk