1
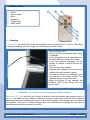
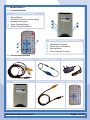
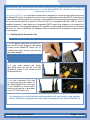
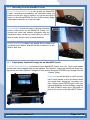
SharkEYE
Coach
High Quality Underwater Video System
User Manual 1.2b
Serial Number :
Date Supplied :
Accessories :
Model
:
Variant
:
Your SharkEYE Was Supplied By:
SwimRight Ltd.
91 Wilderness Road
Reading
Berkshire
RG6 5RE
Great Britain
Tel
: +44 (0)870 446 5960
Fax : +44 (0)870 383 5960
E-mail : [email protected]
For sales & support please visit : www.swimright.co.uk.
Table of Contents
1 - Introduction
2 - Guaranty
3 - Safety Information
4 - Storage Information
5 - General Operation
5.1 - Case Dimensions
5.2 - Features
5.3 - Control and Input Features
5.4 - Accessories Included
5.5 - Getting Started
5.6 - Recording
5.7 - Video Tips
5.8 - Remote Control
5.9 - Charging
6 - Accessories
6.1 - SharkMOUNT
6.2 - SharkWAND
6.3 - SharkVISION
6.4 - SharkVISION Pro
6.5 - Additional Software Packages Available
7 - Technical Specification
7.1 - Monitor
7.2 - Camera
8 - Further Reading
9 - Troubleshooting
10 - Servicing
11 - Disposal Information
12 - Service Record
1.
Notice of Copyright
© SwimRight Ltd. 2008
All rights reserved. No reproduction, copy
or transmission of this publication may be
made without written permission.
Published by SwimRight Ltd.
Printed in Great Britain.
Introduction
The SharkEYE Coach is an advanced underwater video system designed to fulfil the needs of the
professional swimming teacher or coach. To get the most out of your system we recommend that
you take the time to read this manual thoroughly.
Any aquatic discipline, be it swimming, synchronised swimming or diving, can benefit from underwater video analysis. The SharkEYE Coach has been designed and developed by SwimRight,
and has been manufactured to the highest quality standards. We hope that the performance of
your unit will meet or exceed your expectations. The demonstration videos on our website also
provide valuable tips to help you get the best performance from your unit.
You may also wish to consider purchasing some of our accessories to complement the SharkEYE
Coach. These include: SharkWAND, SharkMOUNT, SharkVISION, SharkVISION Pro and our
various software products. Further information on all of these can be found in the relevant sections of this manual.
James Golding
Sales Director - SwimRight Ltd.
For sales & support please visit : www.swimright.co.uk.
Page 1 of 18
2.
Terms of One Year Limited Warranty
In order to avoid unnecessary inconvenience we suggest that you read the instruction manual carefully before requesting guaranty service.
Your Guaranty
This Guaranty applies to your SharkEYE provided that it was purchased within the Guaranty Area.
By this Guaranty, SwimRight guaranties the product to be free from defects in materials and workmanship at the date of original purchase for a period of
ONE YEAR from that date. If within the guaranty period the product is determined to be defective (at the date of original purchase) due to improper materials
or workmanship, SwimRight or an authorised distributor, without charge for labour or parts, repair or (at SwimRight's discretion) replace the product or its
defective parts subject to the terms and limitations below.
1. Guaranty services will be provided only if the original invoice or sales receipt (indicating the date of purchase, model name and place of purchase) is
presented with the defective product within the guaranty period. SwimRight may refuse free-of-charge guaranty service if these documents are not presented
or if they are incomplete or illegible. This guaranty will not apply if the model name or serial number on the product has been altered, deleted, removed or
made illegible.
2. This guaranty does not cover transport costs and risks associated with transport of your product to and from SwimRight.
3. This guaranty does not cover:
a) periodic maintenance and repair or parts replacement due to wear and tear
b) consumables (components that are expected to require periodic replacement during the lifetime of a product such as non-rechargeable batteries, print
cartridges, styli, bulbs, etc.)
c) damage or defects caused by use, operation or treatment of the product inconsistent with normal personal or domestic use
d) damage or changes to the product as a result of :
i. misuse, including:
- treatment resulting in physical, cosmetic or surface damage or changes to the product or damage to liquid crystal displays.
- failure to install or use the product for its normal purpose or in accordance with SwimRight instructions on installation or use.
- failure to maintain the product in accordance with SwimRight instructions on proper maintenance.
- installation or use of the product in a manner inconsistent with the technical or safety laws or standards in the country where it is installed or used.
ii. virus infections or use of the product with software not provided with the product or incorrectly installed software.
iii. the condition of or defects in systems with which the product is used or incorporated except other SwimRight products designed to be used with the
product.
iv. use of the product with accessories, peripheral equipment and other products of a type, condition and standard other than prescribed by SwimRight.
v. repair or attempted repair by persons who are not SwimRight or authorised distributors.
vi. adjustments or adaptations without SwimRight’s prior written consent, including:
- upgrading the product beyond specifications or features described in the instruction manual, or
- modifications to the product to conform it to national or local technical or safety standards in countries other than those for which the product was
specifically designed and manufactured.
vii. neglect.
viii. accidents, fire, liquids, chemicals, other substances, flooding, vibrations, excessive heat, improper ventilation, power surges, excess or incorrect supply
or input voltage, radiation, electrostatic discharges including lighting, other external forces and impacts.
4. This guaranty covers only hardware components of the product. It does not cover software (whether of SwimRight or others) for which an enduser license
agreement or separate warranty/guaranty statements or exclusions are provided or intended to apply.
Exclusions and Limitations
Except as stated above, SwimRight makes no warranties (express, implied, statutory or otherwise) regarding product or accompanying or constituent
software quality, performance, accuracy, reliability, fitness for a particular purpose, or otherwise.
If this exclusion is not permitted or fully permitted by applicable law, SwimRight excludes or limits its warranties only to the maximum extent permitted by
applicable law. Any warranty that cannot be fully excluded will be limited (as far as permitted by applicable law) to the duration of this guaranty. SwimRight’s
only obligation under this guaranty is to repair or replace products subject to these guaranty terms and conditions.
SwimRight is not liable for any loss or damage relating to products, service, this guaranty or otherwise, including - economic or intangible losses - the price
paid for the product - loss of profits, revenue, data, enjoyment or use of the product or any associated products - indirect, incidental or consequential loss
or damage.
This applies whether that loss or damage relates to: impaired or non-operation of the product or associated products through defects or unavailability while
with SwimRight, which caused downtime, loss of user time or business interruption inaccuracy of output from the product or associated products damage
to or loss of software programs or removable data storage media, or virus infections and other causes. This applies to loss and damages under any legal
theory, including negligence and other torts, breach of contract, express or implied warranty, and strict liability (even where SwimRight has been advised of
the possibility of such damages).
Where applicable law prohibits or limits these liability exclusions, SwimRight excludes or limits its liability only to the maximum extent permitted by applicable
law. For example, some countries prohibit the exclusion or limitation of damages resulting from negligence, gross negligence, wilful misconduct, deceit and
similar acts. SwimRight’s liability under this guaranty will in no case exceed the price paid for the product, but if applicable law permits only higher liability
limitations, the higher limitations apply.
Your Legal Rights Reserved
Consumers have legal (statutory) rights under applicable national laws relating to the sale of consumer products. This guaranty does not affect statutory
rights you may have nor those rights that cannot be excluded or limited, nor rights against the person from whom you purchased the product. You may
assert any rights you have at your sole discretion.
For sales & support please visit : www.swimright.co.uk.
Page 2 of 18
3.
Safety Information
For safe operation these precautions should be observed when using your SharkEYE :
• Do not connect the SharkEYE to the mains electrical supply when it is near to water, or whilst the unit or the person operating it is wet or damp.
• Do not leave the monitor power connected whilst the unit is not in use.
• Do not operate the unit if it appears damaged in any way.
• Do not operate the unit if any of the cabling appears damaged. The cables connected to
the unit should be inspected before operation for any sign of cuts, tears or damage to the
cable seals.
4.
Storage Information
4.1 Temperature
The unit may be stored between 20°C and 60°C. The unit may be operated between 0°C and
40°C. It should be stored in a dry environment, out of direct sunlight. To protect the TFT screen it
should be stored with the lid closed.
4.2 Maintenance
All cables should be unplugged from the unit for storage. For storage the cables should be coiled
and stowed in the recess in the centre of the unit. The unit may be cleaned with alcohol free
cleaning solutions and a lint free cloth. The camera lens should be cleaned and dried after every
use with a clean lint free cloth.
5.
General Operation
5.1 Case Dimensions
135
280
385
NB: All dimensions are in millimeters (mm).
For sales & support please visit : www.swimright.co.uk.
Page 3 of 18
5.2 Features
Monitor Unit
• 7” TFT Colour LCD Panel
• Portable Flight Case
• Integral Storage Battery
• International External Charger
• Bi-Colour Charging State Indicator
• PAL/NTSC Operation
• Remote Control
• Brightness, Contrast & Colour Correction
• Image Manipulation Options
• 4 pin DIN Camera Input
• RCA Jack Video Input
• RCA Jack Video Output
• 2.1mm DC Power Connection
Camera
• Colour Image
• Low Power Consumption
• 4 pin DIN Video Output
• Cable Reel
• Fully Automatic Electronic Shutter
• Auto Aperture Control
• Infrared Illumination Function
• Submersible Enclosure
For sales & support please visit : www.swimright.co.uk.
Page 4 of 18
5.3 Control and Input Features
Screen Controls
1
2
3
4
5
6
7
8
9
10
Power Input
Camera Input (4 Pin DIN)
Composite Video Input (RCA)
Composite Video Output (RCA)
Source Select
Toggle
Menu
Volume Up
Volume Down
Power On / Off
Please Note
5
1
6
2
7
8
3
9
10
4
A small number of ‘light’ or ‘dark’ spots
may appear on the LCD screen. This is a
common phenomenon with all active matrix
displays, and should not cause concern.
5.4 Accessories Included
Mounting Boss
Power Adapter
RCA Video Lead
Cable Reel
Remote Control
Manual
EYE
Shark ch
Coa
High
r Video
erwate
1.2b
y Und
Qualit User Manual
:
Number
Serial
d:
Supplie
Date
:
ories
Access
Model
t
Varian
System
:
:
YE
SharkE
Your
plied
Was Sup
By:
ight Ltd.
SwimR ss Road
erne
91 Wild ding
Rea
ire
Berksh
RG6 5REain
Brit
Great
0
446 596 0
(0)870
383 596
: +44
(0)870 right.co.uk
Tel
: +44
s@swim
Fax
: sale
E-mail
For sales & support please visit : www.swimright.co.uk.
.swimri
t : www
k.
ght.co.u
se visi
port plea
s & sup
For sale
Page 5 of 18
5.5 Getting Started
• Open the storage case.
• Carefully un-wrap the cables and remove the camera from its protective foam.
• Connect the 4 pin DIN connector of the camera to the monitor and tighten the screw.
• Plug the DC power cable into the monitor.
• Press the power button on LCD monitor.
• Push the input selector on the monitor to select AV1.
• Use the unit as you wish.
• Detach both video and power connectors.
• Clean and dry the camera lens with a clean lint free cloth.
• Replace camera and cables in the case.
5.6 Recording
Video from the SharkEYE may be recorded with any device that has a composite video input.
Camcorders, VCRs and DVD Recorders equipped with an RCA jack composite video input (commonly colour coded yellow) may be connected directly to the AV output of the SharkEYE using the
supplied video adapter and RCA video lead.
• Open the SharkEYE case
• Connect and power up the SharkEYE system
• Connect the RCA video lead to the composite video output
• Connect the other end of the RCA video lead to the input of your recording device.
• The image from the SharkEYE will appear on the screen of the recording device.
• Record as usual
For recording to a laptop using the SharkVISION or SharkVISION Pro, please see sections 6.3 - 6.4.
5.7 Video Tips
Every swimming pool is different. The balance of lighting and backround colours within each
location will require some experimentation and adjustment to achieve the best results. These are
some general tips for filming within swimming pool environments.
• If in doubt when adjusting the brightness and contrast of the image, a darker image is generally
more useful that an image that is too light.
• The viewing angle of the camera can greatly effect the level of contrast achieved. If your image
has a low-contrast ‘over exposed’ appearance, try lowering the viewing angle of the camera (ie.
decreasing the angle the camera makes with the surface of the water.)
• The lighting with in different pools can vary dramatically. The SharkEYE’s screen can be adjusted
to compensate for unusual colour casts, just like a normal television. The unit has as five pre-set
colour balances: Vivid, Light, Memory, Standard and Soft.
• Lighting directly overhead will produce the best results. Strong light sources close to the water
will produce ‘flare’ on the video, and spoil the image.
• For the best results, particularly when undertaking detailed analytical work, swimwear in a block
colour that contrasts strongly with the background in the pool is the best choice.
For sales & support please visit : www.swimright.co.uk.
Page 6 of 18
5.8 Remote Control
1
2
3
4
5
6
Power
Source Select
Menu
Toggle Up
Toggle Down
Mode Select
4
2
1
5
3
6
5.9 Charging
In normal use, the SharkEYE Coach internal battery has an endurance of 4-5 hours. The battery
is charged using the external charger by following the procedure below.
• Open the flight case.
Inspect the unit for standing water, damp
or damage.
• If the unit appears wet or damp drain any
standing water and gently dry it down.
• If the unit appears damaged, do not
attempt to charge it. Return the unit for
service.
• Take out the mains adapter
• Plug the mains adapter into a socket and
observe that the indicator is green.
• Connect the lead to the charging socket at the top of the battery module. The
indicator may turn red at this point.
• When the battery is fully charged the
indicator LED on the charger will turn
green again.
WARNING : Do not leave the unit unattended whilst charging.
The SharkEYE Coach will take up to 8 hours to charge. When the indicator light changes from red
to green, the battery is fully charged. Keep the connector of the camera and DC plug detached
and stowed during the charging process to ensure safe charging. If the charger does not respond
as expected, or the unit is not fully charged after more than 8 hours charging, the unit may be
damaged and should be returned for service.
For sales & support please visit : www.swimright.co.uk.
Page 7 of 18
6.
Accessories
6.1 SharkMOUNT
The SharkMOUNT allows the underwater camera to be positioned anywhere on the floor of a pool, keeping the camera in
a fixed position.
The camera can be tilted through 135 degrees vertically and
panned through 360 degrees horizontally allowing the user
great flexibility in viewing angle.
The camera is adjusted by a wing nut on the SharkMOUNT
support. The position of the camera can be set by the coach
above the water or below the water by a swimmer.
To connect the SharkMOUNT to the camera
• Attach the mounting boss to the pivot of the
SharkMOUNT, using the stainless steel hardware supplied.
• Make sure that there is one washer on either
side of the pivot assembly.
• Hold the SharkMOUNT still with one hand, whilst you
gently slide the camera back onto the mounting boss
with the other hand.
• The camera has two positions on the boss. For
general use, we recommend the position nearer to
the pivot.
• The angle of the camera may now be set and the
locating bolt tightened to hold the desired position.
For sales & support please visit : www.swimright.co.uk.
Page 8 of 18
6.2 SharkWAND
The SharkWAND allows the user to track a swimmer along
the poolside. The SharkWAND is variable in length between
40cm and 110 cm. The camera is attached onto the wand
using the mounting boss as for the SharkMOUNT.
The SharkWAND is best used by tracking a swimmer up and
down the poolside capturing footage of the swimmer as they
swim. When using the SharkWAND please take care to avoid
tripping on the trailing cable.
To connect the SharkWAND to the camera
• Attach the mounting boss to the end of the
SharkWAND as before.
• Take care that there is a washer on either side of
the assembly.
• Gently slide the camera into position on the
mounting boss. We recommend that the front
position, that furthest from the pivot, should be
used with the SharkWAND.
• The position of the camera may now be set, and the
adjustment locked using the wingnut on the pivot.
For sales & support please visit : www.swimright.co.uk.
Page 9 of 18
6.3 SharkVISION
The SharkVISION allows the user to connect the
SharkEYE unit directly to the USB port of their
computer. Video may then be recorded either
directly to DVD or to the computer hard drive for
later viewing and analysis.
All of the necessary components are included to
allow the user to capture video using the SharkVISION straight away.
• Open the SharkEYE case
• Power up the SharkEYE system
• Connect the video adaptor to the video output on
the bottom right corner of the monitor
• Connect the RCA Video Cable into one end of the
video adaptor
• Connect the RCA video cable to the video port
(colour coded yellow) of the SharkVISION
• Connect the SharkVISION to your computer's
USB port
• Record video to either DVD or hard disc using the
software application of your choice.
For sales & support please visit : www.swimright.co.uk.
Page 10 of 18
6.4 SharkVISION Pro
6.4.1 Control Features
Hard Disk Controls
1
2
3
4
5
Record Button
Exit Button (used to stop recording)
Navigational Joystick
Video Playback Button
Power On and Off Button
REC
Remote Control Main Functions
1
2
3
4
Navigational Controls
Power On and Off Button
Record Button
Video Playback Controls
6.4.2 Accessories Included
3 Way Composite Lead
SharkVISION Pro
DC Power Supply
Mains Power Supply
Single Way Composite Lead Remote Control
For sales & support please visit : www.swimright.co.uk.
Page 11 of 18
Before using your SharkVISION Pro please read the entire following section for important
information regarding the setup and use of the SharkVISION Pro, misuse could lead to a
malfunction of the unit.
The SharkVISION Pro is a hard disk storage device designed to record and play back video from
the SharkEYE Coach. It enables the user to record footage taken with a SharkEYE Coach directly
to the onboard hard disk built in to the unit. It also enables the user to play back footage to PC or
TV as well as being able to transfer to DVD and VHS. It is compatible with both USB 1.1 and 2.0
enabled computers. It also features a Composite/SCART output, this enables you to connect it to
most televisions. It is compatible with both PC and Mac. It comes with specific drivers for Windows
98 users, for users of Windows XP, Windows Vista or Macintosh OS, installation of these drivers
is not required.
6.4.3 Setting Up the Device for Use
Once you have your SharkEYE Coach set up, follow these simple steps to set up your SharkVISION Por for recording.
First to supply it with power you must connect the DC Power Supply to the battery
socket on the SharkEYE Coach. For recording from other sources, you can use
the mains adapter.
To maximise usage whilst plugged into the SharkEYE
Coach it is advised that it’s on board battery should be
fully charged, as the SharkVISION Pro will draw extra
power from the power supply of the SharkEYE Coach.
Next you must connect the Single
Way RCA Lead from the AV In on the
SharkEYE Coach to the Output on the
SharkVISION Pro.
Finally the Composite 3 Pin lead
is connected from the Output of
the SharkVISION Pro to the input
of the SarkEYE or media device
which you would like to play back
from (TV, DVD Player etc.).
It is important to note that the cables supplied will only work in one configuration. Different configurations may lead to damage to the SharkVISION Pro.
For sales & support please visit : www.swimright.co.uk.
Page 12 of 18
6.4.4 Recording From the SharkEYE Coach
Once the SharkVISION Pro is set up with the SharkEYE
Coach, recording and playback are controlled using the
buttons on the unit. All you need to do is press the record
button on the SharkVISION Pro and it will instantly begin
video capture directly on to the hard disk.
You will notice a small file name in the top left hand
corner of the screen on the SharkEYE Coach. You
should note down this number alongside with the
swimmer’s name so that at a later date you will be
able to easily find the video of each swimmer.
Stopping recording is again very simple. All you need to do
is press the Exit button, and the file will be saved on to the
disk for later use.
6.4.5 Playing back Captured Footage on the SharkEYE Coach
Once the SharkVISION Pro is connected to the SharkEYE Coach, turn it on. Once it has loaded
you will see a menu appear with several options. The “Movies” section will contain all of the footage which you have captured. Navigate to this section and press ENTER to go through into the
“Videos” folder.
From here you will be able to select a swimmer’s movie based on the file names which
you noted down during the recording session. Simply press ENTER again once you
have selected the desired footage using the
UP and DOWN arrows and it will begin to
play on the screen of the SharkEYE Coach.
For sales & support please visit : www.swimright.co.uk.
Page 13 of 18
6.4.5 Playing back Captured Footage on a Computer
In order to play back files captured on the SharkVISION Pro on a computer, attach the SharkVISION Pro to a USB port on your computer with the cable provided with the unit.
PC users will need to go into “My Computer” and
look for a drive labelled as “NAME (X:)” (where
X is the allocated letter for the drive depending on your system and NAME is the name of the drive: typically
UNTITLED” or “WDC WD80 Media”). Within this folder will be a
file named “Video” where you will be able to find all of the videos
which have been captured using the SharkVISION Pro (the file
names will be the same as the ones you have noted down whilst
recording).
Please note: Mac users should read this section before using their SharkVISION Pro.
Mac users will first of all need to format the hard drive using the Disk Utility (located
in the “Utilities” folder inside the “Applications” folder). Once the SharkVISION Pro
is connected to your computer, an error dialogue box will appear - click “Initialize”
and you will be taken straight to the Disk Utility. From here select the drive (it will be
named “UNTITLED” or “WDC WD80 Media”) and then go to the “Erase” tab, select the
volume format (FAT is recommended) and enter a
desired name in the field
then click “Erase…”.
Your SharkVISION Pro is now ready for use.
(Please note that it will also work with Windows computers if you formatted the drive as FAT)
When you next plug in the SharkVISION Pro to your computer you will see a folder named with
the name you gave the drive during the reformatting process. Open this folder and you will see
a folder called “Video”, where you will be able to find all of the videos which have been captured
using the SharkVISION Pro (the file names will be the same as the ones you have noted down
whilst recording.
6.4.6 Playing back Captured Footage on an AV Device
Any television or device which has either a SCART or Composite input can be used to play back
video from the SharkVISION Pro. Simply attach the 3 pin composite lead to the unit and then the
3 different coloured pins into the corresponding sockets on your device (generally TV, DVD or
VHS player). If your device has a SCART Input and no Composite Input then you will need to use
an adapter. Select the appropriate AV output and then play back as normal using the controls on
the SharkVISION Pro.
6.5 Additional Software Packages Available
The SharkEYE and SharkVISION are ideal for use in combination with a number of our other
software products. DARTFISH Connect video analysis software is ideal for simple analysis of
swimming technique. The SharkEYE is also fully compatible with AQUANEX™, the world’s most
advanced biomechanical analysis system. For more details of Dartfish and AQUANEX™ products currently available, please visit our website or contact your local SharkEYE distributor directly.
For sales & support please visit : www.swimright.co.uk.
Page 14 of 18
7.
Technical Specification
7.1 Monitor
Display Device
Screen Size
Audio Output
Application Power Supply
Power Consumption
Video Input
Outer Dimension
Weight
Dot Matrix
Resolution Contrast Ratio
Brightness
Screening Frequency
Camera Input port A/V Port
: Colour TFT-LCD panel
: 7 inches
: 0.3W
: Storage battery (DC 12V)
: ~ 10W
: 1.0V (p-p) 20%, 75 Ohm
: L360mm x W260mm x H120mm
: 6kg
: 0.107(H) X 0.372 (V)
: 440 (H) X 234 (V)
: 150:1
: 300 cd/m
: CCIR/EIA
: DIN socket
: RCA
7.2 Camera
The camera uses a high resolution low illumination CCD and has an integral LED infra-red light
source. The camera housing is fully watertight.
Do not attempt for any reason to open the camera housing.
The pressure seal will be broken, and the unit will no longer be watertight.
Image Sensor
: 1/4” sharp CCD
Signal system
: PAL or NTSC
Effective Pixel
PAL : 512 X 582 pixels
NTSC: 512 X 492
Photographic Area
: 3.6mm X 2.7mm
Scanning System
: 2:1 alternate scanning
TV Line
: 420 line
Horizontal Synchronous Frequency PAL : 15,625 KHz
NTSC : 15,734 Khz
Vertical Synchronous Frequency PAL : 50Hz
NTSC: 60Hz
Minimum Illumination
: 1Lux / F1.2 (0Lux / F1.2 with LED)
Video Output
: 1.0vp-p, 75 Ohm
Gamma Factor
: 0.45
Automatic Gain Control
: Automatic
Electronic Shutter
PAL : 1/50~1/10,000s
NTSC : 1/60~1/10,000s
Backlight Compensation
: Automatic
Consumption Current
: Max. 100mA
Power
: 12V DC
Usable Temperature
: -20ºC – 70ºC, max humidity 95%
Weight
: 1.2kg
Lens
: F=3.6mm / F=2.0 standard
Viewing Angle
: 90º
For sales & support please visit : www.swimright.co.uk.
Page 15 of 18
8.
Further Reading
For a coaching perspective on the use of underwater video analysis we recommend
“Championship Swim Training” by Bill Sweetenham and John Atkinson (2003, Human Kinetics
ISBN: 978-0-7360-4543-8).
Whilst it does not specifically address the use of video, this book makes extensive use of underwater perspective drawings that provide an invaluable guide to the first time user of underwater
video for swimming analysis.
9.
No Picture
Troubleshooting
Problem
Solution
• Check for dirty or loose camera connection.
• Charge battery.
• Check power switch is in ‘ON’ position.
• Inspect system for damage.
Dark Picture
• Adjust brightness and contrast controls.
Poor Colour Balance
• Change colour selection to improve.
Vertically or Laterally Inverted Picture
• Adjust UP/DOWN, LEFT/RIGHT on remote.
My SharkVISION Pro does not work with
my Mac.
Please refer to section 6.4.5 for information
with regards on how to set up SharkVISION
Pro for Mac.
My SharkVISION Pro will not power up.
• If you are using on board power from the
SharkEYE Coach, ensure that the battery
is fully charged.
• Ensure that all power connectors are fully
inserted.
• If you notice any damage to the unit or power adapter please contact your SharkEYE
Coach distributor for replacement parts.
10.
Servicing
To ensure long life and optimum operation, your SharkEYE should be returned to your distributor for servicing once per year. During the service, the SharkEYE will be thoroughly tested and
cleaned to verify it's performance and safety.
For clients in the UK, the annual service also includes the PAT electrical safety test for the
appliance, to ensure continued safe operation and allow the user to comply with their statutory
responsibility in respect of portable appliances. The service and testing record of your SharkEYE
is located at the back of this manual.
For sales & support please visit : www.swimright.co.uk.
Page 16 of 18
11.
Disposal Information
Disposing of the Packaging
The shipping package has protected your new SharkEYE unit on the way to you. All packaging
materials are environmentally-friendly and recyclable. Please contribute to a better environment
by disposing of the packaging in an environmentally sustainable manner. If you are unsure, please
ask your local authority about the best means of disposal.
DANGER OF SUFFOCATION
Keep packaging materials away from children. Danger of suffocation from shipping cartons, plastic
films, bags and tapes.
Disposing of the Unit
Once your SharkEYE has reached the end of its useful life please dispose of it in an environmentally concious fashion. Correct recycling will enable valuable raw materials to be recovered and
reused.
DANGER OF INJURY
When disposing of your SharkEYE discard the power adapter separately to the rest of the main
unit.
12.
Service Record
Date
Service Center
Remarks
For sales & support please visit : www.swimright.co.uk.
PAT Test
Page 17 of 18
Date
Service Center
Remarks
For sales & support please visit : www.swimright.co.uk.
PAT Test
Page 18 of 18
Thank you
for choosing
SharkEYE.
For sales & support please visit : www.swimright.co.uk.