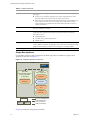
1
Application Discovery Manager Administration Guide vCenter Application Discovery Manager 6.1.1 This document supports the version of each product listed and supports all subsequent versions until the document is replaced by a new edition. To check for more recent editions of this document, see http://www.vmware.com/support/pubs. EN-000451-01 Application Discovery Manager Administration Guide You can find the most up-to-date technical documentation on the VMware Web site at: http://www.vmware.com/support/ The VMware Web site also provides the latest product updates. If you have comments about this documentation, submit your feedback to: [email protected] Copyright © 2010 VMware, Inc. All rights reserved. This product is protected by U.S. and international copyright and intellectual property laws. VMware products are covered by one or more patents listed at http://www.vmware.com/go/patents. VMware is a registered trademark or trademark of VMware, Inc. in the United States and/or other jurisdictions. All other marks and names mentioned herein may be trademarks of their respective companies. VMware, Inc. 3401 Hillview Ave. Palo Alto, CA 94304 www.vmware.com 2 VMware, Inc. Contents About This Book 7 1 Overview 9 System Architecture 9 Distributed Appliance Solutions 11 Virtual and Physical Appliance Solutions 11 Virtual Appliance Deployment 11 Physical Appliance Deployment 12 Mirrored Network Traffic 12 vCollector 12 Mixed Environment 13 Where To Go Next 13 Installation of New or Additional ADM Components 13 Licenses 13 Upgrading ADM 13 Migrating to a New Appliance 13 Security 13 2 Installing ADM 15 ADM Installation Requirements 15 Installation Personnel 15 ESX Resources 15 Installing the vSphere Client 16 Disabling vMotion 16 Preparing the Environment 17 Preparing an ESX Configuration 17 Deploying the Virtual Appliances 18 Deploying the ADM Virtual Appliances 19 Installing Windows Collector 20 3 Setting Up ADM 23 Process 23 Order of Setup 23 ADM Setup Procedures 23 Launching the First Boot Configuration Tool 24 Configuring the Root Password 24 Configuring Static Network Settings 25 Configuring the Timezone and Time 25 Configuring the Appliance Role 26 Post‐Installation Steps 27 Logging In to the ADM Console 27 Initiating Passive Discovery 27 VMware, Inc. 3 Application Discovery Manager Administration Guide 4 Securing ADM 29 Changing the Root Password 29 Resetting the ADM Root Password 29 OpenSSL Self‐Signed Test Certificates 30 CA Signed Test Certificates 30 Self‐Signed Certificates 30 5 Maintenance 33 ADM Services 33 Product Support Packages 34 Using the ADM Console 35 Using the CLI 35 Restoring an ADM Environment by Using a Product Support Package Reconfiguring an ADM Deployment 38 Adding a Remote Database to an Existing ADM Deployment 38 Converting a Single‐Box or Aggregator to a Remote Database 38 Moving a Database to a Remote Appliance 39 Licenses 39 Uploading a License 40 36 6 Upgrading ADM 41 Overview 41 Appliance Type 41 Mixed Environments 41 Licenses 41 Appliance Migration 41 Backing Up Data 41 Upgrading Appliances 42 Important Notes 42 Preliminary Procedures 42 Upgrading Appliances Using CLI 42 Post‐Upgrade Steps 43 7 Migrating to a New Appliance 45 Overview 45 Supported Migration 45 Licenses 45 System Architecture 45 Process 46 Preliminary Procedures 46 Data Restoration 47 Single‐Box Solution 47 Distributed Solutions 47 Distributed Solution with Remote Database Post‐Migration Steps 48 48 8 Troubleshooting ADM 49 Troubleshooting ADM by Using the Product Support Package Troubleshooting Error Messages During WMI Discovery 49 Detail Discovery Troubleshooting 49 Using ADM Console 50 WMI 50 4 49 VMware, Inc. Contents single.sh 50 snmpdump 53 nlcapture 53 9 Uninstalling ADM 55 Uninstalling the ADM Appliance 55 A Time Zones 57 B ADM API Tutorial 59 API Features 59 Insight_control 59 Asynch API 60 Dump API 60 Bulk API 61 Web Services API 61 Index 63 VMware, Inc. 5 Application Discovery Manager Administration Guide 6 VMware, Inc. About This Book The VMware vCenter™ Application Discovery Manager (ADM) Administration Guide provides information that the administrators are required to install and configure the ADM. Intended Audience This document is part of the VMware vCenter Application Discovery Manager documentation set, and is intended for use by system administrators and integrators responsible for installing ADM. The installation procedures in this document must be performed by IT professionals familiar with virtualization and VMware technologies such as VMware ESX™ servers and related virtual and physical equipment. VMware Technical Publications Glossary VMware Technical Publications provides a glossary of terms that might be unfamiliar to you. For definitions of terms as they are used in VMware technical documentation go to http://www.vmware.com/support/pubs. Document Feedback VMware welcomes your suggestions for improving our documentation. If you have comments, send your feedback to [email protected]. Technical Support and Education Resources The following sections describe the technical support resources available to you. To access the current version of this book and other books, go to http://www.vmware.com/support/pubs. Online and Telephone Support To use online support to submit technical support requests, view your product and contract information, and register your products, go to http://www.vmware.com/support. Customers with appropriate support contracts should use telephone support for the fastest response on priority 1 issues. Go to http://www.vmware.com/support/phone_support. Support Offerings To find out how VMware support offerings can help meet your business needs, go to http://www.vmware.com/support/services. VMware, Inc. 7 Application Discovery Manager Administration Guide VMware Professional Services VMware Education Services courses offer extensive hands‐on labs, case study examples, and course materials designed to be used as on‐the‐job reference tools. Courses are available onsite, in the classroom, and live online. For onsite pilot programs and implementation best practices, VMware Consulting Services provides offerings to help you assess, plan, build, and manage your virtual environment. To access information about education classes, certification programs, and consulting services, go to http://www.vmware.com/services. 8 VMware, Inc. 1 1 Overview This chapter describes the different VMware vCenter Application Discovery Manager (ADM) architecture solutions and configuration. This chapter includes the following topics: “System Architecture” on page 9 “Virtual and Physical Appliance Solutions” on page 11 “vCollector” on page 12 “Mixed Environment” on page 13 “Where To Go Next” on page 13 System Architecture The ADM provides system architecture solutions to meet the requirements of different environments as shown in Figure 1‐1. Figure 1-1. ADM Components Passive Discovery Database Aggregator Active Discovery-Unix Active Discovery-Windows VMware provides ADM on one or more appliances. The mode of the appliance determines which component is running. ADM components are described in Table 1‐1. VMware, Inc. 9 Application Discovery Manager Administration Guide Table 1-1. ADM Components Component Description Active Discovery‐ UNIX Collects data from the configuration objects in your data center. The following discovery types apply: IP discovery: A method for detecting hosts or other configuration items with a specific IP address when Passive Discovery fails to discover them. Detail discovery: Extends the information obtained using Passive and IP Discovery. It uses common network protocols to remotely query servers in the managed network and obtains supplementary information about network hosts which is added to the database. Active Discovery‐ Windows A discovery engine that uses WMI based discovery policies for performing active discovery on Windows machines. Passive Discovery Passively observes the network traffic by performing a deep‐packet analysis to discover applications and component relationships in physical and virtual environments. It also allows you to: Map dependencies. Count the activity of these dependencies. Identify services. Aggregator Receives data from the discovery components and reconciles the data before transferring it to the database component. The aggregator also provides the user interface for using ADM and is the integration point for various integrations, for example, ERDB. Database An Oracle RDBMS used for storing discovered data and ADM configuration. Single-Box Appliance In a Single‐Box appliance solution architecture, the ADM components are enabled on a single Virtual Appliance (VA) as shown in Figure 1‐2. Figure 1-2. Single-Box Appliance Architecture ESX1 vSwitch ADM VM2 Role=Windows collector (running Win2008 on any ESX) Active DiscoveryWindows ADM VM1 Role = single-box Aggregator Database Active DiscoveryUnix Passive Discovery Physical switch 1 Physical switch 2 Runs on (Virtualization) Logical monitoring port connectivity ADM Connectivity Chapter 3 provides the configuration instructions. 10 VMware, Inc. Chapter 1 Overview Distributed Appliance Solutions The distributed appliance solution has at least one designated appliance enabled as a Collector, and another appliance enabled as an Aggregator and Database as shown in Figure 1‐3. Figure 1-3. Distributed Appliance Solution ESX2 ESX3 vSwitch vSwitch ESX1 vSwitch ADM VM4 ADM VM4 Role = Passive collector Role = Collector ADM VM3 Role = collector ADM VM1 Role = Aggregator Active DiscoveryUnix Active DiscoveryUnix Aggregator Passive Discovery Passive Discovery Database Passive Discovery ESX4 vSwitch ADM VM6 Role = Windows Collector (running Win2008 on any ESX) Active DiscoveryWindows Physical switch 1 Physical switch 2 Runs on (Virtualization) Logical monitoring port connectivity ADM Connectivity NOTE In a Distributed with remote database setup, there is a designated appliance to host the database. Also, Passive and Detail Discovery can run on single or multiple Collectors. Virtual and Physical Appliance Solutions You can set up ADM either: On your ESX or ESXi servers as described in “Virtual Appliance Deployment” on page 11 On existing IBM physical appliances, only upgrading is supported as described in “Upgrading ADM” on page 13. Virtual Appliance Deployment ADM version 6.1.x is delivered as VA, which is a virtual machine image that includes an operating system and the relevant ADM software components installed on it. A VA can run one or multiple ADM components depending on the appliance role selected. Deploying a virtual machine template in an Open Virtualization Format (OVF) onto the ESX or ESXi server creates an ADM Virtual Appliance. After deployment, power up the VA and then configure the standard appliance settings, network, and user information. VMware, Inc. 11 Application Discovery Manager Administration Guide Download the following artifacts from the VMware Web site: http://downloads.vmware.com/Application Discovery Manager Core ADM Template: An OVF template that includes all ADM components except for the Windows Collector and you can configure as Aggregator, Aggregator with remote database, Database, or Single‐Box. Collector ADM Template: A smaller OVF template that includes the Passive Collector and Active and Passive Collector and you can configure as passive and active discovery Collector and Passive Discovery Collector. Windows Collector Installer: An executable file that installs the Windows Collector component on top of the Windows 2008 R2 operating systems. Physical Appliance Deployment ADM supports the upgrading of existing IBM single box and Distributed solutions (including those that use a remote database). Mirrored Network Traffic The method in which the appliance performs passive discovery is by analyzing mirrored traffic from a switch or router. Network devices that have the ability to configure a mirrored port (sometimes called as a Switched Port Analyzer, span port or monitor port) can forward a copy of all the network traffic from all (or selected) ports to one or more mirrored ports. Typically, each network device has all its ports mirrored to one port. These mirrored ports are then connected directly to one of the network interfaces on the ESX server. IMPORTANT Consult IT professionals of your organization to ensure that the appropriate switches or routers that contains the network traffic is used for Discovery are configured properly for port mirroring and are accessible to the ADM appliance. Perform one of the following steps if you have to connect multiple monitor ports: Connect the monitor ports to an aggregate switch (A‐Switch), which is also configured with a monitor port. Plug the mirrored port of the A‐Switch into the ESX server network interface. Contact your VMware Sales Representative if you require an A‐Switch. Add few more network interfaces to ESX server. Install another ADM Passive Collector on a different ESX server. NOTE The ADM Passive Collector can work with maximum of three monitor ports. If you have to connect more than three monitor ports, you must add another ADM Passive Collector. vCollector The ADM uses a virtual collector (vCollector) to listen to communication between virtual machines that run on the same VMware ESX Server. A vCollector is present inside a virtual machine and its listener collects the information about the virtual machines deployed on the ESX Server. By deploying a vCollector, the ADM is able to passively discover dependencies in a virtualized environment. You can then view information about the virtual machines that are deployed on the same ESX Server including: 12 Dependency maps between virtual machines. Activity counts of the dependencies. Services running on the virtual machines. Additional information that is offered by the listener. VMware, Inc. Chapter 1 Overview Mixed Environment The ADM 6.1.x release introduces ADM as a virtual appliance, but it also supports upgrading from 6.0 on a physical IBM appliances. You can upgrade your physical environment with additional virtual 6.1.x appliances like mixed environment. This additional virtual appliance can play a role of Passive Collectors (vCollectors) or an additional Passive and Active Collectors. . NOTE All ADM appliances that participate in mixed environemnt mode must run the same 6.1.x version of the ADM. Where To Go Next This section provides links that contains more information on the topics listed. Installation of New or Additional ADM Components Continue by configuring initial appliance settings as described in Chapter 2. Licenses You need a new license to use ADM after upgrading or migrating. Obtain the license from your VMware Sales representative. For more information, see “Licenses” on page 39. Upgrading ADM Continue with upgrade procedures as described in Chapter 6. Migrating to a New Appliance Continue with migration procedures as described in Chapter 7. Security For more information on ADM security, see Chapter 4.. VMware, Inc. 13 Application Discovery Manager Administration Guide 14 VMware, Inc. 2 2 Installing ADM This chapter describes installation and deployment of the ADM. This chapter includes the following topics: “ADM Installation Requirements” on page 15 “Disabling vMotion” on page 16 “Preparing the Environment” on page 17 “Deploying the Virtual Appliances” on page 18 “Installing Windows Collector” on page 20 ADM Installation Requirements ADM is an appliance that can run in a VMware infrastructure. This section contains requirements that must be met before you install and use the ADM appliance. Installation Personnel The installation procedures in this document must be performed by IT professionals familiar with virtualization and VMware technologies such as ESX servers and related virtual and physical equipment. ESX Resources To use the ADM appliance, you must install the ADM appliance on a VMware ESX server version 3.5 or later. Configure the virtual machine on your ESX server according to the deployment model with resources as described in Table 2‐1. Table 2-1. Virtual Appliance Deployments ADM Virtual Appliance (VA) Memory (GB) Number of vCPUs NICs Disk (GB) OVF Template Single‐Box 4 4 4 80 Core Aggregator + DB 4 4 1 80 Core Aggregator 3 2 1 80 Core Database 3 2 1 80 Core Passive Collector 2 1 4 8 Collector Linux Active + Passive Collector 4 2 4 8 Collector Windows Active Discovery Collector 2 1 1 20 NA NOTE VMware provides WinApe installer instead of OVF template for Windows 2008 R2 (Datacenter, Enterprise, and Standard) operating systems that hosts the WinApe. VMware, Inc. 15 Application Discovery Manager Administration Guide Installing the vSphere Client Install the vSphere client to work with VMware environment. To download and install the vSphere Client 1 Launch Internet Explorer browser. NOTE ADM supports Windows Internet Explorer 6.0 and later browsers. 2 In the address bar, type the IP number of the ESX Server where the virtual machine is installed, for example: https://ESX Server IP 3 Click the Download vSphere Client link, and then save the client executable file to your local hard disk. 4 Run the executable file. 5 Accept the license and click Next. 6 Type the user name and organization details if they do not appear by default. Click Next. 7 At the next screen, click Next without selecting Install vSphere Host Update Utility. 8 If different from the default, specify the installation folder, and then click Next. 9 Click Install. NOTE The vSphere client installation can take several minutes. 10 Click Finish to close the wizard. Disabling vMotion IMPORTANT ADM virtual appliances are not supported by vMotion. If the ADM virtual appliance is installed on a VMware DRS cluster, perform the following steps to disable automatic vMotion. To disable automatic vMotion 16 1 In the vSphere client, select the cluster, right‐click on it and select Edit Settings. 2 In the VMware DRS section, select Virtual Machine Options. 3 Select the ADM virtual appliances. 4 Select Disable from the Automation Level list box. 5 Click OK. VMware, Inc. Chapter 2 Installing ADM Preparing the Environment Perform the following procedures before you set up the ADM. Preparing an ESX Configuration Create and configure a new vSwitch for each physical span port. Repeat the following procedures for each new vSwitch. Creating a New vSwitch for Passive Discovery To create a new vSwitch for Passive Discovery 1 Connect the monitor ports to available network interfaces on the ESX server. 2 Connect to the ESX server or vCenter by using vSphere client. 3 Navigate to the Configuration tab on the ESX server where you want to deploy ADM appliances. 4 Navigate to the networking configuration option. 5 Click Add Networking to open the Add network wizard. 6 Select connection type as Virtual Machine, and click Next. 7 Select the vmnic that is connected to the monitor port on the physical switch and click Next. 8 Specify a network label, for example, span port, for the new port group and click Next. 9 Click Finish. Configuring the vSwitch General Settings for Passive Discovery To configure the vSwitch general settings for Passive Discovery 1 Open the new vSwitch Properties window. 2 Select the vSwitch and click Edit. 3 Navigate to the Security tab and change the Promiscuous Mode from Reject to Accept and click OK. 4 Click the network adapters tab, select the relevant vmnic and click Edit. 5 Change the Configured Speed, Duplex to 10 MB, Full Duplex. 6 Click OK and then Close. Configuring the vSwitch for Passive Collector Connect the Passive Collector to a port group. To define a port group 1 Create a port group in the vSwitch as follows: a Log in to the ESX Server or vCenter using vCenter Client. The Virtual Infrastructure Client screen appears. b Click the Configuration tab. c Select Networking from the Hardware list. IMPORTANT Perform the following steps to connect to vSwitches that span the internal traffic between virtual machines running on the ESX Server. VMware, Inc. d From the preceding screen, select Properties. e Select Ports and click Add. f Select Virtual Machine and click Next. 17 Application Discovery Manager Administration Guide 2 g Set the Network Label, for example, ADM span port and click Next. h Verify that the port group is listed, and click Finish. Change the Promiscuous Mode to Accept. This value is set to Reject by default. a Select the port group that you created; for example, ADM span port. b Click Edit and select Security tab. c Select Promiscuous Mode, and then select Accept from the list box. d Click OK and then Close. Configuring dvSwitch for Passive Collector If a virtual machine is directly connected to the network and not through the vSwitch, the physical Collector observes the traffic, while the vSwitch does not. This is termed as VMDirectPath. Software‐based Cisco Nexus switches are supported. This procedure is relevant only for vSphere 4 and not for ESX 3.5. To create a port group in the dvSwitch 1 Log in to the vCenter server with vCenter client. 2 Click Configuration and then select Networking from the Inventory tab. 3 Select Distributed vSwitch. 4 On the Configuration tab, select New Port Group. 5 Configure support for all VLANs by entering the details on the Create Distributed Virtual Port Group window as shown in Table 2‐2. . Table 2-2. VLAN Support Parameter Value Specified Name A name for port group (ADM span port). The name must be same as in vSwitch procedure. Number of ports One for each ESX in data center VLAN type VLAN Trunking VLAN ID 0‐4094 6 Click Next to finish and return to the dvSwitch Network Configuration screen. 7 Select the ADM span port group and click Properties. 8 Click the Security tab on the ADM span port Properties window. 9 Select Promiscuous Mode, and then select Accept from the list box. 10 Click OK and then Close. Deploying the Virtual Appliances The ADM virtual appliance contains and runs one or more of the following components: Aggregator Database Active Discovery UNIX Passive Discovery “System Architecture” on page 9 describes the appliance architecture. Perform the following procedures by using a Windows machine with remote access to the ESX server. 18 VMware, Inc. Chapter 2 Installing ADM Deploying the ADM Virtual Appliances Virtual appliances are installed on the ESX server according the configurations in Table 2‐3. Table 2-3. Virtual Appliance Configuration Appliance Type OVF Template Includes Component(s) Aggregator ADM Core Aggregator Database Single‐Box ADM Core Aggregator Database Passive Discovery UNIX Active Discovery Database ADM Core Database Aggregator with remote database ADM Core Aggregator Passive Discovery Collector ADM Collector Passive Discovery Passive and Active Discovery Collector ADM Collector UNIX Active and Passive Discovery NOTE Install a separate Windows Collector using an installation wizard as described in “Installing Windows Collector” on page 20. IMPORTANT Performance of ADM Collectors is affected by distance and network latency between the Collectors and objects being discovered. For more information, see VMware vCenter Application Discovery Manager Peformance and Scalability Guide. Before You Begin Ensure all requirements are met as described in “ESX Resources” on page 15. NOTE You can deploy ADM components in any order or even simultaneously by using the vSphere client. Deployment Procedure Repeat the following steps on each ADM virtual appliance, except the Windows Collector that is installed separately as described in “Installing Windows Collector” on page 20: 1 Download the ADM virtual appliance files from VMware Web site and extract the files to a local folder. The extracted Zip files include an OVF and a VMDK file. The VA files are in Zip format with the following naming convention: OVF Template‐build number where: OVF Template is as described in Table 2‐3. build number is the ADM version and build number. IMPORTANT Ensure that the build number is identical for all appliances deployed. 2 Log in to the ESX server by using the vSphere client. NOTE If an SSL Certificate Warning message appears, click Ignore. 3 VMware, Inc. In the File menu, select Deploy OVF Template. Browse to the OVF file and select it. 19 Application Discovery Manager Administration Guide 4 Click Next. The OVF Template Details screen appears. 5 Click Next. The Name and Location screen appears. 6 Type a unique virtual appliance name according to the IT naming convention of your organization and with relevance to the appliance type as described in Table 2‐3. 7 Click Next. The Datastore screen appears. NOTE If there is more than one datastore, select the datastore where you want to install the virtual machine. 8 Click Next. The Network Mapping screen appears. 9 Click Next. The Ready to Complete screen appears. It displays details about the OVF file, size for download and size when extracted, virtual appliance name, host or cluster, data store and network mapping. 10 Click Finish to confirm the settings and begin the deployment. NOTE The process of copying and configuring the ADM component can take several minutes. The deployment and configuration status appears in a message dialog box and the Recent Tasks pane. 11 Click Close in the message dialog box when deployment successfully completes. 12 Repeat this procedure until all components are deployed, and then continue with “Installing Windows Collector” on page 20. Installing Windows Collector Before You Begin Ensure that the Windows machine on which the Collector is being installed meets the minimum requirements as described in “ESX Resources” on page 15. Deployment To deploy Windows Collector on a Windows machine 1 Download the VMware vCenter ADM Windows Collector executable file from VMware Web site to your local Windows machine. 2 Double‐click the executable file. NOTE If a warning appears about an unknown publisher, click Run to proceed. The InstallShield Wizard screen appears. 3 Click Next. The License Agreement screen appears. NOTE Use the scroll bar to view all of the license text. If you do not want to accept the license, you will be prompted to confirm this before the installation program closes. 4 Read the license, select I accept the terms of the license agreement, and click Next. The Choose Installation Folder screen appears. NOTE The default installation path is: C:\Program Files\VMware\ADM. 20 5 If you want to change the default installation location, click Change and select the preferred installation directory. 6 Click Next. The Host Information screen appears. VMware, Inc. Chapter 2 Installing ADM 7 Type the following information to configure the Windows Collector: Aggregator IP Address Windows Collector unique ID NOTE This is the same identifier that was defined on the Aggregator side for WMI discovery. The default value is 200. 8 Click Next. The Installation screen appears. 9 Click Install to begin the installation. NOTE The process of installing and configuring the Windows Collector can take several minutes. 10 Click Finish to close the InstallShield Wizard screen when the installation process is complete. Uninstall To uninstall the ADM Windows Collector 1 Open the Windows Control Panel. 2 In the Control Panel window, select Program > Uninstall a Program. The Uninstall or change a porgram screen appears. 3 Double‐click or right‐click and select Uninstall to initiate removal of the ADM Windows Collector. NOTE The removal of the Windows Collector can take several minutes. 4 VMware, Inc. Click Finish to close the InstallShield Wizard screen when the uninstallation process is complete. 21 Application Discovery Manager Administration Guide 22 VMware, Inc. 3 Setting Up ADM 3 This chapter provides information for setting up the ADM virtual appliance deployments. This chapter includes the following topics. “Process” on page 23 “Post‐Installation Steps” on page 27 Process After the ADM appliance is deployed on the ESX Server, perform the following procedures: “Order of Setup” on page 23. “ADM Setup Procedures” on page 23 “Configuring the Root Password” on page 24 “Configuring Static Network Settings” on page 25 NOTE ADM only supports using a static IP address for the ADM virtual machine. “Configuring the Appliance Role” on page 26 “Uploading a License” on page 40 Order of Setup Repeat the setup procedures for all ADM components in the following order for all virtual appliances: 1 Database (where remote database is used) 2 Aggregator 3 Collectors (Passive, Active and Passive Collector) The Windows Collector is set up as described in “Installing Windows Collector” on page 20. ADM Setup Procedures Before you begin ensure that you have performed the following. 1 Ensure all relevant components are deployed as described in “Deploying the Virtual Appliances” on page 18. 2 Obtain the required information for each appliance deployed in Step 1 and record these values as shown in Table 3‐1. VMware, Inc. 23 Application Discovery Manager Administration Guide Table 3-1. Network Values Parameter Value Network IP address Network netmask Network gateway Domain Name Server (DNS) NOTE: You can enter up to three Domain Name Servers separated by comma. Fully Qualified (FQ) hostname Launching the First Boot Configuration Tool Repeat the following steps for each ADM virtual appliance: NOTE The Windows Active Collector is set up as described in “Installing Windows Collector” on page 20. 1 While selecting the virtual appliance, power it up by either: clicking the toolbar icon or right‐clicking and selecting Power > Power On NOTE Status of various tasks appear in the Recent Tasks pane on the bottom of the vSphere Client main screen. 2 Right‐click the relevant appliance and select Open Console tab to monitor this procedure. The appliance and relevant services start up. A Welcome message for the ADM first boot configuration tool (wizard) appears. 3 To launch the tool and configure the initial appliance settings, type yes. The wizard asks you to change the default password. You can change the default password by following the instructions described in “Configuring the Root Password” on page 24. NOTE If you type no for the initial appliance settings message, you can run the initial configuration later by running the system_setup command. NOTE If you type no for the change password message, the wizard prompts you to add network information. You can add the network information as described in “Configuring Static Network Settings” on page 25. Configuring the Root Password Perform the following procedure to change the root password. User Name and Passwords Passwords must contain a minimum of eight characters and it is recommended to include the following character types: 24 numeric uppercase lowercase non‐alphanumeric such as # or ! VMware, Inc. Chapter 3 Setting Up ADM To change the root password 1 Type a new password for the root user and press Enter. 2 Retype the password and press Enter to confirm. The wizard now asks to add network information, type yes. The wizard prompts you to add network information and you can add the network information as described in “Configuring Static Network Settings” on page 25. NOTE If you type no, you can add the network information by running the system_setup command and a message to set up the timezone appears. You can set up the timezone as described in “Configuring the Timezone and Time” on page 25. Configuring Static Network Settings The ADM only supports using a static IP address for the ADM virtual appliance. NOTE Default values appear in parenthesis. Some of these values must be changed according to the following steps. Beginning with the IP address, type the values that are recorded in “ADM Setup Procedures” on page 23, as described in Table 3‐2. Table 3-2. Network Settings CLI prompt Notes and Values IP address Type the IP address. Netmask Type the netmask. Gateway Type the gateway. DNS Type the DNS. Hostname Fully qualified hostname to be used by ADM, for example localhost.localdomain.com If all the network information is correct, the wizard prompts you to set up the timezone. You can set up the timezone as described in “Configuring the Timezone and Time” on page 25. Configuring the Timezone and Time This prompt asks you to set up the timezone, type yes. The wizard displays the current timezone and prompts you to set up the time zone by clicking the number of your choice. The options available are as follows: 1 From zone list: If you select 1, all possible zones are listed and you can enter the number of timezone that you want to set. The wizard displays the selected timezone and asks for confirmation. If you type yes, the timezone is selected and a message to set up the local time appears. or 2 Manually: If you select 2, a message that asks you to enter major world city in continent/city format appears. Enter the details as per the format and press Enter. If the timezone entered is present in the database, the timezone is selected and a message to set up the local time appears. or 3 Exit TimeZone settings: If you select 3, the wizard exits the timezone configuration and a message to set up the local time is displayed. For more information about timezones, see Appendix A, “Time Zones,” on page 57. The wizard displays the current time and asks to set up the local time. Enter the current date and local time in YYYY/MM/DD‐HH:MM:SS format, and press Enter. VMware, Inc. 25 Application Discovery Manager Administration Guide The wizard displays all the settings that you have completed and asks for your confirmation to save the information. If you type yes, the wizard saves the settings and the system starts rebooting. After completion, the wizard displays the message to set the appliance role setting. You can configure the appliance role as described in “Configuring the Appliance Role” on page 26. NOTE If you type no, the wizard does not save anything and you must start the settings from the beginning. Configuring the Appliance Role NOTE If you type no for appliance role set up, you must run the role_setup command to set up the appliance role. For Core appliances deployed in“Deploying the Virtual Appliances” on page 18, the appliance role choices are shown in Table 3‐3. Table 3-3. Core Appliance Roles Select Role Configures 1 Aggregator Combined Aggregator and database appliance in distributed solution. 2 Single‐Box Single‐Box solution. 3 Database Database appliance in Distributed with remote database solution. 4 Aggregator with remote database Aggregator appliance in Distributed with remote database solution. 5 Remind me later Skips appliance role configuration for now. You must run the role_setup command to set up the appliance role. To configure the appliance role for Core 1 Type yes at the appliance role prompt and press Enter. 2 Type the role number and press Enter. NOTE If you select 4, the wizard also asks to enter the database IP. The wizard starts configuring appliance role and creates the initial database schema. This process might take some time. The appliance role is then created. This process might take some time. For Collector appliances deployed in “Deploying the Virtual Appliances” on page 18, the appliance role choices are shown in Table 3‐4. Table 3-4. Collector Appliance Roles 26 Select Role Configures 1 Passive and Active Discovery Collector Single Collector for active and passive discovery 2 Passive Discovery Collector This option also configures Passive Collector Internal. 3 Remind me later Skips appliance role configuration for now. You must run the role_setup command to set up the appliance role. VMware, Inc. Chapter 3 Setting Up ADM To configure the appliance role for Collector 1 Type yes at the appliance role prompt and press Enter. 2 Type the role number and press Enter. 3 If you select 1, you have to enter the Collector ID of your choice and press Enter. The default value is 100. 4 Type the Aggregator IP and press Enter. The appliance role is then created. This process might take some time. NOTE The Windows Active Collector role is installed by running an executable as described in “Installing Windows Collector” on page 20. Post-Installation Steps Before you login to the ADM console, clear the cache of your browser to prevent the possible appearance of incorrect information in the displays, application errors, and other error messages when opening the ADM. NOTE Additional ADM UI administrators and the more limited operator users are later defined by the default ADM admin user. The VMware vCenter Application Discovery Manager User’s Guide provides more details. Logging In to the ADM Console After you complete the appliance installation, login to the system by using the browser and perform the following steps: 1 Type the IP address of the management appliance in the address bar and click Go. The login screen appears. 2 Type admin in the Username field and default password 123456 in the Password field. 3 Click Login. IMPORTANT You might be required to upload a new license. Before proceeding, review the criteria and if necessary, perform the steps described in“Licenses” on page 39. Initiating Passive Discovery Only one Passive Discovery Policy Definition is present in the ADM. The first time you use ADM, you must set up the policy definition and start it. To initiate Passive Discovery 1 Click Manage, and then select the Passive Discovery menu. 2 Select the components on which ADM performs Passive Discovery from the Scope Component field. 3 Based on your selection, type the appropriate IP information: IP range: Use Notation to type a group of hosts with similar IP addresses. For example, 192.0.2.* includes all hosts with IPs starting with 192.0.2. You can also search all hosts by typing an asterisk in each field. Use IP range to include a group of hosts within a defined IP range. IP: Add a single specific host to the group to include or exclude from the scope. Subnet NetMask: Configure the IP address scope by providing the base network address with the full dotted decimal notation for the subnet mask, Subnet Slash Notation: Configure the IP address scope by providing the base network address with the Classless Inter‐Domain Routing (CIDR) notation for the subnet mask. 4 Click Include to include the components in the discovery or Exclude to exclude them from it. 5 Repeat Step 2 through Step 4 for each component that you are including or excluding from discovery. VMware, Inc. 27 Application Discovery Manager Administration Guide 6 Optionally, use the rules and rule templates to further define the scope criteria: Y: Instructs ADM to include the components in the Passive Discovery. N: Excludes the components from discovery. I: Allows you to ignore the rule. 7 If you select a rule template, click the blue link to customize the rule. 8 Click Update to save the settings. 9 Optionally, add a Passive Discovery Plan. 10 Restart Passive Discovery. Navigate to the Manage > System page, and click Restart Discovery. 11 Click OK in the message box that states: Starting a new Passive Discovery deletes all existing discovery data. This might take a few minutes. The system is unavailable to all users during this process. Continue? 28 12 Click OK to begin the discovery process. The dashboard reappears with the Discovery status (initially “Discovering”) in the top status bar of the ADM Console. 13 You can now begin using the ADM. The VMware vCenter Application Discovery Manager User’s Guide provides an overview of Passive Discovery, and the online help provides more detail on the actions that you can perform. VMware, Inc. 4 Securing ADM 4 This chapter provides information on securing ADM appliance. This chapter includes the following topics: “Changing the Root Password” on page 29 “Resetting the ADM Root Password” on page 29 “OpenSSL Self‐Signed Test Certificates” on page 30 “CA Signed Test Certificates” on page 30 Changing the Root Password To change the root password 1 Log in to the ADM appliance by using a Secure Shell (SSH) client. 2 Run the passwd command: a The wizard asks to enter a new password. b Retype the password. If both the passwords match, the password is changed and all authentication tokens gets updated. Resetting the ADM Root Password To reset the ADM root password 1 Using the VMware vSphere client, start or restart the virtual machine. 2 After the virtual machine restarts, click any key in the console window. NOTE If you do not click any key in the console window immediately after the virtual machine restarts, you must restart the virtual machine and perform step 2 again. To give you additional time when clicking a key in the console window, you can manually add a line to the VMX file. Adding the line to the file causes the BIOS to delay. For example, to cause a 10 second delay, power down the virtual machine, open the VMX file in a text editor, type the following line in the VMX file: bios.bootDelay="10000" The boot screen appears. 3 Press e to enter the GRUB boot menu. The GNU GRUB loader screen appears. 4 Highlight (2.6.24.7‐9.smp.pae.gcc3.4.x86.i686), and press e. 5 Select the kernel line and press e to edit the entry. VMware, Inc. 29 Application Discovery Manager Administration Guide 6 Place your cursor at the end of the line and append the line by typing: single 7 Press Enter to commit the change. 8 Press b to start the system. Your system starts without requiring a password. 9 Type the following command to reset the password: passwd 10 Follow the prompts as they appear on the screen to set the password. 11 Type the following command to restart the system: reboot Your password is changed and restarts the system. NOTE You can also reset the ADM root password by running system_setup command. OpenSSL Self-Signed Test Certificates The VMware vCenter Application Discovery Manager default installed certificate is created during the installation and is valid for one year to use the appliance until you acquire a local Certificate Authority (CA). Public‐facing secure Web sites must use a third‐party CA. If you want to use the appliance in test environment and then deploy that appliance to a production environment, you must not change the hostname as the ADM does not support changing the hostname. Instead, you can set up an alias in the DNS to resolve the appliance hostname. CA Signed Test Certificates To create CA signed certificates, you must generate a certificate request file (csr). The certificate request file provides details about the requester of the certificate and the certificate is signed by the private key above to your trusted certificate authority. Create the certificate request by typing: openssl req -new -key server.key -out server.csr Fill in the X.509 attributes as specified previously. For more details consult your CA. To install the certificate provided by your CA, perform the steps described in “Copying the .key and .crt Files” on page 31. Free CA providers, as http://www.cacert.org exist. Self-Signed Certificates Use self‐signed certificates only in the test environments, or where only a limited number of connections is established. For example, peer‐to‐peer relationships can be a custom VPN or AS2 link between two companies, or between two different sites of the same company. Self‐signed certificates become impractical as the number of certificates necessary to manage grows linearly with the number of peering relationships. A local CA, while more complex to setup, reduces the number of keys required to be distributed for verification, and replicates a real‐world certificate environment. A CA can cost less to manage than hundreds or thousands of individual certificates on each peer system. NOTE Do not use the self‐signed certificates in production environments. Certificate creation requires the openssl utility. The openssl utility is located in the ADM appliance folder. /usr/bin/openssl 30 VMware, Inc. Chapter 4 Securing ADM To create a certificate 1 To generate the Rivest, Shamir, and Adleman (RSA) key type: cd /etc/httpd/conf/ssl.prm/ openssl genrsa 2048 > server.key chmod 400 server.key The openSSL utility can generate a Digital Signature Algorithm (DSA) key by using the gendsa option. For compatibility, VMware recommends RSA keys by using 2048‐bits as the key size. 2 Create the certificate by typing: openssl req -new -x509 -nodes -sha1 -days 365 -key server.key > server.crt The -new, -x509, and -nodes arguments are required to create an unencrypted certificate. The -days argument specifies the length of time the certificate is valid. For encrypted certificates, every time you are required to type the password until the key is loaded. NOTE In most cases, encrypted certificates are not worth the operational burden, as each process restart or system restart requires you to manually type a password. You can ask questions to complete X.509 attributes certificate. Adjust the answers to your local settings. If frequently typed, you can update the system openssl.cnf file (in the /usr/share/ssl/ directory) with the correct defaults. Table 4‐1 lists X.509 attribute sample prompts and answers. Table 4-1. X.509 Sample Prompts and Answers Prompt Answer Country name (2 letter code) [AU]: US State or province name (full name) [Some‐State]: Massachusetts Locality name (eg, city) [ ]: Boston Organization name (for example, company) [Internet Widgits Pty Ltd]: YourCompanyOrg Organizational unit name (for example, section) [ ]: ‐ Common name (for example, YOUR name) [ ]: hostname.domain E‐mail address [ ]: [email protected] For web services, the common name field must exactly match the hostname (or VIP name, for hosts associated with a load balancer) of the system certificate is used on; otherwise, a certificate to hostname mismatch can occur. In peer‐to‐peer setups for AS2, this field can usually be set to a descriptive string. The certificate data in the server.crt file must be transferred to all client systems that need to verify the key of the server to which it is connected. If this method does not scale, setup a CA, and distribute the signing certificate to the clients instead of each self‐signed certificate. Optionally, you can extract the metadata. Copying the .key and .crt Files Type the following commands to copy the .key and .crt files: cp server.crt /etc/httpd/conf/ssl.crt cp server.key /etc/httpd/conf/ssl.key To make the certificate effective, restart the Apache service by typing adm_control.pl --restart apache VMware, Inc. 31 Application Discovery Manager Administration Guide 32 VMware, Inc. 5 Maintenance 5 This chapter describes the necessary concepts and procedures to maintain an ADM deployment. This chapter includes the following topics: “ADM Services” on page 33 “Product Support Packages” on page 34 “Restoring an ADM Environment by Using a Product Support Package” on page 36 “Reconfiguring an ADM Deployment” on page 38 “Licenses” on page 39 ADM Services Table 5‐1 describes the main ADM services. Table 5-1. ADM Services Service name Description apache Web server service. active_probe Service responsible for performing Detail Discovery and runs on Linux Collectors and the Windows virtual machine. This service performs: engine WMI‐based discovery on the Windows Collector SSH‐, SNMP‐, VI‐SDK‐, and Telnet‐based discovery on the UNIX Collector The core of ADM and includes the following components: User interface Management Reconciliations Analytic listener Service responsible for the Passive Discovery mechanisms. oracle Database service. vnc Physical IBM Collectors only. The vnc service enables VNC access to the Windows instance so that the IP address can be configured. vmware Physical IBM Collectors only. The Windows instance on the appliance is installed on a virtual machine. The vmware service starts VMware so that the Windows instance can start. watchdog VMware, Inc. Service that monitors the health of the other services. If another service has a problem, watchdog service tries to identify the service and resolve the problem. 33 Application Discovery Manager Administration Guide Managing Services with adm_control ADM provides the adm_control.pl script to start, stop, and monitor ADM services. You can start or stop any service, but if you stop any service all dependent services are stopped as a result. All dependent services is listed during the stop process. Table 5‐2 lists and describes the commands for the ADM services. Table 5-2. ADM Service Commands Use the Following Command To adm_control.pl --status <service name> Display the status of the ADM service. adm_control.pl --stop <service name> Stop the ADM service. adm_control.pl --start <service name> Start a stopped ADM service. adm_control.pl --restart <service name> Stop and restart the ADM service. adm_control.pl --help Display all of the command options. adm_control.pl --command all Apply the command to all services. Service name is a name of Service defined in Table 5‐1. NOTE Every appliance has only relevant services started and all the others are disabled depending on the role. To run an adm_control.pl command 1 Log in to the appliance as user root. 2 Type the adm_control.pl command as demonstrated in Table 5‐2, for example: adm_control.pl --stop all All services that are listed in Table 5‐1 stop. Product Support Packages Create the product support packages to back up, restore, or troubleshoot the ADM. Product support packages contain a real‐time capture of the ADM database, configuration files, customization files, and logs. Table 5‐3 describes the files the product support package contains and its use. Table 5-3. Product Support Packages Files and Uses File Use Database data Back up and restore of the ADM database. Active Probe and Passive Listener definition files Back up and restore of the required ADM configurations. Detail discovery and Passive Discovery fingerprints Back up and restore of the custom ADM configurations. Logs Troubleshooting. License file Serial number used for managed server host. VMware recommends that you create and save a support package prior to performing any maintenance procedures, such as an upgrade, restore, and fresh installations or before contacting VMware Customer Support. Support packages are backups of the ADM and relevant configuration files. These packages contain troubleshooting log files and are used to restore your ADM environment. 34 VMware, Inc. Chapter 5 Maintenance You can create support packages either through the ADM Console or through the Command Line Interface (CLI). NOTE Product support packages require a password for extraction. Contact VMware Customer Support to retrieve the password if you use the product support package to restore ADM or the ADM database as described in “Restoring an ADM Environment by Using a Product Support Package” on page 36. CAUTION Re‐imaging removes all files (including the support package) from the appliance, so save the support package elsewhere. Using the ADM Console Use the ADM Console to create a product support package in an Single‐box setup deployment and to create a product support package for the Aggregator in any type of ADM deployment. Chapter 2 describes the different ADM deployment options: NOTE The UI option is relevant only to the appliances with Aggregator component. 1 Log in to the ADM Console. 2 Navigate to Manage > System > Create Product Support Package. 3 Wait for a few minutes and then refresh the page to see if the Status has changed from Pending to Success. 4 Click the appropriate product support package Zip file displayed in the table and download it. By default, the filenames are listed from the most current back date. Each product support package Zip filename includes the ADM database schema version, date, and timestamp for easy recognition. 5 Click Save. NOTE By default, the ADM saves the product support packages only for seven days. Ensure to save to the product support package to another location if you want to save the information for longer duration. Using the CLI Use the CLI to create support packages for each collector or database in a distributed ADM deployment, or for the Aggregator, database, or Single‐Box deployment when the Aggregator is not available through the ADM Console. Chapter 1 describes the different ADM deployment options: 1 Log in to the Collector or Aggregator appliance as user root. NOTE Log in to the Aggregator to create a backup of the ADM database. You are not required to login to the remote database appliance to create a backup of the database files. 2 Change the directory to the /home/nlayers/Seneca/management/APIs directory. 3 Type the following command: ./InSight_control.sh supportpackage --get --output filename filename.zip is created at the same location. 4 Copy and save the zip file from the ADM appliance to a different location. NOTE Ensure to save to the product support package to another location if you want to save the information for longer duration. The ADM saves the package only for seven days if you select the default location. VMware, Inc. 35 Application Discovery Manager Administration Guide Restoring an ADM Environment by Using a Product Support Package To restore an ADM configuration 1 Backup your ADM environment as described in “Product Support Packages” on page 34. 2 Contact VMware Customer Support to retrieve the password for extracting the product support package. 3 Follow the steps in “Restore the ADM Database” on page 36. 4 If necessary, “Restoring the Custom Discovery and Configuration Files” on page 37. IMPORTANT If you are migrating to a new appliance, follow the instructions in “Migrating to a New Appliance” on page 45. NOTE In the following sections, the directory in which the product support package files are extracted is called as supportpackagedir. Restore the ADM Database The following steps describes restoration of the ADM database in an Single‐Box and distributed deployment. Chapter 1 describes the different ADM deployment options: 1 Log in to the Aggregator or Single‐Box appliance as user root. NOTE Distributed deployment only: In a distributed deployment the database or remote database is restored through the Aggregator. 2 Create a temporary directory: mkdir supportpackagedir 3 Copy the support package into the temporary directory that you created in Step 2. 4 Extract the support package into the temporary directory: unzip support_package__version_date_and_timestamp.zip where version_date_and_timestamp is the unique identifier of the package. 5 When prompted for the password, type the password you retrieved from VMware Customer Support. 6 After extraction completes, copy the database backup file: supportpackagedir/supportpackage/backup.db_dump-main-db_schema_build-db_dump.gz where db_schema_build is the database schema version and build number. 7 Place the copied file in the following directory: /home/nlayers/Seneca/Control/bin/home/nlayers/Seneca/db_scripts/oracle 8 Type the following command to stop the engine service: /adm_control.pl --stop engine 9 Type the following command to switch to the nlayers user: su - nlayers 10 Change directory to: cd /home/nlayers/Seneca/db_scripts/oracle 11 Type the following command to restore the db backup: ./db_restore.sh backup.db_dump-main-db_schema_build-db_dump.gz prod where db_schema_build is the database schema version and build number. NOTE The database restore process can take up to 30 minutes. 36 VMware, Inc. Chapter 5 Maintenance 12 Exit from the nlayers user. 13 Type the following adm_control.pl command to start the services: /home/nlayers/Seneca/Control/bin/adm_control.pl --start all NOTE If the ADM configuration being restored has custom configuration files or fingerprints, you must complete the steps outlined in “Restoring the Custom Discovery and Configuration Files” on page 37. Restoring the Custom Discovery and Configuration Files ADM custom configuration files contain restore information for Passive Discovery custom fingerprints, Passive Discovery custom configuration, Detail Discovery custom fingerprints, and Detail Discovery custom configuration. To restore the custom discovery and configuration files 1 Log in to the Collector or Single‐Box setup as user root. IMPORTANT For distributed solutions only: The custom files must reside on the Collector appliance. In this case complete the following steps on each Collector in the deployment. If the feature can be customized, the ./custom/* directory contains the files. If the directory is empty, no customization files are associated with the feature. 2 Create a temporary directory: mkdir supportpackagedir 3 Copy the support package into the temporary directory you created in Step 2. 4 Extract the support package into the temporary directory: unzip support_package__version_date_and_timestamp.zip where version_date_and_timestamp is the unique identifier of the package. 5 When prompted for the password, type the password you retrieved from VMware Customer Support. 6 Copy all files from: supportpackagedir/supportpackage/listener/custom/conf 7 Place the copied files to: /home/nlayers/Seneca/probe 8 Copy all files from: supportpackagedir/supportpackage/listener/custom/kb 9 Place the copied files to: /home/nlayers/Seneca/probe/resources 10 Copy all files from: supportpackagedir/supportpackage/active_discovery/custom/conf 11 Place the copied files to: /home/nlayers/Seneca/ActiveProbe/conf 12 Change directory to: /home/nlayers/Seneca/management/APIs 13 Type the following command: ./InSight_control.sh adkb --checkout /tmp 14 Copy all files and subdirectories from: supportpackagedir/supportpackage/active_discovery/custom/kb/custom VMware, Inc. 37 Application Discovery Manager Administration Guide 15 Place the copied files to: /tmp/adkb/custom 16 Overwrite any files or folders in the destination directory if prompted to do so. 17 Type the following command to check in the custom fingerprints: /home/nlayers/Seneca/management/APIs/InSight_control.sh adkb --checkin /tmp 18 Type the following adm_control.pl command to restart the relevant services: /home/nlayers/Seneca/Control/bin/adm_control.pl --restart all NOTE Distributed deployment: Repeat Step 1 through Step 18 for each collector in the ADM deployment. Reconfiguring an ADM Deployment You can reconfigure deployment of physical IBM all‐in one, Aggregator and database appliances as follows: “Adding a Remote Database to an Existing ADM Deployment” on page 38 “Converting a Single‐Box or Aggregator to a Remote Database” on page 38. Note important restrictions. “Moving a Database to a Remote Appliance” on page 39 Virtual components must be redeployed as described in “Installing ADM” on page 15. Adding a Remote Database to an Existing ADM Deployment To add a remote database to the ADM deployment 1 Ensure that all components are running ADM version 6.0 or later before adding the remote database to your ADM deployment. All appliances must be on the same version. 2 If you have an existing database, back it up using the steps described in “Product Support Packages” on page 34. 3 After ensuring that all components are running the same ADM version, follow the instructions described in “Upgrading Appliances” on page 42. 4 Restore the backed‐up database to the new database appliance as described in “Restore the ADM Database” on page 36. Converting a Single-Box or Aggregator to a Remote Database Beware of the following before converting an existing component to a remote database: CAUTION You cannot restore the data from a component that you are converting. All of the data on the Single‐Box or Aggregator component that you are converting to a remote database is lost during conversion. You can only convert an Aggregator component that is not part of the ADM deployment into a remote database. For example, if you have an Aggregator appliance that you are using in a test environment, and another that you are using in your production environment, you can convert the test component into a remote database. You can convert an Aggregator component into a remote database when you already have more than one Aggregator appliance. You can convert an appliance that is running an Single‐Box setup into a remote database. To convert the component to a remote database 38 1 Setup the database appliance as described in the “ADM Setup Procedures” on page 23. 2 Log in to the database appliance as user root. VMware, Inc. Chapter 5 Maintenance 3 Ensure that the database mode is set correctly, as follows: a Type the command: /home/nlayers/Seneca/tools/appliance_conf.pl --status b If the mode is not database correct it by typing: /home/nlayers/Seneca/tools/appliance_conf.pl -mode=d 4 Make a note of the IP address of the remote database. 5 Run the appliance_conf.pl script on the Aggregator appliance: a Edit the file /home/nlayers/Seneca/tools/remote.db.conf. b Replace the existing IP address with the remote database appliance IP address. c Run the appliance_conf.pl script with the –mode=g option by typing: /home/nlayers/Seneca/tools/appliance_conf.pl -mode=g 6 Restart the appliance. 7 Clear the cache of your browser to prevent the possible appearance of incorrect information in the displays, application errors, and other error messages when opening the ADM. Moving a Database to a Remote Appliance To move a database to a remote appliance 1 Backup the database from the existing database as described in “Product Support Packages” on page 34. 2 Copy the database backup file backup.db_dump-main-db_scheme_version-db_dump.gz to the Remote Database appliance. 3 Restore the database on the Remote Database appliance as described in “Restore the ADM Database” on page 36. 4 Log in to the database appliance as user root. 5 Type the following command to ensure that the database mode is set to the correct mode: /home/nlayers/Seneca/tools/appliance_conf.pl --status 6 If the mode is database, continue with the following step. If the mode is not database, type the following command to change the mode: /home/nlayers/Seneca/tools/appliance_conf.pl -mode=d 7 Note the IP address of the remote database. 8 Continue to perform the steps described in “Adding a Remote Database to an Existing ADM Deployment” on page 38. Licenses You must renew the licenses when: reaching the expiration date expanding the customer‐discovered network scope. This procedure for uploading a new license must be performed following each: initial installation migration of ADM for 6.1.x release. upgrade from ADM 6.0.x It is not necessary to perform this procedure when upgrading from ADM versions 6.1.x or later. VMware, Inc. 39 Application Discovery Manager Administration Guide Access the Licenses Properties screen from the Manage > System > Licensing menu in the ADM UI that displays the license information, which includes the licensed feature, quantity of available licenses, and expiry date. The appropriate warning message appears on the Dashboard, Inventory and License Properties page. An ADM UI administrator can login to review license limitations and upload new licenses as required. Uploading a License IMPORTANT Before you begin, obtain the serial number for managed server host. Perform the following procedure to upload a license. 40 1 Log in to the ADM UI as an admin user. 2 Navigate to the Manage > System screen and click Licensing. The License Properties screen appears 3 Click Upload a new License. The Upload a new license screen appears. 4 Enter the serial number and click Apply. If the serial number is valid, the serial number is uploaded and License Properties page is displayed. VMware, Inc. 6 Upgrading ADM 6 This chapter describes the necessary concepts and procedures to upgrade an ADM deployment. This chapter includes the following topics: “Overview” on page 41 “Upgrading Appliances” on page 42 “Post‐Upgrade Steps” on page 43 Overview The following considerations apply for appliance upgrades and migration. Appliance Type You can upgrade ADM on physical ADM on virtual appliances running versions 6.1.x or later as described in “Upgrading Appliances” on page 42. Mixed Environments Some sites can have a combination of physical and virtual appliances. You must upgrade them to the same ADM version by using the procedures described in “Upgrading Appliances” on page 42. For more information about mixed environment, see “Mixed Environment” on page 13. Licenses You need a new license to use ADM after upgrading from 6.0.X. Obtain the license from your VMware Sales representative. “Licenses” on page 13 provides more information. Appliance Migration Chapter 7 describes procedures for migration to virtual appliances. Backing Up Data Backup the data to prevent loss during the migration and upgrade process. “Product Support Packages” on page 34 describes backup and restore procedures. VMware, Inc. 41 Application Discovery Manager Administration Guide Upgrading Appliances This section describes the upgrading of Application Discovery Manager versions 6.0.x or later for physical appliances and 6.1.x or later for virtual appliances. Important Notes All appliances in your current environment must run ADM version 6.0.x or later. Also, upgrade all appliances to the same ADM version. Before upgrading the ADM, familiarize yourself with “Overview” on page 41. For distributed solutions, perform the upgrades in the following order: a Remote database appliance (where one exists) b Collectors c Aggregator Repeat the following procedures for all appliances and architecture solutions, unless otherwise indicated. Preliminary Procedures 1 Backup your data as described in “Product Support Packages” on page 34 (performed on Aggregator or Single‐Box appliance and collectors if custom fingerprints exists). 2 Log in to the appliance and open an SSH session and type the following command to monitor the progress of upgrade: tail -f /var/log/nlayers/update.log This SSH session is in addition to any other session opened for the purpose of upgrading. The above script also prints success or failure messages along with other useful information to stdout. 3 Perform all upgrades by using the CLI procedures as described in “Upgrading Appliances Using CLI” on page 42. Upgrading Appliances Using CLI To upgrade all appliances by using CLI 1 Download the update_runner.pl and InSightUpdate-version.upd files from http://downloads.vmware.com/Application Discovery Manager into: /home/nlayers/rpms/versionX.x/ 2 Change file access: chmod 744 update_runner.pl 3 Upgrade VMware ADM services: ./update_runner.pl -u -f InSightUpdate-version-build.upd 4 Wait for the upgrade to complete. For distributed solutions, repeat the upgrade procedures for all remaining appliances as described in “Upgrading Appliances” on page 42. NOTE The upgrade process can take several minutes to complete. You cannot access the ADM Console while the upgrade is in progress. 5 Proceed with “Post‐Upgrade Steps” on page 43. NOTE WinApe is upgraded as part of aggregator upgrade and you are not required to upgrade it separately. 42 VMware, Inc. Chapter 6 Upgrading ADM Post-Upgrade Steps Before you login to the ADM console: Clear the cache of your browser to prevent the possible appearance of incorrect information in the displays, application errors, and other error messages when opening the ADM. IMPORTANT You might be required to upload a new license if you are upgrading from 6.0.x. Before proceeding, review the criteria and if necessary, perform the steps described in“Licenses” on page 13. You can now begin using the ADM. VMware, Inc. 43 Application Discovery Manager Administration Guide 44 VMware, Inc. 7 Migrating to a New Appliance 7 This chapter provides instructions on migration of an existing physical or virtual ADM appliance to a virtual appliance supplied by VMware. This chapter includes the following topics: “Overview” on page 45 “Preliminary Procedures” on page 46 “Data Restoration” on page 47 “Post‐Migration Steps” on page 48 Overview Additional documentation as described below is available at http://downloads.vmware.com/ Supported Migration Appliance migration is supported from ADM 6.0.x. Upgrade earlier versions to the latest 6.0.x version by using the procedures described in the “Upgrading ADM” on page 41. NOTE Part of the upgrade procedure to ADM 6.0.x can include upgrading custom fingerprints created in earlier version. Additional information on fingerprints is available in the VMware vCenter Application Discovery Manager Fingerprint Developers Guide. Licenses You need a new license to use ADM after migrating to a new appliance. Obtain the license from your VMware Sales representative. More information is provided in “Licenses” on page 13. System Architecture Detailed descriptions are provided in “System Architecture” on page 9. Migration steps differ for different appliance setups: Single‐Box Distributed Distributed with remote database IMPORTANT The new virtual appliance solutions feature separate virtual appliance components for Collectors, Database, and the Aggregator. Initial setup and data restoration is therefore performed separately for each component. VMware, Inc. 45 Application Discovery Manager Administration Guide Migrate or upgrade all appliances to the same ADM version in the following order: 1 Remote database (for Distributed with remote database solution) 2 Collectors (for all Distributed solutions) 3 Aggregator Process The migration process is as follows: 1 Record the current appliance network settings as described in “ADM Setup Procedures” on page 23. 2 Backup your data as described in “Product Support Packages” on page 34. IMPORTANT The backup procedures involve copying custom ADM files. Ensure that the files maintain the original nLayers ownership after copying. Editing the files as root might change the ownership of the files. 3 Backup UNIX Collectors if custom fingerprints exist. 4 Backup Windows Collector fingerprints as described in “Backing Up WinApe Migration Files” on page 46 and shutdown all old appliances. 5 Install and deploy the new virtual appliance as described in “Deploying the Virtual Appliances” on page 18. 6 Restart the appliance and performing initial setup tasks as described in Chapter 3. 7 Restore UNIX Collector fingerprints. 8 Restore Windows Collector fingerprints as described in “Restoring WinApe Migration Files” on page 47. Preliminary Procedures CAUTION Backup of existing data is essential to prevent data loss during the migration process. For all solutions, back up files are needed for WinApe migration to another computer as shown in table Table 7‐1. The following table describes the WinApe migrations files. For virtual appliance, the default location is C:\Program Files\VMware\ADM. For physical appliance, the default location is C:\Program Files\nLayers\InSightActiveDiscovery. Table 7-1. WinApe Migration Files File Remark \lib\java\adkbcustom.jar Always Backing Up WinApe Migration Files NOTE You can only manually backup the WinApe migration files. 46 1 Log in to the WinApe appliance. 2 Navigate to the folder where WinApe is installed. 3 Create the backup of adkbcustom.jar file present in \lib\java folder. VMware, Inc. Chapter 7 Migrating to a New Appliance Restoring WinApe Migration Files NOTE Backup your ADM environment as described in “Backing Up WinApe Migration Files” on page 46. The following procedures describes the restoration of WinApe migration files. 1 Log in to the WinApe appliance. 2 Copy the adkbcustom.jar backup file. 3 Navigate to the \lib folder. 4 Replace the current file in \lib folder with the copied file. 5 Run the services.msc command. 6 Restart the service VMware vCenter ADM Windows Collector. Data Restoration This section provides information about data restoration for Single‐Box, distributed, and distributed with remote database solution. Single-Box Solution 1 Restore the ADM database as described in “Restoring an ADM Environment by Using a Product Support Package” on page 36. 2 Restore the custom discovery and configuration files as described in “Restoring the Custom Discovery and Configuration Files” on page 37. 3 For WinApe, first create the backup as described in “Backing Up WinApe Migration Files” on page 46 and then restore it as described in “Restoring WinApe Migration Files” on page 47. Distributed Solutions These steps apply to distributed solutions without a remote database. Perform the following steps on all appliances in the following order: Collectors, WinApe, and Aggregator. Collectors Repeat the following steps for each Collector appliance: 1 Log in to the Collector virtual appliance. 2 Restore the custom discovery and configuration files as described in “Restoring the Custom Discovery and Configuration Files” on page 37. WinApe Repeat the following steps for each Windows appliance: 1 Log in to the WinApe appliance. 2 Backup the WinApe migration files as described in “Backing Up WinApe Migration Files” on page 46. 3 Restore the WinApe migration files as described in “Restoring WinApe Migration Files” on page 47. VMware, Inc. 47 Application Discovery Manager Administration Guide Aggregator 1 Log in to the Aggregator virtual appliance. 2 Restore the ADM database as described in “Troubleshooting ADM by Using the Product Support Package” on page 49. 3 Make the necessary changes in the Active probe configuration screen under the Manage > System menu of the ADM console to reflect the new collector appliance. The VMware vCenter Application Discovery Manager User’s Guide. Distributed Solution with Remote Database These steps apply to distributed solutions with a remote database. Perform the following steps on all appliances in the following order: Collectors, WinApe, database, Aggregator. Collectors Repeat the following steps for each Collector appliance: 1 Log in to the Collector virtual appliance. 2 Restore the custom discovery and configuration files as described in “Restoring the Custom Discovery and Configuration Files” on page 37. WinApe Repeat the following steps for each Windows appliance: 1 Log in to the WinApe appliance. 2 Backup the WinApe migration files as described in “Backing Up WinApe Migration Files” on page 46. 3 Restore the WinApe migration files as described in “Restoring WinApe Migration Files” on page 47 Database 1 Log in to the database virtual appliance. 2 Restore the ADM database as described in “Restoring an ADM Environment by Using a Product Support Package” on page 36. Aggregator 1 Log in to the Aggregator virtual appliance. 2 Make the necessary changes in the Active probe configuration screen under the Manage > System menu of the ADM console to reflect the new collector appliance. The VMware vCenter Application Discovery Manager User’s Guide. Post-Migration Steps Before you login to the ADM console: Clear the cache of your browser to prevent the possible appearance of incorrect information in the displays, application errors, and other error messages when opening the ADM. NOTE ADM default groups does not get refreshed during the upgrade. The Management chapter of the VMware vCenter Application Discovery Manager User’s Guide provides more information on groups administration. You can now begin using the ADM. 48 VMware, Inc. 8 Troubleshooting ADM 8 This chapter provides instructions on troubleshooting of the ADM. This chapter includes the following topics: “Troubleshooting ADM by Using the Product Support Package” on page 49 “Troubleshooting Error Messages During WMI Discovery” on page 49 “Detail Discovery Troubleshooting” on page 49 Troubleshooting ADM by Using the Product Support Package You can use the ADM product support package for troubleshooting: 1 Create an ADM product support package as described in “Product Support Packages” on page 34. 2 Contact your VMware Customer Support representative and provide them with the product support package that you generated in Step 1. Troubleshooting Error Messages During WMI Discovery WMI Discovery might fail on a target Windows XP machine with an Access Denied error message even if you provide valid credentials. This issue occurs because the Use simple file sharing option is selected by default for some of the Windows XP deployments. To troubleshoot WMI Discovery failure 1 On the Tools tab, select Folder Options. 2 Select the View tab. 3 In the Advance settings box, deselect the Use simple file sharing option. 4 Click OK. Detail Discovery Troubleshooting This section describes utilities and programs that help with troubleshooting. 1 Create an ADM detail discovery product support package as described in “Using ADM Console” on page 50. 2 Contact your VMware Customer Support representative and provide them with the product support package that you generated in Step 1. VMware, Inc. 49 Application Discovery Manager Administration Guide Using ADM Console You must first create a detail discovery product support package for detail discovery troubleshooting. To create a detail discovery product support package 1 Log in to the ADM console. 2 Navigate to Discovery > Inventory. 3 Click a host that is already discovered using detail discovery method. 4 On the Detail Discovery Policies tab, select name of the policy for which you need to create a support package. 5 Click Support Package. Creation of support package takes about five minutes. Navigate to Manage > System > Support Package List to download the support package. WMI WMI Detail Discovery requires specific permissions and configuration on the target host. Microsoft includes a testing tool, called WBemTest, on every computer that has WMI installed. This tool tests for the same permission and configurations that ADM requires. For example, if an access denied failure occurs while connecting to the target host, the WbemTest tool raises a similar error indicating a problem with the target host configuration. To perform troubleshooting 1 Check permissions and configuration using the WBemTest tool. More information is available on the Microsoft Web site: http://technet.microsoft.com/en‐us/library/cc785775.aspx 2 Check ADM Discovery using the utilities described in the following sections. single.sh The single.sh utility is a stand‐alone command line utility that runs Detail Discovery on a specific host. The single.sh utility creates a support package that contains the Detail Discovery results and more useful information. VMware Customer Support can use this support package to analyze the problems offsite. NOTE This section refers to support packages used specifically for Detail Discovery troubleshooting. Other support packages are used for backing up, restoring, upgrading, and troubleshooting of the ADM application and are described in Chapter 5. This utility is useful for testing the communication parameters for connecting to a host (for example, the user and password), and to find out the retrievable properties from a host without having to go through the process of defining a Detail Discovery policy in the ADM Console. Location /home/nlayers/Seneca/ActiveProbe/bin/single.sh Usage single.sh [-A Attribute Artifacts] [-a address] [--AddExU Additional Unix Exclude Directories] [--AddExW Additional Windows Exclude Directories] [--AddIncU Additional Unix Search Scope] [--AddIncW Additional Windows Search Scope] [-c host] [-d port] [-D Configuration Items] [-e Management IP] [--ExU Unix Exclude Directories] [--ExW Windows Exclude Directories] [-G CI Groups] [-h] [-i] [--IncU Unix Search Scope] [--IncW Windows Search Scope] [-j classpath] [-l] [-M maxdepth] [-n path] [-p ports] [-P Access profile] [-r filename] [-t timeout] [-T Discovery result translator class] [-v] [-w] 50 VMware, Inc. Chapter 8 Troubleshooting ADM Table 8‐1 lists and describes parameters for the single.sh utility. Table 8-1. single.sh Parameters Parameter Description -A,--planArtifacts Attribute Artifacts Attribute artifacts to discover. -a, -address address Address(es) of the discovery target. Use commas as separators. -AddExU Additional UNIX Exclude Directories Additional Exclude directories from search in the UNIX file system. -AddExW Additional Windows Exclude Directories Additional Exclude directories from search in the Windows file system. -AddIncU Additional UNIX Search Scope Additional Scope for search in the UNIX file system. -AddIncW Additional Windows Search Scope Additional Scope for search in the Windows file system. -c, -Collector host Specifies the Collector that runs the actual discovery. -d, -debug port Start JVM with enabled remote debugging on the specified port and wait for ENTER key before continuing. -D, -planCis Configuration Items Configuration items to discover. -e, -management Management IP Specifies the management IP to use if an access profile is read from the management (using the -P option). -ExU UNIX Exclude Directories Exclude directories from search in UNIX file system. -ExW Windows Exclude Directories Exclude directories from search in Windows file system. -G, -planCiGroups CI Groups Configuration Item groups to discover. -h, -help Brief help message. -i, -interactive Interactive mode that allows you to type protocol‐specific commands. -IncU UNIX Search Scope Scope for search in UNIX file system. -IncW Windows Search Scope Scope for search in Windows file system. -j, -classpath classpath Adds additional path to the classpath. This additional path will have the highest priority. -l, planhelp Prints information about available artifacts and artifact groups. -M, -maxdepth maxdepth Maximum depth for search in file system. -n, -outputPrefix path Specifies the path prefix of the output file (for example, /tmp/). Note: The directory path must end with a backslash (/). If this option is not used, a predefined filename is used, and the file is created in the current working directory. VMware, Inc. -p, -ports port One or more ports to use when connecting to the target host (for scanning as well). Use commas as separators. These ports applies even if the connection details are fetched from the management. -P, -accessProfile Access profile Discovery parameters or policy/access profile name to fetch from the management. -r, -read filename Read from a playback or snmpdump file instead of going out to the network. -t, -timeout timeout Connect timeout to use when connecting to the target host. If connection details are fetched from the management, they will override this parameter. 51 Application Discovery Manager Administration Guide Table 8-1. single.sh Parameters (Continued) Parameter Description -T, -translator Discovery result translator class Specify the discovery result translator class. Predefined translators are available through their aliases, for example: class com.nlayers.seneca.ap.mediation.DoNothingDiscoveryResult Translator adm class com.nlayers.seneca.ap.mediation.cim.AdmToCimXmlDiscove ryResultTranslator cimxml class com.nlayers.seneca.ap.mediation.cim.AdmToCimDiscoveryR esultTranslator cim are available Values in brackets are aliases -v, verbosehelp Print verbose help. -w, -wait Slows down playback to be the same duration as the original execution. Examples: To probe target IP 1.2.3.4 on UNIX using protocol SSH ./single.sh -P \"ssh:username=root,password=54321\" -a 1.2.3.4 ./single.sh -P \"ssh:username=root\" -a 1.2.3.4 (A password will be requested by the application interactively without echoing.) To probe target IP 1.2.3.4 on UNIX using protocol TELNET ./single.sh -P \"telnet:username=root,password=54321\" -a 1.2.3.4 To probe target IP 1.2.3.4 on UNIX using protocol SNMP ./single.sh -P \"snmp:communityString=public\" -a 1.2.3.4 To probe target IP 1.2.3.4 on Windows using protocol WMI single.bat -P \"wmi:domain=il.nlayers.com,username=administrator,password=54321\" -a 1.2.3.4 (default locator credentials will be used from properties file) To probe target IP 1.2.3.4 using protocol VI-SDK ./single.sh -P \"visdk:username=administrator,password=54321\" -a 1.2.3.4 Create debug package: single.sh -a address -P Access profile Read from playback file: single.sh -r filename Access profile can have one of the following formats: Name of a Detail Discovery policy. In this case the necessary information is read from a Detail Discovery policy defined in the user console. Full definition of the needed discovery details in a protocol‐specific format: protocol-name:prop1=value1,prop2=value2,... The following protocol names are supported: SSH, Telnet, SNMP, VI‐SDK and WMI. In addition, all protocols supports the ‐timeout parameter with a default value of 20000 milliseconds. The ports parameter is supported for all protocols except WMI and VI‐SDK, with default ports of 22 for SSH, 23 for Telnet, and 161 for SNMP. 52 VMware, Inc. Chapter 8 Troubleshooting ADM Note the following: Escaped double‐quotes surround the protocol information—these must be used. Unknown arguments are ignored. Omitted password fields are requested by the application interactively without echoing. Default search scope for different platforms: Windows: Include: [/Program Files] Exclude: [/Documents and Settings, /WINDOWS] UNIX: Include: [/bin, /sbin, /usr/bin, /usr/sbin, /usr/local, /usr/local/bin, /usr/local/sbin, /usr, /opt] Exclude: [/boot, /dev, /devices, /proc, /unix, /kernel, /platform, /cdrom, /CDROM, /sd_cdrom, /SD_CDROM, /Mail, /mail, /nsmail, /vol, /lost+found, /media, /tmp, /mnt, /jumpstart, /pcfs, /sys, /usr/kvm/sys, /stand, /var/news, /var/log, /var/run, /var/lock, /var/www, /var/cache, /var/tmp, /etc/gconf] snmpdump The snmpwalk program is bundled with Linux, which runs SNMP on a given IP address and creates a textual dump of the whole tree of results. This program is often used while extending and debugging the SNMP portion of the Detail Discovery knowledge base. A new Detail Discovery feature allows VMware Customer Support to record a complete snapshot of the SNMP responses of a network host, using snmpwalk. You can use the resulting dump file to fix SNMP Detail Discovery problems encountered by VMware Customer Support. A standardized script called snmpdump.sh is now supplied with ADM to create this snmpwalk dump file. Location /home/nlayers/Seneca/ActiveProbe/bin/snmpdump.sh Usage Running snmpdump.sh on the command line yields the following usage information: ./snmpdump.sh host_ip output_file The first parameter is the host IP to query. The second parameter is the name of the file in which to save the results. Examples Create an snmpwalk dump for IP 1.2.3.4 and save the results into file snmpdump.1.2.3.4.txt: ./snmpdump.sh 1.2.3.4 snmpdump.1.2.3.4.txt nlcapture You can use the nlcapture utility in place of tcpdump to capture network activity. This utility supports the same default parameters as tcpdump, but sets the snaplen to be large enough so as to not truncate packets. In addition, this utility provides a parameter not supported by tcpdump: ‐R, which filters packets based on their protocol (for example, HTTP) or based on protocol‐specific attributes. VMware, Inc. 53 Application Discovery Manager Administration Guide Similar to tcpdump, you can use nlcapture to filter an existing capture file and transform it to a new, filtered file. See usage below. Location /home/nlayers/Seneca/tools/nlcapture.pl Usage Running nlcapture on the command line yields: nlcapture.pl tcpdump options [-R ethereal display filter string] For example: To listen on eth1 and capture all HTTP and ICMP packets into the file bla.dump: nlcapture.pl -i eth1 -R "http||icmp" -w myoutput.dump As explained earlier, nlcapture supports all common tcpdump parameters such as ‐i. Additionally, it supports the -R parameter to filter on the network protocol or according to the value of specific protocol fields. Protocol names are written in lowercase. The following URL provides details on the filters that you can use: http://www.ethereal.com/docs/man‐pages/ethereal‐filter.4.html The filters of nlcapture utility are different from the tcpdump filters. They are easier to use and understand. 54 VMware, Inc. 9 Uninstalling ADM 9 This chapter provides information for uninstalling the ADM appliance and includes “Uninstalling the ADM Appliance” on page 55. Uninstalling the ADM Appliance To uninstall the ADM appliance, follow the procedure of your organization for removing a virtual machine. VMware, Inc. 55 Application Discovery Manager Administration Guide 56 VMware, Inc. A A Time Zones This appendix lists ADM time zones as shown in Table A‐1. Table A-1. Time Zones for ADM VMware, Inc. Asia/Baku ‐ Asia/Nicosia Asia/Tel_Aviv ‐ Etc/Greenwich Etc/GMT ‐ Indian/Reunion Mexico/BajaNorte ‐ US/Aleutian Asia/Baku Asia/Tel_Aviv Etc/GMT Mexico/BajaNorte Asia/Bangkok Asia/Istanbul Europe/Amsterdam Mexico/General Asia/Beirut Asia/Makassar Europe/Andorra Mexico/BajaSur Asia/Bishkek Asia/Macau Europe/Athens Mideast/Riyadh89 Asia/Brunei Asia/Macao Europe/Belfast Mideast/Riyadh88 Asia/Kuala_Lumpur Asia/Jerusalem Europe/Berlin Mideast/Riyadh87 Asia/Choibalsan Asia/Hong_Kong Europe/Brussels Pacific/Enderbury Asia/Colombo Asia/Dhaka Europe/Bucharest Pacific/Apia Asia/Damascus Asia/Dacca Europe/Budapest Pacific/Efate Asia/Dili Asia/Chungking Europe/Copenhagen Pacific/Funafuti Asia/Dubai Asia/Chongqing Europe/Gibraltar Pacific/Fakaofo Asia/Dushanbe Asia/Ashkhabad Europe/Helsinki Pacific/Fiji Asia/Gaza Asia/Ashgabat Europe/Kaliningrad Pacific/Port_Moresby Asia/Harbin Atlantic/Cape_Verde Europe/Kiev Pacific/Galapagos Asia/Hovd Atlantic/Azores Europe/Luxembourg Pacific/Guadalcanal Asia/Irkutsk Atlantic/Bermuda Europe/Madrid Pacific/Guam Asia/Jakarta Atlantic/Canary Europe/Malta Pacific/Johnston Asia/Jayapura Atlantic/South_Georgia Europe/Minsk Pacific/Kiritimati Asia/Kabul Atlantic/Faeroe Europe/Monaco Pacific/Kosrae Asia/Kamchatka Atlantic/Madeira Europe/Paris Pacific/Majuro Asia/Karachi Atlantic/St_Helena Europe/Riga Pacific/Marquesas Asia/Kashgar Atlantic/Stanley Europe/Samara Pacific/Midway Asia/Katmandu Atlantic/Reykjavik Europe/Simferopol Pacific/Nauru Asia/Krasnoyarsk Atlantic/Jan_Mayen Europe/Sofia Pacific/Niue Asia/Novosibirsk Australia/Lindeman Europe/Stockholm Pacific/Norfolk Asia/Kuching Australia/West Europe/Tallinn Pacific/Noumea Asia/Kuwait Australia/LHI Europe/Tirane Pacific/Palau Asia/Magadan Australia/Perth Europe/Uzhgorod Pacific/Ponape 57 Application Discovery Manager Administration Guide Table A-1. Time Zones for ADM (Continued) 58 Asia/Manila Australia/Victoria Europe/Vaduz Pacific/Samoa Asia/Muscat Australia/ACT Europe/Vienna Pacific/Rarotonga Asia/Phnom_Penh Australia/Melbourne Europe/Vilnius Pacific/Saipan Asia/Omsk Australia/Lord_Howe Europe/Zaporozhye Pacific/Tahiti Asia/Oral Australia/Tasmania Europe/Zurich Pacific/Tarawa Asia/Yekaterinburg Australia/Hobart Europe/Warsaw Pacific/Tongatapu Asia/Pontianak Australia/North Europe/San_Marino Pacific/Truk Asia/Pyongyang Australia/Darwin Europe/Vatican Pacific/Wake Asia/Qatar Australia/Yancowinna Europe/Moscow Pacific/Wallis Asia/Qyzylorda Australia/Broken_Hill Europe/Rome Pacific/Yap Asia/Rangoon Australia/Queensland Europe/London Pacific/Pitcairn Asia/Riyadh Australia/Brisbane Europe/Lisbon Pacific/Auckland Asia/Saigon Australia/South Europe/Tiraspol Pacific/Pago_Pago Asia/Sakhalin Australia/NSW Europe/Oslo Pacific/Gambier Asia/Samarkand Australia/Adelaide Europe/Chisinau Pacific/Chatham Asia/Tashkent Australia/Canberra Europe/Prague Pacific/Kwajalein Asia/Tbilisi Australia/Sydney Europe/Bratislava Pacific/Honolulu Asia/Urumqi Brazil/DeNoronha Europe/Ljubljana Pacific/Easter Asia/Vientiane Brazil/East Europe/Sarajevo US/Samoa Asia/Vladivostok Brazil/Acre Europe/Skopje US/Hawaii Asia/Yakutsk Brazil/West Europe/Zagreb US/Arizona Asia/Ulaanbaatar Canada/Newfoundland Europe/Dublin US/Eastern Asia/Yerevan Canada/Central Europe/Nicosia US/Pacific Asia/Ujung_Pandang Canada/Yukon Europe/Belgrade US/Michigan Asia/Ulan_Bator Canada/Pacific Europe/Istanbul US/Mountain Asia/Tokyo Canada/Saskatchewan Europe/Mariehamn US/Central Asia/Thimphu Canada/Atlantic Indian/Antananarivo US/Alaska Asia/Thimbu Canada/Eastern Indian/Chagos US/Aleutian Asia/Tehran Canada/Mountain Indian/Christmas Asia/Taipei Chile/EasterIsland Indian/Cocos Asia/Singapore Chile/Continental Indian/Comoro Asia/Shanghai Etc/Universal Indian/Kerguelen Asia/Seoul Etc/Zulu Indian/Mahe Asia/Riyadh89 Etc/UCT Indian/Maldives Asia/Riyadh88 Etc/UTC Indian/Mauritius Asia/Riyadh87 Etc/GMT0 Indian/Mayotte Asia/Nicosia Etc/Greenwich Indian/Reunion VMware, Inc. B ADM API Tutorial B This appendix describes the ADM API and explains how to access and use it. Topics include: “API Features” on page 59 “Web Services API” on page 61 API Features The API of ADM allows clients to query its database and export parts of it by means of a web services API. The following cases are explained in the following sections: Writing the system status into an XML output file; “Insight_control” on page 59. Synchronization of CMDB applications with data of ADM; “Asynch API” on page 60. Population of third party applications with data of ADM. Dumping of entire database tables and uploading to an FTP server; “Dump API” on page 60. Access to filtered data by bulk (paginated); “Bulk API” on page 61. You can divide the API into three sections, where two are dedicated to querying the ADM (Dump and Bulk), and the third is in charge of tracking those queries (Asynch). Insight_control The Insight_control utility writes the system status into an XML output file. To run Insight_control utility 1 Log in to the appliance as user root. 2 Change the directory by typing: cd /home/nlayers/Seneca/management/APIs 3 Type the following command to generate a system status output file: ./InSight_control.sh systemstatus --get --output /tmp/systemstatus NOTE You can substitute a different file and path for /tmp/systemstatus. Service Status Service status can be: Running: The service is running. Disabled: The ADM intentionally stops the service. Not Running (Purposely Stopped): The service was stopped intentionally, for example, a service was manually stopped by the adm_control.pl --stop command. VMware, Inc. 59 Application Discovery Manager Administration Guide Sample Status Output <SystemStatus> <version>6.1.0-6013</version> <uptime> 09:20:15 up 7 days, 18 min, 1 user, load average: 1.36, 2.17, 1.71</uptime> <engine>Running</engine> <listener>Not Running (Purposely Stopped)</listener> <active_probe>Not Running (Purposely Stopped)</active_probe> <oracle>Running</oracle> <apache>Running</apache> <watchdog>Running</watchdog> </SystemStatus> Asynch API Operations in ADMʹs API are asynchronous. The client has to track the progress (or lack thereof) of this task and retrieve its results. NOTE The operations within the context of the web‐service client are synchronic, that is, the calling of the function that does the actual delivery of the query is synchronic, and the client blocks until that operation is completed. Tasks are uniquely identified by a Universal Unique Identifier, whose string representation is returned upon a task creation. Future references to a task must be done using this same string. Tasks have predefined parameters regarding their life‐span in every state, for example, a finished task waits in the system for 24 hours before its resources are recalled and the task is deleted. A task can have any of the following states, which you can retrieve by using getTaskState ( String id): PENDING: The task is created and initialized and is waiting to be executed by ADM. RUNNING: A getTaskProgress() returns an Integer between 0 and 100. CANCELLED: System can cancel a task if it takes too long to execute. RUNNING: The task is being executed. You can track the process by calling getTaskProgress(String id). A task can be in this state for a limited amount of time; system cancels all the offending tasks. FINISHED: The task has finished running successfully, and its produce is ready and waiting to be collected by the client. ERROR/CANCEL: The task has either failed or been canceled (using cancelTask( String id) ). Dump API The Dump API provides you with the possibility of dumping the complete contents of a table (or small set of tables) that corresponds to a given entity (HOSTS, SERVICES, CONNECTIONS, and so on.). In this API, flexibility has been traded for speed, and it is intended for those cases where an application intends to mirror ADMʹs data, and periodically synchronize with it. The Dump API works as follows: 60 1 Select the type of entities that it needs and a discovery date (optional) for those entities. 2 Call dump( ) with those parameters, and obtain the task UUID in a string form. 3 Track the progress of the task using the Asynch API (getTaskState( ) and getTaskProgress( ) ). 4 Repeat Step 3 until the task reaches the FINISHED or ERROR state. 5 If the task is in the FINISHED state, then the files containing the dumped database tables are ready and waiting to be collected (either using SSH or in the FTP server if supplied). The files are stored in a subdirectory whose name is identical to the task ID. VMware, Inc. Appendix B ADM API Tutorial Bulk API The Bulk API provides you with the possibility of querying the ADM with more sophisticated filters, and browsing the result set by means of pagination. The results are delivered in subsets (pages) of a predefined size and formatted in XML CIM. This API is intended for those cases where an application intends to browse on finely‐filtered segment of the ADMʹs data. The Bulk API works as follows 1 Create the filter object and select the level of granularity of the results. 2 Call query( ) with the filter object and obtain the task UUID in string form. 3 After the task is FINISHED, you can retrieve the maximum amount of pages available in this result set by calling getPageAmount( ). 4 At this moment, there is an iterator in ADM that you can control by the following calls, and the results retrieved from them: 5 a hasNextPage( ) b getNextPage( ) After finishing retrieval of all the data with the specific query, you must call closeQuery() to release all resources associated with this query. Web Services API The preferred method to access ADMʹs API is through the web services API, which provides for a standardized way of communication and high interoperability. This API is not locked in a given programming language. ADM offers a description of the API in a machine‐readable document formatted in Web Services Description Language (WSDL). With this document, automated tools available for the popular programming languages can create the low‐level code necessary to access transparently the functionality provided by the ADM. VMware, Inc. 61 Application Discovery Manager Administration Guide 62 VMware, Inc. Index A U active_probe service 33 ADM architecture solutions 9 required time zones 57 restore 36 services 33 ADM API 59 adm_control.pl script 34 Apache service 33 Asynch API 60 upgrading ADM 34 V virtual appliance 10 VNC service 33 W Watchdog service 33 Web services API 61 B Bulk API 61 C converting components into a remote database 38 D Dump API 60 E Engine service 33 I installation backup 35 L Listener service 33 M managing services 34 O Oracle service 33 P performing an installation backup 35 R restore 36 ADM database 36 S services 33 T time zones 57 VMware, Inc. 63 Application Discovery Manager Administration Guide 64 VMware, Inc.