1
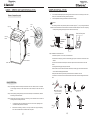
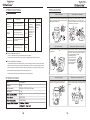
MODEL:
VIVA LOGIC
Videocon Industries Limited
14Km Stone, Aurangabad-Paithan Road, Chitegaon,
Dist-Aurangabad-431105
Tel : 91-2431-251501 Fax : -1-2431-251551
COVER 4
COVER 1
FEATURES AND ACCESSORIES
INDEX
FEATURES
Features and accessories
Names of parts and sample installation
Transparent window, unique outlook design: Adopting the transparent cover, gives clarity at a glance in the course of washing.
Sample installation
Spraying water flow, washing more drastically: Adopting unique pulsator can produce spraying water flow from the bottom, to break up the wrapped clothing,
so that the clothing can be washed more sufficiently and uniformly. Installation of the water inlet hose
Installation of the drain hose
Dynamic soak, powerful washing: Adopting the model of dynamic soak, the detergent will better be dissolved by water and fully infiltrated into the clothes, especially wash the stubborn dirt off the clothes.
Power source and grounding
Installation of the Rat Mesh
Sample operation
FUZZY LOGIC wash to make your machine decide water level as per cloth load
and give best optimized wash performance.
Control panel design
Fully automatic program
FIVE special wash programs to suit your different type of clothes and family
washing requirements during different seasons.
Additional explanation
Memory back up : This functions enables your machine to complete the remaining
cycles after the power resumes.
Operation method
HOT, COLD, WARM options for water you are using for washing. This functions
helps you to get better washing results, less detergent consumption.
Delay time program
Confirmation of the delay and inspection
DIGITAL DISPLAY : Helps you set delay time, so that washing machine can work
for you as per your desired timings, also helps you to check the remaining time
of your wash cycle.
Cancel the delay time or alternate the delay time
Use the cleaning solution for twice
Weight standard of the clothes
Compact structure, pleasing appearance and durable:The Cabinet sprayed
with plastic powder and the base made of engineering plastic,make it
resistible to corrosion and durable.
Automatic Power OFF when washing finishes.
Washing tips
Auto balance for intellectual and automatic correction while spinning.
Pre-
wash of dirty clothes
Load Size and detergent
Automatic defect discrimination thru beep alarm.
Method of maintenance
Trouble shooting
Other functions
Tap Adaptor
Specifications
Precautions
Warranty terms and Conditions
14
15-16
Ratmesh
with Screw
NAMES OF PARTS AND SAMPLE INSTALLATION
SAMPLE INSTALLATION
3. Use a thread tied with bulky objects to be hung on the side face and face side. As the figure: when A=A',
Names of respective parts
B=B', that is to show that the washing machine is placed flat.
4.
After the adjustment the fixing pole should be screwed back and tight.
Notices:
Top Lid
Top
Frame
o
Inner
Tub
automatic check and rectification or other abnormal circumstances will often take place in the course of spinning.
Filter
All foam packing including the fixing frame on the base foam in the step 2.
it may cause great vibration or If the washing machine is not placed flat (
maximum inclination angle is 2 ), Base foam Fixing frame
Control
Panel
Pulsator
Loose
Power
Cord
Adjustable foot
Screw in Fixing pole Tight
Screw out
Bukly objects
Drain
Hose
Step 4:
Installation of the water inlet hose
1. Check the tap mouth. If it is not even, it can be filed even.
2. Screw loose the locking ring, but do not let the locking ring drop off. Screw the four screws at the same Cabinet
Base
distance.
3. Put the universal connector into the tap and stick to the tap mouth at the most and then screw in the screws.
4. Screw tight the locking ring to the right at the most.
5. Pull the skirt of one end of the water inlet hose downwards, and then plug in the universal connector. A
sound of "
KA-
TA" means proper connection.
6. Grasp the water inlet hose by hand and pull it downward to see whether it is secured.
7. Screw the nut on the other end of the water inlet hose into the water inlet of the washing machine to the most.
Sample I
nstallation
Tap
File
Step 1:The washing machine should be placed inside the room with a flat floor, which is convenient for water supply and drain, has low moisture and no direct sunshine, and does not freeze in winter. If the calibre of the tap is big, the connecting ring can be taken off.
Step 2:All foam packing (
including the fixing frame on the base foam) should be taken off, otherwise the washing machine will not work.
Step 3:Please adjust the washing machine even according to the instructions below to make the washing machine run steadily in low noise.
1.
Loose the fixing pole on the adjusting foot, screw in or screw out the adjusting foot to make the four feet placed even on the floor.
2. When the floor is slanting or uneven, it is not easy to make even only by the adjusting foot. Then the rubber band can be added to the un-
flat place.
Skirt
Connecting ring
Locking ring
SAMPLE INSTALLATION AND SIMPLE OPERATION
SAMPLE INSTALLATION
Notices:
After installation, do not start the washing machine in hurry. First open the tap to let the water press Step 7:
Installation of the Rat Mesh
into the water inlet hose to check whether there is any leakage in the connectors on the both ends. When the 1. Slant the washing machine with angle of 45 in the direction of pressure is too high, please shut the tap a little to avoid water leakage.
the arrows showed in the figure, put the side with the clasper to o
the washing machine and the other side to the ground, insert base Cabinet
Slot
Base cover
cover along the direction of the upper slot of the base from the Step 5:Installation of the drain hose
1. Press the fixing ring with hand to make it loose and Inner hose
Fixing ring back side of the washing machine.
Hole for Self-
tapping screw
engaged on the drain hose and put the drain hose 2. Put the base cover straight to the point and then press the base into the leading skirt of drain hose in the bottom of cover upward till there is a sound of "
Gaba" and then screw in the washing machine to the end at the most (
soak the a self-
tapping screw(
without the self-
tapping screw for plastic head of the drain hose in warm water, it will make cabinet).
the engagement easy), and loose the fixing ring to Drain hose
let it clasp the drain hose.
Leading ring
Sample O
peration
2. It had better put the outlet of the drain hose into the nearby drainage permanently, which can save Preparations before using
:
the trouble that the drain hose has to be connected each time before use. If the drainage is far from the 1. Lay the drain hose at proper place. washing machine, it can be solved by connection of the drain hoses head with end to extend.
2. Connect the water inlet hose and open the tap. 3. Put the power plug into the socket. 4. Take out the coins and other sundries and shake off the mud and sand on the clothes.
Notices: Drain faults will be caused when the drain hose is blocked.
5. Determine water level.
Press "
Water level" button to select the water level.
6. Press "
Power" switch button.
7. Press "
Start/
Pause" button. The washing machine will go into operation by the automatic program of standard.
Notices:
Step 6:
Power source and grounding
The washing machine employs alternative current with the rated voltage and frequency. When the voltage fluctuates between 10% of rated voltage, the washing machine can work normally. A special power socket for the washing machine had better be set beside the washing machine for convenience and safety. The method of connection of the socket is as the figure below:
Notices:
The socket and the grounding wire must be installed by an electrician to prevent incorrect installation or use of the socket, and to guarantee the safety of use of electricity.
The power wire of the washing machine employs Y Grounding wire
connection and the replacement of the power wire should be carried out by professionals.
No connection of the grounding wire with the neutral wire, otherwise the cabinet will be charged, which is likely to cause the danger of electric shock.
Rated voltage  ̄
If you want to set other programs, please see and read "
Full automatic program" and "
Self-
program".
According to your needs, select corresponding programs for your service.
CONTROL PANEL DESIGN
FULLY AUTOMATIC PROGRAM
Fully Automatic Program
Selection of function
Press the button to select +SPIN",
"
WASH"+
"
RINSE""
"
SOAK"+
"
WASH"+
"
RINSE"+
"
SPIN", Press water level button, to select "
WASH",
"
WASH"+
"
RINSE",
the appropriate water level, that
"
RINSE"+
"
SPIN",
"
SPIN".
matched the load size.
Water Level 1 : Light ON
Water Level 2 : Light OFF
Start/
Pause
Water Level 3 : Light ON
After program selection,
press Water Level 4 : Light OFF
the button to start.
Proceed same way to water
Press the button to pause in the level 8.
course of operation,
press the button again the program continues till the program is finished.
Features of eight fully auto program are as follows:
Water level
/
Heavy
Economy
/ Wool
/
Program
Clothes Type
Wash
Fuzzy
-
Wash 12 minutes
Power
Economy
Less dirty Clothes
Wash 2 minutes
On & off power
Automatic power off
Delicate
Women under
Rinse
Spin (
min.) Total time
2 Times
6
About 43
1 Times + 1 Times
(
Spray rinse)
1
10
Wash 10 minutes
2 Times
2
33
garments, articles
with embroidery
Heavy
Dirty Clothes like
Coats, Jeans, Bed
Sheets, etc.
Wash 15 minutes
2 Times
7
47
Wool
Woolen clothes
Wash 15 minutes
2 Times
Only Drain
34
Anti-wrinkle
-
Wash 8 minutes
2 Times
Only Drain
27
Notices:
CHILD LOCK
The total time included the time of entering water and the drain time.
Total time can change
depending on the pressure of the tap water and the drain speed. L ock
Child Press WATER LEVEL &
.
.UNCTION at same time to
F
.ctivate CHILD LOCK.
a
For more details read “Additional
.
.xplanation” on page 8.
E
Delay
Press the button to preset delay
time. Less than 24 hours each press
the button, the delay-
time is added
an hour . More than 24 hours each press the button, the delay-
time is added 6 hours, after to 48 hours, the
preset indicator is come back origin
status. If always press the button,
the delay time will automatically
change.
TEMPERATURE
Press the button to set the wash mode of water inlet to HOT or COLD. When the lights of HOT and COLD are ON at the same time, the HOT water and COLD water are coming.
By pressing the button again you can select HOT, COLD and WARM
water to be used.
Program
By washing requirement you may
optional select the programs of
light)/
flash),
"
FUZZY "(
"
BULKY "(
(
light)/
flash)
"
ECONOMY"
"
WOOL"(
light)/
flash).
"
DELICATE"(
"
ANTI-
WRINKLE "(
* PLS DO NOT MATCH THE CONTROL PANEL WITH YOUR MACHINE.
THIS IS SCHEMATIC DIAGRAM ONLY AND CAN VARY FROM YOUR MACHINE.
the interval of switching on and off power should be more than 30 seconds.
! In order to protect controller, r
Additional explanation
1. "
CHILD LOCK" function: After starting, press the "
FUNCTION" and "
WATER LEVEL" button at the same time, this "
CHILD LOCK" function can be set, then all buttons will be locked and not to be selected (
including the "
POWER" button), the indication is displayed "
CL" one second every 5 seconds, and press the "
FUNCTION" and "
WATER LEVEL" button at the same time again to unlock the function.
2. In the course SOAK ,
the washer does not stop completely, it will wash interval to let the washing evenly mix with the detergent.
OPERATION METHOD
OPERATION METHOD
Load size and the detergent
Operation method
Delay time program
Method of use of the "
DELAY"
button
Water level
Water volume
Delay time means the beginning time of washing.
1. Switch on the power.
"
DELAY"
is Press the button, the digital light of delay time turned on, the number begins to add from 1, it adds an hour as per press in 24 hours, it adds 6 hours as per press in the period of 24 hours to 48 hours. Press the button again, the is light of delay time turned off. Continuously press the the number begins to automatically button over 1.
5 seconds, change according to the above rules. Loose the button, the number stops to change.
Concentrated
washing powder
Common
washing powder
(Each 0.6 g needs 1 liter of water)
(Each 1 g needs 1 liter of water)
Weight of laundry
8
About 53 L
5.2∼5.5kg
About 32 g
About 53 g
7
About 48 L
4.4∼5.2kg
About 29 g
About 48 g
6
About 43 L
3.6∼4.4kg
About 26 g
About 43 g
5
About 38 L
2.8∼3.6kg
About 23g
About 38 g
6. Press "
DELAY" button to select the beginning 4
About 34L
2.0∼2.8kg
About 20g
About 34 g
Time of washing.
3
About 30 L
1.2∼2.0kg
About 18 g
About 30 g
2
About 25 L
0.8∼1.2kg
About 15 g
About 25
1
About 17L
<0.8kg
About 10g
About 17g
2. Open the tap and hang the drain hose up.
3. Put into the washing and detergent.
4. Select the proper water level according to the quantity of clothes.
5. Select the functions and programs.
7. Close the lid and press "
START/
PAUSE" button.
Confirmation of the delay and inspection
After the delay function is started, the corresponding light will be flashed, and other lights are turned off.
After the delay function is started, press "
Delay" button continuously, you may inspect the program and function set, loosen the button, the program will automatically come back delay status.
Cancel the delay time, or alternate the delay time
Press "
POWER" button to cancel delay time.
To change the delay time, please cancel delay time, and then press "
Delay" button to reset.
Notices:
The highest priority of using the detergent is low and mid foam detergent.
The volume of detergent is changed with different type of clothes. You need read user manual. Water volume is different because of clothes variety . When the washing machine does not
operate well, please adjust clothes volume and water level.
The water volume above listed is based on normal clothes volume.
Weight standard of the clothes
Use the cleaning solution for twice
or "
button to set the Single
1. Put in the washing in the first batch and detergent and press "
Wash" Function" "
wash" to run.
2. Take out the washing in the first batch after hearing the buzzing sound.
Rinse","
Spin".
3. Put in the washing in the second batch, and run "
Wash","
Union suit including coat and trousers(
blended) about 800g
Pyjamas including coat and trousers (
cotton) about 500g
Bedsheet (
cotton)
about 500g
Bath towel (
cotton) about 300g
Long sleeves shirt (
blended) about 200g
Short sleeves shirt (
cotton) about 130g
4. Take out the washing in the second batch after hearing the buzzing sound.
button to run "
Rinse" and "
Spin".
5. Put in the washing in the first batch and press"
Function" Pre-
wash of dirty clothes
One of the"
Rinse/
Spin" program can be selected to perform pre-
wash as for clothes seriously stained Trunks (
cotton) about 50g
Socks (
blended) about 50g
with mud, and then add washing powder and select the full program to wash.
Washing tips
Notices:
Please use the water that temperature is below .
50
If the water level is less than the set "
Water level", the machine will add water automatically.
Put the easily damaged and loose clothes into mesh before washing.
Put bulk clothes and easily suspended clothes at the bottom of tub.
Turn the easily damaged face of clothes inside before washing.
If the clothes hold webbing and zipper you need to tie and zipper that before washing.
Get rid of mud on clothes before washing.
You can add some washing powder on the specially dirty place before washing.
METHOD OF MAINTENANCE
TROUBLE SHOOTING
The following cases are not faults
Exceptional
phenomenon
1.
There is water injection in time of washing or rinsing, which is due to that the washer senses the inadequacy of water and exchanges water level automatically.
2.
There is the phenomenon of intermittent spinning in the beginning of spinning, which is performed to achieve better spinning effects.
No indication
in controller
3. In the course of spin, the program return to the wash program. Because that is designed to rectify the unbalanced distribution Cause
The power plug is not plugged tight.
The power switch is not switched on.
Not press "
START/
PAUSE" button.
Power cut.
Solution
Re-
plug the power plug.
Check the power socket, or change other "
START/
PAUSE" button.
Socket.Press Wait for switching on electricity.
of load in the spin tub.
4. There is water sound from Spin Tub. This is because there is balancing liquid in Spin Tub Balancer ring. It is for reducing
vibration of spinning.
The inlet hose
leakage
Do not rightly connect the tap with the Re-
install rightly the universal connector.
universal connector.
Do not screw tight the nut of the water Screw tight the nut.
inlet hose.
Does not drain
The drain hose is wrung or jammed.
5. Control panel remains warn after Power is switched OFF. This is due to heat in electrical parts below Control Panel.
The drain hose is made swimmingly, and solve the problem of jam.
Method Of Maintenance
After the whole washing program
Maintenance of shell
The washing machine will give Buzzer sound
after any program operation to remind you of out the load or going on with other operations. After finishing washing, please shut off the tap, pull out the plug in case of water leakage or fire accident.
Cleaning the water inlet
After long time use, the water inlet mesh bag may
be blocked with smudginess, and should be cleaned according to the following steps:
Use soft cloth to wipe off the water and dirt on the surface each time after use of the washing machine. Detergent, propellant and other chemicals are not allowed to use, for they can cause damage to the surface.
Wait for coming water.
water.
Dose not inject water Stop Open the tap.
Do not open the tap.
the netting according to the method
Whether the wire netting in the water Clean Cleaning of the water inlet". inlet was stopped up by the sundries. of "
Spinning stops and Cause by that the washing placed water injecting begins uneven.
in the course of spin
Cleaning of the lint filter
After using the washing machine for a period, please clean it according to the following steps:
1. Take out the lint filter.
1. Switch on the power, followed by shutting off the tap .
Turn the mesh bag outside and wash it clean in the
2. Let the washer works for 5 seconds so that water 2. flows into the tub through the water inlet hose. then turn water.
3. Restore it and refix it.
off the power.
3. Unload the water inlet hose and clean the mesh bag, then restore the water inlet assembly.
Does not spin
This is automatic rectification for spinning in the washing program. That the washing
are too much or too little, or that the washing
machine is not placed plane will cause the unbalance in time of spinning. If there is still abnormal circumstances after checking the above mentioned points, please pull out the power plug and contact
with local service as soon as possible. the upper lid.
After end to drain, do not close the lid.Close Open the lid in course of spinning.
Intermittent to the normal phenomenon order to attain the better spinning Belong spinning In generally.
effect.
Before using the
Remainning water due to testing or Belong to the normal phenomenon machine water exsits experiment generally.
in the factory.
in the drain hose.
Notices:
The washing machine does not work normally because the voltage is low or too high. Please pull out the plug and wait till the voltage becomes normal.
If there is still abnormal circumstances after checking the above-
mentioned points, please pull out the plug. Do not repair it by yourself at home, which is very dangerous.
OTHER FUNCTIONS
PRECAUTIONS
Function of fault alarm
Indication of fault
Safe use of power
Cause of fault
of the Phenomenon Alarm Solution of alarm
of fault
buzzing sound
Alarm for
water injection
Entering water less than 16 minutes, reset water level.
E1
Alarm for
opening lid
Open the lid after start the delay time. Open the lid when the washer is spinning.
E2
Imbalance alarm
Be examined imbalance for the third time.
E3
Drain alarm
After draining for 4 minutes, does not finished to drain.
E4
Open the lid to The buzzer goes deal with faults, on buzzing close the lid sound for 10 then solve the seconds. If the to alarm does not alarm.
be solved , every 16 minutes re-
buzzs for 10 seconds.
Function of automatic power-
off
1. Start 10 minutes later to not work, automatically shut off the power.
2. After end to wash and the buzzer sounds 6 times, automatically shut off the power at once. Function of adjusting for unbalance
1. If the clothes are placed uneven before spinning, easy to result in bigger vibrancy of spinning. The washing Keep away from dampness
Don'
t place the washing machine in extreme Please plug the power cord into the special voltage. f or dampness may The plug-
in and plug-
out of the wire should go on damp surroudings, weaken the insulation of the machine,
which may with the plug held with hand.
cause electric shock or faults.
Don'
t use hot water
Don'
t open the lid in time of spinning
the lid is opened in time of spinning, the washing Don'
t use hot water over 50 to avoid deformation If machine will arrest at once, which will shorten the of the plastics.
service life. Please avoid opening the lid in the course of operation as possible and furthermore, don'
t put hands into the tub, for it is very dangerous that the clothes wind the hand despite of low speed of rotation.
machine has a function of adjusting unbalance. When working, the system of the washing machine always inspects running state. If finding a phenomenon that the spinning vibrancy is too big, the washing machine automatically start the adjusting program To adjust the clothes`
s state. 2. The washing machine can adjust unbalance twice, if no effect, it will alarm.
SPECIFICATIONS
Avoid spray of water
Item
VIVA LOGIC
Capacity
6.0kg
Net Dimension
Net Weight
526 (W) x 536 (D) x 915(H) mm.
31 kg
53 Ltr.
230V, 50 Hz
360W (Wash)
Don'
t let water spray onto the switch or the
panel in case of electric shock and faults.
Keep away from smoke and fire
Don'
t place lighted candles, cigarettes and thermos nearby to avoid fire accidents or deformation of the plastics.
WARRANTY TERMS AND CONDITIONS
1. Repair or replacement, free of charges, of any part or parts of your ELECTROLUX washing machine except Top Lids, Knobs,
Inlet/Drain Hose and Lint Filter for a period of 24 months from the date of invoice/bill when we identify the defects as due
to faulty material or workmanship and not due to improper usage or faulty electric supply/connection.
WARRANTY TERMS AND CONDITIONS
10. If any colored internal or external components are replaced there will be commitment to ensure that shades match
with the original or other components. The replaced shades, patterns, tints may vary from the customer’s unit due to
continuous usage of unit. Any matching components changed at customer’s request will be on chargeable basis except
the component which are actually needed.
For any doubts or clarifications please contact us on-
TEKCARE INDIA PRIVATE LIMITED.,
15km. STONE, AURANGABAD-PAITHAN ROAD,
VILLAGE CHITEGAON, TALUKA PAITHAN,
AURANGABAD - 431 105,
MAHARASHTRA, INDIA.
PHONE No. - 02431 - 329271,329783
E MAIL : [email protected]
Web : www.servicedelight.com
15
16
AUTHORISED SERVICE CENTERS
Warranty Registration
Warranty Registration
(Local Sales office Copy)
17