1
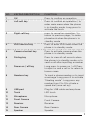
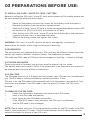
ASPERA R12
USER MANUAL
CONTENTS:
WELCOME THANK YOU FOR PURCHASING ASPERA R12, A WATERPROOF, DUSTPROOF
MOBILE PHONE. PLEASE READ CAREFULLY THIS USER MANUAL BEFORE
STARTING TO USE YOUR PHONE.
01 SAFETY INSTRUCTIONS
3
02 OVERVIEW
6
03 PREPARATIONS BEFORE USING
9
3.1 Install SIM card / micro SD card / battery
3.2 Passwords
3.3 Charging
3.4 Power on/off
3.5 Earphone
04 BASIC OPERATIONS
9
9
10
10
10
11
4.1 Make a call
4.2 Volume adjustment
4.3 Answer a call
4.4 End or reject a call
05 MAIN MENU
11
11
11
11
11
5.1 Phonebook
5.2 Camera
5.3 Calls
5.4 Settings
5.5 Messages
5.6 WLAN
5.7 Tools
5.8 WIFI Hotspot
5.9 File manager
5.10 Media player
5.11 Entertainment
5.12 Services
06 EASY TROUBLE SHOOTING
11
13
14
16
17
18
18
19
19
20
20
20
21
07 TECHNICAL SUPPORT
21
2
01 SAFETY INSTRUCTIONS:
• D
uring lightning and rain, please do not use the mobile phone outdoors or when
the phone is being charged, so as to avoid being struck by lightning or other
potential dangers.
• P
lease do not put the battery in extreme high-temperature environments
(high temperature will make the battery hot), otherwise it may result in fire
or explosion.
• If the phone is being charged, please keep the phone and charger away from
people or other flammable and explosive articles in order to avoid fire, explosion
or other dangers.
• P
lease strictly adhered to the mobile usage rules and shut down the mobile phone
on occasions where any use of the mobile phone is prohibited.
• P
lease do not put the mobile phone, battery and charger in any strong electromagnetic
field, such as induction cooker or microwave oven; it may lead
to short-circuit, fire or explosion.
• P
lease do not arbitrarily refit the mobile phone, or disassemble the mobile phone and
accessories without authorization. Improper refitting or disassembling may trigger
fire and explosion of the mobile phone. Only authorized organizations can repair the
mobile phone.
• P
lease ONLY use original battery, charger and accessories of the Aspera R12.
• P
lease do not join the two poles of the battery, or you may short-circuit the battery.
• T
he mobile phone should be powered off in hospitals or other places where use
of the mobile phone is prohibited . Mobile phones may affect electronic equipment
and medical devices, such as pacemakers, hearing aids and other medical electronic
equipment.
• P
lease do not use the mobile phone without a hands-free device when driving.
Otherwise, please park your car before making a call.
• P
lease do not put the mobile phone near the car airbag or region reachable by the
air bag after activation. Otherwise when the airbag expands or ruptures, the mobile
phone is likely to cause serious damage to the people in the car due to strong
force which may propel it within the car.
3
01 SAFETY INSTRUCTIONS:
C0NTINUED
• P
lease keep the mobile phone, battery and charger out of the reach of children.
Please do not let children use the mobile phone, battery and charger in the absence
of adult supervision.
• P
lease power off the mobile phone before cleaning and maintenance. If the mobile
phone is connected to the charger, you need to unplug the charger from the power
outlet, and disconnect the connection between the charger and the mobile phone in
order to avoid electric shock, short circuit of battery or charger.
• D
o not use chemical lotion or scrubbing cleanser to wipe the mobile phone or the
charger, otherwise it may damage the components or cause fire. Slightly wet and
anti-static soft clean cloth can be used.
• P
lease do not throw the old and abandoned lithium batteries into the rubbish bin,
send them to designated collection locations or return them to our company.
• P
lease do not charge the mobile phone in environments with much dust, humidity,
too high, or too low temperature, and the power wire cannot be close to external
sources of heat.
• P
lease do not use the phone functions such as camera, video and recording to
infringe the rights of copyright owners or privacy of individuals.
• T
he company will not be responsible for any losses caused by not recording,
deleting, destruction or damage of photos, video and recordings caused by its
accessories or software on the use of the functions including camera, video and
audio.
• In the use of network functions, if the user downloads a file with a virus, which
makes the mobile phone not work normally; the company does not undertake any
responsibility arising from the action.
4
Note: The application of value-added services of the mobile phone is provided by
relevant service providers. Please refer to the relevant help or network providers notes
for detailed information.
Warning
Aspera will not take on any responsibility for the users who are not in compliance with
the above advice or improper use of the mobile phone.
Statement
The Company reserves the right to improve the product without making any advance
notice, and keeps final interpreting rights on the product performance. The company
is committed to product quality and will continue to launch new versions of products.
So if the contents stated in the manual are slightly different from the function,
specification or design, please refer to the mobile phone. Such changes are not notified
additionally. Your understanding is appreciated.
5
02 OVERVIEW:
PHONE LAYOUT
10
13
12
15
14
9
1
2
3
4
6
5
7
8
11
6
NO.
KEYPAD DESCRIPTION
FUNCTION
1
OK
Press to confirm an operation
2
Left soft key
Press to confirm an operation / to
enter main menu when the phone
is in standby mode. Long press to
activate the torch.
3
Right soft key
press to cancel an operation / to
return to previous page / to enter
phonebook when the phone is in
standby mode
4
SMS Shortcut key
Press to enter SMS menu when the
phone is in standby mode
5
Camera shortcut key
Press to activate camera when the
phone is in standby mode
6
Dialing key
Press to view all call records when
the phone is in standby mode, or to
send a call after inputting a number
7
Power on / off key
Long press to power on / off. Press
to reject or end a call or to return to
home screen
8
Numbers key
To input a phone number or to input
a message. Long press # to activate
“Meeting mode”. Long press any
number from 2 to 9 to ctivate a
speed dial (once set up)
9
USB port
Plug for USB cable and earphone
10
Torch
LED torch
11
Microphone
Microphone
12
Front Camera
Front Camera
13
Receiver
Receiver
14
Rear Camera
Rear Camera
15
Speaker
Speaker
7
02 OVERVIEW:
ICONS
Network Signal
Keypad Blocked
Music Playing
Alarm On
Earphone Mode
Network Data Connection Established
Missed Calls
New SMS
New MMS
Profile ‘General’
Meeting Mode On
Bluetooth On
Battery
8
03 PREPARATIONS BEFORE USE:
3.1 INSTALL SIM CARD / MICRO SD CARD / BATTERY
Before installing the SIM card / micro SD card, please power off the mobile phone and
do not connect the phone to the charger.
• Power off the phone, unscrew the screws on the battery cover and open it.
Remove the battery from the battery compartment.
• Slide the SIM card / micro SD card in to the corresponding compartment. SIM 1
will connect to 3G/2G and SIM 2 will connect to 2G only.
• After sliding in the SIM card / micro SD card, install the battery and then press
it gently to make sure it is positioned correctly.
• Slide on the battery cover and tighten the screws.
WARNING: SIM card / micro SD card can be easily damaged by scratches or
deformation, be careful when using, installing and removing.
3.2 PASSWORDS
The password of your telephone and your SIM card may be different. Please input the
correct password in different situations below. The telephone password,
PIN code and PIN2 code of SIM card can be changed in “Settings -> Security settings”
3.2.1 PHONE PASSWORD
Phone password will protect your privacy once the phone is lost or stolen.
The default phone password is 0000. If the phone lock is on, the phone password will
be required each time the phone is powered on.
3.2.2 PIN CODE
The PIN code (consists of 4~8 digits) and will protect your SIM from any unauthorized
use. The PIN code is usually provided by network providers. If the
PIN lock is on, the PIN code will be required each time the phone is powered on. Only
three trials are allowed. If the PIN code is input incorrectly 3 times, the SIM card is
blocked.
TO UNBLOCK THE SIM CARD:
• Follow the instructions displayed and input correct PUK code.
• Input a new PIN code and confirm.
• Input again the new PIN code and confirm.
• If the initial PUK code is input correctly, the SIM card is un blocked ,
and the PIN code is also changed.
NOTE: Please check with your SIM card network provider for the PUK code. If the PUK
code is input incorrectly 10 times , the SIM card becomes invalid, please contact the
network provider to acquire a new SIM card.
9
03 PREPARATIONS BEFORE USE:
3.2.3 PIN2 CODE
PIN2 code (consists of 4~8 digits) is provided together with SIM card by the
network provider. It’s set for “Call time” and “Call cost” functions. Please check with
the network provider if your SIM card is offered with these functions. If the PIN2
code is input incorrectly 3 times , the SIM card is blocked.
TO UNBLOCK THE SIM CARD:
• Follow the instructions displayed and input correct PUK2 code.
• Input a new PIN2 code and confirm.
• Input again the new PIN2 code and confirm.
NOTE: PUK2 code (consists of 8 digits) is provided by the network provider. If the
PUK 2 code is input incorrectly 10 times, the functions provided by PIN2 code are
blocked. Please contact the network provider to acquire a new SIM card.
3.2.4 CALL BARRING PASSWORD
The Call barring password is required when using “Call barring”. Please ask your
network provider If you do not know this code.
3.3 CHARGING
The “Battery indicator” icon indicates the battery level. Once the battery level is
low, “Low battery” will pop-up on the screen. To charge your phone connect it to
the power supply by using the original charger and USB cable supplied in the box.
If the phone is left unused for a long time and the battery runs out completely, it
may take a few minutes to power on the phone after the charging starts.
ATTENTION: Please do check if the power supply meets all specifications of the
charger (check the sticker on the charger for the rated input voltage / current of
the charger ) . It‘s strongly recommended to fully discharge and charge the battery
for the first 3 cycles.
3.4 POWER ON/OFF
In power off mode, long press the “Power on/off” key to power on the phone.
If a password is required when powering on, input the correct phone password.
The default phone password is 0000. If a PIN code is required, please input the
correct PIN code which is provided by network provider. Long press “Power on/off”
key to power off the phone.
3.5 EARPHONE
When the earphone is plugged in, the phone goes into “Earphone Profile”
automatically.
10
04 BASIC OPERATIONS:
4.1 MAKE A CALL
In standby mode, input the phone number then press the Dialing key to make a call.
International call: Press * twice to input “+”, then input the country code and phone
number Call an extension number: Dial the host number, then dial the extension
number according to the corresponding voice hints. By inserting “P” (press * key
3 times ) between the host number and extension number , the mobile phone will
automatically dial the extension number after the host number answers the call.
1. MAKE
A CALL TO A CONTACT IN THE PHONEBOOK:
In standby mode, press right soft key to enter the phonebook.
Find the contact and press Dialing key to make the call.
2. REDIALING/CALL BACK:
In standby mode, press the Dialing key to view the call history,
select the number or contact to redial / call back.
4.2 VOLUME ADJUSTMENT
During a call, press Navigation key “Up” or “Down” to turn volume up or volume down.
4.3 ANSWER A CALL
Press Dialing key or Left soft key to answer a call.
4.4 END OR REJECT A CALL
Press “Power on/off ” key or Right soft key to end or reject a call.
05 MAIN MENU:
5.1 PHONEBOOK
5.1.1 SEARCH
Search for the contact by pressing navigation keys “Up” or “down”
QUICK SEARCH:
Input the contacts name to find the contact’s detailed information.
11
05 MAIN MENU:
5.1.2 ADD NEW CONTACT
The contact can be saved to SIM or the phone telephone.
• Save to SIM: only “Name” and “Number ” are able to be saved.
• Save in telephone: More information can be saved in telephone
(Name, Number, Fax, Email, etc.).
5.1.3 BASIC OPERATIONS
After selecting a contact, press “Options” to get access the operations below:
•
•
•
•
•
•
•
•
•
•
View: View all detail information of the contact
Send message: to send an SMS or MMS to the contact
Call: place call to the contact
Edit: Edit the information about the contact
Delete: Remove from the phonebook
Copy: Copy the contact information from SIM to Phone or from
Phone to SIM
Move: Move the contact information from SIM to Phone or from
Phone to SIM
Send business card: Send the contact information to others via SMS,
MMS, Email or Bluetooth.
Add to blacklist: rejects calls from this number
Mark several: to select several contacts and bring an operation on all
selected contacts at one time
5.1.4 PHONE BOOK SETTINGS
• Contacts displayed: Select the contacts to be displayed in phonebook
(Only display contacts saved in SIM1, or in SIM2, or in the Phone or all the
contacts).
• Speed dial: Activate Speed dialing function and set speed dialing numbers. Only
the keys 2~9 are dedicated to speed dial. When Speed dial is on and speed dial
numbers are set, long press the key 2~9 in standby mode to make a call to the
corresponding phone numbers.
• My number: Edit number and information about the owner
• Extra numbers: Edit name of the owner of SIM1 and SIM2; Settings of function
“Fixed calls” (Fixed calls requires PUK2 code and support from network provider)
• Memory status: Display the occupied phonebook capacity and the total phone
capacity of SIM and the phone.
• Copy contacts: Copy all contacts from the phone to SIM or from SIM
to the phone.
• Move contacts: Move all contacts from the phone to SIM or from SIM
to the phone.
12
• Delete all contacts: Delete all the contacts from phonebook of SIM or the
phone or both.
• Name display: Decide how to display the last name and first name of the
contact when there is an incoming call.
5.2 CAMERA
5.2.1 CAMERA
•
Activate the camera by pressing the shortcut key “Camera” on the keypad.
• Press the navigation key “ Up” or “ Down ” to switch between camera mode
and video recording mode.
• Press the central key to capture a photo or start the video recording; or
press the left soft key before capturing or video taking for the following
options: EV / White balance / Effects / Shutter sound / Contrast / Image
quality / Image size adjustment; Switch Scene mode; Self- timer settings;
Preferred image storage, etc.
5.2.2 ALBUM
Select a photo in the album and press left soft key for further options:
•
View: View the photo
•
Image information: Check the detailed information about the photo.
• Edit: Add to the photo a frame, special effects, adjust the contrast of
the photo, rotate or clip the photo, etc.
• Browse style: Select the display mode (List or Matrix) of all photos in
the album.
• Send: Sent the photo via MMS , Email or Bluetooth.
• Use as: Use the photo as wallpaper or screen saver or ID picture of
a contact.
• Rename: Rename the photo
• Delete: Delete the photo
• Sort by: Sort the photos by different orders.
• Delete all files: Delete all photos in the album.
• Storage: Save the photos in the phone or in the memory card.
5.2.3 FM RADIO
FM radio requires the earphone plugged in. Press left of the key for following
further operations:
• Channel list: Add your favourite channels in this list. 30 channels maximum.
• Manual input: Input the frequency of the channel.
13
05 MAIN MENU:
• Auto search: Search for the channels and save them automatically.
• Settings: Activate or deactivate “Background play” and “Loudspeaker”
Note: In FM radio mode, press * or # to volume up or down.
5.2.4 EDITOR
Edit a photo. Please refer to 5.2.2 Album > Edit
5.2.5 RECORDER
The recorded audios are saved by default in folder “Audio” in the Micro SD card.
Select an audio document, press left soft key for following operations:
• Play: Play the audio document. Press * or # to volume up or down.
• Append: Append new record to the existing audio document.
• Rename: Rename the audio document.
• Delete: Delete the audio document.
• Use as: Use the audio as incoming call melody.
• Send: Send the audio via MMS, Email or Bluetooth
5.3.1 CALLS 5.3.1 CALL HISTORY
Check recent dialed calls, Missed calls, Received calls. Press left soft key for
following operations:
•
View: View the most recent 50 calls.
•
Call: Call the number
•
Send message: Send SMS or MMS.
•
Save to phonebook
•
Add to black list
•
Edit before call: Edit the number before dialing
•
Delete: Delete this call history
•
Delete all: Delete all call history
• Advanced: Check call timers, call cost, message counter and GPRS counter
5.3.3 CALL SETTINGS
5.3.3.1 SIM1/SIM2 SETTINGS
• Caller ID: Display or hide caller ID when receiving a call.
• Call waiting: If call waiting is activated, while the phone is already on a call
and there is a new incoming call, a notice will pop-up on the screen and
you can answer this new incoming call. If call waiting is deactivated, while
the phone is on a call, it cannot be reached until it ends the ongoing call.
14
• Call divert: Transfer the call to another designated number. The success of
call divert setting is related with the network and SIM card. The system will
give appropriate setting tips
• Call barring: This function also requires network support. Please contact
your network provider to activate this function. Network provider will
provide the corresponding network password for you to activate call
barring service.
5.3.3.2 ADVANCED SETTINGS
• Blacklist: Activate or deactivate the blacklist and add numbers into the blacklist
• Auto redial: In case the other side is busy, the phone will redial
automatically. The redial will repeat 10 times until the call is answered.
During redialing, no other phone calls can be made. Deactivate this
function if you want to stop the auto redial.
• Call time display: Display the call time
• Call time reminder: Set a reminder ( a short “Bip” ) when the call duration
reaches the predefined time limit.
• Auto quick end: Set a limit of call duration. Once the limit is reached,
the call is ended automatically.
• Reject by SMS: Send an SMS automatically when rejecting a call.
• Connect notice: The phone vibrates when the call connection is
established.
• Answer mode:
• Any key: Answer a call by pressing any key.
• Auto answer on Earphone mode: When the phone is on Earphone mode,
the incoming call will be answered automatically.
5.4 SETTINGS
5.4.1 PROFILES
Profiles are a group of preset characteristics. You can also change and save
other definitions in the profiles according to your own preferences. The phone
provides a set of default profiles including the General, Silent, Meeting, Outdoor
and My style. In standby mode, long pressing “#” key will activate Meeting mode.
When the earphone is plugged in, the profile Earphone is activated automatically.
Select “Options > Customize” to customize the profile settings.
15
05 MAIN MENU:
5.4.2 PHONE SETTINGS
5.4.2.1 TIME AND DATE
Set home city, time and date, and format of time and date
5.4.2.2 SCHEDULE POWER ON/OFF
Set a time for automatic Power on / off for the phone. Please activate this function
before setting a automatic Power on/off time.
5.4.2.3 LANGUAGE
Select a system language
5.4.2.4 SHORTCUTS
Different function menus can be added into Shortcuts. Press the navigation left key
to display the list of Shortcuts, and select the function menu you want to open.
5.4.2.5 DEDICATED KEY
The dedicated key is the central key directly under the screen. You can preset the
functions on the four sides. Select up, down, left or right and assign the specific
function to that key.
5.4.2.6 AUTOMATIC TIME UPDATE
Update the time automatically.
Note: A SIM card supporting this function is required. Please check with your
network provider.
5.4.2.7 DUAL SIM SWITCH
Manually selected by user: Decide to open which SIM every time the phone
is powered on. Automatic activation : SIM is open once it‘s inserted in SIM
compartment.
5.4.2.8 FLIGHT MODE
When Flight mode is on, the phone will not be able to make / receive calls or
send / receive messages.
5.4.2.9 LCD BACKLIGHT SETTINGS
Adjust the backlight brightness and set time for backlight when there is no
operation on the phone.
16
5.4.2.10 RESTORE FACTORY SETTINGS
The phone password is required to restore factory settings.
Attention: the data saved in the phone will be completely erased after this
operation. Please make sure that any important data is properly backed up.
5.4.3 DISPLAY SETTINGS
Set wallpaper and screen saver. 5 wallpapers and 5 screen savers are offered in the
phone.
5.4.4 DUAL SIM SETTINGS
Select the mode for Dual SIM: Dual SIM open, Only SIM1 open, Only SIM2 open
5.4.5 NETWORK SETTINGS
SIM1/SIM2 network settings: Select appropriate network.
Note: Please do not register networks inconsistent with the SIM card, so as to
restrict normal use. For details, please consult the network provider. Preferred
mode: Select and set the preferences of network.
5.4.6 SECURITY SETTINGS
• SIM1/SIM2 security: Activate PIN lock or change the PIN code. Please refer
to 3.2 Passwords
• Phone security: Activate phone lock or change the phone password.
Please refer to 3.2 Passwords. Auto key pad lock: If the phone is in standby
mode and without any operation within a certain time, the keypad will be
locked automatically. To unlock the keypad, press the left soft key, then
press *
• Privacy security: The phone password is required for using this function.
You can protect your Phonebook ,Messages, Call history and Files by
requiring to in put the phone password before getting access to these
menus.
5.4.7 CONNECTIVITY
Manage WiFi connections
17
05 MAIN MENU:
5.5 MESSAGES
5.5.1 NEW MESSAGE
Edit a new SMS or MMS. Press the central key for further operations as below:
Send the SMS or MMS, Add recipient , Insert symbols, Select a preferred input
method, Add CC / BCC / Subject, Add picture, Add audio, Add video, Switch
between SMS and MMS, Insert templates, Save as drafts, etc.
5.5.2 INBOX
View the received messages including SMS and MMS ; and press “options ” to go
see the operations below: forward the message, delete the message, delete all
messages in the Inbox, call the sender, Save the sender in phonebook, etc.
5.5.3 DRAFTS
Stores the messages which are not sent
5.5.4 OUTBOX
Stores the messages which have failed to send.
5.5.5 SENT MESSAGES
Store the messages which are sent successfully.
5.5.6 ARCHIVE
Stores the messages which are moved over.
5.5.7 DELETE MESSAGES
Select and delete the messages in Inbox, Outbox, Drafts, Messages sent.
5.5.8 MESSAGE SETTINGS
Set the relative parameters of SMS and MMS
5.5.9 EMAIL
For the first use, please create an Email account. After the creation of Email
account, get access to following operations:
• View: View all Emails in Inbox, Outbox, Emails sent and Drafts.
• Write Email: Edit a new Email.
• Email accounts: Set the Email account according to the information
provided by email service provider.
5.5.10 BROADCAST MESSAGES
Set the receive mode, languages and channel for receiving broadcast messages
18
5.5.11 TEMPLATES
Edit the templates of SMS and MMS.
5.6 WLAN
Activate the WLAN to search for any WLAN nearby and available. Some WLAN
require a password.
5.7 TOOLS
5.7.1 BLUETOOTH
• Power: turn on / off Blue tooth. When Bluetooth is turned off, all Bluetooth
connections are ended.
Note: Bluetooth connection will consume extra battery capacity.
• Visibility: Visibility of your Bluetooth device.
• My device: Search for nearby devices and pair with your mobile phone.
A device which has been paired up before will display automatically in the
list of My device.
• Search audio device : The phone will automatically search the audio
devices nearby and displays the results after searching.
• My name: Edit your device name.
• Advanced: Set the audio path, storage, sharing permissions and view
my address.
5.7.2 ALARM
There are 5 alarms in your mobile phone you can turn on/off respectively.
Edit alarm: Turn on/off the alarm, set the time of the alarm,etc. If the mobile phone
is powered off, when the alarm time comes, a notice will pop up on screen to
ask if you want to power on the phone or not.
5.7.3 CALENDAR
The Calendar is provided with a function on adding events . Press “Options”,
then select “Add events”. All events added will be displayed on the calendar.
5.7.4 CALCULATOR
5.7.5 TASKS: CREATE TASKS
5 .7.6 CURRENCY CONVERTER :
Convert between different currencies.
19
05 MAIN MENU:
5.7.7 WORD CLOCK
5.8 WIFI HOTSPOT
WiFi Hotspot is to share the internet connection of your phone with other digital
devices. Note: Your phone will incur data charges for using the WiFi Hotspot
function. When WiFi Hotspot is activated, your phone will have no access to the
internet via a secondary WiFi connection.
5.9 FILE MANAGER
Display all the folders and files saved in the phone and in the micro SD card (if it’s
mounted). Press “Options” for more operations on the folders and the files.
5.10 MEDIA PLAYER
5.10.1 NOW PLAYING
List of audios and videos which are being played. Press * or # to volume up or
down. Press navigation left key or right key to go to previous or next file.
5.10.2 MY PLAYLISTS
Select audio or video documents from the phone or the micro SD card and move
them to my playlists.
5.11 ENTERTAINMENT
Ebook, Java and Games are provided as entertainment.
5.12 SERVICES
Internet service: Open the navigator for internet surfing. Data account: Set WAP
account of your SIM card in order to get access to internet surfing.
Prior to contacting the after-sales service please make the following simple
inspection to save maintenance time and expenses for you as much as possible.
20
06 EASY TROUBLESHOOTING:
TROUBLES
CAUSES AND RESOLUTIONS
PHONE CAN’T BE POWERED ON
Check if the battery is installed properly. Take out the battery and reinstall it.
Check if the battery is empty and charge it.
CONNECTION PROBLEM TO NETWORK
Signals are too weak, please try in another open area.
THE CELL PHONE IS OUT OF THE NETWORK COVERAGE OF SERVICE PROVIDER
/ SIM CARD IS INVALID
please contact your network supplier.
07 TECHNICAL SUPPORT:
This product is designed as shock resistant phone, however, please don’t hit the
phone intentionally. This may bring damages to the performance of your phone,
and it will be no longer under warranty.
Technical Support Email: [email protected]
21