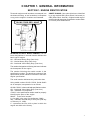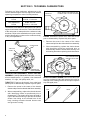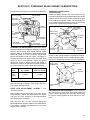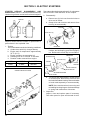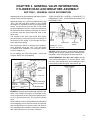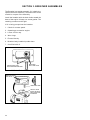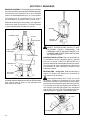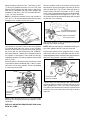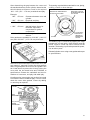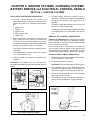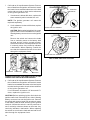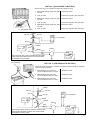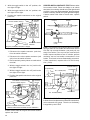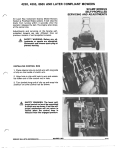
1
TECUMSEH
T E C H N I C I A N ' S
H A N D B O O K
This manual covers the following models:
VH80, VH100, HH80, HH100, HH120, OH120-180
Model numbers are located on the engine shroud.
Other illustrated Tecumseh 2-Cycle Engine, 4-Cycle Engine
and Transmission manuals; booklets; and wall charts are
available through Tecumseh.
For complete listing write or call
8 TO 18 HP
CAST IRON
FOUR CYCLE
ENGINES
Contents
Page
CHAPTER 1. GENERAL INFORMATION ................................................................................................................................... 1
SECTION 1. ENGINE IDENTIFICATION ............................................................................................................................. 1
SECTION 2. ENGINE CARE ............................................................................................................................................... 2
CHAPTER 2. AIR CLEANERS, CARBURETORS, GOVERNORS AND LINKAGE ................................................................... 4
SECTION 1. AIR CLEANERS .............................................................................................................................................. 4
SECTION 2. GENERAL CARBURETOR INFORMATION .................................................................................................. 5
SECTION 3. TECUMSEH CARBURETORS ....................................................................................................................... 6
SECTION 4. WALBRO CARBURETORS .......................................................................................................................... 10
HH80 - 120, VH80 - 100 .............................................................................................................................................. 10
SECTION 5. OVERHEAD VALVE ENGINE CARBURETORS .......................................................................................... 13
SECTION 6. GOVERNORS ............................................................................................................................................... 16
SECTION 7. IMPULSE FUEL PUMP ................................................................................................................................. 19
CHAPTER 3. REWIND STARTERS, ELECTRIC STARTERS, TROUBLESHOOTING AND GENERATORS ......................... 20
SECTION 1. REWIND STARTERS .................................................................................................................................... 20
SECTION 2. ELECTRIC STARTERS ................................................................................................................................ 22
SECTION 3. 12 VOLT STARTER TROUBLE SHOOTING CHART ................................................................................... 25
CHAPTER 4. GENERAL VALVE INFORMATION, CYLINDER HEAD AND BREATHER ASSEMBLY ................................... 27
SECTION 1. GENERAL VALVE INFORMATION ............................................................................................................... 27
SECTION 2. CYLINDER HEAD ......................................................................................................................................... 31
SECTION 3. BREATHER ASSEMBLIES ........................................................................................................................... 32
CHAPTER 5. PISTON AND RINGS, CONNECTING RODS AND CRANKSHAFTS ................................................................ 33
SECTION 1. PISTON AND RINGS .................................................................................................................................... 33
SECTION 2. CONNECTING RODS ................................................................................................................................... 35
SECTION 3. CRANKSHAFTS ........................................................................................................................................... 36
CHAPTER 6. CAMSHAFT, BEARINGS AND SEALS ............................................................................................................... 37
SECTION 1. CAMSHAFT .................................................................................................................................................. 37
SECTION 2. BEARINGS .................................................................................................................................................... 38
SECTION 3. SEALS ........................................................................................................................................................... 42
CHAPTER 7. DYNA-STATIC® BALANCING SYSTEM ............................................................................................................. 43
CHAPTER 8. IGNITION SYSTEMS, CHARGING SYSTEMS BATTERY SERVICE and
ELECTRICAL CONTROL PANELS .......................................................................................................................................... 45
SECTION 1. IGNITION SYSTEMS .................................................................................................................................... 45
SECTION 2. CHARGING SYSTEMS ................................................................................................................................. 48
SECTION 3. BATTERY SERVICE ..................................................................................................................................... 53
SECTION 4. ELECTRICAL CONTROL PANELS .............................................................................................................. 56
CHAPTER 9. TROUBLESHOOTING ........................................................................................................................................ 61
CHAPTER 10. 8 H.P. & LARGER ENGINE SPECIFICATIONS AND TORQUES .................................................................... 66
SECTION 1. CROSS REFERENCE LIST FOR TABLE OF SPECIFICATIONS ................................................................ 66
SECTION 2. TORQUE SPECIFICATIONS ........................................................................................................................ 70
8 H.P. & LARGER ENGINES (EXCEPT VALVE-IN-HEAD) ......................................................................................... 70
SECTION 3. VALVE-IN-HEAD ENGINE SPECIFICATIONS ............................................................................................. 71
SECTION 4. TORQUE SPECIFICATIONS ........................................................................................................................ 73
VALVE-IN-HEAD .......................................................................................................................................................... 73
CHAPTER 11. EDUCATIONAL MATERIALS AND TOOLS ...................................................................................................... 74
C Tecumseh Products Company
1998
i
CHAPTER 1. GENERAL INFORMATION
SECTION 1. ENGINE IDENTIFICATION
Tecumseh engine model numbers are stamped into
the blower housing, or are located on a nameplate
or tag on the engine in locations as illustrated.
OH160-170033 SER 8044C
SHORT BLOCKS. New short blocks are identified
by a tag marked SBH (Short Block Horizontal) or
SBV (Short Block Vertical). Original model tags of
engines should always be transferred to a short block
for correct parts identification.
INTERPRETATION OF MODEL NUMBER. The first
letter designations in a model number indicate the
basic type of engine.
HH - Horizontal-Heavy Duty (Cast Iron)
VH - Vertical-Heavy Duty (Cast Iron)
OH - Overhead Valve-Heavy Duty (Cast Iron)
The number designations following the letter indicates
the horsepower of the engine.
The number following the model number is the
specification number. The last three numbers of the
specification number indicate a variation to the basic
engine specification.
The serial number indicates the production data.
Using model number OH160-170033, Serial 8044C
as an example, interpretation is as follows:
OH160-170033 - is the model and specification number.
OH - Overhead Valve-Heavy Duty (Cast Iron)
160 - Indicates 16 horsepower.
170033 - is the specification number used for properly
identifying the parts of the engine.
8044C - is the serial number.
8 - first digit is the year of manufacture (1998)
044 - indicates calendar day of that year (044 day
or February 13, 1998).
C - represents the line, shift or plant in which the
engine was built at the factory.
1
SECTION 2. ENGINE CARE
FUELS. Use clean, fresh unleaded automotive gasoline
in all Tecumseh four-cycle engines. (Leaded “regular”
gasoline is an acceptable substitute.)
NOTE: Do Not use gasoline containing methanol
(wood alcohol). Gasoline containing a maximum of
10 ethanol or grain alcohol (sometimes called “gasohol”)
may be used but requires special care when engine
is unused for extended periods.
See “STORAGE” instructions.
ENGINE OIL, ALL FOUR CYCLE ENGINES:
USE A CLEAN, HIGH QUALITY, DETERGENT OIL.
Be sure original container is marked with engine
service classification “SF - SJ.”
CAUTION: Remove spark plug wire before doing
any service work on engine.
1. Service or replace air cleaner as necessary.
2. Inspect level and condition of oil; drain oil.
3. Remove blower housing, clean all dirt, grass or
debris from intake screen, head and cylinder cooling
fins and carburetor governor levers and linkage.
4. Remove cylinder head, remove carbon, inspect
valves and cylinder bore. Replace head using
a new head gasket. Torque to specifications.
FOR SUMMER (ABOVE 32°F, 0°C) USE SAE 30 OIL
(SAE10W30 is an acceptable substitute.)
5. Remove carburetor, clean and install carburetor
kit, make adjustment pre-sets where needed.
Make sure fuel tank, fuel filters and fuel lines
are clean. Reinstall carburetor, replacing any worn
or damaged governor springs or linkage. Make
proper governor adjustment.
FOR WINTER (BELOW 32°F, 0°C) USE SAE 5W20
OR 5W30 OIL.
(SAE10W is an acceptable substitute.)
6. Remove flywheel, check for leaks in oil seals,
check flywheel key and reinstall flywheel. Replace
spark plug and check for spark.
(BELOW 0°F, -18°C ONLY) Use 0W30 oil or SAE10W
oil diluted with 10% kerosene is acceptable.
7. Make sure all remote linkage is properly adjusted
for proper operation.
NOTE: For severe, prolonged, winter operation of
HH120 model, SAE10W oil is recommended.
8. Replace fuel and oil.
DO NOT USE SAE10W40 OIL.
OIL CHANGE INTERVALS. Change oil after first two
(2) hours of operation and every 25 hours thereafter,
or more often if operated under dusty or dirty conditions.
OIL CHECK. Check oil every 5 hours or each time
the equipment is used. Position equipment so the
engine is level when checking the oil.
BREAK-IN PROCEDURE. Proper break-in procedure
is important for proper seating of rings, on a new
engine or newly overhauled engine.
Do normal work with the unit, running the engine
under load. Vary the load on the engine frequently
to aid in seating of the rings.
The engine should not be allowed to idle or run at
part throttle for extended periods during break-in.
Work the engine but do not abuse it.
TUNE-UP PROCEDURE. The following is a minor
tune-up procedure. When this procedure is completed,
the engine will operate properly or you may discover
that further repairs may have to be performed.
NOTE: It is recommended to use only factory parts
in a Tecumseh engine. This is especially important
with an air filter, since the use of any other than the
specified part number may result in serious damage
to the engine.
2
9. Run engine and adjust carburetor and set R.P.M.
to specifications found on Microfiche or computer
parts lookup.
STORAGE: (IF THE ENGINE IS TO BE UNUSED
FOR 30 DAYS OR MORE)
CAUTION: NEVER STORE THE ENGINE WITH
FUEL IN THE TANK INDOORS , IN ENCLOSED
POORLY VENTILATED AREAS WHERE FUEL
FUMES MAY REACH AN OPEN FLAME, SPARK
OR PILOT LIGHT AS ON A FURNACE, WATER
HEATER, CLOTHES DRYER OR OTHER GAS
APPLIANCE.
Gasoline can become unstable in less than 30 days
and form deposits that can impede proper fuel flow
and engine operation. To prevent deposits from forming,
all gasoline must be removed from the fuel tank and
the carburetor. An acceptable alternative to removing
all gasoline is adding a fuel stabilizer to the gasoline.
Fuel stabilizer (such as Tecumseh’s Part No. 730245)
is added to the fuel tank or storage container. Always
follow the mix ratio found on the stabilizer container.
Run the engine at least 10 minutes after adding the
stabilizer to allow it to reach the carburetor.
DRAINING THE FUEL SYSTEM:
CAUTION: DRAIN THE FUEL INTO AN
APPROVED CONTAINER OUTDOORS, AND
AWAY FROM ANY OPEN FLAME OR
COMBUSTION SOURCE. BE SURE THE
ENGINE IS COOL.
1. Remove all gasoline from the fuel tank by running
the engine until the engine stops, or by draining
the fuel tank by removing the fuel line at the
carburetor or fuel tank. Be careful not to damage
the fuel line, fittings, or fuel tank.
2. Drain the carburetor by pressing upward on the
bowl drain (if equipped) which is located on the
bottom of the carburetor bowl. On carburetors
without a bowl drain, the carburetor may be drained
by loosening the bowl nut on the bottom carburetor
one full turn. Allow to completely drain and retighten
the bowl nut being careful not to damage the
bowl gasket when tightening.
3. If "Gasohol" has been used, complete the above
procedure and then put one half pint of unleaded
gasoline into the fuel tank and repeat the above
procedure. If Gasohol is allowed to remain in
the fuel system during storage, the alcohol content
will cause rubber gaskets and seals to deteriorate.
Change Oil: If the oil has not been changed recently,
this is a good time to do it.
Oil Cylinder Bore:
1. Disconnect the spark plug wire and ground the
wire to the engine. Remove the spark plug and
put 1/2 ounce (14 ml) of clean engine oil into
the spark plug hole.
2. Cover the spark plug hole with a shop towel.
3. Crank the engine over slowly several times.
CAUTION: AVOID SPRAY FROM SPARK PLUG
HOLE WHEN SLOWLY CRANKING ENGINE
OVER.
4. Install the spark plug and connect the spark plug
wire.
Clean Engine: Remove the blower housing and clean
all dirt, grass or debris from the intake screen, cylinder
head, cylinder cooling fins, carburetor, governor levers
and linkage.
3
CHAPTER 2. AIR CLEANERS, CARBURETORS,
GOVERNORS AND LINKAGE
SECTION 1. AIR CLEANERS
PAPER-TYPE AIR CLEANER SERVICE. Dry type
paper air cleaners are utilized on all Tecumseh Large
Frame engines. These air cleaners have treated paper
elements with rubberlike sealing edges. These edges
must seal properly to prevent dirt leakage.
COVER
ELEMENT
POLYURETHANE-TYPE AIR CLEANER. Some
Tecumseh Large Frame engines may use a polyurethane
air filter in conjunction with a paper filter.
GASKET
BASE
SPACER
BOLT
BRACKET
BOLT
PAPER
ELEMENT
SEALING EDGES
PAPER-TYPE AIR CLEANER SERVICE. Replace
air filter once a year or more often in extremely dusty
or dirty conditions.
DO NOT ATTEMPT TO CLEAN OR OIL FILTER.
Be sure to clean base and cover thoroughly before
installing new paper filter.
NEVER RUN THE ENGINE WITHOUT THE COMPLETE
AIR CLEANER INSTALLED ON THE ENGINE.
NOTE: Serious damage to the engine may result in
using other than the specified part number filter.
Use factory recommended parts only.
BACK
COVER
POLY
OUTER ELEMENT
FRONT COVER
POLY-TYPE AIR CLEANER SERVICE. Clean and
re-oil every 3 months or every 25 operating hours,
whichever comes first. Clean daily if used in extremely
dusty or dirty conditions. Proceed as follows:
Remove wing nut and cover.
Slide foam filter off paper filter.
Wash foam filter in water and detergent solution and
squeeze, Don’t twist until all dirt is removed.
Rinse thoroughly in clear water.
Wrap in a clean cloth and squeeze, Don’t twist until
completely dry.
Saturate foam filter with engine oil and squeeze,
Don’t twist to distribute oil and remove excess oil.
Clean top side of base and inside of cover thoroughly.
Replace foam filter, cover and wing nut. Tighten wing
nut securely.
NEVER RUN ENGINE WITHOUT COMPLETE AIR
CLEANER INSTALLED ON ENGINE.
4
SECTION 2. GENERAL CARBURETOR INFORMATION
CARBURETOR IDENTIFICATION. Tecumseh
carburetors are identified by a model number and
code date stamping on the carburetor as illustrated.
ALTERNATE LOCATION
FOR MODEL NUMBER
89 3
F
89 3
F 5
This carburetor is used on the Overhead Valve engine
12, 14, 16 & 18 horsepower.
CARBURETOR
CODE DATE
CARBURETOR
MODEL NUMBER
When servicing carburetors, use the engine model
number or the model number on the carburetor and
proper section in the Master Parts Manual or Microfiche
Catalog for proper service information.
CARBURETOR
MODEL NUMBER
FLOAT-FEED CARBURETORS. Float-feed carburetors
use a hollow metal float to maintain the operating
level of fuel in the carburetor. As the fuel is used,
the fuel level in the carburetor bowl drops and the
float moves downward. This actuates the inlet needle
valve, to allow fuel to flow by gravity into the fuel
bowl. As the fuel level in the bowl again rises, it
raises the float. This float motion adjusts the fuel
flow at the proper rate and keeps the fuel at the
proper mixture level.
These carburetors are used on some HH80-100120 and VH80-100 engines.
5
SECTION 3. TECUMSEH CARBURETORS
Following are initial carburetor adjustments to be
used to start the engine. After the engine has reached
operating temperature make final adjustments.
Main Adjustment
Screw
HH80-100-120
VH100, 1-3/4 turns.
Idle Adjustment
Screw
HH80-100-120
VH100, 1-1/4 turns
The Master Parts Manual or Microfiche has a direct
engine-to carburetor reference list. Further identification
of the carburetor is stamped on the carburetor body
as shown. Refer to the standard service part number
and the identification number on the carburetor body,
in any correspondence.
THROTTLE
SHUTTER
NOTE: IDENTIFYING MARK WILL BE
FOUND IN THE 3 O’CLOCK POSITION
CHOKE. Examine the choke lever, shaft and shutter
prior to disassembly. Replace any worn parts.
1. Remove the screw in the center of the choke
shutter and pull out the choke shaft lever assembly.
CHOKE LEVER
THROTTLE
LEVER
2. When reassembling, replace the choke shutter
with identifying marks as positioned prior to
disassembly. Hold the choke shaft securely into
the bearing bore when replacing the choke shutter.
CHOKE SHUTTER CUT
OUT CLEARANCE FOR
INTERNAL VENT TUBE
WELCH PLUG
CARBURETOR
MODEL NUMBER
CARBURETOR DISASSEMBLY, INSPECTION AND
ASSEMBLY. Carefully disassemble carburetor, removing
all non-metallic parts, i.e., gaskets, viton seats and
needles, “O” rings, fuel pump valve, etc.
THROTTLE. Examine the throttle lever shaft and
shutter prior to disassembly. Replace any worn parts.
IDLE ADJUSTMENT SCREW. Remove the idle screw
from the carburetor body and examine the point for
damage to the seating surface of the taper. Replace
any damaged parts.
1. Remove the screw in the center of the throttle
shutter and pull out the throttle shaft lever assembly.
BAD
2. When reassembling, replace the throttle shutter
with identifying marks as positioned prior to
disassembly. The throttle shaft must be held in
tight to the bottom bearing to prevent the throttle
shutter from riding on the throttle bore of the
body, causing excessive throttle shutter wear
and governor hunting.
6
GOOD
HIGH SPEED ADJUSTMENT SCREW. For service,
examine the taper of the high speed adjustment screw.
If the taper is damaged at the area where it seats,
replace the screw and fuel bowl retainer nut as an
assembly.
INLET NEEDLE. The inlet needle is anchored to
the float tab by a clip, to assure proper movement
of the inlet needle off of the seat when the float
drops. The inlet needle clip must be positioned as
shown during reassembly.
FUEL BOWL RETAINING NUT. Remove the fuel bowl
retaining nut including fiber washer.
Examine the small fuel passage in the annular groove
in the retaining nut. This passage must be clean
for the proper transfer of fuel into the idle metering
system. Replace any worn parts.
When replacing, torque the fuel bowl nut to 50-60
inch pounds.
CLIP
OPEN END
OF CLIP
LONG END
OF CLIP
THROTTLE END
FUEL BOWL
FLAT OF FUEL BOWL
TOWARD FUEL INLET
FITTING
FIBER WASHER
TORQUE TO
50 - 60 INCH
POUNDS
FUEL BOWL
RETAINING NUT
“O” RING
BRASS WASHER
HIGH SPEED ADJUSTMENT
SPRING AND SCREW
FUEL BOWL. Check the bowl for corrosion or dirt.
Replace if necessary.
The fuel bowl must be free of dirt and corrosion.
When tearing down carburetor for repair, replace
fuel bowl “O” ring. Before installation lubricate the
“O” ring with a small amount of oil for easier installation.
The fuel bowl flat surface must be positioned on
the same side of the carburetor as the fuel inlet fitting
or same side as the float hinge pin to assure full
travel of the float.
CHOKE END
Examine the inlet needle. If any wear is evident, or
any of the corners show signs of rounding, the needle
should be replaced.
The inlet needle hooks onto the float tab by means
of a spring clip. To prevent binding, the long, straight
end of the clip should face the choke end of the
carburetor as shown.
SERVICING THE VITON SEAT.
a. REMOVAL. If the seat is to be replaced use the
bent end of a paper clip or wire with a 3/32'’
(.24 mm) hook. Push the hook through the Viton
seat hole. Then with the hook, pull the Viton seat
out. Replace with a new seat.
NOTE: A #4 crochet hook can also be used for removal.
b. INSTALLATION.
NOTE: After thoroughly cleaning the cavity, moisten
the viton seat with oil.
Insert the seat with the grooved side into the
cup. Press the viton seat squarely into the base
with a punch.
“O” RING
CHECK FOR
CORROSION
AND DIRT
3/32”
(.24 mm)
HOOK END
FUEL BOWL
FLOAT. Remove the float. Examine the float for crushing
or holes. Examine the float hinge bearing surfaces
through which the float hinge pin passes and replace
if worn.
INSTALLATION OF VITON SEAT
INLET NEEDLE
INSERT THIS
SEATS AT THIS
FACE FIRST
POINT
REMOVAL OF VITON SEAT
7
HIGH SPEED NOZZLE. The carburetor body contains
a main nozzle emulsion tube pressed into the carburetor
body to a predetermined depth and positioned within
the venturi of the carburetor. Do not attempt to remove
this main nozzle. Repositioning of this nozzle will
seriously affect the metering characteristics of the
carburetor and will require replacement of the entire
carburetor.
CARBURETOR BODY. When removing the choke
and throttle shafts, check shafts and bearings in
carburetor body for wear. Any looseness in these
areas can cause dirt to enter the engine and cause
premature wear. If dust seals are present, these should
be positioned next to the carburetor body.
To do a proper cleaning job, welch plugs should be
removed to expose drilled passages. To remove the
welch plug, sharpen a small chisel to a sharp wedge
point. Drive the chisel into the welch plug, push down
on chisel and pry plug out of position.
PIERCE PLUG WITH TIP
SMALL CHISEL
WELCH PLUG TO BE
REMOVED
PRY OUT PLUG
MAIN NOZZLE
EMULSION TUBE
DO NOT REMOVE
DO NOT ALLOW
CHISEL POINT TO
STRIKE CARBURETOR
BODY
ABOUT 1/8” (3.2 MM)
WIDE
WELCH PLUG
FUEL INLET FITTING. If necessary, this fitting can
be removed by pulling and twisting. Be sure to install
the fitting in the same position as the original. When
installing the fitting, insert tip into the carburetor
body, then coat the exposed portion of the shank
with Loctite grade A; then press it in until the shoulder
contacts the carburetor body.
PRESS IN PARTIALLY
THEN APPLY LOCTITE
GRADE A
SOME INLET FITTINGS
UTILIZED A STRAINER
SMALL CHISEL
When all accessories and shafts have been removed,
soak the carburetor in carburetor cleaner for a maximum
of 30 minutes. Blow out all passages with compressed
air in the opposite direction of normal fuel flow or
use a soft tag wire. Clean all metallic parts with solvent.
To install a new welch plug after cleaning, place
the welch plug into receptacle with raised portion
up. With a punch equal, or greater than the size of
the plug, merely flatten the plug. Do not dent or drive
the center of the plug below the top surface of the
carburetor.
FLAT-END PUNCH
NEW WELCH
PLUG
8
SAME OR LARGER
DIAMETER OF PLUG
FLOAT ADJUSTING PROCEDURE
All Tecumseh carburetors with an adjustable float
require the correct float height to achieve the proper
operation and easy engine starts. To check the float
setting, hold the carburetor in an upside down position.
Remove the bowl nut, float bowl, and "O" ring. Place
an 11/64" (4.369 mm) drill bit across the top of the
carburetor casting on the opposite side and parallel
to the float hinge pin. The float must just touch the
drill bit when the bit is flush with the edge of the
float. If the float is too high or too low, adjust the
height by bending the tab accordingly. If the required
adjustment is minor, the tab adjustment may be made
without removing the float and carefully inserting a
small bladed screwdriver to bend the tab.
FLOAT
FLOAT HINGE
AND PIN
FLOAT
SETTING
11/64” (4.369 mm)
ADJUSTING TAB
INLET NEEDLE
AND SEAT
9
SECTION 4. WALBRO CARBURETORS
HH80 - 120, VH80 - 100
WALBRO CARBURETORS. Following are initial
carburetor adjustments to be used to start the engine.
After the engine has reached operating temperature,
make final adjustments.
Main Adjustment
Screw
HH80, 100, 120
VH80, 100, 1-1/2 turns off seat
Idle Adjustment
Screw
HH80, 100 120
VH80 100 1-1/4 turns off seat
For proper carburetion the atmospheric vent MUST
be open. Examine and clean if necessary.
A sluggish engine speed control may at times be
caused by dirt or paint on the throttle return spring.
Clean if required.
Install the throttle plate with the numbers (if present)
facing out when closed. Move the throttle shaft to
the closed position, place the throttle plate on the
shaft and secure with the retaining screws. The throttle
should move freely. If binding is present, correct by
loosening screws and repositioning throttle plate.
THROTTLE LEVER
THROTTLE SHUTTER
THROTTLE STOP
SCREW
MOUNTING
FLANGE
INSTALL WITH
NUMBERS OUT
62
29
Examine the inlet needle. “A” is a needle that is
serviceable, if the tip appears damaged as “B”, replace
needle and seat assembly. Tighten the inlet seat to
40 to 50 inch pounds (4.5 - 5.7 Nm). Always use a
new gasket. Clean all dirt from the inlet seat cavity.
Choke lever positioning is maintained by the stop
spring, replace if damaged.
The fuel inlet fitting should be checked if leakage
is detected in the carburetor area. Do not screw in
too tight, this may crack the carburetor body. The
fuel bowl drain should also be examined in event
fuel leakage is detected. It may be necessary at
times to replace the internal rubber seat. Examine
the throttle return spring if slow engine response is
noted during operation. Correct by cleaning the throttle
return or realigning the throttle plate.
Normally the main nozzle should not be removed.
It is possible to clean the carburetor with solvent
and compressed air. Remove and replace the main
nozzle only if the high speed needle seat is damaged
or because of excessive dirt.
MAIN NOZZLE
EMULSION TUBE
“B” DAMAGED
- Replace
INLET
NEEDLE
“A”
CHOKE STOP SPRING
THROTTLE LEVER
CHOKE LEVER
THROTTLE RETURN
SPRING
INLET
SEAT
SECONDARY
IDLE DISCHARGE
FUEL INLET
PRIMARY IDLE
DISCHARGE
THROTTLE SHUTTER
FUEL BOWL NUT
FUEL BOWL
10
HIGH SPEED
ADJUSTMENT SCREW
INLET SEAT
GASKET
INLET SEAT
CAVITY
Do not remove the main nozzle. If it is necessary to
remove the main nozzle to aid in cleaning, discard
the main nozzle and use a service replacement nozzle
with an under cut in the thread area. If the nozzle
removed is under cut it can be reused. This procedure
must be followed to assure delivery of fuel to the
idle system.
UNDERCUT
ANNULAR
GROOVE
EARLY
SERVICE
MAIN NOZZLE
(REUSABLE)
ORIGINAL
MAIN NOZZLE
DO NOT REUSE IF REMOVED
Float settings are measured opposite the float hinge.
Remove float by pulling out float axle. Bend adjusting
tab to correct setting. Always remove the float to
make adjustments.
Examine the float hinge and axle for wear. If evident
replace the parts.
FLOAT
FLOAT HINGE
AND AXLE
NEW
This shows early and new needle valve, seat, gasket,
and spring assembly for large horsepower engine
carburetors.
Early carburetors have a metal-to-metal needle and
seat contact. The float setting for this model will be
.110'’ - .130'’ (2.794 - 3.362 mm).
New carburetors contain a viton seal in the seat and
a spring on the needle. For engines with the new
carburetor and having a fuel pump, the float setting
is .140 (3.556 mm).
For engines with the new carburetor, without a fuel
pump, the float setting is .075 (1.905 mm).
FLOAT
SETTING
Ô
Ô
The float setting on carburetors used on vertical 8
and 10 H.P. engines is .070'’ to .110'’ (1.778 - 2.794
mm). No variance for carburetor having a fuel pump.
The gasket must fit over the float spring as shown
to avoid cutting by the spring when assembled.
ADJUSTING
TAB
INLET NEEDLE
AND SEAT
GASKET GOES
OVER SPRING
(IF EQUIPPED)
CHOKE END OF
CARBURETOR
ENDS OF SPRING
POINT TOWARD CHOKE
END OF CARBURETOR
11
When assembling the float to the carburetor body,
position the needle spring on the adjusting tag so
that it hangs down. Hold the float spring under tension
until the carburetor body will support the slight spring
tension.
Prior to removing the fuel bowl nut, remove the high
speed adjustment needle. Use a 7/16'’ box end wrench
or socket to remove the fuel bowl nut. When replacing
the fuel bowl nut be sure to position the fiber gasket
under the nut and tighten securely.
NOTE: THE SPRING ENDS MUST POINT TOWARD
THE CARBURETOR CHOKE END.
Examine the tip of the high speed needle, if it appears
as illustrated, replace. If the tip of the high speed
adjustment needle is damaged, the seat is probably
damaged. The seat is part of the main nozzle. When
replacing the high speed needle the main nozzle
should also be replaced.
HIGH SPEED
ADJUSTMENT NEEDLE
TENSION SPRING
FUEL BOWL
“A”
FUEL BOWL DRAIN
“O” RING
HOLD SLIGHT
SPRING TENSION
WITH THUMB
Ô
Position the choke shaft and shutter in the closed
position prior to tightening the screws. Hard starting
may be due to insufficient choking action because
of a misaligned choke plate. Correct by readjusting
choke plate to close completely.
A typical choke shutter found on horizontal engines
is shown in the figure below. The full choke position
of choke lever is counterclockwise when viewed from
top of the carburetor. Note cut-out position of choke
shutter.
INSTALL WITH
NUMBERS OUT
CCW
CHOKE SHUTTER
62
29
“B” DAMAGED
(Replace)
FUEL BOWL NUT
OUTSIDE GASKET
Use new gaskets when rebuilding the carburetor. If
the fuel bowl to carburetor body gasket does not
seat, enlarge by stretching with 4 or 5 quick short
strokes. Fiber gasket must be used between center
of fuel bowl and carburetor body.
The fuel pick up passage must be clean to assure
adequate fuel flow from the fuel bowl to the metering
systems.
INSIDE FIBER
GASKET
FUEL BOWL
GASKET AND SEAT
AIR CLEANER
MOUNTING
Figure below shows a typical choke shutter found
on vertical engines. The full choke position of the
choke lever is clockwise when viewing from the top
of the carburetor. Note cut-out position of choke shutter.
CHOKE
SHUTTER
CW
AIR CLEANER
MOUNTING
NUMBERS
OPPOSITE SIDE
12
MAIN
NOZZLE
FUEL
PICK-UP
PASSAGE
FLOAT
SECTION 5. OVERHEAD VALVE ENGINE CARBURETORS
Overhead valve engines utilize Walbro carburetors.
THROTTLE PLATE
CHOKE LEVER
THROTTLE
RETURN SPRING
IDLE SPEED
ADJUSTMENT
SCREW
CHOKE
SHUTTER
IDLE SPEED
ADJUSTMENT
SCREW
RETAINING
SCREWS
ATMOSPHERIC
VENT OPENING
FUEL BOWL
FUEL BOWL
RETAINING NUT
HIGH SPEED
ADJUSTMENT SCREW
CARBURETOR ADJUSTMENT. Carburetor factory
adjustment should not be changed. However, if required,
perform the following: with engine running (Allow
engine to warm up for 5 minutes). Open throttle (speed
control at “RUN” or “FAST” position). Adjust high
speed adjustment screw per chart, clockwise or
counterclockwise until engine runs smoothly. With
control in idle or slow position, adjust idle speed
adjustment screw to obtain correct idle speed. If
necessary, readjust idle adjustment screw clockwise
or counterclockwise until engine idles smoothly.
OH120
THRU
OH180
THROTTLE PLATE
INSTALL WITH
NUMBERS OUT
IDLE
ADJUSTMENT
SCREW
CARB.
CARBURETOR SERVICING
Throttle Shutter
Install the throttle shutter with the numbers facing
out when closed. Move the throttle shaft to the closed
position, place the throttle shutter on the shaft and
secure with new retaining screws. The throttle should
move freely. If binding is present, correct by loosening
screws and repositioning throttle shutter.
HIGH SPEED
ADJ. SCREW*
IDLE ADJ. SCREW*
1 TURN*
1 TURN*
MOUNTING
FLANGE
THROTTLE
SHUTTER
CHOKE SHUTTER. Position the choke shaft and
shutter in the closed position to tighten the screws.
Hard starting may be due to misaligned choke plate.
Correct by readjusting the plate to close completely.
INSTALL WITH
NUMBERS OUT
CHOKE SHAFT
CHOKE
SHUTTER
*All Adjustments Off of Seat
IDLE ADJUSTMENT SCREW. Close idle adjustment
screw by turning clockwise. Close finger tight only.
Forcing will damage screw.
OPEN IDLE ADJUSTMENT SCREW: 1 turn
counterclockwise.
Start engine and with the throttle open (then return
to idle position), adjust idle adjust screw one-eighth
(1/8) turn at a time clockwise or counterclockwise
until engine runs smoothly.
ATMOSPHERIC
VENT
AIR CLEANING
MOUNTING
HIGH SPEED ADJUSTING SCREW. Prior to removing
the fuel bowl nut, remove the high speed adjusting
needle. When replacing the fuel bowl nut be sure
to position a fiber gasket on each side of the fuel
bowl.
With control at “idle” or “slow” position, adjust idle
speed adjustment screw to obtain correct idle speed.
If necessary, readjust idle adjustment screw until
engine idles smoothly.
13
Examine the tip of the high speed adjustment screw.
If the tip of the screw is damaged, the seat, which
is part of the main nozzle, is probably damaged.
When replacing the screw, the nozzle should also
be replaced with a service replacement nozzle only.
INLET NEEDLE & SEAT. The inlet needle and seat
are replaceable as an assembly. If the tip appears
damaged, replace the needle and seat assembly.
MAIN NOZZLE
HIGH SPEED
ADJUSTMENT SCREW
FUEL BOWL
TENSION
SPRING
“A”
“O” RING
“B” DAMAGED
Replace
RE-USE
CHAMFERED
INSERT
EDGE
FACE FIRST
“B” DAMAGED
Replace
INLET SEAT
CAVITY
FLOAT
MOUNTING
INLET NEEDLE TIP
SEATS AT THIS POINT
OUTSIDE FIBER
GASKET
MAIN NOZZLE. Normally the main nozzle should
not be removed, if it is, clean the carburetor with
solvent and compressed air. Remove and replace
the main nozzle only if the seat is damaged or is
excessively dirty.
Replace the float and axle if wear is evident. The
float must measure .275” / .315'’ (6.985 / 8.001 mm)
from top of boss to surface of float (closest to center).
MEASURE AT EDGE
CLOSEST TO CENTER
FLOAT HINGE
AND AXLE
Ô
If it is necessary to remove the main nozzle, discard
it and use a service replacement nozzle with an undercut
in the thread area. If the nozzle removed is already
under cut, it can be reused. This replacement assures
delivery of fuel to the idle system.
FLOAT SETTING. Float Settings are measured opposite
the float hinge. Remove float by pulling out float
axle. Bend adjusting tab to correct setting. Always
remove the float to make adjustments.
Ô
FUEL BOWL NUT
.275 (6.985 mm)
.315 (8.001 mm)
FLOAT
UNDERCUT
ANNULAR
GROOVE
INLET NEEDLE
AND SEAT
ADJUSTING TAB
Position carburetor in an upright position.
SERVICE MAIN
NOZZLE - REUSABLE
ORIGINAL
MAIN NOZZLE
(DO NOT REUSE IF REMOVED)
If float is lower than dimensions shown in figure,
bend outside tab GENTLY so float does not drop
plus or minus .060'’ (1.524 mm) from base of boss.
FLOAT
OUTSIDE TAB
BOSS
14
.060
(1.524 mm)
ASSEMBLING SEAT, SPRING & FLOAT. Shown below
is the float, hinge pin, seat and the float spring.
DAMPER
SPRING
FIXED HIGH SPEED CARBURETOR. On carburetors
of a later design the high speed screw has been
replaced by a fixed speed nut. Adjustment is made
only on the idle adjustment screw since the high
speed setting is fixed.
PIN
FLOAT
When assembling the float to the carburetor body,
position the needle spring on the adjusting tang so
that it hangs down. Hold the float damper spring
under tension until the carburetor body will support
the slight spring tension. The spring ends must point
toward the carburetor choke end.
HOLD SLIGHT SPRING
TENSION WITH THUMB
IDLE ADJUSTMENT
SCREW
FIXED SPEED NUT
WALBRO WHG. The early production OH engine
was equipped with a LMH carburetor. The newer
engines since 1987 have been manufactured with
a WHG carburetor. Service replacements are all WHG,
which include an instruction sheet covering service.
The bowl gasket must be positioned over the float
spring as shown.
FUEL BOWL GASKET AND SEAT
INSIDE FIBER
GASKET
FUEL
PICK-UP
PASSAGE
WHG
LMH
WHG
LMH
NEW WHG
EARLY LMH
FLOAT
GASKET GOES
OVER SPRING
15
SECTION 6. GOVERNORS
This Governor Assembly is used on current production
HH & OH Tecumseh Engines.
SHAFT PRESSED TO GEAR
GOVERNOR GEAR
There is an oil groove on the inside of the spool to
prevent oil pressure from building up under the spool.
Position the governor gear and flyweight assembly
on the governor gear shaft. Secure with a retaining
ring. Place the governor spool on the governor gear
shaft.
The spool is positioned on the governor gear shaft
with the fingers of the flyweight under the rim of the
spool.
Some models have an oil hole in the closed end for
lubrication. CAUTION: On reassembly make sure
hole is open. Other models have a groove on the
inside that serves the same purpose.
WASHERS
PRESS GOVERNOR
“GEAR SHAFT’
INTO THIS DIMENSION*
To position the governor gear assembly, insert the
shaft opposite the flyweights into the cylinder block.
SPOOL
1” (25.4 mm)
RETAINING RING GROOVE
GOVERNOR
GEAR
OIL HOLE
(ON SOME MODELS)
FLYWEIGHT
ASSEMBLY
*1.031” (26.187 mm)
ON MODELS WITH WASHER
WASHER ON
SOME MODELS
GOVERNOR
GEAR SHAFT
WASHER
Position the governor gear assembly (with washer
under governor gear) to mesh with the camshaft gear.
Place the governor spool (with washer under the
spool) on the governor gear assembly, with the fingers
of the flyweights under the rim of the spool.
GOVERNOR GEAR AND
FLYWEIGHT ASSEMBLY
GOVERNOR SPOOL
GOVERNOR SHAFT
GROOVED SLOT
(INTERNAL)
GOVERNOR GEAR
16
FLYWEIGHT
RETAINING RING
Remove the governor gear shaft by threading the
shaft with 1/4-28 die. Place a number of washers
on the shaft and turn on a nut. By tightening the nut
against the washers the shaft will be pulled from
the cylinder.
For old style governor assembly, position the governor
gear shaft over the opening in the cylinder block
and tap lightly with a hammer to start. Use a press
to position. Refer to top picture for proper pressed
in depth. Measure from the top of the governor gear
shaft to the machined surface on the cylinder block.
CYLINDER COVER
GOVERNOR ADJUSTMENT FOR HORIZONTAL ENGINES
GOVERNOR ROD
PIVOT POINT
“C”
GOVERNOR
SPRING
MOVE TO
‘RUN’ POSITION
“A”
RETAINING RING
“B”
GOVERNOR SPOOL
CONTACTS LEVER
TURN CCW
The governor rod is retained in the cylinder cover
bushing with a retaining ring.
The governor spool moves the governor rod by
contacting the lever. Outward movement of the governor
spool moves the governor levers and carburetor throttle
to a closed position.
The lever must contact the governor spool tightly
for best governor control and for correct adjustment
procedure.
BEARING WITH
SEAL TO OUTSIDE
BEARINGS
BEARING END
FLUSH WITH CASTING
GOVERNOR
ADJUSTING
SCREWS
1. SETTING VARIABLE SPEED ADJUSTING
SCREW. Before attaching the bowden wire, set
the engine for maximum R.P.M. (See Mfg.
specifications) with engine running. Use a good
tachometer. Move lever “A” clockwise until lower
end strikes the adjusting screw at “1”. (See picture
below)
Loosen lock nut on adjusting screw and turn in to
decrease R.P.M. Turn out to increase R.P.M.
CAUTION: DO NOT EXCEED RECOMMENDED R.P.M.
RETAINING RING
WASHER
The governor rod on some valve-in-head model engines
utilize needle bearings. If bearing(s) are removed,
always install new bearing(s). Remove with 3/8'’
(9.525 mm) diameter punch and mallet. To install,
tap the first bearing in until the bearing end is flush
with casting. Holding a finger over hole will indicate
when bearing is driven into casting far enough. Drive
the outside bearing in with edge flush with outside
surface of casting and seal (in bearing) at outside
end.
GOVERNOR ADJUSTMENT FOR HORIZONTAL
ENGINES (See Picture: Governor Adjustment for
Horizontal Engines)
2. ADJUSTING FIXED SPEED. The fixed speed
adjusting screw is the optional position “2”. Adjust
it by starting the engine, then loosening the locknut.
Turn screw in to increase R.P.M. and out to decrease
R.P.M.
IDLE
HOLE “B”
(CW)
HOLE “C”
ADJUSTING SCREW
FIXED SPEED
POSITION “2”
OPTIONAL
Move remote controls to RUN position.
“A” LEVER
PIVOT
(CW)
Loosen Screw “A”.
Pivot plate “B” counterclockwise (ccw) and hold.
BOWDEN WIRE
CLAMP “B”
FAST
ADJUSTING SCREW VARIABLE
SPEED POSITION “1” STANDARD
BOWDEN WIRE
CLAMP “C”
Move lever “C” to left.
Tighten screw “A” securely.
When the governor is properly set, the carburetor
throttle lever will be in a wide open position when
the controls are set for starting.
The governor spring is to be anchored in the bottom
center hole (D) of plate “B”. Do not stretch or cut
the governor spring. Above adjustments will correct
any variations in governor control.
17
VERTICAL CRANKSHAFT GOVERNOR
ADJUSTMENT.
Move remote controls to RUN position.
Loosen screw “A”.
Turn plate “B” counterclockwise (ccw) and hold.
ADJUSTING FIXED SPEED. The fixed speed adjusting
screw is the optional position “2”. Adjust it merely
by starting the engine and after loosening the lock
nut turn screw in (clockwise) to increase spring tension
and hold engine at higher R.P.M. and out
(counterclockwise) to decrease tension on spring
and allow speed to be decreased more easily.
Move lever “C” to left.
“FIXED SPEED”
Tighten screw “A” securely.
When the governor is set properly the carburetor
throttle will be in wide open position.
BOWDEN WIRE
CLAMP “B”
HOLE “C”
GOVERNOR ADJUSTMENT VERTICAL
THROTTLE TOWARD
FULL OPEN
THROTTLE TOWARD
Ô
FULL CLOSED
HOLE “B”
Ô
GOVERNOR
SPRING
BOWDEN
WIRE
CLAMP “C”
“A” LEVER
LEVER “C”
SCREW “A”
“D”
PLATE “B”
GOVERNOR
ADJUSTING
SCREWS
TURN CCW
VARIABLE SPEED ADJUSTMENT. Before attaching
the remote speed control (bowden wire) set the engine
for maximum R.P.M. (See Mfg. specifications). Use
a good tachometer.
Move lever “A” clockwise until lower end strikes the
adjusting screw “1”.
Loosen lock nut on adjusting screw “1” and turn in
(clockwise) to decrease R.P.M. and out counterclockwise
to increase R.P.M.
CAUTION: DO NOT EXCEED RECOMMENDED R.P.M.
18
ADJUSTING SCREW
FIXED SPEED
POSITION “2”
(OPTIONAL)
ADJUSTING SCREW
VARIABLE SPEED
POSITION “1”
(STANDARD)
SECTION 7. IMPULSE FUEL PUMP
IMPULSE FUEL PUMP. This pump is mounted onto
the carburetor inlet and has connections from the
fuel supply and also a pulse line to the engine crankcase.
CAUTION: IN ORDER FOR THE PUMP TO OPERATE
SATISFACTORILY THE CORRECT OIL LEVEL IN
THE CRANKCASE MUST BE MAINTAINED. TOO
MUCH OIL WILL ADVERSELY EFFECT THE PUMPS
OPERATION.
FOUR SCREWS INTO
BACKSIDE OF PLATE
TO BACKSIDE
OF PLATE
WHEN ASSEMBLED
THIS SIDE FACES INTO
CONCAVE CAVITY OF
ABOVE ASSEMBLY
It is operated by changing pressure created by the
engine piston movement and transmitted to the pump
through a pulse line. The increasing and decreasing
pressures acting on the diaphragm and flap valves
lift fuel from the fuel tank to the carburetor of the
engine.
SPRING IN
HOLE CAVITY
CARBURETOR FITTING
ATMOSPHERIC
VENT
VALVE OPEN
DIAPHRAGM
BUTTON WITH SPRING
VALVE
CLOSED
TYPE I
FILTER
AIR BLEED
VALVE CLOSED
FUEL SUPPLY
PULSE LINE
TO CRANKCASE
±
±
CRANKCASE PRESSURE
CRANKCASE SUCTION AND Ü
FLOW DIRECTION
Ô ATMOSPHERIC PRESSURE Ô ATMOSPHERIC PRESSURE Ô
ACTING ON DAMPING
ACTING ON DAMPING
DIAPHRAGM
DIAPHRAGM
ÜFUEL FLOW
VALVE
OPEN
SUCTION FUEL FLOW
DIRECTION
ATMOSPHERIC PRESSURE
CAUSED FUEL FLOW
To service, separate the pump by removing the four
(4) screws. Clean all new parts with a solvent and
install a new kit which consists of coil springs, gaskets
and diaphragms.
The diaphragms must be installed against the center
body with the gaskets against the outside covers.
The parts are designed so they cannot be misassembled
without damage.
To test the unit, assemble the carburetor to the engine,
leaving the pump off. Connect gravity fuel feed supply
to the carburetor. With the pulse line connected to
the pump and engine running, a definite flow should
result.
PREVIOUS STYLE
TYPE I
NEW STYLE
TYPE II
The new style pump (TYPE II) will replace older (TYPE
I) pumps. An assembly kit is available with instructions
and all the parts needed to convert to the new style.
If a complete replacement of an old style is not necessary,
a repair kit is still available.
If the flow is erratic or intermittent, the pump needs
repair or replacement.
19
CHAPTER 3. REWIND STARTERS, ELECTRIC STARTERS,
TROUBLESHOOTING AND GENERATORS
SECTION 1. REWIND STARTERS
REWIND STARTER DISASSEMBLY PROCEDURE
1. Clamp starter in a vise and pull rope out, and
clamp pulley.
2. Untie knot in rope and remove.
REASSEMBLY. Lubricate the recoil spring and center
shaft with a small amount of light grease. Place the
pulley over the center shaft and bottom. Insert a
1/8'’ (3.175 mm) punch or rod into the through hole
in the pulley, and turn the pulley. This will aid in
positioning and engaging the spring.
3. Slowly release spring tension.
4. Remove retainer screw, retainer cup; starter dog
and spring, and brake spring.
5. Lift out pulley, turn spring and keeper assembly
to remove from housing.
1/8” (3.175 mm)
PUNCH
Replace all worn or damaged parts.
BRAKE SPRING
RETAINER
TURN PULLEY
WASHER
RETAINER
RETURN
SPRING
PULLEY
STARTER
DOGS
SPRING REPLACEMENT. Disassemble the starter
completely.
New springs are enclosed in retainers. Be sure spring
is positioned with wrapping in direction as illustrated.
Position new spring and retainer over housing and
press the spring out of the retainer into the starter
housing.
APPLY LIGHT
LUBRICANT
20
REWIND
SPRING
INSERT PUNCH INTO
THROUGH HOLE AIDING
SPRING ENGAGEMENT
REWINDING SPRING AND REASSEMBLY. Place
the large washer, 1-3/8'’ (34.925 mm) over the center
shaft. Insert the dogs, so that they will fold in close
to the center. Press the brake spring on the retainer.
The brake spring must be a tight fit on the retainer.
Hold the retainer and brake spring assembly at an
angle to engage the return spring to the dowel on
the pulley. Secure with the center screw and washer
and tighten securely. Failure of the starter to engage
may be traced to either a loose center screw, or
loose brake spring. Tighten the screw or replace
the brake spring. Replace the rope as outlined.
VISE
ASSEMBLING STARTER TO ENGINE. It is important
to center the starter hub containing the starter dogs
in the center cup so there is equal contact on all
the dogs into the teeth of the cup.
Before securing the starter with the mounting screws,
place the hub into the cup then pull the rope enough
to cause the starter dogs to equally engage in the
teeth. With the dogs securely in the cup, tighten
the mounting screws to 40-60 inch pounds
(4.5 - 6.8 Nm) torque. If mounting holes do not line
up, blower housing is bent and must be replaced.
SCREW DRIVER
PREWIND
7 TURNS
INSERT ROPE
TIGHTEN STARTER MOUNTING SCREWS AFTER HUB
IS CENTERED IN CUP
CLAMP WITH PLIERS TO
RETAIN TENSION
ROPE REPLACEMENT. Prepare the rope, place a
thin 3/4'’ (19.05 mm) diameter washer with a 1/4'’
(3.175 mm) hole on the rope and tie a knot. The
other end of the rope should be thinned to a point
for easier threading.
Clamp the starter in a vise, upside down, by one
leg opposite the rope outlet. Place a screw driver
in the rope hole of the pulley and turn counterclockwise
until tight, then allow to unwind until hole in pulley
for rope lines up with hole in housing. Clamp the
pulley in this position with lever action pliers. Clamp
over starter housing and pulley, protect the painted
surface.
Insert the rope into the pulley hole and guide it with
needle nose pliers through the rope outlet in the
housing. Secure the handle with a double knot. Hold
the rope taut, release the pliers and allow the rope
to wind on the pulley.
STARTER
CUP
STARTER
HUB
STARTER
STARTER DOGS EQUALLY SECURE IN TEETH FOR
CORRECT CENTERING OF STARTER HUB
ON SOME VALVE-IN-HEAD ENGINES:
PULLEY (SHEAVE-TYPE) STARTER. Consists of
a rope sheave-type. The engine comes equipped
with starter rails and the blower housing is constructed
with a removable plate for conversion to an electric
start.
CENTER SCREW
STARTER DOG
WASHER
21
SECTION 2. ELECTRIC STARTERS
STARTER SERVICE, DISASSEMBLY AND
INSPECTION. Part No. is found on identification tag.
Used on large frame vertical and horizontal engines.
Test and trouble shooting procedures for 12 volt starters
can be found in other Sections of this chapter.
2. Disassembly.
a. Remove two (2) lock nuts from thru bolts on
drive end of starter.
b. Grasp drive end of starter and remove from
housing as an assembly.
PART NO.
HOUSING
LOCK NUTS (2)
Repair of these starters consists of replacement of
parts shown in the exploded view.
1. Testing
Test 12 Volt starters under the following conditions:
a. Conduct test with fully charged battery.
b. Engine and oil temperature approximately
70° F (21°C).
c. Engine contains recommended oil.
d. Cranking test not to exceed 10 seconds.
e. Parasitic loads removed from engine.
MODEL
AMPERES
ENGINE RPM
33835
70 MAX.
600 MIN.
THRUST
WASHER
DRIVE END
c. Remove dust cover, retaining ring, spring
retainer, anti-drift spring, gear and engaging
nut. Remove drive end cap from armature.
ARMATURE
ENGAGING NUT
LOCK NUTS (2)
SPRING
GEAR
THRUST
WASHER
RETAINING
RING
THRUST WASHER
HOUSING & ARMATURE NOT AVAILABLE
ORDER COMPLETE SYSTEM
DRIVE END CAP
SPRING RETAINER
DUST COVER
d. To remove end cap assembly, loosen the nut
on terminal post. Remove the lock nuts and
thru bolts from starter housing. Remove brushes
or brush card separately or as an assembly.
NOTE: Care must be taken in removing and
reinstalling brush springs to eliminate damage
to spring and malfunction of brushes.
3. Inspection
Inspect, clean and replace parts if necessary.
Test motor parts for open and shorted circuits.
22
BRUSH CARD
NEW STARTER MOUNTING SCREWS AND WASHERS
BRUSH AND BRUSH
SPRING (4)
LOCK NUT
ADJUSTING BOLT
CYLINDER
TERMINAL
POST
THRU BOLTS (2)
COMMUTATOR
END CAP
LOCK NUTS (2)
4. Assembly
a. Install drive end cap, engaging nut and gear,
anti-drift spring, spring retainer, retaining ring,
and dust cover to armature. Install armature
into housing.
b. Install brush card assembly and two (2) thru
bolts so stops on bolts will secure brush card.
Secure lock nuts on drive end of starter.
c. Install thrust washer on armature and install
commutator end cap. Insure that the twopiece grommet is properly installed to prevent
moisture from entering this area.
d. Install end cap lock nuts.
COMMUTATOR
END CAP
LOCK NUTS (2)
TWO PIECE GROMMET
AND TERMINAL BOLT
When using starter motor, part no. 33835 to replace
starter part no. 32817 on vertical crankshaft models,
proceed as follows.
1. Remove the two (2) 5/16-18 x 7/8'’ (22.225 mm)
screws that attached the original starter and discard.
2. Install the 5/16-18 x 1-3/8'’ (34.925 mm) adjusting
bolt through the hole in the starter bracket with
a lock nut on each side of the bracket. Position
bolt so head will not touch cylinder when starter
is installed.
3. Install motor with two (2) 5/16-18 x 5/8'’ (115.875
mm) screws and lockwashers. Torque screws
to 140-170 inch lbs. (18.2 - 19.2 Nm).
STARTER MOTOR TESTS
a. Preliminary Tests
Before checking the starter motor perform the
following preliminary checks:
1. Battery must be at least 3/4 full charge.
2. Determine parts such as switch, solenoid,
between power source and starter motor are
in good working order.
3. Terminals must be bright and clean for full
conductance.
4. Check wires for breaks, insulation breakdown.
5. Proper size (gauge) wire between power source
and starter motor.
6. If starter motor does engage the flywheel
but fails to crank engine, check the engine
for excessive friction caused by a seized rod
or piston.
7. Check related parts such as clutches, pulleys,
etc. for excessive friction.
b. Visual Checks
Make a visual check of the starter motor before
checking electrically. Remove the starter motor
and check for freedom of operation by turning
the shaft. Look for:
1. Worn out brushes.
2. Weak brush springs.
3. Dirt on the commutator bars.
4. Armature binding, caused by dirt or bushings
being gummed up through excessive lubrication.
STARTER CHECKING AND SERVICE. Remove nuts
at both ends of starter and take off rear end cap.
CHECK FIELD. Using a continuity light or ohm meter,
check field by attaching one lead to each field coil
connection. Continuity should exist between these
two points. Check continuity between each field coil
connection and the starter housing. No continuity
should exist.
4. Turn adjusting bolt so head of bolt securely bottoms
on cylinder. Tighten nuts to hold bolt in position.
23
ARMATURE CHECK. If commutator bars are glazed
or dirty they can be turned down in a lathe. While
rotating, hold a strip of 00 sandpaper lightly on the
commutator, moving it back and forth. (Do not use
emery cloth). Recut grooves between commutator
bars to a depth equal to the width of the insulators.
3. With a pliers or vise grip tool, grasp the throughbolts as close to the flanged end as possible
(away from the threaded end), and remove the
two nuts retaining the driving end cap of the starter.
Remove the armature and driving cap assembly.
Remove the two through-bolts, noting the position
of the brush ground eyelet under the throughbolt flange.
4. Note the position and the connections of the brush
wires. Clip the solid field wires as close to the
connectors as possible.
5. Remove the brush card from the starter, noting
the position of the clearance slot. Clean the starter
and all parts of accumulated dust and dirt. Scrape
the insulating varnish off of the solid field wires,
back approximately 1/2” (12.7 mm) from ends.
Using a continuity tester to make certain no continuity
exists between the commutator (copper) and the
iron of the armature, rotate armature and check out
all commutator bars.
The armature can be thoroughly checked with a growler
if available.
CHECK BRUSHES. Before removing armature, check
brushes for wear. Make sure brushes are not worn
to the point where the brush wire bottoms out in the
slot of the brush holder. Brush springs must have
enough strength to keep tension on the brushes and
hold them against the commutator.
If brushes need replacement, remove by unhooking
terminals or clipping connections and resoldering.
If brush card is warped from overheating, replace
the brush card assembly.
BRUSH CARD
6. Insert the new brush card into position, guiding
the solid field wires through the proper slots in
the brush card.
7. Using the proper crimp connector, crimp and solder
the remaining brush leads to the solid field wires.
Use a pair of pinchers or needle-nose pliers to
hold the woven brush lead adjacent to the connector
while soldering (this provides a heat sink so that
solder does not flow up the brush lead). Using
electrical tape or shrink tubing, insulate the crimped
connection nearest the starter terminal post. Position
the wires to prevent shorts or grounding of the
starter.
8. Spread the brushes to install the armature into
the housing, and replace the starter throughbolts, being sure to install them through the ground
brush eyelet terminals. Install and tighten the
drive end through-bolt nuts. Tighten securely,
but do not over tighten as this may warp the
new brush card and impair brush movement.
9. Replace the thrust washer on the end of the armature
and replace the starter end cap. Install the starter
end cap locking nuts and tighten securely. Tighten
the nut on the starter terminal post.
BRUSH AND BRUSH
SPRING (4)
TERMINAL POST
INSTRUCTIONS FOR REPLACING STARTER BRUSH
CARD #33848 ON STARTER #33835
1. Loosen the two nuts on the starter terminal post,
but do not remove.
2. Remove the nuts holding the starter and cap in
place. Remove the starter end cap. Note the thrust
washer on the end of the armature.
24
10. Test the starter for proper operation before
reinstallation on the engine.
SECTION 3
12 VOLT STARTER TROUBLE SHOOTING CHART
PROBLEM
PROBABLE CAUSE
FIX
Does not function
Weak or dead battery
Check charge and/or replace battery.
Corroded battery terminals
and/or electrical connections
Clean terminals and/or connections.
Brushes sticking
Free brushes. Replace worn brushes and
those that have come in contact with grease
and oil.
Dirty or oily commutator
Clean and dress commutator.
Armature binding or bent
Free armature and adjust end play or replace
starter.
Open or shorted armature
Replace starter.
Shorted, open or grounded
field coil
Replace starter.
Loose or faulty electrical
connections
Correct.
Load on engine
Disengage all drive apparatus and relieve all
belt and chain tension.
Electric starter cranks but no
spark at spark plug.
Disconnect ignition cutoff wire at the engine.
Crank engine. If spark at spark plug ignition
switch, interlock switch and safety switch is
inoperative. If no spark, check magneto. Check
wires for poor connection cuts or breaks.
Electric starter does not crank
engine
Remove wire from starter. Use a jumper battery
and cables and attach directly to starter. If
starter cranks engine the starter is okay; check
solenoid, starter switches, safety switches and
interlock switches. Check wires for poor
connections, cuts or breaks.
Unit controls engaged
Insure all unit controls are in neutral or
disengaged.
Low RPM
Worn bearings in cap assemblies Clean bearings or replace cap assemblies.
Bent armature
Replace starter.
Binding armature
Free up armature. Adjust armature end play.
Brushes not seated properly
Correct.
Weak or annealed brush springs
Replace springs.
Incorrect engine oil weight
Insure the correct weight of oil is being used.
Dirty armature commutator
Clean commutator.
Shorted or open armature
Replace starter.
Loose or faulty electrical
connections in motor
Correct.
Motor stalls under load Shorted or open armature
Shorted field coil
Replace starter.
Replace starter.
25
12 VOLT STARTER TROUBLE SHOOTING CHART (Cont.)
PROBLEM
PROBABLE CAUSE
Intermittent operation Brushes binding in holders
Free up brushes. Replace worn brushes and
those that have come in contact with grease and
oil.
Dirty or oily commutator
Clean and dress commutator. Replace any brush
that has come in contact with grease or oil.
Loose or faulty electrical
connections
Correct.
Open armature
Replace starter.
Break in electrical circuit
Disconnect ignition cutoff wire at the engine.
Crank engine. If spark, check ignition switch,
safety switch, and interlock switch. Check wires
for poor connections, cuts or breaks.
Sluggish
Dirt and oil on drive assembly
disengagement of the and at armature shaft
drive assembly
pinion gear
Bent armature
26
FIX
Clean drive assembly and armature shaft and
lubricate shaft splines.
Replace starter.
CHAPTER 4. GENERAL VALVE INFORMATION,
CYLINDER HEAD AND BREATHER ASSEMBLY
SECTION 1. GENERAL VALVE INFORMATION
Adjusting valves for 8 horsepower and larger engines
(except valve-in-head engines)
Intake valve gap .010, (.254 mm) exhaust valve gap
.020, (.508 mm) set when engine is cold. Rotate
the engine to Top Dead Center of the compression
stroke, this will assure that the lifter is not raised
by the compression relief pin. Valve stem ends must
be ground flat when adjusting valve gap. An uneven
or concave end can cause abnormal wear to the
valve train.
The outside of the valve stem guide also guides
the valve spring. A valve spring cap is used only on
the bottom of the spring. A pin through the valve
stem retains the spring.
Use a step type reamer to enlarge valve guides if
worn. Oversize valves are 1/32'’ (.787 mm) larger
in diameter than standard. (For oversize reamer,
Consult Chapter 11).
Do not enlarge the valve lifter guide, lifters with
oversize stems are not available.
VALVE GUIDE MAY BE
OVERSIZED 1/32” (.787 mm)
TURN ADJUSTING SCREW: CLOCKWISE TO
DECREASE LASH, COUNTERCLOCKWISE TO
INCREASE LASH.
ROCKER ARMS
LOCKNUTS
FEELER
GAUGE
VALVE STEM
ADJUSTING
SCREW
INTAKE .005 (.127 mm)
EXHAUST .010 (.254 mm)
VALVES. Valves must be in good condition, properly
sealing and the proper gap must be maintained for
full power, easy starting and efficient operation.
VALVE REMOVAL On 8 H.P. and Larger (except
valve overhead engines). To remove valves, raise
the lower valve spring caps, while holding the valve
head tightly against the seat, and remove pin.
VALVE STEM
AND SPRING
GUIDE
VALVE CAP
EXHAUST
VALVE GAP
.020 (.508 mm)
COLD
INTAKE
VALVE GAP
.010 (.254 mm)
COLD
VALVE LIFTER GUIDE
DO NOT OVERSIZE
OIL RETURN HOLE
ADJUSTING VALVES ON OVERHEAD VALVE
ENGINES. Remove the breather and top half of the
valve cover. Rotate the engine to Top Dead Center
of the compression stroke. Adjust the exhaust valve
to .010 (.254 mm) and .005 (.127 mm) for the intake
valve.
Assure that the locknut is loosened before attempting
to turn adjusting screw. After the locknut is loosened,
turn the adjusting screw with an open end wrench.
Turn adjusting screw clockwise to decrease clearance
and counterclockwise to increase clearance.
27
VALVE REMOVAL PROCEDURE FOR VALVE-INHEAD ENGINES.
The following is necessary for cylinder head disassembly.
REMOVAL OF ROCKER ARM HOUSING PARTS.
Locate the piston at top dead center for easier access
in servicing the valve train. After removing the rocker
arms by removing the retaining rings, it may be necessary
to loosen the locknut and back off the adjusting screw
before pulling off the rocker arms. NOTE: Rocker
arm shaft is not an inseparable unit from the rocker
arm housing and should not be removed from the
housing.
LOWER VALVE
SPRING CAP
UPPER VALVE
SPRING CLIP
PUSH RODS
REMOVAL OF ROCKER ARM HOUSING. Remove
rocker arm housing by removing the retaining cap
screws. The valve spring retainer cupped side must
be facing in the up position.
A white Teflon “O” Ring is used under the valve spring
retainer on the exhaust valve. The regular black rubber
“O” Ring is used under the valve spring retainer on
the intake valve. Be careful not to switch rings, or
damage may result.
Remove head to remove the valves - Reverse procedure
for reassembly.
VALVE SPRING
RETAINER
CHAMFER
“O” RING
ROCKER ARM HOUSING RETAINING SCREWS,
WASHERS AND SEALING “O” RINGS
VALVE SPRING
ROCKER ARM SHAFT
REMOVAL OF VALVE SPRINGS. Use a valve spring
compressor tool, part No. 670237A to compress the
valve spring and remove the valve retainers. Be sure
piston is at T.D.C. The valve cap is then taken off
for removal of the spring. When reinstalling the valve
cap and retainers after valve servicing, it may be
necessary to hold both valves in their seats until
the springs, cap, and retainer have been installed
on the valve stems. Access can usually be gained
through the exhaust and intake manifold in the head.
RETAINERS HELD BY SPRING
TENSION AGAINST THE CAP
ROCKER ARM SHAFT. The rocker arm shaft is not
a replaceable part. The rocker arm housing, rocker
arm shaft and screw are an inseparable assembly.
ROCKER
ARM SHAFT
RETAINING
SCREW
RETAINER
VALVE SPRINGS FREE LENGTH
FOR 8 HORSEPOWER AND LARGER ENGINES
(EXCEPT VALVE-IN-HEAD ENGINES). Valve springs
should be replaced when an engine is overhauled.
Weak valve springs will spoil the best overhaul job.
CAP
VALVE SPRING
COMPRESSOR TOOL
PART NO. 670237A
Valve spring free length should be checked. Comparing
one spring with the other can be a quick check to
notice any difference. If a difference is noticed, carefully
measure free lengths and strength of each spring.
See specifications.
Check valve spring free length, it should be 1.885'’
(47.879 mm). If both ends are not parallel, replace
with new springs.
28
VALVE INSTALLATION. To reinstall valves, position
valve caps and spring in the valve compartment.
Valve spring free length should be checked and installed
so the dampening coils are located opposite the keepers.
INSTALL PIN Release valve spring tension to lock
cap in place.
FREE
LENGTH
1.885”
(47.879 mm)
1/32”
(.787 mm)
FACE
45°
MUST BE FLAT
AND TRUE
FOR 8 HP AND LARGER (EXCEPT VALVE-IN-HEAD)
SPRING MUST BE SQUARE
NO MARGIN
MARGIN
WRONG
WRONG
STANDARD STEM
DIAMETER
SEE SPECIFICATIONS
STEM
OVERSIZE STEM
DIAMETER
SEE SPECIFICATIONS
MUST BE FLAT
AND TRUE
IMPORTANT: GRIND FLAT TO OBTAIN
CORRECT VALVE CLEARANCE
DAMPENING COILS
LOCATED CLOSER
TOGETHER
DAMPENING COILS ON VALVE SPRINGS. The valve
spring should be assembled so the dampening coil
is located to the stationary end of the spring (opposite
the cap and retainers).
VALVE SEATS. Valve seats are not replaceable. If
they are burned or pitted, they can be recut using a
Neway valve and seat cutter. Seats are cut to an
angle of 46°. If the seat is over 3/64'’ (1.194 mm)
wide after cutting, use a 30° cutter to narrow the
face.
ALWAYS DEGLAZE
CYLINDER WALL
VALVE-IN-HEAD SPRINGS. Check valve spring free
length, it should be 1-15/16'’ (49.225 mm) long. If
both ends are not parallel, replace with new springs.
SPRING MUST BE SQUARE
SEE SPECIFICATIONS
SECTION FOR
DIMENSIONS
46° ANGLE
VALVE SEAT IN CYLINDER
FREE
LENGTH
1.938”
(49.225 MM)
DAMPENING COILS
LOCATED CLOSER
TOGETHER.
POSITION TOWARD
VALVE BOX.
VALVE SEAT CUTTING REQUIREMENTS. Cut valve
seats to 46° and valve to 45°. See Specifications.
VALVE SEAT 46°
FOR VALVE-IN-HEAD ENGINES
VALVE GRINDING. Valve grinding procedures are
the same for all 8 horsepower and other engines.
(Including overhead valve engines). See Chapter
on specifications.
Correct valve grinding procedures are essential to
obtain a satisfactory result.
Face and seat angles must be accurate and the surfaces
must be smooth.
A 1/32” (.787 mm) margin must be left on the valve
head after refacing. The valve without a margin would
burn and distort very rapidly.
Use a “Vee” block and the flat side of a grindstone
to grind valve clearance. The end of the stem must
be flat and true or abnormal wear will occur.
EXHAUST
INTAKE
VALVE SEAT IN HEAD
VALVE GUIDE DIMENSIONAL CHECK. Check
dimensions per specification requirements, determine
if valve guide clearance is beyond acceptable tolerance.
If valve guide clearance is worn beyond tolerance,
ream valve guide oversize and install 1/32'’ (.787
mm) oversize valve, or replace valve guides.
29
THIS SYMBOL POINTS OUT IMPORTANT SAFETY
INSTRUCTIONS WHICH IF NOT FOLLOWED
COULD ENDANGER THE PERSONAL SAFETY
AND/OR PROPERTY OF YOURSELF AND
OTHERS. READ AND FOLLOW ALL
INSTRUCTIONS.
VALVE GUIDE REMOVAL AND INSTALLATION
INSTRUCTION FOR VALVE-IN-HEAD ENGINES.
REMOVING THE OLD VALVE GUIDES
1. Submerge the head in a pan of oil so that both
guides are covered with oil.
2. Heat oil on a hot plate until the oil begins to
smoke. About 15 to 20 minutes. 375° (190°C) 400° (204°C).
3. When the oil begins to smoke, remove the head
from the pan of oil with a pair of pliers. Drain
excess oil.
4. Place head on the bed of an arbor press on parallels
with the snap rings on the long ends of the guides
facing down.
5. Use a 1/2'’(25.4 mm) diameter, 6'’ (152 mm) driftpunch and the arbor press to push valve guides
out of the head.
GUIDES
HEAD
OIL
HOT PLATE
HEAT UNTIL OIL BEGINS TO SMOKE.
CAUTION - When locating the drift punch on the
guides be sure to center the punch. DO NOT allow
the punch to make contact with the head when pressing
out the guides.
VALVE GUIDES
1/2” (12.7 mm) FLAT
DRIFT PUNCH
CENTER PUNCH DRIFT ON VALVE GUIDE
30
INSTALLING NEW GUIDES
NOTE For easy installation, the replacement guides
should be placed in the freezer compartment of a
refrigerator or on ice for no less than 30 minutes
prior to installation.
1. Submerge head with guides removed in a container
of oil so that both guide bores are covered with
oil.
2. Heat oil on a hot plate until the oil begins to
smoke. About 15 to 20 minutes.
3. When the oil begins to smoke, remove the head
from the pan with a pair of pliers. Drain excess
oil.
4. Place head, with gasket surface down, on a piece
of wood, 6 x 12 inches (152 X 304 mm).
5. Remove the new guides from cold storage and
install snap rings used for locating both valve
guides. Insert the guides. It may be necessary
to use a rubber or rawhide mallet to fully seat
the guides to the snap ring depths in the head.
DO NOT use a metal hammer head, or guide
damage will result.
6. Allow head assembly to cool; recut both valve
seats.
SECTION 2. CYLINDER HEAD
CYLINDER HEAD TORQUE. For 8 H.P. and larger
engines (except valve-in-head engines), make sure
surfaces are clean, then place new head gasket on
cylinder and position head.
BELLEVILLE WASHER
CROWN SIDE UP
FLAT
WASHER
Slide one belleville washer (crown toward bolt head)
and one flat washer (sharp edge toward bolt head)
over each bolt as shown in illustration.
Insert the bolts in the head with the two shorter bolts
in the position shown in the illustration. The two short
bolts for positions 1 and 8 are 2'’ long (50.8 mm)
and all other bolts are 2-1/4'’ long (57.15 mm).
Tighten bolts evenly to 50 in. lbs. (5.6 Nm) torque.
Increase torque evenly by 50 in. lbs. (5.6 Nm) until
final torque of 200 in. lbs. (22.6 Nm) is attained in
the following sequence: (See Figure)
TORQUE IN NUMERICAL
ORDER
HEAD BOLTS
BELLEVILLE WASHER
(CROWN TOWARD
BOLT HEAD)
FLAT WASHER
(SHARP EDGE
TOWARD BOLT
HEAD)
7
2-1/4”
(57.15 mm)
BOLTS
6
4
2’ (50.8 mm)
BOLTS
HEAD ASSEMBLY, TORQUE SPECIFICATIONS. Run
engine for 30 minutes, allow to cool until head is
cool to the touch and then retorque the bolts in the
same sequence as described. (All except number
“1” (25.4 mm) bolt which cannot be retorqued unless
the rocker arm housing is removed.)
1 1-3/8”
(34.925 mm)
4
1-3/4”
(44.45 mm)
PUSH ROD TUBE
“O” RINGS
1
2
9
5
3
8
6
1-3/4”
(44.45 mm)
SPARK
PLUG
HOLE
Run engine for 15 minutes, allow to cool and then
retorque the bolts in the same sequence as described
above.
3
1-3/4”
(44.45 mm)
5
1-3/8”
(34.925 mm)
2
1-3/4”
(44.45 mm)
TORQUE IN NUMERICAL ORDER
CYLINDER HEAD TORQUE FOR VALVE-IN-HEAD
ENGINES.
Slide one belleville washer (crown toward bolt head)
and one flat washer (sharp edge toward bolt head)
over each bolt as shown in illustration.
Torque head bolts to 200 inch pounds (22.6 Nm) in
50 inch pound (5.6 Nm) increments. Tighten in numerical
order. Note that head bolts marked 1 and 5 are
1-3/8'’ long (34.925 mm). Other bolts are 1-3/4'’ long
(44.45 mm).
31
SECTION 3. BREATHER ASSEMBLIES
The Breather is a sealed assembly. If it is defective,
replace the entire assembly. The rubber tube on the
outside is not part of the assembly.
Install the breather with the drain holes toward the
base of the engine. Always use a new gasket. The
retaining screws must be tight.
If oil is being pumped out the breather:
1. Check for excess speed.
2. Operating at excessive angles.
3. Loose oil filler cap.
4. Worn rings.
5. Excess blow-by.
6. Breather body installed up-side down.
7. Overfilled with oil.
FOR 8 HP AND LARGER (EXCEPT VALVE-IN-HEAD)
DRAIN HOLES MUST
BE TOWARD ENGINE BASE
BREATHER
BODY AND VALVE
FOR VALVE-IN-HEAD ENGINES
BREATHER BODY
AND VALVE
BREATHER TUBE
TROUGH TO BE
INSTALLED AWAY
FROM CARB SIDE
OF ENGINE
32
CHAPTER 5. PISTON AND RINGS, CONNECTING RODS
AND CRANKSHAFTS
SECTION 1. PISTON AND RINGS
PISTON AND RING DISASSEMBLY. Always remove
ridge and carbon buildup before attempting to remove
the piston and ring assembly from the cylinder.
Always deglaze the cylinder when replacing the piston
and rings. This must be done to allow the rings to
seat.
Make sure surfaces are clean, then place new head
gasket on cylinder and position head.
RING GROOVE CHECK. Check the side clearance
of the ring in the groove using a feeler gauge. If
excessive, replace the piston. See Specifications.
TOP PISTON LAND CLEARANCE
PISTON
CYLINDER
WALL
Always use a new head gasket if the cylinder head
has been removed.
2nd
COMPRESSION RING
POSSIBLE RIDGE
BUILD UP AREA
1st
COMPRESSION RING
SIDE
CLEARANCE
3rd
OIL CONTROL RING
PISTON DIAMETER MEASUREMENT. Check piston
diameter on the bottom of the skirt. Check at 90° to
center line of wrist pin hole. This is a cam ground
piston and the diameter will not be the same when
checked at another point.
Pistons and rings may be available in either .010'’
(.254 mm), .020'’ (.508 mm), .030'’ (.762 mm) and
.040'’ (1.016 mm) oversize.
RING AND WRIST PIN ASSEMBLY. Stagger the piston
ring gaps 90° apart when installing piston and ring
assembly in cylinder.
The wrist pin retainers must be seated in the groove.
Move the wrist pin if necessary. Failure to correctly
seat the retainers may result in costly repairs.
The wrist pin is a palm press fit (pressed in by hand
with some resistance). If loose, check connecting
rod for seizing. Replace piston and wrist pin if loose.
RING GAPS
EXPANDER
CHECK PISTON DIAMETER
AT THIS POINT
RING END GAP MEASUREMENT. Before installing
the rings, insert each ring into the cylinder bore to
check the end gap. This gap check should be made
in a worn cylinder, a reconditioned cylinder and a
new cylinder.
An inverted piston should be used to push the ring
into the cylinder to a point that would be the center
of ring travel. The ring travel area will be the most
worn area in a used cylinder. Insert the piston ring
into the cylinder and place the top side of the piston
on the ring to position the ring squarely in the bore;
remove piston. Measure the end gap by inserting a
feeler gauge between the ring ends. Check each
ring using the same procedure.
WRIST PIN AND RETAINER
The end gap dimensions are shown in the specification
division of this manual. If end gap is greater than
the maximum specification, then the cylinder must
be measured and perhaps bored oversize. If the
end gap is too small, carefully remeasure the bore
for undersize dimension and enlarge if necessary.
33
ARROWHEAD
FEELER GAUGE
PISTON RING
MATCH MARKS
RING
CENTERED IN
RING TRAVEL
AREA
INVERTED PISTON
TO POSITION RING
SQUARELY IN CYLINDER
CHECK RING
END GAP
PISTON RING INSTALLATION. Only correct piston
ring installation will assure full power. Carefully note
the ring sequence when removing the worn rings
from the piston. Note especially the ring expander,
as it may be found both behind the second (compression)
ring and the third (oil control) ring.
Although piston rings are installed correctly, they
will not perform unless the piston and cylinder are
reconditioned. Clean and check the ring grooves
for wear. Deglaze the cylinder bore with a fine abrasive
cloth; this will aid in the seating of the rings.
When reinstalling the rings, note the marks on the
first and second rings in dictating the top of the ring.
Stagger the ring end gaps to prevent compression
loss. Use plenty of service classification SF - SJ
rated oil to lubricate all friction surfaces during engine
reassembly.
INSIDE CHAMFER
TO PISTON TOP
UNDER CUT
(DOWN)
EXPANDER LOCATED
BEHIND THE SECOND
COMPRESSION RING
AND BEHIND THE
OIL CONTROL RING
OFFSET PISTON INSTALLATION FOR OH180 VALVE
OVERHEAD ENGINE. The connecting rod is assembled
to the piston with match marks facing the mechanic
and the arrowhead on the piston pointing to the right
i.e., arrowhead facing the push rod tube area.
34
ARROWHEAD FACING PUSH
ROD TUBES
SECTION 2. CONNECTING RODS
When reinstalling a used connecting rod ALWAYS
use new nuts on the bolts. These locking nuts will
ensure that the torque will be retained when the
connecting rod is replaced.
FOR ENGINE MODELS VH80 and VH100
ENGINE ROTATION
The connecting rod must be installed with the match
mark facing out of the cylinder, toward the P.T.O.
end of the crankshaft. This will ensure the correct
positioning of the oil dipper. Install as illustrated.
OIL FEED HOLE
The heads of the through bolts must be seated tight
against the machined shoulder on the connecting
rod. Failure to check this may result in a false torque
reading and premature failure.
IMPORTANT Torque to correct specifications. 110
inch pounds (12.43 Nm).
OIL VAPOR
PICK-UP HOLE
NOTE Before installing, clean the connecting rod
bearing surfaces with a clean cloth. Rods are coated
with lead which will slightly oxidize in storage, this
oxidation must be removed.
FOR ENGINE MODELS HH80, HH100 and HH120
and VALVE-IN-HEAD ENGINES.
SLIP FIT
WRIST PIN
OIL VAPOR
PICK-UP
HOLE
Torque to correct specifications 110-inch pounds (12.43
Nm). After initial torque use a drift and a hammer
(13 oz.) (390 ml) and strike the rod bearing cap above
each lock nut. This will seat the cap releasing some
torque on the lock nuts. Retorque lock nuts to
specifications.
THROUGH
BOLT
INSTALL WITH MATCH
MARK FACING OUT AND
OIL DIPPER AS SHOWN
SPECIFICATION SECTION
FOR BEARING SIZE AND NUT
TORQUE
The vertical crankshaft 8 and 10 H.P. engines have
a connecting rod with two lube holes. This rod is
not interchangeable with the horizontal connecting
rod. The above requirements listed for a horizontal
crankshaft rod also apply to the vertical crankshaft
engines connecting rod.
35
SECTION 3. CRANKSHAFTS
CRANKPIN WEAR. Crankpins should be examined
for wear, scoring, or out of-round. If any of these
conditions are noted, replace the crankshaft. See
specifications.
Lubricate the crankpin generously before attaching
the connecting rod. This will prevent damage during
the initial run-in after reassembly.
EXAMINE CRANKPIN FOR WEAR OR DAMAGE
REPLACE IF DAMAGED
Note the chamfer tooth on the crankshaft gear. This
tooth is used as a reference mark to be matched
with the timing mark on the camshaft.
The crankshaft gear is replaceable. Remove gear
with a conventional puller after the roller bearing
has been removed. The gear and the bearing may
be removed simultaneously, but much difficulty may
be encountered.
Roller bearing must be heated before it is installed.
NOTE: If a damaged gear is replaced, the mating
gear should also be replaced. Example: If the camshaft
is damaged and replaced, the crankshaft gear should
be replaced.
CHAMFER TOOTH
CRANKSHAFT GEAR
The vertical VH80 and VH100 (without oil pump) oil
slinger is located on the crankshaft. It is locked in
position between the bearing and the crank gear
and maintains that position due to a slot in the gear
and a stamped bulge in the slinger. This alignment
is necessary to direct the lubricant up into the engine
at a closely engineered angle. Note the pickup trough
and the stiffening rib. View B shows the trough alignment
in correct relation to the crankcase journal. The slinger
should not be incorrectly assembled 180° out of phase.
A
USE BEARING
SEPARATOR AND
PULLER TO REMOVE
TAPERED BEARING
PTO TAPERED BEARING
PRESS FIT, HEAT IN OIL
TO INSTALL
REMOVE GEAR BY
PLACING PULLER
JAW UNDER GEAR
CRANKSHAFT GEAR IS PRESS FIT AND
POSITIONED WITH CHAMFERED TOOTH
AWAY FROM COUNTERWEIGHT
CRANKSHAFT GEAR INSTALLATION. Use an arbor
press and suitable driver to press crankshaft gear
into position. Keyway in crankshaft gear is to fit over
gear pin and beveled tooth must face P.T.O. end of
crankshaft. Crankshaft gear must fit tightly against
shoulder.
On engines equipped with Dyna-Static, the
counterweight balance gear is installed between the
crankshaft gear, spacer and the bearing. Keyway
in counterbalance gear is to fit over gear pin and
beveled tooth is in line with keyway.
B
PLUNGER TYPE PUMP
Some vertical VH100 engines use a plunger-type
oil pump to circulate lubrication. The oil is pumped
up through a hole in the camshaft to a passage allowing
the crankshaft and parts to be lubricated.
OIL SPRAY OPENING
CHAMFER
AWAY FROM
COUNTERWEIGHT
AGAINST
SHOULDER
PLUNGER
REMOVE GEAR
BY PLACING PULLER
JAW UNDER GEAR
36
SUPPORT CRANKSHAFT
AT COUNTERWEIGHT
WHEN PRESSING ON GEAR
CHAPTER 6. CAMSHAFT, BEARINGS AND SEALS
SECTION 1. CAMSHAFT
CAMSHAFT GEAR TEETH WEAR. When servicing
engines, check the camshaft at the points indicated
by the asterisks in figure. Examine the gear teeth
for wear and damage. See Specifications.
VALVE TIMING FOR ENGINE WITH HELICAL CUT
GEARS.
NOTE: If a damaged gear is replaced, the mating
gear should also be replaced.
Example: If the camshaft is damaged and replaced,
the crankshaft gear should be replaced.
MECHANICAL COMPRESSION RELEASE. Clean
the mechanism in a conventional parts cleaner and
dry thoroughly. Individual component parts are not
available as service replacement and cannot be obtained
from the factory. New replacement camshafts with
the compression relief mechanism are available.
CHAMFERED GEAR TOOTH
TIMING
MARK
HOBBING
HOLE
NOTE: When matching up helical gears, do so with
a slight rotating motion of the crankshaft to the right.
This way the teeth will slide together easier and the
chamfered tooth and match mark will line up.
*SEE SPECIFICATIONS
SECTION FOR
DIMENSIONS
VALVE TIMING. Match chamfered gear tooth on
crankshaft with mark and hobbing hole on camshaft
gear.
C/S PTO END
CHAMFERED TOOTH
CHAMFERED TOOTH
MARK
HOBBING HOLE
37
SECTION 2. BEARINGS
BEARING ASSEMBLY. The following figure illustrates
the correct assembly of the tapered crankshaft bearings.
The bearing at the flywheel end of the crankshaft
seats in an adjustable bearing cup “A” in the cylinder.
The bearing cup “B” supporting the P.T.O. end of
the crankshaft is a press fit in the cylinder cover.
Examine the bearing for wear, pitting, rust, alignment,
and uneven wear of the rollers. If in doubt, replace
to assure dependable trouble free service.
BEARING
CYLINDER COVER
“A”
“O” RING
SHIM GASKET
STEEL WASHER
IF REQUIRED
ROLLER BEARING
BEARING CUP
“B”
BOTTOM ON
SHOULDER
BEARING REMOVAL. Remove the bearing by securing
a bearing separator between the bearing and crankshaft
gear. Secure jaws of puller on the separator and
draw bearing off shaft.
BEARING
SEPARATOR
THIS SYMBOL POINTS OUT IMPORTANT
SAFETY INSTRUCTIONS WHICH IF NOT
FOLLOWED COULD ENDANGER THE
PERSONAL SAFETY AND/OR PROPERTY OF
YOURSELF AND OTHERS. READ AND FOLLOW
ALL INSTRUCTIONS.
BEARING INSTALLATION. Use only new bearings
for installation on the crankshaft. Once a bearing
has been removed it MUST be REPLACED as it
becomes distorted and damaged while being removed.
The new bearing may be installed on the crankshaft
with pressure or heat. Heating the bearing is the
preferred method.
METHOD ONE - Using Heat. Heat the bearings in
engine oil. Support the bearing off the bottom of
the container as illustrated.
Heat to approximately 300° F (148° C) or until
oil smokes. Support the crankshaft in a vise. Hold
the bearing carefully to prevent burns. Work rapidly
to assure proper placement while the bearing is hot.
The bearing must seat tight against the shoulder of
the magneto end and tight against the crankshaft
gear on the P.T.O. end. (If on a counterweight system,
bearing should be against counterweight gear.)
BEARING HELD OFF
BOTTOM OF CONTAINER
OIL LEVEL
NEW BEARING
38
METHOD TWO - Cold Bearing. The crankshaft MUST
be supported between the counterweights when pressing
on bearings. Use a driver to direct the pressure of
an arbor press onto the inner race of the bearing
when installing. The bearing must be seated tight
against the shoulder of the crankshaft counterweight
(on magneto end).
TAP CRANKSHAFT LIGHTLY
TO SEAT IN PTO BEARING
This method may require a great amount of
force, therefore, method one should be
considered first.
PRESS THE BEARING CUP
IN UNTIL TIGHT
Position the cylinder cover (magneto end), oil seal,
and sleeve tool over the crankshaft and seat on the
machined gasket surface. Insert a feeler gauge between
the cover and cylinder, record the reading.
C/S MUST BE AT ROOM
TEMPERATURE OR
COOLER
INNER RACE
BEARING CONE
ASSEMBLY
BEARING MUST FIT
TIGHT AGAINST
SHOULDER
If there is no space between the cover and the machined
gasket surface to allow insertion of the feeler gauge,
use a .010” (.254 mm) metal spacer. The spacer
fits between the bearing cup and inside surface of
the cover. More than one may be used if required.
FEELER GAUGE
MEASUREMENT
SUPPORT C/S AT THIS POINT WHEN PRESSING ON BEARING
BEARING CUP INSPECTION. The bearing cup should
be examined for rust, pitting, scuffing, cracks or other
damage.
The bearing cup is removed by tapping the edge
beneath the oil seal with a light hammer and flat
punch. Press in a new cup until it bottoms on the
shoulder. The bearing cup must be pressed in square,
use an arbor press.
BEARING CUP PRESSED
INTO BOTTOM ON SHOULDER
REMOVE BY
TAPPING ON
INSIDE EDGE
WITH FLAT
PUNCH
NOTE: POSITION COVER AND MAKE MEASUREMENTS
WITHOUT GASKETS OR “O” RING
Determine the gap between the cover and the machined
surface on the cylinder, which should be from .001'’
- .007'’ (.025 mm.- .178 mm), in which case no shim
gaskets will be required. However, if the space measures
over .007: (.178 mm), follow the example below. Use
of gaskets must be limited to a combined total of
.010” (.254 mm) thick. Steel spacers must then be
used to eliminate crankshaft end play. (Note: For
VH100 with oil pump, see procedure on next page).
Example:
OIL SEAL
PLACE SMALL
AMOUNT OF
GREASE ON
INNER EDGE
OF SEAL
PROCEDURES FOR CYLINDER COVER FIT. Reinstall
cylinder cover using a new gasket and torque to
specifications.
After the cylinder cover is secured to correct torque
specification, place the engine in a stand or device
that will allow the P.T.O. (Power Take-Off) shaft to
extend freely. Turn the crankshaft until the piston
is at T.D.C. Tap the flywheel end of the crankshaft
lightly with a mallet to seat the P.T.O. bearing. With
either fingers or two screw drivers, press the bearing
cup inward until tight.
.010'’
.254 mm clearance measured between cover
and cylinder. If clearance is over .010”
(.254 mm), use spacer.
- .004'’ -.102 mm .001'’ to .007'’ (.025 - .1278 mm)
allowed but use .004” (.102 mm) as
the median.
= .006'’ = .152 mm Shim thickness required
+ .006'’
.152 mm
Double above figure for thickness
required to compensate for gasket
compression
.012'’
.305 mm
total amount of shim gaskets required
(Continued on top next page)
39
When the space measures .001'’ (.025 mm) to .007'’
(.178 mm) no gaskets required, or if over .007'’ and
shimmed with gaskets the end result is that there
shall be no crankshaft end play. Shim gaskets are
available in .004/.005” (.102/.127 mm) and .005/.007”
(.127/.178 mm) thickness.
NOTE: If clearance between cover and cylinder is
over .007'’ (.178 mm) and gasket shims are not used,
damage to the cylinder cover can result.
After the cylinder cover is secured to correct torque
specification, place the engine in a stand or device
that will allow the P.T.O. (Power-Take-Off) shaft to
extend freely. DO NOT set engine on P.T.O. shaft
or the correct crankshaft end play cannot be obtained.
Turn the crankshaft until the piston is a T.D.C. Tap
the flywheel end of the crankshaft lightly with a mallet
to seat the P.T.O. bearing.
TAP CRANKSHAFT LIGHTLY
TO SEAT IN PTO BEARING
PRESS THE BEARING
CUP IN UNTIL TIGHT
Insert an oil seal in the cover. Position the .010 (.254
mm) spacer, if required. Position the shim gaskets
(if required) and place the cover on the cylinder.
Use an oil seal sleeve to protect the oil seal. Secure
the cover with the hex head bolts and TORQUE.
See Specifications. Rotate the crankshaft and test
for freedom of movement. There shall not be any
crankshaft end play. The only exception is the VH100
with oil pump.
With either fingers or two screwdrivers, press the
bearing cup inward until tight.
NOTE: When measuring for crankshaft end play be
sure shim gaskets and O rings are removed.
Position the cylinder cover (magneto end), oil seal,
and sleeve tool over the crankshaft and seat on the
machined gasket surface. Insert a feeler gauge between
the cover and cylinder; record the reading.
Knocking noise in an engine may at times be traced
to excessive radial crankshaft play. If this is noted,
review the cover shim gaskets. Correct by adding
or removing as required.
FEELER
GAUGE
COVER
POSITION COVER
WITHOUT GASKETS
SHIM
GASKETS
“O” RING
.010 (.254 mm)
SPACER AS
REQUIRED
Newer model engines have an “O” ring which seals
between the shim gaskets and the chamfer on the
crankcase.
END PLAY ADJUSTING PROCEDURES FOR VH100
WITH OIL PUMP
40
If space does not exist between the cover and the
machined gasket surface to allow insertion of the
feeler gauge use a .010 (.254 mm) metal spacer.
The spacer fits between the bearing cup and inside
surface of the cover. More than one may be used if
required.
After determining the gap between the cover and
the machined surface on the cylinder, determine the
shim thickness as follows to result in the required
.002 - .007 (.051 - .178 mm) crankshaft end play.
Example:
.003'’
.076 mm
- .002'’
.005'’
.051 mm
.127 mm
+ .003'’
.076 mm
.008'’
.203 mm
The bearing cup should be examined for rust, pitting,
scuffing, cracks or other damage.
BEARING CUP PRESSED INTO
BOTTOM ON SHOULDER
REMOVE BY TAPPING
ON INSIDE EDGE WITH
FLAT PUNCH
Clearance between cover and
cylinder
Required end play
Shim thickness required
Add half above figure for
thickness required to
compensate for gasket
compression
Use shim gaskets that total this
amount.
Shim gaskets are available in .004/.005” (.102/.127
mm) and .005/.007” (.127/.178 mm) thickness.
OIL SEAL
PLACE SMALL
AMOUNT OF
GREASE ON
INNER EDGE
OF SEAL
The bearing cup is removed by tapping the edge
beneath the oil seal with a light hammer and flat
punch. Press in a new cup until it bottoms on the
shoulder. The bearing cup must be pressed in square,
use an arbor press.
Reinstall cylinder cover using a new gasket and torque
to specifications.
Insert an oil seal in the cover. Position the .010 (.254
mm) spacer if required. Position the shim gaskets
and O ring and place the cover on the cylinder. Use
an oil seal sleeve to protect the oil seal. Secure the
cover with the hex head bolts and TORQUE to
specifications. Rotate the crankshaft and test for
freedom of movement, end play and radial play.
Knocking noise in an engine may at times be traced
to excessive radial crankshaft play. If this is noted,
check the cover shim gaskets. Correct by adding
or removing as required.
COVER
SHIM
GASKETS
.010 (.254 mm)
SPACER
AS REQUIRED
41
SECTION 3. SEALS
Use an oil seal protector when removing covers from
crankshaft. See Chapter 11 of Mechanics Manual
under “Tools”, using tool as shown. Remove the cylinder
cover at either the P.T.O. or flywheel end. Drive the
seal out of the cylinder cover from the inside out.
Install a new seal. Use new gaskets. Use the seal
protector when replacing the cover.
SEAL PROTECTORL
DRIVE DOWN
WITH HAMMER
UNTIL SEAL IS
FLUSH WITH COVER
Ô
OIL SEAL MUST BE
SQUARE IN BORE
SEAL DRIVER
DRIVE OIL SEAL FLUSH
TO .025 (.635 mm)
BELOW SURFACE
OIL SEAL
SEAL
PROTECTOR/
INSTALLER
CYLINDER COVER
C/S SEAL MAG. END
BEARING OR
CYLINDER COVER
(Removed from engine)
USE THIS METHOD TO DRIVE OIL SEALS FLUSH
AND SQUARE INTO THE SEAL RECEPTACLE
DRIVE OIL SEAL
FLUSH TO .025 (.635 mm)
BELOW SURFACE
OIL SEAL MUST BE
SQUARE IN BORE
C/S SEAL PTO END
Remove the covers before installing the oil seal.
The crankshaft cannot protrude while the seal is
being installed.
Lay the cover on a flat clean surface. Use a seal
driver and the correct seal installer to drive the seal
into position. (See Chapter 11, Technician’s Manual
for tools). Place the seal onto the seal protector/
installer and then over the bore, center the driver
over the seal and drive the seal into position with a
hammer.
USE A SEAL PROTECTOR EVERY TIME THE OIL
SEAL IS PUT ONTO OR PULLED OFF OF THE
CRANKSHAFT.
42
CHAPTER 7. DYNA-STATIC ® BALANCING SYSTEM
TECUMSEH DYNA-STATIC® BALANCING SYSTEM.
Dyna-Static® Tecumseh’s Balancing system for horizontal
crankshaft 10, 12, 14, 16 and 18 H.P.
Dyna-Static ® operates by means of a pair of
counterweighted gears driven off the crankshaft to
counteract the unbalance caused by the counterweights
on the crankshaft. The exterior distinguishing feature
of an engine equipped with a balance system is the
“deep-dished” side cover. This cover contains the
counterbalance gears and shaft.
Tecumseh Dyna-Static® balancing system also utilizes
a helical (angle) cut set of gears consisting of a
crankshaft gear and two counterbalance gears. There
are two sets of helical counterweight assemblies.
The difference between the two assemblies is the
counterweight mass. They cannot be distinguished
by size. Check Parts Manual or Microfiche for correct
counterweight set. The helical cut gear assemblies
may be interchanged with the regular cut gear
assemblies, but only if all three gears (crankshaft
gear and two counterweight gears) are interchanged
as a set.
ALIGNING THE COUNTERWEIGHTS (Side-by-Side
counterweights) This view of the side cover is from
the outside showing the pipe plugs which plug the
alignment holes during normal operation.
NOTE: Be careful when installing the cylinder cover
that the counterweight balance gears remain in
alignment.
Remove pipe plugs from flange, assemble flange
to cylinder making sure the slots stay in hole. Slots
may have to be moved either way with punch or
screwdriver to mesh gears. If you can see any part
of slots in holes after assembled, it is correctly
assembled. Reinstall pipe plugs.
The important thing is to keep the counterweight
gears perfectly aligned on the crankshaft gear. Any
misalignment of these gears can cause vibration.
Insure also that the governor rod assembly is correctly
placed.
T.D.C.
PIPE PLUGS
TOP & BOTTOM COUNTERWEIGHTS
On some production models the counterweight balancing
gears are placed top and bottom of the crankshaft.
The gears mesh with the driver gear on crankshaft
when the piston is at T.D.C. and the gear weights
are down as shown.
NOTE: If a damaged gear is replaced, the mating
gear should also be replaced.
On some production models the counterbalancing
gears are placed top and bottom of crankshaft.
Example: If the camshaft is damaged and replaced,
the crankshaft gear should be replaced.
T.D.C.
PIPE PLUGS
43
Positioning of helical-type gears is the same as shown
in the figure below.
PISTON
AT T.D.C.
PISTON
AT T.D.C.
SPACER
On current production models, the counterweight
balancing gears are placed top and bottom of the
crankshaft. The position dimension is the same as
for side-by-side counterweight models.
COUNTERWEIGHT
FULL
BOTTOM
COUNTERWEIGHT SPACER
FULL BOTTOM
REGULAR CUT GEARS
HELICAL CUT GEARS
1.7135 (43.523 mm)
1.7185 (43.650 mm)
CRANKSHAFT GEAR ALIGNMENT
NOTE: Whenever the camshaft gear is damaged,
the crankshaft gear should be replaced.
Note the chamfer tooth on the crankshaft gear. This
tooth is used as a reference mark to be matched
with the timing mark on the camshaft.
On engines equipped with Dyna-Static, the
counterbalance weight drive gear is installed between
the crankshaft gear and the bearing with a spacer.
The crankshaft gear and the counterbalance weight
drive gear are replaceable. Remove gears with a
conventional puller after the roller bearing has been
removed.
BEARING REPLACEMENT.
If replacement of caged needle bearings is required,
press the replacement in flush to .015 (.381 mm)
below inside surface, use tool No. 670210. This figure
shows the counterweight side and the slot cut for
the tool alignment.
PRESSED CAGED BEARING IN FLUSH TO
.015 (.381 mm) BELOW SURFACE
SLOT FOR
ALIGNMENT TOOL
The figure below shows one counterbalanced driven
gear removed from the shaft. Each counterbalanced
shaft is pressed into the cylinder cover so that a
dimension of 1.7135'’(43.523 mm) to 1.7185'’ (43.650
mm) exists between the side cover boss and the
end of the shaft.
1.7135 (43.523 mm)
1.7185 (43.650 mm)
44
CHAPTER 8. IGNITION SYSTEMS, CHARGING SYSTEMS
BATTERY SERVICE and ELECTRICAL CONTROL PANELS
SECTION 1. IGNITION SYSTEMS
SOLID STATE SYSTEM IGNITION SERVICE.
a.
General. Follow through the checks and
explanations below, if everything checks ok, then
replace the ignition unit. The parts of the system
are:
1.
2.
3.
4.
5.
b.
c.
d.
Ignition coil.
Flywheel.
Ignition unit.
High tension lead.
Spark plug.
e. Air Gap Checks. Adjust the system so that a
.006/.010'’ (.152/.254 mm) clearance exists between
the ignition unit and the long trigger pin in the
flywheel.
To adjust, loosen the retaining screw and move
the unit to find the proper gap.
Follow through the checks and explanations below,
if everything checks ok, then replace the ignition
unit.
REMOVAL OF FLYWHEEL TRIGGER PINS
Spark Plug Check. Test ignition by using a test
plug or hold the high tension lead terminal
1/8-in.(3.175 mm) from the spark plug. Crank
the engine over rapidly. If a good blue spark jumps
the gap, the ignition system is functional.
Removal of damaged pins. CAUTION: Pins must
not be reused. Use care not to damage flywheel.
Never hammer on a flywheel as permanent damage
to the magnets could result.
If no spark is present, make the following checks:
c through f.
Use vise-grip pliers to remove the pins. If the pins
are very tight, hammer lightly on the pliers at the
same time pulling on the pins. Do not twist. If a vise
is used to secure the flywheel, use care not to damage.
Check high tension lead for a ground or an open
circuit in the ignition unit.
Check coil lead and connection to ignition unit
terminal.
CAUTION: If the engine won’t run, after previous
acceptable performance, check the equipment ignition
switch.
1/8”
(3.175 mm)
Ô
Ô
HIGH
TENSION
LEAD
1/8” (3.175 mm)
GROMMET
IGNITION
UNIT
IGNITION
UNIT
TERMINAL
INSTALLATION OF NEW TRIGGER PINS.
1. Position the flywheel with the fins on a flat surface.
Holes toward you - See Figure.
2. Coat shaft of pins with Loctite.
CAUTION: Do not use a hammer to drive in pins.
3. Use masking tape to cover wide-mouth pliers
(channel lock type) and press fit the short pin
into hole on right. Fit the long pin on the left.
4. Pins must be pressed up to pin shoulder. Wipe
away any excess Locktite.
5. The magneto air gap must now be adjusted to
correct for any changes in trigger pin height.
SET GAP
.006” .152 mm
.010” .254 mm
LONG TRIGGER PIN
SHORT TRIGGER PIN
SET GAP
.006” .152 mm
.010” .254 mm
LONG TRIGGER PIN
SHORT TRIGGER PIN
.187
(4.750 mm)
HIGH
TENSION
LEAD
.250
(6.35 mm)
SHORT PIN
LONG PIN
10 and 20 AMP ALTERNATOR SYSTEMS
45
f.
Coil Lead on 10 Amp Alternator Systems. Remove
the coil lead from the ignition unit terminal. Attach
the leads from a standard ohmmeter to the lead
eyelet and to ground to check series resistance
of the ignition generator coil.
RETAINING
SCREWS
1. If resistance is below 400 ohms, replace the
stator assembly which includes the coil.
NOTE: The ignition generator coil cannot be
replaced separately.
2. If coil resistance is above 400 ohms, replace
the ignition unit.
CAUTION: Before replacing Ignition Unit, meter
ignition cutoff circuit in the switch for a “short”,
allowing battery current to burn out the ignition
unit.
STATOR AND COIL ASSEMBLY
FOR 10 AMP IGNITION SYSTEM
RETAINING SCREWS
Remove the switch and connect the leads
from a continuity meter to the battery lead
terminal and the ignition ground terminal.
Actuate the switch in various positions to see
if continuity exists. Any continuity indicates
a bad switch. When replacing a switch be
sure that the lead and terminal do not short
through the equipment frame.
STATOR AND COIL ASSEMBLY
FOR 20 AMP IGNITION SYSTEMS
OHMMETER
TO GROUND
LEAD
EYELET
COIL LEAD
CONNECTIONS ARE THE SAME FOR 8 H.P. AND
LARGER AND VALVE-IN-HEAD ENGINES
g. Coil Lead on 20 Amp Alternator Systems. Remove
the coil lead from the ignition unit terminal. Attach
leads from a standard ohmmeter to the lead eyelet
terminal and to ground to check series resistance
of the ignition generator coil.
If coil resistance is between 115 ohms and 171
ohms, replace the ignition unit.
CAUTION: Before replacing Ignition Unit check the
ignition cutoff circuit in the switch, for a “short” allowing
battery current to burn out the ignition unit. Remove
the switch and connect leads from acontinuity meter
to the battery lead terminal and the ignition ground
terminal. Actuate the switch in various positions to
see if continuity exists as shown on the meter. Any
continuity indicates a bad switch. When replacing
the switch be sure that the lead and terminal do not
short through the equipment frame.
46
SOLID STATE IGNITION
ALTERNATOR TYPE).
SYSTEM
(NON-
SPADE CONNECTOR FOR 20 AMP
IGNITION UNIT
CAUTION: Do not attempt to crank engine with
the primary wire of the transformer disconnected.
Also do not allow the primary wire of the
transformer to be grounded or arc. A broken
wire causing an open circuit to or in the transformer
can also cause permanent damage. See Step
2.
CHARGING
COIL
1. Preliminary Tests
GROUND
TERMINAL
Spark Test . . .Check for spark.
Perform the following visual tests:
HIGH TENSION LEAD . . .Inspect for cracks or
indications of arcing. Replace the transformer
if a questionable lead is found.
LOW TENSION LEADS . . .Check all leads for
shorts. Check ignition cut-off lead to see that
unit is not grounded out. Repair leads if possible,
or replace.
FLYWHEEL . . .Check magnets for strength. Check
key and keyway. Be sure that the key locks the
flywheel to the crankshaft.
2. After the above visual checks are made the
transformer and solid state components can be
checked using a Merc-O-Tronic, Graham-Lee or
similar tester.
NOTE: Before using parts for tests, be sure any
problem which caused replacement is corrected
first.
3. When testers are not available... Use new
replacement parts as test for possible failed parts.
SOLID STATE STATOR - Replace and test for
spark. Time the magneto by turning
counterclockwise as far as it will go. Tighten retaining
screws to 5-7 foot pounds (6.8 - 12.4 mm).
HIGH
TENSION
LEAD
PULSE
TRANSFORMER
IGNITION
CUT-OFF
LEAD
IGNITION UNIT
LOW TENSION LEAD
USED WITH 20 AMP
SINGLE MAGNET FLYWHEEL
TO C. D. I.
MODULE
EXCITER
COIL
TO SHUT OFF SWITCH
SCHEMATIC DIAGRAM
CHARGE
COIL
IGNITION BLOW-OUT PROTECTION
NOTE: THERE MUST BE AN ELECTRICAL
CONTINUITY FROM EITHER LEAD TO
BASE PLATE, BUT NO CONTINUITY IN
THE REVERSE DIRECTION OR BETWEEN
LEADS.
STATOR PLATE ASSEMBLY (20 AMP SYSTEM).
Previous tests also apply, except for the following:
1. Test the ignition unit first. If good, remove flywheel
and check coil for continuity.
2. Determine if correct flywheel is used, if previously
replaced. The flywheel used for a 20 amp system
is not compatible with flywheel used on a 10
amp systems.
3. The stator cannot be turned once secured with
stator bolts.
PRIMARY SET GAP
.006
WIRE
.010
(.152 mm)
(.254 mm)
LONG
TRIGGER
PIN
TIME
NEW NON-ALTERNATOR
SOLID STATE STATOR
SHORT
TRIGGER
PIN
FLYWHEEL
PRIMARY
WIRE
MAGNETO
IGNITION COIL
ONE TYPE OF NON-ALTERNATOR
IGNITION
FOUND ON 8 HP AND LARGER ENGINES
ONE TYPE OF NON-ALTERNATOR
IGNITION
FOUND ON VALVE-IN-HEAD ENGINES
47
SECTION 2. CHARGING SYSTEMS
PRECAUTIONS
CAUTION: Electrical components of the 10 amp
alternator system are similar to the 20 amp alternator
system. Use care not to interchange electrical
components; severe damage will result.
A. Do not connect battery to cables in wrong polarity.
This will cause regulator-rectifier damage.
B. Break continuity between the regulator-rectifier
unit and battery when using a remote charger
on the battery. This will eliminate damage to the
regulator-rectifier if polarity is reversed.
C. Disconnect wiring harness at regulator-rectifier
before using arc welder on equipment.
Do not force or modify connectors. Test values are
identical to original 20 amp alternator system.
PRE-SERVICE CHECKS
a. Check for a good ground between regulator-rectifier
and mounting.
b. Check for poor connections or broken wires.
c. Check the fuse.
NOTE: Battery voltage must be above 6 volts for
the regulator to be activated. This applies only to
the 20 amp system with regulator-rectifier in housing.
MAGNETO SHUT OFF LEAD
GREEN
D. Do not short alternator leads together.
VIEW A A
E. When normally running the engine DO NOT
disconnect the lead to the battery.
NOTE: Only when testing the D.C. output, should
the D.C. output lead be disconnected from the
battery.
VIEW B B
D.C. OUTPUT LEAD
RED
SOLID STATE RECTIFIER
REGULATOR MOUNTED
ON ENGINE (PROVIDED
BY TECUMSEH)
STARTING MOTOR
RED
GREEN
GROUND IS THRU THE
MOUNTING BOLTS
SOLENOID
FUSE
LIGHT ETC.
F. If wiring must be replaced in any part of the circuitry,
be certain the same size (gauge) wire is used.
Wire between the battery to the starter motor
must be a minimum of No. 6 gauge. For the 20
amp alternator system the charge circuit uses
No. 14 gauge wire. Most of the remaining portion
of the circuitry will be No. 18.
Newer 20 amp systems are distinguished by the
regulator-rectifier installed in the blower housing.
Connectors are not interchangeable with connectors
on the external type regulator-rectifier 20 amp system.
ALL INDICATED GROUNDS ARE TO
ENGINE ALL GROUND CONNECTIONS TO
BE CLEANED TO A BRIGHT FINISH
SAFETY STANDARDS MAY REQUIRE AN
OVER LOAD PROTECTION DEVICE ON
BATTERY FEED SIDE OF SWITCH IN
ADDITION TO OR IN LIEU OF FUSE
SHOWN ON DIAGRAM
BATTERY RECOMMENDED MIN SIZE 32
AMPERE HOUR LARGER SIZE REQUIRED
FOR COLD TEMPERATURE OPERATION
50 AMPERE HOUR
BATTERY
SWITCH
AMMETER
KEY SWITCH
20 AMP. ALTERNATOR SYSTEM
GROUND IS THRU MT’G BOLTS
MAGNETO
GROUND
STARTING MOTOR
A.C.
MAG. GROUND
(GREEN LEAD)
A.C. (YELLOW
LEADS)
STARTING MOTOR
A.C.
A.C.
SOLENOID
A.C.
VIEW A A
GROUND IS THRU
THE MOUNTING
BOLTS
SOLENOID
LIGHT ETC.
BATTERY
SWITCH
GROUND IS THRU
MT’G SCREWS
B+
LIGHT ETC.
SWITCH
BATTERY
GROUND IS THRU
MT’G SCREWS
BATTERY
SOLID STATE
RECTIFIERREGULATOR
A.C.
AMMETER
30 AMP FUSE
KEY SWITCH
AMMETER
KEY SWITCH
OFF - MAGNETO TO GROUND ALL OTHERS OPEN.
RUN - MAGNETO OPEN, RECTIFIER BATTERY, BATTERY TO LIGHTS.
START - BATTERY TO SOLENOID.
10 AMP. ALTERNATOR SYSTEM
48
VIEW F F
OFF - MAGNETO TO GROUND, ACCESSORY TO GROUND ALL OTHERS OPEN.
RUN - RECTIFIER TO BATTERY, ACCESSORY TO BATTERY. ALL OTHERS OPEN.
START - BATTERY TO SOLENOID. ALL OTHERS OPEN.
20 AMP. ALTERNATOR SYSTEM
Before performing the following tests see page 48, A through F.
TEST NO. 1 (NO CHARGE TO BATTERY)
NOTE: Tests must be followed in their order of listing. EXAMPLE: Test No. 1 must be completed before
proceeding to Test No. 2. Replace any defective part.
10 AMP ALTERNATOR TEST
B+ TERMINAL WIRE
Disconnect B+ at battery lead (NOTE: Keep test to a minimum with B+
wire disconnected from the battery) and check D.C. voltage between
B+ regulator lead and case:
D.C. VOLTMETER LEADS
1. 2500 RPM 13.0 volts min.
3000 RPM 16.0 volts min.
3600 RPM 20.00 volts min.
1. System okay. Check for
defective ammeter.
2. If less than above voltages but
greater than 0 volts.
2. Check for possible defective
regulator-rectifier.
3. If 0 volts at any above speeds.
3. Check for defective stator or
regulator-rectifier.
REGULATOR-RECTIFIER
TEST NO. 2 (NO CHARGE TO BATTERY)
With battery connected, check B+ to ground voltage with D.C. voltmeter.
1. 2500 RPM: If 11.0 volts or higher
place load (head lights) on battery
to reduce battery voltage to 10.0
volts. 3000 RPM: If 20.0 volts
or higher place load (head lights)
on battery to reduce battery
voltage to 11.0 volts. 3600 RPM:
If 13.5 volts or higher place load
(head lights) on battery to reduce
battery voltage to 12.0 volts.
A.C. VOLTMETER LEADS
a. If charge rate increases.
System okay. Battery was charged
fully.
b. If charge rate does not increase.
Check for defective stator or
regulator.
TEST NO. 3 (NO CHARGE TO BATTERY)
Disconnect plug from regulator-rectifier and test A.C. voltage at plug.
1. 2500 RPM: Voltage reads less
than 16 volts.
1. Defective stator
2. Voltage reads over 16 volts.
2. Defective regulator-rectifier.
3. 3000 RPM: Voltage reads less
than 19 volts.
3. Defective stator
4. Voltage reads over 19 volts.
4. Defective regulator-rectifier.
5. 3600 RPM: Voltage reads less
than 24 volts.
5. Defective stator
6. Voltage reads over 24 volts.
6. Defective regulator-rectifier.
49
TEST NO. 4 (BATTERY ALWAYS CHARGING AT HIGH RATE)
Check B+ to ground voltage with D.C. voltmeter.
1. 2500 RPM: Voltage over 14.7 volts. 1. Regulator not functioning.
2. 3000 RPM: Voltage over 14.7 volts. 2. Regulator not functioning.
3. 3600 RPM: Voltage over 14.7 volts. 3. Regulator not functioning.
4. 2500 RPM: Voltage under 12.0 volts. 4. Battery charge low. Alternator
and Regulator System okay.
Check battery.
5. 3000 RPM: Voltage under 13 volts.
5. Battery charge low. Alternator
and Regulator System okay.
Check battery.
6. 3600 RPM: Voltage under 14.7 volts. 6. Battery charge low. Alternator
and Regulator System okay.
Check battery.
TEST NO. 5 (BATTERY BOILING OR FUMING)
Check B+ to ground voltage with D.C. voltmeter.
1. If over 14.7 volts.
1. Regulator not functioning.
Visual check for overfilling.
Overfilled battery may appear to
fume due to expansion.
20 AMP. ALTERNATOR TESTS
Before performing the following tests, see page 48, A through F.
TEST NO. 1 (NO CHARGE TO BATTERY)
TERMINAL WIRE
NOTE: Tests must be followed in their order of listing. EXAMPLE: Test No. 1
must be completed before proceeding to Test No. 2. Replace any defective
part.
D.C.
VOLTMETER
LEADS
RECTIFIER-REGULATOR
With battery connected check B+ to
ground voltage with D.C. voltmeter.
1. Place load (head lights) on battery
to reduce battery voltage to below
12.5 volts. (This may take a few
minutes.)
2. Start engine. Run at 2500 RPM, 3000
RPM and 3600 RPM with same load
as above.
a. If voltage increases.
TEST SET-UP ON 20 AMP SYSTEMS WITH
EXTERNAL REGULATOR-RECTIFIER
b. If voltage does not increase.
a. System okay - Battery was charged
fully.
b. Check for defective stator or
regulator system. Tests No. 2
and No. 3.
GREEN
YELLOW
YELLOW
YELLOW
YELLOW
GREEN
RECT. - REG.
RED
GREEN
FUSE
RED
SWITCH
B
R
M
TEST SETUP ON NEW 20 AMP. SYSTEMS WITH RECTIFIERREGULATOR IN BLOWER HOUSING. TEST VALUES SAME
AS ORIGINAL 20 AMP. SYSTEM.
50
BATTERY
D.C.VOLTMETER
TEST NO. 2 (NO CHARGE TO BATTERY)
Disconnect plug from regulator and test AC voltage at plug.
1. 2500 RPM: Voltage reads less than 1. Defective stator.
32 volts.
2. Over 32 Volts.
2. Defective regulator See Test No.3.
3. 3000 RPM: Voltage reads less than 3. Defective stator.
38 volts.
4. Over 38 volts.
4. Defective regulator See Test No.3.
5. 3600 RPM: Voltage reads less than 5. Defective stator.
45 volts.
A.C. VOLTMETER LEADS
6. Over 45 volts
6. Defective regulator See Test No.3.
GREEN
YELLOW
YELLOW
A.C.VOLTMETER
YELLOW
YELLOW
GREEN
RED
RECT. - REG.
SWITCH
R
B
GREEN
FUSE
RED
M
TEST SETUP ON NEW 20 AMP. SYSTEMS WITH RECTIFIERREGULATOR IN BLOWER HOUSING. TEST VALUES SAME
AS ORIGINAL 20 AMP. SYSTEM.
D.C. AMMETER
BATTERY
TEST NO. 3 (LOW CHARGE TO BATTERY)
Check current output with D.C. ammeter connected in series from B+ of regulator
to positive side of battery.
1. 2500 RPM @ 12.5 volts load
current reads less than 13 amps.
1. Defective stator.
2. 3000 RPM @ 12.5 volts load.
current reads less than 15 amps
2. Defective stator.
3. 3600 RPM @ 12.5 volts load
current reads less than 17 amps.
3. Defective stator.
GREEN
YELLOW
YELLOW
YELLOW
D.C.VOLTMETER
YELLOW
GREEN
RECT. - REG.
GREEN
RED
FUSE
SWITCH
B
R
RED
M
TEST SETUP ON NEW 20 AMP. SYSTEMS WITH RECTIFIERREGULATOR IN BLOWER HOUSING. TEST VALUES SAME
AS ORIGINAL 20 AMP. SYSTEM.
BATTERY
51
TEST NO. 4 (BATTERY ALWAYS CHARGING AT HIGH RATE)
Check B+ to ground voltage with D.C. voltmeter.
1. If over 14.8 volts at 2500 RPM,
3000 RPM, and 3600 RPM.
1. Regulator is not functioning.
2. If under 14.4 volts @ 2500 RPM.
@ 3000 RPM.
@ 3600 RPM.
2. Battery charge low. Alternator okay,
check battery.
D.C. VOLTMETER
TEST NO. 5 (BATTERY BOILING OR FUMING).
Check B+ to ground voltage with D.C. voltmeter.
1. If over 14.8 volts.
1. Regulator not functioning.
Visual check for overfilling.
TEST SETUP ON NEW 20 AMP. SYSTEMS WITH RECTIFIERREGULATOR IN BLOWER HOUSING. TEST VALUES SAME
AS ORIGINAL 20 AMP. SYSTEM.
GREEN
YELLOW
D.C.VOLTMETER
YELLOW
YELLOW
Overfilled battery may appear to fume
due to expansion.
YELLOW
GREEN
RED
GREEN
SWITCH
R
B
RECT. - REG.
FUSE
RED
M
52
BATTERY
SECTION 3. BATTERY SERVICE
BATTERY POWER DECREASES WHILE ENGINE
CRANKING POWER REQUIREMENT
INCREASES WITH FALLING TEMPERATURE
100%
80°F
(26oC)
100%
68%
32°F
(0oC)
165%
30%
46%
0°F
(-18oC)
250%
-20°F
(-30oC)
350%
greater rating is recommended.
BATTERY CONDITION. While the battery is built to
satisfactorily withstand the conditions under which
it will normally operate, excessive mechanical abuse
leads to early failure.
The following points are important to properly install
a battery:
1. Be sure the battery carrier is clean and that the
new battery rests level when installed.
2. Tighten the hold-down evenly until snug. Do not
draw down tight enough to distort or crack the
battery case.
3. Be sure the cables are in good condition and
the terminal clamps are CLEAN. Grease battery
terminals lightly with petroleum jelly before attaching
cable clamps. Make sure the ground cable is
CLEAN and TIGHT at the engine block or frame.
BATTERY CHECK. Because the battery is part of
two circuits starting, ignition and charging (in the
ignition circuit, only in switch starting units) the battery
should be checked first.
4. Check polarity to be sure battery is not reversed
with respect to the generating system.
If battery has a shorted cell, overcharging can result,
and the regulator rectifier may appear to be at fault.
If a cell has an open or high resistance connection,
cranking motor operation will be affected, but replacing
the cranking motor will not cure the trouble. If the
battery is badly sulphated, consistent low gravity
readings, slow cranking, and possible poor ignition
performance can be experienced during starting.
CAUTION: The charging process will chemically liberate
oxygen and hydrogen gasses. This highly flammable
mixture may be dangerous if ignited. Disconnect ground
terminal first to prevent arcing at the positive terminal.
BATTERY SIZE RATIO: AMPERAGE TO
TEMPERATURE. It is always good practice to select
a replacement battery of an electrical size at least
equal to the battery originally engineered for the
vehicle by the manufacturer.
Battery power decreases while the need for engine
cranking power increases with falling temperature.
Subzero cold reduces battery capacity of a fully charged
battery to 30% of its normal power and at the same
time increases cranking load beyond the normal warm
weather load.
Hot weather will place excessive electrical loads on
batteries. Difficulty in starting may occur when cranking
is attempted shortly after a hot engine has been
turned off.
If the capacity rating for the original equipment battery
cannot be determined, a 32 amp or greater rated
replacement battery would be sufficient. IMPORTANT:
For operation at colder temperatures, a 50 amp or
5. Connect “ground” terminal of the battery last,
to avoid “short” circuits which will damage the
battery.
BATTERY PRECAUTIONS. If a battery is not used
for a long period of time, it is advisable to remove
the terminal connections to prevent a slow discharge.
On some units there is an ON-OFF switch to cut
the battery out of the circuit when not in use.
Be careful when replacing battery connections. A
reversal of polarity can cause damage to the regulatorrectifier.
BATTERY MAINTENANCE: (Acid-Type) Check water
level periodically to determine that the top of the
battery plates are covered. Never overfill !
Whenever possible, add only distilled water. If not
available, use water with the lowest possible mineral
content. Hard water will cause an accumulation of
calcium deposits.
Never add water to a battery at below freezing
temperatures unless the water has been thoroughly
mixed with electrolyte first. This may be done by
operating the engine for about 4 hours.
Do not add acid unless it has been lost. Only water
in the sulfuric acid solution is normally evaporated
through normal usage. If the solution has been lost
by spilling, add acid so there is not more than a 10
to 1 ratio of acid to water.
53
Check to determine if the vent holes in the caps
are open.
In normal usage the battery casing may be partially
covered with a white powder. Clean such areas with
a solution of 1 part bicarbonate of soda to 4 parts
water. Use care to prevent solution from entering
battery cells.
If battery terminals show corrosion, remove battery
connections carefully. Do not twist or use unnecessary
force to remove from battery. Brighten battery posts
and connections. Coat battery posts and terminal
connections with petroleum jelly and replace. (Never
hammer on battery posts!)
TESTING THE BATTERY. Voltage Check of AcidType Battery (12 volt).
NOTE: Do not attempt to measure individual cell
voltage by “jabbing” a voltmeter probe through the
battery cover.
**Time Required to Charge Battery
at 5 Amp Hour Rate
*Specific
Percentage of
24 Amp
Gravity Charge in Battery Hours
32 Amp
Hours
50 Amp
Hours
1.140
Discharged
5 hours
7 hours
10 hours
1.170
25% Charged
4 hours
5 hours
8 hours
1.200
50% Charged
3 hours
5 hours
4 hours
1.230
75% Charged
1 hours
2 hours
3 hours
1.260
100% Charged
*This may vary from battery manufacturer ’s
specifications.
**These are approximations. Time may vary due to
cell conditions, battery construction, heat, etc.
NOTE: The approximate charging time can be calculated
by dividing the Amp-Hour rate of the battery by the
Amp-Hour charging rate of charger. (For example:
a 55 amp-hour battery on a 5 amp hour charger will
take about 11 hours to charge.) The slower charging
rate, the easier it is on the battery, and the more
thoroughly you will dissolve the sulfate that has collected.
Generally a charge rate of 5-7 amps per hour is
ideal.
1. Using a battery tester voltmeter, hook up the
battery and adjust for 3 times the amp-hour rating
of the battery.
2. After 15 seconds (no longer) read the voltmeter.
If the voltage is over 9.6 volts check the specific
gravity. If reading is below 1.230, charge the
battery.
54
SPECIFIC GRAVITY CHECK. Use a hydrometer to
determine that there is at least 75% charge in the
battery.
CAUTION: Electrolyte solution contains sulfuric acid.
Handle with care since spilled liquid is very corrosive
to skin and clothing. Use protective eye cover.
1. Remove caps and check water level, if below
battery plates, add water and recheck battery
after the water has mixed with the electrolyte
after about 4 hours use with engine charge.
2. Put the hydrometer into battery and draw electrolyte
into barrel.
3. Make sure the hydrometer float rides freely in
electrolyte. Clean inside of barrel with soap and
water if float persistently sticks to side of barrel.
Clean and dry before use.
4. Make certain readings on float are at eye level.
5. Adjust reading according to temperature of
electrolyte. Add .004 for each 10 o (12 oC) above
80°F (26°C). or subtract .004 for each 10o (12oC)
below 80°F (26°C).
If there is a difference of more than .05 volts between
the highest and lowest cells, replace the battery.
If there is less than .05 volts between the highest
and lowest cells, charge the battery per the chart.
If battery is above 9.6 volts the battery is o.k.
If battery reads less than 9.6 volts after charge, the
battery is ready to be replaced.
Use caution in reconnecting the battery cables to
the battery. An accidental reversal of polarity can
cause damage to the regulator-rectifier.
Battery Condition
Specific Gravity
Discharged
1.110 to 1.130
No useful charge
1.140 to 1.160
25%
1.170 to 1.190
50%
1.200 to 1.220
75%
1.230 to 1.250
100%
1.260 to 1.280
55
SECTION 4. ELECTRICAL CONTROL PANELS
IGNITION CUT-OFF
TOGGLE SWITCH
AMMETER
BROWN
on
ON-OFF
SWITCH
off
BROWN
HEAVY DUTY
PUSH BUTTON
STARTER SWITCH
ELECTRICAL CONTROL PANEL SERVICE PART
NO. 730155. The test procedures explained below
will deal only with the control panel.
Before attempting to locate an apparent defect in
the control panel switches or ammeter, insure all
connections between control panel, starter and battery
are secure and free from corrosion and wire or insulation
breaks. Battery should be fully charged or be at a
minimum of 75% charge. Engine ignition spark should
be checked for an intense spark.
Remove side plates from control panel. Remove engine
alternator connector plug from panel connector. Use
a volt-ohm-millimeter or battery powered test light
for the following tests. CAUTION - Remove (+) lead
from battery before attempting any of the following
tests.
BATTERY
POWERED
CONTINUITY
TESTER
REMOVE POSITIVE (+)
LEAD WIRE FROM BATTERY
ON-OFF SWITCH - DC RELAY CIRCUIT. Remove
both brown wires from switch terminal. Attach test
leads to switch terminal. Place switch to the “ON”
position. Continuity (test light should light) should
exist. Leave test leads attached and move switch
to the “OFF” position. Continuity should not exist
(test light should not light). If switch fails either of
these tests, switch must be replaced.
BROWN
REMOVE STARTER
MOTOR WIRE
GREEN
STARTER SWITCH
ON-OFF
SWITCH
REMOVE POSITIVE (B+)
WIRE FROM BATTERY
GREEN
BATTERY POWERED
CONTINUITY TESTER
REMOVE POSITIVE (+)
LEAD WIRE FROM BATTERY
ON-OFF SWITCH IGNITION GROUND CIRCUIT.
Remove both the green wires from switch terminals.
Attach test leads of tester (Battery type test light or
ohmmeter) to switch terminals. Move toggle switch
to the “ON” position. No continuity (light should not
light) should exist. Leave test leads attached to switch
and move switch to “OFF” position. Continuity should
exist (light should light). If switch fails to either test,
switch must be replaced.
56
BATTERY POWERED
CONTINUITY TESTER
STARTER SWITCH. Remove wires from starter switch.
Place test leads on to switch terminals. No continuity
should exist (Test light should not light). Leave test
leads attached depress starter button. Continuity
should exist (Test light should light). If starter switch
fails either of these tests, replace switch.
AMMETER. CAUTION The ammeter will not show
a charge if the battery is at full charge. The rate of
charge will depend on the amount of charge in the
battery. The lower the charge in the battery, the higher
the reading on the ammeter. If ammeter does not
show a charge or discharge, start and stop engine
(use electric starter) several times to lower charge
of the battery. Observe ammeter and if there is no
deflection, proceed with the following test.
To test ammeter remove right side panel. Remove
brown wire from “On/Off” switch. Use a volt/ohm/
millimeter. Attach one test lead to the terminal the
brown wire was removed from, attach other test lead
to positive terminal of start switches. Set tester to
the ampere scale and start engine. Set throttle control
at full throttle and observe meter. If meter registers
a charge, system is okay and meter on panel is
inoperative. This test can also be made using a good
ammeter. Attach a wire to each terminal of the ammeter
and hookup as described above. No reading on either
meter would indicate a problem with the regulatorrectifier and/or alternator.
BROWN
STARTER SWITCH
ON-OFF
TOGGLE SWITCH
ELECTRICAL CONTROL PANEL SERVICE PART
NO. 730198. The following test procedures will be
limited to the control panel. Test procedures for electrical
components external to this control panel will be
found in their respective areas. Before attempting
to locate an apparent defect in the control panel
switches insure all connections between control panel,
starter and battery are secure and free from corrosion
and wire or insulation breaks. Battery should be fully
charged or be at a minimum of 75% charge. Engine
ignition spark should be checked for an intense spark.
DISCONNECT FROM BATTERY
STARTER
SWITCH
ON-OFF TOGGLE SWITCH
(GREEN
LEAD)
AMMETER
CONNECTOR
FUSE
GROUND
(GREEN
LEAD)
ALLIGATOR CLIPS
BATTERY POWERED
CONTINUITY TESTER
NO. 16 WIRE
CAUTION - Remove the control panel from the engine
bracket then remove (+) lead from battery before
attempting any of the following tests.
ON-OFF TOGGLE SWITCH-IGNITION GROUND
CIRCUIT. Note: One of several continuity testers
may be used. For the following tests a battery powered
continuity tester is used.
ALTERNATOR
CONNECTOR
IGNITION
GROUND
DISCONNECT FROM STARTER
BROWN
REGULATOR
RECTIFIER
SWITCH
AMP
A. Test for switch continuity of magneto cutout circuit.
ON POSITION
FROM BATTERY
When disconnecting spade connectors from terminals
use care not to damage wire connections or switch
terminals. The use of a pair of needlenosed pliers
is recommended.
NO. 6 WIRE
1. Disconnect the two green leads by pulling spade
connectors off of terminals.
2. Place continuity tester probes on each switch
terminal.
57
3. With the toggle switch in the “off” position, the
test light will light.
4. With the toggle switch in the “on” position, the
test light will not light.
5. Position the spade connectors to the original
positions.
DISCONNECT FROM BATTERY
ON-OFF TOGGLE SWITCH
STARTER SWITCH CONTINUITY TEST. Remove wires
from starter switch. Place test leads on to switch
terminals. No continuity should exist (Test light should
not light). Leave test leads attached; depress starter
button. Continuity should exist (Test light should light).
If starter switch fails either of these tests, replace
switch.
STARTER
SWITCH
PUSH IN
SPRING
(RED LEAD)
FUSE
GROUND
TURN CCW
REMOVE
(RED
LEAD)
CONNECTOR
DISCONNECT FROM
STARTER
BATTERY POWERED CONTINUITY TESTER
FUSE (30 AMP)
(3 AG)
2. Disconnect the other spade connector (red
wire) from the switch terminal.
FUSE. To remove the fuse, push the cap in to compress
spring at base of fuse holder and with same motion
turn the cap counterclockwise (ccw) and pull cap
away from holder. Fuse can now be removed from
holder. Inspect condition of fuse. If in doubt, perform
continuity test on fuse and/or connections in fuse
holder. To reinstall, reverse disassembly procedure.
3. Place continuity tester probes on each switch
terminal.
If fuse is defective, replace with a 12 volt/30 amp.
size. (3 AG)
B. Test for switch continuity of D.C. circuit.
1. Disconnect the spade connector (red wire)
from the switch terminal.
4. With the toggle switch in the “on” position the
test light will light.
STARTER SWITCH
ON (POSITION)
5. With the toggle switch in the “off” position the
test light will not light.
6. Position the spade connectors to the original
positions.
DISCONNECT FROM BATTERY
ON-OFF TOGGLE SWITCH
RED
TO BATTERY
NO. 14 WIRE (RED)
NO. 6 WIRE
GREEN
OFF (POSITION)
FUSE
STARTER
SWITCH
FUSE
GROUND
NO. 12 WIRE (RED)
NO. 6
WIRE
TO STARTER
NO. 16 WIRE (GREEN)
CONNECTOR
BATTERY POWERED CONTINUITY TESTER
REMOVE WIRES FROM STARTER SWITCH TERMINALS
If either of the tests do not give the correct results,
replace the switch.
58
WIRING DIAGRAM. The wiring diagram is shown
to show the correct placement of electrical connections,
color code and wire gauge. The wire to the battery
is supplied by the O.E.M.
TROUBLESHOOTING FOR ELECTRICAL CONTROL PANEL,
SERVICE PART NO. 730155.
TROUBLE
Electric Starter Does Not Crank
Engine
PROBABLE CAUSE
Check to determine if crankshaft
turns freely; if not, check for
binding belts, pulleys, clutches,
etc.
Relieve load on crankshaft.
Disengage associated
equipment clutches, belts or
pulleys.
Check battery connections for
corrosion and/or breaks.
Correct problem.
Weak or bad battery.
Replace or charge battery if
less than 3/4 charged.
Push button starter switch.
Replace if inoperative. See
Service Instruction on preceding
pages.
Electric starter.
See troubleshooting chart.
Panel wiring.
Correct problem.
Starter Cranks Engine But Engine Toggle switch.
Does Not Start
Insure spade connectors are
secured to appropriate switch
terminals.
Ammeter Does Not Show A Charge Weak or bad battery.
(If battery is fully charged,
ammeter will not show a charge)
Ammeter Shows A Discharge.
REMEDY
If inoperative, replace. See
Service Instructions on
preceding pages.
Correct. See Service Instructions
on preceding pages. See
“Engine Fails to Start”
Charge or replace.
Faulty wiring and/or connections.
Correct or replace.
Shorted or open alternator.
Replace.
Regulator-Rectifier.
Replace.
Ammeter.
Replace if inoperable. See
Service Instruction on preceding
pages.
Broken wiring and/or insulation.
Correct problem.
Toggle switch.
Check and replace if inoperable.
See Service Instructions on
preceding pages.
59
TROUBLESHOOTING FOR ELECTRICAL CONTROL PANEL,
SERVICE PART NO. 730198.
TROUBLE
PROBABLE CAUSE
Electric Starter Does Not Crank
Engine.
Check to determine if crankshaft
Relieve load on crankshaft.
turns freely; if not, check for
Disengage associated equipment
binding belts, pulleys, clutches, etc. clutches, belts or pulleys.
Starter Cranks Engine But
Engine Does Not Start.
60
REMEDY
Check battery connections for
corrosion and/or breaks.
Correct problem.
Weak or bad battery.
Replace or charge battery if less
than 3/4 charged.
Push button starter switch.
Replace if inoperative. See
Service Instruction on preceding
pages.
Electric starter.
See troubleshooting chart.
Panel wiring.
Correct problem.
Toggle Switch
If inoperative, replace. See
Service Instruction on preceding
pages.
Insure spade connectors are
secured to appropriate
switch terminals.
Correct problem.
CHAPTER 9. TROUBLESHOOTING
TROUBLESHOOTING
Below is a list of common problems and remedies. Follow a uniform procedure to locate and eliminate
the causes.
Cause
Remedy
A. ENGINE FAILS TO START OR STARTS WITH DIFFICULTY
No fuel in tank.
Fill tank with clean, fresh fuel.
Shut-off valve closed.
Open valve
Obstructed fuel line.
Clean fuel screen and line. If necessary, remove
and clean carburetor.
Tank cap vent obstructed.
Open vent in fuel tank cap.
Water in fuel.
Drain tank. Clean carburetor and fuel lines. Dry
spark plug electrodes. Fill tank with clean, fresh
fuel.
Engine over-choked.
Close fuel shut-off and pull starter until engine
starts. Reopen fuel shut-off for normal fuel flow.
Improper carburetor adjustment.
Adjust carburetor.
Loose or defective magneto wiring.
Check magneto wiring for shorts or grounds;
repair if necessary.
Faulty ignition unit.
Check ignition unit. Solid State.
Check points, timing on standard ignition units.
Spark plug fouled.
Clean and regap spark plug.
Spark plug porcelain cracked.
Replace spark plug.
Poor compression.
Check compression.
No spark at plug.
Disconnect ignition cut-off wire at the engine. Crank
engine. If spark at spark plug, ignition switch, safety
switch or interlock switch is inoperative. If no spark,
check magneto. Check wires for poor connections,
cuts, or breaks.
Electric starter does not crank engine.
See 12 volt starter trouble shooting chart page.
B. ENGINE KNOCKS
Carbon in combustion chamber.
Remove cylinder head and clean carbon from
head and piston.
Loose or worn connecting rod.
Replace connecting rod.
Loose flywheel.
Check flywheel key and keyway; replace parts if
necessary. Tighten flywheel nut to proper torque
(See Table of Specifications).
Worn cylinder.
Recondition cylinder or replace.
Improper Magneto Timing.
Time ignition.
Improperly set ignition unit.
Check ignition unit.
Excessive main bearing end play.
Readjust to correct crankshaft end play.
61
C. ENGINE MISSES UNDER LOAD
Cause
Remedy
Spark plug fouled.
Clean and regap spark plug.
Spark plug porcelain cracked.
Replace spark plug.
Improper spark plug gap.
Regap spark plug.
Pitted magneto breaker points.
Clean and dress breaker points. Replace badly
pitted breaker points.
Magneto breaker arm sluggish.
Clean and lubricate breaker point rod and arm.
Check for spring tension.
Faulty condenser.
Check condenser on a tester; replace if defective.
Improper carburetor adjustment.
Adjust carburetor.
Improper valve clearance.
Adjust valve clearance.
Weak valve spring.
Replace valve spring.
D. ENGINE LACKS POWER
Choke partially closed.
Open choke.
Improper carburetor adjustment.
Adjust carburetor.
Magneto improperly timed.
Time engine.
Loss of compression.
Check compression.
Lack of lubrication.
Fill crankcase to the proper level.
Air cleaner restricted.
Clean or replace air cleaner.
Valves leaking.
Grind valves.
Valve timing inaccurate.
Check timing marks on camshaft and crankshaft
gear.
Carburetor dirty or damaged.
Clean, repair carburetor. See Carburetor Chapter 2.
Ignition system malfunction.
Check and repair system.
E. ENGINE OVERHEATS
Engine improperly timed.
Time engine.
Carburetor improperly adjusted (lean).
Adjust carburetor.
Air flow obstructed.
Remove any obstructions from air passages in shrouds.
Excessive load on engine.
Check operation of associated equipment.
Reduce excessive load.
Carbon in combustion chamber.
Remove cylinder head and clean carbon from head
and piston.
Lack of lubrication.
Fill crankcase to proper level.
F. ENGINE SURGES OR RUNS UNEVENLY.
Fuel tank cap vent hole clogged.
Open vent hole.
Governor parts sticking or binding.
Clean, and if necessary repair governor parts.
Carburetor throttle linkage or throttle shaft
and/or butterfly binding or sticking.
Clean, lubricate, or adjust linkage and deburr throttle
shaft or butterfly.
62
Cause
Remedy
Governor not properly adjusted.
Adjust governor.
Carburetor not properly adjusted.
Adjust carburetor.
Intermittent spark at spark plug.
Disconnect ignition cut-off wire at the engine. Crank
engine. If spark, check ignition switch, safety switch
and interlock switch. If no spark, check magneto.
Check wires for poor connections cuts or breaks.
G. ENGINE VIBRATES EXCESSIVELY
Engine not securely mounted.
Tighten loose mounting bolts.
Bent crankshaft.
Replace crankshaft.
Associated equipment out of balance.
Check associated equipment.
Counterbalance counterweights not properly aligned. Check.
H. ENGINE USED EXCESSIVE AMOUNT OF OIL.
Engine speed too fast.
Using tachometer adjust engine RPM to specification.
Oil level too high.
Check level turn dipstick cap tightly into receptacle for
accurate level reading.
Oil filler cap loose or gasket damaged causing
spillage out of breather.
Replace ring gasket under cap and tighten cap securely.
Breather mechanism damaged or dirty causing
leakage.
Replace breather assembly.
Gaskets or “O” rings damaged or gasket or “O” ring
surfaces nicked causing oil to leak out.
Install new gaskets or “O” rings.
Valve guides worn.
Ream valve guide oversize and install 1/32'’ (.787 mm)
oversize valve.
Cylinder wall worn or glazed allowing oil to pass
rings into combustion chamber.
Deglaze cylinder as necessary.
Piston rings and grooves worn excessively.
Reinstall new rings and check land clearance and correct
as necessary.
Piston fit too loose.
Measure and replace as necessary.
Piston oil control ring return holes clogged.
Remove oil control ring and clean return holes.
Oil passages obstructed.
Clean out all oil passages.
I. OIL SEAL LEAKS
Seal hardened or worn.
Replace seal.
Crankshaft seal contact surface is slightly
scratched causing seal to wear excessively.
Crankshaft seal rubbing surface must be smoothed
before installing new seal. Use a fine crocus cloth.
Care must be taken when removing seals.
Crankshaft bearing under seal is worn excessively Check crankshaft bearings for wear and replace if
causing crankshaft to move.
necessary.
Seal outside seat (oil seal bore) in cylinder or
side cover is damaged allowing oil to seep
around outer edge of seal.
Visually check seal receptacle (oil seal bore) for
damage. Replace P.T.O. cylinder cover or small cylinder
cover on the magneto end, if necessary.
New seal installed without correct seal driver
and not seating squarely in cavity.
Replace with new seal using proper tools and methods.
63
Cause
Remedy
New seal damaged upon installation.
Use proper seal protector tools and methods for
installing another new seal.
Bent crankshaft causing seal to leak.
Check crankshaft for straightness and replace if
necessary. (Never straighten a bent crankshaft)
Oil seal driven too far into cavity.
Remove seal and replace with new seal using the
correct driver tool and procedures.
J. BREATHER PASSING OIL
Engine speed too fast.
Use tachometer to adjust correct RPM.
Loose oil fill cap or gasket damaged or missing.
Install new ring gasket under cap and tighten
securely.
Oil level too high.
Check oil level Turn dipstick cap tightly into
receptacle for accurate level reading. DO NOT fill
above full mark.
Breather mechanism damaged.
Replace.
Breather mechanism dirty.
Clean thoroughly in solvent.
Piston ring end gaps aligned.
Rotate end gaps so as to be staggered 90° apart.
Drain hole in breather box clogged.
Clean hole with wire to allow oil to return to
crankcase.
Breather mechanism loose or gaskets leaking.
Install new gaskets and tighten securely.
Damaged or worn oil seals on end of crankshaft.
Replace seals.
Rings not seated properly.
Check for worn or out of round cylinder. Replace
rings. Break in new rings with engine working
under a varying load. Rings must be seated under
high compression or in other words under varied
load conditions.
Breather assembly not assembled correctly on engine. Refer to breather section.
Cylinder cover gasket leaking.
64
Replace cover gaskets.
K. TROUBLE SHOOTING CARBURETION
POINTS TO CHECK FOR CARBURETOR MALFUNCTION
Trouble
Correction
Carburetor out of adjustment .....................................
4-12-13-14-15-17-22
Engine will not start ....................................................
1-2-3-4-5-6-7-9-12-13
Engine will not accelerate ..........................................
3-4-12-13-14-26
Engine hunts (at idle or high speed) .........................
4-5-9-10-11-12-13-14-22-23-26
Engine will not idle......................................................
5-9-10-12-14-15-16-22-23-24-26
Engine lacks power at high speed ............................
3-4-7-9-12-13-22-23-26
Carburetor floods ........................................................
5-8-19-23-24
Carburetor leaks .........................................................
7-8-11-20-25-26
Engine overspeeds .....................................................
9-10-12-16-17-20-22
Idle speed is excessive ..............................................
9-10-15-16-17-20-22
Choke does not open fully .........................................
9-10-17
Engine starves for fuel at high speed (leans out) ..
1-2-4-5-7-12-17-19-21-23
Carburetor runs rich with main adjustment needle
shut off
8-12-19-20-21-23
Performance unsatisfactory after being serviced ..
1thru 14 and 17 thru 23
1. Open fuel shut-off valve at fuel tank, fill tank
with fuel.
14. Adjust idle mixture adjustment screw. Check to
see that it is the correct screw.
2. Examine and clean fuel line and filter (where
applicable).
15. Adjust idle speed screw.
3. Check ignition, spark plug and compression.
16. Check position of choke and throttle plates.
4. Clean air cleaner, service as required.
17. Adjust control cable or linkage to assure full choke
and carburetor control.
5. Dirt or restriction in fuel system, clean tank and
fuel strainers, check for kinks or sharp bends.
18. Clean carburetor after removing all non-metallic
parts that are serviceable. Trace all passages.
6. Check for stale fuel or water in fuel, fill with fresh
fuel.
19. Check inlet needle and seat condition and proper
installation.
7. Examine fuel line and pick-up for sealing at fittings.
20. Check sealing of welch plugs, cups, plugs and
gaskets.
8. Check and clean atmospheric vent holes.
9. Examine throttle and choke shafts for binding
or excessive play, remove all dirt or paint, replace
shaft.
10. Examine throttle and choke return springs for
operation.
21. Check fuel pump operation of pulse pump, clean
the pulse line after removing it from the pump
and engine fittings.
22. Adjust governor linkage.
23. Adjust float setting.
11. Examine idle and main mixture adjustment screws
and “O” rings for cracks or damage.
24. Check float shaft for wear and float for leaks or
dents.
12. Adjust main mixture adjustment screw. Check
to see that it is the correct screw.
25. Check seal for fuel drain or bowl gasket.
13. Examine main nozzle and replace with service
nozzle.
26. Is carburetor operating at excessive angle, 31°
or more ?
65
CHAPTER 10. 8 H.P. & LARGER
ENGINE AND TORQUE SPECIFICATIONS
ALSO VALVE-IN-HEAD SPECIFICATIONS AND TORQUES
SECTION 1. CROSS REFERENCE LIST FOR TABLE OF SPECIFICATIONS
Craftsman
Engine Model
See
Model
Craftsman
Engine Model
143.558012
143.558022
143.558032
143.558052
143.559012
143.559022
143.559032
143.559042
143.562012
143.562022
143.562032
143.568032
143.569022
143.569032
143.569042
143.569052
143.569082
143.572012
143.572022
143.572032
143.572042
143.572052
143.572062
143.572092
143.572102
143.578012
143.578022
143.578052
143.578062
143.578072
143.579012
143.579022
143.579032
143.579042
143.579052
143.579062
143.579072
143.579082
143.579092
143.579102
143.579112
143.579132
143.582012
143.582022
143.582032
143.582042
143.582052
143.582062
143.582072
143.582082
143.582092
143.582102
143.582112
143.582122
143.582132
143.582142
143.582172
143.588012
HH80
HH80
HH80
HH80
HH100
HH100
HH100
HH100
HH120
HH120
HH1200
HH80
HH100
HH100
HH100
HH100
HH100
HH120
HH120
HH120
HH120
HH120
HH120
HH120
HH120
HH80
HH80
HH80
HH80
HH80
HH100
HH100
HH100
HH100
HH100
HH100
HH100
HH100
HH100
HH100
HH100
HH100
HH120
HH120
HH120
HH120
HH120
HH120
HH120
HH120
HH120
HH120
HH120
HH120
HH120
HH120
HH120
HH80
143.588032
143.589012
143.589022
143.589032
143.589042
143.589052
143.589072
143.592012
143.592022
143.592032
143.592052
143.592062
143.592072
143.592082
143.598012
143.599012
143.599022
143.599042
143.599052
143.599062
143.602012
143.602022
143.602032
143.602052
143.602062
143.602072
143.602082
143.602092
143.602102
143.602112
143.602122
143.608012
143.608022
143.608032
143.609022
143.609032
143.609042
143.609052
143.609072
143.612012
143.612022
143.619012
143.622012
143.622022
143.622032
143.622042
143.622052
143.622062
143.622072
143.622082
143.622092
143.622102
143.628012
143.628022
143.629012
143.629022
143.629032
143.629042
66
See
Model
Craftsman
Engine Model
See
Model
HH80
HH100
HH100
HH100
HH100
HH100
HH100
HH120
HH120
HH120
HH120
HH120
HH120
HH120
HH80
HH100
HH100
HH100
HH100
HH100
HH120
HH120
HH120
HH120
HH120
HH120
HH120
HH120
HH120
HH120
HH120
HH80
HH80
HH80
HH100
HH100
HH100
HH100
HH100
HH120
HH120
HH100
HH120
HH120
HH120
HH120
HH120
HH120
HH120
HH120
HH120
HH120
HH80
HH80
HH100
HH100
HH100
HH100
143.629052
143.629062
HH100
HH100
143.629072
HH100
143.632022
HH120
143.632032
HH120
143.632042
HH120
143.639012
HH100
143.642012
HH120
143.642022
143.642032
143.642042
143.649012
143.649022
143.652012
143.652022
143.652032
143.652042
143.652052
143.652062
143.652072
143.659012
143.659022
143.659032
143.662012
143.669012
143.672012
143.672022
143.672032
143.672042
143.672052
143.672062
143.672072
143.676082
143.679012
143.679022
143.679032
143.712012
143.712022
143.712032
143.712042
143.760012
143.780012
HH120
HH120
HH120
HH100
HH100
HH120
HH120
HH120
HH120
HH120
HH120
HH120
HH100
HH100
HH100
HH120
HH100
HH120
HH120
HH120
HH120
HH120
HH120
HH120
HH100
HH100
HH100
HH100
HH120
HH120
HH120
HH120
HH120
HH120
Craftsman
Engine Model
See
Model
Model
HH80
HH100
U.S.
Metric
Displacement
23.7
384.4cc
Stroke
2-3/4'’
Bore
Timing Dimension
69.85mm
U.S.
HH120
Metric
U.S.
Metric
23.7
284.4cc
27.66
453.4 cc
2-3/4'’
69.85mm
2-7/8'’
73.025mm
3.3120
84.125
3.3120
84.125
3.500
88.900mm
3.3130
84.150
3.3130
84.150
3.501
88.925mm
TDC-Start
.095 Run
TDC-Start
2.41
.095 Run
TDC-Start
2.41
.095 Run
2.41mm
Point Gap
.020
.508
.020
.508
.020
.508
Spark Plug Gap
.028
.033
.711
.838
.028
.033
.711
.838
.028
.033
.711mm
.838mm
.010
.020
.254
.508
.010
.020
.254
.508
.010
.020
.254mm
.508mm
Valve Clearance
Intake
Exhaust
Valve Seat Angle
Valve Seat Width
46°
46°
46°
.042
.042
.042
1.067
.042
1.067mm
.052
.052
.052
1.321
.052
1.321mm
Valve Face Angle
45°
Valve Face Width
.089
.099
2.261
2.515
.089
.099
2.261
2.515
.089
.099
2.261
2.515
Valve Lip Width
.06
1.524
.06
1.524
.06
1.524
1.885
47.879
1.885
47.879
1.885
47.879
Valve Spring Free Length
Valve Guides STD Diameter
Valve Guides Over-Size Dimensions
Dia. Crankshaft Conn. Rod Journal
45°
Piston Diameter
45°
45°
.312
7.925
.312
7.925
.312
7.925
7.950
.313
7.950
.313
7.950
.343
8.712
.343
8.712
.343
8.712
.344
8.738
.344
8.738
.344
8.738
1.3750
34.925
1.3750
34.925
1.3750
34.925
1.3755
34.938
1.3755
34.938
1.3755
34.938
1.3765
Crankshaft End Play
45°
.313
Maximum Conn. Rod Dia.Crank Bearing Maximum
Shaft Seat Dia. for Roller Bearings
45°
Maximum
34.963
1.3765
Maximum
34.963
1.3765
34.963
1.1865
30.137
1.1865
30.137
1.1865
30.137
1.1870
30.150
1.1870
30.150
1.1870
30.150
None
3.3080
3.3100
None
84.023
84.074
3.3080
3.3100
None
84.023
84.074
3.4950
3.4970
88.773
88.824
NOTE: All dimensions are in inches and millimeters unless noted.
67
Model
HH80
HH100
HH120
U.S.
Metric
U.S.
Piston Pin Diameter
.6873
.6875
17.457
17.463
.6873
.6875
17.457
17.463
.6873
.6875
17.457
17.463
Width Comp. Ring Groove
.0950
.0960
2.413
2.438
.0950
.0960
2.413
2.438
.0950
.0960
2.413
2.438
Width Oil Ring Groove
.1880
.1900
4.775
4.826
.1880
.1900
4.775
4.826
.1880
.1890
4.775
4.826
Side Clearance Ring Groove
.0020
.0035
.051
.889
.0020
.0035
.051
.889
.0020
.0035
.051
.889
Ring End Gap
.007
.020
.178
.508
.007
.020
.178
.508
.007
.020
.178
.508
Top Piston Land Clearance
.0305
.0335
.775
.851
.030
.035
.762
.889
.031
.036
.787
.914
Piston Skirt Clearance
.002
.005
.051
.127
.002
.005
.051
.127
.003
.006
.076
.127
Camshaft Bearing Diameter
.6235
.6240
15.837
15.850
.6235
.6240
15.837
15.850
.6235
.6240
15.837
15.850
Cam Lobe Diameter Nose to Heel
1.3045
1.3085
33.134
33.326
1.3045
1.3085
33.134
33.236
1.3045
1.3085
33.134
33.236
Magneto Air Gap
.006
.010
.152
.254
.006
.010
.152
.254
.006
.010
.152
.254
Model
Metric
VH80
U.S.
Metric
VH100
U.S.
Metric
Displacement
23.7
388.4 cc
23.7
388.4 cc
Stroke
2-3/4'’
69.85
2-3/4'’
69.85
Bore
3.3120
3.3130
84.125
84.150
3.3120
3.3130
84.125
84.150
Timing Dimension
Solid State
Solid State
Point Gap
Solid State
Solid State
Spark Plug Gap
.035
.889
.035
.889
.010
.020
.254
.508
.010
.020
.254
.508
Valve Seat Angle
46°
46°
46°
46°
Valve Seat Width
.042
.052
1.067
1.321
.042
.052
1.067
1.321
Valve Clearance
68
Intake
Exhaust
U.S.
Metric
Model
VH80
VH100
U.S.
Metric
U.S.
Metric
Valve Face Angle
45°
45°
45o
45o
Valve Face Width
.089
.099
2.261
2.515
.089
.099
2.261
2.515
Valve Lip Width
.06
1.524
.06
1.524
Valve Spring Free Length
1.885
47.879
1.885
47.879
Valve Guides STD Diameter
.312
.313
7.925
7.950
.312
.313
7.925
7.950
Valve Guides Over-Size Dimensions
.344
.345
8.738
8.763
.344
.345
8.738
8.763
Diameter Crankshaft Conn. Rod Journal
1.3750
1.3755
34.925
34.938
1.3750
1.3755
34.925
34.938
Maximum Conn. Rod Dia. Crank Bearing
1.3761
44.097
1.3761
44.097
Shaft Seat Dia. for Roller Bearings
1.1865
1.1870
30.137
30.150
1.1865
1.1870
30.137
30.150
Crankshaft End Play
None
Piston Diameter
3.308
3.310
84.023
84.074
3.308
3.310
84.023
84.074
Piston Pin Diameter
.6873
.6875
17.457
17.463
.6873
.6875
17.457
17.463
Width Comp. Ring Groove
.0950
.0960
2.41
2.438
.0950
.0960
2.41
2.438
Width Oil Ring Groove
.1800
.1900
4.572
4.826
.1800
.1900
4.572
4.826
Side Clearance Ring Groove
.0025
.0030
.635
.076
.0025
.0030
.635
.076
Ring End Gap
.010
.020
.254
.508
.010
.020
.254
.508
Top Piston Land Clearance
.0305
.0335
.775
.851
.0305
.0335
.775
.851
Piston Skirt Clearance
.003
.076
.003
.076
Camshaft Bearing Diameter
.6235
.6240
15.837
15.850
.6235
.6240
15.837
15.850
Cam Lobe Diameter Nose to Heel
1.3045
1.3085
33.134
33.236
1.3045
1.3085
33.134
33.236
Magneto Air Gap
.006
.010
.152
.254
.006
.010
Solid State
.152
.254
None
NOTE: All dimensions are in inches and millimeters unless noted.
69
SECTION 2. TORQUE SPECIFICATIONS
8 H.P. & LARGER ENGINES (EXCEPT VALVE-IN-HEAD)
INCH POUNDS
NEWTON METER
Cylinder Head Bolts
180 - 240
20.3 - 27.1
Connecting Rod Lock Nuts
86 - 110
9.7 - 12.4
Mounting Flange or Cylinder Cover
100 - 130
11.3 - 14.7
Flywheel Nut
600 - 660
67.8 - 74.6
Spark Plug
220 - 280
24.9 - 31.6
Carburetor to Cylinder
72 - 96
8.1 - 10.9
Air Cleaner to Elbow
15 - 25
1.7 - 2.8
Air Cleaner Bracket to Carburetor
15 - 25
1.7 - 2.8
Tank Bracket to Housing
35 - 50
4.0 - 5.7
Tank Bracket to Cylinder (5/16'’ Lower)
150 - 200
17 - 22.6
Tank Bracket to Head Bolt
150 - 200
17 - 22.6
Starter-Top Mount Recoil
40 - 60
4.5 - 6.8
Belt Guard to Blower Housing
25 - 35
2.8 - 4.0
Flywheel Screen & Pulley
72 - 96
8.1 - 10.9
Stationary Point Screw
15 - 20
1.7 - 2.3
Blower Housing Baffle to Cylinder
72 - 96
8.1 - 10.9
Blower Housing to Baffle or Cylinder
48 - 72
5.4 - 8.1
Breaker Point Cover
15 - 25
1.7 - 2.8
Magneto Stator Mounting
72 - 96
8.1 - 10.9
Breather to Cylinder
20 - 25
2.3 - 2.8
Oil Drain Plug 3/8 18
80 - 100
9.0 - 11.3
Blower Housing Extension to Cylinder
72 - 96
8.1 - 10.9
Stub Shaft Bolts to Flywheel
100 - 125
11.3 - 14.1
Motor Generator all Mounting Bolts
65 - 100
7.4 - 11.3
NOTE: Divide by 12 for foot pounds.
70
SECTION 3. VALVE-IN-HEAD ENGINE SPECIFICATIONS
Description
Model OH120
Model OH140
U.S.
Metric U.S.
Metric
See Note
Model OH150 Model OH160
U.S.
Metric U.S.
Metric
See Note
Model OH180
U.S.
Metric
See Note
Displacement
21.1
346 cc
23.7
388 cc
27.66
453 cc
27.66
453 cc
30.0
492 cc
Stroke
2.75
69.80
2.75
69.80
2.875
69.80
2.875
69.80
2.875
69.80
Bore
3.125
3.126
79.375
79.400
3.312
3.313
84.125
84.150
3.500
3.501
88.900
88.925
3.500
3.501
88.900
88.925
3.625
3.626
92.075
92.100
Spark Plug Gap
.030
.762
.030
.762
.030
.762
.030
.762
.030
.762
Valve Clearance Intake
Exhaust
.005
.010
.0127
.254
.005
.010
.0127
.254
.005
.010
.0127
.254
.005
.010
.0127
.254
.005
.010
.0127
.254
Valve Seat Angle
46°
Valve Seat Width
.042
.052
1.067
1.321
.042
.052
1.067
1.321
.042
.052
1.067
1.321
.042
.052
1.067
1.321
.042
.052
1.067
1.321
Valve Face Angle
45° +
45o
45° +
45o
45° +
45o
45° +
45o
45° +
45o
Valve Face Width
.094
2.388
.133
3.378
.133
3.378
.133
3.378
.133
3.378
Valve Lip Width
.06
1.524
.06
1.524
.06
1.524
.06
1.524
.06
1.524
Valve Spring Free Length
1.915
48.641
1.980
50.292
1.980
50.292
1.980
50.292
1.980
50.292
Valve Guides STD Diameter
.312
.313
7.925
7.950
.312
.313
7.925
7.950
.312
.313
7.925
7.950
.312
.313
7.925
7.950
.312
.313
7.925
7.950
Dia. Crankshaft Conn.
Rod Journal
1.3750
1.3755
34.925
34.938
1.3750
1.3755
34.925
34.938
1.3750
1.3755
34.925
34.938
1.3750
1.3755
34.925
34.938
1.3750
1.3755
34.925
34.938
Maximum Conn. Rod Dia.
1.3765
34.963
1.3765
34.963
1.3765
34.963
1.3765
34.963
1.3765
34.963
Shaft Seat Dia. for
Roller Bearings
1.1865
1.1870
30.137
30.150
1.1865
1.1870
30.137
30.150
1.1865
1.1870
30.137
30.150
1.1865
1.1870
30.137
30.150
1.1865 30.137
1.1870 30.150
Crankshaft End Play
*None
.001
.025
.007
.178
Preload
*None
.001
.025
.007
.178
Preload
*None
.001
.025
.007
.178
Preload
*None
.001
.007
Preload
.025
.178
*None
.001
.025
.007
.178
Preload
Piston Skirt Diameter
3.121
3.123
79.273
79.324
3.3080
3.3100
84.023
84.074
3.4950
3.4970
88.773
88.824
3.4950
3.4970
88.773
88.824
3.620
3.622
Piston Pin Diameter
.6876
.6880
17.465
17.475
.6876
.6880
17.465
17.475
.6876
.6880
17.465
17.475
.6876
.6880
17.465
17.475
.7810
.7812
Width Comp. Ring Groove
.0950
.0960
2.413
2.438
.0950
.0960
2.413
2.438
.0950
.0960
2.413
2.438
.0950
.0960
2.413
2.438
.0955
.0965
Width Oil Ring Groove
.1880
.1900
4.775
4.826
.1880
.1900
4.775
4.826
.1880
.1890
4.775
4.826
.1880
.1890
4.775
4.826
.1880
.1895
46°
46°
46°
46°
Crank Bearing
Note: First Model Year was designated as an HH140, 150, 160.
91.948
91.999
4.775
4.826
71
Description
Model OH120
Model OH140
Model OH150 Model OH160
Model OH180
U.S.
Metric U.S.
Metric U.S.
Metric U.S.
Metric U.S.
Metric
Side Clearance Ring
Groove Compression
.0015 .038
.0035 .089
.0015
.0035
.038
.089
.0015
.0035
.038
.089
.0015
.0035
.038
.089
.0015
.0035
.038
.089
Ring End Gap
.010
.020
.254
.508
.010
.020
.254
.508
.010
.020
.254
.508
.010
.020
.254
.508
.010
.020
.254
.508
Top Piston Land Clearance
.031
.034
.787
.864
.030
.035
.762
.889
.031
.036
.787
.864
.031
.036
.787
.864
.031
.036
.787
.864
Camshaft Bearing Diameter
.6235 15.837
.6240 15.850
.6235
.6240
15.837
15.850
.6235
.6240
15.837 .6235
15.850 .6240
Cam Lobe Diameter Nose
to Heel
1.3117 33.317
1.3167 33.444
1.3117 33.317
1.3167 33.444
CROSS REFERENCE LIST
Craftsman Engine Model
See Model
143.626272
143.630012
143.630022
143.640012
143.640022
143.640032
143.640042
143.640052
143.650012
143.650022
143.650032
143.660012
143.660022
143.670012
143.670032
143.670042
OH160
OH160
OH160
OH160
OH160
OH160
OH160
OH160
OH160
OH160
OH160
OH160
OH160
OH140
OH160
OH140
15.837 .6235
15.850 .6240
15.837
15.850
1.3117 33.317 1.3117 33.317 1.3117 33.317
1.3167 33.444 1.3167 33.444 1.3167 33.444
CROSS REFERENCE LIST
Craftsman Engine Model
See Model
143.670052
143.670062
143.670072
143.670082
143.670092
143.680012
143.680022
143.680032
143.700012
143.710012
143.710022
143.730012
143.730022
143.740012
143.740022
143.770022
OH160
OH160
OH160
OH140
OH140
OH140
OH140
OH160
OH180
OH160
OH140
OH160
OH140
OH140
OH160
OH180
“Torque specifications listed on this page should not be confused with the torque value observed on engines
which have been run. Torque relaxation occurs on all engines from thermal expansion and contraction. The
torque specifications take relaxation into account so a sufficient clamping force exists after an engine has
been run.”
72
SECTION 4. TORQUE SPECIFICATIONS
VALVE-IN-HEAD
TORQUE SPECIFICATIONS
INCH
Nm
180 - 240
20.3 - 27.1
86 - 110
9.7 - 12.4
Mounting Flange Cylinder Cover Screw
100 - 130
11.3 - 14.7
Cylinder Cover Flywheel End
120 - 160
13.6 - 18.1
Flywheel Nut
600 - 660
67.8 - 74.6
P.T.O. Shaft to Flywheel
100 - 125
11.3 - 14.1
Spark Plug
220 - 280
24.9 - 31.6
Intake Pipe to Cylinder
72 - 96
8.1 - 10.9
Carburetor to Intake Pipe
48 - 72
5.4 - 8.1
Air Cleaner Elbow to Carburetor
25 - 35
2.8 - 4.0
Air Cleaner Bracket to Elbow
15 - 25
1.7 - 2.8
Air Cleaner Bracket to Carburetor
15 - 25
1.7 - 2.8
Tank Bracket to Cylinder (5/16'’ Lower)
150 - 200
17.0 - 22.6
Tank Bracket to Cylinder (1/4'’)
96 - 120
10.9 - 13.6
40 - 60
4.5 - 6.8
140 - 170
15.8 - 19.2
Rope Start Pulley Mounting Screws
60 - 75
6.8 - 8.5
Rocker Arm Box to Cylinder Head
80 - 90
9.0 - 10.2
Rocker Arm Cover and Breather (Screw to Stud)
15 - 20
1.7 - 2.3
Rocker Arm Adjusting Screw Lock Nut
50 - 70
5.5 - 8.0
Rocker Box Cover to Mtg. Stud
20 - 30
2.3 - 3.4
Magneto Stator Mounting Screw
72 - 96
8.1 - 10.9
Blower Housing to Baffle or Cylinder
48 - 72
5.4 - 8.1
Housing Baffle to Cylinder
72 - 96
8.1 - 10.9
Blower Housing Extension to Cylinder
72 - 96
8.1 - 10.9
Governor Rod Clamp to Rod (Screw and Nut)
15 - 25
1.7 - 2.8
Governor Rod Clamp to Lever (Screw and Nut)
15 - 20
1.7 - 2.3
Ground Wire to Terminal
5 - 10
.6 - 1.1
Toggle Stop Switch Nut
10 - 15
1.1 - 1.7
Oil Drain Plug 3/8 18
80 - 100
9.0 - 11.3
Oil Drain Cap
35 - 50
4.0 - 5.7
Hand Tighten
Hand Tighten
Cylinder Head Bolts
Connecting Rod Screw or Nut
Starter-Recoil-Top Mount
Starter-Electric-Straight Drive
Oil Fill Plug (Large Diameter)
73
CHAPTER 11. EDUCATIONAL MATERIALS AND TOOLS
VIDEO PROGRAMS
CARBURETOR TROUBLESHOOTING BOOKLET
695907
This booklet is designed as a quick
reference to carburetion problems and
related repair procedures.
695015
Carburetor Troubleshooting. Covers identification
of carburetors used on Tecumseh engines and how
to troubleshoot and repair them. VHS only.
IGNITION SYSTEMS TROUBLESHOOTING BOOKLET
694903
695059
Understanding Tecumseh Ignition Systems. A basic
program designed to give the small engine technician
first hand knowledge of Tecumseh ignition systems
so the technician can understand the system and
perform repairs to it. VHS only.
This booklet contains information on
the identification, possible problems
and related repair procedures of
Tecumseh Ignition Systems.
695148
Teardown and reassembly of the 900 series transaxles.
This video will show a complete step-by-step procedure
for teardown and reassembly of the 900, 910 and
920 series transaxles.
SPECIAL TOOLS BOOKLET
694862
This booklet depicts all specialty tools
offered by Tecumseh which can be
used on 2 and 4 cycle engines and
Peerless units.
695185
Electrical Troubleshooting. This video training program
will assist the small engine technician in the proper
procedures for troubleshooting electrical systems
on outdoor power equipment.
695285
An in-depth look at the 800 series transaxles. Detailing
the teardown and reassembly procedures for the
800, 801 and 820 transaxles.
SPECIAL BOOKLETS
QUICK REFERENCE CHART BOOKLET
695933
This booklet contains the quick
reference information found on
Tecumseh wall charts.
This booklet is designed to be used
as a work bench quick reference guide
when servicing Tecumseh engines
and motion drive systems.
INSTRUCTIONAL GUIDE
692738
Assists in the use and
understanding of the Tecumseh
Master Parts Manual. Illustrates
time saving features incorporated
into the manual. Explains new
carburetor parts breakdown format.
TESTER BOOKLETS
694529
Test procedures for Tecumseh electrical
components using Graham-Lee Tester
31-SM or 31-SMX-H.
4-CYCLE ENGINE FAILURE
ANALYSIS
695590
This booklet is designed as a tool
for the average technician to
correctly assess the cause of
failure.
694530
Test procedures for Tecumseh electrical
components using Merco-O-Tronic
Tester 9800. (Tests are similar for
98, 98A and 79.)
74
75
TAPER GAP GAUGE
VALVE LAPPING TOOL
No. 670154 - Valve lapping tool.
No. 670256 - Taper Gap Gauge
1/32'’ OVERSIZE GUIDE REAMER
No. 670284 - HH & VH80-120 and OH120-180
No. 670305 - Strap Wrench
VIBRATION TACHOMETER
No. 670156 - Vibration Tachometer
No. 670117 - Ring Expander
AIR GAP GAUGE
*No. 670216 - Air gap gauge .0075 (.191 mm)
shim stock for setting air gap.
76