1
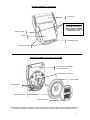
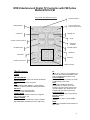
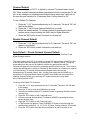
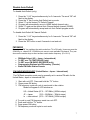
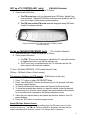
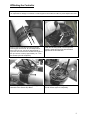
MTVC2-FM
MYE Entertianment TV Controller
with FM Receiver Option
Operation Manual
man_mtvc2fm_v4
www.myeclubtv.com
CONTENTS
FCC COMPLIANCE………………………………………
2
INDUSTRY CANADA COMPLIANCE…………………..
2
MTVC2 ORIENTATION……………………………………
3
KEYPAD ORIENTATION…………………………………
4
DISPLAY ORIENTATION………………………………..
5
SPECIAL FEATURES…………………………………….
5
CHANNEL DEFAULT / AUTO DEFAULT………………
6
FM RADIO ………………………………………………...
7
SET as a TV CONTROLLER ONLY……………………….
8
SET as an FM RADIO RECEIVER ONLY………………….
8
ATTACHING THE CONTROLLER………………………
9
INTELLIJACK………………………………………………
11
WARRANTY……………………………………………….
12/13
FCC Compliance Statement
NOTE: This equipment has been tested and found to comply with the limits for a class B digital devise
pursuant to part 15 of the FCC rules.
These limits are designed to provide reasonable protection against harmful interference when the equipment is
operated in a residential environment. This equipment generates, uses and can radiate radio frequency energy
and if not installed and used in accordance with the instruction manual may cause harmful interference to
radio communications. However, there is no guarantee that interference will not occur in a particular
installation. If this equipment does cause harmful interference to radio or television reception, which can be
determined by turning the unit off and on, the user is encouraged to try to correct the interference by one or
more of the following measures:
•
•
•
•
Reorient or relocate the receiver.
Increase the separation between the equipment and the receiver.
Connect the equipment to an outlet different from that which the receiver is connected.
Consult your MYE dealer or experienced Radio / TV technician
INDUSTRY CANADA COMPLIANCE STATEMENT
(1) This device may not cause harmful interference, and
(2) This device must accept any interference received, including interference that may cause undesired operation.
2
RECEIVER ASSEMBLY - FRONT VIEW
LCD DISPLAY
FRONT MOUNTING SCREWS
UNSCREW TO RELEASE the
MOUNTING BASE ASSEMBLY.
(PLEASE READ “ATTACHING
THE RECEIVER” PG. 9)
FRONT FLANGE
KEYPAD
HEADPHONE JACK
CABLE EXIT HOLES
RECEIVER ASSEMBLY & MOUNTING - REAR VIEW
BAR CODE SERIAL NUMBER
AND RATING LABEL
CSAFE CABLE RJ45 JACK
REAR FLANGE
CABLE BLOCKS
CABLE EXIT HOLES
MOUNTING BASE
USE only MYE Entertainment cables with all MYE Entertainment receiver controllers. MYE Entertainment will not be
responsible for damage to controllers or cardio equipment when alternate cables or power adapters are used.
3
MYE Entertainment Digital TV Controller with FM Option
Model MTVC2-FM
MTVC2-FM KEY IDENTIFICATION
FM RADIO SELECT
POWER ON/OFF
VOLUME UP
TV Select (FM Preset
Select in FM only Mode)
CHANNEL UP
SCAN
CLOSED CAPTION / MUTE
PREVIOUS
CHANNEL
VOLUME DOWN
CHANNEL DOWN
HOME KEY
EQ SELECT
DASH KEY
ASPECT RATIO (DTV)
DIRECT ACCESS
Main Features:
POWER
ON/OFF
FM RADIO SELECT
Selects FM mode for audio from FM radio broadcasts.
Volume Up/Down
Controls Volume Level Up and Down
Mute
Toggles between Mute ON/OFF – Closed Caption
ON/OFF (TV mode) and MUTE ON/OFF (FM mode).
EQ Select
Select between 5 preset EQ tones:
Flat, Rock, Jazz, Classical & Bass
ASPECT RATIO
Adjust the picture ASPECT RATIO of TV programs
(DTV mode) (16:9 or 4:3)
DIRECT ACCESS
DIRECT CHANNEL ACCESS (TV mode) or DIRECT
FM FREQUENCY ACCESS (ex: 106.7) (FM mode).
TV
Return to TV mode as a TV controller from
FM mode. Also selects FM PRESET mode
while in FM RECEIVER (ONLY) mode.
Channel Up/Down
Selects up or down TV channel (TV mode)
or FM frequency (FM mode).
Scan
Allows user to SCAN through each
programmed TV channel (TV mode) .
Pauses 5 seconds on each channel until
next KEY PRESS. Also, SCANS to next
available FM radio station. (FM mode)
Previous Channel
Allows user to jump back to the previously
listened to channel
Home Key
Allows user to jump to a preset HOME
channel.
DASH
For DIRECT ACCESS channel selection in
DTV mode.
4
DISPLAY and ICON IDENTIFICATION
CURRENT FM
FREQUENCY
PRESET
CHANNEL
MUTE “ON”
FAULTY
HEADPHONE
JACK
FREQUENCY
TV MODE
FM MODE
EQ PRESETS
VOLUME
LEVEL
INDICATOR
Special Features:
•
•
•
•
AUTO OFF Sensor
Channel Default
Auto Default – Private Network Channel Default
FM Radio
Auto OFF Sensor
The controller can be set to monitor for the absence of vibration for 10 minutes.
Should this occur, the console can automatically power OFF the TV and
controller, saving energy and extending product life.
To Enable the Auto OFF Sensor:
Note: Factory default is “Disabled.”
1. Press the “Scan & CC” buttons simultaneously for 3-5 seconds unit the
word “OFF” is displayed
2. Press the “TV” button to turn the feature ON.
3. Press the “EQ” button or wait 5 seconds to set and exit.
To Disable the Auto OFF Sensor
1. Press the “Scan & CC” buttons simultaneously for 3-5 seconds unit the
word “OFF” is displayed.
2. Press the “EQ” button or wait 5 seconds to set and exit.
5
Channel Default
This feature allows the LCD TV to default to a preset TV channel when turned
ON. When a default channel has been programmed into the controller the TV will
turn on but change to a predetermined channel during which time it will lock out
the user key pad functions for 10 seconds. Note: Factory default is ‘Off’.
To set a Default TV Channel:
1. Press the “1 & 3” keys simultaneously for 3-4 seconds. The word “Off” will
flash in the display.
2. Press the “1” key to enter Channel Default set up mode.
3. Select the desired default TV channel number by pressing the direct
access numeric keys including the DASH key for digital channels.
4. Press the “EQ” button or wait 5 seconds to set and exit.
Disable Channel Default
1. Press the “1 & 3” keys simultaneously for 3-4 seconds. The word “Off” will
appear in the display.
2. Press the “EQ” button or wait 5 seconds to set and exit.
Auto Default – Private Network Channel Default
Exclusive feature works with in-club private TV networks including ClubCom™ and
Digital Signage systems.
This feature allows the LCD TV to default to a preset TV channel when turned ON, wait
a user set delay time then default to a second preset TV channel (Home). During the
preset delay time the user will be unable to use the key pad functions and the
controller’s display will count down the remaining seconds of the lock out. Once normal
viewing has started and no activity is detected by the controller (no vibration) for a period
of 10 minutes the TV channel will automatically default back to the second
predetermined TV channel (Home). Also, if at any time during use the HOME key is
pressed the TV will automatically switch to HOME. Auto Default can be turned off by
enabling Channel Default or by selecting OFF when entering the set up mode.
Note: Factory default is OFF.
To set the Auto Default TV Channels:
1. Press the “1 & 3” keys simultaneously for 3-4 seconds. The word “Off” will flash
in the display.
2. Press the “2” key to enter Auto Default set up mode.
3. Select the first desired default TV channel number by pressing the direct access
numeric keys.
4. Press the “EQ” button or wait 5 seconds to set.
5. Select the second desired default TV channel (HOME) by pressing the direct
access numeric keys.
6. Press the “EQ” button or wait 5 seconds to set.
7. A TIME number will appear. Press CHANNEL UP button to scroll through the
available time settings (5, 10, 15, 20, 25, 30) Note: Factory default is 30 seconds.
8. Press the “EQ” button to set the above information or wait 5 seconds to set.
6
Disable Auto Default
To disable Auto Default (only):
1. Press the “1 & 3” keys simultaneously for 3-4 seconds. The word “Off” will
flash in the display.
2. Press the “2” key to enter Auto Default set up mode.
3. Select “0” as the desired TV Default Channel.
4. Program will automatically move to HOME default channel entry.
5. Select ”0” again as the desired Auto Channel default channel (HOME).
6. Program will automatically accept and exit Auto Default program mode.
To disable Auto Default & Channel Default:
1. Press the “1 & 3” keys simultaneously for 3-4 seconds. The word “Off” will
flash in the display.
2. Press the “EQ” button or wait 5 seconds to set and exit.
FM RADIO
Pressing the “FM” key switches the audio mode from TV to FM radio. Users can press the
SCAN key or channel UP / DOWN keys to move to next available FM channel. They can
also use the number keys to direct access a radio station frequency. (Ex: 101.5)
•
•
•
•
•
FM Mode Select ( US – Japan – International)
To SET as a TV CONTROLLER (only)
To SET as an FM RADIO RECEIVER (only)
Programming Stations into FM memory (Presets)
Erase FM Radio Station Presets
FM RADIO MODE SELECT (United States – Japan – International)
The FM Radio reception mode may be manually set to receive FM radio for the
United States, Japan or International FM.
1. Start with unit OFF. Press and hold the “TV” button.
2. Press power ON button.
3. FM frequency mode will cycle to next mode in the rotation.
Modes will appear in LCD window as:
US = United States (87.5 – 107.9MHz) (200kHz steps)
JP = Japan
(76.0 – 90.0MHz) (100kHz steps)
In = International (87.5 – 107.9MHz) (100kHz steps)
4. To cycle to next FM frequency mode turn unit OFF.
5. Press and hold the “TV” button.
6. Press power ON button.
7. FM frequency mode will cycle to next mode.
7
SET as a TV CONTROLLER (only)
(FM RADIO Disabled)
1. Start with unit OFF. Press and hold the “0” button.
2. Press power ON button.
a. The FM arrow icon (only) is displayed when FM Radio “disable” has
been selected. When the FM Radio mode has been disabled, the FM
icon is no longer visible during normal operation.
b. The FM icon and the FM arrow icon are displayed when FM Radio
“enable” has been selected.
Only the FM arrow icon is displayed when FM Radio “disable”
has been selected.
Set as an FM RADIO RECEIVER (only)
(TV Controller Disabled )
1. Start with unit OFF. Press and hold the “5” button.
2. Press power ON button.
a. The FM - TV icons are displayed to indicate the TV controller function
is disabled and unit is now an FM receiver only.
b. The TV icon only is displayed when the TV controller and the FM
radio option both have been enabled.
TV key = FM Radio PRESETS (20 Possible Presets Total)
FM key = FM Radio (Scan or Direct access)
Programming Stations into FM memory (FM Receiver mode only.)
1. Press “TV” button to select FM PRESET Mode.
2. Press “Last & Mute/CC” buttons simultaneously for 3-4 seconds until radio
frequency begins flashing.
3. To find the desired radio station press the Channel Up/Down buttons.
4. To store the selected radio station to a specific number, press the desired
numeric key for 2 seconds. Upon release, the preset number will illuminate
for 2 seconds before returning to the flashing frequency mode.
5. Select the next desired station and repeat the previous steps for up to 20
preset stations.
6. Press the “EQ” button to exit the program mode.
Erase FM Radio Station Presets
The FM Radio Presets may be erased by holding down the FM button down for three
seconds at power up. The FM and TV icons will both be displayed, indicating that the
erasure has taken place however Channel 1 will always retain 1 frequency.
8
Attaching the Controller
USE only MYE Entertainment cables with all MYE Entertainment receiver controllers. MYE Entertainment will not
be responsible for damage to controllers or cardio equipment when alternate cables or power adapters are used.
Wrap the Secure Grip Band around the intended
mounting pole and cut to fit. Do not overlap ends or
have a gap over 1/8”. Secure the Grip Band with 1
nylon tie in the center channel. OFFSET the knuckle of
the nylon tie from center by approximately 1/4”. Trim
Install the Mounting Base over the nylon tie
knuckle. Insert two nylon ties into the holes
opposite the tie knuckle hole.
the excess nylon tie completely.
Seat the nylon ties into the corresponding
channels of the Secure Grip Band.
Pull the nylon ties tight to align all 3 tie knuckles.
Trim all excess nylon tie completely.
9
Attaching the Controller – cont.
Position and install the Rear Flange onto the
Mounting Base. Interlocking gears assure secure
positioning regardless of the rotation.
Insert one end of the controller cable into the
RJ45 jack on the back of the receiver assembly.
Insert the other end of the controller cable in the
MYE TV RJ45 port. See TV manual for additional
information.
A
B
C
Route the cable through the appropriate rubber
cable blocks A, B or C depending on where you
need the cable to exit the receiver flange.
Align and attach the controller assembly to the
Rear Flange using the Front Flange mounting
screws.
USE only MYE Entertainment cables with all MYE Entertainment receiver controllers. MYE Entertainment will not
be responsible for damage to controllers or cardio equipment when alternate or other cables are used.
10
IntelliJack - Self Diagnostic Headphone Jack
The IntelliJack self diagnostic headphone circuit detects when the headphone
jack has failed or been damaged. When a faulty headphone jack is detected, a
flashing “headphone” icon appears in the LCD display. It will remain on until a
new jack is installed and the icon reset.
To Replace the Intellijack:
1. Loosen the two screws evenly on the bottom of the IntelliJack module and
remove.
2. Carefully insert new IntelliJack module without bending contact pins.
3. Reset the Icon. Turn MYE Controller OFF then press and hold the “Power”
button for 3-4 seconds. When the icon appears again release the Power
button.
IMPORTANT NOTICE: Defective user headphones may also trigger the faulty
headphone jack icon. It is important to audibly test the headphone jack prior to
replacement. If the problem was triggered by faulty headphones the icon may be
reset by plugging in known good headphones for at least 10 seconds or following
step #3 above.
11
WARRANTY
PLEASE READ THESE WARRANTY TERMS AND CONDITIONS CAREFULLY BEFORE USING YOUR MYE
ENTERTAINMENT PRODUCT. BY USING THE EQUIPMENT, YOU ARE CONSENTING TO BE BOUND BY THE
FOLLOWING WARRANTY TERMS AND CONDITIONS.
LIMITED WARRANTY
MYE ENTERTAINMENT (MYE) WARRANTS ALL NEW MYE PRODUCTS TO BE FREE FROM DEFECTS IN MATERIALS
AND MANUFACTURERS FOR THE WARRANTY PERIODS SET FORTH BELOW. THE WARRANTY PERIODS
COMMENCE ON THE INVOICE DATE OF THE ORIGINAL PURCHASE. THIS WARRANTY APPLIES ONLY AGAINST
DEFECTS DISCOVERED WITHIN THE WARRANTY PERIOD AND EXTENDS ONLY TO THE ORIGINAL PURCHASER OF
THE PRODUCT. PARTS REPAIRED OR REPLACED UNDER THE TERMS OF THIS WARRANTY WILL BE
WARRANTED FOR THE REMAINDER OF THE ORIGINAL WARRANTY PERIOD ONLY. TO CLAIM UNDER THIS
WARRANTY, THE BUYER MUST NOTIFY MYE OR YOUR AUTHORIZED MYE ENTERTAINMENT DEALER WITHIN
30 DAYS AFTER THE DATE OF DISCOVERY OF ANY NONCONFORMITY AND MAKE THE AFFECTED PRODUCT
AVAILABLE FOR INSPECTION BY MYE ENTERTAINMENT OR ITS SERVICE REPRESENTATIVE. MYE
ENTERTAINMENT PRODUCTS DEEMED DEFECTIVE BY A MYE ENTERTAINMENT REPRESENTATIVE WILL BE
ISSUED A RETURN AUTHORIZATION NUMBER. MYE ENTERTAINMENT WILL NOT ACCEPT RETURNS WITHOUT
A RETURN AUTHORIZATION NUMBER. MYE ENTERTAINMENT RESERVES THE RIGHT, AT THEIR OPTION, TO
REPAIR OR REPLACE THE PRODUCT AFTER VERIFICATION OF DEFECT. PRODUCT THAT FAILS AFTER THE
WARRANTY PERIOD EXPIRES WILL BE REPAIRED OR REPLACED AT THE CURRENT PART AND LABOR
PRICING AFTER AUTHORIZATION FROM THE CUSTOMER. REPAIRS ARE WARRANTED FOR 90 DAYS. MYE
ENTERTAINMENT’S OBLIGATIONS UNDER THIS WARRANTY ARE LIMITED AS SET FORTH BELOW:
WARRANTY PERIODS AND COVERAGE:
MTVC2-FM CONTROLLERS
2 YEAR PARTS, LABOR
CONDITIONS AND RESTRICTIONS:
THIS WARRANTY IS VALID ONLY IN ACCORDANCE WITH THE FOLLOWING CONDITIONS:
THE WARRANTY APPLIES TO THE MYE ENTERTAINMENT PRODUCT ONLY 1) WHILE IT REMAINS IN THE
POSSESSION OF THE ORIGINAL PURCHASER AND PROOF OF PURCHASE IS DEMONSTRATED. 2) IT HAS NOT
BEEN SUBJECT TO ACCIDENT, MISUSE, ABUSE, IMPROPER SERVICE, MECHANICAL OR ELECTRICAL NON-MYE
ENTERTAINMENT AUTHORIZED MODIFICATION. 3) CLAIMS MADE WITHIN THE WARRANTY PERIOD.
THIS WARRANTY DOES NOT COVER DAMAGED OR FAILURE CAUSED BY ELECTRICAL WIRING NOT BEING IN
COMPLIANCE WITH ELECTRICAL CODES OR MYE’S OWNER MANUAL SPECIFICATIONS, OR FAILURES TO
PROVIDE REASONABLE AND NECESSARY MAINTENANCE AS OUTLINED IN THE OWNER’S MANUAL.
WARRANTIES OUTSIDE THE UNITED STATES AND CANADA MAY VARY. PLEASE CONTACT YOUR LOCAL
DEALER FOR DETAILS.
LIMITED WARRANTY SHALL NOT APPLY TO:
1)
SOFTWARE UPGRADES.
2)
NORMAL WEAR AND TEAR, CONSUMABLES AND COSMETIC ITEMS INCLUDING BUT NOT LIMITED TO
LABELS.
3)
REPAIRS REFORMED ON MYE PRODUCTS MISSING A SERIAL NUMBER OR WITH A SERIAL TAG THAT
HAS BEEN ALTERED, REATTACHED OR DEFACED.
4)
SERVICE CALLS TO CORRECT INSTALLATION OF THE PRODUCT OR INSTRUCT OWNERS ON HOW TO
USE THE PRODUCT.
5)
PICK UP AND DELIVERY INVOLVING REPAIRS
6)
ANY LABOR COSTS INCURRED BEYOND THE APPLICABLE LABOR WARRANTY PERIOD
7)
THE USER IS CAUTIONED THAT CHANGES OR MODIFICATIONS NOT EXPRESSLY APPROVED BY THE
MANUFACTURER OF THE PRODUCT COULD VOID THE USER’S AUTHORITY TO OPERATE THE PRODUCT.
12
WARRANTY – cont.
THE WARRANTIES PROVIDED HEREIN ARE THE EXCLUSIVE WARRANTIES GIVEN BY MYE ENTERTAINMENT AND
SUPERSEDE ANY PRIOR, CONTRARY OR ADDITIONAL REPRESENTATIONS, WHETHER ORAL OR WRITTEN. ANY
IMPLIED WARRANTIES, INCLUDING THE WARRANTY OF MERCHANTABILITY OR FITNESS FOR A PARTICULAR
PURPOSE THAT APPLY TO ANY PARTS DESCRIBED ABOVE ARE LIMITED IN DURATION TO THE PERIODS OF
EXPRESS WARRANTIES GIVEN ABOVE FOR THOSE SAME PARTS. MYE HEREBY DISCLAIMS AND EXCLUDES
THOSE WARRANTIES THEREAFTER. SOME STATES DO NOT ALLOW LIMITATIONS ON HOW LONG AN IMPLIED
WARRANTY LASTS, SO THE ABOVE LIMITATION MAY NOT APPLY TO YOU. MYE ENTERTAINMENT ALSO HEREBY
DISCLAIMS AND EXCLUDES ALL OTHER OBLIGATIONS OR LIABILITIES, EXPRESS OR IMPLIED, ARISING BY LAW
OR OTHERWISE, WITH RESPECT TO ANY NONCONFORMANCE OR DEFECT IN ANY PRODUCT, INCLUDING BUT
NOT LIMITED TO: (A) ANY OBLIGATION, LIABILITY, RIGHT, CLAIM OR REMEDY IN TORT, WHETHER OR NOT
ARISING FROM THE NEGLIGENCE OF MYE OR ITS SUPPLIERS (WHETHER ACTIVE, PASSIVE OR IMPUTED); AND
(B) ANY OBLIGATION, LIABILITY, RIGHT, CLAIM OR REMEDY FOR LOSS OF OR DAMAGE TO ANY PRODUCT. THIS
DISCLAIMER AND RELEASE SHALL APPLY EVEN IF THE EXPRESSED WARRANTY SET FORTH ABOVE FAILS OF
ITS ESSENTIAL PURPOSE.
FOR ANY PRODUCT DESCRIBED ABOVE THAT FAILS TO CONFORM TO ITS WARRANTY, MYE ENTERTAINMENT WILL
PROVIDE, AT THEIR OPTION ONE OF THE FOLLOWING: 1) REPAIR, 2) REPLACEMENT OR 3) REFUND OF THE
PURCHASE PRICE.
MYE AND/OR ITS SUPPLIERS SHALL HAVE NO OBLIGATION OR LIABILITY, WHETHER ARISING IN CONTRACT
(INCLUDING WARRANTY), TORT (INCLUDING ACTIVE, PASSIVE, OR IMPUTED NEGLIGENCE AND STRICT
LIABILITY), OR OTHERWISE, FOR DAMAGE TO THE PRODUCT, PROPERTY DAMAGE, LOSS OF USE, REVENUE OR
PROFIT, COST OF CAPITAL, COST OF SUBSTITUTE PRODUCT, ADDITIONAL COSTS INCURRED BY BUYER (BY
WAY OF CORRECTION OR OTHERWISE) OR ANY OTHER INCIDENTAL, SPECIAL, INDIRECT, OR CONSEQUENTIAL
DAMAGES, WHETHER RESULTING FROM NON-DELIVERY OR FROM THE USE, MISUSE OR INABILITY TO USE THE
PRODUCT. THIS EXCLUSION APPLIES EVEN IF THE ABOVE WARRANTY FAILS OF ITS ESSENTIAL PURPOSES
AND REGARDLESS OF WHETHER SUCH DAMAGES ARE SOUGHT FOR BREACH OF WARRANTY, BREACH OF
CONTRACT, NEGLIGENCE OR STRICT LIABILITY IN TORT OR UNDER ANY OTHER LEGAL THEORY.
SOME STATES DO NOT ALLOW THE EXCLUSION OR LIMITATION OF INCIDENTAL OR CONSEQUENTIAL DAMAGES SO
THE ABOVE LIMITATION MAY NOT APPLY TO YOU.
THIS WARRANTY GIVES SPECIFIC LEGAL RIGHTS. YOU MAY ALSO HAVE OTHER RIGHTS WHICH VARY FROM STATE
TO STATE.
MYE Entertainment, Inc
25129 The Old Road
Suite 305
Stevenson Ranch, Ca. 91381
1-661-964-0217
www.myeclubtv.com
072311
© MYE Entertainment LLC All Rights Reserved 2011
13