1
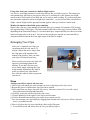
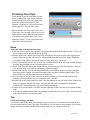
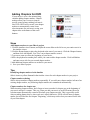
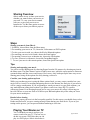
iMovie HD Tutorial
When you make a movie, you create a
memory that will last forever. With
iMovie, you simply arrange your video
clips, still images, and music in the order
that best tells your story.
iMovie makes it easy to share your movies
with your friends and family. Screen it on
your TV, phone, iPod, or post it on the
Internet.
Moving Video to Your Mac
After you capture great footage with your
FireWire camcorder, you’re ready to make a
movie. First you’ll need to connect your
camcorder to your Mac, and then copy
footage from the camcorder into iMovie, a
process known as importing.
iMovie makes importing easy. When you
import video into an iMovie project, it
automatically divides your video into
individual clips, making it easy to edit.
Steps
Import your camcorder video into a new project
1. Use a FireWire cable to connect your camcorder to the FireWire port on your Mac, then switch
your camcorder to VCR, VTR, or Play mode.
2. Open iMovie and create a new project by clicking the Create a New Project button or by going to
the File menu and then choosing New.
3. Type a name for your project and choose a location. By default, iMovie chooses the Movies folder
on your hard disk.
4. Click the disclosure triangle to select a video format. You’ll probably want to use DV, unless
you’re using an HDV camera, an iSight, or you shot your video in widescreen format. Click
Create.
5. iMovie will open your new project in camera mode and display the message Camera Connected.
6. Use the playback controls in iMovie to rewind to where you want to start importing your video.
7. Click the Import button. Watch as the clips appear in the iMovie Clips pane. iMovie will create a
new clip whenever you stopped the camcorder while recording. This helps you easily identify
scene breaks.
8. When you’re finished importing, click the Import button again to stop the import process.
9. To review your imported video, select a video clip in the Clips pane and click the Play button.
10. Save your project by choosing Save Project from the File menu.
Tips
iMovie automatically detects your camcorder
iMovie will automatically detect when you have a FireWire camcorder connected. If you see the
message No Camera Attached, make sure your camera is turned on and properly plugged in to your
computer via a FireWire cable and that your camcorder is set to VCR, VTR, or Play mode. You can
also click the Connection Help button for more suggestions.
iMovie supports different video formats
When you create your project, choose the appropriate video format depending on your needs. For
importing video from your camcorder, choose between DV, DV Widescreen, HDV 1080i, and HDV
720i. For recording from your iSight, select iSight. If you will be copying MPEG-4 files from your
PDA or phone, select MPEG-4.
Import directly to the iMovie timeline
You can import footage directly from your camcorder to the iMovie timeline rather than to the Clips
pane. This is a quick and easy way to get your footage into your iMovie project. You can then edit
right in the timeline. From the iMovie menu, choose Preferences, click Import, and then choose the
option Place clips in Movie Timeline.
If you’re importing video that is already edited
Instead of importing your video as separate clips, you can set iMovie to import your video as a
single clip. This may be useful if you’re importing a movie that you’ve already edited and you just
want to change a small portion. From the iMovie menu, choose Preferences, click Import, and then
deselect the "Start a new clip at each scene break" option. If you prefer, select "Limit scene length
to" and set a limit for the number of minutes. This will ensure your imported files don’t get too large,
in case you’ll be copying clips between iMovie projects.
What you need to make a high-definition video with iMovie
High definition video is quickly becoming the format you see broadcast on TV. An HD camcorder
stores more pixels than a standard camcorder, letting you see more detail in your video footage.
iMovie supports importing and editing video from HD camcorders (HDV 720p and 1080i), so you
can make movies just like the pros—and it’s a great way to archive your most precious life events in
the highest resolution possible
Using video from an MPEG-4 camera
Many digital still cameras, PDAs, and mobile phones let you record short videos in the MPEG-4
format, a standard compression that is used to significantly reduce the file size of video. While
iMovie doesn't know how to import video from these devices directly, as it does with FireWire
devices, you can still use the MPEG-4 files once you've copied them to your Mac. Just drag them
into the iMovie Clips pane using the Finder or import them using Import from the File menu.
2
Apple Tutorial
Using video from your connected or built-in iSight camera
You can use your iSight camera to record video directly into your iMovie project. This means you
can spontaneously add clips to your project while you’re working on it. Just connect your iSight
camera to the FireWire port of your Mac and you’re ready to start recording. If you have more then
one camcorder connected, such as an iSight and a camcorder,—or you have an iMac with a built-in
iSight—choose iSight from the pop-up menu that appears when you switch to camera mode.
Monitor the amount of hard disk space remaining
Digital video clips use a large amount of hard disk space. For example, five minutes of DV footage
uses approximately 1GB of space. The same amount of HD video can occupy between 2GB to 4GB,
depending on the format and footage. To save hard disk space, import and edit your video in sections
instead of trying to do so all at once. You can see how much space remains on your hard disk by
using the monitor located in the lower-right corner of the iMovie window.
Arranging Your Clips
After you’ve imported your clips, you
can arrange them for your movie. To
include a clip in the movie, drag it from
the Clips pane to the timeline at the
bottom of the window. How you order
your clips will help tell your story.
When you play your movie, the clips will
appear as you arranged them in the
timeline. If you don’t like how your
movie looks, simply rearrange the clips
in the timeline. Remember, the order in
which you filmed your video doesn’t
have to be the order in which you present
your movie.
Steps
Arrange your iMovie clips to tell your story
1. Select a clip with which you want to begin your movie, and drag it to the clip viewer.
2. Repeat this process with the other clips you want to include.
3. Notice that when you drag a clip to the clip viewer, it becomes selected. You can tell a clip is
selected because its background turns blue.
4. Click Play to play the selected clip in the clip viewer.
5. Click the blank area to the right of your clips to deselect them.
6. Click the Rewind button and play your entire movie sequence so far.
7. You can rearrange your clips simply by dragging them around in the clip viewer. Select a clip and
move it to another location.
8. Select a clip from the clip viewer and drag it back to the Clips pane.
9. Go to the File menu and choose Save to save your iMovie project.
3
Apple Tutorial
Tips
Decide the story your movie will tell
When creating your movie, think about the story you want your movie to tell. Is it meant to
entertain, inform, or persuade your audience? As you decide which clips to include and where to
include them, always ask yourself, will this help tell my story best.
Carefully consider how you arrange your clips
When creating your movie, think about how you want to arrange your clips. Consider mixing wide
shots with close-ups; adding a shot that sets the location (known as an establishing shot) before
showing close-ups; and including similar shots at the beginning and end of your movie, which
provides a sense of closure. Be creative and have fun—your audience will appreciate it.
Easily move clips around
There are a few different ways you can move clips around in iMovie. You can drag imported clips
from the Clips pane to the timeline or drag and rearrange clips within the timeline itself. You can
even open multiple iMovie projects and copy clips between them, too. To select and move multiple
clips, hold down the Command key while selecting individual clips, or hold down the Shift key to
select a range of clips.
Split a clip into multiple clips
If you have a really long clip with no scene break, and you want to break it into several sections, it’s
easy to create multiple clips. Just move the playhead to where you want to split the clip, and then
choose Split Video Clip at Playhead from the Edit menu.
Delete clips you don’t want to use
After you decide which clips you want to use in your iMovie project, you might want to delete any
unused clips. This helps keep your project organized and reclaim hard disk space. To delete unused
clips drag them to the iMovie trash, or select the clips and press the Delete key. The clips stay in the
iMovie trash, and can be retrieved, until you empty the trash. To retrieve a clip from the iMovie
trash, simply open the trash and drag the clip back to your project.
See when a clip was recorded
You can see when a clip was recorded to help if you’re arranging clips chronologically. Double-click
a clip to open the Clip Info window. Besides the size and duration of your clip, you’ll see the date it
was captured.
Compare the lengths of your movie’s clips
To view a clip’s length relative to the length of other clips in the movie, click the Timeline Viewer
button in the iMovie window. The clips appear as long narrow boxes along with the tracks for any
music you’ve added. You can use the Zoom slider in this view to see more or less of your clips in the
window.
4
Apple Tutorial
Trimming Your Clips
Good editing is part of what makes a great
movie. Editing long clips to their essential
elements helps keep your story going, and
makes the movie interesting for your
audience. With iMovie, you can easily edit
out the parts of a clip you don’t want.
iMovie includes two easy ways to edit your
video clips. You can split a clip in two or roll
up the end of a clip to hide the part you don’t
want shown. Best of all, iMovie is a "nondestructive editor," so you can go back and
undo your edits if necessary.
Steps
Trim your clips to include the best parts
1. In the clip viewer, select a clip and play it to approximately halfway through the clip. Use the red
line to monitor where the playhead is in the clip.
2. From the Edit menu, choose Split Video Clip at Playhead. This will cut your video clip into two
pieces. Notice the second clip has a new video thumbnail to display its first frame. This helps
you identify what video is associated with your clips after they’ve been cut.
3. Use the Left and Right Arrow keys to move back and forth between the two clips. Follow along by
watching the playhead as it moves between the two clips.
4. Choose Undo from the Edit menu to undo this cut and join the two clips back together. Leave the
clip selected. Now we’ll apply an edit using a different method.
5. Switch to the timeline view by clicking the timeline viewer button. Notice your clips expand to
show their relative length. Also notice the ends of the clips have slightly rounded edges. This
indicates they are full clips and haven’t been edited yet.
6. Move the arrow to the end of the selected clip until it changes to a vertical line with an arrow
pointing left. This indicates you are positioned to do a roll edit.
7. Drag the end of the clip towards the center. The clip shortens as you roll up the video. Release the
mouse to complete the roll edit. Notice the clip edge now shows a straight line instead of a
rounded edge. This indicates the clip was rolled up underneath.
8. To show how you can adjust a roll edit, drag the right edge of the clip back to its original starting
point.
9. Now that you understand the basics of applying cuts and roll edits to your video, practice editing
your video to include only the best parts.
Tips
Easily undo changes you made
You want to work fluidly with your footage to create a great movie. Sometimes you might make a
few edits and decide you don’t like them. With iMovie you can undo as many changes as you want.
Simply choose Undo from the Edit menu as many times as you want between saves.
5
Apple Tutorial
Trimmed portions of clips are never deleted
When you use direct trimming, the unused portion of your clip is simply rolled up underneath your
clip. You can always unroll the footage back out if you change your mind about which footage you
want to use. You can also choose Revert Clip to Original from the Advanced menu.
Cropping and deleting portions of a clip
Besides direct trimming, you can select precisely which parts of your clips you want to show in your
movie by using Crop or Clear. Select a portion of a clip in the clip viewer by dragging the crop
markers below the scrubber bar to indicate where you want your clip to begin and end. Next, go to
the Edit menu and choose Crop or Clear to remove a section. You can use the arrow keys on your
keyboard to move frame by frame through your footage, or hold down the Shift key while pressing
the arrow key to move ten frames at a time.
Change two clips at once
You can use direct trimming to edit the ending point of one clip and the beginning point of the next
clip. Hold down the Command key as you drag from the center of one clip toward the next clip,
effectively trimming the adjacent clip.
View waveforms when you use direct trimming with audio
When you want to be precise with your audio editing in the timeline, go to the View menu and
choose Show Audio Waveforms. Select an audio clip and use the Up and Down Arrow keys to
enlarge or shrink the view of the waveforms. This way, when you edit in the timeline you can see
exactly where your sound starts and stops, and even see where the beats occur.
Ripple your clips down the timeline
In the timeline view, position your pointer in the center of a clip, and then click and drag your mouse
to the right. All of the clips in the timeline, beginning with the clip you selected, move to the right,
leaving a gap in the timeline. You can fill this gap with another clip, a photo, or even a title.
Add color clips in your movie
With iMovie, you can create clips in the timeline that don’t contain video footage, but fill the frame
with black or another color. This can help you create interesting transitions and give you dramatic
backgrounds for titles. In the timeline, simply drag a clip from the center to the right to insert space
before your clip. Switch to Clip view and notice a black clip appears before your selected clip. To
change the color, just double-click the clip. In the window that appears, you can set the clip’s color
and duration.
6
Apple Tutorial
Playing Your New Movie
iMovie includes many options for playing
your movie, from playing one or more clips
to playing the entire movie. You can jump
to any location in your movie or scrub
through the movie at your own speed. You
can also play your movie in full-screen
mode to see how it will appear outside the
iMovie editor.
Steps
Play your iMovie project
1. Click the Rewind button to go to the start of your movie. To make sure all clips are deselected
click the blank area to the right of your clips.
2. Press the Space bar a few times to start and stop playing your movie. You can also click the Play
and Stop buttons, but you may find that the Space bar is more convenient while you are editing.
3. As you play your movie, follow along by watching the playhead in the iMovie scrubber bar. You
can also follow the playhead in either the clip viewer or timeline viewer.
4. In the timeline viewer, drag the playhead in the scrubber bar back and forth. Try dragging the
timeline playhead back and forth too. In both cases, you can scrub through your movie to quickly
get a feel for how it plays.
5. Click anywhere in the scrubber bar to jump to a new point. Click the Return button when you are
finished to move to the start of your movie.
6. To watch your movie in full-screen mode, click the Full Screen button. To exit full-screen mode,
click the mouse.
7. Practice navigating around your movie in both the clip viewer and timeline viewer, as well as the
scrubber bar. When you are finished, save your movie.
Tips
Using the keyboard
You can use the Left and Right Arrow keys to move a single frame at a time or hold the arrow keys
down to play forwards and backwards. Hold the Shift key while pressing the arrow keys to move ten
frames at a time. Press the Home key to move to the start of your movie.
Anticipate upcoming edit points
As you preview your movie, get in the habit of watching the playhead to tell where you are in the
timeline. This will help you anticipate upcoming edits, such as a the start of a new clip or a
transition. You’ll find you use this technique a lot when deciding where to place an edit or polishing
off the final version of your movie.
7
Apple Tutorial
Adding Polish with
iMovie Themes
iMovie includes Apple-designed
iMovie theme elements that you can
use to add consistent looking scenes
throughout your movie. This is a great
way to add an interesting opening to
your movie, introduce a new chapter,
segue from one clip to another, or show
closing credits along with a closing
video.
Best of all, you can customize the
theme elements to incorporate your
own video or photos.
Steps
Add scenes to your project using iMovie themes
1. To view the different themes available in iMovie, click Themes. Use the pop-up menu at the top of
the Themes pane to get a feel for what each theme looks like. Select the Reflection - White
theme.
2. Use the scroll bar to see the various theme elements included with this theme.
3. Select the Open theme element and watch the preview. This is a great choice for the opening of a
movie, as it allows us to incorporate a title and video in an opening sequence.
4. In the Title 1 field, type a movie title. As the preview plays, you’ll see your title used at the end of
the preview.
5. Make sure the Drop Zone Editor is visible. If it is hidden, click the Show Drop Zones button.
6. Drag video clips from your timeline into the drop zones labeled 1, 2, and 3. Notice the preview
changes to include your new video in the theme and a reflection of your video appears
underneath the theme drop zones. This is an example of the advanced compositing available with
iMovie themes.
7. Replace the video in drop zone 2 with a photo from your iPhoto Library. To do so, click Media,
and then click Photos. Drag a photo from your iPhoto Library to drop zone 2. Watch as the
preview updates to show your photo added to the theme.
8. Click Apply to create a new video clip that uses your title, video, and photo. You’ll see a new clip
added to the end of your movie. After iMovie finishes creating, or rendering, the clip, drag it to
the start of your movie to be your new opening sequence.
9. Select the Lower Third theme element. The preview updates the theme element with the video
from drop zone 1. This would be a great choice in the middle of your movie to give viewers
additional information, such as who a person is the first time they appear in your movie. Enter
the name of the person you want to introduce in the title field and click Apply to create this
sequence. Move it to the middle of your movie when it is finished rendering.
Congratulations! You’ve successfully applied your video, photos, and a title to two different theme
elements. Continue experimenting with different theme elements to see how they can best be
incorporated in your movies.
8
Apple Tutorial
Tips
Different theme elements to choose from
iMovie includes five theme styles: Travel, Road Trip, Pass Through, Reflection - White, and
Reflection - Black. Each theme style includes various theme elements, such as Open, Chapter,
Bumper, Lower Third, and Credits. Theme elements have associated places to be used throughout a
movie, although ultimately where you decide to use a theme element is up to your personal style.
Where to use the Open theme element
The Open theme element is great for the opening of your movie. It includes a place to display your
movie title, along with a drop zone for one or more scenes from your movie.
Where to use the Chapter theme element
The Chapter theme element is great for the beginning of a new chapter or new section of your video.
It includes a place to display your chapter title.
Where to use the Bumper theme element
The Bumper theme element is typically used to segue between two sections of your movie or a
movie scene and a break. Bumper elements typically include multiple drop zones and may or may
not include a place for a title. Bumpers are typically seen on a news or documentary show before or
after going to commercial, as a way to keep viewers interested in what’s coming up after the break.
Where to use the Lower Thirds theme element
The Lower Thirds theme element is used to display to a title or graphic that appears over a single
video clip, using the lower third of the screen. It is often used in documentaries or news segments to
introduce text to a given video clip, such as the name of a person or location just introduced. Many
times lower thirds includes motion and text to add pizzazz when introducing viewers to something
new.
Where to use the Credits theme element
The Credits theme element is used at the end of a movie, to display credits or a list of names
associated with the movie just shown.
Coordinate iMovie themes and iDVD themes
All five iMovie themes have corresponding themes in iDVD. You may decide to coordinate your
projects by using the same themes in your movies as on your DVD menus. You’ll even find some
iPhoto themes and books have similar theme styles.
Creating custom movies for your drop zones
Instead of dropping your existing photos or movie clips into a theme drop zone, you may decide to
create a custom movie clip to be used in a drop zone. This way, you have more control over exactly
what gets played from a drop zone. Keep in mind that drop zones in movie themes are usually only
displayed for a few seconds.
9
Apple Tutorial
Adding Photos
Whether you’re on vacation or in the
backyard at home, sometimes you’ll want
to capture events with your camcorder, and
other times you’ll want to take pictures
with your digital camera. And sometimes
you’ll want to do both. Wouldn’t it be great
if you could combine your best video and
your favorite digital pictures? With iMovie,
you can.
Steps
Add photos to your iMovie project
1. In iMovie, click the Media button to open the iLife Media Browser. Choose Photos to see your
iPhoto Library and click Show Photo Settings to see the Photo Settings window. The Photo
Settings window allows you to set the Ken Burns Effect. For now, disable the Ken Burns effect
using the checkbox in the Photo Settings window.
2. Use the arrows to scroll through all the pictures in your library.
3. Drag a photo from your iPhoto Library to the clip viewer. Notice the photo will be imported into
your iMovie project and placed on the timeline. Look at the top of the new clip in the timeline to
see the duration associated with your photo.
4. Double-click on the photo in the timeline to see information about it. Give your photo a new name
and change the duration to 4 seconds. Click Set to see the changes take effect in the timeline.
5. Select another photo in your iPhoto Library. From the Photo Settings window, turn the Ken Burns
effect on to apply motion to the next photo you’ll import. To make setting the motion easier,
click the icon with two arrows to deselect the loop option in the Preview window.
6. In the Photo Settings window, click in the Start area. Move the Zoom slider to the left until it reads
1.00. Next, click the End area and set the Zoom slider to the middle. Use the bottom slider to
adjust the time associated with your image. Click the loop arrows to see a preview of the motion
that will be applied to your photo.
7. Click Apply to have your photo imported to the timeline with the Ken Burns effect applied.
8.Select your photo in the timeline and change the duration and direction using the Photo Settings
window. Click Apply to update your photo.
9. Click the Rewind button, then press the Space bar to see the new photos play in your movie.
10
Apple Tutorial
Tips
Organize your pictures ahead of time
If you plan to include lots of digital pictures in your movie, you may want to organize them first. In
iPhoto, create a new album, and then add the pictures in the order in which you want them to appear
in your movie.
Make a still image from a video clip
You may have a poor-quality video clip that contains one great image. With iMovie, you can easily
turn any frame of a video clip into a still image to use in your movie. Simply move the playhead to
the image in the clip, and choose Create Still Frame from the Edit menu. Your new still clip appears
in the Clips pane. If you want to adjust its length, double-click the clip to open the Clip Info window
and enter a new length for your still image.
Change the length of a still image
The method for changing the length of an image in your movie depends if it is a still image or has
the Ken Burns effect applied. For a still image, double-click the clip to open the Clip Info window
and enter a new length for your still image. For an image with the Ken Burns effect applied, select
the image, then adjust the duration slider at the bottom of the Photo Settings pane, and click Apply.
Of course you can also edit any clip directly in the timeline by choosing the Split Video Clip at
Playhead from the Edit menu.
Drag photos directly from iPhoto into the iMovie clips pane
You can also search your iPhoto Library from within iPhoto to find just the right picture for your
movie. When you locate the picture you want, drag it from iPhoto to the iMovie Clips pane or the
timeline.
Importing video clips you took using your digital camera
Many digital cameras let you take short video clips. This can be useful if you’re at an event without
your camcorder. When you import your photos into iPhoto, these movies will also become part of
your Photo Library. You can then drag these movie clips to your iMovie project and edit them, just
like the footage you take with your camcorder.
Use the Ken Burns Effect in iMovie to crop your pictures to match your widescreen footage
Within iMovie, when your project is set as HDV or DV Widescreen, the Photos pane is pre-set for
16:9 aspect ratio, allowing you to crop a photo to the same aspect ratio of your video footage.
Use iPhoto to resize your digital pictures to match your HD video footage
If you’re editing your pictures in iPhoto, for use with an HDV or DV widescreen iMovie project, go
to Edit mode, and then choose 16 x 9 (HD) from the Constrain pop-up menu in the bottom toolbar.
This will constrain the crop tool to a 16:9 ratio—the same used in your video footage. This way, you
can take advantage of the great editing tools in iPhoto.
Scanning your old photographs
You’re not limited to using only digital photos in your movie. Consider scanning your old pictures
and including them. For example, you could scan your parents’ wedding pictures to use in a video
you make for their wedding anniversary.
11
Apple Tutorial
Adding a Soundtrack
One of the easiest ways to change an
ordinary movie into something special is to
add a music soundtrack. A good soundtrack
is often the difference between movies you
watch again and again, and those that
collect dust on the shelf.
With iMovie, you can easily add music to a
movie from your favorite CD, GarageBand
or your iTunes Library. You can also adjust
the length and volume of your music right
within iMovie. For added spice, iMovie
even includes special sound effects that can
add fun to your existing video clips.
Steps
Add a soundtrack to your iMovie project
1. Click the timeline viewer button. Notice the two additional audio tracks beneath the video track.
2. Move the playhead to where you want the music to begin in the timeline.
3. Click the Media button and then click the Audio button. Notice the source list showing you have
audio available from GarageBand and iTunes, as well as sound effects that come with iMovie.
4. Click the disclosure triangle to show your iTunes Library. Click your library to see your iTunes
music. Your songs will be displayed in the track list, right below the source list. You can resize
the track list if needed.
5. Select a song and click the audio Play button to listen to the song. Click the Place at Playhead
button to import the song into your movie. One the song is imported; you'll see it added to an
audio track in the timeline viewer. Click the Play button to listen to your movie with your new
soundtrack.
6. To adjust the volume of the track, use the clip volume controls underneath the audio tracks. Notice
the percentage update to reflect your new volume.
7. Adjust the length of the track by dragging the end of the song towards the middle. You may have
to scroll to reach the end of the song.
8. To place a soft fade at the new song ending, select Show Clip Volume Levels from the View
menu. Your song will now show a line indicating it has a constant audio level setting for the
entire song. To fade the end of the song, click the end of the clip level line and drag it to the
bottom of the clip. Notice only the end of the line changes, indicated by the yellow color. This
shows the volume is fading out at the new end of your song.
9. Move the playhead to a few seconds before the end of your song. Press the Space bar to review
how the song sounds with your new fade at the end.
12
Apple Tutorial
10 From the audio source list, close your iTunes Library and select Skywalker Sound Effects. From
the track list, scroll down until you see Outdoor Cheer. Select Outdoor Cheer and click the audio
Play button to hear how it sounds. This could be a fun ending to your song. Drag it from the
track list and place in alongside your song ending in the empty audio track. Play your movie
again to hear the new ending to your song.
Tips
Sample different songs with your video
It’s amazing how much impact a soundtrack will add to a movie or montage. Sample different songs
with your footage to see how different music can affect the mood of your iMovie project.
Preview your movie with or without music
When playing your movie, you can isolate which audio tracks you want to hear. Use the checkboxes
at the far right side of the timeline viewer to turn the three music tracks on and off. The top
checkbox controls the audio included with your video clip.
Find your iTunes music quickly and easily
If you have a large iTunes Library, you can access specific iTunes playlists from the Audio pane.
You can also select a playlist or your library and type the name of a song in the Search field. As you
type, you’ll see your list of music shorten to match what you’re typing.
Check the iTunes Music Store for ideas
Look in the iTunes Essentials section of the iTunes Music Store to find a nice variety of musical
styles and genres. If you know you want a song that contains certain words, try an Advanced Search
of the Music Store to see what new ideas for music you can come up with.
Drag songs directly from iTunes
Rather than accessing your music from the iLife Media Browser in iMovie, you can search your
music library right in iTunes to find just the song you’re looking for, and then drag it your movie
project’s timeline.
Lock audio to a clip
You can ensure a sound effect or any audio clip stays in sync with a point in your video by locking it
to the video clip. This is especially helpful in the early stages of editing your movie when you are
still moving many clips around. To lock an audio clip to a video clip, move the playhead to the point
in your audio clip you want to lock and choose Lock Audio Clip at Playhead from the Advanced
menu. You’ll see two yellow push-pins added to your clips to indicate they are "pinned" together.
Add sound effects
iMovie comes with Skywalker and standard sound effects that you can use to enhance your movie. If
you have sound effects that you created yourself or purchased from a sound library, you can easily
add them to your iMovie sound effects list. Place the sound effect file in the Sound Effects folder
located in the iMovie folder in the Library folder in your home folder. The next time you open
iMovie, you’ll see the file in the list of sound effects. Sound effect files are either AIFF or MP3
format.
13
Apple Tutorial
Use GarageBand to score your iMovie project
GarageBand 3 lets you score your iMovie project. To start, import your movie into a GarageBand
project. You’ll be able to play your movie inside GarageBand, while creating your new soundtrack.
Adding Narration
A narrator can set the context for your
scene. Narrators can describe a location,
introduce the people in the scene, and even
give your audience additional information
that you didn’t capture on video.
With iMovie, however, you don’t have to
narrate your movie as you’re filming it;
you can add narration later. This way, you
can position the narration exactly where
you want it, adjust volume levels without
affecting the main audio, and rerecord if
you make a mistake.
Steps
Add narration to your iMovie project
1. Make sure your Mac has a built-in microphone, an iSight camera, or an external microphone
connected.
2. In iMovie, click the timeline viewer button to display the audio tracks.
3. Move the timeline playhead to where you want your narration, or voiceover, to begin.
4. In the Audio pane, click the Record button and then speak clearly into the microphone. As you
speak, try to speak loudly enough so that the input meters appear green or yellow, but not so
loudly that the meters appear red.
5. Click the Record button again to stop recording. You’ll see your audio was added to the timeline
as you were recording.
6. Move the timeline playhead to the beginning of your recording and click Play to review your
narration.
7. To isolate your narration, use the audio checkboxes at the far right to deselect the audio from the
other tracks. After reviewing your isolated audio, enable audio for all three tracks.
8. Save your project.
14
Apple Tutorial
Tips
Write a script
To help you sound more like a pro, consider writing a script for your narration. You can practice this
before you actually record so your voice sounds more relaxed and natural.
Using your iSight as a microphone
You’ve used your attached iSight camera to chat with a buddy. Why not take advantage of the highquality microphone, and record your narration into iMovie with your iSight? Just plug it in to the
FireWire port on your Mac and you’re ready to record using your iSight in iMovie. Many Macs have
a built-in iSight and microphone as well.
Use an external USB microphone
You can get high-quality voice recordings with an external USB microphone and your Mac. These
microphones often come with headsets, so the microphone will be positioned very close to your
mouth and will pick up more of your voice and less room noise.
Use your camcorder to record audio
If you don't have an external microphone available, you can also record narration to videotape and
only use the audio portion. Import your video as usual and add it to the timeline. Highlight your
video clip and choose Extract Audio from the Advanced menu. Your audio will be extracted from
the video and placed on the track immediately below, locked to your video. To unlock audio,
highlight your audio clip and choose Unlock Audio Clip from the Advanced menu. Move the audio
to the narration point in your video and discard the unused video clip.
Take your laptop someplace quiet
Remember that the microphone you record with is going to pick up all the sound in the room. If
you’re using a laptop, consider moving to a quiet room, close the door behind you, and shut off any
other machines before you begin recording.
Don’t try to record your narration all at once
It’s easier to record your narration in small pieces. You’ll be able to position the pieces exactly
where you want them in your movie, and you’ll have to rerecord only a small portion if you make a
mistake.
Lock narration to a video clip
You can ensure a narration or any audio clip stays in sync with a point in your video by locking it to
the video clip. This is especially helpful when adding narration, since narration is often associated
with the specific video it plays with. To lock any audio clip to a video clip, move the playhead where
you want to lock the audio and choose Lock Audio Clip at Playhead from the Advanced menu.
You’ll see two yellow push-pins added to your clips to indicate they are "pinned" together.
Lower the volume or mute the video clips’ audio
When you add your own narration, you may want to lower the volume of your audio tracks or any
music you’ve added. This way, the audio won’t overwhelm your audience, and they will be able to
hear your narration better. Just select the clips or music track you want to change, and then use the
Clip volume slider to lower the volume. To only lower audio at a specific area in your video, use
Show Clip Volume Levels from the View menu and edit the audio right before and after your
narration plays.
15
Apple Tutorial
Adding Titles
You’ve created a great movie. Now it
needs an equally great title. iMovie comes
with many title styles, all of which you can
customize by changing the size, font, or
color of the title’s text. You can even set
your title to fly in from off-screen.
With iMovie, you can add titles to any part
of your movie. You can also add captions,
and even create scrolling credits for the end
of your movie. You have the option to set
titles over video, still pictures, or a solid
background.
Steps
Add titles to your iMovie project
1. Open the clip viewer and click the Return button. This will set the location for our title to be at the
beginning of the movie.
2. Click the Editing button, and then click the Titles button.
3. Select Centered Title from the list of available title styles. Notice the preview window shows the
title using sample text.
4. Enter your own title in the lines provided. Notice you can add additional lines by using the Add
(+) button.
5. Adjust the size of the text to fit better on screen. Adjust the speed or duration sliders to your
preference. Select Over black and click the Add button to create the new title. Notice your new
clip is added to the beginning of your movie. A small red line below the transition marker
updates as the title is being created, or rendered.
6. Select your new title clip and choose a different title style. Click the disclosure triangle for
Bouncing to reveal multiple choices. Select Bounce Across as the new style for your title.
7. Use the Wave, Speed, and Pause sliders to customize the title style. You can also select the
direction text will enter the screen using the arrow buttons to the left of the text fields.
8. Deselect "Over black" and click Update. This will change your previous title to now play over
your first video clip.
9. Select the Scrolling - Rolling Centered Credits title to create a closing credits clip for your movie.
Tips
Use titles creatively
Titles are useful for more than just the beginning and ending of your movie. You can use a title to
show the passage of time. Consider titles such as "Meanwhile, back at home" or "Two weeks later."
You can even use titles to list the names of the people in your movie, which you’ll find helpful when
you watch your movie years later.
16
Apple Tutorial
Adjust the speed of a title
With iMovie, you can adjust how fast titles appear and how long they stay onscreen by using the
Speed and Pause sliders in the Titles pane. Remember to leave your titles onscreen long enough for
your audience to read them.
Changing the placement of text on screen
You can also get creative with where you place text on screen by inserting spaces and line breaks in
the Music Video style. For example, in an interview, you might want to highlight key points as a list
on the top right side of the screen.
Use multiple titles in a single clip
You’re not limited to a single title in a video clip, but can use multiple titles on the same clip. For
example, you could combine a centered title with a subtitle.
Place videos and still images inside your title text
The Clip to Characters title feature lets you create titles with special effects where you can see
through your titles to display animated gradients, motion images, video clips and more. Try varying
the kind of footage you place behind your title. For example, use black and white footage, clips with
lots of effects, or even still images that move out of the frame to discover some really interesting title
effects.
Adding Transitions
How your movie transitions between clips
helps determine its flow. For example,
upbeat, fast-paced music videos tend to
have abrupt cuts between clips. By
contrast, videos for slow, dramatic songs
tend to use transitions that slowly fade one
clip into the next.
iMovie comes with many transitions that
you can easily add to your movie. You can
fade between clips, push one clip offscreen
as the next clip appears, and even add
transitions between video clips and still
images.
Steps
Add transitions between your video clips
1. Open the clip viewer and click the Return button. This will set the location for our first transition
to be at the beginning of the movie.
2. Click the Editing button and then click Transitions. You’ll see a list of all the transitions you can
choose from.
3. Select Fade In and watch the preview applied to your first clip. You can control the length of the
fade in using the speed slider.
17
Apple Tutorial
4. Drag the Fade-In transition to be the first clip in your movie. You’ll see the other clips shift to the
right as you drop the fade-in in place and you’ll see a new transition marker get added to your
movie. Notice the small red line below the transition marker. This line appears while the
transition is being created, or rendered.
5. After the transition marker renders, click the Rewind button and watch the new opening of your
movie.
6. Select the second video clip in your movie, and then select the Cross Dissolve transition. Notice
the preview window now shows a cross dissolve from your first video clip to the second.
7. Drag the Cross Dissolve transition to the location between your first and second video clips to
apply it.
8. After the new transition renders, click Rewind, and then click Play. Notice how the new cross
dissolve provides a smooth transition between your two clips.
Select the cross dissolve transition marker, and change the speed of the transition using the speed
slider. Click Update to apply the new speed to your existing transition.
Tips
Identifying the type of transition
The blue box listed to the left of each transition will tell you the type of transition it is. A single
triangle facing right indicates this transition is applied to the beginning of a clip, such as a fade-in. A
single triangle facing left indicates this transition is applied to the end of a clip, such as a wash out.
Two triangles indicates the transition is applied between two clips, such as a cross dissolve.
Adjust a transition’s speed and other settings
You can adjust the speed of most transitions. For example, you can apply a quick cross dissolve
between two clips or fade a clip in over several seconds. Use the Speed slider at the botton of the
Transitions pane to adjust the timing, and then click the Update button. With the Push transition, you
can adjust where the clip comes from.
Applying a transition to multiple clips at once
If you want to apply the same transition between multiple clips, select the clips in the timeline, then
apply the transition. This adds the transition to all of the selected clips. To select multiple clips, hold
down the Command key while selecting the individual clips or hold the Shift key to select a range of
clips.
Fade in and out to black
There may be times in your movie when you want to show that you’ve switched to a different
location or time of day. A technique commonly used to achieve this goal is to fade your video to, or
from, black. Use the Speed slider to adjust the length of the fade, and then drag the Fade In transition
to the left of (or the Fade Out transition to the right of) a clip in the clip viewer. Fades are also most
common at the beginning or end of a movie.
Use transitions to make your subject magically appear
You can use a dissolve transition between clips to have your subject appear as if by magic. For
example, with your camcorder on a tripod, capture video of someone in a room. Then stop recording
and have the person leave the room. Without moving your camcorder, capture more footage of the
empty room. You can edit these clips together in iMovie with a dissolve to have your subject appear
and disappear from the scene!
18
Apple Tutorial
While your transition renders
You can keep working in iMovie while you transitions are being created or updated. You just won’t
be able to play the full transition until it has completed rendering.
How two-clip transitions affect your movie length
Most two-clip transitions shorten the overall length of your movie because a transition between two
clips combines part of each clip. For example, if you add a two-second cross-dissolve, your movie
will be shortened by two seconds. Consider this when matching a movie’s length to a specific song,
or when aligning scenes to specific points in your soundtrack, since adding a transition could affect
the overall length of your movie. An exception is Overlap, because it uses a single frame from the
outgoing clip as it fades in the following clip. As such, the overall movie length is not affected.
When to use a transition
Just because you can insert a transition between clips, don’t feel you must. While transitions can be a
great way to add fun to a video, give it a soft montage-like feeling, or imply the passage of time or
change of location, most Hollywood movies use very few transitions. While the most common
transitions are cross-dissolves and fades, sometimes the best transition from one clip to another is a
straight cut.
Have your subject push the transition
If you film your subject appearing to push against a wall, you can use this footage in combination
with a Push effect so it appears that the subject is causing the video transition to occur in your
movie.
Using Video Effects
iMovie comes with effects you can use to
enhance your movie. For example, you can
change a clip to black and white, or give it a
sharp or soft focus. When you’re feeling
really creative, you can add effects such as
rain, fog, and even fairy dust!
Effects can be applied to both video clips and
still images. You can apply effects to one or
all of your clips, and even apply multiple
effects to the same clip.
Steps
Apply a video effect to a video clip
1. Click the Editing button and then click the Video FX button.
2. Select a video clip that doesn’t have a transition applied to it, then select the Fast/Slow/Reverse
effect.
3. Use the Speed slider to change the speed of your video clip. You’ll see a preview of your effect in
the Movie monitor.
19
Apple Tutorial
4. Click Apply to apply the effect to your video clip. Notice the small square icon added to the top of
your clip in the clip viewer. Once the effect has fully rendered, click Play to watch your modified
video clip.
5. With the same clip selected, apply a second effect to it. This time use the the Black and White
effect. The a number 2 in the clip icon indicates there are two effects applied to this video clip.
6. Choose Undo from the Edit menu. Notice the clip icon changes to reflect only a single effect is
applied to it.
7. Save your iMovie project.
Tips
Real-time video effects
Certain video effects will allow you to edit and preview them in real time, without waiting for
rendering. You can also make changes and see them instantly. They render in the background and
leverage your computer’s GPU to accelerate the process to save time for saving and exporting.
These effects are listed under the category Quartz Composer. Note that the ability to use These
effects in real time depends capabilities of your computer.
Apply an effect to part of a clip
There may be times when you want to apply an effect to only part of a clip. For example, in a movie
about your dog, you might want to use the earthquake effect only when your dog walks across the
floor. Use the crop markers, below the timeline in the Preview area, to select part of the clip. Then
select the effect you want to add, and click the Apply button. The effect will be added to the selected
portion of the clip.
Apply one effect to multiple clips
You can apply one effect to multiple clips, such as change a series of clips to black and white. To do
this, select the first clip in the series. Then hold down the Command key and select the other clips.
Click Apply to apply the same effect to all the selected clips.
Deleting a video effect
To delete a video effect applied to a clip, select the clip and press the Delete key. If you have
multiple effects applied to a clip, the last effect applied will be removed first.
Speed up a clip to add excitement
Speeding up a clip is a great way to add excitement or fun to your video. For example, speeding up
various dancing scenes could be a good way to show people having fun in a wedding video.
Speeding up a clip also helps when you wish to get an entire activity in your video, but do not wish
to take up the actual time alloted. For example, a congo line is a great candidate for being sped up.
Don’t overdo it with effects
Although effects can be a lot of fun, they can easily distract your audience from the subject of your
movie. When adding effects to your movie, think about the purpose of each effect and whether
applying it enhances or distracts from the story you’re trying to tell.
20
Apple Tutorial
Using Audio Effects
iMovie comes with audio effects you can
use to enhance the sound of your movie.
For example, you can adjust a song using a
graphics equalizer or give it an overall
tone. You can even change the pitch or
reduce unwanted noise, such as a camera
hum or wind noise.
Steps
Apply an audio effect to a video clip
1. Open the timeline viewer and select a video clip that includes people talking.
2. Click the Editing button and then click the Audio FX button.
3. Select the Pitch Change effect and adjust the slider. Click Preview to hear how your clip will
sound.
4. Click Apply. iMovie will split the audio from the video clip and place it on the audio track below.
A red bar will show while the audio effect is being applied.
5. When the effect is applied, play the clip to hear the new audio effect.
6. Switch to the clip viewer and rearrange where this clip is in your movie. Switch back to timeline
view to see how the audio moved with your video clip, despite being on a separate track. This is
because even though the audio was extracted from the video clip, they are still "pinned" to one
another. The yellow pushpins show this in timeline viewer.
Tips
Removing wind noise and camera hum
If you recorded outside on a windy day, or your camcorder records its own operating noise with the
built-in microphone, you might hear unwanted noise in your video. Use the Noise Reducer effect to
reduce any unwanted noise in your recording.
Obtaining clean audio
While iMovie 6 includes the Noise Reducer audio effect, the best way to end up with clean audio in
your movies is to record it clean to begin with. For important audio recordings, consider using an
external microphone closer to the subject, such as a lavaliere mic or a handheld mic. Also, always
monitor any important audio recording with headphones during the recording process. If you’ll be
recording in a noisy environment, such as a live music event where you’re surrounded by a noisy
audience, consider getting noise-reduction headphones, so you can still hear the audio coming from
the camera.
21
Apple Tutorial
Adding Chapters for iDVD
If your movie is over a few minutes long,
consider adding chapter markers. Chapter
markers allow your viewers to jump to
specific scenes when watching your movie
on a DVD. iDVD will even use your chapter
markers to automatically create scene
selection menus for your movie, using your
chapter titles as the names of the scene
buttons.
Steps
Add chapter markers to your iMovie project
1. Click the timeline viewer button, and adjust the zoom slider to the left to see your entire movie in
the timeline viewer.
2. Click the Return button to place the playhead at the start of your movie. Click the Chapters button,
and then click Add Marker. You’ll see a new chapter marker created.
3. Type a new name to reflect the beginning of your movie.
4. Move the playhead to another place where you want to add a chapter marker. Click Add Marker
and enter a new title for your second chapter marker.
5. Add additional chapter markers as needed to your movie.
6. Save your iMovie project.
Tips
Identifying chapter markers in the timeline
iMovie inserts a yellow diamond in the timeline viewer for each chapter marker in your project.
Chapter marker ordering
iMovie always numbers chapter markers sequentially. If you add a new chapter marker in front of an
existing chapter marker, any following chapter markers are renumbered automatically.
Chapter markers for chapter one
When inserting chapter markers, don’t forget to insert a marker for chapter one at the beginning of
your movie and give it a name. This way, when you add your movie to an iDVD menu, the scene
selection menu automatically created will include your chapter one title. This is especially useful
when recording theater shows, where each act is titled. Otherwise, iDVD will still insert a chapter
marker, but will label the first chapter "Beginning," which may not be what you wanted for the title
of your first chapter.
22
Apple Tutorial
Chapter markers within one second
If you attempt to create a chapter marker within one second of an existing chapter marker, iMovie
will display an error that there is already a chapter marker near this location. Also, iMovie always
assumes there is a chapter marker at the start of your movie, whether or not you have added one. As
such, you cannot add a chapter marker within the first second of your movie, unless it is at the first
frame of your movie.
Moving video clips after setting chapter markers
Chapter markers are associated with a time location in your movie, not a specific clip. If you
rearrange your movie clips after adding chapter markers, the chapter markers stay in their original
location. As such, it’s best to insert chapter markers as a last step, once the flow of your movie has
been finalized.
Chapter markers and iDVD
By creating chapter markers in iMovie, you guarantee your iDVD projects will have your correct
chapter names and starting points. While iDVD can add chapter markers after the fact, they are
based on elapsed time in your movie, not when specific scenes occur. (The default is every 5
minutes, but you can change this number.) Chapter markers based on elapsed time help viewers to
advance through your movie quickly, but are not scene-specific. Also, when you add chapter
markers using iDVD, they’re only applied to the individual iDVD project, not the original movie
file. For these reasons, it’s always best to add chapter markers to your movie when you’re making it,
to ensure you can have the correct starting point and name for each scene. Chapter markers can also
be used for your video podcasts.
Making a Video Podcast
If you're creating a series of movies, like
footage from each game in a soccer season or
places visited on a vacation, you can use a
video podcast to share your movie with team
members and friends—even the world.
Use iMovie to create your movie episodes,
and use iWeb to publish them as video
podcasts. You can even use .Mac for hosting
your video podcasts and publishing them in
the iTunes Podcast Directory so others can
easily find them.
23
Apple Tutorial
Steps
Create your first video podcast
1. Create a new iMovie project and import a few minutes of video. Move the video to the timeline.
2. Click Chapters and add a few chapter markers to your movie using the Add Marker button. Space
the markers out throughout your movie. Add chapter titles to the chapter markers.
3. Verify Podcast URLs are visible under the chapter titles of your chapter markers. If you are not
sure, select the Marker menu and verify a checkmark is next to the menu item Show Podcast
URLs. If the checkmark is not shown, choose the Show Podcast URLs from the Markers menu
item to enable it.
4. Select a chapter marker and click Link URL. Type in a URL associated with your movie content,
such as one with your personal website. This URL could even be a location in the iTunes Music
Store. Viewers will be able select this website to access to a specific location when viewing your
podcast.
5. Make sure each chapter has a chapter name. Optionally, add podcast URLs to one or two other
chapter markers.
6. Choose iWeb from the Share menu. Select Share for video podcast and click Share. If you see a
message that your movie needs to be rendered before you can proceed, click Proceed Anyway.
While you would want to render before posting a video podcast, it is not necessary to our
purposes here.
7. iMovie will open iWeb and proceed with setting up your video podcast. To choose a template for
your webpage, scroll down and select Travel. Notice the sample travel page shown.
8. Select the Podcast page and click Choose. iWeb opens with your movie inserted onto a page for
your video podcast series. Look at the left of the iWeb window to see your site and first page
listed. As you publish additional video podcasts, they would be added to your site as additional
entries.
9. From here you could simply update the sample text and click Publish. You could also select
Publish to .Mac or Publish to Folder from the File menu.
10. Congratulations. You’ve successfully created a movie that can be published as a video podcast.
For more information on using the iWeb application, visit the iWeb tutorial.
Tips
Additional options for creating video podcasts
iWeb and GarageBand include additional features for creating video podcasts, such as setting the
series artist, contact email, parental advisory rating, and iWeb allows you to submit your podcast to
the iTunes Podcast Directory.
Posting your video podcast with .Mac
iWeb includes the ability to publish your site to a folder so you can copy your podcast files to any
server of your choice. For added convenience, you can publish your podcast files to your .Mac
account for the easiest way to get your podcast up and running. You can also have your podcast
listed in the iTunes Music Store so it is easy for viewers to find.
24
Apple Tutorial
Sharing Overview
iMovie makes it easy to share your movies,
whether you want to show your movies on
your own TV, carry your movies around
with you, or post your movies to an
Internet site. Use the Share option to access
all the ways to share your iMovie projects.
Steps
Sharing your movie from iMovie
1. In iMovie, choose Share from the Share menu.
2. For watching your movie on TV, choose the Videocamera or iDVD options.
3. To take your movies with you, choose the iPod or Bluetooth options.
4. For emailing your movies to friends, choose the Email option.
5. For posting your movies to an Internet site, choose the iWeb option.
6. To score your movie with music, choose the GarageBand option.
7. To save your movie with custom options, choose the QuickTime option.
Tips
Sharing and exporting your movie
You can access the Sharing pane by choosing Export from the File menu or by choosing any item in
the Share menu. The Share menu is easier to find for new users, while the export option is what most
seasoned editors and Mac users would expect. Don’t worry, they both open up the same easy-to-use
Sharing pane, listing all the options for easily sharing your movie.
Consider your sharing options up front
While you can share any movie using the Share options listed, you may want to consider how your
movie will be viewed. For emailing and posting movies to the Internet, the final size of your movies
will be a major consideration. If you are planning to watch your movie on your iPod or phone, you
may make different editing choices than if you plan to watch it on a large HD TV screen in
widescreen format. Even choosing between how to carry your movie may affect it. Knowing you
have 60 GB free on your new iPod or 30 MB on your Bluetooth phone may affect what you create
for your movie masterpiece.
Render before sharing
You want to export your movie in the best quality possible. For this reason, you should always select
Render and Proceed if you get a warning message when sharing your final movie. If you are just
testing out the process, you can proceed without rendering to save time.
Playing Your Movies on TV
You’ve finished your movie and now you 25
want to watch it on your TV. The best way to
do this is to create a DVD disc that you can
play in a DVD player. iMovie also makes it
Apple Tutorial
Steps
Send your movie to iDVD and choose a theme
1. In iMovie , choose iDVD from the Share menu.
2. Click the Share button to send your movie to iDVD. If you receive a warning that your movie
needs to be rendered first, click Render and Proceed.
3. After iDVD opens, notice your movie appears in the iDVD window.
4. Click the Themes button and select a theme for your DVD.
5. Select Autofill Drop Zones from the Project menu. This will apply your movie to any drop zones
in the menu theme.
6. Click the Preview button to see how your DVD will look.
7. Click the Burn button, and then insert a blank DVD into your Mac.
8. When the disc is finished, eject it from your Mac and watch it in your DVD player.
Tips
Send your movie to your camcorder
If you want to share your movie with friends or family members who don’t have a DVD player,
iMovie makes it easy to send your movie back to your camcorder. With your movie on a digital
video tape, you can hook your camcorder up to your VCR and create a VHS tape, or hook your
camcorder to your TV to watch your movie. Connect your camcorder to your Mac, in iMovie HD
choose Video Camera from the Share menu, and then click Share.
Adding your movie to an existing iDVD project
If you have an iDVD project already open, you can easily add an additional iMovie project to it.
Because iMovie projects in your movies folder appear as movies in the iLife Media Browser, just
select one and drag it to an iDVD menu to add it. You can also drag the project directly from the
Finder into an iDVD menu.
Use new videotape when exporting your movie
26
Apple Tutorial
It is a good idea to export your movie to a new digital videotape so that you don’t copy over your
original video footage. You never know when you might want to use footage you didn’t use earlier.
If you find yourself making short movies, consider creating a master tape that contains all of your
finished movies.
Lock your tape when finished
You can lock your videotape to prevent accidentally writing over important material. Just flip the
switch to the "save" position on the edge of your videotape and your material is safe.
Add black to before or after your movie
Rather than showing your audience static before and after your movie, you can set iMovie to record
a few seconds of black at the beginning and end of your movie. This will give your presentation a
polished look. You’ll find this option in the Videocamera pane of the Share window. For High
Definition movies, a minimum of 6 seconds of black is recommended.
Save your movie on VHS tape
If you want to share your movie with friends or family members who don’t have a DVD player, you
can copy it to VHS tape. After sharing your movie back to your camcorder, connect your camcorder
up to your VCR’s video and audio in connectors. Then, press Record on your VCR and Play on your
camcorder. Viola, you have your video saved to a VHS tape.
Taking Your Movies with You
You can show your creations to friends and
family wherever you go by putting your
movies on your iPod, mobile phone, or PDA.
With your movie on a portable device, you can
easily watch your movies anywhere. You can
even connect your iPod to a TV and show your
video masterpiece to a larger audience.
Steps
Send your movie to your iPod
1. From the Share menu, choose iPod.
2. In the sheet that appears, click the Share button.
3. Watch as your movie is compressed and saved in your iTunes Library.
4. In iTunes, click the Videos playlist in the Source column, and then double-click your movie to
view it in iTunes.
5. Sync your video-capable iPod with your Mac to transfer your movie to your iPod.
6. On your iPod select Videos from the main menu, then select Video Playlists. Select your movie
from the list of movies to play it.
Tips
27
Apple Tutorial
Send your movie to a compatible Bluetooth phone or PDA
If you want to view your movies on your Bluetooth enabled cell phone or PDA iMovie makes it easy
to transfer your creations for viewing anywhere. In iMovie go to the Share menu and choose
Bluetooth. In the sheet that appears, click the Share button. Your Mac will search for any Bluetooth
enabled devices in range, choose the device you want to send your movie to from the list that
appears, and then click Select. On your cell phone or PDA accept the incoming movie, and enjoy the
show.
Watching videos from your iPod on your TV
With the optional iPod AV cable, you can watch videos stored on your iPod on a television. Simply
connect one end of the iPod AV cable to your TV and the other end to your iPod or iPod Universal
Dock. From the iPod main menu, choose Videos > Video Settings, and set TV Out to On.
Phones and PDAs have limited space
Because of the limited hard disk space available on many phones and PDAs, you should make sure
that any device you share clips with will be able to receive the clips.
Adding Bluetooth to your Mac
Many Apple computers come with Bluetooth technology built in. You can purchase Bluetooth USB
Adapters for any Mac with a USB port to enable short-range wireless data connectivity between
your Mac and Bluetooth-enabled devices. Go to www.apple.com/store and then click the Wireless
link in the Mac Accessory section.
Using Your Movies on the
Internet
Just as directors need distributors for their
films, after you’ve created your home
masterpiece in iMovie, you’ll need a way to
share it with your family and friends. With
iWeb and .Mac, you can share your digital
movies on a webpage. This way, anyone with
access to the Internet can watch your movie
anytime.
iMovie, iWeb, and .Mac make it easy to create
your own movie webpage. After your webpage
is published, you’ll have an Internet address
that you can give to others.
Steps
28
Apple Tutorial
Share for web with iWeb and .Mac
1. With your completed iMovie project, go to the Share menu and choose iWeb.
2. From the Share window, select "Share for web" and click Share.
3. After your movie is compressed, iWeb will open. Choose a template for your movie, and then
click Choose.
4. Make changes to the title and placeholder text on the page.
5. Click Publish. iWeb will copy your updated site information to your .Mac account as a web page.
6. Note the new location of your published web page from the dialog announcing your site has been
published.
7. Click the "Visit site now" button to view your page on your .Mac account.
Share for video podcast with iWeb and .Mac
1. With your completed iMovie project, go to the Share menu and choose iWeb.
2. From the Share window, select "Share for video podcast" and click Share.
3. After your movie is compressed, iWeb will open. Choose a template for your page, select the
Podcast style, and then click Choose.
4. Make changes to the title and placeholder text on the page.
5. Click Publish. iWeb will copy your updated site information to your .Mac account as a web page.
6. Note the new location of your published web page from the dialog announcing your site has been
published.
7. Click the "Visit site now" button to view your page on your .Mac account.
Share your blog with iWeb and .Mac
1. With your completed iMovie project, go to the Share menu and then choose iWeb.
2. From the Share window, select "Share for video podcast" and click Share.
3. After your movie is compressed, iWeb will open. Choose a template for your page, select the Blog
style, and then click Choose.
4. Make changes to the title and placeholder text on the page.
5. Click Publish. iWeb will copy your updated site information to your .Mac account as a web page.
6. Note the new location of your published web page from the dialog announcing your site has been
published.
7. Click the "Visit site now" button to view your page on your .Mac account.
Tips
Send your movie in an email message
With iMovie, you can send small movies, or even just clips from your movie in an email message.
To do so, just select the clips you want to share, go to the Share menu, choose Email, then select
your email application of choice from the Send email using pop-up menu. You can select "Share
selected clips only" to send specific clips instead of the entire movie. When you’re ready, click
Share and iMovie will automatically compress your movie clips, launch your email application, and
create a new email message with your compressed movie added to the contents. Enter an email
address and send your movie on its way.
Publish your page to a non-.Mac account
If you want to publish your movie to a website that is not hosted by .Mac, go to the iWeb File menu
and choose Publish to a Folder. This will save all the files for your website to a folder on your hard
disk that you can copy to your web server.
Modify your webpage
29
Apple Tutorial
You can easily make changes to your webpages right from iWeb. Open iWeb, select the page you
want to edit, and then make your changes. When you’re ready, click the Publish button. You can
even use the Site Organizer to see how your site is organized.
Buy more storage space online
If you need more .Mac iDisk space to publish all your movies, just go to www.mac.com, log in, click
the Account icon, and follow the onscreen instructions for purchasing additional storage space.
What's Next
Now that you've had a chance to play with
iMovie by importing video from your
camcorder; editing your footage into a
finished movie complete with titles,
transitions, effects, and a soundtrack; and
sharing your final product with others, you’re
ready to expand your moviemaking skills.
You can use other iLife applications like
iTunes and iPhoto to organize your movie’s
music and photos, GarageBand to score your
own soundtrack, and iDVD and iWeb to
share your creations with the world.
30
Apple Tutorial