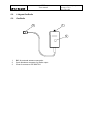
1
REI2
REI2
User manual
User manual
Doc: R2U_2_1079_002_E
Version: 1.07.9
Page 2 of 64
REI2
User manual
Doc: R2U_2_1079_002_E
Version: 1.07.9
Page 3 of 64
Summary
1.
INTRODUCTION.........................................................................................................7
2.
A LOOK AT REI2........................................................................................................8
2.1.
Top .......................................................................................................................................8
2.1.1.
Printer compartment.....................................................................................................9
2.1.2.
Line keyboard ............................................................................................................10
2.1.3.
Main keyboard ...........................................................................................................11
2.2.
Back ...................................................................................................................................12
2.3.
Connectors .........................................................................................................................12
2.4.
Side ....................................................................................................................................13
2.5.
Materials in the REI2 package ...........................................................................................13
3.
CONVENTIONS ........................................................................................................14
4.
STARTING ................................................................................................................15
4.1.
Introduction........................................................................................................................15
4.2.
First switching on...............................................................................................................15
4.2.1.
Synchronization .........................................................................................................15
4.2.2.
Data not valid message ..............................................................................................16
5.
OPERATIONAL PHILOSOPHY................................................................................17
6.
SYNCHRONIZATION OF REI2’S INTERNAL CLOCK ............................................18
6.1.
Synchronization .................................................................................................................18
6.2.
Modifying synchronization value ......................................................................................18
6.3.
Synchronization verify.......................................................................................................18
6.4.
Signal .................................................................................................................................18
7.
BATTERY RECHARGE ............................................................................................20
7.1.
Discharge/recharge.............................................................................................................20
7.2.
Immediate recharge............................................................................................................20
7.3.
Interrupt..............................................................................................................................21
8.
BATTERY CAPACITY MEASUREMENT .................................................................22
9.
RACE MANAGEMENT .............................................................................................23
9.1.
New race ............................................................................................................................23
9.2.
Delete/Retrieve stored race ................................................................................................23
9.3.
Continue current race .........................................................................................................23
9.4.
Total memory deletion .......................................................................................................24
10. SWITCHING OFF......................................................................................................25
11. MEMORIZATION ......................................................................................................26
11.1. Memory capacity................................................................................................................26
12. SOFTWARE UPDATING ..........................................................................................27
13. CONNECTION SCHEMES........................................................................................28
13.1. Banana jack lines ...............................................................................................................28
13.2. DIN lines ............................................................................................................................28
13.3. LinkGate system ................................................................................................................28
13.4. LinkPod system..................................................................................................................29
13.5. Computer............................................................................................................................29
13.6. Displayboards ....................................................................................................................29
REI2
User manual
13.7.
13.8.
13.9.
13.10.
13.11.
Doc: R2U_2_1079_002_E
Version: 1.07.9
Page 4 of 64
REI2 net .............................................................................................................................29
Analogue I/O......................................................................................................................29
Digital I/O ..........................................................................................................................29
Power supply......................................................................................................................30
Starter .................................................................................................................................30
14. MENU STRUCTURE.................................................................................................38
14.1. Initial menu ........................................................................................................................38
15. MAINTENANCE........................................................................................................39
15.1. Cleaning .............................................................................................................................39
15.2. Changing paper ..................................................................................................................39
15.3. Releasing the paper ............................................................................................................40
16. CLIMATIC CONDITIONS..........................................................................................41
17. TECHNICAL DATA...................................................................................................42
17.1. Connectors .........................................................................................................................42
17.1.1.
Supply ........................................................................................................................43
17.1.2.
Analogue I/O..............................................................................................................43
17.1.3.
Digital I/O ..................................................................................................................43
17.1.4.
Radio ..........................................................................................................................43
17.1.5.
Computer A................................................................................................................43
17.1.6.
Computer B ................................................................................................................44
17.1.7.
Display Board ............................................................................................................44
17.1.8.
Rei2 Net .....................................................................................................................44
17.1.9.
Timing Inputs.............................................................................................................44
17.1.10. LinkPod......................................................................................................................44
17.1.11. Start ............................................................................................................................45
17.2. Sports homologization .......................................................................................................45
17.3. Technical conformity certificates.......................................................................................45
18. GUARANTEES AND RESPONSIBILITIES ..............................................................46
1.
INTRODUCTION TO LINKGATE..............................................................................48
2.
LINKGATE ENCODER: 3 FEATURES GUARANTEEING THE RELIABILITY OF
RADIO TRANSMISSION...................................................................................................49
2.1.
Digital transmission of impulses........................................................................................49
2.2.
The Repeat function ...........................................................................................................49
2.3.
Internal memorization of event times ................................................................................49
3.
USING THE LINKGATE ENCODER.........................................................................50
3.1.
Selecting the channel .........................................................................................................50
3.2.
Selecting signal type ..........................................................................................................50
3.3.
Selecting working frequency .............................................................................................50
3.4.
Impulse transmission..........................................................................................................51
3.5.
The repeat function ............................................................................................................51
3.6.
Acquiring a speed...............................................................................................................51
3.7.
Hardware resetting .............................................................................................................52
3.8.
Memory resetting ...............................................................................................................52
3.9.
Synchronization .................................................................................................................52
3.10. Downloading data onto REI2.............................................................................................53
3.11. Modem function.................................................................................................................53
3.12. Maintenance .......................................................................................................................54
REI2
User manual
3.12.1.
3.12.2.
3.12.3.
4.
Doc: R2U_2_1079_002_E
Version: 1.07.9
Page 5 of 64
Encoder Enc003 .........................................................................................................54
EncRadio Enc004 and Encoder Enc005 ....................................................................54
Decoder e DecRadio ..................................................................................................54
LICENCES ................................................................................................................55
5.
FIGURES ..................................................................................................................56
5.1.
Linkgate EncRadio.............................................................................................................56
5.2.
Linkgate DecRadio ............................................................................................................58
5.3.
DecRadio............................................................................................................................58
5.4.
Taking the speed ................................................................................................................59
1.
INTRODUCTION TO LINKPOD................................................................................61
1.1.
Information transmitted......................................................................................................61
1.2.
Measurement and speed precision .....................................................................................61
1.3.
The Pod ..............................................................................................................................61
1.4.
Insulation............................................................................................................................62
1.5.
Maintenance .......................................................................................................................62
1.
EDITING HISTORY...................................................................................................63
REI2
User manual
Doc: R2U_2_1079_002_E
Version: 1.07.9
Page 6 of 64
Index of figures
Fig. 1 – Overview.................................................................................................................................8
Fig. 2 – Printer compartment ...............................................................................................................9
Fig. 3 – Line keyboard .......................................................................................................................10
Fig. 4 – Main keyboard ......................................................................................................................11
Fig. 5 – Back (connectors) .................................................................................................................12
Fig. 6 – Left side (speacker connector)..............................................................................................13
Fig. 7– Example of connection using the banana jack sockets..........................................................31
Fig. 8– Example of connection using both the banana jack sockets and the DIN sockets. ..............32
Fig. 9– Diagram for N/O line.............................................................................................................33
Fig. 10– Diagram for N/C line ...........................................................................................................33
Fig. 11– Diagram for N/O line with 1 impulse only..........................................................................34
Fig. 12– Example of connection between two computers .................................................................35
Fig. 13– Example of connection of a MicroTab displayboard ..........................................................36
Fig. 14– Example of connection of two or more MicroTab displayboards .......................................37
Fig. 15 – 6 pole DIN ..........................................................................................................................42
Fig. 16 – 180° 5 pole DIN..................................................................................................................42
Fig. 17 – 240° 5 pole Nucletron.........................................................................................................42
Fig. 18 – Taking the speed .................................................................................................................59
REI2
User manual
Doc: R2U_2_1079_002_E
Version: 1.07.9
Page 7 of 64
1. Introduction
Congratulations on choosing the Microgate REI2 stopwatch.
Microgate REI2 is a powerful and versatile stopwatch which can be expanded and configured by
the user in many ways to satisfy various needs.
The software of the Microgate REI2 stopwatch includes several operating programs which allow
the device to be used for most sports, during training sessions as well as in official competitions.
Some operating programs are supplied as extra options.
The main features are:
•
•
•
•
•
•
•
•
•
•
•
•
•
•
•
•
Limited size and weight
Quartz time base compensated for temperature with a precision of 1 PPM equal to ± 0,08 s/day
throughout the temperature range (-20 + 70 °C)
Maintenance of synchronization also with the stopwatch in “standby”, once again with
maximum precision (1 ppm)
Internal memorization precision of 1/25,000 of a second
3 microprocessors, 2 of 8 bits and 1 of 16
2 MB of ROM flash memory and 2MB of RAM
Selectable measurement precision from 1 second to 1/10,000 of a second
Internal cadmium nickel batteries with an operational autonomy of about 20 hours and 21 days
when off but with maintenance of synchronization
8-lines-a-second thermal graphic printer
240-by-64-point graphic display with lighting feature
High quality 32-key mechanical keyboard protected by film cover
Possibility of memorising and reusing up to 8 races with data retained also with the stopwatch
switched off
4 direct input lines for the connection of start and finish devices (gates, photocells….)
Connectable to LinkGate and LinkPod systems
Connections for analogue and digital devices
Serial connections for connection of computers and displayboards
REI2 is part of a series of products created by Microgate for the management of sports events. The
main products which can be connected to REI2 include:
•
•
•
•
•
•
•
•
•
•
LinkGate system for the radio transmission of timing impulses (see relative appendix)
LinkPod system for the radio transmission of timing impulses (see relative appendix)
Starting gates
Polifemo photocells
Barrier photocells
MicroTab alphanumeric displayboards
MicroGraph graphic displayboards
MicroClima climatic sensor for acquiring air temperature and humidity and snow temperature
MicroSem signal light
Electronic Bang, the starting bang
This manual refers to the Kernel 1.07.9 software version.
Doc: R2U_2_1079_002_E
Version: 1.07.9
Page 8 of 64
REI2
User manual
2. A look at REI2
2.1.
Top
2
1
F1
F2
F3
F5
F4
START
STOP
LCK
STA
LCK
LAP
3
Fig. 1 – Overview
1
2
3
4
Printer compartment
Graphic display
Line keyboard
Main keyboard
STO
AUX
ALT
ENT
7
8
9
ESC
4
5
6
0
1
2
3
0:11.539
4
Doc: R2U_2_1079_002_E
Version: 1.07.9
Page 9 of 64
REI2
User manual
2.1.1.
Printer compartment
1
2
6
4
5
3
Fig. 2 – Printer compartment
1
2
3
4
5
6
Slot for spindle
Paper compartment
Thermal head
Roller
Head block lever
<Reset> button for complete annulment of REI2
Doc: R2U_2_1079_002_E
Version: 1.07.9
Page 10 of 64
REI2
User manual
2.1.2.
Line keyboard
1
2
LCK
3
4
LCK
STA
LAP
STO
AUX
5
6
7
8
Fig. 3 – Line keyboard
1
2
3
4
5
6
7
8
<LCK> Software block on the lines selected by the user with activation signal led
<ARM> Immediate Rearm on the lines selected by the user with activation signal led
<LCK> Software block on the Stop line with activation signal led
<ARM> Immediate Rearm of the Stop line with activation signal led
<STA> manual Start impulse
<LAP> manual intermediate impulse
<STO> manual Stop impulse
<AUX> manual auxiliary impulse
Allocation of the ‘channel’ on which the <STA> <LAP> <STO> and <AUX> keys operate can be
modified in accordance with the program.
Doc: R2U_2_1079_002_E
Version: 1.07.9
Page 11 of 64
REI2
User manual
2.1.3.
Main keyboard
1
F1
F2
F3
F4
F5
10
START
2
STOP
3
ALT
4
5
6
ENT
7
8
9
ESC
4
5
6
0
1
2
3
7
0:11.539
11
8
9
Fig. 4 – Main keyboard
1
2
3
4
5
6
7
8
9
10
11
<F1> <F2> <F3> <F4> <F5> function keys
<Printer> key: when pressed alone it winds the paper forward, together with the <ALT>
key it winds it back
<Light > key activates the back lighting of the graphic display
<ALT> key modifies the functioning of the other keys
<ENT> key usually confirms what is done
<ESC> key usually allows you to quit what you are doing
Numeric keyboard
<Arrow up> key
<Arrow down>key
<Displayboard> key with activation led allows you to manage the functioning of the
displayboard/displayboards
<Start/Stop> key modifies the types of event on which you are working
The functioning of the various keys can change according to the program used.
Doc: R2U_2_1079_002_E
Version: 1.07.9
Page 12 of 64
REI2
User manual
2.2.
Back
2
3
4
6
1
7
8
9
10
11
12
15
13
16
POWER
SUPPLY
ANALOG I/O
DIGITAL I/O
RADIO
COMPUTER
A
5
COMPUTER
B
DISPLAY
BOARD
REI 2
NET
START
LAP
STOP
AUX
TIMING
INPUTS
LINKPOD
14
Fig. 5 – Back (connectors)
2.3.
Connectors
1. On/Off Switch
2. Power
3. Analogue inputs for the connection of sensors with analogue outputs, such as the sensors for air
temperature/humidity and snow temperature
4. Digital input output for connection to devices with digital command (e.g. MicroSem signal
light) or unblocking devices
5. Input for LinkGate Decoder and DecRadio connection
6. Serial I/O ‘A’ for computer connection
7. Seriale I/O ‘B’ for computer connection. The two connections can supply and receive different
data simultaneously
8. Connection for displayboards
9. Connection for REI2 NET network – a number of REI2 operators collaborate at the same event
10. Start line input
11. Lap line input
12. Stop line input
13. Aux line input
14. Grounds
15. Lines: input (duplicated) of the main lines
16. Connection for LinkPod system
Doc: R2U_2_1079_002_E
Version: 1.07.9
Page 13 of 64
REI2
User manual
2.4.
Side
1
Fig. 6 – Left side (speacker connector)
1
External speaker connector
2.5.
Materials in the REI2 package
REI2 is supplied togetherwith the following material:
•
The REI2 stopwatch
•
A bag for transport
•
Adaptor/battery charger
•
REI2 / PC connection cable
•
Two rolls of thermal paper
REI2
User manual
Doc: R2U_2_1079_002_E
Version: 1.07.9
Page 14 of 64
3. Conventions
In this manual the keys to be pressed are shown inside chevrons. For example, press <F1> means
the yellow key marked F1, while the options proposed by REI2 are indicated in bold type.
This symbol
This symbol
)
)!
draws your attention to points about which you must be particularly careful.
draws your attention to points about which you must be extremely careful.
REI2
User manual
Doc: R2U_2_1079_002_E
Version: 1.07.9
Page 15 of 64
4. Starting
4.1.
Introduction
The best way to learn to use Microgate’s REI2 stopwatch is to begin trying. Bear in mind that there
is no sequence of keys which can damage your stopwatch. However, make sure you read this
manual carefully before connecting any accessories.
This chapter will guide you step by step in the operations to be carried out when starting to use your
REI2.
4.2.
First switching on
Start by connecting the mains power supply to the Supply connector, wait a few seconds and switch
on the device.
In the initial screen display the firmware release and language appear for a few seconds. In this case
you will see 1.07.9 followed by 0 or 1 indicating the battery type. 1 indicates longlife batteries
while 0 indicates standard duration.
Note: The request for synchronization does not appear if the internal clock of your REI2 is still
synchronized; the data not valid message does not appear if REI2’s memory contains valid data.
4.2.1.
Synchronization
!!!
ATTENTION
!!!
The system has lost synchronization
A) Synchronize
B) Do not synchronize
A
The first time REI2 is switched on, its internal clock is
not synchronized. With <F1> select the option
Synchronize
B
*** SYNCHRONIZATION ***
Insert the time
00:00:00.0000
*** SYNCHRONIZATION ***
Insert the time
Insert the date
09:30:00.0000
1/01/1999
You are asked for the time of synchronization. Insert
real time, for example 9.30, with the keys <9>
<ENT> <3> <0> <ENT> <ENT> <ENT>
You are now asked for the date, for example, 3 June
2003. To insert it, press <3> <ENT><6> <ENT> <2>
<0> <0> <3> <ENT>
REI2
User manual
*** SYNCHRONIZATION ***
09:30:00.0000
03/06/2003
Input hour
Input date
Correct OK
Now confirm the data you have inserted with the
<F4> key
menu
*** SYNCHRONIZATION ***
Input hour
Doc: R2U_2_1079_002_E
Version: 1.07.9
Page 16 of 64
09:30:00.0000
03/06/2003
REI2 is now ready to be synchronized. Give a short
impulse with the <STA> key
Input date
START to synchronize!
menu
*** SYNCHRONIZATION***
Input hour
09:30:00.0000
03/06/2003
Input date
START to synchronize!
SYNCHRONIZED!!
As soon as the impulse has been received, the
message ‘SYNCHRONIZED’ appears for a few
moments
menu
*** SYNCHRONIZATION ***
Input hour
09:30:00.0000
03/06/2003
Input date
START to synchronize
SYNCHRONIZED!!
menu
4.2.2.
Data not valid message
09:30:30.3
ATTENTION MEMORY CORRUPTED
Press ENTER to continue
On the left of the display the internal running clock
appears. Initially REI2 has no valid data in its
memory and the user is informed of this. Press
<ENT> to continue.
REI2
User manual
Doc: R2U_2_1079_002_E
Version: 1.07.9
Page 17 of 64
5. Operational philosophy
The various choices possible as regards the various menu choices, the various options and the
various modifiable values are assigned each time to the 5 function keys <F1>…<F5>. All the
operational choices are shown on the bottom line of the display.
There are two possible assignment modes:
1. A function/choice appears above the corresponding function key
2. A letter at the beginning of the line refers to the corresponding function key.
HH:MM:SS.D
A:xxx xxxx xxx xxxxx xxxxx
B:yy yyy yyyyy yyyyy yyy
C:kkkkk kkkkkkk kk
A
B
C
zzzz
list
1: Press <F5> to activate this function
2: Press <F3> to activate this choice
The presence or absence of particular choices depends on the function/program activated.
It will often be necessary to insert numerical data (for example, an athlete’s start number) with the
numeric keyboard. The possibility of doing this is indicated by the presence of a cursor (vertical bar
or black square) on the field concerned. After setting the required value, this value can be confirmed
by pressing <ENT>.
The <ALT> key does not have its own function but is used simultaneously with other keys to
modify their behaviour.
The <ESC> key has several functions
• Inside a menu it allows you to return to the previous menu
• During the insertion of a numerical value, it deletes the last figure keyed in and if pressed down
for a long time it deletes the whole field.
REI2
User manual
Doc: R2U_2_1079_002_E
Version: 1.07.9
Page 18 of 64
6. Synchronization of REI2’s internal clock
REI2 can be synchronized by means of the keyboard, the external line or via radio with the
LinkGate system. If necessary, synchronization can be corrected by putting the internal clock
forward or back.
6.1.
Synchronization
Through this function, REI2’s internal clock is synchronized. The operation is performed by
inserting the time of synchronization, confirming each field (hour, minutes, ….) with the <ENT>
key and then the date.
Attention: To be able to carry out synchronization the start line must be’at rest’ when <F4> is
pressed (open for line N/O, closed for line N/C). If the line is not ‘at rest’, the message
‘!!!ATTENTION!!! START line unable to give synchronization impulse………’ will appear.
With:
• <F2> the inserted data can be modified if a mistake has been
• <F4> to confirm synchronization data. With the next start impulse, the internal clock starts
• <F5> to return to the previous menu.
6.2.
Modifying synchronization value
In certain situations it may be necessary to change the synchronization of REI2 to align it with other
devices which cannot be resynchronized. After establishing the gap in synchronization between the
two devices (for example with a stop in parallel), insert its value as ‘Time change’ (paying
attention to the alignment; for example, 3 hundredths should be inserted as 300 ten-thousandths).
The date can also be changed. Each value should be confirmed with <ENT>.
The enabled function keys are:
• <F1> Time+ to change the sign of variation, with each press it enables the increase or reduction
of values
• <F3> Correct to change any incorrectly inserted data
• <F4> OK to carry out correction of synchronization
• <F5> menu to quit the function.
6.3.
Synchronization verify
Calling up this function makes REI2 ready to receive an impulse from a line (main or LinkPod) or
the LinkGate system
The message SYNCHRONIZATION VERIFY – Wait for impulse… appears on the display.
When REI2 receives an impulse, the channel the impulse comes from and the date and time when it
was acquired are printed on the printed strip.
6.4.
Signal
With this function a synchronization impulse for the synchronization of other devices can be
generated. When the function is activated, a request is made for the time and date for generation of
the impulse. Every value must be confirmed with <ENT>.
REI2
User manual
Doc: R2U_2_1079_002_E
Version: 1.07.9
Page 19 of 64
The signal is generated by switching pin 6 of the I/O digital port to level 0.
REI2
User manual
Doc: R2U_2_1079_002_E
Version: 1.07.9
Page 20 of 64
7. Battery recharge
During normal functioning, the presence of a valid external source of power supply (with a socket
as symbol) or low battery condition (with the symbol of a battery) is shown in the display to the
right of the first line. From the moment the symbol appears, about 90 minutes of autonomy remain.
Recharging of REI2’s internal batteries is managed entirely by the microprocessor. In this way it
has been possible to implement a recharge control which guarantees maximum efficiency of the
batteries at all times, at the same time prolonging their operational life.
When you enter this function, the current state of power supply is shown on the sixth line of the
display as follows:
•
•
•
•
•
‘Battery use …’ the internal batteries are being used
‘Maintenance’ the stopwatch is supplied by the external power source and at the same time the
efficiency of the batteries is maintained by a trickle charge but they are NOT recharged
‘Discharge…’ the internal batteries are completely discharged before being subsequently
recharged
‘Recharge’ recharge in progress; on the right, the time remaining before the end of recharge is
shown
‘Recharge blocked’ recharge has been temporarily interrupted because of insufficient voltage.
It will resume automatically as soon as a voltage level is restored.
To recharge the batteries, connect the plug for recharging to any continuous current supply between
11 and 24 volts. In the REI2 package a special adaptor is provided for mains power supply (220V).
)
)
7.1.
To recharge the batteries or completely discharge them, REI2 must remain switched
on. During recharge it is possible to carry out every kind of timing. The important
thing is not to switch it off.
After a reset the battery gauge cannot calculate the battery status correctly ( ). It
will therefore be necessary to carry out a Charge/Recharge cycle to have accurate
knowledge of battery status.
Discharge/recharge
When this function is selected, the internal batteries are first completely discharged and then
recharged. This is the most correct procedure for keeping the internal batteries at maximum
efficiency.
The duration of the discharge phase depends on how fully the batteries are charged and can last up
to about 3 hours.
The duration of the subsequent recharge phase is 7 hours for the old type of battery (in version
1.07.9.0), while for the new type (in version 1.07.9.1) it is about 9 hours 15 minutes. At the end of
recharge the message ‘RECHARGE OK!’ appears.
7.2.
Immediate recharge
If it is not possible to charge or recharge in the correct way because of lack of time or for any other
reason, it is possible just to recharge. In this way recharge time is reduced but this procedure is not
recommended as it reduces the efficiency of the batteries.
REI2
User manual
7.3.
Doc: R2U_2_1079_002_E
Version: 1.07.9
Page 21 of 64
Interrupt
With this function the discharge and recharge phases are interrupted. REI2 returns to maintenance
status until external power is present.
REI2
User manual
Doc: R2U_2_1079_002_E
Version: 1.07.9
Page 22 of 64
8. Battery capacity measurement
This function is used for accurate regulation of the residual battery charge.
This operation should be repeated every 6 months to offset natural deterioration in the performance
of the internal batteries.
First REI2 discharges the batteries, then it fully recharges them, discharges them and finally fully
recharges them again. All these operations take about 24 hours.
REI2
User manual
Doc: R2U_2_1079_002_E
Version: 1.07.9
Page 23 of 64
9. Race management
REI2 can memorise up to 8 different races and their relative configurations. It is possible to suspend
a race at any moment, to manage a different one and then to retrieve the suspended race.
As soon as REI2 has finished checking synchronization and memory content it activates the race
management menu.
At the end of timing, no operation is necessary to memorise a race. All the data is automatically
recorded in the memory of the stopwatch and retained also when the machine is switched off. For
stored data retention times, consult section 11, Memorization, on p. 26.
9.1.
New race
Selecting this option allows you to start a new race. You are asked for the program to be used and
when you have selected this, you are given the indication ‘NEW RACE’ and the number assigned
on the printout.
If all the eight races available have been stored, the message ‘ATTENTION! – Race Memory Full
– Delete one or more races – Press a key to continue’ appears and you must delete one of the
stored races to be able to continue.
9.2.
Delete/Retrieve stored race
This option allows you to retrieve or delete a previously stored race from the list of races proposed.
In the column:
• RACE the consecutive race number appears. The symbol * to the left of the number indicates
the last active race, which is retrieved if 9.3, Continue current race, is selected.
• DATE the start date
• START the start time
• TYPE the type of program used for the race.
The positions which are free for memorization of a race are indicated by ‘---‘.
The enabled function keys are:
• <F1> Ç: to scroll the race list up
• <F2> È: to scroll the list down
• <F3> to delete the race shown by the symbol . You are requested to confirm that you wish to
delete the race, <F4> to delete, <F5> to annul deletion. If you select an unused race number, the
message ‘Deletion impossible’ appears
• <F4> retrieves the race indicated by the symbol and allows you to resume timing of it. If you
select an unused race number, the message ‘Race not available’ appears
• <F5> to return to the previous menu.
9.3.
Continue current race
By selecting this option, you resume timing of the last race stored, and retain all its timings and
configuration settings.
REI2
User manual
9.4.
Doc: R2U_2_1079_002_E
Version: 1.07.9
Page 24 of 64
Total memory deletion
Selecting this option allows you to delete all the data of all the stored races. On the display the
message ‘******* ATTENTION ******* - All data and races will be irreversibly cancelled,
proceed?’ Press <F4> for Yes to delete all the stored races, press <F5> for No to annul the deletion
operation.
REI2
User manual
10.
Doc: R2U_2_1079_002_E
Version: 1.07.9
Page 25 of 64
Switching off
Operating the switch on the back of REI2 activates its switching off function (see fig. 5 ref. 1). At
this point there are 3 possibilities:
Pressing key <F1> for SWITCH OFF switches off the stopwatch completely with retention of all
the data stored but the loss of synchronization.
Pressing the key <F3> for STANDBY puts REI2 in a state of suspension: everything is switched
off except the time base. In this way, as well as the data stored, the device also retains
synchronization set at the regular precision of 1 ppm.
Pressing the key <F5> for CONTINUE annuls switching off and returns you to the same point you
were in before operating the switch.
REI2
User manual
11.
Doc: R2U_2_1079_002_E
Version: 1.07.9
Page 26 of 64
Memorization
The duration of retention of the data stored by REI2 depends on the choice made when switching
off. The following table summarises the typical values for fully charged internal batteries in good
condition.
Off
Standby
Race results and configuration
More than 30 days
More than 15 days
Synchronization set
Not retained
More than 15 days
11.1.
Memory capacity
REI2 has a 2 MB memory for storing events and the configurations of various races. This memory
is big enough to store about 65,000 events.
When the memory is full, the message Memory full appears on the last line of the display. In this
situation, REI2 records the last event acquired by deleting the penultimate one so that it can in any
case be printed. Space for the race in progress can be freed by deleting one of the stored races.
65,000 events correspond to approximately 8 single start races of about 2000 competitors each, in
which Start, Stop and two intermediate events are taken.
REI2
User manual
12.
Doc: R2U_2_1079_002_E
Version: 1.07.9
Page 27 of 64
Software updating
The software of the REI2 stopwatch is recorded in flash memory and can be updated if new
versions or updates are released.
Each software update is ‘labelled’ with an identity number composed of 2 groups of figures
separated by a dot. The first group represents the version. It is modified only if important
improvements are made and this always entails changes in the manual. The second group represents
the release and can reflect internal improvements to the program which are not visible to the user or
improvements of functional characteristics which entail changes in the user manual (e.g. 1.00). If
there is a third group of figures, this represents an update of the release indicated (e.g.: 1.05.4
indicates an update to release 5 of version 1).
The various updates and the program for downloading the updates, microFlasher.exe., will be made
available on Microgate’s internet site at WWW.MICROGATE.IT in the download section.
Details of the software versions available and any modifications to ways of updating will be
published on the same site.
To carry out updating you will require a personal computer with a Windows 95 or higher operating
system, with a free serial port and the dedicated REI2-PC connecting cable. Here are the steps you
must follow:
•
•
•
•
•
•
•
•
Connect the PC serial output to the REI2 Computer A input.
Switch on REI2 by keeping the keys <F1> <F2> ed <F3> simultaneously pressed down. The
serial number of the stopwatch and the wait message for connection to the computer (‘Waiting
for PC connection…’) will appear
Launch the microFlasher program on the PC
Recognition of the program to be updated will be indicated in the events window. The serial
port on which the attempt is made is shown in the field ‘Serial communication’
At the moment the program establishes connection with REI2, program transfer begins. The
continuation of the operation is indicated with a ‘thermometer’ in the program
When the operation is terminated, the message ‘Device correctly programmed’ appears on the
computer while the message ‘Device successfully programmed’ appears on REI2’s display
Disconnect the cable between the PC and REI2 and reset the stopwatch by pressing the reset
button inside the printer compartment
In the ‘Race management’ menu, carry out ‘Clear all memory ‘ (see, for example, section 20.4
in the ‘Single starts manual’).
Notes:
If program transmission does not begin within 30 seconds, check whether the connection is correct
and try again.
At the end of program transfer REI2 checks the quality of the program received. If there is an error
a message appears, informing you of this. In this case it is possible to reset REI2 and to carry out
programming again.
REI2
User manual
13.
Doc: R2U_2_1079_002_E
Version: 1.07.9
Page 28 of 64
Connection schemes
Below, several of the most frequently used connection modes are shown as examples. Although all
the connections are fitted with safety circuits to protect against short-circuits, you should be careful
to avoid any short-circuits.
)
)!
With the exception of the power socket, which should however only be used within the
defined ranges, no source of power should be applied to any contact if you wish to
avoid possible damage to the stopwatch and the peripherals connected to it.
REI2 AND ANY PERIPHERALS AND ACCESSORIES SHOULD BE
CONNECTED TO THE MAINS SUPPLY (220V) ONLY WITH THE
DEDICATED
ADAPTORS.
CONNECTION
CABLES
FOUND
CONNECTED UP SHOULD BE CONSIDERED ‘LIVE’ UNTIL YOU HAVE PROOF TO
THE CONTRARY.
13.1.
Banana jack lines
REI2 accepts command devices with contact either normally open or normally closed. To connect
devices which do not require power or have their own power supply, 4 input lines are available:
Start, Lap (intermediate), Stop and Aux (auxiliary), all configurable in accordance with the program
used. Each line has its own ground contact. All the grounds are connected to each other and
therefore equivalent and invertible.
Fig. 7 shows an example of connection using banana jacks.
13.2.
DIN lines
On the DIN connector the same 4 lines and the relative ground are available together with stabilised
power supply for powering external devices such as cells. It is therefore possible to power the
external device without ‘consuming’ the charge of the batteries in it, in the case of devices which
have them (for example, the Polifemo cell), or to power devices which do not have them (e.g.
LBM1 cells).
The contacts are connected in parallel to those on the banana jacks.
Fig. 8 shows an example of a connection using the lines on the DIN connector. This connection,
with the Polifemo cell configured in Stop, is similar to the one in section 13.1, Banana jack lines.
For N/O contacts, the contact is considered closed when a voltage signal of at least 2,8 volts for the
duration of 1/10,000s is detected and reopened with a fall of 2,2v for 1/1,000s, while for N/C the
contact is considered open when a current signal of 2,8 v for the duration of 1/10,000s is detected
and reclosed at 2,2v per 1/1,000s (difference of potential between line and ground).
Both for the N/O lines and the N/C lines all events inside 1/1000s (antibounce circuit) from the
event detected are ignored. The maximum recommended load on the lines is 2 KΩ.
See Fig. 9 and Fig. 10 for the relative schemes and Fig. 11 for an example of impulses ‘discarded’
after the first one. The schemes are NOT to scale.
13.3.
LinkGate system
For details of the connection modes of the LinkGate system, see appendix ‘B’.
REI2
User manual
13.4.
Doc: R2U_2_1079_002_E
Version: 1.07.9
Page 29 of 64
LinkPod system
For details of the connection modes of the LinkPod system, see appendix ‘C’.
13.5.
Computer
REI2 has two separate connection ports, individually configurable, for dialogue with electronic
processors. The standard supported is RS 232. Although contacts for hardware flow control are
present, in this kernel version these are not managed. Instead, an Xon/Xoff software control is
implemented using the suspension and resumption commands (for details, see appendix D).
Fig. 12 shows an example of connection between REI2 and two different processors.
13.6.
Displayboards
Fig. 13 and Fig. 14 are examples of the connection of one or more Microgate μTAB master
displayboards to REI2. The first displayboard is connected to the ‘Displayboard’ output of the
stopwatch, the second, and any others used, to the ‘Serial 2’ port of the first displayboard. For
further details about displayboard connection modes, consult the relative manual.
On the ‘Displayboard’ connector the output to the displayboards is available both in the standard
RS232, the one typically used for connection of Microtab displayboards, and in RS485, preferred
for connection to MicroGraph displayboards.
As default values, the RS232 output has 1200 bps, 8 bits of data, 1 stop no parity.
Although a computer can be connected to this output to intercept data sent to the displayboards and
to maintain compatibility with software already written, it should be remembered that the data
displayed is limited to what is necesary for the functioning of the displayboards and the output
cannot be configured.
13.7.
REI2 net
This port is reserved EXCLUSIVELY for the connection of other Microgate devices (e.g. REI2),
using the respective REI2 NET ports and the dedicated Microgate cables cod. CAB091.
13.8.
Analogue I/O
This connector allows you to connect external data acquisition devices to one of the 3
analogue/digital 13-bit converters inside REI2. Typical of these instruments is the μClima sensor
for measuring air temperature and humidity and snow temperature. The voltage range accepted is
from 0 to 5 volts.The reading frequency can be programmed via software and the value has been
arrived at through the carefully calculated average of 66 repeated readings.
13.9.
Digital I/O
5 digital signals are available on this connector. 4 of them are configurable, individually via the
software, at the input or output, and in the case of one signal, only at the output. The output level is
0 volts for the value 0 and 5 volts for the value 1, while the input value is between 0 and 2 volts for
the value 0 and between 3 and 5 volts for the value 1.
The signal light Microgate μSEM can be connected to this port.
REI2
User manual
Doc: R2U_2_1079_002_E
Version: 1.07.9
Page 30 of 64
The maximum current available on this connector is 5 milliamperes.
13.10. Power supply
The external power source such as, for example, the adaptor/battery charger supplied in the REI2
package, should be connected to this connector. REI2 accepts a voltage of between 9 and 24 volts
on the input. Keep in mind that with voltages between 9 and 11 volts the internal batteries cannot be
recharged but only ‘maintained’ (see section 7, Battery recharge on page 20).
13.11. Starter
An acoustic start device can be connected to this connector, which is located on the left side of
REI2.
The minimum load allowed is 4 Ω.
REI2
User manual
Doc: R2U_2_1079_002_E
Version: 1.07.9
Page 31 of 64
Fig. 7– Example of connection using the banana jack sockets
Gate
Photocell
Start line
Stop line
REI2
User manual
Doc: R2U_2_1079_002_E
Version: 1.07.9
Page 32 of 64
Fig. 8– Example of connection using both the banana jack sockets and the DIN sockets.
Gate
Photocell
Start line
Lines
REI2
User manual
Doc: R2U_2_1079_002_E
Version: 1.07.9
Page 33 of 64
Fig. 9– Diagram for N/O line
ΔT min 1/10.000s
ΔT min 1/1.000s
5 volt
2,8 volt
2,2 volt
0 volt
Impulse n° 1
Impulse N° 2
Fig. 10– Diagram for N/C line
5 volt
2,8 volt
2,2 volt
0 volt
ΔT min 1/10.000s
ΔT min 1/1.000s
REI2
User manual
Doc: R2U_2_1079_002_E
Version: 1.07.9
Page 34 of 64
Fig. 11– Diagram for N/O line with 1 impulse only
5 volt
2,8 volt
2,2 volt
0 volt
ΔT > 1/10.000s,
<2,2v
Valid impulse
ΔT < 1/1.000s,
>2,8v
ΔT Too short, line
not reopened
ΔT > 1/1.000s,
<2,8v
Voltage too low,
line not reopened
REI2
User manual
Doc: R2U_2_1079_002_E
Version: 1.07.9
Page 35 of 64
Fig. 12– Example of connection between two computers
COMPUTER A
COMPUTER B
9-pole female
CANNON plug
Computer
REI2
User manual
Doc: R2U_2_1079_002_E
Version: 1.07.9
Page 36 of 64
Fig. 13– Example of connection of a MicroTab displayboard
Displayboard
Serial 1
9-figure alphanumeric
MICROTAB displayboard
REI2
User manual
Doc: R2U_2_1079_002_E
Version: 1.07.9
Page 37 of 64
Fig. 14– Example of connection of two or more MicroTab displayboards
Displayboard
Serial 1
Serial 2
Serial 2, if required
towards others
displayboards
9-figure alphanumeric
MICROTAB displayboard
REI2
User manual
14.
Menu structure
14.1. Initial menu
A: New race
A: Single starts
B: Group starts
C: Simple stopwatch
D: Parallel
Other
A: Show jumping
B: Swimming
C: PC-ONLINE
D: Dual timer
B: Delete/Recall stored race
C: Continue current race
D: Clear all memory
Others
A: Battery recharge
A: Discharge/recharge
B: Immediate recharge
C: Interrupt
B: LinkGate radio signal level test
C: Line status (main and pod)
D: Autotuning Battery
Doc: R2U_2_1079_002_E
Version: 1.07.9
Page 38 of 64
REI2
User manual
15.
Doc: R2U_2_1079_002_E
Version: 1.07.9
Page 39 of 64
Maintenance
The only maintenance operations the user can perform are the recharging of batteries, external
cleaning and the changing of paper.
In no circumstances should the device be opened. To do so will render the guarantee invalid. No
maintenance must be carried out on an internal part outside a specialised laboratory.
15.1.
Cleaning
If necessary REI2 can be cleaned with a damp cloth and a non-aggressive detergent. Do not use
solvents such as trichloroethylene, acetone, benzine or other aggressive solvents. Do not let water
get into the printer compartment. Remove any sand carefully by blowing it away.
15.2.
Changing paper
The REI2 printer uses rolls of thermal paper which can be obtained from Microgate. Alternatively it
is possible to use thermal paper, easily obtainable on the market (of the same kind normally used by
POS and cash registers). In this case a few metres of the roll should be removed to reduce its
diameter.
In most cases red bars are printed about 1 metre from the end of each roll to warn that it is ending.
In this case there is ‘autonomy’ for about 150 time events.
To change the paper, follow these instructions:
• Open the printer compartment by turning the fastening screw in an anti-clockwise direction.
• Take out the finished roll, making sure you take out the central plastic spindle with it.
• Cut the strip about 5cm from the printer.
• Press the <Printer > key until all the paper has been taken out.
• Place the paper under the roller. It will be gripped and passed under the roller.¹
• Press the <Printer > key.
• Insert the spindle in the roll and place the roll in the compartment so that the spindle is inserted
in the slots.
• Pass the paper through the slit in the cover of the printer and fasten with the screw.
)
Remember to press the <Printer > key to reactivate it after changing the paper. Until
the key is pressed the printer remains inactive and no printout is made.
When no paper is inserted (or the head is in the ‘unblocked’ position) any lines to be printed are
retained in REI2’s memory and printed as soon as the paper is inserted (or the head is returned to
the ‘blocked’ position).
¹ A special sensor detects the presence of the paper. If the paper is not gripped, either because it is cut badly or for any
other reason, it can be gripped by pressing the <Printer > key and keeping this key pressed down until the paper has
passed from the other side of the roll.
REI2
User manual
15.3.
Doc: R2U_2_1079_002_E
Version: 1.07.9
Page 40 of 64
Releasing the paper
If necessary it is possible to withdraw the paper from the printer manually by releasing the head
with the appropriate for this lever and carefully pulling it out with your hands. When you have
finished this operation, reblock the head, again with the appropriate lever.
)
To avoid damaging the surface of the internal head, it should never be touched with
metal or pointed objects.
REI2
User manual
16.
Doc: R2U_2_1079_002_E
Version: 1.07.9
Page 41 of 64
Climatic conditions
REI2 has been tested in extremely difficult conditions of use. The optimal operational temperature
range is between –20 °C and +50 °C with uncondensated humidity from 0 to 90%. At temperatures
below –20C° the speed at which the graphic display is updated may be reduced and there may be a
loss of measurement accuracy of 0,05 ppm/°C. After a few minutes the inside of the device
naturally warms up, limiting such problems.
Temperatures above +50 °C can cause a loss of measurement accuracy of 0,05 ppm /°C.
The maximum range of use is –40°C to +70 °C. The device should not be used outside this range.
The range for storage is from –50°C to +100 °C. If the device has been stored at a temperature
outside its range of use, wait a few hours until it returns within the operational range.
Doc: R2U_2_1079_002_E
Version: 1.07.9
Page 42 of 64
REI2
User manual
17.
Technical data
17.1.
Connectors
All the connectors are seen from the contact side (and are also visible when you look at REI2 from
the back). The connection schemes are provided for documentation. Microgate recommends the use
of its own dedicated cables, which have undergone the EU standards tests.
6 pole DIN 45322 female panel connector
3
2
4
Fig. 15 – 6 pole DIN
5
1
6
180° 5 pole DIN 41524 female panel connector
2
4
5
Fig. 16 – 180° 5 pole DIN
1
3
240° 5 pole Nucletron male connector
1
5
Fig. 17 – 240° 5 pole Nucletron
2
4
3
REI2
User manual
17.1.1.
Doc: R2U_2_1079_002_E
Version: 1.07.9
Page 43 of 64
Supply
180° 5 pole socket for power supply
1
Ground
2
Not connected
3
External power supply input of from 9 to 24 allowed, maximum absoprtion 10 W1
4
Not connected
5
Not connected
17.1.2.
Analogue I/O
240° 6 pole socket for connection of analogue acquisition devices
1
Analogue input 0 (0..5V)
2
Analogue input 1 (0..5V)
3
Analogue input 2 (0..5V)
4
5V regulated output for power supply of external devices, max 800mA
5
Ground (reference for analogue inputs)
6
Not connected
17.1.3.
Digital I/O
240° 6 pole socket for connection of digital acquisition devices
1
Digital input/output 0 (0/5V, configurable via software)
2
Digital input/output 1 (0/5V, configurable via software)
3
Digital input/output 2 (0/5V, configurable via software)
4
Digital input/output 3 (0/5V, configurable via software)
5
Ground
6
Digital output (0/5V)
17.1.4.
Radio
5 pole miniDIN socket
1
Input
2
-10V, max 20mA
3
Output
4
Regulated 5V output, max 800mA
5
Ground
17.1.5.
Computer A
240° 6 pole socket standard signal RS 232 no hardware protocol
1
Serial output (TXD)
2
Not used
3
RS232 input for flow control
4
RS232 output for flow control
5
6
1
GND
Serial input (RXD)
Between 9 and 11 volts REI2 is correctly powered but the internal batteries cannot be recharged.
REI2
User manual
17.1.6.
Doc: R2U_2_1079_002_E
Version: 1.07.9
Page 44 of 64
Computer B
240° 6 pole socket standard signal RS 232
1
Serial output (TXD)
2
Not used
3
RS232 input for flow control
4
RS232 output for flow control
5
GND
6
Serial input (RXD)
17.1.7.
Display Board
240° 6 pole socket standard signal RS 232 and RS 485
1
Serial output RS232 (TXD)
2
3
Serial output RS485 (+)
4
Serial output RS485 (-)
5
GND
6
Serial input RS232 (RXD)
17.1.8.
Rei2 Net
240° 6 pole socket standard signal RS 485
1
2
3
Serial output RS485 (+)
4
Serial output RS485 (-)
5
GND
6
17.1.9.
Timing Inputs
240° 6 pole socket signal at TTL level contacts not polarised
1
START
2
Regulated 5V output for power supply of external devices, max 800mA
3
Ground
4
LAP
5
STOP
6
AUX
17.1.10.
LinkPod
240° 6 pole socket standard signal RS 485 (with galvanic insulation)
1
Optoinsulated serial output RS485 (+)
2
15V regulated output galvanically insulated from the device, max 150mA
3
Ground galvanically insulated from the device
4
Optoinsulated serial output RS485
5
Optoinsulated serial input/output RS485 (+)
6
Optoinsulated serial input/output RS485 (+)
Doc: R2U_2_1079_002_E
Version: 1.07.9
Page 45 of 64
REI2
User manual
17.1.11.
Start
3.5 mono jack
17.2.
Sports homologization
Data concerning sports homologization is available from Microgate.
17.3.
Technical conformity certificates
Technical conformity certificates are available from Microsoft. Details of the certificates issued by
Italy, Germany, France and Switzerland are given below.
Nation
Authority
Certificate
Italy
Ministero delle Telecomunicazioni
EMC/99/IST/027
Germany and Austria
TÜV
TPS A100 244L CEPT LPD-D
France
ART Autorité de Régulation des 99 0083 PPL 0
Télécommunications
Switzerland
BAKOM OFCOM UFCOM
BAKOM 99.0044.K.P.
REI2
User manual
18.
Doc: R2U_2_1079_002_E
Version: 1.07.9
Page 46 of 64
Guarantees and responsibilities
Microgate guarantees its products against defects of workmanship for a period of one year from the
date of delivery.
Microgate cannot accept any responsibility for breakages of REI2 or other equipment due to
incorrect connection of power sources or auxiliary devices, including those produced by Microgate,
as a result of the use of unsuitable connecting cables.
Microgate cannot be held in any way responsible for any malfunctioning which may occur during
the timing of any kind of event.
B
LINKGATE SYSTEM
Doc: R2U_2_1079_002_E
Version: 1.07.9
Page 48 of 64
REI2
User manual
1. Introduction to LinkGate
The transmission of an impulse via radio is a critical phase in timekeeping. The possibility of
losing the data transmitted, of having very inaccurate timing and the transmission difficulties in
some zones has often made timekeepers and trainers skeptical about this type of approach.
The LinkGate Encoder system represents a radical innovation in the field of radio transmission
of impulses for timekeeping. Technological evolution makes it possible to go from the old
impulse transmission systems to the more modern data transmission concept, which can
guarantee extreme accuracy, redundancy of the information transmitted and greater reliability. In
addition, the compact size of the system and the possibility of using modules which have built-in
radio or modules which can be connected to any type of VHF or UHF transmitter radio make the
LinkGate Encoder the ideal instrument for training and competitions at every level.
The components of the LinkGate system are:
Type
Power supply
Radio
Encoder (Enc003)
Trasmitter
Lithium battery Connectable to external transceiver
Decoder (Dec003)
Receiver
Taken
from Connectable to external transceiver
stopwatch
Encoder (Enc005)
Trasmitter
NiMh internal Connectable to external transceiver
batteries
EncRadio (Enc004) Transmitter
NiMh internal With built-in radio module and
batteries
connectable to external transceiver
DecRadio (Dec004) Receiver
Taken
from With built-in radio module and
stopwatch
connectable to external transceiver
The use of modules with or without built-in radio is similar. Consequently in the following
instructions, except when otherwise specified, the term Encoder will be used to refer to both the
module of transmission with radio (Encradio) and to the module without radio (Encoder), and the
term Decoder will refer to the receiving module (also with or without radio). The Encoder
Enc003 and Encoder Enc005 modules are the same except for the type of power supply.
REI2
User manual
Doc: R2U_2_1079_002_E
Version: 1.07.9
Page 49 of 64
2. LinkGate Encoder: 3 features guaranteeing the reliability of radio
transmission
To overcome unreliability and the various problems associated with the old concept of radio
transmission of impulses, LinkGate Encoder offers a number of reliable and innovative
solutions.
2.1.
Digital transmission of impulses
LinkGate Encoder transmits a set of data (no longer a single impulse!) that contains a large
quantity of information. In particular, the following are transmitted:
•
•
•
•
The transmitter’s code (which can be selected with the Channel Select switches)
The Type of signal transmitted (Start, Lap number or Stop, which can be selected with the
Signal Type switch)
How long ago the event took place
The Time taken to cover a speed base (if present).
To the set of data are added numerous control codes and error auto-correction codes which
prevent a signal from being incorrectly interpreted during reception.
All the data (information + control codes) are transmitted 16 times, in order to reduce the
possibility of reception failure.
Even with very disturbed signal transmission, this system ensures maximum reliability and
precision (+/- 0.4 thousandths of a second); the complete reception of a single set of data is all
that is required to reconstruct the original time of the event.
2.2.
The Repeat function
If there are any problems in data reception, (radio malfunction, interference from a more
powerful transmission, a cable which comes unplugged, etc...) you can use the REPEAT
function. LinkGate Encoder allows you to repeatedly re-transmit impulses which have not been
received, even after a considerable length of time has passed.
As soon as the transmission of an event begins, LinkGate Encoder starts counting the time from
the start. By pressing the REPEAT key, you transfer the correct time to the stopwatch which
takes into account the time which has passed up to that moment.
2.3.
Internal memorization of event times
LinkGate Encoder is equipped with a Real Time Clock that allows you to use event times in
event management. This special characteristic enables you to save the times of every event on a
permanent memory, subsequently giving you the possibility through serial link of downloading
its contents onto Microgate’s stopwatches. The device stores the last 256 event times and speeds
and so allows you to retrieve after an interval of time any data lost because of radio malfunction
or any other reason.
REI2
User manual
Doc: R2U_2_1079_002_E
Version: 1.07.9
Page 50 of 64
3. Using the LinkGate Encoder
3.1.
Selecting the channel
Every LinkGate Encoder is equipped with a 7 switch panel (CHANNEL SELECT switch from 2
to 8) for setting the transmission channel. The transmission channel is used in such a way that
only the stopwatches REI2, Racetime2 and REI set to the same reception channel can receive the
transmission signal as valid.
When turned on, the Microgate Racetime and REI stopwatches display the currently selected
channel while REI2 indicates it and prints its configuration (both as a number and as an ON/OFF
configuration of the LinkGate Encoder switches). By choosing the same switch configuration on
the Encoders that you want to use, you can be certain to receive only the signals from your own
timing system. This type of filter for signals being received is particularly useful as, by selecting
different channels you can use several systems (stopwatch + Encoder) in the same zone and even
on the same frequency without any risk of timings interfering with one another. For the REI2
stopwatch, consult the individual program manuals.
3.2.
Selecting signal type
LinkGate Encoder makes it possible to identify the type of impulse that is being transmitted
(START, LAP number or STOP). The rotary selector (marked SIGNAL TYPE) has 16 positions
from 0 to F with the following meanings:
0= START
1= LAP n°1
A= LAP n°10
B= LAP n°11
C= LAP n°12
D= LAP n°13
E= LAP n°14
F= STOP
The type of signal is chosen by placing the number or letter for the signal you want next to the
black dot by the words SIGNAL TYPE. (Note: the letters are written on the edge of the selector).
3.3.
Selecting working frequency
To be able to communicate with each other the components of the LinkGate system must operate
on the same radio frequency and with the same type of modulation.
Encoder e Decoder:
For the LinkGate Encoder and LinkGate Decoder systems the setting
of the working and modulation frequency is performed on the radio
devices connected.
EncRadio e DecRadio:
For LinkGate EncRadio and Linkgate DecRadio the working
frequency can be varied by using the 4 switches (protected by a plastic
window) on the back of both the transmitter and receiver. 16 different
radio channels can be made available by exploiting the various
combinations.
REI2
User manual
Doc: R2U_2_1079_002_E
Version: 1.07.9
Page 51 of 64
A sufficiently high level of the quality of the radio signal received by the LinkGate system is a
necessary condition for its correct use. When you have completed configuration of the LinkGate
system, we advise you to perform the ‘LinkGate radio signal level test’, present in the various
timing programs on the various stopwatches, to assess its quality.
By distributing the various frequencies available, complex LinkGate systems can be used at
events which take place near each other without causing mutual interference.
3.4.
Impulse transmission
An impulse can be transmitted in two ways:
1. with the manual activation key (SIGNAL key)
2. by means of any signal given by the closing of a contact normally open produced by a gate or
photocell., using the BLACK banana jack as a ground and the GREEN banana jack as the
signal.
At the end of data transmission, the LinkGate Encoder will emit a BEEP, which signals that the
device has functioned correctly.
By using a switch (switch n. 1 next to the words SHORT IMPULSE LONG) you can set
transmission duration (approximately 2.3 seconds for long transmission and 0.6 seconds for
short). By selecting long transmission, you will obtain greater redundancy of information as the
same data will be transmitted 16 times. If you select short transmission the set of data will only
be transmitted 4 times so you will have lower redundancy but with a substantial reduction of
transmission time.
For normal use, we advise you always to use long transmission (switch n. 1 OFF) in order to
maximise the redundancy of transmitted data. However, for special applications such as the
taking of several intermediate times very close together, using short transmission is the only
practical solution if transmissions are not to overlap.
Encoder and Decoder:
3.5.
IMPORTANT: when using short impulse transmission, it is advisable
to operate the receiving radio’s “SQUELCH control so that it remains
constantly activated In this way, you will avoid losing impulses as a
result of the delay caused when the transceiver switches over to
reception.
The repeat function
If for some reason the last event was not received by the Microgate stopwatches you can
retransmit it to them by pressing the REPEAT button even after a considerable interval of time.
If the problem should continue, the event can be re-transmitted as many times as necessary until
satisfactory reception has been obtained.
3.6.
Acquiring a speed
With LinkGate Encoder you can receive up to 16 pass-by speeds from as many different
acquisition zones. The basic idea is to calculate the time taken to cover a speed base extremely
accurately and transmit it together with the corresponding impulse (START, LAP or STOP).
Then, by inserting the length of every single speed base into the Microgate stopwatch, you can
obtain the value for the average speed for that stretch.
REI2
User manual
Doc: R2U_2_1079_002_E
Version: 1.07.9
Page 52 of 64
The input signal in the speed base must be brought onto the RED banana jack and the relative
ground onto the BLACK banana jack (see cap. 5.1 Linkgate EncRadio on page 56); the output
signal of the speed base must be brought onto the GREEN banana jack together with its ground
which must be connected to the BLACK banana jack.
When an impulse is received from a speed base input (from the RED banana jack), LinkGate
Encoder sets the time running. If within 8 seconds there is an impulse from the speed base
output (from the GREEN banana jack), LinkGate Encoder will transmit the time between the two
signals (time taken to cover the speed base) and the impulse of the speed base output (that is, the
corresponding LAP or STOP impulse). In the case of a START signal (with the rotating selector
on position 0), the impulse of the output signal from the speed base will always be transmitted,
but the receiving stopwatch will reconstruct the correct time.
If more than 8 seconds pass between an input impulse in the speed base and an output impulse,
the system will automatically discard the value – only transmitting the output impulse of the
speed base (the signal corresponding to the GREEN banana jack).
3.7.
Hardware resetting
It is possible to reset LinkGate Encoder to hardware mode. The hardware reset deletes all the
data in the memory, sets the internal clock to zero and, if the system has crashed for any reason,
restores it to an operational state. On the other side from the keyboard there is a hole in the case.
By inserting a pointed instrument you will press a button which will reset it. We suggest you
keep the button down for a few moments to ensure the machine has been reset.
3.8.
Memory resetting
Resetting the memory causes the deletion of stored data and of the system’s internal time. You
can activate reset by keeping the 2ND key pressed down and then releasing the REPEAT
(RESET) key. When this command has been received, LinkGate Encoder will emit three tones as
follows: BOOP-BEEP-BOOP. The system is now reset!
3.9.
Synchronization
LinkGate Encoder is equipped with a Real Time Clock which enables you to associate any event
with a time. It is therefore possible to synchronize LinkGate Encoder’s internal clock with any
type of stopwatch. The procedure for synchronizing the system is as follows:
• Connect the ground (GND) of the stopwatch to LinkGate Encoder’s BLACK banana
jack
• Hold down the 2ND key and then press and release the SIGNAL (SYNC) key
• LinkGate Encoder will emit the tones BOOP-BEEP (the system is waiting for a
START)
• Connect the start line to the GREEN banana jack
• Within two minutes give a start signal to synchronize the system (either by pressing
the SIGNAL key or by closing the start line on the ground)
• On receiving the START signal, LinkGate Encoder will emit two tones tone: BEEPBOOP (the system is synchronized)
If you wish to synchronize two or more Encoders with a stopwatch, the procedure remains the
same. You must connect all the ground lines (BLACK banana jacks) with the ground of the
stopwatch; then for every LinkGate Encoder you must activate the SYNC procedure (the second
REI2
User manual
Doc: R2U_2_1079_002_E
Version: 1.07.9
Page 53 of 64
point in the procedure), connect the start line with all the GREEN banana jacks and give a
common START.
Note: LinkGate Encoder automatically synchronizes itself to the time 00:00:00.000; it is not
possible to set other times.
3.10.
Downloading data onto REI2
LinkGate Encoder memorises the last 256 events and the last 256 speeds (if acquired) on an
internal permanent memory and so makes possible retrieval after an interval of time of any
impulses lost as a result of radio malfunction or for any other reason. To be able to transfer the
contents of LinkGate Encoder’s memory onto the REI2 stopwatch, it is necessary to use the
dedicated cable (CAB9), which should be connected to LinkGate Encoder’s 5 pole connector at
one end, and at the other to the ‘Computer B’ 5 pole connector (Fig. 15) on REI2. Once the
correct menu has been selected on REI2’s stopwatch (see manuals for the individual programs),
you can proceed with data downloading by pressing the 2ND key and then by pressing and
releasing the ‘MODEM’ (SERIAL) key. The start of downloading is signaled by the two tones
BOOP-BEEP; then within 2 seconds two counters will appear on REI2’s display to indicate the
number of times and speeds actually downloaded. At the end of data downloading, the two tones
BEEP-BOOP indicate that the procedure has terminated correctly.
Attention: if you download data immediately after performing a memory RESET (2ND +
REPEAT (RESET)) and without transmitting any impulses, LinkGate Encoder will download
the entire contents of the memory (256 times + 256 speeds).
IMPORTANT: During data downloading onto REI2, disconnect the LinkGate Decoder
from the stopwatch. Also disconnect the data download cable during timing via radio.
3.11.
Modem function
LinkGate Encoder can also be used as a modem transmitter. Contrary to what happens when
transmission is generated during an event, however, the signal at the input does not take the form
of sets of data with error correction codes, but is simply transformed into a signal compatible for
radio transmission. Data reliability is left entirely to the efficiency of the radio system.
In this function mode, LinkGate Encoder accepts as input a Serial signal with a maximum speed
of 1200 Baud and generates a FSK modulation between 1200 Hz (logic signal 0) and 1800 Hz
(logic signal 1).
The digital input signal (level RS 232, RS 485 or TTL) is connected to the blue banana jack and
the black banana jack.
The MODEM function can be activated by pressing the ‘MODEM’ key 3 times consecutively
and rhythmically. At the first two presses, you will hear a BEEP tone. At the third, the tones
BOOP-BEEP will signal entrance into MODEM function. If the key is not pressed with the
correct rhythm, the system will refuse to enter this mode. The reason for this complicated
procedure for activating this function is that the MODEM function quickly uses up the battery.
In this way you can avoid the danger of rapidly running down the battery by accidentally
touching the MODEM key.
To terminate the transmission session you need only press the MODEM key once. The system
will emit the tones BEEP-BOOP to signal correct termination of the procedure.
REI2
User manual
3.12.
3.12.1.
Doc: R2U_2_1079_002_E
Version: 1.07.9
Page 54 of 64
Maintenance
Encoder Enc003
This module is designed to avoid the need for any type of standard maintenance. In normal
working conditions the lithium battery (3.6 V) has a life of approximately 6 years. When the
LinkGate Encoder is in a situation of limited autonomy, it emits an acoustic signal to warn the
user. The low battery signal consists of three brief tones BEEP-BEEP-BEEP at the end of an
impulse transmission. In this case, you should immediately contact your Microgate
representative or the company for battery replacement and an overhaul of the system.
3.12.2.
EncRadio Enc004 and Encoder Enc005
The Encradio (Enc004) and Encoder (Enc005) modules are powered by internal NiMh batteries,
which can be recharged with the adaptors supplied. They can be used without recharging for
about 10,000 impulses or 8 hours in the displayboard command mode. When LinkGate radio’s
power is running low, it warns the user with an acoustic signal. The low battery signal consists of
the emission of 3 brief BEEPs at the end of the transmission of an impulse. Usually, the power
remaining is sufficient to finish the timing session.
Any power source between 9 and 20 Volts can be used to charge the internal batteries and also
for external power supply. To increase the life of the internal batteries, it is advisable to recharge
only after the low battery warning or after 3 months of not being used.
3.12.3.
Decoder e DecRadio
The Decoder and DecRadio modules take power directly from the Microgate stopwatch using the
dedicated connecting cable.
REI2
User manual
Doc: R2U_2_1079_002_E
Version: 1.07.9
Page 55 of 64
4. Licences
Encoder and Decoder:
For the use of the LinkGate Encoder and Decoder modules, check the
regulations for radio transmissions of the country in which you intend
to use them. (In Italy, with the exception of specific cases, users of
transceivers must have a licence).
DecRadio and EncRadio: The DecRadio and EncRadio modules do not require a licence (in
Italy and the EU) when functioning with the built-in radio module.
Details of homologization and licensing are given below.
Italy: DGPGF/4/2/03/339883/F0/0004199
Germany/Austria: TPS A 100 244 L
France: 990083PPL0
Switzerland: 99.0044.K.P
UK: 14033
REI2
User manual
Doc: R2U_2_1079_002_E
Version: 1.07.9
Page 56 of 64
5. Figures
5.1.
Linkgate EncRadio
5
1
2
SIGNAL
REPEAT
SYNC
RESET
2ND
MODEM
6
11
SERIAL
SIGNAL TYPE
3
0= START
ON
1-E= LAP
F= STOP
S
CHANNEL
L
SELECT
9
10
8
4
VISTA
FRONTALE
FRONT
VIEW
1
2
3
4
5
6
7
8
9
10
11
7
VISTA
LATO SINISTRO
LATERAL
VIEW
SIGNAL button
SECOND FUNCTION button
Selector for redundancy of signal transmitted (Long/Short)
On/Off switch
REPEAT button
MODEM button
Rotating selector for type of signal transmitted (Start, Lap, Stop)
Channel transmission selector
LOW BATTERY led
Jack connector for battery recharge
Cover for access to DIP SWITCH selector for transmission frequency
VISTA POSTERIORE
BOTTOM
VIEW
Doc: R2U_2_1079_002_E
Version: 1.07.9
Page 57 of 64
REI2
User manual
5
2
3
1
VISTA
LATO INFERIORE
BOTTOM
VIEW
1
2
3
4
5
6
6
4
VISTA
LATO SUPERIORE
UPPER
VIEW
SIGNAL signal banana jack (GREEN)
Earth signal banana jack (BLACK)
SPEED signal banana jack (RED)
5 pole Nucletron connector for Radio connection and data download
BNC for external antenna connection
MODEM input banana jack
REI2
User manual
5.2.
Linkgate DecRadio
5.3.
DecRadio
2
Doc: R2U_2_1079_002_E
Version: 1.07.9
Page 58 of 64
1
3
1
2
3
BNC for external antenna connection
5 pole Nucletron connector for Radio output
Cover for access to DIP SWITCH
Doc: R2U_2_1079_002_E
Version: 1.07.9
Page 59 of 64
REI2
User manual
5.4.
Taking the speed
Fig. 18 – Taking the speed
BLACK PLUG IN
BLACK SOCKET
POLIFEMO
DECRADIO
BLACK PLUG IN
BLACK SOCKET
ENCRADIO
CAB048 or CAB050
GREEN PLUG IN
GREEN SOCKET
GREEN PLUG IN
GREEN SOCKET
POLIFEMO
GREEN PLUG IN
RED SOCKET
BLACK PLUG IN
BLACK SOCKET
GREEN PLUG IN
GREEN SOCKET
BLACK PLUG IN
BLACK SOCKET
C
LINKPOD SYSTEM
REI2
User manual
Doc: R2U_2_1079_002_E
Version: 1.07.9
Page 61 of 64
1. Introduction to LinkPod
The LinkPod system allows you to connect a maximum 80 external lines to REI2, in addition to the
4 available on the device. For each line the logical channel to which it corresponds, disactivation
times and possible activation and disactivation can be individually specified.
The system consists of a variable number of Pods (maximum 10) and their respective connecting
cables.
1.1.
Information transmitted
The Pods do not send REI2 a simple signal of opening or closing of contact but transmit sets of
information containing the moment at which the event took place and the line and Pod which
acquired it. The protocol used for transmission is RS 485. Each Pod deals with any conflicts of
transmission.
1.2.
Measurement and speed precision
The accuracy of measurement obtained by using the LinkPod system is the same as that obtained by
using the normal input lines of REI2.
The Pods keep themselves synchronized with REI2 by using a special synchronization signal sent
by REI2. Consequently the maximum time lag is always lower than REI2’s resolution (1/25,000s).
The system can acquire and transmit to REI2 the status and events acquired by any module in a very
short time (maximum150 ms). Therefore also simultaneous events, such as the simultaneous closing
of all 80 contacts, are acquired and reported to REI2 within 150 ms, maintaining maximum
accuracy of measurement.
1.3.
The Pod
Every pod has a series of 8 input lines, 2 connectors for connection to the other Pods and the
stopwatch, a device for setting the number of Pods (address) and a series of switches for the N/O or
N/C configuration of the inputs.
The number assigned to the Pod must be different for each of the Pods connected. When you assign
numbers, you do not necessarily have to follow the order in which the Pods are connected to each
other but can number as you like. However, it is advisable to assign numbers consecutively to
simplify the identification of the lines.
The lines of each Pod can be individually configured as N/O or N/C independently from each other
and from every other Pod.
The cable is used to supply power and the synchronization signal and to transmit the sets of data
containing the information concerning the events acquired (time, number of pods and line). It is
therefore advisable to use the dedicated Microgate cables, type CAB092, or cables of similar
quality.
The maximum distance between REI2 and the farthest Pod is about 1000 m.
Connection cables of different sizes are available. The cable used consists of 3 twisted pairs with
watertight Amphenol connectors at the ends.
REI2
User manual
1.4.
Doc: R2U_2_1079_002_E
Version: 1.07.9
Page 62 of 64
Insulation
The external lines are galvanically insulated from the stopwatch power supply according to CE
specifications and so can also be used at a swimming pool.
1.5.
Maintenance
After being used at a swimming pool, the Pods should be washed in running water and left to dry
before they are put away to avoid damage from chlorine. (The chlorine mist present in swimming
pools is very aggressive and can attack any material). The connection cables, in particular the
connectors, should be washed and dried.
REI2
User manual
Doc: R2U_2_1079_002_E
Version: 1.07.9
Page 63 of 64
1. Editing history
The table below summarises the main changes made to this document.
Program
version
1.03
Chapter
1.06
1.06
1.06
1.06
1.07.9
6.3
6.4
10
11
Page Editing description
18
18
25
26
Removal of introductory chapter to transmission protocol,
now inserted in the manual ‘Transmission protocol’.
New function Synchronization verify
New function Signal
New function Switching off
Function changed Memorization
Editing for version 1.07.9
REI2
User manual
Doc: R2U_2_1079_002_E
Version: 1.07.9
Page 64 of 64
Copyright
Copyright © 1999, 2005 by Microgate s.r.l.
All rights reserved
No part of this document or of any of the individual manuals may be copied or reproduced without
previously making a written application to Microgate s.r.l. for authorisation.
All the marks or names of products mentioned in this document or in the individual manuals are or
may be registered marks belonging to the individual firms.
Microgate, REI2, REI, RaceTime, MicroTab, µTab, MicroGraph, µGraph, MicroBeep, µBeep,
Uploder, Microrun, MicroLink, µFlasher, LinkPod, LinkGate, LinkGate encoder, LinkGate
decoder, EncRadio, DecRadio, Polifemo, MicroSem, µSem, are registered marks of Microgate s.r.l.
or of licensed users.
Microgate s.r.l. reserves the right to modify the products described in this document and/or in the
relative manuals without notice.
Collaborators in the creation of REI2 and the preparation of the relative manuals are:
Ing. Roberto Biasi
Dr. Vinicio Biasi
Ing. Federico Gori
Ing. Alessandro Miorelli
Giuliano Menestrina
Daniele Veronese
The software and manuals are available in the following languages: Italian, English, German and
French.
Microgate S.r.L
39100 Bolzano - Bozen
Via Stradivari, 4 Stradivaristr.
ITALY
Tel. +39 471 501532 - Fax +39 471 501524
e-mail [email protected]