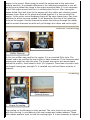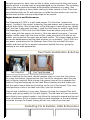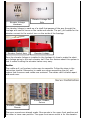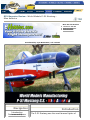
1
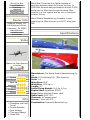
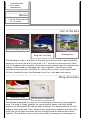
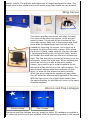
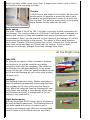
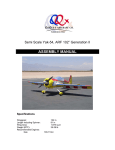
RCU Magazine Review - World Models P-51 Mustang Miss America
More On This Product
1 Active For-Sale Ad!
Show user ratings
Check for Retailers
Contributed by: Lynn Bowerman | Tell a Friend
Navigation
Introduction
Features and Specs
Introduction
The P-51 Mustang was the most famous fighter of
Out of the Box
At the Flight Line
Summary
Manufacturer &
Distributor Info
Dealer Info
AirBorne Models, LLC
2403 Research Drive,
Livermore, CA 94550
www.airbornemodels.com
World War II was the first fighter capable of
escorting bombers deep into enemy territory. In
1966 Miss America was purchased as a stock P-51D
and given the Miss America paint scheme. Miss
America is a true legend, and an icon in American
Aviation history.
World Models Manufacturing Company is now
producing the Miss America in an 80.5" wing span
ARF.
Specifications
Video
Watch the Miss America
in Action
6.78 MB
Ratings
Quality
Performance
Ease of
Assembly
Looks
Hardware
Manual
Hits
Fiberglass cowl and
Scoop
Robust Retracts
Fast building
Thorough Manual
Good Stall
Manufacture: The World Models Manufacturing Co.,
Ltd
Model: P-51 Mustang G.S. (Miss America)
Scale: 1/5
Wing Span: 80.5"
Wing Area: 1155 sq in
Length: 70"
Actual Flying Weight: 15.0 lbs 0.0 oz
Engine Used: Supertigre G2300
Prop: Master Airscrew Classic 18x6
Radio Used: JR XF 783
Channels: 6 Channels used
Servos: 7 Hitec HS-475,
Construction: Plywood & Balsa Built up
characteristics
Very scale
appearance
Misses
Some Covering had
to re-ironed
Out of the Box
Fuse,Cowl,Scoop,Spinner
Wing and Tail Parts
Mustang Box
The Mustang arrived in a large box. Everything in the box was in good condition,
except for one wing tip with a few dings in it. I shrunk the covering and it looks
fine. All hardware was complete. Some items worth mentioning; the retracts were
already installed and are designed well. Also supplied in the kit was a clear
temporary cowl used as a template for making the cut outs in the painted cowl.
All that's needed to finish the Mustang is fuel line, radio gear and engine.
Wing Assembly
Wing and Tubes
Wing Halves Hardware
World Models designed the wing on the mustang as a two-piece, plug together
wing. The wing is joined together by two aluminum tubes, and then bolted
together by the supplied 90-degree angle brackets. The angle brackets are first
bolted to each wing half. Then, slide the two wing halves together and the other
bolts then go through the other half of the angle brackets drawing the halves
together. This feature is very nice for being able to transport the mustang in a
smaller vehicle. The ailerons and flaps come all hinged and glued in place. The
hinges used in the mustang are an all-metal hinge that should be very durable.
Wing Servos
The aileron and flap servos are very easy to install.
First remove the servo bay covers, which are just
taped in place. The servos will be mounted to the
servo bay covers. Next look in the manual and it will
show what the balsa blocks look like that will be
needed for mounting the servos. Use a servo as a
template for gluing the blocks in place. After gluing
the blocks in place, make holes for the servo screws.
I recommend wicking thin CA into the holes, as this
will harden the wood and help the servo screws stay
tight. The flap and aileron servos will mount on to the
wing servo covers the same way. When installing the
servos be sure to you look at the servo covers
closely, they need to go in certain locations so the
ailerons and flap servos go in the right direction. The
aileron servo outputs need to be opposite of each
other, in order for the ailerons to work correctly.
When the servo outputs are opposite of each other
this will make the ailerons work opposite of the other.
With the flap servos, the output arms need to face
the same direction, so the flaps will move in the same
direction together.
Aileron and Flap Linkages
Aileron Linkage
Flap Linkage
The aileron and flap linkages are very simple to make. All hardware is supplied in
kit. After the control horns are installed, hold the controlling surface in the neutral
position and get a measurement to the servo. Make a 90-degree bend in the
wire; this end will go through the servo arm. The other end will hook to the
control horn with a clevis. Make sure, after the linkages are made, there is no
binding and the servo can actuate fully, without hitting on servo the arm opening.
It may become necessary to increase the size of the opening. Be sure to install on
the linkages the supplied small pieces of fuel tubing. These ensure that the clevis
cannot open up and come off.
Retracts
Retract Up
Retract down
The retracts are already installed in the wing. They are robust in size and are
mounted very solidly. At the wheel, the strut was designed to have some give
built into it for hard landings. This can be seen by the U shaped bend next to the
wheel. Another nice feature of these retracts is there is no need to use a retract
servo.
The retracts, have a spring inside them that assist the servo as the wheel is
coming up. In the instruction manual World Models tells how much travel is need
from your servo to fully actuate the retract mechanism. This can be accomplished
with a large servo arm. If for some reason you should bend one of the retract
strut, there are procedures in the back of the instruction manual on how to
straighten them.
Outer Retract doors
Follow the instructions manual when installing. Use
Household Goop adhesive on all parts when
assembling. The Goop adhesive will dry and stay
flexible, which is useful if the retract doors should
bumped or have a hard landing.
Outer Retract doors
Retract Servos
Servo in Up position
Servo in Down Position
Retract Servo
The BMS-620MG servo from Blue Bird was chosen for the retracts. It has all
metal gears, double ball bearings and produces 120 ounce inches of torque. The
supplied control horns with servo will give the needed throw for the retract to
actuate fully. The Mustang uses two servos one in each wing half. All necessary
hardware is supplied.
Engine & Cowling Installation
Engine Box Side
Engine Box
The Supertigre G2300 was chosen for the review; it has a displacement of 1.40
cubic inches or 23cc and develops 3.7 horsepower @ 12,500 RPM. Weight with
muffler is 37.65 ounces or 2.35 Lbs. The suggested prop sizes from Supertiger
are 18x6, 18x8 and 18x10. The 18x6 Master Airscrew, Classic was chosen for the
review. A lighter pitched prop will to let the engine RPM be higher.
Engine Mounting
Engine Mounts and
Hardware
Engine Left Side
Engine Right Side
The engine mount that is supplied in the kit is an anti vibration type mount.
There's a little more work involved with assembling the mount and installing the
engine in the mount. When ready to install the engine look at the instruction
manual carefully. A noticeable difference in the mounting procedures is you will
be drilling out plates that clamp to the engine mounting tabs. It is not necessary
to drill the engine mount itself for it is already done for you. After having the
plates drilled, then bolt them to the engine with the rubber anti vibration pieces
between them. Once all the pieces are bolted together it is time to install the
engine. In the motor mount hardware there will be many brass shims. Pay close
attention to which ones are needed. It will depend on the size of the mounting
holes on the engine. Use the brass shims where the bolts go through the rubber
and the mount otherwise the bolts will pull through the rubber and not be tight.
Muffler Mounting
Muffler Mounted
Muffler Opening
A slim line muffler was used for the review. It is an inverted Pitt's style. The
firewall had to be modified for the muffler to have clearance. If the recommended
engines are used then skip this step. The firewall was cut to give ample space
around the muffler, them boxed in with 1/16 plywood. There was no concern with
the firewall loosing any strength. It is installed very well and there is plenty of
material.
Cowling
Cowling Screws
Engine In cowling
The cowling on the Mustang is nicely painted. The color lines line up very nicely
with the covering. A nice feature is the cowl screws and rubber washers. These
little rubber washers' work to hold the cowling tight. It is not necessary to tighten
the cowl screws very tight, they act like a rubber mount and let they cowl move
slightly without it coming loose or being damaged by the vibration. The mounting
holes in the cowl parts are already drilled making installation very easy. Also
World Models supplies a clear plastic cowling to make cutouts in first. Then once
your satisfied with your fit and openings you slide the clear plastic cowl over the
painted cowl and the cutout and openings will be perfect.
Engine break in and Performance
The Superetigre G 2300 is a well made engine. The first time I started the
engine, I primed it like normal, hooked up the glow starter and it started right up
and sat there idling. After three tanks of fuel the engine it was idling very reliably
and I felt that it was ready to flown. I used the 18x6 prop for break in and flying.
The Supertigre G 2300 turns the 18x6 Master Airscrew classic prop at 8300
rpm's, even with the engine not broke in. One note about the engine, if you use
another muffler other than the stock muffler, make sure that the outlet on the
muffler you choose has the same size as stock muffler. The engine needs to have
the correct backpressure and fuel tank pressure to run properly. The G 2300 is a
nice power combination for the Mustang. Use a Slim line inverted Pitt's style
muffler and there will be no engine components outside the cowl, giving the
mustang a nice scale appearance.
Fuel Tank Installation & Set up
Fuel Lines Exit
Fuel Tank Mounted
Before installing the fuel tank, decide between a two or three line fuel system.
For a two-line system, disconnect the fuel-line off the carburetor each time the
tank is filled or emptied. With a three-line system there will be a separate line
used for filling and emptying the fuel tank When installing the tank make sure
that the motor mount bolts aren't sticking too far out of the firewall. If so, they
could puncture a hole in the tank over time, from the vibration.
The fuel tank installation is very easy. Because of using the inverted Pitts style
muffler and having modify the fire wall slightly, The fuel tank will have to moved
back slightly from original location. Just follow the instruction manual and you will
have no problems. One nice feature with the tank installation is the tank stopper
protrudes through the firewall leaving all fuel lines visible from the front.
Installing Fin & Rudder, Stab & Elevators
Stab and Joiner Tubes
Stabs Joined
Vertical Fin Installed
Installing the tail parts was very easy; they aligned perfectly and took very little
time. The horizontal stabs are designed so that they can be removed, making
transportation much easier. The instruction manual says to glue the joiner tube
into one half of the stab. After installing stabs on fuselage, there are two supplied
screws that go through the stabs and into the fuselage. World Models has already
installed the blind nuts in the fuselage and they line up very nicely. The vertical
fin is glued in to the fuselage. The rear of the fuselage is designed so, that the
rudder post will slide into the fuselage halves and it will hold the fin in place. As a
suggestion to make sure that fin stays in proper alignment, use masking tape to
hold still. The instruction manual tells what steps to take to make sure you have
proper alignment.
Control Linkages
Assembled Pull, Pull
Elevator, Rudder Pull,
Pull Hardware
Pull, Pull Linkages
The rudder and elevator linkages are a cabled pull, pull system, which will need
assembling. Follow the instruction manual carefully when assembling. There are
illustrations showing how the wire must be looped around the brass bushing, and
then crimped. One word of caution when assembling the pull, pull system. Make
sure that the servo and controlling surface are centered, so the length of the
cable will be correct. There is only one opportunity to make it right. Once made,
its permanent.
Elevator Linkage
Hardware
Elevator Linkage One
Side
The elevator linkage is made up of a shaft that passes all the way through the
fuselage with control horns on the inside and outside. The pull, pull cables for the
elevator connect to the control horn on the inside of the fuselage.
Elevator Control Horn
Elevator Linkage
Once the elevator linkage is installed in the fuselage it's time to make the short
wire linkage going to the each elevator half. One nice feature about this system is
that it makes leveling the elevator halves very easy.
Rudder
The rudder pull, pull system is also easy to assemble. Follow the steps in the
instruction manual. Remember to make sure when assembling the pull, pull
system that the servo and rudder are centered. The cables can't be taken apart
and made over.
Servo Installation
Elevator, Rudder,
Servos
Elevator, Rudder Servo
Mounts
The servo mounts are already made. One mounts in the upper front position and
the other in lower rear position. The upper front servo mount is for the elevator.
Mount the lower rudder servo mount first. If upper servo mount is put in first it
will interfere with mounting the lower.
Throttle
A HS-85 servo was used for the throttle. By using the
smaller servo it's possible to mount the servo more
forward in an area that wasn't meant for a servo but
fits very well. This puts the servo closer to the engine
and a shorter throttle cable can be used.
Throttle Servo Mounted
Radio set up
The radio I chose is the JR Xp 783. I felt that it would be a good combination for
the Mustang. The receiver battery is a 2500mah 5 cell Nimh pack. I wrapped the
battery and receiver in foam and installed them where the instruction manual
recommended. Next I ran the antenna out the bottom of the fuselage. All control
throws were set according to the manual. The rudder is 41mm each direction
from center. Elevator 18mm up & down from center. Ailerons are 12mm up and
down from center and flaps are 50mm down for landing. It has not been
necessary to make any changes from these settings since flown.
At the Flight Line
Take Offs
On take offs you apply a little up elevator. Advance
the throttle to full and be ready for any rudder
corrections that might be necessary. The rudder on
the Mustang has real good authority, so be careful
not to over correct. As the air speed increases the tail
will lift and the Mustang will roll on the main landing
till ready to fly.
Landings
The Mustang lands very nicely. Always remember to
keep the airspeed up especially when using the flaps.
The mustang will fly very slowly with the flaps on
fully. When not using the flaps the Mustang will land
much faster and stalling is more abrupt. When ever
the Mustang would stall, it always went to the left
making it very predictable.
Flight Performance
With the Supertigre G2300 there's plenty of power to
do most aerobatic maneuvers. The Mustang flies at a
nice scale speed with plenty of power to pull it
through scale looking loops. With the recommended
control throws on the ailerons rolls are very scale.
Weight & Balance
World Models recommends the Center of Gravity to
be 6.9 inches behind the leading edge of the wing at
the fuselage sides. Always remember the Mustang is
low wing airplane and should balanced up side down.
With the G2300 there was no need for any additional
weight for balancing.
Summary
The Miss America Mustang is great flying and nice looking stand off scale
Mustang. It looks like a real Mustang in the air and flies like one. The Mustang
comes with good hardware, nice scale spinner and painted pilot. It's a good
value for the money.
Follow the instructions in the manual when assembling and you should be happy
with the results.
Distributor Information
AirBorne Models, LLC
2403 Research Drive,
Livermore, CA 94550
www.airborne-models.com
Hitec RCD USA, Inc.
12115 Paine RD
Poway CA, 92064
www.hitecrcd.com
Balsa Products LLC
140 East Road West- Suit J
Piscataway NJ, 08854
www.balsapr.com
The comments, observations and conclusions made in this review are solely with respect to the particular item the editor reviewed and may not
apply generally to similar products by the manufacturer. We cannot be responsible for any manufacturer defects in workmanship or other
deficiencies in products like the one featured in the review.
TELL A FRIEND ABOUT THIS REVIEW OR CHECK OUT THESE OTHER GREAT REVIEWS!
Manufacturer
Photo
Great
Planes
Graupner
Balancing
Product
Summary
One thing Great Planes isn't shy about is trying a
revolutionary approach to solving a common problem.
In this case, the issue is practicing those low-andU-Can-Do 3D Ep
slow 3D maneuvers without fear of doing major
damage to the airplane when the "dumb thumbs"
come a-calling.
Starlet - 50
The Starlet 50 is an open frame design based on
Graupner's UNI EXPERT mechanics. Powered by a .46
to .50-size heli engine, the Starlet is primarily for the
novice heli pilot although it is a capable aerobatic
performer well suited for the more advanced pilot.
Upside Down!
It seems that lately we have been getting a lot of
questions asking if it is correct to balance a low wing
plane upside-down. The simple answer to this is
"Yes", but a more accurate answer would be "Usually,
but not necessarily always". Once you understand the
basic principle, you'll easily see why.
Reviewed
11/20/2005
11/20/2005
11/13/2005
Bad Boy V2
Precision Aerobatics have set a new standard for
Almost-Ready-To-Fly models. I have never seen
another ARF that has been this high quality. The
plane does everything you tell it to do and will
definitely become a frequent flyer in my hanger.
11/07/2005
Twister ARF
Model Tech's NEW Twister ARF is a aerobatic platform
that can fly precise pattern or awesome 3D freestyle
with just a click of your high and low rate switch.
With it's sleek lines and exceptional covering, this
bird looks good in the air and sitting in the pits.
11/07/2005
Bill Pryor
How to
I often see ads for planes that say you can pick them
Crate/Ship a up, but they're too big to ship. Wrong! Nothing is too
Giant Scale Air big to ship.
11/05/2005
World
Models
The Cessna Skylane EP has full house controls
(ailerons, elevator, rudder, and throttle) which extend
Cessna Skylane maneuvering limits and deliver scale flying. The
EP
strong wood structure and tough covering give the
airframe low wingloading and the capability for
further power upgrades.
10/31/2005
World
Models
I cranked up the YS 110 and set her on the runway.
The Landing Gear are very sturdy, and hold the
Ultimate 120R
Ultimate's nose high enough that the 16x4 APC Prop
had no trouble clearing the ground.
10/31/2005
Precision
Aerobatics
Model Tech
Gary Wright originally designed the E3D kit to fill a
gap in the market for a fully acrobatically capable
Gary
Wright
CEN Racing
RD Logics
Model Tech
Proboat
Hobbico
Skyshark
RC
electric plane that could exist on an expensive power
system. Today that mission statement continues to
live on, however with one improvement, it is now sold
as an ARF
E3D ARF
10/25/2005
Genesis 46 LE
RTR Limited
Edition
The Cen Genesis 46 LE may offer up feelings of déjà
vu to anyone who has driven the original version of
the truck. It certainly gave me that very feeling for
me, once I pulled it out of the box. However, despite
the facts that things appear the same, there are
some significant differences that have been
incorporated with the truck this time around. I'm
definitely curious to dive into this truck and see what
all Cen has changed.
10/25/2005
SHO
Despite how impressive the buggy looks, it isn't going
to prove itself sitting beside the box. After all, this
buggy arrived at my doorstep, and I'm not known for
being a pushover in regards to putting a vehicle
through a torture test. So, it's time to head to the
hobby store and grab some nitro.
10/16/2005
Modeltech introduces the the Magic Formula 3D to its
Magic Formula
line of 3D type aircraft. It includes large control
3D
surfaces and expertly covered in genuine Monokote.
10/07/2005
The Vortex is one sleek looking watercraft, which is a
fact that can't be denied. Just viewing it after pulling
it from the box, gave me some visions of power and
speed.
10/07/2005
Vortex .46
Airboat RTR
The Hobbico Superstar EP ARF is available in three
versions to suit your needs and level of
Superstar - EP completeness. In stock form, the direct drive Speed
600 motor provides adequate power and flight times
of around 5 minutes.
10/07/2005
So a while back, when I was surfing the Internet, I
came across Skyshark R/C's ad for their upcoming
new ARF - A Christen Eagle! This plane seemed to
Christian Eagle have everything - Nice lines, good aerobatic
capability, and a color scheme that not only fits its
name, but that is one of the most beautiful and
recognizable in the industry.
10/07/2005
Return to Magazine Homepage
RCUniverse is a service of 24-7 RC, Inc. Copyright © 2001-2005. Privacy Policy
GET FREE RC CONTENT FOR YOUR WEBSITE
Search | Marketplace | Event Central | Local Clubs | Magazine | Product Ratings | New Products | Discussion Forums
Photo Gallery | Member Video Posts | RCU Video Gallery | Instructor Search | Field|Track|Marina Search
Member Locator | Advertisers | Hobby Vendor Resources | Rate Manufacturers | Sign In/Sign Up
Products Videos WattFlyer.com
RCU2 | 210.17.233.166 | 0 | 52540546-11164717 | 1 | 01:03:38 AM EST | NC