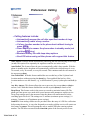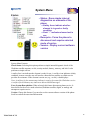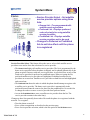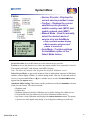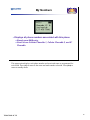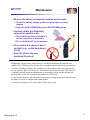
1
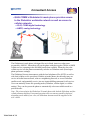
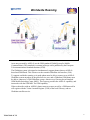
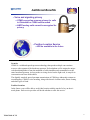
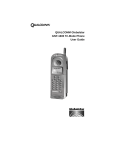
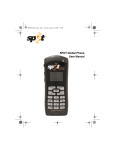
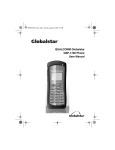
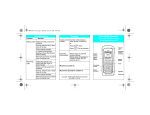
QUALCOMM Globalstar Tri-Mode Phone
GSP-1600
Student Guide
TG84-73001-1C X1
QUALCOMM Incorporated
5775 Morehouse Drive, San Diego, CA 92121
U.S.A.
Copyright © QUALCOMM, Incorporated, 1999.
All rights reserved. Printed in the United States of America.
Service Provider and/or Buyer may reproduce and distribute this document, whether in
whole or part, for purposes related to the operation, maintenance, marketing and sale of the
QUALCOMM Globalstar phones. Subject to QUALCOMM's prior written consent, Service
Provider and/or Buyer may modify this document for the same purposes, provided that none
of the proprietary notices on this document are altered or removed. Service Provider and/or
Buyer shall indemnify, defend and hold QUALCOMM harmless for any claims that are
based on errors, warranties, representations, or infringing materials contained in such
modifications
This technology is controlled by the United States Government. Diversion contrary to U.S.
law prohibited.
Globalstar is a trademark of Loral QUALCOMM Satellite Services, Inc.
QUALCOMM Globalstar Tri-Mode Phone GSP-1600
TG84-73001-1C X1
September 13, 1999
Objectives
• Upon completion of this course you will be able to:
➭ Describe the following for the GSP-1600:
• Features and benefits of the
QUALCOMM Globalstar tri-mode phone
• Phone, calling, and menu basics
• Operation of the phone
• Use of the nine menus to configure the
phone and to set preferences
• Safe use of the phone
• Battery and battery charger use, care,
and maintenance
• Other accessories benefits and use
• Troubleshooting common problems
TG84-73001-1C X1
2
Convenient Access
• QUALCOMM’s Globalstar tri-mode phone provides access
to the Globalstar worldwide network as well as access to
cellular networks
➭ IS-95, CDMA digital technology
➭ AMPS, analog technology
or
The Globalstar tri-mode phone is designed for use in North America or other areas
governed by ANSI-41. Subscribers will use the phone with their regular CDMA or AMPS
cellular service (operating in the 800 MHz band) when available. When they leave the
cellular service area the phone automatically switches to Globalstar mode (based upon
phone preference settings).
The Globalstar Gateway interconnects with the local telephone office (PSTN) as well as
with local cellular service provider(s).With the tri-mode phone, the subscriber may use
service in his/her home network, roam to a neighboring network, or access Globalstar
satellite mode, and potentially receive just one itemized billing statement for all services.
Users can manually choose the operating mode (Globalstar, cellular digital, or cellular
analog). They can also preset the phone to automatically select an available mode in a
preferred order.
Note: The picture depicts the Globalstar Tri-mode phone with both the Globalstar and the
cellular antennas deployed. In normal operation only one antenna would be deployed,
depending on the mode of use. Also, the Globalstar antenna would be angled over the
user’s head.
TG84-73001-1C X1
7
Worldwide Roaming
Areas not governed by ANSI-41 use the GSM standard (Global System for Mobile
Communication). This standard is common in Europe and is published by the European
Telecommunications Standards Institute (ETSI).
The Globalstar system is designed to simultaneously support phones that are ANSI-41based and GSM-based. This is done over the common Globalstar Air Interface (GAI).
To support worldwide roaming, a tri-mode phone must be able to connect to an ANSI-41
Globalstar system anywhere in the global service area, and a Globalstar GSM phone must
be able to connect to a GSM Globalstar system. Almost every Gateway has an attached
GSM Mobile Switching Center (MSC). The Gateway provides the ANSI-41 capability, and
interworks with the GSM MSC for GSM capability.
When a subscriber with an ANSI-41 phone roams to an area served by a GSM network he
will register with the Visitor Location Register (VLR) of the local Gateway, and use
Globalstar satellite service.
TG84-73001-1C X1
8
Additional Benefits
• Voice and signaling privacy
➭ CDMA encryption ensures privacy for calls
in Globalstar or CDMA cellular mode
➭ AMPS analog calls cannot be encrypted for
privacy
• Position Location Service
➭ Will be available in the future
Security:
CDMA is a wideband spread spectrum technology that spreads multiple conversations
across a wide segment of the broadcast spectrum. Each telephone call is assigned a unique
code that distinguishes it from the multitude of calls simultaneously transmitted over the
same broadcast spectrum. As long as the receiving device has the right code, it can pick its
conversation out from all the others.
The digitally encoded, spread spectrum transmissions of CDMA are inherently resistant to
eavesdropping. CDMA’s voice encoding, along with about 4.4 trillion codes, deters cloning
and other types of fraud.
Position Location:
In the future a user will be able to see his/her location with the touch of a key on the trimode phone. Each service provider will decide whether to offer this service.
TG84-73001-1C X1
9
Getting Started
Session Objectives
•
•
•
•
Learn the physical features of the tri-mode phone
Review the display indicators for phone status information
Understand the role of the Security Module
Understand the basics of using the phone:
➭ Deploying the antenna
➭ Power-on
➭ Making calls
➭ Receiving calls
TG84-73001-1C X1
12
QUALCOMM Globalstar
Tri-Mode Phone
• The tri-mode phone is the user interface to a complex
communications system
➭ Combines satellite communications technology with cellular
communications technology
➭ Requires operation in two distinct ways
➭ Requires working knowledge of the
technology and components
of the system
• Not for the average cellular
customer - used in specialized
markets or by users with special
needs
➭ Certain industries
➭ Areas without telephony
infrastructure
The Globalstar system is a unique new method of wireless telecommunications. The trimode phone combines this new satellite communications technology with existing cellular
telecommunications technology. Owning one is like having two phones because there are
two separate and distinct modes of operation.
The successful salesperson must have a working knowledge of the technologies combined
in the tri-mode phone. Besides knowledge of cellular systems and operation, the
salesperson must understand the Globalstar system. This includes:
• The components of the system; user, satellite, ground
• Basic call model
• CDMA and how this gives the Globalstar system more voice clarity and improved
security
The salesperson must also understand how the tri-mode phone is used for service in
Globalstar satellite mode. There are certain operations issues that must be clearly
demonstrated and understood for the customer to enjoy using Globalstar satellite service. It
is also important to understand who needs a Globalstar satellite phone, and to help
customers determine their specific service usage (i.e., how they will use Globalstar and
cellular service).
TG84-73001-1C X1
13
Features of the
Tri-mode Phone
Cellular antenna
Light Indicator
Earpiece
Volume buttons
Globalstar satellite antenna
(back of phone - not shown)
Display indicators
Screen
SMART KEY™ options
SMART KEYs™
Information key
Send key
Punctuation key
Mode select key
Security module
Message key
Clear key
End key
International dialing (+) key
Scroll keys
Power key
Microphone
Some of the parts of the phone are self explanatory, like the earpiece and microphone, or Send
key. Explanations of the remaining items follow:
Light indicator: Flashes when powering on or when receiving a call, and when a text or voice
message is received.
Volume Buttons: Press to adjust the earpiece volume. In some functions, used to scroll or
advance the cursor.
SMART KEYs™: Press the appropriate SMART KEY™ to access the corresponding option
displayed at the bottom of the screen
Display indicators: See next page for a list of display indicators and their meanings.
Information key: Related to the display of the isymbol on the screen. In standby mode it
displays when the phone successfully registers. Press to display current phone number and
service provider (G*) or NAM name (cellular). If it appears in a menu press to display help
During number entry, press to insert pauses and hyphens..
Clear key: Press to delete the last number or letter entered or return to previous screen.
Message key: Used to access text messages and voice mail notifications.
End Key: Press to end a call. If not on a call, press to return to standby mode.
Punctuation key: Add punctuation or spaces when entering letters.
Mode select key: Press and hold this key to display the menu for selection of service mode
(AutoMode, Globalstar, Digital, Analog).
International Dialing Key: Press and hold until the “+” appears to automatically enter the
international access code before entering the country code and phone number.
Scroll keys: Press to scroll through menu items when the scroll arrow displays on the screen.
Security module: Required to activate phone for Globalstar satellite service.
TG84-73001-1C X1
14
Display Indicators
Phone operating in Globalstar
satellite mode
Phone operating in digital mode
(if neither of the above indicators
is displayed, phone is in analog
mode)
Signal strength. Four lines
indicates strong signal, one line
indicates extremely weak signal.
Call in progress
No service available. Phone will
beep if service is not available
and you try to place a call.
Roaming for service outside
home area.
Text message received
Voice mail notification received
✓
Battery charge. Four diagonal
bars indicates full charge; one
bar indicates minimal charge,
and blinking indicates no charge
Help is available; press the info
key.
Designates additional level of
call privacy (cellular) or
encryption (Globalstar)
Designates the menu option
currently selected.
Indicates you can scroll between
screens using the volume
buttons or scroll keys.
Indicates the text message is
locked.
Indicates the text message is
unlocked.
These indicators show the status of the phone and battery charge level, and provide quick
information about various messages and functions of the phone.
Note: While using the tri-mode phone be careful not to scratch the screen. Do not set the
phone face down unless the screen is protected.
TG84-73001-1C X1
15
Globalstar Satellite Call
Security Module
• Tri-mode phone is used for two types of calls:
➭ Satellite calls (Globalstar satellite mode)
➭ Cellular calls (digital mode or analog mode)
• Security Module must be installed before Globalstar
satellite calls may be made
➭ Contains the Globalstar
authentication key (A-key),
supplied by Service Provider
• A-key authentication process
begins when the Tri-mode UT is
powered on in Globalstar mode
• Emergency calls may still be made
without A-key authentication
Donot
notremove
removethe
theSecurity
Security
Do
Modulefrom
fromthe
thephone!
phone!
Module
The tri-mode phone can be thought of as “two phones in one” because it operates in two
distinct ways to make and receive two types of calls:
• Globalstar satellite calls
• Digital or analog cellular calls
Using Globalstar satellite mode requires that the Security Module card be properly installed
in the front lower left side of phone. It contains the Globalstar authentication key (A-key)
that is used in the authentication process, as well as a unique ID number and the user’s
service plan options. Installation allows the tri-mode phone to receive a call or to make
non-emergency Globalstar calls. The security module card installed in the phone is not
interchangeable; it only works with that phone.
The Service Provider installs and maintains the security module cards from its home
service area. Note that the security module only prevents unauthorized Globalstar calls.
Cellular calls can be made without the security module card.
The Globalstar A-key authentication process occurs when the tri-mode phone is turned on
in the Globalstar mode. A signal with information that includes the A-key and the unique
ID number is sent from the phone to a Gateway. An authentication process is performed
using the corresponding data in the Service Provider’s authentication database. When the
results are matched the phone may be used.
TG84-73001-1C X1
16
Deploying the Globalstar
Antenna
• Deployment position depends on whether the
user places the phone on the right or left ear
• User must be outside with
unobstructed view of the
sky to place a Globalstar call
• Carefully rotate the antenna
to its deployment position
➭ Holding phone at ear, point index
finger toward sky; antenna should
point in same direction
➭ The end will telescope automatically
Whenclosing,
closing,the
theantenna
antennawill
willretract
retractautomatically.
automatically.
When
Donot
notpush
pushon
onthe
theend
endor
orititwill
willbreak.
break.
Do
To use the tri-mode phone for a Globalstar call, the Globalstar antenna on the back must be
rotated until it sets into one of two positions. The position depends on whether the user
places the phone on the right or left ear. When the phone is resting comfortably between
the user’s ear and mouth, the Globalstar antenna must be pointing straight up to the sky.
A quick way of checking correct antenna position is to hold the phone to the ear and point
the index finger of the hand holding the phone toward the sky. The antenna should point in
the same direction. The antenna should also point straight up when using the keypad or
looking at the screen.
To make a Globalstar call the user must be outside with an unobstructed view of the sky.
For best performance, the user should move away from tall obstacles such as buildings,
trees, or mountains. A tri-mode phone can be used in Globalstar mode inside a vehicle with
a Globalstar car kit.
TG84-73001-1C X1
17
Power On - Standby Mode
• Power on:
➭ Press and hold Pwr about one second
➭ Indicator light illuminates briefly
➭ Phone goes to standby mode and searches for service based
upon service mode selected
Antenna
Antennamust
mustbe
be
deployed
to
deployed toacquire
acquire
Globalstar
Globalstarservice
service
• Once the phone acquires service the banner and the
appropriate icons display
➭ Date and time may optionally display based on service mode
➭ If service is not found after repeated attempts phone goes to
power save mode
When the phone is powered on it goes to standby mode and searches for available service.
The mode of service it looks for may be based on user preference, or the user may select
the desired mode of service (procedure is described on the next page).
The Globalstar antenna must be deployed if the phone is set to look for Globalstar service.
A message displays on the screen to remind the user to raise the antenna for Globalstar
service.
If the phone fails to acquire service after several attempts it will switch to power save mode
to maximize the life of the battery. The following message displays:
Service Not
Found, press
key to retry
menu
book
To return to standby mode press any key.
TG84-73001-1C X1
18
Making a Call
1 Deploy the Globalstar antenna or cellular antenna
2 Press and hold the Pwr key to turn phone on
3 Select mode, if necessary
4 Enter the phone number to be called
Note: Keep antenna pointing up while using keypad or viewing screen
5 Press Send
• To redial the last number called: Press Send
• To mute the call: Press
mute
To immediately change the operating mode of the tri-mode phone:
• Press and hold the (* É) key. This displays the mode menu.
• Press the number key of the preferred mode of service (2, 3, or 4).
Note: This is only applicable to this session of use. When the phone is turned off/on it will
reset to the user-defined preference.
While in conversation one SMART KEY™ option is to mute the call. Press the
corresponding key for mute. The word “Mute” appears on the screen to remind you the call
is muted. Press the key again to turn mute off.
In future pages keys will be represented as the characters on the key surrounded by
parentheses as shown above. SMART KEY ™ options will be enclosed in |bars|.
TG84-73001-1C X1
19
Receiving a Call
• When a call is being received:
➭ Phone rings
➭ Indicator light flashes
➭ “Incoming Call” flashes on the screen
• To answer the call:
➭ Press Send
Toreceive
receivean
anincoming
incomingGlobalstar
Globalstar
To
callthe
theGlobalstar
Globalstarantenna
antennamust
must
call
bein
inthe
thedeployed
deployedposition
position
be
• To end a call:
➭ Press End
Caller ID:
If the Service Provider offers Caller ID, the screen displays the phone number of the
incoming call. If this phone number matches a number in the phone’s directory the name of
the caller will also display.
TG84-73001-1C X1
20
Phone Features & Options
Session Objectives
• Learn the menu options of the phone
• Review each option and its features
➭ Phone Book
➭ Call History
➭ Messages
➭ Features
➭ Call Information
➭ Security
➭ Preferences
➭ System
➭ My Numbers
TG84-73001-1C X1
22
Using the Menus
• In standby mode, press the
menu key
to display the Main Menu.
• Press the corresponding number key to
make a selection
• Use the scroll keys * Ñ Ò # to see
additional information when
scroll arrows display
➭ Volume buttons also scroll
• Press the Clr key to return to
previous screen without
saving changes
• Press End to exit the menu
➭ Note: Menus can be accessed during a call,
e.g., to enter scratchpad information
There are many features and preferences that the user of the tri-mode phone can use and
configure. Remember these basic rules for navigating through menus:
• SMARTKEYS™ are used throughout menus to offer configuration options. To begin,
press the |menu| key to display the first screen of the Main Menu.
• When a numbered list displays, press the number key corresponding to the desired
selection. The item does not have to appear on the screen to enter its number (e.g.,
from the first Main Menu screen press “7” to access the Preferences menu).
• Scroll arrows display on a screen to indicate there is more information above, below,
or both above and below the current screen. Use the (∗ Ñ) and (Ò #) keys to scroll
between screens. The volume buttons on the side of the phone also scroll.
• Configuring the options and features is performed by using a combination of
SMARTKEYS™, numbered selections, and scroll keys. Entry of letters and numbers
is also performed, and is described on the next page.
• The (Clr) key will back you up one screen. The (End) key will exit the menu and
return to standby mode.
– Note: Menus can be accessed during a call, for entry of a phone number or to use
the scratchpad. Use the (Clr) key repeatedly to return to the main menu if on a call
(do not press (End) or you will disconnect the call.
TG84-73001-1C X1
23
Main Menu Options
• There are nine main Menu Options as displayed
in the picture
➭ The purpose and functionality of each will be
described in this class
➭ For more detailed information
and step-by-step procedures
refer to the User Guide
Phone Book: Used to save up to 99 phone numbers in the memory of the phone. Each
entry contains a name (up to 12 characters), phone number, and location (two digit number
used for speed dialing).
Call Hist: The last ten incoming or outgoing satellite or cellular calls are stored in the
phone’s memory. These can be accessed, the details viewed, saved to the phone book, and
used to place another call.
Messages: This menu is for retrieving short message service (SMS) messages and/or
voicemail messages. These are optional services offered by the Service Provider.
Features: Features include a key guard to lock phone keys and a scratchpad.
Call Info: This menu contains counters for tracking the number of calls and airtime.
Security: The phone is sold with a default lock code for locking the phone against
unauthorized use. This menu is used to change the lock code, set the security restrictions,
and erase memory items (e.g., call history).
Preference: This menu allows you to set user preferences like ringer settings, display
settings, alerts, and calling settings.
System: This menu allows you to set Service Provider preferences and use up to two
different number assignment modules (NAMs).
My Numbers: Displays all phone numbers assigned to the phone (up to three).
TG84-73001-1C X1
24
Entering Characters
JJ K
K LL
jj kk ll
55
<space>
<space>
@
@&
& (( )) ::
.. ‘‘ ## ** ,, 11
A
AB
BC
C
aa bb cc
22
G
GH
H II gg hh ii 44
FF
ff
M
MN
NO
Om
m nn oo 66
PP Q
QR
R SS pp qq rr ss 77
Move
Move
cursor
cursor
backward
backward
D
D EE
dd ee
33
W
W XX YY ZZ w
w xx yy zz 99
00
TT U
U VV
tt uu vv
88
Move
Move
cursor
cursor
forward;
forward;
enter
enter
space
space
Some options require the entry of numbers and/or letters which is done from the keypad.
Numbers and associated letters are printed on the keys. Press a key repeatedly to display
the letters in uppercase, lowercase, then the number. Once you have the desired character,
press the next character and the cursor will move to the next position.
• If the next character is on the same key, advance the cursor by pressing the (Ò #) key
or the down volume button. This will also insert a space. The (∗ Ñ) key or up volume
button moves the cursor back one space.
• To delete a character, position the cursor over the character and press Clr . Press and
hold this key to delete the entire entry.
• The number “1” key is for punctuation or spaces. Press this key repeatedly to display
punctuation in the order listed in the slide above.
Entering Pauses
Pauses are useful when entering numbers to send to automated services. For example, when
retrieving voicemail you may have to enter the voice mailbox number then wait to enter
your password.
During entry of a number press the |info| key to choose between Hard Pause and and Time
Pause. Hard pause requires that you press |resume| and Time Pause inserts a two-second
pause. Another option on this screen is to force the entry of a hyphen.
Instructor Note: As each menu is described in the next slides, have the students “play” with
the menu and its options and features.
TG84-73001-1C X1
25
Phone Book Menu
View
View of
of aa phone
phone
book
book entry
entry
• Stores up to 99 phone book entries, by two digit location
• Options:
➭ Edit the name, number, or location
➭ Erase the entry
➭ Make the entry secret so the number does not display
➭ View the entire phone number
➭ Prepend numbers to an existing entry
➭ Send dual tone multi-frequency (DTMF) tones for phone book
entries to use automated phone services
The Phone Book menu allows you to store up to 99 phone numbers. To make a phone book
entry, enter the number on the keypad and choose |save|. Enter the name and location
number when prompted. Other ways to save phone book entries will be described in later
sections.
Entries are identified by user-assigned two-digit location numbers for speed dialing. To
speed dial a number when you know its location, simply enter the location number and
press (Send).
From standby mode, display the phone book by pressing |book| or via menu option 1. Once
the phone book entries are displayed, use the scroll keys to locate and select the desired
entry. You may also |find| the entry by name, number, or location. To call the selected
number press (Send). Other options allow you to edit the entry or to erase it.
Make an entry Secret if you do not want the number to display on the screen when viewing
the entry or when calling the number. Your security code will be required to view or
change the options for an entry that has been made secret.
Sometimes it is necessary to add numbers at the beginning of an entry, e.g., an area code.
This can be done through either the View or Prepend options. After selecting either option,
simply begin adding the prepended numbers using the keypad, and press |save| when
finished.
The Send Tones option in this menu is useful when you want to send DTMF tones for
numbers in the phone book to an automated services system. Select the entry, press
|options| and choose Send Tones.
TG84-73001-1C X1
26
Call History List
Call
Call History
History List
List
with
with the
the first
first
entry
entry selected
selected
• Contains last 10 incoming or outgoing satellite or cellular
calls, numbered 0 - 9
• Scroll keys move up or down through the list
• Caller name will display if number appears in phone book
• Press Send to call the number or choose Send from the
options menu
• Choose Save to make a phone book entry
The Call History list displays the last 10 calls. As new calls are made or received the new
call displays at the top of the list and the oldest call is deleted. If the calling or called
party’s number is already a phone book entry their name will appear in the list instead of
the phone number.
The scroll keys (∗ Ñ) and (Ò #) move through the list. When you reach the end a dashed
line displays, then the list begins again at “0.”
With an entry selected, press |view| to see more information about the call. This screen
displays a header indicating the type of call:
•
•
•
•
•
•
Called by - incoming call
Call to - outgoing call
Added - entries added from the scratchpad
Missed - unanswered incoming calls
Caller ID - caller ID information received
Call Waiting - information received during a call
Also displayed on this view screen is the call history number (0-9), name (if the phone
number matches a phone book entry), and the phone number.
You can call the selected number by pressing (Send). Alternately, press |options| to access
additional functions. This menu allows you to view call time and duration, to call the
number (send), or to save the number in your phone book. You can also prepend numbers
before saving or calling, or send the number as DTMF tones.
TG84-73001-1C X1
27
Messages
Access
Access this
this screen
screen from
from
Main
Menu
or
Main Menu or press
press this
this
button
on
the
keypad
button on the keypad
• Short message services (SMS) are optionally offered
through Service Providers, including:
➭ Voicemail
➭ Text messaging
• When you receive messages the phone beeps and displays
the corresponding indicator
• Message indicators display until all new messages are read
SMS services for voicemail and text messages are offered optionally by service
providers.When the phone is on and a message is received, the phone sounds a beep and
displays the corresponding indicator, which displays until all messages are read. When you
read a message, new messages are accessed before old messages.
To access messages choose Messages from the Main Menu or press the
key on the
keypad to display the screen in the slide above. Choose |text| or |voice| messages.
Voice messages:
When you have received voicemail messages you receive notification as described above.
Press |voice| to display the call back number (or name if the number is in your phone book).
You must call your voicemail system to hear the message. As new messages are received
the total number of voice messages is updated . There is also a |view|option to display more
detail if available, and an |erase| option to erase old messages.
Text messages:
Text messages can include call back numbers, messages, urgency stamps, time and date
stamps, and potentially names if the call back number matches an entry in the phone book.
Text messages can be locked if they need to be saved. The phone stores as many text
messages as the available memory allows. As new messages are received the oldest are
deleted unless they are locked. If all messages are locked when a new message is received
and the phone is out of memory, the new message is lost. The network may try to redeliver
the message later.
TG84-73001-1C X1
28
Features
Features menu
menu
Features
• Key Guard:
➭ Locks keypad to prevent accidental use
➭ User can answer the phone while key guard is on
• Scratchpad:
➭ Used to enter up to 32 numbers
➭ Can add number to call history, save to phone book, or send
DTMF tones
Key Guard:
This feature locks the phone keypad to prevent accidental use of the phone. One way to
apply this feature is to choose it from the Features menu. The shortcut is to press and hold
the (end) key while in standby mode.
When the keypad is locked this message displays across the bottom of the screen:
KeyGuard On
To turn the key guard off press the numbers 1, 2, 3.
Scratchpad:
The scratchpad is useful for storing up to 32 numbers. You might use this to enter a phone
number you are being given during a call, or to enter a banking account number in
preparation for accessing an automated banking information system. There are three
options for use of the number in the scratchpad:
- Add the entered number at the top of your call history list. This will
display the indicator “Added.”
• Save - Save the entered number in your phone book. You will be prompted to enter
the name and location.
• Send Tones - Send DTMF tones over the air. This option is only available during a
call.
• AddToHist
TG84-73001-1C X1
29
Call Info Menu
Depiction of
of
Depiction
the
“All
Calls”
the “All Calls”
option
option
• Contains counters that track the number and duration of
calls for billing purposes
➭ Home Calls, Roam Calls, and Recent Calls can be reset to zero
➭ All Calls displays all call information for the lifetime of your
phone and cannot be reset
The Call Info menu contains counters that display the number of calls and airtime. There
are five options:
• Last Call - Displays duration of the last call in minutes and seconds. If call history is
empty “None” displays. This counter cannot be reset.
• Home Calls - Displays the number of calls and total duration of all calls made in your
home service area since the last time this counter was reset to 0.
• Roam Calls - Displays the number of calls and total duration of all calls made while
roaming in a neighboring network since the last time this counter was reset to 0.
• Recent Calls - Displays the number of calls and total duration of all calls made since
the last time this counter was reset to 0.
• All Calls - Displays the number of calls and total duration of all calls made during
the lifetime of the phone. This counter cannot be reset.
TG84-73001-1C X1
30
Security Menu
Depictions
Depictions of
of some
some functions
functions of
of the
the Security
Security menu
menu
Lock/Restrict
Lock/Restrict
Phone
Phone
Erase Memory
Memory
Erase
Items
Items
Enter New
New
Enter
Code/PIN
Code/PIN
• Enter lock code to access Security Menu
➭ Supplied by Service Provider when phone is purchased
• Security options include:
➭ Locking/restricting phone to prevent unauthorized use
➭ Entering new lock code or analog cellular PIN
➭ Erasing call history, phone book, and/or SMS messages
➭ Resetting preferences to default settings
Lock/Restrict Phone
Locking the phone allows the user to receive calls, but only make calls to emergency or
priority numbers. Up to three priority numbers can be entered using menu option 4 Priority
#. All other functions are locked, including speed dialing. The locking options are to never
lock the phone, to lock it “now,” or to lock it when the phone powers on. User can unlock
the phone by entering the lock code.
Restricting the phone is similar to locking the phone except it also allows calls to locations
1-9 in the phone book, and these may be the priority numbers if speed dialing is desired.
Restricting the phone can only be changed via the Security menu.
Entering New Codes
The lock code is the access code for the security menu and the code used to unlock the
phone. A default code is supplied with the phone, which is the last 4 digits of the Globalstar
phone number. A PIN may be required to access analog cellular service. The Enter PIN
option allows the user to enter the PIN of choice. Note: The PIN must be associated with a
specific NAM. This is described in the System Menu section.
Erasing Memory Items
Choose Erase Call to erase the entire call history list. Choose Erase Book to erase all entries
in the phone book. Choose Erase SMS to erase all locked or unlocked text and all voicemail
notification messages.
Reset Preferences
Choosing this option resets all user preferences (changed using the Preferences menu) to
the default settings. The banner and lock code are not reset. Service provider preferred and
prohibited lists are deleted.
TG84-73001-1C X1
31
Preferences: Sounds
• The first Preference menu option is to set the phone sounds
and volumes
➭ Ringer
➭ Earpiece
➭ Key beep
• Mute Stereo option is used with Car Kit
The Preferences menu is used to configure various user settings. There are 4 choices with
various options, so each will be covered separately.
The Sounds option allows the user to: set ringer type and volume; set earpiece volume: set
key beep sound, volume, and length. The MuteStereo option is used with the car kit.
Ringer Type: Besides the standard ring, there are four different ringer options and three
songs that can be chosen as the ringer type.
Volume Settings: There are 9 ringer, earpiece, and key beep volume settings. These are
depicted on the screen by a series of graduated bars as well as by the number of the volume
setting. As the volume is increased the phone plays a tone (earpiece, key beep) or the ringer
to demonstrate the higher volume. The ringer and key beep volumes can also be set to
“silent.” If the ringer is silent then Ringer Off displays instead of the date in standby mode.
Note: While on a call the earpiece volume is controlled by the volume buttons on the side of
the phone.
Key Beep Sound, Length: Key beep sound options are tone and click. Most users will use
tone. Key beep length options are standard and custom. Standard key beep is short and
fixed in length. Custom key beep sounds as long as the key is pressed. It is recommended to
use the standard key beep unless an automated system or device (e.g., answering machine)
requires the use of press and hold tone functionality.
TG84-73001-1C X1
32
Preferences: Display
• Backlight: Set to maximize battery life
• Banner: Displays when phone is turned on
• Auto Hyphen: Automatically place hyphens as phone
numbers are entered
• Show Time: Set the time format
• Timezone: Select time zone to display in satellite mode
• SMS Time: Adjust time of received SMS messages
• Language: Select English, Spanish, Portuguese, or French
Backlight: This option refers to the backlighting of the LCD screen. The setting affects the
life of the battery. The range of settings is from Always Off, which increases battery life to
Always On, which decreases battery life. Remaining options are for the backlight to turn off
after 7 seconds, 15 seconds, or 30 seconds after the last key press.
Banner: Up to 12 characters can be entered to display when the phone is turned on. This
might be the company name, or a special identifier for this phone.
Show Time: The time format choices include:
• 12 Hour: After 12:00 noon the time displays as 1:00 PM and so on.
• 24 Hour: Military time; 1:00 PM displays as 13:00.
• UTC: Universal time coordinated, this is the 24 hour time scale maintained by the
Bureau International de l’Heure.
Auto Hyphen: When enabled, this feature automatically inserts hyphens as a phone
number is entered. Hyphens can make a number easier to read, and make it easier to notice
entry errors. Hyphens may also be entered manually by pressing the (info) key.
Globalstar Time Zone: When operating in Globalstar satellite mode, the phone displays
UTC time. This option allows the user to select a different time zone to display. Both
standard time and daylight/summer time zones are available for selection.
SMS Time: Used to enable the adjustment of the time received in a SMS message to the
time zone selected in the previous menu option.
Language: Select from four choices of language. Display changes when (OK) is pressed.
TG84-73001-1C X1
33
Preferences: Alerts
• Set alerts that sound a tone when events occur
➭ Fade alert when call drops
➭ Minute alert to help track how long a call is taking
➭ Service change alert to notify you when the call is handed off
to another network
➭ New Message alert for new SMS messages
The user can set alerts that sound a tone when certain events take place:
• Use the Fade alert if you want audible notification that your call has been dropped.
• Use the Minute alert to hear a tone at the end of every minute while on a call.
• Use the Service alert to hear a tone when the phone enters or leaves a service area.
The phone also displays a message
• Use the New Message alert to notify you audibly when new text or voicemail
notifications are received.
Basically, each alert is set using on and off selections. With the New Message alert you can
choose to be notified once upon initial receipt of the message, periodically, or never (off).
TG84-73001-1C X1
34
Preferences: Calling
• Calling features include:
➭ Automatically answer the call after specified number of rings
➭ Automatically redial a busy number
➭ Call any location number in the phone book without having to
press Send
➭ Press any key to answer the phone when in standby mode (not
just the Send key)
➭ Maximize battery life with deep sleep options
➭ Send PIN when analog cellular phone calls support this feature
Auto Answer: Settings include automatically answering the call after one ring or two rings
(or off). This option is set separately for regular use and for use in the car kit.
Auto Redial: This feature allows the user to automatically redial a busy number. With the
phone in standby mode, the phone will automatically redial at the selected interval: every
10 seconds, every 30 seconds, or every 60 seconds. This continues until the call connects or
the user presses (End).
One Touch Dial: With this feature enabled the user can dial any of the 99 phone book
location numbers without pressing the (Send) key. Press and hold the last key of the
location number to use this feature, e.g., to dial location 32 press ( 3 ) then press and hold ( 2
).
Any Key Answer: This feature allows the user to press any key except (Pwr) or (End) to
answer a call. With this feature disabled the user has to press (Send) to answer a call.
Deep Sleep: This feature works in the power save mode to maximize battery life.The
phone goes into power save mode after several unsuccessful attempts to acquire service.
Deep sleep settings specify the amount of time the phone will remain inactive before
searching again for service.The settings are 15 minutes (maximum power savings), 10
minutes, 5 minutes, or off (minimum power savings).
Send PIN: Some analog cellular service providers allow the entry of a PIN for verification
before using the service. A user who frequently uses analog cellular service will want to set
this feature to prompt. This will prompt the user to send the PIN after entering a phone
number. The PIN that was entered in the Enter PIN option of the Security menu is sent.
TG84-73001-1C X1
35
System Menu
• Status - Runs simple internal
diagnostics on elements of the
phone
➭ Smiley faces indicate whether
element is in good or faulty
condition
➭ Dash “-” indicates element not in
use
• Reacquire - Force the phone to
disconnect and acquire selected
mode of service
• Version - Display current software
version
System Menu Features:
Check Status: Selecting this option performs a simple internal diagnostic check of the
Globalstar satellite antenna, car kit, security module, battery, memory, and lock. It also
performs a simple self test.
A smiley face icon indicates the element is ready for use. A sad face icon indicates a faulty
condition; in most cases the user will need to contact his/her satellite or cellular service
provider for assistance. If the element is not in use (e.g., car kit), a dash displays.
Note: A sad face for the antenna may indicate it needs to be rotated for Globalstar service.
A sad face for the Memory may indicate to delete old SMS messages.
Force System Reacquisition: When selected, this feature disconnects phone service. It
then checks for the service mode selection (Globalstar satellite, digital, or analog) and
attempts to acquire service.
Version: Choose this feature if you need to see the current software version of the phone.
Scroll to read all the associated information.
TG84-73001-1C X1
36
System Menu
• Service Provider Select - Set satellite
service provider options using three
lists:
➭ Known List - Pre-programmed with
satellite service providers
➭ Preferred List - Displays preferred
order of priority for using satellite
service providers
➭ Prohibited List - Displays satellite
service providers not to be used
• Changes to Preferred or Prohibited
list do not take effect until the phone
is re-registered
Service Provider Select: This feature allows the user to select which satellite service
providers to use and to force the selection of a service provider.
• The Known List displays all satellite service providers. The list is programmed by the
home service provider before the phone is shipped, and is updated dynamically as the
phone acquires Gateways with new service providers. Access this list to set any of the
listed service providers to preferred or prohibited status. When reviewing the list,
preferred satellite service providers are highlighted. Prohibited satellite service
providers are crossed out. Satellite service providers on both lists are both highlighted
and crossed out.
• The Preferred List shows the order in which the phone should attempt to register with
a satellite service provider. The home service provider is automatically in the
preferred list and cannot be removed or placed on the prohibited list. Access this list
to change the order or remove a service provider from preferred status.
• Access the Prohibited List to erase a satellite service provider from the list. The
service provider remains in the other list(s).
Changes to these lists generally do not take effect until the phone is re-registered with the
network. To re-register:
• Turn the phone on and off
• Force system reacquisition as described on the previous page
• Force service provider selection, which is the last option on the SP Select menu
TG84-73001-1C X1
37
System Menu
• Service Provider - Displays the
current service provider’s name
• Territory - Displays the current
satellite service provider’s
mobile country code (MCC) and
mobile network code (MNC)
• Manual Mode - Used to manually
select the desired mode of
service or to set AutoMode
➭ Only available modes display
➭ Mode remains selected until
phone is turned off
• Auto Mode - Contains settings
for AutoMode option of the
Select Mode feature
Service Provider: Access this feature to see the current service provider.
Territory: Access this feature to see where the current satellite service provider is located.
The country code (MCC) and network code (MNC) display.
Note: The above only display when the phone has acquired Globalstar service
Select Service Mode: As previously mentioned, the tri-mode phone operates in Globalstar
satellite, cellular digital (CDMA), or cellular analog modes. One way to select the mode of
service is to press and hold the (∗ Ñ) key. Another way is to select the ManualMode menu
option from the System menu.
Automatic Mode Setting: This feature sets the preference used by the AutoMode selection
of the previous feature. The choices include:
•
•
•
•
•
Globalstar only
Cellular only
Globalstar preferred (look for Globalstar service before looking for cellular service
Cell preferred (look for cellular service before Globalstar satellite service).
Any choice except Globalstar only displays the Cellular Preference menu. The option
is given to use only digital, only analog, or to set digital or analog as a preference.
TG84-73001-1C X1
38
System Menu
• A Number Assignment Module
(NAM) is a phone number assigned
by a cellular service provider
• Phone allows up to two cellular
NAMS and one Globalstar NAM
• NAMs are entered into the phone by
the Service Provider(s)
➭ Auto NAM - Automatically switches
NAMs to home system service
during system searches
➭ Set NAM - Choose which NAM to use
➭ Set System - Sets system preference
for roaming in cellular service mode
Sometimes a user will activate service with more than one cellular provider. For example, a
businessperson who travels frequently to a distant city may activate service with a service
provider in that city so his/her cellular phone will work in either location.
Each cellular service provider programs the phone with a number assignment module, or
NAM, that contains the phone number it has assigned along with other information. The
user then switches NAMs manually in the phone as necessary.
The tri-mode phone holds up to 2 NAMs, labeled 1 and 2. These are programmed by the
service provider using a UT Program Support Tool or through a hidden service
programming menu in the phone. There is also a NAM associated with the Globalstar
satellite service provider which may be associated with cellular NAM information.
The user can access the NAM Select option of the System menu to set the NAM or
configure preferences. The choices include:
- If set to yes the phone will automatically try each NAM in numerical
order when searching for cellular service.
• Auto NAM
• Set NAM
- Scroll to manually select the preferred NAM.
- This affects roaming for cellular service (Globalstar roaming is not
affected). The choices are automatic (enable roaming), no roaming, A only, and B only
(use only cellular “A” system or cellular “B” system).
• Set System
TG84-73001-1C X1
39
My Numbers
• Displays all phone numbers associated with this phone
➭ Based upon NAM entry
➭ Scroll to see Cellular PhoneNo 1, Cellular PhoneNo 2, and G*
PhoneNo
This menu option displays each phone number and associated name as programmed for
each NAM. Press (Clr) to return to the menu and make another selection. Press (End) to
return to standby mode.
TG84-73001-1C X1
40
Accessories: Battery
Polymer Lithium
Ion Battery
Snap into place
Press and lift to remove
Performance
Operating Mode
Estimated
Talk Time
in hours
Standby Time
in hours
Globalstar satellite
3.5
9
CDMA (Code Division Multiple Access)
4.5
72
AMPS (Advanced Mobile Phone System)
2.5
14
The phone is sold with a rechargeable polymer lithium ion battery located on the back of
the phone. Recommend that users purchase an extra battery as a backup. The battery snaps
into place. To remove, turn the power off, push on the latch and lift out.
Note: Use only QUALCOMM batteries in a QUALCOMM Globalstar phone.
The battery charge level indicator displays in the top right corner of the screen. Four
diagonal bars indicate full charge and one bar indicates minimal charge. The phone
alerts the user when the battery needs charging by flashing the indicator. In addition
it beeps three times (continuing to beep every minute if phone is in use), and
displays a low battery message on the screen.
A user should charge the battery immediately after purchasing the phone. The battery does
not need to be completely drained before recharging.
Care and Maintenance
• Do not use the battery in temperatures less than -4°F (-20°C) or greater than +140°F
(+60°C)
• Keep the metal contacts clean
• Do not dispose of the battery in a fire
• Do not disassemble the battery or short circuit it
• Do not store batteries where temperatures are below -22°F (-30°C) or above +140°F
(+60°C)
TG84-73001-1C X1
44
Maintenance
• Be sure the battery is properly installed and charged
➭ Check the battery charge symbol in upper right corner of
display
➭ Only use QUALCOMM batteries in QUALCOMM phones
• Carefully rotate the Globalstar
antenna for satellite calls
➭ Do not push on the end to make it
retract; retraction is automatic
➭ Do not hold the UT by the antenna
• Do not store the phone in direct
sunlight (e.g., on the dashboard
of car)
• Keep the phone dry and
protected from dust
Maintaining a proper charge on the battery is essential to maximize the talk time and
standby times. The battery does not need to be completely drained before being recharged.
To make a Globalstar satellite call, carefully rotate the antenna to the correct position for
the ear where the phone will be placed. The antenna extends automatically. When the call
is finished, carefully rotate the antenna back to its storage position, and the antenna will
automatically retract. Do not push on the antenna or it will break.
To not hold the phone by either antenna. Do not touch it during operation as this may cause
the phone to operate at a higher power than needed.
As with any electronic device, protect the UT from rain or dust.
TG84-73001-1C X1
49