1
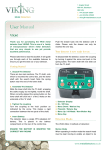
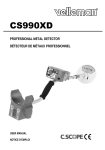
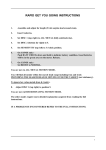
New Product Report Minelab Safari
Part 1
Minelab manufactures a hugely diverse range of detectors whose inherent design and build quality
characteristics are to world class standards. In terms of its mainstream product line-up, Minelab has, with
such models as the Explorer and X-Terra, broadened its product range significantly in recent years. The
pace of innovation has been rapid and just recently we have seen the introduction of the revolutionary
E-Trac and now we are delighted to present Safari to further enhance Minelab’s product range.
Safari Features
Improved filtering during detection
New Pro coil
Improved target ID in Trash Density High
Improved discrimination
Improved audio response in Trash Density High
Improved depth gauge now updates
during and at end of detection(s)
New VCO style pin point audio
Better balance
Faster start-up
Interface Layout of Safari
The Safari is well presented with good quality buttons, housing and an intuitive functional interface.
The front panel is well thought out and buttons fall to hand easily. Central to the Safari’s operation is the Menu push
button control which allows the operator to access the Main Menu choices which are:
(a) Sensitivity – controls Safari’s sensitivity to targets
(b) Threshold – controls a background hum used to audibly identify when targets are discriminated
(c) Noise Cancel – selects a stable operating channel in noisy environments
(d) Target Volume – controls the signals Target Volume – not Safari’s overall Volume
(e) Contrast – adjusts the screen to optimize screen clarity in high/low visibility
(f) Trash Density – an innovative feature with a High & Low adjustment. High is suggested in areas where iron targets
are plentiful such as one or more targets underneath the coil at any given time and in areas of high mineralization.
Low would suit cleaner, quieter areas with few targets present or the likelihood of having just one target underneath
the coil at any given time.
-2-
Interpreting the Display
Safari’s digital display always shows the following information;
1. Battery power icon – at the top right hand side you can see the condition of your
battery at any time – 3 blocks equals a full cell – a flashing icon shows that
shutdown is imminent and Flat Battery Shutdown appears. Before this occurs a
descending audio warning sound is heard several times to indicate low power.
2. Graphic Identification Bar – this area of the display is the key to seeing exactly what
is either detected or rejected – black areas show rejected targets – clear areas show
accepted space.
3. Discrimination Pattern – would be either Pre-Set settings, or any mixed merging of
light and dark areas in a saved discrimination pattern customised by the user.
4. Target Cursor – this is a ‘free moving’ indicator travelling up and down the Graphic
Identification Bar stopping at the matching conductivity level of the detected
target – a tiny arrow flashes three times very quickly above the cursor after
detection.
5. Target ID numbers – represents the ferrous and non-ferrous targets alike and range from – 10 to + 40 (TIP – Low
grade foil can read as low as 0)
6. Target Icons – shows representations of typical targets to be found such as coins, rings, foil and ring pulls and can
signify what is in the ground.
7. Depth Gauge – a thin vertical bar located in the centre of the display which indicates approximate coin depth
from surface to level 12”. If completely shaded the find is close to the surface – if half shaded then the coin should
be at 6” mark and so on.
8.
Mode Indicator – this is a clever feature as each of the four mode icons can show three different things. A tick
indicates a Factory Setting. If a factory setting has been modified, that is if you have either added to it or taken
something away but not yet saved changes, an asterisk will show. If a discrimination pattern has been “saved” by
the user an icon of a ‘stick man’ will show in the slot. So you should always know at a glance which mode or setting
you are working in.
9. Sounds Indicator – depending on which mode you select into, a tiny speaker icon will appear briefly which will
indicate which mode the Audio response is set to. Coins and Coin/Jewellery will show C for conductive sounds;
Relic & All-Metal will show F for ferrous sounds.
Note: In Relic and All Metal modes the Target Icons are not represented. This is because relics can come in all shapes
and sizes and would not necessarily correspond with the shown target icons, which are pre-set as smaller everyday
objects such as coins, rings and trash items. Experienced relic hunters will interpret the information based on the
conductive number value displayed, the tone and the audio intensity of the signal produced.
Preset Modes in Safari
Safari comes equipped with four pre-programmed search modes to facilitate the complete novice and expert alike to
get going “right out of the box” immediately. The 4 Modes are:
1. Coins – has some inbuilt discrimination against ferrous materials, foil & low-grade aluminum
2. Coin & Jewellery – has some ferrous discrimination and a low foil rejection active
3. Relic – has a low level of ferrous discrimination active
4. All-Metal – has no discrimination active whatsoever – a true all-metal mode.
-3-
The Quickstart Coins and Coins & Jewellery Modes may suit the beginner or someone first starting out on the great
adventure that metal detection is, and the Relic and All-Metal Modes may suit the “more experienced” detectorist or
a person who is more used to hearing “all sounds” from both wanted & unwanted targets along with the occasional
ground noise as well. This is where the “more professional” approach comes in; deciding to dig or not dig based on
the interpretation of all visual and audible information presented to a user during “the normal detection” of any
target.
If you adapt a mode to your own preferred settings, you can then program it as a new search mode into one of four,
user defined slots. This gives you the added flexibility of creating extra modes for particular environments.
Safari has the means and ability to present itself well no matter what the job and, during my time with Safari
prototypes it was found to be a lot more capable than I expected for the types of tasks which I asked it to do.
Part 2: TECH TALK
TRASH DENSITY “What is it and how will it help me find more?”
With the addition of improved digital filtering developed exclusively for Safari, this professional option is now vastly
improved and as a result can improve target discrimination and corresponding target ID’s.
Signals can also sound “crisper” and more informative as well.
There are two settings for this control High (Default) & Low Trash Density.
High is suitable for areas with unusually high amounts of ferrous (iron) trash (the likelihood of more than one target
under the coil at any given time) and also areas with highly variable ground mineralisation. High setting detects
targets at a faster rate, so in areas with a lot of trash, particularly if close together, High may be best.
High setting is more likely to detect the presence of a “good” target in amongst a number of rejected targets.
Similarly, High is the preferred setting when detecting in heavily mineralised or variable ground. A slightly faster
sweep speed can work best in High as the Safari signal response works faster to pick out good targets in between the
trash but requires a wider discrimination pattern.
However, if searching for a “specific” target, a much narrower “Accept” pattern is possible, allowing you to ignore a
greater percentage of unwanted trash or other targets.
In Trash Density Low which is suitable to cleaner ground a slower sweep speed can get the best results and can
provide more accurate discrimination.
Low is a speciality setting which should only be used in clean ground such as beaches or some inland locations such
as open forest, woodland and large uncluttered open fields. In these locations Low can provide you with the most
precise Target ID’s.
Low can also have a slightly better depth capability in most soil conditions, but is not recommended in areas where
targets may be close together. A normal sweep speed can also work better when Low is selected.
-4-
SAFARI DISCRIMINATION TUTORIAL # 1
DISCRIMINATION SCALE – MODIFYING / SAVING
Safari makes it so easy to find exactly what you want and to ignore what
you don’t want. It couldn’t be simpler.
Here’s how:
ACCEPT/REJECT button – this is the key and allows you to adjust the
discrimination pattern to accept or reject any of the 51 segments
shown on the detect screen. This allows you to “build” a custom
discrimination pattern that will ignore unwanted targets and still
get you “the keepers!” When a target is detected, an ID number appears on the left hand side of the screen, an icon
appears on the right hand side and a bar and cursor appear in the Discrimination scale along the bottom of the
screen in a bar graph. The location of the cursor corresponds to the discrimination rating or ID number of the object.
The Target ID Range has 51 numbers from – 10 to + 40
Ferrous objects will have ID’s in the –10 to – 1 range
Non-ferrous objects will have ID’s in the 0 to + 40 range
Objects with highest conductivity will produce the highest numbers and objects with low conductivity characteristics
will produce corresponding low number Target ID’s.
The discrimination pattern of a factory pre-set mode can be modified and saved as a personal setting, so that your
new discrimination pattern can be recalled at any time.
An asterisk icon ❄ will be displayed on the screen to show that a particular mode has been modified.
There are three methods of modifying disc patterns.
Method 1- to reject a specific target/object
1. Wave the coil over the object. The detector will move the cursor to indicate the object’s position on the scale,
and the targets ID number will appear on the screen.
2. Press the ACCEPT/REJECT button to reject the object’s ID.
3. Wave the coil over the target and check it is being rejected. If it still produces a response, reject its new ID by
pressing accept/reject a second time.
Method 2 – to reject a specific Target ID number
1. In the Detect screen use + and – buttons to select the ID you want to modify. The cursor and the Target ID numbers will indicate the selected ID.
2. Press the ACCEPT/REJECT button to either accept or reject that ID. You will notice the band on the
discrimination scale will become shaded if rejected or clear if accepted. The accept/reject button will toggle
between accepting and rejecting targets.
Method 3 – to accept or reject a large range of Target ID numbers
1. Start from either the first or last number of the ID band you wish to select.
2. Push and hold both the ACCEPT/REJECT button, and the – or + button until the selected area is achieved. You
will note that the cursor box on the Graphic Identification Bar will be shaded when the accept/reject button is
in REJECT mode and clear when in the ACCEPT mode.
Once the discrimination has been modified the ❄ icon will appear next to the mode button to show that the detect
mode has been modified.
Note: These changes to the discrimination pattern will be lost if you change to a different detect mode. So, if you are
always changing modes, be sure to save your changes first. You can always toggle backwards and forwards between
your settings and the factory pre-set settings to check your signals. The modified discrimination pattern can be saved
as a user detect mode by following the next tutorial.
-5-
SAFARI DISCRIMINATION TUTORIAL # 2
To create and save a user mode (personal setting)
A tiny “stick man” icon will appear next to the mode button when the changes are saved as a personal setting.
1.
2.
3.
4.
Select the Factory Pre-Set detect mode you would like to change.
Modify the discrimination pattern as outlined previously.
Press and hold the mode button for about three seconds until the SAVED message appears on screen.
When the mode is saved the stick man icon will appear next to the mode button that had been pressed. You can save your personal pre-set mode in any of the four pre-set locations. Once a user mode is saved, just press the mode button to revert to the factory setting or toggle back and forth between the two settings.
Part 3
Power Options
Your new Minelab Safari comes with an alkaline holder which takes eight 1.5V pen-light cells.
Ensure you buy good quality alkaline batteries. You can expect up to 14 hours of operation from a new set. Wearing
headphones extends the life of the cells quite a bit. You can also purchase as recommended Minelab accessory
items a mains wall charger and a NiMH 1600/1800 mAH rechargeable cell. This may be a worthy investment if you
plan on using your new Safari quite often. Expected battery life can be greater with the 1800 mAH with upwards of
16 hours use possible. Please follow instructions and guidelines for proper care of NiMH battery cells.
Coil
Yes, other coils can be used with Safari.
The Safari uses an 11” DD coil as standard. This coil has already been introduced to the Explorer and E-Trac series
of detectors with great success and glowing tributes. The coil is both lightweight and waterproof but is still really
durable. Allied to the new longer lower shaft, it means that it is easy to use and it also gives the machine a good
balanced feel when in the field. Depth is really impressive and the pinpointing is sharp too which is helped by the
physical nature of the coil with the cross supports creating an identifiable centre point.
The smaller Minelab FBS 8” coil can be used without having to make any adjustments. In fact, the use of small coils
is encouraged on junky coin-shooting sites. Another tip would be to always remove and clean the coil cover after a
few detecting sessions, especially after immersing the coil in salt water. This can help in reducing the chances of false
signals occurring.
FIELD APPRAISAL
The Safari has four operating modes and in reality any of the four modes can be used in most applications. However,
the Coins mode would be a good mode setting to start with, if new to the Safari detector. This has some in-built
discrimination against most iron, foil and light aluminum.
If you find that you would like to increase, or decrease, the amount of discrimination just follow the easy steps
outlined above in the Modifying/Saving tutorial. The learning curve for this detector is really short and compared to
other detectors is really quick to pick up on as well. Just press the Power button, pick a mode and that’s it…it’s really
quick. You will find that targets will give a range of sounds varying in pitch from a low sound to a high squeal. In Coins
mode, on the beach or in coin shooting areas, coins (modern and many older ones) will give a high pitched sound.
The opposite may happen on some older sites you visit. Some of the older, thinner, low grade collectible
-6-
coins (ancient Roman bronze & and hammered silver coins) can give a lower sound
depending on their size and purity of metallic make-up. On the other side of the
panel you will find the All-Metal mode. This is very helpful to get extra depth when
conditions allow, such as on very clean ground or operating over salt water beaches.
You don’t have to press any ‘ Salt ‘ switches or make any adjustments after coming
from a land site to dry sand area – the detector does it all for you - automatically.
For beach hunters who are after good depth and sensitivity to jewellery the Coins/
Jewellery mode is the one to use, especially on the dry sand. However, if you want to extend the depth and don’t
mind digging extra signals the use of either All-Metal or Relic mode would be best.
If, while land searching, the presence of ferrous junk is heavy, use the High Trash Density option and use a quicker
sweep. If clean, the opposite would apply. If ground minerals are low the All-Metal mode is a very good primary
search mode. It can make the presence of a non-ferrous target in amongst ferrous junk stand out by its higher pitch.
Easy toggling between any of the four modes is quick and easy. As previously stated you can create your own disc
patterns and use a combination of different patterns to check signals.
SAFARI is an amazing beach machine! It also excels on land sites and provides good depth, sensitivity and accurate
information via its very useful and large screen. The Depth Indicator is spot-on and the Pin Point graphic is really
useful as you can see when the center of the coil is directly over the center of a target (coin). Pin pointing has never
been easier as you can now not only hear the louder response but can see it on the graphic scale feature as well.
Through a series of bars that fill to a black and empty to a clear condition one can estimate the exact location of the
target.
The new lightweight “Pro” coil supplied with Safari is much more comfortable in use. It feels better, handles better
and distributes the weight more evenly across the forearm making swinging the detector a breeze!
CONCLUSION
The all-new MINELAB SAFARI defines just how good a metal detector can be!
Innovation and sheer ease of use in a fantastic package!
Safari represents a great step up the ladder to FBS technology…Minelab’s specialty and class leading
technology sharing a common platform with the proven Explorer and ground-breaking E-Trac detectors,
allowing a Safari owner to enjoy all the benefits this super advanced system enjoys, and at a very modest
price.
So easy to set up and use with the minimum of fuss you can be searching successfully for what you want to
find in just seconds!
Enjoy Safari and…Good Hunting!
Des Dunne
Minelab International
-7-