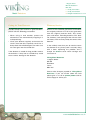
1
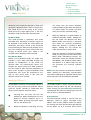
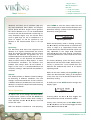
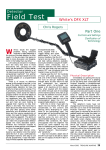
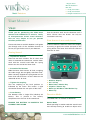
1 Angela Street
Mill Hill, Blackburn
BB2 4DJ
t: +44 (0)1254 55887
f: +44 (0)1254 676901
Metal Detectors
e: [email protected]
User Manual
VK40
Thank you for purchasing the VK40 metal
detector from VIKING. This is one of a family
of microprocessor driven metal detectors
that are very simple to use yet provide
excellent performance.
Push the drawer back into the detector until it
clicks. Please note the drawer can only be
inserted the one way.
Please take time to read this booklet. It will guide
you through each of the available features to
ensure you get the best out of your detector.
To disassemble the detector, loosen the coupling
by turning it against the arrow and push in the
spring button. The lower shaft will now slide out
from the 'S' shaft.
Your detector is now ready for use
Getting Started
1. Unpack The Detector
There are two main sections. The 'S' shaft, onto
which is mounted the control box, and the lower
shaft with the search head. Note the spring
button near the end of the lower shaft.
1
2
3
2. Assemble The Detector
Slide the lower shaft into the 'S' shaft, wrapping
the cable snugly, but not tightly, round the shaft.
When correctly aligned the spring button on the
lower shaft will click into 1 of the 3 holes on the
underside of the 'S' shaft.
3. Tighten the coupling
Turn the coupling to the 'lock' position as
indicated by the arrow. This makes a rigid
connection between the two parts of the shaft.
4. Insert Battery
The detector takes a single PP3 (alkaline) 9V
battery. This is placed in the battery
compartment on the rear of the control box.
ENSURE THE BATTERY IS INSERTED THE
CORRECT WAY ROUND
1
6
1.
2.
3.
4.
5.
6.
4
5
Detector Display
On / Off Key
Menu Down / Motion Key
Pinpoint / Retune Key
Menu Up / All-Metal / Non-Motion Key
Menu Key
Detection Modes
The VK40 offers 3 methods of detection:
Motion Mode
When operating in motion mode the search head
must be kept moving to enable an object to be
www.metaldetectors.co.uk
1 Angela Street
Mill Hill, Blackburn
BB2 4DJ
t: +44 (0)1254 55887
f: +44 (0)1254 676901
Metal Detectors
e: [email protected]
detected. In this mode the detector is silent until
an object is detected when it emits a sharp beep.
The sound occurs as the centre of the search
head passes the target object. This is the only
detection mode that provides discrimination.
P
All-Metal Mode
This mode provides a continuous faint audio
threshold tone, allowing the smallest signals to
be detected. In this mode the audio output will
continually, but slowly, retune to the threshold
level preventing the detector from drifting out of
tune, but requiring the search head to be kept
moving to detect items. This mode is not
available when detecting in Beach mode.
When the detector is in either Motion or
All-Metal detection modes, holding this
key will switch the detector into NonMotion mode until the key is released.
This allows for accurate pinpointing.
When the detector is working in NonMotion, holding this key retunes the
audio threshold to its preset level.
▲
Non-Motion Mode
Similar to the All-Metal mode, this mode also
provides a faint audio threshold through the
speaker or headphones. In this mode the
detector does not automatically retune, but
enables the search head to be held stationary
over the target to allow accurate pinpointing. In
some cases changes in ground conditions and
temperature may cause the threshold to vary
from its faint preset level. In this case the
detector needs to be retuned,
When the detector is detecting in Motion
mode, pressing this key will switch to AllMetal mode. Subsequent presses will
alternately switch the detector between
Non-Motion and All-Metal modes. When
the detector is in Menu mode, this key
will increment the currently selected
setting.
MENU This key switches the detector into Menu
mode, allowing the Sensitivity, Discrimination
and Ground settings to be adjusted and the Auto
Power Off feature to be enabled or disabled.
Membrane Keypad
Detector Setup
All the VK40's functions are controlled from the 5
keys on the front panel of the detector. Please
read this section carefully to understand how
these controls operate with each other.
The VK40 provides a menu system to alter the
detector settings which can aid with detecting.
These settings are: Discrimination, Sensitivity
and Ground. The effect of changing the value of
each of these is described below:
Pressing this key once will turn the
detector on. When the detector has com
pleted its startup sequence and is in
detect mode, pressing this button again
will turn the detector off.
▼
2
will switch from the current detection
mode to Motion mode. When the detector
is in Menu mode, this button will decre
ment the currently selected setting.
When the detector is operating, this key
Discrimination
The Discrimination setting is used to alter the
detectors ability to ignore unwanted metal
objects when used in Motion mode. The higher
this setting, the more discriminating the detector
will be. When set at 0 all metal items will be
www.metaldetectors.co.uk
1 Angela Street
Mill Hill, Blackburn
BB2 4DJ
t: +44 (0)1254 55887
f: +44 (0)1254 676901
Metal Detectors
detected, and when set to maximum (90) only
the most conductive items (Silver and Copper)
will be found. All other targets will be ignored.
For normal detector use it is not recommended
to search with the Discrimination set too high as
many desirable targets may be missed. Items
such as gold rings are not as conductive as a
piece of copper so will be ignored by the
detector if the Discrimination level is set too
high.
Sensitivity
The Sensitivity level alters how responsive the
detector is to signals received from the search
head. The higher the Sensitivity level, the more
responsive the detector. For general use it is
recommended that the Sensitivity level is set to
maximum (90), as this improves the detectors
ability to locate small or deep objects. In some
environmental conditions, the detector may
produce false beeps which do not indicate a
target. In this case is is recommended that the
sensitivity setting is reduced until the problem is
resolved.
Ground
The VK40 provides 2 different Ground settings
for detecting in different conditions. The two
settings are Inland and Beach. As wet sand has
a different effect on the detector to soil, when the
detector is used on the beach the Ground setting
must be set to Beach.
Menu Operation
To adjust each of the settings described above,
a simple menu system is used. The MENU key
on the keypad is used to select which setting is
to be adjusted, and the ▼ and ▲ keys are used
to alter the value.
With the detector switched on and operating,
3
e: [email protected]
press MENU to enter the menu mode. This will
cause the display to show the Discrimination and
Sensitivity settings, and the current setting of the
Sensitivity setting will flash:
Adjusting Sensitivity
While the Sensitivity value is flashing, pressing
the ▼ or ▲ keys will decrement or increment the
value, in steps of 5, respectively. Please note
that the Sensitivity and Discrimination values are
only adjustable in the range 0-90. Therefore
pressing ▼ when the value reads 0, and similarly pressing ▲ when the value reads 90, will have
no effect.
To resume detecting, press the P key and the
detector will exit the menu mode. Alternatively, if
no key is pressed for a few seconds then the
detector will automatically return to its normal
operating mode.
Whilst in the menu mode, pressing MENU again
allows the Discrimination setting to be adjusted
in the same way as that described above for the
Sensitivity setting.
A third press of the MENU button changes the
display again:
Changing Ground Mode
Pressing either the ▼ or ▲ keys toggles the
detector between Inland and Beach modes.
Finally, after a fourth press of the MENU button
the ▼ and ▲ keys can be used to toggle the Auto
Power Off feature On or Off.
www.metaldetectors.co.uk
1 Angela Street
Mill Hill, Blackburn
BB2 4DJ
t: +44 (0)1254 55887
f: +44 (0)1254 676901
Metal Detectors
From this stage of the menu mode, a subsequent
press of the MENU key will return the detector to
normal operation. Again, this can also be
achieved by pressing P or waiting a few seconds.
e: [email protected]
battery fades, the height of the blocks will
gradually reduce. When the bar fills up with
blocks just one pixel high, "Low-Battery" will be
read on the display and the battery should be
replaced.
Additional Features
Target ID
This part of the display provides an indication of
the identity of each target. When the search
head is swept past a target, a number - between
0 and 95 - is shown on the display and the bar
displays a number of blocks dependant on the
number shown. If only one or two blocks appear,
and the number that appears is low, then the
object is likely to be iron. If seven or eight blocks
are shown, and the number is high, then the
object is likely to be of high conductivity. Some
typical targets are shown here:
Nail
5p
Shilling
Battery Check
The detector continually monitors the condition
of the battery. When the detector indicates a
target, the bar on the display fills up dependant
on the object found. When the battery is in good
condition the blocks will be the same height as
all the other characters on the display. As the
4
Replace Battery
Power Off
Pressing the
key will store the current
detector settings and switch the detector off.
Note: If the battery is removed without first
switching the detector off, the current settings
may not be stored.
Auto Power-Off
If the detector receives no signals for
approximately 5 minutes, it will consider itself
not to be in use and automatically switch off. This
should not cause a problem in normal use and
prevents battery draining should the detector
accidentally be left switched on. This feature can
be switched off, if desired, through the menu.
Headphone Socket
This is on the underside of the display box and
will accept a standard pair of headphones with a
¼" stereo jack plug. The loudspeaker will be
disabled when a plug is inserted into the
headphone socket. Headphones are particularly
recommended for searching in the Non-Motion
or All-Metal modes.
www.metaldetectors.co.uk
1 Angela Street
Mill Hill, Blackburn
BB2 4DJ
t: +44 (0)1254 55887
f: +44 (0)1254 676901
Metal Detectors
e: [email protected]
Using Your Detector
Firstly, switch the detector on using the
key.
Put the detector into Motion mode by pressing
the ▼ key. Check the sensitivity level. It should
be set at maximum (90). If it is not, press the
MENU key once and then use the ▲ key to
increasethe setting. At first it is best to work with
the Discrimination level set at 0. Follow the
earlier instructions for information on altering
this setting. With experience a level will be found
where most rubbish is ignored and desired
objects still give an audio signal. This will be
determined by trial and error and depends on the
preference of the individual detectorist.
To detect, hold the detector by the handgrip with
your arm in the rest. Lower the search head to
the ground ensuring that it is flat to the ground.
If you feel the length of the shaft or the position
of the armrest are wrong adjust them now.
Keeping the head close and parallel to the
ground, sweep it back and forth in an arc in front
of you. The speed at which you sweep is not
critical but remember that the machine is more
likely to miss targets if you go too fast. Walk
slowly forward as you sweep, allowing the area
searched each time to overlap with that
searched by the previous sweep to avoid missing
targets.
5
The detector will emit a beep when an object is
detected. The display will also give a target ID
number as described earlier. Repeated sweeps
are recommended to obtain a more accurate
reading.
The object can then be pinpointed either by
pressing the Pinpoint button, or by switching to
All-Metal or Non-Motion modes. In either of
these modes the audio signal is loudest when
the search head is directly over the target object.
The target ID system is not infallible. The signals
received from round steel objects, for example a
washer or recent 2p piece, can confuse the
detector. If repeated sweeps over a target give a
wide range of numbers and the number of blocks
shown on the display varies greatly this is the
detectors way of telling the user that one of
these 'problem' objects has been found. The
choice to dig or not is up to the user. Remember
that the display only acts as a guide.
www.metaldetectors.co.uk
1 Angela Street
Mill Hill, Blackburn
BB2 4DJ
t: +44 (0)1254 55887
f: +44 (0)1254 676901
Metal Detectors
e: [email protected]
Caring for Your Detector
Warranty Service
In order to keep your machine in good condition,
please take the following precautions:
Return of the enclosed guarantee card entitles
the original purchaser to a full 2-year guarantee
from the original purchase date. This covers
parts and labour, excluding batteries. This does
not, however, cover postage of the unit to or from
our factory. This must be paid by the owner of the
detector.
• When using in bad weather, protect the
electronics in the control box by wrapping in a
waterproof bag.
• Clean your detector regularly and ensure the
shaft is free from dirt, especially sand. Use a
damp cloth with mild detergent, but make sure
no water gets into the control box.
If the detector is stored for long periods remove
the batteries. If they leak or corrode they could
cause serious damage to the detector.
In the unlikely event that you do need to return
the detector to us, please pack it securely along
with a letter explaining the problem and a
cheque for £6.00 to cover return carriage and
insurance to:
Viking Metal Detectors
1 Angela Street
Mill Hill
Blackburn
Lancs.
BB2 4DJ
Please make cheques payable to Viking Metal
Detectors. If you are unsure about the fault
please give us a call on (01254) 55887 and we
will be happy to advise you.
6
www.metaldetectors.co.uk