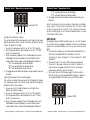
1
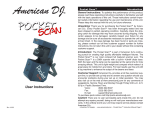
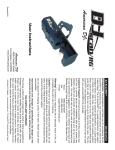
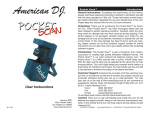
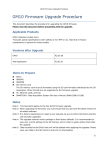
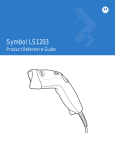
User Instructions
©American DJ Supply
American DJ World Headquarters:
4295 Charter Street Los Angeles, CA 90058 USA
Tel: 323-582-2650 / Fax: 323-582-2610
Web: www.americandj.com / E-mail: [email protected]
American DJ
DMX-512
4295 Charter Street
Los Angeles Ca. 90058
www.americandj.com
Pocket Scan™ Introduction
Introduction:
Congratulations and thank you for purchasing the Pocket ScanTM
from American DJ. The new Pocket ScanTM is part of American
DJ’s continuing pursuit for creating high quality affordable intelligent fixtures. The Pocket Scan TM is our most compact full
featured scanner ever. The Pocket Scan™ is a DMX scanner
with a built-in 5mW diode laser. Both the laser and the lamp can
be operated at the same time.
Customer Support:
American DJ® provides a toll free customer support line, to provide set up help and to answer any question should you encounter problems during your set up or initial operation. You may also
visit us on the web at www.americandj.com for any comments or
suggestions.
Service Hours are Monday through Friday 10:00 a.m. to 5:00 p.m.
Pacific Standard Time.
Voice:
(800) 322-6337
Fax:
(323) 582-2610
E-mail:
[email protected]
Pocket Scan™ Specifications
Model: Pocket Scan™
SPECIFICATIONS:
Working Position:
Voltage:
Lamp:
Weight:
Dimensions:
Fuse:
Colors:
Gobos:
Any safe working position
120V
ZB-JCR 12V/100W
10 lbs.
11.5” x 4.75” x 6”
2A GMA
15 plus white
13 plus spot
Pocket Scan™ Product Registration
The Pocket ScanTM comes with a 1 year limited warranty. We
recommend filling out the warranty registration card that came
with your fixture to validate your warranty. You may also register
your product on-line at www.americandj.com.
Warning! To prevent or reduce the risk of electrical shock or fire,
do not expose this unit to rain or moisture.
Caution! There are no user serviceable parts inside this unit. Do
not attempt any repairs yourself, doing so will void your manufactures warranty. In the unlikely event your unit may require service
please contact your nearest American DJ dealer.
HALOGEN LAMP WARNING!
This fixture is fitted with a halogen lamp which is highly susceptible
to damage if improperly handled. Never touch lamp with your bare
fingers as the oil from your hands will shorten lamp life. Also, never
move the fixture until the lamp has had ample time to cool. Remember,
lamps are not covered under warranty conditions.
©American
DJ Supply® - www.americandj.com - Pocket Scan™ Instruction Manual Page 2
©American
DJ Supply® - www.americandj.com - Pocket Scan™ Instruction Manual Page 15
Pocket Scan™ Trouble Shooting Cont.
data transmission problems (which will show up as
random or incorrect movements) for best result, use
proper balanced data transmission cable.
Unit does not respond to sound;
1. Check to see if the unit is receiving DMX (the RED LED
should be off).
2. Quiet or high pitched sounds will not activate the unit.
Unit blacks out in stand alone mode;
1. Some of the units’ built-in patterns include special
effects such as blackout sweeps. When connecting two
units up, only one is ever blackened out at once, and
the blackout ‘swaps’ between the units.
If problems are not resolved; Contact your American DJ®
dealer for service.
Pocket Scan™ Introduction
Quick Start Stand Alone Mode
Connect all your units together via the XLR connector.
You can connect up to 16 units together in Master/Slave
mode. The master unit will run the slaves to the masters
built in programs and internal microphone. Plug in all units.
When the Pocket Scan™ is first turned on, it will run through
an internal self test where it moves all motors to their zero
position. After the self test the units will react to sound, and
chase to the several built in programs.
FEATURES:
Pocket Scan™ features include:
• Scanner and Laser in one effect
• 5mW diode laser
• 15 colors plus white
• Split colors
• 13 gobos plus spot
• Separate color and gobo wheels
• High Speed Shutter with variable Speed
• 170 degree pan / 110 degree tilt
• Full Micro-stepping, with 4 stepper motors.
• Built in Microphone
• Auto switch to Stand-Alone (Master/Slave) operation
when DMX signal is disconnected
• Run up to 16 heads without controller.
• DMX-512 protocol
• Full Focusing.
• Fan cooled
• Uses 4 DMX Channels.
• Optional RF-Wireless remote control
• Digital DMX display
Improvements and changes in specifications and design to this
manual and unit may be made at any time without prior notice.
©American
DJ Supply® - www.americandj.com - Pocket Scan™ Instruction Manual Page 14
©American
DJ Supply® - www.americandj.com - Pocket Scan™ Instruction Manual Page 3
Pocket Scan™ Introduction
WARNINGS:
• Do not spill water or other liquids in to or on to your unit.
• Be sure that the local power outlet match that of the
required voltage for your unit.
• Do not attempt to operate this unit if the power cord
has been frayed or broken. Please route your power
cord out of the way of foot traffic.
• Do not attempt to remove or break off the ground
prong from the electrical cord. This prong is used to
reduce the risk of electrical shock and fire in case of an
internal short.
• Disconnect from main power before making any type
of connection.
• Do not remove the top cover under any conditions.
There are no user serviceable parts inside.
• Never plug this unit in to a dimmer pack
• Always be sure to mount this unit in an area that will
allow proper ventilation. Allow about 6” (15cm)
between this device and a wall.
• Do not attempt to operate this unit, if it becomes
damaged in any way.
• Never operate this unit when it’s cover is removed.
• To reduce the risk of electrical shock or fire, do not
expose this unit rain or moisture
• This unit is intended for indoor use only, use of this
product outdoors voids all warranties.
• During long periods of non-use, disconnect the unit’s
main power.
• Always mount this unit in safe and stable matter.
©American
DJ Supply® - www.americandj.com - Pocket Scan™ Instruction Manual Page 4
Pocket Scan™ Trouble Shooting
Listed below are a few common problems the user may
encounter, with solutions.
No light from the unit;
1. Check if the ‘Power On’ (red) LED is lit and the fan is
running. If not, there is no main supply.
2. Check the fuse in the back panel.
3. Check if lamp is lit. The user should be able to see some
light escape through the fan. If power is present but the
lamp is not lit, lamp may need to be replaced.
Note: The unit has been designed to shut the lamp down
after 60 seconds of inactivity. This is a way of extending
lamp life, be assured this is not a problem with the fixture.
Unit not responding to DMX;
1. If the RED LED in the LCD is flashing, the unit is definitely
receiving DMX
2. Check for prper DMX addressing.
3. If the DMX LED is not lit, check that the DMX cables are
connected properly and are wired correctly (pin 3 is
‘hot’; on some other DMX devices pin 2 may be ‘hot’).
Also, check that all cables are connected to the right
connectors; it does matter which way the inputs and
outputs are connected.
4. If it is a bad connection, the RED LED may flash when
cables are wiggled (but remember it may also be the
unit sensing audio!)
5. If DMX connectors are fairly short, ordinary microphone
cables may be used. For longer runs, this may cause
©American
DJ Supply® - www.americandj.com - Pocket Scan™ Instruction Manual Page 13
Pocket Scan™ DMX Settings
Pocket Scan™ Set Up
Unpacking:
DMX CHANNEL
DMX512
LEVEL RANGE
0 - 255
1
2
3
PAN
TILT
COLOR
5
WHITE
ORANGE 306
200
99
95
89
85
79
75
69
65
59
55
49
45
39
35
29
25
19
15
9
5
0
YELLOW 601
GREEN 204
UV108
MAGENTA 501
4
5
6
UNIT RESET
FAST
OPEN
FAST STROBE
FAST STROBE
Power Supply:
GOBO 11
GOBO 7
8
AUDIO MODE
GOBO 10
CYAN 104
RED304
TORQUES 208
7
7
LASER
GOBO 12
GOBO9
BLACKOUT
OPEN
GOBO 13
MAGENTA 507
PINK 310
YELLOW 603
BLUE 101
ORANGE 302
GREEN 201
3
GOBO 14
6
SHUTTER SPEED
AUDIO MODE
AUDIO MODE
ROTATION CCW ROTATION CCW
ROTATION CW
ROTATION CW
255
2
4
GOBO
GOBO 8
GOBO 6
GOBO 5
GOBO 4
SLOW
SLOW STROBE
GOBO 3
RELATIVE
GOBO 2
CLOSED
GOBO 1
9
Every Pocket Scan™ has been thoroughly tested and has been
shipped in perfect operating condition. Carefully check the shipping carton for damage that may have occurred during shipping. If the carton appears to be damaged, carefully inspect
your fixture for any damage. In the case damage has been
found please contact our toll free customer support number for
further instructions.
10
11
SLOW STROBE
CLOSED
12
13
Gobo layout. Note gobo one is Large Spot - Open Shutter.
14
1
Before plugging your unit in be sure the source voltage in your
area matches the required voltage for your American DJ® Pocket
Scan.™ The American DJ® Pocket Scan™ is available in a 115v
and 230v version. Because line voltage may vary from venue to
venue, you should be sure to plug your unit into a matching wall
outlet before attempting to operate you controller.
Data Cable (DMX Cable) Requirements:
Your controller and packs require a standard 3-pin XLR connector
for DMX data input and DMX data output (Figure 1). If you are
making your own cables be sure to use standard two conductor
shielded cable (This cable may be purchased at almost all pro
sound and lighting stores). Your cables should be made with a
male and female XLR connector on either end of the cable. Also
remember that DMX cable must be daisy chained and can not
be “Y”ed or split.
Notice: Do not use the ground lug on the XLR connector. Do
not connect the cable’s shield conductor to the ground lug or
allow the shield conductor to come in contact with the XLR’s
outer casing. Grounding the shield could cause a short circuit
and erratic behavior.
DMX512 OUT
CONTROLLER
CONNECTOR
3 PIN
COMMON
1
2
3
DMX +
DMX -
1
3
2
DMX512 IN
CONNECTOR
3 PIN
Figure 2
©American
DJ Supply® - www.americandj.com - Pocket Scan™ Instruction Manual Page 12
©American
DJ Supply® - www.americandj.com - Pocket Scan™ Instruction Manual Page 5
X-
XLR Female Socket
XLR Male Socket
1 Ground
2 Cold
2 Cold
1 Ground
XLR Pin Configuration
Pin 1 = Shield
Pin 2 = Data Compliment (negative)
3 HotINPUT
REMOTE
SOUND
CONTROL
INPUT
OUTPUT
SOUND
3 Hot
REMOTETrue
INPUT
OUTPUT
Pin 3 = Data
(positive)
CONTROL
INPUT
Notice: Be sure to follow figures two and three when making your
own cables.
Special Note: Line Termination.
POWER
1
3
2
DMX512 IN
(X-CALIBUR)
CONNECTOR
3 PIN
1
3
2
Termination reduces signal errors and
avoids signal transmission problems
and interference. It is always advisable
to connect a DMX terminal, (Resistance
120 Ohm 1/4 W) between PIN 2 (DMX-)
and PIN 3 (DMX +) of the last fixture.
Fuse Replacement: Caution! Always disconnect the main
power before attempting to replace the fuse. Remember always
replace with the same type lamp and fuse.
1. With a flat screwdriver wedge the fuse holder out of the its
housing
2. Remove the old fuse from the holder and replace with the
exact same type fuse.
3. Replace the fuse holder in to the fuse holder housing.
4. Reconnect main power.
POWER
When longer runs of cable are used, you may need to use a terminator on the last unit to avoid erratic behavior. A terminator
is a 90-120 ohm 1/4 watt resistor which is connected between
pins 2 and 3 of a male XLR connector (DATA + and DATA -). This
unit is inserted in the female XLR connector of the last unit in your
daisy chain to terminate the line. Using a cable terminator will
decrease the possibilities of erratic behavior.
MON
X+
Pocket Scan™ Fuse Replacement
Pocket Scan™ Set Up
Figure 4
Mounting.
Be sure the yoke is firmly attached to the unit. Attach clamps
to the yoke of the Pocket Scan.™ The Pocket Scan™ can be
mounted to a wall or may hung from truss.
Pocket Scan™ Lamp Replacement
Lamp Replacement: Caution! Never open the unit when in
use. Always disconnect the main power before attempting to
replace the lamp. Remember always replace with the same
type lamp and fuse.
1. Be sure to follow the proper procedures when handling
halogen bulbs.
2. Lamp replacement has been made simple by incorporating
the use of a removable lamp cover and a thumb screw.
3. Loosen the thumb screw on front lower cover.
4. Remove the lamp cover.
5. Remove and replace the bulb.
6. Reassemble.
Pocket Scan™ Focusing
1. To focus the Pocket ScanTM it is best to first turn down the
music so the mirror stops moving.
2. Loosen the thumb screw on the front of the unit that hold
the lens in place.
3. Adjust the focus by moving the lens up and down, until you
reach proper focus.
4. Tighten the thumb screws after you achieve your desired
focus.
©American
DJ Supply® - www.americandj.com - Pocket Scan™ Instruction Manual Page 6
©American
DJ Supply® - www.americandj.com - Pocket Scan™ Instruction Manual Page 11
Pocket Scan™ Operation Cont.
Adjusting The DMX address:
The DMX address is adjusteded by using the “1, 10, and 100”
keys directly below the LCD. Each press of a button will increase
the selected value of one. Please note that each tap of the
keys will only increase the displayed value, you may decrease
the value.
Pocket Scan™ Reset Function
This function will reset all functions to their default setting. You
may reset the fixture by turing the unit on and off. If your units
are being controlled through a DMX controller, you may also
reset the fixtures by adjusting DMX channel seven to a value of
240-255.
Pocket Scan™ Automatic Lamp Control
This function will automatically shut off the lamp if the shutter is
closed for more than one minute in DMX mode. In Sound-Active
mode the lamp will automatically shut off is their there is no
music source for more than a minute. This function has been
incorporated to extend lamp life.
Pocket Scan™ Cleaning
Due to fog residue, smoke, and dust cleaning the internal and
external optical lenses must be carried out periodically to optimize light output.
1. Use normal glass cleaner and a soft cloth to wipe down the
outside casing.
2. Use a brush to wipe down the fan grill.
3. Clean the external optics with glass cleaner and a soft cloth
every 20 days.
4. Clean the internal optics with glass cleaner and a soft cloth
every 30-60 days.
5. Always be sure to dry all parts completely before plugging
the unit back in.
Cleaning frequency depends on the environment in which the
fixture operates (i.e. smoke, fog residue, dust, dew).
©American
DJ Supply® - www.americandj.com - Pocket Scan™ Instruction Manual Page 10
Pocket Scan™ Operating Instructions
Operating Modes:
You can use the Pocket ScanTM in three ways:
• Stand alone mode - The unit will react to sound, chasing
through the several built in programs. You can also use the
optional Pocket Scan/RF Remote Control to set blackout,
strobe or slow scan mode.
• Master/Slave mode - You can daisy chain up to 16 units
together to get a synchronized light show that will react to
sound chasing through several built in programs.
• DMX control mode - This function will allow you to control
each individual fixtures traits with a standard DMX 512
controller such as the American DJ Show Designer.TM
Stand Alone Mode:
The Pocket ScanTM has a sophisticated built-in light show that
will run to sound when there is no DMX signal present. Plug the
fixture in and it will chase through its programs via sound. You
can also use the optional wireless remote to blackout, strobe,
or slow scan the units.
Master-Slave Operation:
This function will allow you to link up to 16 units together to run
in a Master-Slave mode. In Master-Slave operation one unit
will act as the controlling unit and the others will react to the
controlling units built-in programs. Any unit can act as a Master
or as a Slave however, units must be programmed to act as
“Masters” or as “Slaves.” There are two Master-Slave modes,
Fast and Slow.
Master-Slave Connections:
1. Daisy chain your units via the XLR connector on the top of
the unit. Use standard XLR microphone cables to link your
units together. Remember that the Male XLR connector is the
input and the Female XLR connector is the output. The first
unit in the chain (master) will use the female XLR connector
only. The last unit in the chain will use the male XLR
connector only.
©American
DJ Supply® - www.americandj.com - Pocket Scan™ Instruction Manual Page 7
Pocket Scan™ Operating Instructions
Pocket Scan™ Operation Cont.
“S-F” will equal Master/Send Fast Mode
“S-S” will equal Master/Send Slow Mode
4. To toggle between Fast and Slow modes repeat steps one
and two.
Pocket Scan™ LCD
100
10
1
Setting Units as Masters or Slaves:
This section will detail the procedure for switching units between
Masters and Slaves. Each unit can function as a “Master” or as a
“Slave” To adjust the settings:
1. Be sure the main power switch is set to the “OFF” position.
2. With the power off press and hold down the LCD “100-Key,”
and turn the power on.
3. When the power is applied, the LCD will display the current
DMX address and then display the current Master-Slave
mode. Master-Slave modes will be displayed as followed:
“S-F” will equal Master/Send Fast Mode
“S-S” will equal Master/Send Slow Mode
“rEC” will equal Slave/Recieve Mode
4. To toggle between Master and Slave mode repeat steps one
and two.
Adjusting the Speed of the internal Program:
This section will detail the procedure for changing the Master
Unit operating mode. The master mode may be changed to
operate in Fast or Slow modes.
1. Be sure your unit is in Master mode, see Setting Units as
Masters or as Slaves, above.
2. Be sure the main power switch is set to the “OFF” position.
3. With the power off press and hold down the LCD “10-Key,”
and turn the power on.
4. When the power is applied, the LCD will display the current
DMX address and then display the current Master-Slave
mode. Master-Slave modes will be displayed as followed:
©American
DJ Supply® - www.americandj.com - Pocket Scan™ Instruction Manual Page 8
Note: The remote control only operates in Stand-Alone or MasterSlave modes. If the remote is used while the units are in DMX
mode, the remote will not function. If the unit does not receive
an active DMX signal, the unit will automatically react to sound
in the Master/Slave mode.
DMX Mode:
Operating through a DMX controller give the user the freedom
to create their own programs tailored to their own individual
needs. This function also allows you to use your fixtures as spot
lights.
1. This function will allow you to control each individual fixture’s
traits with a standard DMX 512 controller such as the
American DJ® Show Designer™ or the American DJ® DMX
Operator.™
2. The Pocket ScanTM uses seven DMX channels to operate;
Channel 1 is mirror pan, channel 2 is mirror tilt, channel 3 is
color, channel 4 is gobo, channel 5 is shutter, channel 6 is
speed, and channel 7 controls the laser.
3. To run your fixture in DMX mode, plug in the fixture via the
XLR connections to any standard DMX controller. - Follow the
set-up specifications that come with your DMX controller.
Pocket Scan™ LCD
100
©American
10
1
DJ Supply® - www.americandj.com - Pocket Scan™ Instruction Manual Page 9