1
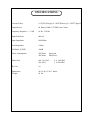
MANLEY
LABORATORIES, INC.
OWNER'SMANUAL
MANLEY 100 WATT
STEREO AMPLIFIER
MANLEY LABORATORIES, INC.
13880 MAGNOLIA AVE.
CHINO, CA. 91710
TEL: (909) 627-4256
FAX: (909)628-2482
CONTENTS
SECTION
PAGE
INTRODUCTION
3
MAINSCONNECTIONS
4
CONNECTINGYOURAMPLIFIER
5
BIAS PROCEDURES
6
OPERATIONAL NOTES
7
SPECIFICATIONS
8
WARRANTY
9
WARRANTY REGISTRATION
10
INTRODUCTION
THANK YOU!...
for choosing the Manley Euro 100 Stereo Amplifier. Designed by David Manley, the Manley Euro 100 Stereo
Amplifier uses only the best available components, with the shortest and cleanest signal path possible, and with the
use of our own milling equipment we can provide you with a amplifier that looks as good as it sounds. For this
amplifier design, we have chosen an interesting Russian military tube, the GammaY50. The circuit and the
components used have been chosen carefully after years of development and refinement for reliability, constancy
and most importanly, musical, accurate, and emotional delivery of the sound. The circuit topology is similar to
other designs in the MANLEY range. This amplifier is configured for ULTRALINEAR or "partial-triode"
operation which achieves the seductive quality of triode operation without the inefficiency and sacrifice in power
of triode operation. We emphasize big, beefy resevoir capacitors in the high voltage supplies giving plenty of
instant energy for dynamic performance of transient peaks and bass performance which often exceeds that of rival
solid-state amplifiers. We run high voltages on the plates of the output tubes and are thus able to run them at lower
current which will result in longer life for the output tubes. Each output tube has its own bias adjust, and the
procedure for adjusting each tube's current draw is described in this manual. The output transformer has been
factory set in series-parallel for an optimum 5 ohm load which will drive most speakers. Other output impedances
can be achieved by changing the configuration of the transformer secondary. Please contact us at the factory should
you need to do this.
Thank you again, and please enjoy!
GENERAL NOTES
LOCATION & VENTILATION
The Manley Stereo 100 Amplifier must be installed in a stable location with ample ventilation. Allow a minimum
of 2 inches of clearance on the top and sides of the amplifiers, such that constant movement of air can flow. Do
not place amplifiers directly on high pile carpet or any other surface that will block the ventilation holes
underneath the amplifiers. If you have small children or pets, you should consider placing the amplifiers out of
reach or using the optional cages (covers) available as an option to prevent damage to the amplifier or damage to
your small children or pets by the amplifier as the tubes do get hot during operation.
WATER & MOISTURE
As with any electrical equipment, this amplifier should not be used near water or moisture. If liquid enters the
amplifier, it must be immediately returned to your deal for servicing.
SERVICING
The user should not attempt to service the amplifier beyond that described in the owner's manual. Refer all
servicing other than biasing and tube replacement to Manley Laboratories
SPECIAL NOTES
Tubes may become loose during transit. Straighten and press down each tube before plugging the amplifier into
the mains socket. Furthermore, NEVER touch the tubes after the amplifier has been switched on, the tubes become
very hot during operation and should only be handled after the power has been turned off and the tubes have
cooled.
WARNING!
!
TO PREVENT THE RISK OF ELECTRIC SHOCK
DO NOT OPEN THE CABINET
REFER SERVICING TO
QUALIFIED PERSONEL
MAINS CONNECTIONS
Your amplifier has been factory set to the correct mains voltage for your country. The voltage
setting is marked on the serial badge, located on the rear panel. Check that this complies with
your local supply.
Export units for certain markets have a moulded mains plug fitted to comply with local requirements. If your unit does not have a plug fitted the coloured wires should be connected to the
appropriate plug terminals in accordance with the following code.
GREEN/YELLOW
BLUE
BROWN
EARTH
NEUTRAL
LIVE
terminal
terminal
terminal
As the colours of the wires in the mains lead may not correspond with the coloured marking
identifying the terminals in your plug proceed as follows;
The wire which is coloured GREEN/YELLOW must be connected to the terminal in the plug
which is marked by the letter E or by the safety earth symbol or coloured GREEN or GREEN
and YELLOW.
The wire which is coloured BLUE must be connected to the terminal in the plug which is
marked by the letter N or coloured BLACK.
The wire which is coloured BROWN must be connected to the terminal in the plug which is
marked by the letter L or coloured RED.
DO NOT CONNECT/SWITCH ON THE MAINS SUPPLY UNTIL ALL OTHER CONNECTIONS HAVE BEEN MADE.
CONNECTING YOUR AMPLIFIER
Setting up your amplifier is rather easy.
1. Connect all source components (turntable, CD, Tuner, Tape DAT, etc.) to your
preamplifier.
2. Connect the interconnects from the output of the preamplifier or switching center
to the RCA input on the top rear of the amplifier.
3. Connect the hot or "+" speaker cable to the red binding post and the common or "" speaker cable to the black binding post (See diagarm 2). Ensure that the other
end of the cable is connected correctly to the speaker. Tighten the binding posts
by hand. If you use a nut-driver (3/8") do not over-tighten the posts or you may
breaak the connection inside the amplifier.
4. Ensure that the "mains" switch on the front panel is in the "off" or "0" position.
5. Turn on Preamplifier and any source components you plan to use.
6. Plug amplifier into wall outlet.
7. Turn on the amplifier and allow it a minute or so to 'warm up' before playing any
audio signal.
8. Turn up the volume and enjoy.
BIAS PROCEDURES
The Manley Euro Stereo 100 is a fixed bias system that requires very little attention. If you wish
to adjust or check the bias, follow the following steps.
1.
On diagram 2, which depicts the top panel of the amplifier, you can see 4 black tip jacks
and 1 green tip jack. To measure the current draw of each output tube place the positive probe
(red) into the black tip jack for the tube you wish to measure and the negative probe (black) in
the green (GROUND) tip jack and set the meter to read 'millivolts'.
2.
Each of the four (4) output tubes can have its own bias adjusted by altering its own bias
adjust pot. On diagram 2, you can see the numbering sequence for the 4 output tubes, the
corresponding tip jack (measurement point) and bias adjust pot.
3.
The first step to setting the bias is to turn on the amplifier and ensure that there is zero
signal input. Also, leave your loadspeakers connected as these provide an ideal load on the
output. It is recommended that you leave the amplifier on long enough to ensure that the tubes
have reached their stable current draw.
5.
Place the probes in the first black tip jack (negative probes remains in the green tip jack
for whole biasing proceedure) and adjust the first bias trip pot (see diagram 2) until you measure
300 to 350 mV. Since you are measuring across a 10 ohm cathode resistor, this would
correspond to a 30 to 35 mA bias current.
6.
If you are unable to bring the bias voltage down to 300 to 350 mV on any tube then we
recommend that the tube be carefully watched or replaced.
7.
Follow step five with the remaining tubes. Once they are all set, your amplifier should
be in perfect operation.
Whenever replacing an output tube, or when retubing the unit, use
tubes of the same type and quality as was fit by the factory. Watch and adjust the bias for the
specific output tube or tubes you are replacing as soon as you turn on the amplifier, then check
again after a half hour, and again in a few hours. Should you have any questions, or wish to
purchase approved tubes from us here at Manley Labs, please do not hestitate to call.
OPERATIONAL NOTES
SWITCHING ON
The power switch is located on the lower left hand corner of the front panel. Push the top of the
rocker switch (1) to turn on the amplifier and the bottom of the rocker to turn off the amplifier.
The LED on the right side of the front panel will illuminate indicating that the amplifier is
operating.
RUNNING
It is not recommended that you leave your amplifier permanently switched on. This only wastes
electricity and tube life. Your amplifier has solid state rectification and reaches peak operating
condition in approximately 30 minutes.
TUBE LIFE
As with all tubes, their quality degrades with age. This is due to cathode emission, a natural
process found in all tubes. We recommend that you have your amplifier checked every 3-4
years, depending on usage, usually the amplifier will require re-tubing after this time has
elapsed.
PANEL LAMP
The lamp which illuminates the front panel insert is easily replacable should it ever burn out. To
replace it use only the same type with the same or greater voltage rating. In these amplifiers, the
lamp is a FUSE LAMP STYLE 8V 0.15mA. Dimensions are 1/4" x 1 1/4". To replace the
lamp, first turn off the amplifier and unplug the power cord!
Remove the bottom cover and locate the lamp holder which sets behind the pront panel insert.
Do not touch any other components inside the amplifier as high voltages may be present even
after the amplifier is unplugged, sometimes for weeks! Carefully pry out the old lamp from the
clips and firmly replace with the new lamp of the same type and rating. Replace the bottom
cover after you are through.
SPECIFICATIONS
Vacuum Tubes:
4 x ΓY50 (Output), 2 x 6350 (Driver), 2 x 12AT7 (Input)
Output Power
88 Watts @1Khz 1.5%THD, into 5 ohms
Frequency Response, +/- .5 dB
10 Hz - 35 KHz
Input Sensitivity
800 mV
Input Impedance
100 KOhm
Load Impedance
5 Ohm
S/N Ratio @350W
-80 dB
Power Consumption
220 Watts
420 Watts
Mains Fuse
100, 110, 120V
220, 240 V
B+ Fuse
1A
Dimensions
Weight
W=19, D=13, H=7 inches
46 lbs
Quiescent
Full Power
6 A (Slo-Blo)
3 A (Slo-Blo)
WARRANTY
All Manley Laboratories equipment is covered by a limited warranty against defects in materials
and workmanship for a period of 90 days from date of purchase to the original purchaser only. A
further optional limited 5 year warranty is available to the original purchaser upon proper
registration of ownership within 30 days of date of first purchase.
Proper registration is made by filling out and returning to the factory the warranty card attached to
this general warranty statement, along with a copy of the original sales receipt as proof of the
original date of purchase. Only 1 card is issued with each unit, and the serial number is already
recorded on it.
If the warranty registration card has already been removed then this is not a new unit, and is
therefore not warranted by the factory. If you believe this to be a new unit then please contact the
factory with the details of purchase.
This warranty is provided by the dealer where the unit was purchased, and by Manley Laboratories,
Inc. Under the terms of the warranty defective parts will be repaired or replaced without charge,
excepting the cost of tubes. No warranty is offered on tubes, unless:
1. a Manley Laboratories preamplifier is used with a Manley Laboratories amplifier, and
2. the warranty registration card is filled out.
In such a case a 6 month warranty on tubes is available with the correct recording of the serial
number of the preamplifier on your warranty registration card.
If a Manley Laboratories product fails to meet the above warranty, then the purchaser's sole
remedy shall be to return the product to Manley Laboratories, where the defect will be repaired
without charge for parts and labour. The product will then be returned via prepaid, insured freight,
method and carrier to be determined solely by Manley Laboratories. All returns to the factory must
be in the original packing, (new packing will be supplied for no charge if needed), accompanied by
a written description of the defect, and must be shipped to Manley Laboratories via insured freight
at the customer's own expense. Charges for unauthorized service and transportation costs are not
reimbursable under this warranty, and all warrantees, express or implied, become null and void
where the product has been damaged by misuse, accident, neglect, modification, tampering or
unauthorized alteration by anyone other than Manley Laboratories.
The warrantor assumes no liability for property damage or any other incidental or consequental
damage whatsoever which may result from failure of this product. Any and all warrantees of
merchantability and fitness implied by law are limited to the duration of the expressed warranty.
All warrantees apply only to Manley Laboratories products purchased and used in the USA.
Some states do not allow limitations on how long an implied warranty lasts, so the above
limitations may not apply to you. Some states do not allow the exclusion or limitation of incidental
or consequential damges, so the above exclusion may not apply to you.
This warranty gives you specific legal rights and you may also have other rights which vary from
state to state.
WARRANTY REGISTRATION
We ask that you please fill out this registration form and send the bottom half to:
MANLEY LABORATORIES
REGISTRATION DEPARTMENT
13880 MAGNOLIA AVE.
CHINO CA, 91710
Registration entitles you to product support, full warranty benefits, and notice of product
enhancements and upgrades. You MUST complete and return the following to validate your
warranty and registration. Thank you again for choosing to use Manley Laboratories.
MODEL ____________________
SERIAL No. ______________________
PURCHASE DATE ______________ SUPPLIER ______________________
-------------------------------------------------------------------------------------------------------PLEASE DETACH THIS PORTION AND SEND IT TO MANLEY LABORATORIES
MODEL ____________________
SERIAL No. ______________________
PURCHASE DATE ______________ SUPPLIER _______________________
NAME OF OWNER _______________________________________________
ADDRESS ______________________________________________________
CITY, STATE, ZIP ________________________________________________
TELEPHONE NUMBER ___________________________________________
Serial #'s of Associated Manley Laboratories Equipment ___________________
________________________________________________________________