1
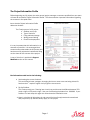
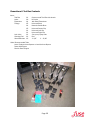
Occupied Workplace Logistics
Furniture Lift Manual
05/2012
Table of Contents
Introduction.........................................................................................................................................3
Project Information Profile .................................................................................................................4
Understanding Furniture.....................................................................................................................5
Initial Walk-Thru...................................................................................................................................7
Project Sequence................................................................................................................................9
Ready the customer for installation.................................................................................... 10
Preparing for intallation....................................................................................................... 13
Lift Project Challenges................................................................................................. 14
Important Questions to Ask......................................................................................... 16
Ready the space................................................................................................................... 16
Installation and Furniture Lifting......................................................................................... 21
Button Up Every Night.......................................................................................................... 22
Tools of the Trade ............................................................................................................................ 25
Safety..............................................................................................................................................................27
Furniture Terminology ..................................................................................................................... 28
Furniture Systems............................................................................................................................ 31
Haworth................................................................................................................................ 32
Herman Miller....................................................................................................................... 37
Steelcase.............................................................................................................................. 44
Knoll...................................................................................................................................... 53
Forms & Support Materials ............................................................................................................ 54
Page 2
Introduction
Occupied Workplace Logistics/Lift Installation Manual
Occupied Workplace Logistics is a system that addresses the plannng, coordination, communication
and installation requirements necessary when renovating an occupied work environment.
Lift Installation is a process that assists in the facilitation of carpet replacement in an occupied space
that uses systems office furniture. The tools (jacks, clips, etc.) referenced in this manual refer to the
Renovisions® patented equipment used by many Fuse Alliance Member Companies, however, the
processes and procedures presented in this manual may be used in conjunction with other “lift” systems.
This manual is provided as a guide to assist in the interaction between you, your customer and your
on-site crew to provide the best experience for all involved with the project. Helful hints and other
supporting materials have been provided for your use.
For information or assistance with Renovisions® tools, please contact:
Mike Hutton
Interface Services
(770) 975-4823
[email protected]
Page 3
The Project Information Profile
Before beginning any lift project, the sales person/project manager or someone qualified from your team
will need to complete a Project Information Profile. This sheet contains important information regarding
the customer’s occupied office.
Items that the Project Information Profile
addresses include:
Project Information Profile
The 5 major parts of a lift project
ÍÍ Subfloor and rip-up
ÍÍ Type of furniture
ÍÍ Filing cabinets/storage
ÍÍ Wiring/power cabling
ÍÍ Phones and equipment
It is very important that this information is as
accurate as possible. It is encouraged that
someone who understands the lift process and
has been on lift projects be involved with filling
out the sheet for the success of the project.
A copy of this form is provided in Support
Materials section of this manual.
Bad information could lead to the following:
ÍÍ Not knowing the correct furniture:
This could lead to lower yardages, damaging furniture or even worse not being able to lift
furniture the 1st couple of nights until you get the correct tools.
ÍÍ Rip Up/Subfloor
This is always a big one. Running into a bad rip-up could mean the different between 250
yards a night or 100 yards a night. Now you are affecting the bottom line. $$$$$$. If your
subfloor is in bad shape this again this slows down the installation crew.
ÍÍ Keep in mind that all being done in and around furniture & equipment and conventional floor prep and rip-up does not always apply to a lift project.
Page 4
Understanding Furniture
Systems Furniture
Most of your projects involving furniture lift will be working with systems furniture. Systems furniture
normally consist of what is called a panel. The panels can be attached to one another in a number of
different ways.
It is important that you understand the differences between a panel & post and a rigid connection. Keep
in mind that very few panels can be lifted from the bottom.
Panels start normally around 32” high and can go up to 80” high. There are some systems that will
go from floor to ceiling. These panels can also have what is called “hang on” components. These
components may consist of overhead storage, lower storage and even worksurfaces being hung from the
panels. All this adds to what you have to lift when performing carpet replacement.
Knowing your furniture can greatly cut down on your preparation/training time when you get on the
jobsite.
Freestanding/Casegoods
Most freestanding furniture/casegoods (desks) will be located in the private offices. These will take a
fair amount of time when working around them. Keep in mind they tend to be a wood veneer or laminate
finish. You may find in some cases this would be a good situation to use your furniture skates to slide
things around as little as possible.
There will be times that you will need what is called a push pad to make the lift due to the size.
Storage and Filing
There are different types of storage and filing. Lateral files, vertical files and pedestals (peds) can be
found in various places around the office. There may also be storage in and under the workstations. In
some cases these files could be attached to the worksurfaces making them a bit more challenging while
performing the lift.
Lateral/vertical files: When there are a large number of files (lateral/vertical) on a project make sure
before the 1st night of the project to determine whether they are ganged together. If files are ganged
together, you should recommend to the customer that they use either in-house labor if available or bring
in their local furniture labor to have the files de-ganged each day prior to getting started. This will greatly
improve down time on the project.
Make sure they get someone the next morning to re-gang the files. It is very important have this done for
safety reasons. Files are ganged together to keep them from falling over on someone.
Pedestals (Peds) Normally found in the workstations under the worksurfaces. Sometimes there are
peds that are floor supported. This means that the worksurface is being supported by the pedestal
which means you would have to lift the pedestal and panel at the same time in order to make the lift in
these areas.
Page 5
Moveable/Demountable Wall Systems
These walls have been around for many years but with the push for LEED are being used more frequently.
They are a very ridged systems that can range from 2” thick up to 4” thick. They can be solid or glass and
can weight from 100 lbs. to 400 lbs. per panel. They normally run from floor to ceiling and many times
are built right on top of the carpet.
Every manufacturer is a little different as far as how they handle the wall connections. Some of the
systems have a floor track and these systems must be handled with care.
If you have questions or concerns regarding the furniture in your customer’s facility, you may choose to
contact the local dealer or manufacturer’s representative for assistance.
Page 6
Initial Walk-thru
The initial walk-thru provides an opportunity to explain the lift process to your customer. This is a good
time to evaluate the project and complete or review the Project Information Profile.
The time during the walk-thru with your customer is important. It can help your customer feel more
relaxed with you, the crew and the lift process.
There are many things to look for when walking a job that will determine the amount of yardage the crew
will be able to install each night.
ÍÍ The two most important factors as in any carpet replacement are
■■ Difficulty in the rip-up
■■ Amount of floor prep
Difficult rip-ups are much more challenging in an occupied environment. With the close proximity of the
furniture and equipment you will need to use small striping machines. Therefore make sure you do a pull
test (using a carpet knife and pliers) when doing the 1st job walk-thru. The pull test will need to be done in
a number of places. You are attempting to determine how taxing the rip-up will be as well as get an idea
of what the sub-floor looks like. Try not to perform the pull test in a high traffic areas where the carpet
generally comes up the easiest.
ÍÍ Find an area in a corner or under a desk, for two reasons:
■■ Areas that do not get foot traffic are typically the toughest to get up.
■■ There will not be an unsightly area or trip hazard until the carpet is replaced.
The amount of floor prep needed cannot typically be determined until the carpet is actually up and out
of the way. All you can do is make your best educated guess from the information acquired during the
pull-up and try to prepare yourself accordingly. This is another reason to perform the pull test in multiple
locations - the sub-floor can vary from area to area.
The better informed and prepared the installation crew, the less likely unexpected floor prep will slow the
project to a crawl. Which if not bid accordingly can seriously affect the success and profitability of the
project.
When initially walking the floor with the facility manager, the more imperfections you bring to his or her
attention, the shorter the nightly punch list and the better off you will be at the end of the project. Many
of these projects have had things that are not correct and gone unnoticed until the installation of the
new carpet. Then everything sticks out like a sore thumb. These things can be easily pointed out during
the initial walk-thru, but obviously everything cannot be detected. Therefore, it is the crew leader’s
responsibility to walk the area to be completed the next night and point out any of imperfections to the
customer before the crew ever gets started.
Page 7
These type of rip-ups are tough when you are working around furniture systems.
Make sure to allow enough time for the crews to rip it up.
Page 8
Project Sequence
Ready the Customer for Installation
• The customer is always first
• Form solid relationship with the customer
• Understanding your customer’s expectations
• Explain approximate time frame, nightly yardage and schedule
Preparing for Installation
• Lift Project Challenges
• Important questions to ask
• Pre-installation walk-thru
• Plan your layout
Ready the Space
• Daily job walks
• Check and double check
• Map and tag
• Removal of loose furniture
Remove the Old Carpet
• Removing the broadloom/carpet Tile
• Do not pass go – until you know what is below
• Neatness counts – Remember vacuum only – keep dust to a minimum
• Follow manufacturer’s recommended installation instructions
Installation and Furniture Lifting
• Select the correct fittings
• Gently lift the furniture (remember only lifting ½” maximum)
• Work together as a team
Button up Every Night
• Clean behind yourself
• Leave the area finished and safe
• Create your own punch list each night
• Plan ahead for tomorrow night
• Keep a job log
• Alert customer to problems and reminders
Page 9
Ready The Customer for Installation
The customer is always first
Customers satisfaction should be our goal each and every night. Open and regular communication is
of the utmost importance in the success of any project. During lift projects, you will need to make sure
there is some form of communication daily, there are many projects where it becomes necessary to
communicate at the end of each night and again in the morning when the customer arrives at the office.
Keep in mind you and your crews will be performing nightly with little to NO Supervision from the end
user. Always ask questions, know what areas are OFF LIMITS and make sure your crews are aware of
these areas.
Form a solid relationship with your customer
The first night of any project is very important and should be performed with precision. The crew’s pace/
schedule is important and should always be communicated with the customer on a nightly/daily basis.
You should consider the customer as part of your team and work together for a successful project. The
last night of any lift project is your second most important night. Making sure all loose ends are tied up
and your crews leave with a satisfied customer.
Understanding Your Customer’s Expectations
Taking the time in the beginning of each project to understand your customer’s expectations makes the
project move along much smoother. Plan on arriving to the job site the 1st day of a project 1 to 3 hours
early (depending on the project scope). You want to spend time walking the project to better understand
the customer’s expectations. During the walk thru you are looking and pointing out things helping them
better understand how you will be performing the lift process.
It is important that everyone has the same project/scope expectations during this 1st meeting.
Below you will find a few things that can become issues during the 1st couple of nights and
should be clarified during the 1st night walk-thru.
ÍÍ Reduced Yardage:
Make sure everyone is clear just how many yards you will attempt to complete the 1st
few nights.
ÍÍ Unrealistic nightly yardages:
Always try and keep your yardages within reason, do not oversell what your crews are
capable of completing each night.
ÍÍ Bad Rip Ups:
Have an understanding what your rip will be before you start to help gauge you nightly
production.
ÍÍ Work hours and Conditions:
Your team and the customer should be clear about the schedule your crew will be
working. Make sure the customer is clear as to what areas your crews are allowed to
access.
Page 10
ÍÍ Walk and talk with your Customer
●● The first night of every job is the “Getting to know you night”
●● Spend time getting acquainted with the furniture, the floor prep, etc. Make every
effort to meet your customer contact and thoroughly walk the space. Ask about
everything from disposal to where to find the vending machines and security.
Walk in and out of several workstations together, point out things you see that can
help your customer better understand what you will need from them to make the
project successful. Point out damages or concerns and discuss how to handle
communications for any situations that may arise in the future. Exchange phone
numbers and discuss your installation strategy for the next few nights. Also make
sure to keep your team informed and updated. Discuss the customer’s concerns
and anything else that may be related to their duties. Together your team and the
customer set the pace and clear the way for a successful installation.
ff Candy Jars - This is a big one to watch the crews on - make sure the crews
don’t empty out the CANDY Jars on the desks
Page 11
Explain approximate time frame, nightly yardage and schedule
Remember customers have no idea what you are capable of ripping up and installing in one night. The
first few nights of any project should be scheduled for a lowered yardage so that the crew can get familiar
with the routine, the location and especially the rip-up.
The routine will consist usually of start time, bringing carpet to the site, sign-in procedures, and location
of smoke rooms, break rooms, washrooms, building rules and regulations.
Finally there is the dreaded rip-up. The best case scenario is carpet tile to carpet tile installed with
releasable adhesive. The first few days will give you a more accurate idea of what your nightly yardage
potential will be. The following is a list of problems that can lower your nightly yardage.
■■
■■
■■
■■
■■
Carpet tile installed wet
Broadloom installed with hi-performance adhesive
Broadloom over pad
Old cutback that has not been sealed
VCT or worse VAT that is coming up with the old carpet
Page 12
Preparing for Installation
You are Judged Every Night
Things that can cause the unwanted call in the morning could be as small as cabinets not in the correct
place, one phone unplugged, glue on some wires, knife blades left lying on a desk or the best one is
you put the wrong chair at a workstation. By punching the work each night, you can eliminate these
unwanted calls. This means vacuuming each night, looking for things out of place, checking the lights
under the overhead bins and even checking for dial tones on the phones. Unfortunately there are times
when mistakes will be made on the jobsite. The important thing is to learn from those mistakes.
If there are issues at a particular desk make sure the issue is corrected if possible and leave a note
letting them know what happened. Also make sure you let the contact person know what is going on as
well. Remember you want this to be a team.
REPORT ALL PROBLEMS EVEN IF YOU FIXED THEM. DO NOT TRY AND HIDE ANYTHING. THEY WILL
FIND OUT EVENTUALLY.
Design a system for leaving and getting messages from your customer and your company. The goal is to
get your message to the customer before the employee does.
When in doubt, leave a message! Remember, if a call has to be made you should be the one making
it.
Page 13
Lift Projects can be full of new challenges nightly
Here are a few of the basic things that will make things go much smoother if performed nightly
by members of your crews.
ÍÍ Tonight’s the night cards: The night before you begin in a new area you should place the
“tonight’s the night” cards out. This will give the end user an opportunity to get their area
ready for the crews.
ÍÍ Map and tag all items: Anything that will be getting moved or slid out of the workstations or
hallways like filling cabinets, chairs, boxes and yes even trash cans should be tagged. Using
painters tape, devise a numbering system in which you can mark the item being moved with
the location that it is being moved from.
ÍÍ Remove all carpet that is not pinned by the furniture: When removing broadloom you
will leave a 4” to 6” “ribbon” under the panel systems and under some cabinets in the
workstations. This requires careful “trace” cutting around all panels, under desks, etc.
Carpet tile removal leaves only tiles under panels and files.
ÍÍ Floor preparation is at best a vacuum and glue: At worst it makes the job painfully
slow if significant floor patching is required. Different tile backings require different floor
preparations. Clarify any floor preparation concerns immediately. Read and follow the
manufacturer’s recommended installation procedures.
ÍÍ Spread glue with care. Rushing the spreading of the glue could cause the glue to get all
over the furniture. Keep the glue 6” from the furniture, walls, wires, and electronics that are
on the floor.
ÍÍ Layout of the installation is done in the walkways of the space: Checking for square lines
and carpet gain is a MUST. Install along both chalk lines and into the workstations. Work
through the workstations in sequence, checking for square and gain often. Use of a laser
square is very helpful to keep lines square.
ÍÍ Jacks: Make sure prior to starting with the lift that the jacks are fitted with the correct
fittings. Distribute the jacks around the furniture systems closest to the chalk line
intersection. Install new carpet tile up to the panels. Begin lifting the furniture and removing
the old carpet. Lift as little as possible. NEVER exceed 1/2” in your lift. Use care when
choosing a lift site. Never lift in the middle of a panel or on the kickplate. Know your
furniture but do not hesitate to contact the customer’s furniture manufacturer if you have any
questions.
ÍÍ Thank you cards: Always place a thank you card on the desk of each end user thanking
them for helping you get the area ready for your crews. This is a very nice touch. It is also a
good idea to leave a mint with the card. This puts the end user at ease when they come in
and are less apt to start looking for things that are wrong.
ÍÍ Button-up neatly every night: Your work is judged every day (usually before the customer
even drinks a cup of coffee in the morning). The goal is to eliminate the bad calls in the
morning. If there is a situation in which the customer must be involved, notify them via
voicemail or by leaving a note on their desk. This will depend on the method you worked out
with your customer prior to beginning work.
Page 14
Things to Look for When Examining Systems Furniture
Un-level or snaking of the panels:
Look across the top of the panels and point out any un-level high or low spots. Point out any snaking or
zig-zagging of the panels that you see. Assure the client that you will attempt to correct that during your
lift process. You will not always be able to get it perfect but you will do your best with it. Rest assured
that if this is not pointed out that in most cases your crew will be blamed for doing it during the lift
process.
Pointing out these things during your walk-thru must done very diplomatically, you do not want the
customer to think that will not take ownership for anything that goes wrong.
Overloaded binder bins/storage:
The added weight can cause undo stress on the hinge configuration that hold the panels together. Once
a panel is lifted all the extra weight pulling at the top of the panels can cause the bottom to kick out and
the hinge is not made to support that type of tension. With that type of tension on the panels it could
cause the panels to become separated during the lift. Look for loose or incomplete connections between
each panel. This needs to be pointed out during the walk thru that way if they do become separated
during the lift the customer understands you may not be at fault.
Other furniture items to look for during the walk thru may include:
ÍÍ Any other noticeable furniture defects
ÍÍ Defects either from improper installation or damage
ÍÍ Bowed work surfaces (are the proper supports under each worksurface and are they
attached correctly)
ÍÍ Improperly cantilevered components, pedestals, worksurfaces or binder bins look to see if
any teeth are showing or if they are supported by any foreign objects.
ÍÍ Chipped or scratched wood finishes
ÍÍ Tears in panel fabric cracked or hanging kick plates
ÍÍ Dented or scratched steel filling cabinets
ÍÍ Missing nuts, bolts, clips (this is a sign that short cuts were taken in the furniture assembly)
ÍÍ Leaning walls (usually binder bins only on one side of wall)
ÍÍ Foot prints on the fabric panels under the worksurfaces and in the walk ways.
Page 15
Important Questions to Ask
Loading Dock
Is there one? If so, is it same or correct height to allow for easy off loading of trucks? If not, allow for
extra labor needed to load the material into the building.
Storage Area:
Is there an area to store carpet? If so, how much carpet can it hold? Is there a secured area for tools to
be stored?
Freight Elevator
Is there one? If not, can the public elevator be used? If not, allow for the additional labor to perform a
stair carry of material.
Computer servers and other sensitive equipment
Is there an in-house computer specialist? Is so, coordinate a night when the specialist can be on site
when the carpet replacement is being performed for those sensitive areas.
Copiers and vending machines
Are they owned or leased? If owned, make the customer aware that you will install up to the copiers
or vending machines and you would like in-house support to have the items moved so the installers to
install under the equipment.
If these items are leased many times the companies that own them have to move them. Make sure the
customer reviews there lease to make sure whom will need to move these items.
HVAC
Can they leave it on? Pulling up the carpet causes added dust particles to float around no matter
how much you vacuum. The added filtration from the HVAC will cut down on the dust buildup the next
morning. This also aids in the adhesive setup and the comfort of the installation crew.
Filing Cabinets
Are they gang bolted? If so, can the facility people/local furniture installers unbolt them ahead of the
installers beginning that area? It is important that they be re-ganged the next morning after the new
carpet has been installed under the files. This is done for SAFETY reasons.
Spare Parts
Find out if there are any spear parts on-site for the furniture. This could be helpful if something is
installed incomplete or needs to be fixed.
These are just some of the questions that when asked at the beginning stages of a project can drastically
cut down on hidden costs and headaches that can come from not being prepared. Also, these questions
and attention to detail may just be what sways the facility manager’s favor and wins you the job
Page 16
Pre-Installation Walk-thru
When planning your layout try to keep the following things in mind and look for problem areas that need
to be addressed with the customer.
ÍÍ Plan areas to go through in complete sets of furniture workstations
ÍÍ Are there a lot of filing cabinets and are they gang bolted.
■■ If they are gang bolted now they are full and can be nearly impossible to move or perform a
lift on.
ÍÍ Are there areas that will need extra time for the customer to get ready?
■■ Avalanche areas (stacks of lose paper and books piled on furniture that will be moved and
could potentially end up on the floor)
ÍÍ Bookshelves
■■ Poor quality bookshelves can fall apart or when moved need to be down loaded or emptied.
■■ Some companies have gang bolted bookshelves that will require more advance time to deal
with.
ÍÍ Libraries
■■ Most library shelves do not like to be lifted or moved they tend to be very top heavy
■■ There is special equipment available for moving and/or lifting library shelving.
ÍÍ Utility shelves
■■ These are the metal shelves that have shelves that are held in place by gravity hooks - these
must be down loaded.
ÍÍ Copiers
■■ Small copier are usually not too bad unless they have a sorter attached then they can be
tricky as you have to be careful not to dislodge or misalign it when moving it around.
■■ Large and expensive copies need to be moved by qualified personal as if you move it and
something goes wrong it could void the manufactures warranty. Most companies have
service contracts on this type of equipment.
Page 17
Plan Your Layout
A very important part of the process involves the layout. By doing a preliminary layout, you can plan the
progress of your job nightly. Taking the time to do a preliminary layout will also let you take advantage of
combining tough areas with easy ones, helping you set the pace and production of the lift project.
If the project is mainly a large open area, plan your layout with your control lines as close to the center of
the room as possible. Breaking the room into four sections would be recommended.
If the job has an inner core, such as an elevator lobby, that must be wrapped completely around. Place
your control lines near the core.
Go through the furniture in complete clusters of workstations. Do not stop halfway through a workstation
as it could create one of the following problems.
■■ The person in the unfinished workstation will have to pack and unpack twice.
■■ You will have to move the furniture twice inside the workstation.
■■ You will have to lift the furniture twice which increases the possibility of damage of problems.
Page 18
Ready the Space
Walk the Job
Walk all areas where carpet will be installed, checking for any conditions that may require the customer’s
attention. Things to look for: swaying panels, un-level panels, bowed work surfaces, dirt or tears in chairs
or panels, or kickplates damaged or missing.
Check and Double Check
Check for locked file drawers (if those drawers are needed in order to unbolt files), existing clip inserts,
damage, or any other areas that may require input from the customer. Be sure to spot any reasons to
involve your customer contact before they leave for the day. If something comes up that you did not have
a chance to cover with them prior to them leaving, leave them a voicemail or note.
Map and Tag
As an important part of any lift project, furniture systems and equipment must be put back in their
original places at the end of each evening. It is important that you accurately identify where things
belong. With painter’s masking tape and pen, you will want to go around the room and tag all the
furniture that will be slid away on furniture skates. This includes all loose items, such as chairs,
credenzas and filing cabinets. When tagging workstations and its contents it is important to label
each station and its contents at same time. For example workstation “A” has 3 items to move out of
the station: the chair A1, the filing cabinet A2 and the credenza A3. If you are moving a freestanding
piece of furniture that butts against a wall, you will also want to mark the place on the wall where the
furniture belongs. If filing cabinets are located under a desk or work surface, be sure to place your tag
on top of the surface, so you can properly align the cabinets at the end of each evening. It is important
to note that one person should do all the tagging. In addition, a hand drawn plan or blueprint might be
necessary. You may even want to take pictures of areas you think you will have trouble remembering the
location of certain items.
ff The facility manager/office coordinator may be able to provide you with a plan that
includes the current furniture layout.
Page 19
Removing the old carpet
Removing Broadloom Carpet
Removing broadloom carpet is often the most difficult part of the process. Cuts must be made around
all panels and fixed objects such as filing cabinets. If file cabinet extends to floor, removing them will
make the job go faster.
Be very careful around wiring! If there’s enough slack in the wiring, ease the wires away from panel being
careful not to unplug them. Cut the carpet as close to the panel as possible. If there is little or no slack
in the wiring, gather the wires as close to the panel as possible before cutting out the carpet from under
the desk/worksurface. Cut the carpet with one hand while restraining the wire mass with the other. Cut
carpet into small sections. Remove the carpet from workstations keeping dirt and debris in the carpet
being removed not on the floor. The end result should be a ribbon of broadloom under the panel with
the wire gathered on and along the ribbon. The ribbon of remaining carpet can be removed before or
during the carpet installation. If the job is extra dirty and dusty take the time to vacuum before removing
the ribbon of old carpet from under the workstation. This will make the installation of new carpet much
easier and faster.
Removing Carpet tile
The process of removing carpet tile is very similar to that of removing broadloom carpet. One basic
difference is that you are not cutting any carpet out from under workstations, so the risk of severing a
wire is less. Do not try to remove one tile and simply replace it with a new one.
Do not pass go until you know what is below.
Do not pass go until you know exactly what is expected in terms of floor preparation and cost. Scraping,
patching and leveling compounds greatly reduces productivity, hence adding greatly to the cost. The
best-case scenario involves replacing carpet tile with carpet tile over a raised floor. No prep is required
and the rip-up is easy. The worst-case scenario shuts the building down due to the fracturing of vinyl
asbestos tile during rip-up.
Neatness Counts
Aggressive rip-up can cause unnecessary dust. To control the amount of dust generated keep the
broadloom folded as much as possible. It is best to roll-up broadloom waste, so the dust stays contained
within the carpet. Also do not sweep the floor with a broom. Always use a vacuum with filter making sure
to clean the floor thoroughly. Cleanup should begin as soon as areas become open. This will allow you
to begin spreading glue in the areas you have already cleaned.
Follow Manufacturer’s Recommended Installation Instructions
Different backing systems may have different floor preparation requirements. Remember from a
manufacturer’s viewpoint, if the product is defective or curls, it will always be your floor prep that is at
fault. Getting signed approval for your prep the first few nights can be an invaluable insurance policy.
Spreading Adhesive
Once the floor is vacuumed, the adhesive can be spread. Use only the manufacture’s recommended
adhesive. The best method for spreading is a medium nap 9” roller (some retailers sell adhesive rollers).
Keep the adhesive 6” away from the furniture, walls, wire and computers/floor mounted equipment.
Wait for the adhesive to fully setup before you proceed. The use of a fan will speed up the setup time
of the adhesive. If you do not wait you could end up working in wet glue which you could get on yourself,
your shoes and then the new carpet.
ff This would be a good time to take a lunch break.
Page 20
Installation and Furniture Lifting
Select the Correct Fittings
Each furniture system may require a different setup. Consult the Project Information Profile for
information to choose the correct fittings for the jacks based on the systems furniture installed for the
particular project you are working on. Distribute the jacks to the crew members. The team lead should
make certain everyone on the team understands where and how to use the jacks/tools.
Gently Lift the Furniture
It is not a weight lifting contest – so go slow and easy on the jacks. Apply gradual force and gently lift the
panel. When using the jack, you will feel how the furniture is reacting to the force. Usually one or two
pumps would be enough to relieve the pressure on the furniture glide. Once you can see that there is
a clear space between the glide and the old carpet you will able to proceed. Be sure to remove the old
carpet first to identify any carpet still pinned down by the furniture. Reposition your jacks as needed and
repeat the process as required. Never lift the furniture more than 1/2”.
Working together as a Team
Working as a team you will find your projects will move along a lot smoother, thus allowing your crews to
install more yardage each night.
Good team work and communication will improve the safety on your project as
well.
Page 21
Button-up every Night
Clean up Behind Yourself
Through the installation process there should be a routine of cleaning up after yourself. As you complete
each workstation, begin “buttoning-up” the area. This will help eliminate phone calls from the customer
the following morning.
Leave the Area Finished and Safe
Make sure that you leave no gaps (tight cut) between the old and the new carpet. If you leave gaps it
could case a trip hazard and gaps also look unprofessional. Do not use tape on the seams as it can be
hard to get off the next night and it also leaves a sticky residue on the new carpet that will attract dirt.
Create Your Own “Punch List” Each Night
Since you are judged every morning, you must be your own critic each night before you go home. You are
strongly advised to bring your own vacuum and use it. If you use the customer’s vacuum, please be
sure to get permission first and empty the bag at the end of each night. You will also want to dust major
surfaces, if that was previously agreed upon by you and the customer. It might by necessary to involve
the customer’s maintenance staff. Check all perimeter tile cuts and correct any visible defects at this
point. Encourage your customer to perform a daily critique of your crews work. They may find cabinets
slightly out of place, etc. by correcting these when you start each evening you avoid a long list of touch
ups that are to be done at the end of the job.
A Note About Security: Make an effort to “check-out” with security each night. Establish a habit of
opening your tool box on the way out each night. Good communication with security is very helpful
in strict environments. You may need to establish a check-in/check-out procedure to eliminate any
possible concerns that could be directed at “the carpet people”
Page 22
Plan Ahead for Tomorrow Night
Before leaving each day, map out the following day’s work. Use the “Tonight’s the Night” cards, which
are designed to notify employees that you will be working in their office areas. This communication helps
you control the pace while informing the customer of progress and intentions for the next night’s work.
You will also want to note any unusual situations that might require assistance from the customer. The
customer will have time to help you prior to the next night’s work. Both you and the customer should
constantly check your work and look ahead. This will make your job much easier and allow the customer
to stay in control of their environment.
Before you leave the jobsite, place a thank you card
and mint on each desk of the area you have completed .
Page 23
Keep a Job Log
A collection of the pre-installation and nightly checklist and worksheets.
Alert Customers to Problems
If any problems occur during the job that night let someone know. Do not hide anything. If you do, they
will find out. Tell the lead on the job and he will relay it to his contact at the facility about the problem.
ff Examples of things that can happen:
■■ Cut phone cords or electrical wires
■■ Hidden flat wire under the carpet cut
■■ Damage to furniture or other articles
■■ Major cracks in the floor (could be sign of major structural damage)
■■ Anything that could get back to the facility contact that could cause a problem
Even if you or your lead fix the problem, let the facility contact know because there might be a further
problem you did not detect. Some phone systems and electronics lock out if they detect any problem
and the facility person may need to contact someone to fix it. This will also let the facility contact know
that you are honest and professional. Most facility people realize things do happen, they just want to be
aware. Leave a note on the person’s desk were the problem occurred that you have contacted the facility
person about the possible problem.
Before leaving for the night, the lead should leave a voicemail or note for the facility person.
■■ That there was a problem
■■ Location of the problem
■■ Able or unable to correct problem
■■ How problem was corrected.
■■ If no problems occur and everything went well, let the facility contact now. You might
want to let them know the yardage that was installed. Keep them in the loop. It is a good
practice for the lead to keep a daily log of events. This shows that you are professional
and could help if questions arise in the future.
Page 24
Tools of the Trade
As previously mentioned in the Introduction to this manual, the tools reference within this manual are
from the Renovisions® patented system.
The Tool Box
Lift tools are a series of jacks and clips that are designed to lift the most common furniture systems,
including freestanding desks and files. Additional tools are available to help with the rip-up of carpet
from under the furniture.
A variety of jack fittings have also been developed to work with specific furniture systems. Special
fittings are included for furniture manufactured by Herman Miller, Haworth, Steelcase, Knoll and other
miscellaneous manufacturers.
As with any precision tool, a trained operator is critical. A surgeon becomes a surgeon through
extensive training – not by buying a knife. Your training and understanding of the tools, furniture, and
carpet tile installation will help you tackle the many different obstacles in the occupied office.
Knowledge: The most important tool
Understanding your customers along with their office environment is as important as having the right
tools for the job. Furniture systems, how they are assembled, how wires are ran through the systems,
as well as the do’s and don’ts are all covered in this manual. Hands-on training is also crucial to
understanding the details of the lift process.
Your customer is an invaluable source of knowledge about their furniture and office environment. Many
times your customer knows the furniture better than you do. Be sure to extract as much information as
possible during the introductory days and nights of the project.
Page 25
Renovisions® Tool Box Contents
Items
Tool Box
Jacks Extensions Fittings Jack Lube Cleaning Pad Allen Wrenches
01
06
04
05
04
05
01
01
01
01
02
Custom made Tool Box with wheels
Lift Jacks
Jack Shaft Extensions
Universal Shoe
Haworth Saddle Shoe
Universal Center Clip
Universal Left Clip
Universal Right Clip
3 oz. pump spray lube
Pad
1 -1/8”
1 – 3/16”
Other Recommended Tools
Laser Products Laser Square or LeveLite Accu-Square
Dasco 640 Ripper
Sinclair Duro Stripper
Page 26
Safety
Keep your fingers out from under kickplates, panels, glides, desks and file cabinets, in the event you
overload the jacks and it kicks out. If you have to put your fingers under things, use multiple jacks to
hold the load.
Keep glue 6” away from panels or jack locations, so jacks are not sitting in glue. The glue will promote
the jack to slide.
When working in hallways or walkways remove handles after jacking to avoid a possible trip hazard. A
rolling cart or someone’s leg could displace the jack causing injury or damage.
When not working on the furniture make sure to lower the jacks to prevent any unnecessary strain on the
furniture.
Ensure that the jack head is positioned tight to the panel and the fitting is locked into the panel to
promote a straight and vertical lift.
Watch out not to pinch your fingers in the climbing mechanism of the jacks
Keep your lift to a maximum of 1/2” - any higher and you are asking for trouble
Wear proper safety equipment
Care and Maintenance
The lift jacks require very little care to maintain proper working condition. Remember if you keep the
jacks in good working condition it will reduce your down time from failed equipment.
Spray lube on the brown pad that was provided in the tool box, rub the pad with the Dura-Lube on the
shaft until the rust is removed. Remove the contaminated lube with a rag, with a clean rag spray a light
coat of Lube on the rag and wipe the shift down. (Do not spray too much lube as it will get on your hands
and then on the furniture).
Do not use WD-40 as it contains water and will promote rust and corrosion.
Perform maintenance on the jacks once a week. Once a month remove the covers and clean out the dirt
and carpet fuzz from the internal parts using an air hose. Lube lightly the upper and lower cams on the
jacks.
Make sure the bottom leg on the jack body is horizontal to the jack shaft. Put the jack in a vice and
straighten with a hammer if needed.
Page 27
Furniture Terminology
Accent Panels:
Accent panel with attachments that
install over current panels. Can be
vertical and horizontal in nature.
Base Covers or Kick Plates:
Trim cover that many times covers the
electrical system.
Base Power-in (BPI)
Location where building power enters the furniture
system. Average one BPI per every 6 workstations.
Page 28
Assembly Unit:
Normally consists of a desk/credenza unit
with overhead unit attached.
Cantilevers:
Support brackets under worksurfaces
or other panel supported elements.
Glide:
Used to level panel systems/files/peds/desks
Panel, Non-Tackable:
This would indicate that the panel would be
a hard surface even if it had fabric.
Panel, Tackable Acoustical:
Fabric-covered with a soft core that allows
for sound absorption and tacking or hanging
things on.
End panels:
These are used as a option to support worksurfaces.
Some times they can attach to panels, make sure
these are re-attached after lift.
Page 29
Power Pole:
Vertical cable/power track that allows power and cable to distributed from the ceiling to
panels systems.
Race Way:
Channel that allows for cable/power to be distributed
through out panel system.
Service Module:
Attach to the top of unit assembly desks and credenzas to provide overhead storage.
Slotted Channel:
This is a vertical track that typically is
on the end of each panel, some times
the track is a shared track that is used
between each panel.
Top Cap/Cover:
These caps/covers can be metal,
wood or plastic. Some panels are designed
to allow for voice/data cables to travel
through these top caps.
Page 30
Furniture Systems
The following pages address specific furniture systems and the tools necessary for each product by
manufacturer and product series. Additional information has been provided to assist with the specific
issues that may come along when lifting these furniture systems.
If you have any concerns regarding a specific furniture system, you may want to contact the manufacturer
or the local product dealer in your market.
Page 31
Haworth UniGroup
Haworth UniGroup is particularly sensitive to lifting. Do not lift from the panel channel slots. The channel
slots are independent from the panels. If you attempt to lift on the channel, you could cause the vertical
channel/hinge to dislodge causing the panels to fall.
In working with the Haworth Unigroup system Renovisions® has designed a special Haworth Saddle
Shoe exclusively for the Haworth Unigroup. The fitting is designed to lift the Unigroup at the raceway
location after removing the kick plates. Using the special shoe will reduce the potential for damage to
the electrical system.
Page 32
Lifting Haworth UniGroup Panels
Haworth UniGroup is an extremely sensitive furniture system that requires the electrical base covers to
be detached prior to lifting. The site is also unusual. Typically panels are lifted at the vertical channel
slots. The special designed Saddle Shoe supports and protects the electrical track on both sides of the
track. Use Jacks in pairs to balance the weight at he hinge, this reduces the load on the “H” Clips as well
Tools Required:
5 each Jacks
5 each Saddle Shoes
Other Tools:
Scraper Bar
Skates
Haworth Saddle Shoe*
*This has been designed to protect the Electrical Raceway
Using Multiple Jacks
When you are ready to begin lifting Haworth
Panels, first detach the base covers and
distribute the jacks around the lift sites. Have
each jack matched by another jack that is lifting
the adjacent panel. This helps eliminate pressure
on the small locking “H”clips at the base of the
panels.
Remember: Use more jacks than usual. Support
the head against the panel with a Skate or Carpet
time to protect the panel from damage. Use one
Jack per panel. Lift as little as possible, and
watch the panel-locking “H” clips for stress to
avoid shearing.
Page 33
Haworth Premise and Race
The Premise panel system has several modified features, including new panel connections and channel
slot attachment detail. The small clips used to lock the panels together have also changed making the
hinge location much friendlier to upward lifting. The electrical connectors are still the same which means
the same location is available for lifting with the Haworth Shoe.
Haworth Race series functions much like Steelcase Context which uses separate power trucks as the
foundation for the panels.
Haworth Premise: This system can also be used in a floor to ceiling application. This is what you see
in the back of this photo. This system can also use wood finish skins adding weight to the system.
Page 34
Haworth Race
You will not see a lot of this product out there, but when you do proceed slowing. This is not a panel base
- it has an open base post and beam system that has power almost at belt line height. Do not attempt to
over lift just using the worksurfaces. This could cause the worksurfaces to dislodge and fall to the floor. It
is strongly advised that you call a lift technician for advice prior to starting the lift project.
Page 35
Haworth Compose
Compose is a rigid hinge system the should not give you too many issues during the lift. This system is
considered a rigid frame and tile system. The frames are bolted together inside the panels. One thing
to keep and eye on would be the top caps as they can in some cases be continuous which means that
the top cap can span the length of 2 panels. Like on all lifts you do not want to over lift. If this system
is loaded and you attempt to over lift you could damage the top cap beyond repair. The top caps are
extruded aluminum.
You will be lifting with the universal clips (center, right and lift)
Page 36
Herman Miller
Action Office
Ethospace
Vivo
Resolve
Page 37
Herman Miller Action Office
The Action Office 1, 2 and 3 series manufactured by Herman Miller is another common furniture system.
Action Office was introduced in the mid 1960’s and since that time it has experienced several evolutions
and improvements.
Action Office is considered a rigid hinge system and can be very smooth to go through if the system has
been installed correctly. It would not hurt to randomly check a number of the hinge connections to make
sure the are connected tightly. If they appear lose or not connected tightly you may want to use an allen
wrench to tighten things up.
Your components will be panel hung with this system and will in many cases create some challenges for
jack placement. Take your time and you will find them.
You will be lifting with mostly the universal clips (center, left and right). You may find some rare times
that you will need the universal shoe. Your universal clips are a little longer for this system. In order to
lock your clips in place, you will be placing them in at a slight angle.
Herman Miller has a rigid panel connection. Panels are attached using a set of wedge blocks that can be
loosened or tighten using an alien wrench.
Page 38
Action Office Thin Base Action Office Large Base
Action Office Large Base Corner with Data Cable Action Office Worksurface with Hanging Pedestal Storage.
Action Office Call center workstation
Page 39
Lifting Action Office Series 2 & 3
The primary difference between Series 1 and 2 is that the latter incorporates the base covers and
electrical tracks into the panel system. The base covers are wider than the panel and everything lifts
when the panel system is raised. Be aware of the fact that base covers become dislodged easily. Lifting
under the large base cover is not recommended since it is both hollow and fragile. Insert the universal
clip into the slotted channel above the base cover (the jack will require the shaft extension due to the
height of the base cover). Remember to turn the stabilizing head to meet the panel. Most of the channel
slots on both Series 2 and 3 are still curved.
Series 3 panels are the same except the base covers are taller and narrower. The channel slots may be
straight (as opposed to curve). The same lift procedures apply using the lift system universal clips.
Tools Required for lifting Action Office:
06
07
02
03
Jacks
Universal Clips (Centers, Left and Right)
Universal Shoes
Shaft Extensions
Other Tools Required:
Scraper Bars
Furniture Skates
Page 40
Herman Miller Ethospace
Ethospace is an elegant upgrade to most office systems furniture. Introduced in the mid-1980’s,
Ethospace takes full advantage of the panel-hung concept. Like the Action Office series the panels are
connected by a wedge blocks and a draw rod that extents from the base of the panel to the top. The
panel connection provides a solid locking system.
The Ethospace furniture system considered a frame and tile system that most of the components hang
from. Those components that do not hang like pedestals are mobile and can be easily moved during the
carpet replacement process.
Ethospace has very thick skins that are about ¾” thick and
you need to use care when inserting the clips into the panels
not to cut the fabric on the skins.
Tools Required:
06
Jacks
04
Universal Clips (Center, Left and Right)
02
Universal Shoes
04
Shaft Extensions
Other Tools Required:
Scraper Bars
Furniture Skates
Page 41
Herman Miller Vivo
This system was introduced by Herman Miller in late 2006. You are starting to see a lot of the product in
the market place. The Vivo is very similar to the Haworth Compose system.
It tends to be a very rigid system from a lift stand point. The one thing you really must watch out for
would be the system is sold with a lot of wing panels that do not go down the floor. There is about a 7”
gap from the floor the where the panel starts. You will need to use your jack extensions in order to get
the height during the Lift.
Storage can be a something to keep an eye on. Herman Miller tends to be sold with more hang on
storage than most systems. This may be something you would want the customer to down load some of
the content in order to help make the lift go smoother.
Page 42
Herman Miller Resolve
There is not a lot to this system. The thing that can get a little tricky with this system would the overhead
power ways. Keep in the mind the system can be deceiving when you first look at it. Make sure the
crews are given a couple of days to become familiar with moving through it.
The system will normally have a lot of canopies that are over the top of the system make sure they are
secure before beginning your Lift.
Page 43
Steelcase
9000
Movable Wall / Avenir
Answer
Kick
Montage
Context
Pathways Tech Wall
Page 44
Steelcase 9000
The Steelcase 9000 panel system has been around for some time. Steelcase introduced an enhanced
version of the system in the early 90’s. Panels are compatible and are attached via the hinge system
that involves a flexible plastic “slip-joint”. Panels hung worksurfaces, overhead storage and filling
cabinets are common. Free standing assembles including desks and filling units are also commonly
found inside a workstation. Electrified panels are the most popular. The power distribution is found in
the raceway or base of the panels. Terminal connections (whips) can be disrupted from improper lifting
sites as well as over aggressive lifting. Keep lifts to a minimum - no more than ½”.
Tools Required:
06
Jacks
10
9000 Panel Locks
07
9000 Corner Locks
06
Universal Clips (Center, Left and Right)
04
Universal Shoes
Other Tools Required:
Scraper Bars
Furniture Skates
Page 45
Steelcase 9000
Steelcase 9000 Conventional
Page 46
Steelcase 9000 Enhanced
Steelcase 9000 Floor supported pedestal
Lift Sites:
The slotted channels at the hinge are the only method of lifting 9000. You are strongly encouraged to
use corner locks as wells as the panel locks when lifting this system. This will keep the panels for sliding
up and down between one another as well protecting your power system. Ensure that the jack heads are
adjusted properly and the universal clips teeth are engaged correctly to promote a good vertical lift.
Pedestals attached below work surfaces often present a challenge. Use the universal shoe to provide
support for the peds and lift it just high enough to remove the carpet from underneath. Make sure you
place your jacks on the inside corners of the peds where there is more support.
Page 47
Steelcase Moveable Wall/Avenir
This was one of Steelcase’s first furniture systems. This systems has evolved from panels with no power
(Moveable Wall) to what is seen more of today and that is Avenir. Some of the most noticeable changes
are the system would be the new power system and now the skins are removable.
The system is a rigid hinge system with hang on components i.e. overhead storage and worksurfaces.
The lower storage can be a bit challenging. Lower storage is all floor supported.
In some cases you may find it easier to remove the worksurface/storage together. This could greatly
speed up you install. It is recommended that you have a crew that is good with furniture and has had
experience with furniture systems in the past.
Tools Required:
05 Jacks
06 Universal Clips (Center, Left and Right)
07 Universal Shoes
Other Tools:
Scraper Bars
Furniture Skates
Steelcase Avenir Low and High Panels Floor supported pedestals.
Steelcase Avenir Team Station with Floor support pedestals.
Page 48
Steelcase Kick
Steelcase Kick was introduced in 2001. It has for the most part replaced the Moveable Wall/Avenir
product.
The system still has the same type of rigid hinge system. Steelcase in hopes of cutting some cost in the
system made a few changes. You will still employ all the same lifting techniques used for the Moveable
Wall/Avenir system.
Tools Required:
06 Jacks
06 Universal Clips (Center, Left and Right)
06 Universal Shoes
Other Tools Required:
Scraper Bars
Furniture Skates
Page 49
Steelcase Montage
Montage has been around for a number of years now. Montage can be installed from low height up
to ceiling height. The panels themselves can be very heavy and when you start adding in all of the
components and storage this system can be challenging to lift.
Do not attempt to slide the early version of this system or you will tear the carpet. The system has
leveling spikes that are designed to go thru the carpet and hit the slab. This would also be considered a
frame and tile system.
Tools Required:
06 Jacks
06 Universal Clips (Center, Left and Right)
02 Universal Shoes
Other Tools Required
Scraper Bar
Page 50
Steelcase Answer
Answer has been in the field for almost 10 years and is a frame and tile system. The interesting thing
about these frame are they are fully assembled in the field by the installers. As you walk this system,
you will see a lot of bowing and leaning of the panels. This would not be considered a very rigid system.
Care must be taking while lifting this system when loaded, unlike most systems the vertical channel you
will be lifting from is a shared channel. In other words, the panel to the left and the right both share the
channel.
DO NOT attempt to lift this system using the universal shoes! You will cause the horizontal supports to
come apart thus possibly bringing down that section of the panels.
Steelcase Answer panels with freestanding worksurfaces and Mobile Peds
Page 51
Steelcase Context
Context is not a panel based system. Context is freestanding worksurfaces with screens on top of the
worksurfaces.
There are a number of different versions of this system. If you run across one of the earlier versions care
must be taking when lifting if the system has power in the base. During the lift the power will become
disconnected for the system. You will need more jacks and one extra man during these types of projects.
Regardless of the version that you are lifting you should use push pads in conjunction with the jacks.
Tools Required:
07 Jacks
08 Universal Shoes
05 Push Pads
Other Tools:
Scraper Bars
Furniture Skates
Steelcase Context with high screens and
no power trunks in the base
Page 52
Knoll
Equity
Morrison
Currents
Page 53
Support Materials & Forms
The following pages provide information on the Occupied Workplace Logistics support materials and
forms currently available.
ÍÍ Ocuppied Workplace Logisitics Brochure
ÍÍ Project Information Profile
ÍÍ Tonight’s the night cards
ÍÍ Thank you cards
ÍÍ Furniture Skates
ÍÍ Renovisions® Tools
For more information or to order these materials, please contact Kris Keller at (407) 574-6600 or
[email protected].
Page 54
Occupied Workplace Logistics Brochure
The Occupied Workplace Logisitics Brochure is available in the two versions shown below.
Cover
Customize brochure
cover with your company
logo and informaton.
Need a Lift?
Tired Carpet Got You Down?
Replace it.
SAM
Designed specifically for working in occupied
facilities, furniture lift installation offers a unique
method of carpet installation that reduces downtime
with less hassles to you and your employees.
Occupied Workplace Logistics takes
the hassle out of replacing carpet in
occupied work environments.
Carpet Replacement
Services
This version of the
brochure provides
information regarding
replacing carpet in
the occupied work
environment.
Occupied Workplace Logistics
is a system that addresses the planning, coordination, communication and installation requirements
necessary when renovating an occupied work environment. Along with your facility manager,
ABC Flooring will oversee the process to update your facility revitalizing your space and maybe
your employees.
Product Selection
Ta k i n g i n t o a c c o u n t p r o d u c t s e l e c t i o n s
that meet your facilites needs and suppor t
the special installation requirements of an
occupied environment, ABC Flooring will work
with you to deter mine the best pr oduct for
your application.
t
e nigh et!
t’s thnew carp
Tonigh
ur
for yo
PROOFPR
(see
)
r side
othe
New carpet will
arrive under your
desk
Before you go home
tonight.
personal belongings.tonight, please put away or box
any significant
Place files, papers,
are located on
and other items
the floor
which
from your workstation. in boxes, they do not have
to be removed
Desktop computers
and PCs located
on the floor should
be turned off.
OO
F
If you have any
questions or need
boxes, please
contact your facilities
manager or office
coordinator.
THANK YOU!
Planning &
Communication
PLEASE LEAVE
THIS CARD ON
YOUR DESK FOR
REUSE.
Installation
Product selection and the specific requirements of
your facility with dictate the process required to install
your new flooring. Whether carpet tile or broadloom, system or freestanding
furniture ABC Flooring will be there every step of the way to guide you.
PLE
The end result - a fresh perspective on your space and your business.
Before
Where Does the Old Carpet Go?
Working with your facility manager, ABC Flooring
will provide clear communication of the process and
how the project will progress. Color coded plans
provide details of the work areas and “Tonight’s
the Night” cards will be made available to notify
employees to expect new flooring in their work
area. Additional instructions and boxes will be
made available as necessary.
Through Ecollect™, we promote sustainable business practices
throughout our organization taking a holistic approach to the
environment and our goal of sustainability. Methods to reduce
and eliminate waste and other nonvalue added processes that
impact our environment are considered throughout all projects.
Reclamation
At the end of the product’s useful life, we provide carpet reclamation services. We
understand the various processes for reclaiming product based on its economical and
environmental impact and recommend the most effective and sustainable process
for reclaiming your material – i.e. recycling, downcycling or repurposing.
Furniture Services
There are options. ABC Flooring will consult with you
on the best way to handle the furnishings in your facility
including coordination with your furniture provider.
Need a Lift?
Tired Carpet Got You Down?
Replace it.
SA
Designed specifically for working in occupied
facilities, furniture lift installation offers a
unique method of carpet installation that
reduces downtime with less hassles to you
and your employees.
Occupied Workplace Logistics takes
the hassle out of replacing carpet in
occupied work environments.
Installation
is a system that addresses the planning, coordination, communication and
installation requirements necessar y when renovating an occupied work
environment. Along with your facility manager, ABC Flooring will oversee
the process to update your facility revitalizing your space and maybe
your employees.
Taking into account product selections
that meet your facilites needs and support
the special installation requirements of an
occupied environment, ABC Flooring will work
with you to determine the best product for
your application.
t
e nigh et!
t’s thnew carp
Tonigh
ur
for yo
)
r side
(see
othe
New carpet will
arrive under
your desk tonight.
Before you go home
personal belongings.tonight, please put away or box
any significant
Place files, papers,
are located on
and other items
the floor
which
from your workstation. in boxes, they do not have
to be removed
Desktop computers
and PCs located
on the floor should
be turned off.
If you have any
questions or need
boxes, please
contact your facilities
manager or office
coordinator.
Planning &
Communication
Working with your facility manager, ABC
Flooring will provide clear communication of
the process and how the project will progress.
Color coded plans provide details of the
work areas and “Tonight’s the Night” cards
will be made available to notify employees
to expect new flooring in their work area.
Additional instructions and boxes will be
made available as necessary.
Furniture Services
There are options. ABC Flooring will
consult with you on the best way to handle
the furnishings in your facility including
coordination with your furniture provider.
Product selection and the specific requirements of your facility with
dictate the process required to install your new flooring. Whether
carpet tile or broadloom, system or freestanding furniture ABC
Flooring will be there every step of the way to guide you.
MP
Occupied Workplace Logistics
Product Selection
After
THANK YOU!
PLEASE LEAVE
THIS CARD ON
YOUR DESK FOR
REUSE.
The end result - a fresh perspective on your space and your business.
Additional Services
Taectibustia dolumquiati aut ea non por re dentur simil int etus et
aborem. Torepedit in re parios volorem poreiciet ut qui ium fugia
doluptasi rem ut eos eatur? Qui dolorat aut parchit illaut quiatent
quibus. Ed experch icillam facepe occaborem dolor accatur ibeatur?
Qui Menda dendit quatecum.
LE
Before
After
Where Does the Old Carpet Go?
Through Ecollect™, we promote sustainable business practices
throughout our organization taking a holistic approach to the
environment and our goal of sustainability. Methods to reduce
and eliminate waste and other nonvalue added processes that
impact our environment are considered throughout all projects.
Reclamation
At the end of the product’s useful life, we provide carpet reclamation services. We
understand the various processes for reclaiming product based on its economical and
environmental impact and recommend the most effective and sustainable process
for reclaiming your material – i.e. recycling, downcycling or repurposing.
Page 55
Additional Services
In addition to the
carpet replacement
services information
provided in the version
above this brochure
allows the dealer
to incorporate the
availability of other
services including
painting, window
treatments and
cabling.
Project Information Profile
Page 56
Tonight’s the night
for your new carpet!
E
ABC
L
(see other side)
P
M
A
S
FLOORING
Tonight’s the night
for your new carpet!
(see other side)
Page 57
ABC
FLOORING
New carpet will arrive under your desk tonight.
Before you go home tonight, please put away or box any significant
personal belongings. Place files, papers, and other items which are
located on the floor in boxes, they do not have to be removed from
your workstation.
Desktop computers and PCs located on the floor should be turned off.
E
L
If you have any questions or need boxes, please
contact your facilities manager or office coordinator.
THANK YOU!
P
M
A
S
New carpet will arrive under your desk tonight.
Before you go home tonight, please put away or box any significant
personal belongings. Place files, papers, and other items which are
located on the floor in boxes, they do not have to be removed from
your workstation.
Desktop computers and PCs located on the floor should be turned off.
If you have any questions or need boxes, please
contact your facilities manager or office coordinator.
THANK YOU!
Page 58
Page 59
S
FLOORING
ABC
for your cooperation in preparing
your office area for new carpet.
for your cooperation in preparing
your office area for new carpet.
FLOORING
ABC
for your cooperation in preparing
your office area for new carpet.
FLOORING
ABC
E
L
P
M
A
FLOORING
ABC
for your cooperation in preparing
your office area for new carpet.
Furniture Skates
Furniture skates can be purchased from XL North. To place an order, please call XL North at
(888) 530-2259.
Renovisions® Tools
For information or assistance with Renovisions® tools, please contact:
Mike Hutton
Interface Services
(770) 975-4823
[email protected]
Page 60