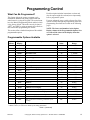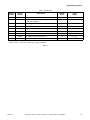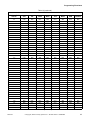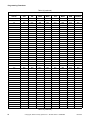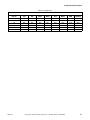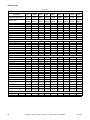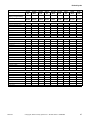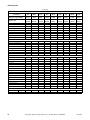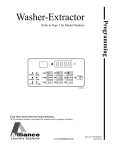
1
Programming
Washer-Extractor
Refer to Page 4 for Model Numbers
CHM1774C
Keep These Instructions for Future Reference.
(If this machine changes ownership, this manual must accompany machine.)
www.comlaundry.com
Part No. F8237901R3
February 2010
WARNING
Failure to install, maintain, and/or operate
this machine according to the
manufacturer's instructions may result in
conditions which can produce bodily injury
and/or property damage.
W030
NOTE: The WARNING and IMPORTANT
instructions appearing in this manual are not meant
to cover all possible conditions and situations that
may occur. It must be understood that common
sense, caution, and carefulness are factors which
cannot be built into these washer-extractors. These
factors MUST BE supplied by the person(s)
installing, maintaining, or operating the washerextractor.
Always contact the distributor, service agent, or
the manufacturer about any problems or conditions you do not understand.
F8237901
© Copyright, Alliance Laundry Systems LLC – DO NOT COPY or TRANSMIT
1
Table of
Contents
Model Identification ...........................................................................
Preliminary Information....................................................................
About the Control .................................................................................
Glossary of Terms.................................................................................
Power Failure Recovery .......................................................................
Communications ...................................................................................
Infra-red Communication .....................................................................
Control Identification.........................................................................
Select Cycle Pads..................................................................................
Display Identification .........................................................................
Light Emitting Diodes (LEDs) .............................................................
Washer-Extractor Operation ............................................................
Start Up.................................................................................................
Ready Mode..........................................................................................
Partial Vend Mode................................................................................
Additional Vend Mode .........................................................................
Start Mode ............................................................................................
Door Locking Mode .............................................................................
Run Mode .............................................................................................
End of Cycle Mode...............................................................................
Cycle Sequence.....................................................................................
Door Unlocking Mode..........................................................................
Signals...................................................................................................
Changing Cycles...................................................................................
Special Features ..................................................................................
Programming Control ...........................................................................
Collecting Audit Information ...............................................................
Rapid Advance Feature.........................................................................
Clearing the Vend Feature ....................................................................
Communications Mode.........................................................................
Coin Drop .............................................................................................
Start Pulse Operation ............................................................................
Top Cover and Coin Vault Openings ...................................................
Special Vend.........................................................................................
OPL Mode ............................................................................................
Opening the Top Cover ......................................................................
Entering the Manual Mode................................................................
How to Enter the Manual Mode ...........................................................
Programming Control ........................................................................
What Can Be Programmed? .................................................................
Programmable Options Available.........................................................
Programming Flowcharts ..................................................................
Entering Manual Mode .........................................................................
Manual Programming ...........................................................................
Diagnostic .............................................................................................
1. Normal/Hot Vend Price “AtS1”...................................................
2. Coin #1 Value “dEn1” .................................................................
3. Coin #2 Value “dEn2” .................................................................
4. Start Pulse Value “PLSE” ............................................................
5. Start Pulse Mode “PLSn”.............................................................
6. Available Type “AtyP” ................................................................
7. Default Cycle “dCYC” ................................................................
4
5
5
5
5
5
5
6
6
7
7
8
8
8
8
8
8
8
8
8
8
8
9
9
10
10
10
10
10
10
10
10
10
10
10
11
12
12
13
13
13
18
18
19
24
25
26
27
28
29
30
31
© Copyright 2010, Alliance Laundry Systems LLC
All rights reserved. No part of the contents of this book may be reproduced or transmitted in any form or by any
means without the expressed written consent of the publisher.
2
© Copyright, Alliance Laundry Systems LLC – DO NOT COPY or TRANSMIT
F8237901
8.
9.
10.
11.
12.
13.
14.
OPL Mode Enable/Disable“oPL” ................................................
Audio Signal “AUd” ....................................................................
Card Reader Display Control “CArd” .........................................
Error Code Programming “Err-”..................................................
Cycle Programming “CyC-” ........................................................
Supply/Compartment Dispenser Programming “SUPC”.............
Number of Balance Retries “bALr”
(Variable Frequency Drives Only)...............................................
15. IR Access (On/Off) “IrA” ............................................................
16. Fahrenheit/Celsius “t FC” (Models with Heat)............................
17. Hot Water Temperature “FH”......................................................
18. Warm Water Temperature “FHC” ...............................................
19. Cold Water Temperature “FC” ....................................................
20. Cooldown Enable/Temperature “Codn” (Models with Heat)......
21. Production Test Cycle (On/Off) “PtEn” ......................................
22. Manual Rapid Advance (On/Off) “rAEn” ...................................
23. No Cycle Time Display “nCtd” ...................................................
24. Programmable Cycle Time Display “PCtd” ................................
25. Slow Drain Detection Adjust Value “SdAd”...............................
26. Pause/Resume Mode (On/Off) “SPAU” ......................................
27. Normal/Warm Vend Price “AtS2”...............................................
28. Normal/Cold Vend Price “AtS3”.................................................
29. Heavy/Hot Vend Price “AtS4” ....................................................
30. Delicate/Warm Vend Price “AtS5” .............................................
31. Delicate/Cold Vend Price “AtS6”................................................
32. Quick/Hot Vend Price “AtS7” .....................................................
33. Quick/Warm Vend Price “AtS8” .................................................
34. Quick/Cold Vend Price “AtS9” ...................................................
35. Set Real-Time Clock “rtC-”.........................................................
36. Special Vend A Data “SPA-” ......................................................
37. Low Water Level “FLo” ..............................................................
38. Medium Water Level “FnEd” ......................................................
39. High Water Level “FHI”..............................................................
40. Auto-Water Leak Detection “ALd-”............................................
Collecting Audit Information ............................................................
Manual Reset.......................................................................................
Production Test Cycle ........................................................................
Error Codes.........................................................................................
Rapid Advance Feature......................................................................
Clear Vend Feature ............................................................................
Power Fail Recovery...........................................................................
Communications Mode ......................................................................
Infra-red Communications....................................................................
Card Reader Communications (Card Models Only) ............................
Default Cycles......................................................................................
F8237901
© Copyright, Alliance Laundry Systems LLC – DO NOT COPY or TRANSMIT
32
33
35
36
40
45
45
46
46
47
47
48
48
49
49
50
50
51
51
52
53
54
55
56
57
58
59
60
61
80
80
81
81
83
84
85
88
91
92
93
94
94
94
95
3
Model Identification
Information in this manual is applicable to these
washer-extractor models:
4
20
SCN020JC2
SCN020JCF
SCN020JCV
SCN020JY2
SCN020JYF
SCN020JYV
30
SCN030JC2
SCN030JCF
SCN030JCV
SCN030JE2
SCN030JEF
SCN030JX2
SCN030JY2
SCN030JYF
SCN030JYV
40
SCN040JC2
SCN040JCF
SCN040JCV
SCN040JD2
SCN040JE2
SCN040JEF
SCN040JY2
SCN040JYF
SCN040JYV
60
SCN060JC2
SCN060JCF
SCN060JCV
SCN060JD2
SCN060JDF
SCN060JX2
SCN060JY2
SCN060JYF
SCN060JYV
80
SCN080JCF
SCN080JCV
SCN080JYF
SCN080JYV
© Copyright, Alliance Laundry Systems LLC – DO NOT COPY or TRANSMIT
F8237901
Preliminary Information
About the Control
Communications
This control is an advanced, programmable computer
that lets the owner control most machine features by
pressing a sequence of keypads. Refer to Figure 1.
The control may be programmed manually or by infrared communication with an external device. A limited
number of features can be programmed by a card reader.
The control allows the owner to program custom
cycles, set vend prices, retrieve audit information,
program special vend features and other
programmable features. Refer to Programming
Control for a list of features. Washer-extractors
shipped from the factory have a default cycle and wash
temperature setting of DELICATE/WARM built in.
However, the owner can change the default cycle, or
any cycle, as needs permit.
Infra-red Communication
IMPORTANT: In the event of a power failure, the
control will not have to be reprogrammed. It is
designed with a memory system that will remember
how it was programmed until the electrical power
is restored.
IMPORTANT: It is extremely important that the
washer-extractor has a good ground connection and
that all mechanical and electrical connections to the
control are made before applying power to or
operating the washer-extractor.
Glossary of Terms
The following are a few terms and abbreviations to
learn. These are referred to throughout the instructions.
An external device, such as a PDA, allows the owner
to program and retrieve information from the control
without touching the keypad. An external device
greatly expands the programming options available to
the owner. However, it is not required to program and
operate the washer-extractor. The operation of an
external device and the advanced features available are
covered separately in the instructions included with
the external device software. Contact Alliance
Laundry Systems for a list of approved PDAs and
other external devices.
Serial Card Reader Communications
(Card Models Only)
The control will accept communication with a serial
card reader in order to perform vending transactions
when a card is inserted to pay for cycles. The card
reader can also allow the owner to program a limited
number of features and collect audit information.
For detailed information on the serial card reader
communications, refer to instructions included with
the card reader.
Display – This term refers to the window area of the
control that displays words and values.
LED (Light Emitting Diode) - This term refers to the
lights next to the keypads and status words of
the control.
Power Failure Recovery
If a cycle is in progress and the power fails, the cycle
status is saved in memory. When the power recovers,
the washer-extractor will resume into the previously
active cycle automatically without user input if the
length of the power failure was less than two minutes.
If the length of the power failure is greater than two
minutes, the control will return to Start Mode and the
cycle step where the power failure occurred. User
must press START pad to resume the cycle.
F8237901
© Copyright, Alliance Laundry Systems LLC – DO NOT COPY or TRANSMIT
5
Control Identification
Select Cycle Pads
the default cycle (DELICATE/WARM). The Select
Cycle keypads are not active after the first fill step of
the cycle. The selected cycle is indicated by the light
(LED) on the pad. Pressing the flashing START pad
will confirm the selection and the cycle will begin.
When the card reader is used, pressing the START pad
will start the cycle and deduct the vend price from the
card.
Refer to Figure 1.
Select Cycle pads are used to select the specific
washer cycle. These pads include NORMAL/HOT,
NORMAL/WARM, NORMAL/COLD, HEAVY/
HOT, DELICATE/WARM, DELICATE/COLD,
QUICK/HOT, QUICK/WARM and QUICK/COLD.
These pads allow the user to select a cycle other than
2
1
3
4
5
6
CHM1774C
CHM1774C
1
2
3
4
5
6
LED Status Lights
Select Cycle Pads
Display
Four 7-Segment Digits
START (enter) Pad
LED Light
Figure 1
6
© Copyright, Alliance Laundry Systems LLC – DO NOT COPY or TRANSMIT
F8237901
Display Identification
Light Emitting Diodes (LEDs)
Spin LED
Refer to Figure 1.
Spin LED is lit during the Final Spin portion of the
cycle.
Light Emitting Diodes (LEDs) are used to indicate the
chosen cycle, cycle status, if vend is needed, when the
bleach compartment is dispensing, and door lock
information. See below for information on each LED.
Cycle LED (NORMAL/HOT, NORMAL/
WARM, NORMAL/COLD, HEAVY/HOT,
DELICATE/WARM, DELICATE/COLD,
QUICK/HOT, QUICK/WARM and QUICK/
COLD)
Cycle LED will remain lit the entire cycle.
Wash LED
Wash LED is lit at the beginning of a wash portion of
the cycle and will remain lit until the wash is
complete.
Door LED
Door LED is lit whenever the door is locked. The door
can’t be opened when this LED is lit.
Bleach LED
Bleach LED is lit when bleach compartment is
dispensing for the first time in the cycle.
Four 7-Segment Digits
The 7-Segment Digits are used to display the time
remaining in a cycle, vend price, error messages and
descriptive codes. During Diagnostic Testing or
Manual Programming of the control, these digits will
display descriptive codes and values (as described in
Entering the Manual Mode).
Rinse LED
Rinse LED is lit at the beginning of a rinse portion of
the cycle and will remain lit until the rinse is complete.
F8237901
© Copyright, Alliance Laundry Systems LLC – DO NOT COPY or TRANSMIT
7
Washer-Extractor Operation
Start Up
Start Mode
When power is applied to the washer-extractor, the
control will display its software version as “S xx”
(“xx” is the version number) for one (1) second. If the
control was not powered down during a running cycle,
it will enter Ready Mode, Partial Vend Mode or Start
Mode.
The control enters this mode when the full vend price
is satisfied, the vend price is zero, the control is in
OPL Mode. The START pad LED will flash one (1)
second on and one (1) second off. If Start Mode is
entered because the vend price is satisfied or the
control is in OPL Mode, the display will show
“PUSH” for one (1) second, “Strt” for one (1) second
and the current cycle time for one (1) second. If Start
Mode is entered because the vend price is zero, the
display will show “FREE”. When first entering Start
Mode, a signal will sound for one (1) second on and
one (1) second off for 10 seconds if Signal for Start is
enabled.
After pressing the START keypad, the door will lock
and the cycle will begin.
Ready Mode
In this mode of operation the control indicates the
current selected cycle by lighting the LEDs. The full
current vend price for the cycle appears in the display.
To start the cycle, the user must satisfy the vend price
and then press the START keypad.
The user will be able to select a different cycle by
pressing a cycle pad when the machine is in Ready
Mode.
Partial Vend Mode
The control enters this mode when part of the vend
price has been entered, but not enough vend is entered
to satisfy the vend price. The control will display the
remaining vend price needed to start the cycle.
Door Locking Mode
The control enters this mode after the START (enter)
keypad is pressed in Start Mode. The control stays in
Door Locking Mode until it confirms the door is
closed and locked.
Run Mode
The user will be able to select a different cycle by
pressing a cycle pad when the machine is in Partial
Vend Mode.
The control enters this mode when a cycle is running.
The time remaining appears in the display, the status
LEDs are lit and the loading door is locked.
Additional Vend Mode
End of Cycle Mode
The control enters this mode if a higher priced cycle is
selected while the machine is in Start Mode or Run
Mode, but before the first fill has completed. If the
vend price is not satisfied within 1 minute, the control
will go back to the first selection and the cycle will
continue if it was paused. After the first fill, all key
presses will be ignored, allowing the washer to go
through the complete cycle.
When a cycle is complete, the control will display “00”
until the washer door is opened, a key is pressed, or a
coin/card is entered. The display will revert back to Ready
Mode if door is opened or keypad is pressed. If vend is
entered, the control will change to Partial Vend Mode or
Start Mode.
Cycle Sequence
Upon the start of a cycle, the control will display the
total cycle time. The appropriate LEDs will light while
the machine passes through different cycle steps. Any
coin entered after the first fill cycle has been started
will be added to the total coin counter, but the user will
not be able to change cycles or water temperature.
Door Unlocking Mode
The control enters this mode after cycle has ended. The
control waits for confirmation that door is unlocked.
Once confirmation is received that door is unlocked,
control will enter End of Cycle Mode.
8
© Copyright, Alliance Laundry Systems LLC – DO NOT COPY or TRANSMIT
F8237901
Washer-Extractor Operation
Signals
Changing Cycles
There are five options when a signal can be used during
the washer operation. These five options are listed below:
1. End of Cycle Signal
By default, this signal is turned off. If turned on, the
signal sounds for three (3) seconds at the end of a
cycle.
2. Signal On Keypad Depression
By default, this signal is turned on and sounds for
a quarter of a second each time a keypad is pressed.
3. Signal On Coin Input/Card Insertion
By default, this signal is turned on and will sound
for a quarter of a second each time a coin or card
is entered.
4. Signal for Card Removal (Card Models Only)
By default, this signal is turned on and will sound
one (1) second on and one (1) second off when
the control is prompting for card removal.
5. Signal for Start
By default, this signal is turned on and will sound
one (1) second on and one (1) second off for 10
seconds after vend price has been satisfied.
NOTE: Refer to Programming Control to program
signal options.
Cycles can be changed anytime during the first Fill
step. After the first Fill step, all key presses are
ignored.
F8237901
Selecting a higher priced cycle will pause the first Fill
step, and the Vend Price will flash one (1) second on and
one (1) second off until the vend price has been satisfied.
After the vend price has been satisfied, the cycle will
continue with the new selections. If the vend price is not
satisfied within 1 minute, the washer control will go
back to the previously set cycle.
© Copyright, Alliance Laundry Systems LLC – DO NOT COPY or TRANSMIT
9
Special Features
Programming Control
Communications Mode
The control allows the washer-extractor owner to
program the control with the use of the keypad. Cycle
and vend options may be programmed, audit
information may be viewed and diagnostic tests may
be run by pressing combinations of the Select Cycle
keypads.
This feature allows the control to communicate with
an external device or the card reader. This allows the
control to be programmed and have its data read
without using the keypad.
For details on programming Select Cycle and vend
options, refer to Programming Control.
Collecting Audit Information
The control will store audit information in its memory
that can be retrieved by pressing various combinations
of Select Cycle keypads. The control will record coins
entered, total machine cycles, total start pulses and
total rapid advance cycles.
For more detailed information on using the
Communications Mode feature, refer to
Communications Mode.
Coin Drop
The control will accept pulses from a single or dual
coin drop to satisfy vend price. Each coin drop will
have the ability to start a cycle.
Start Pulse Operation
NOTE: Additional audit information is retrievable
with an external device and the card reader. Refer
to the appropriate instruction manual.
The control will accept pulses from optional payment
systems. The machine can be programmed to receive a
single start pulse or multiple start pulses, or the Start
Pulse Option can be turned off. The Start Pulse Mode
allows the machine to go from Ready Mode to the
Start Mode after a single pulse or multiple pulses are
received.
Rapid Advance Feature
Top Cover and Coin Vault Openings
This feature allows the user to quickly advance
through active cycles or advance into a cycle from
Ready Mode. This feature is useful when tests must be
performed immediately on a washer-extractor
currently in an active cycle. In this case, the user can
quickly advance through the cycles to the shake out
step, then End of Cycle Mode. At this point, the user
can perform the required tests and then return the
washer-extractor to the point it was interrupted.
The control will capture the times and dates of the
openings of the Coin Vault and the Top Cover. The
information is saved in memory. An open top cover
combined with various keypad presses allows the
control to enter manual modes of operation. These
modes include Manual Programming, Audit Collection
and Diagnostics.
For more information on the audit features, refer to
Collecting Audit Information.
For detailed information on using the Rapid Advance
feature, refer to Rapid Advance Feature.
Clearing the Vend Feature
This feature allows the user to return the control back
to Ready Mode if coins have been entered but the full
vend price has not yet been satisfied.
For more information on using the Clear Vend feature,
refer to Clear Vend Feature.
Special Vend
This feature allows the owner to program the control
to allow programmable vend prices for specific hours
and dates.
For details on programming Special Vend, refer to
Programming Control.
OPL Mode
This feature allows the user to start a cycle without
satisfying the vend price.
For details on enabling OPL Mode, refer to
Programming Control.
10
© Copyright, Alliance Laundry Systems LLC – DO NOT COPY or TRANSMIT
F8237901
Opening the Top Cover
To manually program the control, the top cover must
be opened. Opening and closing the top cover trips a
switch which allows access to various programming
options. Once opened, the top cover may either be left
open, and then closed after programming, or it may be
closed immediately.
The top cover is located on the top of the washerextractor.
1. Unlock top cover.
2. Slide top cover forward slightly to move notches
away from the pegs on the front of the cabinet.
3. Lift the top cover up. To completely remove, lift
top cover away from both top cover hinges. Refer
to Figure 2.
After opening, or opening and closing the top cover,
the operator has 4 minutes and 15 seconds to begin
programming. If the appropriate Select Cycle Pads
have not been pressed in that time, the control will not
accept operator programming. Should this happen,
opening and closing the top cover will once again trip
the switch which allows access to the programming
options.
2
1
3
4
CHM1357R
CHM1357R
1
2
Top Cover Lock
Top Cover
3
4
Top Cover Hinge
Peg
Figure 2
F8237901
© Copyright, Alliance Laundry Systems LLC – DO NOT COPY or TRANSMIT
11
Entering the Manual Mode
For programming, testing, and retrieving information
from the control, it is often necessary to enter the
Manual Mode by following the six simple steps below.
How to Enter the Manual Mode
1. If accessing Diagnostic Tests, be sure the washer
is in the Ready Mode before continuing to step 2.
If the washer is in an active cycle, rapid advance
through the cycle. Refer to the Rapid Advance
Feature. If coins or a card has been entered, refer
to Clear Vend Feature.
2. Open the top cover. Refer to Opening the Top
Cover.
NOTE: The coin vault switch must be closed to
enter Manual Mode.
Manual Mode is broken into two groups: Manual
Programming and Manual Rapid Advance. Manual
Programming can only be turned on or off with an
external device. Refer to the appropriate instruction
manual. Manual Rapid Advance can be turned on and
off using an external device or by manual
programming (refer to option 22 of Programming
Control).
By default, all groups are turned “ON”.
The manual features available in each group are as
follows (the menu displayed on the display in this
mode is in parentheses).
Manual Programming
Manual Programming (Prog)
Manual Read Audit (AUdt)
3. While pressing and holding the HEAVY/HOT
keypad with one hand, press the NORMAL/HOT
keypad with the other hand.
4. The display will show “rAPd”.
Manual Reset (rSEt)
Manual Rapid Advance
Rapid Advance (rAPd)
<
>
5. Press the NORMAL/COLD ( ) keypad or the
DELICATE/COLD ( ) keypad to scroll through
the options until the desired option appears in the
display.
6. Press the START (enter) keypad.
12
© Copyright, Alliance Laundry Systems LLC – DO NOT COPY or TRANSMIT
F8237901
Programming Control
What Can Be Programmed?
This feature allows the owner to program cycle
information, standard vend pricing, special vends and
other features by using the keypads. The control must
have the Manual Programming Mode enabled, which
is the factory default. This mode can only be turned
“OFF” and “ON” by using an external device. Refer to
this section when programming the control.
This section offers a detailed description of all available
programmable options.
Each description includes instructions on when and
why the option might be used and, more importantly,
how to program the option.
For more advanced users, a quick reference list of the
options available through the programming mode and
programming flowcharts are located on the following
pages..
NOTE: The letters and numbers in the Option
Display column of the Programmable Options List
are what will be shown in the display when that
option is selected.
Programmable Options Available
Option
Number
Option
Display
1
“AtS1”
2
Default
Value
Value
Range
Normal/Hot Vend Price
200
0 - 65535
“dEn1”
Coin #1 Value
25
1 - 65535
3
“dEn2”
Coin #2 Value
100
1 - 65535
4
“PLSE”
Start Pulse Value
25
1 - 65535
5
“PLSn”
Start Pulse Mode
128
oFF/128/192
6
“AtyP”
Available Type
0
0-3
7
“dCYC”
Default Cycle
5*
1 - 9*
8
“oPL”
OPL Mode Enable/Disable
oFF
on/oFF
9
“AUd”
Audio Signal
29*
0-31*
10
“CArd”
Card Reader Display Control
oFF
on/oFF
11
a.
Description
“Err-”
Errors
—
—
“CEr-”
Coin Error Parameters
—
—
1.
“CEr1”
Coin Error
on
on/oFF
2.
“CEr2”
Coin Error Penalty
oFF
on/oFF
3.
“CEr3”
Coin Drops Header Present Error
on
on/oFF
b.
“E FL”
Fill Error
on
on/oFF
c.
“E dr”
Drain Error
on
on/oFF
d.
“E Ub”
Unbalance Error Display
on
on/oFF
e.
“E oP”
Open Thermistor Error Display
on
on/oFF
f.
“E SH”
Shorted Thermistor Error Display
on
on/oFF
g.
“E Ht”
Heat Error Display (Heater only)
on
on/oFF
“LEr-”
Water Leak Detection Error
—
—
“LEr1”
Water Leak Detection During a Machine Cycle
(On/Off)
oFF
on/oFF
h.
1.
*Refer to programming section for value definition.
**Refer to the Cycle Charts for default cycle setting informaton.
Table 1 (continued)
F8237901
© Copyright, Alliance Laundry Systems LLC – DO NOT COPY or TRANSMIT
13
Programming Control
Table 1 (continued)
Option
Number
2.
3.
Default
Value
Value
Range
127*
0 - 127*
0*
0 - 127
oFF
on/oFF
Water Leak Detection Day of Week Enable
“LEr3”
Number of cycles between Leak Detection Test
“E Sd”
Slow Drain Detection
“CyC-”
Cycle Programming
“Aglt”
Cycle Agitate
—
—
“tyPE”
Agitate Type
**
1 - 2*
“ASPd”
Agitate Speed (VFd only)
**
Lo/rEg*
“SEg-”
Cycle Segment Programmimg
—
—
“SgEn”
Segment Enable/Disable
**
on/oFF
“FILL”
Fill Step
—
—
“FLEn”
Fill step Enable/Disable
**
on/oFF
“FLEU”
Fill Level
**
HI/ned/Lo
“tEnP”
Fill Temperature
**
35°F - 194°F/
2°C-90°C
“SUPL”
Supply Step
—
—
“SUEn”
Supply Step Enable/Disable
**
on/oFF
**
Display will show Cx
(compartmentoriented) or Sx
(supply-oriented),
depending on how
option 5 (Supply/
Compartment
Dispenser
Programming) is
programmed
a. “C2” or “S1” Compartment #2/Supply #1
**
on/oFF
b. “C3” or “S2” Compartment #3/Supply #2
**
on/oFF
c. “C4” or “S3” Compartment #4/Supply #3
**
on/oFF
d.
Supply #4
**
on/oFF
“SdUr”
Supply Duration
**
Press START keypad
to access options
1.
“SEC”
Seconds
**
0/59
2.
“nln”
Minutes
**
0-9
“AgSt”
Agitate step
—
—
“AgEn”
Agitate Step Enable/Disable
**
on/oFF
12
a.
1.
2.
b.
1.
c.
1.
2.
3.
d.
1.
2.
“dISP”
e.
1.
Description
“LEr2”
i.
f.
Option
Display
“S4”
Refer to Cycle Chart for default cycle
information
Dispenser Options
*Refer to programming section for value definition.
**Refer to the Cycle Chart for default cycle setting informaton.
Table 1 (continued)
14
© Copyright, Alliance Laundry Systems LLC – DO NOT COPY or TRANSMIT
F8237901
Programming Control
Table 1 (continued)
Option
Number
Option
Display
Description
Default
Value
Value
Range
2.
“AdUr”
Agitate Duration (in minutes)
**
1 - 30
for agitate types 1 or
2
3.
“HEAt”
Heat in Agitate (if heater is present)
**
oFF/1/2**
g.
“drAn”
Drain Step
on
on/oFF
h.
“SPIn”
Extract Step
—
—
“SPEn”
Extract Step enable/Disable
**
on/oFF
“SSEC”
Extract Seconds
**
0 - 59
1.
2.
3.
“SnIn”
**
Extract Minutes
Intermediate
Extract: Min. Step
Time =
30 seconds,
Max. Step Time =
3:59 minutes
Final Extract:
Min. Step Time =
30 seconds,
Max. Step Time =
9:59 minutes
4.
“SSPd”
Extract Speed (VFD only)
**
1 - 5*
“Cnin”
Cycle Time
0*
0 - 255 minutes
13
“SUPC”
Supply/Compartment Dispenser Programming
14
“bALr”
Number of Balance Retries (VFD only)
3
1-7
15
“IrA”
IR Access (On/Off)
on
on/oFF
16
“t FC”
Fahrenheit/Celsius
FAHr
(Fahrenheit)
FAHr (Fahrenheit)/
CEL (Celsius)
17
“FH”
Hot Water Temperature
140°F (60°C)
35°F - 194°F/
2°C - 90°C
18
“FHC”
Warm Water Temperature
100°F (38°C)
35°F - 194°F/
2°C - 90°C
19
“FC”
35°F (2°C)
35°F - 194°F/
2°C - 90°C
20
“Codn”
Cooldown Enable/Temperature
oFF
oFF or 50°F - 160°F/
10°C - 71°C
21
“PtEn”
Production Test Cycle (On/Off)
on
on/oFF
22
“rAEn”
Manual Rapid Advance (On/Off)
on
on/oFF
23
“nCtd”
No Cycle Time Display
oFF
on/oFF
24
“PCtd”
Programmable Cycle Time Display
oFF
on/oFF
25
“SdAd”
Slow Drain Detection Adjust
0
0 - 255
i
Cold Water Temperature
C
C (Compartment)/S
(Compartment) (Supply Dispenser)
*Refer to programming section for value definition.
**Refer to the Cycle Charts for default cycle setting informaton.
Table 1 (continued)
F8237901
© Copyright, Alliance Laundry Systems LLC – DO NOT COPY or TRANSMIT
15
Programming Control
Table 1 (continued)
Option
Number
Option
Display
26
“SPAU”
27
Description
Default
Value
Value
Range
Pause/Resume Mode
oFF
on/oFF
“AtS2”
Normal/Warm Vend Price
200
0 - 65535
28
“AtS3”
Normal/Cold Vend Price
200
0 - 65535
29
“AtS4”
Heavy/Hot Vend Price
200
0 - 65535
30
“AtS5”
Delicate/Warm Vend Price
200
0 - 65535
31
“AtS6”
Delicate/Cold Vend Price
200
0 - 65535
32
“AtS7”
Quick/Hot Vend Price
200
0 - 65535
33
“AtS8”
Quick/Warm Vend Price
200
0 - 65535
34
“AtS9”
Quick/Cold Vend Price
200
0 - 65535
“rtC-”
Real Time Clock
—
—
a.
“rtC1”
Set Real Time Clock Minutes
—
00 - 59
b.
“rtC2”
Set Real Time Clock Hours
—
00 - 23
c.
“rtC3”
Set Real Time Clock Day
—
001 (Sunday) 007 (Saturday)
d.
“rtC4”
Set Real Time Clock Date
—
1 - 31
e.
“rtC5”
Set Real Time Clock Month
—
1 - 12
f.
“rtC6”
Set Real Time Clock Year
—
0 (2000) - 99
g.
“rtC7”
Daylight Savings Option
on
on/oFF
35
“SPA-”
Special Vend A Data
—
—
a.
“SA01”
Special Vend A Days Enable
0*
0 - 255*
b.
“SA02”
Special Vend A Start Hour
—
0 - 23
c.
“SA03”
Special Vend A Start Minute
—
0 - 59
d.
“SA04”
Special Vend A Length in Hours
—
0 - 24
e.
“SA05”
Special Vend A Start Month
—
1 - 12
f.
“SA06”
Special Vend A Start Date
—
1 - 31
g.
“SA08”
Special Vend A End Month
—
1 - 12
h.
“SA09”
Special Vend A End Date
—
1 - 31
i.
“SA11”
Special Vend A Normal/Hot Vend Price
—
0 - 65535
j.
“SA12”
Special Vend A Normal/Warm Vend Price
—
0 - 65535
l.
“SA13”
Special Vend A Normal/Cold Vend Price
—
0 - 65535
m.
“SA14”
Special Vend A Heavy/Hot Vend Price
—
0 - 65535
n.
“SA15”
Special Vend A Delicate/Warm Vend Price
—
0 - 65535
o.
“SA16”
Special Vend A Delicate/Cold Vend Price
—
0 - 65535
q.
“SA17”
Special Vend A Quick/Hot Vend Price
—
0 - 65535
r.
“SA18”
Special Vend A Quick/Warm Vend Price
—
0 - 65535
s.
“SA19”
Special Vend A Quick/Cold Vend Price
—
0 - 65535
36
*Refer to programming section for value definition.
**Refer to the Cycle Charts for default cycle setting informaton.
Table 1 (continued)
16
© Copyright, Alliance Laundry Systems LLC – DO NOT COPY or TRANSMIT
F8237901
Programming Control
Table 1 (continued)
Option
Number
t.
Option
Display
Description
Default
Value
Value
Range
“SA20”
Special Vend A Wash Agitate Step Added Minutes
—
0 - 15
“SA21”
Special Vend A Wash Agitate Step
Subtracted Minutes
—
0 - 15
37
“FLo”
Low Water Level
3
1 - 10
38
“FnEd”
Medium Water Level
15
11 - 20
39
“FHI”
High Water Level
27
21 - 30
—
—
oFF
oFF/0-127 (Cycles)
0
0 - 23
127*
0 - 127*
u.
40
“ALd-”
Auto-Water leak Detection
a.
“ALd1”
Auto-Water Leak Detection (On/Off and cycles)
b.
“ALd2”
Auto-Water Leak Detection Hour
c.
“ALd3”
Auto-Water Leak Detection Day of Week
*Refer to programming section for value definition.
**Refer to the Cycle Charts for default cycle setting informaton.
Table 1
F8237901
© Copyright, Alliance Laundry Systems LLC – DO NOT COPY or TRANSMIT
17
Programming Flowcharts
Entering Manual Mode
Enter Manual Mode.
1. Open top cover
2. Press and hold both NORMAL/HOT keypad
and HEAVY/HOT keypad.
“rAPd” - Quickly advance through active
cycles.
1. Press START (enter) keypad to begin Rapid
Advance cycle and advance through cycle
steps.
“Prog” - Program Cycle Information
and other features into the control.
1. Refer to the Manual Programming flowchart.
“CyC” - Total number of machine cycles:
1. Press START (enter) once to read audit.
“rCyC” - Total number of
rapid advance cycles:
1. Press START (enter) once to read audit.
“AUdt” - Retrieve audit information for
machine.
1. Press START (enter) keypad.
2. Press NORMAL/COLD keypad or
DELICATE/COLD keypad to
scroll through options.
“Coi1” - Total number of coins #1:
1. Press START (enter) once to read audit.
“Coi2” - Total number of coins #2:
1. Press START (enter) once to read audit.
“PLSE” - Total number of start pulses.
1. Press START (enter) once to read audit.
“rSEt” - Reset the control’s programming data
to factory default.
1. Press START (enter) keypad.
“dIAg” - Run diagnostic tests on machine
operations.
1. Press START (enter) keypad. Refer to
flowchart.
CHM1322R
CHM1322R
18
© Copyright, Alliance Laundry Systems LLC – DO NOT COPY or TRANSMIT
F8237901
Programming Flowcharts
Manual Programming
“Prog” Enter Program Mode
“AtS1” - Set vend price for NORMAL/HOT wash.
“dEn1” - Set value for the #1 coin entered.
“dEn2” - Set value for the #2 coin entered.
“PLSE” - Program the value of the Start
Pulse.
“PLSn” - Program the Start Pulse Input for
one pulse or multiple pulses.
“AtyP” - Program when control provides an
available output for card and central pay.
“dCYC” - Set the default cycle and
temperature.
“oPL” - Enable/disable OPL Mode in which
no vend price needs to satisfied to operate
machine.
“AUd” - Program when the signal will sound.
“CArd” - Program whether the display is
controlled by machine’s electronic control or
the card reader.
“CEr1” - Coin Error
“CEr-” - Coin Error Parameters
“CEr2” - Coin Error Penalty
“CEr3” - Coin Drops Header Present Error
“E FL” - Fill Error
“E dr” - Drain Error
“Err-” - Turn on/off certain errors in control.
“E Ub” - Unbalance Error (VFD only)
“E oP” - Open Thermistor Error
(Models with heat)
“E SH” - Shorted Thermistor Error
(Models with heat)
“E Ht” - Heat Error (heater only)
“CyC-” - Program aspects for the various
steps in each type of cycle. There are (9)
cycles available for programming.
“LEr1” - Water Leak Detection During
a Machine Cycle
“LEr-” - Leak Detection
“LEr2” - Water Leak Detection - Day
of Week
“E Sd” - Slow Drain Detection
“LEr3” - Number of Cycles between
Leak Detection Test
“tyPE” - Agitation Type:
1 = Normal
2 = Gentle
“AgIt” - Program the cycles agitation
action and speed
“ASPd” - Agitation Speed (VFD only):
“Lo” = Reduced Speed
“rEg” = Normal Speed
“SEg1” - Program options for each
segment. There are (8) segments
available for programming
“SgEn” - Segment Enabled/Disabled:
“on” = Enabled
“oFF” = Disabled
““FLEn” - Fill Step Enable/Disable:
“on” = Enabled
“oFF” = Disabled
“FILL” - Program fill step options
“FLEU” - Fill Level:
“HI” = High Level
“nEd” = Medium Level
“Lo” = Low Level
“tEnP” - Fill Temperature:
“CoLd” = Cold
“UArn” = Warm
“Hot” = Hot
(35°F - 194°F [2°C - 90°C])
(continued)
(continued)
CHM1323R
F8237901
© Copyright, Alliance Laundry Systems LLC – DO NOT COPY or TRANSMIT
19
Programming Flowcharts
(continued)
(continued)
“SUEn” - Supply Step Enable/Disable:
“on” = Enabled
“oFF” = Disabled
“SUPL” - Program supply step options
“dISP” Dispenser Options:
Press START (enter) to access options
“C2” or “S1” Compartment #2/
Supply #1:
“on” = Enabled
“oFF” = Disabled
“C3” or “S2” Compartment #3/
Supply #2:
“on” = Enabled
“oFF” = Disabled
“C4” or “S3” Compartment #4/
Supply #3:
“on” = Enabled
“oFF” = Disabled
“S4” - Supply #4:
“on” = Enabled
“oFF” = Disabled
“SEC” - Seconds:
“0” - “59”
“SdUr” Supply Duration:
Press START (enter) to access options
“nIn” - Minutes:
“0” - “9”
“AgEn” - Agitate Step
Enabled/Disabled:
“on” = Enabled
“oFF” = Disabled
“AgSt” - Program agitate step options
“AdUr” - Agitate Duration (min):
“1” - “30”
“HEAt” - Heat in Agitate
(heat present only):
“oFF” = Disabled
“1” = To Target
“2” = Maintain
“drAn” - Enable/disable drain step
Drain Step:
“on” = Enabled
“oFF” = Disabled
“SPEn” - Extract Step
Enabled/Disabled:
“on” = Enabled
“oFF” = Disabled
“SPIn” - Program extract step options
“SSEC” - Extract Seconds:
“0” - “59”
“SnIn” - Extract Minutes:
“1” - “3” (Intermediate Step)
“1” - “9” (Final Step)
“Cnin” - Cycle Time
“0” - “255”
(continued)
“SSPd” - Extract Speed (VFD only):
1 = Very Low Speed (40)
2 = Low Speed (80)
3 = Medium Speed (100)
4 = High Speed (120)
5 = Very High Speed (140)
CHM1324R
20
© Copyright, Alliance Laundry Systems LLC – DO NOT COPY or TRANSMIT
F8237901
Programming Flowcharts
(continued)
“SUPC” - Choose either supply dispenser
or compartment dispenser.
Dispenser:
“S” = Supply Dispenser
“C” = Compartment Dispenser
“bALr” (VFD only) - Program the number
of times control will retry balancing the
load before moving to extract step.
“IrA” - Enable/disable the ability to read
the control by an external device.
“t FC” (Models with Heat) - Set
temperature shown in Fahrenheit or Celsius.
Temperature:
“CEL” = Celsius
“FAHr” = Fahrenheit
“FH” (Models with Heat) - Set
the temperature of the hot water.
“FHC” (Models with Heat) - Set the
temperature of the warm water.
“FC” (Models with Heat) - Set the
temperature of the cold water.
“Codn” (Models with Heat) - Enable/disable
the cool down water temperature option.
“PtEn” - Enable/disable access to the
production test cycle.
“rAEn” - Enable/disable the rapid advance
feature.
“nCtd” - Enable/disable whether the cycle
time will appear in display.
“PCtd” - Enable/disable programmable
cycle time display.
“SdAd” - Enable/disable slow drain
detection. When enabled can
increase/decrease the time before a slow
drain error will occur.
“SPAU” - Enable/disable Pause/Resume
Mode.
“AtS2” - Set vend price for NORMAL/
WARM wash.
“AtS3” - Set vend price for NORMAL/
COLD wash.
“AtS4” - Set vend price for HEAVY/
HOT wash.
“AtS5” - Set vend price for DELICATE/
WARM wash.
“AtS6” - Set vend price for DELICATE/
COLD wash.
“AtS7” - Set vend price for QUICK/
HOT wash.
“AtS8” - Set vend price for QUICK/
WARM wash.
“AtS9” - Set vend price for QUICK/
COLD wash.
CHM1325R
(continued)
CHM1325R
F8237901
© Copyright, Alliance Laundry Systems LLC – DO NOT COPY or TRANSMIT
21
Programming Flowcharts
(continued)
“rtC1” - Programs minutes:
“0” - “59”
“rtC2” - Programs Hours:
“0” - “23”
“rtC3” - Programs Day of Week:
“1” - “7”
“rtC-” - set the control’s internal clock.
“rtC4” - Programs Date of Month:
“1” - “31”
“rtC5” - Programs Month:
“1” - “12”
“rtC6” - Programs Year:
“0” - “99”
“rtC7” - Programs Daylight Saving:
“on” = Enabled
“oFF” = Disabled
“SA01” - Special Vend A Days
(refer to Table 13)
“SA02” - Special Vend A Start Hour
“SA03” - Special Vend A Start Minute
“SA04” - Special Vend A Length in Hours
“SA05” - Special Vend A Start Month
“SA06” - Special Vend A Start Date
“SPA-” - Enable/disable Special Vend A
option. When enabled can program day or
days with a special vend price.
“SA08” - Special Vend A End Month
“SA09” - Special Vend A End Date
“SA11” - Special Vend A NORMAL/HOT Vend Price
“SA12” - Special Vend A NORMAL/WARM Vend Price
“SA13” - Special Vend A NORMAL/COLD Vend Price
“SA14” - Special Vend A HEAVY/HOT Vend Price
“SA15” - Special Vend A DELICATE/WARM Vend Price
“SA16” - Special Vend A DELICATE/COLD Vend Price
“SA17” - Special Vend A QUICK/HOT Vend Price
“SA18” - Special Vend A QUICK/WARM Vend Price
“SA19” - Special Vend A QUICK/COLD Vend Price
“SA20” - Special Vend A Wash
Agitate Step Added Minutes
“SA21” - Special Vend A Wash
Agitate Step Subtracted Minutes
(continued)
CHM1354R
CHM1354R
22
© Copyright, Alliance Laundry Systems LLC – DO NOT COPY or TRANSMIT
F8237901
Programming Flowcharts
(continued)
“FLo” - Program the low water level
during fill and tumble of all cycles.
“FnEd” - Program the medium water level
during fill and tumble of all cycles.
“FHI” - Program the high water level during
fill and tumble of all cycles.
“tCF” (Models with Heat) - Enable/disable a
temperature controlled fill.
“ALd1” - Auto-Water Leak Detection:
“on”, then “0” - “127”
“oFF”
“ALd-” - Set the time and frequency that the
control automatically checks the water level.
“ALd2” - Auto-Water Leak Detection
Hour:
“0” - “23”
“ALd3” - Auto-Water Leak Detection
Day of Week:
“0” - “127”
CHM1355R
F8237901
© Copyright, Alliance Laundry Systems LLC – DO NOT COPY or TRANSMIT
23
Programming Flowcharts
Diagnostic
“dIAg” - Diagnostic Tests.
1. Press START (enter) keypad.
“d019” - VFD Balance Weight Test
“bAL”
“d020” - Water Purge Test
“PUrg”
“d021” - Water Leak Detection
Test
“Ld”
CHM547R
CHM531R
24
© Copyright, Alliance Laundry Systems LLC – DO NOT COPY or TRANSMIT
F8237901
Programming Flowcharts
This option allows the owner to set the vend price for a
NORMAL/HOT wash. This vend price will be shown
in the display when NORMAL/HOT is selected.
How to Program the Normal/Hot Vend
Price
1. Control must be in Manual Mode. Refer to
Entering the Manual Mode.
<
>
2. Press the NORMAL/COLD ( ) or the
DELICATE/COLD ( ) keypad until “Prog”
appears in the display. Press the START (enter)
keypad.
3. “AtS1” will appear in the display. Press the
START (enter) keypad. The NORMAL/HOT LED
will be lit to show which cycle/temperature price is
being programmed.
4. There are five digits in Normal/Hot Vend Price.
The fifth digit will appear in the display and will
flash one (1) second on, one (1) second off. Refer
to Figure 3.
NOTE: If the vend price is $100.00 or more, the
fifth digit is “1-6”. If the vend price is $99.99 or
less, the fifth digit is “0”.
6. Press the START (enter) keypad to enter the fifth
digit and display remaining four digits. The
active digit will flash one (1) second on and one
(1) second off.
NOTE: To go back to the current programmable
option without changing the value of the active
digit, press the DELICATE/WARM (<) keypad.
7. Press the NORMAL/COLD ( ) or the
DELICATE/COLD ( ) keypad to increase or
decrease the value of the active digit and the
START (enter) keypad to enter the value of the
digit and advance to the next digit.
>
Normal/Hot Vend Price “AtS1”
<
1.
8. Press the START (enter) keypad with the last
active digit. The next option, “dEn1”, will
appear in the display.
NOTE: To program “dEn1” (Coin #1 Value), refer
to option 2. To program other options, refer to the
appropriate section.
How to Exit Programming Feature
Press the DELICATE/WARM (<) keypad until the
control returns to Ready Mode.
CHM507R
Figure 3
<
>
5. Press the NORMAL/COLD ( ) or the
DELICATE/COLD ( ) keypad to increase or
decrease the value of the fifth digit.
NOTE: The vend price can be set from 0 to 65,535.
The default vend price is 200.
F8237901
© Copyright, Alliance Laundry Systems LLC – DO NOT COPY or TRANSMIT
25
Programming Flowcharts
This option allows the owner to set a specific
numerical value for a coin entered. For example, in the
United States the coin value for one quarter would be
measured in cents (25). Therefore, the coin value
entered for one quarter would be 00025.
If the NORMAL/HOT Vend Price (option 1) is set for
“.75”, and the Coin Value is set for “00025”, the vend
price displayed will decrease by .25 for each coin
entered.
How to Program Coin #1 Value
1. Control must be in Manual Mode. Refer to
Entering the Manual Mode.
<
>
2. Press the NORMAL/COLD ( ) or the
DELICATE/COLD ( ) keypad until “Prog”
appears in the display. Press the START (enter)
keypad and “AtS1” will appear in the display.
NOTE: To go back to the current programmable
option without changing the value of the active
digit, press the DELICATE/WARM(<) keypad.
7. Press the NORMAL/COLD ( ) or the
DELICATE/COLD ( ) keypad to increase or
decrease the value of the active digit and the
START (enter) keypad to enter the value of the
digit and advance to the next digit.
8. Press the START (enter) keypad with the last
active digit. The next option, “dEn2”, will
appear in the display.
NOTE: To program “dEn2” (Coin #2 Value), refer
to option 3. To program other options, refer to the
appropriate section.
<
>
3. Press the NORMAL/COLD ( ) or the
DELICATE/COLD ( ) keypad to scroll through
the programmable options until “dEn1” appears
in the display.
6. Press the START (enter) keypad to enter the fifth
digit and display remaining four digits. The
active digit will flash one (1) second on and one
(1) second off.
>
Coin #1 Value “dEn1”
<
2.
How to Exit Programming Feature
Press the DELICATE/WARM (<) keypad until the
control returns to Ready Mode.
4. When “dEn1” appears in the display, press the
START (enter) keypad. There are five digits in
the Coin #1 Value. The fifth digit will appear in
the display and will flash one (1) second on, one
(1) second off. Refer to Figure 4.
NOTE: If the vend price is $100.00 or more, the
fifth digit is “1-6”. If the vend price is $99.99 or
less, the fifth digit is “0”.
CHM507R
Figure 4
<
>
5. Press the NORMAL/COLD ( ) or the
DELICATE/COLD ( ) keypad to increase or
decrease the value of the fifth digit.
NOTE: The coin value can be set from 1 to 65,535.
The default coin value is 25.
26
© Copyright, Alliance Laundry Systems LLC – DO NOT COPY or TRANSMIT
F8237901
Programming Flowcharts
This option allows the owner to set a specific
numerical value for a coin entered when using the dual
coin drop. For example, the coin value for a dollar
coin would be measured in cents (100). Therefore, the
coin value entered for one dollar coin would be 00100.
If the NORMAL/HOT Vend Price (option 1) is set for
“2.00”, and the Coin Value is set for “00100”, the
vend price displayed will decrease by 1.00 for each
dollar coin entered.
How to Program Coin #2 Value
1. Control must be in Manual Mode. Refer to
Entering the Manual Mode.
<
>
2. Press the NORMAL/COLD ( ) or the
DELICATE/COLD ( ) keypad until “Prog”
appears in the display. Press the START (enter)
keypad and “AtS1” will appear in the display.
NOTE: To go back to the current programmable
option without changing the value of the active
digit, press the DELICATE/WARM (<) keypad.
7. Press the NORMAL/COLD ( ) or the
DELICATE/COLD ( ) keypad to increase or
decrease the value of the active digit and the
START (enter) keypad to enter the value of the
digit and advance to the next digit.
8. Press the START (enter) keypad with the last
active digit. The next option, “PLSE”, will
appear in the display.
NOTE: To program “PLSE” (Start Pulse Value),
refer to option 4. To program other options, refer to
the appropriate section.
<
>
3. Press the NORMAL/COLD ( ) or the
DELICATE/COLD ( ) keypad to scroll through
the programmable options until “dEn2” appears
in the display.
6. Press the START (enter) keypad to enter the fifth
digit and display remaining four digits. The
active digit will flash one (1) second on and one
(1) second off.
>
Coin #2 Value “dEn2”
<
3.
How to Exit Programming Feature
Press the DELICATE/WARM (<) keypad until the
control returns to Ready Mode.
4. When “dEn2” appears in the display, press the
START (enter) keypad. There are five digits in
the Coin #2 Value. The fifth digit will appear in
the display and will flash one (1) second on and
one (1) second off. Refer to Figure 5.
NOTE: If the vend price is $100.00 or more, the
fifth digit is “1-6”. If the vend price is $99.99 or
less, the fifth digit is “0”.
CHM507R
Figure 5
<
>
5. Press the NORMAL/COLD ( ) or the
DELICATE/COLD ( ) keypad to increase or
decrease the value of the fifth digit.
NOTE: The coin value can be set from 1 to 65,535.
The default coin value is 100.
F8237901
© Copyright, Alliance Laundry Systems LLC – DO NOT COPY or TRANSMIT
27
Programming Flowcharts
This option allows the owner to program the value of
the Start Pulse if used for multiple pulses with an aftermarket central card reader or pay system. Refer to
option 5 for additional information.
How to Program Start Pulse Value
1. Control must be in Manual Mode. Refer to
Entering the Manual Mode.
<
>
2. Press the NORMAL/COLD ( ) or the
DELICATE/COLD ( ) keypad until “Prog”
appears in the display. Press the START (enter)
keypad and “AtS1” will appear in the display.
<
>
3. Press the NORMAL/COLD ( ) or the
DELICATE/COLD ( ) keypad to scroll through
the programmable options until “PLSE” appears
in the display.
4. When “PLSE” appears in the display, press the
START (enter) keypad. There are five digits in
the Start Pulse Value. The fifth digit will appear
in the display and will flash one (1) second on
and one (1) second off. Refer to Figure 6.
6. Press the START (enter) keypad to enter the fifth
digit and display remaining four digits. The
active digit will flash one (1) second on and one
(1) second off.
NOTE: To go back to the current programmable
option without changing the value of the active
digit, press the DELICATE/WARM (<) keypad.
7. Press the NORMAL/COLD ( ) or the
DELICATE/COLD ( ) keypad to increase or
decrease the value of the active digit and the
START (enter) keypad to enter the value of the
digit and advance to the next digit.
>
Start Pulse Value “PLSE”
<
4.
8. Press the START (enter) keypad with the last
active digit. The next option, “PLSn”, will
appear in the display.
NOTE: To program “PLSn” (Start Pulse Mode),
refer to option 5. To program other options, refer to
the appropriate section.
How to Exit Programming Feature
Press the DELICATE/WARM (<) keypad until the
control returns to Ready Mode.
NOTE: If the vend price is $100.00 or more, the
fifth digit is “1-6”. If the vend price is $99.99 or
less, the fifth digit is “0”.
CHM507R
Figure 6
<
>
5. Press the NORMAL/COLD ( ) or the
DELICATE/COLD ( ) keypad to increase or
decrease the value of the fifth digit.
NOTE: The Start Pulse Value can be set from 1 to
65,535. The default Start Pulse Value is 25.
28
© Copyright, Alliance Laundry Systems LLC – DO NOT COPY or TRANSMIT
F8237901
Programming Flowcharts
5.
Start Pulse Mode “PLSn”
This option allows the owner to program the Start
Pulse Input. The Start Pulse Mode can be used for
after-market central pay or card systems. The central
system sends the start pulse to the Start Pulse Input of
the control to start the cycle. If set for single pulse, one
start pulse from the central system will put the control
in Start Mode. If set for multiple pulses, each pulse
will deduct from the vend price value set up in
option 4 (Start Pulse Value) until the vend is satisfied.
How to Program Start Pulse Mode
5. Locate the desired number in the first column of
Table 2 below.
“PLSn”
Start Pulse
Mode Value
Start Pulse
ON/OFF
Single Pulse/
Multiple Pulses
“oFF”
OFF
OFF
128*
ON
Single Pulse
192
ON
Multiple Pulses
*Factory default setting
Table 2
<
>
2. Press the NORMAL/COLD ( ) or the
DELICATE/COLD ( ) keypad until “Prog”
appears in the display. Press the START (enter)
keypad and “AtS1” will appear in the display.
<
>
3. Press the NORMAL/COLD ( ) or the
DELICATE/COLD ( ) keypad to scroll through
the programmable options until “PLSn” appears
in the display.
4. When “PLSn” appears in the display, press the
START (enter) keypad. “oFF” or a number will
appear in the display. This number corresponds to
the current Start Pulse Mode Programming
Value.
>
6. Press the NORMAL/COLD ( ) or the
DELICATE/COLD ( ) keypad to increase or
decrease the current number until correct.
<
1. Control must be in Manual Mode. Refer to
Entering the Manual Mode.
NOTE: To go back to the current programmable
option without changing the current value, press
the DELICATE/WARM (<) keypad.
7. Press the START (enter) keypad when the correct
number appears in the display.
NOTE: To program “AtyP” (Available Type),
refer to option 6. To program other options,
refer to the appropriate section.
How to Exit Programming Feature
Press the DELICATE/WARM (<) keypad until the
control returns to Ready Mode.
F8237901
© Copyright, Alliance Laundry Systems LLC – DO NOT COPY or TRANSMIT
29
Programming Flowcharts
6.
Available Type “AtyP”
This option allows the owner to program when the
control provides an available output for card and
central pay systems.
How to Program Available Type
1. Control must be in Manual Mode. Refer to
Entering the Manual Mode.
Mode(s) in Which Available
Signal is Active
0*
Ready Mode only
1
Ready Mode, Partial Vend Mode
2
Ready Mode, End of Cycle Mode
3
Ready Mode, End of Cycle Mode,
Partial Vend Mode
*Factory default setting
<
>
2. Press the NORMAL/COLD ( ) or the
DELICATE/COLD ( ) keypad until “Prog”
appears in the display. Press the START (enter)
keypad and “AtS1” will appear in the display.
Available Type
Value
6. Press the START (enter) keypad when the correct
number appears in the display. The next option,
“dCYC”, will appear in the display.
<
>
3. Press the NORMAL/COLD ( ) or the
DELICATE/COLD ( ) keypad to scroll through
the programmable options until “AtyP” appears
in the display.
Table 3
4. When “AtyP” appears in the display, press the
START (enter) keypad. A number will appear in
the display. This number corresponds to the
current Available Type Value.
How to Exit Programming Feature
Press the DELICATE/WARM (<) keypad until the
control returns to Ready Mode.
<
>
5. Press the NORMAL/COLD ( ) or the
DELICATE/COLD ( ) keypad to increase or
decrease the current number to the desired
number selected from Table 3.
NOTE: To program “dCYC” (Default Cycle), refer
to option 7. To program other options, refer to the
appropriate section.
30
© Copyright, Alliance Laundry Systems LLC – DO NOT COPY or TRANSMIT
F8237901
Programming Flowcharts
7.
Default Cycle “dCYC”
This option allows the owner to set the default cycle
and temperature the machine will enter when in the
Ready Mode. When programming the default cycle,
refer to Table 4.
How to Read Table 4
To determine the correct number required to program
Default Cycle, use the following table. The Default
Value column contains the number required in step 5.
The other column corresponds to cycle type.
How to Program Default Cycle
1. Control must be in Manual Mode. Refer to
Entering the Manual Mode.
“dCYC”
Default Value
Cycle Type
1
Normal/Hot
2
Normal/Warm
3
Normal/Cold
4
Heavy/Hot
3. Press the NORMAL/COLD ( ) or the
DELICATE/COLD ( ) keypad to scroll through
the programmable options until “dCYC” appears
in the display.
5*
Delicate/Warm
6
Delicate/Cold
7
Quick/Hot
4. When “dCYC” appears in the display, press the
START (enter) keypad. A number will appear in
the display. This number corresponds to the
current default cycle value. Refer to Table 4.
8
Quick/Warm
9
Quick/Cold
<
>
<
>
2. Press the NORMAL/COLD ( ) or the
DELICATE/COLD ( ) keypad until “Prog”
appears in the display. Press the START (enter)
keypad and “AtS1” will appear in the display.
Table 4
<
>
5. Press the NORMAL/COLD ( ) or the
DELICATE/COLD ( ) keypad to increase or
decrease the current number to the desired
number selected from Table 4.
*Factory default setting
6. Press the START (enter) keypad when the correct
number appears in the display. The next option,
“oPL”, will appear in the display.
NOTE: To program “oPL” (OPL Mode), refer to
option 8. To program other options, refer to the
appropriate section.
How to Exit Programming Feature
Press the DELICATE/WARM (<) keypad until the
control returns to Ready Mode.
F8237901
© Copyright, Alliance Laundry Systems LLC – DO NOT COPY or TRANSMIT
31
Programming Flowcharts
This option allows the owner to enable or disable the
OPL Mode in which no vend price needs to be
satisfied to operate the machine.
How to Program the OPL Mode Enable/
Disable
1. Control must be in Manual Mode. Refer to
Entering the Manual Mode.
5. Press the NORMAL/COLD ( ) or the
DELICATE/COLD ( ) keypad to change the
current status.
6. Press the START (enter) keypad when the
desired status appears in the display. The next
option, “AUd”, will appear in the display.
<
>
2. Press the NORMAL/COLD ( ) or the
DELICATE/COLD ( ) keypad until “Prog”
appears in the display. Press the START (enter)
keypad and “AtS1” will appear in the display.
4. When “oPL” appears in the display, press the
START (enter) keypad. The current OPL Mode
Enable/Disable status will appear in the display.
“on” = Option Enabled
“oFF” = Option Disabled (Default Setting)
>
OPL Mode Enable/Disable“oPL”
<
8.
<
>
3. Press the NORMAL/COLD ( ) or the
DELICATE/COLD ( ) keypad to scroll through
the programmable options until “oPL” appears in
the display.
32
NOTE: To program “AUd” (Audio Signal), refer to
option 9. To program other options, refer to the
appropriate section.
How to Exit Programming Feature
Press the DELICATE/WARM (<) keypad until the
control returns to Ready Mode.
© Copyright, Alliance Laundry Systems LLC – DO NOT COPY or TRANSMIT
F8237901
Programming Flowcharts
This option allows the owner to program when the
signal will sound.
There are five occasions when a signal may sound
during operation. These five occasions are listed
below:
1. End of Cycle Signal
By default, the signal is turned off. If turned on,
the signal will sound for three (3) seconds at the
end of a cycle.
2. Keypad Depression Signal
By default, this signal is turned on and will sound
for a quarter of a second. This signal will sound
each time a keypad is pressed.
3. Coin Input/Card Insertion Signal
By default, this signal is turned on and will sound
for a quarter of a second each time a coin or card
is entered.
4. Remove Card Signal (Card Models Only)
By default, this signal is turned on and will sound
one (1) second on and one (1) second off when
the control is prompting for card removal.
5. Signal for Start
By default, this signal is turned on and will sound
one (1) second on and one (1) second off for 10
seconds after vend price has been satisfied.
4. When “AUd” appears in the display press the
START (enter) keypad. A number will appear in
the display. This number corresponds to the
current Audio Signal Programming Value.
5. Locate the desired number in the first column of
Table 5 on the following page.
6. Press the NORMAL/COLD ( ) or the
DELICATE/COLD ( ) keypad to increase or
decrease the current number until correct.
>
Audio Signal “AUd”
<
9.
For Example: A user might wish to have the signal
sound only when a keypad is pressed. Entering the
number “1” in step 5 would turn off all the options
except KEYPAD. In this instance, the signal would
sound only when a keypad is pressed.
7. Press the START (enter) keypad when the correct
number appears in the display. The next option,
“CArd”, will appear in the display.
NOTE: To program “CArd” (Card Reader Display
Control), refer to option 10. To program other
options, refer to the appropriate section.
How to Exit Programming Feature
Press the DELICATE/WARM (<) keypad until the
control returns to Ready Mode.
How to Program the Audio Signal
1. Control must be in Manual Mode. Refer to
Entering the Manual Mode.
<
>
2. Press the NORMAL/COLD ( ) or the
DELICATE/COLD ( ) keypad until “Prog”
appears in the display. Press the START (enter)
keypad and “AtS1” will appear in the display.
<
>
3. Press the NORMAL/COLD ( ) or the
DELICATE/COLD ( ) keypad to scroll through
the programmable options until “AUd” appears
in the display.
F8237901
© Copyright, Alliance Laundry Systems LLC – DO NOT COPY or TRANSMIT
33
Programming Flowcharts
How to Read Table 5
To determine the correct number required to program
the Audio Signal, use the following chart. The Signal
Value column contains the number required in step 6.
The other columns correspond to individual options.
Each column of options contains a unique combination
of the words “ON” and “OFF” that indicates if that
column’s option is turned on or off when the Signal
Value is entered. Select the desired combination of
options and enter the number found in the Signal Value
column.
Signal Start Remove
Value Mode
Card
Coin/
Card
Input
End of
Key
Cycle Pressed
0
OFF
OFF
OFF
OFF
OFF
1
OFF
OFF
OFF
OFF
ON
2
OFF
OFF
OFF
ON
OFF
3
OFF
OFF
OFF
ON
ON
4
OFF
OFF
ON
OFF
OFF
5
OFF
OFF
ON
OFF
ON
6
OFF
OFF
ON
ON
OFF
7
OFF
OFF
ON
ON
ON
8
OFF
ON
OFF
OFF
OFF
9
OFF
ON
OFF
OFF
ON
10
OFF
ON
OFF
ON
OFF
11
OFF
ON
OFF
ON
ON
12
OFF
ON
ON
OFF
OFF
13
OFF
ON
ON
OFF
ON
14
OFF
ON
ON
ON
OFF
15
OFF
ON
ON
ON
ON
16
ON
OFF
OFF
OFF
OFF
17
ON
OFF
OFF
OFF
ON
18
ON
OFF
OFF
ON
OFF
19
ON
OFF
OFF
ON
ON
20
ON
OFF
ON
OFF
OFF
21
ON
OFF
ON
OFF
ON
22
ON
OFF
ON
ON
OFF
23
ON
OFF
ON
ON
ON
24
ON
ON
OFF
OFF
OFF
25
ON
ON
OFF
OFF
ON
26
ON
ON
OFF
ON
OFF
27
ON
ON
OFF
ON
ON
28
ON
ON
ON
OFF
OFF
29*
ON
ON
ON
OFF
ON
30
ON
ON
ON
ON
OFF
31
ON
ON
ON
ON
ON
*Factory default setting
Table 5
34
© Copyright, Alliance Laundry Systems LLC – DO NOT COPY or TRANSMIT
F8237901
Programming Flowcharts
10. Card Reader Display Control
“CArd”
NOTE: This feature does not need to be
programmed manually. The card reader itself
makes this determination.
5. Press the NORMAL/COLD ( ) or the
DELICATE/COLD ( ) keypad to change the
current status.
How to Program the Card Reader Display
Control
6. Press the START (enter) keypad when the
desired status appears in the display. The next
option, “Err-”, will appear in the display.
1. Control must be in Manual Mode. Refer to
Entering the Manual Mode.
<
>
2. Press the NORMAL/COLD ( ) or the
DELICATE/COLD ( ) keypad until “Prog”
appears in the display. Press the START (enter)
keypad and “AtS1” will appear in the display.
<
NOTE: To program “Err-” (Error Code
Programming), refer to option 11. To program
other options, refer to the appropriate section.
How to Exit Programming Feature
Press the DELICATE/WARM (<) keypad until the
control returns to Ready Mode.
<
>
3. Press the NORMAL/COLD ( ) or the
DELICATE/COLD ( ) keypad to scroll through
the programmable options until “CArd” appears
in the display.
>
This option allows the owner to program whether the
display is controlled by the machine’s electronic
control or by the card reader.
4. When “CArd” appears in the display, press the
START (enter) keypad. The current Card Reader
Display Control Status will appear in the display.
“on” = Card Reader controls display
“oFF” = Machine Electronic Control controls
display (Default Setting)
F8237901
© Copyright, Alliance Laundry Systems LLC – DO NOT COPY or TRANSMIT
35
Programming Flowcharts
11. Error Code Programming “Err-”
“CEr-”
Coin Error Parameters
This option allows the owner to turn on or turn off
certain errors in the control.
“CEr1”
Coin Error - Determines if
display will show error.
How to Program Error Code Programming
“CEr2”
Coin Error Penalty - If enabled,
coin error will erase previous
coins entered and reset the vend
price.
“CEr3”
Coin Drops Header
Present Error - If enabled and
coin drop header is unplugged,
control ignores coin inputs.
1. Control must be in Manual Mode. Refer to
Entering the Manual Mode.
<
>
2. Press the NORMAL/COLD ( ) or the
DELICATE/COLD ( ) keypad until “Prog”
appears in the display. Press the START (enter)
keypad and “AtS1” will appear in the display.
<
>
3. Press the NORMAL/COLD ( ) or the
DELICATE/COLD ( ) keypad to scroll through
the programmable options until “Err-” appears in
the display.
4. When “Err-” appears in the display, press the
START (enter) keypad. Refer to Table 6 for a list
of programmable error code parameters.
Fill Error
“E dr”
Drain Error
“E Ub”
Unbalance Error Display (VFD only)
“E oP”
Open Thermistor Error Display
(Models with Heat)
“E SH”
Shorted Thermistor Error Display
(Models with Heat)
“E Ht”
Heat Error Display (Heater only)
“LEr-”
Leak Detection Error
If Water Leak Detection during a machine
cycle is enabled, then, on the enabled day(s)
of the week, the control will check for water
leaks during running machine cycles. If a
leak is detected, the control will display the
“E Ld” error for one minute after the cycle
is completed. It will also light the right-most
decimal point on the display. The Water
Leak Dectection diagnostic test can be used
to verify the leak.
<
>
5. Press the NORMAL/COLD ( ) or the
DELICATE/COLD ( ) keypad to select error
code.
“E FL”
6. Press the START (enter) keypad when the correct
code appears in the display. The current status
will appear in the display.
<
>
7. “oFF” indicates the option is disabled. “on”
indicates the option is enabled. Press the
NORMAL/COLD ( ) or the DELICATE/COLD
( ) keypad to change the status.
8. Press the START (enter) keypad when the correct
status appears in the display. The next Error Code
Programming option will appear in the display.
Water Leak Detection During a
Machine Cycle - Determines if
water level drops below target
level.
“LEr2”
Water Leak Detection During a
Machine Cycle Day of Week
Enable (Refer to Table 7)
>
NOTE: To program “CyC-” (Cycle Programming),
press the DELICATE/WARM (<) keypad, then the
NORMAL/COLD ( ) keypad and refer to option
12. To program other options, refer to the
appropriate section.
“LEr1”
How to Exit Programming Feature
Press the DELICATE/WARM(<) keypad until the
control returns to Ready Mode.
“LEr3”
“E Sd”
Number of cycles between leak
detection tests.
Slow Drain Detection – Determines if
machine is draining slower than
normal.
If Slow Drain Detection is enabled, the
control will check for slow drain operation
during running machine cycles. If a slow
drain is detected, the control will display the
“E Sd” error for one minute after the cycle
is completed. It will also light the right-most
decimal point on the display.
Table 6
36
© Copyright, Alliance Laundry Systems LLC – DO NOT COPY or TRANSMIT
F8237901
Programming Flowcharts
Day(s) of the Week Enabled Values
Day Of Week
Value
SAT
FRI
THUR
WED
TUE
MON
SUN
0
OFF
OFF
OFF
OFF
OFF
OFF
OFF
1
OFF
OFF
OFF
OFF
OFF
OFF
ON
2
OFF
OFF
OFF
OFF
OFF
ON
OFF
3
OFF
OFF
OFF
OFF
OFF
ON
ON
4
OFF
OFF
OFF
OFF
ON
OFF
OFF
5
OFF
OFF
OFF
OFF
ON
OFF
ON
6
OFF
OFF
OFF
OFF
ON
ON
OFF
7
OFF
OFF
OFF
OFF
ON
ON
ON
8
OFF
OFF
OFF
ON
OFF
OFF
OFF
9
OFF
OFF
OFF
ON
OFF
OFF
ON
10
OFF
OFF
OFF
ON
OFF
ON
OFF
11
OFF
OFF
OFF
ON
OFF
ON
ON
12
OFF
OFF
OFF
ON
ON
OFF
OFF
13
OFF
OFF
OFF
ON
ON
OFF
ON
14
OFF
OFF
OFF
ON
ON
ON
OFF
15
OFF
OFF
OFF
ON
ON
ON
ON
16
OFF
OFF
ON
OFF
OFF
OFF
OFF
17
OFF
OFF
ON
OFF
OFF
OFF
ON
18
OFF
OFF
ON
OFF
OFF
ON
OFF
19
OFF
OFF
ON
OFF
OFF
ON
ON
20
OFF
OFF
ON
OFF
ON
OFF
OFF
21
OFF
OFF
ON
OFF
ON
OFF
ON
22
OFF
OFF
ON
OFF
ON
ON
OFF
23
OFF
OFF
ON
OFF
ON
ON
ON
24
OFF
OFF
ON
ON
OFF
OFF
OFF
25
OFF
OFF
ON
ON
OFF
OFF
ON
26
OFF
OFF
ON
ON
OFF
ON
OFF
27
OFF
OFF
ON
ON
OFF
ON
ON
28
OFF
OFF
ON
ON
ON
OFF
OFF
29
OFF
OFF
ON
ON
ON
OFF
ON
30
OFF
OFF
ON
ON
ON
ON
OFF
31
OFF
OFF
ON
ON
ON
ON
ON
32
OFF
ON
OFF
OFF
OFF
OFF
OFF
33
OFF
ON
OFF
OFF
OFF
OFF
ON
34
35
OFF
OFF
ON
ON
OFF
OFF
OFF
OFF
OFF
OFF
ON
ON
OFF
ON
36
OFF
ON
OFF
OFF
ON
OFF
OFF
37
OFF
ON
OFF
OFF
ON
OFF
ON
38
39
40
OFF
OFF
OFF
ON
ON
ON
OFF
OFF
OFF
OFF
OFF
ON
ON
ON
OFF
ON
ON
OFF
OFF
ON
OFF
Table 7 (continued)
F8237901
© Copyright, Alliance Laundry Systems LLC – DO NOT COPY or TRANSMIT
37
Programming Flowcharts
Table 7 (continued)
Day(s) of the Week Enabled Values
Day Of Week
Value
41
42
43
44
45
46
47
48
49
50
51
52
53
54
55
56
57
58
59
60
61
62
63
64
65
66
67
68
69
70
71
72
73
74
75
76
77
78
79
80
81
82
83
84
SAT
FRI
THUR
WED
TUE
MON
SUN
OFF
OFF
OFF
OFF
OFF
OFF
OFF
OFF
OFF
OFF
OFF
OFF
OFF
OFF
OFF
OFF
OFF
OFF
OFF
OFF
OFF
OFF
OFF
ON
ON
ON
ON
ON
ON
ON
ON
ON
ON
ON
ON
ON
ON
ON
ON
ON
ON
ON
ON
ON
ON
ON
ON
ON
ON
ON
ON
ON
ON
ON
ON
ON
ON
ON
ON
ON
ON
ON
ON
ON
ON
ON
ON
OFF
OFF
OFF
OFF
OFF
OFF
OFF
OFF
OFF
OFF
OFF
OFF
OFF
OFF
OFF
OFF
OFF
OFF
OFF
OFF
OFF
OFF
OFF
OFF
OFF
OFF
OFF
OFF
ON
ON
ON
ON
ON
ON
ON
ON
ON
ON
ON
ON
ON
ON
ON
ON
OFF
OFF
OFF
OFF
OFF
OFF
OFF
OFF
OFF
OFF
OFF
OFF
OFF
OFF
OFF
OFF
ON
ON
ON
ON
ON
ON
ON
ON
ON
ON
ON
ON
OFF
OFF
OFF
OFF
OFF
OFF
OFF
OFF
ON
ON
ON
ON
ON
ON
ON
ON
OFF
OFF
OFF
OFF
OFF
OFF
OFF
OFF
ON
ON
ON
ON
ON
ON
ON
ON
OFF
OFF
OFF
OFF
OFF
OFF
OFF
OFF
ON
ON
ON
ON
OFF
OFF
OFF
OFF
ON
ON
ON
ON
OFF
OFF
OFF
OFF
ON
ON
ON
ON
OFF
OFF
OFF
OFF
ON
ON
ON
ON
ON
OFF
OFF
OFF
ON
ON
ON
ON
OFF
OFF
OFF
OFF
ON
OFF
ON
ON
OFF
OFF
ON
ON
OFF
OFF
ON
ON
OFF
OFF
ON
ON
OFF
OFF
ON
ON
OFF
OFF
ON
ON
OFF
OFF
ON
ON
OFF
OFF
ON
ON
OFF
OFF
ON
ON
OFF
OFF
ON
ON
OFF
OFF
ON
ON
OFF
ON
OFF
ON
OFF
ON
OFF
ON
OFF
ON
OFF
ON
OFF
ON
OFF
ON
OFF
ON
OFF
ON
OFF
ON
OFF
ON
OFF
ON
OFF
ON
OFF
ON
OFF
ON
OFF
ON
OFF
ON
OFF
ON
OFF
ON
OFF
ON
OFF
ON
OFF
Table 7 (continued)
38
© Copyright, Alliance Laundry Systems LLC – DO NOT COPY or TRANSMIT
F8237901
Programming Flowcharts
Table 7 (continued)
Day(s) of the Week Enabled Values
Day Of Week
Value
85
86
87
88
89
90
91
92
93
94
95
96
97
98
99
100
101
102
103
104
105
106
107
108
109
110
111
112
113
114
115
116
117
118
119
120
121
122
123
124
125
126
127*
SAT
FRI
THUR
WED
TUE
MON
SUN
ON
ON
ON
ON
ON
ON
ON
ON
ON
ON
ON
ON
ON
ON
ON
ON
ON
ON
ON
ON
ON
ON
ON
ON
ON
ON
ON
ON
ON
ON
ON
ON
ON
ON
ON
ON
ON
ON
ON
ON
ON
ON
ON
OFF
OFF
OFF
OFF
OFF
OFF
OFF
OFF
OFF
OFF
OFF
ON
ON
ON
ON
ON
ON
ON
ON
ON
ON
ON
ON
ON
ON
ON
ON
ON
ON
ON
ON
ON
ON
ON
ON
ON
ON
ON
ON
ON
ON
ON
ON
ON
ON
ON
ON
ON
ON
ON
ON
ON
ON
ON
OFF
OFF
OFF
OFF
OFF
OFF
OFF
OFF
OFF
OFF
OFF
OFF
OFF
OFF
OFF
OFF
ON
ON
ON
ON
ON
ON
ON
ON
ON
ON
ON
ON
ON
ON
ON
ON
OFF
OFF
OFF
ON
ON
ON
ON
ON
ON
ON
ON
OFF
OFF
OFF
OFF
OFF
OFF
OFF
OFF
ON
ON
ON
ON
ON
ON
ON
ON
OFF
OFF
OFF
OFF
OFF
OFF
OFF
OFF
ON
ON
ON
ON
ON
ON
ON
ON
ON
ON
ON
OFF
OFF
OFF
OFF
ON
ON
ON
ON
OFF
OFF
OFF
OFF
ON
ON
ON
ON
OFF
OFF
OFF
OFF
ON
ON
ON
ON
OFF
OFF
OFF
OFF
ON
ON
ON
ON
OFF
OFF
OFF
OFF
ON
ON
ON
ON
OFF
ON
ON
OFF
OFF
ON
ON
OFF
OFF
ON
ON
OFF
OFF
ON
ON
OFF
OFF
ON
ON
OFF
OFF
ON
ON
OFF
OFF
ON
ON
OFF
OFF
ON
ON
OFF
OFF
ON
ON
OFF
OFF
ON
ON
OFF
OFF
ON
ON
ON
OFF
ON
OFF
ON
OFF
ON
OFF
ON
OFF
ON
OFF
ON
OFF
ON
OFF
ON
OFF
ON
OFF
ON
OFF
ON
OFF
ON
OFF
ON
OFF
ON
OFF
ON
OFF
ON
OFF
ON
OFF
ON
OFF
ON
OFF
ON
OFF
ON
*Factory default setting
Table 7
F8237901
© Copyright, Alliance Laundry Systems LLC – DO NOT COPY or TRANSMIT
39
Programming Flowcharts
12. Cycle Programming “CyC-”
How to Program Cycle Agitate“AgIt”
This option allows the owner to program different
aspects for various steps in each type of cycle. There
are nine cycles available for programming.
This option allows the owner to program the cycle’s
agitation action and speed. These options apply to the
entire cycle.
<
>
2. Press the NORMAL/COLD ( ) or the
DELICATE/COLD ( ) keypad until “Prog”
appears in the display. Press the START (enter)
keypad and “AtS1” will appear in the display.
<
>
3. Press the NORMAL/COLD ( ) or the
DELICATE/COLD ( ) keypad to scroll through
the programmable options until “CyC-” appears
in the display. Press the START (enter) keypad
and “CyC1” will appear in the display.
>
<
3. Press the NORMAL/COLD ( ) or the
DELICATE/COLD ( ) keypad to scroll through
the programmable options. Refer to Table 8.
4. Press the START (enter) keypad when the
desired programmable option appears in the
display. The current status will appear in the
display. Refer to Table 8.
<
>
4. Press the NORMAL/COLD ( ) or the
DELICATE/COLD ( ) keypad to scroll through
the nine cycles to program. Press the START
(enter) keypad when the desired cycle appears in
the display.
2. When “AgIt” appears in the display, press the
START (enter) keypad. The first Cycle Agitate
option will appear in the display.
>
1. Control must be in Manual Mode. Refer to
Entering the Manual Mode.
1. Press the NORMAL/COLD ( ) or the
DELICATE/COLD ( ) keypad to scroll through
the programmable Cycle Programming options
until “AgIt” appears in the display.
<
How to Enter Cycle Programming
<
How to Exit Programming Feature
Press the DELICATE/WARM (<) keypad until the
control returns to Ready Mode.
Status
“tyPE”
Agitate Type
1 = Normal
2 = Gentle
“ASPd”
Agitate Speed
(VFD only)
“Lo” = Reduced Speed
“rEg” = Normal Speed
Table 8
5. Press the NORMAL/COLD ( ) or the
DELICATE/COLD ( ) keypad to change the
current status.
>
>
NOTE: To program “AgIt” (Cycle Agitate),
continue to next option. To program other options,
press the NORMAL/COLD ( ) or the DELICATE/
COLD ( ) keypads and refer to the appropriate
section.
Description
<
5. The first Cycle Programming option, “AgIt”, will
appear in the display.
Final Spin
Step
6. Press the START (enter) keypad when the
desired status appears in the display. The next
Cycle Agitate option will appear in the display.
NOTE: To program “SEg1” (Cycle Segment 1)
press the DELICATE/WARM (<) keypad and
continue to next Cycle Programming option. To
program other options, press the DELICATE/
WARM (<) keypad and refer to the appropriate
section.
How to Exit Programming Feature
Press the DELICATE/WARM (<) keypad until the
control returns to Ready Mode.
40
© Copyright, Alliance Laundry Systems LLC – DO NOT COPY or TRANSMIT
F8237901
Programming Flowcharts
NOTE: If the Segment Enable/Disable is
programmed “oFF”, the other Cycle Segment
programming options can’t be accessed.
4. Press the START (enter) keypad when the
desired Cycle Segment programmable option
appears in the display.
Programming Segment Enable/Disable
1. When “SgEn” appears in the display, press the
START (enter) keypad. The current Segment
Enable/Disable status will appear in the display.
“on” = Segment is enabled
“oFF” = Segment is disabled
<
>
2. Press the NORMAL/COLD ( ) or the
DELICATE/COLD ( ) keypad to change the
current status.
NOTE: If the Segment Enable/Disable is
programmed “oFF”, the other Cycle Segment
programming options can’t be accessed.
3. Press the START (enter) keypad when the
desired status appears in the display. The next
Cycle Segment option, “FILL”, will appear in the
display.
<
>
NOTE: To program “FILL” (Fill Step), continue to
next Cycle Segment option. To program other
options, press the NORMAL/COLD ( ) or the
DELICATE/COLD ( ) keypads and refer to the
appropriate section.
>
3. Press the START (enter) keypad when the
desired option appears in the display. The current
status will appear in the display. Refer to Table 9.
Fill Step
Description
Status
“FLEn”
Fill Step
Enable/Disable
“on”/”oFF”
“FLEU”
Fill Level
“HI” = high level
“nEd” = medium level
“Lo” = low level
“tEnP”
Fill Temperature
“CoLd” = Cold
“UArn” = Warm
“Hot” = Hot
(35°F - 194°F
[2°C - 90°C])
Table 9
4. Press the NORMAL/COLD ( ) or the
DELICATE/COLD ( ) keypad to change the
current status.
5. Press the START (enter) keypad when the
desired status appears in the display. The next
Fill step option will appear in the display.
NOTE: To program “SUPL” (Supply Step),
continue to next Cycle Segment option. To program
other options, press the NORMAL/COLD ( ) or
the DELICATE/COLD ( ) keypads and refer to
the appropriate section.
>
<
>
3. Press the NORMAL/COLD ( ) or the
DELICATE/COLD ( ) keypad to scroll through
the Cycle Segment programmable options.
NOTE: Fill Step “FLEn” must be enabled to scroll
through all Fill Step options.
>
2. When the desired segment appears in the display,
press the START (enter) keypad. “SgEn”
(Segment Enable/Disable) will appear in the
display.
2. Press the NORMAL/COLD ( ) or the
DELICATE/COLD ( ) keypad to scroll through
the programmable Fill step options. Refer to
Table 9.
<
<
>
1. Press the NORMAL/COLD ( ) or the
DELICATE/COLD ( ) keypad to scroll through
the eight programmable Cycle Segments until the
desired segment appears in the display.
1. When “FILL” appears in the display, press the
START (enter) keypad. The first Fill step
programming option will appear in the display.
<
There are eight programmable cycle segments. Within
each segment, there are several programmable options.
Programming Fill Step
<
How to Program Cycle Segment “SEg1”
How to Exit Programming Feature
Press the DELICATE/WARM (<) keypad until the
control returns to Ready Mode.
How to Exit Programming Feature
Press the DELICATE/WARM (<) keypad until the
control returns to Ready Mode.
F8237901
© Copyright, Alliance Laundry Systems LLC – DO NOT COPY or TRANSMIT
41
Programming Flowcharts
NOTE: Supply Step “SUEn” must be enabled to
scroll through all Supply Step options.
3. Press the START (enter) keypad when the
desired option appears in the display. The current
status value will appear in the display. Refer to
Table 10.
NOTE: For the Dispenser options, the display will
show “Cx” or “Sx” depending whether or not the
control is programmed as compartment-oriented
or supply-oriented. Refer to option 13 Supply/
Compartment Dispenser Programming.
Supply Step
Description
Status/Value
“SUEn”
Supply Step
Enable/Disable
“on”/“oFF”
“dISP”
Dispenser Options
Press START (enter)
to access options
“C2” or
“S1”
Compartment #2/
Supply #1
“on”/“oFF”
“C3” or
“S2”
Compartment #3/
Supply #2
“on”/“oFF”
“C4” or
“S3”
Compartment #4/
Supply #3
“on”/“oFF”
“S4”
Supply #4
“on”/“oFF”
Supply Duration
Press START (enter)
to access options
“SEC”
Seconds
0-59
“nIn”
Minutes
0-9
<
NOTE: To program “AgSt” (Agitate Step),
continue to next Cycle Segment option. If in the
Dispenser Options or Supply Duration
programming option, press the DELICATE/
WARM (<) keypad first. To program other options,
press the NORMAL/COLD ( ) or the DELICATE/
COLD ( ) keypads and refer to the appropriate
section.
>
<
>
2. Press the NORMAL/COLD ( ) or the
DELICATE/COLD ( ) keypad to scroll through
the programmable Supply step options. Refer to
Table 10.
5. Press the START (enter) keypad when the
desired status/value appears in the display. The
next Supply step option will appear in the
display.
<
1. When “SUPL” appears in the display, press the
START (enter) keypad. The first Supply step
programming option will appear in the display.
“SdUr”
4. Press the NORMAL/COLD ( ) or the
DELICATE/COLD ( ) keypad to change the
current status/value.
>
Programming Supply Step
How to Exit Programming Feature
Press the DELICATE/WARM (<) keypad until the
control returns to Ready Mode.
Table 10
42
© Copyright, Alliance Laundry Systems LLC – DO NOT COPY or TRANSMIT
F8237901
Programming Flowcharts
Programming Agitate Step
Programming Drain Step
2. Press the NORMAL/COLD ( ) or the
DELICATE/COLD ( ) keypad to scroll through
the programmable Agitate step options. Refer to
Table 11.
2. Press the NORMAL/COLD ( ) or the
DELICATE/COLD ( ) keypad to change the
current status.
“on” = Drain step is enabled
“oFF” = Drain step is disabled
Agitate
Step
Status/Value
“AgEn”
Agitate Step
Enable/Disable
“on”/“oFF”
“AdUr”
Agitate Duration
(in minutes)
1-30
“HEAt”
Heat in Agitate
(If heater is present)
“oFF”, 1 or 2
1 = to target
2 = maintain
3. Press the START (enter) keypad when the
desired status appears in the display. The next
Cycle Segment option, “SPIn”, will appear in the
display.
NOTE: To program “SPIn” (Extract Step),
continue to next Cycle Segment option. To program
other options press the NORMAL/COLD ( ) or the
DELICATE/COLD ( ) keypads and refer to the
appropriate section.
<
Description
NOTE: Drain must be enabled to activate Extract
step.
>
3. Press the START (enter) keypad when the
desired option appears in the display. The current
status/value will appear in the display. Refer to
Table 11.
<
<
NOTE: Agitate Step “AgEn” must be enabled to
scroll through all Agitate Step options.
>
1. When “drAn” appears in the display, press the
START (enter) keypad. The current status will be
displayed.
>
1. When “AgSt” appears in the display, press the
START (enter) keypad. The first Agitate step
programming option will appear in the display.
How to Exit Programming Feature
Press the DELICATE/WARM (<) keypad until the
control returns to Ready Mode.
Table 11
<
>
4. Press the NORMAL/COLD ( ) or the
DELICATE/COLD ( ) keypad to change the
current status/value.
5. Press the START (enter) keypad when the
desired status/value appears in the display. The
next Agitate step option will appear in the
display.
<
>
NOTE: To program “drAn” (Drain Step), continue
to next Cycle Segment option. To program other
options, press the NORMAL/COLD ( ) or the
DELICATE/COLD ( ) keypads and refer to the
appropriate section.
NOTE: If drain step is disabled, the extract cycle
step will not be executed.
How to Exit Programming Feature
Press the DELICATE/WARM (<) keypad until the
control returns to Ready Mode.
F8237901
© Copyright, Alliance Laundry Systems LLC – DO NOT COPY or TRANSMIT
43
Programming Flowcharts
Extract
Step
“SPEn”
Description
Status/Value
Extract Step
Enable/Disable
“on”/“oFF”
“SSEC” Extract Seconds
“SSPd”
Extract Minutes Intermediate Extract:
minimum step time =
30 seconds
maximum step time =
3:59 minutes
Final Extract:
minimum step time =
30 seconds
maximum step time =
9:59 minutes
Extract Speed
(VFD only)
F-speed models Speeds 1-3,
V-speed models use all 5
1 = very low speed (40)
2 = low speed (80)
3 = medium speed (100)
4 = high speed (120)
5 = very high speed (140)
>
This option allows the owner to program minutes to
the cycle’s display time.
1. Press the NORMAL/COLD ( ) or the
DELICATE/COLD ( ) keypad to scroll through
the programmable Cycle Programming options
until “Cnin” appears in the display.
NOTE: The option “PCtd” Programmable Cycle
Time Display must be programmed “on” to access
the “Cnin” option, refer to option 24.
2. When “Cnin” appears in the display, press the
START (enter) keypad. The first cycle time value
will appear in the display.
3. Press the NORMAL/COLD ( ) or the
DELICATE/COLD ( ) keypad to change the
current value.
NOTE: The Program Cycle Time can be set from 0
to 255 minutes. The default value is 0.
4. Press the START (enter) keypad when the
desired cycle time value appears in the display.
NOTE: Programming display time (in minutes)
does not actually change time in the cycle, only to
the displayed cycle time for the user.
NOTE: To program another cycle, repeat Cycle
Programming steps. To program other options,
press the NORMAL/COLD ( ) or the DELICATE/
COLD ( ) keypad and refer to the appropriate
section.
>
“SnIn”
0-59
How to Program Cycle Time “Cnin”
>
3. Press the START (enter) keypad when the
desired option appears in the display. The current
status/value will appear in the display. Refer to
Table 12.
Press the DELICATE/WARM (<) keypad until the
control returns to Ready Mode.
>
NOTE: Extract Step “SPEn” must be enabled to
scroll through all Extract Step options.
How to Exit Programming Feature
<
<
>
2. Press the NORMAL/COLD ( ) or the
DELICATE/COLD ( ) keypad to scroll through
the programmable Extract step options. Refer to
Table 12.
<
1. When “SPIn” appears in the display, press the
START (enter) keypad. The first Extract step
programming option will appear in the display.
NOTE: To program “Cnin” (Cycle Time), continue
to next Cycle Segment Option. To program other
options press the NORMAL/COLD ( ) or the
DELICATE/COLD ( ) keypads and refer to the
appropriate section.
<
Programming Extract Step
<
Table 12
<
>
4. Press the NORMAL/COLD ( ) or the
DELICATE/COLD ( ) keypad to change the
current status/value.
5. Press the START (enter) keypad when the
desired status/value appears in the display. The
next Cycle Segment step option, “SEg2” will
appear in the display.
44
How to Exit Programming Feature
Press the DELICATE/WARM (<) keypad until the
control returns to Ready Mode.
© Copyright, Alliance Laundry Systems LLC – DO NOT COPY or TRANSMIT
F8237901
Programming Flowcharts
<
>
2. Press the NORMAL/COLD ( ) or the
DELICATE/COLD ( ) keypad until “Prog”
appears in the display. Press the START (enter)
keypad, and “AtS1” will appear in the display.
<
>
3. Press the NORMAL/COLD ( ) or the
DELICATE/COLD ( ) keypad to scroll through
the programmable options until “SUPC” appears
in the display.
4. When “SUPC” appears in the display, press the
START (enter) keypad. The current dispenser
option will appear in the display.
“S” = Supply Dispenser
“C” = Compartment Dispenser (Default
Setting)
>
3. Press the NORMAL/COLD ( ) or the
DELICATE/COLD ( ) keypad to scroll through
the programmable options until “bALr” appears
in the display.
4. When “bALr” appears in the display, press the
START (enter) keypad. The current value will
appear in the display.
5. Press the NORMAL/COLD ( ) or the
DELICATE/COLD ( ) keypad to increase or
decrease the current value.
NOTE: The number of balance retries can be set
from 1-7. Default number of balance retries is 3.
<
>
5. Press the NORMAL/COLD ( ) or the
DELICATE/COLD ( ) keypad to change the
dispenser type.
2. Press the NORMAL/COLD ( ) or the
DELICATE/COLD ( ) keypad until “Prog”
appears in the display. Press the START (enter)
keypad, and “AtS1” will appear in the display.
>
1. Control must be in Manual Mode. Refer to
Entering the Manual Mode.
1. Control must be in Manual Mode. Refer to
Entering the Manual Mode.
>
How to Program Supply/Compartment
Dispenser Programming
How to Program Number of Balance
Retries
<
NOTE: Supply Dispenser must only be selected if
machine is connected to an external chemical
supply system.
This option allows the owner to program how many
times the control will retry balancing the load before
moving into Extract step.
<
This option allows the owner to choose between the
supply dispenser or compartment dispenser.
14. Number of Balance Retries
“bALr” (Variable Frequency
Drives Only)
<
13. Supply/Compartment Dispenser
Programming “SUPC”
6. Press the START (enter) keypad when the
desired dispenser type appears in the display. The
next option, “bALr” (VFD models) or “IrA”
(2 speed models), will appear in the display.
NOTE: For VFD models: To program “bALr”
(Number of Balance Retries), refer to option 14.
For 2 speed models: To program “IrA” (IR Access
[on/off]), refer to option 15. To program other
options, refer to the appropriate section.
6. Press the START (enter) keypad when the
desired value appears in the display. The next
option, “IrA”, will appear in the display.
NOTE: To program “IrA” (IR Access [on/off]),
refer to option 15. To program other options, refer
to the appropriate section.
How to Exit Programming Feature
Press the DELICATE/WARM (<) keypad until the
control returns to Ready Mode.
How to Exit Programming Feature
Press the DELICATE/WARM (<) keypad until the
control returns to Ready Mode.
F8237901
© Copyright, Alliance Laundry Systems LLC – DO NOT COPY or TRANSMIT
45
Programming Flowcharts
<
>
2. Press the NORMAL/COLD ( ) or the
DELICATE/COLD ( ) keypad until “Prog”
appears in the display. Press the START (enter)
keypad and “AtS1” will appear in the display.
<
>
3. Press the NORMAL/COLD ( ) or the
DELICATE/COLD ( ) keypad to scroll through
the programmable options until “IrA” appears in
the display.
4. When “IrA” appears in the display, press the
START (enter) keypad. The current IR Access
status will appear in the display.
“on” = Option Enabled (Default Setting)
“oFF” = Option Disabled
How to Program Fahrenheit/Celsius
1. Control must be in Manual Mode. Refer to
Entering the Manual Mode.
2. Press the NORMAL/COLD ( ) or the
DELICATE/COLD ( ) keypad until “Prog”
appears in the display. Press the START (enter)
keypad and “AtS1” will appear in the display.
>
1. Control must be in Manual Mode. Refer to
Entering the Manual Mode.
3. Press the NORMAL/COLD ( ) or the
DELICATE/COLD ( ) keypad to scroll through
the programmable options until “t FC” appears
in the display.
>
How to Program the IR Access (On/Off)
This option allows the owner to set whether the
display will be shown in Fahrenheit or Celsius.
<
This option allows the owner to enable or disable
allowing the control to be read by an external device.
16. Fahrenheit/Celsius “t FC”
(Models with Heat)
<
15. IR Access (On/Off) “IrA”
5. Press the NORMAL/COLD ( ) or the
DELICATE/COLD ( ) keypad to increase or
decrease the current number to the desired
number.
<
<
NOTE: For Models with Heat: To program “t FC”
(Fahrenheit/Celsius), refer to option 16. For Nonheat Models: To program “PtEn” (Production Test
Cycle [On/Off]), refer to option 21. To program
other options, refer to the appropriate section.
>
6. Press the START (enter) keypad when the
desired status appears in the display. The next
option, “t FC” (Models with Heat) or “PtEn”
(Non-heat Models), will appear in the display.
>
5. Press the NORMAL/COLD ( ) or the
DELICATE/COLD ( ) keypad to change the
current status.
4. When “t FC” appears in the display, press the
START (enter) keypad. A number will appear in
the display. This number (found below)
corresponds to the current Fahrenheit/Celsius
setting.
“CEL” = Celsius
“FAHr” = Fahrenheit (Default Setting)
6. Press the START (enter) keypad when the correct
number of degrees appears in the display. The
new value is saved and the next option, “FH”,
will appear in the display.
How to Exit Programming Feature
NOTE: To program “FH” (Hot Water
Temperature), refer to option 17. To program other
options, refer to the appropriate section.
Press the DELICATE/WARM (<) keypad until the
control returns to Ready Mode.
How to Exit Programming Feature
Press the DELICATE/WARM (<) keypad until the
control returns to Ready Mode.
46
© Copyright, Alliance Laundry Systems LLC – DO NOT COPY or TRANSMIT
F8237901
Programming Flowcharts
17. Hot Water Temperature “FH”
This option allows the owner to program the hot water
temperature for models equipped with heat.
How to Program Hot Water Temperature
18. Warm Water Temperature
“FHC”
This option allows the owner to program the warm
water temperature for models equipped with heat.
How to Program Warm Water Temperature
4. When “FH” appears in the display, press the
START (enter) keypad. A number will appear in
the display. This number corresponds to the
current Hot Water Temperature value.
<
>
5. Press the NORMAL/COLD ( ) or the
DELICATE/COLD ( ) keypad to increase or
decrease the current Hot Water Temperature
value to the desired Hot Water Temperature
value.
NOTE: Hot Water Temperature is selectable
between 35° and 194° Fahrenheit (2° and 90°
Celsius). Default temperature is 140° Fahrenheit
(60° Celsius).
<
>
2. Press the NORMAL/COLD ( ) or the
DELICATE/COLD ( ) keypad until “Prog”
appears in the display. Press the START (enter)
keypad and “AtS1” will appear in the display.
>
3. Press the NORMAL/COLD ( ) or the
DELICATE/COLD ( ) keypad to scroll through
the programmable options until “FHC” appears
in the display.
4. When “FHC” appears in the display, press the
START (enter) keypad. A number will appear in
the display. This number corresponds to the
current Warm Water Temperature value.
5. Press the NORMAL/COLD ( ) or the
DELICATE/COLD ( ) keypad to increase or
decrease the current Warm Water Temperature
value to the desired Warm Water Temperature
value.
>
<
>
3. Press the NORMAL/COLD ( ) or the
DELICATE/COLD ( ) keypad to scroll through
the programmable options until “FH” appears in
the display.
1. Control must be in Manual Mode. Refer to
Entering the Manual Mode.
<
<
>
2. Press the NORMAL/COLD ( ) or the
DELICATE/COLD ( ) keypad until “Prog”
appears in the display. Press the START (enter)
keypad and “AtS1” will appear in the display.
<
1. Control must be in Manual Mode. Refer to
Entering the Manual Mode.
NOTE: Warm Water Temperature is selectable
between 35° and 194° Fahrenheit (2° and 90°
Celsius). Default temperature is 100° Fahrenheit
(38° Celsius).
WARNING
WARNING
To prevent personal injury, avoid contact
with inlet water temperatures higher than
125° Fahrenheit (51° Celsius) and hot
surfaces.
W748
NOTE: Refer to option 16 to select Celsius or
Fahrenheit display.
6. Press the START (enter) keypad when the correct
number appears in the display. The next option,
“FHC”, will appear in the display.
NOTE: To program “FHC” (Warm Water
Temperature), refer to option 18. To program other
options, refer to the appropriate section.
How to Exit Programming Feature
Press the DELICATE/WARM (<) keypad until the
control returns to Ready Mode.
F8237901
To prevent personal injury, avoid contact
with inlet water temperatures higher than
125° Fahrenheit (51° Celsius) and hot
surfaces.
W748
NOTE: Refer to option 16 to select Celsius or
Fahrenheit display.
6. Press the START (enter) keypad when the correct
number appears in the display. The next option,
“FC”, will appear in the display.
NOTE: To program “FC” (Cold Water
Temperature), refer to option 19. To program other
options, refer to the appropriate section.
How to Exit Programming Feature
Press the DELICATE/WARM (<) keypad until the
control returns to Ready Mode.
© Copyright, Alliance Laundry Systems LLC – DO NOT COPY or TRANSMIT
47
Programming Flowcharts
<
>
3. Press the NORMAL/COLD ( ) or the
DELICATE/COLD ( ) keypad to scroll through
the programmable options until “FC” appears in
the display.
4. When “FC” appears in the display, press the
START (enter) keypad. A number will appear in
the display. This number corresponds to the
current Cold Water Temperature value.
2. Press the NORMAL/COLD ( ) or the
DELICATE/COLD ( ) keypad until “Prog”
appears in the display. Press the START (enter)
keypad and “AtS1” will appear in the display.
3. Press the NORMAL/COLD ( ) or the
DELICATE/COLD ( ) keypad to scroll through
the programmable options until “Codn” appears
in the display.
4. When “Codn” appears in the display, press the
START (enter) keypad. A number, or “oFF”, will
appear in the display. The number corresponds to
the current Cooldown Water Temperature value,
and “oFF” appears when cooldown is disabled.
5. Press the NORMAL/COLD ( ) or the
DELICATE/COLD ( ) keypad to change the
current status.
<
<
>
5. Press the NORMAL/COLD ( ) or the
DELICATE/COLD ( ) keypad to increase or
decrease the current Cold Water Temperature
value to the desired Cold Water Temperature
value.
1. Control must be in Manual Mode. Refer to
Entering the Manual Mode.
>
<
>
2. Press the NORMAL/COLD ( ) or the
DELICATE/COLD ( ) keypad until “Prog”
appears in the display. Press the START (enter)
keypad and “AtS1” will appear in the display.
How to Program Cooldown Enable/
Temperature
>
1. Control must be in Manual Mode. Refer to
Entering the Manual Mode.
>
How to Program Cold Water Temperature
This option allows the owner to enable or disable the
Cooldown Water Temperature option. If enabled, the
owner can also set the cooldown water temperature.
<
This option allows the owner to program the cold
water temperature for models equipped with heat.
20. Cooldown Enable/Temperature
“Codn” (Models with Heat)
<
19. Cold Water Temperature “FC”
NOTE: Cold Water Temperature is selectable
between 35° and 194° Fahrenheit (2° and 90°
Celsius). Default temperature value is 35°
Fahrenheit (2° Celsius).
NOTE: Cooldown Water Temperature is selectable
between 50° and 160° Fahrenheit (10° and 71°
Celsius). Default temperature value is OFF.
WARNING
6. Press the START (enter) keypad when the
desired value appears in the display.
To prevent personal injury, avoid contact
with inlet water temperatures higher than
125° Fahrenheit (51° Celsius) and hot
surfaces.
NOTE: Refer to option 16 to select Celsius or
Fahrenheit display.
W748
NOTE: Refer to option 16 to select Celsius or
Fahrenheit display.
6. Press the START (enter) keypad when the correct
number appears in the display. The next option,
“Codn”, will appear in the display.
NOTE: To program “Codn” (Cooldown Enable/
Temperature), refer to option 20. To program other
options, refer to the appropriate section.
7. Press the START (enter) keypad when the correct
number appears in the display. The next option,
“PtEn”, will appear in the display.
NOTE: To program “PtEn” (Prouction Test Cycle
[on/off]), refer to option 21. To program other
options, refer to the appropriate section.
How to Exit Programming Feature
Press the DELICATE/WARM (<) keypad until the
control returns to Ready Mode.
How to Exit Programming Feature
Press the DELICATE/WARM (<) keypad until the
control returns to Ready Mode.
48
© Copyright, Alliance Laundry Systems LLC – DO NOT COPY or TRANSMIT
F8237901
Programming Flowcharts
21. Production Test Cycle (On/Off)
“PtEn”
22. Manual Rapid Advance (On/Off)
“rAEn”
This option allows the owner to enable or disable
access to the production test cycle. Refer to
Production Test Cycle section for more information.
This option allows the owner to enable or disable the
rapid advance feature. Refer to Rapid Advance
Feature section for more information.
How to Program the Production Test
Cycle (On/Off)
How to Program the Manual Rapid
Advance (On/Off)
2. Press the NORMAL/COLD ( ) or the
DELICATE/COLD ( ) keypad until “Prog”
appears in the display. Press the START (enter)
keypad and “AtS1” will appear in the display.
2. Press the NORMAL/COLD ( ) or the
DELICATE/COLD ( ) keypad until “Prog”
appears in the display. Press the START (enter)
keypad and “AtS1” will appear in the display.
3. Press the NORMAL/COLD ( ) or the
DELICATE/COLD ( ) keypad to scroll through
the programmable options until “PtEn” appears
in the display.
3. Press the NORMAL/COLD ( ) or the
DELICATE/COLD ( ) keypad to scroll through
the programmable options until “rAEn” appears
in the display.
4. When “PtEn” appears in the display, press the
START (enter) keypad. The current Production
Test Cycle status will appear in the display.
“on” = Option Enabled (Default Setting)
“oFF” = Option Disabled
4. When “rAEn” appears in the display, press the
START (enter) keypad. The current Manual
Rapid Advance status will appear in the display.
“on” = Option Enabled (Default Setting)
“oFF” = Option Disabled
5. Press the NORMAL/COLD ( ) or the
DELICATE/COLD ( ) keypad to change the
current status.
5. Press the NORMAL/COLD ( ) or the
DELICATE/COLD ( ) keypad to change the
current status.
6. Press the START (enter) keypad when the
desired status appears in the display. The next
option, “rAEn”, will appear in the display.
6. Press the START (enter) keypad when the
desired status appears in the display. The next
option, “nCtd”, will appear in the display.
>
<
>
>
<
<
>
<
<
<
>
1. Control must be in Manual Mode. Refer to
Entering the Manual Mode.
>
1. Control must be in Manual Mode. Refer to
Entering the Manual Mode.
NOTE: To program “rAEn” (Manual Rapid
Advance [on/off]), refer to option 22. To program
other options, refer to the appropriate section.
NOTE: To program “nCtd” (No Cycle Time
Display), refer to option 23. To program other
options, refer to the appropriate section.
How to Exit Programming Feature
How to Exit Programming Feature
Press the DELICATE/WARM (<) keypad until the
control returns to Ready Mode.
Press the DELICATE/WARM (<) keypad until the
control returns to Ready Mode.
F8237901
© Copyright, Alliance Laundry Systems LLC – DO NOT COPY or TRANSMIT
49
Programming Flowcharts
<
>
3. Press the NORMAL/COLD ( ) or the
DELICATE/COLD ( ) keypad to scroll through
the programmable options until “nCtd” appears
in the display.
4. When “nCtd” appears in the display, press the
START (enter) keypad. The current No Cycle
Time Display status will appear in the display.
“on” = Option Enabled
“oFF” = Option Disabled (Default Setting)
<
>
5. Press the NORMAL/COLD ( ) or the
DELICATE/COLD ( ) keypad to change the
current status.
6. Press the START (enter) keypad when the
desired status appears in the display. The next
option, “PCtd”, will appear in the display.
NOTE: To program “PCtd” (Programmable Cycle
Time Display), refer to option 24. To program other
options, refer to the appropriate section.
How to Exit Programming Feature
Press the DELICATE/WARM (<) keypad until the
control returns to Ready Mode.
1. Control must be in Manual Mode. Refer to
Entering the Manual Mode.
>
2. Press the NORMAL/COLD ( ) or the
DELICATE/COLD ( ) keypad until “Prog”
appears in the display. Press the START (enter)
keypad and “AtS1” will appear in the display.
3. Press the NORMAL/COLD ( ) or the
DELICATE/COLD ( ) keypad to scroll through
the programmable options until “PCtd” appears
in the display.
>
<
>
2. Press the NORMAL/COLD ( ) or the
DELICATE/COLD ( ) keypad until “Prog”
appears in the display. Press the START (enter)
keypad and “AtS1” will appear in the display.
How to Program Programmable Cycle
Time Display
4. When “PCtd” appears in the display, press the
START (enter) keypad. The current
Programmable Cycle Time Display status will
appear in the display.
“on” = Option Enabled
“oFF” = Option Disabled (Default Setting)
NOTE: Enabling this option will not change the
cycle time, only the display time for the user. Refer
to option “Cnin” in Cycle Programming to
program minutes to the cycle time display.
5. Press the NORMAL/COLD ( ) or the
DELICATE/COLD ( ) keypad to change the
current status.
>
1. Control must be in Manual Mode. Refer to
Entering the Manual Mode.
<
How to Program No Cycle Time Display
This option allows the owner to program the displayed
cycle time.
<
This option allows the owner to enable or disable
whether the cycle time will appear in the display.
24. Programmable Cycle Time
Display “PCtd”
<
23. No Cycle Time Display “nCtd”
6. Press the START (enter) keypad when the
desired status appears in the display. The next
option, “SdAd”, will appear in the display.
NOTE: To program “SdAd” (Slow Drain
Detection Adjust Value), refer to option 25. To
program other options, refer to the appropriate
section.
How to Exit Programming Feature
Press the DELICATE/WARM (<) keypad until the
control returns to Ready Mode.
50
© Copyright, Alliance Laundry Systems LLC – DO NOT COPY or TRANSMIT
F8237901
Programming Flowcharts
25. Slow Drain Detection Adjust
Value “SdAd”
26. Pause/Resume Mode (On/Off)
“SPAU”
This option allows the owner to increase or decrease
the Slow Drain Detection threshold by adding
additional seconds to the threshold value. When
enabled, it increases the time before a Slow Drain
Error will occur.
This option allows the owner to enable or disable
Pause/Resume Mode. When enabled, users can press
the START keypad three times (during first three
minutes of cycle) to pause the cycle.
How to Program No Cycle Time Display
How to Program the Pause/Resume
Mode (On/Off)
2. Press the NORMAL/COLD ( ) or the
DELICATE/COLD ( ) keypad until “Prog”
appears in the display. Press the START (enter)
keypad and “AtS1” will appear in the display.
2. Press the NORMAL/COLD ( ) or the
DELICATE/COLD ( ) keypad until “Prog”
appears in the display. Press the START (enter)
keypad and “AtS1” will appear in the display.
3. Press the NORMAL/COLD ( ) or the
DELICATE/COLD ( ) keypad to scroll through
the programmable options until “SdAd” appears
in the display.
3. Press the NORMAL/COLD ( ) or the
DELICATE/COLD ( ) keypad to scroll through
the programmable options until “SPAU” appears
in the display.
4. When “SdAd” appears in the display, press the
START (enter) keypad. The current Slow Drain
Detection Adjust status will appear in the display.
4. When “SPAU” appears in the display, press the
START (enter) keypad. The current Pause/
Resume status will appear in the display.
>
<
“on” = Option Enabled
“oFF” = Option Disabled (Default Setting)
5. Press the NORMAL/COLD ( ) or the
DELICATE/COLD ( ) keypad to change the
current status.
NOTE: The Slow Drain Detection Adjust Value can
be set from 0 to 255 seconds.
6. Press the START (enter) keypad when the
desired status appears in the display. The next
option, “AtS2”, will appear in the display.
6. Press the START (enter) keypad when the
desired value appears in the display. The next
option, “SPAU”, will appear in the display.
NOTE: To program “SPAU” (Pause/Resume
Mode), refer to option 26. To program other
options, refer to the appropriate section.
How to Exit Programming Feature
<
>
<
>
5. Press the NORMAL/COLD ( ) or the
DELICATE/COLD ( ) keypad to change the
current value.
<
>
<
<
“on” = Option Enabled
“oFF” = Option Disabled (Default Setting)
>
1. Control must be in Manual Mode. Refer to
Entering the Manual Mode.
>
1. Control must be in Manual Mode. Refer to
Entering the Manual Mode.
NOTE: To program “AtS2” (Normal/Warm Vend
Price), refer to option 27. To program other
options, refer to the appropriate section.
How to Exit Programming Feature
Press the DELICATE/WARM (<) keypad until the
control returns to Ready Mode.
Press the DELICATE/WARM (<) keypad until the
control returns to Ready Mode.
F8237901
© Copyright, Alliance Laundry Systems LLC – DO NOT COPY or TRANSMIT
51
Programming Flowcharts
27. Normal/Warm Vend Price
“AtS2”
NOTE: The vend price can be set from 0 to 65,535.
Default vend price is 200.
1. Control must be in Manual Mode. Refer to
Entering the Manual Mode.
<
>
2. Press the NORMAL/COLD ( ) or the
DELICATE/COLD ( ) keypad until “Prog”
appears in the display. Press the START (enter)
keypad, and “AtS1” will appear in the display.
<
>
3. Press the NORMAL/COLD ( ) or the
DELICATE/COLD ( ) keypad to scroll through
the programmable options until “AtS2” appears
in the display. The NORMAL/WARM LED will
be lit to show which cycle/temperature price is
being programmed.
4. When “AtS2” appears in the display, press the
START (enter) keypad. There are five digits in
the Normal/Warm Vend Price. The fifth digit will
appear in the display and will flash one (1)
second on, one (1) second off. Refer to Figure 7.
NOTE: To go back to the current programmable
option without changing the value of the active
digit, press the DELICATE/WARM (<) keypad.
7. Press the NORMAL/COLD ( ) or the
DELICATE/COLD ( ) keypad to increase or
decrease the value of the active digit and the
START (enter) keypad to enter the value of the
digit and advance to the next digit.
>
How to Program the Normal/Warm Vend
Price
6. Press the START (enter) keypad to enter the fifth
digit and display remaining four digits. The
active digit will flash one (1) second on and one
(1) second off.
<
This option allows the owner to set the vend price for a
normal/warm wash. This vend price will be shown in
the display when NORMAL/WARM is selected.
8. Press the START (enter) keypad with the last
active digit. The next option, “AtS3”, will appear
in the display.
NOTE: To program “AtS3” (Normal/Cold Vend
Price), refer to option 28. To program other
options, refer to the appropriate section.
How to Exit Programming Feature
Press the DELICATE/WARM (<) keypad until the
control returns to Ready Mode.
NOTE: If the vend price is $100.00 or more, the
fifth digit is “1-6”. If the vend price is $99.99 or
less, the fifth digit is “0”.
CHM507R
Figure 7
<
>
5. Press the NORMAL/COLD ( ) or the
DELICATE/COLD ( ) keypad to increase or
decrease the value of the fifth digit.
52
© Copyright, Alliance Laundry Systems LLC – DO NOT COPY or TRANSMIT
F8237901
Programming Flowcharts
How to Program the Normal/Cold Vend
Price
1. Control must be in Manual Mode. Refer to
Entering the Manual Mode.
<
>
2. Press the NORMAL/COLD ( ) or the
DELICATE/COLD ( ) keypad until “Prog”
appears in the display. Press the START (enter)
keypad and “AtS1” will appear in the display.
<
>
3. Press the NORMAL/COLD ( ) or the
DELICATE/COLD ( ) keypad to scroll through
the programmable options until “AtS3” appears
in the display. The NORMAL/COLD LED will
be lit to show which cycle/temperature price is
being programmed.
4. When “AtS3” appears in the display, press the
START (enter) keypad. There are five digits in
the NORMAL/COLD Vend Price. The fifth digit
will appear in the display and will flash one (1)
second on, one (1) second off. Refer to
Figure 8.
6. Press the START (enter) keypad to enter the fifth
digit and display remaining four digits. The
active digit will flash one (1) second on and one
(1) second off.
NOTE: To go back to the current programmable
option without changing the value of the active
digit, press the DELICATE/WARM (<) keypad.
7. Press the NORMAL/COLD ( ) or the
DELICATE/COLD ( ) keypad to increase or
decrease the value of the active digit and the
START (enter) keypad to enter the value of the
digit and advance to the next digit.
>
This option allows the owner to set the vend price for a
normal/cold wash. This vend price will be shown in
the display when NORMAL/COLD is selected.
NOTE: The vend price can be set from 0 to 65,535.
Default vend price is 200.
<
28. Normal/Cold Vend Price “AtS3”
8. Press the START (enter) keypad with the last
active digit. The next option, “AtS4”, will appear
in the display.
NOTE: To program “AtS4” (Heavy/Hot Cycle
Vend Price), refer to option 29. To program other
options, refer to the appropriate section.
How to Exit Programming Feature
Press the DELICATE/WARM (<) keypad until the
control returns to Ready Mode.
NOTE: If the vend price is $100.00 or more, the
fifth digit is “1-6”. If the vend price is $99.99 or
less, the fifth digit is “0”.
CHM507R
Figure 8
<
>
5. Press the NORMAL/COLD ( ) or the
DELICATE/COLD ( ) keypad to increase or
decrease the value of the fifth digit.
F8237901
© Copyright, Alliance Laundry Systems LLC – DO NOT COPY or TRANSMIT
53
Programming Flowcharts
How to Program the Heavy/Hot Vend Price
1. Control must be in Manual Mode. Refer to
Entering the Manual Mode.
<
>
2. Press the NORMAL/COLD ( ) or the
DELICATE/COLD ( ) keypad until “Prog”
appears in the display. Press the START (enter)
keypad and “AtS1” will appear in the display.
<
>
3. Press the NORMAL/COLD ( ) or the
DELICATE/COLD ( ) keypad to scroll through
the programmable options until “AtS4” appears
in the display. The HEAVY/HOT LED will be lit
to show which cycle/temperature price is being
programmed.
4. When “AtS4” appears in the display, press the
START (enter) keypad. There are five digits in
the Heavy/Hot Vend Price. The fifth digit will
appear in the display and will flash one (1)
second on, one (1) second off. Refer to
Figure 9.
NOTE: If the vend price is $100.00 or more, the
fifth digit is “1-6”. If the vend price is $99.99 or
less, the fifth digit is “0”.
6. Press the START (enter) keypad to enter the fifth
digit and display remaining four digits. The
active digit will flash one (1) second on and one
(1) second off.
NOTE: To go back to the current programmable
option without changing the value of the active
digit, press the DELICATE/WARM (<) keypad.
7. Press the NORMAL/COLD ( ) or the
DELICATE/COLD ( ) keypad to increase or
decrease the value of the active digit and the
START (enter) keypad to enter the value of the
digit and advance to the next digit.
>
This option allows the owner to set the vend price for a
perm press/hot wash. This vend price will be shown in
the display when HEAVY/HOT is selected.
NOTE: The vend price can be set from 0 to 65,535.
Default vend price is 200.
<
29. Heavy/Hot Vend Price “AtS4”
8. Press the START (enter) keypad with the last
active digit. The next option, “AtS5”, will appear
in the display.
NOTE: To program “AtS5” (Delicate/Warm Vend
Price), refer to option 30. To program other
options, refer to the appropriate section.
How to Exit Programming Feature
Press the DELICATE/WARM (<) keypad until the
control returns to Ready Mode.
CHM507R
Figure 9
<
>
5. Press the NORMAL/COLD ( ) or the
DELICATE/COLD ( ) keypad to increase or
decrease the value of the fifth digit.
54
© Copyright, Alliance Laundry Systems LLC – DO NOT COPY or TRANSMIT
F8237901
Programming Flowcharts
How to Program the Delicate/Warm Vend
Price
1. Control must be in Manual Mode. Refer to
Entering the Manual Mode.
7. Press the NORMAL/COLD ( ) or the
DELICATE/COLD ( ) keypad to increase or
decrease the value of the active digit and the
START (enter) keypad to enter the value of the
digit and advance to the next digit.
<
>
2. Press the NORMAL/COLD ( ) or the
DELICATE/COLD ( ) keypad until “Prog”
appears in the display. Press the START (enter)
keypad and “AtS1” will appear in the display.
NOTE: To go back to the current programmable
option without changing the value of the active
digit, press the DELICATE/WARM (<) keypad.
>
This option allows the owner to set the vend price for a
perm press/warm wash. This vend price will be shown
in the display when DELICATE/WARM is selected.
6. Press the START (enter) keypad to enter the fifth
digit and display remaining four digits. The
active digit will flash one (1) second on and one
(1) second off.
<
30. Delicate/Warm Vend Price
“AtS5”
<
>
3. Press the NORMAL/COLD ( ) or the
DELICATE/COLD ( ) keypad to scroll through
the programmable options until “AtS5” appears
in the display. The DELICATE/WARM LED will
be lit to show which cycle/temperature price is
being programmed.
4. When “AtS5” appears in the display, press the
START (enter) keypad. There are five digits in
the Delicate/Warm Vend Price. The fifth digit
will appear in the display and will flash one (1)
second on, one (1) second off. Refer to
Figure 10.
8. Press the START (enter) keypad with the last
active digit. The next option, “AtS6”, will appear
in the display.
NOTE: To program “AtS6” (Delicate/Cold Vend
Price), refer to option 31. To program other
options, refer to the appropriate section.
How to Exit Programming Feature
Press the DELICATE/WARM (<) keypad until the
control returns to Ready Mode.
NOTE: If the vend price is $100.00 or more, the
fifth digit is “1-6”. If the vend price is $99.99 or
less, the fifth digit is “0”.
CHM507R
Figure 10
<
>
5. Press the NORMAL/COLD ( ) or the
DELICATE/COLD ( ) keypad to increase or
decrease the value of the fifth digit.
NOTE: The vend price can be set from 0 to 65,535.
Default vend price is 200.
F8237901
© Copyright, Alliance Laundry Systems LLC – DO NOT COPY or TRANSMIT
55
Programming Flowcharts
How to Program the Delicate/Cold Vend
Price
1. Control must be in Manual Mode. Refer to
Entering the Manual Mode.
<
>
2. Press the NORMAL/COLD ( ) or the
DELICATE/COLD ( ) keypad until “Prog”
appears in the display. Press the START (enter)
keypad and “AtS1” will appear in the display.
<
>
3. Press the NORMAL/COLD ( ) or the
DELICATE/COLD ( ) keypad to scroll through
the programmable options until “AtS6” appears
in the display. The DELICATE/COLD LED will
be lit to show which cycle/temperature price is
being programmed.
4. When “AtS6” appears in the display, press the
START (enter) keypad. There are five digits in
the Delicate/Cold Vend Price. The fifth digit will
appear in the display and will flash one (1)
second on, one (1) second off. Refer to Figure 11.
NOTE: If the vend price is $100.00 or more, the
fifth digit is “1-6”. If the vend price is $99.99 or
less, the fifth digit is “0”.
6. Press the START (enter) keypad to enter the fifth
digit and display remaining four digits. The
active digit will flash one (1) second on and one
(1) second off.
NOTE: To go back to the current programmable
option without changing the value of the active
digit, press the DELICATE/WARM (<) keypad.
7. Press the NORMAL/COLD ( ) or the
DELICATE/COLD ( ) keypad to increase or
decrease the value of the active digit and the
START (enter) keypad to enter the value of the
digit and advance to the next digit.
>
This option allows the owner to set the vend price for a
perm press/cold wash. This vend price will be shown
in the display when DELICATE/COLD is selected.
NOTE: The vend price can be set from 0 to 65,535.
Default vend price is 200.
<
31. Delicate/Cold Vend Price “AtS6”
8. Press the START (enter) keypad with the last
active digit. The next option, “AtS7”, will appear
in the display.
NOTE: To program “AtS7” (Quick/Hot Vend
Price), refer to option 32. To program other
options, refer to the appropriate section.
How to Exit Programming Feature
Press the DELICATE/WARM (<) keypad until the
control returns to Ready Mode.
CHM507R
Figure 11
<
>
5. Press the NORMAL/COLD ( ) or the
DELICATE/COLD ( ) keypad to increase or
decrease the value of the fifth digit.
56
© Copyright, Alliance Laundry Systems LLC – DO NOT COPY or TRANSMIT
F8237901
Programming Flowcharts
How to Program the Quick/Hot Vend Price
1. Control must be in Manual Mode. Refer to
Entering the Manual Mode.
<
>
2. Press the NORMAL/COLD ( ) or the
DELICATE/COLD ( ) keypad until “Prog”
appears in the display. Press the START (enter)
keypad and “AtS1” will appear in the display.
<
>
3. Press the NORMAL/COLD ( ) or the
DELICATE/COLD ( ) keypad to scroll through
the programmable options until “AtS7” appears
in the display. The QUICK/HOT LED will be lit
to show which cycle/temperature price is being
programmed.
4. When “AtS7” appears in the display, press the
START (enter) keypad. There are five digits in
the Quick/Hot Vend Price. The fifth digit will
appear in the display and will flash one (1)
second on, one (1) second off. Refer to Figure
12.
NOTE: If the vend price is $100.00 or more, the
fifth digit is “1-6”. If the vend price is $99.99 or
less, the fifth digit is “0”.
6. Press the START (enter) keypad to enter the fifth
digit and display remaining four digits. The
active digit will flash one (1) second on and one
(1) second off.
NOTE: To go back to the current programmable
option without changing the value of the active
digit, press the DELICATE/WARM (<) keypad.
7. Press the NORMAL/COLD ( ) or the
DELICATE/COLD ( ) keypad to increase or
decrease the value of the active digit and the
START (enter) keypad to enter the value of the
digit and advance to the next digit.
>
This option allows the owner to set the vend price for a
delicate/hot wash. This vend price will be shown in the
display when QUICK/HOT is selected.
NOTE: The vend price can be set from 0 to 65,535.
Default vend price is 200.
<
32. Quick/Hot Vend Price “AtS7”
8. Press the START (enter) keypad with the last
active digit. The next option, “AtS8”, will appear
in the display.
NOTE: To program “AtS8” (Quick/Warm Vend
Price), refer to option 33. To program other
options, refer to the appropriate section.
How to Exit Programming Feature
Press the DELICATE/WARM (<) keypad until the
control returns to Ready Mode.
CHM507R
Figure 12
<
>
5. Press the NORMAL/COLD ( ) or the
DELICATE/COLD ( ) keypad to increase or
decrease the value of the fifth digit.
F8237901
© Copyright, Alliance Laundry Systems LLC – DO NOT COPY or TRANSMIT
57
Programming Flowcharts
How to Program the Quick/Warm Vend
Price
1. Control must be in Manual Mode. Refer to
Entering the Manual Mode.
<
>
2. Press the NORMAL/COLD ( ) or the
DELICATE/COLD ( ) keypad until “Prog”
appears in the display. Press the START (enter)
keypad and “AtS1” will appear in the display.
<
>
3. Press the NORMAL/COLD ( ) or the
DELICATE/COLD ( ) keypad to scroll through
the programmable options until “AtS8” appears
in the display. The QUICK/WARM LED will be
lit to show which cycle/temperature price is
being programmed.
4. When “AtS8” appears in the display, press the
START (enter) keypad. There are five digits in
the Quick/Warm Vend Price. The fifth digit will
appear in the display and will flash one (1)
second on, one (1) second off. Refer to
Figure 13.
6. Press the START (enter) keypad to enter the fifth
digit and display remaining four digits. The
active digit will flash one (1) second on and one
(1) second off.
NOTE: To go back to the current programmable
option without changing the value of the active
digit, press the DELICATE/WARM (<) keypad.
7. Press the NORMAL/COLD ( ) or the
DELICATE/COLD ( ) keypad to increase or
decrease the value of the active digit and the
START (enter) keypad to enter the value of the
digit and advance to the next digit.
>
This option allows the owner to set the vend price for a
delicate/warm wash. This vend price will be shown in
the display when QUICK/WARM is selected.
NOTE: The vend price can be set from 0 to 65,535.
Default vend price is 200.
<
33. Quick/Warm Vend Price “AtS8”
8. Press the START (enter) keypad with the last
active digit. The next option, “AtS9”, will appear
in the display.
NOTE: To program “AtS9” (Quick/Cold Vend
Price), refer to option 34. To program other
options, refer to the appropriate section.
How to Exit Programming Feature
Press the DELICATE/WARM (<) keypad until the
control returns to Ready Mode.
NOTE: If the vend price is $100.00 or more, the
fifth digit is “1-6”. If the vend price is $99.99 or
less, the fifth digit is “0”.
CHM507R
Figure 13
<
>
5. Press the NORMAL/COLD ( ) or the
DELICATE/COLD ( ) keypad to increase or
decrease the value of the fifth digit.
58
© Copyright, Alliance Laundry Systems LLC – DO NOT COPY or TRANSMIT
F8237901
Programming Flowcharts
How to Program the Quick/Cold Vend
Price
1. Control must be in Manual Mode. Refer to
Entering the Manual Mode.
<
>
2. Press the NORMAL/COLD ( ) or the
DELICATE/COLD ( ) keypad until “Prog”
appears in the display. Press the START (enter)
keypad and “AtS1” will appear in the display.
<
>
3. Press the NORMAL/COLD ( ) or the
DELICATE/COLD ( ) keypad to scroll through
the programmable options until “AtS9” appears
in the display. The QUICK/COLD LED will be
lit to show which cycle/temperature price is
being programmed.
4. When “AtS9” appears in the display, press the
START (enter) keypad. There are five digits in
the Quick/Cold Vend Price. The fifth digit will
appear in the display and will flash one (1)
second on, one (1) second off. Refer to Figure
14.
6. Press the START (enter) keypad to enter the fifth
digit and display remaining four digits. The
active digit will flash one (1) second on and one
(1) second off.
NOTE: To go back to the current programmable
option without changing the value of the active
digit, press the DELICATE/WARM (<) keypad.
7. Press the NORMAL/COLD ( ) or the
DELICATE/COLD ( ) keypad to increase or
decrease the value of the active digit and the
START (enter) keypad to enter the value of the
digit and advance to the next digit.
>
This option allows the owner to set the vend price for a
delicate/cold wash. This vend price will be shown in
the display when QUICK/COLD is selected.
NOTE: The vend price can be set from 0 to 65,535.
Default vend price is 200.
<
34. Quick/Cold Vend Price “AtS9”
8. Press the START (enter) keypad with the last
active digit. The next option, “rtC-”, will appear
in the display.
NOTE: To program “rtC-” (Real Time Clock),
refer to option 35. To program other options, refer
to the appropriate section.
How to Exit Programming Feature
Press the DELICATE/WARM (<) keypad until the
control returns to Ready Mode.
NOTE: If the vend price is $100.00 or more, the
fifth digit is “1-6”. If the vend price is $99.99 or
less, the fifth digit is “0”.
CHM507R
Figure 14
<
>
5. Press the NORMAL/COLD ( ) or the
DELICATE/COLD ( ) keypad to increase or
decrease the value of the fifth digit.
F8237901
© Copyright, Alliance Laundry Systems LLC – DO NOT COPY or TRANSMIT
59
Programming Flowcharts
35. Set Real-Time Clock “rtC-”
This option allows the owner to set the control’s
internal clock to the correct time and date.
How to Program the Time and Date
1. Control must be in Manual Mode. Refer to
Entering the Manual Mode.
<
>
2. Press the NORMAL/COLD ( ) or the
DELICATE/COLD ( ) keypad until “Prog”
appears in the display. Press the START (enter)
keypad and “AtS1” will appear in the display.
If programming Daylight Saving, “rtC7”, “on”
enables Daylight Saving Time and “oFF” disables
Daylight Saving Time.
7. Press the START (enter) keypad when the correct
time or date appears in the display. The next Set
Real-Time Clock option will appear in the
display.
<
>
3. Press the NORMAL/COLD ( ) or the
DELICATE/COLD ( ) keypad to scroll through
the programmable options until “rtC-” appears in
the display. Press the START keypad and “rtC1”
will appear in the display.
NOTE: The hours will be displayed in military
time. For day of week, Sunday is considered day
one (1), Monday is day two (2) and so on. For year,
the year 2000 is “00”, the year 2001 is “01” and so
on.
How to Exit Programming Feature
<
>
4. Press the NORMAL/COLD ( ) or the
DELICATE/COLD ( ) keypad to scroll through
the programmable options. Refer to Table 13.
NOTE: To program “SPA-” (Special Vend A Data),
press the DELICATE/WARM (<) keypad and refer
to option 36. To program other options, refer to the
appropriate section.
“rtC1”
Programs Minutes (0-59)
“rtC2”
Programs Hours (0-23)
“rtC3”
Programs Day of Week (1-7)
“rtC4”
Programs Date of Month (1-31)
“rtC5”
Programs Month (1-12)
“rtC6”
Programs Year (0-99)
“rtC7”
Programs Daylight Saving
(ON*, OFF)
Press the DELICATE/WARM (<) keypad until the
control returns to Ready Mode.
*Factory Default Setting
Table 13
5. When the desired option appears in the display,
press the START (enter) keypad. The current
value will appear in the display.
<
>
6. Press the NORMAL/COLD ( ) or the
DELICATE/COLD ( ) keypad to increase or
decrease the minutes, hours, day of week, date of
the month, month, year to the correct time or
date.
60
© Copyright, Alliance Laundry Systems LLC – DO NOT COPY or TRANSMIT
F8237901
Programming Flowcharts
Special Vend A is used to change the standard vend
prices for special occasions. The special vend can be
programmed to start and end on a specific day or days
of the week.
The owner may also turn the Special Vend A option on
or off if desired.
How to Program Special Vend A Days
Enable “SA01”
1. Control must be in Manual Mode. Refer to
Entering the Manual Mode.
<
>
2. Press the NORMAL/COLD ( ) or the
DELICATE/COLD ( ) keypad until “Prog”
appears in the display. Press the START (enter)
keypad and “AtS1” will appear in the display.
<
>
3. Press the NORMAL/COLD ( ) or the
DELICATE/COLD ( ) keypad to scroll through
the programmable options until “SPA-” appears
in the display. Press the START (enter) keypad
and “SA01” will appear in the display.
F8237901
5. Locate the desired number in the first column of
Table 14 on the following pages.
6. Press the NORMAL/COLD ( ) or the
DELICATE/COLD ( ) keypad to increase or
decrease the current number until correct.
>
This option allows the owner to set the day or days of
a special vend.
4. When “SA01” appears in the display, press the
START (enter) keypad. A number will appear in
the display that corresponds to the current
Special Vend A Days Enable Programming
Value.
<
36. Special Vend A Data “SPA-”
7. Press the START (enter) keypad when the correct
number appears in the display. The next Special
Vend A option, “SA02”, will appear in the
display.
NOTE: To program “SA02” (Special Vend A Start
Hour), continue to the next Special Vend A option.
To program other options, press the DELICATE/
WARM (<) keypad and refer to the appropriate
section.
How to Exit Programming Feature
Press the DELICATE/WARM (<) keypad until the
control returns to Ready Mode.
© Copyright, Alliance Laundry Systems LLC – DO NOT COPY or TRANSMIT
61
Programming Flowcharts
How to Read Table 14
To determine the correct number required to program
the Special Vend Days Enable, use the following table.
The Special Vend Value column contains the number
required in step 6. The other columns correspond to
individual days.
Each column of days contains a unique combination of
the words “ON” and “OFF” that indicates if that
column’s day is turned on or off when the value is
entered. Select the desired combination of days and
enter the number found in the value column.
“SA01”
SPECIAL VEND
VALUE
SAT
FRI
THUR
WED
TUE
MON
SUN
ON/OFF
0*
OFF
OFF
OFF
OFF
OFF
OFF
OFF
OFF
3
OFF
OFF
OFF
OFF
OFF
OFF
ON
ON
5
OFF
OFF
OFF
OFF
OFF
ON
OFF
ON
7
OFF
OFF
OFF
OFF
OFF
ON
ON
ON
9
OFF
OFF
OFF
OFF
ON
OFF
OFF
ON
11
OFF
OFF
OFF
OFF
ON
OFF
ON
ON
13
OFF
OFF
OFF
OFF
ON
ON
OFF
ON
15
OFF
OFF
OFF
OFF
ON
ON
ON
ON
17
OFF
OFF
OFF
ON
OFF
OFF
OFF
ON
19
OFF
OFF
OFF
ON
OFF
OFF
ON
ON
21
OFF
OFF
OFF
ON
OFF
ON
OFF
ON
23
OFF
OFF
OFF
ON
OFF
ON
ON
ON
25
OFF
OFF
OFF
ON
ON
OFF
OFF
ON
27
OFF
OFF
OFF
ON
ON
OFF
ON
ON
29
OFF
OFF
OFF
ON
ON
ON
OFF
ON
31
OFF
OFF
OFF
ON
ON
ON
ON
ON
33
OFF
OFF
ON
OFF
OFF
OFF
OFF
ON
35
OFF
OFF
ON
OFF
OFF
OFF
ON
ON
37
OFF
OFF
ON
OFF
OFF
ON
OFF
ON
39
OFF
OFF
ON
OFF
OFF
ON
ON
ON
41
OFF
OFF
ON
OFF
ON
OFF
OFF
ON
43
OFF
OFF
ON
OFF
ON
OFF
ON
ON
45
OFF
OFF
ON
OFF
ON
ON
OFF
ON
47
OFF
OFF
ON
OFF
ON
ON
ON
ON
49
OFF
OFF
ON
ON
OFF
OFF
OFF
ON
51
OFF
OFF
ON
ON
OFF
OFF
ON
ON
53
OFF
OFF
ON
ON
OFF
ON
OFF
ON
55
OFF
OFF
ON
ON
OFF
ON
ON
ON
57
OFF
OFF
ON
ON
ON
OFF
OFF
ON
59
OFF
OFF
ON
ON
ON
OFF
ON
ON
61
OFF
OFF
ON
ON
ON
ON
OFF
ON
63
OFF
OFF
ON
ON
ON
ON
ON
ON
65
OFF
ON
OFF
OFF
OFF
OFF
OFF
ON
67
OFF
ON
OFF
OFF
OFF
OFF
ON
ON
*Factory default setting
Table 14 (continued)
62
© Copyright, Alliance Laundry Systems LLC – DO NOT COPY or TRANSMIT
F8237901
Programming Flowcharts
Table 14 (continued)
“SA01”
SPECIAL VEND
VALUE
SAT
FRI
THUR
WED
TUE
MON
SUN
ON/OFF
69
71
73
75
77
79
81
83
85
87
89
91
93
95
97
99
101
103
105
107
109
111
113
115
117
119
121
123
125
127
129
131
133
135
137
139
141
143
145
147
149
151
153
155
OFF
OFF
OFF
OFF
OFF
OFF
OFF
OFF
OFF
OFF
OFF
OFF
OFF
OFF
OFF
OFF
OFF
OFF
OFF
OFF
OFF
OFF
OFF
OFF
OFF
OFF
OFF
OFF
OFF
OFF
ON
ON
ON
ON
ON
ON
ON
ON
ON
ON
ON
ON
ON
ON
ON
ON
ON
ON
ON
ON
ON
ON
ON
ON
ON
ON
ON
ON
ON
ON
ON
ON
ON
ON
ON
ON
ON
ON
ON
ON
ON
ON
ON
ON
OFF
OFF
OFF
OFF
OFF
OFF
OFF
OFF
OFF
OFF
OFF
OFF
OFF
OFF
OFF
OFF
OFF
OFF
OFF
OFF
OFF
OFF
OFF
OFF
OFF
OFF
OFF
OFF
ON
ON
ON
ON
ON
ON
ON
ON
ON
ON
ON
ON
ON
ON
ON
ON
OFF
OFF
OFF
OFF
OFF
OFF
OFF
OFF
OFF
OFF
OFF
OFF
OFF
OFF
OFF
OFF
OFF
OFF
OFF
OFF
ON
ON
ON
ON
ON
ON
ON
ON
OFF
OFF
OFF
OFF
OFF
OFF
OFF
OFF
ON
ON
ON
ON
ON
ON
ON
ON
OFF
OFF
OFF
OFF
OFF
OFF
OFF
OFF
ON
ON
ON
ON
ON
ON
OFF
OFF
ON
ON
ON
ON
OFF
OFF
OFF
OFF
ON
ON
ON
ON
OFF
OFF
OFF
OFF
ON
ON
ON
ON
OFF
OFF
OFF
OFF
ON
ON
ON
ON
OFF
OFF
OFF
OFF
ON
ON
ON
ON
OFF
OFF
OFF
OFF
ON
ON
ON
ON
OFF
OFF
ON
ON
OFF
OFF
ON
ON
OFF
OFF
ON
ON
OFF
OFF
ON
ON
OFF
OFF
ON
ON
OFF
OFF
ON
ON
OFF
OFF
ON
ON
OFF
OFF
ON
ON
OFF
OFF
ON
ON
OFF
OFF
ON
ON
OFF
OFF
OFF
ON
OFF
ON
OFF
ON
OFF
ON
OFF
ON
OFF
ON
OFF
ON
OFF
ON
OFF
ON
OFF
ON
OFF
ON
OFF
ON
OFF
ON
OFF
ON
OFF
ON
OFF
ON
OFF
ON
OFF
ON
OFF
ON
OFF
ON
OFF
ON
OFF
ON
ON
ON
ON
ON
ON
ON
ON
ON
ON
ON
ON
ON
ON
ON
ON
ON
ON
ON
ON
ON
ON
ON
ON
ON
ON
ON
ON
ON
ON
ON
ON
ON
ON
ON
ON
ON
ON
ON
ON
ON
ON
ON
ON
ON
Table 14 (continued)
F8237901
© Copyright, Alliance Laundry Systems LLC – DO NOT COPY or TRANSMIT
63
Programming Flowcharts
Table 14 (continued)
“SA01”
SPECIAL VEND
VALUE
157
159
161
163
165
167
169
171
173
175
177
179
181
183
185
187
189
191
193
195
197
199
201
203
205
207
209
211
213
215
217
219
221
223
225
227
229
231
233
235
237
239
241
243
SAT
FRI
THUR
WED
TUE
MON
SUN
ON/OFF
ON
ON
ON
ON
ON
ON
ON
ON
ON
ON
ON
ON
ON
ON
ON
ON
ON
ON
ON
ON
ON
ON
ON
ON
ON
ON
ON
ON
ON
ON
ON
ON
ON
ON
ON
ON
ON
ON
ON
ON
ON
ON
ON
ON
OFF
OFF
OFF
OFF
OFF
OFF
OFF
OFF
OFF
OFF
OFF
OFF
OFF
OFF
OFF
OFF
OFF
OFF
ON
ON
ON
ON
ON
ON
ON
ON
ON
ON
ON
ON
ON
ON
ON
ON
ON
ON
ON
ON
ON
ON
ON
ON
ON
ON
OFF
OFF
ON
ON
ON
ON
ON
ON
ON
ON
ON
ON
ON
ON
ON
ON
ON
ON
OFF
OFF
OFF
OFF
OFF
OFF
OFF
OFF
OFF
OFF
OFF
OFF
OFF
OFF
OFF
OFF
ON
ON
ON
ON
ON
ON
ON
ON
ON
ON
ON
ON
OFF
OFF
OFF
OFF
OFF
OFF
OFF
OFF
ON
ON
ON
ON
ON
ON
ON
ON
OFF
OFF
OFF
OFF
OFF
OFF
OFF
OFF
ON
ON
ON
ON
ON
ON
ON
ON
OFF
OFF
OFF
OFF
OFF
OFF
OFF
OFF
ON
ON
ON
ON
OFF
OFF
OFF
OFF
ON
ON
ON
ON
OFF
OFF
OFF
OFF
ON
ON
ON
ON
OFF
OFF
OFF
OFF
ON
ON
ON
ON
OFF
OFF
OFF
OFF
ON
ON
ON
ON
OFF
OFF
OFF
OFF
ON
ON
ON
ON
OFF
OFF
ON
ON
OFF
OFF
ON
ON
OFF
OFF
ON
ON
OFF
OFF
ON
ON
OFF
OFF
ON
ON
OFF
OFF
ON
ON
OFF
OFF
ON
ON
OFF
OFF
ON
ON
OFF
OFF
ON
ON
OFF
OFF
ON
ON
OFF
OFF
ON
ON
OFF
OFF
OFF
ON
OFF
ON
OFF
ON
OFF
ON
OFF
ON
OFF
ON
OFF
ON
OFF
ON
OFF
ON
OFF
ON
OFF
ON
OFF
ON
OFF
ON
OFF
ON
OFF
ON
OFF
ON
OFF
ON
OFF
ON
OFF
ON
OFF
ON
OFF
ON
OFF
ON
ON
ON
ON
ON
ON
ON
ON
ON
ON
ON
ON
ON
ON
ON
ON
ON
ON
ON
ON
ON
ON
ON
ON
ON
ON
ON
ON
ON
ON
ON
ON
ON
ON
ON
ON
ON
ON
ON
ON
ON
ON
ON
ON
ON
Table 14 (continued)
64
© Copyright, Alliance Laundry Systems LLC – DO NOT COPY or TRANSMIT
F8237901
Programming Flowcharts
Table 14 (continued)
“SA01”
SPECIAL VEND
VALUE
245
247
249
251
253
255
SAT
FRI
THUR
WED
TUE
MON
SUN
ON/OFF
ON
ON
ON
ON
ON
ON
ON
ON
ON
ON
ON
ON
ON
ON
ON
ON
ON
ON
ON
ON
ON
ON
ON
ON
OFF
OFF
ON
ON
ON
ON
ON
ON
OFF
OFF
ON
ON
OFF
ON
OFF
ON
OFF
ON
ON
ON
ON
ON
ON
ON
Table 14
F8237901
© Copyright, Alliance Laundry Systems LLC – DO NOT COPY or TRANSMIT
65
Programming Flowcharts
How to Program Special Vend A Start
Hour “SA02”
How to Program Special Vend A Start
Minute “SA03”
This option allows the owner to set the hour that
Special Vend A will begin, from 0-23.
This option allows the owner to set the minute that
Special Vend A will begin, from 0-59.
2. When “SA02” appears in the display, press the
START (enter) keypad. The current start time (in
military time) will appear in the display.
2. When “SA03” appears in the display, press the
START (enter) keypad. The current start minute
will appear in the display.
<
>
3. Press the NORMAL/COLD ( ) or the
DELICATE/COLD ( ) keypad to increase or
decrease the start hour to the desired hour.
4. Press the START (enter) keypad when the correct
hour appears in the display. The next Special Vend
A option, “SA03”, will appear in the display.
NOTE: To program “SA03” (Special Vend A Start
Minute), continue to next Special Vend A option. To
program other options, press the DELICATE/
WARM (<) keypad and refer to the appropriate
section.
How to Exit Programming Feature
<
>
3. Press the NORMAL/COLD ( ) or the
DELICATE/COLD ( ) keypad to increase or
decrease the start minute to the desired minute.
<
<
NOTE: The hours will be displayed in military
time (0-23).
>
1. Press the NORMAL/COLD ( ) or the
DELICATE/COLD ( ) keypad to scroll through
the programmable Special Vend A options until
“SA03” appears in the display.
>
1. Press the NORMAL/COLD ( ) or the
DELICATE/COLD ( ) keypad to scroll through
the programmable Special Vend A options until
“SA02” appears in the display.
4. Press the START (enter) keypad when the correct
minute appears in the display. The next Special
Vend A option, “SA04”, will appear in the
display.
NOTE: To program “SA04” (Special Vend A
Length in Hours), continue to next Special Vend A
option. To program other options, press the
DELICATE/WARM (<) keypad and refer to the
appropriate section.
How to Exit Programming Feature
Press the DELICATE/WARM (<) keypad until the
control returns to Ready Mode.
Press the DELICATE/WARM (<) keypad until the
control returns to Ready Mode.
66
© Copyright, Alliance Laundry Systems LLC – DO NOT COPY or TRANSMIT
F8237901
Programming Flowcharts
How to Program Special Vend A Length in
Hours “SA04”
How to Program Special Vend A Start
Month “SA05”
This option allows the owner to set the length in hours
for Special Vend A, from 0-24.
This option allows the owner to set the month that
Special Vend A will begin, from 1-12.
4. Press the START (enter) keypad when the correct
hour appears in the display. The next Special Vend
A option, “SA05”, will appear in the display.
NOTE: To program “SA05” (Special Vend A Start
Month), continue to next Special Vend A option. To
program other options, press the DELICATE/
WARM (<) keypad and refer to the appropriate
section.
How to Exit Programming Feature
Press the DELICATE/WARM (<) keypad until the
control returns to Ready Mode.
>
2. When “SA05” appears in the display, press the
START (enter) keypad. The current start month
will appear in the display.
3. Press the NORMAL/COLD ( ) or the
DELICATE/COLD ( ) keypad to increase or
decrease the start month to the desired month.
>
<
>
3. Press the NORMAL/COLD ( ) or the
DELICATE/COLD ( ) keypad to increase or
decrease the current length of hours to the desired
number of hours.
1. Press the NORMAL/COLD ( ) or the
DELICATE/COLD ( ) keypad to scroll through
the programmable Special Vend A options until
“SA05” appears in the display.
<
2. When “SA04” appears in the display, press the
START (enter) keypad. The current length in
hours will appear in the display.
NOTE: If Special Vend A Start Month, Start Date,
End Month, or End Date are programmed to zero
(default is zero), the Special Vend A will be active
every week on the days programmed in Table 14.
<
<
>
1. Press the NORMAL/COLD ( ) or the
DELICATE/COLD ( ) keypad to scroll through
the programmable Special Vend A options until
“SA04” appears in the display.
If “0” is selected and Special Vend A is on,
Special Vend A will occur at the time and days of
week selected, regardless of the month.
4. Press the START (enter) keypad when the correct
month appears in the display. The next Special
Vend A option, “SA06”, will appear in the
display.
NOTE: To program “SA06” (Special Vend A Start
Date), continue to next Special Vend A option. To
program other options, press the DELICATE/
WARM (<) keypad and refer to the appropriate
section.
How to Exit Programming Feature
Press the DELICATE/WARM (<) keypad until the
control returns to Ready Mode.
F8237901
© Copyright, Alliance Laundry Systems LLC – DO NOT COPY or TRANSMIT
67
Programming Flowcharts
How to Program Special Vend A Start Date
“SA06”
How to Program Special Vend A End
Month “SA08”
This option allows the owner to set the date that
Special Vend A will begin, from 1-31.
This option allows the owner to set the month that
Special Vend A will end, from 1-12.
2. When “SA06” appears in the display, press the
START (enter) keypad. The current start date will
appear in the display.
2. When “SA08” appears in the display, press the
START (enter) keypad. The current end month
will appear in the display.
3. Press the NORMAL/COLD ( ) or the
DELICATE/COLD ( ) keypad to increase or
decrease the start date to the desired date.
3. Press the NORMAL/COLD ( ) or the
DELICATE/COLD ( ) keypad to increase or
decrease the end month to the desired month.
>
<
<
>
<
<
>
1. Press the NORMAL/COLD ( ) or the
DELICATE/COLD ( ) keypad to scroll through
the programmable Special Vend A options until
“SA08” appears in the display.
>
1. Press the NORMAL/COLD ( ) or the
DELICATE/COLD ( ) keypad to scroll through
the programmable Special Vend A options until
“SA06” appears in the display.
If “0” is selected and Special Vend A is on,
Special Vend A will occur at the time and days of
week selected, regardless of the date.
If “0” is selected and Special Vend A is on,
Special Vend A will occur at the time and day of
week selected, regardless of the month.
4. Press the START (enter) keypad when the correct
date appears in the display. The next Special Vend
A option, “SA08”, will appear in the display.
4. Press the START (enter) keypad when the correct
month appears in the display. The next Special
Vend A option, “SA09”, will appear in the
display.
NOTE: To program “SA08” (Special Vend A End
Month), continue to next Special Vend A option. To
program other options, press the DELICATE/
WARM (<) keypad and refer to the appropriate
section.
How to Exit Programming Feature
Press the DELICATE/WARM (<) keypad until the
control returns to Ready Mode.
68
NOTE: To program “SA09” (Special Vend A End
Date), continue to next Special Vend A option. To
program other options, press the DELICATE/
WARM (<) keypad and refer to the appropriate
section.
How to Exit Programming Feature
Press the DELICATE/WARM (<) keypad until the
control returns to Ready Mode.
© Copyright, Alliance Laundry Systems LLC – DO NOT COPY or TRANSMIT
F8237901
Programming Flowcharts
How to Program Special Vend A End Date
“SA09”
This option allows the owner to set the date that
Special Vend A will end, from 1-31.
<
>
1. Press the NORMAL/COLD ( ) or the
DELICATE/COLD ( ) keypad to scroll through
the programmable Special Vend A options until
“SA09” appears in the display.
2. When “SA09” appears in the display, press the
START (enter) keypad. The current end date will
appear in the display.
4. Press the START (enter) keypad when the correct
date appears in the display. The next Special Vend
A option, “SA11”, will appear in the display.
NOTE: To program “SA11” (Special Vend A
Normal/Hot Vend Price), continue to next Special
Vend A option. To program other options, press the
DELICATE/WARM (<) keypad and refer to the
appropriate section.
How to Exit Programming Feature
Press the DELICATE/WARM (<) keypad until the
control returns to Ready Mode.
<
>
3. Press the NORMAL/COLD ( ) or the
DELICATE/COLD ( ) keypad to increase or
decrease the end date to the desired date.
If “0” is selected and Special Vend A is on,
Special Vend A will occur at the time or days of
week selected, regardless of the date.
F8237901
© Copyright, Alliance Laundry Systems LLC – DO NOT COPY or TRANSMIT
69
Programming Flowcharts
<
>
1. Press the NORMAL/COLD ( ) or the
DELICATE/COLD ( ) keypad to scroll through
the programmable Special Vend A options until
“SA11” appears in the display.
2. When “SA11” appears in the display, press the
START (enter) keypad. There are five digits in
the Special Vend A Normal/Hot Vend Price. The
fifth digit will appear in the display and will flash
one (1) second on and one (1) second off. Refer
to Figure 15.
NOTE: If the vend price is $100.00 or more, the
fifth digit is “1-6”. If the vend price is $99.99 or
less, the fifth digit is “0”.
5. Press the NORMAL/COLD ( ) or the
DELICATE/COLD ( ) keypad to increase or
decrease the value of the active digit and the
START keypad to enter the value of the digit and
advance to the next digit.
>
This option allows the owner to set the vend price for a
NORMAL/HOT wash in Special Vend A. The
corresponding LED will be lit while programming.
NOTE: To go back to the current programmable
Special Vend A option without changing the value
of the active digit, press the DELICATE/WARM
(<) keypad.
<
How to Program Special Vend A Normal/
Hot Vend Price “SA11”
6. Press the START (enter) keypad with the last
active digit. The next Special Vend A option,
“SA12”, will appear in the display.
NOTE: To program “SA12” (Special Vend A
Normal/Warm Vend Price), continue to next
Special Vend A option. To program other options,
press the DELICATE/WARM (<) keypad and refer
to the appropriate section.
How to Exit Programming Feature
Press the DELICATE/WARM (<) keypad until the
control returns to Ready Mode.
CHM507R
Figure 15
<
>
3. Press the NORMAL/COLD ( ) or the
DELICATE/COLD ( ) keypad to increase or
decrease the value of the fifth digit.
NOTE: The vend price can be set from 0 to 65,535.
4. Press the START (enter) keypad to enter the fifth
digit and display remaining four digits. The
active digit will flash one (1) second on and one
(1) second off.
70
© Copyright, Alliance Laundry Systems LLC – DO NOT COPY or TRANSMIT
F8237901
Programming Flowcharts
<
>
1. Press the NORMAL/COLD ( ) or the
DELICATE/COLD ( ) keypad to scroll through
the programmable Special Vend A options until
“SA12” appears in the display.
2. When “SA12” appears in the display, press the
START (enter) keypad. There are five digits in
the Special Vend A Normal/Warm Vend Price.
The fifth digit will appear in the display and will
flash one (1) second on and one (1) second off.
Refer to Figure 16.
NOTE: If the vend price is $100.00 or more, the
fifth digit is “1-6”. If the vend price is $99.99 or
less, the fifth digit is “0”.
5. Press the NORMAL/COLD ( ) or the
DELICATE/COLD ( ) keypad to increase or
decrease the value of the active digit and the
START keypad to enter the value of the digit and
advance to the next digit.
>
This option allows the owner to set the vend price for a
NORMAL/WARM wash in Special Vend A. The
corresponding LED will be lit while programming.
NOTE: To go back to the current programmable
Special Vend A option without changing the value
of the active digit, press the DELICATE/WARM
(<) keypad.
<
How to Program Special Vend A Normal/
Warm Vend Price “SA12”
6. Press the START (enter) keypad with the last
active digit. The next Special Vend A option,
“SA13”, will appear in the display.
NOTE: To program “SA13” (Special Vend A
Normal/cold Vend Price), continue to next Special
Vend A option. To program other options, press the
DELICATE/WARM (<) keypad and refer to the
appropriate section.
How to Exit Programming Feature
Press the DELICATE/WARM (<) keypad until the
control returns to Ready Mode.
CHM507R
Figure 16
<
>
3. Press the NORMAL/COLD ( ) or the
DELICATE/COLD ( ) keypad to increase or
decrease the value of the fifth digit.
NOTE: The vend price can be set from 0 to 65,535.
4. Press the START (enter) keypad to enter the fifth
digit and display remaining four digits. The
active digit will flash one (1) second on and one
(1) second off.
F8237901
© Copyright, Alliance Laundry Systems LLC – DO NOT COPY or TRANSMIT
71
Programming Flowcharts
<
>
1. Press the NORMAL/COLD ( ) or the
DELICATE/COLD ( ) keypad to scroll through
the programmable Special Vend A options until
“SA13” appears in the display.
2. When “SA13” appears in the display, press the
START (enter) keypad. There are five digits in
the Special Vend A NORMAL/COLD Vend
Price. The fifth digit will appear in the display
and will flash one (1) second on and one (1)
second off. Refer to Figure 17.
NOTE: If the vend price is $100.00 or more, the
fifth digit is “1-6”. If the vend price is $99.99 or
less, the fifth digit is “0”.
5. Press the NORMAL/COLD ( ) or the
DELICATE/COLD ( ) keypad to increase or
decrease the value of the active digit and the
START keypad to enter the value of the digit and
advance to the next digit.
>
This option allows the owner to set the vend price for a
NORMAL/COLD wash in Special Vend A. The
corresponding LED will be lit while programming.
NOTE: To go back to the current programmable
Special Vend A option without changing the value
of the active digit, press the DELICATE/WARM
(<) keypad.
<
How to Program Special Vend A Normal/
Cold Vend Price “SA13”
6. Press the START (enter) keypad with the last
active digit. The next Special Vend A option,
“SA14”, will appear in the display.
NOTE: To program “SA14” (Special Vend A
Heavy/Hot Vend Price), continue to next Special
Vend A option. To program other options, press the
DELICATE/WARM (<) keypad and refer to the
appropriate section.
How to Exit Programming Feature
Press the DELICATE/WARM (<) keypad until the
control returns to Ready Mode.
CHM507R
Figure 17
<
>
3. Press the NORMAL/COLD ( ) or the
DELICATE/COLD ( ) keypad to increase or
decrease the value of the fifth digit.
NOTE: The vend price can be set from 0 to 65,535.
4. Press the START (enter) keypad to enter the fifth
digit and display remaining four digits. The
active digit will flash one (1) second on and one
(1) second off.
72
© Copyright, Alliance Laundry Systems LLC – DO NOT COPY or TRANSMIT
F8237901
Programming Flowcharts
<
>
1. Press the NORMAL/COLD ( ) or the
DELICATE/COLD ( ) keypad to scroll through
the programmable Special Vend A options until
“SA14” appears in the display.
2. When “SA14” appears in the display, press the
START (enter) keypad. There are five digits in
the Special Vend A Heavy/Hot Vend Price. The
fifth digit will appear in the display and will flash
one (1) second on and one (1) second off. Refer
to Figure 18.
NOTE: If the vend price is $100.00 or more, the
fifth digit is “1-6”. If the vend price is $99.99 or
less, the fifth digit is “0”.
5. Press the NORMAL/COLD ( ) or the
DELICATE/COLD ( ) keypad to increase or
decrease the value of the active digit and the
START keypad to enter the value of the digit and
advance to the next digit.
>
This option allows the owner to set the vend price for a
HEAVY/HOT wash in Special Vend A. The
corresponding LED will be lit while programming.
NOTE: To go back to the current programmable
Special Vend A option without changing the value
of the active digit, press the DELICATE/WARM
(<) keypad.
<
How to Program Special Vend A Heavy/
Hot Vend Price “SA14”
6. Press the START (enter) keypad with the last
active digit. The next Special Vend A option,
“SA15”, will appear in the display.
NOTE: To program “SA15” (Special Vend A
Delicate/Warm Vend Price), continue to next
Special Vend A option. To program other options,
press the DELICATE/WARM (<) keypad and refer
to the appropriate section.
How to Exit Programming Feature
Press the DELICATE/WARM (<) keypad until the
control returns to Ready Mode.
CHM507R
Figure 18
<
>
3. Press the NORMAL/COLD ( ) or the
DELICATE/COLD ( ) keypad to increase or
decrease the value of the fifth digit.
NOTE: The vend price can be set from 0 to 65,535.
4. Press the START (enter) keypad to enter the fifth
digit and display remaining four digits. The
active digit will flash one (1) second on and one
(1) second off.
F8237901
© Copyright, Alliance Laundry Systems LLC – DO NOT COPY or TRANSMIT
73
Programming Flowcharts
<
>
1. Press the NORMAL/COLD ( ) or the
DELICATE/COLD ( ) keypad to scroll through
the programmable Special Vend A options until
“SA15” appears in the display.
2. When “SA15” appears in the display, press the
START (enter) keypad. There are five digits in
the Special Vend A Delicate/Warm Vend Price.
The fifth digit will appear in the display and will
flash one (1) second on and one (1) second off.
Refer to Figure 19.
NOTE: If the vend price is $100.00 or more, the
fifth digit is “1-6”. If the vend price is $99.99 or
less, the fifth digit is “0”.
5. Press the NORMAL/COLD ( ) or the
DELICATE/COLD ( ) keypad to increase or
decrease the value of the active digit and the
START keypad to enter the value of the digit and
advance to the next digit.
>
This option allows the owner to set the vend price for a
DELICATE/WARM wash in Special Vend A. The
corresponding LED will be lit while programming.
NOTE: To go back to the current programmable
Special Vend A option without changing the value
of the active digit, press the DELICATE/WARM
(<) keypad.
<
How to Program Special Vend A Delicate/
Warm Vend Price “SA15”
6. Press the START (enter) keypad with the last
active digit. The next Special Vend A option,
“SA16”, will appear in the display.
NOTE: To program “SA16” (Special Vend A
Delicate/Cold Vend Price), continue to next Special
Vend A option. To program other options, press the
DELICATE/WARM (<) keypad and refer to the
appropriate section.
How to Exit Programming Feature
Press the DELICATE/WARM (<) keypad until the
control returns to Ready Mode.
CHM507R
Figure 19
<
>
3. Press the NORMAL/COLD ( ) or the
DELICATE/COLD ( ) keypad to increase or
decrease the value of the fifth digit.
NOTE: The vend price can be set from 0 to 65,535.
4. Press the START (enter) keypad to enter the fifth
digit and display remaining four digits. The
active digit will flash one (1) second on and one
(1) second off.
74
© Copyright, Alliance Laundry Systems LLC – DO NOT COPY or TRANSMIT
F8237901
Programming Flowcharts
<
>
1. Press the NORMAL/COLD ( ) or the
DELICATE/COLD ( ) keypad to scroll through
the programmable Special Vend A options until
“SA16” appears in the display.
2. When “SA16” appears in the display, press the
START (enter) keypad. There are five digits in
the Special Vend A Delicate/Cold Vend Price.
The fifth digit will appear in the display and will
flash one (1) second on and one (1) second off.
Refer to Figure 20.
NOTE: If the vend price is $100.00 or more, the
fifth digit is “1-6”. If the vend price is $99.99 or
less, the fifth digit is “0”.
5. Press the NORMAL/COLD ( ) or the
DELICATE/COLD ( ) keypad to increase or
decrease the value of the active digit and the
START keypad to enter the value of the digit and
advance to the next digit.
>
This option allows the owner to set the vend price for a
DELICATE/COLD wash in Special Vend A. The
corresponding LED will be lit while programming.
NOTE: To go back to the current programmable
Special Vend A option without changing the value
of the active digit, press the DELICATE/WARM
(<) keypad.
<
How to Program Special Vend A Delicate/
Cold Vend Price “SA16”
6. Press the START (enter) keypad with the last
active digit. The next Special Vend A option,
“SA17”, will appear in the display.
NOTE: To program “SA17” (Special Vend A
Quick/Hot Vend Price), continue to next Special
Vend A option. To program other options, press the
DELICATE/WARM (<) keypad and refer to the
appropriate section.
How to Exit Programming Feature
Press the DELICATE/WARM (<) keypad until the
control returns to Ready Mode.
CHM507R
Figure 20
<
>
3. Press the NORMAL/COLD ( ) or the
DELICATE/COLD ( ) keypad to increase or
decrease the value of the fifth digit.
NOTE: The vend price can be set from 0 to 65,535.
4. Press the START (enter) keypad to enter the fifth
digit and display remaining four digits. The
active digit will flash one (1) second on and one
(1) second off.
F8237901
© Copyright, Alliance Laundry Systems LLC – DO NOT COPY or TRANSMIT
75
Programming Flowcharts
<
>
1. Press the NORMAL/COLD ( ) or the
DELICATE/COLD ( ) keypad to scroll through
the programmable Special Vend A options until
“SA17” appears in the display.
2. When “SA17” appears in the display, press the
START (enter) keypad. There are five digits in
the Special Vend A Quick/Hot Vend Price. The
fifth digit will appear in the display and will flash
one (1) second on and one (1) second off. Refer
to Figure 21.
NOTE: If the vend price is $100.00 or more, the
fifth digit is “1-6”. If the vend price is $99.99 or
less, the fifth digit is “0”.
5. Press the NORMAL/COLD ( ) or the
DELICATE/COLD ( ) keypad to increase or
decrease the value of the active digit and the
START keypad to enter the value of the digit and
advance to the next digit.
>
This option allows the owner to set the vend price for a
QUICK/HOT wash in Special Vend A. The
corresponding LED will be lit while programming.
NOTE: To go back to the current programmable
Special Vend A option without changing the value
of the active digit, press the DELICATE/WARM
(<) keypad.
<
How to Program Special Vend A Quick/Hot
Vend Price “SA17”
6. Press the START (enter) keypad with the last
active digit. The next Special Vend A option,
“SA18”, will appear in the display.
NOTE: To program “SA18” (Special Vend A
Quick/Warm Vend Price), continue to next Special
Vend A option. To program other options, press the
DELICATE/WARM (<) keypad and refer to the
appropriate section.
How to Exit Programming Feature
Press the DELICATE/WARM (<) keypad until the
control returns to Ready Mode.
CHM507R
Figure 21
<
>
3. Press the NORMAL/COLD ( ) or the
DELICATE/COLD ( ) keypad to increase or
decrease the value of the fifth digit.
NOTE: The vend price can be set from 0 to 65,535.
4. Press the START (enter) keypad to enter the fifth
digit and display remaining four digits. The
active digit will flash one (1) second on and one
(1) second off.
76
© Copyright, Alliance Laundry Systems LLC – DO NOT COPY or TRANSMIT
F8237901
Programming Flowcharts
<
>
1. Press the NORMAL/COLD ( ) or the
DELICATE/COLD ( ) keypad to scroll through
the programmable Special Vend A options until
“SA18” appears in the display.
2. When “SA18” appears in the display, press the
START (enter) keypad. There are five digits in
the Special Vend A Quick/Warm Vend Price. The
fifth digit will appear in the display and will flash
one (1) second on and one (1) second off. Refer
to Figure 22.
NOTE: If the vend price is $100.00 or more, the
fifth digit is “1-6”. If the vend price is $99.99 or
less, the fifth digit is “0”.
5. Press the NORMAL/COLD ( ) or the
DELICATE/COLD ( ) keypad to increase or
decrease the value of the active digit and the
START keypad to enter the value of the digit and
advance to the next digit.
>
This option allows the owner to set the vend price for a
QUICK/WARM wash in Special Vend A. The
corresponding LED will be lit while programming.
NOTE: To go back to the current programmable
Special Vend A option without changing the value
of the active digit, press the DELICATE/WARM
(<) keypad.
<
How to Program Special Vend A Quick/
Warm Vend Price “SA18”
6. Press the START (enter) keypad with the last
active digit. The next Special Vend A option,
“SA19”, will appear in the display.
NOTE: To program “SA19” (Special Vend A
Quick/Cold Vend Price), continue to next Special
Vend A option. To program other options, press the
DELICATE/WARM (<) keypad and refer to the
appropriate section.
How to Exit Programming Feature
Press the DELICATE/WARM (<) keypad until the
control returns to Ready Mode.
CHM507R
Figure 22
<
>
3. Press the NORMAL/COLD ( ) or the
DELICATE/COLD ( ) keypad to increase or
decrease the value of the fifth digit.
NOTE: The vend price can be set from 0 to 65,535.
4. Press the START (enter) keypad to enter the fifth
digit and display remaining four digits. The
active digit will flash one (1) second on and one
(1) second off.
F8237901
© Copyright, Alliance Laundry Systems LLC – DO NOT COPY or TRANSMIT
77
Programming Flowcharts
<
>
1. Press the NORMAL/COLD ( ) or the
DELICATE/COLD ( ) keypad to scroll through
the programmable Special Vend A options until
“SA19” appears in the display.
2. When “SA19” appears in the display, press the
START (enter) keypad. There are five digits in
the Special Vend A Quick/Cold Vend Price. The
fifth digit will appear in the display and will flash
one (1) second on and one (1) second off. Refer
to Figure 23.
NOTE: If the vend price is $100.00 or more, the
fifth digit is “1-6”. If the vend price is $99.99 or
less, the fifth digit is “0”.
5. Press the NORMAL/COLD ( ) or the
DELICATE/COLD ( ) keypad to increase or
decrease the value of the active digit and the
START keypad to enter the value of the digit and
advance to the next digit.
>
This option allows the owner to set the vend price for a
QUICK/COLD wash in Special Vend A. The
corresponding LED will be lit while programming.
NOTE: To go back to the current programmable
Special Vend A option without changing the value
of the active digit, press the DELICATE/WARM
(<) keypad.
<
How to Program Special Vend A Quick/
Cold Vend Price “SA19”
6. Press the START (enter) keypad with the last
active digit. The next Special Vend A option,
“SA20”, will appear in the display.
NOTE: To program “SA20” (Special Vend A Wash
Agitate Step Added Minutes), continue to next
Special Vend A option. To program other options,
press the DELICATE/WARM (<) keypad and refer
to the appropriate section.
How to Exit Programming Feature
Press the DELICATE/WARM (<) keypad until the
control returns to Ready Mode.
CHM507R
Figure 23
<
>
3. Press the NORMAL/COLD ( ) or the
DELICATE/COLD ( ) keypad to increase or
decrease the value of the fifth digit.
NOTE: The vend price can be set from 0 to 65,535.
4. Press the START (enter) keypad to enter the fifth
digit and display remaining four digits. The
active digit will flash one (1) second on and one
(1) second off.
78
© Copyright, Alliance Laundry Systems LLC – DO NOT COPY or TRANSMIT
F8237901
Programming Flowcharts
This option allows the owner to add time to the wash
agitate part of the cycle in Special Vend A.
This option allows the owner to subtract time from the
wash agitate part of the cycle in Special Vend A.
1. Press the NORMAL/COLD ( ) or the
DELICATE/COLD ( ) keypad to scroll through
the programmable Special Vend A options until
“SA20” appears in the display.
1. Press the NORMAL/COLD ( ) or the
DELICATE/COLD ( ) keypad to scroll through
the programmable Special Vend A options until
“SA21” appears in the display.
2. When “SA20” appears in the display, press the
START (enter) keypad.
2. When “SA21” appears in the display, press the
START (enter) keypad.
3. Press the NORMAL/COLD ( ) or the
DELICATE/COLD ( ) keypad to increase or
decrease the number of minutes displayed to the
desired number of added minutes.
3. Press the NORMAL/COLD ( ) or the
DELICATE/COLD ( ) keypad to increase or
decrease the number of minutes displayed to the
desired number of subtracted minutes.
4. Press the START (enter) keypad when the correct
number of minutes appears in the display. The
next Special Vend A option, “SA21”, will appear
in the display.
>
<
<
>
<
<
NOTE: The Special Vend A Added Wash Agitate
Time can be set from zero “0” to 15 minutes.
>
How to Program Special Vend A Wash
Agitate Step Subtracted Minutes “SA21”
>
How to Program Special Vend A Wash
Agitate Step Added Minutes “SA20”
NOTE: The Special Vend A Subtracted Wash
Agitate Time can be set from zero “0” to 15
minutes.
4. Press the START (enter) keypad when the correct
number of minutes appears in the display. The
next Special Vend A option, “SA01”, will appear
in the display.
NOTE: To program “SA21” (Special Vend A Wash
Agitate Step Subtracted Minutes), continue to next
Special Vend A option. To program other options,
press the DELICATE/WARM (<) keypad and refer
to the appropriate section.
NOTE: To program “FLo” (Low Water Level),
press the DELICATE/WARM (<) keypad and refer
to option 37. To program other options refer to the
appropriate section.
How to Exit Programming Feature
How to Exit Programming Feature
Press the DELICATE/WARM (<) keypad until the
control returns to Ready Mode.
Press the DELICATE/WARM (<) keypad until the
control returns to Ready Mode.
F8237901
© Copyright, Alliance Laundry Systems LLC – DO NOT COPY or TRANSMIT
79
Programming Flowcharts
37. Low Water Level “FLo”
38. Medium Water Level “FnEd”
This option allows the owner to program the low water
level during fill and tumble of all cycles.
This option allows the owner to program the medium
water level during fill and tumble of all cycles.
How to Program Low Water Level
How to Program Medium Water Level
2. Press the NORMAL/COLD ( ) or the
DELICATE/COLD ( ) keypad until “Prog”
appears in the display. Press the START (enter)
keypad and “AtS1” will appear in the display.
2. Press the NORMAL/COLD ( ) or the
DELICATE/COLD ( ) keypad until “Prog”
appears in the display. Press the START (enter)
keypad and “AtS1” will appear in the display.
3. Press the NORMAL/COLD ( ) or the
DELICATE/COLD ( ) keypad to scroll through
the programmable options until “FLo” appears in
the display.
3. Press the NORMAL/COLD ( ) or the
DELICATE/COLD ( ) keypad to scroll through
the programmable options until “FnEd” appears
in the display.
4. When “FLo” appears in the display, press the
START (enter) keypad. A number will appear in
the display. This number corresponds to the
current low water level during tumble and fill of
all cycles.
4. When “FnEd” appears in the display, press the
START (enter) keypad. A number will appear in
the display. This number corresponds to the
current medium water level during tumble and
fill of all cycles.
5. Press the NORMAL/COLD ( ) or the
DELICATE/COLD ( ) keypad to increase or
decrease the current water level to the desired
water level.
5. Press the NORMAL/COLD ( ) or the
DELICATE/COLD ( ) keypad to increase or
decrease the current water level to the desired
water level.
NOTE: The Low Water Level value can be set from
1 to 10. Default Low Water Level value is 3.
NOTE: The Medium Water Level value can be set
from 11 to 20. Default Medium Water Level value
is 15.
How to Exit Programming Feature
Press the DELICATE/WARM (<) keypad until the
control returns to Ready Mode.
80
>
<
<
>
>
NOTE: To program “FnEd” (Medium Water
Level), refer to option 38. To program other
options, refer to the appropriate section.
<
>
<
<
<
6. Press the START (enter) keypad when the correct
number appears in the display. The next option,
“FnEd”, will appear in the display.
>
1. Control must be in Manual Mode. Refer to
Entering the Manual Mode.
>
1. Control must be in Manual Mode. Refer to
Entering the Manual Mode.
6. Press the START (enter) keypad when the correct
number appears in the display. The next option,
“FHI”, will appear in the display.
NOTE: To program “FHI” (High Water Level),
refer to option 39. To program other options, refer
to the appropriate section.
How to Exit Programming Feature
Press the DELICATE/WARM (<) keypad until the
control returns to Ready Mode.
© Copyright, Alliance Laundry Systems LLC – DO NOT COPY or TRANSMIT
F8237901
Programming Flowcharts
39. High Water Level “FHI”
This option allows the owner to program the high
water level during fill and tumble of all cycles.
How to Program High Water Level
1. Control must be in Manual Mode. Refer to
Entering the Manual Mode.
<
>
2. Press the NORMAL/COLD ( ) or the
DELICATE/COLD ( ) keypad until “Prog”
appears in the display. Press the START (enter)
keypad and “AtS1” will appear in the display.
<
>
3. Press the NORMAL/COLD ( ) or the
DELICATE/COLD ( ) keypad to scroll through
the programmable options until “FHI” appears in
the display.
40. Auto-Water Leak Detection
“ALd-”
This option allows the owner to set the time and
frequency that the control automatically checks the
water level. The owner programs which day(s) of the
week and hour of day(s) they want this test to occur.
The owner may also program this test to occur after
XX number of machine cycles have been completed
since the last time the test was run. In order for this
auto-water leak detection test to occur, the machine’s
door must be closed.
How to Program the Auto-Water Leak
Detection
1. Control must be in Manual Mode. Refer to
Entering the Manual Mode.
5. Press the NORMAL/COLD ( ) or the
DELICATE/COLD ( ) keypad to increase or
decrease the current water level to the desired
water level.
3. Press the NORMAL/COLD ( ) or the
DELICATE/COLD ( ) keypad to scroll through
the programmable options until “ALd-” appears
in the display. Press the START keypad and
“ALd1” will appear in the display.
NOTE: The High Water Level value can be set
from 21 to 30. Default High Water Level setting is
27.
4. Press the NORMAL/COLD ( ) or the
DELICATE/COLD ( ) keypad to scroll through
the programmable options. Refer to Table 15.
>
<
>
<
<
<
6. Press the START (enter) keypad when the correct
number appears in the display. The next option,
“ALd-”, will appear in the display.
>
2. Press the NORMAL/COLD ( ) or the
DELICATE/COLD ( ) keypad until “Prog”
appears in the display. Press the START (enter)
keypad and “AtS1” will appear in the display.
>
4. When “FHI” appears in the display, press the
START (enter) keypad. A number will appear in
the display. This number corresponds to the
current high water level during tumble and fill of
all cycles.
“ALd1”
NOTE: To program “ALd-” (Auto-Water Leak
Detection), refer to option 40. To program other
options, refer to the appropriate section.
Auto-Water Leak Detection (“oFF”* or “0”
through “127” cycles [“on”] – Number of
completed cycles after which this test will
occur)
“ALd2”
Auto-Water Leak Detection Hour (“0”* –“23”
– Hour of the day this test will occur)
How to Exit Programming Feature
“ALd3”
Press the DELICATE/WARM (<) keypad until the
control returns to Ready Mode.
Auto-Water Leak Detection Day of Week
(“0” –“127”* – Refer to Table 7)
*Factory Default Setting
Table 15
F8237901
© Copyright, Alliance Laundry Systems LLC – DO NOT COPY or TRANSMIT
81
Programming Flowcharts
5. When the desired option appears in the display,
press the START (enter) keypad. The current
value will appear in the display.
<
>
6. Press the NORMAL/COLD ( ) or the
DELICATE/COLD ( ) keypad to enable during
cycles, disable, increase or decrease the hours, or
day.
NOTE: The hours will be displayed in military
time. For day of week, Sunday is considered day
one (1), Monday is day two (2) and so on. Refer to
Table 7.
82
7. Press the START (enter) keypad when the correct
value appears in the display. The next option
“AtS1”, will appear in the display.
NOTE: To program “AtS1” (Normal/Hot Vend
Price), refer to option 1. To program other options,
refer to the appropriate section.
How to Exit Programming Feature
Press the DELICATE/WARM (<) keypad until the
control returns to Ready Mode.
© Copyright, Alliance Laundry Systems LLC – DO NOT COPY or TRANSMIT
F8237901
Collecting Audit Information
This feature allows the owner to retrieve audit
information stored in the washer-extractor by pressing a
sequence of pads on the control. For an explanation of
the audit options available, refer to Table 16.
Audit Options List
#
Display
1
“CyC”
How to Enter Audit Feature
2
There are two methods the owner can use to enter the
Audit Feature.
3
“rCyC” Total # of rapid advanced cycles
“Coi1” Total # of coins #1
4
“Coi2”
Entering the Audit Feature by Manual
Mode
5
“PLSE” Total # of Start Pulses
1. Control must be in Manual Mode to start. Refer
to Entering the Manual Mode.
<
>
2. Press the NORMAL/COLD ( ) or the
DELICATE/COLD ( ) keypad until “AUdt”
appears.
3. Press the START (enter) keypad. “CyC” will
appear.
Entering the Audit Feature with the Coin
Vault Open
1. Open coin vault. Make sure top cover is closed.
2. Press the START (enter) keypad.
How to Read Audit Data
<
>
1. Use the NORMAL/COLD ( ) or the
DELICATE/COLD ( ) keypad to scroll through
various options until the desired option is shown
in the display. Refer to the Audit Options List,
Table 16, for an explanation of the audit options
available.
Description
Total # of machine cycles
Total # of coins #2
Table 16
2. Once the desired option appears in the display,
press the START (enter) keypad once to start the
audit count. At this point, the display will show
the first four-digit segment of the audit value. If
the audit count is 10,000 or higher, press the
START (enter) keypad again to view the last four
digits of the number.
NOTE: The display can show up to 4 digits at one
time. Audit counts 10,000 or higher are separated
into two 4-digit segments. Each time the START
(enter) keypad is pressed in step 2, the display will
show the next 4-digit segment in the audit value. If
the value is 9,999 or less, only one 4-digit segment
will be shown.
For Example: In the Total Number of Coins #1 option
with “Coi1” shown in the display, the audit has
counted 10,009 coins. Pressing the START (enter)
keypad one time will show “_ _ _ 1” to represent ten
thousand. Pressing the START (enter) keypad a second
time will display “0009” meaning nine. The total
equals “00010009” or 10,009.
3. Press the START (enter) keypad again. The
control will go to the next audit option in the
Audit Options List.
4. To select other audit options, repeat steps 1 – 4.
How to Exit Audit Feature
Press the DELICATE/WARM (<) keypad.
NOTE: To exit Audit Feature when using Coin
Vault Open method, owner must close coin vault.
F8237901
© Copyright, Alliance Laundry Systems LLC – DO NOT COPY or TRANSMIT
83
Manual Reset
This feature allows the owner to reset the washerextractor control’s programming data to the factory
default settings by pressing a sequence of pads on the
control. For an explanation of the Factory Default
Settings, refer to Table 1.
How to Enter Manual Reset
1. Control must be in Manual Mode to start.
Refer to Entering the Manual Mode.
<
>
2. Press the NORMAL/COLD ( ) or the
DELICATE/COLD ( ) keypad until “rSEt”
appears.
3. Press the START (enter) keypad. The control will
be blank until the programming is complete.
Once the program has been reset, the control will
display the next Manual Mode option, “diAg”.
84
© Copyright, Alliance Laundry Systems LLC – DO NOT COPY or TRANSMIT
F8237901
Production Test Cycle
To Enter Production Test Cycle
1. Be certain control is in Ready Mode and top
cover or coin vault is open.
2. While pressing and holding the NORMAL/
COLD keypad with one hand, press the QUICK/
HOT keypad with the other hand.
3. When the control enters the Production Test
Cycle, it will first display “S xx” with the “xx”
showing the software version of the front end
control.
4. The control will advance through the sequence of
test steps whenever any key is pressed. Refer to
Table 17 for all tests in the Production Test
Cycle.
To Exit Production Test Cycle
To exit a test step, power down the machine.
F8237901
© Copyright, Alliance Laundry Systems LLC – DO NOT COPY or TRANSMIT
85
Production Test Cycle
Production Test Cycle Quick Reference Chart
Display
Test Cycle Step
Comments
“S xx”
FEC Control Software
Version
xx is the software version number.
“o xx”
Output Board Software
Version
xx is the software version number.
“Ct25”
Control Type
2.5 is the Control type.
“COIn”
Control Type
Coin
“USA”
Control Type
Domestic
“drAn”
Drain Type
Gravity drain
“tEnP”
Temp Sensor
Step skipped if not model with heat.
“HEAt”
Heater
Step skipped if not heater-equipped.
“L dC”
Door Lock Type
“L dC” for 24 VDC lock.
“droP” or “drCL”
Door Status
Door open or closed.
“drUL” or “drLo”
Door Lock Status
Door will lock.
“8.8.8.8.” + all LEDs
Display Test
All display elements are lit.
“PAxx” where xx = 1-3,
5-11
Keypad Test step
Advance after all keypads are pressed.
“A xx”
Top Cover Switch Test
xx is either “CL” for closed or “oP” for open.
“U xx”
Coin Vault Switch Test
xx is either “CL” for closed or “oP” for open.
“CxCx”
Coin Drop Test
1st x is number of Coin Drop #1 coins. 2nd x is number of Coin
Drop #2 coins.
“Cxxx”
Machine Type/Size
“HFIL”
Hot Fill to Low Level
All water outputs turned off when Low Level reached.
“CFIL”
Cold Fill to Low Level
All water outputs turned off when Low Level reached.
“bFIL”
Warm Fill to Low Level
All water outputs turned off when Low Level reached.
“bFIH”
Warm Fill to High Level
All water outputs turned off when High Level reached.
“S1” for supply or
“C2Co” for
compartment
Supply #1 or Compartment
#2 Cold Fill
“S2” for supply or
“C2Ho” for
compartment
Supply #2 or Compartment
#2 Hot Fill
“S3” for supply or
“C3Co” for
compartment
Supply #3 or Compartment
#3 Cold Fill
“S4” for supply or
“C4Ho” for
compartment
Supply #4 or Compartment
#4 Hot Fill
“xxxF” degrees F or
“xxxC” degrees C
depending on the
Fahrenheit/Celsius
programming parameter
Heat water to 110°F or
display temperature
xxx is degree temperature. This step skipped if not model with
heat. Heater turned off when temperature reached.
Table 17 (continued)
86
© Copyright, Alliance Laundry Systems LLC – DO NOT COPY or TRANSMIT
F8237901
Production Test Cycle
Table 17 (continued)
Production Test Cycle Quick Reference Chart
Display
Test Mode
Comments
“LoAg”
Reduced Wash Speed
Forward with no agitation
action
This step skipped on 2 Speed Models.
“Ag”
Wash Speed Forward with no
agitation action
“rAg”
Wash Speed Reverse with no
agitation action
“drAI”
Drain Distribution Speed
“PUrg”
Factory Valve Purge
“SP 1”
Extract Speed #1 “very low”
This step skipped on 2 Speed Models.
“SP 2”
Extract Speed #2 “low”
This step skipped on 2 Speed Models.
“SP 3”
Extract Speed #3 “medium”
This step skipped on 2 Speed Models.
“SP 4” (VFD Models)
or
“SPIn”
(2 Speed Models)
Extract Speed #4 “high”
This step skipped on F-Speed Models.
“SP 5”
Extract Speed #5 “very high” This step skipped on 2 Speed and F-Speed Models.
“Prdn”
End of test
Turn Power off
Table 17
F8237901
© Copyright, Alliance Laundry Systems LLC – DO NOT COPY or TRANSMIT
87
Error Codes
Following is a list of possible error codes for an
electronic control. Errors beginning with “EI” refer to
external device Infra-red communication errors. Errors
beginning with “EC” refer to card reader errors. All
other errors refer to machine errors.
Display
Cause/
Corrective Action
Description
EI01
Transmission Failure
Communication failure. Re-aim external device and try
again.
EI02
Time-out Error
Communication failure. Re-aim external device and try
again.
EI03
Invalid Command Code
Communication successful, but the command was not
valid for this machine type, or the control could not
perform the command in its current mode of operation.
Ensure data is for current machine type and control is in
correct mode.
EI04
Expecting Upload Request
Communication failure. Re-aim external device and try
again.
EI05
Invalid or Out-of-Range Data
The value in at least one of the programming options is
invalid or out of range. Recheck the programming
option’s value and try again.
EI09
CRC-16 Error
Communication failure. Re-aim external device and try
again.
EI0A
Framing Error
Communication error. Re-aim external device and try
again.
EI0C
Time-out Exceeded
Communication error. Re-aim external device and try
again.
EI0E
Encryption Error
Communication error. Re-aim external device and try
again. If the problem persists, check that the security
code is correct.
EI0F
Infra-red Disabled
Communication failure or infra-red is disabled.
Manually enable infra-red on control or re-aim external
device and try again.
EC02
Time-out Error
Communication failure. Try card again.
EC03
Invalid Command Code
Communication successful, but the command was not
valid for this machine type, or the control could not
perform the command in its current mode of operation.
Ensure data is for current machine type and control is in
correct mode.
EC05
Invalid or Out-of-Range Data
The value in at least one of the programming options is
invalid or out of range. Recheck the programming
option’s value and try again.
Table 18 (continued)
88
© Copyright, Alliance Laundry Systems LLC – DO NOT COPY or TRANSMIT
F8237901
Error Codes
Table 18 (continued)
Display
Cause/
Corrective Action
Description
EC11
No Card Reader Initialization
Communication is valid, but there is no card reader
initialization. Power down, power up and try again.
EC18
No Communication
Card reader is initialized, communication lost. Power
down, power up and try again. If error persists, replace
control or card reader.
EC19
No Card Reader Communication
Communication failure. Power down, power up and try
again. If error persists, replace control or card reader.
E FL
Fill Error
Programmed water level not reached within 10 minutes
(or other programmed length of time) in any fill agitate
cycle. End cycle. Power down machine to clear.
E SP
SPI Communications Error
Front End control cannot communicate with output
board. Power down the machine, power up and try
again.
E dL
Door Lock Error
Door does not lock immeadiately upon closing (open
and reclose door) or doesn’t unlock 5 seconds after cycle
completion. Power down machine and retry.
E do
Door Open Error
Control detects door open. Caused by pulling on door
while locked or about to lock. Correct inoperative door
locking system. End cycle. Power down machine to
clear.
E Ub
Unbalance Error
Unable to balance load. Redistribute load and run cycle.
door
Door Open Indicator
Door is not closed in Start Mode. If door is closed, check
for improper wiring or faulty door switch.
Err
Coin Error
Invalid coin pulse or inoperative coin sensor. Check coin
drop area and remove obstructions. If error persists,
tampering may have occured. Evaluate security
procedures.
E dr
Drain Alarm Error
Machine not drained within 15 minutes (or other
programmed length of time) in any drain step. End
cycle. Power down machine to clear.
E Ht
Heat Alarm Error
Programmed heat alarm time of 120 minutes or other
programmed length of time is exceeded. Turns off heater
output for remainder of cycle.
E oP
Open Temperature Sensor Error
Control senses temperature less than 0°F (-18°C) in
machine equipped with temperature sensor. Heater and
thermistor related operations are disabled.
E SH
Shorted Temperature Sensor Error
Control senses temperature greater than 220°F (104°C)
in machine equipped with temperature sensor. Heater
and thermistor related operations are disabled for
remainder of cycle.
E ro
Rotation Sensor Error
Invalid signal received from Rotation Sensor. Control
will activate coast times to complete cycle.
Table 18 (continued)
F8237901
© Copyright, Alliance Laundry Systems LLC – DO NOT COPY or TRANSMIT
89
Error Codes
Table 18 (continued)
Display
Cause/
Corrective Action
Description
E FS
Frame Balance Switch Error
Control detects Frame Balance Switch open. End cycle.
E db
Drive Balance Switch Error
Control detects VFD Balance Switch input closed at
start of drain step. End cycle. Power down machine to
clear.
E Ld
Water Leak Detection Error
If control senses a drop in water level during diagnostic
testing. Power down machine to clear. If control shows
error after door is open (when cycle is completed) for
one minute or after test has been completed, lights the
right-most decimal point* on the display and the error
information will be logged in audit data.
E Sd
Slow Drain Error
If control shows error after door is open (when cycle is
completed) for one minute, lights the right-most decimal
point* on the display and the error information will be
logged in audit data.
*To clear the decimal point on display, press the START (enter) keypad 3 times in succession (within 5 seconds).
Table 18
90
© Copyright, Alliance Laundry Systems LLC – DO NOT COPY or TRANSMIT
F8237901
Rapid Advance Feature
The Rapid Advance feature allows the owner to
quickly advance through active cycles or advance into
a cycle from the ready mode.
How to Enter Rapid Advance
How to Enter Rapid Advance During
an Active Cycle
1. Be certain top cover is open and coin vault switch
is closed.
2. Press the NORMAL/COLD ( ) or the
DELICATE/COLD ( ) keypad until “rAPd”
appears in the display.
3. Press the NORMAL/COLD ( ) or the
DELICATE/COLD ( ) keypad until “rAPd”
appears in the display.
3. Press the START (enter) keypad. The display will
show cycle time and the START (enter) keypad
LED will flash.
4. Press START (enter) to activate Rapid Advance
cycle.
NOTE: Door must be closed to start cycle.
<
<
4. Press the START (enter) keypad to start cycle.
>
2. While pressing and holding the HEAVY/HOT
keypad with one hand, press the NORMAL/HOT
keypad with the other hand.
>
1. If control is in Ready Mode, control must be put
into Manual Mode. Refer to Entering the
Manual Mode.
How to Use Rapid Advance
Control may be in an active cycle or in the Ready
Mode to use the Rapid Advance feature.
While in the Rapid Advance Mode, pressing the
START (enter) keypad will advance the washerextractor to the next cycle step. The cycle indicator
lights will tell which cycle step the washer-extractor is
in.
For Example: If the washer is in the first Fill cycle
step, pressing the START (enter) keypad will advance
the washer into the Agitate cycle step.
Continue pressing the START (enter) keypad until the
cycle is completed.
How to Exit Rapid Advance Feature
1. Advance through the cycles until reaching the
Ready Mode.
NOTE: The Rapid Advance option must be turned
on for Rapid Advance to work. Refer to option 22
in Programming Control.
F8237901
© Copyright, Alliance Laundry Systems LLC – DO NOT COPY or TRANSMIT
91
Clear Vend Feature
The Clear Vend feature allows the owner to clear a
control which is in the middle of satisfying a vend
price, and set it back to the Ready Mode.
How to Clear Vend
1. Open the top cover. Refer to Opening the Top
Cover.
2. While pressing and holding the HEAVY/HOT
keypad with one hand, press the NORMAL/
WARM keypad with the other hand. The control
will reset to Ready Mode.
92
© Copyright, Alliance Laundry Systems LLC – DO NOT COPY or TRANSMIT
F8237901
Power Fail Recovery
The Power Fail Recovery feature allows the cycle
status to be saved in memory in the event of a power
failure.
If the power failure lasted less than 2 minutes, the
cycle will resume without requiring the user to press
the START (enter) keypad to restart.
If the power failure lasted longer than 2 minutes, the
START (enter) keypad will flash until it is pressed and
the cycle will restart from the point it left off.
F8237901
© Copyright, Alliance Laundry Systems LLC – DO NOT COPY or TRANSMIT
93
Communications Mode
Infra-red Communications
The Infra-red Communications feature allows the
control to communicate with an external device. The
control can be programmed and have its data read
without using the keypad. It may also be used to start
and stop various diagnostic tests.
How to Begin Communications with An
External Device
Card Reader Communications
(Card Models Only)
The Card Reader Communications feature allows the
control to communicate with the card reader. The
control can be programmed for a limited number of
options and have its data read without using the
keypad.
The control will go blank and the display will show
“-C-” until the communication is complete. If an error
occurs that terminates communication, the display will
show “EIXX” (“XX” represents the error code).
NOTE: The Infra-red Communications option
must be turned on. Refer to option 15 in
Programming Control.
94
© Copyright, Alliance Laundry Systems LLC – DO NOT COPY or TRANSMIT
F8237901
Default Cycles
Cycle Chart
Normal/
Heavy/
Cold
Hot
Normal/
Hot
Normal/
Warm
CYC1
CYC2
CYC3
Agitation type
18/3/18
Normal
18/3/18
Normal
Wash 1 (ON/OFF)
OFF
2
Warm
Cycle Stops
Cycle reference
(display in Program Mode)
Time for agitation (min.)
Fill Temperature
Fill Level
Supply
Heat (if enabled)
Delicate/
Warm
Delicate/
Cold
Quick/
Hot
Quick/
Warm
Quick/
Cold
CYC4
CYC5
CYC6
CYC7
CYC8
CYC9
18/3/18
Normal
18/3/18
Normal
3/12/3
Gentle
3/12/3
Gentle
18/3/18
Normal
18/3/18
Normal
18/3/18
Normal
OFF
OFF
ON
OFF
OFF
OFF
OFF
OFF
2
2
2
4
4
2
2
2
Warm
Cold
Warm
Warm
Cold
Cold
Cold
Cold
High
High
High
Low
High
High
Low
Low
Low
C1 (S1)
C1 (S1)
C1 (S1)
C1 (S1)
C1 (S1)
C1 (S1)
C1 (S1)
C1 (S1)
C1 (S1)
2
2
2
2
2
2
2
2
2
Yes
Yes
Yes
Yes
Yes
Yes
Yes
Yes
Yes
Spin (min.)
0
0
0
0
0
0
0
0
0
Wash 2 (ON/OFF)
ON
ON
ON
ON
ON
ON
ON
ON
ON
6
6
6
6
6
6
4
4
4
Hot
Warm
Cold
Hot
Warm
Cold
Hot
Warm
Cold
Low
Low
Low
Low
Low
Low
Low
Low
Low
Drain
Time for agitation (min.)
Fill Temperature
Fill Level
Supply
Heat (if enabled)
C1, C2, C3 C1, C2, C3 C1, C2, C3 C1, C2, C3 C1, C2, C3 C1, C2, C3 C1, C2, C3 C1, C2, C3 C1, C2, C3
(S1, S2)
(S1, S2)
(S1, S2)
(S1, S2)
(S1, S2)
(S1, S2)
(S1, S2)
(S1, S2)
(S1, S2)
2
2
2
2
2
2
2
2
2
Yes
Yes
Yes
Yes
Yes
Yes
Yes
Yes
Yes
Spin (min.)
0
0
0
0
0
0
0
0
0
Wash 3 (ON/OFF)
OFF
OFF
OFF
OFF
OFF
OFF
OFF
OFF
OFF
2
2
2
2
2
2
2
2
2
Cold
Cold
Cold
Cold
Cold
Cold
Cold
Cold
Cold
Low
Low
Low
Low
Low
Low
Low
Low
Low
Drain
Time for agitation (min.)
Fill Temperature
Fill Level
Supply
Heat (if enabled)
C1, C2, C3 C1, C2, C3 C1, C2, C3 C1, C2, C3 C1, C2, C3 C1, C2, C3 C1, C2, C3 C1, C2, C3 C1, C2, C3
2
2
2
2
2
2
2
2
2
Yes
Yes
Yes
Yes
Yes
Yes
Yes
Yes
Yes
Spin (min.)
0
0
0
0
0
0
0
0
0
Wash 4 (ON/OFF)
OFF
OFF
OFF
OFF
OFF
OFF
OFF
OFF
OFF
2
2
2
2
2
2
2
2
2
Cold
Cold
Cold
Cold
Cold
Cold
Cold
Cold
Cold
Low
Low
Low
Low
Low
Low
Low
Low
Low
Drain
Time for agitation (min.)
Fill Temperature
Fill Level
Supply
Heat (if enabled)
Drain
Spin (min.)
F8237901
C1, C2, C3 C1, C2, C3 C1, C2, C3 C1, C2, C3 C1, C2, C3 C1, C2, C3 C1, C2, C3 C1, C2, C3 C1, C2, C3
2
2
2
2
2
2
2
2
2
Yes
Yes
Yes
Yes
Yes
Yes
Yes
Yes
Yes
0
0
0
0
0
0
0
0
0
(continued)
© Copyright, Alliance Laundry Systems LLC – DO NOT COPY or TRANSMIT
95
Default Cycles
(continued)
Cycle Stops
Cycle reference
(display in Program Mode)
Agitation type
Rinse 1 (ON/OFF)
Time for agitation (min.)
Fill Temperature
Fill Level
Supply
Cycle Chart
Normal/
Heavy/
Cold
Hot
Normal/
Hot
Normal/
Warm
Delicate/
Warm
Delicate/
Cold
Quick/
Hot
Quick/
Warm
Quick/
Cold
CYC1
CYC2
CYC3
CYC4
CYC5
CYC6
CYC7
CYC8
CYC9
18/3/18
Normal
18/3/18
Normal
18/3/18
Normal
18/3/18
Normal
3/12/3
Gentle
3/12/3
Gentle
18/3/18
Normal
18/3/18
Normal
18/3/18
Normal
ON
2
ON
ON
ON
ON
ON
ON
ON
ON
2
2
2
2
2
2
2
2
Cold
Cold
Cold
Cold
Cold
Cold
Cold
Cold
Cold
Low
Low
Low
High
High
High
High
High
High
C1, C2, C3 C1, C2, C3 C1, C2, C3 C1, C2, C3 C1, C2, C3 C1, C2, C3 C1, C2, C3 C1, C2, C3 C1, C2, C3
Heat (if enabled)
0
0
0
0
0
0
0
0
0
Yes
Yes
Yes
Yes
Yes
Yes
Yes
Yes
Yes
Spin (min.)
0
0
0
0
0
0
0
0
0
Rinse 2 (ON/OFF)
OFF
OFF
OFF
OFF
OFF
OFF
OFF
OFF
OFF
2
2
2
2
2
2
2
2
2
Cold
Cold
Cold
Cold
Cold
Cold
Cold
Cold
Cold
Low
Low
Low
Low
Low
Low
Low
Low
Low
Drain
Time for agitation (min.)
Fill Temperature
Fill Level
Supply
C1, C2, C3 C1, C2, C3 C1, C2, C3 C1, C2, C3 C1, C2, C3 C1, C2, C3 C1, C2, C3 C1, C2, C3 C1, C2, C3
Heat (if enabled)
0
0
0
0
0
0
0
0
0
Yes
Yes
Yes
Yes
Yes
Yes
Yes
Yes
Yes
Spin (min.)
0
0
0
0
0
0
0
0
0
Rinse 3 (ON/OFF)
OFF
OFF
OFF
OFF
OFF
OFF
OFF
OFF
OFF
2
2
2
2
3
3
2
2
2
Cold
Cold
Cold
Cold
Cold
Cold
Cold
Cold
Cold
High
High
High
High
High
High
Low
Low
Low
Drain
Time for agitation (min.)
Fill Temperature
Fill Level
Supply
C1, C2, C3 C1, C2, C3 C1, C2, C3 C1, C2, C3 C1, C2, C3 C1, C2, C3 C1, C2, C3 C1, C2, C3 C1, C2, C3
Heat (if enabled)
0
0
0
0
0
0
0
0
0
Yes
Yes
Yes
Yes
Yes
Yes
Yes
Yes
Yes
Spin (min.)
1 (High)
1 (High)
1 (High)
0
1 (High)
1 (High)
0
0
0
Rinse 4 (ON/OFF)
ON
ON
ON
ON
ON
ON
ON
ON
ON
4
4
4
4
2
2
2
2
2
Cold
Cold
Cold
Cold
Cold
Cold
Cold
Cold
Cold
Low
Low
Low
Low
Low
Low
Low
Low
Low
Drain
Time for agitation (min.)
Fill Temperature
Fill Level
Supply
C1, C2, C3, C1, C2, C3, C1, C2, C3, C1, C2, C3 C1, C2, C3 C1, C2, C3 C1, C2, C3 C1, C2, C3 C1, C2, C3
C4 (S3, S4) C4 (S3, S4) C4 (S3, S4) (S3, S4)
(S3, S4)
(S3, S4)
(S3, S4)
(S3, S4)
(S3, S4)
Heat (if enabled)
Drain
Spin (min.)
Default Cycle Time
(hh:mm:ss)
96
0
0
0
0
0
0
0
0
0
Yes
Yes
Yes
Yes
Yes
Yes
Yes
Yes
Yes
3
(High)
3
(High)
4
4
4
4
(Very High) (Very High) (Very High) (Very High)
2
2
2
(Very High) (Very High) (Very High)
2 speed
00:22:20
00:22:20
00:22:20
00:26:20
00:19:20
00:19:20
00:16:20
00:16:20
00:16:20
V or F-speed
00:23:05
00:23:05
00:23:05
00:27:05
00:20:05
00:20:05
00:17:05
00:17:05
00:17:05
© Copyright, Alliance Laundry Systems LLC – DO NOT COPY or TRANSMIT
F8237901
Default Cycles
Cycle Stops
Cycle reference
(display in Program Mode)
Agitation type
Blank Cycle Chart
Normal/
Heavy/
Delicate/
Cold
Hot
Warm
Normal/
Hot
Normal/
Warm
CYC1
CYC2
CYC3
CYC4
18/3/18
Normal
18/3/18
Normal
18/3/18
Normal
18/3/18
Normal
Delicate/
Cold
Quick/
Hot
Quick/
Warm
Quick/
Cold
CYC5
CYC6
CYC7
CYC8
CYC9
3/12/3
Gentle
3/12/3
Gentle
18/3/18
Normal
18/3/18
Normal
18/3/18
Normal
Wash 1 (ON/OFF)
Time for agitation (min.)
Fill Temperature
Fill Level
Supply
Heat (if enabled)
Drain
Spin (min.)
Wash 2 (ON/OFF)
Time for agitation (min.)
Fill Temperature
Fill Level
Supply
Heat (if enabled)
Drain
Spin (min.)
Wash 3 (ON/OFF)
Time for agitation (min.)
Fill Temperature
Fill Level
Supply
Heat (if enabled)
Drain
Spin (min.)
Wash 4 (ON/OFF)
Time for agitation (min.)
Fill Temperature
Fill Level
Supply
Heat (if enabled)
Drain
Spin (min.)
(continued)
F8237901
© Copyright, Alliance Laundry Systems LLC – DO NOT COPY or TRANSMIT
97
Default Cycles
(continued)
Cycle Stops
Cycle reference
(display in Program Mode)
Agitation type
Blank Cycle Chart
Normal/
Heavy/
Delicate/
Cold
Hot
Warm
Normal/
Hot
Normal/
Warm
CYC1
CYC2
CYC3
CYC4
18/3/18
Normal
18/3/18
Normal
18/3/18
Normal
18/3/18
Normal
Delicate/
Cold
Quick/
Hot
Quick/
Warm
Quick/
Cold
CYC5
CYC6
CYC7
CYC8
CYC9
3/12/3
Gentle
3/12/3
Gentle
18/3/18
Normal
18/3/18
Normal
18/3/18
Normal
Rinse 1 (ON/OFF)
Time for agitation (min.)
Fill Temperature
Fill Level
Supply
Heat (if enabled)
Drain
Spin (min.)
Rinse 2 (ON/OFF)
Time for agitation (min.)
Fill Temperature
Fill Level
Supply
Heat (if enabled)
Drain
Spin (min.)
Rinse 3 (ON/OFF)
Time for agitation (min.)
Fill Temperature
Fill Level
Supply
Heat (if enabled)
Drain
Spin (min.)
Rinse 4 (ON/OFF)
Time for agitation (min.)
Fill Temperature
Fill Level
Supply
Heat (if enabled)
Drain
Spin (min.)
Default Cycle Time
(hh:mm:ss)
98
2 speed
V or F-speed
© Copyright, Alliance Laundry Systems LLC – DO NOT COPY or TRANSMIT
F8237901
Default Cycles
Cycle Stops
Cycle reference
(display in Program Mode)
Agitation type
Blank Cycle Chart
Normal/
Heavy/
Delicate/
Cold
Hot
Warm
Normal/
Hot
Normal/
Warm
CYC1
CYC2
CYC3
CYC4
18/3/18
Normal
18/3/18
Normal
18/3/18
Normal
18/3/18
Normal
Delicate/
Cold
Quick/
Hot
Quick/
Warm
Quick/
Cold
CYC5
CYC6
CYC7
CYC8
CYC9
3/12/3
Gentle
3/12/3
Gentle
18/3/18
Normal
18/3/18
Normal
18/3/18
Normal
Wash 1 (ON/OFF)
Time for agitation (min.)
Fill Temperature
Fill Level
Supply
Heat (if enabled)
Drain
Spin (min.)
Wash 2 (ON/OFF)
Time for agitation (min.)
Fill Temperature
Fill Level
Supply
Heat (if enabled)
Drain
Spin (min.)
Wash 3 (ON/OFF)
Time for agitation (min.)
Fill Temperature
Fill Level
Supply
Heat (if enabled)
Drain
Spin (min.)
Wash 4 (ON/OFF)
Time for agitation (min.)
Fill Temperature
Fill Level
Supply
Heat (if enabled)
Drain
Spin (min.)
(continued)
F8237901
© Copyright, Alliance Laundry Systems LLC – DO NOT COPY or TRANSMIT
99
Default Cycles
(continued)
Cycle Stops
Cycle reference
(display in Program Mode)
Agitation type
Blank Cycle Chart
Normal/
Heavy/
Delicate/
Cold
Hot
Warm
Normal/
Hot
Normal/
Warm
CYC1
CYC2
CYC3
CYC4
18/3/18
Normal
18/3/18
Normal
18/3/18
Normal
18/3/18
Normal
Delicate/
Cold
Quick/
Hot
Quick/
Warm
Quick/
Cold
CYC5
CYC6
CYC7
CYC8
CYC9
3/12/3
Gentle
3/12/3
Gentle
18/3/18
Normal
18/3/18
Normal
18/3/18
Normal
Rinse 1 (ON/OFF)
Time for agitation (min.)
Fill Temperature
Fill Level
Supply
Heat (if enabled)
Drain
Spin (min.)
Rinse 2 (ON/OFF)
Time for agitation (min.)
Fill Temperature
Fill Level
Supply
Heat (if enabled)
Drain
Spin (min.)
Rinse 3 (ON/OFF)
Time for agitation (min.)
Fill Temperature
Fill Level
Supply
Heat (if enabled)
Drain
Spin (min.)
Rinse 4 (ON/OFF)
Time for agitation (min.)
Fill Temperature
Fill Level
Supply
Heat (if enabled)
Drain
Spin (min.)
Default Cycle Time
(hh:mm:ss)
100
2 speed
V or F-speed
© Copyright, Alliance Laundry Systems LLC – DO NOT COPY or TRANSMIT
F8237901
Default Cycles
Cycle Stops
Cycle reference
(display in Program Mode)
Agitation type
Blank Cycle Chart
Normal/
Heavy/
Delicate/
Cold
Hot
Warm
Normal/
Hot
Normal/
Warm
CYC1
CYC2
CYC3
CYC4
18/3/18
Normal
18/3/18
Normal
18/3/18
Normal
18/3/18
Normal
Delicate/
Cold
Quick/
Hot
Quick/
Warm
Quick/
Cold
CYC5
CYC6
CYC7
CYC8
CYC9
3/12/3
Gentle
3/12/3
Gentle
18/3/18
Normal
18/3/18
Normal
18/3/18
Normal
Wash 1 (ON/OFF)
Time for agitation (min.)
Fill Temperature
Fill Level
Supply
Heat (if enabled)
Drain
Spin (min.)
Wash 2 (ON/OFF)
Time for agitation (min.)
Fill Temperature
Fill Level
Supply
Heat (if enabled)
Drain
Spin (min.)
Wash 3 (ON/OFF)
Time for agitation (min.)
Fill Temperature
Fill Level
Supply
Heat (if enabled)
Drain
Spin (min.)
Wash 4 (ON/OFF)
Time for agitation (min.)
Fill Temperature
Fill Level
Supply
Heat (if enabled)
Drain
Spin (min.)
(continued)
F8237901
© Copyright, Alliance Laundry Systems LLC – DO NOT COPY or TRANSMIT
101
Default Cycles
(continued)
Cycle Stops
Cycle reference
(display in Program Mode)
Agitation type
Blank Cycle Chart
Normal/
Heavy/
Delicate/
Cold
Hot
Warm
Normal/
Hot
Normal/
Warm
CYC1
CYC2
CYC3
CYC4
18/3/18
Normal
18/3/18
Normal
18/3/18
Normal
18/3/18
Normal
Delicate/
Cold
Quick/
Hot
Quick/
Warm
Quick/
Cold
CYC5
CYC6
CYC7
CYC8
CYC9
3/12/3
Gentle
3/12/3
Gentle
18/3/18
Normal
18/3/18
Normal
18/3/18
Normal
Rinse 1 (ON/OFF)
Time for agitation (min.)
Fill Temperature
Fill Level
Supply
Heat (if enabled)
Drain
Spin (min.)
Rinse 2 (ON/OFF)
Time for agitation (min.)
Fill Temperature
Fill Level
Supply
Heat (if enabled)
Drain
Spin (min.)
Rinse 3 (ON/OFF)
Time for agitation (min.)
Fill Temperature
Fill Level
Supply
Heat (if enabled)
Drain
Spin (min.)
Rinse 4 (ON/OFF)
Time for agitation (min.)
Fill Temperature
Fill Level
Supply
Heat (if enabled)
Drain
Spin (min.)
Default Cycle Time
(hh:mm:ss)
102
2 speed
V or F-speed
© Copyright, Alliance Laundry Systems LLC – DO NOT COPY or TRANSMIT
F8237901