1
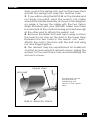
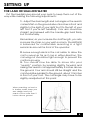
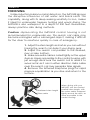
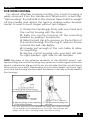
Impulse
Pulse Induction Metal Detector
Operating Manual
FISHER
RESEARCH
LABORATORY
CONTENTS
About Your Impulse ................................................................ pg. 1
Condensed Operating Instructions ...................................... pg. 3
Assembly ................................................................................. pg. 4
Setting Up................................................................................. pg. 6
For Land or Shallow Water ................................................. pg. 6
For Diving ............................................................................. pg. 7
For Hipmounting.................................................................. pg. 8
Control Panel .......................................................................... pg. 9
Tuning ....................................................................................... pg. 10
Searching ................................................................................ pg. 10
On land or Shallow Water ................................................. pg. 10
Underwater .......................................................................... pg. 12
Pinpointing ............................................................................... pg. 13
Target Recovery ..................................................................... pg. 15
Recovery Tools ................................................................... pg. 15
Operating Tips ......................................................................... pg. 16
Batteries ................................................................................... pg. 17
Home Recharger ................................................................ pg. 18
Auto Recharger .................................................................. pg. 18
Tips about Nicad Batteries ................................................. pg. 19
Maintenance .......................................................................... pg. 20
Storage................................................................................. pg. 20
Cleaning .............................................................................. pg. 20
Battery Compartment ........................................................ pg. 20
Treasure Hunter’s Code Of Ethics .......................................... pg. 21
Where To Use Your Metal Detector In The U.S. .................... pg. 22
Specifications ......................................................................... pg. 23
ABOUT YOUR DETECTOR
Fisher Research Laboratory has been producing rugged, high
quality, high performance metal detectors since 1931, longer than
any other company in the world. Your IMPULSE is a product of
that proud heritage. Designed for deep-sea treasure hunting,
the IMPULSE will also do the job in surf, on the beach, in fresh
water or on land.
Pulse induction (PI) metal detectors have been around for years.
Their ability to detect metal in black sand and salt water make
pulse induction metal detectors particularly suited to underwater
treasure hunting, wreck diving, shallow-water treasure hunting
and beach combing.
However, pulse induction metal detectors have had their
drawbacks. Most have been heavy, expensive and unstable,
requiring the operator to retune frequently. Pulse induction metal
detectors also have had high battery drain, creating frustrating
power loss and added expense.
But worst of all, pulse induction metal detectors have been
plagued by slow response. Because the search coil is slow to
respond to a target, sensitivity and depth can be maximized only
at slow sweep speeds, forcing the operator to slow down,
thereby covering less ground. “Autotune” pulse induction
detectors do have a rapid response, but the search coil must
be in motion to detect a target.
In 1985, engineers at Fisher Research Laboratory began work
on a new pulse induction metal detector, one that would
combine extreme depth in salt water with high battery
performance, stability, low cost and fast target response.
Their answer is the IMPULSE—a no-motion detector that responds
instantly to targets and frees the operator to hunt fast, slow or
with no motion at all. In addition, battery life of the IMPULSE has
been greatly extended over previous pulse induction detectors.
In fact, battery life of the IMPULSE is better than most inductionbalance metal detectors. And stability is greatly improved. There’s
no need to retune the IMPULSE every few feet.
1
ABOUT YOUR DETECTOR
Here are some important features built into your IMPULSE:
1. LCD: A liquid crystal display gives a visual
indication of signal strength; with a bar graph that
climbs as the signal strength increases. The LCD also
constantly monitors battery strength.
2. LED: A light emitting diode flashes when a target
is located.
3. VCO Pinpointing: An audio signal tone increases
in pitch and volume as the center of the search
coil passes over the target.
4. Leak proof: The IMPULSE is leak proof to 250 feet.
5. Salt Water Operation: Salt water or wet sand is
no problem for the IMPULSE. Its pulse induction
technology virtually ignores salt water, making it
the ideal underwater and beach-hunting machine.
6. Black Sand Operation: The IMPULSE penetrates
black sand and some highly mineralized soils where
ordinary detectors won’t work at all.
7. No-motion Pinpointing: You can sweep the
IMPULSE search coil, or hold it motionless over your
target and still get a target response.
8. Target Response: Sweep your search coil fast,
slow or not at all. The IMPULSE responds to targets no
matter how fast or slow you sweep the search coil.
9. Spider Coil: The 8-inch, open-center Spider coil
makes pinpointing easier. It’s lightweight, tough,
Electro-Static Insulated (ESI shielded) and 100
percent waterproof. Unlike most single-coil pulse
detectors, the IMPULSE has a receiver coil in the
center for easier and more accurate pinpointing.
10. Lightweight, Balanced and Comfortable: Only
about 5 pounds total weight with a cushioned
armrest and foam grip.
11. Hip-mountable: For almost effortless searching, the
control housing slides off the handle and onto your belt.
12. Battery Life: About 40 hours on carbon-zinc
batteries. Even more with alkalines.
2
ABOUT YOUR DETECTOR
13. All Metals: The IMPULSE detects all metals. It
has no “discrimination” circuitry, which drastically
reduces the ability of a pulse induction metal
detector to detect gold and silver.
14. Easy to Use: Just pick it up, turn it on and adjust
the TUNER control to the threshold level. You’re
ready to hunt.
CONDENSED OPERATING INSTRUCTIONS
Your IMPULSE is fairly simple to operate; however, its no-motion
design makes it operate differently from more-common, VLF,
induction-balance metal detectors. Therefore, even if you are
an experienced detector user, we strongly recommend that you
read this entire manual before starting. But if you just can’t wait,
here are some quick instructions to get you going on land.
1. Hold the coil up and away from any metal.
2. Set the tuner full counter clockwise, just before
it clicks into the “BATT TEST” position.
3. Set the VOLUME control knob to “10.”
4. Hold the search coil 1 to 2 inches above the
ground and adjust the TUNER control knob until the
audio tone can just barely be heard (usually one
or two bars on the LCD).
5. Readjust the volume control to a comfortable level,
when the search coil is passed over a large target.
6. You’re ready to go. Walk slowly and keep the coil
close to and parallel to the ground.
7. To pinpoint a target, locate the spot where the
volume and pitch of the audio signal peak. The LCD
signal-strength meter will also peak when the
center of the search coil is directly over the target.
8. To pinpoint the target more precisely, detune the
detector by readjusting the TUNER control counter
clockwise. This will reduce the sensitivity of the
search coil until only the center, or hot spot,
responds to the target.
3
CONDENSED OPERATING INSTRUCTIONS
9. Retune your IMPULSE before resuming your
search.
10. Good Hunting!
ASSEMBLY
Light emitting
diode (LED)
Battery access panel
(not shown)
Liquid crystal
Display
8-inch Spider coil
Nylon wing nut
Control panel
Fiberglass
reinforced
lower stem
Foam hand grip
Adjustable
arm rest
Coiled
cable
Headphone
plug
Submersible
headphones
Arm rest
screws
Fiberglass upper stem
Fisher M-Scope IMPULSE pulse induction metal detector.
Your Fisher IMPULSE requires very little assembly. Unpack it
carefully and save the carton, which may come in handy for
future storage or shipment.
1. Remove the headphone, handle and searchcoil assemblies from the carrying case. Be careful
not to damage the foam-rubber inserts or put any
strain on the cable connections.
2. Adjust the lower stem to the approximate length
you will be using; extended for stand-up use or as
short as possible for diving. To extend the lower
4
ASSEMBLY
stem, push in the spring lock, pull out the lower stem
and let the spring lock snap into another hole.
3. If you will be using the IMPULSE on the handle and
not body mounted, wind the search coil cable
around the handle assembly as shown in the diagram
on page 4. Secure the cable with the two Velcro
straps included with your IMPULSE. Make sure there
is some slack at the control-housing end and enough
at the other end to attach the search coil.
4. Remove the Delrin bolt and nylon wing nut from
the search coil. Line up the hole in the lower stem
between the two holes in the search coil “ears”.
Attach the coil to the stem with the bolt and wing
nut and finger tighten.
5. The armrest may be repositioned for maximum
comfort by removing the armrest screws, sliding the
armrest to the next screw hole and reinstalling the
arm-rest screws.
Upper stem
Arm rest
The arm rest can be
repositioned by
readjusting two
screws on the upper
stem.
Built-in detector stand
5
SETTING UP
FOR LAND OR SHALLOW WATER
Put the headphones around your neck to keep them out of the
way while making the following adjustments:
1. Adjust the stem length and coil angle so the search
coil rests flat on the ground about 6 inches in front and
slightly to the right of your right foot (to the left of your
left foot if you’re left handed). Your arm should be
straight and relaxed with the handle grip held firmly
but comfortably.
Remember, as you increase the shaft length, you also
increase the strain on your wrist and arm. The IMPULSE
is balanced for comfortable searching in a tight
semicircle around the front of the operator.
2. Leave enough slack in the coil cable to allow the
coil to swivel as far as it can in either direction. The
coil wing nut should be tight enough to prevent the
coil from moving.
3. You should now be able to move into your
“search” position by leaning slightly forward and
raising the search coil approximately 2 inches above
the ground. Your arm should still be straight and the
coil should be parallel to the ground, about 12 inches
in front of your foot. The coil angle may have to be
slightly readjusted at this point.
When searching on land or
in shallow water, keep your
arm straight and your
search coil no more than 2
inches above ground.
6
SETTING UP
FOR DIVING
Unlike induction-balance metal detectors, the IMPULSE ignores
the disruptive influences of salt water and black sand. This
capability, along with its deep-seeking sensitivity to iron, makes
it ideal for underwater treasure hunting and wreck diving. The
IMPULSE is also waterproof to a depth of 250 feet. Remember,
always practice safe diving methods.
Caution: Hipmounting the IMPULSE control housing is not
recommended for underwater use. The search coil cable may
become entangled with a submerged object, making it difficult
for the diver to resurface quickly in case of emergency.
1. Adjust the stem length as short as you can without
having the search coil detect your diving gear.
2. Adjust the search coil parallel to the seabed,
river or lake bottom.
3. Make sure extra cable is coiled tightly on the upper
stem as closely as possible to the control housing, with
just enough slack near the search coil to allow it to
swivel as far as it can in either direction. Extra cable
near the search coil may generate false signals.
4. Remove the tethered earphone plugs for rapid
pressure equalization as you dive and return to the
surface.
Shortened stem length
Extra cable
When diving with your
IMPULSE, use the shortest
possible stem length, with
the extra cable wrapped
tightly around the stem, as
close as possible to the
control housing.
7
SETTING UP
FOR HIPMOUNTING
For almost effortless treasure hunting, the control housing is
easily removed from the handle and attached to a belt clip.
“Hipmounting” the IMPULSE in this manner takes half the weight
off the handle and allows the land or shallow-water Treasure
Hunter to search much longer without arm fatigue.
1. Grasp the handle grip firmly with one hand and
the control housing with the other.
2. Slide the control housing off the mounting
bracket by pulling it toward you.
3. Slide the belt clip into grooves on the bottom of
the control housing. This is a snug fit, and you’ll have
to bend the belt clip slightly.
4. Unwrap just enough of the coil cable to allow
for searching.
5. Slip the control housing onto your belt, left side
for right-handers, right side for left-handers.
NOTE: Because of the extreme sensitivity of the IMPULSE search coil,
hipmounting the control housing may produce a false signal when the
search coil reaches the end of its arc (on the side that the control box is
attached to your belt). Depending on your stem length and how high
you have the housing hip mounted, the search coil may actually detect
the housing.
You can hipmount your IMPULSE by sliding the control housing
off the handle and attaching it to your belt. This reduces the
weigth of the stem, creating nearly effortless hunting.
8
CONTROL PANEL
1. TUNER/BATT TEST CONTROL: Tunes the detector
to its maximum sensitivity by adjusting the “threshold
level” to a faint tone. Also, when turned to BATT
TEST position, signals condition of batteries with
audio tone and LCD bar graph.
2. Liquid Crystal Display: LCD gives a continuous,
visual check of battery condition and provides a
visual display of signal strength. A bar graph rises
with an increase in signal strength and falls with a
decrease in signal strength. The bar graph also
indicates the approximate strength of the batteries
when the tuner is in the BATT TEST position. A fullscale reading of the bar graph indicates fully
charged batteries, while just a few bars means the
batteries are getting low. And when there’s only a
couple or no bars remaining, it’s time to replace
the batteries. Also, at this point, “BATT OK” is
replaced by a flashing “LO BATT.”
NOTE: Always remove your headphones or turn
down the volume before clicking into the BATT TEST
position.
3. Light Emitting Diode: LED flashes red when a
target is detected or the batteries are being tested.
4. VOLUME CONTROL: Adjusts volume of audio
headphone signal. The OFF position turns detector off.
5. STEM MOUNT: Bottom of control housing slides
into mount on stem handle, providing easy
detachment of the control housing for hipmounting.
2
3
1
4
The IMPULSE offers the user three
different target signals: an audio
target response, a large LCD bar
graph and a bright, red LED.
5
9
TUNING
Tuning your IMPULSE is a simple but necessary step before
beginning your search. If you’re hunting underwater, the
following steps should be performed underwater.
1. Hold the coil up and away
from any metal.
2. Set the tuner full counter
clockwise, just before it clicks
into the “BATT TEST” position.
3. Set the VOLUME control
knob to “10.”
4. Hold the search coil 1 to 2
inches above the ground and
adjust the TUNER control knob
The TUNER control Knob
until the audio tone can just
must be adjusted before
barely be heard (usually one or
starting your search
two bars on the LCD). Then finetune it just a little bit louder than a faint tone (usually about
two bars).
5. Readjust the volume control to a comfortable level
when the search coil is passed over a large target.
6. You’ve now tuned your IMPULSE to its proper “threshold
tone” and you’re ready to begin searching. When you
move from dry sand to wet sand, or as ground
mineralization or temperature changes, you will have to
readjust your tuner slightly to maintain your threshold setting.
SEARCHING
ON LAND OR SHALLOW WATER
Using good search techniques is every bit as important as having
a good detector.
1. Make sure your IMPULSE is properly tuned (see Tuning,
above) and the VOLUME control is adjusted before
beginning your search.
2. Begin by walking slowly, keeping the search coil as
close to the ground as possible.
10
SEARCHING
When the stem length is properly adjusted
the IMPULSE is balanced for sweeping in a
tight semicircle. Wide to the right for right
handers. Wide to the left for left handers.
Be sure to overlap your sweeps.
3. Walk slowly and sweep the search coil in a tight
semicircle, keeping the coil parallel and as close to
the ground as practical.
4. The IMPULSE has three signals that alert you to a
target: 1) an audible tone, 2) a meter that measures
signal strength and 3) a flashing red light. Listen intently
for the IMPULSE audio signal tone. The tone increases
in volume and raises in pitch when directly over the
target and decreases in volume and lowers in pitch
when moving away.
5. Overlap your sweeps by at least 50 percent.
Remember that your coil’s depth penetration is
conical, and if you don’t overlap each sweep you’ll
miss the deeper targets.
6. Search in a methodical manner. Pay close attention
to where you’re going and where you’ve been.
Be sure to keep the search
coil parallel and close to
the ground at all times.
11
SEARCHING
7. Take your time. If
you walk too fast you
can’t overlap your
sweeps, and you’ll
miss a lot of ground.
The LCD
indicates signal
strength and
continuously
monitors
battery
conditions.
NOTE: Your threshold tone will
probably go up and down as you
search. This is a perfectly normal
response since the distance
between your coil and the ground
varies as you sweep the coil back
and forth. You may want to readjust your threshold level slightly to
maintain a comfortable “average” threshold volume. You will also
have to readjust it if the ground mineralization changes sufficiently
or if you enter or leave wet sand.
UNDERWATER
The IMPULSE is waterproof to 250 feet, and it operates the same
underwater as on land. However, some differences in search
technique should be noted.
1. Tune your IMPULSE underwater, on the bottom.
You may want to run your threshold tone and
volume slightly higher than you would on land. If
you’re wearing a hood, you’ll probably have to
turn the volume control to maximum.
2. Keep the coil as far away from you (and your
dive gear) as possible. Sweep the search coil back
and forth in a wide semi-circle in front of you to
cover the bottom in a methodical manner.
3. Keep the coil parallel and as close to the bottom
as possible. Overlap your sweeps at least 50 percent.
4. Because your IMPULSE is a no-motion detector,
you can detect buried metallic objects in cracks,
crevices and out-of-the-way places without
having to move the coil back and forth.
5. Remember, observe all the rules of safe diving.
12
SEARCHING
NOTE:
Your threshold tone will probably go up and down as you search.
This is a perfectly normal response since the distance between
your coil and the bottom varies as you sweep the coil back and
forth. You may want to readjust your threshold level slightly to
maintain a comfortable “average “ threshold volume. You will also
have to readjust it if the ground mineralization changes sufficiently.
Divers can sweep the IMPULSE
search coil in a wide semicircle to
methodically cover a large open
area, or probe cracks and crevices
with the search coil using no motion.
PINPOINTING
Pinpointing your target with the IMPULSE is relatively simple,
but it will take some practice.
1. Make sure your IMPULSE is in tune. (See page
10, Tuning, if you need to tune your IMPULSE.)
2. Locate a target and pass the search coil over
it. You should notice three things from your IMPULSE:
1) The red LED flashes, indicating a target, 2) The
LCD signal-strength bar graph climbs, peaking
when the coil is directly over the target and 3) an
audible tone is heard, increasing in pitch and
volume as the search coil passes over the target.
3. Sweep the coil over the target, side-to-side and
13
PINPOINTING
front to back, to find the spot where the bar graph
peaks and the signal tone is loudest and highest.
Because the scan area of pulse-induction metal
detectors is fairly wide, further pinpointing may be
required, especially on large or very shallow targets.
4. Readjust the TUNING control slightly counterclockwise,
throwing the instrument slightly out of tune below the
audio threshold point. When the IMPULSE is detuned,
the sensitivity of the coil is decreased.
5. With your IMPULSE slightly detuned, sweep the
search coil over the target again. You’ll notice that
the target area has shrunk.
6. Continue to detune your IMPULSE until only a
slight signal is heard when the coil is passed over
the target.
7. With the IMPULSE set to this minimum-tune mode,
only the center of the coil, or hot spot, will respond
to the target, pinpointing the target location.
8. Another way to pinpoint large and/or shallow
targets is to simply lift the search coil until only a
faint, narrow target response is heard.
9. After digging the target, retune your IMPULSE
before continuing.
Hot Spot
Search coil penetration
with minimized tuning
Search coil penetration
with readjusted tuning
Pinpointing with the
IMPULSE no-motion
detector is
accomplished by
adjusting the tuning
so that only the
center of the search
coil remains
sensetive to the
target.
Search coil penetration
with maximized tuning
14
TARGET RECOVERY
Once you’ve identified and pinpointed a target, your
objective is to recover it quickly and neatly, leaving virtually no
trace of your excavation. There are almost as many ways to do
this as there are treasure hunters. Whatever works for you is good
enough as long as you don’t break any laws, damage
vegetation or leave uncovered holes.
Generally speaking, beachcombers do little if any damage to
the environment while recovering targets. However, if you plan to
use your IMPULSE on lawns or in parks, your target recovery method
can be very important. Two of the most successful methods are
illustrated in a separate booklet enclosed with your IMPULSE.
Reminder: Whichever method you choose, remember that
responsible treasure hunters take pride in their ability to leave
soil and vegetation intact and undamaged.
RECOVERY TOOLS
1. Sandscoops
designed
especially
for
beachcombers and shallow-water treasure
hunters are available at metal-detector outlets.
2. Divers use a variety of recovery tools,
depending on the condition of the seabed or lake
bottom. A sturdy dive knife will suffice in packed
mud or small rocks. Most divers prefer to use their
hands in loose sand. Professional treasure hunters
often use an air hose fed by a surface compressor
to blow away loose sand, gravel or mud.
3. For land recovery, a sturdy hunting knife with a
5-inch blade will suffice in most soils. A high quality,
double-edged “survival” knife is an even better
choice (and more expensive) because it will be
almost impossible to bend or break.
CAUTION: Using a jack knife without a locking
blade is a good way to lose a finger.
4. A heavy duty, blunt screwdriver is commonly
used for shallow targets where digging or
“plugging” are objectionable.
15
OPERATING TIPS
1. Keep the search coil cable wound snugly around
the stem when diving around coral or jagged rocks
to keep it from snagging.
2. Divers should make sure the drain holes in the
headset are unobstructed. Better yet, wait until
you’re on the bottom before putting your headset
on, and take it off before surfacing.
3. Divers should also keep the search coil at least 2
feet away from their bodies. Metal gear (weights,
gauges, tanks, etc.) will be detected by the
IMPULSE if held too close.
4. Practice pinpointing. There’s nothing sacred
about the method described in this manual. Many
IMPULSE users have developed their own
pinpointing methods.
5. If you’re wading or hunting on land, hold your
digging tool behind your back or above your waist.
Your IMPULSE is sensitive enough to sound off each
time the coil gets near it.
6. Don’t waste a lot of time digging holes for targets
you can’t find. If your hole keeps getting deeper and
wider, cover it up and go on. You may be over a buried
pipe or some other large, deep target. (However, if
you’re looking for a deep target, keep digging.)
7. If you’re looking for large, shallow targets,
detune your IMPULSE slightly below threshold. You’ll
pass right over a lot of small trash this way, but you
won’t miss items capable of producing a strong
target signal.
8. Good things often come in two’s or even three’s.
Once you’ve recovered a good target, always
recheck the hole for a second signal and carefully
search the immediate area by searching slowly
around the hole two or three times, slowly
increasing your search area. Always dig every
suspicious sound in the vicinity of a good find.
9. Recheck your hole even if your find was trash.
Good targets are often found beneath bad ones.
10. Practice. Practice over known targets. Practice
16
OPERATING TIPS
tuning. Practice pinpointing. Reread the
appropriate part of this manual if you’re having
problems.
BATTERIES
Eight AA batteries located in the rear section of the control
housing power the IMPULSE. The batteries are sealed off from
the electronics so that accidental water leakage into the battery
compartment will not damage the circuitry. To replace the
batteries, remove the battery access panel:
1. Remove the battery cover by partially
unscrewing the two, knurled thumb screws with a
coin or screwdriver. (The knurled knobs are
“captive screws” and do not have to be
completely removed from the battery cover.)
2. Remove the battery pack from the Control
Housing and disconnect the battery lead
connector. Be very careful not to put any undue
strain on the battery leads.
3. Remove the batteries from the battery packs.
Note the polarity markings inside the pack and
install fresh batteries. You may use regular carbon
zinc, alkaline or rechargeable Nicads.
17
BATTERIES
4. Reconnect the battery lead.
5. Insert the battery pack into the Control Housing
with the lead connector on top. Fold the leads
across the top of the pack.
6. Make sure the O-Ring and both sealing surfaces
are clear before reinstalling the battery cover. THIS
IS EXTREMELY IMPORTANT!
7. Finger tighten the thumb screws, and then
carefully tighten again 1/4 turn with a coin or
screwdriver.
HOME RECHARGER
Recharging Nicad batteries with the optional 110-volt
recharger is a simple procedure:
1. Remove and disconnect the Nicad battery pack
from the IMPULSE Control Housing.
2. Connect the recharger battery lead to the
battery pack.
3. Plug the recharger into a wall outlet, and the
batteries will begin recharging immediately.
4. The small, green light in the charger will stay on during
the entire charge cycle, indicating that all connections
have been made and the charger is working.
5. A full charge will take about 24 hours. Do not
charge more than 48 hours.
AUTO RECHARGER
The complete IMPULSE recharge kit (optional) includes one
battery pack, eight Nicad batteries, one 110-volt, 60-cycle home
recharger and one 12-volt, negative-ground, auto cigarette
lighter recharger. The 12-Volt Recharger offers a method to
recharge your nicad batteries while on the road.
1. Remove and disconnect the Nicad battery
pack from the Control Housing.
18
BATTERIES
2. Connect the cigarette lighter recharger battery
lead to the battery pack.
3. Plug the recharger into the cigarette lighter
socket, and the batteries will immediately begin
recharging.
4. The small, green light may glow briefly if the
batteries are completely dead and the engine is
running. Normally, it will not glow at all.
5. An overnight charge with the engine off may
give only 6 to 8 hours of battery life. A full charge
may take as long as 48 hours (less with the engine
running). For this reason, the Auto Charger may best
be used for occasional “Booster” charges (see Tips).
6. Do not charge over 48 hours.
TIPS ABOUT NICAD BATTERIES
Nicad batteries may accept as many as 1,000 recharges;
however, they have some limitations.
1. Nicad batteries will only last about half as long
as standard carbon-zinc batteries before
recharging is required.
2. Nicad batteries may develop a “memory” if you
give them repeated “booster” charges. In other
words, if you charge your Nicad batteries over and
over again for only three 3 hours at a time, the
batteries will eventually only hold a 3-hour charge.
3. Nicad batteries may reverse polarity if discharged
too low and refuse to recharge. Don’t leave your
detector turned on, and don’t continue to operate
it after the “LO BATT” indicator starts flashing.
19
MAINTENANCE
Your IMPULSE doesn’t require a lot of care. It’s built with high
quality materials, and it’s waterproof to a depth of 250 feet. But
there are a few things you should do to keep it in peak operating
condition.
STORAGE
1. If you’re not going to be using it for a while, take
the batteries out. Acid damage caused by leaking
batteries can be severe.
2. Avoid extreme temperatures. Don’t leave it
inside a closed car sitting in the sun or even worse,
in the trunk of a car.
CLEANING
1. Sand and dirt between the coil “ears” and lower
stem will literally grind away the ears and stem.
2. The headphone ear pads may be removed,
rinsed and squeezed out to remove any seawater
salt build-up. Rinse out the cups as well.
3. Sand, silt or fine dirt between the upper and
lower stems will cause the lower stem to freeze up.
Rinse frequently.
4. Rinse the area under the two knobs on the
control panel thoroughly after use.
5. Always clean and dry the area around the
battery-cover seal before opening.
BATTERY COMPARTMENT
1. Remove the battery cover and check for water
after each use.
2. Keep the sealing surfaces of the battery cover
and control housing clean and free of scratches
and nicks. Remove the O-ring from the cover
occasionally and apply a very thin coat of clear
silicone grease or Vaseline.
20
TREASURE HUNTER’S CODE OF ETHICS
LETS PRESERVE OUR TREASURED SPORT!
Laws governing the use of metal detectors are becoming
more and more common. In many countries, the use of metal
detectors is illegal or severely restricted. Don’t let this happen
in your area.
ALWAYS get permission to hunt on private property.
ALWAYS leave a site cleaner than you found it. Take at least
some trash with you or, if you can, take it all.
ALWAYS fill in your holes neatly whether you’re in a city park or
remote wildernessness. Leave the land as it was before you
disturbed it.
ALWAYS obey all laws relating to Treasure Hunting.
ALWAYS return valuable property if you can locate the original
owner.
ALWAYS do whatever you can to give the hobby of Treasure
Hunting the good image it needs and deserves.
21
Where To Use Your Metal Detector In The U.S.
National Forest and Federal Lands—Metal detecting is
allowed only by special permit acquired from the federal
government. Each area has a district office.
Corps of Engineers, Lakes, Shorelines and Lands—Permission
has been granted only on predisturbed sites, such as beaches
and attached swimming areas. New Corps lakes and lands
must be okayed by the main office of the Army Corps of
Engineers. Each area has a district office.
State Parks and Lands—Some state parks are open to metal
detecting, but some are not. Always check with the park
ranger before attempting to use your detector.
Bureau of Land Management (BLM) Lands—Some areas are
open for metal detecting, and some are not. Always check
with the district office.
City or County Park Lands—Most are open to metal detecting
unless notice is given by a sign or city ordinance. When in
doubt, always check with the city’s Parks and Recreation
Department.
Public School Grounds—Most are open to metal detecting
unless notice is given by a sign, city ordinance, law
enforcement official, or school employee. You should always
check with the school office first.
Privately Owned Lands (Private Property)—Permission required.
And it is always best to have the permission in writing.
Historically Marked Lands or Sites—Metal detecting is not
allowed. Don’t even think about it.
22
SPECIFICATIONS
1
Length 2 ......... Extended ...................................................................... 50"
Collapsed ...................................................................... 31"
8" Coil
Weight ........ Complete (with Headset) .................. 5.2 lbs.
Handle and Search Coil ...................... 2.3 lbs.
Control Housing ..................................... 2.4 lbs.
2
10 1/2" Coil
5.5 lbs.
2.6 lbs.
2.4 lbs.
Transmit Frequency ........................................ 5,333 pulses per second
crystal controlled
Audio Target Response (Headset) ................................................ VCO 3
Visual Target Response .................................................................. 1. LED 4
2. LCD bar graph 5
Headset ......................................................... Waterproof, Piezo Electric
Interchangeable .......................................................... No
Ground Balance Required ................................................................. No
Search Motion Required ..................................................................... No
Detachable Control Housing for Hipmounting ................................ Yes
Salt Water/Fresh Water Operation .................................................... Yes
Land Operation .................................................................................... Yes
Submersible .............................................................................. to 250 feet
Search Coil Type ............. Dual Spider coil, (Non-inductive balance)
Diameter .................................... 8" or 10 1/2"
Shielding ........................................ 100% ESI 6
Interchangeable .................................... No
Batteries .............................................................. (8)1.5-Volt, AA penlight
Battery Life 2 ............. Carbon Zinc ....................................... 40-50 hours
A l k a l i n e .............................................. 100+ hours
N i c a d s ............................................... 20-25 hours
Automatic Battery Check ................................................................... Yes
Operating Temperature ............................................................. 32-120°F
23
SPECIFICATIONS
NOTES
1. Subject to modification without notice.
2. Approximate.
3. VCO: Voltage Controlled Oscillator. Volume and frequency increase
as target is approached.
4. LED: Light Emitting Diode. Bright red light.
5. LCD: Liquid Crystal Display. Bar graph displays signal strength and
battery condition.
6. ESI: Electro-Static Insulated to reduce certain types of false signals.
7. The length and terms of the warranty will vary outside the U.S. Check
with your distributor for details. Fisher Research Laboratory does not warrant
suitability to specific use. Fisher Research Laboratory shall in no event be
liable for any direct, incidental, consequential or indirect damages.
24
25
QUALITY
Fisher detectors are renowned for their quality.
Each detector is hand crafted in the USA with pride
PERFORMANCE
Treasure Hunters worldwide rely on Fisher.
Our detectors are durable, dependable, and search deeper..
REPUTATION
Fisher produced the first patented metal detector in 1931. For
over 70 years, the Fisher logo has been a mark of excellence.
LIFETIME
WARRANTY
Fisher believes in the products we produce and backs this
belief with a lifetime warranty, the best in the industry, on all of
our consumer detectors. Warranty may vary outside of the
United States. See your dealer for details
SERVICE
Fisher is committed to providing you, our valued customer, with
superior service. Each and every instrument is rigidly tested and
carefully inspected during assembly and before shipment.
Should you have any questions or problems, contact:
FISHER RESEARCH LABORATORY
200 West Willmott Road.,
Los Banos, California 93635
Tel 209.826.3292 Fax 209.826.0416
www.fisherlab.com email:[email protected]
EXPORT DEPARTMENT
P.O. Box 1896
New Haven, CT 06508 USA
Tel 203.288.1638 Fax 203.287.8099
email: [email protected]