1
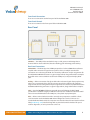
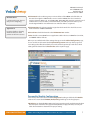
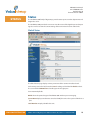
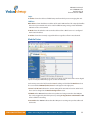
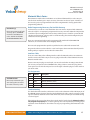
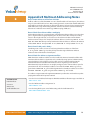
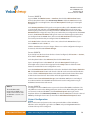
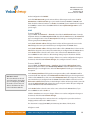
AM360r User Manual
revised 2009.02.16 for
Hardware Rev. B
Firmware Version 1.00.23
AudioMate 360r User Manual
AM360r
IP Voice Gateway for Land Mobile Radio
overview
tour
installation
config
specs
status
A
B
WWW.VOICEINTEROP.COM
Table of Contents
Overview
Voice Communications Via Your IP Network................................................... 2
AudioMate 360r Product Tour
Front Panel............................................................................................................. 3
Rear Panel............................................................................................................... 4
Installation
Network Considerations....................................................................................... 5
Bandwidth Consumption and CoDecs.............................................................. 5
Electrical Considerations..................................................................................... 5
Configuration
Log In...................................................................................................................... 6
Global Configuration............................................................................................ 6
Personality Module Configuration..................................................................... 7
Status
Global Status........................................................................................................10
Module Status......................................................................................................11
AudioMate 360r Specifications
Appendix A - Interface Examples
Ritron Nexus Radio Base....................................................................................14
Motorola Waris Series.........................................................................................15
Appendix B Multicast Addressing Notes
Appendix C - WAVE Configuration
Multicast Configuration.....................................................................................17
Unicast Configuration........................................................................................18
8000 N. Federal Highway, Suite 100, Boca Raton, FL, 33487 V: +1 561.939.3300
AM360r User Manual
revised 2009.02.16 for
Hardware Rev. B
Firmware Version 1.00.23
overview
Overview
Voice Communications Via Your IP Network
The AudioMate 360 family of IP voice gateways links your IP network with a new world of
voice communications possibilities. Now, disparate communications modes and equipment
can interoperate as never before.
The AudioMate 360a interfaces with baseband audio devices such as microphones, public
address amplifiers, broadcast receivers, and portable music players. The AudioMate 360i
interfaces with iDEN PTT radio networks, while the AudioMate 360r interfaces with existing
2-way radio equipment such as repeaters and control stations.
The AudioMate 360r connects to a 2-way Land Mobile Radio via either a balanced Type 2 or
3 E&M port or single-ended control and audio connections. The other portion of the unit
connects to your IP network using a standard 10/100BaseT LAN interface to provide the link
to other IP voice gateways and soft consoles running on desktop and laptop PCs.
Once properly installed and configured, any AudioMate Communicator soft console on your
LAN or WAN can transmit and receive over the radio attached to the AudioMate 360r IP voice
gateway. The AudioMate Server can accept telephone calls, iDEN calls from an AudioMate
360i, and other interoperating radio systems to form a huge conference of disparate modes
of communications.
$
%
$
%
$
&
!#
!"
WWW.VOICEINTEROP.COM
'(
%(
8000 N. Federal Highway, Suite 100, Boca Raton, FL, 33487 V: +1 561.939.3300
AM360r User Manual
revised 2009.02.16 for
Hardware Rev. B
Firmware Version 1.00.23
tour
AudioMate 360r Product Tour
Front Panel
Front Panel Indicators
All front panel indicator LEDs can display one of seven color states: OFF, RED, RED FLASHING,
GREEN, GREEN FLASHING, AMBER and AMBER FLASHING each of which can be used to
indicate a different condition within the AudioMate 360r.
LED
Amber
Amber
flashing
Green
Green
flashing
Red
Red
flashing
OK
Booting,
awaiting
DHCP
address
N/A
Normal
operation
N/A
Boot error
(view boot
via USB
serial port)
N/A
Link
N/A
N/A
Connected
to AM360
server
N/A
N/A
Seeking
AM360
server
Rx
Buffering
audio from
IP network
N/A
Playing rcvd N/A
RTP stream
out radio
port
N/A
N/A
Tx
N/A
N/A
N/A
N/A
Sending
RTP stream
to IP
network
N/A
Mic
N/A
N/A
N/A
N/A
M-lead
asserted
N/A
Ear
N/A
N/A
E-lead input
is active
N/A
N/A
N/A
ANI
N/A
N/A
N/A
N/A
N/A
N/A
DTMF
N/A
N/A
N/A
N/A
N/A
N/A
ANI = Automatic Number Identification, used for PTT ID
WWW.VOICEINTEROP.COM
8000 N. Federal Highway, Suite 100, Boca Raton, FL, 33487 V: +1 561.939.3300
AM360r User Manual
revised 2009.02.16 for
Hardware Rev. B
Firmware Version 1.00.23
Front Panel Connections
There are no connections to the front panel of the AudioMate 360r.
Front Panel Controls
There are no controls on the front panel of the AudioMate 360r.
Rear Panel
Rear Panel Indicators
LAN Port — The LAN jack has two built-in lamps: a solid green one indicating that an
electrical link has been established, the other flashing green indicating packet activity.
Rear Panel Connections
4-Wire E&M — This RJ-45 Type II or III E&M port provides a balanced 600 ohm transformercoupled audio connection to popular 2-way radios. There are multiple standards for
connections to a radio using the RJ-45. The electrical specifications and pin assignments for
the AudioMate 360r E&M connector are given in Appendix A, along with interface examples.
Be careful not to connect an Ethernet cable to the E&M port, as they both employ RJ-45
jacks.
Analog — Allows connection of single-ended audio and control signals from popular 2-way
radios via a screw terminal plug. This plug accepts stranded or solid wire. All signaling is
single ended, referenced to ground. The pin assignments and electrical specifications for the
AudioMate 360r Analog connector are given in Appendix A, along with interface examples.
LAN — Standard 10/100BaseT Ethernet port with pin-outs following the AT&T T568B
specification. A standard Category 5 LAN cable connects it to an Ethernet switch. Be careful
not to connect the E&M cable to the LAN port, as they both employ RJ-45 jacks.
USB — Allows a trained technician with a correctly setup computer to establish a direct
serial connection to the AudioMate 360r internal Diagnostic Console. Connects via a
standard USB A to Mini-B cable. The computer must have the Virtual Comm. Port driver from
FTDI (ftdichip.com) installed along with any standard terminal emulator. This port is
used for diagnostics; no voice parameters can be set.
WWW.VOICEINTEROP.COM
8000 N. Federal Highway, Suite 100, Boca Raton, FL, 33487 V: +1 561.939.3300
AM360r User Manual
revised 2009.02.16 for
Hardware Rev. B
Firmware Version 1.00.23
12 V — 12 Volt d.c. input, tip is positive, ring is negative. The supplied power adapter converts
120 Volt a.c. main power to 12 Volts d.c. at 500 mAmps maximum. The power plug has a
1.3mm inner diameter.
Rear Panel Controls
Reset — This recessed push button reboots the processor in the AudioMate 360. Depress
using a pen or any device with a small tip. The length of time that it is held depressed
determines the type of reset:
Quick Reset – A momentary press performs a simple reset.
Factory Reset – Press and hold until OK light goes from AMBER to GREEN to reset those
options found on the web configuration screens to factory defaults. While the AudioMate
360 is awaiting an address from a DHCP server this could take as much as 60 seconds. In
order to ensure that the device loads factory default settings the Reset button must be
held this entire time, until the OK light changes from AMBER.
installation
Installation
Network Considerations
In the typical AudioMate installation all endpoints are contained entirely in a corporate
LAN, or participate via a WAN link, either unicast through a VPN or an engineered MPLS
network, for example. It is preferable that all routers serving network segments that
connect AudioMate endpoints be configured to route multicast streams. This can smooth
implementation of multicast systems in general, and the deployment of AudioMate
Communicator remote control soft consoles in particular.
Multicast is used to allow multiple endpoints to share one stream of audio packets, thus
reducing bandwidth consumption. However, while multicast streams typically pass
seamlessly through Ethernet switches, they are typically blocked by most routers unless
proper preparations are made to accommodate multicast. It is a near certainty that multicast
streams will not flow through most Internet routers. Therefore, unicast addresses are
acceptable for use in the AudioMate 360 line of IP gateways.
Bandwidth Consumption and CoDecs
The G.711 codec (encoder/decoder algorithm) consumes approximately 84kilobits/second
per stream. More aggressive codecs consume less bandwidth, but their output audio
is typically of lower quality. Some codecs perform poorly in environments with high
acoustic noise near the microphone. Narrowband IP links might require a more aggressive
codec, while endpoints on your LAN will likely do well with the G.711 codec. Because the
AudioMate Media Server can perform transcoding between coding algorithms you have the
opportunity to optimize bandwidth usage versus audio quality.
Electrical Considerations
The AudioMate 360 gateways are powered by 12 Volts d.c. which can be provided by the
provided plug-in power supply or by a 12 Volt battery with float charging system. In either
case, the power must be clean and free of a.c. noise components and interruptions. The
supplied power module should be plugged into an uninterruptible power supply (UPS) for
trouble-free service. If a 12 Volt battery/charger system is used, the charger must keep noise
to less than 12mVp-p.
WWW.VOICEINTEROP.COM
8000 N. Federal Highway, Suite 100, Boca Raton, FL, 33487 V: +1 561.939.3300
AM360r User Manual
revised 2009.02.16 for
Hardware Rev. B
Firmware Version 1.00.23
config
AudioMate 360
The Address Finder utility is
available at our web site:
www.voiceinterop.com
Configuration
Individual AudioMate 360 units are configured via web browser pointed to the management
address of the unit. The units are shipped with DHCP enabled and will accept whatever
address is assigned by your DHCP server, within approximately 60 seconds after power-up.
Failing that, the units will default to an IP address of 192.168.0.254 after timing out. Use
the AudioMate 360 address finder utility to locate the addresses of your units in preparation
for configuration.
Each unit requires two groups of configuration data: one group that is common across the
AudioMate 360 family and a second group that is specific to the personality module of the
unit.
Log In
AudioMate 360
username = admin
password = password
Type the address of the AudioMate 360 unit under test into the address bar of your web
browser. (At the time of this writing the freely available Mozilla Firefox web browser provides
smoother operation for these purposes.) If a name had been previously assigned to this
particular AudioMate 360 unit it will appear in the title bar of the web browser to assist in
identifying it. At the prompt, for user name type admin and for password type the word
password.
If your credentials were accepted you will see a two part screen with a menu panel on the
left pane and a page labeled AM360 Status on the right pane.
Global Configuration
In the menu pane on the left, locate the Configuration heading and click the link Global
under it. The screen labeled AM360 Configuration should appear in the right pane.
You may safely ignore the AMCP settings.
WWW.VOICEINTEROP.COM
8000 N. Federal Highway, Suite 100, Boca Raton, FL, 33487 V: +1 561.939.3300
AM360r User Manual
revised 2009.02.16 for
Hardware Rev. B
Firmware Version 1.00.23
RTP Remote IP
is relative to this unit, the one
that you are configuring.
Appendix B
has more detail on selecting
multicast addresses with
pointers to reference sources.
RTP Remote IP is the multicast group or unicast address of the other end of the link, not
this unit. This might be a WAVE media server or another AM360. The Class D multicast
range lies between 225.0.0.0 and 239.255.255.255 with numerous restrictions and
considerations. A unicast address should fall within your LAN’s private IP address space.
Consult Appendix B for more information on multicast address assignment.
RTP Remote Port is the IP port number assigned to this channel. This should be an even
number between 16384 and 65534.
RTP Local Port should be identical to the RTP Remote Port number.
Codec should be set to G711u for most applications. Other choices are G711a for G.711 A-law,
and GSM for GSM 6.1 full rate.
When you are satisfied with all the settings that appear on the Global Configuration page,
be sure to click on the button labeled Update Configuration at the top of the page. Your
new settings take effect immediately. To revert back to the previously saved values while
editing click the button labeled Reset Values at the top of the page.
Personality Module Configuration
In the menu pane on the left, locate the Configuration heading and click the link Module
under it. The screen labeled AM360r (Radio) Config should appear in the right pane.
COS Polarity sets the AudioMate 360r unit to begin streaming audio to the IP network when
the COS input is held either low (approximately 0 Volts) or high (3-12 Volts). Consult your
radio documentation to determine the proper setting.
WWW.VOICEINTEROP.COM
8000 N. Federal Highway, Suite 100, Boca Raton, FL, 33487 V: +1 561.939.3300
AM360r User Manual
revised 2009.02.16 for
Hardware Rev. B
Firmware Version 1.00.23
Receive De-Emphasis Enable will apply a 6dB per octave roll-off of high frequencies; this is
effectively a low-pass filter using an industry standard curve in cases where the audio input
to the AudioMate 360r is connected to the discriminator output of a conventional radio.
Check this box to enable the de-emphasis low-pass filter or clear the check box to allow
the receive audio to pass through the AudioMate 360 with no equalization (flat audio).
Receive Gain accepts a number from 0 to 63 representing 64 steps of gain or attenuation in
the audio line from the attached radio receiver to the IP network. Level 0 represents the
lowest audio level while 63 represents the highest audio level.
Analog Receiver to VoIP Mode drop-down listbox determines the triggering mechanism
that will begin the stream from the radio receiver to the IP network.
OFF prevents any receive audio from being streamed to the IP network.
COS (Carrier-Operated Switch) will stream audio to the IP network when the COS digital
input is asserted, either on the Single-Ended COS logic line or the M-lead of the E&M
interface.
NSQ (Noise Squelch) is only useful when the receive audio input of the AudioMate 360r
is connected to the radio receiver’s unsquelched discriminator source in a conventional
radio. The AudioMate 360r will determine the presence of received signal based on the
reduction in white noise from the radio. If this setting is selected, then the NSQ Gain
setting must also be configured for proper operation.
COS+NSQ (AND Squelch) computes the Boolean logic value of the COS AND NSQ.
That is, if the COS digital input is asserted and the NSQ detector is also active, then
the AudioMate 360r will stream receive audio to the IP network. The most common
application for this setting would be to use the noise squelch detector to ascertain that
an intelligible signal is present at the radio receiver while the COS input is connected to a
coded squelch detector (PL or DPL) to block out all but the desired users on the channel.
This is commonly referred to as “AND Squelch”.
ON activates the receive audio stream at all times, even when there is no receive audio
to send. This setting can interfere with proper operation of channel patches, therefore its
use is discouraged.
NSQ Gain sets the squelch level provided by the AudioMate 360r when the receive audio
input is connected to the discriminator output of a conventional radio. This setting is only
useful when NSQ or COS+NSQ is selected in Analog Receiver to VoIP Mode above. It is
also likely that you will want to check the box for Receive De-Emphasis Enable as well.
PTT Polarity sets the logic level that will be applied to the PTT digital output in order to key
the attached radio transmitter. For radios requiring an active low or ground signal on their
PTT lines, select Active LO. For other types of keying circuits select Active HI. Consult your
radio technical manual to determine the proper setting.
Transmit Pre-Emphasis Enable will apply a 6 dB per octave high pass filter to the transmit
audio stream from the IP network to the transmitter audio of the attached radio. Check
the box to apply this filter or clear the check box to allow the transmitted audio to pass
unprocessed (flat audio). In general, if the transmit audio line of the AudioMate 360r is
connected to the microphone input of the attached radio, then leave this check box
WWW.VOICEINTEROP.COM
8000 N. Federal Highway, Suite 100, Boca Raton, FL, 33487 V: +1 561.939.3300
AM360r User Manual
revised 2009.02.16 for
Hardware Rev. B
Firmware Version 1.00.23
cleared. If the audio is fed directly to the FM modulator of the radio, this check box should
be checked to enable pre-emphasis.
Transmit Gain accepts a number from 0 to 63 representing 64 steps of attenuation or gain
in the audio path from the IP network to the attached radio transmitter. Level 0 represents
the lowest audio level while 63 represents the highest audio level. Follow the procedure
specified in your radio’s technical manual to set this to an acceptable level.
VoIP to Transmitter Mode determines whether the AudioMate 360r will allow two-way
audio flow or prohibit transmission entirely.
OFF disables the AudioMate 360r from keying the attached radio transmitter. Use to
prohibit transmission entirely in listen-only applications where the radio should never be
keyed under any circumstances.
Half Duplex allows transmission over the attached radio, but will not stream receive
audio during transmission. Select this when attached to a control station radio.
Full Duplex allows transmission over the attached radio while simultaneously sending
receive audio back to the IP network. Select this when attached to a full-duplex repeater
station.
ON keys the attached radio transmitter full-time regardless of the signals from the IP
network.
PTT Delay (Hang Time) sets the time period between the end of the IP network stream and
the release of the PTT signal by the AudioMate 360r. This can be useful if the radio unkeys
before all the audio has finished playing out of the buffer. Acceptable values for PTT Delay
range from 0 to 25.5 seconds in increments of 0.1 seconds.
PTT Timeout sets the maximum duration of a transmission to prevent the attached radio
from typing up the channel, such as an stuck footswitch on a console on the IP network.
Acceptable values for PTT Timeout range from 0 minutes to 25.5 minutes. Typically this
value is set between 1 and 3 minutes for practical applications.
When you are satisfied with all the settings that appear on the Module Configuration page,
be sure to click on the button labeled Update Configuration at the top of the page. Your
new settings take effect immediately. To revert back to the previously saved values while
editing click the button labeled Reset Values at the top of the page.
WWW.VOICEINTEROP.COM
8000 N. Federal Highway, Suite 100, Boca Raton, FL, 33487 V: +1 561.939.3300
AM360r User Manual
revised 2009.02.16 for
Hardware Rev. B
Firmware Version 1.00.23
status
Status
The AudioMate 360 family of IP gateways provide status reports to make adjustments and
diagnostics easier.
The AudioMate 360r provides the means to view the status of the digital input and output
signals as well as to view the current settings of the transmit and receive audio levels.
Global Status
The Global Status page displays various parameters of the common interface board.
In the menu pane on the left, locate the Status heading and click the link Global under it.
The screen labeled AM360 Status should appear in the right pane.
Some noteworthy fields:
Model shows the particular type of AudioMate 360 unit that you are managing.
System Name displays text that was stored to identify this unit or the system of which it is a
part.
Serial Number uniquely identifies this unit.
WWW.VOICEINTEROP.COM
8000 N. Federal Highway, Suite 100, Boca Raton, FL, 33487 V: +1 561.939.3300
10
AM360r User Manual
revised 2009.02.16 for
Hardware Rev. B
Firmware Version 1.00.23
Login
IP Address shows the address of YOUR computer from which you are managing this unit.
LAN Port
MAC Address shows the Ethernet address of the unit’s LAN interface. This uniquely identifies
the unit on your network and can be useful in differentiating among several AudioMate
360 units on the same network.
IP Mode shows whether the unit received its address from a DHCP server or is configured
with a static IP address.
IP Address shows the currently assigned IP address regardless of how it was obtained.
Module Status
The Module Status page displays the audio level settings and the state of the various digital
inputs and outputs. Refresh the page to see the current states.
In the menu pane on the left, locate the Status heading and click the link Module under it.
The screen labeled AM360r (Radio) Status should appear in the right pane.
TX Level and RX Level indicate the current setting of the transmit and receive audio levels.
These can be changed in the Module Configuration screen.
Talk Mode when Active indicates that voice packets are being streamed to the LAN port.
This can be triggered by the COS input or by setting Analog Receiver to VoIP Mode to ON
to force full-time streaming.
Listen Mode when Active indicates that the LAN port is receiving voice packets addressed
to this unit.
WWW.VOICEINTEROP.COM
8000 N. Federal Highway, Suite 100, Boca Raton, FL, 33487 V: +1 561.939.3300
11
AM360r User Manual
revised 2009.02.16 for
Hardware Rev. B
Firmware Version 1.00.23
COS Input indicates that the state of this digital input line is currently at the Active level,
whether defined to be high or low. In a properly configured system this would go active
when the attached radio’s receiver is receiving a signal.
NSQ Detector indicates whether the unit’s built-in noise squelch detector is receiving
enough discriminator noise to turn off the path from the receive audio input to the LAN
port. Less noise means more signal which in turn means that this indicator will show Active.
In most configurations this will always indicate Active since there is no high frequency
noise for the detector to decode.
Ear Input follows the state of the E-lead on the E&M port.
PTT Output indicates whether this digital output line is asserted, shown as Key, or whether
it is idle. If troubleshooting and this indicates Key yet the attached radio does not transmit,
check the wiring of the interface cable and whether the radio requires an active low or
active high signal to key the transmitter.
Mic Output indicates the state of the M-lead on the E&M port.
WWW.VOICEINTEROP.COM
8000 N. Federal Highway, Suite 100, Boca Raton, FL, 33487 V: +1 561.939.3300
12
AM360r User Manual
revised 2009.02.16 for
Hardware Rev. B
Firmware Version 1.00.23
specs
AudioMate 360r Specifications
Physical
Form factor
Stand-alone unit
Dimensions
1.75 in. (4.5 cm) H x 3.6 in. (9.2 cm) W x 5.2 in. (13.2 cm) D
Weight
0.8 pounds (0.4 kg)
Electrical
Input Voltage
12 Volts d.c. nominal, 16 Volts d.c. MAX., 10 Volts d.c. min.
Input current
350 mAmps nominal
Audio Interface
Line input, balanced
0 dBm nominal, +10 dBm MAX. @ 600 Ohms (E&M port)
Line input, single-ended
2.2 Volts peak-peak nominal, 5 Volts peak-peak MAX. @ 10K
Ohms
Line output, balanced
0 dBm nominal, +10 dBm MAX. @ 600 Ohms (E&M port)
Line output, single-ended
2.2 Volts peak-peak nominal, 5 Volts peak-peak MAX. @ 100
Ohms
Digital I/O
Outputs
PTT, 12 Volts @ 500 mAmp MAX., open drain; user-selectable
active hi or low
Inputs
COS, high > 3 Volts (18 Volts MAX.); user-selectable active high
or low
L.A.N.
10/100-BaseT Ethernet RJ-45 jack
Serial
USB-mini B diagnostic port
E&M
Type II (two) and Type III (three) E&M interface
Digital audio
CoDecs
G.711 μ-law 64kbps, G.711 A-law 64kbps, GSM 6.10 (13kbps)
Environmental
Operating temperature
0 to +40 Centigrade
Storage temperature
-20 to +60 Centigrade
Miscellaneous
Indicators
Activity: OK, Link, Tx, Rx, Mic, Ear, ANI, DTMF
Features
Firmware upgrade over Ethernet; web browser configuration
screens (no jumpers); telnet diagnostic output, USB
diagnostic and basic configuration utility
Ports
4-wire E&M RJ-45; 5-pin inline for single-ended audio and
digital i/o; LAN RJ-45; 12 Volt coaxial jack; USB-mini B for
diagnostics
Specifications subject to change. Note hardware revision and firmware version of your
particular unit when consulting specifications and instructions.
WWW.VOICEINTEROP.COM
8000 N. Federal Highway, Suite 100, Boca Raton, FL, 33487 V: +1 561.939.3300
13
AM360r User Manual
revised 2009.02.16 for
Hardware Rev. B
Firmware Version 1.00.23
A
Appendix A - Interface Examples
Ritron Nexus Radio Base
The Ritron NRB is a small, lightweight radio available in VHF and UHF bands that is wellsuited to demonstration use. It interfaces with the AudioMate 360r via a straight–through
E&M or standard Category 5 LAN cable on the hardrware revision B and later units.
Not Working?
Configure Ritron radio E&M
jumpers to positions A, C, E
for proper operation.
Ritron Jumper Settings
¤ Remove the 2 side screws and the 2 smaller bottom screws to remove the base of the
Ritron radio.
¤ Locate the E&M daughter board and move jumpers to positions A, C, and E.
¤ Re-install the cover and screws.
E&M Cable
Pin Assignments
Ritron AM360r
Wire color
Description
1
1
Orange
-12 Volts (SB)
2
2
Orange/White
COS (M-lead)
3
3
Green
Rx audio, balanced
4
4
Blue/White
Tx audio, balanced
5
5
Blue
Tx audio, balanced
6
6
Green/White
Rx audio, balanced
7
7
Brown/White
PTT to Ritron (E-lead)
8
8
Brown
Ground (SG)
AM360r E&M Interface Simplified Schematic
Radio OR Trunk/PBX
1
COS
out
PTT
Detect
Sig IN
Off Hook
2
7
B
-48V
Detect
2
2
7
7
Sig OUT
A
8
1
1
8
8
SB
AM360 4 Wire E&M Port
(Emulates Cisco Audio Gateway/Router)
-12v
Current Limiter
68ma
M
DC-DC
1 Watt
B
E
SG
A
B
+12v
Type II & III
3
600
ohm
3
AM360r RJ-45
T
600
ohm
Audio IN
6
6
4
4
600
ohm
R
T1
Audio OUT
5
5
R1
600
ohm
A = Connection to 4 Wire E&M Type II and III Units
B = Connection to 4 Wire E&M Unpowered Units
WWW.VOICEINTEROP.COM
8000 N. Federal Highway, Suite 100, Boca Raton, FL, 33487 V: +1 561.939.3300
14
AM360r User Manual
revised 2009.02.16 for
Hardware Rev. B
Firmware Version 1.00.23
Motorola Waris Series
Most Motorola mobile radios in the Waris series (CM and CDM models) use the same pinouts for basic interfacing via a 16-pin accessory connector on the rear apron. A number of
the accessory pins are programmable in the radio using Motorola’s closely guarded CPS
programming software.
Not Working?
Proper programming of radio
accessory pins is ESSENTIAL
to interface with Motorola
radios. CHECK ACCESSORY
PIN PROGRAMMING FIRST.
Radio Programming Necessary For Use With Gateway
In almost every case where a new installation does not work as expected with a Motorola
radio, the culprit is an improperly programmed accessory connector. Motorola CPS provides
a number of preset configuration macros that speed this process. Look for a preset labeled
"telephone interconnect", "phone patch" or similar wording. This should configure the pins
of interest to do the right thing.
Pin 8 on a conventional radio must be programmed for combined PL/DPL AND COR
indication; on a trunked radio select Talkgroup Activity.
Pin 11 must be programmed to provide squelched receiver audio with constant level.
Program the radio to use Pin 2 which is a mic level input to the transmitter that will provide
limiting with pre-emphasis and use Pin 3 for external PTT.
Interface Cable
There are several eBay sellers offering interface cables for Motorola radios. At a minimum
look for a 5-wire cable with a 16-pin accessory plug on it that fits all the CDM and CM series
Motorola mobile radios.
Because some 16-pin plugs are not keyed, care must be used when inserting it into the 20pin accessory receptacle on the CDM1550 radios, being certain to center the plug; that is,
leave 2 pins bare on the left and 2 pins bare on the right so that the plug sits in the center 16
pins of the radio.
Pin Assignments
AudioMate 360r
Note: Jumper Motorola pins
15 and 16 together to enable
the radio’s internal speaker.
Mot
AM360r
Description
2
TXA
Transmit microphone audio to radio
3
PTT
Push-to-talk control signal to radio
7
GND
Ground, common, return
8
COS
Carrier-Operated Switch (COS, COR, RUS), receive activity indicator
11
RXA
Receive line-level audio from radio
Troubleshooting
If in doubt about the interface, a Volt meter can be used to determine if the COS input pin of
the AM360r gateway changes when the attached Motorola radio is actively receiving a radio
signal. It should be between 5 and 12 Volts when idle, and should drop to near 0 Volts during
a received signal.
If the Voltage does not go low when the received signal is heard, then the Motorola radio is
not programmed properly for use with a gateway. This is the #1 problem preventing proper
operation of new installations. Check the accessory pin programming of the Motorola radio
FIRST.
WWW.VOICEINTEROP.COM
8000 N. Federal Highway, Suite 100, Boca Raton, FL, 33487 V: +1 561.939.3300
15
AM360r User Manual
revised 2009.02.16 for
Hardware Rev. B
Firmware Version 1.00.23
B
Appendix B Multicast Addressing Notes
Note 1: Avoid addresses of the form 224.0.0.x
Traffic to addresses of the form 224.0.0.x is often flooded to all switch ports. This address
range is reserved for link-local uses. Many routing protocols assume that all traffic within this
range will be received by all routers on the network. Hence (at least all Cisco) switches flood
traffic within this range. The flooding behavior overrides the normal selective forwarding
behavior of a multicast-aware switch (e.g. IGMP snooping, CGMP, etc.).
Note 2: Watch for multicast address ambiguity
32 IP multicast addresses are mapped onto each Ethernet multicast address. A receiver that
joins a single IP multicast group implicitly joins 31 others due to this overlap. The overlap
occurs in the 5 high-order bits, so it’s best to use the 23 low-order bits to make distinct
multicast streams unique. For example, IP multicast addresses in the range 239.0.0.0 to
239.127.255.255 all map to unique Ethernet multicast addresses. However, IP multicast
address 239.128.0.0 maps to 239.0.0.0, 239.128.0.1 maps to 239.0.0.1, etc.
Note 3: Avoid x.0.0.y and x.128.0.y
Combining notes 1 and 2, it’s best to avoid using IP multicast addresses of the form
x.0.0.y and x.128.0.y since they all map onto the range of Ethernet multicast
addresses that are flooded to all switch ports.
Note 4: Watch for address assignment conflicts
IANA administers multicast addresses on the world-wide Internet. Potential conflicts with
Internet multicast address assignments can be avoided by using (private) administratively
scoped addresses. Such addresses can be safely used on a network connected to the
Internet without fear of conflict with multicast sources originating on the Internet.
Administratively Scoped addresses are roughly analogous to the unicast address space for
private internets. Site-local multicast addresses are of the form 239.255.x.y, but can
grow down to 239.252.x.y if needed. Organization-local multicast addresses are of the
form 239.192-251.x.y, but can grow down to 239.x.y.z if needed.
The address range 239.252.1.1 through 239.255.255.254 is preferred to avoid multicast packet
propogation outside of the private network.
AudioMate 360
Detailed info at:
cisco.com
29west.com
smallnetbuilder.com
WWW.VOICEINTEROP.COM
» See also Cisco’s Guidelines for Enterprise IP Multicast Address Allocation paper available at
www.cisco.com
» See also “Multicast Address Assignment” at
www.29west.com
» See also Doug Reid’s 3 part series “Multicasting and the Small Network” at
www.smallnetbuilder.com
8000 N. Federal Highway, Suite 100, Boca Raton, FL, 33487 V: +1 561.939.3300
16
AM360r User Manual
revised 2009.02.16 for
Hardware Rev. B
Firmware Version 1.00.23
C
Appendix C - WAVE Configuration
WAVE (Wide Area Voice Environment) from Twisted Pair Solutions provides the glue to tie
together your various IP voice communications endpoints. The AudioMate 360 family of IP
voice gateways works seamlessly with WAVE to extend your communications options and
enhance interoperability among disparate devices.
Multicast groups are preferred for WAVE installations to allow many soft consoles to
participate in the same communication channels without increasing the bandwidth
consumed by each console. Deploying multicast links to each AudioMate 360 device allows
for seamless failover if that option is implemented in WAVE. Any participating media server
listens to the multicast streams and picks up where the failed media server dropped off.
However, in some networks the only option is unicast transmission. This forces the
AudioMate 360 units to be configured as point-to-point trunk links and prevents their
streams from being picked up automatically by a failover server. In other words, if the target
media server fails at the other end of the point-to-point pipe the packets have nowhere to
go. As long as these limitations are acceptable, unicast point-to-point links can be employed.
Multicast Configuration
AM360
Open a web browser and point it to the management IP address of the AudioMate
360 device to be configured. Log in with user admin and password password or the
credentials that you have configured.
Under Configuration click Global.
In the field RTP Remote IP type the desired multicast group address, following the
guidelines in Appendix B. Addresses in the 239.255.x.y block are recommended for
private local area networks. For RTP Remote Port and RTP Local Port type a port number
between 16384 and 65534; both fields should be identical numbers. For Codec select
G.711u; if this network segment will not support about 100kbps streams then select GSM.
Click the button Update Configuration to save your changes.
WAVE
Channels (WAVE 3)
Log in to WAVE. Click Channels -> Channels, then click the Add Channel button. From the
dropdown listbox select Multicast Trunk, then click the Next button. In the Name field type
a meaningful name. Tab to the Description field and type a meaningful description. Select a
group from the Group listbox.
In the IP address field type the exact same multicast group address that you configured into
the AM360 above. Tab over to the Port field and type the exact same port number that you
configured into the AM360 above. Check the box labeled Use the same IP address and port
as ‘Audio Receive’. In the Codec listbox select the same codec as was selected in the AM360
above; if you choose GSM then set the Scale to 1. All remaining settings may be left at their
defaults.
Click the Save button to save your changes. If there are no other configuration changes to
be entered, click the button Commit Changes.
WWW.VOICEINTEROP.COM
8000 N. Federal Highway, Suite 100, Boca Raton, FL, 33487 V: +1 561.939.3300
17
AM360r User Manual
revised 2009.02.16 for
Hardware Rev. B
Firmware Version 1.00.23
Channels (WAVE 4)
Log in to WAVE. Click Media Servers -> Interfaces, then click the Add Interface button.
From the dropdown listbox select VoiceInterop AM360 and click the Next button. In the
Name field type a meaningful name. Tab to the Description field and type a meaningful
description.
In the Gateway IP Address field type the management address of the AM360 that will be
associated with this endpoint. In the RTP Remote IP address field type the exact same
multicast group address that you configured into the AM360 above. Tab over to the RTP
Remote Port field and type the exact same port number that you configured into the AM360
above. In the RTP Local IP address field type the exact same multicast group address that
you configured into the AM360 above. Tab over to the RTP Local Port field and type the
exact same port number that you configured into the AM360 above.
In the Codec listbox select the same codec as was selected in the AM360 above; if you
choose GSM then set the Scale to 1.
Click the Save button to save your changes. If there are no other configuration changes to
be entered, click the button Commit Changes.
Sessions (WAVE 3)
If you already have the desired standard user channel configured, click Sessions -> Sessions,
then click the Add Session button.
In the dropdown listbox select Advanced, then click the Next button.
Type a meaningful name in the Name field. Tab to the Description field and type a
meaningful name. Select the desired group from the Group listbox and click the Save
button to reveal the full Session configuration screen.
Leave the Conference ID / DN field blank and clear the checkbox labeled Treat as the Dial-In
DN. Click the Add Servers button and select the desired media servers that will handle this
session. Click the Add Participant button and add the multicast trunk channel from above
and the desired standard user channel that will be bridged with this AM360 device.
Click the button Save and Commit changes. Your AudioMate 360 device is now bridged
via multicast with the desired WAVE Standard channel. Test the configuration using an
AudioMate Communicator soft console.
WAVE 4
The AudioMate 360 is
integrated into WAVE 4 as a
media server interface. Add
an AM360 to a session as an
interface.
Sessions (WAVE 4)
To configure a session in WAVE version 4, proceed as directed for WAVE 3 installations. The
only difference comes when adding participants to the session. After adding the standard
user channel as indicated for WAVE 3, click the Add Participant button again. In the
dropdown listbox select VoiceInterop AM360, then click the Next button. Select the desired
AM360 by checking the box next to it, then click the Add Selected Participants button.
Unicast Configuration
AM360
Open a web browser and point it to the management IP address of the AudioMate
360 device to be configured. Log in with user admin and password password or the
credentials that you have configured.
WWW.VOICEINTEROP.COM
8000 N. Federal Highway, Suite 100, Boca Raton, FL, 33487 V: +1 561.939.3300
18
AM360r User Manual
revised 2009.02.16 for
Hardware Rev. B
Firmware Version 1.00.23
Under Configuration click Global.
In the field RTP Remote IP type the unicast address of the target media server. For RTP
Remote Port and RTP Local Port type a port number between 16384 and 65534; both
fields should be identical numbers. For Codec select G.711u; if your network will not support
about 100kbps streams then select GSM. Click the button Update Configuration to save
your changes.
WAVE
Channels (WAVE 3)
Log in to WAVE. Click Channels -> Channels, then click the Add Channel button. From the
dropdown listbox select Point-to-point Trunk, then click the Next button. In the Name field
type a meaningful name. Tab to the Description field and type a meaningful description.
Select a group from the Group listbox.
In the Trunk Side A IP address field type the IP address of the target media server. In the
Port field type the same port number that you configured into the AM360 above.
In the Trunk Side B IP address field type the IP address of the AM360 above. Tab over to the
Port field and type the exact same port number that you configured into the AM360 above.
In the Codec listbox select the same codec as was selected in the AM360 above; if you
choose GSM then set the Scale to 1. All remaining settings may be left at their defaults.
Click the Save button to save your changes. If there are no other configuration changes to
be entered, click the button Commit Changes; else, configure Sessions as above.
Channels (WAVE 4)
Log in to WAVE. Click Media Servers -> Interfaces, then click the Add Interface button.
From the dropdown listbox select VoiceInterop AM360 and click the Next button. In the
Name field type a meaningful name. Tab to the Description field and type a meaningful
description.
Remote vs Local
The terms Remote and Local
are relative to the device that
you are configuring. In WAVE,
the media server is the Local
address while Remote refers
to the AudioMate 360 unit.
In the Gateway IP Address field type the management address of the AM360 that will be
associated with this endpoint. In the RTP Remote IP address field type the management IP
address of the AM360 above. Tab over to the RTP Remote Port field and type the exact same
port number that you configured into the AM360’s field labeled ‘RTP Local Port’. Leave the
RTP Local IP address field blank to use the binding IP address of the target media server. Tab
over to the RTP Local Port field and type the exact same port number that you configured
into the AM360’s field labeled ‘RTP Remote Port’.
In the Codec listbox select the same codec as was selected in the AM360 above; if you
choose GSM then set the Scale to 1.
Click the Save button to save your changes. If there are no other configuration changes to
be entered, click the button Commit Changes.
The session that bridges these unicast channels is configured in a procedure similar to
bridging multicast channels in WAVE version 4.
This document is copyright © 2008 by VoiceInterop, Boca Raton, Florida, U.S.A.
All rights reserved.
WWW.VOICEINTEROP.COM
8000 N. Federal Highway, Suite 100, Boca Raton, FL, 33487 V: +1 561.939.3300
19