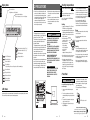
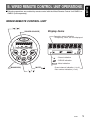
1
Owner’s manual
Mode d’emploi
Manual de instrucciones
Istruzioni per l’uso
CMD4
WATERTIGHT MARINE AM/FM/CD MULTIMEDIA
CONTROLLER
•
COMBINÉ NAUTIQUE ÉTANCHE RADIO AM/FMLECTEUR CD MULTIMEDIA
•
CONTROLADOR MULTIMEDIA MARINO DE AM/FM/
DISCOS CD IMPERMEABLE
•
UNITÀ DI CONTROLLO MULTIMEDIALE PER USO
MARITTIMO AM/FM/CD IMPERMEABILE
Clarion Co., Ltd.
All Rights Reserved. Copyright © 2004: Clarion Co., Ltd.
Printed in China / Imprimé en Chine / Impreso en China / Stampato in Cina
2004/12
PE-2686B
280-8187-00
English
Thank you for purchasing this Clarion product.
∗ Please read this owner’s manual in its entirety before operating this equipment.
∗ After reading this manual, be sure to keep it in a handy place (e.g., glove compartment).
∗ Check the contents of the enclosed warranty card and keep it with this manual.
∗ This manual includes the operating procedures of the CD changer and Sirius satellite connected
via the CeNET cable. The CD changer and Sirius satellite have their own manuals, but no
explanations for operating them are described.
Contents
1. FEATURES ...................................................................................................................................... 2
2. PRECAUTIONS .............................................................................................................................. 3
Handling Compact Discs ................................................................................................................. 4
Front Panel ...................................................................................................................................... 4
3. CONTROLS .................................................................................................................................... 5
4. NOMENCLATURE .......................................................................................................................... 6
Names of the Buttons and their Functions ...................................................................................... 6
Major button operations when external equipment is connected to this unit ................................... 7
Display Items ................................................................................................................................... 8
LCD Screen ..................................................................................................................................... 8
5. WIRED REMOTE CONTROL UNIT OPERATIONS ........................................................................ 9
6. OPERATIONS ................................................................................................................................ 11
Basic Operations ............................................................................................................................ 11
Radio Operations ........................................................................................................................... 12
CD Operations ............................................................................................................................... 14
Operations Common to Each Mode .............................................................................................. 15
7. ACCESSORIES ............................................................................................................................ 17
Sirius Satellite Radio Operations ................................................................................................... 17
CD Changer Operations ................................................................................................................ 20
8. TROUBLESHOOTING .................................................................................................................. 21
9. ERROR DISPLAYS ....................................................................................................................... 22
10. SPECIFICATIONS ......................................................................................................................... 23
1. FEATURES
• Meets ASTM B117 Salt/Fog Exposure
Standard
• Meets ASTM D4329 UV Exposure Standard
• Pelgan Z ® Conformal Coated PCB and
Microprocessor
• Rotary Volume, Bass, Treble, and Fade
Controls
• Direct Access Source Selectors
• Rubber Tactile Action Control Buttons
• High Definition Positive LC Display
• Bright White LED Illumination
• Quick Release CD Door
2
CMD4
• Integrated Chassis Drip Shield and Mounting
Gasket
• Spring Loaded Silicon Oil Damped
Suspension System
• CD-R/CD-RW Compatible
• Magi-Tune+® Tuner with 6 AM/18FM Presets
• 2-Channel RCA Audio Auxiliary Input
• 6-Channel RCA Audio Output (Front/Rear/
Non-Fade)
• 4-Channel Speaker Output (53 x 4 Max)
CMD4
93
Display Items
Handling Compact Discs
: Preset channel indication (1 to 6)
Disc number indication (1 to 6)
: A-LOUD indication
: SIRIUS indication
: Category indication
: Manual indication
: Stereo indication
: Disc indication
• Lights during disc scan, disc repeat, and disc random play.
: Scan indication
: Repeat indication
: Random indication
: Enter indication
1. When it is very cold in the boat and the unit is
used soon after switching on the heater, the
disc and the optical components may become
fogged and not operate properly. Wipe fogged
discs with a soft cloth. Fogged optical
components will naturally return to normal
when the unit is left for about one hour, after
which it will operate normally.
This equipment has been tested and found to
comply with the limits for a Class B digital device,
pursuant to Part 15 of the FCC Rules.
These limits are designed to provide reasonable
protection against harmful interference in a
residential installation.
This equipment generates, uses, and can radiate
radio frequency energy and, if not installed and
used in accordance with the instructions, may
cause harmful interference to radio
communications. However, there is no guarantee
that interference will not occur in a particular
installation.
If this equipment does cause harmful interference
to radio or television reception, which can be
determined by turning the equipment off and on,
the user is encouraged to consult the dealer or
an experienced radio/TV technician for help.
2. When the boat is underway in rough water the
CD may skip as a result of intense vibrations
and shock.
3. This unit uses a precision mechanism. Even
in the event that trouble arises, never open
the case, disassemble the unit, or lubricate
the rotating parts.
CAUTION
USE OF CONTROLS, ADJUSTMENTS, OR
PERFORMANCE OF PROCEDURES OTHER
THAN THOSE SPECIFIED HEREIN, MAY
RESULT IN HAZARDOUS RADIATION
EXPOSURE.
THE COMPACT DISC PLAYER and MINI DISC
PLAYER SHOULD NOT BE ADJUSTED OR
REPAIRED BY ANYONE EXCEPT PROPERLY
QUALIFIED SERVICE PERSONNEL.
CHANGES OR MODIFICATIONS NOT
EXPRESSLY APPROVED BY THE
MANUFACTURER FOR COMPLIANCE COULD
VOID THE USER’S AUTHORITY TO OPERATE
THE EQUIPMENT.
INFORMATION FOR USERS:.
CHANGES OR MODIFICATIONS TO THIS
PRODUCT NOT APPROVED BY THE
MANUFACTURER WILL VOID THE
WARRANTY AND WILL VIOLATE FCC
APPROVAL.
Use only compact discs bearing the
mark.
Do not play heart-shaped, octagonal, or other
specially shaped compact discs.
Some CDs recorded in CD-R/CD-RW mode
may not be usable.
Handling
• Compared to ordinary music CDs, CD-R and
CD-RW discs are easily affected by high
temperature and humidity. Prolonged exposure
to high heat and humidity may make the discs
unplayable. Therefore, do not leave them for a
long time in the boat.
• New discs may have Ball-point pen
rough edges. If such
Roughness
discs are used, the
player may not work,
or the sound may
skip. Use a ball-point
pen or the like to
remove any
roughness from the edge of the disc.
• Never stick labels on the surface of the compact
disc or mark the surface with a pencil or pen.
• Never play a compact disc with any
cellophane tape or other glue on it or with
peeling off marks. If you try to play such a
compact disc, you may not be able to get it
back out of the CD player or it may damage
the CD player.
• Do not use compact discs that have large
scratches, are misshapen, cracked, etc. Use of
such discs may cause misoperation or damage.
• To remove a compact disc from its storage case,
press down on the center of the case and lift the
disc out, holding it carefully by the edges.
• Do not use commercially available CD
protection sheets or discs equipped with
stabilizers, etc. These may damage the disc or
cause breakdown of the internal mechanism.
Storage
• Do not expose compact discs to direct sunlight
or any heat source.
• Do not expose compact discs to excess
humidity or dust.
• Do not expose compact discs to direct heat
from heaters.
Cleaning
• To remove fingermarks and dust, use a soft
cloth and wipe in a straight line from the center
of the compact disc to the circumference.
• Do not use any solvents, such as commercially
available cleaners, anti-static spray, or thinner
to clean compact discs.
• After using special compact disc cleaner, let
the compact disc dry off well before playing it.
Front Panel
CAUTION
: Mute indication
When opening and closing the front panel,
be careful not to catch your fingers. They
could be injured.
1. Always use this unit with the front panel
closed.
2. Do not force operations or use this device
abnormally when opening or closing the front
panel.
3. Do not use the front panel as a tray to place
objects on when it is open.
4. When closing the front panel, do not press
the [OPEN] button.
LCD Screen
In extreme cold, the screen movement may slow down and the screen may darken, but this is normal.
The screen will recover when it returns to normal temperature.
Bottom View of Source Unit
5. Strong impacts to the operating or display
section can cause damage or deformation.
6. If the front panel does not open fully, gently
open it with your hand.
7. Do not touch the panel OPEN detection
switch.
OPEN detection switch.
Be sure to unfold and read the next page.
Veuillez déplier et vous référer à la page suivante.
Cerciórese de desplegar y de leer la página siguiente.
Assicurarsi di aprire e leggere la pagina successiva.
8
CMD4
CMD4
3
CMD4
4
English
Disc In indications
• Lights when a disc is loaded.
Operation status indication
• Titles, frequency, clock, etc. are displays.
English
English
2. PRECAUTIONS
Source unit / Appareil pilote / Unidad fuente / Unità di fonte
Français Español
[SEEK/MAN]
[MENU]
[AM/FM]
[AUX]
Note:
• Be sure to read this chapter referring to the front diagrams of chapter “3. CONTROLS” on page 5
(unfold).
Names of the Buttons and their Functions
[CD/CDC]
[SAT]
[CAT]
[ROTARY]
[OPEN]
[ENT]
[CD/CDC] (CD/CD changer) button
[REPEAT] button
• Use to switch between CD and CD changer
mode.
• Repeat play while in the CD mode.
[SAT] (Satellite) button
• Plays 10 seconds of each track while in the
CD mode.
• Use to switch to SIRIUS mode.
• Switch the band.
[
/MUTE]
Italiano
]
[DIRECT]
[TREBLE]
[
[FADE]
DISC
[RANDOM]
[REPEAT]
[SCAN]
]
Note: Be sure to unfold this page and refer to the front diagrams as you read each chapter.
Remarque: Veuillez déplier cette page et vous référer aux schémas quand vous lisez chaque chapitre.
Nota: Cuando lea los capítulos, despliegue esta página y consulte los diagramas.
Nota: Assicurarsi di aprire questa pagina e fare riferimento a questi diagrammi quando si legge ciascun capitolo.
5
CMD4
• Seek or manual tunings while in the radio
mode.
[MENU] (Title) button
[←DISC→] (Disc up/down) buttons
• Select the desired CD in the CD changer.
[RANDOM] button
• Perform random play. Also perform disc
random play when the button is pressed and
held.
• Enter the category selection mode.
• When held depressed for 1 second or longer,
category scan is performed.
[REPEAT] button
[DIRECT] (1–6) buttons
[SCAN] button
• Use to switch to AUX mode.
[BASS] knob
[ROTARY] knob
• Adjust the bass by turning the knob clockwise
or counterclockwise.
[OPEN] button
• Open the panel by pressing the “Clarion
Marine” oval latch button. Audio will mute
with the front panel open.
[MENU] button
• Press and hold the button for 1 second or
longer to switch to the menu mode.
[Q]
[SEEK/MAN] (Seek/Manual) button
[CAT] (Category) button
[A], [D] buttons
• Select a station while in the radio mode or
select a track when listening to a CD. The
buttons are also used to adjust function
settings.
• Press and hold the button for 1 second or
longer to switch to fast-forward/fast-rewind.
[POWER] button
• Press the button to turn on the power.
Press and hold the button for 1 second or
longer to turn the power off.
• Switches operation between Radio, CD, Aux,
and CeNET modes.
• Performs various settings.
[DIRECT] (1–6) buttons
[CD SLOT]
• Store a station into memory or recall it
directly while in the radio mode.
• CD insertion slot.
[DISP] (Display) button
• Eject a CD when it is loaded into the unit.
• Switch the display indication (Main display,
Sub display, Clock display).
[RESET] button
[RANDOM] button
• CD plays random track order.
6
CMD4
• Use to perform title scroll.
• Stores a station into memory or recall it
directly.
[DISP] (Display) button
• When held depressed for 1 second or longer,
switches title.
[A], [D] buttons
• Select a station.
• Perform repeat play. When this button is
pressed and held, single disc repeat play is
performed.
• Perform scan play for 10 seconds of each
track. Disc scan play is performed when the
button is pressed and held.
[A], [D] buttons
• Select a track when listening to a disc.
• Press and hold the button for 1 second or
longer to switch to fast-forward/fast-rewind.
[s/MUTE] (Play/Pause/Mute) button
• When held depressed for 1 second or longer,
performs Play or Pause.
[s/MUTE] (Play/Pause/Mute) button
• When held depressed for 1 second or longer,
performs Play or Pause.
• Turns mute ON/OFF.
[ENT] (Enter) button
[RESET]
• Use to switch between CD and CD changer
mode.
• Adjust the treble by turning the knob
clockwise or counterclockwise.
• Seek or manual tunings while in the radio
mode.
[CD SLOT]
[CD/CDC] (CD/CD changer) button
• Use to switch to SIRIUS mode.
• Switch the band.
∗ For details, see the section “CD Changer
Operations”.
[TREBLE] knob
[SEEK/MAN] (Seek/Manual) button
With the front panel opened / Avec le panneau avant ouvert /
Con el panel frontal abierto / Con il frontalino aperto
[SAT] (Satellite) button
∗ For details, see the section “Sirius
Satellite Radio operations”.
• Use to switch to radio mode.
• Switch the band.
• Adjust the volume by turning the knob
clockwise or counterclockwise.
• Use the knob to perform function
adjustments.
[DISP]
[BASS]
[FADE] (Fader) knob
● When the CD changer is
connected
[AM/FM] button
[AUX] button
], [
[SCAN] button
● When the Sirius Satellite
Radio is connected
• Adjust the fader by turning the knob
clockwise or counterclockwise.
[POWER]
[
Major button operations when external equipment is
connected to this unit
4. NOMENCLATURE
[Q] (Eject) button
• Press and hold the button for about 2
seconds when the following symptoms occur.
∗ Nothing happens when buttons are pressed.
∗ Display is not accurate.
CMD4
7
Eng ish
English
English
English
3.CONTROLS / LES COMMANDES
CONTROLES / CONTROLLI
Display Items
Handling Compact Discs
: Preset channel indication (1 to 6)
Disc number indication (1 to 6)
: A-LOUD indication
: SIRIUS indication
: Category indication
: Manual indication
: Stereo indication
: Disc indication
• Lights during disc scan, disc repeat, and disc random play.
: Scan indication
: Repeat indication
: Random indication
: Enter indication
1. When it is very cold in the boat and the unit is
used soon after switching on the heater, the
disc and the optical components may become
fogged and not operate properly. Wipe fogged
discs with a soft cloth. Fogged optical
components will naturally return to normal
when the unit is left for about one hour, after
which it will operate normally.
This equipment has been tested and found to
comply with the limits for a Class B digital device,
pursuant to Part 15 of the FCC Rules.
These limits are designed to provide reasonable
protection against harmful interference in a
residential installation.
This equipment generates, uses, and can radiate
radio frequency energy and, if not installed and
used in accordance with the instructions, may
cause harmful interference to radio
communications. However, there is no guarantee
that interference will not occur in a particular
installation.
If this equipment does cause harmful interference
to radio or television reception, which can be
determined by turning the equipment off and on,
the user is encouraged to consult the dealer or
an experienced radio/TV technician for help.
2. When the boat is underway in rough water the
CD may skip as a result of intense vibrations
and shock.
3. This unit uses a precision mechanism. Even
in the event that trouble arises, never open
the case, disassemble the unit, or lubricate
the rotating parts.
CAUTION
USE OF CONTROLS, ADJUSTMENTS, OR
PERFORMANCE OF PROCEDURES OTHER
THAN THOSE SPECIFIED HEREIN, MAY
RESULT IN HAZARDOUS RADIATION
EXPOSURE.
THE COMPACT DISC PLAYER and MINI DISC
PLAYER SHOULD NOT BE ADJUSTED OR
REPAIRED BY ANYONE EXCEPT PROPERLY
QUALIFIED SERVICE PERSONNEL.
CHANGES OR MODIFICATIONS NOT
EXPRESSLY APPROVED BY THE
MANUFACTURER FOR COMPLIANCE COULD
VOID THE USER’S AUTHORITY TO OPERATE
THE EQUIPMENT.
INFORMATION FOR USERS:.
CHANGES OR MODIFICATIONS TO THIS
PRODUCT NOT APPROVED BY THE
MANUFACTURER WILL VOID THE
WARRANTY AND WILL VIOLATE FCC
APPROVAL.
Use only compact discs bearing the
mark.
Do not play heart-shaped, octagonal, or other
specially shaped compact discs.
Some CDs recorded in CD-R/CD-RW mode
may not be usable.
Handling
• Compared to ordinary music CDs, CD-R and
CD-RW discs are easily affected by high
temperature and humidity. Prolonged exposure
to high heat and humidity may make the discs
unplayable. Therefore, do not leave them for a
long time in the boat.
• New discs may have Ball-point pen
rough edges. If such
Roughness
discs are used, the
player may not work,
or the sound may
skip. Use a ball-point
pen or the like to
remove any
roughness from the edge of the disc.
• Never stick labels on the surface of the compact
disc or mark the surface with a pencil or pen.
• Never play a compact disc with any
cellophane tape or other glue on it or with
peeling off marks. If you try to play such a
compact disc, you may not be able to get it
back out of the CD player or it may damage
the CD player.
• Do not use compact discs that have large
scratches, are misshapen, cracked, etc. Use of
such discs may cause misoperation or damage.
• To remove a compact disc from its storage case,
press down on the center of the case and lift the
disc out, holding it carefully by the edges.
• Do not use commercially available CD
protection sheets or discs equipped with
stabilizers, etc. These may damage the disc or
cause breakdown of the internal mechanism.
Storage
• Do not expose compact discs to direct sunlight
or any heat source.
• Do not expose compact discs to excess
humidity or dust.
• Do not expose compact discs to direct heat
from heaters.
Cleaning
• To remove fingermarks and dust, use a soft
cloth and wipe in a straight line from the center
of the compact disc to the circumference.
• Do not use any solvents, such as commercially
available cleaners, anti-static spray, or thinner
to clean compact discs.
• After using special compact disc cleaner, let
the compact disc dry off well before playing it.
Front Panel
CAUTION
: Mute indication
When opening and closing the front panel,
be careful not to catch your fingers. They
could be injured.
1. Always use this unit with the front panel
closed.
2. Do not force operations or use this device
abnormally when opening or closing the front
panel.
3. Do not use the front panel as a tray to place
objects on when it is open.
4. When closing the front panel, do not press
the [OPEN] button.
LCD Screen
In extreme cold, the screen movement may slow down and the screen may darken, but this is normal.
The screen will recover when it returns to normal temperature.
Bottom View of Source Unit
5. Strong impacts to the operating or display
section can cause damage or deformation.
6. If the front panel does not open fully, gently
open it with your hand.
7. Do not touch the panel OPEN detection
switch.
OPEN detection switch.
Be sure to unfold and read the next page.
Veuillez déplier et vous référer à la page suivante.
Cerciórese de desplegar y de leer la página siguiente.
Assicurarsi di aprire e leggere la pagina successiva.
8
CMD4
CMD4
3
CMD4
4
English
Disc In indications
• Lights when a disc is loaded.
Operation status indication
• Titles, frequency, clock, etc. are displays.
English
English
2. PRECAUTIONS
English
5. WIRED REMOTE CONTROL UNIT OPERATIONS
■ Following operations are enabled by remote control with the Wired Remote Control Unit CMRC1 or
CMRC2 (sold separately).
WIRED REMOTE CONTROL UNIT
[
],[
]
Display Items
[POWER/SOURCE]
Operation status indication
∗ Frequency, clock, etc. are displayed.
: Stereo indication
: SIRIUS indication
: Mute indication
[BAND/DISC]
[MUTE/
[
],[
]
Preset channel indication (1 to 6)
Disc number indication (1 to 6)
]
CMD4
9
WIRED REMOTE CONTROL UNIT OPERATIONS
English
CAUTION
Lower the volume level before powering the
source unit off. The source unit stores the
last volume setting. If the source unit is
powered off with the volume up, when the
source unit is powered back on, the sudden
loud volume may harm your hearing and/or
damage the source unit.
WARNING
When the front panel is open, no sound is
produced, and source unit controls and
remote control unit operations are disabled.
Always shut the front panel after changing
the CD.
EXPOSING THE UNIT TO WATER WITH THE
FRONT PANEL OPEN WILL CAUSE
DAMAGE OR UNIT MALFUNCTION!
[POWER/SOURCE] button
Turning on and off the power
Press the [SOURCE] button to turn the power
on and press and hold it for 1 second or longer
to turn the power off.
Changing the operation mode
Each time the [SOURCE] button is pressed, the
mode switches in the following order:
Radio mode ➜ SIRIUS mode ➜ CD mode
➜ CD changer mode ➜ AUX mode ➜ Radio
mode.....
Notes:
• If the above equipment is not connected,
corresponding mode cannot be selected.
• In CD mode, if no CD is loaded in the unit, the
radio mode is selected.
[ w ], [ z ] Buttons
Adjusting the volume
Press the [ w ] button to increase the volume
and press the [ z ] button to decrease the
volume.
[BAND/DISC] Button
Changing the band (in Radio mode)
Each time the [BAND] button is pressed, the
band switches in the following order:
FM1 ➜ FM2 ➜ FM3 ➜ AM ➜ FM1.....
Changing the disc (in CD changer mode)
Each time the [BAND] button is pressed, the
disc switches in the following order:
1 ➜ 2 ➜ 3 ➜ 4 ➜ 5 ➜ 6 ➜ 1.....
10
CMD4
[MUTE/s] Button
Press the [MUTE] button. The sound is muted
immediately.
To cancel, press the [MUTE] button again.
When held depressed for 1 second or longer,
performs Play or Pause.
[a], [d] Buttons
Selecting tracks (in CD changer mode or CD
mode)
Press the [d] button to start playback from the
beginning of the following track. Press the [a]
button to start playback from the beginning of
the current track. If pressed again, the track
moves to the previous one.
Fast-forward and fast-rewind (in CD changer
mode or CD mode)
Press and hold the [d] button to fast-forward
the disc. Press and hold the [a] button to fastrewind the disc.
∗ Pressing and holding the [a] or [d] buttons for
1 second or longer will move forward or backward
3 times faster than normal play, and pressing and
holding it for 3 seconds or longer will do the
operation 30 times faster.
Changing preset stations (in Radio mode)
Each time the [a] or [d] buttons are pressed,
the preset station switches in the following
order:
1 ➜ 2 ➜ 3 ➜ 4 ➜ 5 ➜ 6 ➜ 1.....
or
6 ➜ 5 ➜ 4 ➜ 3 ➜ 2 ➜ 1 ➜ 6.....
Basic Operations
Note:Be sure to read this chapter referring to the front diagrams of
chapter “3. CONTROLS” on page 5 (unfold).
CAUTION
Lower the volume level before powering the
source unit off. The source unit stores the
last volume setting. If the source unit is
powered off with the volume up, when the
source unit is powered back on, the sudden
loud volume may harm your hearing and/or
damage the source unit.
WARNING
When the front panel is open, no sound is
produced, and source unit controls and
remote control unit operations are disabled.
Always shut the front panel after changing
the CD.
EXPOSING THE UNIT TO WATER WITH THE
FRONT PANEL OPEN WILL CAUSE
DAMAGE OR UNIT MALFUNCTION!
Turning on/off the power
1. Press the [POWER] button.
2. The illumination and display on the unit light
up. The unit automatically remembers its last
operation mode and will automatically switch
to display that mode.
3. Press and hold the [POWER] button for 1
second or longer to turn off the power for the
unit.
Note:
• System check
During the initial power up of this unit, it will go
through a system check procedure. This
procedure verifies any devices connected through
CeNET. Any additional CeNET devices plugged
into the unit after the initial power up will initiate
the system check procedure. The system check
starts automatically within the unit.
Selecting a mode
Adjusting the volume
Turning the [ROTARY] knob clockwise
increases the volume; turning it
counterclockwise decreases the volume.
∗ The volume level is from 0 (minimum) to 33
(maximum).
Switching the display
Press the [DISP] button to select the desired
display.
Each time you press the [DISP] button, the
display switches in the following order:
Main display
Sub display (SIRIUS mode only)
Clock display
Main display
∗ Once selected, the preferred display becomes
the display default. When a function
adjustment such as volume is made, the
screen will momentarily switch to that
function’s display, then revert back to the
preferred display several seconds after the
adjustment.
1. Press the [CD/CDC], [SAT], [AM/FM] or
[AUX] button to change the operation mode.
2. Each time you press the [POWER] button,
the operation mode changes in the following
order:
Radio mode ➜ SIRIUS mode ➜ CD mode
➜ CD changer mode ➜ AUX mode ➜
Radio mode...
∗ External equipment not connected with
CeNET is not displayed.
CMD4
11
English
6. OPERATIONS
Radio Operations
Adjusting the bass
FM reception
1. Turning the [BASS] knob clockwise
emphasizes the bass; turning it
counterclockwise attenuates the bass.
For enhanced FM performance the
tuner includes signal actuated stereo control,
Enhanced Multi AGC, Impulse noise reduction
circuits and Multipath noise reduction circuits.
∗ Adjustment range: –6 to +6 dB
Adjusting the treble
1. Turning the [TREBLE] knob clockwise
emphasizes the treble; turning it
counterclockwise attenuates the treble.
∗ Adjustment range: –6 to +6 dB
This unit is initially set to USA frequency intervals
of 10kHz for AM and 200kHz for FM. When using
it outside the USA, the frequency reception range
can be switched to the intervals below.
∗ Adjustment range: F12 (full front) to R12 (full
rear)
AM
Adjusting the fader
1. Turning the [FADE] knob clockwise
emphasizes the sound from the front
speakers; turning it counterclockwise
emphasizes the sound from the rear
speakers. The fader adjusts both the source
unit RCA and speaker outputs.
®
Changing the reception area
FM
English
Basic Operations
Frequency
spacing
Frequency
range
Frequency
spacing
Frequency
range
U.S.
standard
(Initial setting)
Other
countries
Europe
standard
10 kHz
9 kHz
9 kHz
530 to
1,710 kHz
531 to
1,629 kHz
531 to
1,602 kHz
200 kHz
50 kHz
50 kHz
87.9 to
107.9 MHz
87.0 to
108 MHz
87.5 to
108 MHz
Setting the reception area
∗ Any station preset memories are lost when the
reception area is changed.
1. Press the [AM/FM] button and select the
desired radio band (FM or AM).
• U.S. standard (initial setting)
2. While pressing the [DISP] button, press and
hold the number “1” of the [DIRECT] buttons
for 2 seconds or longer.
• Other countries (new setting)
2. While pressing the [DISP] button, press and
hold the number “2” of the [DIRECT] buttons
for 2 seconds or longer.
• Europe standard (new setting)
2. While pressing the [DISP] button, press and
hold the number “3” of the [DIRECT] buttons
for 2 seconds or longer.
Listening to the radio
1. Press the [AM/FM] or [POWER] button to
select the radio mode. The frequency appears
in the display.
2. Press the [AM/FM] button to select the radio
band. Each time the button is pressed, the radio
reception band changes in the following order:
FM1 ➜ FM2 ➜ FM3 ➜ AM ➜ FM1...
3. Press the [a] or [d] button to tune in the
desired station.
12
CMD4
Radio Operations
Recalling a preset station
A total of 24 preset positions (6-FM1, 6-FM2, 6FM3, 6-AM) exist to store individual radio
stations in memory. Pressing the corresponding
[DIRECT] button recalls the stored radio
frequency automatically.
1. Press the [AM/FM] button and select the
desired band (FM or AM).
2. Press the corresponding [DIRECT] button to
recall the stored station.
Tuning
There are 3 types of tuning mode available, seek
tuning, manual tuning and preset tuning.
∗ Press and hold one of the [DIRECT] buttons
for 2 seconds or longer to store the current
station into preset memory.
Seek tuning
Manual memory
1. Press the [AM/FM] button and select the
desired band (FM or AM).
1. Select the desired station with seek tuning,
manual tuning or preset tuning.
2. Press and hold one of the [DIRECT] buttons
for 2 seconds or longer to store the current
station into preset memory.
∗ If “MANU” is lit in the display, press the
[SEEK/MAN] button. “MANU” in the display
goes off, and seek tuning is now available.
2. Press the [a] or [d] button to
automatically seek a station.
When the [d] button is pressed, the station is
sought in the direction of higher frequencies; if
the [a] button is pressed, the station is
sought in the direction of lower frequencies.
Manual tuning
There are 2 manual tuning methods available:
Quick tuning and step tuning.
When you are in the step tuning mode, the
frequency changes one step at a time. In the
quick tuning mode, you can quickly tune the
desired frequency.
1. Press the [AM/FM] button and select the
desired band (FM or AM).
∗ If “MANU” is not lit in the display, press the
[SEEK/MAN] button. “MANU” is lit in the
display and manual tuning is now available.
2. Tune in a station.
●Quick tuning:
Press and hold the [a] or [d] button for 1
second or longer to tune in a station.
●Step tuning:
Press the [a] or [d] button to manually
tune in a station.
CMD4
13
English
Mute
Use this function to turn off the sound
immediately.
1. Press the [s/MUTE] button.
The sound turns off and “MUTE” appears in
the display.
2. Press the [s/MUTE] button again to
cancel the mute mode.
CD Operations
English
Loading a CD
Listening to a CD already inserted
1. Open the front panel by pressing the [OPEN]
button.
Press the [CD/CDC] or [POWER] button to
select the CD mode. Play starts automatically. If
no CD is loaded in the unit, “NO DISC” appears
in the display.
∗ Press the button firmly. If the front panel does
not open fully, gently open it with your hand.
2. Insert a CD into the center of the [CD SLOT]
with the label side facing up, and completely
close the front panel.
The CD plays automatically after loading.
For CD (12 cm)
For single CD (8 cm)
CD SLOT
Pausing play
1. Press and hold the [s/MUTE] button for 1
second or longer to pause play. “PAUSE”
appears in the display.
2. To resume CD play, press and hold the
[s/MUTE] button for 1 second or longer
again.
Selecting a track
Notes:
• Never insert foreign objects into the CD SLOT.
• If the CD is not inserted easily, there may be
another CD in the mechanism or the unit may
require service.
mark and CD-ROMs
• Discs not bearing the
cannot be played by this unit.
• Some CDs recorded in CD-R/CD-RW mode may
not be usable.
Loading 8 cm compact discs
∗ No adapter is required to play an 8 cm CD.
∗ Insert the 8 cm CD into the center of the insertion
slot.
Ejecting a CD
1. Open the front panel by pressing the [OPEN]
button.
∗ Press the button firmly. If the front panel does
not open fully, gently open it with your hand.
2. Press the [Q] button to eject the CD. Take it
out from the ejected position.
Notes:
• Forcing a CD into the CD mechanism can
damage the CD or source unit.
The CD will automatically load after being placed
approximately 1/3rd of the way into the CD
mechanism.
• If a CD (12 cm) is left in the ejected position for
15 seconds, the CD is automatically reloaded
(Auto reload).
• 8 cm CDs are not auto reloaded. Be sure to
remove it when ejected.
14
CMD4
●Track-up
1. Press the [d] button to move ahead to the
beginning of the next track.
2. Each time you press the [d] button, the
track advances ahead to the beginning of the
next track.
●Track-down
1. Press the [a] button to move back to the
beginning of the current track.
2. Press the [a] button twice to move to the
beginning of the previous track.
Fast-forward/fast-rewind
●Fast-forward
Press and hold the [d] button for 1 second or
longer.
●Fast-rewind
Press and hold the [a] button for 1 second or
longer.
Scan play
Scan play locates and plays the first 10 seconds
of each track on a disc automatically. This
function continues on the disc until it is
cancelled.
∗ The scan play is useful when you want to select a
desired track.
1. Press the [SCAN] button.
2. To cancel the scan play, press the [SCAN]
button again.
CD Operations
Random play
Random play selects and plays individual tracks
on a disc in no particular order. This function
continues automatically until it is cancelled.
1. Press the [RANDOM] button.
2. To cancel the random play, press the
[RANDOM] button again.
Operations Common to Each Mode
Setting the clock
Adjusting the bass (Q-curve)
1. Press and hold the [MENU] button for 1
second or longer to switch to the menu
mode.
2. Press the [a] or [d] button to select
“CLOCK”.
3. Press the [ENT] button.
4. Press the [a] or [d] button to select the
hour or the minute.
5. Turn the [ROTARY] knob to set the correct
time.
∗ The factory default setting is “B-Q 1”.
(Adjustment 1/1.25/1.5/2)
∗ The clock is displayed in 12-hour format.
6. Press the [ENT] button to store the time into
memory.
7. Press the [MENU] button to return to the
previous mode.
Note:
• You cannot set the clock when it is displayed with
only the ignition on. If you drain or remove the
boat’s battery or take out this unit, the clock is reset.
While setting the clock, if another button or
operation is selected, the clock set mode is
canceled.
Adjusting the bass (Frequency)
∗ The factory default setting is “B-FRQ 60”.
(Adjustment 60/100/200 Hz)
1. Press and hold the [MENU] button for 1
second or longer to switch to the menu
mode.
2. Press the [a] or [d] button to select
“BASS FRQ”.
3. Turn the [ROTARY] knob to select the
frequency.
4. Press the [MENU] button to return to the
previous mode.
1. Press and hold the [MENU] button for 1
second or longer to switch to the menu
mode.
2. Press the [a] or [d] button to select
“BASS Q”.
3. Turn the [ROTARY] knob to select the Qcurve.
4. Press the [MENU] button to return to the
previous mode.
Adjusting the treble (Frequency)
∗ The factory default setting is “T-FRQ10K”.
(Adjustment 10 kHz/15 kHz)
1. Press and hold the [MENU] button for 1
second or longer to switch to the menu
mode.
2. Press the [a] or [d] button to select
“TREB FRQ”.
3. Turn the [ROTARY] knob to select the
frequency.
4. Press the [MENU] button to return to the
previous mode.
Setting the loudness
∗ The factory default setting is “OFF”.
1. Press and hold the [MENU] button for 1
second or longer to switch to the menu
mode.
2. Press the [a] or [d] button to select “ALOUD”.
3. Turn the [ROTARY] knob to select “ON” or
“OFF”.
4. Press the [MENU] button to return to the
previous mode.
CMD4
15
English
Repeat play
Repeat play continuously plays the current
track. This function continues automatically until
it is cancelled.
1. Press the [REPEAT] button.
2. To cancel the repeat play, press the
[REPEAT] button again.
Operations Common to Each Mode
English
Adjusting the non-fader
Performing a system check
∗ The factory default setting is “NFVOL 0”.
(Adjustment range: –6 to +6)
This function verifies the devices hooked up
through CeNET.
1. Press and hold the [MENU] button for 1
second or longer to switch to the menu
mode.
2. Press the [a] or [d] button to select “SCHECK”.
3. Press and hold the [ENT] button for 1 second
or longer to start the system check.
CeNET connection configuration is
automatically checked.
When the system check is complete, the
display returns to the previous mode.
1. Press and hold the [MENU] button for 1
second or longer to switch to the menu
mode.
2. Press the [a] or [d] button to select “NF
VOL”.
3. Turn the [ROTARY] knob to adjust the nonfader volume.
4. Press the [MENU] button to return to the
previous mode.
Adjusting the display contrast
You can adjust the display contrast to match the
angle of installation of the unit.
∗ The factory default setting is “8”. (Adjustment
level: 1 to 8)
1. Press and hold the [MENU] button for 1
second or longer to switch to the menu
mode.
2. Press the [a] or [d] button to select
“CONTRAST”.
3. Turn the [ROTARY] knob to adjust the
contrast.
4. Press the [MENU] button to return to the
previous mode.
Selecting AUX IN sensitivity
Make the following settings to select the
sensitivity when sounds from external devices
connected to this unit are difficult to hear even
after adjusting the volume.
∗ The factory default setting is “MID”.
1. Press and hold the [MENU] button for 1
second or longer to switch to the menu
mode.
2. Press the [a] or [d] button to select “AUX
SENS”.
3. Turn the [ROTARY] knob to select from
“HIGH”, “MID” or “LOW”.
4. Press the [MENU] button to return to the
previous mode.
16
CMD4
AUX function
This system has an external input jack so you
can listen to sounds and music from external
devices connected to this unit.
English
7. ACCESSORIES
Sirius Satellite Radio Operations
What is Sirius Satellite Radio?
Sirius is radio the way it was meant to be: Up
to 100 new channels of digital quality
programming delivered to listeners coast to
coast via satellite. That means 50 channels of
completely commercial-free music. Plus up to
50 more channels of news, sports, and
entertainment from names like CNBC,
Discovery, SCI-FI Channel, A&E, House of
Blues, E!, NPR, Speedvision and ESPN.
Sirius is live, dynamic entertainment, completely
focused on listeners. Every minute of every day
of every week will be different. All 50
commercial-free music channels are created inhouse and hosted by DJs who know and love
the music. Do you like Reggae? How about
Classic Rock or New Rock? Sirius has an array
of choices spanning a vast range of musical
tastes including the hits of the 50’s, 60’s, 70’s, &
80’s as well as Jazz, Country, Blues, Pop, Rap,
R&B, Bluegrass, Alternative, Classical, Heavy
Metal, Dance and many others...
From its state-of-the-art, digital broadcasting
facility in Rockefeller Center, New York City,
Sirius will deliver the broadest, deepest mix of
radio entertainment from coast to coast.
Sirius will bring you music and entertainment
programming that is simply not available on
traditional radio in any market across the
country. It’s radio like you’ve never heard
before.
So Get Sirius and Listen Up! For more
information, visit siriusradio.com.
To receive Sirius Satellite Radio on
this receiver
This receiver contains a SIRIUS ID for user
identification. All you have to do to obtain a
subscriber contract and enable reception of
Sirius Satellite Radio is to call the Sirius
Service Center (1-888-539-SIRIUS (7474),
online at siriusradio.com) and inform us of your
SIRIUS ID and a few other details.
Verifying your Sirius ID
1. Press and hold the [MENU] button for 1
second or longer to switch to the menu
mode.
2. Press the [a] or [d] button to select “SID
DISP”.
3. Press the [ENT] button to display the SIRIUS
ID.
The source unit displays the high-order 6
digits of the SIRIUS ID in the Operation
status indication.
4. Turn the [ROTARY] knob clockwise to
change the low-order 6 digits of the SIRIUS
ID.
To display the high-order 6 digits of the
SIRIUS ID again, turn the [ROTARY] knob
counterclockwise.
Selecting Sirius Radio modes
Press the [SAT] or [POWER] button to select
the Sirius mode.
The Sirius indication lights entering the mode
that was engaged when the unit was turned off
last time.
Selecting a band
Press the [SAT] button to select a band.
Each press of the button changes the display as
shown below.
SR1 ➜ SR2 ➜ SR3 ➜ SR1 …
∗ The currently received band is displayed in the
function mode indication.
∗ Models without a function mode indication display
the band name and channel number in the
Operation status indication.
● Information displayed during reception
The following information is displayed in the
Operation status indication when Sirius Radio
cannot be received normally.
• UPDATING : when the receiver is turned on
the first time or after a reset
• LINKING
: when a channel is being tuned
in (no signal is yet received), or
an antenna issue exists.
• INVLD CH : a channel without a broadcast
has been selected, or the
receiver may not be activated.
• “CALL 888”→“539-SIRI”
: a channel not covered by your
contract
Call Sirius Service Center (1888-539-SIRIUS (7474)).
Online at siriusradio.com
CMD4
17
Sirius Satellite Radio Operations
English
Switching the display
Manual tuning
1. Press the [DISP] button to select the sub
display.
2. In the sub display, press and hold the [DISP]
button for 1 second or longer to cycle
between the following display modes:
Channel name ➜ title ➜ artist name ➜
category name ➜ text ➜ channel name
➜…
Notes:
• The Operation status indication of the source unit
displays the abbreviated channel name for 2
seconds when a station is selected before
returning to the previous display mode.
• Scrolling starts when the channel name or other
text has been displayed for 2 seconds. When
scrolling finishes, the first text display appears.
To start scrolling again, press the [MENU] button.
Any channel including channels without
broadcasts and channels not covered by the
contract can be selected during manual tuning.
1. Press the [SEEK/MAN] button.
Channel selection
Channels are selected with the following buttons.
• The [a] or [d] button
• The [DIRECT] buttons
• The [CAT] button
∗ For details, see the following operation
descriptions.
Note:
• The audio output is muted and other button
operations are not accepted during channel
selection.
Tuning
There are 3 types of tuning mode available, seek
tuning, manual tuning and preset tuning.
Seek tuning
Only channels that can be received are selected
while channels without broadcasts and channels
not covered by the contract are automatically
skipped.
1. Press the [a] or [d] button.
The receiver seeks the next available
channel below or above the current channel.
2. Press and hold the [a] or [d] button.
The receiver moves to seek channels below
or above the current channel. If the channel
found when either button is released is
available that channel is received.
Otherwise, seeking continues until an
available channel is found.
18
CMD4
∗ This changes the seek mode to manual mode
and the “MANU” indicator on the display
lights. When this operation is performed in
manual mode, the seek mode is engaged and
the “MANU” indicator on the display goes off.
Notes:
• Operations cannot be performed for two seconds
after pressing the [SEEK/MAN] button.
• The receiver automatically reverts to the seek
mode when the [a] or [d] button is not used for
7 seconds in the manual mode.
2. Press the [a] or [d] button. The receiver
moves to channels above or below the
current channel one by one.
3. Press and hold the [a] or [d] for 1 second
or longer.
The receiver moves to seek channels below
or above the current channel and the
channel found when either button is released
is received.
Recalling a preset channel
A total of 18 SIRIUS channels can be stored (6SR1, 6-SR2 and 6-SR3). This allows you to
select your favorite SIRIUS channels and store
them in memory for later recall.
1. Press the [SAT] button and select the desired
SIRIUS band (SR1, SR2 or SR3).
2. To recall a stored SIRIUS channel, press the
desired [DIRECT] button to select that
channel.
∗ Press and hold one of the [DIRECT] buttons
for 2 seconds or longer to store the current
channel into preset memory.
Manual memory
1. Select the desired channel with seek tuning,
manual tuning or preset tuning.
2. Press and hold one of the [DIRECT] buttons
for 2 seconds or longer to store the current
channel into preset memory.
Notes:
• When the name of a channel stored in memory is
changed by a broadcasting channel, the display
may show a channel name that differs from the
stored name.
• A channel stored in memory may be discontinued
at the option of the broadcasting channel.
Sirius Satellite Radio Operations
Category scanning
In a category scan, broadcast channels in the
same category as the current channel are
selected about every 10 seconds.
1. Press and hold the [CAT] button for 1 second
or longer to start a category scan.
2. Press the [CAT] button, a [DIRECT] button,
the [a] or [d] button to cancel a category
scan.
Note:
• Category scanning is not available when no
category is defined for the current channel.
Receiving channels selected by
category
This starts seek tuning and broadcast channels
that meet the specified category are selected.
The “CAT” indicator is displayed during the
category selection mode.
1. Press the [CAT] button to enter the category
selection mode.
2. Turn the [ROTARY] knob clockwise or
counterclockwise to select a category.
Or, press a [DIRECT] button if the category
is preset.
3. Press the [a] or [d] button to tune in a
channel.
4. Press the [CAT] button again to cancel.
Notes:
• When the category selection mode is entered,
the category of the last received channel is
displayed first.
• The category selection mode is canceled when
no channel with the selected category can be
found.
• Press the [a] or [d] button within 7 seconds
after a channel has been set to continue seeking
channels up or down. The category selection
mode is canceled and normal reception is
resumed if no operation is performed for 7
seconds.
Presetting a category
A category can be preset by registering specific
categories in [DIRECT] buttons 1 to 6. Then the
desired category can be recalled by pressing
the corresponding [DIRECT] button.
1. Press the [CAT] button to enter the category
mode.
2. Turn the [ROTARY] knob clockwise or
counterclockwise to select a category.
3. Press and hold one of the [DIRECT] buttons
for 2 seconds or longer to store the current
category into preset memory.
Notes:
• When the name of a channel stored in memory is
changed by a broadcasting channel, the display
may show a channel name that differs from the
stored name.
• A channel stored in memory may be
discontinued at the option of the broadcasting
channel.
CMD4
19
English
Category selection function
SIRIUS Radio allows you to select broadcast
channel category (contents).
CD Changer Operations
English
CD changer functions
Fast-forward/fast-rewind
When an optional CD changer is connected
through the CeNET cable, this unit controls all
CD changer functions. This unit can control a
total of 2 changers.
Press the [CD/CDC] or [POWER] button to
select the CD changer mode to start play. If 2
CD changers are connected, press the [CD/
CDC] button to select the CD changer for play.
●Fast-forward
Press and hold the [d] button for 1 second or
longer.
●Fast-rewind
Press and hold the [a] button for 1 second or
longer.
∗ If “NO MAG” appears in the display, insert the
magazine into the CD changer. “DISC CHK”
appears in the display while the player loads
(checks) the magazine.
∗ If “NO DISC” appears in the display, eject the
magazine and insert discs into each slot. Then,
reinsert the magazine back into the CD changer.
Note:
• Some CDs recorded in CD-R/CD-RW mode may
not be usable.
CAUTION
Depending on the recording format, CD-ROM
discs may not play properly.
Pausing play
1. Press and hold the [s/MUTE] button for 1
second or longer to pause play. “PAUSE”
appears in the display.
2. To resume CD play, press and hold the [s/
MUTE] button for 1 second or longer again.
Scan play
Scan play locates and plays the first 10 seconds
of each track on a disc automatically. This
function continues on the disc until it is cancelled.
∗ The scan play is useful when you want to select a
desired track.
1. Press the [SCAN] button.
2. To cancel the scan play, press the [SCAN]
button again.
Disc scan play
Disc scan play locates and plays the first 10
seconds of the first track on each disc in the
currently selected CD changer. This function
continues automatically until it is cancelled.
∗ Disc scan play is useful when you want to select
a desired CD.
1. Press and hold the [SCAN] button for 1
second or longer.
2. To cancel disc scan play, press the [SCAN]
button again.
Selecting a CD
Repeat play
1. Press the [←DISC→] button to select the
desired disc.
Repeat play continuously plays the current
track. This function continues automatically until
it is cancelled.
1. Press the [REPEAT] button.
2. To cancel repeat play, press the [REPEAT]
button again.
∗ If a CD is not loaded in a slot of magazine,
pressing the [←DISC→] button can not work.
Selecting a track
●Track-up
1. Press the [d] button to move ahead to the
beginning of the next track.
2. Each time you press the [d] button, the
track advances ahead to the beginning of the
next track.
●Track-down
1. Press the [a] button to move back to the
beginning of the current track.
2. Press the [a] button twice to move to the
beginning of the previous track.
20
CMD4
Disc repeat play
After all the tracks on the current disc have
been played, disc repeat play automatically
replays the current disc over from the first track.
This function continues automatically until it is
cancelled.
1. Press and hold the [REPEAT] button for 1
second or longer.
2. To cancel disc repeat play, press the
[REPEAT] button again.
CD Changer Operations
Disc random play
The disc random play selects and plays
individual tracks or discs automatically in no
particular order. This function continues
automatically until it is cancelled.
1. Press and hold the [RANDOM] button for 1
second or longer.
2. To cancel disc random play, press the
[RANDOM] button again.
8. TROUBLESHOOTING
General
Problem
Cause
Power does not
turn on.
(No sound is
produced.)
Fuse is blown.
Replace with a fuse of the same amperage. If the
fuse blows again, consult your store of purchase.
Incorrect wiring.
Consult your store of purchase.
No sound output
when operating
the unit with
amplifiers.
Turn the unit off and check each wire for a possible
Amplifier turn-on lead is
short. If the amplifier turn-on lead shorts out, cover it
shorted to ground or
excessive current is required. with insulation such as tape.
Nothing happens
when buttons are
pressed.
The microprocessor has
malfunctioned due to noise,
etc.
Open the front panel by
pressing the [OPEN] button.
Press the reset button for
about 2 seconds with a thin
rod.
No audio.
The speaker protection
circuit is operating.
1. Check the speaker connection.
2. Turn down sound volume. Function can also be
restored by turning the power off and on again.
3. If the sound is muted again, consult your store of
purchase.
Compact disc
Another compact disc is
cannot be loaded. already loaded.
Reset
button
Eject the compact disc before loading the new one.
Compact disc is dirty.
Clean the compact disc with a soft cloth.
Compact disc is heavily
scratched or warped.
Replace with a compact disc with no scratches.
Sound is bad
directly after
power is turned
on.
Water droplets may form on
the internal lens.
Let dry for about 1 hour with the power on.
Source selection
does not
recognize CeNET
source
connection.
The microprocessor has not
stored the proper CeNET
information.
Perform a system check.
See “Operations Common to Each Mode”,
performing a system check section.
The CeNET cable is not
connected properly.
Ensure the CeNET cables are properly connected.
CD
Sound skips or is
noisy.
CeNET
Measure
CMD4
21
English
Random play
Random play selects and plays individual tracks
on the disc in no particular order. This function
continues automatically until it is cancelled.
1. Press the [RANDOM] button.
2. To cancel random play, press the [RANDOM]
button again.
If an error occurs, one of the following displays is displayed.
Take the measures described below to eliminate the problem.
CD
Error Display
CD changer
English
9. ERROR DISPLAYS
Cause
Measure
ERROR 2
A CD is caught inside the CD deck and is
not ejected.
This is a failure of CD deck’s mechanism.
Consult your store of purchase.
ERROR 3
A CD cannot be played due to scratches,
etc.
Replace with a non-scratched,
non-warped-disc.
ERROR 6
A CD is loaded upside-down inside the CD
deck and does not play.
Eject the disc, then reload it properly.
ERROR 2
A CD inside the CD changer is not loaded.
This is a failure of CD changer’s mechanism.
Consult your store of purchase.
ERROR 3
A CD inside the CD changer cannot be
played due to scratches, etc.
Replace with a non-scratched, non-warped
disc.
ERROR 6
A CD inside the CD changer cannot be
played because it is loaded upside-down.
Eject the disc, then reload it properly.
If an error display other than the ones described above appears, press the reset button. If the problem
persists, turn off the power and consult your store of purchase.
22
CMD4
Source unit harness wire connections
Wire Color
Function
Yellow
+12V DC Constant Power
Source/Memory
Red
+12V DC Switch Lead/
Accessory
Black
Ground
Blue/White
Amplifier Remote Turn-on
Grey
Right Front Speaker (+)
Grey/Black
Right Front Speaker (–)
White
Left Front Speaker (+)
White/Black
Left Front Speaker (–)
Purple
Right Rear Speaker (+)
Purple/Black
Right Rear Speaker (–)
Green
Left Rear Speaker (+)
Green/Black
Left Rear Speaker (–)
FM Tuner
Frequency Range:
U.S.A
: 87.9 MHz to 107.9 MHz
Europe : 87.5 MHz to 108.0 MHz
Australia : 87.0 MHz to 108.0 MHz
Usable Sensitivity: 9 dBf
50dB Quieting Sensitivity: 15 dBf
Alternate Channel Selectivity: 70 dB
Stereo Separation (1 kHz): 35 dB
Frequency Response (±3 dB): 30 Hz to 15 kHz
AM Tuner
Frequency Range:
U.S.A
: 530 kHz to 1710 kHz
Europe : 531 kHz to 1602 kHz
Australia : 531 kHz to 1629 kHz
Usable Sensitivity: 25 µV
CD Player
RCA Connections
System: Compact disc digital audio system
Usable Discs: Compact disc
Frequency Response (±1 dB): 10 Hz to 20 kHz
Signal to Noise Ratio (1 kHz): 100 dB
Dynamic Range (1 kHz): 95 dB
Harmonic Distortion: 0.01%
Wire Color
Function
Grey/Red
Right Front Line Level
Output (Full range)
Grey/White
Left Front Line Level
Output (Full range)
Black/Red
Right Rear Line Level
Output (Full range)
Black/White
Left Rear Line Level
Output (Full range)
Purple/Red
Right Non-Fadeable Line
Level Output (Full range)
Purple/White
Left Non-Fadeable Line
Level Output (Full range)
Red/Red
Right Auxiliary Input
General
Red/White
Left Auxiliary Input
Power Supply Voltage: 14.4 V DC
(10.8 to 15.6 V allowable), negative ground
Current Consumption: Less than 15 A
Speaker Impedance: 4 Ω (4 Ω to 8 Ω allowable)
Weight / Source unit: 3.52 lb. (1.6 kg)
Dimensions / Source unit:
7-1/8" (Width) ✕ 2" (Height) ✕ 7-5/16" (Depth)
[180.4 (W) ✕ 51.2 (H) ✕ 186 (D) mm]
Escutcheon section :
7-7/8" (Width) ✕ 3-5/8" (Height) ✕ 1-7/8"
(Depth)
[199.4 (W) ✕ 91.9 (H) ✕ 47 (D) mm]
Audio
Maximum Power Output: 212 W (53 W ✕ 4 ch)
Continuous Average Power Output:
17 W ✕ 4, into 4 Ω, 20 Hz to 20 kHz, 1%THD
Bass Control Action (60 Hz): ±15 dB
Treble Control Action (10 kHz): ±12 dB
Line Output Level (CD 1 kHz): 2 V
Note:
• Specifications and design are subject to change
without notice for further improvement.
CMD4
23
English
10. SPECIFICATIONS
24
CMD4
Owner’s manual
Mode d’emploi
Manual de instrucciones
Istruzioni per l’uso
CMD4
WATERTIGHT MARINE AM/FM/CD MULTIMEDIA
CONTROLLER
•
COMBINÉ NAUTIQUE ÉTANCHE RADIO AM/FMLECTEUR CD MULTIMEDIA
•
CONTROLADOR MULTIMEDIA MARINO DE AM/FM/
DISCOS CD IMPERMEABLE
•
UNITÀ DI CONTROLLO MULTIMEDIALE PER USO
MARITTIMO AM/FM/CD IMPERMEABILE
Clarion Co., Ltd.
All Rights Reserved. Copyright © 2004: Clarion Co., Ltd.
Printed in China / Imprimé en Chine / Impreso en China / Stampato in Cina
2004/12
PE-2686B
280-8187-00