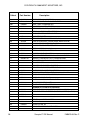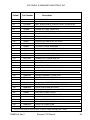
1
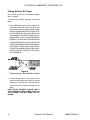
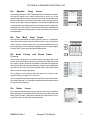
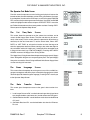
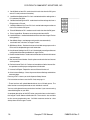
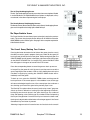
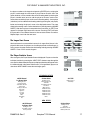
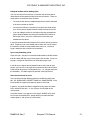
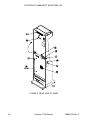
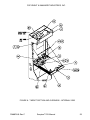
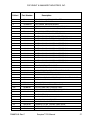
Merit Industries, Inc. 2525 State Rd. Bensalem, PA 19020-8529 (215) 639-4700 1-(800) 523-2760 http://www.scorpiondarts.com PM0075-03-0C Table of Contents Introduction ................................................................................................ page 1 Operator’s Section ..................................................................................... pages 2-11 Site Preparation ...................................................................................... page 2 Setup and Installation ............................................................................. page 3 Disassembly of target from base .......................................................... page 4 Reassembly of target to base .............................................................. page 5 Installing a PCMCIA modem ............................................................... page 5 Linking multiple DX games .................................................................. page 6 Operator Setup Screen .......................................................................... page 7 Coin Mech Setup Screen ........................................................................ page 7 Game Pricing and Round Limits Screen ................................................. page 7 Books Screen ......................................................................................... page 7 Game Setup Screen ............................................................................... page 8 Machine Setup Screen ........................................................................ page 8 Game Rules Screen ............................................................................ page 8 Game Popularity Screen ........................................................................ page 8 Operator Test Mode Screen .................................................................... page 9 Set Time and Date Screen ...................................................................... page 9 Happy Hour Setup Screen .................................................................. page 9 Game Language Screen ........................................................................ page 9 Data Transfer Screen .............................................................................. pages 9-10 PC-Card/PCMCIA Modem Operation Instructions .................................... page 11 Player’s Section ......................................................................................... pages 12-15 The Information Screen .......................................................................... page 12 Game Rules/Help Screens ..................................................................... page 12 Game Select Screen .............................................................................. page 12 Secondary Game Screens ..................................................................... page 12 Player Select Screen .............................................................................. page 13 Start Game Screen ................................................................................. page 13 Solo Challenger Mode Screen ................................................................ page 13 Handicapping Mode Screens .................................................................. pages 13-14 x01 Handicapping Screens .................................................................. pages 13-14 Cricket Handicapping Screens ............................................................ page 14 321 ZAP Handicapping Screens ......................................................... page 15 Novelty Games Handicapping Screens ............................................... page 15 Player Statistics Screen ......................................................................... page 15 Cancel Game/Backup Turn Feature ....................................................... page 15 League Play Section .................................................................................. pages 16-17 League Select Screen ............................................................................ page 16 Selecting Home and Away Team ............................................................. page 16 League Team Select Screen .................................................................. page 16 League Player Input Screen .................................................................... pages 16-17 League Start Screen .............................................................................. page 17 Player Statistics Screen ......................................................................... page 17 Standard Game Stats List ................................................................... page 17 NDA Game Stats List .......................................................................... page 17 Spot Cricket/Hits-Per-Round charts ........................................................ page 18 Using the DX Ranking Feature .................................................................... pages 19-22 How It Works ....................................................................................... page 19 How to Set up the Ranking Event ......................................................... pages 19-20 More About the Database .................................................................... page 20 Linking DX machines and the Ranking system .................................... page 21 Tips on Using the Ranking System ...................................................... page 21 Set Up Summary ................................................................................. page 22 Parts Lists and Drawings ........................................................................... pages 23-30 Warranty .................................................................................................... page 31 COPYRIGHT © 2000 MERIT INDUSTRIES, INC. Introduction The Scorpion™ DX dart machine features an LCD panel a card reader a keypad x86 based CPU 1 meg RAM (expandable to 2 meg) Flash Memory Drive two PCM/CIA slots Variable overhead PC104 BUS The same size cabinet as all Scorpion models NV RAM w/Clock The Scorpion™ DX makes use of an “ATM-style” interface, where the individual button functions are determined by the information displayed on the screen. Pressing a button that corresponds to a desired game/option icon will activate that game/ option. References, in this manual, to “pressing a button” mean to press the button corresponding to the icon displayed on the screen. PM0075-03 Rev C Scorpion™ DX Manual 1 COPYRIGHT © 2000 MERIT INDUSTRIES, INC. SITE PREPARATION In determining the location for your SCORPION™ DX dart game, consideration must be given to the location of a suitable, grounded electrical outlet, as well as an accessible phone jack. Since the game is a computerized device, it should have a separate circuit, if at all possible. If a circuit is not available, care should be taken to provide a clean and constant voltage. As a basic guideline, never connect the unit to a circuit that also supplies power to freezers, coolers or other high power-consuming and electrical noise-making equipment. The game should be prominently located to attract attention, but not where games will be interrupted by people walking through the playing area. The play area must extend approximately 8' from the front of the machine to accommodate the throw line. 2 Scorpion™ DX Manual PM0075-03 Rev C COPYRIGHT © 2000 MERIT INDUSTRIES, INC. SET-UP AND INSTALLATION Floor Model Installation 1. Locate and remove the plastic bag stapled to the top of the base section. This bag contains the game keys. 2. Open the control panel door and pull up on the target section until the Velcro latch on the target section door separates from the Velcro hook on the base section. Continue pulling the target section up until it locks into its upright position. Be careful not to damage any of the cables that run from the target section into the base section. Close the control panel door. Refer to Figure 1. 3. Use the provided key to unlock the target door. In the upper, right corner of the target section you will see a safety hook holding the door in its closed position. Push the hook upward to release the target door. Inside, stapled to the floor of the target section, you will find a plastic bag with three threaded knobs. Place the knobs and washers in the holes provided, as shown in Figure 3. of the game to determine when the game is level. Attach the safety chain from the game to the wall hook installed in Step 6. 8. Set the floor mark for the throw line. In the U.S.A., the throw line should be placed 8 feet from the face of the target. In some European countries, the throw line distance is placed 2.44 meters or 2.37 meters from the face of the target. Consult your local rules for throw line distances. The throw line decal can be found in the coin box. 9. Remove the line cord from its slot at the bottom, rear of the game (see Figure 1 for location). Plug the cord into the wall outlet and power up the game. Disassembly of Target Section from Base Section Figure 1 - Scorpion DX Rear View 4. Close the target section door. 5. Using the key provided, open the coin box door. 6. Locate and remove the bag of hardware inside the coin box. This hardware is used to secure the game to the wall. Refer to the instructions contained within the bag to properly install the hook needed for your application. 7. Move the game into position. Adjust the levelers until the game does not rock and is stable; use the level built into the control panel PM0075-03 Rev C 1. If you decide to move the game to a different location and you do not have access to a large van or vehicle, you may need to disassemble the target from the base. In those circumstances, follow the steps below. 2. Unplug the power cord from the wall and store it in the slot at the rear of the base of the game. 3. With the game in the upright position, open the control panel door. Disconnect the target lamp power cord from the power supply. Unhook the light power cord from the clips holding it in place to the back of the cabinet. Also disconnect the main wiring harness or harnesses that may connect between the target and base sections. Close and lock the con- Scorpion™ DX Manual 3 COPYRIGHT © 2000 MERIT INDUSTRIES, INC. trol panel door. 4. Unlock and open the target section door. Carefully pull the target lamp power cord and other wiring harnesses up into the target compartment. Next, remove the large black assembly knobs and washers. Store the knobs outside of the target section for future use. Carefully close and lock the target section door. Remove all keys from the target door lock. 5. Locate the anti-tip bracket on the rear of the cabinet (see Figure 1). Pull upwards on the bracket while folding the top section down. Make sure that the top unit is resting on the metal support bracket and that the Velcro latch on the target section securely aligns with the Velcro hook on the base section. 6. Standing at the back facing the folded down target section, place one hand on the target section and apply a small amount of force forward to hold the section in place. With your other hand, take the hinge pin that is bent to form a handle and pull outward. (See Figure 2.) Make sure that the hinge pin is fully removed. Repeat the same procedure for the other hinge pin. Figure 2 - Scorpion DX Internal View 7. You are now ready to remove the target section. Lift the target section upward slightly and Figure 3 - Target Section Hinge 4 Scorpion™ DX Manual PM0075-03 Rev C COPYRIGHT © 2000 MERIT INDUSTRIES, INC. position it over the safety base hook. Place the target section, HINGE END ONLY, on the floor. NOTE: DO NOT RESET THE TARGET SECTION ON THE HOOD END. REST IT ON THE HINGE END ONLY. FAILURE TO DO SO COULD DAMAGE CABLES OR OVERHEAD DISPLAY. Reassembly of the Target Section to the Base Section 1. Installing a PCMCIA Modem 1. Turn off the game. 2. Open the control panel door and locate the PCMCIA slots on the CPU board. 3. Plug the modem phone line adapter cord (included with the modem) into the modem. See Figure 4. The reassembly of the target section is very similar to that of disassembly. Position the target section so that it is resting on the wood strip located above the Velcro at the bottom of the base. Align the hinges of the target section with the base section hinge pins. Install the hinge pins, locking them into position. Refer to Figure 3. NOTE: YOU MAY HAVE TO LIFT THE TARGET SECTION SLIGHTLY TO ALLOW THE HINGE PINS TO MOVE FREELY INTO THE LOCKED POSITION. Figure 4 Plug the modem phone cord into the modem 4. Install the modem into the rear PCMCIA slot (to allow the front slot to be used for PC-card data transfer). See Figure 5. 2. Open the control panel door. 3. Make sure that the hinge pins are in the locked position. Next swing the target section up into its upright position. 4. Very carefully open the target section front door. Place the large black assembly knobs and washers into the hole that they were removed from during disassembly. (Refer to “Floor Model Installation,” Step 3.) 5. Locate the overhead light power cable in the control panel section. Feed the cable down into the base and reconnect it to the power supply. Also reconnect the main harness or harnesses that interconnect between the sections. 6. Close all doors. Reposition the game and connect the safety chain to the wall. Plug the power cord into a wall outlet and turn on the power. Figure 5 Install the modem in the rear PCMCIA slot 5. Remove the strain relief plate and run the phone line through the hole in the communication board plate and connect it to the phone jack (you may need to use an adapter to extend the phone line that comes with the modem). See Figure 6. Replace the strain relief over the hole and tighten the thumbnuts to secure the modem line. 6. Turn on the game. PM0075-03 Rev C Scorpion™ DX Manual 5 COPYRIGHT © 2000 MERIT INDUSTRIES, INC. Linking Multiple DX Games Up to 32 DX games can be networked together within a location. To connect your games, follow the instructions below. 1. Using RS485 cable, connect one end to the communications board of one game and connect the other end to the communications board on another DX game. (RS485 CABLE IS NOT PHONE LINE. DO NOT USE REGULAR PHONE LINE TO LINK YOUR GAMES. YOU NEED TO USE SPECIAL RS485 CABLE. ALSO, IF A LONGER CABLE IS NEEDED, CONTACT MERIT INDUSTRIES OR YOUR DISTRIBUTOR; DO NOT EXTEND THE CABLE USING AN ADAPTER OR THE LINK WILL NOT WORK! YOU MAY USE AN ADAPTER TO EXTEND THE MODEM PHONE CORD, IF NECESSARY. (SEE THE PARTS LIST FOR CABLE PART NUMBERS). Figure 6 Communications Board/Modem Access 2. Continue linking games in this manner until all games are connected in series; DO NOT connect the games in a closed circuit (i.e. do not connect the last game in the chain to the first game in the chain). NOTE: DO NOT CONNECT A PHONE LINE TO THE COMMUNICATIONS BOARD JACKS ON THE DX GAME. THIS WILL BURN OUT THE BOARD! 6 Scorpion™ DX Manual PM0075-03 Rev C COPYRIGHT © 2000 MERIT INDUSTRIES, INC. The Operator Setup Screen Accessed by pressing the <TEST> button located in the control panel section, the Operator Setup screen allows the operator to access any of the operator-adjustable functions (set the coin mech values, set individual game pricing and round limits, review books information, set the game language, set the time, transfer data, check game popularity, set various game options) and to access the game’s operator test mode (each of these functions is explained in more detail later in this section). The software revision block, at the bottom of the screen, displays the build time/date, version and revision of the currently installed program. The Coin Mech Setup Screen From this screen the operator can set the values (for “Coins In,” “Credits Given” and “Counter Value”) for up to two (2) mechanical mechs or four (4) electronic mechs. To set the values for a given mech, use the UP and DOWN arrow buttons to select the coin mech and enter the appropriate values using the keypad. Pressing <EXIT> returns you to the Operator Setup Screen. The Game Screen Pricing and Round Limits At this screen, the operator can set the standard and Happy Hour pricing for each game and set the round limits. To set the prices and/or round limits for a particular game, use the UP and DOWN arrow buttons to highlight the desired game and enter the new price/rounds using the keypad. Setting the round limit to “00” sets the game for unlimited rounds. See the Set Happy Hours screen for setting Happy Hours. The ’01 Options Pricing Feature allows the operator to charge an extra credit for selecting an option for an ’01 game. The ’01 League Discount Feature allows the operator to set the cost for all 301, 401 and 501 games to 1 CR, regardless of options selected and normal cost of the game for team/league play. The Books Screen This screen will allow the operator to view and clear both current and lifetime books information. Clearing lifetime books will also reset the Bonus Spin, Idle Mode, Free Play Credits, League Dues and the Buy in Credits counters. Pressing <EXIT> returns you to the Operator Setup Screen. PM0075-03 Rev C Scorpion™ DX Manual 7 COPYRIGHT © 2000 MERIT INDUSTRIES, INC. The Game Setup Screen From this screen the operator can set the game volume, set the contrast of the LCD display, adjust the delay for the automatic player change (APC), set the delay for the button-press player change, toggle the 3-dart Out Display on and off and remove any unused credits that are currently on the machine. Pressing <EXIT> returns you to the Operator Setup Screen. Pressing <MORE SETTINGS> will access the Machine Setup Screen. The APC and the button press player change delays can be set to 1 through 8 seconds (in 1 second increments). The Machine Setup Screen allows the operator to toggle on and off the target alarm, the microphone, the ultrasonics, free play mode, bonus spin and the idle mode promotional credit. Pressing <RESET TO FACTORY DEFAULTS> will reset ALL game settings to the factory defaults (not just the settings displayed at this screen). Pressing <GAME RULES SETUP> will access the Game Rules Screen. The Rounds Limit Buy In feature allows the player to continue play, after a game has reached its round limit (this function only applies to games with round limits). Setting the Round Limit Buy In to "ON" activates the round limit buy in feature. The Bonus Credit Feature provides a random match feature at the end of each game. A randomly selected number is compared to the 1’s digit of all players’ scores. Credits equal to the cost of the game are awarded for each matching digit. The Promo Credits Feature automatically provides a free credit after the machine has been in idle mode for approximately 30 minutes. This credit can be removed by pressing the Cancel Game button. The Game Rules Screen allows the operator to configure the bullseye’s default settings, set the Cricket team win rules, set the freeze rule for ‘01 games, toggle the stat display on and off, set the missed dart sound on or off and toggle the stats mode between STANDARD and NDA (see page 18 for stats information). Pressing <EXIT> returns you to the Operator Setup Screen. The Game Popularity Screen This screen allows the operator to see the popularity of each individual game (displayed in number of times played), as well as view the popularity of Solo Challenger®. Pressing <EXIT> returns you to the Operator Setup Screen. 8 Scorpion™ DX Manual PM0075-03 Rev C COPYRIGHT © 2000 MERIT INDUSTRIES, INC. The Operator Test Mode Screen From this screen the operator can test all of the game’s physical features: the barcode reader, the overhead display, cricket LEDs, game buttons, the target, the microphone, the coin mechs and all lamps, as well as the game’s RAM and RTC (real time clock) and inter-game communications . Use the UP and DOWN arrows to highlight the desired test and press <EXECUTE TEST> to start the test. Follow the instructions on the screen to perform each test. Pressing <EXIT> Returns you to the Operator Setup Screen. The Set Time/Date Screen This screen allows the operator to set the system time and date, and to access the Set Happy Hours Screen. The time and date may be set correctly at the factory, but this screen allows the operator to adjust them as necessary for the local time zone. To set the time or date, select <SET DATE> or <SET TIME> to activate that function and use the keypad to enter the appropriate date/time. When entering a date, enter two digits for day and month and the full 4-digit year. If setting the time, remember to set it using a 24-hour clock (e.g. 17:00, NOT 5:00(pm)). Pressing <SET HAPPY HOURS> accesses the Happy Hours Pricing Screen. The Happy Hours Pricing Screen allows the operator to program special “Happy Hours” during which the game can use special game prices. The special Happy Hour prices are set at the Game Pricing and Round Limits Screen. Happy Hours are also set using a 24-hour clock. The Game Language Screen This screen allows the operator to set the game to any of the available languages or to toggle on and off the player-selectable language feature (which allows the player to choose the game language). Pressing <EXIT> returns you to the Operator Setup Screen. The Data Transfer Screen This screen gives the operator access to the game’s data transfer functions: 1. Load League Data on to DX - used to load new league data (player/team stats, league schedule, match format, etc.) and ad screens onto a DX game.* 2. Get New Matches from DX - used to load new match data from the DX onto a PC-card.* 3. Get Books Data from DX - used to load books data from the DX onto a PC-card. PM0075-03 Rev C Scorpion™ DX Manual 9 COPYRIGHT © 2000 MERIT INDUSTRIES, INC. 4. Get All Matches from DX - used to load all match data from the DX game onto a PC-card (maximum 42 matches). 5. Load Machine Settings from PC-Card - used to load machine settings from a PC-card onto a DX game. 6. Get Machine Settings from DX - used to load machine settings data from a DX game onto a PC-card. 7. Load New Software Ver. From PC-Card - used to load new game software from a PC-card onto a DX game. 8. Erase All Matches on DX - used to erase all match data from the DX game. 9. Erase League Data - Removes current league data from the DX. 10. Load Ad Screens - used to load advertisement screens from League Tracker to the game(s).* 11. Send Match Setup - used to program the machine to automatically send match info, in fax form, to League Tracker.* 12. DX Memory Status - Provides the status of available storage space on the DX as well as completed league match information. 13. Load Internet Settings from PC-Card - Used to load pre-configured Internet configuration information provided from League Tracker 14. Select Location Number - Used to select the location call time for the internet communications. 15. Set Internet Phone Number - Sets the phone number for the local internet service provider. 16. Perform Internet Test Call - Performs an immediate call to the Internet Service provider to confirm proper configuration at the location. 17. Internet Call Report - Reports the success/failure of the last call. 18. Clear Internet Settings - Clears the present Internet Settings and disables communications. Pressing <EXIT> returns you to the Operator Setup Screen. For instructions on how to use the PC-Card, see page 11. * These functions will upload/download data from all linked games. The other functions must be performed on each individual machine. You may safely ignore the communications functions if your are not running automated leagues on your DX's. A complete description of the DX/Tracker communications can be found in the League Tracker Software distribution CD. The manual is also available on-line at www.scorpiondarts.com. Call Merit customer service for a free 90 day demo CD of League Tracker. 10 Scorpion™ DX Manual PM0075-03 Rev C COPYRIGHT © 2000 MERIT INDUSTRIES, INC. In order to make use of the upload and download features provided by the Scorpion™ DX, the operator must have a PC-card (PCMCIA card) or a PC-card modem. See the parts list in this manual for PCMCIA card reader/ writer, PC-card and PC-card modem kit numbers. Contact your distributor or Merit Industries to order. PC-Card/PCMCIA Modem Operation Instructions If you are using a PCMCIA modem for transfer of league data, make sure to insert the modem card into the rear PCMCIA slot on the motherboard, so that the front slot will be available for uploading and downloading information using a PC-card (see Figure 5 for slot locations). To use a PC-card to upload or download information, follow the instructions below. 1. Open the control panel section and insert your PC-card into the front PCMCIA slot. 2. Enter the Data Transfer Screen. 3. Select the appropriate data transfer function. If multiple DX games are linked together, the data transfer functions listed below will work for all of the linked games: Setup Fax Header and Password Load League Data on to DX Get New Matches from DX Load Machine Settings Load Ad Screens Erase Ad Screens The information will automatically be transferred to/from all networked games; all of the other data transfer functions require you to load/get the information to/from each individual machine. See the parts list in this manual for PC-card and PC-card modem kit numbers. Contact your distributor or Merit Customer Service to order. PM0075-03 Rev C Scorpion™ DX Manual 11 COPYRIGHT © 2000 MERIT INDUSTRIES, INC. The Player’s Section This section contains game and game handicap selection information. The Information Screen The Information Screen is displayed by pressing any of the game buttons while the game is in the idle mode. This screen allows the user to access any of the help/rules screens, read “How to Play” instructions, learn about current tournaments and check the local league schedule, without depositing any coins. Rules/Help Screens Rules/help screens are available for all games and options on the Scorpion DX; they are accessible from the idle mode, as well as virtually all of the other screens, and provide players with all of the information needed to play a game. While in a rules/help screen the user may press one of the buttons (corresponding to an option to get an explanation of that option. An example of an ’01 rules/ help screen is shown here. The Game Select Screen After a coin has been inserted, or any button is pressed, the Game Select Screen is displayed. From the Game Select Screen, the user can, by pressing the appropriate button, select any of the available games, or the user can initiate LEAGUE PLAY (see the League Play section of this manual for more information). Once a game button is pressed, the Game Setup Screen is displayed. The Secondary Game Screens After selecting a game, a secondary game screen is displayed. For 321 Zap and ’01 games, this screen allows you to select any of the available options; for Cricket and Novelty games this screen allows you to select a specific game. The Cricket secondary game screen is shown here. Once a game (or options) is selected, the Player Select screen is displayed. (Selecting different options for each player in a game is referred to as “options handicapping” and is done at the Handicapping screen (see the Start Game Screen). 12 Scorpion™ DX Manual PM0075-03 Rev C COPYRIGHT © 2000 MERIT INDUSTRIES, INC. The Player Select Screen Once a game (and any options) has been entered, the Player Select Screen is displayed. This screen shows the selected game and its cost and allows the user to select the number of players or team modes: Either select from one to four individual players, by pressing the appropriate button on the left side of the display, or select from two types of team play, Traditional and Split Stats by pressing the appropriate button on the right side of the display. Traditional team play has four players playing as two teams on four scores; Split Stats team play allows four players to play as two teams on two scores, but still maintain individual stats by odd and even rounds. The Start Game Screen After the number of players has been selected (and/or the type of team play), the Start Screen is displayed. Each game type (e.g. Cricket, ’01, 321 Zap) has its own Game Play screen. This screen allows the user to access the MPR/PPD and Options Handicapping screens, set the Bullseye Mode and access the Solo Challenger® screen. The Solo Challenger® Mode Once Solo Challenger® has been selected the Start Screen displays the four available skill levels, highlighting "L1-Novice" to begin. Repeatedly press the <SKILL LEVEL> button to advance to the desired skill level. Solo is initially positioned as the last player and Solo’s position is indicated in the upper left portion of the screen. Use the top, left button to move Solo’s player position as desired. <CANCEL SOLO> may be pressed to void the Solo player feature. <SET H’CAPS> may be pressed to access the game’s handicapping screen. The Handicapping Modes ’01 Handicapping Screens The ’01 Handicapping Screen gives users two ways to handicap their play: Points-Per-Dart Handicapping and Options Handicapping. Points-Per-Dart Handicapping Each player’s points-per-dart average is entered using the keypad. PPD averages range from 10 to 40. Any PPDs entered below 10 will be set to 10; any PPDs entered above 40 will be set to 40. Entered PPDs are shown at PM0075-03 Rev C Scorpion™ DX Manual 13 COPYRIGHT © 2000 MERIT INDUSTRIES, INC. the bottom of each player column. After the PPD has been entered for a player, press the <OK?> button to advance to the next player. Options Handicapping When entering the Handicap Mode, all player positions, including Solo, will start with the same options and bullseye mode as had been set at the Game Setup Screen. Options Handicapping allows the users to handicap their play by selecting different options for each player. Options include Double In and/or Double Out, Masters Out and Split/Solid Bullseye. Options are displayed, as they are selected, in the column representing the current player. When the highlighted player position is set for the desired options and PPD value, press the <OK?> button to lock in the settings and advance to the next player position. When all positions have been locked in, the Handicap Screen returns to the Start Screen. The Cricket Handicapping Screens (NOTE: on 8-player games, this feature is only available in League Mode.) The Cricket Handicapping Screens give users two ways to handicap their game: Spot handicapping, for casual players, and Marks-Per-Round handicapping for league players. Marks-Per-Round Handicapping Marks-Per-Round (MPR) handicapping allows league players to handicap their game based on their Marks-Per-Round averages, as well as allowing the players to set the Bullseye (split or solid) for each player. When first entering the Cricket Handicapping mode, the MPR handicapping screen is displayed. Each player’s MPR average is entered using the keypad. MPR averages can range from 0.5 to 8.0. Any MPRs entered below 0.5 will be set to 0.5; any MPRs entered above 8.0 will be set to 8.0. After the MPR has been entered, press the <OK?> button to advance to the next player. To access the Spot Cricket handicapping screen press the <SPOT LEVEL H’CAPPING> button. See the chart on page 19 to see how many marks are awarded for a given MPR average. Spot Handicapping Spot Cricket allows players to handicap their game using seven “Spot” levels of difficulty, as well as allowing the players to set the Bullseye (split or solid) for each player. Each level starts a player with a predetermined number of marks: Spot 0, the base level has no “spots” marked; Spot 6, the highest level, gives a player two marks on each number and the Bullseye. See the chart on page 19 to see how many marks are given for each Spot level. Pressing the <MPR H’CAPPING> button will access the MPR Hanidcapping Screen. 14 Scorpion™ DX Manual PM0075-03 Rev C COPYRIGHT © 2000 MERIT INDUSTRIES, INC. The 321 Zap Handicapping Screen The 321 Zap Handicapping Screen lets users select from several options: Double In and/or Double Out, and Split/Solid Bullseye. Options are displayed, as they are selected, in the column representing the current player. The Novelty Games Handicapping Screens The Novelty Games (Burma Road, Hi-Score and Lo-Score) Handicapping Screen gives users the option of selecting Split or Solid Bullseye. The Player Statistics Screen The Player Statistics Screen allows players to view their stats for the previous match. This screen also gives players the ability to PLAY AGAIN or exit to the GAME MENU to select another game. See page 18 for a complete explanation of the Statistics Screen. The Cancel Game/Backup Turn Feature Pressing the button located on the left side of the game gives the user(s) the ability to cancel a game in progress (losing any credits for that game) or back up to one full round in the current game. After pressing the button, the CANCEL GAME icon will appear in the upper, right corner of the LCD screen (or the ABORT LEAGUE icon if in League Play) and the BACKUP TURN icon will appear in the upper, left corner of the LCD screen. Press the corresponding button to cancel the game or back up one turn. In League Play, the game will ask if the user is sure they want to cancel the game, requiring the user to select <YES> or <NO> before the match can be canceled. In regular play, pressing the <CANCEL GAME> button will immediately cancel the game.* To back up a turn, press the <BACKUP TURN> button and the game will back up one turn. If the current player is in the middle of a turn, backing up will return to the beginning of that turn; if the current player has not thrown a dart, backing up will return the game to the previous player’s turn. The Back Up Turn option allows the user(s) one back up “event” per game. A back up event is defined as: backing up to the beginning of Round 1, backing up once for each player in the game, backing up any number of times and throwing a dart or backing up any number of times and pressing the Player Change button. Once the back up turn feature has been used, the feature is deactivated and the button will no longer appear if the Cancel Game/Back Up Turn button is pressed. *Aborting a league match will cause the loss of all statistics for that match! PM0075-03 Rev C Scorpion™ DX Manual 15 COPYRIGHT © 2000 MERIT INDUSTRIES, INC. League Play Section This section contains information related to playing league games on the Scorpion™ DX. The Scorpion™ DX League Mode allows for fully-automated league play. Used in conjunction with League Tracker software, all league information can be recorded and tracked electronically. The League Select Screen The League Select Screen provides a list of all leagues being played at this location. Players select their league by entering the appropriate league number on the keypad and pressing <ENTER>. If more than one "page" of leagues is available, pressing <MORE LEAGUES> will display another screen of league names; if more than one "page" is not available, the MORE LEAGUES icon will not be displayed. If there is only one league loaded into the game, this screen is bypassed and players go directly to the next screen. Selecting Home and Away Team After selecting <LEAGUE PLAY> from the Game Select Menu, the player is prompted to select <HOME TEAM> or <AWAY TEAM>. Once that selection is made, the player is presented with the League Team Select Screen. Forfeiting a League Game League players can forfeit a match at the Home/Away Team Select screen. To forfeit a match, press the <FORFEIT MATCH> button on the Home/ Away Team Select screen. At the next screen, use the keypad to enter the forfeiting team’s number, the team number for the team that is present and the player number of the player entering the forfeit information. NOTE: Entering a forfeit match will send match data to League Tracker just like with a normal match. The League Team Select Screen At the League Team Select Screen, the player is asked to select a team by entering the appropriate team number, either by entering the team number on the keypad and pressing <ENTER> or by swiping the team card through the card reader. This screen also gives players access to Player and Team Standings, as well as the League Schedule. After a team has been selected, the League Player Input Screen is displayed. The League Player Input Screen At this screen, players for the coming match are selected from the complete team roster. Players are entered into the current team roster by entering 16 Scorpion™ DX Manual PM0075-03 Rev C COPYRIGHT © 2000 MERIT INDUSTRIES, INC. the player number on the keypad and pressing (ENTER) or by swiping the player’s card through the card reader. A player not on the team, but in the game database, can be moved to the current shooting order by entering the player’s number twice (once to add the player to the team roster and a second time to add the player to the current shooting order). A new player (substitute) can be added to the shooting order by pressing the (sub player) button and entering the player’s name at the displayed screen. The score sheet for the coming match can be checked at any time by pressing (SCORE SHEET). After the last player is entered for the current team, an (EXIT) icon appears in the lower right corner of the screen. Pressing (EXIT) will return the game to the Team Select Screen for the next team to enter its number. Repeat Steps 3 and 4 for the next team. The League Start Screen After both teams have entered their rosters, the League Start Screen is displayed. At this screen, the players can view the player order and handicaps, as well as access the score sheet to view the throwing order by pressing <SCORE SHEET>. Press <PLAY> to start the game. The Player Statistics Screen After each game, the Player Statistics Screen is displayed. Players can view the individual statistics by pressing the <NEXT STAT> button to step through the stats (the lists below show which stats are displayed, based on the type of statistics mode selected at the Game Rules Screen). In League Mode, players can also select <NEXT GAME> to start the next league game. STANDARD STATS x01/Hi-Score/ Lo-Score Stats Ending Scores Points-per-Dart Total Darts Thrown Total Points Points-per-Round Hat Tricks High Ton Low Ton Ton 80s Wins Dart Outs 69 Cricket Stats 321 ZAP Ending Scores Marks-per-Round Total Hits Total Darts Thrown Hat Tricks White Horses 9-Mark Rounds 8-Mark Rounds 7-Mark Rounds 6-Mark Rounds 5-Mark Rounds Wins Ending Scores Total Zaps NDA STATS x01/Hi-Score/ Lo-Score Stats Cricket Stats Ending Scores Total Hits Total Darts Thrown Marks-per-Round Ending Scores Total Darts Thrown Points-per-Dart PM0075-03 Rev C Scorpion™ DX Manual 17 COPYRIGHT © 2000 MERIT INDUSTRIES, INC. MARKS-PER-ROUND HANDICAPPING CHART SPOT CRICKET HANDICAPPING CHART 18 Scorpion™ DX Manual PM0075-03 Rev C COPYRIGHT © 2000 MERIT INDUSTRIES, INC. Using the DX Ranking Feature The new R6 version of the DX features an innovative stand-alone promotional tournament mode. This mode ranks player by performance and it similar to the timed tournament modes on Merit’s Megatouch video products. The event’s ranking list is available to the players from the DX machine’s idle mode. How it Works To Play The event is a timed duration tournament. Players may play as often as they like for the duration of the event. A MATCH will consist of a sequence of 1 to 7 games (as configured by the operator). The player with the most points at the end of the tournament wins. Scoring Players earn 1 point for playing each game in the MATCH, 5 points for winning a game in the MATCH, and 1 point for each feat achieved in the MATCH. In addition, each player’s total score is multiplied by the total number of players that are playing in the current match. The more players that participate in a given MATCH, the more players are rewarded The DX will not limit how many times players can play. However this can be managed manually so that players are allowed to play only once. This is especially applicable to “one night” events. How to Setup the Ranking Event The event is configured from the operator setup mode on the DX. From the operator setup mode, select GAME SETUP -> MACHINE SETTINGS -> PROMOTIONAL FEATURES -> SETUP RANKING EVENT. • Start Time - The time and date when the event will start • End Time - The time and date when the event ends • Number of Games – The number of games that each match will have. Pressing the button will raise the counter. (Example: Players will play 3 games in the MATCH) • Event Games – Pressing this button will bring up the Ranking Game Selection screen where you can select the types of games that will be played in the MATCH. You may also select any options for each game. • Price Per Player – The price in CREDITS (per player) that players must play to play a MATCH. • Erase Player Data – Pressing this button will erase the entire ranking event player database that is stored in the DX. This database consist of the player's name and their score. Since the database can grow indefinitely over time, it is a good idea to clear this out every season. PM0075-03 Rev C Scorpion™ DX Manual 19 COPYRIGHT © 2000 MERIT INDUSTRIES, INC. • • • Erase Event/Reset Player Scores – Pressing this button will erase the current event information and will reset the players' scores to zero. The players names are NOT deleted. As you run several back to back events, you would press this button before setting up a new event. This prevents the players from having to re-enter their names and ID numbers for each event. Hide Top Player Score – This feature is optional. Its purpose is to reduce cheating by the players. For example, let’s suppose the event ends on Friday night at 8:00. Player Joe is the leader at 100 points. Close in second is Player Steve with 98 points. Since player Steve realizes that Player Joe is not present at the location, he throws in some quarters and taps out a MATCH by hand so that he can win the event. With the “Hide Top Player Score” option turned on, Player Steve would not know what Player Joe’s score is. Player Steve would only know that Player Joe has a higher score. Player Steve is less likely to cheat if he does not know how far ahead Joe is. Set Name of Event. – You must create a name for the event in order to enable the ranking feature. This title will appear in the ranking list and in the DX game select screen (Example “Bud Light Challenge” or “Friday Night Cricket”. Erasing the event resets this title. More about the Database The database uses about 36 bytes per person in the tournament. This means that a database with 1000 players will take about 36 kilobytes. This is entirely manageable on the DX dart machine. Keep in mind that over long periods of time the database will get large and you will need to delete the entire database. Each record for the player consist of the player’s name, ID number and the player’s current event score. The first time a player plays, the DX will ask them for an ID number. If they have not been assigned an ID number (and they do not play in leagues), the DX will assign a new random number. The player will then be prompted to enter their name in an alphanumeric screen. From this point on, the player should use this ID number to play in the event. They can always see their number in the ranking list if they forget it. If you are running electronic leagues on your DX’s, have your players use their league ID number when they play in the ranking event. This way they will not have to spend time entering their names into the machine (the DX will look up the player name in the league definition files). 20 Scorpion™ DX Manual PM0075-03 Rev C COPYRIGHT © 2000 MERIT INDUSTRIES, INC. Linking DX machines and the Ranking system You may link several DX machines at a location and the event format and database will be updated across the all of the machines. There are some special circumstances to be aware of: • The machine with the most modified database will send its database to all other machines on the link. • If one of the machines is turned off and at some later timed turned on, it will acquire the database from the other machines on the link. • If you are adding machines to a location make sure you delete the player database before connecting it to the other DX machines at the location since it may have a database that has been more modified than the others. If you feel uncomfortable with linking the DX machines then by no means do so. Especially if you have trouble with locations that may be moving the machines around to accommodate other events (i.e., rock band stage is where the dart machines are located etc.). Tips on using the Ranking system Player ID cards – Players can use the barcode reader on the DX to enter their ID number OR they may manually type in their number. If they are playing in a league on the DX they can swipe their league card. If you do not run leagues but you would like to have ID cards for your players, you can have a set of generic pre-printed cards made available at the location that players can temporarily use. (i.e., they get them from the bartender). This works especially well with “one night” events. Games that work well with this system You may select from the following games for the Ranking event: 301, 501, 701; HIGHSCORE, CRICKET, GAME 321, GAME SNIPER. In the future the DX will support more types of games in this mode. In general, any game that offers the opportunity for players to achieve feats, and works well with 1, 2, 3 or 4 players is well suited for the ranking event. Cut-throat Cricket is very popular in this regard. SNIPER at this time has no feats associated with it, (except the win) but works well with multiple players. X01 games are also suitable. PM0075-03 Rev C Scorpion™ DX Manual 21 COPYRIGHT © 2000 MERIT INDUSTRIES, INC. Set Up Summary 1) Set starting time/date 2) Set ending time/date 3) Select number of games in the MATCH 4) Set up the type of game (for each game in the match) 5) Set the cost per player in credits 6) Select the “Hide top Player Score” option (if desired) 7) Set the NAME of the EVENT (must be performed to enable the feature) 22 Scorpion™ DX Manual PM0075-03 Rev C COPYRIGHT © 2000 MERIT INDUSTRIES, INC. FIGURE 7 - FRONT VIEW OF GAME PM0075-03 Rev C Scorpion™ DX Manual 23 COPYRIGHT © 2000 MERIT INDUSTRIES, INC. FIGURE 8 - REAR VIEW OF GAME 24 Scorpion™ DX Manual PM0075-03 Rev C COPYRIGHT © 2000 MERIT INDUSTRIES, INC. FIGURE 9 - TARGET SECTION AND OVERHEAD - INTERNAL VIEW PM0075-03 Rev C Scorpion™ DX Manual 25 COPYRIGHT © 2000 MERIT INDUSTRIES, INC. FIGURE 10 - FRONT VIEW OF GAME - OPEN CONTROL PANEL FIGURE 11 - CONTROL PANEL SECTION 26 Scorpion™ DX Manual PM0075-03 Rev C COPYRIGHT © 2000 MERIT INDUSTRIES, INC. Callout Part Number Description 2 TA10014-01 PCA, DMU02, CONTROL PANEL, LEFT 3 TA10015-01 PCA, DMU03, KEY BOARD 4 TA10016-01 PCA, DMU04, BARCODE READER 5 SA0012-01 CABLE ASSY, PCA TO PBBODY, SCORPION DX 6 HW8833 TENSION CLIP, 11/16” #8 MOUNTING HOLE 10 TA10020-01 PCA, DMU05, OPTICAL SENSOR 11 HW8352-02 BUTTON, OBLONG, BLANK, DRT CTRL PNL 12 HW8352-03 BUTTON, ROUND, “*” SYMBOL, DRT CTRL PNL 13 HW8352-04 BUTTON, ROUND, “ENTER” SYMBOL, DRT CTRL PNL 14 HW8352-05 BUTTON, ROUND, NUMBER “0”, DRT CTRL PNL 15 HW8352-06 BUTTON, ROUND, NUMBER “1”, DRT CTRL PNL 20 HW8352-07 BUTTON, ROUND, NUMBER “2”, DRT CTRL PNL 21 HW8352-08 BUTTON, ROUND, NUMBER “3”, DRT CTRL PNL 22 HW8352-09 BUTTON, ROUND, NUMBER “4”, DRT CTRL PNL 23 HW8352-10 BUTTON, ROUND, NUMBER “5”, DRT CTRL PNL 24 HW8352-11 BUTTON, ROUND, NUMBER “6”, DRT CTRL PNL 25 HW8352-12 BUTTON, ROUND, NUMBER “7”, DRT CTRL PNL 30 HW8352-13 BUTTON, ROUND, NUMBER “8”, DRT CTRL PNL 31 HW8352-14 BUTTON, ROUND, NUMBER “9”, DRT CTRL PNL 32 MW1733-01 HINGE, DART CONTROL PANEL 33 HW8716 LOCK, FLAT, STR, #564, 1-7/16” 34 HW8353-01 SUPPORT PANEL, LENS, DART CONTROL PANEL 35 HW8354-01 DART CONTROL PANEL 40 GL1750-01 INSTRDCL, SCORPION DX, UR, ENG 41 SW1623 PBBODY, LARGE SQUARE, RED, SYMBOL, PLAYER CHANGE 42 SB9380-01 DISPLAY ASSEMBLY, SCORPION DX 42a* EC9380 LCD, 320 X 240 42b* HW8351-01 GASKET, LENS, DART CONTROL PANEL 42c* GL0002-01 FILTER, LENS, DART CONTROL PANEL 42d EC2190-01 ASSY, RIBBON CABLE, OPTREX LCD DISPLAY 42e* HW8355-01 EYE HOUSING, DART CONTROL PANEL DX TARGET ASSY 43 SB1796-02 LAMP ASSY, F15T8CW, 120V, CL79 43a* EC6052-05 FLUOR, 15”, 120V-60HZ, W/IEC 43b* LB2100 LAMP, FLUOR, 15”, F15T8CW 44 SB1767-01 HARNESS, ULTRA, THR/RMV LAMP, UR DX 45 GL1701-05 DECAL, TARGET, GRAY, SCORPION DX, UR 50 SB1958-22 OVERHEAD, SCORPION 9000 PM0075-03 Rev C Scorpion™ DX Manual 27 COPYRIGHT © 2000 MERIT INDUSTRIES, INC. Callout Part Number Description 50a* GL2779-01 PLEXI, DISP, 9000, SCORPION 50b* TA10005-01 PCA, OVHD, LED, RANDOM CRKT, TSTD 50c* HW8985 ENCL, CRKT OVERHEAD, BLK 51 SA1786 PCA, TGT/MIC INTFC, TESTED 52 HW8933 STANDOFF, NYL, PCB, ¼, BLIND HOLE 53 GL1004-01 DECAL, 321 ZAP PLAYED HERE, ENG BASIC TARGET ASSEMBLY PARTS 54 WD2831-01 CABINET, TARGET 55 SB1908-01 TRANSDUCER ASSY, ULTRASONIC, DX 60 SB1904 LAMP HOLDER ASSY, WEDGE BASE (BULB# LB1150) 61 MW1714-02 HINGE, MTG BRACKET, RIGHT, UR D2 62 MW1715-02 HINGE, MTG BRACKET, LEFT, UR D2 63 SA1554 RIBBON CABLE, 2 X 20, 59” 64 EC2196-01 RIBBON CABLE, CPU-MATRIX, 27” 65 SB1793-02 ANTI-TIP CABLE ASSY, UR D2 70 SB1441-04 TRANSDUCER/PIEZO ASSY, 8”L, 3-PIN CONNECTOR 71 MW0021-01 BRACKET, MOUNTING, LEFT, OVERHEAD ASSY 72 MW0021-02 BRACKET, MOUNTING, RIGHT, OVERHEAD ASSY TARGET PARTS 73a HW8012-02 TARGET MAT, RUBBER, NEOPRENE .62 73b HW8012-03 TARGET MAT, RUBBER, URETHANE .031 74 SA8704 MATRIX/WOOD ASSEMBLY, LGTGT-S 75 SB1484-02 SPIDER W/SEGMENTS, LGTGT-S, BLACK-4 COLORS 80 DS2001 CATCH RING SEGMENT, LGTGT-XS, BLACK 81 DS2009 CATCH RING CAP, BLACK 82 HW6366 MATRIX MOUNTING POST, KNURLED 83 HW8326 SPACER, TARGET, PLASTIC 84 HW8979 SLIDE LATCH, DART MATRIX SW SEGMENT KITS FOR BLACK SPIDERS X DS5078 SEGMENT KIT SINGLE, LGTGT-S, CREAM (10 EACH) X DS5079 SEGMENT KIT DOUBLE/TRIPLE, LGTGT-S, GREEN (10 EACH) X DS5085 SEGMENT KIT DB/TP/OB, LGTGT-S, RED (10 EACH DOUBLE, TRIPLE; 1 OUTER BULL) X DS5087 SEGMENT KIT SGL/IB, LGTGT-S, BLACK (10 EACH DOUBLE, TRIPLE; 1 OUTER BULL) GENERAL ASSEMBLY PARTS 85 HW8991 HINGE, UR 86 HW8992 HINGE PIN, UR, D2 90 MW1723 BRACKET, ANTI-FOLD, S-FD DARTS 28 Scorpion™ DX Manual PM0075-03 Rev C COPYRIGHT © 2000 MERIT INDUSTRIES, INC. Callout Part Number Description DX BASE ASSEMBLY 92 HW8888-01 CABLE CLAMP, FLAT, 3.25”W, W/ADH 93 EC2189-01 ASSY, RIBBON CABLE, CONTROL PANEL, SCORPION DX 94 TA10026-01 CPU, PCA FOR DX, TSTD 95 HW8986 LEAGUE SLOT, ABS, FACE PLATE 100 SB1765-02 HARNESS, M/CREJ, UR, DX 101 GL1706 DECAL, CANCEL GAME BUTTON, ENG 102 EC2001 CORD, POWER, USA 103 HW8230 25¢/25¢ COIN DOOR 104 SA4037 COUNTER W/CONNECTOR, 5V, 6 DIGIT X SB1646-01 BAR DART PACK X SB3000 KIT, SAFETY CHAIN HARDWARE 105 GL1700-04 DECAL, BASE, GRAY, SCORPION DX, UR 110 SB1766-01 HARNESS, SPEAKER, METER, COIN INT, UR, DX 111 GL1721-01 DECAL, SCORPION DX, UR 113 SB1769-01 HARNESS, CANCEL GAME BUTTON, DX 114 SB1770-01 HARNESS, CFL POWER, SCRP DX BASIC BASE ASSEMBLY PARTS 115 WD2836-01 CABINET, BASE 116 MW0035-01 MOUNTING PLATE, CPU 121 HW8857-01 FISHPAPER, MOUNTING MAIN BOARD, DX 122 SW3044 PB ASSY, SMALL ROUND, BLK, BLANK 123 TA10028-01 PCA, DAISY CHAIN 124 SB1637-02 SPEAKER ASSEMBLY, 8 OHM, 6” UR 125 EC7528-02 POWER SUPPLY, SWT, PS/2-PC 130 HW8960 LEG LEVELER, 2”, 3/8-16THD 131 TA10029-01 PCA, DMU08, INVERTER BOARD 132 MW0030-01 PLATE, CVR & COMM CABLE STRAIN RELIEF 133 MW0029-01 PLATE, COM PCA/ENTRY COVER 134 EC2193-01 RIBBON CABLE, 2X5 PIN, 14”L, COMM DX 135 SA4090 TEST SWITCH ASSY, SINGLE 143 HW9002-01 COVER, FOOT RAMP, W/O PSA, SCRP 144 HW0024-01 RUBBER FLAP, UNDER, SCRP BASE 144a* MW0079-01 STRAP, RUBBER FLAP, SCORPION BASE 145 MW0034-01 BRACKET, POWER SUPPLY 150 MW0033-01 COVER, AC POWER CORD 151 HW8873 CABLE, MOUNTING, FLAT, 1”, #6SCR *This part is not shown in the illustration; it is part of a larger assembly that is shown. PM0075-03 Rev C Scorpion™ DX Manual 29 COPYRIGHT © 2000 MERIT INDUSTRIES, INC. PCMCIA HARDWARE AND CABLING KITS 30 PART NUMBER DESCRIPTION KAD-104-001 PCMCIA EXTERNAL ADAPTER FOR PC KIT KAD-104-002 PCMCIA FLASHDISK KIT 4MEG KAD-104-003 PCMCIA DATA/FAX MODEM KAD-104-004 PCMCIA INTERNAL ADAPTER FOR PC KIT EC0073-01 CABLE, RJ11, RS485, 15’ EC0073-02 CABLE, RJ11, RS485, 25’ EC0073-03 CABLE, RJ11, RS485, 50’ EC0073-04 CABLE, RJ11, RS485, 100’ Scorpion™ DX Manual PM0075-03 Rev C COPYRIGHT © 2000 MERIT INDUSTRIES, INC. Merit Limited Warranty for Coin-Operated Dart Machine Merit Industries, Inc., warrants the Scorpion™ DX dart machines purchased prior to February 2000 to be free from defects in material and workmanship for a period of twenty-four months from the date of delivery or twenty-five months from the date of shipment from its facilities, whichever occurs first. The Scorpion DX machines purchased after February 2000 will be under warranty until February 2002. The warranty covers all major components except the coin mechanism, which is governed by the original manufacturer’s warranty. Consumables such as fuses, light bulbs, switches, line cords and target rubber mats are warranted for a period of six months from the date of delivery or seven months from date of shipment, whichever comes first. period. Merit reserves the right to request the serial numbers of the item and/or game which has failed, and copies of sales invoices, bills of lading or other documents as required to determine the validity of the warranty coverage Merit’s obligation shall be limited to repair or replacement, as stated above, and shall specifically exclude any liability for consequential damage or loss of earnings. Merit may, at its discretion, provide replacement parts under warranty prior to receiving defective items without incurring any ongoing obligation to extend such accommodations. The above terms and conditions constitute the sole obligation, written or implied, of Merit Industries under its warranty coverage. Failure or damage due to misuse, vandalism, excessive or intentional abuse, operation outside specified conditions (including but not limited to improper electrical power source), normal wear and tear, fire, water damage, acts of God, acts of war and civil unrest, are specifically excluded. Damage resulting from improper servicing by unqualified personnel is also excluded. Cabinet damage resulting from normal wear and tear or customer/ user abuse is not included. Merit products are carefully inspected and thoroughly tested prior to packing and shipment. Any damage discovered upon receipt of goods, whether obvious or concealed, must be reported immediately to the delivering carrier and claims made directly to them. Merit assumes no responsibility for damages once the product has left its facilities, and any disputes regarding transportation damage must be resolved with the shipping company(s). Merit will repair or replace, at its option, any component, part or subassembly that fails under warranty, provided that the failed item is returned, shipping charges prepaid, to Merit’s repair facility and Merit is notified of the failure within the warranty PM0075-03 Rev C FCC WARNING: THIS EQUIPMENT COMPLIES WITH THE REQUIREMENTS IN PART 15 OF FCC RULES FOR A CLASS “A” COMPUTING DEVICE. OPERATION OF THIS EQUIPMENT IN A RESIDENTIAL AREA MAY CAUSE INTERFERENCE TO RADIO AND TV RECEPTION REQUIRING THE OPERATOR TO TAKE WHATEVER STEPS ARE NECESSARY TO CORRECT THE INTERFERENCE. Scorpion™ DX Manual 31