1
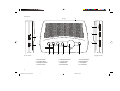
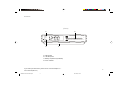
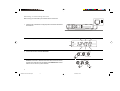
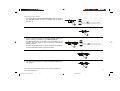
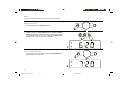
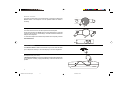
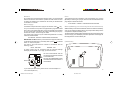
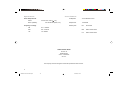
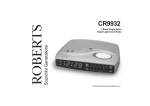
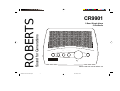
ROBERTS
CR9901
Sound for Generations
3 Band Single Alarm
Clock Radio
CR9901 Instruction Book.pm6
T im e
H our
M in u te
A la rm /O ff
S le e p
C R 9901
3 B a n d C lo c k R a d io
Please read this manual before use
1
24/10/99, 13:48
Controls
FM
O ff B u z z A u to O n
5
M W
LW
4
V o lu m e
3
(Top)
2
H our
M in u te
A la rm /O ff
S le e p
Low
D im m e r
H ig h
6
1
T u n in g
T im e
CR 9901
3 B a n d C lo c k R a d io
12
(Left side)
11
10
9
8
7
1. Dimmer switch
5. Waveband selector
2. Function switch
6. Tuning control
10. Minute button
3. Headphone socket
7. Sleep button
11. Hour button
4. Volume control
8. Snooze button
12. Time button
9. Alarm/Off button
1
CR9901 Instruction Book.pm6
2
24/10/99, 13:48
(Right side)
Controls
(Front)
15
16
150
LW
17 0
210
240
260
kH z
PM
18
M W
540
600
800
FM
88
92
96
10 0 0
10 0
13 0 0
10 4
16 0 0
kH z
10 8
M H z
10 6
17
15. PM indicator
16. LED dial pointer
17. Battery compartment (underside)
18. Alarm indicator
If you need any further advice, please call our Technical Helpline on :2
0181 758 0338 (Mon-Fri)
CR9901 Instruction Book.pm6
3
24/10/99, 13:48
Switching on and setting the time
Before using your clock radio you must first set the correct time.
ON
1. Place the unit on a flat surface. Plug the power cord into the wall socket
and switch on.
15 0
LW
17 0
21 0
24 0
26 0
M W
54 0
60 0
80 0
FM
88
92
96
10 0 0
10 0
130 0
10 4
10 6
2. The clock display will flash 12.00.
P M
3. Press and hold down the Time Set button.
4. Whilst holding down the Time Set button press the Hour, or Minute
buttons to set the time. Release the buttons when the correct time is
reached. The clock uses a 12 hour display with aPM indicator. Ensure
that the correct 12 hour cycle is selected.
T im e
T im e
3
CR9901 Instruction Book.pm6
4
kH z
P M
24/10/99, 13:48
H our
H our
M i n u te
M in u te
160 0
kH z
10 8
M Hz
Listening to the Radio
1. Turn on the radio by sliding the Function switch to the 'On' position.
The LED dial pointer will light up indicating that the radio is
switched on.
O ff B u z z A u to O n
150
LW
170
210
M W
540
600
800
FM
88
92
96
240
10 0 0
10 0
260
13 0 0
10 4
kH z
16 0 0
kH z
10 6
10 8
M Hz
240
260
2. Select the required waveband using the Waveband selector switch.
FM
M W
3. Tune in to the desired station by rotating the Tuning control. The
station frequency is indicated by the LED dial pointer.
The Wire aerial located on the rear of your clock radio is for FM
reception. The wire should be fully extended and positioned for
optimum reception.
For MW and LW reception there is a built in ferrite aerial. Rotate the
your clock radio to the position giving best reception.
T u n in g
LW
150
LW
170
210
M W
540
600
800
FM
88
92
96
10 0 0
10 0
13 0 0
10 4
10 6
kH z
16 0 0
kH z
10 8
M Hz
4. Adjust the volume by rotating the Volume control.
V o lu m e
5. The radio can be switched off by sliding the Function switch to the
'Off' position.
O ff B u z z A u to
O n
If you need any further advice, please call our Technical Helpline on :4
0181 758 0338 (Mon-Fri)
CR9901 Instruction Book.pm6
5
24/10/99, 13:48
Alarm
The alarm can be set to wake you by either the buzzer or the radio.
A la r m / O ff
Setting alarm time
1. Press and hold down the Alarm/Off button.
T im e
2. Whilst holding down theAlarm/Off button press the Hour, or Minute
buttons to set the time. Release the buttons when the correct alarm
time is reached. The clock uses a 12 hour display with aPM indicator.
Ensure that the correct 12 hour cycle is selected.
P M
A la rm / O ff
Checking the alarm time
1. To check alarm time, press and hold down the Alarm/Off button the
display will show the alarm time.
P M
5
CR9901 Instruction Book.pm6
6
24/10/99, 13:48
H our
M in u te
Setting the alarm to wake to buzzer
O ff B u z z A u to
O n
1. Set the alarm time as previously described. Set the Function switch
to the 'Buzz' position. The Alarm indicator will light.
The alarm will sound every day at the preset time for 59 minutes. To
turn off the alarm until the next day press the Alarm/Off button.
To turn off the alarms permanently set the Function selector to the
'Off' position.
P M
Setting the alarms to wake to radio
1. Set the alarm time as previously described. Set the Function switch
to the 'Auto' position. The Alarm indicator will light.
O ff B u z z A u to O n
Ensure that the volume is set to the correct level and the desired station
is tuned in.
The alarm will sound every day at the preset time for 59 minutes.
To turn off the alarm until the next day press the Alarm/Off button.
To turn off the alarms permanently set the Function selector to the
'Off' position.
P M
If you need any further advice, please call our Technical Helpline on :6
0181 758 0338 (Mon-Fri)
CR9901 Instruction Book.pm6
7
24/10/99, 13:48
Snooze control
A la r m / O ff
The radio or buzzer alarm can be silenced for 7 minutes by pressing the
Snooze button. This sequence can be repeated whilst the alarm is
sounding.
Sleep timer
A la r m / O ff
The radio can be set to turn off after a preset time has elapsed.
Press and hold down the Sleep button until the desired time is reached
(maximum 59 minutes in 1 minute steps). The radio will switch off after the
sleep time has elapsed.
To cancel the sleep function before the preset time has expired, press the
Alarm/Off button.
P M
D im m e r
Dimmer Switch
H ig h
The Dimmer switch located on the left side of your clock radio will allow
you to adjust the intensity of the clock display to suit room brightness.
Headphones (on rear)
A Headphone Socket (3.5mm) is provided for use with either headphones
or an earpiece. Inserting a plug automatically mutes the internal loudspeaker.
7
CR9901 Instruction Book.pm6
8
24/10/99, 13:48
Low
General
Fuse
Do not allow this unit to be exposed to water or steam. It is recommended
that the FM band be used wherever possible as better results in terms
of quality and freedom from interference will usually be obtained than
on the MW or LW bands.
This apparatus must be protected by a 3A fuse (BS1362) in a 13A plug
(BS1363). If another type of plug is used a 5A fuse should be fitted in the
plug, adaptor or distribution board.
IF IN DOUBT - CONSULT A QUALIFIED ELECTRICIAN.
Mains supply
only.
Back-up Battery (not necessary for the unit to function)
For your convenience this product is supplied with a plug which is fitted
with a fuse of the appropriate rating. If the plug supplied is not suitable
for your socket outlet, it should be removed by unscrewing the plug top,
the terminal screws, and removing the cable.
Slide the battery cover catch in the direction of the arrow. Remove the battery
cover. Fit a 9 volt IEC size 6LR61 (6F22, PP3) or equivalent battery into the
compartment. Replace the battery cover.
The CR9901 will operate from a supply of AC 230volts, 50Hz
The correct style of plug to suit your household together with a correctly
rated fuse should be fitted.
The time and alarm settings will be retained during a temporary failure of the
AC mains supply. The LED display will not be operational. The display will
be extinguished to conserve battery life.
IF IN DOUBT - CONSULT A QUALIFIED ELECTRICIAN
IMPORTANT. DO NOT make any connection to the larger terminal which
or coloured
is marked with the letter E or by the safety earth symbol
Green or Green-and-yellow.
(Underside)
The wires in the mains lead are coloured in accordance with the
following codes :BLUE - NEUTRAL
BROWN - LIVE
As these colours may not correspond with the coloured markings
identifying the terminals in your plug, proceed as follows:The wire coloured BLUE must be
connected to the terminal marked N
or coloured BLACK.
E (Earth)
Brown (Live)
3 amp The wire coloured BROWN must be
connected to the terminal marked L or
coloured RED.
L
Blue (Neutral)
N
Cord
If you need any further advice, please call our Technical Helpline on :8
0181 758 0338 (Mon-Fri)
CR9901 Instruction Book.pm6
9
24/10/99, 13:48
Specifications
Circuit Features
Power Requirements
Mains
AC 230 volts, 50Hz
Back-up Battery
IEC size 6LR61 (6F22, PP3)
Frequency Coverage
FM
87.5 - 108MHz
MW
525 - 1610kHz
LW
147- 284kHz
Loudspeaker
75mm diameter 8 ohms
Output Power
0.3W RMS
Aerial System
FM
Wire Aerial
MW
Built-in Ferrite aerial
LW
Built-in Ferrite aerial
only
ROBERTS RADIO LIMITED
PO BOX 130
MEXBOROUGH
SOUTH YORKSHIRE
S64 8YT
The Company reserves the right to amend the specification without notice.
9
CR9901 Instruction Book.pm6
10
24/10/99, 13:48
Notes:
If you need any further advice, please call our Technical Helpline on :0181 758 0338 (Mon-Fri)
CR9901 Instruction Book.pm6
11
24/10/99, 13:48
Guarantee
This instrument is guaranteed for twelve months from the date of delivery to the original owner against failure due to faulty workmanship or component
breakdown, subject to the procedure stated below. Should any component or part fail during this guarantee period it will be repaired or replaced free of charge.
The guarantee does not cover:
1. Damage resulting from incorrect use.
2. Consequential damage.
3. Receivers with removed or defaced serial numbers.
Procedure:
Any claim under this guarantee should be made through the dealer from whom the instrument was purchased. It is likely that your Roberts dealer will be
able to attend to any defect quickly and efficiently, but should it be necessary the dealer will return the instrument to the company’s service department for
attention. In the event that it is not possible to return the instrument to the Roberts dealer from whom it was purchased, please contact Roberts Radio
Technical Services department at the address shown below before taking further action.
These statements do not affect the statutory rights of a consumer.
ROBERTS RADIO TECHNICAL SERVICES DEPARTMENT
97-99 Worton Road
Isleworth Middlesex
TW7 6EG
Technical Helpline:- 0181 758 0338 (Mon-Fri)
Issue 1
CR9901 Instruction Book.pm6
12
24/10/99, 13:48