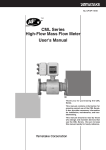
1
Installation Manual
and
Service Log
for
Twin Flow
Important.
Read these instructions carefully before attempting installation or use of
this appliance. All work must be carried out by competent persons.
WARNINGS
Persons carrying out installation work on the Rinnai Twin Flow require the following
certificates
For any gas work carried out: Registration in proof of competence scheme. At time of writing
CORGI is the only acceptable body. ACS certification must also be up to date.
The Twin Flow hot water system is not covered by Building Regulations Part G3 unless it is
a closed system such as one piped with a secondary return system. If there is a secondary
return then the installer must be able to show proof of G3 competence, which can be shown
through a Registered Operative Identity Card for the installation of Unvented Domestic Hot
Water Systems or the Association of Installers of Unvented Hot Water Systems (Scotland
and Northern Ireland.)
The Twin Flow system, when used with the prewired Back plate and moulded plug does not
require the installer to have any special electrical qualification. If the back plate is not used,
or additional wiring is carried out then the installer must be able to show competence in the
installation of electrical wiring which can be shown through: EIC certification. IEE 17th
Edition, or Part P.
Building Regulation G3 draws attention to the Building Regulations 1991, especially
Regulation 11(1), 12(4), and 13(3). The following is quoted from these and Building
Regulation G3.
A person who intends to carry out building work or to make a material
change of use shall-give to the local authority full plans and a building notice accompanied by a
statement which specifies:
a: the name, make, model and type of hot water storage system to be
installed
b: the name of the body, if any, which has approved or certified that the
system is capable of performing in a way which satisfies the requirements of
paragraph G3 of Schedule 1.*
c: the name of the body, if any, which has issued any current registered
operative identity card to the installer or proposed installer of the system.
The full plans shall consist of a description of the proposed building work or
material change of use, and the plans, particulars and statements required.
This can now be satisfied through a notification Self-Certification scheme.
It is the responsibility of the installer to make sure that proper certification has been gained,
and that the system is installed to the necessary regulations and instructions within this
installation manual.
Additionally the installation must be carried out to the requirements of
Building Regulations issued by the Department of the Environment
Building Standards (Scotland) Regulations.
I.E.E. Wiring regulations for electrical installations.
BS 6700
Local byelaws
Water regulations
Health and safety at work etc. Act 1974
Such other specifications and regulations that may supersede or complement the above
documents. Additional documents listed in the Infinity water heater manual.
2
CONTENTS
Warnings..............................................................................................................2
Contents................................................................................................................3
Property Owners Responsibility..................... .......................................................4
Twin Flow Package Parts......................................................................................5
Basic Operating Principle......................................................................................6
Planning Out The Site...........................................................................................7
Preparing The Wall...............................................................................................8
Preparing Backplate.............................................................................................9
Installation Backplate..........................................................................................10
Installation Water Heater.....................................................................................11
Installation Boiler.................................................................................................12
Twin Flow Gas Pipework.....................................................................................13
Twin Flow Mains Cold Water Pipework...............................................................14
Twin Flow Hot Water Pipework...........................................................................15
Twin Flow Central heating Pipework...................................................................16
Twin Flow Flueing................................................................................................17
Twin Flow Electrics..........................................................................................18-20
Twin Flow Controls...............................................................................................21
Twin Flow Condensate Disposal..........................................................................22
Twin Flow Condensate Disposal Diagrams.....................................................23/24
Commissioning Procedure..................................................................................25
Commissioning Record.......................................................................................26
Twin Flow Maintenance.......................................................................................27
Twin Flow Service Record...............................................................................28/29
Twin Flow Parts Record.......................................................................................30
Service Contact....................................................................................................31
3
PROPERTY OWNER’S RESPONSIBILITY
Twin Flow in Domestic Properties.
Any domestic heating and hot water system must be subject to an annual service. All gas
appliances must be serviced by a competent person.
Twin Flow in Commercial and Rented Properties.
If the property is to be used as a commercial premise, including landlord’s rented
accommodation, then there is a duty of care to protect employees, tenants, and the public
from the possible dangers of hot water systems including scalding and Legionella. Although
this document is not intended to give expert advice on ways to avoid these issues it can
serve as a guideline to what should be done and where more information can be found. The
full list of responsibilities can be found in the following documents
TM13 CIBSE: Minimising the Risk of Legionnaires Disease
ACOP L8: The Control of Legionella Bacteria in Water Systems
HSE publication: Legionnaires Disease: A guide for employers
Various other documents that are industry specific such as
HSE publication: Controlling Legionella in Nursing and Residential Homes
NHS Estates HTM 2040 The Control of Legionella in Healthcare Premises: a code of
practice.
and HTM 2027 Hot and Cold Water Supply, Storage and Mains Services.
There are many industry specific documents regarding the distribution of hot water. These
can be found in
IP 14/03 from the BRE: Preventing Hot Water Scalding In Bathrooms: Using TMVs
This list is not comprehensive.
The responsibilities, relative to the Rinnai Twin Flow type of heating and hot water system,
can be summarised in the following way.
1. If used, a secondary return should be set to 600C or higher and must return at over 500C.
The water at the furthest outlets must reach 500C within 60 seconds.
2. Warning signs should be placed over taps where the temperature could exceed 550C.
Where people are at high risk consider thermostatic mixing valves.
3. A risk assessment should be carried out, by a suitably qualified person, to gauge the
associated risk of the hot water system. This assessment should be reviewed at regular
intervals.
4. Based on this assessment a maintenance regime should be determined.
The Twin Flow system must be serviced and checked for safety annually. This alone
is not sufficient. Some parts of the hot water system, such as rarely used shower
heads or terminal fittings, may require frequent maintenance. Frequent checks should
be carried out to ensure the hot water system is operating correctly.
5. The system must be commissioned by a qualified person.
Your Installer’s details:
Commissioning/ Service Engineers Details:
4
TWIN FLOW PACKAGE PARTS
The Rinnai Twin Flow is supplied with the following.
•
A Rinnai 26i Water Heater
•
A Rinnai E32S Condensing Boiler
•
A Rinnai Twin Flow standard flue kit made up of:
- A 26i standard flue kit (vertical or horizontal)
- A E32S standard flue kit (vertical or horizontal)
•
Twin Flow Valve Pack
Includes 4 water ball valves and 2 gas ball valves
•
A Universal Controller MC-91-1A
•
A Flow Switch (normally closed <6 L/min)
•
Prewired Backplate
•
Backplate fixing pack ( 10mm Masonry Drill Required )
•
Heating system filling loop and 16L expansion vessel
•
Programmable wireless room thermostat
•
Outside weather compensation sensor kit
Extras/Options
•
Opentherm controller
•
•
Deluxe hot water remote controllers
(maximum 3 deluxe plus 1 universal per heater)
•
Higher output and/or external water heaters from the Rinnai range
•
Hot water system unvented kit
•
Terminal Guards
5
BASIC OPERATING PRINCIPLE
The boiler and water heater are installed together to supply the property with heating
and hot water.
Boiler.
The boiler can be controlled by a wireless room stat or an Opentherm controller.
When the room is below temperature the boiler will come on to heat it up. The boiler
is fully modulating so as the return water temperature increases and the room warms
up the unit will reduce the gas input.
A weather compensation system is used to increase the efficiency of the system by
reducing the temperature set point of the boiler when the ambient outside
temperature increases.
Water Heater.
The water heater is used to supply the taps and outlets with hot water. It is a fully
modulating, high capacity unit that perfectly controls the outlet temperature. It allows
the user to control the temperature with a series of remote controllers. Once the
temperature is set the hot tap can be used without the need for mixing cold in at the
point of use. More than one outlet can be used without fluctuations of temperature.
The high capacity of the unit will allow multiple showers or outlets to be run at once
without sacrifice of the hot water.
Flow Switch.
A flow switch is used on the cold pipe of the water heater to control the Twin Flow
system. If the flow rate exceeds 5 L/min the flow switch contacts will open. This will
cause the boiler to extinguish and go into stand by mode. This means that although
the maximum potential gas consumption of the system is 86kW, which exceeds the
supply from a U6 domestic gas meter, the system will never draw more than the
input of the water heater (54kW.) This will consume 5.05 m3/hr and still leave almost
1 m3/hr available for any small gas appliances such as cookers or gas fires.
6
PLANNING OUT THE SITE
When choosing the location of the Twin Flow the following should be taken
into account:1.
The Twin Flow has a necessary clearance of 100mm to the side with the
isolator switches and 60 mm on the other side. It also requires 250mm
above, 600mm to the front, and enough space below for the pipework.
2.
The Twin Flow should mount on a wall or suitable framework that can
hold the total weight of the system. An ideal location will minimise pipe
runs as much as possible, but also take up as little of the building
occupants living space as possible . For ease the backplate can be
mounted either way up to put the boiler left or right of the water heater.
3.
There must be enough gas available for the water heater.
4.
There must be water and electricity available.
5.
There must be enough room and lighting to service the units.
6.
The heaters should be installed in a location that is accessible for
maintenance. If the heaters are at high level, or access is by means of a
ladder, there should be a ladder or scaffolding available on site at all
times.
7.
There must be suitable drainage available so that if a leak was to occur
from the heater or boiler, including a leak of hot water, it would not cause
damage to the building, furnishings, or inhabitants.
8.
There must be a suitable place when using internal units to get the flues
out of the building in a safe manner. The flue terminals should be a
minimum of 2m above the ground whenever possible.
9.
The weather compensation probe should be placed outside of a north
facing wall.
10. The wireless room thermostat should be placed approximately 1.5m off
the floor, away from hot and cold draughts.
7
PREPARING WALL
Open the box with the backplate in it. Along with the backplate are the expansion
vessel, template and mountings.
Remove the template and fix it to the wall in the chosen location. Make sure it is the
right way up as the same template is used for left and right handed installations. The
template is marked WATER HEATER and BOILER; make sure the letters that are
written right side up show the two appliances as they are to be laid out. Mark the
centres of the two flues at the top of the template. The backplate bolt holes are in
pairs, top and bottom. Mark 3 holes on the top half of the template and 3 holes on
the bottom half of the template. In all cases mark the top hole of the pair.
Remove the template and drill the holes. If plugs (which are supplied) are required
the holes should be drilled with a 10 mm drill. Plug the holes and screw the supplied
screws in until they head is within 10mm of the wall. These will be tightened once
the back plate is put on the wall.
Drill the holes for the flues next. The flue terminals are 125mm diameter so the flue
holes must be larger than this. Do not drill them larger than 150mm.
BOILER
WATER HEATER
WATER HEATER
BOILER
8
PREPARING BACKPLATE
When the backplate is removed from the box the 16L expansion vessel for the
heating circuit may not be fixed into position. Place a foam pad (supplied) on each
side of the expansion vessel to prevent any vibration noise. The vessel should be
installed to the back of the backplate through the bracket and held in with the spring
band. This is attached the same way regardless of left or right handed installation.
The flexible connection should be attached to the vessel and run through the open
hole in the middle upright of the frame. This places the other end of the flexible
connection on the boiler side of the backplate.
Next determine the top of the backplate. The water heater mounts on the panel in
front of the expansion vessel. Stand the panel up so that the water heater will be on
the desired side of the backplate right side up. Near the bottom of the backplate on
the water heater side there is a 20mm blanking gland. Remove the blanking gland
and put the water heater cabling and gland through and tighten down the gland.
The backplate is supplied prewired for ease of installation. However, the external
controls will have to be connected to the controls box. Before hanging the backplate
locate the two off Din plug connection points on the outside of the box.
9
INSTALLATION BACKPLATE
Now hang the backplate over the six bolts in the wall and then tighten them up using
a ratcheting spanner or socket driver.
PRIOR TO MOUNTING THE TWIN FLOW
APPLIANCES THE HOLES FOR THE FLUES MUST
BE CORE DRILLED.
IF ANY BUILDING DEBRIS IS FOUND TO
CONTAMINATE THE TWIN FLOW THE
MANUFACURER’S WARRANTY IS NULL AND VOID
10
INSTALLATION WATER HEATER
The water heater must be installed to the requirements of the Installation Manual
supplied with the heater. These instructions do not supersede those instructions, but
are to be followed in conjunction with that manual.
1. Siting the Water Heater.
The water heater should be located on the studded back plate. The necessary
clearance between the boiler and water heater flues is achieved with the backplate
used in a left hand or right hand configuration. The flue terminals should be a
minimum of 2m above the ground whenever possible.
2. Temperature Setpoint.
This can be done in two ways: with controllers or without controllers. If running
cabling for the remotes to the hot water points of use would be to difficult then the
water heater can be used without remotes. The temperature can be set on the dip
switches within the unit. Details are in the water heater manual. The temperature
should be set to the maximum required in the property. In a domestic situation 55C
(the water heater factory setting) should be sufficient. In a commercial setting, and if
there is a secondary return, then 60C should be used.
If the property is undergoing a full refurbishment, or is a new build, then running the
cabling for remotes will be easier. Up to four remotes can be used with the 26i water
heater. At least one of these must be the universal remote (MC-91-1A) that is
supplied with the unit. The other three can be deluxe or universal remotes. If deluxe
units are used at least one must be a Master Controller (MC-70-2A) and the other
two can be Bathroom Controllers (BC-70-2A).
These remotes will give the user the ability to control the hot water temperature at
the point of use. They will also display an error code if there is a problem with the
heater.
MC-91-1A
BC-70-2A
MC-70-2A
11
INSTALLATION BOILER
The boiler must be installed to the requirements of the Installation Manual supplied
with the boiler. These instructions do not supersede those instructions, but are to be
followed in conjunction with that manual.
1. Siting the boiler.
The boiler is supplied with a bracket which can be located on the predrilled
backplate. The necessary clearance between the boiler and water heater flues is
achieved with the backplate used in a left hand or right hand configuration. Once the
bracket is secured the boiler can mount directly on to it.
2. Temperature Control.
The boiler operating temperature is to be set in the boiler controller. This is detailed
in the boiler manual.
Room Temperature control is through the wireless programmable room thermostat
that is supplied with the system. The receiver is plugged into the control box behind
the backplate and the stat is located in the required room. Directions on using the
room stat are supplied.
Wireless programmable room stat.
12
TWIN FLOW GAS PIPEWORK
The gas pipe work for the Twin Flow should be sized for the total system gas
consumption in accordance with British Standards. Due to the flow switch the
maximum gas consumption of the standard Twin Flow system is 54 kW (5.05 m3/hr.)
This is based on the E32S 32kW boiler and a 26i water heater. If a larger or smaller
water heater is used it will alter this gas rate.
The correctly sized gas supply pipe should be run to the Twin Flow. Near the Twin
Flow the gas pipe can branch off to the boiler and water heater in 22mm or 3/4inch
pipe. Each appliance must have an isolating valve (supplied with the Twin Flow) and
union connection for removal of the appliance.
Water Heater
Boiler
Gas Pipe
13
TWIN FLOW MAINS COLD WATER PIPEWORK
The mains cold water pipework for the water heater of the Twin Flow should be sized
based on the maximum flow rate through it. If a high temperature set point is to be
used such as 55 or 60C then the maximum flow rate through the heater (based on a
summer incoming temperature of 20C, which is the maximum allowable in the UK) is
around 20 L/min. For lower setpoints the maximum flow rate through the heater
could be as high as 32 L/min. Based on a maximum water flow velocity of 1.5 m/s
the water supply to the heater should be 22mm regardless of set point. 15mm pipe
can be used but it will increase the pressure drop and flow velocity and may lead to
water hammer.
The water heater must have an isolating valve (supplied with the Twin Flow) and
union connection for removal of the appliance.
The flow switch supplied with the Twin Flow must be installed on the cold water inlet
to the heater. The wiring from the switch will be to the control box inside the back
plate. DO NOT USE HOT WORKS ANY WHERE NEAR THE FLOW SWITCH
UNDER NO CIRCUMSTANCES MUST THE FLOW SWITCH BE
REMOVED OR DISCONNECTED FROM THE BOILER CONTROL
CIRCUIT
The filling loop for the boiler (supplied with the Twin Flow) should branch off of the
mains cold water upstream of the water heater isolating valve.
If a secondary return is to be used the mains cold water pipe must have a full
unvented kit installed. These, along with further details, are available from Rinnai
UK. The secondary return should be piped into the cold inlet of the water heater.
Water Heater
Boiler
Mains Cold Pipe
Location for
filling loop T
Flow
Switch
14
TWIN FLOW HOT WATER PIPEWORK
The hot water supply pipe work from the water heater of the Twin Flow should be the
same size as the mains supply to the heater.
The water heater must have an isolating valve (supplied with the Twin Flow) and
union connection for removal of the appliance on the hot water supply.
HOT SUPPLY
15
TWIN FLOW CENTRAL HEATING PIPEWORK
The central heating pump within the boiler has an available external head of 17kPa.
The water heater must have an isolating valve (supplied with the Twin Flow) and
union connection for removal of the appliance on the hot water supply.
Water Heater
Boiler
Heating Flow
Heating Return
ADDITIONAL PUMP / LOW LOSS HEADER
If it is found that the system resistance is greater than the working head of the pump
installed within the boiler, an additional pump may be fitted to the primary flow pipe
from the boiler. This must be installed after a permanently open by pass, with a
minimum size of 28mm. If the primary pipework is greater than the boiler connection,
then the by pass should be sized one size greater than that of the installed service.
It is possible to install the boiler on a low loss header. This will improve the
performance of the unit, as the flow rates through the heating circuit do not influence
the flow rates through the boiler, this will however result in the internal pump working
as a shunt pump. An additional pump must be installed to the primary flow to the
heating circuit after the header.
16
TWIN FLOW FLUEING
For standard horizontal flueing the Twin Flow is supplied with a flue kit including:
2 x wall terminal 600mm long, concentric, 80/125.
2 x white gasket (internal)
2 x black gasket (external)
1 x straight F/F adapter
2 x 90 bend M/F
The flue connection on the top of the water heater is a male connection. When
flueing directly through the wall behind the Twin Flow the water heater must have a
straight Female/Female adapter, then a male/female 90 degree bend and then the
wall terminal. This should tip slightly down to the outside to prevent rain ingress.
The boiler has a female connection on the top of the unit. The boiler requires a
male/female 90 degree bend and the wall terminal. This should tip slightly back to
the boiler to prevent a drip hazard outside the building.
Other flue combinations are available from Rinnai. The appliance flues can
terminate horizontally or vertically and can extend long distances. The water heater
can flue 15m less 2m per bend to a maximum of 4 bends, and a maximum height of
9m. The boiler can flue 24m less 3m per 90 degree bend or 1m per 45 degree bend
with no maximum height or number of bends.
A full programme of parts are available from Rinnai UK.
Water Heater
Boiler
17
TWIN FLOW ELECTRICS
All of the mains electrics has been prewired. The only mains voltage electrical
installation that needs to be done is to plug the Twin Flow in. This has been done so
that the installer does not require any special certification such as Part P, and to
make it as easy as possible. The side of the unit has two isolator switches that
isolate the appliances on both poles with at least a 3mm gap. If the installer chooses
to cut off the moulded plug and wire into a permanent supply this will not effect the
warranty as long as it is done correctly.
Both the water heater and boiler have to be connected into the loom, via the
appropriate plugs as show on the following pages
Moulded
Plug
Water Heater
Boiler
Backplate connection box
18
TWIN FLOW ELECTRICS
SOLAR
CONECTIONS
N2
L1
Solar pump
EARTH
EXT 444
EXT 443
N 24
L 14
Time and
temp RF
controller
EARTH
Keypad
DHW
EXT 32
EXT 31
N 23
L 13
Water
heater
EARTH
S L 442
SL441
SL44
SL43
SL42
SL41
N 22
L12
DHW Flow
switch
Boiler
EARTH
DHW
Switch
Heating
switch
Neutral 2
Live 1
EARTH
Wiring Loom Schematic
19
3 pin plug
TWIN FLOW ELECTRICS
Mains
L1 N2 E
Htg Control
L12 N22 E
443 444
Htg Boiler
Switch
L1 L12
N2 N22
E
Keypad x3
31 32
DHW Flow
Switch
441 442
W Htg
switch
L1 L13
N2 N23
E
W Htg
L13 N23 E
31 32
Boiler
L12 N22 E
Electrical Backplate Layout
41 42 43 44
240volts 3Amp Fused
Controls 0 volt Contacts
20
TWIN FLOW CONTROLS
There are three controls that must be plugged into the control box of the unit. These
are the water heater remote, flow switch, and the boiler wireless room stat receiver.
Correct location and locking of the three plugs must be observed before power is
applied to the unit.
Control Connection Points
Opentherm / Weather Compensation
If chosen the Opentherm controller is wired directly to the boiler connections within
the boiler casing.
Weather compensation is also wired directly into the boiler. See boiler manual for
more information.
21
TWIN FLOW CONDENSATE DISPOSAL
The boiler condensate drain combines the pressure relief and condensate drain
together. The condensate side has an internal trap to prevent by-products of
combustion entering the room.
Condensate and Pressure Relief Discharge Disposal.
Disposal of the condensate/pressure relief water must be done in accordance with
BS 6798:2000, the Building Regulations Part H, Building Regulation G3, and any
local building controls.
These rules should be followed when piping the discharge.
1.
2.
3.
4.
5.
6.
7.
8.
8.
9.
A minimum distance of 300mm must be between the bottom of the
tundish and the first bend.
Do not reduce the size of the drain pipework
The pipe work must have an air gap
Maximum run is 3m between boiler and air gap
Air gap must be within the thermal envelope.
Any bends should be close to the boiler
The pipe may not rise above the boiler connection point
The pipe may not have any low spots that will collect water. The
pipe work must drain dry.
The discharge must flow to a safe place for disposal away from the
boiler that is visible
The discharge must not create a hazard to the building, contents, or
inhabitants. Scalding injury or water damage can occur if the
drainage pipe work is incorrect.
The condensate can be drained externally into a gully or a soak away. The
condensate can also be drained inside the building into an internal stack, or
combined with the drain from an internal fixture. The various methods are shown in
the diagrams on the following page. If a stack is used for discharge then a trap must
be placed in between the tundish and the stack to prevent smells from entering the
room.
Pipework must be at least 22mm, consider using larger pipe work if there is a risk of
freezing. External pipe work should be as short as possible, and must be less than
3m. All external condensate pipe work must be at least 32mm and insulated to
protect from freezing, especially the trap. If the pipework is exposed the insulation
must be waterproof.
All condensate pipework must fall with at least a 2.50 angle from the horizontal (this
is 50mm drop per horizontal metre. The pipe work must be drain material such as
PVC, uPVC, ABS, or PP. Copper cannot be used. The pipework should be
bracketed to prevent sagging.
The condensate pipe work shall not have any tap, valve, or restriction in the line.
22
TWIN FLOW CONDENSATE DISPOSAL
23
TWIN FLOW CONDENSATE DISPOSAL
24
COMMISSIONING PROCEDURE
Following installation of the Twin Flow the following must be done to commission the
system. This is to include the commissioning of the Twin Flow system only.
Commissioning procedures for the water heater and boiler
are found in the Installation Instructions with each
appliance.
1. After installation of the Twin Flow all pipework, valves, and radiators must be
flushed out.
2. Connect the Twin Flow to the building pipe work.
3. Check all connections for tightness.
4. Check Expansion Vessel pre-charge pressure, according to Manufacturer’s
specification. Pressure point is on top of the vessel, accessible at the top or bottom
of the backplate depending on left or right hand orientation. Instructions are included
with the expansion vessel.
5. Manually operate the boiler relief valve. Ensure that water is discharged from the
valves and runs freely down the discharge pipes. Ensure that the valves properly reseat.
6. Switch on boiler and follow commissioning procedure in the manual supplied with
the boiler.
7. Switch on water heater and follow commissioning procedure in the manual
supplied with the water heater.
8. Check strainer and all filters for blockages.
9. Explain to the customer how to operate the system, and that the system must be
maintained annually.
IT IS THE INSTALLER’S RESPONSIBILITY TO
ENSURE THE SYSTEM IS LEFT SAFE
25
COMMISSIONING RECORD NOTES
Please make note of all commissioning figures here
for future references
Attach Flue Gas Analyzer printout to this page.
26
MAINTAINING TWIN FLOW
All gas appliances must be serviced at least annually
by a CORGI registered engineer. This should include :
Water Heater
•
•
•
•
•
•
•
•
•
•
•
•
Isolate electrics and valve off hot, cold, and gas to unit.
Check the water filter and strainer to be sure there are no blockages.
Remove the combustion fan and clean the impeller.
Check the burner for wear or water damage. Vacuum out any debris.
Wipe out chamber.
Check the heat exchanger for soot or hot spots that could be caused by
poor combustion.
Clean carbon build up from ionisation and ignition probes.
Check flue terminal for blockages or potential blockages, check that flue
is in good condition.
Check all electrical connections are reconnected
The gas pressures should then be re-set. The procedure is detailed in
the water heater manual.
Verify temperature control by checking temperature at outlet, keep in
mind that there will be pipework losses.
Check all gas joints inside the unit with an electronic gas detection
device when starting unit.
Leak check all joints back to the service valve for commercial
installations, or tightness check the system in domestic properties.
Boiler
•
•
•
•
•
•
•
•
•
•
•
•
•
•
Isolate electrics and gas
Clean inside of casing with soft cloth
Remove combustion fan and burner assembly
Remove burner cassette check for damage, cracks etc. If cracked
replace complete cassette. Clean with soft brush and vacuum cleaner
Replace all gaskets: burner, fan, and heat exchanger.
Check venturi and gas/air distribution plate for dirt and clean
Check heat exchanger for dirt, if necessary clean with soft brush and
vacuum cleaner. Taking care to prevent dirt falling back into the heat
exchanger. FLUSHING THE HEAT EXCHANGER FROM THE TOP
DOWN IS NOT PERMITTED,
Check ignition and ionisation probes clean if necessary and replace if
cracked.
Refit all components
Check condensate drain to ensure it is not blocked
Check flue to ensure it is clear
Reinstate electrics and gas supply
Fire boiler and check all safety devices
Check combustion if alteration to the combustion is required refer to the
boiler manual.
27
SERVICE RECORD
SERVICE 1
DATE____________
Company______________________
Address ______________________
_____________________________
TEL __________________________
Engineer ______________________
Serviced..Water Heater / Boiler / Both
Comments_____________________
_____________________________
_____________________________
SERVICE 2
DATE____________
Company______________________
Address ______________________
_____________________________
TEL __________________________
Engineer ______________________
Serviced..Water Heater / Boiler / Both
Comments_____________________
_____________________________
_____________________________
SERVICE 3
DATE____________
Company______________________
Address ______________________
_____________________________
TEL __________________________
Engineer ______________________
Serviced..Water Heater / Boiler / Both
Comments_____________________
_____________________________
_____________________________
SERVICE 4
DATE____________
Company______________________
Address ______________________
_____________________________
TEL __________________________
Engineer ______________________
Serviced..Water Heater / Boiler / Both
Comments_____________________
_____________________________
_____________________________
SERVICE 5
DATE____________
Company______________________
Address ______________________
_____________________________
TEL __________________________
Engineer ______________________
Serviced..Water Heater / Boiler / Both
Comments_____________________
_____________________________
_____________________________
SERVICE 6
DATE____________
Company______________________
Address ______________________
_____________________________
TEL __________________________
Engineer ______________________
Serviced..Water Heater / Boiler / Both
Comments_____________________
_____________________________
_____________________________
SERVICE 7
DATE____________
Company______________________
Address ______________________
_____________________________
TEL __________________________
Engineer ______________________
Serviced..Water Heater / Boiler / Both
Comments_____________________
_____________________________
_____________________________
SERVICE 8
DATE____________
Company______________________
Address ______________________
_____________________________
TEL __________________________
Engineer ______________________
Serviced..Water Heater / Boiler / Both
Comments_____________________
_____________________________
_____________________________
28
SERVICE RECORD
SERVICE 9
DATE____________
Company______________________
Address ______________________
_____________________________
TEL __________________________
Engineer ______________________
Serviced..Water Heater / Boiler / Both
Comments_____________________
_____________________________
_____________________________
SERVICE 10 DATE____________
Company______________________
Address ______________________
_____________________________
TEL __________________________
Engineer ______________________
Serviced..Water Heater / Boiler / Both
Comments_____________________
_____________________________
_____________________________
SERVICE 11
DATE____________
Company______________________
Address ______________________
_____________________________
TEL __________________________
Engineer ______________________
Serviced..Water Heater / Boiler / Both
Comments_____________________
_____________________________
_____________________________
SERVICE 12 DATE____________
Company______________________
Address ______________________
_____________________________
TEL __________________________
Engineer ______________________
Serviced..Water Heater / Boiler / Both
Comments_____________________
_____________________________
_____________________________
SERVICE 13 DATE____________
Company______________________
Address ______________________
_____________________________
TEL __________________________
Engineer ______________________
Serviced..Water Heater / Boiler / Both
Comments_____________________
_____________________________
_____________________________
SERVICE 14 DATE____________
Company______________________
Address ______________________
_____________________________
TEL __________________________
Engineer ______________________
Serviced..Water Heater / Boiler / Both
Comments_____________________
_____________________________
_____________________________
SERVICE 15 DATE____________
Company______________________
Address ______________________
_____________________________
TEL __________________________
Engineer ______________________
Serviced..Water Heater / Boiler / Both
Comments_____________________
_____________________________
_____________________________
SERVICE 16 DATE____________
Company______________________
Address ______________________
_____________________________
TEL __________________________
Engineer ______________________
Serviced..Water Heater / Boiler / Both
Comments_____________________
_____________________________
_____________________________
29
Serial Number
if applicable
Part Replaced
Reason
If any parts require to be replaced on a Twin Flow Appliance please note it here so future engineers are
aware of what work has been carried out date.
Unit / Part
Date
Engineer /
Company
PARTS REPLACED
30
SERVICE CONTACT
Rinnai UK LTD.
9 Christleton Court
Manor Park
Runcorn
Cheshire
WA7 1ST
Tel. 01928 531870
Fax. 01928 531880
E-mail. [email protected]
Web.
www.rinnaiuk.com
31