1
PERATOR'S
MAN
AL
MANUAL DEL OPERADOR
19.2 VOLT CAULK GUN
PISTOLA DE CALAFATEAR
DE 19,2 V
Model No.
315.115960
Numero de Modelo
315.115960
WARNING:
To reduce the risk
of injury, the user must read and
understand the operator's manual
before using this product.
ADVERTENCIA:
BATTERIES AND CHARGERS
SOLD SEPARATELY
Para reducir el
LAS PILAS Y LOS CARGADORES
SE VENDEN POR SEPARADO
riesgo de lesiones, el usuario debe leer
y comprender el manual del operador
antes de usar este producto.
Customer
Help Line: 1-800-932-3188
Tel_fono de atenci6n al consumidor:
Sears, Roebuck
1-800-932-3188
and Co,, 3333 Beverly Rd,, Hoffman
Estates, IL 60179 USA
Visit the Craftsman web page: www.sears.com/craftsman
Visite el sitio web de Craftsman: www.sears.com/craftsman
Save this manual
987000-306
3-18-09 (REV:01)
Guarde
este manual
for future
para futuras
reference
consulta
C
ESPANOL
ENGLISH
[]
Warranty ......................................................................
2
[]
Garant[a ......................................................................
2
[]
Introduction .................................................................
2
[]
Introducci6n ................................................................
2
[]
General Safety Rules ..............................................
3-4
[]
Reglas de seguridad generales ..............................
3-4
[]
Specific Safety Rules ..................................................
4
[]
Reglas de seguridad espec[ficas ................................ 4
[]
Symbols ......................................................................
5
[]
S[mbolos .....................................................................
5
[]
Features ......................................................................
6
[]
Caracter[sticas ............................................................
6
[]
Assembly ....................................................................
6
[]
Armado .......................................................................
6
[]
Operation ................................................................
7-8
[]
Funcionamiento
[]
Maintenance ...............................................................
9
[]
Mantenimiento ............................................................
[]
Exploded View and Parts List ...................................
10
[]
Figura numeras (ilustraciones) ................................
[]
Figure numbers (illustrations) ..................................
ii-iii
[]
Pedidos de piezas / Servicio ................. P_g. posterior
[]
Parts Ordering / Service ..............................
ONE=YEAR FULL WARRANTY
......................................................
7-8
9
ii-iii
Back Page
ON CRAFTSMAN
TOOL
If this Craftsman tool fails to give complete satisfaction within one year from date of purchase, RETURN IT TO ANY
SEARS STORE OR OTHER CRAFTSMAN OUTLET IN THE UNITED STATES FOR FREE REPLACEMENT.
If this Craftsman tool is used for commercial
purchase.
or rental purposes, this warranty applies for only 90 days from the date of
This warranty gives you specific legal rights, and you may also have other rights which vary from state to state.
Sears, Roebuck and Co., Hoffman Estates, IL 60179
UN ANO DE GARANTIA TOTAL EN LAS HERRAMIENTAS CRAFTSMAN
Si esta herramienta Craftsman no le brinda satisfacci6n completa dentro de un perfodo de un a_o a partir de la fecha de compra,
REGRESELA A CUALQUlER TIENDA SEARS U OTRO LUGAR DE VENTA DE PRODUCTOS CRAFTSMAN EN ESTADOS
UNIDOS, DONDE LE SERA REEMPLAZADA GRATUITAMENTE,
Siesta herramienta Craftsman se emplea para fines comerciales o se alquila, esta garantfa es valida solamente durante 90 dfas a
partir de la fecha de compra.
Esta garant[a le confiere derechos legales espec[ficos, yes posibte que usted goce de otros derechos, los cuales pueden variar de
estado a estado.
Sears, Roebuck and Co., Hoffman Estates, IL 60179 USA
This tool has many features for making its use more pleasant and enjoyable. Safety, performance,
have been given top priority in the design of this product making it easy to maintain and operate.
and dependability
Esta herramienta ofrece numerosas caracteristicas para hacer mb.sagradable y placentero su uso. En el dise_o de este producto se
ha conferido prioridad a la seguridad, el desempe_o y la fiabilidad, pot Io cual se facilita su manejo y mantenimiento.
_1_I_
WARNING!Readall instructions.
Failure to
follow all instructions listed below may result in
electric shock, fire and/or serious injury. The term
"power tool" in all of the warnings listed below
refers to your mains-operated (corded) power tool
or battery-operated (cordless) power tool.
SAVE THESE
INSTRUCTIONS
WORK
SAFETY
AREA
[] Keep work area clean and well lit. Cluttered or dark
areas invite accidents.
[] Do not operate power tools in explosive
atmospheres, such as in the presence of flammable
liquids, gases or dust. Power tools create sparks
which may ignite the dust or fumes.
[] Keep children and bystanders away while operating a
power tool. Distractions can cause you to lose control.
ELECTRICAL
SAFETY
[] Power tool plugs must match the outlet. Never
modify the plug in any way. Do not use any adapter
plugs with earthed (grounded) power tools.
Unmodified plugs and matching outlets will reduce risk
of electric shock.
[] Avoid body contact with earthed or grounded surfaces
such as pipes, radiators, ranges and refrigerators.
There is an increased risk of electric shock if your body
is earthed or grounded.
[] Do not expose power tools to rain or wet
conditions. Water entering a power tool will increase
the risk of electric shock.
[] Do not abuse the cord. Never use the cord for
carrying, pulling or unplugging the power tool. Keep
cord away from heat, oil, sharp edges or moving
parts. Damaged or entangled cords increase the risk of
electric shock.
MODEL
315.115960
SAFETY
[] Stay alert, watch what you are doing and use
common sense when operating a power tool. Do
not use a power tool while you are tired or under
the influence of drugs, alcohol or medication. A
moment of inattention while operating power tools may
result in serious personal injury.
[] Use safety equipment.
Safety equipment such
safety shoes, hard hat,
appropriate conditions
Always wear eye protection.
as dust mask, non-skid
or hearing protection used for
will reduce personal injuries.
[] Avoid accidental starting. Ensure the switch is in
the off-position before plugging in. Carrying power
tools with your finger on the switch or plugging in
power tools that have the switch on invites accidents.
[] Remove any adjusting key or wrench before turning
the power tool on. A wrench or a key left attached to a
rotating part of the power tool may result in personal injury.
[] Do not overreach. Keep proper footing and balance
at all times. This enables better control of the power
tool in unexpected situations.
[] Dress properly. Do not wear loose clothing or
jewelry. Keep your hair, clothing and gloves away
from moving parts. Loose clothes, jewelry, or long
hair can be caught in moving parts.
[] if devices are provided for the connection of dust
extraction and collection facilities, ensure these are
connected and properly used. Use of these devices
can reduce dust-related hazards.
[] Do not wear loose clothing or jewelry. Contain long
hair. Loose clothes, jewelry, or long hair can be drawn
into air vents.
[] Do not use on a ladder or unstable support. Stable
footing on a solid surface enables better control of the
power tool in unexpected situations.
POWER TOOL USE AND CARE
[] Do not force the power tool. Use the correct power tool
for your application. The correct power tool will do the job
better and safer at the rate for which it was designed.
[] Do not use the power tool if the switch does not turn
only with charger listed.
it on and off. Any power tool that cannot be controlled
BATTERY PACK
with the switch is dangerous and must be repaired.
CHARGER
(M-ion)
[] Disconnect the plug from the power source and/or
315.113740
the battery pack from the power tool before making
(13O285OO3,
any adjustments,
changing accessories,
or storing
(Multi-Chemistry)
13O285OO6)
power tools. Such preventive safety measures reduce
315.259260
the risk of starting the power tool accidentally.
315.113710
(140351001)
[] Store idle power tools out of the reach of children and
(130156001)
do not allow persons unfamiliar with the power tool
BATTERY PACK
315.259260
or these instructions to operate the power tool. Power
(Ni-Cd)
(140351001)
tools are dangerous in the hands of untrained users.
1425301 _11041)
[] Maintain power tools. Check for misalignment
or
binding
of
moving
parts,
breakage
of
parts,
and
any
130279013
315.115730
other
condition
that
may
affect
the
power
tool's
130279005
(140301003)
operation. If damaged, have the power tool repaired
(Item No. 911375)
315.115720
before use. Many accidents are caused by poorly
(140301001)
maintained power tools.
3 - English
[] When operating a power tool outdoors, use an
extension cord suitable for outdoor use. Use of
a cord suitable for outdoor use reduces the risk of
electric shock.
[] Use battery
PERSONAL
[] Keepcuttingtoolssharpand
clean. Properly
maintained cutting tools with sharp cutting edges are
less likely to bind and are easier to control.
[] Use the power tool, accessories and tool bits etc.,
in accordance with these instructions and in the
manner intended for the particular type of power
tool, taking into account the working conditions
and the work to be performed. Use of the power
tool for operations different from those intended could
result in a hazardous situation.
BATTERY TOOL USE AND CARE
[] Ensure the switch is in the off position before
inserting battery pack. Inserting the battery pack into
power tools that have the switch on invites accidents.
[] Recharge only
manufacturer.
of battery pack
another battery
with the charger specified by the
A charger that is suitable for one type
may create a risk of fire when used with
pack.
[] When battery pack is not in use, keep it away from
other metal objects like paper clips, coins, keys, nails,
screws, or other small metal objects that can make a
connection from one terminal to another. Shorting the
battery terminals together may cause burns or a fire.
[] Under abusive conditions, liquid may be ejected
from the battery, avoid contact. If contact
accidentally occurs, flush with water. If liquid
contacts eyes, additionally seek medical help. Liquid
ejected from the battery may cause irritation or burns.
SERVICE
[] Have your power tool serviced by a qualified repair
person using only identical replacement parts. This
will ensure that the safety of the power tool is maintained.
,_
[]
[] Use power tools only with specifically designated
battery packs. Use of any other battery packs may
create a risk of injury and fire.
[] Hold power tools by insulated gripping surfaces
when performing an operation where the cutting
tool may contact hidden wiring or its own cord.
Contact with a "live" wire will also make exposed metal
parts of the tool "live" and shock the operator.
[] Know your power tool. Read operator's manual
carefully. Learn its applications and limitations, as
well as the specific potential hazards related to this
power tool. Following this rule will reduce the risk of
electric shock, fire, or serious injury.
[] Always wear eye protection marked to comply with
ANSI Z87.1. Following this rule will reduce the risk of
serious personal injury.
[] Maintain labels and nameplates. These carry
important information. If unreadable or missing,
contact an authorized service center for a replacement.
[] Protect your lungs. Wear a face or dust mask if the
operation is dusty. Following this rule will reduce the
risk of serious personal injury.
[] Protect your hearing. Wear hearing protectors
during extended periods of operation. Following this
rule will reduce the risk of serious personal injury.
[] Keep hands out of the plunger and plunger rod area
of the caulk gun.
[] Battery tools do not have to be plugged into an
electrical outlet; therefore, they are always in
operating condition. Be aware of possible hazards
when not using your battery tool or when changing
accessories.
Following this rule will reduce the risk of
electric shock, fire, or serious personal injury.
[] Do not place battery tools or their batteries near
fire or heat. This will reduce the risk of explosion and
possibly injury.
WARNING! To reduce the risk of injury, user must
read instruction manual.
When servicing a power tool, use only identical
replacement parts. Follow instructions in the
Maintenance section of this manual. Use of
unauthorized parts or failure to follow Maintenance
instructions may create a risk of shock or injury.
[] Do not crush, drop or damage battery pack. Do
not use a battery pack or charger that has been
dropped or received a sharp blow. A damaged
battery is subject to explosion. Properly dispose of a
dropped or damaged battery immediately.
[] Batteries can explode in the presence of a source
of ignition, such as a pilot light. To reduce the risk of
serious personal injury, never use any cordless product
in the presence of open flame. An exploded battery
can propel debris and chemicals. If exposed, flush with
water immediately.
[] Do not charge battery tool in a damp or wet location.
Following this rule will reduce the risk of electric shock.
[] For best results, your battery tool should be charged
in a location where the temperature is more than
50°F but less than 100°F. To reduce the risk of serious
personal injury, do not store outside or in vehicles.
[] Under extreme usage or temperature conditions,
battery leakage may occur, if liquid comes in
contact with your skin, wash immediately with
soap and water, then neutralize with lemon juice
or vinegar. If liquid gets into your eyes, flush them
with clean water for at least 10 minutes, then seek
immediate medical attention. Following this rule will
reduce the risk of serious personal injury.
[] If the power supply cord is damaged, it must be
replaced only by the manufacturer or by an authorized
service center to avoid risk.
[] Save these instructions. Refer to them frequently and
use them to instruct others who may use this tool. If you
loan someone this tool, loan them these instructions also
to prevent misuse of the product and possible injury.
4 - English
Thefollowingsignalwordsandmeanings
areintendedto explainthe levelsof riskassociatedwiththis product.
SYMBOL
SIGNAL
MEANING
,_
DANGER:
Indicates an imminently hazardous situation, which, if not avoided, will result
in death or serious injury.
,_
WARNING:
Indicates a potentially hazardous situation, which, if not avoided, could result
in death or serious injury.
,_
CAUTION:
Indicates a potentially hazardous situation, which, if not avoided, may result
in minor or moderate injury.
CAUTION:
(Without Safety Alert Symbol) Indicates a situation that may result in property
damage.
Some of the following symbols may be used on this product. Please study them and learn their meaning. Proper
interpretation of these symbols will allow you to operate the product better and safer.
SYMBOL
A
NAME
DESIGNATION/EXPLANATION
Safety Alert
Indicates a potential personal injury hazard.
Volts
Voltage
Minutes
Time
Direct Current
Type or a characteristic
No Load Speed
Rotational speed, at no load
.../min
Per Minute
Revolutions, strokes, surface speed, orbits etc., per minute
@
Wet Conditions Alert
Do not expose to rain or use in damp locations.
Read The Operator's Manual
To reduce the risk of injury, user must read and understand
operator's manual before using this product.
Eye Protection
Always wear eye protection marked to comply with ANSI Z87.1.
Recycle Symbols
This product uses lithium-ion or nickel-cadmium batteries. Local,
state or federal laws may prohibit disposal of batteries in ordinary
trash. Consult your local waste authority for information regarding
available recycling and/or disposal options.
V
min
m
===
no
@
0
c_
5 - English
of current
PRODUCT
SPECIFICATIONS
Motor ..................................................................
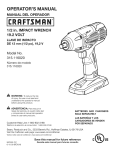
KNOW
YOUR CAULK
19.2 V, DC
GUN
PLUNGER
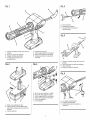
See Figure 1,
The safe use of this product requires an understanding
of the information on the product and in this operator's
manual as well as a knowledge of the project you are
attempting. Before use of this product, familiarize yourself
with all operating features and safety rules.
AUTO SHUT-OFF
When the caulk tube is empty, the auto shut-off feature
will cause the motor to shut off.
CARRIAGE
PUNCTURETOOL
For your convenience, a puncture tool is provided for
breaking the seal on a new tube of caulk. When using a
partially filled caulk tube, the puncture tool can be used to
remove any hardened material from the tube's nozzle.
LOCK
SWITCH
TRIGGER
Depressing the switch trigger starts the forward motion of
the plunger rod.
PROTECTION
An electronic overload protection feature causes the
motor to automatically shut down if too much pressure is
exerted on the caulk tube.
PLUNGER
ROD HANDLE
The switch lock prevents depression of the switch trigger.
The carriage frame holds a standard 10 oz. tube of caulk.
OVERLOAD
Standard 10 oz. cartridge
The plunger rod handle is used to pull the plunger rod
back, allowing caulk to be loaded.
SWITCH
FRAME
ELECTRONIC
Capacity .....................................
ROD
VARIABLE
SPEED
SELECTOR
The plunger speed can be adjusted with the variable
speed selector. This allows you to adjust the material feed
rate to suit your particular application.
The forward movement of the plunger rod applies
pressure to the bottom of an open caulk tube, causing
caulk to be dispensed.
UNPACKING
PACKING
This product has been shipped completely assembled.
Caulk Gun
[] Carefully remove the product and any accessories from
the box. Make sure that all items listed in the packing
list are included.
Operator's Manual
A
WARNING:
Do not use this product if it is not
completely assembled or if any parts appear to be
missing or damaged. Use of a product that is not
properly and completely assembled could result in
serious personal injury.
A
A
WARNING:
If any parts are damaged or missing
do not operate this product until the parts are
replaced. Use of this product with damaged or missing parts could result in serious personal injury.
WARNING:
Do not attempt to modify this product
or create accessories not recommended for use with
this product. Any such alteration or modification is
misuse and could result in a hazardous condition
[] Inspect the product carefully to make sure no breakage
or damage occurred during shipping.
[] Do not discard the packing material until you have
carefully inspected and satisfactorily operated the
product.
LIST
leading to possible serious personal injury.
,&
[] If any parts are damaged or missing, please call
1-800-932-3188 for assistance.
6 - English
WARNING:
To prevent accidental starting that
could cause serious personal injury, always remove
the battery pack from the product when assembling
parts.
A
A
A
CAUTION:
When placing battery pack in the
tool, be sure raised rib on battery pack aligns with
the bottom of the caulk gun and latches into place
properly. Improper installation of the battery pack can
cause damage to internal components.
WARNING:
Do not allow familiarity with products to
make you careless. Remember that a careless
fraction of a second is sufficient to inflict serious
injury.
WARNING:
Always wear eye protection marked to
comply with ANSI Z87.1. Failure to do so could result
in objects being thrown into your eyes resulting in
possible serious injury.
TO REMOVE
BATTERY
PACK
See Figure 2.
[] Lock the switch trigger by sliding the switch lock up.
[] Depress the latches on the side of battery pack.
[] Remove the battery pack from the tool.
WARNING:
Do not use any attachments or
accessories not recommended by the manufacturer
of this product. The use of attachments or
accessories not recommended can result in serious
personal injury.
APPLICATIONS
A
WARNING:
Battery products are always in
operating condition. Therefore, the switch should
always be locked when not in use or carrying at your
side.
You may use this product for the purposes listed below:
STARTING/STOPPING
See Figure 3.
THE CAULK
GUN
[] Sealing cracks to keep your home's conditioned
air inside while keeping unconditioned air outside,
increasing your home's energy efficiency
Before attempting to start the caulk gun, be sure the
switch lock is in the unlocked position.
[] To turn the caulk gun ON, depress the switch trigger.
[] Filling holes and cracks before painting
[] To turn the caulk gun OFF, release the switch trigger.
[] Creating a moisture barrier around areas that could be
damaged by water
LOCKING
THE SWITCH
TRIGGER
See Figure 3.
[] Sealing cracks to keep insects from crawling inside
your home
The switch trigger of the caulk gun can be locked off
using the slide switch located below the switch trigger.
[] Applying adhesive
This product will accept DieHardo 19.2 V lithium-ion
battery packs and Craftsman 19.2 V nickel-cadmium
battery packs.
For complete charging and battery instructions, refer to
the Operator's Manual for the battery packs and chargers
listed in the General Safety Rules.
[] To lock the switch trigger, slide the switch lock up.
This will prevent the caulk gun switch trigger from
being depressed.
BATTERY
LOADING
PROTECTION
FEATURES
[] Lock the switch trigger by sliding the switch lock up.
If the tool stops during use, release the trigger to reset
and resume operation. If the tool still does not work, the
battery needs to be recharged.
BATTERY
CAULK
See Figures 4 - 5.
DieHard_e 19.2 V lithium-ion battery packs are designed
with features that protect the lithium-ion cells and
maximize battery life.
TO INSTALL
[] To unlock the switch trigger, slide the switch down.
This will allow the caulk gun switch trigger to be
depressed.
PACK
See Figure 2,
[] Lock the switch trigger by sliding the switch lock up.
[] Place the battery pack on the tool.
[] Make sure the latches on each side of the battery
pack snap into place and the battery pack is secured
on the tool before beginning operation.
[] Using a utility knife, cut off the tip of the spout on
a standard 10 oz. tube of caulk. Cut the tip at a
45 ° angle. Remove as little as possible, taking into
consideration the size of the "bead" of caulk you need.
[] Check for a second inner seal at the base of the spout.
If found, insert the puncture tool inside the spout to
break the seal before using. If using a partially filled
tube, use the puncture tool to remove any hardened
material from the tip.
NOTE: An inner seal is usually found only in
cardboard caulk tubes.
[]
7 - English
While holding the caulk gun steady with one hand, pull
the handle of the plunger rod away from the caulk gun.
Continue pulling until plunger base reaches the back
of the carriage frame.
[] Loadthe caulktubeintothecarriageframe,making
sureit iswellseatedatbothends.
ELECTRONIC
OVERLOAD
PROTECTION
The caulk gun is protected by an electronic overload
protection feature. If too much pressure is exerted on
the tube, the motor will shut down. This helps to prevent
damage to the tool and the caulk tube. If the motor shuts
off, make sure that:
[] Nozzle tip is cut
[] Inner seal in the caulk tube is broken
[] Hardened material is removed from the nozzle
[] Caulk tube is not damaged or frozen
[] Plunger rod is free of cauIWadhesive materials
Release the trigger and wait for 3 to 5 seconds to allow
the electronics to reset. If the motor again shuts off, move
the variable speed selector to the middle position and
press the trigger again. If the motor continues to shut
off, try another tube of material or take the tool to an
authorized service center.
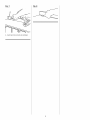
APPLY(NG
CAULK
See Figures 6 - 8,
[] Prepare the surface to be caulked by removing any
dust, dirt, or remnants of old caulking. Make sure the
area to be caulked is clean and dry.
[] Set the speed of the caulk gun to match your
application needs, using just enough caulk to do the
job. Experiment in an out-of-the-way area to find the
best speed to use to deliver the caulk bead you want.
[] Hold the gun at a slight angle. If filling a crack, insert
the spout into the crack, if possible; otherwise, run the
caulk gun along the surface.
[] Squeeze the trigger on the caulk gun, allowing the
caulk to extrude from the tube tip.
NOTE: If the bead of caulk is too narrow, re-cut the
nozzle to provide a larger opening. However, it is better
to apply a thin bead of caulk and add a little more
if necessary than to apply too much and attempt to
remove the excess.
[] Carefully move the caulk gun at an even pace along the
gap to be filled as you continue to depress the switch
trigger. Make sure the caulk comes in full contact with
both application surfaces. If necessary, use your finger
to gently press the caulk into a corner or crack.
NOTE: The best fill is usually achieved by pushing the
caulk out into the gap in a forward motion. However, in
some cases (particularly where the side materials are
rough or uneven), a pulling motion may work better as
the cartridge will be less likely to get snagged along the
joint.
[] The motor will shut off automatically when a caulk tube
becomes empty. Pull the plunger rod back and replace
the caulk tube as necessary.
[] To end the caulk bead, release the switch trigger.
[] Draw a moistened finger or other "smoothing tool"
along the caulk bead after applying. This will help the
caulk adhere to the application surfaces and will create
a clean, finished appearance.
[] Use a damp towel or rag to clean off any excess caulk.
8 - English
A
A
WARNING:
When servicing, use only identical
Craftsman replacement parts. Use of any other part
may create a hazard or cause product damage.
WARNING:
Always wear eye protection marked to
comply with ANSI Z87.1. Failure to do so could result
in objects being thrown into your eyes resulting in
possible serious injury.
Only the parts shown on the parts list are intended to be
repaired or replaced by the customer. All other parts
should be replaced at a Sears Service Center.
BATTERY PACK REMOVAL
FOR RECYCLING
A
WARNING:
To avoid serious personal injury, always
remove the battery pack from the tool when cleaning
or performing any maintenance.
GENERAL
MAINTENANCE
Avoid using solvents when cleaning plastic parts. Most
plastics are susceptible to damage from various types of
commercial solvents and may be damaged by their use.
Use clean cloths to remove dirt, dust, oil, grease, etc.
_b,
WARNING:
Do not at any time let brake fluids,
gasoline, petroleum-based products, penetrating
oils, etc., come in contact with plastic parts.
Chemicals can damage, weaken or destroy plastic
which may result in serious personal injury.
9 - English
AND PREPARATION
WARNING:
Upon removal, cover the battery
pack's terminals with heavy-duty adhesive tape. Do
not attempt to destroy or disassemble battery pack
or remove any of its components. Lithium-ion and
nickel-cadmium batteries must be recycled or disposed of properly. Also, never touch both terminals
with metal objects and/or body parts as short circuit
may result. Keep away from children. Failure to
comply with these warnings could result in fire and/
or serious injury.
CRAFTSMAN
i
CAULK
GUN - MODEL
NUMBER
315.115960
J
The model
number
will be found
on a plate
the motor
housing.
number
in all
correspondence
regarding
yourattached
CAULK toGUN
or when
orderingAlways
repair mention
parts, the model
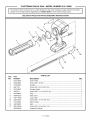
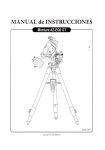
SEE BACK
PAGE FOR PARTS ORDERING
2
1
INSTRUCTIONS
3
10
11
\
12
13
PARTS
LIST
Key
No.
1
Part
Number
631279001
Description
Tube Holder .....................................................................................................
2
660409001
Screw (M4 x 6 mm) .........................................................................................
1
3
512830001
Plunger ............................................................................................................
1
4
6621106
Screw (M3 x 6 mm Pan Hd.) ...........................................................................
1
5
631286001
Plunger Holder ................................................................................................
1
6
6620614
Screw (M3.5 x 14 mm Pan Hd.) ......................................................................
2
7
8
631288001
940045227
Ring .................................................................................................................
Data Label .......................................................................................................
1
1
Qty.
1
9
940114206
Logo Label ......................................................................................................
1
10
11
660219007
512790001
Screw (M5 x 15 mm Pan Hd.) .........................................................................
Rack Handle ....................................................................................................
1
1
12
640796001
Rack ................................................................................................................
1
660164038
Screw (M4 x 6 mm Soc. Hd.) ..........................................................................
1
987000306
Operator's
13
Manual
10 - English
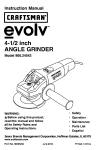
B
\
A
C
o
\
A - Spout (boquilla)
B - Puncture tool (punzon)
C - Carriageframe (estructura de
desplazamiento)
\
A - Plunger rod handle (mango de la barra del
embolo)
B - Caulkgun (pistola de calafatear)
C - Plunger rod (barra del _mbolo)
D - Carriageframe (estructura de
desplazamiento)
E- Puncture tool (punzon)
F - Switch trigger (gatillo del interruptor)
G -Switch lock (seguro del interruptor)
H -Variable speed selector (selector de
velocidad)
A - Plunger rod handle (mango de la barra del
embolo)
B - Caulktube (tubo de masilla de calafatear)
C - Spout (boquilla)
D - Plunger rod (barra del embolo)
A - Toturn on (para encenderla unidad)
B - Toturn off (para apagar la unidad)
C - Switch trigger (gatillo del interruptor)
D -Switch lock (seguro del interruptor)
E- Unlock (desasegurar)
F- Lock (asegurar)
A - Battery pack (paquetede pilas)
B - Depress latchesto releasebattery pack
(para soltar el paquetede pilas oprima los
pestillos)
C - Latches (pestillos)
A- Low speed (velocidad baja)
B - Hi speed (velocidad alta)
C - Variablespeed selector (selector de
velocidad)
A-Caulk
bead
(tirademasilla
decalafatear)
iADVERTENClA!
Lea todas las instrucciones. El
incumptimiento de las instrucciones se_atadas abajo
puede causar descargas electricas, incendios y lesiones
serias. El termino "herramienta electrica" empteado
en todos los avisos de advertencia enumerados abajo
se refiere alas herramientas etectricas de cord6n
(atambricas) y de baterfas (inatambricas).
GUARDE ESTAS INSTRUCClONES
SEGURIDAD
EN EL AREA DE TRABAJO
[]
[]
[]
[]
[]
[]
[]
Mantenga alejados a los niSos y circunstantes
al
maniobrar una herramienta
el_ctrica. Toda distracci6n
puede causar la perdida del control de la herramienta.
[]
ELI_CTRICA
Evite el contacto del cuerpo con las superficies de objetos
conectados a tierra, como las tubedas, radiadores, estufas y
refrigeradores.
Existe un mayor riesgo de descargas electricas
si el cuerpo esta haciendo tierra.
No exponga las herramientas el6ctricas a la Iluvia ni a
condiciones de humedad. La introduccion de agua en una
herramienta electrica aumenta el riesgo de descargas electricas.
No maltrate el cord6n el_ctrico. Nunca utilice el cord6n
para trasladar, desconectar o tJrar de la herramJenta
el_ctrica. Mantenga el cord6n lejos del calor, aceite, bordes
afilados y piezas m6viles. Los cordones electricos daSados o
enredados aumentan el riesgo de descargas electricas.
una herramienta
el_ctrica a la intemperie, use
de extensi6n apropiado para el exterior. Usando
adecuado para el exterior se disminuye el riesgo de
electricas.
Cargue las baterJas solamente
MODELO
PAQUETE DE
BATERJAS (Li-ion}
315.113740
(130285003,
130285006)
315.113710
(130156001)
315.115960
[]
[]
Las clavijas de las herramientas electricas deben
corresponder alas tomas de corriente donde se conectan.
Nunca modifique la clavija de ninguna forma. No utilice
ninguna clavija adaptadora con herramientas electricas
dotadas de contacto a tierra. Conectando las clavijas
originales en las tomas de corriente donde corresponden se
disminuye el riesgo de una descarga electrica.
[] AI utilJzar
un cord6n
un cord6n
descargas
[]
[]
Mantenga limpia y bien iluminada el area de trabajo.
Un &rea de trabajo mat despejada o mat iluminada propicia
accidentes.
No utilice herramientas
motorizadas
en atm6sferas
explosivas, como las existentes alrededor de IJquidos,
gases y polvos inflamables. Las herramientas electricas
generan chispas que pueden encender el potvo y los vapores
inflamables.
SEGURIDAD
SEGURIDAD
PAQUETE DE
BATERJAS (Ni-Cd)
con el cargador
indicado.
(Item
No. 911375)
[]
[]
[]
[]
[]
[]
(QuJmica MUltiple)
315.259260
(140351001)
[]
315.259260
(140351001)
315.115730
(140301003)
315.115720
(140301001)
Retire toda Ilave o herramienta de ajuste antes de
encender la herramienta
el_ctrica. Toda Ilave o herramienta
de ajuste dejada en una pieza giratoria de la herramienta
electrica puede causar lesiones.
No estire el cuerpo para alcanzar mayor distancia.
Mantenga una postura firme y buen equilJbrio en todo
momento. De esta manera se Iogra un mejor control de la
herramienta electrica en situaciones inesperadas.
Vistase adecuadamente.
No vista ropas holgadas ni
joyas. Mantenga el cabello, la ropa y los guantes alejados
de las piezas m6viles. Las ropas holgadas, las joyas y el
cabello largo pueden engancharse en las piezas m6viles.
Si se suministran
dispositivos
para conectar mangueras
de extracci6n y captaci6n de polvo, asegQrese de que
6stas est6n bien conectadas y se usen correctamente.
La
utilizaci6n de estos dispositivos puede disminuir los peligros
relacionados con el polvo.
No vista ropas holgadas ni joyas. Rec6jase el cabello
siesta largo. Las ropas hotgadas y las joyas, asi como el
cabelto largo, pueden resuttar atraidas hacia el interior de las
aberturas de ventilaci6n.
No utilice la unidad al estar en una escalera o en un
soporte inestable. Una postura estabte sobre una superficie
solida permite un mejor control de la herramienta electrica en
situaciones inesperadas.
EMpLEO Y CUIDADO
ELECTRICA
CARGADOR
1425301 _11041)
130279013
130279005
[]
PERSONAL
Permanezca alerta, preste atenci6n a Io que est_
haciendo y aplique el sentido comQn al utilJzar
herramJentas el6ctricas. No utilJce la herramienta
electrica siesta cansado o se encuentra bajo los efectos
de alguna droga, alcohol o medicamento.
Un momento de
inatenci6n at utitizar una herramienta electrica puede causar
lesiones corporales serias.
Use equipo de seguridad. Siempre p6ngase protecci6n
ocular. El uso de equipo de seguridad como mascarilla para
el polvo, catzado de seguridad, casco y protecci6n para los
oidos en las circunstancias donde corresponda disminuye el
riesgo de lesiones.
Evite un arranque accidental de la unidad. AsegQrese
de que el interruptor est_ en la posici6n de apagado
antes de conectar la herramienta.
Portar las herramientas
electricas con el dedo en el interruptor, o conectarlas con el
interruptor puesto, propicia accidentes.
[]
DE LA HERRAMIENTA
No fuerce la herramienta el_ctrica. Utilice la herramienta
el6ctrica adecuada para cada trabajo. La herramienta electrica
adecuada efectOa mejor y de manera mas segura el trabajo, si
ademas se maneja a la velocidad para la que esta diseSada.
No use la herramienta el_ctrica si el interruptor no enciende
o no apaga. Cualquier herramienta electrica que no pueda
controlarse con el interruptor es peligrosa y debe repararse.
Desconecte la clavija del suministro de corriente o
retire el paquete de baterias de la herramienta el_ctrica,
seg_n sea el caso, antes de efectuarle cualquier
ajuste, cambiarle accesorios o guardarla. Tales medidas
preventivas de seguridad reducen el riesgo de poner en
marcha accidentalmente la herramienta electrica.
Guarde las herramJentas el_ctricas desocupadas
fuera
del alcance de los ni5os y no permita que las utilicen
personas no famJliarizadas con las mismas o con estas
instrucciones. Las herramientas electricas son peligrosas en
manos de personas no capacitadas en el uso de las mismas.
3- EspaSol
I
[]
[]
Preste mantenimiento alas herramientas el_ctricas. Revise
para vet si hay desalineaci6n o atoramiento de piezas
m6viles, ruptura de piezas o toda otra condici6n que pueda
afectar el funcionamiento de la herramienta el_ctrica. Si esta
dafiada la herramienta el_ctrica, mandela a reparar antes de
usarla. Numerosos accidentes son causados por herramientas
electricas mal cuidadas.
Mantenga las herramientas de corte afiladas y limp{as.
Las herramientas de corte bien cuidadas y con bordes bien
afilados, tienen menos probabilidad de atascarse en la pieza
de trabajo y son mas faciles de controlar.
Utilice la herramienta electrica, los accesorios y brocas,
hojas y cuchillas de torte, ruedas de esmeril, etc. de
conform{dad con estas instrucciones, y de la forma
apropiada para cada una de dichas herramientas,
tomando en cuenta las condiciones de trabajo y la
tarea pot realizar. Si se utiliza la herramienta electrica para
operaciones diferentes de las indicadas podr[a originar una
situaci6n peligrosa.
EMPLEO
PILAS
[]
[]
[]
[]
[]
[]
[]
[]
[]
[]
Y CUIDADO
DE LA HERRAMIENTA
[]
[]
[]
SERVIClO
[]
Permita que un tecnico de reparaci6n calificado preste
servicio a la herramienta electrica, y s61o con piezas de
repuesto identicas. De esta manera se mantiene la seguridad
de la herramienta electrica.
_
iADVERTENClA!
Para reducir el riesgo de lesiones, el
usuario debe leer el manual de instrucciones.
DE
Asegurese de que el interruptor este en la posici6n de
apagado antes de introducir el paquete de baterias.
Introducir el paquete de baterias en una herramienta electrica
que tenga el interruptor en encendido propicia accidentes.
$61o cargue el paquete de baterias con el cargador
especificado
pot el fabricante. Un cargador adecuado para
un tipo paquete de baterias puede significar un riesgo de
incendio si se emplea con un paquete de baterias diferente.
Sujete las herramientas
el_ctricas pot las superficies
aisladas de sujeci6n al efectuar una operaci6n en la cual
la herramienta de corte pueda entrar en contacto con
cables ocultos o con su propio cord6n el_ctrico.
Todo
contacto de una herramienta con un cable cargado carga
las piezas met&licas expuestas de la herramienta y da una
descarga electrica al operador.
Familiar{cese con su herramienta electrica. Lea
cuidadosamente
el manual del operador. Aprenda sus
usos y limitaciones, as{ como los posibles peligros
especfficos de esta herramienta electrica. Con el
cumplimiento de esta regia se reduce el riesgo de una
descarga electrica, incendio o lesi6n seria.
Siempre p6ngase protecci6n ocular con la marca de
cumplimiento de la norma ANSi Z87.1. Con el cumplimiento
de esta regla se reduce el riesgo de lesiones corporales set{as.
Mantenga las manos lejos del area del embolo de la pistola
de calafatear y de la barra del mismo. Los dedos pueden
resultar pellizcados entre el portatubo y el embolo.
Prot_jase los pulmones. Use una careta o mascarilla
contra el polvo si la operaci6n genera mucho polvo. Con el
cumplimiento de esta regla se reduce el riesgo de lesiones serias.
Protejase los o{dos. Durante per{odos prolongados de
utilizaci6n del producto, p6ngase protecteur d'oreille. Con
el cumplimiento de esta regla se reduce el riesgo de lesiones
corporales set{as.
Mantenga manos fuera del _mbolo y area de barra de
_mbolo del pistola de calafatear.
No se necesita conectar a una toma de corriente las
herramientas
de bater{as; pot Io tanto, siempre estan en
condiciones de funcionamiento.
Este consciente de los
posibles peligros cuando no este usando la herramienta
de bater{as o cuando este cambiando los accesorios de la
misma. Con el cumpiimiento de esta regla se reduce el riesgo
de una descarga electrica, incendio o lesi6n corporal seria.
Utilice las herramientas el6ctricas s61o con los paquetes de
baterias especificamente
indicados. El empleo de paquetes
de bater[as diferentes puede presentar un riesgo de incendio.
Cuando no este utiiizandose el paquete de baterias,
mant6ngalo lejos de otros objetos metal{cos como clips,
monedas, llaves, ciavos, tornillos y otros objetos metal{cos
peque5os que puedan establecer conexi6n entre ambas
terminales. Establecer una conexion directa entre las dos
terminales de las baterias puede causar quemaduras o incendios.
Si se maltratan las baterias, puede derramarse liquido
de las mismas; evite todo contacto con este. En caso de
contacto, lavese con agua. Si el liquido Ilega a tocar los
ojos, ademas busque atenci6n medica. El liquido de las
baterias puede causar irritaci6n y quemaduras.
[]
AI dar servicio a una herramienta electrica, s61o utilice
piezas de repuesto identicas. Siga las instrucciones
seSaladas en la secci6n Mantenimiento de este manual. El
empleo de piezas no autorizadas o el incumplimiento de las
instrucciones de mantenimiento puede significar un riesgo de
descarga electrica o de lesiones.
[]
No coloque herramientas de baterias ni las baterias
mismas cerca del fuego odel calor. De esta manera se
reduce el riesgo de explosiones y de lesiones.
No aplaste, deje caer o dafie de baterias. Nunca utilice una
bateria o cargador que se ha caido, aplastado, recibido un
golpe contundente o ha sido dafiado(a) de alguna manera.
Las baterias daSadas pueden sufrir explosiones. Deseche de
inmediato toda pila que haya sufrido una caida o cualquier daSo.
Las hater{as pueden explotar en presencia de fuentes
de inflamaci6n, como los pilotos de gas. Para reducir el
riesgo de lesiones serias, nunca use un producto inalambrico
en presencia de llamas expuestas. La explosi6n de una
pila puede lanzar fragmentos y compuestos qu[micos. Si
ha quedado expuesto a la explosi6n de una pila, Ib.vese de
inmediato con agua.
No cargue herramientas de bater{as en lugares mojados
o humedos. Con el cumplimiento de esta regla se reduce el
riesgo de una descarga electrica.
Para obtener resultados 6ptimos, debe cargar la
herramienta de bater{as en un lugar donde la temperatura
este entre 10 y 38 °C (entre 50 y 100 °F}. No guarde la
herramienta a la intemperie ni en el interior de vehiculos.
En condiciones extremas de uso o temperatura las
bater{as pueden emanar liquido. Si el liquido Ilega a
tocarle la piel, lavese de inmediato con agua y jab6n,
y despues neutralice los efectos con jugo de lim6n o
vinagre. Si le entra liquido en los ojos, laveselos con agua
limpia pot Io menos 10 minutos, y despues busque de
inmediato atenci6n reed{ca. Con el cumplimiento de esta
regla se reduce el riesgo de lesiones corporales set{as.
Siesta daSado el cord6n de corriente, debe ser reemplazado
0nicamente pot elfabricante o en un centro de servicio autorizado
para evitar riesgos.
Guarde estas instrucciones. Cons01telas con frecuencia y
empteelas para instruir a otras personas que puedan utitizar
esta herramienta. Si presta a atguien esta herramienta,
facititele tambien las instrucciones con el fin de evitar un uso
indebido del producto y posibtes lesiones.
[]
[]
[]
[]
[]
[]
[]
4- EspaSol
Lassiguientes
palabrasdesefiaNzaci6n
ysussignificados
tienenelobjetodeexpNcar
losnivelesderiesgorelacionados
coneste producto.
SIMBOLO
SEI_AL
SIGNIFICADO
,_
PELIGRO:
Indica una situaci6n peNgrosa inminente, la cual, si no se evita, causar_
la muerte o lesiones serias.
,_
ADVERTENCIA:
Indica una situaci6n peNgrosa posible, la cual, si no se evita, podr[a causar
la muerte o lesiones serias.
PRECAUCI6N:
Indica una situaci6n peligrosa posible, la cual, si no se evita, podr[a causar
lesiones menores o leves.
PRECAUCI6N:
(sin el sfmbolo de alerta de seguridad) Indica una situaci6n que puede
producir dafios materiales.
Es posible que se empleen en este producto algunos de los siguientes s[mbolos. Le supNcamos estudiarlos y aprender
su significado. Una correcta interpretaci6n de estos s[mbolos le permitir_ utiNzar mejor y de manera m_s segura el
producto.
SiMBOLO
A
DENOMINACI6N/EXPLICACI6N
NOMBRE
Alerta de seguridad
Indica un peNgro posible de lesiones personales.
Volts
Voltaje
Minutos
Tiempo
Corriente continua
Tipo o caracter[stica de corriente
Velocidad en vacfo
Velocidad de rotaci6n, en vac[o
.../min
Por minuto
Revoluciones,
por minuto
@
Alerta de condiciones
V
min
m
===
no
@
0
h0medas
carreras,
velocidad
superficial,
6rbitas,
etc.,
No exponga la unidad a la Iluvia ni la use en lugares h0medos.
Lea el manual del operador
Para reducir el riesgo de lesiones, el usuario debe leer y comprender
el manual del operador antes de usar este producto.
Protecci6n ocular
Siempre p6ngase protecci6n ocular con la marca de
cumpNmiento de la norma ANSI Z87.1.
S[mbolos de reciclado
Este producto
contiene
bater[as
de nfquel-cadmio
o
iones de litio. Es posible que algunas leyes municipales,
estatales
o federales
proh[ban desechar
las baterfas de
n[quel-cadmio en la basura normal. Consulte alas autoridades
reguladoras de desechos para obtener informaci6n en relaci6n con
las alternativas de reciclado y desecho disponibles.
5 - Espafiol
ESPECIFICACIONES
DEL PRODUCTO
Motor .................................................
FAMILIARiCESE
19,2 volts, corr. cont.
CON LA PISTOLA
DE
BARRA
CALAFATEAR
Vea la figura 1.
El uso seguro que este producto requiere la comprensi6n
de la informaci6n impresa en la herramienta y en el
manual del operador as[ como ciertos conocimientos
sobre el proyecto a realizar. Antes de usar este
producto, familiar[cese con todas las caracter[sticas de
funcionamiento y normas de seguridad.
APAGADO
AUTOMATICO
Cuando se vac[a el tubo de masilla, la caracteristica
apagado autom_tico de la unidad apaga el motor.
ESTRUCTURA
Capacidad ........................ Cartucho est_ndar de 10 onzas
de
DEL EMBOLO
El movimiento de avance de la barra del _mbolo aplica
presi6n en la parte inferior del tubo abierto de masilla de
calafatear y empuja _sta hacia afuera para aplicarla.
PUNZ(SN
Para conveniencia del operador, se suministra un punz6n
para romper el sello de los tubos nuevos de masilla
de calafatear. Cuando se utiliza un tubo de masilla de
calafatear ya medio vac[o, el punzOn puede utilizarse para
desprender todo el material endurecido presente en la
boquilla del tubo.
SEGURO
DE DESPLAZAMIENTO
DEL INTERRUPTOR
El seguro del interruptor impide oprimir el gatillo.
La estructura de desplazamiento soporta un tubo de
masilla de calafatear de 10 onzas.
GATILLO
PROTECCK_)N
AI oprimir el gatillo del interruptor se inicia el movimiento
de avance de la barra del _mbolo.
ELECTR6NICA
CONTRA
SOBRECARGAS
SELECTOR
Una caracteristica de protecci6n electr6nica contra
sobrecargas apaga el motor autom_ticamente si hay
demasiada presi6n aplicada en el tubo de masilla de
calafatear.
MANGO
DE LA BARRA
DEL INTERRUPTOR
DE VELOCIDAD
La velocidad del _mbolo puede ajustarse con el selector
de velocidad. I_ste permite ajustar la magnitud del flujo de
material para adecuarlo a cada aplicaci6n en particular.
DEL EMBOLO
El mango de la barra del _mbolo sirve para tirar de la
barra hacia atr_s, para permitir cargar la masilla.
DESEMPAQUETADO
Este producto se empaca completamente
LISTA DE EMPAQUETADO
armado.
Pistola de calafatear
[] Extraiga cuidadosamente de la caja el producto y los
accesorios. Compruebe que est_n presentes todos los
art[culos enumerados en la lista de empaquetado.
A
ADVERTENClA:
No use este producto si no est_
totalmente ensamblado o si alguna pieza falta o est_
daSada. Si utiliza un producto que no se encuentra
ensamblado de forma correcta y completa, puede
sufrir lesiones graves.
Manual del operador
A
A
[] Inspeccione cuidadosamente el producto, para verificar que no haya sufrido ninguna rotura o daSo durante
el transporte.
[] No deseche el material de empaquetado hasta que
haya inspeccionado el producto con cuidado y la haya
utilizado satisfactoriamente.
[] Si hay piezas daSadas o faltantes, le suplicamos Ilamar
al 1-800-932-3188, donde le brindaremos asistencia.
A
6- EspaSol
ADVERTENCIA:
Si hay piezas daSadas o faltantes,
no utilice este producto hasta haberlas repuesto
todas. Usar este producto con falta o est_ daSada
alguna pieza podr[a tener como resultado herida
personal grave.
ADVERTENCIA:
No intente modificar este producto
ni fabricar accesorios no recomendados para ella.
Cualquier alteraci6n o modificaci6n constituye
maltrato y puede causar una condici6n peligrosa, con
las consecuentes lesiones corporales graves.
ADVERTENCIA:
Para evitar un arranque accidental
que pudiera causar lesiones corporales graves,
desmonte siempre el paquete de bater[as antes de
instalar piezas en el producto.
A
A
A
ADVERTENCIA:
No permita que su familarizaci6n
con los productos Io vuelva descuidado. Tenga
presente que un descuido de un instante es
suficiente para causar una lesi6n grave.
ADVERTENClA:
Siempre p6ngase protecci6n
ocular con la marca de cumplimiento de la norma
ANSI Z87.1. Si no cumple esta advertencia, los
objetos que salen despedidos pueden producirle
lesiones serias en los ojos.
quede bien asegurado en la herramienta antes de
empezar a utilizar _sta.
PRECAUCION,
AI colocar el paquete de baterfas
en la herramienta, asegOrese que la costilla realzada
del mismo quede alineada con la parte inferior del
pistola de calafatear y de que los pestillos entren
adecuadamente en su lugar con un chasquido. Si
no se instala debidamente el paquete de baterfas
pueden dafiarse los componentes internos.
PARA DESMONTAR
Vea la figura 2.
ADVERTENCIA:
No utilice ningOn aditamento o
accesorio no recomendado por el fabricante de esta
herramienta. El empleo de aditamentos o accesorios
no recomendandos puede causar lesiones graves.
Este producto puede emplearse para los fines siguientes:
[] Sellado de grietas para mantener adentro el aire
acondicionado del hogar manteniendo al mismo
tiempo afuera el aire sin acondicionar, aument_ndose
as[ la eficiencia en el consumo de energfa del hogar
[] Oprima los pestillos laterales del paquete de bater[as.
[] Retire de la herramienta el paquete de baterfas.
ADVERTENClA:
Las herramientas de baterias
siempre est_n en condiciones de funcionamiento.
Por Io tanto, siempre debe estar asegurado el
interruptor cuando no est_ us_ndose o el operador
Io Ileve por un lado.
[] Rellenado de agujeros y grietas antes de pintar
ENCENDIDO
Y APAGADO
DE CALAFATEAR
[] Formar una barrera de protecci6n contra la humedad
en areas que pudieran resultar dafiadas por el agua
Vea la figura 3.
[] Sellado de grietas para impedir la entrada de insectos
al interior de la casa
[] Aplicaci6n de adhesivo
Este producto acepta los paquetes de baterfas DieHard_
de iones de litio de 19,2 V y los paquetes de baterfas
Craftsman de n[quel-cadmio de 19,2 V.
Para ver las instrucciones de carga y bater[a completas,
consulte el manual del operador de los paquetes de
baterfas y cargadores enumerados en las Reglas de
seguridad generales.
CARACTERISTICAS
BATERiAS
DE PROTECClON
DE LAS
Las baterfas de iones de litio DieHard<ode 19,2 V estan
diseSadas con caracteristicas que protegen las celdas de
iones de litio y maximizan la duraci6n de las baterfas.
Si la herramienta se detiene durante el uso, suelte el
gatillo para reiniciarla y reanude el funcionamiento. Si aun
as[ no funciona, se debe recargar la baterfa.
PARA INSTALAR
EL PAQUETE
DE BATERiAS
[] Para ENCENDER la pistola de calafatear, oprima el
gatillo del interruptor.
[] Para APAGAR la pistola de calafatear, suelte el gatillo
del interruptor.
ASEGURAMIENTO
DEL INTERRUPTOR
DEL GATILLO
Vea la figura 3.
El gatillo del interruptor de la pistola de calafatear puede
asegurarse en la posici6n de apagado mediante el bot6n
deslizable situado abajo de dicho gatillo.
[] Para asegurar el gatillo del interruptor, suba el seguro.
De esta manera se impide oprimir el gatillo de la
pistola de calafatear.
[] Para desasegurar el gatillo del interruptor, baje el
seguro. De esta manera se permite oprimir el gatillo de
la pistola de calafatear.
COLOCACION
[] Para asegurar el gatillo del interruptor, suba el seguro.
DE CALAFATEAR
Vea las figuras 4 y 5.
[] AsegOrese de que los pestillos situados en ambos
lados del paquete de baterfas entren completamente
en su lugar con un chasquido y de que el paquete
DE LA PISTOLA
Antes de intentar encender la pistola de calafatear,
asegOrese de que el seguro del interruptor est_ en la
posici6n de desaseguramiento.
Vea la figura 2.
[] Coloque el paquete de baterfas en la herramienta.
DE PILAS
[] Para asegurar ei gatillo del interruptor, suba ei seguro.
A
APMCAClONES
EL PAQUETE
DEL TUBO
DE MASILLA
[] Asegure el gatillo del interruptor, para ello, suba el
seguro.
[] Con una navaja de uso general corte la punta de la
boquilla de un tubo est_ndar de masilla de calafatear
7- Espa5ol
de 10onzas.Cortela puntaa un_ngulode45°. Corte
tan pococomoseaposible,tomandoencuentael
tama_odela "tira"demasillaqueseanecesaria.
[] Reviseparaversi hayunsellointeriorenlabasede
laboquilla.SiIoencuentra,
antesde usareltubode
masilla,introduzcaelpunzOn
porlaboquillahasta
romperel sello.Cuandose utilizauntubodemasillade
calafatearyamediovac[o,el punzOn
puedeutilizarse
paradesprender
todoelmaterialendurecidopresente
enla punta.
NOTA:Lostubosdecartonnormalmente
tienensello
interno.
[] Mientrassostienefirmemente
lapistoladecalafatear
conunamano,tiredelmangodelabarradel_mbolo
alej_ndolodela pistol&ContinOe
tirandodelmango
hastaquela basedel_mboloIleguea la parteposterior
de laestructuradedesplazamiento.
[] Coloqueeltubodemasillade calafatear
enla
estructurade desplazamiento,
asegur_ndose
de
dejarlobienasentadoenambosextremos.
PROTECCI()N
ELECTRONICA
CONTRA
SOBRECARGAS
La pistola de calafatear est_ protegida con una
caracter[stica de protecciOn electrOnica contra
sobrecarga. Si se ejerce mucha presiOn en el tubo, se
apaga el motor. Esto ayuda a evitar da_ar la herramienta
y el tubo de masilla de calafatear. Si se apaga el motor,
aseg0rese de que:
[] Ajuste la velocidad de la pistola de calafatear segOn
se necesite para aquella aplicaciOn en particular,
utilizando solamente suficiente masilla para el trabajo.
Experimente en un area alejada para encontrar la
velocidad Optima para aplicar la cantidad de masilla
deseada.
[] Mantenga la pistola a un _ngulo peque_o. Siva a
rellenar una grieta, introduzca la boquilla en aqu_lla si
es posible; de Io contrario, pase la pistola de calafatear
a Io largo de la superficie.
[] Oprima el gatillo de la pistola de calafatear,
permitiendo que se vaya extruyendo la masilla por la
punta del tubo.
NOTA: Si quedO demasiado angosta la tira de masilla,
vuelva a cortar la boquilla para dejarle una abertura
mayor. No obstante, es mejor aplicar una tira delgada
de masilla y agregar un poco si es necesario, en lugar
de aplicar demasiado y luego intentar eliminar el
exceso.
[] Desplace cuidadosamente la pistola de calafatear a
un paso uniforme a Io largo de la abertura por rellenar
a medida que continOa oprimiendo el gatillo del
interruptor. AsegOrese de que la masilla de calafatear
toque completamente ambas superficies de aplicaciOn.
Si es necesario, con el dedo aplique presiOn leve para
introducir la masilla en las esquinas y grietas.
NOTA: El mejor relleno se Iogra normalmente
movi_ndose hacia adelante para empujar la masilla
hacia el interior de la abertura. No obstante, en algunos
casos (en particular si las superficies est_n _speras o
desiguales), un movimiento hacia atr_s puede producir
mejores resultados, ya que es m_s dificil que el
cartucho se atore en la juntura.
[] Est_ cortada la punta de la boquilla
[] Est_ roto el sello del tubo de masilla
[] No haya material endurecido presente en la boquilla
[] No est_ da_ado o congelado el tubo de masilla
[] La barra del _mbolo est_ libre de masilla y materiales
adhesivos
Suelte el gatillo y espere de 3 a 5 segundos para permitir
que se reajuste el sistema electrOnico. Si el motor se
apaga de nuevo, ponga el selector de velocidad en
la posiciOn media y oprima nuevamente el gatillo. Si
continOa apag_ndose el motor, pruebe con otro tubo de
material o Ileve la herramienta a un centro de servicio
autorizado.
APLICACION
DE LA MASILLA
DE CALAFATEAR
Vea las figuras 6 a 8.
[] Prepare la superficie que va a calafatear; para ello,
limpie el polvo, suciedad y restos de masilla vieja.
AsegOrese de que est_ limpia y seca la superficie por
calafatear.
[] El motor se apaga autom_ticamente cuando queda
vac[o el tubo de masilla de calafatear. Tire de la barra
del _mbolo hacia atr_s y reemplace el tubo de masilla
de calafatear cada vez que sea necesario.
[] Para terminar la tira de masilla de calafatear, suelte el
gatillo del interruptor.
[] Pase un dedo humedecido u otra "herramienta
alisadora" a Io largo de la tira de masilla despu_s de
aplicarla. De esta manera se adhiere la masilla a las
superficies de aplicaciOn y se da una apariencia limpia
y acabada.
[] Con una toalla o un trapo hOmedo limpie toda la
masilla excesiva.
8- Espa_oi
A
A
A
Solamente los componentes enumerados en la lista
de piezas pueden ser reparados o cambiados por el
consumidor. Todas las piezas restantes deben ser
reemplazadas en un centro de servicio Sears.
ADVERTENCIA:
AI dar ser_/icio a la herramienta,
utilice solamente piezas de repuesto Craftsman
id_nticas. El empleo de piezas diferentes puede
implicar peligro o causar da_os al producto.
REMOCl0N
BATERiAS
ADVERTENClA:
Siempre p6ngase protecci6n
ocular con la marca de cumplimiento de la norma
ANSI Z87.1. Si no cumple esta advertencia, los
objetos que salen despedidos pueden producirle
lesiones serias en los ojos.
,&
ADVERTENClA:
Para evitar lesiones corporales
graves, siempre retire el paquete de bater[as de la
herramienta al Iimpiarla o darle mantenimiento.
MANTENIMIENTO
GENERAL
Evite el empleo de solventes al Iimpiar piezas de pl_stico.
La mayor parte de los pl_sticos son susceptibles a
diferentes tipos de solventes comerciales y pueden
resultar da_ados. Utilice pa_os Iimpios para eliminar la
suciedad, polvo, aceite, grasa, etc.
,_
ADVERTENOIA:
No permita en ningOn momento
que I[quido para frenos, gasolina, productos a base
de petrOleo, aceites penetrantes, etc., entren en
contacto con las piezas de pl_stico. Las sustancias
qu[micas pueden da_ar, debilitar o destruir el
pl_stico, Io cual puede a su vez producir lesiones
corporales graves.
9- Espa_ol
Y PREPARAClON
DEL PAQUETE
PARA EL REClCLADO
DE
ADVERTENClA:
AI retirar el paquete de bater[as,
cubra las terminales del mismo con cinta adhesiva
reforzada. No intente destruir o desarmar el
paquete de bater[as, ni de desmontar ninguno de
sus componentes. Las bater[as deben reciclarse o
desecharse debidamente. Asimismo, nunca toque
ambas terminales con objetos met_licos y partes del
cuerpo, ya que puede producirse un corto circuito.
Mant_ngase fuera del alcance de los niSos. La
inobservancia de estas advertencias puede causar
incendios y lesiones corporales serias.
Your Home
For expert troubleshooting
and home solutions advice:
÷anag÷
www.managemyhome.com
For repair - in your home - of all major brand appliances,
lawn and garden equipment, or heating and cooling systems,
no matter who made it, no matter who sold it!
For the replacement parts, accessories and
owner's manuals that you need to do-it-yourself.
For Sears professional installation of home appliances
and items like garage door openers and water heaters.
1-800-4-MY-HOME ®
Call anytime,
(1-800-469-4663)
day or night (U.S.A. and Canada)
www.sears.com
www.sears.ca
Our Home
For repair of carry-in items like vacuums, lawn equipment,
and electronics, call anytime for the location of your nearest
Sears Parts & Repair Service
1-800-488-1222
(U.S.A.)
1-800-469-4663
www.sears.com
To purchase a protection
1-800-827-6655
(Canada)
www.sears.ca
agreement
(U.S.A.)
Para pedir servicio de reparaci6n
a domicilio, y para ordenar piezas:
1-888-SU-HOGAR
Center
on a product serviced by Sears:
1-800-361-6665
Au Canada
pour service en frangais:
1-800-LE-FOYER
®
Mc
(1-800-533-6937)
www.sears.ca
(1-888-784-6427)
Trademark / TM Trademark / SM Service Mark of Sears Brands, LLC
® Marca Registrada / TM Marca de Fabrica / SM Marca de Servicio de Sears Brands,
MC Marque de commerce / MD Marque depos6e de Sears Brands, LLC
(Canada)
® Registered
LLC
© Sears
Brands,
LLC