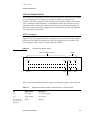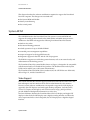
1
Developer Note PowerBook Duo 270c Developer Note Developer Press © Apple Computer, Inc. 1993 Apple Computer, Inc. © 1993, Apple Computer, Inc. All rights reserved. No part of this publication may be reproduced, stored in a retrieval system, or transmitted, in any form or by any means, mechanical, electronic, photocopying, recording, or otherwise, without prior written permission of Apple Computer, Inc. Printed in the United States of America. No licenses, express or implied, are granted with respect to any of the technology described in this book. Apple retains all intellectual property rights associated with the technology described in this book. This book is intended to assist application developers to develop applications only for Apple Macintosh computers. Apple Computer, Inc. 20525 Mariani Avenue Cupertino, CA 95014 408-996-1010 Apple, the Apple logo, APDA, AppleLink, LaserWriter, Macintosh, and Classic® are trademarks of Apple Computer, Inc., registered in the United States and other countries. Macintosh Quadra, PowerBook, and PowerBook Duo are trademarks of Apple Computer, Inc. Adobe Illustrator and PostScript are trademarks of Adobe Systems Incorporated, which may be registered in certain jurisdictions. AGFA is a trademark of Agfa-Gevaert. FrameMaker® is a registered trademark of Frame Technology Corporation. Internet™ is a trademark of Digital Equipment Corporation. Helvetica® and Palatino® are registered trademarks of Linotype Company. ITC Zapf Dingbats® is a registered trademark of International Typeface Corporation. Adobe™ and PostScript™ are trademarks of Adobe Systems Incorporated. America Online is a trademark of Quantum Computer Services, Inc. CompuServe® is a registered trademark of CompuServe Inc. Simultaneously published in the United States and Canada. LIMITED WARRANTY ON MEDIA AND REPLACEMENT ALL IMPLIED WARRANTIES ON THIS MANUAL, INCLUDING IMPLIED WARRANTIES OF MERCHANTABILITY AND FITNESS FOR A PARTICULAR PURPOSE, ARE LIMITED IN DURATION TO NINETY (90) DAYS FROM THE DATE OF THE ORIGINAL RETAIL PURCHASE OF THIS PRODUCT. Even though Apple has reviewed this manual, APPLE MAKES NO WARRANTY OR REPRESENTATION, EITHER EXPRESS OR IMPLIED, WITH RESPECT TO THIS MANUAL, ITS QUALITY, ACCURACY, MERCHANTABILITY, OR FITNESS FOR A PARTICULAR PURPOSE. AS A RESULT, THIS MANUAL IS SOLD “AS IS,” AND YOU, THE PURCHASER, ARE ASSUMING THE ENTIRE RISK AS TO ITS QUALITY AND ACCURACY. IN NO EVENT WILL APPLE BE LIABLE FOR DIRECT, INDIRECT, SPECIAL, INCIDENTAL, OR CONSEQUENTIAL DAMAGES RESULTING FROM ANY DEFECT OR INACCURACY IN THIS MANUAL, even if advised of the possibility of such damages. THE WARRANTY AND REMEDIES SET FORTH ABOVE ARE EXCLUSIVE AND IN LIEU OF ALL OTHERS, ORAL OR WRITTEN, EXPRESS OR IMPLIED. No Apple dealer, agent, or employee is authorized to make any modification, extension, or addition to this warranty. Some states do not allow the exclusion or limitation of implied warranties or liability for incidental or consequential damages, so the above limitation or exclusion may not apply to you. This warranty gives you specific legal rights, and you may also have other rights which vary from state to state. Contents Figures and Tables Preface About This Note v vii Conventions Used In This Book Other Reference Material viii For More Information ix Chapter 1 vii Introduction to the PowerBook Duo 270c Computer PowerBook Duo 270c Computer Features Chapter 2 Hardware Modifications Software Modifications 2 5 Active-Matrix TFT Color Display Features Changes on Main Logic Board 7 Integrated Floating-Point Unit 8 Color Control Chip (CSC) 8 DRAM Configuration 9 240 MB Hard Disk Drive 9 Environmental Specifications 9 Housing Requirements 10 Hard Disk Interface 12 Interface Requirements 13 SCSI Connectors 13 Terminator 15 Power Requirements 16 Inverter/Speaker Board 16 Clamshell Housing 17 Chapter 3 1 6 19 System ROM 20 Video Support 20 8-Bit Color 21 16-Bit Color 22 Support for Internal FPU 22 Support for Extended DRAM 22 Extended Power Management Capabilities 22 iii Network Support 22 Diagnostic Support 22 Battery Reconditioning 23 Before Reconditioning 23 Reconditioning Dialog Boxes 24 PowerBook Duo 270c Control Panels 27 PowerBook Setup Panel 27 PowerBook Control Panel 28 Custom and Easy Controls for Battery Conservation Power Conservation 29 Appendix A Color Lookup Table (CLUT) Index iv 41 31 29 Figures and Tables Chapter 1 Introduction to the PowerBook Duo 270c Computer Figure 1-1 Chapter 2 5 Figure 2-1 Figure 2-2 Figure 2-3 Figure 2-4 Figure 2-5 PowerBook Duo 270c main logic board 8 Hard disk drive housing 11 Bracket for the hard disk drive 12 Hard disk drive SCSI connector 13 The PowerBook Duo 270c computer housing in open position 18 Table 2-1 Table 2-2 Table 2-3 Features of the active-matrix TFT color display 6 Environmental specifications for 240 MB hard disk drive 9 Hard disk drive SCSI connector signal assignments – SCSI and power 13 Hard disk drive SCSI connector signal assignments – SCSI ID 15 SCSI ID encoding 15 Power requirements for the 240 MB hard disk drive 16 Table 2-5 Table 2-6 Software Modifications Figure 3-1 Figure 3-2 Figure 3-3 Figure 3-4 Figure 3-5 Figure 3-6 Figure 3-7 Figure 3-8 Figure 3-9 Figure 3-10 Appendix A Simplified block diagram of the PowerBook Duo 270c computer system 4 Hardware Modifications Table 2-4 Chapter 3 1 19 PowerBook Duo 270c color lookup table 21 Power adapter warning 23 Initial information dialog box 24 Main informational dialog box 25 Less-than-30-days message 25 Final confirmation: less than 30 days 26 Waiting image 26 Completion dialog box 26 PowerBook Setup panel 28 PowerBook control panel 29 Color Lookup Table (CLUT) Table A-1 31 Color look up table 31 v vi P R E F A C E About This Note This note is a supplement to Macintosh Developer Notes, Number 2, Macintosh Duo System, APDA publication number R0457LL/A. It describes the design features of the PowerBook Duo 270c computer, which is basically a PowerBook Duo computer with an active-matrix color display, expanded hard disk capabilities, higher capacity batteries, and an integrated floating-point unit (FPU). This note provides the hardware or software developer with the additional information needed to design hardware and software elements for the PowerBook Duo 270c computer. This publication assumes you are familiar with the functionality and programming requirements for Apple Macintosh computers. It contains the following three chapters and an appendix: ■ Chapter 1, “Introduction to the PowerBook Duo 270c Computer” ■ Chapter 2, “Hardware Modifications” ■ Chapter 3, “Software Modifications” The chapters and appendix are followed by an index. Conventions Used In This Book 0 This developer note uses the following conventions: IMPORTANT A note like this contains information that is essential to an understanding of the text, and of the PowerBook Duo 270c computer. ▲ ▲ WARNING A note like this directs your attention to something that could cause injury to staff, damage to equipment, or loss of data. ▲ A slash in front of a signal name (/RESET) indicates an active low signal. vii P R E F A C E The following common abbreviations are used in this note: AM active matrix CCFL cold cathode fluorescent lamp CSC color screen controller DRAM dynamic random-access memory FPU floating-point unit FSTN film super-twist nematic K 1024 LCD liquid crystal display MB megabyte Mbit megabit ms millisecond MSC main system controller µs microsecond ns nanosecond PCB printed circuit board RAM random access memory RMS root mean square SCSI small computer system interface SIMM single inline memory module TFT thin-film transistor TQFP thin quad flat pack VRAM video RAM When unusual abbreviations appear in this developer note, the corresponding terms are also spelled out. Standard units of measure and other widely used abbreviations are not spelled out. A distinction is made between boards and cards. Boards are a permanent part of the computer or expansion device. Cards may be inserted into the system and can be added or exchanged. Other Reference Material Related documentation includes: ■ viii Macintosh Developer Notes, Number 2, Macintosh Duo System, APDA publication number R0457LL/A ■ Guide to the Macintosh Family Hardware, second edition ■ Designing Cards and Drivers for the Macintosh Family, third edition 0 P R E F A C E ■ ■ Inside Macintosh, Volumes I through VI Macintosh Classic II, Macintosh PowerBook Family, and Macintosh Quadra Family Developer Notes, APDA publication number R0I43LL/A. For More Information 0 APDA is Apple’s worldwide source for over three hundred development tools, technical resources, training products, and information for anyone interested in developing applications on Apple platforms. Customers receive the quarterly APDA Tools Catalog featuring all current versions of Apple development tools and the most popular third-party development tools. Ordering is easy; there are no membership fees, and application forms are not required for most of our products. APDA offers convenient payment and shipping options, including site licensing. To order products or to request a complimentary copy of the APDA Tools Catalog, contact APDA Apple Computer, Inc. P.O. Box 319 Buffalo, NY 14207-0319 Telephone 800-282-2732 (United States) 800-637-0029 (Canada) 716-871-6555 (International) Fax 716-871-6511 AppleLink APDA America Online APDA CompuServe 76666,2405 Internet [email protected] ix P R E F A C E x C H A P T E R Figure 1-0 Listing 1-0 Table 1-0 1 Introduction to the PowerBook Duo 270c Computer 1 C H A P T E R 1 Introduction to the PowerBook Duo 270c Computer The Macintosh PowerBook Duo 270c computer is a member of the PowerBook Duo family of computers. It has all the basic features of the PowerBook Duo computer but also has certain new features which are described in this note. These features include ■ ■ ■ an active-matrix (AM) thin-film transistor (TFT) 8-bit or 16-bit color display support for the color display via the color-screen controller (CSC) device, housed on the main logic board a 160 MB or a 240 MB hard drive (the 160 MB drive is not described separately in this note) ■ integrated floating-point unit (FPU) ■ higher capacity batteries ■ an inverter/speaker board compatible with active matrix TFT color displays only ■ software support for the color video and battery recharging ■ modified system ROM The computer uses the same 33 MHz 68030 microprocessor as the PowerBook Duo 230 computer. Chapter 2, “Hardware Modifications,” describes the modifications made to the original PowerBook Duo computer to implement the PowerBook Duo 270c computer. Chapter 3, “Software Modifications,” describes the changes made to the software to support the additional features. This note is a supplement to the Macintosh Duo System Developer Note, R0457LL/A, which contains detailed information about the basic Macintosh PowerBook Duo computer. PowerBook Duo 270c Computer Features 1 Features of the PowerBook Duo 270c computer are listed below. Items in boldface type are unique to the PowerBook Duo 270c computer and are described in more detail later in this note. All other items are discussed in detail in the Macintosh Duo System Developer Note. ■ main processor: 33 MHz 68030 microprocessor ■ integrated floating-point unit ■ ■ Power Manager: a custom microcontroller that provides intelligent power management ■ integral hard disk: 160 MB or 240 MB capacity ■ 4 MB of DRAM (dynamic random access memory) on the main logic board ■ 2 main system controller (MSC): controls DRAM, ROM, built-in I/O, sound, and some power-saving features 8 MB memory expansion card expands memory capacity up to 12 MB; third-party SIMM (single inline memory) card expands memory capacity up to 32 MB PowerBook Duo 270c Computer Features C H A P T E R 1 Introduction to the PowerBook Duo 270c Computer ■ 1 MB of ROM (read only memory): stores system and configuration data. ■ active-matrix TFT 8-bit or 16-bit color display ■ ■ ■ video components: a color-screen controller (CSC) chip and video RAM; the CSC controls the interface between the processor, the video RAM, and the display; the VRAMs store the data required to write and refresh the display inverter/speaker board compatible with both FSTN (film super-twist nematic) and AM displays Combo chip: includes the Serial Communication Controller (SCC) and Small Computer System Interface (SCSI) controller ■ enhanced sound chip: supports 8-bit monaural sound input and output ■ integral microphone and speakers ■ modem: internal modem/fax card, referred to as the Express Modem ■ keyboard: integral full-function keyboard with trackball ■ ■ I/O: one 152-pin connector for expansion devices, one mini-DIN 8-pin serial port, one modem port, and a power connector nickel metal hydride battery: 4.5-hour removable and rechargeable battery Figure 1-1 shows a simplified block diagram of the PowerBook Duo 270c computer system PowerBook Duo 270c Computer Features 3 C H A P T E R 1 Introduction to the PowerBook Duo 270c Computer Figure 1-1 Simplified block diagram of the PowerBook Duo 270c computer system Main expansion connector Provides access to: Duo Floppy Adapter Duo MiniDock DuoDock Communication Memory and storage Fax/modem SCC interface SCSI capability 4MB DRAM Up to 32 MB DRAM expansion 160 MB or 240 MB hard disk Processing and control 68030 33 MHz microprocessor Main system controller (MSC) Power Manager Video control Sound control System ROM Integrated FPU Human interface Active-matrix 8-bit or 16-bit color display Keyboard Trackball Microphone and speaker 4 PowerBook Duo 270c Computer Features C H A P T E R Figure 2-0 Listing 2-0 Table 2-0 2 Hardware Modifications 2 C H A P T E R 2 Hardware Modifications This chapter describes hardware features of the PowerBook Duo 270cPowerBook Duo 270c computer that make it different from the Macintosh PowerBook Duo computer. These features include ■ the active-matrix TFT color display ■ the integrated floating point unit ■ color screen controller ■ ■ the 160 MB or 240 MB hard disk drive (the 160 MB drive is not described separately in this note) the inverter/speaker board This chapter also describes the hardware changes required to support these features: ■ modified main logic board ■ modified clamshell housing Active-Matrix TFT Color Display Features 2 The PowerBook Duo 270c display is an active-matrix TFT color display. It is 3.8 millimeters thicker than the basic PowerBook Duo display, requiring the computer housing to be thicker than that of the original PowerBook Duo. (See the section “Clamshell Housing,” later in this chapter.) The display can be driven in two modes. In what is termed 8-bit mode, with 8 bits per pixel, and a 640-pixel by 480-pixel display area, the PowerBook Duo 270c can display up to 256 different colors at a time. In what is termed 16-bit mode, but which is actually 15 bits per pixel, the PowerBook Duo 270c can display thousands (up to 32K) of colors on a 640-pixel by 400-pixel display area. The system software allows you to select either mode by means of the Monitor control panel (see Chapter 3). Because the VRAM is a fixed size, 256K by 16 maximum, it can handle only a certain amount of data. If you select the 16-bit mode, to enable the VRAM to handle the thousands of colors, the system software resizes the display area down to 400 lines instead of 480, and centers the lines on the screen, leaving black bands of 40 lines each at the top and bottom of the screen. Table 2-1 lists the features of the active-matrix TFT color display. Table 2-1 6 Features of the active-matrix TFT color display Feature Description Display matrix 640 x 480 pixels, 8-bit color 640 x 400 pixels, 16-bit color Active display area 171 mm x 130 mm Display module dimensions 237.4 mm wide, 175.2 mm high, 8.7 mm deep Active-Matrix TFT Color Display Features C H A P T E R 2 Hardware Modifications Table 2-1 Features of the active-matrix TFT color display Feature Description Standard display mode Normally white Contrast ratio 60:1 minimum Pixel pitch 0.267 (high) by 0.270 (wide) = R+G+B = 1 pixel Pixel configuration R, G, B vertical stripes Total pixel on/off switching speed or response time <80 ms Surface treatment Antiglare polarizer at 2H pencil hardness Backlight/CCFL Integrated backlight system, with typical RMS operating values of 470 Vrms at 5.5 mA Changes on Main Logic Board 2 The outline of the PowerBook Duo 270c computer’s main logic board is identical to the outline of the main logic board in the PowerBook Duo. However, there are several component changes, as described below. Figure 2-1 shows a view of the main logic board, with new components shaded. The changes to the board include ■ an on-board floating-point unit ■ replacement of the GSC with the CSC ■ rearrangement of the on-board DRAM Changes on Main Logic Board 7 C H A P T E R 2 Hardware Modifications Figure 2-1 PowerBook Duo 270c main logic board Serial port connector 152-pin main expansion connector Power adapter Transformer Transformer ROM slots MC68030 processor DFAC V R A M Power Manager MSC Keyboard connectors Drawing not to scale 68882 FPU Test Trackball DRAM Modem expansion connector DRAM array CSC DRAM DRAM Combo DRAM expansion connector DRAM Backup Hard drive Connectors Components that are different for the Escher computer The logic board contains 8 DRAMs - 4 on each side of the board Integrated Floating-Point Unit 2 The PowerBook Duo 270c computer has an integrated FPU mounted on the main logic board in a PLCC socket. The FPU is a 68882 device. Figure 2-1 shows the position of the FPU on the logic board. Color Control Chip (CSC) 2 The CSC replaces the PowerBook Duo’s gray-scale controller (GSC). Figure 2-1 shows its position on the main logic board. The CSC is a 144-pin TQFP (thin quad flat pack) device. It supports FSTN and TFT LCD display panels, in color or monochrome/gray, in two raster matrix configurations: 640 x 480 and 640 x 400, in dual-drive and single-drive configurations. It supports the following color and grayscale modes: 8 ■ 1 bit per pixel (2 colors or grays), black-and-white monochrome ■ 2 bits per pixel (4 colors or grays) ■ 4 bits per pixel (16 colors or grays) ■ 8 bits per pixel (256 colors or grays) ■ 16 bits per pixel (32K colors or grays), with 640 x 400 display Changes on Main Logic Board C H A P T E R 2 Hardware Modifications DRAM Configuration 2 The PowerBook Duo 270c main logic board contains 8 DRAMs, which make up the 4 MB of on-board DRAM. Four of the DRAMs are located on the front of the main logic board, and four on the back of the board, whereas on the main logic board of PowerBook Duo computer, all eight DRAMs are on the front of the board. 240 MB Hard Disk Drive 2 This section describes the 240 MB hard disk drive. It includes the following information about the drive: ■ environmental specifications ■ housing requirements ■ interface requirements IMPORTANT It is possible to mount a 160 MB hard disk drive in the PowerBook Duo 270c housing. The physical requirements for this drive are the same as for the 240 MB drive, and therefore the 160 MB drive is not described separately in this section. ▲ Environmental Specifications 2 Table 2-2 provides a summary of environmental specifications for the 240 MB hard disk drive. Table 2-2 Environmental specifications for 240 MB hard disk drive Category Condition Specification Temperature of ambient air inside a low airflow thermal chamber, non-condensing Operating limits: 5 to 55 degrees C Nonoperating and storage: -40 to 60 degrees C 240 MB Hard Disk Drive 9 C H A P T E R 2 Hardware Modifications Table 2-2 Environmental specifications for 240 MB hard disk drive Temperature gradient Relative humidity Altitude Housing Requirements Operating: 20 degrees C per hour Non-operating: Below rate causing condensation Operating: 10-90%, noncondensing, maximum wet bulb 20 degrees C Non-operating: Non-condensing, maximum wet bulb 35 degrees C Operating: -200 to 15,000 feet Shipping: -200 to 15,000 feet 2 The PowerBook Duo 270c computer accommodates either a 160 MB hard disk drive or a 240 MB drive. The hard disk drive is housed in the PowerBook Duo 270c clamshell housing. Figure 2-2 shows the dimensions of the 240 MB hard disk. The height of the disk drive is critical, and it must not exceed 19mm (0.75) inches. Both drives are currently 19 millimeters tall, but eventually the 160 MB drive will be available in 12.5-millimeter and 17-millimeter versions. The drive may be mounted through either side-mounting or bottom-mounting holes machined into the disk drive housing. A bracket, shown in Figure 2-3, is attached to the side of the hard disk and holds it in place in the PowerBook Duo 270c computer housing. 10 240 MB Hard Disk Drive C H A P T E R 2 Hardware Modifications Figure 2-2 Hard disk drive housing Bottom view (PCB side) 1.375" ± .015" (34.93 ± 0.38mm) 4.000" (101.60mm) maximum 1.500" (38.10mm) End view 8 Pin J2 Pin 1 Vacant row in 50 pin connector Pin 1 2.759" (70.01mm) PCB connector 40 Pin J1 SCSI PCB controller 2.430" (61.72) Position 17 (key) CL 2 1 0.387" ± 0.012" (9.83 ± 0.30mm) Connector position Bottom mounting holes M 3.0 (4x) 0.079" (2.00mm) Connector envelope Side view 0.750" (19.05mm) maximum 0.118" (3.00 0.00 1.375" ± .015" (34.93 ± 0.38mm) 1.500" (38.10mm) Side mounting holes M 3.0 (4x) Notes: 1. All dimensions in inches (mm). 2. Tolerances (unless otherwise noted): .XX = +/-0.25mm (.XXX = +/- .010 inches). Key: 1 Connector position from edge of drive to center line of first connector pin (39). 2 Connector envelope does not include flex cable or mating receptacle. Connector pins are to be flush with drive envelope dimensions. 240 MB Hard Disk Drive 11 C H A P T E R 2 Hardware Modifications Figure 2-3 Bracket for the hard disk drive 2.874" (73.00mm) 0.188" (4.795±0.125mm) 1 0 0.125" (3.200mm) 2 CL 2x 0.079" (2.00mm) 0.299" (8.60) (7.60mm) 0.125" (3.20mm) (1.60mm) 0.082" (2.10mm) 4x R 0.039" (1.00mm) 2x R full 0.165" (4.20mm) 3x R 1.00 (7.80) 0.549" (13.95mm) 1.5" (38.10mm) 3 0.192" (4.900±0.125mm) 3x 0.307" (7.80mm) 2x R 0.059" (1.50mm) 3x 0.137" (3.50mm) 3x 0.275" (7.00mm) 0.137" (3.50mm) 3x 0 0.118" (3.00mm) 2.598" (66.00mm) 1.299" (33.00mm) 6x R 0.059" (1.50mm) Key 1 This surface to be free of burrs and sharp edges. 2 Mark part number, rev level, vendor I.D., and date code with 0.19±0.06 high permanent contrasting characters. Locate where shown. 3 Arrow indicates direction of material grain. Notes: 1. Interpret dimensions and tolerances per ANSI Y14.5M-1982 2. Material: CRS 1010-1020, 1.00 ± 0.05 (.0394 ± .0020) thick. 3. Finish: Zinc pre-plate per Mil.Spec. QQ-Z-325a Class 3 (0.00020) type II. 4. Maximum burr allowance is 15% of material thickness. 5. Starred (*) dimensions and notes are critical control dimensions for Apple incoming quality control inspection 6. Tooling required to make this part to be property of Apple Computer, Inc. and shall be permanently marked with Apple’s name and appropriate part number. 7. All dimensions apply after finish. Hard Disk Interface This section describes the interface requirements for the 240 MB hard disk drive. It provides specifications and signal assignments for the SCSI connector. 12 240 MB Hard Disk Drive 2 C H A P T E R 2 Hardware Modifications Interface Requirements 2 The interface to the hard disk is an ANSC X3T9.2 SCSI interface. It implements the Apple SCSI command protocol and diagnostic command set. Buffer size supports a 1:1 interleave. The drive supports the SCSI asynchronous information transfer. The transfer rate is 1.5 MB per second (minimum). An embedded controller provides error recovery algorithms, which include error check and correction (ECC), seek retry, head offset (for open-loop systems), and defect management. The SCSI interface provides a SCSI ID that can be detected by the hardware. SCSI Connectors 2 The disk drive SCSI connector comprises two segments, as shown in Figure 2-4. The first segment has 40 pins, arranged in two rows. It transfers SCSI signals between the CPU and the hard disk drive, and it also supplies power to the drive. The second segment of the connector accommodates the SCSI ID. Figure 2-4 Hard disk drive SCSI connector SCSI commands and power SCSI ID Pin 39 Pin 1 Pin 7 Pin 1 Pin 40 Pin 2 Pin 8 Pin 2 Key Table 2-3 lists and describes the interface signals for the 40-pin segment of the connector. Table 2-3 Hard disk drive SCSI connector signal assignments – SCSI and power Pin Signal name Description 1, 2 +5V logic +5 V power supply 3, 4 Logic return +5 V return 5, 7, 9, 11, 13, 15, 19, 21, 23, 27, 31, 35 GND Ground 240 MB Hard Disk Drive 13 C H A P T E R 2 Hardware Modifications Table 2-3 Hard disk drive SCSI connector signal assignments – SCSI and power (continued) Pin Signal name Description 6 /DB0 Data bus bit 0 8 /DB1 Data bus bit 1 10 /DB2 Data bus bit 2 12 /DB3 Data bus bit 3 14 /DB4 Data bus bit 4 16 /DB5 Data bus bit 5 17 KEY Not connected; used as connector key 18 /DB6 Data bus bit 6 20 /DB7 Data bus bit 7 22 /PARITY Data bus parity 24 TERM PWR Terminator power; pulls up termination resistors for all signal lines 25 /ATN Attention indicator 26 /BSY Busy signal 28 /ACK Acknowledge (handshake signal); asserted in response to a request for access (/REQ) 29 /RST SCSI bus reset 30 /MSG Message phase 32 /SEL SCSI select 33 /I/O Controls the direction of data movement: when this signal is low, data is output from the disk drive; when it is high, data is input 34 /C/D Indicates whether data or control signals are on the SCSI bus: when this signal is low, data is on the bus; when it is high, control signals are on the bus 36 /REQ Access request; the CPU asserts this signal to request access to the hard disk 37, 38 MOTOR RET Return for +5 V power supply for motor 39, 40 +5V MOTOR +5 V power supply for the motor 14 240 MB Hard Disk Drive C H A P T E R 2 Hardware Modifications Table 2-4 lists and describes the interface signals for the 8-pin segment of the connector. Table 2-4 Hard disk drive SCSI connector signal assignments – SCSI ID Pin Signal name Description 1, 2, 3, 4, 8 Unused These pins are not used and are not connected electrically to the CPU 5 /ID1 SCSI ID 1 6 /ID2 SCSI ID 2 7 /ID4 SCSI ID 4 The internal hard disk is assigned a SCSI ID number (0-7). Pins 5-7 on the SCSI connector are encoded and allow the CPU to select the appropriate device. Table 2-5 shows how the ID signals are encoded. Table 2-5 SCSI ID encoding ID1: Pin 5 ID2:Pin 6 ID4: Pin 7 SCSI ID High High High 0 Low High High 1 High Low High 2 Low Low High 3 High High Low 4 Low High Low 5 High Low Low 6 Low Low Low 7 Terminator 2 The hard disk has 1000-ohm termination resistors for all I/O signal lines. The lines are pulled up to through the resistors to termination power. 240 MB Hard Disk Drive 15 C H A P T E R 2 Hardware Modifications Power Requirements 2 Power drawn for the hard disk must be less than or equal to values shown in Table 2-6 for each mode. All measurements are under nominal environmental and voltage conditions. The limits include 1000-ohm pull-up resistors on all signal lines. Table 2-6 Mode Power requirements for the 240 MB hard disk drive Current (amps) Mean Startup (1) Maximum 1.30 Random operation (2) 0.50 0.60 Idle 0.30 0.35 NOTE 1 Startup values are peak values during response time of Power On to Power Ready. NOTE 2 Random operation values are RMS values with a 40% random seek, 40% write/read (1write in 10 reads) and 20% idle mode. Inverter/Speaker Board The inverter/speaker board is located in the clamshell housing, directly under the display. It interfaces between the basic CPU and the active-matrix display and performs the following basic functions for the PowerBook Duo 270c computer: ■ ■ ■ ▲ It converts the DC power supplied by the computer’s battery to the AC power required to drive the cold cathode fluorescent lamp (CCFL), that provides the backlighting for the active-matrix LCD display. Typical CCFL drive power is 400 VRMS (voltage root mean square) at 3mA, with maximum output of 2000V peak to peak at 6 mA. It provides pass-through circuitry for the data and timing signals, supplied by the CSC to the LCD display, and for the +5V from the power supply. It converts the DC voltage supplied by the computer’s battery to +5 VDC level required for the LCD bias, which is typically +5 V at 200 mA. WARNING You should not open or modify any of the circuitry associated with the inverter/speaker board. The PowerBook Duo 270c active-matrix display is assembled into the clamshell housing in a clean room environment. Opening up the equipment in any other environment could cause damage to the unit. The high-voltage inverter/speaker board may pose a risk if you are handling the board. The LCD display is susceptible to damage from electrostatic discharge (ESD). ▲ 16 Inverter/Speaker Board 2 C H A P T E R 2 Hardware Modifications Clamshell Housing 2 The PowerBook Duo 270c computer is housed in a clamshell case. Since the display is 3.8 millimeters (0.149 inches) thicker than the original PowerBook Duo display, the overall housing is also thicker than the original PowerBook Duo housing. When the case is closed, it measures 203.2 millimeters by 274.32 millimeters (8 inches by 10.8 inches), and is 36.8 millimeters (1.449 inches) deep. Figure 2-7 shows an open view of the clamshell. IMPORTANT Since the clamshell case is slightly deeper than the case of the original PowerBook Duo, if you plan to use the PowerBook Duo 270c computer with the Duo Dock, you cannot use a standard Duo Dock. The slot is not deep enough to accommodate the PowerBook Duo 270c clamshell case. There are two solutions. You may upgrade the top shell of an existing Duo Dock to enlarge the slot. Future Duo Docks will accommodate the deeper case, and will not require modification. ▲ Clamshell Housing 17 C H A P T E R 2 Hardware Modifications Figure 2-5 The PowerBook Duo 270c computer housing in open position Curved housing Open/close latch Sleep LED 16-level grayscale supertwist display Speaker Apple logo and product name Display clutch assembly Brightness Microphone 2mm travel keyboard Cap lock LED Trackball NiHy battery 160 or 240 MB hard disk Clamshell switch 18 Clamshell Housing Power key C H A P T E R 3 Figure 3-0 Listing 3-0 Table 3-0 Software Modifications 3 C H A P T E R 2 Software Modifications This chapter describes the software modifications required to support the PowerBook Duo 270c computer. The changes are associated with ■ the System ROM and Enabler ■ battery reconditioning ■ the control panels System ROM 3 The 1 MB ROM used in the PowerBook Duo 270c system is a universal ROM and supports all existing products based on the 68020, 68030, and 68040 microprocessors. Additions to the ROM code support the following PowerBook Duo 270c features: ■ built-in color video ■ the internal floating-point unit ■ refresh operation for up to 32 MB of DRAM ■ extended power management capabilities ■ improved support for the AppleTalk network ■ diagnostic support for the FPU and the CSC chip registers The ROM also supports several docking station features, such as an external cache, and enhancements to the docking process. The PowerBook Duo 270c system Enabler, known as Figeac, is designed to be compatible with the entire family of PowerBook Duo products. The Enabler resides in the System Folder, and it enables you to add system enhancements. The PowerBook Duo 270c ROM version number is $27, the CPU ID bits are A55A 1002, the box flag is 71, and the Gestalt ID is 77. Video Support This section describes the software support provided for both 8-bit and 16-bit color. The basic techniques used are similar to those used in other Macintosh color monitors. However, certain software modifications are required to support the LCD display, as opposed to the CRT displays used with Apple desktop computers. Inside Macintosh, Volume VI, Chapters 16 through 19, and Inside Macintosh: Imaging With QuickDraw, provide additional background information on video color. One basic difference between the PowerBook Duo 270c LCD display and Apple CRT displays is that while the CRT display uses a digital-to-analog interface to achieve the colors represented in the color lookup table, the LCD display uses a digital-to-digital interface. 20 System ROM 3 C H A P T E R 2 Software Modifications 8-Bit Color 3 The CSC video driver resides in the slot 0 configuration (declaration) ROM (part of the system ROM on the main logic board). The driver supports 8-bit color on a 640-by-480-pixel screen. The 8-bits-per-pixel configuration produces 256 colors. Figure 3-1 shows the color lookup table with values for sample indexes (pixels). You are advised to select colors from first 215 entries in the color table. The values of the entries are based upon combinations of 00, 33, 66, 99, CC, and FF. The last 40 entries in the table are assigned to shades of pure red, green, blue, and gray, and are based upon combinations of 00, 11, 22, 44, 55, 77, 88, AA, BB, and EE. These entries are ramped and dithered, to produce the various shades. Dithering, which may be implemented spatially or temporally, mixes primary colors to produce the effect of a range of different shades. Appendix A, “Color Lookup Table,” provides a complete listing of the 256 indexes and their values. Figure 3-1 PowerBook Duo 270c color lookup table Pixel 15 R = FF G = 99 B = 66 Pixel 0 R = FF G = FF B = FF Pixel 66 R = CC G = 00 B = FF Pixel 216 R = EE G = 00 B = 00 Pixel 215 R = 00 G = 00 B = 33 Shaded pixels represent first 216 entries in the color table Plain pixels represent the last 40 entries in the color table System ROM Pixel 255 R = 00 G = 00 B = 00 21 C H A P T E R 2 Software Modifications 16-Bit Color 3 You may select 16-bit color from an option in the Monitor control panel. If you select this option, the image area on the LCD display is reduced to 640 x 400 pixels and narrow black bands appears at the top and bottom of the screen. With 16-bit color, you have access to thousands of different colors. Support for Internal FPU 3 The PowerBook Duo 270c computer contains an internal FPU. When the PowerBook Duo 270c is installed in a Duo Dock or attached to the Duo MiniDock or Duo Floppy Adapter, an external FPU may also be installed on the main logic board of the dock or the adapter. The external FPU takes priority over the internal FPU, and the default power-on procedure disables the internal FPU to prevent a possible conflict. The startup sequence has been modified to detect the presence of an external FPU. If there is no external FPU, the PowerBook Duo 270c computer’s internal FPU is enabled. Support for Extended DRAM 3 The memory system controller (MSC) installed on the PowerBook Duo 270c computer’s main logic board supports up to 40 MB of self-refreshing DRAM. Currently, PowerBook Duo 270c hardware provides decoding for up to 32 MB of DRAM. Extended Power Management Capabilities 3 The latest release of the Power Manager code, which resides in the PowerBook Duo 270c ROM, allows you to modify the system time without impacting the battery-charging algorithm. Firmware features added for the PowerBook Duo 270c computer also support a sleep LED, version dependent code, 4/5A Panasonic battery support, and battery conditioning. The Power Manager section of the PowerBook Duo 270c ROM provides a standard set of routines that you may access. All other routines are private. Network Support 3 The latest version of AppleTalk is included in both the PowerBook Duo 270c ROM and the System Disk. The new version of AppleTalk is more efficient in remembering network settings when the PowerBook Duo 270c computer is being docked or undocked. AppleTalk resources are removed from the System Enabler file. The Installer application installs AppleTalk files directly into the System file when needed. Diagnostic Support The PowerBook Duo 270c ROM enables diagnostic testing for the FPU, the CSC chip registers, and the VRAM by means of the CSC. 22 System ROM 3 C H A P T E R 2 Software Modifications Battery Reconditioning 3 The PowerBook Duo 270c computer is powered either by a main wall supply or by its battery unit. When the computer is plugged in, it can decide whether power is supplied by the wall supply or by the battery. This feature makes it easier to initiate a battery reconditioning cycle. All you need to do is initiate the Recondition application and proceed through a number of informational dialog boxes. After you have approved all stages by clicking the OK button, the application configures the Power Manager to perform the reconditioning process. When reconditioning starts, the Power Manager is placed in forced discharge mode. In this mode, the Power Manager switches the external power adapter off and ignores all the low power levels, including hardware shutdown. It disables the battery charging circuit, although it turns it on once every second to read the battery voltage. The Power Manager stays in this forced discharge mode until Battery Recondition clears it. This occurs either when the battery has been reconditioned or when you abort the process. Before Reconditioning 3 To recondition the battery, you must plug the PowerBook Duo 270c power adapter into the main power supply. If the adapter is not plugged in when you initiate the Recondition application the dialog box shown in Figure 3-2 appears on the screen. The OK button is not available until you plug in the adapter. If you unplug the power adapter while the battery is being reconditioned, the application terminates and no further dialog boxes are displayed. Figure 3-2 Power adapter warning Battery Reconditioning 23 C H A P T E R 2 Software Modifications IMPORTANT In all dialog boxes associated with reconditioning the battery, you have to make a conscious decision to recondition the battery. All defaults cause the application to terminate. This is important for a variety of reasons: the reconditioning process takes about two hours, and you do not want to enter the process inadvertently; you should not recondition the battery more frequently than every 30 days; and when you initiate the Recondition application, all other applications shut down. ▲ Reconditioning Dialog Boxes 3 The Recondition application has several levels of informational dialog box. The first level, shown in Figure 3-3 contains general information. You open this dialog box if you want to initiate the application to see what it does. The dialog box briefly explains the battery memory effect and the reconditioning process. It summarizes the information found in the user’s manual. IMPORTANT As you proceed through the reconditioning process, the default button in each dialog box is Quit. If you hit the Enter or Return key while a dialog box is displayed on the screen, the Recondition application automatically quits. To initiate or proceed with the reconditioning process, you have to click OK or Recondition. ▲ Figure 3-3 Initial information dialog box The only control in the initial information dialog box is the OK button. When you click this button you proceed to the Main Informational dialog box, shown in Figure 3-4. This box displays specific information about the battery, including battery type, serial 24 Battery Reconditioning C H A P T E R 2 Software Modifications number, and the date the battery was last reconditioned. The default control for this dialog is the Quit button. You have to click the Recondition button to start reconditioning. Figure 3-4 Main informational dialog box If it has been less than 30 days since the battery was last reconditioned, the message shown in Figure 3-5 is displayed as part of the main informational dialog box. Figure 3-5 Less-than-30-days message Message Battery Reconditioning 25 C H A P T E R 2 Software Modifications If you decide to proceed with reconditioning, and have reconditioned the battery within the last 30 days, the dialog box shown in Figure 3-6 appears on the screen. It warns you not to recondition the battery but gives you the option of proceeding. Figure 3-6 Final confirmation: less than 30 days Once you have decided to go ahead and recondition the battery, the Power Manager is reconfigured to forced discharge, all open applications, including the Finder, are closed, and the screen is blanked. The Recondition application code enters a loop as it waits for the battery to reach the required voltage. During this wait period, the symbol shown in Figure 3-7 is displayed on the screen to let you know that the machine is still running. If you wish to terminate the Recondition application, you may press Command and period. Figure 3-7 Waiting image If you decide to quit the application, the application restores the machine state and exits. The Finder restarts the system. If you continue reconditioning the battery, the process continues until the battery reaches the required voltage, at which point the dialog box shown in Figure 3-8 appears on the screen. Figure 3-8 26 Completion dialog box Battery Reconditioning C H A P T E R 2 Software Modifications This dialog box is displayed for one minute, during which time you may click the OK button. If you do not click the button, the application automatically times out, and the dialog box goes away automatically. When the reconditioning process has been completed, the Preferences file is updated to indicate that the battery has been reconditioned. PowerBook Duo 270c Control Panels 3 The functions controlled by the PowerBook Duo control panel have been split between two panels: PowerBook Setup and PowerBook. Having two panels makes it easier to control functions currently available with the PowerBook Duo 270c computer and leaves room for growth. Dimming has been moved from PowerBook Display and is now part of PowerBook. Mirror remains in PowerBook Display. The first control panel, PowerBook Setup, controls setup functions for the modem port configuration, SCSI disk mode, and automatic wakeup. The second panel, PowerBook, is a power management control panel. It contains the battery conservation controls, including those items generally available through the Options button in PowerBook version 7.1: sleep, processor cycling, and Econo-Mode. It controls backlight dimming, and it can also automatically change the Power Manager configuration based on the machine’s power source. PowerBook Setup Panel 3 The PowerBook Duo 270c computer’s PowerBook Setup control panel is a modified version of the PowerBook control panel that shipped with System 7.1. It is essentially the same control panel, but with all power conservation features removed. The PowerBook Setup panel has been further modified to accommodate different modem configurations. The modem controls in the PowerBook Setup control panel distinguish between the Express Modem and other modems. Figure 3-9 shows the PowerBook Setup panel with modem controls. PowerBook Duo 270c Control Panels 27 C H A P T E R 2 Software Modifications Figure 3-9 PowerBook Setup panel The control panel determines what type of modem is installed and chooses the appropriate control titles. If an Express Modem is present, “Internal Modem” is changed to “Compatible” and “External Modem” to “Normal.” The functions associated with the radio buttons have not changed. However, the titles are different to remove the confusion generated by the incorrect use of internal/external modem when an Express Modem is installed. If you have an Express Modem installed, you should use the Normal setting. In this mode, the modem is accessed through the Communications ToolBox (CTB). If you are using an application that is not CTB-aware, you should use the Compatible setting. This will patch the existing serial driver to route serial commands through the CTB to the Express Modem. If you have a third-party internal modem installed, the control titles will be Internal Modem and External Modem, and they will behave as expected, with Internal Modem selecting the modem installed in the system. These titles are the same as those used in PowerBook 7.1. IMPORTANT If you select Compatible, port A (Printer/Modem, Modem) is not available for serial connections. However, AppleTalk is still available. ▲ PowerBook Control Panel The PowerBook control panel, shown in Figure 3-10, is a completely new control panel. It controls only those functions associated with battery and power conservation, as described in the next two sections. The PowerBook control panel is designed for two different groups of users: those who require the power management procedure to be as simple and transparent as possible and power users who wish to have complete control over the power management function. 28 PowerBook Duo 270c Control Panels 3 C H A P T E R 2 Software Modifications Figure 3-10 PowerBook control panel Information about power management is stored in the Preferences file in the System Folder. When the system is booted, the file is read and the contents are stored permanently in memory. Custom and Easy Controls for Battery Conservation 3 There are two methods of accessing controls. Initially, if you open the PowerBook control panel, you will see one simple slider switch (see Figure 3-10), Better Conservation/Better Performance. You may adjust this slider, as required, to improve battery conservation or system performance, or you may leave it in the default position. If you toggle the Easy/Custom box in the control panel, you will be able to access three additional sliders that are subsets of Battery Conservation. They are System Sleeps, Hard Disk Spins Down, and Backlight Dims. If you move any of these sliders, the change will be reflected in the Better Conservation/Better Performance slider, alerting you as to whether the change improves performance or provides better conservation. The controls revert to the single slider if you toggle the Easy/Custom control again. The PowerBook control panel remembers the state in which the controls were left when last used. Power Conservation 3 There are two modes of battery conservation. One is used when the PowerBook Duo 270c computer is plugged into AC main power, and the other is used when the computer is running on its battery. A TimeMgr task installed by system extension in the PowerBook Duo file can automatically change the power management settings based on the machine environment. When the PowerBook Duo 270c computer is shipped, the Power Conservation part of the PowerBook control panel is set with the default settings for Power Adapter and Auto PowerBook Duo 270c Control Panels 29 C H A P T E R 2 Software Modifications enabled, as shown in Figure 3-10. If you are using Easy mode, you will not be able to edit these settings. If you are in Custom mode, you can enable or disable automatic conservation (Auto), select either Battery or Power Adapter as the power source, or revert to the default settings. The changes you make in this panel are stored in the Preferences file. At certain times, the PowerBook control panel compares the current Power Manager settings with both sets of parameters. It does this during open and activate events, when you switch from Manual to Auto power conservations, and when you switch to Custom mode. If a match is found, the name of the matching set is displayed in the pop-up menu, and both the menu and the default button are active. If no match is found, No Set Selected is shown in the pop-up menu, and both menu and default buttons are inactive. Once a valid set is selected, No Set Selected is removed from the pop-up menu. 30 PowerBook Duo 270c Control Panels A P P E N D I X Figure A-0 Listing A-0 Table A-0 A Color Lookup Table (CLUT) A This appendix contains more information about the PowerBook Duo 270c color lookup. Table A-1 shows the values for each index. Index numbers are shown in hexadecimal ($0000, $0001, etc.) and decimal (0, 1, etc.). Red (R) green (G), and blue (B) values are shown in hexadecimal ($FFFF, $CCCC, etc.). The first 215 entries are the RGB combinations, made up of 00, 33, 66, 99, CC, and FF. These colors are not dithered. You should generally select colors from these 215 entries of the CLUT. The last 40 entries are assigned to red ramp, green ramp, blue ramp, and to gray scales. These last 40 entries are dithered, either spatially or temporally, to produce various shades of red, green, blue, and gray. The entries are made up of combinations of 00, 11, 22, 44, 55, 77, 88, AA, BB, DD, and EE. Table A-1 Color look up table Index (hex) Index (dec) R value G value B value $0000 0 $FFFF $FFFF $FFFF $0001 1 $FFFF $FFFF $CCCC $0002 2 $FFFF $FFFF $9999 $0003 3 $FFFF $FFFF $6666 $0004 4 $FFFF $FFFF $3333 $0005 5 $FFFF $FFFF $0000 $0006 6 $FFFF $CCCC $FFFF $0007 7 $FFFF $CCCC $CCCC $0008 8 $FFFF $CCCC $9999 $0009 9 $FFFF $CCCC $6666 $000A 10 $FFFF $CCCC $3333 $000B 11 $FFFF $CCCC $0000 $000C 12 $FFFF $9999 $FFFF $000D 13 $FFFF $9999 $CCCC $000E 14 $FFFF $9999 $9999 $000F 15 $FFFF $9999 $6666 $0010 16 $FFFF $9999 $3333 $0011 17 $FFFF $9999 $0000 31 A P P E N D I X A Color Lookup Table (CLUT) Table A-1 32 Color look up table (continued) Index (hex) Index (dec) R value G value B value $0012 18 $FFFF $6666 $FFFF $0013 19 $FFFF $6666 $CCCC $0014 20 $FFFF $6666 $9999 $0015 21 $FFFF $6666 $6666 $0016 22 $FFFF $6666 $3333 $0017 23 $FFFF $6666 $0000 $0018 24 $FFFF $3333 $FFFF $0019 25 $FFFF $3333 $CCCC $001A 26 $FFFF $3333 $9999 $001B 27 $FFFF $3333 $6666 $001C 28 $FFFF $3333 $3333 $001D 29 $FFFF $3333 $0000 $001E 30 $FFFF $0000 $FFFF $001F 31 $FFFF $0000 $CCCC $0020 32 $FFFF $0000 $9999 $0021 33 $FFFF $0000 $6666 $0022 34 $FFFF $0000 $3333 $0023 35 $FFFF $0000 $0000 $0024 36 $CCCC $FFFF $FFFF $0025 37 $CCCC $FFFF $CCCC $0026 38 $CCCC $FFFF $9999 $0027 39 $CCCC $FFFF $6666 $0028 40 $CCCC $FFFF $3333 $0029 41 $CCCC $FFFF $0000 $002A 42 $CCCC $CCCC $FFFF $002B 43 $CCCC $CCCC $CCCC $002C 44 $CCCC $CCCC $CCCC $002D 45 $CCCC $CCCC $6666 $002E 46 $CCCC $CCCC $3333 $002F 47 $CCCC $CCCC $0000 $0030 48 $CCCC $9999 $FFFF A P P E N D I X A Color Lookup Table (CLUT) Table A-1 Color look up table (continued) Index (hex) Index (dec) R value G value B value $0031 49 $CCCC $9999 $CCCC $0032 50 $CCCC $9999 $9999 $0033 51 $CCCC $9999 $6666 $0034 52 $CCCC $9999 $3333 $0035 53 $CCCC $9999 $0000 $0036 54 $CCCC $6666 $FFFF $0037 55 $CCCC $6666 $CCCC $0038 56 $CCCC $6666 $9999 $0039 57 $CCCC $6666 $6666 $003A 58 $CCCC $6666 $3333 $003B 59 $CCCC $6666 $0000 $003C 60 $CCCC $3333 $FFFF $003D 61 $CCCC $3333 $CCCC $003E 62 $CCCC $3333 $9999 $003F 63 $CCCC $3333 $6666 $0040 64 $CCCC $3333 $3333 $0041 65 $CCCC $3333 $0000 $0042 66 $CCCC $0000 $FFFF $0043 67 $CCCC $0000 $CCCC $0044 68 $CCCC $0000 $9999 $0045 69 $CCCC $0000 $6666 $0046 70 $CCCC $0000 $3333 $0047 71 $CCCC $0000 $0000 $0048 72 $9999 $FFFF $FFFF $0049 73 $9999 $FFFF $CCCC $004A 74 $9999 $FFFF $9999 $004B 75 $9999 $FFFF $6666 $004C 76 $9999 $FFFF $3333 $004D 77 $9999 $FFFF $0000 $004E 78 $9999 $9999 $FFFF $004F 79 $9999 $CCCC $CCCC 33 A P P E N D I X A Color Lookup Table (CLUT) Table A-1 34 Color look up table (continued) Index (hex) Index (dec) R value G value B value $0050 80 $9999 $CCCC $9999 $0051 81 $9999 $CCCC $6666 $0052 82 $9999 $CCCC $3333 $0053 83 $9999 $CCCC $0000 $0054 84 $9999 $9999 $FFFF $0055 85 $9999 $9999 $CCCC $0056 86 $9999 $9999 $9999 $0057 87 $9999 $9999 $6666 $0058 88 $9999 $9999 $3333 $0059 89 $9999 $9999 $0000 $005A 90 $9999 $6666 $FFFF $005B 91 $9999 $6666 $CCCC $005C 92 $9999 $6666 $9999 $005D 93 $9999 $6666 $6666 $005E 94 $9999 $6666 $3333 $005F 95 $9999 $6666 $0000 $0060 96 $9999 $3333 $FFFF $0061 97 $9999 $3333 $CCCC $0062 98 $9999 $3333 $9999 $0063 99 $9999 $3333 $6666 $0064 100 $9999 $3333 $3333 $0065 101 $9999 $3333 $0000 $0066 102 $9999 $0000 $FFFF $0067 103 $9999 $0000 $CCCC $0068 104 $9999 $0000 $9999 $0069 105 $9999 $0000 $6666 $006A 106 $9999 $0000 $3333 $006B 107 $9999 $0000 $0000 $006C 108 $6666 $FFFF $FFFF $006D 109 $6666 $FFFF $CCCC $006E 110 $6666 $FFFF $9999 A P P E N D I X A Color Lookup Table (CLUT) Table A-1 Color look up table (continued) Index (hex) Index (dec) R value G value B value $006F 111 $6666 $FFFF $6666 $0070 112 $6666 $FFFF $3333 $0071 113 $6666 $FFFF $0000 $0072 114 $6666 $CCCC $FFFF $0073 115 $6666 $CCCC $CCCC $0074 116 $6666 $CCCC $9999 $0075 117 $6666 $CCCC $6666 $0076 118 $6666 $CCCC $3333 $0077 119 $6666 $CCCC $0000 $0078 120 $6666 $9999 $FFFF $0079 121 $6666 $9999 $CCCC $007A 122 $6666 $9999 $9999 $007B 123 $6666 $9999 $6666 $007C 124 $6666 $9999 $3333 $007D 125 $6666 $9999 $0000 $007E 126 $6666 $6666 $FFFF $007F 127 $6666 $6666 $CCCC $0080 128 $6666 $6666 $9999 $0081 129 $6666 $6666 $6666 $0082 130 $6666 $6666 $3333 $0083 131 $6666 $6666 $0000 $0084 132 $6666 $3333 $FFFF $0085 133 $6666 $3333 $CCCC $0086 134 $6666 $3333 $9999 $0087 135 $6666 $3333 $6666 $0088 136 $6666 $3333 $3333 $0089 137 $6666 $3333 $0000 $008A 138 $6666 $0000 $FFFF $008B 139 $6666 $0000 $CCCC $008C 140 $6666 $0000 $9999 $008D 141 $6666 $0000 $6666 35 A P P E N D I X A Color Lookup Table (CLUT) Table A-1 36 Color look up table (continued) Index (hex) Index (dec) R value G value B value $008E 142 $6666 $0000 $3333 $008F 143 $6666 $0000 $0000 $0090 144 $3333 $FFFF $FFFF $0091 145 $3333 $FFFF $CCCC $0092 146 $3333 $FFFF $9999 $0093 147 $3333 $FFFF $6666 $0094 148 $3333 $FFFF $3333 $0095 149 $3333 $FFFF $0000 $0096 150 $3333 $CCCC $FFFF $0097 151 $3333 $CCCC $CCCC $0098 152 $3333 $CCCC $9999 $0099 153 $3333 $CCCC $6666 $009A 154 $3333 $CCCC $3333 $009B 155 $3333 $CCCC $0000 $009C 156 $3333 $9999 $FFFF $009D 157 $3333 $9999 $CCCC $009E 158 $3333 $9999 $9999 $009F 159 $3333 $9999 $6666 $00A0 160 $3333 $9999 $3333 $00A1 161 $3333 $9999 $0000 $00A2 162 $3333 $6666 $FFFF $00A3 163 $3333 $6666 $CCCC $00A4 164 $3333 $6666 $9999 $00A5 165 $3333 $6666 $6666 $00A6 166 $3333 $6666 $3333 $00A7 167 $3333 $6666 $0000 $00A8 168 $3333 $3333 $FFFF $00A9 169 $3333 $3333 $CCCC $00AA 170 $3333 $3333 $9999 $00AB 171 $3333 $3333 $6666 $00AC 172 $3333 $3333 $3333 A P P E N D I X A Color Lookup Table (CLUT) Table A-1 Color look up table (continued) Index (hex) Index (dec) R value G value B value $00AD 173 $3333 $3333 $0000 $00AE 174 $3333 $0000 $FFFF $00AF 175 $3333 $0000 $CCCC $00B0 176 $3333 $0000 $9999 $00B1 177 $3333 $0000 $6666 $00B2 178 $3333 $0000 $3333 $00B3 179 $3333 $0000 $0000 $00B4 180 $0000 $FFFF $FFFF $00B5 181 $0000 $FFFF $CCCC $00B6 182 $0000 $FFFF $9999 $00B7 183 $0000 $FFFF $6666 $00B8 184 $0000 $FFFF $3333 $00B9 185 $0000 $FFFF $0000 $00BA 186 $0000 $CCCC $FFFF $00BB 187 $0000 $CCCC $CCCC $00BC 188 $0000 $CCCC $9999 $00BD 189 $0000 $CCCC $6666 $00BE 190 $0000 $CCCC $3333 $00BF 191 $0000 $CCCC $0000 $00C0 192 $0000 $9999 $FFFF $00C1 193 $0000 $9999 $CCCC $00C2 194 $0000 $9999 $9999 $00C3 195 $0000 $9999 $6666 $00C4 196 $0000 $9999 $3333 $00C5 197 $0000 $9999 $0000 $00C6 198 $0000 $6666 $FFFF $00C7 199 $0000 $6666 $CCCC $00C8 200 $0000 $6666 $9999 $00C9 201 $0000 $6666 $6666 $00CA 202 $0000 $6666 $3333 $00CB 203 $0000 $3333 $0000 37 A P P E N D I X A Color Lookup Table (CLUT) Table A-1 38 Color look up table (continued) Index (hex) Index (dec) R value G value B value $00CC 204 $0000 $3333 $FFFF $00CD 205 $0000 $3333 $CCCC $00CE 206 $0000 $3333 $9999 $00CF 207 $0000 $3333 $6666 $00D0 208 $0000 $3333 $3333 $00D1 209 $0000 $0000 $0000 $00D2 210 $0000 $0000 $FFFF $00D3 211 $0000 $0000 $CCCC $00D4 212 $0000 $0000 $9999 $00D5 213 $0000 $0000 $6666 $00D6 214 $0000 $0000 $3333 $00D7 215 $EEEE $0000 $0000 $00D8 216 $DDDD $0000 $0000 $00D9 217 $BBBB $0000 $0000 $00DA 218 $AAAA $0000 $0000 $00DB 219 $8888 $0000 $0000 $00DC 220 $7777 $0000 $0000 $00DD 221 $5555 $0000 $0000 $00DE 222 $4444 $0000 $0000 $00DF 223 $2222 $0000 $0000 $00E0 224 $1111 $0000 $0000 $00E1 225 $0000 $EEEE $0000 $00E2 226 $0000 $0000 $0000 $00E3 227 $0000 $BBBB $0000 $00E4 228 $0000 $AAAA $0000 $00E5 229 $0000 $8888 $0000 $00E6 230 $0000 $7777 $0000 $00E7 231 $0000 $5555 $0000 $00E8 232 $0000 $4444 $0000 $00E9 233 $0000 $2222 $0000 $00EA 234 $0000 $1111 $0000 A P P E N D I X A Color Lookup Table (CLUT) Table A-1 Color look up table (continued) Index (hex) Index (dec) R value G value B value $00EB 235 $0000 $0000 $EEEE $00EC 236 $0000 $0000 $DDDD $00ED 237 $0000 $0000 $BBBB $00EE 238 $0000 $0000 $AAAA $00EF 239 $0000 $0000 $8888 $00F0 240 $0000 $0000 $7777 $00F1 241 $0000 $0000 $5555 $00F2 242 $0000 $0000 $4444 $00F3 243 $0000 $0000 $2222 $00F4 244 $0000 $0000 $1111 $00F5 245 $EEEE $EEEE $EEEE $00F6 246 $DDDD $DDDD $DDDD $00F7 247 $BBBB $BBBB $BBBB $00F8 248 $AAAA $AAAA $AAAA $00F9 249 $8888 $8888 $8888 $00FA 250 $7777 $7777 $7777 $00FB 251 $5555 $5555 $5555 $00FC 252 $4444 $4444 $4444 $00FD 253 $2222 $2222 $2222 $00FE 254 $1111 $1111 $1111 $00FF 255 $0000 $0000 $0000 39 A P P E N D I X A Color Lookup Table (CLUT) 40 Index Numerals custom controls 29 custom mode 29 16-bit color 22 8-bit color 21 D A active-matrix color display 3, 6 APDA addresses ix B battery 3 reconditioning 23 battery conservation custom controls 29 easy controls 29 battery reconditioning dialog boxes completion 26 final confirmation less than 30 days 26 initial information 24 less-than-30-days message 25 main informational 25 waiting image 26 block diagram 4 box flag 20 bracket, hard disk drive 12 C clamshell housing modifications 17 color control chip 8 color lookup table 31 color table 21 Combo chip 3 Communications Toolbox 28 completion dialog box 26 Control Panels 27 conventions used in book vii CPU ID bits 20 CSC 8 CSC video driver 21 dimensions, hard disk drive 11 display 3 dithering 20 DRAM 2 DRAM expansion 2, 22 E easy controls 29 easy mode 29 Enabler 20 environmental specifications, hard disk drive 9 Express Modem 27, 28 installation 10 interface 12, 13 power requirements 16 SCSI connector 13 terminator 15 hardware modifications 2, 6 housing, hard disk drive 10, 11 I ID encoding, SCSI 15 initial information dialog box 24 installation, hard disk drive 10 integrated floating-point unit 2, 8 interface, hard disk drive 12, 13 internal FPU 22 internal modem 27, 28 inverter/speaker board 3, 16 I/O connector 3 K F fax card 3 features active-matrix color display 6 PowerBook Duo 270c computer 2 final confirmation less than 30 days 26 floating-point unit 2 forced discharge 26 forced discharge mode 23 FPU 22 H hard disk drive 2, 9 bracket 12 environmental specifications 9 housing 11 housing requirements 10 keyboard 3 L less-than-30-days dialog box 25 M main informational dialog box 25 main logic board 7, 8 microphone 3 modem card 3 modem control panel 28 modems 27, 28 modifications clamshell housing 17 hardware 2, 6 software 2, 20 41 I N D E X N network 22 new features 2 nickel metal hydride battery 3 P power adapter warning 23 PowerBook control panel 28 PowerBook Setup panel 28 power conservation 29 power management 22 power management control panel 27 Power Manager 2, 23, 26 power requirements, hard disk drive 16 Preferences file 29 processor 2 Serial Communication Controller (SCC) 3 serial port 28 signal assignments, SCSI connector 13, 15 Small Computer System Interface (SCSI) controller 3 software modifications 2, 20 sound 3 speakers 3 system block diagram 4 system controller 2 system control panel 27 modification 27 system Enabler 20 system ROM 20 T terminator, hard disk drive 15 R U Recondition application 24, 26 reconditioning dialog boxes 24 reconditioning for battery 23 reference material viii related documentation viii ROM 3 system 20 universal 20 version number 20 ROM support AppleTalk 22 CSC video 21 diagnostics 22 docking station 20 DRAM expansion 22 internal FPU 22 network 22 power management 22 universal ROM 20 S SCSI connector hard disk drive 13 signal assignments 13, 15 SCSI ID encoding 15 42 V video components 3 W waiting image 26 I N D E X 43 T H E A P P L E P U B L I S H I N G S Y S T E M This Apple manual was written, edited, and composed on a desktop publishing system using Apple Macintosh computers and FrameMaker software. Proof pages were created on an Apple LaserWriter IINTX printer. Final page negatives were output directly from text files on an AGFA ProSet 9800 imagesetter. Line art was created using Adobe Illustrator. PostScript , the page-description language for the LaserWriter, was developed by Adobe Systems Incorporated. Text type is Palatino and display type is Helvetica. Bullets are ITC Zapf Dingbats. Some elements, such as program listings, are set in Apple Courier. WRITER Joyce D. Mann DEVELOPMENTAL EDITOR Beverley Zegarski ILLUSTRATOR Deborah Dennis PRODUCTION EDITOR Gerri Gray Special thanks to Mike Puckett, Clark Donahue, Markus Wallgren, Bill Schonfeld, Ray Kubick, and Rolly Reed Draft. Preliminary, Confidential. 1995 Apple Computer, Inc. 3/14/95 Colophon--A-W