1
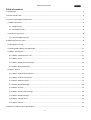
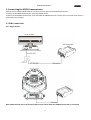
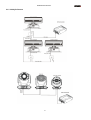
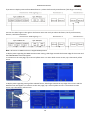
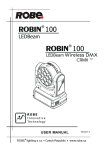
Version 2.0
RDM Communicator
Table of contents
1. Introduction ................................................................................................................................................................ 3
2. Device exterior view ................................................................................................................................................... 3
3. Connecting the RDM Communicator.......................................................................................................................... 4
3.1 DMX connection ................................................................................................................................................... 4
3.1.1 Single fixture .................................................................................................................................................. 4
3.1.2 Multiple fixtures............................................................................................................................................ 5
3.2 Ethernet connection ............................................................................................................................................. 6
3.2.1 Art-Net/DMX converter ................................................................................................................................. 7
4. RDM Communicator menu ......................................................................................................................................... 8
4.1 Navigation in menu............................................................................................................................................... 8
4.2 Setting DMX address and DMX mode ................................................................................................................11
4.3 Menu “Preferences” ...........................................................................................................................................11
4.3.1 Menu “Communicator info” .......................................................................................................................12
4.3.2 Menu “Tools” ...............................................................................................................................................12
4.3.3 Menu “Display/Timers Settings” .................................................................................................................13
4.3.4 Menu “Network Settings” ........................................................................................................................... 15
4.4 Menu “Device”....................................................................................................................................................17
4.4.1 Menu “Supported Parameters” ...................................................................................................................17
4.4.2 Menu “Product Information” ......................................................................................................................17
4.4.3 Menu “DMX 512 Setup” .............................................................................................................................. 17
4.4.4 Menu “Status Messages”.............................................................................................................................19
4.4.5 Menu “Sensors” ...........................................................................................................................................19
4.4.6 Menu “Power/Lamp Settings” .....................................................................................................................20
4.4.7 Menu “Display Settings” ..............................................................................................................................20
4.4.8 Menu “Configuration” .................................................................................................................................21
4.4.9 Menu “Control” ...........................................................................................................................................21
5. Mechanical and electrical specifications .................................................................................................................22
2
RDM Communicator
RDM Communicator
1. Introduction
The RDM Communicator is a multi-functional interface for ROBE and Anolis fixtures. This device allows to set
parameters (DMX address, DMX mode...etc) for Anolis non-display fixtures (like ArcPad Xtreme, ArcPad 48
Integral). The RDM Communicator also enables remote fixture status monitoring, fixture detection, fixture
parameter setup and can be used in combination with any Robe/Anolis fixtures which support RDM protocol.
Main features:
- Connection to any Robe/Anolis fixture with RDM protocol
- Possibility to set multiple fixtures in serial DMX chain
- Graphic touch screen for fixture setting and addressing
- 4 operational buttons
- Battery operated
- No extra PSU needed (only for charging the battery)
- Rugged aluminium housing
- RDM Out
- Ethernet input
2. Device exterior view
1- RDM Out (5-pin XLR, female)
2- RDM Out (3-pin XLR, female )
3- Ethernet (RJ 45)
4- Charging connector
5- Graphic touch screen
6- ESCAPE button
7- NEXT button
8- PREV button
9- ENTER button (Power on/off)
10- Sliding eye (to hang device e.g. on belt)
3
RDM Communicator
3. Connecting the RDM Communicator
Fixtures have to support RDM protocol in order to control them via the RDM Communicator.
To switch on the RDM Communicator, press the ENTER button.
To switch off the RDM Communicator, press and hold the ENTER button for a while (this is not work if the device is
connected to the charger).
3.1 DMX connection
3.1.1 Single fixture
Note: DMX controller has to be disconnected from the fixture when the RDM Communicator is connected.
4
RDM Communicator
3.1.2 Multiple fixtures
5
RDM Communicator
3.2 Ethernet connection
If the RDM Communicator is connected to the fixtures via Ethernet, you can only read sending DMX values by
means of the option “Art-Net to DMX”. Next functions as a fixture identifications, settings, addressings etc. are
available at DMX connection only.
6
RDM Communicator
3.2.1 Art-Net/DMX converter
If the menu “Art-Net To DMX “ is selected, the RDM Communicator works as Art-Net/DMX converter.
Note: ArtNET Scanner screen has to be still displayed to activate tis converter.
7
RDM Communicator
4. RDM Communicator menu
4.1 Navigation in menu
Control icons:
- used to save adjusted values and leave menu.
- used to leave a menu item without saving change.
- used to move on the next page of menu.
- used to move on the previous page of menu.
- used to move by one level of menu back
You can also use four control buttons: ESCAPE, NEXT, PREV, ENTER
After pressing the ENTER button, the empty screen will appear.
Connect the RDM Communicator with the fixture (via XLR connectors) and the main screen will appear:
Current fixture and number
of all found fixtures
Warning icon – means
Warni
that some error message
exists at current fixture
Battery charge level
(green
green icon=fully
charged red icon= flat)
charged,
DMX address setting
DMX mode selection
The screen shows basic parameters of the first found fixture (MAC address, name, manufacturer, DMX address and
DMX mode) and total number of found fixtures.
fixtures
To browse found fixtures, slide finger to the right (left) onto the fixture name row. Current fixture will move (light)
for a short while.
8
RDM Communicator
To select fixtures by type, slide finger crossways as shown below.
To select fixtures by manufacturer, slide finger in an opposite diagonal as shown below.
Examples:
There is a DMX line with fixtures from three manufactures. Robe fixtures are divided into two groups: LEDBeam
100 fixtures and Robin MMX Spot fixtures.
If you want to display fixture MMX Spot_1, select this fixture by type (slide finger crossways). You can also
slide finger to the right on the fixture name row until you select this fixture, but if you have many fixtures, it will
take some time.
9
RDM Communicator
If you want to display Fixture 8 from Manufacturer 3, select this fixture by manufacturer (slide finger crossways).
You can also slide finger to the right on the fixture name row until you select this fixture, but if you have many
fixtures, it will take some time.
Note. All fixtures in DMX line have to support RDM protocol.
To display items regarding the RDM Communicator setting, slide finger towards the bottom edge of the screen and
the PREFERENCES screen will appear.
To continue on the next page, tap a vertical yellow arrow. To return back at main screen, tap a horizontal yellow
arrow.
To display items regarding setting of the selected fixture, slide finger towards the top edge of the screen and the
DEVICE screen will appear. To continue on the next page, tap a vertical yellow arrow. To return back at main
screen, tap a horizontal yellow arrow.
10
RDM Communicator
4.2 Setting DMX address and DMX mode
To set a DMX address of the current displayed fixture, touch and hold the DMX address line until the“ Set DMX
address” screen will appear. Set DMX address and confirm it with . To go back at the main screen without
changing DMX address, tap
.
If you need
d type a DMX address < 100, type 0 on the first position of the address, e.g. DMX address
=25, type 025.
To set a DMX mode of the current displayed fixture, touch and hold the DMX preset line until the“ DMX preset”
screen will appear. Select desired DMX mode and confirm it with . To go back at the main screen without
changing DMX address, tap
.
Figures in parentheses give a number of used channels at respective DMX mode.
4.3 Menu “Preferences”
To enter the menu, slide finger towards the bottom edge of the screen and the PREFERENCES screen will appear.
To continue on the next page, tap a vertical yellow arrow. To return back at main screen, tap a horizontal yellow
arrow. To enter desired menu, tap menu item
11
RDM Communicator
4.3.1 Menu “Communicator info”
4.3.2 Menu “Tools”
4.3.2.1 Menu “DMX Console”
If you tap the icon of slider , you can set DMX value for desired slot. A total number of slots is
512. To go faster on desired slot, tap the icon and set DMX address as needed.
E.g., you need slot 80 and higher, set DMX address at 080 and the first displayed slot will be 80.
Next slots will be 81, 82.....
12
RDM Communicator
4.3.2.2 Menu “Art-Net To DMX”
In this application the RDM Communicator works as ArtNet/DMX converter. Connect the RDM
Communicator to ArtNet via RJ 45 port and at DMX output (5 pin XLR) connect fixtures. There are
displayed receiving DMX values for each channel. If you tap the icon , you can set suitable Artnet
Universe to see desired channels in another universe.
4.3.2.2 Menu “DMX Scanner”
This menu shows receiving DMX values at each channel.
4.3.3 Menu “Display/Timers Settings”
13
RDM Communicator
4.3.3.1 Menu “Display Intensity”
The menu item allows to set display intensity from min. Level (1) to max. Level (10).
4.3.3.2 Menu “Screen Saver Delay”
The menu item allows you to keep the screen permanent on ( value Off has to be set) or turn it off
automatically after 1-20 minutes.
4.3.3.3 Menu “Power Off Timer”
The menu item allows you to keep the device permanent on ( value Off has to be set) or turn it off
automatically after 1-20 minutes.
4.3.3.4 Menu “Discovery Timer”
The menu item allows you to set frequency (5 -60 seconds) of scanning DMX line for new fixtures.
14
RDM Communicator
4.3.3.5 Menu “Recalibrate Touchscreen”
Use this menu item to recalibrate touchscreen. During recalibration process, follow instructions on
display.
4.3.4 Menu “Network Settings”
4.3.4.1 Menu “Default IP Address”
The menu item allows you to select only the first number (2 or 10) of the default IP address of the
RDM Communicator .
4.3.4.2 Menu “Custom IP Address”
The menu item allows you to set all numbers of IP address of the RDM Communicator .
15
RDM Communicator
4.3.4.3 Menu “Net Mask”
The menu item allows you to set all numbers of Net Mask of the RDM Communicator .
4.3.4.4 Menu “ArtNet Universe”
The menu item allows you to set ArntNet Universe of the RDM Communicator .
4.3.4.5 Menu “Update Firmware”
The menu item serves for software update of the RDM Communicator.
16
RDM Communicator
4.4 Menu “Device”
To enter the menu, slide finger towards the top edge of the screen and the DEVICE screen will appear. To continue
on the next page, tap a vertical yellow arrow. To return back at main screen, tap a horizontal yellow arrow.
4.4.1 Menu “Supported Parameters”
A list of parameters for selected fixture, supported parameters are marked with *.
4.4.2 Menu “Product Information”
4.4.3 Menu “DMX 512 Setup”
17
RDM Communicator
4.4.3.1 Menu “DMX Start Address”
The menu item allows you to set a DMX address for selected fixture.
If you need type a DMX address < 100, type 0 on the first position of the address, e.g. DMX address
=25, type 025.
4.4.3.2 Menu “DMX Personality”
The menu item allows you to set a DMX mode for selected fixture.
4.4.3.3 Menu “Slots Information”
..............
The menu item allows you to read and set DMX values for each slot (channel) of selected fixture.
Number of displayed slots depends on a DMX mode set in the menu “DMX Personality”.
18
RDM Communicator
If you tap the icon of slider , you can set DMX value for desired slot. A total number of slots is
determined by selected DMX mode. To change DMX mode or DMX address, tap the icon .
4.4.3.4 Menu “DMX Console”
The menu item shows DMX channels of selected fixture if the function “Slots Information” is not
supported.
4.4.4 Menu “Status Messages”
In this screen some error and warning messages may be displayed.
4.4.5 Menu “Sensors”
The menu item shows measured values of sensors (usually heat) of selected fixture.
19
RDM Communicator
4.4.6 Menu “Power/Lamp Settings”
The menu item shows information concerning operating hours of the fixture/lamp, lamp strikes etc.
4.4.7 Menu “Display Settings”
The menu item allows you to set behaviour of the fixture display according your need.
4.4.6.1 Menu “Display invert”
Normal - Standard display orientation if the fixture is placed horizontally (e.g. on the floor).
Inverted - Inverted orientation (needed if the fixture is hanged on a truss).
Auto - The option activates a gravitation sensor for automatic screen orientation (fixture has to be
equipped with this feature).
4.4.6.2 Menu “Display Level”
Use this menu item to set desired display intensity from min. (0) to max. (255).
20
RDM Communicator
4.4.8 Menu “Configuration”
The menu item allows you to set another features of the fixture according your need. If some menu item
is not available, it means that this function is not supported by the fixture.
4.4.9 Menu “Control”
Identify Device – the menu item serves for identification of selected fixture. If you tap this item, the
selected fixture will start pan/tilt movement or colour changing.
Reset device – total reset of the fixture.
Remote LED Display – This function allows you to set and control fixtures without display (e.g. ArcPad 48
Integral).
21
RDM Communicator
5. Mechanical and electrical specifications
Dimensions (mm)
Weight
0.4 kg
Charger
Input 100-240V, 0.3A max.,50-60Hz
Output +5V/1.2A, 6W max.
Connection
Ethernet –RJ45
RDM-Out: 3/5-pin XLR (female)
Included items
1 x RDM Communicator
1 x Charger (No. 13051273)
1 x User manual
January 30, 2012
Specifications are subject to change without notice.
22
RDM Communicator
23