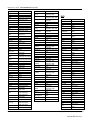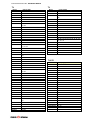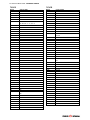
1
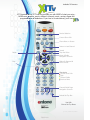
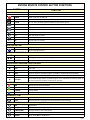
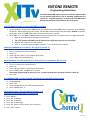
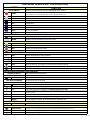
IPTV User’s Guide Entone and Universal Remote Control Menu, Channel Guide and Settings Digital Video Recorder Video on Demand Wireless Network Name & Password (Case sensitive ‐ alpha characters are all capitalized): Network Name or SSID: (from Zyxel modem 12‐digit alpha & numeric MAC Address) Network Password or Security Key: (from Zyxel modem 13‐digit alpha & numeric serial number) This password is for wireless Internet access; for computers, laptops, iPads, electronic book readers, gaming devices, mobile phone Wi‐Fi access and other wireless devices. Default system logon Password: 1234 This password may be required after a system upgrade or if the “Welcome” logon screen appears. VOD 4‐digit numeric Purchase PIN Number: _____________ This password is for renting Video on Demand movies and events. XIT the Hometown Folks IPTV with HD, DVR and Video on Demand The Fastest High Speed Internet! XIT Channel 1 = Local Advertising and Information Unlimited Local Phone Unlimited Long Distance Bundle ‘N’ Save Regional Directory Come by our office to select a service package just for you! Call 244-3355 or 384-3311 in Dalhart or 366-3355 in Stratford www.xit.net Table of Contents Entone Remote Button Functions & Programming Instructions Universal Remote Button Functions & Programming Instructions Just the Basics Power ON/OFF . . . . . . . . . . . . . . . . . . . . . . . . . . . 1 Basic Menu, Guide and Settings Information . . . . . . . . . . . . . 2-5 Main Menu . . . . . . . . . . . . . . . . . . . . . . . . . . . . . 2 Basic TV Controls . . . . . . . . . . . . . . . . . . . . . . . . . 2 Channel Guide . . . . . . . . . . . . . . . . . . . . . . . . . . . 3 My Favorites . . . . . . . . . . . . . . . . . . . . . . . . . 3 Search for Programming . . . . . . . . . . . . . . . . . . . . 3 Autotune Program or Series . . . . . . . . . . . . . . . . . . 3 Quick and Advanced Search of Channel Guide . . . . . . . . . . 4 Weather . . . . . . . . . . . . . . . . . . . . . . . . . . . . . . 5 Settings - Account, Preferences and Help . . . . . . . . . . . . . . 6-10 Account Menu. . . . . . . . . . . . . . . . . . . . . . . . . . . . 6 Create Users . . . . . . . . . . . . . . . . . . . . . . . . . 6 Setting Parental Controls . . . . . . . . . . . . . . . . . . 7 Change Password . . . . . . . . . . . . . . . . . . . . . . . 8 Autologin . . . . . . . . . . . . . . . . . . . . . . . . . . 8 Purchase PIN . . . . . . . . . . . . . . . . . . . . . . . . . 8 Rating PIN . . . . . . . . . . . . . . . . . . . . . . . . . . 9 Preferences . . . . . . . . . . . . . . . . . . . . . . . . . . . . 9 Set Up and Check Caller Id . . . . . . . . . . . . . . . . . . 9 Set Language. . . . . . . . . . . . . . . . . . . . . . . . . 10 Set Appearances and Favorite Channels . . . . . . . . . . . . 10 Help and Logout . . . . . . . . . . . . . . . . . . . . . . . . . 10 IPTV Feature - DVR and Pause Live TV . . . . . . . . . . . . . . . 11-15 Recording and Deleting DVR Programs. . . . . . . . . . . . . . . . 11 Remote Control DVR Buttons. . . . . . . . . . . . . . . . . . 12 Navigating the My DVR Menu . . . . . . . . . . . . . . . . . . . . 12 My DVR-Recorded by Date or Title . . . . . . . . . . . . . . 12 My DVR-Scheduled by Date or Title . . . . . . . . . . . . . . 13 My DVR-Series . . . . . . . . . . . . . . . . . . . . . . . . 13 My DVR-Manual Recordings . . . . . . . . . . . . . . . . . . 14 My DVR-Set Manual Recordings . . . . . . . . . . . . . . . . 14 My DVR-Settings, Priorities, Failed & All . . . . . . . . . . 14 Time Shifted TV & Pausing Live TV . . . . . . . . . . . . . . . . 15 IPTV Feature - Video on Demand (VOD) - Movies Menu . . . . . . . . 16-18 General Information . . . . . . . . . . . . . . . . . . . . . . . 16 Set Purchase PIN . . . . . . . . . . . . . . . . . . . . . . 16 Renting a movie or view a movie trailer . . . . . . . . . . . 16 Navigating in a Video on Demand Movie . . . . . . . . . . . . . . 17 Navigating the VOD (Movies) Menu . . . . . . . . . . . . . . . 17-18 FREE On Demand-Karaoke . . . . . . . . . . . . . . . . . . . . . . 18 Reporting IPTV Trouble . . . . . . . . . . . . . . . . . . . . . . . . 19 Rebooting your system . . . . . . . . . . . . . . . . . . . . . . 19 Appendix A – Entone Remote Device Codes TV and Device Codes – Universal Remote Device Codes Available TV Remotes XIT Communications’ IPTV service provides you with MORE of what you enjoy… MORE news, weather, sports, children’s channels, music, movies, drama and programming for all audiences. If you love to be entertained, you’ll love Device Selection Current Show Info Clears Menu or Screen Return to Last Channel Pause Record Stop the Video Menu & Guide Navigation Controls Play Video On Demand & DVR Controls Shortcuts Current Show Info Help Channel Guide Previous Menu Channel Guide Page Navigation Controls Reload Set Top Box Use With Entone Set Top Boxes © 2010, Conklin Corporation ENTONE REMOTE CONTROL BUTTON FUNCTIONS BUTTON BLUE SETUP BUTTON ORANGE INPUT BUTTON FUNCTION POWER Used for programming the remote functions. Used to locate video stream input source or as directed by XIT personnel. Power on/off the TV and STB. STB Activate the set top box (STB) mode on the remote control. TV, AUX TV = TV AUX = Activate alternate modes on the remote control. LANG Not an active button at this time. INFO Displays current show information. MENU Display the Main Menu. GUIDE Display the interactive Channel Guide. EXIT Clear the menu or screen. LAST Return to previous TV Channel. +/– VOL Raise or lower TV volume. +/– CH Change the channel number up or down. MENU NAVIGATION ARROW Navigate among selectable items on the screen. OK Select a highlighted item. CHANNEL GUIDE CONTROLS CH UP/DOWN Change the channel number up or down. CH BACK/FWD CH BACK/FWD Display previous or next channel time period. Display previous or next channel time period. REWIND/FAST FWD Jump to previous or next day. VOD/RECORDED PROGRAM (DVR) CONTROLS PLAY Play video. Resume normal play from Rewind, Fast Fwd, or Pause. STOP Stop video. RECORD Record a program. Press red button with white dot then OK > OK to record. PAUSE Pause the video or recorded program. (Press ► to resume where you paused). REWIND FAST FWD Rewind video or recorded program. Fast forward through video or recorded program. Press repeatedly to increase speed. In the channel guide fast forward will display the next day. SHORTCUTS INFO Display current show information. HELP Not an active button at this time. CH GUIDE Channel Guide PREVIOUS Must be in a menu or window, this is a "Back" button. Displays previous menu or window. NUMBER BUTTONS 1, 2…O NUMBER Select channel or enter login password. MUTE Mute the volume. Press again to resume previous volume setting. LAST TWO ROWS (where sticker has been applied) HELP Display HELP. PG UP/DOWN Display previous or next group of channels PG BACK/FWD Display previous or next time period. HOME Reload the set top box. REFRESH Not an active button at this time. b h 02.18.11 ENTONE REMOTE Programming Instructions A brand new ENTONE remote control must first be registered with the set top box (STB) before it can be manually programmed to a specific TV. Program Remote # 1 to channel 10 or the HD Stream, Remote # 2 to channel 23 and Remote #3 to channel 39. REGISTER REMOTE TO STB – In front of ENTONE Set Top Box: 1. Press and hold for 10 seconds the “STB” button on remote while pressing “OK” button on the front of the ENTONE set top box. When releasing the “OK” button, the ENTONE set top box front panel will display “RC REG” to indicate registration mode. The “STB” button will stay lit once the button is released. 2. Press “STB” once. The “STB” & “AUX” buttons will light to indicate that the remote control is in registration mode. • Register the #1 Remote by pressing 1 on the remote. • The “STB” button will blink twice to indicate the registration process was successful. • Register each remote in the same manner. • Press “2” on the #2 remote to register and press “3” on the #3 remote to register. MANUALLY PROGRAM TO TV or Device – Be in front of specific TV: 1. Turn on TV and tune to correct channel. 2. Press “TV” 3. Press and hold “SETUP” until TV button blinks twice. 4. Enter 4 digit code from Appendix A. AUTO PROGRAM – Use this method if TV or device code is not available or did not work: 1. 2. 3. 4. Turn on TV and tune to correct channel. Press “TV” Press and hold “SETUP” until TV button blinks twice Press “POWER” then “CHANNEL UP” one time. The remote will go through a code every 5 sec. To speed up the process, arrow up until the TV shuts off. 5. Press “OK”. SET POWER BUTTON- In front of specific TV using the corresponding remote control: 1. 2. 3. 4. TV should be ON. Press “STB” Press and hold “SETUP” until STB button blinks twice Press “POWER” then “1” TO SET AUTO-LOGIN – This will enable Auto-Login, so a password is not required when TV is turned on: 1. 2. 3. 4. 5. 6. Press “MENU” Press “OK” on Settings Press “OK” on Account Press “OK” on Auto Login Press “OK” twice (1 time to set & 1 time to confirm) Press “EXIT” 3 times 07.27.11 Available TV Remotes XIT Communications’ IPTV service provides you with MORE of what you enjoy… MORE news, weather, sports, children’s channels, music, movies, drama and programming for all audiences. If you love to be entertained, you’ll love Device Selection Current Show Info Clears Menu or Screen Menu & Guide Navigation Controls Channel Guide Page Navigation Controls Shortcuts A Channel Guide B Previous Menu C Current Show Info D Help Return To Last Channel Channel Guide Page Navigation Controls Reload Set Top Box Video On Demand & DVR Controls TV Video Source Universal Use With Any Registered Set Top Box UNIVERSAL REMOTE BUTTON FUNCTIONS BUTTON System ON/OFF +/– FUNCTION Powers off the STB and all devices programmed to the remote. POWER Powers on/off whatever device mode that is currently activated. For example, if the remote is activated for the TV it will power on/off the TV. If activated for the DVD or VCR it will power them on/off. STB AUX, DVD, VCR, TV GUIDE HELP INFO EXIT MENU PAGE Activate the set top box (STB) mode on the remote control. Activate alternate modes on the remote control. Display the interactive Channel Guide. Display HELP. Display current show information. Clear the menu or screen. Display Main Menu. Channel Guide page up and page down. MENU NAVIGATION OK/SEL ARROW SHORTCUTS CH GUIDE A PREVIOUS B INFO C HELP D CHANNEL GUIDE CONTROLS +/– PAGE ARROW VOL CH MUTE LAST GUIDE Select a highlighted item. Navigate among selectable items on the screen. Channel Guide Display previous menu or window. Display current show information. Display HELP. Channel Guide page up and page down. Up/Down/Back or Forward one channel or time at a time. Raise or lower TV volume. Change the channel number up or down. Mute the volume. Press again to resume previous volume setting. Return to previous TV channel. Channel Guide VOD/RECORDED PROGRAM (DVR) CONTROLS ON Demand Button PAGE BACK & FORWARD HOME SKIP BACK & FORWARD Green DVR Button REPLAY FWD REW PLAY Not an active button at this time. Not active buttons at this time. Reload Set Top Box. Not active buttons at this time. Not an active button at this time. Not active buttons at this time. Rewind video or recorded program. Play video. Resume normal play from Rewind, Fast Fwd, or Pause. FF Fast forward through video or recorded program. Press repeatedly to increase speed. In the channel guide fast forward will display the next day. STOP PAUSE RECORD Stop video. Pause the video or recorded program. (Press ► to resume where you paused.) Record program to a DVR. Press Red Rec button then OK > OK. NUMBER BUTTONS 1, 2…O NUMBER Select channel or enter login password. VIDEO SOURCE CH LIGHT TV video source. In TV mode press video source to display which video stream you are on. OTHER +/– Channel Guide page up and page down. Will backlight the keypad for use in the dark. 02.18.11 UNIVERSAL REMOTE Programming Instructions The universal remote control is used with the CISCO 330 and CISCO 430 set top box (STB). A new universal remote needs to be programmed to both the set top box (STB) and to the TV or other device. This remote can be programmed for use with more than one device. It can be programmed for the TV, DVD, VCR, or use the AUX button to program other devices. The quick programming instructions can also be found on the back of the Universal Remote. The device keys or buttons are located along the top row of the remote. You must be in front of the STB and the TV or other device when programming the remote. Programming the remote to the STB box programs the remote to control the channel up/down and other remote control button functions like guide, menu, last, exit, etc. Programming the remote to the TV will allow the remote to control the TV power on/off function and the volume up/down. 1. Program the Universal Remote to the STB: These instructions apply for both the Cisco 330 and Cisco 430 set top boxes. a. Power on the set top box. b. Press and hold the STB button and the OK/SEL button until the STB button lights. c. Press 251 on the number key pad, and then press the STB button to store the code. 2. Quick Programming the Universal Remote to the TV: a. Turn on the TV you want to program. b. Press the TV button and the OK/SEL button until the TV button lights. c. Press the CH+ (Channel up) until TV turns off, then release. (This can take several seconds. Please keep going it will take awhile. You can press and hold the channel up button and this will go faster, but you need to pay close attention and release as soon as the TV powers off.) d. Press the TV button to store the code. 3. Quick Programming the Universal Remote to other devices: a. Turn on the device you want to program (DVD, VCR, etc.) b. Press and hold the device button and the OK/SEL until the device button lights. c. Press and hold the CH+ (Channel Up) until the device turns off, then release. d. Press the device button to store code. 4. Manually Programming the Universal Remote using device codes: a. Using the “TV and Device Brand Codes” find the 3-digit device code or codes for the appropriate device (TV, VCR, DVD, AUX, etc.) that the remote is being programmed to. b. Turn on the device you want to program. c. Press the device button and the OK/SEL button until the device button lights. d. Using the number key pad enter the 3-digit device code from step number 4 a. e. If none of the device codes provided in the “TV and Device Brand Codes” work for your particular device, use the Quick Programming method detailed in step 1 or 2 above. Note: The system on/off button on the universal remote will power on/off all devices programmed to the remote. 07.27.11 IPTV User’s Guide ENTONE & UNIVERSAL Remote Controls Just the basics… STB = Set Top Box; DVR = Digital Video Recorder; VOD = Video on Demand (movies) ENTONE REMOTES – used with Hydra (3‐stream STB) and Amulet (single stream STB): POWER ON = Press POWER button for two seconds – this powers on the TV and STB POWER OFF = Press POWER button for two seconds – this powers off the TV and STB NOTE: Some ENTONE remotes have been programmed to use the following sequence to POWER ON/OFF the TV: TV/POWER/Wait for Picture/STB button or simply TV/POWER to turn on and off the TV. To set these REMOTES to use only the POWER button do the following: Press STB > Press and hold SETUP until STB blinks twice > Press POWER > Press 1 Repeat this step for all REMOTES. ENTONE remotes are RF, which means they use radio frequency to operate. This means these remotes operate in a similar manner as the Next Level remotes. The customer does NOT need to be directly in front or point the remote directly at the ENTONE set top box in order to work. UNIVERSAL REMOTES – CISCO 330 and 430 single stream boxes: The POWER button controls whatever device (TV, DVD, VCR, etc.) has been selected or has been programmed to the remote. Power Button: Turns on/off only the device previously selected from the device buttons below the power button. Example: to power on the TV, press TV button then POWER. System On/Off Button: Turns on/off the TV, STB and any other device programmed to the remote (i.e. Blu‐Ray Player, DVD, VCR, gaming, etc.). To Power on other devices programmed to the Universal Remote, press the appropriate device button then the power button. UNIVERSAL REMOTES are IR, which means they use infrared to operate. The UNIVERSAL remote does require the customer to be in front of the set top box and point the remote directly at the STB. So, line of sight is required. The Cisco 330, Cisco 430 and ENTONE Amulet are all single stream boxes and can only provide service to one TV at a time. 1 Basic Menu, Guide and Settings Information Navigate menus using the arrow keys and the OK/SEL button to select or toggle options. Main Menu My Guide = My Channels (the channels that the customer subscribes to) Search = Search Guide My DVR = DVR Menu VOD = Video on Demand, Movies and Event Categories Weather = Dalhart and Texas Weather My Services = News, Caller ID Settings = Account, Preferences, Help Logout = Logout (default password is 1234) Basic TV Controls Change the channel: Using Number buttons, enter the channel number. ~ OR~ On the CH (Channel) buttons, press + or – to scroll up or down one channel at a time. Use = REW and FF to advance the guide to the next or previous DAY. View Current Channel Information: See a description of the program you’re watching as well as current channel information. Press the Red Shortcut or INFO button. info In addition, every time you change the channel, a programming banner displays channel information and a program progress bar. 2 Menu > My Guide = Channel Guide Press the Guide button once = My Channels Press the Guide button twice = My Favorites My Channels = the channels that the customer subscribes to. My Favorites = the channels the customer has selected as favorites. Setting “My Favorites” allows the customer to create a separate program guide of the channels the customer watches the most. This channel guide will be smaller and easier to scroll thru to quickly find favorite channels. How to set up My Favorites: Method 1: Guide > Scroll to channel > Info > Add to Favorites > OK > OK Method 2: Menu > Settings > Preferences > Favorite Channels > Scroll thru available channels, highlight the channel, and add by pressing OK. Use the same process to REMOVE from favorites. How to Search for programming: Menu > Search > Select Type of programming > Movies, Sports, Series, Kids, News Menu > Search > Advanced > Search by Genre, Day, Time, Channel, Title > Search How to Autotune or Autotune Series: You can set your TV to tune to a later program automatically. Use your remote control to set it up. Guide > Scroll to selected program > OK > Autotune or Autotune Series > OK (See below) Press the Guide button to see the Channel Guide. Press as many times as needed to see later programming. guide Using arrow buttons ( ), navigate to the program you want your TV to tune to later. Press OK. guide / [selected program] + ok Press to select Autotune. Press OK. 3 guide In the Channel Guide, a clock icon indicates that the program is selected for Autotune. guide / [selected program] + ok To cancel an Autotune selection, navigate to the program, press OK, select Cancel Autotune, and press OK again. How to use the Quick and Advanced Search features of the Channel Guide: The IPTV guide offers quick and advanced search features. The quick search allows you to search the guide for current programming by program genre or type. The advanced search feature allows you to search the guide by using search filters such as program title, specific channel, or day, etc. Quick Search Menu > Search > then select from Advanced, Movies, Sports, Series, Kids, News menu / search Quick Search To search for a category of programming— such as movies, sports, series, or kids’ programs—press to make your selection, and then press OK. menu / search / [movies] View the Search Results of upcoming programs for the category you selected. Use arrow buttons to select an individual program and see its description at the top of the window. Advanced Search Menu > Search > Advanced menu / search Advanced Search To search for specific programming using search filters—such as program title, channel, or day, select Advanced and then press OK. 4 menu / search / advanced Press arrow buttons to select one or more categories: Genre, Day, From (start time), To (end time), Channel, Title. Press OK to scroll through options in the fields on this screen. If you search by Title, you’ll spell the program name in the pop-up keyboard. (Partial spelling is okay.) Use arrow buttons to select the letters and press OK after each. When you’re done, select the check mark and press OK. In the Search Channel Guide window, select Search and press OK. View Search Results. Press arrow buttons ( ) to select a program from the list and see its description at the top of the window. Menu > My DVR = DVR Menu Menu > My DVR = DVR Menu. See Page 11‐15 for details regarding the MY DVR menu. Menu > VOD = Video on Demand Movie and Event Categories Menu > VOD = Movie Menu. See Page 16‐18 for details regarding the Movie menu. Menu > Weather = Dalhart and Texas Weather Menu > Weather > Dalhart = Dalhart current weather and six‐day forecast Menu > Weather > Texas > Scroll to city in Texas = View current weather and six‐day forecast for location selected. Menu / Weather Press to view alternate locations. 5 Menu > My Services Menu > My Services > News The NEWS feature is not operational at this time. If NEWS is selected, the TV will go to a black screen and then go back to the current TV program that was being viewed. Access your Caller ID by using the My Services menu option. Please see page 9, for additional information on how to set up and check your Caller ID. Menu > Settings = Account, Preferences, and Help Menu > Settings > Account menu Details = Customer’s account information. Activity = Shows estimated pending charges without taxes or fees. It will show pay per view charges for movies/events that have been rented. Manage Users = The system Manager is established for your account by XIT during the initial activation. This Manager will have a default 1234 password. The Manager can then set up 3 additional users. Available Subscriptions = Subscription Bundles > Other Services = Weather and STBPVR may appear check marked based on customer subscription. STB PVR stands for Set Top Box Personal Video Recorder. The check mark indicates that the customer subscribes to DVR services. xitcomm = lists all available services, with the customer’s services check marked. My Own Subscriptions = Lists only the services that the customer has subscribed to. Change Password = Change password Autologin = By setting Autologin, you disable the login password procedure. By removing Autologin, the login procedure will be enabled. Purchase PIN = Set Purchase PIN for purchasing movies and events. Rating PIN = Set Rating PIN for individual users. This is used for setting parental controls Manage Users – Create additional Users: Menu > Settings > Account > Manage Users > Create NEW menu / settings / account / manage users Access the Account menu and select Manage Users. Select Create New and press OK. If you don’t see the Create New option, it’s because your account already has the maximum number of users. Contact Customer Service to add users. With ABC selected, press OK. The pop‐up keyboard will appear, use arrow buttons to select letters, pressing OK after each letter to spell the new user name. Select the and press OK when the name is completed. 6 / settings / account / manage users / create new With ABC selected, press OK. In the pop-up keyboard, press arrow buttons ( ) to select letters. Press OK after each letter to spell the new username. Select the check mark and press OK. Complete the remaining fields: Password Press number buttons on the remote to enter a numeric password of your choice. [If you make a mistake, press Pg Back () to erase.] Confirm Enter the password numbers again. Rating Press OK to scroll through ratings. Stop at the highest rating level you want this user to view. Users will need a Rating PIN to view programming higher than the rating you specify here. Sp.Limit Press number buttons to enter amount this user may spend per billing period (for VoD, PPV, etc.). Can(not) Subscribe Press OK to toggle between Can and Cannot Subscribe. Can Subscribe means this user will be able to add subscription services. Select OK and press OK to save settings. Setting Parental Controls after users are created: Users must be created before parental controls can be activated: LOCK user out of TV for a set time: Menu > Settings > Account > Manage Users > User Name > Locks > OK Follow on‐screen instructions, choosing the lockout period, pressing OK to scroll through options. With the fields set, select LOCK and press OK. 7 LOCK user out of program /channel: Menu > Settings > Account > Manage Users > User Name > Locks > Channel Locks > OK > The channel guide will appear on screen, scroll to select program or channel that needs to be locked. You will then have the option to: LOCK PROGRAM or LOCK CHANNEL or CANCEL. Make the appropriate selection and press OK. LOCK user out of TV indefinitely: Menu > Settings > Account > Manage Users > User Name > Locks > Lock NOW > OK This user is now blocked from logging in. To unlock the user, repeat these steps, except select Unlock Now. Change Password: Menu > Settings > Account > Change Password menu / settings / account / change password Access the Account menu and select Change Password. Complete the fields: Old – Use number buttons to enter old password. New – Use number buttons to enter new password. Confirm – Enter the password numbers again. Press to select OK. Press OK. How to set Autologin: Menu > Settings > Account > Autologin > OK > OK Do this for each video stream. Autologin is normally disabled at the time of installation. If Autologin is enabled, a password will be required each time the TV is turned on. Activate PIN Protection: There are two types of optional personal identification numbers (PINs): Purchase PIN allows secure purchase of services, movies, etc. and a Rating PIN allows for parental controls. How to Set Purchase PIN: A Purchase PIN is required for purchasing Video on Demand Movies/Events. Menu > Settings > Account > Purchase PIN Access the Account menu and select Purchase PIN. Complete the fields: New PIN – Use number buttons to enter 4-digit numeric PIN. Confirm new PIN – Enter the PIN again. Password – Enter your 4-digit numeric password. Enable PIN Protection – Press OK to select Yes or No. (Will appear only if PIN Protection is activated.) Click Apply and press OK. 8 How to Set Rating: A Rating PIN allows a user to view programming with a higher rating than the rating specified when the user was created. Menu > Settings > Account > Rating PIN menu / settings / account / rating pin Access the Account menu and select Rating PIN. Complete the fields: New PIN – Use number buttons to enter the 4-digit numeric PIN. Confirm new PIN – Enter PIN again. Password – Enter your 4-digit numeric password. Enable PIN Protection – Press OK to select Yes or No. (Will appear only if PIN protection is activated.) If No, then this user cannot view programming with a higher rating under any circumstances. PIN Protected Rating – Press OK to select the highest rating user can view without a Rating PIN. Select Apply and press OK. Example: John is a 13-year-old user specified with a TV-14 rating. His parents also assigned John a PIN-protected rating of R. The following rules apply to John: PIN-Protection enabled (option ‘Yes’) May view programming as high as TV-14 without PIN May view R with PIN May not ever view higher than R PIN-Protection disabled (option ‘No’) May view as high as TV-14 only Menu > Settings > Preferences How to set up your CALLER ID: At this time CALLER ID is available to customers with IPTV service, if they have been converted to our new soft switch. If you subscribe to CALLER ID as part of a bundled service package or as an individually priced additional feature, the CALLER ID will appear on your TV screen. To activate CALLER ID on your system, please follow these steps: Menu > Settings > Preferences > Alerts* > Phone > OK ( will appear) > APPLY > OK *If Alerts does not appear as an on‐screen option, contact XIT to verify your subscription to Caller ID and that the feature has been properly provisioned on your account. After receiving verification from XIT, go to the Main Menu and Logout. Log back on when the blue welcome screen appears by entering the default password 1234 or password that has been set by customer and press OK/SEL to log back on. Then, repeat Menu > Settings > Preferences > Alerts > Phone > OK ( will appear) > APPLY > OK. How to check your CALLER ID: Menu > My Services > Calls > ALL This will bring up the phone numbers that have called the customer’s number. How to clear the calls on your CALLER ID: Menu > My Services > Calls > Select an entry > Delete Entry or Clear List are the options. 9 How to set the Language: Menu > Settings > Preferences > Menu Language > English > OK Menu > Detalles > Preferencias > Menu Idioma > Espanol (us) > OK How set Appearances: Menu > Settings > Preferences > Appearance Change the color scheme, font size, font bold or regular, etc. Appearances is also where you can activate the on‐screen Help Bar. Both the Help Bar and the Full Screen Graphics need to be turned on. APPLY will save the settings. How to set Favorite Channels: The Preferences Menu offers an alternate method for setting your favorite channels. menufavorite channels Select Menu > Settings > Preferences > Favorite Channels. Click a channel in the left column to add it to your Favorites list. Click a channel in the right column to remove it from your Favorites. Add as many Favorite channels as you like—there is no limit. Menu > Settings > Help Help is all about the remote control keys, what the different keys do and how to navigate with the remote control keys. The ‘HELP’ keys do not offer any troubleshooting information. Remote Control Keys = Explains the different keys on the remote control. Channel Tuning – Channel Listing = Remote Control Keys for tuning channel and volume Quick Keys – Navigational and Scrolling = Quick Keys Channel Guide = Remote Control Keys to navigate the channel guide Network PVR = Remote Control Keys (keys for use with DVR & VOD) Movies = Remote Control Keys for renting movies Favorite Channels = Remote Control Keys for adding or removing ‘Favorites’ Menu > Logout Menu > Logout will log you off the system. The screen will go black for a few seconds then the blue welcome screen will appear, so you can log back on. Log back on using the 1234 (default password) or password that has been set by customer. Enter password and press OK/SEL – if you enter the wrong password it will display a message in yellow that the wrong password was entered. 10 IPTV Feature ‐ DVR & Pause Live TV Menu > My DVR = DVR Menu General Information DVR = Digital Video Recorder Pricing ‐ $9.95 per month per household DVR is available for both High Definition (HD) and Standard Definition (SD) TV service. Recording and Deleting DVR Programs How to record a single program: To record a program you are watching: Press Red Record Button > OK > OK To record a program that you are not currently watching: Guide > Select a program > OK > RECORD > OK How to record a series: Guide > Select a program > OK > RECORD SERIES > Settings > RECORD SERIES > OK It is very important to set the “Keep at Least” (all episodes or 1‐7 episodes) and “Record Episodes” (New or Rerun episodes) settings. The default setting for “Keep at Least” is “Last 1 Episode” and the default setting for “Record Episodes” is “New only”. Example: Customer wants to record “American Idol” which runs on two consecutive nights. They will need to change the “Keep at Least” setting to ALL or more than 1 episode. If not the DVR will record the first night and will only retain that episode until the next day when the second night records. Settings Screen will display the following options: “Start offset (min)” – Allows the customer to set the number of minutes to start recording before the program is scheduled to start. “End offset (min)” – Allows the customer to set the number of minutes to continue recording after program is scheduled to end. “Keep at least” – Allows the customer to set the number of episodes to store. The options are ALL or 1‐7 episodes. Use the OK/SEL button to toggle between options. “Record Episodes” – Allows the customer to set the option to record NEW episodes, or NEW and RERUN episodes. Use the OK/SEL button to toggle between options. Click on Record Series > OK How to replay a recorded program or series: Menu > My DVR > Recorded > Select by date or title > Select program > START > OK How to delete a recorded program: Menu > My DVR > Recorded > Select by date or title > Select program > REMOVE > OK How to delete ALL recorded programs: Menu > My DVR > Recorded > Select by date or title > Select program > REMOVE ALL > OK This will REMOVE all recorded and scheduled programs. It will completely clear the DVR. It does take a few minutes for the process to complete. 11 Two programs cannot be recorded during the same time period: If you start recording a program on channel A and then go to channel B and try to record a program at the same time, you will get the following message once you attempt to record the second program during the same time period. “The program you want to record overlaps with other programs to be recorded.” RESOLVE CONFLICT or CANCEL will be your options. If you select RESOLVE CONFLICT – you will have the option to REMOVE recording A to add B or CANCEL. Remote Control DVR buttons: To record use the red button with white dot on the ENTONE remote and use the white button with the red dot on the UNIVERSAL remote. = Play = Pause = Stop REW and FF for rewind and fast forward on the Universal remote. = REW and FF on the ENTONE remote. How do the Entone & Universal Remotes differ in regard to button functions for DVR? Both remotes have record, pause, play, rewind, and fast forward buttons. They just look different and are placed differently on the remotes. The steps to navigate within the on‐screen guide, menu and My DVR menu are the same. Note: the green DVR button on the Universal remote is not operational at this time. Navigating the DVR Menu When working within any menu you will use OK/SEL to select or toggle menu options. Use the blue shortcut “back” (B) button or the EXIT button to return to the previous menu. Main Menu > My DVR Select a menu option and follow on‐screen instructions. Menu > My DVR > Recorded – By date or by title: This will detail what has been recorded by either date or title. To view any of these recordings, scroll to the desired recording and select using the OK/SEL button. The Select Action window will appear with the following options: Select Action: Remove Start Cancel Remove All Resume Settings 12 Scroll to the desired action and select using OK/SEL. Remove = Erase the selected program from the recorded list. Remove All = Erase all programs in the recorded and scheduled list. Clears out the DVR. Start = Start the recorded program at the beginning. Resume = Continue to play the program if it has already been started. Cancel = Returns you back to the previous screen that lists all recorded programs. Settings = Change recording preferences like “Start offset, End offset and Keep until” options. “Start offset (min)” – Allows the customer to set the number of minutes to start recording before the program is scheduled to start. “End offset (min)” – Allows the customer to set the number of minutes to continue recording after program is scheduled to end. “Keep until” ‐ Allows for 2 options: 1. Until space needed. 2. Until I delete. Use the OK/SEL button to toggle between the options and then APPLY to save the settings. Menu > My DVR > Scheduled – By date or by title: This will detail what has been scheduled to record by either date or title. To view any of these recordings, scroll to the desired recording and select using the OK/SEL button. The Select Action window will appear. Scroll to the desired action and select using OK/SEL. If the program is scheduled, but not recorded yet the Start and Resume will not be available. Menu > My DVR > Series: This will detail what TV series have been recorded or are scheduled to be recorded by the name of the program. To view any of these recordings, scroll to the desired recording and select using the OK/SEL button. The Select Action window will appear. If the program is scheduled, but not recorded yet the Start and Resume will not be available. Select Action: Remove Start Cancel Remove All Resume Settings Interrupt Scroll to the desired action and select using OK/SEL. Interrupt = This will keep the series already recorded, but stop recording future episodes. Settings = Settings for a series include the following options. “Start offset (min)” – Allows the customer to set the number of minutes to start recording before the program is scheduled to start. “End offset (min)” – Allows the customer to set the number of minutes to continue recording after program is scheduled to end. “Keep at least” – Allows the customer to set the number of episodes to store. The options are ALL or 1‐7 episodes. Use the OK/SEL button to toggle between options. “Record Episodes” – Allows the customer to set the option to record NEW episodes, or NEW and RERUN episodes. Use the OK/SEL button to toggle between options. Click on Record Series > OK 13 Menu > My DVR > Manual Recordings: This will detail what is scheduled to record by either date or title. View these recordings in the same way other recordings are viewed. A manual recording is a recording that is created by using the “Set Manual Recording” option. Menu > My DVR > Set Manual Recordings: Manual recordings let the customer specify the time, channel, and/or date to record without using the channel guide. For example the customer may want to record one channel for an entire evening. Follow on‐screen options for Channel; From/To (hour/min); Repeat; Period start (month/day). The customer can also name the recording and save it using SET. Menu > My DVR > Default DVR Settings: Use this option to pre‐set your recording preferences for the following types of recordings: Series Recording Single Series Episode Movies Show Sports Manual Recording Other Menu > My DVR > Priorities: Only one program can be recorded during a time period. Use the priorities option to choose which program to record if more than one is scheduled during the same period. In case of conflict, items with higher priority will be recorded. To increase an item’s priority, select it and press OK. To lower an item’s priority, select it and press red/info. Menu > My DVR > Failed – By date or by title: Lists recordings that failed by date or title. Menu > My DVR > All – By date or by title: Lists all recordings by date or title. The following icons show the status of each recording. The scheduled icon will display in the channel Guide. Completed successfully Unsuccessful In progress Scheduled 14 Time Shifted TV (Pausing Live TV) How to pause live TV: Press Pause ( ) ‐ This will pause the program you are watching. To resume the program from the point where it was paused hit Play (). For example: you are watching TV and the door bell rings…if you press pause, when you get back to the TV, press play and you will start right where you left off. You can rewind to the point in the broadcast where you pressed pause and if you are away for several minutes you will also be able to FF thru any commercials that would have buffered. If you want to go to the live broadcast at any point press STOP. Press Pause ( ) > wait a few minutes > then Play () to begin Time Shifted TV. This will start the buffering of the program and allow the customer to rewind live TV and skip any commercials that have been buffered. IMPORTANT! Changing channels during time shifted TV will end the buffering of the program that had been paused and will erase the live programming that had previously been buffered. So if you change channels, after pausing live TV you will no longer be able to rewind the live program. Simply hit PAUSE and then PLAY again to re‐start the buffering that will allow you to pause and rewind live TV. 15 IPTV Feature ‐ Video on Demand VOD (Movies) Menu General Information: 1. Pricing ‐ Varies depending on the type of movie or event selected for viewing. 2. Purchase PIN – A purchase PIN must be entered in order to rent a movie or event. A purchase PIN must be set up on each set top box in the home. The same purchase PIN and password can be used for all set top boxes. 3. Movie Preview ‐ Preview a movie by watching the movie TRAILER, which is a 5 minute clip of the movie or read a summary of the movie PLOT before renting. 4. Viewing Time ‐ Once a movie has been rented, it is available for viewing for 24 hours. It can be viewed multiple times during the 24 hours from the time it was rented. If the movie was selected from the 2‐Day Movie Rental category, it can be viewed multiple times within the 2‐Day rental period. 5. XX Adult Movies – There is NO TRAILER to view for adult movies. The customer can read a summary of the plot before renting, but once the movie is purchased there is NO CANCELATION FEATURE. 6. Genre ‐ Is the type of movie category such as family, drama, horror or just in. 7. The JUST IN genre/category will often times be the newest movies. Menu > VOD > Movies > Just In The category “new releases” will also be newer movies. How to set Purchase PIN (see page 8 for more details): Menu > Settings > Account > Purchase PIN Set a 4‐digit numeric PIN number, confirm the PIN number and set up a PASSWORD. The PURCHASE PIN and PASSWORD cannot be the same 4‐digit number. Click APPLY to complete the purchase pin set‐up. A Purchase PIN must be set up for each STB in the home. How to RENT a Movie or View Trailer: Menu > VOD > Movies > Select a Movie Category > Select Movie Once the movie has been selected the movie window will display the Director, Actor, Movie Genre, Rating, and the Price. The following options will be available: Rent – Begin the steps for renting the movie. Plot – Read a summary of the movie plot. Trailer – View a 5 minute trailer of the movie. 16 Navigating in a Video on Demand (VOD) Movie: When you navigate with the remote control in a VOD movie, the Progress Bar (below) appears. Button Play (►) Function Start or resume the movie. Progress Bar Indication Shows current place in the movie by section and minute (mm:ss). Shows the section and time (mm:ss) where paused. Shows the section and time (mm:ss) where paused. Indicates Rewind or Fast Forward mode and rate; 2x = twice as fast as Play speed, 4x = four times as fast, and so on. Shows the selected movie section and minutes transpired in the movie (mm:ss). Stop () Pause the movie. Press ► to resume. Pause () Pause the movie. Press ► to resume. Rewind / Fast Fwd ( / ) Rewind / fast‐forward the movie. Press repeatedly to increase speed. Number keys (0–9) OR arrow keys ( ) Skip among the ten movie sections. Number keys: Press the number of sections to skip over; for example, press 6 to start at section 7 of the movie. (0 takes you to the beginning.) Arrow keys: Press right or left arrow key ( ) to skip forward or back among movie sections; press OK. Menu View Progress Bar. Exit Hide Progress Bar. Back Exit the VOD movie and return to regular programming. To return to the VOD movie, press Menu and select the movie as you did when you rented it. Movies are available for viewing during the 24 hours after purchase. Navigating the VOD (Movies) Menu When working within any menu you will use OK/SEL to select the menu options. Use the blue shortcut “back” (B) button or the EXIT button to return to the previous menu. Main Menu > VOD Menu > VOD > Search = Search movies by genre, rating or category. From Search, the ADVANCED Search feature will allow you to refine your search by movie title, last name of the director, or actor. 17 To search for a specific movie title using the Advanced Search: Menu > VOD > OK > Search > OK > Advanced Search > OK > ABC > OK using the remote control keypad, use to move from letter to letter on the on‐screen keyboard. Use the OK button to select a letter. Select the green checkmark to save the title. SEARCH will now be highlighted, press the OK button on the remote to begin the search. Click on the movie title to RENT, read the PLOT or view TRAILER (preview). Menu > VOD > Rented Movies = Lists movies that have been rented and allows the movie to be viewed again. Highlight the movie, select by using OK/SEL and press play to view the rented movie again during the 24 hour rental period. Menu > VOD > Events = Mature Events, Ring Sports, Specials, Uncensored Menu > VOD > Free on Demand = Caught on Demand HD = Golf TV Kids = Kids Unlimited and Ninos Central Kids Unlimited = Preschool, Storyland, and Toon Time Ninos Central = Spanish children’s programming Music = Karaoke Karaoke is FREE and fun entertainment for your family and friends. Menu > VOD > Free on Demand > Music > Karaoke > Select Type of Music > Select Song > Rent > Enter PIN # to BUY at no charge. At the end of the selection you will have the option to restart or exit. Continue to exit until you reach the desired menu or TV program screen. Menu > VOD > HD on Demand = Golf TV HD Events HD Movies = All movies that are available in HD are listed here, including JUST IN movies that can be viewed in high definition. Menu > VOD > Local = Local programming Menu > VOD > Movies = Select the type of movie you are interested in and view all available movies in that particular category. Movie categories are subject to change, some will be short term promotional categories for a particular type of movie. 2 Day Rental En Espanol Action Extras All Movies Family Animated Heroes Horror Sci‐Fi Comedy Jacka$$ Movies Drama Just In Library – Action, Comedy, Drama, Family, Horror Sci‐Fi New Releases – Action, All Movies, Comedy, Double Features, Drama, Family, Horror Sci‐Fi Menu > VOD > XX Adult = Lists all the Adult category movies 18 Troubleshooting ITPV SYSTEM REBOOT Q: What is a reboot? A: Unplugging the set top box from the electricity. When a customer needs to do a reboot, all TV’s connected to the set top box that is going to be rebooted should be turned ON before the set top box is unplugged from the electricity. Once the system comes back up make sure all streams are working, and then turn off each TV. Q: When should a customer do a reboot? A: Reboot the system when all other methods of resolving the issue have failed. B: Reboot the system after the customer has added services such as premium channels, DVR or HD, etc. The reboot will need to be done after the new services are provisioned or as directed by XIT. Trouble Issues: If you experience problems with any of your services, please contact XIT immediately to report the trouble. It is very important when reporting trouble with your IPTV service that you provide as much information as possible about the issue you are experiencing and please provide the CHANNEL or CHANNEL NUMBERS that you are having problems with. These issues need to be reported to XIT as soon as possible: Picture Tiling (‘little boxes’, digitizing, pixilation) Picture Freezing Audio Freezing Channel Freezing Video Stream Freezing Poor Picture Quality (snowy, grainy, fuzzy, or blurry) IPTV Set Top Box has to be rebooted too often Can’t Change channels – often this issue can be resolved by pressing the STB button on the remote. This should re‐sync the remote to the set top box. If this does not resolve the issue please contact XIT. XIT is committed to providing you with the best TV experience ever! Please call us anytime you experience any problems with any of your services. Dalhart Customer Care Internet Help Desk 806‐244‐3355 1‐800‐ 687‐0780 Dalhart Headquarters 806‐384‐3311 Stratford Customer Care 806‐366‐3355 Repair and Trouble Reporting 806‐244‐0811 888‐858‐0886 (Toll Free for out of area) 19 URC PLUS User’s GuideENTONE REMOTE Device Codes Appendix Appendix A – Device Code Your URC Plus can control many brands and models of television, VCR, DVD and other types of audio-visual equipment. The following pages list device codes for many categories and brands of equipment. You may need to test several codes to find the best match for your equipment. Your equipment may be supported even if your brand is not shown in the list below. If you cannot locate your brand, or none of the listed device codes works, then you may still use the Auto-Search feature to try to locate a suitable device code. Instructions for using the Auto-Search feature is located on page 15 of this guide. TV Admiral Adventura Aiwa Akai Albatron Alleron America Action Amtron Anam Anam National AOC Apex Audiovox Aventura Bang & Olufsen Belcor Bell & Howell Benq Bradford Brillian Brockwood Broksonic Candle Carnivale Carver CCE Celebrity Celera Changhong Citizen Clarion Coby Colortyme Concerto 0001, 0020 0012 0071 0002, 0018, 0053 0013 0009 0023 0008 0023 0003, 0008 0004, 0005, 0006, 0018, 0080 0021, 0025, 0041 0008, 0023 0022 0031 0004 0001 0015, 0083 0008, 0023 0028 0004 0023, 0075 0004, 0006, 0012, 0018 0018 0019 0029 0002 0025 0025 0004, 0006, 0008, 0018 0023 0076 0004, 0006 0004, 0006 Contec Contec/Cony Craig Crosley Crown CTX Curtis Mathes CXC Cytron Daewoo Daytron Dell DiamondVision Dimensia Dumont Durabrand Dwin Electroband Electrograph Electrohome Emerson Envision Epson ESA Fujitsu Funai Futuretech Gateway GE Gibralter Goldstar Gradiente Grunpy 0023 0007, 0008 0008, 0023 0019 0008, 0023 0082 0000, 0004, 0006, 0018, 0019, 0020, 0053 0008, 0023 0085 0004, 0005, 0006, 0043 0004, 0006 0065 0032 0000 0004, 0011, 0017 0016, 0022, 0023, 0045 0020 0002 0026 0002, 0003, 0004, 0006 0004, 0006, 0007, 0008, 0009, 0022, 0023, 0043 0004, 0006, 0018 0081 0022 0009 0008, 0009, 0022, 0023 0008, 0023 0026, 0027 0000, 0003, 0004, 0006, 0010, 0034, 0037, 0061 0004, 0011, 0017, 0018 0004, 0005, 0006, 0007, 0018 0087 0008, 0009, 0023 Haier Hallmark Harman/Kardon Harvard Havermy Hewlett Packard Hisense Hitachi Hyundai IMA Infinity Insignia Inteq Janeil JBL JC Penney JCB Jensen JVC Kawasho KEC Kenwood KLH Kloss Novabeam KTV LG Logik Luxman LXI Magnavox Majestic Marantz Matsushita Maxent 0016, 0030 0004, 0006 0019 0008, 0023 0020 0072 0091 0004, 0006, 0007 0014 0008 0019 0045, 0084 0017 0012 0019 0000, 0004, 0005, 0006, 0010 0002 0004, 0006 0007, 0010, 0067 0002, 0004, 0006 0023 0004, 0006, 0018 0025 0008, 0012 0008, 0018, 0023, 0029 0004, 0005, 0013 0001 0004, 0006 0000, 0006, 0019, 0021 0004, 0006, 0018, 0019, 0038, 0040, 0059, 0064, 0065 0001 0004, 0006, 0018, 0019, 0040 0024 0026 Copyright 2009 Entone, Inc. All rights reserved V2.2 for URC Plusv3.8 URC PLUS User’s Guide Megapower Megatron Memorex MGA Midland Mitsubishi Monivision Montgomery Ward Motorola MTC Multitech NAD NEC Net-TV Nikko Norcent Olevia Onwa Optimus Optonica Orion Panasonic Penney Philco Philips Philips Magnavox Pilot Pioneer Polaroid Portland Prima Princeton Prism Proscan Proton Protron Proview Pulsar Quasar Radio Shack Radio Shack/Realistic RCA Realistic Runco Sampo Samsung Sansui Sanyo ENTONE REMOTE Device Codes 0013 0006 0001, 0005, 0006, 0063 0004, 0005, 0006, 0018 0010, 0011, 0017 0004, 0005, 0006, 0020 0013 0001 0003, 0020 0004, 0005, 0006, 0018 0008, 0023, 0029 0006, 0021 0003, 0004, 0005, 0006, 0018 0026 0006, 0018 0080 0073, 0079 0008, 0023 0024 0020 0045 0003, 0010, 0024, 0035, 0047 0018, 0021 0003, 0004, 0005, 0006, 0007, 0018, 0019 0003, 0004, 0007, 0019, 0038, 0040, 0065 0038 0004, 0018 0004, 0006 0025, 0077 0004, 0005, 0006 0086 0013 0010 0000 0004, 0006, 0007 0074 0090 0004, 0011, 0017 0003, 0010, 0024 0018, 0023 0000, 0004, 0006, 0007, 0008 0000, 0003, 0004, 0005, 0006, 0033, 0037, 0044, 0057 0018, 0023 0011, 0017, 0018 0004, 0006, 0018, 0026 0004, 0005, 0006, 0007, 0018, 0029, 0042, 0053, 0054 0045 0004, 0070 Scotch Scott Sears Sharp Sheng Chia Shogun Signature Sony Soundesign Squareview SSS Starlite Superscan Supre-Macy Supreme SVA Sylvania Symphonic Syntax Syntax-Brillian Tandy Tatung Technics Techwood Teknika Telefunken TMK TNCi Toshiba Vector Research Vidikron Vidtech Viewsonic Viking Vizio Wards Waycon Westinghouse White Westinghouse Yamaha Zenith 0006 0004, 0006, 0007, 0008, 0009, 0023 0000, 0004, 0006, 0009, 0019, 0021, 0022 0004, 0006, 0007, 0020, 0055 0020 0004 0001 0002, 0036, 0039, 0050, 0051, 0052, 0056 0004, 0006, 0008, 0009, 0023 0022 0004, 0008, 0023 0008, 0023 0020 0012 0002 0030 0004, 0006, 0018, 0019, 0022 0008, 0022, 0023, 0063 0073 0073 0020 0003, 0027 0010, 0024 0004, 0006, 0010 0001, 0004, 0005, 0006, 0007, 0008, 0009, 0019, 0023 0053 0004, 0006 0017 0021, 0046, 0048, 0049, 0058, 0060, 0062, 0066 0018 0019 0004, 0005, 0006 0026, 0078 0012 0027, 0089 0000, 0001, 0004, 0005, 0006, 0009, 0018, 0019 0021 0069 0043 0004, 0005, 0006, 0018 0001, 0004, 0011, 0017 DVD Accurian Advent Aiwa Akai Alco Allegro Amphion MediaWorks AMW Apex Arrgo Aspire Audiovox Bang & Olufsen Blaupunkt Blue Parade Broksonic California Audio Labs CineVision Coby Curtis Mathes CyberHome Daewoo Denon Disney Durabrand Emerson Enterprise ESA Fisher Funai GE 2027 2006 2074 2000 2004 2022 2085 2085 2013, 2014, 2031, 2059 2023 2007 2004 2016 2014 2012 2000, 2069 2002 2022 2060 2024 2023, 2029 2022, 2066 2002, 2056, 2073 2062 2025 2001, 2017, 2026 2017 2026 2018 2026 2011, 2014, 2063 Go Video Gradiente Greenhill Harman/Kardon Hitachi Hiteker Initial Insignia Integra JBL JVC Kawasaki Kenwood 2022, 2067 2002 2014 2019, 2077 2046 2013 2014, 2049 2026, 2084 2012 2019 2048 2004 2002, 2076 KLH 2004, 2014 2003, 2009, 2070 2028 Koss Landel Copyright 2009 Entone, Inc. All rights reserved. V2.2 for URC Plus v3.8 URC PLUS User’s GuideENTONE REMOTE Device Codes Lasonic Lenoxx LG Liquid Video Liteon Magnavox Memorex Microsoft Mintek Mitsubishi Nesa Next Base Onkyo Oppo Oritron 2020 2008, 2025 2017, 2022, 2064, 2082 2009 2027, 2071 2001, 2010, 2026, 2057 2000, 2062 2011 2014, 2021 2065 2014 2028 2010 2015 2003, 2009 Philips Pioneer 2002, 2010, 2034, 2036, 2053, 2056, 2079, 2080, 2081 2010, 2057 2012, 2051, 2083 Polaroid 2043 Proceed Proscan Qwestar 2013 2011, 2055 2003 RCA 2004, 2011, 2012, 2014, 2038, 2055 Regent Rio Rowa 2008 2022 2005 Panasonic Samsung Sansui Sanyo Sharp Shinsonic Sonic Blue Sony Superscan Sylvania Teac Technics Theta Digital 2002, 2039, 2041, 2046, 2050, 2052, 2058, 2067, 2078 2000 2000, 2018 2068 2021 2022 2032, 2033, 2037, 2042, 2044, 2045, 2047, 2054, 2075 2001 2001, 2026 2004 2002 2012 Urban Concepts US Logic Venturer 2000, 2010, 2030, 2035, 2040, 2061, 2072 2010 2021 2004 Xbox Yamaha Zenith 2011 2002, 2034 2010, 2017, 2022, 2064 Toshiba VCR 1007 Realistic 1007 ReplayTV 1000, 1001, 1014 1000, 1001 1003, 1004 1003 1008 1005 1003 1004, 1009, 1016 1003 1000, 1001, 1004 1003 1004 1008 1004 1001, 1002, 1003, 1004, 1005, 1009, 1010 1002 1008 1008 1015 1004 1002 1002, 1005 1000, 1001 1003 1008 1002 1008 1004 1003 1010, 1018 1004, 1006, 1012 1004 1004, 1007, 1016 1016 1003 1009 1001 1001 1004 1003 1001, 1002, 1003, 1004, 1005 1003 1003 1002, 1004, 1007, 1011 1001, 1002, 1003, 1004, 1005 1006 1008 Ricavision 1008 1008 1004 1000, 1001, 1002, 1003, 1004 1004 Runco Samsung Sanky Sansui Sanyo 1009 1002, 1007 1009 1010, 1018 1001, 1002 ABS Adventura Aiwa Alienware American High Asha Audio Dynamics Audiovox Beaumark Bell & Howell Calix Candle Canon Citizen Colortyme Craig Curtis Mathes Cybernex CyberPower Daewoo DBX Dell DIRECTV Durabrand Dynatech Electrohome Electrophonic Emerson Fisher Fuji Funai Garrard Gateway GE Goldstar Gradiente Harley Davidson Harman/Kardon Headquarter Hewlett Packard HNS Howard Computers HP Hughes Network Systems Humax 1008 1005 1005 1008 1004 1002 1000 1003 1002 1001 1003 1002, 1003 1004 1002, 1003 1000 1002, 1003 1000, 1002, 1004 1002 1008 1005 1000 1008 1007 1009 1005 1003 1003 1003, 1004, 1005 1001 1004 1005 1005 1008 1002, 1004 1000, 1003 1005 1005 1000 1001 1008 1007 1008 1008 Hush iBUYPOWER Instant Replay JC Penney JCL JVC Kenwood Kodak LG Linksys Lloyd's LXI Magnavox Magnin Marantz Marta Matsushita Media Center PC MEI Memorex MGN Technology Microsoft Mind Mitsubishi Motorola MTC Multitech NEC Nikko Niveus Media Noblex Northgate Olympus Optimus Orion Panasonic Philco Philips Philips Magnavox Pilot Pulsar Quarter Quartz Quasar Radio Shack Radio Shack/Realistic Radix Randex RCA Copyright 2009 Entone, Inc. All rights reserved. V2.2 for URC Plus v3.8 URC PLUS User’s GuideENTONE REMOTE Device Codes Sears Sharp Shogun Singer Sonic Blue Sony Stack STS Sylvania Symphonic Systemax Tagar Systems Tandy Tashiko Teac Technics Teknika Tivo TMK Toshiba Totevision Touch Unitech Vector Research Video Concepts Videosonic Viewsonic Voodoo Wards XR-1000 Yamaha Zenith ZT Group 1001, 1003, 1004 1017 1002 1004 1006 1008, 1013 1008 1004 1004, 1005 1005 1008 1008 1001 1003 1005 1004 1003, 1004, 1005 1007 1002 1008, 1019 1002, 1003 1008 1002 1000 1000 1002 1008 1008 1002, 1003, 1004, 1005 1004, 1005 1000, 1001 1009 1008 Cable Box Americast 3000, 3001, 3002, 3004, 3024, 3025 3033 Antronix Archer AT&T Bell South Cable Vision Cabletenna Cableview Clearmaster ClearMax Colour Voice Comcast Comtronics Contec 3006, 3007 3007 3041 3033 3036 3006 3005 3032 3032 3009 3037, 3038 3010 3011 ABC Coolmax COX Director Eastern Everquest Focus GC Electronics GE Gemini General Instrument Goldstar Hamlin Hitachi Jasco 3032 3039 3031 3012 3026 3030 3007 3000, 3001 3013, 3026 3001, 3029, 3031, 3037 3027 3014, 3015 3001 3026 3001, 3013, 3024, Jerrold 3026, 3029, 3031 Magnavox 3016 Memorex 3017, 3025 3029, 3031, 3038, Motorola 3039, 3041 Movie Time 3018 Multitech 3032 NEC 3003 NET Brazil 3042 NSC 3018 Oak 3011 Pace 3028 Panasonic 3021, 3023, 3025 Paragon 3025 Philips 3008, 3009, 3016 Pioneer 3019, 3027, 3035 Popular Mechanics 3030 Proscan 3000, 3001 Pulsar 3025 Quasar 3025 Radio Shack 3026, 3032 RCA 3005, 3023 Realistic 3007 Recoton 3030 Regal 3015 Regency 3012 Rembrandt 3001 Runco 3025 Samsung 3019, 3027 Scientific Atlanta 3004, 3041 Signal 3013, 3026 Signature 3001 Sony 3034, 3036 Sprucer 3023 Standard Component 3020 Starcom 3013, 3024, 3026 Stargate 3013, 3026 Starquest 3013, 3026 Supercable 3029 Supermax TIME WARNER Tocom Toshiba Tristar Tusa TV86 Unika United Cable Universal V2 View Star Viewmaster Vision Vortex View Zenith Zentek 3032 3040 3002 3025 3032 3013, 3026 3018 3006, 3007 3024 3006, 3007 3032 3011, 3016, 3018 3032 3032 3032 3022, 3025, 3033 3030 Satellite Alphastar 4010 CaptiveWorks Chaparral Coolsat 4053 4004 4054 4013, 4015, 4016, 4019, 4021, 4022, DIRECTV 4028, 4029, 4031, 4035, 4036, 4041, 4042, 4043, 4046, 4047 4000, 4001, 4002, Dish Network 4003, 4014, 4020, 4023, 4033, 4044, 4045 Dishpro 4000, 4014 Drake 4005 4000, 4014, 4033, Echostar 4044, 4045 Expressvu 4000 General Instrument 4006, 4017 GOI 4000 Hisense 4018 Hitachi 4011 HTS 4000 Hughes Network 4013, 4019, 4022, Systems 4024, 4041 Humax 4055 Ilo 4018 Jerrold 4017 JVC 4000, 4033, 4044, 4045 LG 4048 Magnavox 4016 Memorex 4016 Mitsubishi 4022 Motorola 4017 Next Level 4017 Panasonic 4043, 4047, 4049 Copyright 2009 Entone, Inc. All rights reserved. V2.2 for URC Plus v3.8 URC PLUS User’s GuiGHENTONE REMOTE Device Codes Pansat Paysat Philips Pioneer Primestar Proton Radio Shack RCA Realistic Samsung Sharp Sony Star Choice STS Tivo Toshiba UltimateTV Uniden US Digital USDTV Viewsat Voom Zenith 4051 4016 4013, 4016, 4024, 4031, 4042 4013 4009 4018 4017 4024, 4025, 4026, 4028, 4029, 4030, 4034 4007 4013, 4024, 4036, 4038 4050 4015, 4021, 4027, 4032, 4035, 4037, 4039, 4040 4017 4012 4013, 4024 4041 4015 4008, 4016 4018 4018 4052 4017 4046 Audio ADC Adcom Aiwa Alco Amphion Media Works AMW Anam Apex Audiotronic Audiovox B&K Bang & Olufsen BOSE Capetronic Carver Coby Curtis Mathes Denon Fisher GE GPX Harman/Kardon Hitachi Integra JVC Kenwood KLH Koss Left Coast Magnavox Marantz Mitsubishi 5005 5067 5055 5011 5012 5012 5007 5064 5008 5011, 5063 5068 5017 5028, 5046 5005 5008 5059 5001 5052, 5053, 5054 5013 5000 5065 5002, 5060 5013 5004 5056 5009, 5031 5011 5010 5002 5005, 5008, 5033 5002, 5008 5062 NAD Nakamichi NEC Onkyo Optimus Oritron Panasonic Philips Pioneer Polk Audio RCA Rio Samsung Sanyo Sharp Sherwood Shure Sonic Blue Sony Soundesign Stereophonics Sunfire Teac Technics Thorens Venturer Wards Yamaha 5016 5015 5003 5034, 5037, 5038, 5045, 5049, 5051 5001, 5005, 5006, 5007 5010 5027, 5035, 5047 5002, 5008, 5061 5001, 5005, 5006, 5021, 5026, 5029 5002 5001, 5005, 5006, 5007, 5011, 5057 5014 5041 5013 5066 5058 5003 5014 5018, 5019, 5020, 5022, 5023, 5024, 5025, 5030, 5032, 5042, 5043 5000 5006 5009 5007, 5011 5044 5008 5011 5000 5004, 5036, 5040, 5048, 5050 Copyright 2009 Entone, Inc. All rights reserved. V2.2 for URC Plus v3.8 TV and Device Brand Codes - UNIVERSAL REMOTE TV & Device Brand Codes - UNIVERSAL Remote TV Brand ADMIRAL ADVENT AIKO AKAI ALARON AMARK AMERICA ACTION AMPRO ANAM AOC APEX DIGITAL AUDIOVOX BAYSONIC BELL&HOWELL BRADFORD BROKSONIC CANDLE CAPEHART CARVER CELEBRITY CETRONIC CINERAL CITIZEN CLASSIC CONCERTO CONTEC CORONADO CRAIG CROSLEY CROWN CURTIS MATHES CXC DAEWOO DAYTRON DELL DENON DUMONT DWIN DYNASTY DYNATECH ELECTROBAND ELECTROHOME EMERSON TV Code (3-digit) 072 081 160 161 096 247 103 006 146 248 028 112 143 043 073 043 054 055 056 080 058 006 004 112 015 226 037 076 103 043 035 043 072 043 096 006 002 003 004 058 164 148 043 103 120 006 002 003 004 101 043 004 043 051 143 043 054 028 164 043 143 006 004 101 143 011 043 076 103 055 004 127 120 004 143 041 011 004 073 161 043 062 001 024 076 143 005 028 043 048 076 151 153 154 Brand ESA FISHER FUJITSU FUNAI FUTURETECH GATEWAY GE 112 103 143 072 081 120 164 143 016 043 044 125 096 155 004 051 143 GIBRALTER GOLDSTAR GRUNPY HALL MARK HARLEY DAVIDSON HARMAN KARDON HARVARD HITACHI HP HYUNDAI INFINITY INSIGNIA INKEL INTEQ JBL JCB JCPENNEY JENSEN JVC KENWOOD KLOSS KTV LG LODGENET LOEWE LOGIK LUXMAN LXI MAGNAVOX MAJESTIC MARANTZ MATSUI MATSUSHITA MEGATRON MITSUBISHI Code (3-digit) 078 007 057 164 028 198 246 066 028 043 052 249 043 242 078 006 073 144 160 161 074 091 155 081 120 004 073 004 106 119 110 112 028 043 004 028 164 043 163 004 007 009 011 143 158 027 039 049 067 164 024 129 073 164 001 004 006 008 024 030 013 038 001 034 083 206 006 001 002 059 006 043 143 154 004 106 119 110 112 072 207 164 072 004 007 015 052 081 160 006 003 004 022 059 164 094 160 028 035 072 164 006 164 080 004 109 024 042 004 040 004 008 009 034 056 113 127 143 072 010 012 023 075 065 101 143 156 160 113 127 143 084 164 060 061 063 064 127 146 028 081 225 TV and Device Brand Codes - UNIVERSAL REMOTE TV Brand MOTOROLA MTC MULTITECH NAD OPTIMUS OPTOMA PHILCO PHILIPS PIONEER POLAROID PORTLAND PRISM PROSCAN PROTON QUASAR RADIO SHACK RCA REALISTIC RUNCO SAMPO SAMSUNG SANSEI SANSUI SANYO SCEPTRE SCOTCH SCOTT SEARS SEMIVOX SEMP SHARP SIGNATURE SONY SOUNDESIGN SPECTRICON SQUAREVIEW SSS STARLITE SUPRE MACY SUPREME SVA SYLVANIA SYMPHONIC SYNAX OLEVIA TANDY TATUNG TECHNICS TV Code (3-digit) 081 006 004 062 101 043 015 025 080 029 032 006 003 004 024 056 059 060 063 064 127 143 164 164 005 038 093 127 006 003 004 059 210 023 025 135 176 004 018 006 209 234 015 077 078 079 004 143 103 034 144 160 161 004 058 143 171 173 112 034 056 004 019 127 143 043 160 161 144 156 065 006 004 023 024 056 074 152 081 007 019 072 073 050 006 004 058 242 004 101 127 133 143 160 089 105 211 228 229 120 096 007 053 057 082 020 036 004 004 005 028 043 048 143 004 007 015 028 030 057 082 094 143 160 052 164 043 015 081 014 019 028 004 022 143 175 072 001 126 139 003 004 028 043 112 052 004 043 043 002 001 079 006 003 059 060 063 064 127 160 164 044 249 052 249 084 081 056 062 034 080 Brand TECHNOL ACE TECHWOOD TEKNIKA TELERENT TERA TMK TNCI TOSHIBA TOTEVISION UNIVERSAL VIDEO CONCEPTS VIDIKRON VIDTECH WARDS WESTINGHOUSE YAMAHA YORK YUPITERU ZENITH ZONDA Code (3-digit) 028 004 002 003 004 024 028 043 072 101 143 103 164 072 172 004 073 015 030 07 040 062 101 045 143 008 009 146 174 188 164 050 004 004 064 164 008 009 019 028 060 061 063 072 074 143 O76 036 004 006 004 043 072 073 095 103 011 096 112 TV/VCR Brand ADMIRAL AIKO AIWA AKAI AMERICA ACTION AMERICAN HIGH AMPRO ANAM ASHA AUDIO DYNAMICS AUDIOVOX BEAUMARK BROKSONIC CALIX CANON CAPEHART CCE CINERAL CITIZEN COLT CRAIG CURTIS MATHES CYBERNEX DAEWOO Code (3-digit) 025 053 117 034 161 101 043 046 124 146 117 031 072 031 103 040 012 023 043 101 040 035 037 129 025 101 028 031 108 024 117 117 101 117 148 003 040 135 024 101 031 041 040 005 108 111 117 017 065 007 010 TV and Device Brand Codes - UNIVERSAL REMOTE TV/VCR TV/VCR Brand DAYTRON DBX DYNATECH ELECTROHOME ELECTROPHONIC EMERSON Brand NEC NIKKO NOBLEX NORDMENDE OLYMPUS OPTIMUS PILOT PIONEER PORTLAND PROFITRONIC PROTEC RCA Code (3-digit) 108 012 023 043 034 053 059 101 101 006 029 035 037 129 153 017 025 027 031 034 036 046 101 131 138 117 FISHER 003 010 008 009 FUJI 031 FUNAI 034 GARRARD 034 GE 031 072 144 147 063 107 109 040 053 GO VIDEO 132 155 040 136 GOLDSTAR 101 004 012 020 HARLEY DAVIDSON 034 HARMAN KARDON 012 045 HARWOOD 024 HITACHI 004 026 034 043 063 137 150 HQ 034 HUGHES 004 INSTANTREPLAY 031 JCL 031 JCPENEY 004 012 031 040 101 JENSEN 043 JVC 048 043 055 060 130 150 152 012 031 KEC 101 117 KENWOOD 034 150 014 048 KLH 024 KODAK 031 101 LG 101 004 012 020 LLOYD 034 LOGIK 024 LXI 003 009 017 034 101 004 106 MAGIN 040 MAGNASONIC 117 MAGNAVOX 067 031 034 068 041 156 170 MARANTZ 067 069 012 031 MARTA 101 MATSUI 027 030 MATSUSHITA 031 MEI 031 040 101 003 014 031 034 053 072 134 139 MEMOREX 025 MGA 045 046 059 MGNTECHNOLOGY 040 MINOLTA 004 020 MITSUBISHI 059 061 051 004 046 020 045 053 MOTOROLA 031 053 MTC 034 040 MULTITECH 024 034 Code (3-digit) 012 023 043 048 101 040 043 031 053 101 101 021 004 048 108 040 024 107 109 144 041 031 004 020 034 040 147 158 053 SALORA 014 SAMSUNG 040 017 107 109 113 115 124 122 SANKY 053 SANSUI 043 135 048 025 034 SANYO 003 014 040 134 SCOTT 017 037 129 131 SEARS 003 004 008 014 017 081 101 010 031 034 SHART 053 031 054 159 SHINTOM 024 SHOGUN 040 SINGER 024 001 057 058 003 052 053 031 154 171 009 SONY 034 SOUNDESIGN 034 STS 004 SYLVANIA 031 034 059 067 SYMPHONIC 034 TANDY 034 010 TATUNG 043 TEAC 034 043 TECHNICS 031 070 TEKNIKA 031 034 101 THOMAS 034 TMK 006 040 TOSHIBA 017 131 004 008 059 082 150 TOTEVISION 040 101 UNITECH 040 VECTORRESEARCH 012 VIDEO CONCEPTS 012 034 046 VIDEOSONIC 040 WARDS 003 004 017 024 031 034 040 053 054 131 WESTINGHOUSE 024 025 XR1000 024 031 034 YAMAHA 012 034 043 ZENITH 072 034 001 058 080 101 153 048 025 TV and Device Brand Codes - UNIVERSAL REMOTE TV/DVD Brand AIWA ALPINE APEX DIGITAL ARCAM CARYAUDIO DESIGN CLASSE CYBERHOME DAEWOO DENON FUNAI GE GOLDSTAR GO VIDEO HARMAN KARDON HITACHI HITEKER JVC KENWOOD KLH LG MAGNAVOX MARANTZ MCINTOSH MEMOREX MITSUBISHI MYRYAD NAD TV/DVD Code (3-digit) 202 221 251 246 182 183 215 184 193 220 220 226 241 208 230 231 235 239 201 187 188 189 194 243 223 246 238 216 210 148 254 237 253 242 217 207 227 224 247 239 Brand NAKAMICHI ONKYO OPTIMUS PANASONIC PHILIPS PIONEER POLAROID PRIMARE PROCEED PROSCAN RCA SAMSUNG SANSUI SANYO SENSORY SCIENCE SHARP SONY SYLVANIA SYMPHONIC TATUNG TECHNICS THETA DIGITAL TOSHIBA VENTURER YAMAHA ZENITH Code (3-digit) 225 240 229 228 206 226 253 237 214 242 255 222 229 195 185 186 245 230 231 230 231 236 248 201 191 205 204 189 190 252 232 218 203 208 034 224 228 229 223 244 219 205 192 209 249 226 181 239 226 235 239