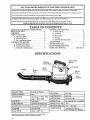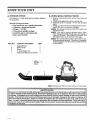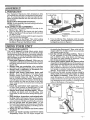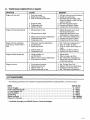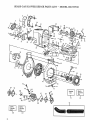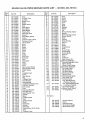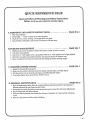
1
IMPORTANT
MANUAL
Do Not
Throw
Away
Operator's
Manual
Model No.
358.797910
Always
Wear Eye Protection
s Rs/c
GAS POWER
®
BLOWER
WARNING:
Read the Operator's
Manual and
Follow All Warnings
and Safety
Instructions.
Failure
To Do So
Can Result in Serious Injury.
Sold by Sears,
530-067870-5-01/22/93
Roebuck
2 Cycle
Engine
Fuel Mix 40:1
® Assembly
® Maintenance
e Operation
® Repair
and Co., Hoffman
Estates,
Ill. 60179
Parts
USA
o Sears, Roebuck
and Co. 1993
ONE
YEAR LIMITED
WARRANTY
ON CRAFTSMAN
POWER
BLOWER
For One Year fi,omdate ofpurchase,when thisPower Blower ismaintained,lubricated,
and tuned up accordingto the operatingand
maintenance instructions
l'nthe operator'smanual, Sears willrepairfreeofcharge any defectinmaterialor workmanship
Thiswarranty
excludes
blower
tubes,
spark
plug,
andaircleanei_
whichaleexpendable
parts
andbecomewornduring
normaluse
Ifthis
PowerBlowerisusedforcommercial
orrental
purposes,
this
warranty
doesnotapply
WARRANTY SERVICEISAVAILABLEBY RETURNING THE UNIT TO THE NEAREST SEARS SERVICECENTER/DEPARTMENT
INTHE UNITED STATES Thiswarranty
applies
onlywhile
this
product
isinuseintheUnited
States.
Thiswarranty
gives
youspecific
legal
rights,
andyoumay also
haveother
rights
whichvaryfromstate
tostate
SEARS, ROEBUCK AND CO./DEPT.D/817WA,HOFFMAN ESTATES, IL 60179
TABLE OF CONTENTS
WARNINGS AND SAFETY INSTRUCTIONS
KNOW YOUR UNIT .........................
ASSEMBLY .................................
USING YOUR UNIT ........................
A, Operator Safety .............................
B, Operating Tips .....................
C, Pre-operation
Checks ................
FUELING YOUR ENGINE
...................
A_ Fueling Information
..................
B, Starthlg Instructions
..................
C. Carburetor
Adjustments
..............
,,
3
4
5
5
5
6
6
7
7
7
8
GENERAL MAINTENANCE
...............
A_ Starter Rope .........................
B_ Air Filter ............................
C. Fuel Tai_k
D_ Storage
E, Trouble
ACCESSORIES
REPAIR PARTS
9
9
10
...........................
10
................................
Shooting Chart ..............
..............................
LIST .........................
QUICK REFERENCE
PAGE ...................
15
PARTS AND SERVICE ..............
Back Cover
SPECIFICATIONS
Engine
Button
Throttle/
Choke Knob
Nozzle
/
Stop
Fuel Cap
Spark
Blower
Tube
Starter
j
Rope
Rear
Handle
ENGINE
TYPE:
2 Cycle Air Cooled
DISPLACEMENT:
22cc
ENGINE
Operating- 7000 - 7600
Idle- -3800-4600
RPM:
MUFFLER:
Lo Tone
AIR VELOCITY:
140 mph
AIR VOLUME:
330 cu.ft./min.
SPARK PLUG:
CJ-SY(Cat.
No. 71-85853)
IGNITION:
Solid State
CARBURETOR:
All Position
Diaphragm
SPARK PLUG GAP:
.025"
ENGINE
Momentary
Kill Switch
MODULE
.010 - .014 inch
STOP BUTTON:
STARTER:
Auto Rewind
FUEL TANK:
450cc (15.8 ft. oz.)
Manufactured undor ono or mor_ oftho following U,S, Patent_: 4,404,706; 4,413,3711
4,674,146_4,846,123;D29S,S74
OtherIiS
andforelgapatentspending
-2-
11
11
11
12
AIR GAP:
LUBRICATION:
Gasoline/Oil Mixture- See "Fueling Your Engine"
_r_
...............
..................................
Ak WARNINGS
Failure
A. KNOW
YOUR
to follow
AND SAFETY
all Safety
Rules
and
UNIT
1. Read your Operator's
Manual carefully until you
completely understand
and can follow all warnings
and safety instructions before operating the unit.
2. Restrict
your unit to users who understand and will
follow all warnings and safety instructions
in this
manual.
B. PLAN
AHEAD
1. Always wear eye proteetion
when operating, servicing, or performing maintenance on your unit
2. Always
wear
a respirator
or faeemask
when
working with the unit in dusty environments
3. Always
wear heav_
long pants, boots,
and
gloves. Do not go barefoot or wear short pants, sandals, jewelry, loose clothing, or clothing with loosely
hanging straps, ties, tassels, etc.; they can be caugl_t
in moving parts. Secure hair so it is above shoulder
length
Being fully covered will help protect you from
4.
5.
6.
7.
_]oeCen
s of
plantswhich
such could
as poison
ivy that
can be
by toxic
the unit,
be more
of a hazard
than touching the plant itself.
Do not operate
the unit when you are tired, ill, upset, or if you are under the influence of alcohol, drugs,
or medication.
Keep children,
bystanders,
and animals
away
from the work area a minimum of 30 feet when starting
or operating the unitr
Inspect
the area before startingthe
unit.
Remove all debris and hard objects such as rocks, glass,
wire, etc. that can ricochet, be thrown, or otherwise
cause injury or damage during operation.
Do not operate
the umt' near an open flame, D o
not blow ash from fireplaces, barbecue pits, brush
piles, etc., or anything that is burning or smoking,
such as cigars, cigarettes, or matchas.
C. HANDLE
FUEL
WITH
CAUTION
1. Eliminate
all sources of sparks or flame (including smoking, open flames, or work that can cause
sparks) in the areas where fuel is mixed, poured, or
stored.
2. Mix andpour
fuel in an outdoor area; store fuel
in a cool, dry, well-ventilated
place; use an approved,
marked container for all fuel purposes.
3. Do not smoke while handling
fuel or while operating the unit.
4. Do not fill fuel tank while engine is running.
5. Wipe up all fuel spills before starting engine.
6. Move at least 10 feet away from fuel and fueling
site before starting the engine.
D. OPERATE
YOUR
UNIT
SAFELY
1. Inspect
the entire unit before each use for worn,
loose, missing, or damaged parts, Do not use until the
unit is in proper working ordel:
2. Keep the outside surfaces
free of oil and fuel.
Precautions
INSTRUCTIONS
can result
in serious
injury.
3. Never start or run engine inside a closed room
or bmldmg.
Breathing exhaust fumes can kill
4. Do not set the unit on any surface
except
a
clean, hard area to start the engine or while the
engine
is running.
Debris such as gravel, sand,
dust, grass, etc could be picked up by the air intake
and thrown out through the discharge opening, damaging the unit, property, or causing serious injury to
bystanders or the operatorr
5. Avoid dangerous
environments.
Do not use in unventilated areas or where explosive vapors or carbon
monoxide build up could be present
6. Do not overreach
or use from unstable surfaces
such as ladders, trees, steep slopes, rooftops, etc Use
extra care when using on stairways
Keep firm footing and balance at all times.
7. Never place objects inside the blower tubes; always direct the blowing debris away from people, animals, glass, and solid objects such as trees, automobiles, walls, etc The force of air can cause rocks, dirt,
or sticks to be thrown or to ricochet which can hurt
people or animals, break glass, or cause other damage
Do not allow the unit to be used as a to:_
8. Never place any object in the air intake opening
as this could restrict proper air flow and cause damage
to the unit,
9. Never run the engine without
the blower tubes
attached.
10.Nevar use for spreading
chemicals,
fertilizers,
or any other material which may contain toxic substances.
ll.Use only for jobs explained
in this manual.
E. MAINTAIN
YOUR
UNIT
PROPERLY
1. Have
all maintenance
other than the recommended procedures described in the Operator's Manual performed by your Sears Service Center.
2. Disconnect
spark
plug
before
performing
maintenance
except for carburetor adjustment
3. Use only genuine
replacement
parts as recommended by Sears to avoid creating a hazard and/or
voiding your warranty.
4. Check air intake
openings
and blower
tubes
frequently,
always with the engine stopped
Keep
vents and tubes free of debris which can accumulate
and restrict proper air flow
5. Before storing the unit, use up any fuel remaining in the fuel system.
Use up fuelleft in the fuel
lines and carburetor by starting the engine and letting it run until it stops
6. Do not use any accessory
or attachment
other
than those recommended by Sears for use with your
unit.
7. Do not store the unit or fuel in a closed area
where fuel vapors can reach sparks or an open flame
from hot water heaters, electric motors or switches,
furnaces, etc,
8. Store in a dry area out of the reach of children.
SPECIAL NOTICE
For users on U.S. Forest Land and in some states, including California (Public Resources Codes 4442 and 4443), Idaho,
Maine, Minnesota, New Jersey, Oregon, and Washington:
Certain internal combustion engines operated on forest, brush, and!or
grass- covered land in the above areas are required to be equipped with a spark arrestor, maintained in effective working order, or the
engine mustbe constructed, equipped, and maintained for the prevention of fLre Checkwithyour state or localauthorities for regulations
pertainingtothesereguirements
Failuretofo!lowtheserequirementsisaviolationofthelaw
Thisunitisnotfactory-equipped
with a spark arrestor; however, a spark arrestor is available as an optional part. Ira spark arrestor is required in your area, contact your
Sears Service Center or Parts Department for Spark Arrestor kit #530-069285.
--3--
KNOW
YOUR
UNIT
A. INTRODUCTION
B. UNPACKING
Your blower is a high performance
for tough jobs,
product
designed
Special Features
include:
® Top handle for one-handed
operation.
e Vibration - dampened
handle.
® Weight - 10.5 lbs.
® Convenient
upright storage.
® Available
gutter attachment
kit.
e Rear assist handle.
KEY NO.
1.
2.
3.
4.
-
CARTON
CONTENTS
Engine/Blower
Blower Tube
Nozzle
2-cycle Engine Oil
Operator's
Manuai (not shown)
INSTRUCTIONS
1. Remove contents from the carton if you have not
done so.
2_ Check parts against the carton contents list.
3_ Examine parts for damage.
Do not use damaged
parts.
4, IVotify your Sears Service Center/Department
immediately if a part is missing or damaged
NOTE." It is normal to hear the fuel filter rattle in an
empty fuel tank.
NOTE." Your unit is factory equipped with a vibration-dampened
handle which causes the handle to
appear to be loose. This condition is normal.
See
the Safety Notice at the bottom of this page.
N_
Your unit has been factory tested and the carburetor precisely adjusted_ Therefore, it is possible
to smell gasoline or to find a drop of oil/fuel residue
on the muffler,
QTY.
I
1
1
1
1
2
\
Illustration
may differ from actual model due to design changes
SAFETY NOTICE
Exposure
to vibrations
through prolonged
use of gasoline
powered
hand tools could cause blood vessel
or nerve damage in the fingers, hands, and wrists of people prone to circulation
disorders
or abnormal
swellings.
Prolonged
use in cold weather
has been linkec
people.
If symptoms
occur such as numbness,
pain, loss of strength,
change in skin color or texture
loss of feeling
in the fingers, hands, or wrists, discontinue
the use of this tool and seek medical
attention. An anti-vibration
system does not guarantee
the avoidance
of these problems.
Users who operate power tools on a continual
and regular basis must monitor closely their physical
condition
and the
condition
of this tool.
-4-
ASSEMBLY
A. PREPARATION
Your Operator's Manual has been developed to help
you assemble the unit and to understand
its safe operation. It is important
that you read your manual completely to become familiar with the unit before you begin assembly.
READ YOUR OPERATOR'S
MANUAL.
NOTE: To ease assembly, lubricate locking tabs before
assembling tubes_
B. BLOWER
TUBE
ASSEMBLY
L Locate the two Locking Tabs on the side of the
Blower Tube, Figure L
2. Align the Grooves on the Nozzle with the Locking
Tabs on the Blower Tube and push the Nozzle onto
the Blower Tube_
3_ Turn the Nozzle clockwise until the parts snap into
place and are firm and tight_
4. Align Grooves on the BIower Tube with Locking
Tabs in the Blower Outlet (Figure 1, inset) and push
the Blower Tube into the Blower Outlet.
Locking
Tabs
_
Blower
Outlet,,_
Blower Tube_
No__
Locking
Figure
Tabs
I
5_ Turn the Blower Tube clockwise until the parts
snap into place. When assembled, the nozzle should
be aligned as shown in Figure 2.
USING YOUR UNIT
A.
OPERATOR
SAFETY
The unit is designed to sweep debris, grass, straw,
leaves, small twigs, or light snow. It can also be used for
fast drying wet outdoor areas such as a patio, sidewalk,
carport, etc_ Never use for spreading or mistingchemicals, fertilizers, or any other materials which may contaln toxic substances.
1. Read your Operator's
Manual.
Make sure you
completely understand
and can follow all warnings
and safety instructions
in the manual before operating the unit,
2. Always wear
eye protection
when operating,
servicing, or performin_ maintenance
on your unit.
3. Always
wear a respirator
or facemask
when
working in dusty environments_
4. Always
wear
heavy, long pants,
boots,
and
gloves.
Do not go barefoot or wear short pants,
sandals, jewelry, loose clothing, or clothing with
loosely hanging straps, ties, tassels, etc.
Secure
hair so it is above shoulder length
Being fully covered will help protect you from pieces of toxic plants
such as poison ivy that can be blown by the unit,
which could be more of a hazard than touching the
plant itsel£
5. Check the unit before
each operation.
Look
for worn, loose, missing, or damaged parts. Do not
use the unit until it is in proper working order.
6. Inspect
area before
starting
engine.
Remove
all debris and objects such as rocks, glass, wire,
large sticks, etc that can cause damage during operation.
7, Keep children,
bystanders,
and animals safely away. Before starting the engine and during operation, make certain children, people, and animals
are a minimum
of 30 feet away from the work area.
8. Do not operate
near an open flame.
Do not
blow ash from fireplaces, barbecue pits, brush piles,
etc, or anything that is burning or smoking, such as
cigars, cigarettes, or matches_
9, Never run the unit without
the blower
tubes
attached.
10.Cheek
air intake
opening
and blower
tubes
frequentl_
always with the engine stopped and
the spark plug disconnected.
Keep vents and discharge tubes free of debris which can accumulate
and restrict proper air flow.
ll.Use
the correct
operating
position.
Figure 2_
Do not overreach
or use from unstable
surfaces
such as ladders, trees, steep slopes, roof tops, etc_
Use extra care when cleaning on stairways,
Keep
firm footing and balance at all times_
12.Never place
objects inside the blower
tubes;
always direct blowing debris away from people, animals, glass, and solid objects such as trees, automobiles, walls, etc_ The force of air can cause rocks,
dirt, or sticks to be thrown or to ricochet which may
hurt people or animals, break glass, or cause other
damage. Do not allow unit to be used as a toy.
13Do not set the unit on any surface
except
a
clean, hard area to start the engine
or while
the engine
is running.
Debris such as gravel,
sand, dust, grass, etc, could be picked up by the air
intake and thrown out through the discharge opening, damaging the unit, property, or causing serious
injury to bystanders
or the operator.
Eye
Top
Rear
Assist
Handle
Figure
2
-5-
B.
OPERATING
TIPS
&, WARNING
1
Do not use the unit without
the blower
tubes[
properly
attached
to avmd flying debris and]or|
impeller
contact
which can cause serious injur_
/
1. Always work going away from solid objects
such as wails, large stones, automobiles
and
A WARNING
Always wear eye protection
to prevent
rocks or I
debms from being blown or rmocheting
into the
eyes .mad.face which can result in blindness
or se[ rious i_lur_.
fences,
2. Do not operate
unit at full throttle
when
cleaning
in corners.
Clean corners by starting
in corners and moving outward to straight areas
to prevent an accumulation of debris which could
fly into face,
3. Be careful when working
near plants.
The
force of' the air could damage tender plants
4. Direct
air flow by directing the nozzle dowu or
to one side.
5. Vary the air flow by turning the Throttle Knob
to the desired setting. Use low speed when blowing in corners,
against walls, around
tender
plants, in extremely
dusty areas, etc
Use high
speed when blowing in open areas,
C.
PRE-OPERATION
Before
operating
your
unit,
always:
THE AIR FILTER.
Clean the filter if dirty before operating the unit.
For location, see the "Air Filter" section.
NOTES
-6-
a. Sweeping debris or grass clippings fi'om driveways, sidewalks,
patios, parks, parking lots,
barns, stadiums, etc.
b. Blowing grass clippings, straw, or leaves into
piles_
c. Fast drying wet outdoor areas such as a patio.
d. Removing debris f_om corners, around joints,
and between bricks.
e. Blowing light snow from driveways, sidewalks,
or patios.
CHECKS
1. _'CHECK
OVER WARNINGS
AND SAFETY
INSTRUCTIONS
in this Operator's
Manuai.
Make certain you completely understand
and follow each one.
2. v'CHECK
6. Use the assist handle located on the back ofthe
u_fit when working above the waist or when a
two-handed
gripis desired.
7. Uses For Your Blower:
3. _'CHECK
THE UNIT FOR LOOSE BOLTS,
NUTS, OR FITTINGS.
Tighten, repair, or replace parts as necess.ary. You
will need a Phillips screwdriver
and a 5/32 hex
wrench. Use only genuine replacement
parts as
recommended
by Sears.
4. v'CHECK
THE FUEL TANK.
Fill with a clean, fresh fuel mixture according to
the instructions
in the "Fuel Mixture" section.
FUELING
YOUR ENGINE
A. FUELING
INFORMATION
1. FUEL SAFETY
a. Use only recommended
fuel mixtures.
b. Mix and pour fuel outdoors
and where
there are no sparks or flames.
c. Use a container
approved
for fuel,
d. Do not smoke or allow smoking near fuel
or the unit or while using the unit.
e. Wipe up all fuel spills before starting
the
engine
fi Move at least 10 feet away from fueling
site before starting
engine.
g. Stop engine before removing
fuel cap
h. Before
storing the unit, use up fuel left in
the fuel lines and carburetor
by starting the
engine and letting it run until it stops.
i. Store unit and fuel in an area where fuel
vapors
cannot
reach
sparks
or open
flames from water heaters, electric motors or
switches, furnaces, etc.
j. Always remove
the fuel cap slowly to relieve pressure
in the fuel tank.
2. FUEL MIXTURE
® Your unit is powered
by a 2-cycle
engine
which requires
a fuel mixture
of regular
unleaded
gasoline
and a high quality engine oil specially
made for 2-cycle,
air
cooled
engines.
The internal
design of the
2- cycle engine requires lubrication
of moving
parts. Lubrication
is provided when recommended mixture of gasoline and oil is used_
e Gasoline must be clean and fresh,
After a
short period of time, gasoline will chemically
break down and form compounds
that cause
hard starting and damage in 2-cycle engines_
e The correct
measure
of gasoline
to oil is
very important.
Too much oil in the mixture
will foul the spark plug,
to overheat
Too little oil will cause
and seize.
the engine
3. USE THE FOLLOWING
ONLY:
SEARS CRAFTSMAN
2-cycle
engine
oil
mixed at 40:1 is strongly recommended,
Consult the instructions
on the oil container
for
proper mixing.
B. STARTING
1 PART OIL TO 40 PARTS GASOLINE=
3,2 fl oz, oil to i gallon gasoline
8.0 fl, oz. oil to 2.5 gallon gasoline
Not all air cooled 2-cycle engine oils have the
same qualities,
If SEARS CRAFTSMAN
2-cycle engine oil is not available, use agood
quality, 2-cycle
engine oil recommended
for
air - cooled engines, Mix at a ratio of 16:1 (8 oz,
oil to 1 gallon gasoline)_ A 16:1 fuel mixture
with these oils will assure adequate lubrication
for your engine,
4. DO NOT USE:
e NMMA Oil--National
Marine Manufacturers Association
(formerly
BIA)
Does not have proper additives for air-cooled,
2-cycle engines and can cause engine damage
e AUTOMOTIVE
OILDoes not have proper additives for air- cooled,
2-cycle engines and can cause engine damage.
A CAUTION
Experience
indicates
that alcohol
blended
fuels
(called gasohol
or usingethanol
or methanol)
can
attract
mmsture
which
leads
to separation
and
formation
of acids during
storage.
Acidic gas can
damage the .ft_el system of an engine while in stor.
age. To avmd engine problems,
do not leave fuel
m the umt when storing
for 30 days or longer.
Start the engine and let it run until the fuel lines
and carburetor
are empty. Use fresh fuel next season. See the "Storage"
sectmn for additional
information.
Never use engine or carburetor
cleaner products
in the fuel tank or permanent
damage
can occur.
5. HOW TO MIX FUEL AND FILL TANK
a_ Pour the proper measure of engine oiI into an approved, marked container
Then, fill the contalner with regular unleaded gasoline,
NOTE: If fuel is already in the container, add the
proper measure of engine oil Then, close the
container tightly and shake it momentarily.
NOTE.
Do not mix gasoline and oil directly in the
fuel tank.
b, Using a spout or funnel, fill the fuel tank with
fuel mix.
c Reinstall the fuel caps securel_
INSTRUCTIONS
1. Before Starting the Engine:
a, Fualtheengine;then,move atleasti0 ft,(3m)
away from thefuelingsite.
b, Hold unit in the startingpositionshown in
Figure3. Make sureblower nozzleisdirected
away from people,animals,glass,
and solidobjects.
A WARNING
When starting
engine,
hold the unit as shown in
Figure 3. Do not set the unit on any surface except a clean, hard area while starting
or running
the engine.
Debris
such as gravel,
sand, dust,
grass, etc., could be picked up by the mr intake
and thrown out through
the discharge
opening,
lamagmg
the umt or property,
or causing serious
..njury to bystanders
or the operator.
_L_.._ ._-:-_-_---_.:_
_
Figure
_
_
3
-7-
2. For a Cold Engine:
a, Set the unit on a clean, hard surface,
b. Turn Throttle Knob to the "FULL
position. Figure 4.
CHOKE"
c, Pull Starter
Rope sharply until engine attempts to run, but no more than 8 pulls on full
choke, The engine "attempts
to run" may
be hard to hear. The operator
must listen
carefully
After 8 pulls, proceed to step"d?'
even if the engine has not attempted
to run_
d. Turn Throttle Knob to the "HALF CHOKE"
position_ Figure 4.
e. Pull Starter Rope sharply
but no more than 5 pulls_
until
engine
runs,
NOTE:
If"engine has not started after 5 pulls in
the "HALF CHOKE" position, repeat steps "a"
through "e."
£
Allow engine to run for 10 seconds in the
"HALF
CHOKE"
position,
then turn
the
Throttle
Knob to the "FULL THROTTLE"
position.
If engine dies, repeat steps "d." through
"f." If engine does not operate properly, refer to
the "Carburetor
Adjustments"
section,
g. To stop engine, turn Throttle
"IDLE" position_
Then, press
"STOP" switch until the engine
4_
C. CARBURETOR
e
Knob to the
and hold the
stops, Figure
Figure 4
3. For a Warm Engine
or a Warm Engine
After
Running
Out of Fuel:
a_ Turn Throttle
Knob to the "HALF CHOKE"
position.
Figure 4.
b. Pull the Starter Rope sharply until the engine
runs, but no more than 3 pulls.
NOTE: If the engine does not run after 3 pulls in
the "_F
CHOKE" position
repeat steps "a?'
through
e. for Cold Engine starting.
c, Turn tile Throttle Knob to the desired position,
d. To stop engine
turn Throttle
Knob to the
"IDLE" position.
Then, press and hold the
"STOP" switch until the engine stops. Figure
4.
ADJUSTMENTS
Poor engine performance
can be a result of
other causes
such as a dirty air filter, carbon
build-up
on the muffler outlets, etc. See the
"Trouble Shooting Chart" before proceeding with
carburetor
adjustments,
The carburetor
has been carefully
adjusted
at the factory.
Due to changes in altitude and operating conditions, your carburetor
may require
adjusting.
To make the adjustment,
carefully follow the procedure below.
1. PREPARATION
a. Use fresh fuel mix. See the "Fueling Your
Engine" section_
b. Turn the Mixture Screw (Figure 5) clockwise until fully closed, but do not over_
tighten.
Figure 5. Then, turn it one full
turn counterclockwise°
c. Turn Idle Speed Screw (Figure 5) clockwise
until it stops, Do not overtighten.
Then,
turn it three full turns counterclockwise_
2. IDLE SPEED ADJUSTMENT
a, Start the unit and let it run for 3 minutes to
warm up the engine.
b, Position the Throttle Knob to the "IDLE"
position,
c_ Adjust Idle Speed Screw until the engine
idles as slowly as possible without stalling_
-- Turn screw clockwise if engine stalls.
-- Turn screw counterclockwise
to slow em
gine down_
-8-
STOP
Idle SpeedScrew
Mixture
Screw
Figure
5
The mixture
setting
is a highly critical adjustment.
If set incorreetl_
permanent
damage to the engine will occur. Do not operate
en_ne
at full throttle
for prolonged
pemods whale making
the mixture
adjustment.
3. MIXTURE
ADJUSTMENT:
a. Position
the throttle
knob to the "FULL
THROTTLE"
position,
b. Turn the mixture screw slowly clockwise until engine speed is reduced
Note this position,
c. Turn
the screw slowly
counterclockwise,
Stop when the engine begins to run roughly.
d. Turn screw slowly the minimum
amount
clockwise until the engine runs smoothly.
Turning the mixture screw too far clockwise will result in poor acceleration
and poor
starting.
GENERAL
MAINTENANCE
A. STARTER
ROPE
Replace
the
badly worn.
starter
rope
if the
rope
breaks
or is
NOTE." When replacing an unbroken
rope, cut the
rope and allow the rope to rewind onto the pulley.
Pulley
Housing
Pulley
Locator
A W_G
]
Do not remove
the Pulley
when
replacing
the
starter
rope.
Always wear eye protection
when I
servicing
the starter rope. The recoil spring, lo- I
cated beneath
the pulley, is under tension.
If the
spring pops out, serious injury can result.
To repair
or replace:
L Disconnect
the spark
plug.
plug wire from
the spark
2. Set the unit on a fiat surface as shown in Figure
3. Remove
the Pulley Housing
Screws and
Pulley Housing from the Engine. Figure 6.
6
the
Metal
4. Grasp the Pinion [Figure 7 (inset)] and wind the
pulley clockwise until the Pulley stops.
Then,
slowly unwind the pulley counterclockwise
until
the Pulley Notch (Figure 7) is aligned with the
notch in the Pulley Housing. Insert a screwdriver
into the hole formed by the aligned notches. Figure 7.
5_ Remove the Rope Retainer Screw/Washer.
7. Discard any remaining rope.
Eyelet
anti
Rope Guide
Blower Outlet
Locator
Hole
Figure
6
Figure
6, Move away from fuel tank and melt ends of rope_
7, Allow each melted end to drip once; then while the
rope is still hot, pull each melted end through a
clean rag to obtain a smooth, pointed end.
8. Insert one end ofthe rope through the starter handle and secure with a knot. Leave 3/16" pigtail behind the knot. Figure 6 (Inset).
Helix
Rope Tail
Rope
9. Insert the other end ofthe rope through the Metal
Eyelet, then over the Rope Guide. Figure 6.
Rope
10. Guide rope inside the pulley, then up through
Pulley Hole. Figure 7 (Inset).
Hole
the
ll.Wrap
rope counterclockwise
around Helix and
tuck the loose end back under the rope, Figure 7.
Leave about a i inch tall next to the Retainer Rib
as shown in Figure 7.
When performing
step 12., do not over°
tighten the Retainer Screw. Over tightening
the
screw can cause the screw post to strip out, Tighten the screw until the bottom of the washer is snug
against the rope.
12, Install
13,Pull
and tighten
the rope tightly
Rope Retainer
around
Screw/Washer.
the Helix.
14. Slightly pull the rope to relieve the pressure on the
screwdriver,
Remove the screwdriver
and allow
the rope to rewind slowly,
Retainer
Rib
Rope Retainer
Screw/Washer
Figure 7
NOTE." When performing
step 15., be sure
overtighten
the screws.
Overtightening
screws can strip-out
the Fan Housing.
not to
the
15.Aligu the locator post on the pulley housing with
the locator hole on the fan housing.
Figure 6.
Reassemble
the Pulley Housing to the engine.
Tighten screws securel_
-9-
B. Air Filter
A dirty air filter decreases engine performance
and
increases fuel consumption_
Clean the Air Filter:
o Frequentl_
® Always clean after 5 tanks of fuel or 5 hours
of operation,
whichever
is less.
Follow these steps:
L Turn Throttle Knob to the "FULL CHOKE" position Figure 4,
2, Remove the Air Filter Cover Screws and Air Filter
Cover on top of the unit. Figure 8,
3. Remove the Air Filter° Figure 8 (inset)_
4_ Wash the Air Filter with soap and waten
] CAUTION: [ Do not clean
filter
other
flammable
solvent
to avoid
hazard.
I
Air Filter
Cover Screws -
Air
Filter
in gasoline
or
creating
a fire
5. Squeeze the Air Filter dry.
6_ Add 4 or 5 drops of oil to the the Air Filter,
_OTE:
Avoid soaking the Air Filter with oil_
Figure 8
7, Squeeze the Air Filter to distribute
oil.
8, Reinstall Air Filter and Ah. Filter Coven Figure 8.
C. FUEL
TANK
1. Never
use gasoline
that is more than 2
months old in a fuel mixture.
Gasoline begins
to break down after a short period of time and will
form compounds that cause hard starting and
damage in 2-cycle engines.
Using a fuel mix or gasoline
over 2
months old will cause the engine to be difficult or impossible
to start.
2_ Inspect the unit for fuel leaks each time it is
used. Repair or replace parts as necessary.
3. Do not leave fuel in the unit when storing
for 30 days or longer. Use up fuel left hz the fuel
lines and carburetor
by starting the engine and
letting it run until it stops,
D. STORAGE
1. Clean the unit before storing.
Pay particular
attention
to the air intake area, keeping it free of
debris. Use a mild detergent
and sponge to clean
the plastic surfaces.
2. Do not store the unit or fuel in a closed area
where fuel vapors can reach sparks or an open
flame from hot water heaters, electric motors or
switches, furnaces, etc.
3. Store unit in a dry area out of the reach of
children.
4. Do not leave fuel in the unit when storing
for 30 days or longer. Use up fuel left in the fuel
lines and carburetor
by starting the engine and
letting it run until it stops.
NOTE: If you do not want to remove the gasolhm
from your unit, SEARS CRAFTSMAN Fuel Stabilizer (#71 - 33500) may be added to gasoline left in
the tank to minimize gum deposits and acids. If
the tank is almost empty, mix stabilizer with fresh
gasoline in a separate container and add to tank.
- 10-
ALWAYS FOLLOW INSTRUCTIONS
ON THE
STABILIZER
CONTAINER.
THEN, RUN THE
ENGINE AT LEAST 2 MINUTES
AFTER STABILIZER IS ADDED TO ALLOW MIXTURE TO
REACH CARBURETOR.
STORE UNIT IN A
SAFE PLACE. SEE STEP 2 (this section).
Ak WARNING
It is important
to prevent
gmn deposits
frog
forming in essential
fuel system parts such as th_
carburetor,
fuel filter, fuel hose, or fuel tank dur
ing storage.
Experience
indicates
that alcohol
blended fuels (called Gasohol or using ethanol or
methanol)
can attract
moisture
which
leads to
separation
and formation
of acids during storage.
Acidic gas can damage
the fuel system of an engine while in storage.
E. TROUBLE
SHOOTING
CHART
TROUBLE
CAUSE
Engine
1, Fuel tank empty.
2, Spark plug not firing,
3, Fuel not reaching carburetor.
will not start,
REMEDY
4. Engine flooded.
5. Compression
low.
6, Ignition module.
Engine
will not idle properly
1, Idle speed set too low.
2, Idle speed set too high.
3. Mixture screw requires
4_ Crankshaft
seals worn,
5, Compression low.
adjustment,
L Fill tank with correct fuel mixture.
2, Install new spark plug,
3_ Check for dirty fuel filter; cle_
Check for kinked or split fuel
repair or replace,
4. See "Starting Instructions."
5_ Contact your Service Center,
6. Contact your Service Center.
1 Adjust idle speed screw clockwise to increase speed,
2, Adjust idle speed screw counterclockwise
to reduce speed.
3, See "Carburetor Adjustments."
4. Contact your Service Center.
5, Contact your Service Center.
B
Engine will not accelerate,
lacks power, or dies under
load
Engine
Engine
smokes
a
excessively.
1. Carburetor
requires
2, Air filter dirty.
3, Spark plug fouled.
4_ Carbon build-up,
5. Compression low.
1, See "Carburetor
Adjustments
2. Clean or replace air filter.
3. Clean or replace spark plug m
regap.
4, Contact your Service Center.
5. Contact your Service Center.
5. Choke partially on.
6. Air filter dirty.
7. Mixture screw requires
,
Fuel mixture incorrect_
L
2.
3.
4,
Adjust choke,
Clean or replace air filter.
See "Carburetor
Adjustments
Empty fuel tank and refill wit
correct fuel mixture.
1.
2,
3_
4,
See "FuelingYour
Unit."
Replace with correct spark pll
Contact your Service Center,
See "Carburetor Adjustments
1,
2,
3.
4,
runs hot,
adjustment.
adjustment.
Fuel mixture incorrect.
Spark plug incorrect.
Carbon build-up.
Mixture screw set too low.
ACCESSORIES
The following
accessories
are available
through
Sears Retail Stores,
ITElY_
Outlets,
or Service
Centers_
STOCK
Safety Goggles
.........................................................................
Gutter Attachment
Kit .................................................................
2-Cycle
Engine Oil ....................................................................
Fuel Stabilizer
.........................................................................
Spark Plug
............................................................................
Spark Arrestor
........................................................................
Operator's
Manual .....................................................................
* Available
Catalog
through
your
SEARS
Service
NO.
71-85707
71-79992
71-36551
71-33500
71-85853
530-069285*
530-067870*
Center/Catalogue.
-11-
SEARS GAS BLOWER REPAIR PARTS LIST - MODEL 358.797910
2O
21
30
35
18
19
51
14
10
54
53
12
56
15
16
17
63
71
72
8O
9O
74
75
76
95
93
94
79
109
108
99
p
98
96_
101
100
Kit
Gasket
104
105
Repair
Kit
\
106
12
][o 1b
Gasket
Kit
107
7
Arrestor
[ Spark
Kit
T
T
91
92
55
SEARS GAS BLOWER
,ey
lo.
Part No,
1
530-015635
530-029489
530-029611
530-029615
530-029614
530-029608
530-015887
530-015852
530-015254
530-029480
530-029485
530-029481
530-029486
530-015147
530-029588
530-035290
530-019164
530-029484
530-015880
530-029600
530-029607
530-029565
530-029434
530-015879
530-015876
530-019154
530-027593
530-029781
530-015241
530-029597
530-015805
530-069293
530-015771
530-029227
530-029228
530-029116
530-015126
530-010945
530-015788
530-032103
530-015787
530-019158
530-032102
530-015789
530-014004
530-010897
530-069247
530-029602
530-010729
530-014267
530-030073
530-012244
530-027525
530-029606
530-015776
530-039137
530-019178
530-026413
530-015162
530-014005
530-069274
530-015775
530-014016
2
3
4
5
6
7
8
9
10
11
12
13
14
15
16
17
18
19
20
21
22
23
24
25
26
27
28
29
30
31
32
33
34
35
36
37
38
39
40
41
42
43
44
45
46
47
48
49
50
51
52
53
54
55
56
57
58
59
60
61
62
63
REPAIR PARTS LIST - MODEL 358.797910
Description
Screw
Air Filter Cover
Air Filter
Handle Cover
Handle
Handle Isolator
Screw
Choke Spacer
Wave Washer
Choke Shutter
Throttle Wire
Choke Mtg, Plate
Retainer
Wave Washer (Knob)
Air Box
Carburetor (WA-207A)
Carburetor Gasket
Throttle Knob
Screw
Button
Spring
Shroud
Spring
Screw
Screw
Gasket
Reed Valve
Reed Stop
Screw
Heat Shield
Screw
Muffler
Screw
Spark Arrestor Screen
Spark Arrestor Clamp
Muffler Spring
Key
Crankshaft Ass'y,
Spacer
Inner Bearing
Ring
Crankshaft Seal
Outer Bearing
Retaining Ring
Crankcase/Crankshaft
Ass'y,
Fuel Pick-Up Ass'y,
Fuel Line Kit
Foam
Fuel Cap w/Retainer
Fuel Tank Ass'y,
Spark Plug (CA-8Y)
Cylinder
Spacer
Leadwire Switch
Screw
Ignition Module
Gasket
Piston Ring
Retainer
Piston Rod
Piston Kit (Incl. 58, 59 & Pin)
ey I
Part No.
Description
o. I
,4 I
i5 I
_6 I
,," ,'
i8 I
iv I
tn I
'"
_2 i
73 i
74
15
76
17
78
79
30
31
32
33
34
35
36
B7
88
89
90
91
92
93
94
95
96
97
98
99
100
101
102
103
104
105
106
530-015918
530-029603
530-029613
530 - 029601
530-015239
530-015872
530-029433
530-039139
530-015149
530-626605
530-029432
530-094865
530-014265
530-069271
530-029575
530-027523
530-094867
530-015851
530-015772
530-029448
530-029449
530-015882
530-069306
530-027531
530-027569
530-069232
530-015886
530-069302
530-069348
530-035014
530-035151
530-035212
530-035214
530-035166
530-035164
530-03520.3
530-035208
530-035028
530-035031
530-035188
530-035106
530-035178
530-035260
107
5.30-0.35219
108
109
110
530-035211
530-0352!7
530-035218
Screw
Isolator
Spring
Insulator
Screw
Screw
Baffle
Flywheel
Washer
Nut
Blower Housing (Upper)
Impeller
Blower Housing (Lower)
Blower 3hbe Kit
Roller
Retainer
Pulley Housing
Roll Pin
Screw
Pinion
Drag Element
Screw
Starter Pulley
Starter Spring
Starter Handle
Rope Kit
Screw
Gasket Kit
Spark Arrestor Kit
+Metering
Diaphragm
*+ Metering Diaphragm Gasket
Mixture Needle
Mixture Needle Spring
*+ Fuel Pump Diaphragm
*+ Fuel Pump Gasket
Idle Speed Screw
Idle Speed Spring
Metering Lever Pm
. Metering [,ever
. Metering Lever Spring
Inlet Needle Valve
lit
Fuel Inlet Screen
Carh Kwik Repair Kit
( *Indicates Contents)
Carb. Gasket/Diaphragm
Kit
( +Indicates Contents)
Clrcmt Plate Gasket
_"
Mixture Needle Washer '
'+"O" Ring Mixture
'
:
Not Shown
530-067870
530-061344
530-029620
530-029624
530-029625
Operator Manual
Carton
Instruction Decal
Shroud Decal (Right)
Shroud Decal ([,eft)
Screw
Crankcase
Ass'y,
13
- 14 -
QUICK
Read
A.WARNINGS
REFERENCE
PAGE
and follow
all Warnings
and Safety
Failure
to do so can result
in serious
AND
SAFETY
INSTRUCTIONS
Instructions.
injury.
....................
PAGE
NO.
3
PAGE
NO.
7
PAGE
NO.
7
PAGE
NO.
9
1. Wear eye protection.
2 Dress safely - - boots or safety shoes and long pants_
3 Check for worn, loose, missing, or damaged parts and repair.
4
Keep children,
B. FUELING
1. Eliminate
bystanders,
YOUR
all sources
and animals
ENGINE
of sparks
2_ Use clean, fresh gasoline,
3. Use 3.2 oz. 2-cycle engine
a minimum
of 30 feet away.
......................................
or flame where
oil to 1 gal. gasoline
fuel is mixed, poured,
OR 8 oz, 2-cycle
or stored.
engine
oil to 2_5 gal. gasoline_
4. Mix fuel in an approved, marked container; mix and pour fuel in an outdoor area,
5_ Move a minimum of 10 feet away from fuel and fueling site before starting engine.
C. STARTING
INSTRUCTIONS
...................................
1. Adjust the Throttle Knob properly.
2_ Make sure the nozzle is directed away from people, animals,
glass, and solid objects_
3_ Pull the starter
the engine.
4
rope no more than 8 times to avoid flooding
To stop the engine, press and hold the "STOP"
D.GENERAL
MAINTENANCE
1. Have all maintenance
switch.
....................................
other than the recommended
procedures
Manual performed by your Sears Service Centen
2. Disconnect the spark plug before performing
maintenance
3_ Run fuel from the unit before storing.
4_ Clean air filter frequently,
is less_
5
but always after 5 hours
Store in a dry place out of the reach of children
described
in the Operator's
except for carburetor
of operation
or 5 tanks
adjustments.
of fuel, whichever
The Model Number will be found below the top handle with the Serial
Number. Always mention the Model Number when requesting
service
or repair parts for your unit.
All parts listed herein may be ordered
and most Sears Stores.
Operator's
Manual
WHEN ORDERING
ING INFORMATION
from any Sears Service
Center
REPAIR PARTS ALWAYS GIVE THE FOLLOWAS SHOWN IN THIS LIST:
1
The PART NUMBER
3.
The PART DESCRIPTION
2.
The MODEL
4_
The NAME OF ITEM
NUMBER
358.797910
GAS POWER
--
BLOWER
If the parts you need are not stocked locally, your order will be transmitted to a Sears Repair Parts Distribution
Center for handling.
Model No.
When you buy merchandise
from
Sears you get an extra value that
nobody else can offer - Sears Service.
358.797910
Across town or across the country, Sears Service is always near,
providing
trustworthy,
competent
service
technicians
using
only Sears specified factory parts.
How to Order
Repair
Parts
Your Sears Merchandise
takes on added value when you discover that Sears
has Service Units throughout
the country.
Each is staffed by Searstrained, professional
technicians
using Sears approved methods.
SEARS
SERVICE
IS AT YOUR
SERVICE
Sold by Sears, Roebuck
530 - 067870
- 5 - O1/22/93
and Co., Hoffman
Estates,
Ill. 60179 USA
PRINTED IN U.S.A.