1
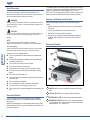
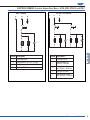
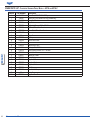
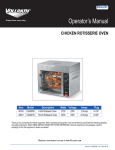
ENGLISH Operator’s Manual COUNTERTOP SANDWICH PRESS Item 40794 40795 40794-C 40795-C Model TSI7001 TSI8002 TSI7001 TSI8002 Description Voltage Sandwich Press, Ribbed Plate, Cast Iron 120V Sandwich Press, Ribbed Plate, Cast Iron 220V Sandwich Press, Ribbed Plate, Cast Iron 120V Sandwich Press, Ribbed Plate, Cast Iron 220V Watts 1800 3080 1800 3080 Amps 15 Amps 14 Amps 15 Amps 14 Amps Plug 5-15P 6-15P 5-20P 6-20P Thank you for purchasing this Vollrath Counter Top Cooking Equipment. Before operating the unit, read and familiarize yourself with the following operating and safety instructions. SAVE THE ORIGINAL BOX AND PACKAGING. Use this packaging to ship the unit if repairs are needed. SAVE THESE INSTRUCTIONS FOR FUTURE REFERENCE. Item No. 2350014-1 en Rev 06/14 Safety Precautions To ensure safe operation, read the following statements and understand their meaning. This manual contains safety precautions which are explained below. Please read carefully. WARNING Warning is used to indicate the presence of a hazard that can cause severe personal injury, death, or substantial property damage if the warning is ignored. CAUTION Caution is used to indicate the presence of a hazard that will or can cause minor personal injury or property damage if the caution is ignored. NOTE Note is used to notify people of installation, operation, or maintenance information that is important but not hazard-related. This sandwich press is a medium duty appliance capable of a wide variety of applications. The temperature is thermostatically controlled. The temperature range for non-coated surface models is between 120°F (49°C) and 550°F (288°C). The thermostat is also the ON/OFF switch. An indicator lamp adjacent to the thermostat dial indicates when the elements are heating. Unpacking the Equipment and Initial Setup Dispose of all packaging, materials in an environmentally responsible manner. 1. Remove all packing material and tape, as well as any protective plastic from the unit. 2. Clean any glue residue left over from the plastic or tape. 3. Place the unit in the desired position and height. 4. Plug the unit into a properly grounded electrical supply matching the nameplate rating. Damage to the unit can occur if incorrect power is supplied. Features and Controls For Your Safety! ENGLISH These precautions should be followed at all times. Failure to follow these precautions could result in injury to yourself and others. To reduce risk of injury or damage to the unit: Use only grounded electrical outlets matching the nameplate rated voltage. Have equipment installed by a qualified personal in accordance with local codes and ordinances. This unit must only be used in a flat, level position. Do not use an extension cord with this unit. Unplug the unit, turn off and let it cool before cleaning or moving. Do not spray controls or outside of the unit with liquids or cleaning agents. Do not clean the unit with steel wool. Keep the unit and power cord away from open flames, electric burners or excessive heat. Do not operate the unit unattended. Do not operate the unit in public areas and/or around children. The unit may be hot, even though the pilot light is not on. Do not operate if the unit has been damaged or is malfunctioning in any way. Function and Purpose This unit is intended to be used for contact grilling foods in commercial foodservice operations only. It is not intended for household, industrial or laboratory use. Before using this equipment it must be cleaned and dried thoroughly. Clean all surfaces before use. Failure to clean surfaces before using the unit could cause food contamination. 2 Operator’s Manual A B C F E D Figure 1. Features and Controls A HANDLE. Used to control the up and down movement of the top grill plate. B TOP GRILL PLATE. Contains a heating element and heats food. C BOTTOM GRILL PLATE. Contains a heating element and heats food. D THERMOSTAT CONTROL dial. Used to set or adjust the temperature of the cooking plate. The numbers on the dial correspond with the grill plate temperature. The “0” position is off. E F PILOT LIGHT. This light indicates the element is heating. Once the set temperature has been reached the light will go out. This light indicates that the element is heating. Once the temperature has been reached the light will go out. Unit will continue to maintain heat and temperature with the light cycling. This is not a power indicator light. Cleaning To maintain the appearance and increase the service life, clean your unit daily. WARNING DRIP TRAY. A container that collects grease, oil and liquid from the bottom grill plate. This is removable for draining and cleaning. Operation WARNING Burn Hazard. Do not touch hot food, liquid or heating surfaces while unit is heating or operating. Burn Hazard. Do not touch hot food, liquid or heating surfaces while unit is heating or operating. Hot surfaces and food can burn skin. Allow the hot surfaces to cool before handling. Do not drop or spill water into the cooking surface as it can spray or splatter. NOTE: Do not clean the unit with steel wool. 1. Allow the unit to cool completely before cleaning. Hot surfaces and food can burn skin. Allow the hot surfaces to cool before handling. Do not drop or spill water into the cooking surface as it can spray or splatter. WARNING Electrical Shock Hazard. Keep water and other liquids from entering the inside of the unit. Liquid inside the unit could cause an electrical shock. Electrical Shock Hazard. Keep water and other liquids from entering the inside of the unit. Liquid inside the unit could cause an electrical shock. Do not spray water or cleaning products. Liquid could contact the electrical components and cause a short circuit or an electrical shock. Do not use unit if power cord is damaged or has been modified 2. 3. 4. 5. Unplug the unit. Do not immerse the cord, plug or unit in water or any other liquid. Wipe grease or oil into the drip tray (F). See Figure 1. Using a damp cloth or sponge dipped in soapy water to clean the unit and plates (B and C); rinse thoroughly. 6. Dry thoroughly after cleaning. 7. Empty and clean the drip tray (F). ENGLISH Before initial use, turn the thermostat control to the maximum setting, close the lid and allow unit to burn in for 30 minutes. You may notice smoke appearing due to the cooking surface burning in. This is normal. After 30 minute burn in period the unit is ready for use. To begin heating or cooking: 1. Preheat unit to desired temperature. 2. Center the food product onto the bottom grill plate (C). See Figure 1. 3. Use handle (A) to lower top grill plate (B) to desires height. 4. Heat for desired length of time. 5. Raise handle and remove food product. WARNING Do not spray the unit or controls with water or cleaning products. Liquid could contact the electrical components and cause a short circuit or an electrical shock. Do not use unit if power cord is damaged or has been modified 6. At the end of each cooking cycle wipe down the cooking the plates. Never allow excess fat, oil, or grease to build up as this will result in a build-up of carbon on the plates. Operator’s Manual 3 Troubleshooting Troubleshooting Chart Problem It might be caused by Pilot Light does not come on when the temperature control is turned up. Grill Plates do not get hot. Course of Action Unit is not plugged in. Plug unit in. Pilot Light malfunction. Replace Pilot Light. Low or no voltage from power source (wall outlet). Verify correct voltage is being provided to unit. If not, have qualified personnel correct power problem. Heating Element is faulty. Replace Heating Element. Service and Repair There are no user serviceable parts within this appliance. To avoid serious injury or damage, never attempt to repair the unit or replace a damaged power cord yourself. Do not send units directly to the Vollrath Company. Please contact the qualified professional repair service listed below. VOLLRATH Technical Services • 1-800-628-0832 • Email: [email protected] ENGLISH When contacting the Authorized Professional Service Center, please be ready with the item number, model number (if applicable), serial number, and proof of purchase showing the date the unit was purchased. 4 Operator’s Manual ELECTRICAL DRAWING - Countertop Sandwich Press, Models ~ 40794, 40795, 407941-C and 40795-C 208-240V ~ 2700-3600 Watt 120V ~ 1800Watt N L1 L2 G T L1 G T 1 2 2 3 1 T 3 4 2 1 5 4 4 1 Thermostat Control 2 Heating Element, Top, 120V ~ 810 Watt 3 Heating Element, Bottom, 120V ~ 990 Watt 4 Pilot Light, 120V, Amber Callout Description 1 Thermostat Control 2 Heating Element, Top, 208-240V ~ 860W Max 3 Heating Element, Bottom, Left, 208-240V ~ 940W Max 4 Pilot Light, 240V, Red 5 Heating Element, Bottom, Right, 208-240V ~ 940W Max Operator’s Manual ENGLISH Callout Description 5 SPARE PARTS LIST - Countertop Sandwich Press, Models ~ 40794 and 40794-C ENGLISH Callout 6 1 1 2 3 4 5 6 7 8 9 10 11 12 13 15 16 17 18 19 20 21 22 23 24 N/S Part Number XAA0005 1786001 XAA0012 XTSI2004 XTSI2030 XTSI2006 XTSI2007 XTSA0007 N/A XTSI2005 XAA0009 N/A XTSI2015 XAA0011 XTSI2035 XTSI2016 XTSI2017 XTSI2018 XTSI2019 XTSI2020 XTSI2021 XTSI2036 XTSI2023 N/A XTSI2024 Operator’s Manual Description Power Cord, 120V, NEMA 5-15P Plug Power Cord, 120V, NEMA 5-20P Plug (Canada only) Power Cord Restraint Foot, Rubber Top Heating Element, 120V ~ 810 Watt Top Plate, Ribbed, Non-Coated Bottom Plate, Ribbed, Non-Coated Thermostat Bottom Cover Drip Tray Control Panel Fascia Frame Control Knob (0-550) Pilot Light, Red, 120 Volt Bottom Heating Element 120V ~ 990 Watt Handle, Steel Handle Grip, Plastic Handle Spring Hinge Axle, Front Hinge Axle Circlip Hinge Axle, Rear Wire Tube Brass Saddle Clamp Spring Cover Hinge Axle Rear Cover EXPLODED VIEW - Countertop Sandwich Press, Models ~ 40794 and 40794-C 27 26 21 22 19 23 4 18 5 24 6 17 16 2 15 ENGLISH 1 11 10 14 13 3 12 20 7 25 9 8 Operator’s Manual 7 SPARE PARTS LIST - Countertop Sandwich Press, Models ~ 40795 and 40795-C ENGLISH Callout 8 1 2 3 3 4 5 6 7 7 8 9 10 11 12 13 14 15 16 17 18 19 20 21 22 23 24 25 26 27 28 Part Number Description XTSI3007 XTSI3005 XTSI2037 XTSI2038 N/A XTSI3022 N/A XAA0006 1786201 XAA0012 XTSI2004 XTSA0007 N/A XTSI3004 N/A XTSI2015 XAA0002 N/A XAA0009 XTSI3008 XTSI3019 XTSI3020 XTSI2018 XTSI2023 XTSI3006 XTSI3021 N/A N/A N/A N/A Operator’s Manual Top Heating Element, 208-240V ~ 860W Max Top Plate Wire Tube, Left Wire Tube, Right Wire Tube, Clip Hinge Axle, Rear, (includes Clips) Hinge Axle, Washer Power Cord, 240V, NEMA 6-15P Plug Power Cord, 240V, NEMA 6-20P Plug (Canada only) Power Cord Restraint Foot, Rubber Thermostat Top Cover Drip Tray (includes Knobs) Box Thermostat Control Knob Pilot Light, Red, 220 Volt Pilot Light Fascia Control Panel Fascia Bottom Heating Element, 208-240V 940W Max Handle, Steel Handle Grip, Plastic Handle Spring Brass Saddle Clamp Bottom Plate Hinge Axle, Rear Decal, Vollrath Bottom Cover, Vented Bottom Cover, Non-Vented Wire Brush EXPLODED VIEW - Countertop Sandwich Press, Models ~ 40795 and 40795-C 11 6 22 6 24 1 3 21 22 5 1 4 21 20 2 3 5 19 20 7 18 8 17 18 16 15 ENGLISH 19 9 12 13 10 14 25 27 26 28 Operator’s Manual 9 Warranty Statement for The Vollrath Co. L.L.C. This warranty does not apply to products purchased for personal, family or household use, and The Vollrath Company LLC does not offer a written warranty to purchasers for such uses. The Vollrath Company LLC warrants each of its products listed below against defects in materials and workmanship for the applicable period provided below. All other products manufactured or distributed by The Vollrath Company LLC are warranted against defects in materials and workmanship for a period of one year. In all cases, the warranty runs from the date of the end user’s original purchase found on the receipt. Replacement parts – The warranty period is 90 days. For complete warranty information, product registration and new product announcement, visit www.vollrath.com. The Vollrath Company, L.L.C. 1236 North 18th Street Sheboygan, WI 53081-3201 U.S.A. www.vollrath.com Main Tel: 800.628.0830 Fax: 800.752.5620 Technical Services: 800.628.0832 Service Fax: 920.459.5462 Canada Service: 800.695.8560 © 2014 The Vollrath Company, L.L.C. Item No. 2350014-1 en Rev 6/14