1
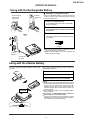
MD-MT190H
OPERATION MANUAL
Using with the Rechargeable Battery
■ Charging the rechargeable battery
Insert the
– side first.
Do not force the
battery cover
open too far.
When the rechargeable battery is used for the first time
or when you want to use it after a long period of disuse,
be sure to charge it fully.
1
Insert the rechargeable battery.
A rechargeable battery other than the AD-N55BT
cannot be charged.
2
3
Plug the AC adaptor into the wall socket, and
then insert the plug on the other end into the DC
IN 5V socket.
Press the MENU/CHRG button.
The battery indicator will scroll, and battery will begin charging.
Scrolling
●
●
AC 230V,
50/60Hz
After the rechargeable battery is charged or used, it
will get slightly warm. This is normal.
When the portable MD is turned on or operating, the
battery will not be charged.
To the DC IN
5V socket
Using with the Alkaline Battery
Use one commercially available alkaline battery (LR6,
"AA" size).
Open
2
1
Press
Back of the
portable MD
RELEASE
When using the alkaline battery, be sure to insert the
rechargeable battery also.
1
2
3
Open the case cover.
Insert an alkaline battery into the battery case.
Attach the battery case to the portable MD.
Caution:
● Whilst you are using the rechargeable battery and the
alkaline battery at the same time, do not remove either
of them. If you do, when the unit is in the play mode,
playback will stop. When in the recording mode, the
recorded contents will be erased, and the power may
be disconnected.
● Do not replace the battery or the rechargeable battery
during operation.
● Do not use a rechargeable battery (nickel-cadmium battery etc.) in the battery case.
● If the unit is not used for a long period of time, remove
the battery. (Even if the power is turned off, the battery
will be drained slowly but continuously.)
LOCK
–5–
MD-MT190H
Error Messages
ERROR MESSAGES
BATT EMPTY
BLANK MD
MEANING
●
The battery has run down.
●
Nothing is recorded.
(Replace the disc with a recorded disc.)
Can't COPY
●
You tried to record from a copy prohibited MiniDisc.
ERROR MESSAGES
Can'tSTAMP
Can't EDIT
You tried to record signals other than
music (such as data).
●
A track cannot be edited.
(Change the stop position of the track and
then edit it.)
Can't PLAY
●
You tried to play back a track that cannot be played with this equipment.
Can't READ (*)
●
The disc data cannot be read because
the disc is damaged.
(Reload the Minidisc or replace it with another one.)
Can't REC
●
●
Stamp function does not work.
(Check the number of tracks.)
Can'tWRITE
●
Cannot save the TOC information correctly to a MiniDisc.
DEFECT!
●
The disc is scratched.
(Record using the analogue cable.)
●
MEANING
(If the recorded sound is not right, retry
recording or replace the disc with a recordable one.)
DISC FULL
●
The disc is out of recording space.
Er-MD (**)
●
The microprocessor has reported a
system fault and the unit is out of order.
(To have it repaired, go to the distributor
where you purchased the unit.)
HOLD
●
The unit is in the hold mode.
LOCKED
●
You removed a MiniDisc whilst recording or editing.
(Turn off the power before removing the
MiniDisc.)
Recording cannot be performed correctly due to vibration or shock.
NO DISC
●
A disc has not been loaded.
Number or symbol appears in (*) position.
ERROR MESSAGES
NO SIGNAL
MEANING
●
Poor connection of the digital cable.
●
No output signal comes out from the
connected unit to playback.
(Use the AC power for the connected
unit.)
●
The input signal has improper sampling frequency.
PLAY MD
●
You tried to record on a playback-only
disc.
PROTECTED
●
The write protection tab of a MiniDisc
is set to the protected position.
●
You tried to record on a playback-only
disc.
●
Since a track number is currently being located or updated, the unit cannot
accept your command.
SORRY
ERROR MESSAGES
TEMP OVER
MEANING
●
The temperature is too high.
(Turn off the power, and wait for a while.)
TOC FORM
(**)
●
There is an error in the recording signal.
(Erase all of the tracks, and then record
again.)
TOC FULL
●
There is no space left for recording
character information (track names,
disc names, etc.).
Tr. Protect
●
The track has been protected from being erased.
(Edit the track with the device on which it
was recorded.)
? DISC
●
A disc which contains data other than
music was played.
(A disc which contains nonmusic data
cannot be played.)
(Wait for a while and try the operation
again.)
●
There is an error in the signal recorded
on the disc.
Number or symbol appears in (*) position.
–6–
MD-MT190H
MiniDisc System Limitations
The unit may have the following symptoms whilst recording or editing. The unit is not out of order.
SYMPTOM
LIMITATIONS
"DISC FULL" or "TOC FULL" appears
even though the MiniDisc still has recording time left.
More than 255 tracks (maximum) cannot be recorded regardless of
the recording time. If the MiniDisc is recorded or edited repeatedly or
if it has scratches (recording skips scratched parts), you may not be
able to record the maximum tracks above.
The remaining recording time does not
increase even though you erased
tracks.
The unit does not count non-recorded portions that last 12 or fewer
seconds to display the remaining recording time. The time may not
increase even if you erase short tracks.
The total of the recorded time and the
remaining time does not match the maximum recordable time.
One cluster (approximately 2 seconds) is the minimum unit for recording. For example, a 3-second track uses 2 clusters (approximately 4 seconds). Therefore, the actual recordable time may be
shorter than the displayed time.
(The number of seconds indicates that in the stereo recording mode
(SP). It varies depending on the recording mode.)
Combine function does not work.
A MiniDisc on which recording and editing are repeated may not allow the combine function.
Sound skips in fast reverse/forward.
If one track is divided and recorded in separate places on a repeatedly recorded or edited MiniDisc, sound may skip.
A track number is created in the middle
of a track.
A track number may be created if there are scratches or dust on the
MiniDisc.
Troubleshooting
Many potential "problems" can be resolved by the owner without calling a service technician. If something seems to be wrong
with this product, check the following before calling your authorised SHARP dealer or service centre.
The unit does not turn on.
Some sounds are skipped.
●
Is the AC adaptor disconnected?
●
Is the battery exhausted?
●
Is the battery exhausted?
●
Is the unit being subjected to excessive vibration?
●
Is the unit in the hold mode?
●
Has condensation formed inside the unit?
●
Is the unit being influenced by mechanical shock or by
static electricity?
The MiniDisc cannot be ejected.
●
Has the track number or character information been
written on the disc yet?
●
Is the unit in the recording or editing mode?
No sound is heard from the earphones.
●
Is the volume set too low?
●
Are the earphones plugged in?
●
Are you trying to play a MiniDisc with data on it instead
of a MiniDisc containing music?
When the operation buttons are pressed, the unit does
not respond.
●
Is the unit in the hold mode?
●
Is the battery exhausted?
●
Is the earphones plug inserted firmly?
Recording and editing are impossible.
●
Is the MiniDisc protected against accidental erasure?
●
Is the unit connected properly to the other equipment?
●
Is the AC adaptor unplugged or did a power failure occur whilst recording or editing?
●
Is the unit in the hold mode?
●
Is an optical signal being output from the stereo system? Read the operation manual for the stereo system.
–7–
MD-MT190H
2 Connect the AC adaptor
1 Insert a MiniDisc
AC 230V, 50/60 Hz
2
Insert according to
the direction arrow.
4
3
1
To wall socket.
1 Slide the OPEN lever to re-
3 Insert a MiniDisc as shown.
lease the compartment door.
2 Lift it up.
To the DC IN 5V socket.
4 Close the compartment door.
1 Plug the AC adaptor into the
2 Insert the plug on the other
wall socket.
end into the DC IN 5V socket.
Before using the unit with a rechargeable battery, the battery has to be charged.
When you record on a MiniDisc,
check that the erase prevention tab
is set to the “recordable” position.
Recordable
Caution:
● Insert the plugs firmly.
● When the unit is not in use for extended periods, remove the AC adaptor from
the wall socket.
Recording
prevented
3 Connections
Preparation for use
The unit does not work
if the HOLD button is set to HOLD.
■ To connect to a stereo system with "LINE OUT" or "AUDIO OUT"
sockets (Analogue connection)
If the audio system has only one pair of sockets,they are usualy for
input only and recording via this connection is not possible.
Remote control unit
Move the HOLD switch to the safety position
(direction indicated by the arrow).
Orange mark
Hold
LINE IN
To the DC IN
5V socket
Press the HOLD button for 2 seconds or more.
Hold
Supplied
connection
cable
Released
RIGH
T
LEFT
Red: To right
White: To Left
CAUTION:
It is not recommendable to put the
MiniDisc into a rear pocket, as this
may damage the product when sitting.
–8–
MD-MT190H
Recording
Recording: continued
Check that the unit is connected to the stereo system.
4 Press the PAUSE button on the stereo system to enter the playback pause mode.
Here you can select the track to be recorded.
5 Press the MENU/CHRG button repeatedly to select “REC MODE”.
6 Press the ENTER/SYNC button.
7 Press the MENU/CHRG button repeatedly to select recording mode.
8 Press the ENTER/SYNC button.
The mode will be set automatically after 7 seconds even if the
ENTER/SYNC button is not pressed.
9 Press the 06 button to start the MiniDisc unit recording.
10 Begin playback on the stereo system, the output will be recorded.
1 Press the REC button.
Record pause mode is entered.
2 Begin playback on the stereo system connected to this portable MD.
To stop recording
Press the ■ :OFF/HOLD button.
To enable the record level to be set.
●
3 Press the REC LEVEL 5 or 4 button to adjust the recording level.
Adjust the recording level so that the maximum sound volume from the
source makes the reading swing somewhere between –4 dB and 0 dB.
●
Level meter indicator
This unit can adjust the digital recording level just the same as the analogue recording.
TOC display
Playback
R
Right
channel
L
Left
channel
When recording stops, “TOC” (Table
Of Contents) appears. Whilst “TOC”
appears, the MiniDisc recorded
contents have not yet been updated.
To prevent the new recording from
being lost, it is not possible to remove the MiniDisc whilst “TOC” is
displayed.
To the REMOTE
socket
1 Insert the earphones plug firmly into the earphones socket on
the remote control unit.
2 Plug the remote control into the REMOTE socket on the unit.
3 Insert a MiniDisc.
4 Press the 06 button.
Playback starts automatically with a playback only MiniDisc or a MiniDisc
which is protected against accidental erasure (Auto-play function).
To stop playback
Press the ■ :OFF/HOLD button.
If the unit is not operated for at least 2 minutes whilst in the stop mode, the power will
shut off automatically.
–9–
To update the recorded contents
of the MiniDisc
Press the ■ :OFF/HOLD button
whilst in the stop mode.
●
The power turns off after recorded
contents have been updated on the
MiniDisc.
Warning:
If the power is removed (Battery/AC
adaptor) whilst “TOC” is displayed, the
MiniDisc unit lid will remain locked until
the battery/main power is restored and
the unit is turned on. Your new recordings or edited changes will be lost and
your MiniDisc may become unusable.