1
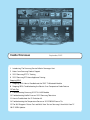
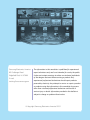
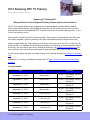
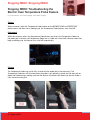
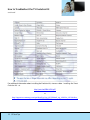
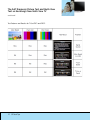
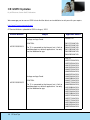
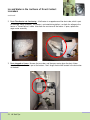
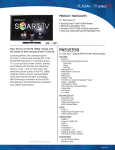
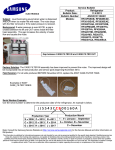
Samsung Service
News
Your source for service information
Samsung Service
News
Your source for service information
Inside this issue
September, 2013
1 Introducing: The Samsung Service Bulletin Scavenger Hunt
3 Notes from Samsung Product Support
4 2013 Samsung RTC TV Training
6 2013 Samsung RTC Home Appliance Training
Stopping REDO
7 Stopping REDO: How to Troubleshoot the 2013 TV Bluetooth Module
8 Stopping REDO: Troubleshooting the Electric Oven Temperature Probe Feature
CE Tech Tips
9 Troubleshooting Samsung 2013 TVs’ MOIP Module
10 Troubleshooting Netflix Errors on 2013 Samsung Televisions
11 How to Troubleshoot the TV Evolution Kit
14 Troubleshooting the Temperature Sensor on 2013 F8500 Plasma TVs
15 The Self Diagnosis Picture Test and Multi-View Test on Samsung’s New Multi-View TV
18 CE GSPN Updates
Samsung Service
News
Your source for service information
Inside this issue
September, 2013
HA Tech Tips
19 Samsung’s Sparkling Water Refrigerator Stars on Jimmy Kimmel Live
20 Ice and Water in the Ice Room of Direct Contact Icemakers
22 Refrigerators: Checking the DC Fan Voltage at the Main PCB
Samsung Service
News
Your source for service information
Samsung Electronics America
85 Challenger Road
Ridgefield Park, NJ 07660
E-mail:
[email protected]
The information in this newsletter is published for experienced
repair technicians only and is not intended for use by the public.
It does not contain warnings to advise non-technical individuals
of the dangers that exist when servicing a product. Only
experienced professional technicians should repair products
powered by electricity. Any attempt to service or repair a product
or products using the information in this newsletter by anyone
other than a trained professional technician could result in
serious injury or death. Information provided in this bulletin is
subject to change or update without notice.
© Copyright Samsung Electronics America 2013
Introducing: The Samsung Service
Bulletin Scavenger Hunt
Test Your Knowledge of Samsung Service
Bulletins
Rules: Each month, we will provide a Scavenger
Hunt page containing a list of service bulletins and
questions about those bulletins. See the next page.
The goal is to answer as many of the questions
correctly as you can!
To Enter: Answer the questions about the service
bulletins, tell us whether you knew the answer,
looked it up, or couldn’t find it. When you’re done,
fill in the personal information at the bottom
of the page. Then, e-mail the answer page or
the newsletter containing the answer page to:
[email protected]. Put Scavenger
in the e-mail’s topic field.
The Winner: The following month, we will announce
the winner with the most correct items. If there is
a tie, the winner will be chosen based on the entry
date and time…First in wins!
The Prize: The winner will win a $20.00 gift card.
Eligibility: Only 1 winner per ASC. No one from
Samsung Electronics of America or any of its
subsidiaries is eligible to enter.
1 Introducing: The Samsung Service Bulletin Scavenger Hunt
All questions refer to the model numbers and service bulletins listed.
Answer the questions by typing into the blue fields or clicking the blue circles.
Once you answer the question, let us know: did you know it, looked it up, or couldn’t find it?
Make sure to fill in your personal information at the bottom before sending!
Model:
Question
UN55ES7500FXZA
Service Bulletin
Number
ASC20130429001
PN43F4500AFXZA
ASC20130606003
What are the 2 possible
symptoms?
UN46F5000AFXZA
ASC20130620001
Answer
List the 3 issues that can
cause the TV to reset.
True/False: After replacing
the main board, there is no
reason to upgrade the
firmware.
What 2 chipsets are
affected?
Knowledge
(Check one)
Knew it
Looked it up
Couldn't find it
Knew it
Looked it up
Couldn't find it
True
False
Knew it
Looked it up
Couldn't find it
Knew it
Looked it up
Couldn't find it
What are the S/W folder
names of each?
Knew it
Looked it up
Couldn't find it
PN51E450A1FXZA
ASC20120606001
Fill in the blank.
PN51E550D1FXZA
ASC20120611001
The two points to measure
between for resistance to
determine if the Y buffer
board has failed is?
Knew it
Looked it up
Couldn't find it
The measurement should
read at or above what
resistance?
Knew it
Looked it up
Couldn't find it
If the rear cover is removed
incorrectly, what can be
damaged?
Knew it
Looked it up
Couldn't find it
UN40EH6000FXZA
ASC20120319002
The Eco sensor, which is part of the
Function Board, has been improved to
achieve better
sensitivity.
__________
ASC #
Tech ID #
Email address
First/Last name
Mailing address
Email this completed scavenger list to: [email protected]
Put “Scavenger” in the e-mail Subject field.
Knew it
Looked it up
Couldn't find it
Notes from Samsung Product Support
By Jorge Tavora, Product Support Manager
Alert: When calling Tech Support, pay close attention to the greeting. The menus have changed.
±± Press 1 for parts related issues. (If you need a part number, a part researched, received a wrong
or defective part, etc.)
±± Press 2 for warranty or field service. (If you have a warranty/billing/policies question.)
±± Press 3 for the Technical Support Hotline. (If you need technical assistance.)
Please have the back cover(s) off the product and your meter ready before calling Technical Support.
This will expedite your call.
To better assist you with your repairs, let us know if the suggestions made by
S.A.R.A. (Samsung Automated Repair Assistance) were helpful or not. Take the short
survey at the bottom of your Service Order ticket.
Is the symptom code assigned by the call center correct? YES/NO
Was the “Repair Assistance” guide helpful (repair scenario and parts recommendation)? YES/NO
This is what the survey looks like… it consists of 2 - 6 questions depending on the answers you
provide. It will only take 20-30 seconds.
Symptom Feedback - By providing us with feedback, S.A.R.A. can provide you with more effective
Repair Assistance.
In the long run, this can improve your overall LTP, FTF, and REDO percentage.
3 Notes from Samsung Product Support
2013 Samsung RTC TV Training
By Jim Foster, Manager, Training
Samsung TV Training 2013
Being held at one of our Regional Training Centers and at select locations!
For 2013, by popular demand, Samsung continues to accommodate your demanding schedule
with one day update training. To be eligible to attend the one day training session, you must have
attended and successfully completed 2012 TV product training in one of our training centers, or at a
live, on-site training session.
Samsung will still hold 3 day Basic classes quarterly. These classes are intended for new techs who
have never attended a Samsung training or for techs who need extra help to improve their skills.
Attend in-depth, hands-on, 1 day Update or 3 day Basic training at one of our RTCs in Little Ferry, NJ
or Bensenville, IL! In addition, we will be holding limited on-site trainings at various locations around
the country. You can reserve your seat in training by emailing us at [email protected]. You
must send an e-mail and receive a confirmation to guarantee admission. Walk-ins are not accepted.
You can always obtain the most up to date training list by sending an email to [email protected].
com.
Additionally, TV training is available on-demand 24/7 at https://my.plus1solutions.net/clientPortals/
samsung/
Training Schedule:
Date
City
September 10, 2013
Bensenville, IL
September 11, 2013
Bensenville, IL
September 12, 2013
Bensenville, IL
September 13, 2013
Bensenville, IL
September 24, 2013
Little Ferry, NJ
September 25, 2013
Little Ferry, NJ
September 26, 2013
Little Ferry, NJ
September 27, 2013
Little Ferry, NJ
4 2013 Samsung RTC TV Training
Comments
FE/ASC 1 day Update Training
(Session 1)
FE/ASC 1 day Update Training
(Session 2)
FE/ASC 1 day Update Training
(Session 3)
FE/ASC 1 day Update Training
(Session 4)
FE/ASC 1 day Update Training
(Session 1)
FE/ASC 1 day Update Training
(Session 2)
FE/ASC 1 day Update Training
(Session 3)
FE/ASC 1 day Update Training
(Session 4)
2013 Samsung RTC TV Training
continued
Date
City
Comments
October 9 -11, 2013
Bensenville, IL
FE/ASC 3 day Basic Training
October 29 -31, 2013
Little Ferry, NJ
FE/ASC 3 day Basic Training
Above: The KN55S9CAF OLED TV
5 2013 Samsung RTC TV Training
2013 Samsung RTC Home Appliance
Training
By Jim Foster, Manager, Training
Samsung HA Training 2013
For 2013, per popular demand, Samsung continues to accommodate your demanding schedule
with two day update training. To be eligible to attend the two day training session, techs must have
attended and successfully completed 2012 product training in one of our training centers, or at a live,
on-site training session.
Samsung will still hold 4 day Basic classes quarterly. These classes are intended for new techs who
have never attended a Samsung training or for techs who need extra help to improve their skills.
Attend in-depth, hands-on 2 day Update or 4 day Basic training at one of our RTCs!
You can reserve your seat in training by emailing [email protected]. You must send an e-mail
and receive a confirmation to guarantee admission. Walk-ins are not accepted.
Additionally, Home Appliance training is available on-demand 24/7 at https://my.plus1solutions.net/
clientPortals/samsung/
Training Schedule:
Date
City
September 10 -11, 2013
Little Ferry, NJ
September 12 -13, 2013
Little Ferry, NJ
September 24 -25, 2013
Bensenville, IL
September 26 -27, 2013
Bensenville, IL
October 1 - 4, 2013
Little Ferry, NJ
October 22 -25, 2013
Bensenville, IL
6 2013 Samsung RTC Home Appliance Training
Comments
ME/ASC 2013 Products 2 day
Update Training (Session 1)
ME/ASC 2013 Products 2 day
Update Training (Session 2)
ME/ASC 2013 Products 2 day
Update Training (Session 1)
ME/ASC 2013 Products 2 day
Update Training (Session 2)
ME/ASC 2013 Products 4 day
Basic Training
ME/ASC 2013 Products 4 day
Basic Training
Stopping REDO Stopping REDO
Stopping REDO
Stopping REDO: How to Troubleshoot the
2013 TV Bluetooth Module
By Khaled Abuali and Paul Kim, Managers, Product Support Engineering
You can troubleshoot the Bluetooth Module by measuring the voltages at its connector pins.
1. With the TV in Standby, measure Pins 7/8/9/10 and verify the correct DC voltages. If the voltages
are missing or not correct, check the cabling and supply feed from the Main Board.
2. Turn on the TV. Measure Pins 7/8/10 and Pin 9 for correct DC Supply Voltages. If missing or not
correct, check the cable and supply feed from the Main Board.
3. Measure Pins 5/6 which carry the Bluetooth Signals. If the voltages for Pins 5/6 are missing or not
correct in the Power On state, the problem is likely the Bluetooth module.
Pin
Pin 1
Pin 2
Pin 3
Pin 4
Pin 5
Pin 6
Pin 7
Pin 8
Pin 9
Pin 10
Stand-by
0V
0V
0V
0V
0V
0V
5.20 V
3.26 V
3.28 V
3.28 V
Power On
0V
0V
0V
0V
2.29 VDC *
0.85 VDC *
5.20 V
3.26 V
0V
3.28 V
Note
DC
DC
DC
DC
BT (2.4Ghz) Signal
BT (2.4Ghz) Signal
N/A
DC
DC
DC
The Actual “Bluetooth Signal” at Pins 5 and 6.
The effective DC voltage readings for the Bluetooth signal at Pins 5
and 6 are shown in the table above.
7 Stopping REDO
Stopping REDO Stopping REDO
Stopping REDO: Troubleshooting the
Electric Oven Temperature Probe Feature
By Jason Abrams, Assistant Manager, HA Product Support
Subject
When customers select the Temperature Probe feature on the NE58F9710WS or NE58F9500SS
electric ovens, and then start a cooking cycle, the Temperature Probe features shuts itself off.
Background
When the customer selects the Temperature Probe feature and inserts the Temperature Probe into
the probe jack in the oven, the Temperature Probe icon is visible next to the clock. However, when they
begin a cooking cycle, the feature shuts itself off automatically.
Solution
The Temperature Probe may not be fully inserted into the probe jack in the oven cavity. The
Temperature Probe icon will illuminate when the probe is only partially inserted, but the oven will not
detect the Probe during a cooking cycle and the feature will cancel itself. Make sure that the Probe is
fully inserted into the jack.
8 Stopping REDO
CE Tech Tips
Troubleshooting Samsung 2013 TVs’
MOIP Module
By Khaled Abuali, Manager, Product Support Engineering
If a customer complains of Voice and/or Motion control problems, the problem could be caused by
the MOIP module (camera and Mic), the Main board, or the customer’s environment. You can easily
diagnose the MOIP module without having to open the set’s back cover.
Step 1: Press the MUTE-569-EXIT buttons on the remote control. The camera picture should be
displayed and the Mic is activated.
•• Verify that the camera is enabled. Some models allow you to push-in the module to disable the
camera, some use a sliding door to close the camera window.
•• Verify that the camera has a clear picture. Adjust the camera tilt until the image is in the center
of screen.
•• Verify that the Mic is working properly.
Step 2: Use the Self Diagnosis menu to test the customer’s environment. On the TV’s menu, select
Menu ➔ Support ➔Self Diagnosis ➔ Voice & Motion Control Environment Check. This option displays
bar graphs depicting ambient noise and brightness levels to determine if they are suitable for SMART
Interaction use. Confirm that the level of the Noise Check bar graph is not in the Noisy area and that
the Brightness bar graph is in the Ideal area.
9 CE Tech Tips
Troubleshooting Netflix Errors on 2013
Samsung Televisions
By Juan Morales, Regional Technical Trainer
The Netflix application within Samsung’s Smart Hub platform requires a good network connection
for video and movie streaming. If a customer has a problem with the Netflix app, here’s some check
points to help isolate the issue.
First it’s important to check the network’s physical environment. For example, make sure the
customer’s router is within 52 feet of the TV. There could be other environmental or network issues,
but this is a good first check.
After confirming the router’s position, perform a Network Test. To perform a Network Test, follow these
steps:
1. In the TV’s menu, open Network.
2. Select Network Status.
3. Choose Wireless.
4. Select the access point. The TV will attempt to connect to the Network.
If the Network test fails, follow these steps:
1. Power-cycle the TV.
2. Disconnect all the network devices.
3. Plug in and then power on the modem. Wait about 2 minutes.
4. Plug in and then power on the wireless router. Wait 2 minutes.
5. Plug in and then power on the TV. Run the network test again.
If the Network Test is successful, but Netflix is still not working, you will have to set the DNS server
settings manually. To set the DNS server settings manually, follow these steps:
1. Select IP Settings.
2. Select obtain info manually, and then choose enter manually.
3. Enter all network information, and then enter 8.8.8.8 in the DNS field.
4. When done, try to launch Netflix again.
Finally, if Netflix still will not open or there is a connection error, check the ESN number. To check the
ESN number, follow these steps:
1. Open the Netflix application.
2. Press the arrow keys on the remote in this order: Up, Up, Down, Down, Left, Right, Left, Right, Up,
Up, Up, Up. A pop up screen appears.
3. Check the ESN number. If the number is missing, replace the Main Board.
4. After replacing the board, try to launch Netflix again.
10 CE Tech Tips
How to Troubleshoot the TV Evolution Kit
By Khaled Abuali and Paul Kim, Managers, Product Support Engineering
The Evolution Kit upgrades select 2012 Smart TVs, giving them most of the functions available on
2013 Smart TVs.
Evolution Kit Installation
You must have the latest TV software before installing the Evolution Kit. (T-ECPAKUC-1051.2 or a
higher version)
Turn off the TV, unplug the power cable, and then install the Evolution Kit as shown below.
Press the Evolution Kit again as shown on the left to
make sure the kit is securely attached to the TV.
Turn the TV ON. The TV should detect the Evolution
Kit and upgrade the software.
If it is not attached properly, you’ll see the following
symptoms:
1. The TV doesn’t detect the Evolution Kit.
2. The TV may keep rebooting.
11 CE Tech Tips
How to Troubleshoot the TV Evolution Kit
continued
Detaching the Evolution Kit
1. Turn off the TV, and then unplug the power cable.
2. Hold the Evolution Kit’s edges, push in the button (1) on the right side, and then pull the Evolution
Kit away from the TV as illustrated in the figure below (2).
If you have to install a new Evolution Kit or you don’t want to use the Evolution Kit, you must restore
the TV’s SW through the Internet. Go to Menu>Support>Software Upgrade>Internet.
Limitations
a. The Evolution Kit provides most functions that are available on the 2013 Samsung TVs. There
are some exceptions, such as Screen Mirroring.
b. A wireless network connection via Plug & Access is not supported. Use a different method such
as entering a password or WPS to establish a wireless network connection.
c. Soft APs are not supported. Use Wi-Fi Direct to connect mobile devices to the TV directly.
d. Installing the Evolution Kit may reset some of the existing TV settings.
e. 2013 Evolution Kit doesn’t support the following applications:
12 CE Tech Tips
How to Troubleshoot the TV Evolution Kit
continued
For additional information about installing the Evolution Kit, view our video - Installing the Smart
Evolution Kit - at:
http://youtu.be/S8NnXOUUq1E
or
http://support-us.samsung.com/spsn/detail.jsp?ctg_id=201&sub_ctg_id=&live_id=2&video_
id=2590292053001
13 CE Tech Tips
Troubleshooting the Temperature Sensor
on 2013 F8500 Plasma TVs
By Juan Morales, Regional Technical Trainer
2013 F8500 Plasma TVs have a temperature sensor which, depending on the environment, will power
off the TV to prevent damage.
To test the temp sensor, plug in the TV, and then check the LED on the Main/Logic Board. If the LED
blinks twice every 4 seconds, it could indicate a defective temp sensor.
To continue troubleshooting, follow these steps:
1. Confirm the temperature sensor connector CN4008 on the X-Main board is seated properly.
2. If it is seated properly, remove the power cord.
3. Remove the temp sensor connector.
4. Use tape to hold the temp sensor in place, and then check the resistance across the two wire
leads, pins 1 & 3.
5. The normal resistance at room temperature with the TV unplugged is about 10K ohms. If the
sensor has an open or shorted resistance condition, suspect a defective temp sensor.
6. If the resistance is normal, reconnect the connector, and then plug in the TV.
7. Verify the voltage at pin 1 Temp Sensor. If the temp sensor is working properly, the voltage will
start at 1.6VDC and will drop as the TV warms up.
Temp Sensor
14 CE Tech Tips
The Self Diagnosis Picture Test and
Multi-View Test on Samsung’s New
Multi-View TV
By Chuck Russo, Assistant Manager, Training
The Multi-View feature on Samsung’s new OLED, Multi-View TV - model KN55S9CAF - lets two
users, wearing Samsung Multi-View 3D glasses, independently view different content on the TV
simultaneously.
To help you diagnose problems with the TV’s single and Multi-View picture, the KN55S9CAF has two
independent, self-diagnosis picture tests in the customer menu. The tests are described below.
Customer Picture Test for the Single View Screen (FRC 1 path)
1. Select Self Diagnosis
2. Select Picture Test
3. Verify the Test 1 Photo which
is from Main Board. If it’s OK,
suspect a source, cable, or
input.
4. Verify the Test 2 Test Pattern
from the T-Con (FRC 1). If it’s
OK, the Main Board or LVDS is
the problem.
5. Verify Test 3 from the T-Con.
If it’s OK, and Test 2 failed,
then the T-Con Board is the
problem.
Note: For a full list of all possible
test results, see page 17.
15 CE Tech Tips
The Self Diagnosis Picture Test and Multi-View
Test on Samsung’s New Multi-View TV
continued
Customer Picture Test for the Multi-View Screen (FRC 2 path)
1. Select Self Diagnosis.
2. Select Multi-View Test.
3. Verify the Test 1 Photo which
is from Main Board. If it’s OK,
suspect a source, cable, or
input.
4. Verify the Test 2 Test Pattern
from the T-Con (FRC 2). If it’s
OK, the Main Board or LVDS is
the problem.
5. Verify Test 3 from the T-Con.
If it’s OK, and Test 2 failed,
then the T-Con Board is the
problem.
Note: For a full list of all possible
test results, see page 17.
16 CE Tech Tips
The Self Diagnosis Picture Test and Multi-View
Test on Samsung’s New Multi-View TV
continued
Test Patterns and Results for T-Con FRC1 and FRC 2
17 CE Tech Tips
CE GSPN Updates
By Jeff Brutman, Senior Staff, Publications
We encourage you to use our GSPN site to find the latest service bulletins to aid you with your repairs:
http://gspn3.samsungcsportal.com/
CE Service Bulletins uploaded to GSPN in August, 2013:
Bulletin Number
ASC20130812001
Subject
Applicable Models
No Apps on Apps Panel
Plasma TVs
SYMPTOM:
PN51F5500AFXZA,
PN60F5500AFXZA,
PN64F5500AFXZA,
PN51F8500AFXZA,
PN60F8500AFXZA,
PN64F8500AFXZA
The TV is connected to the Internet, but it fails to
load/download any default applications. You only
see the WebBrowser app.
LED TVs
No Apps on Apps Panel
ASC20130812002
18 CE Tech Tips
SYMPTOM:
The TV is connected to the Internet, but it fails to
load/download any default applications. You only
see the WebBrowser app.
UN32F5500AFXZA,
UN32F6300AFXZA,
UN40F5500AFXZA,
UN40F6300AFXZA,
UN46F5500AFXZA,
UN46F6300AFXZA,
UN46F6350AFXZA,
UN46F6400AFXZA,
UN46F6800AFXZA,
UN46F7100AFXZA,
UN46F7500AFXZA,
UN46F8000AFXZA,
UN50F6800AFXZA,
UN55F6300AFXZA,
UN55F6400AFXZA,
UN55F6800AFXZA,
UN55F7050AFXZA,
UN55F7100AFXZA,
UN55F7500AFXZA,
UN55F8000AFXZA,
UN60F6300AFXZA,
UN65F6300AFXZA
HA Tech Tips
Samsung’s Sparkling Water Refrigerator
Stars on Jimmy Kimmel Live
By Nicholas Webert, Regional Technical Trainer
YaYa and Guillermo (pictured below) of the late night talk show “Jimmy Kimmel Live” helped launch
Samsung’s new sparkling water refrigerator to stardom by featuring it in one of their comedy spots.
The Samsung Product Support team – in the person of yours truly - was excited to be asked to assist
in the filming of this hilarious bit for the show. During the filming, YaYa and Guillermo disagreed over
which was better, sparkling or flat water. As they battled to persuade each other that their personal
choice was better, I battled to keep from laughing so loud that the director would kick me off the set.
Even though there was a difference of opinion over the water, they both agreed that no other
refrigerator on the market was as big and beautiful as the new Samsung RF31FM. Guillermo was
impressed by how much food you could keep inside, while YaYa found the extra space useful for
storing things like his shoes. That’s right. You read that correctly - his shoes. He explained that if you
can run as fast as he can, your shoes need cooling off too.
At the end of the fifth hour of filming, the 90 second spot was completed. I tried to tell everyone on
the set of how much I enjoyed being present, but was unable to get a word in edgewise. The only
topic open for discussion was “Where can we get the new RF31FM with sparkling water and how
much does it cost?”
Now this article should have some technical information from the Product Support team, so here it is:
When testing a sparkling water dispenser that does not dispense, open the refrigerator door, and then
press the “Energy Saver” button for 5 seconds. You will hear the valve click open. If the valve sound is
present, replace the soda stream bottle. If the sound is missing, replace the sparkling water assembly.
Before the filming, the crew thought the sparkling water dispenser was not working. After this quick
test, I was able to look like a hero by just replacing the soda bottle. Turns out, days prior to filming,
the sparkling water feature was enjoyed by all members of the Jimmy Kimmel Live crew… and they
had emptied the CO2 cylinder.
19 HA Tech Tips
Ice and Water in the Ice Room of Direct
Contact Icemakers
By Wes Sirois, Manager, HA Product Support
Models:
RF263BEAE**, RF263TEAE**,RF323TEDB**,RF31FMESB**, RF31FMEDB**, RF32FMQDB**
Symptom :
Ice forms on the bottom tray of the ice maker and/or the floor of the ice room.
Background: Water remains in the tray under the icemaker, due to improper defrosting or draining.
Possible Causes and Solutions:
1. Ice maker fill tube obstruction: Remove the icemaker, and then reconnect the wiring. Cycle the
icemaker, and then check the fill function. Water should come out in a steady stream. If water is
spraying out, there is an obstruction in the tube and all of the water is not going into the ice mold.
Blocked Fill Tube
20 HA Tech Tips
Foam Removed from Tube
Ice and Water in the Ice Room of Direct Contact
Icemakers
continued
2. Drain Tube Heater not functioning: A foil heater is wrapped around the drain tube, which is part
of the auger motor assembly. This heater is activated during defrost, so check for voltage to the
heater in “Forced Defrost” mode. Also check the resistance of the heater. If open, replace the
auger motor assembly.
3. Drain clogged or frozen: Remove the ice maker, and then pour water down the drain. Water
should empty into the drain pan at the bottom. Don’t forget the duck bill located in the drain tube
at the back.
21 HA Tech Tips
Refrigerators: Checking the DC Fan
Voltage at the Main PCB
By Dorian Rua, Assistant Manager, Training
Fan speed information is read by the main PCB. If the fan speed exceeds 600RPM, or the speed is
slow, or the fan has stopped, the fan drive circuit is disabled. After 10 seconds, the circuit tries to get
the fan running properly again for 3 seconds. If this fails, the circuit waits 10 seconds, and then tries
again. If the fan continues to malfunction for 5 cycles -10 seconds off, 3 seconds on - the fan drive
circuit is disabled for 10 minutes.
To test the fan motor, put one lead of your tester on any circuit ground on the main PCB. Put the other
lead on the test point you want to read. For example, when measuring the voltage of the Fresh Food
Evaporator Fan, you would put one lead of your tester on pin 1 and the other on pin 4 (FF-Fan). See
the image below. The voltage of the fan should be between 7 and 11 volts DC.
You may need to enter the Forced mode to activate the fans and read the voltages. If the evaporator
is blocked with ice, this may prevent correct air flow and fan operation. Remove the ice, and then
check the voltage again. If everything is clear around the fan, but you detect no voltage, then the
motor may be at fault.
The door switches control the evaporator fan motors. If the doors are open, the fans should not run.
Close the doors or switches to test the motors. There might be a 10 to 60 second delay.
Note: When checking the functionality of the DC fans, refer to the fast track for detailed fan
information. This information is located on the top of the second page in all refrigerator fast tracks.
22 HA Tech Tips