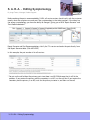
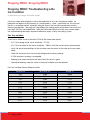
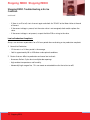
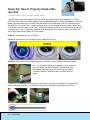
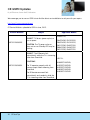
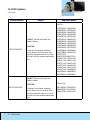
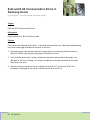
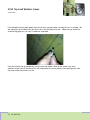
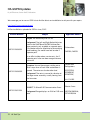
1
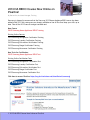
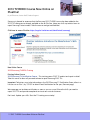
Samsung TechTalk is now Samsung Service News! Samsung Service News Your source for service information Samsung Service News Introducing our new name, Samsung Service News. Going forward, we will continue to provide you with the repair information you need, plus - as our new name implies - a wider range of service, product, and Samsung news to keep you up to date on all things service at Samsung. Your source for service information Inside this issue July, 2013 1 2013 HA REDO Course Now Online on PlusOne! 2 2013 TV REDO Course Now Online on PlusOne! 3 Flat Panel Certification Privileges Are About to Expire! 4 2013 Samsung RTC TV Training 6 2013 Samsung RTC Home Appliance Training 7 Samsung Takes the Wraps Off ‘Club des Chefs’ at Samsung House in NYC 9 Guidelines for Cancelling Samsung Service Tickets 10 S. A. R. A. - Editing Symptomology Stopping REDO 11 Stopping REDO: Troubleshooting a No Ice Condition CE Tech Tips 14 Quick Tip: How to Properly Clean a Blu-ray Lens 16 Testing LED Panel Voltage from the Main PCB 17 IR Remote Failing Intermittently While LED TV Plays Streaming Video Samsung Service News Your source for service information Inside this issue July, 2013 18 Troubleshooting the New 2013 Plasma TV Main/Logic Board 20 CE GSPN Updates HA Tech Tips 22 E-84 and E-85 Communication Errors in Samsung Ovens 24 Dryers - Stopping Rattling Noises from the Heater Duct 25 New HA Fast Tracks Now Available! 26 French Door Refrigerator Noise Complaints 27 Water Valve Connector Installation Errors 28 Troubleshooting Washer 3E Errors 29 Preventing Odors in Front Loading Washing Machines 30 2012 Top Load Washers Issues 32 HA GSPN Updates Samsung Service News Your source for service information Samsung Electronics America 85 Challenger Road Ridgefield Park, NJ 07660 E-mail: [email protected] The information in this newsletter is published for experienced repair technicians only and is not intended for use by the public. It does not contain warnings to advise non-technical individuals of the dangers that exist when servicing a product. Only experienced professional technicians should repair products powered by electricity. Any attempt to service or repair a product or products using the information in this newsletter by anyone other than a trained professional technician could result in serious injury or death. Information provided in this bulletin is subject to change or update without notice. © Copyright Samsung Electronics America 2013 2013 HA REDO Course Now Online on PlusOne! By Dorian Rua, Assistant Manager, Training Samsung is pleased to announce that the Samsung 2013 Home Appliance REDO course has been added to the 2013 HA training courses already available on line on PlusOne. Keep your skills up to date. Take all the 2013 courses and get certified now! New Course 2013 Samsung Home Appliance REDO Training Existing Online Courses 2013 Samsung Refrigerator Certification Training 2013 Samsung Laundry Certification Training 2013 Samsung Dishwasher Certification Training 2013 Samsung Range Certification Training 2013 Samsung Microwave Certification Training New Tests for Certification 2013 Samsung Home Appliance REDO Test Existing Online Certification Tests 2013 Samsung Refrigerator Certification Test 2013 Samsung Laundry Certification Test 2013 Samsung Dishwasher Certification Test 2013 Samsung Range Certification Test 2013 Samsung Microwave Certification Test Click here to access PlusOne: https://my.plus1solutions.net/clientPortals/samsung/ 1 2013 HA REDO Course Now Online on PlusOne! 2013 TV REDO Course Now Online on PlusOne! By Jeff Brutman, Senior Staff, Product Support Samsung is pleased to announce that the Samsung 2013 TV REDO course has been added to the 2013 TV training course already available on line on PlusOne. Keep your skills up to date. Learn to repair Samsung’s latest models. Take the courses and get certified now! Click here to access PlusOne: https://my.plus1solutions.net/clientPortals/samsung/ New Online Course 2013 Samsung TV REDO Training Existing Online Course 2013 Samsung TV Certification Course - This training covers 2013 TV product and repair in detail. Take this course to learn all you need to know to repair Samsung 2013 TVs. Important: Technicians must also take and pass the 2013 Samsung TV Certification Exam, either in a live class or on Plus 1, by 7/31/13 to obtain Panel Certification for the year. (See next page.) We encourage you to obtain certification as soon as you can so you’ll have the skills you need to repair 2013 TVs and provide exceptional service to our mutual customers. Don’t wait. Update your skills. Start the TV training course today! 2 2013 TV REDO Course Now Online on PlusOne! Flat Panel Certification Privileges Are About to Expire! Technicians who obtained 2012 Flat Panel certification privileges are advised that those privileges are about to expire. If you want to continue to order warranty LCD and PDP panels without contacting Tech Support, make sure you update your certification to 2013 status by July 31st. 2013 Flat Panel training and the accompanying 2013 TV certification exam are available now at: https://my.plus1solutions.net/clientPortals/samsung/ Don’t wait. Take the training, take the exam, and update your certification today! 3 Flat Panel Certification Privileges Are About to Expire! 2013 Samsung RTC TV Training By Jim Foster, Manager, Training Samsung TV Training 2013 Being held at one of our Regional Training Centers and at select locations! For 2013, by popular demand, Samsung continues to accommodate your demanding schedule with one day update training. To be eligible to attend the one day training session, you must have attended and successfully completed 2012 TV product training in one of our training centers, or at a live, on-site training session. Samsung will still hold 3 day Basic classes quarterly. These classes are intended for new techs who have never attended a Samsung training or for techs who need extra help to improve their skills. Attend in-depth, hands-on 1 day Update or 3 day Basic training at one of our RTCs in Little Ferry, NJ or Bensenville, IL! In addition, we will be holding limited on-site trainings at various locations around the country. You can reserve your seat in training by emailing us at [email protected] You can always obtain the most up to date training list by sending an email to [email protected]. com Additionally, TV training is available on-demand 24/7 at https://my.plus1solutions.net/clientPortals/ samsung/ Training Schedule: Date City Comments July 9, 2013 Little Ferry, NJ FE/ASC 1 day Update Training (Session 1) July 10, 2013 Little Ferry, NJ FE/ASC 1 day Update Training (Session 2) July 11, 2013 Little Ferry, NJ FE/ASC 1 day Update Training (Session 3) July 12, 2013 Little Ferry, NJ FE/ASC 1 day Update Training (Session 4) July 10, 2013 Bensenville, IL FE/ASC 1 day Update Training (Session 1) July 11, 2013 Bensenville, IL FE/ASC 1 day Update Training (Session 2) 4 2013 Samsung RTC TV Training 2013 Samsung RTC TV Training continued Date City Comments July 30, 2013 Little Ferry, NJ FE/ASC 1 day Update Training (Session 1) July 31, 2013 Little Ferry, NJ FE/ASC 1 day Update Training (Session 2) August 1, 2013 Little Ferry, NJ FE/ASC 1 day Update Training (Session 3) August 2, 2013 Little Ferry, NJ FE/ASC 1 day Update Training (Session 4) July 30-31, 2013 Tunica, Mississippi NESDA Convention August 6, 2013 Bensenville, IL FE/ASC 1 day Update Training (Session 1) August 7, 2013 Bensenville, IL FE/ASC 1 day Update Training (Session 2) August 8, 2013 Bensenville, IL FE/ASC 1 day Update Training (Session 3) August 9, 2013 Bensenville, IL FE/ASC 1 day Update Training (Session 4) August 20, 2013 Little Ferry, NJ FE/ASC 1 day Update Training (Session 1) August 21, 2013 Little Ferry, NJ FE/ASC 1 day Update Training (Session 2) August 22, 2013 Little Ferry, NJ FE/ASC 1 day Update Training (Session 3) August 23, 2013 Little Ferry, NJ FE/ASC 1 day Update Training (Session 4) 5 2013 Samsung RTC TV Training 2013 Samsung RTC Home Appliance Training By Jim Foster, Manager, Training Samsung HA Training 2013 For 2013, per popular demand, Samsung continues to accommodate your demanding schedule with two day update training. To be eligible to attend the two day training session, techs must have attended and successfully completed 2012 product training in one of our training centers, or at a live, onsite training session. Samsung will still hold 4 day Basic classes quarterly. These classes are intended for new techs who have never attended a Samsung training or for techs who need extra help to improve their skills. Attend in-depth, hands-on 2 day Update or 4 day Basic training at one of our RTCs! You can reserve your seat in training by emailing [email protected] Additionally, Home Appliance training is available on-demand 24/7 at https://my.plus1solutions.net/ clientPortals/samsung/ Training Schedule: Date City Comments July 16 - 19, 2013 Little Ferry, NJ ME/ASC 2013 products 4 day Basic Training July 23 – 26, 2013 Bensenville, IL ME/ASC 2013 products 4 day Basic Training July 30, 2013 Tunica, Mississippi NESDA Convention August 13-14, 2013 Little Ferry, NJ August 15-16, 2013 Little Ferry, NJ August 20-21, 2013 Bensenville, IL August 22-23, 2013 Bensenville, IL ME/ASC 2013 Products 2 day Update Training (Session 1) ME/ASC 2013 Products 2 day Update Training (Session 2) ME/ASC 2013 Products 2 day Update Training (Session 1) ME/ASC 2013 Products 2 day Update Training (Session 2) 6 2013 Samsung RTC Home Appliance Training Samsung Takes the Wraps Off ‘Club des Chefs’ at Samsung House in NYC By Paul Yun, Assistant Manager, Strategic Planning In June, Samsung Electronics revealed that it will partner with Michelin-starred chefs to design new kitchen electronics, boosting its focus on the home appliance market. Samsung Electronics took the wraps off the partnership during an event in Manhattan’s trendy Soho neighborhood. The company set up a temporary “Samsung House,” which was later briefly opened to the public, to demonstrate its various home electronics. As for its new “Club de Chefs,” Samsung will call on a handful of award-winning chefs to “serve as ambassadors and consultants” and give insight into new appliances from early in the design process. The club members include Frank Castronovo and Frank Falcinelli of Frankie Sputino in New York; Christopher Kostow of The Meadowhead in Napa Valley, Calif.; Eric Trochon of Semilla in Paris; and Michel Troisgros of Maison Troisgros in Roanne, France. “Why create a new kitchen culture?” asked Samsung Electronics co-CEO Boo-Keun Yoon during the event. “Because the kitchen is the center of the home.” He added that working with chefs will give Samsung insight into what chefs and foodies desire in their kitchens. Electronics companies have been making home appliances for years, but the area is becoming an even bigger focus for many. Everything, from washing machines to refrigerators, is becoming smarter, with many incorporating processors and other technology that allows them to interact with smartphones and other devices. For example, people now can use their phones to remotely start their dryers or turn off their air conditioners. Samsung Electronics also showed off its new French-door refrigerator that includes a sparkling water dispenser and its refrigerator with a section that converts to a freezer, as needed. Sourced from Shara Tibken, senior writer for CNET focused on Samsung and other consumer tech news. Boo-Keun Yoon, co-CEO of Samsung Electronics Co The inside of Samsung House 7 Samsung Takes the Wraps Off “Club des Chef” at Samsung House in NYC Samsung Takes the Wraps Off ‘Club des Chefs’ at Samsung House in NYC continued Hilary Farr of HGTV’s “Love It or Leave It” The built-in Sodastream option for sparkling water straight out of the fridge door, available in Samsung’s RF31FMESBSR. An innovative Samsung Oven. Michelin three-star and James Beard Award-winning chefs Christopher Kostow, Michel Troisgros, Eric Trochon, Frank Castronovo, and Frank Falcinelli A high efficiency Samsung washer and dryer set. Chefs Michel Troisgros and Eric Trochon team up to prepare something special. 8 Samsung Takes the Wraps Off “Club des Chef” at Samsung House in NYC Guidelines for Cancelling Samsung Service Tickets By Stanley Sherrard, Senior Manager, Field Service Occasionally, you may need to cancel a Service Ticket. In the table below are the proper guidelines regarding ticket cancellation. The reasons displayed in GSPN are listed on the left and the Cancellation Reason Descriptions are on the right. GSPN Cancel Reason Code Customer Information Incorrect [HC020] Contact 3 times and failed [HC025] Request Duplicated [HCZ31] Reschedule for later [HCZ33] Cost Issue – Out of Warranty [HCZ34] Call assigned to other Servicer [HCZ36] Product Replaced by Dealer [HCZ38] Unit working properly [HCZ71] Void Warranty – Damage/Cosmetic [HCZ72] Cancellation Reason Description Address or phone numbers provided on the ticket are incorrect so customer could not be contacted Three attempts to contact the customer on 3 separate days have failed – each contact attempt should be notated in the Service ticket in the three “Customer Call Attempt” fields Duplicate ticket for same customer and same unit Use when the customer is not available (vacation, out of town, etc.) within 7 days of ticket creation date. Do not use this code to prevent a ticket from going over LTP. (See note in red below.) Customer decides not to continue with the repair due to the out of warranty cost issue. Account assigned to the service ticket is no longer conducting the repair. Repair is no longer needed because unit has been exchanged by Dealer. Customer no longer needs service because the unit is working properly. Unit has physical damage which voids the Samsung warranty and customer does not want to continue with the out of warranty repair. Note: Do not use this code after you visit a customer and need to order parts for a follow-up visit. These types of cases should be left as “Pending” with the proper pending reason selected on the ticket. Also, do not use this code if you are unable to schedule with a customer within 7 days of ticket creation due to your availability/capacity. Use this code only when the customer is not available within 7 days. The only reason tickets should be cancelled are the reasons listed above. Cancelling tickets to improve your KPI is not allowed and could result in disciplinary action. Also, please note that in the event a new ticket is created as a follow-up to a cancelled ticket, the customer’s turn-around time starts from the initial cancelled ticket creation date. If you have any questions regarding ticket cancellation, please contact your Field Service Team. 9 Guidelines for Cancelling Samsung Service Tickets S. A. R. A. - Editing Symptomology By Jorge Tavora, Manager, Product Support Before ordering the parts recommended by S.A.R.A, all service centers should verify with the customer exactly what the symptoms are and see if the symptomology in the ticket matches. If the ticket has the wrong symptomology, you have the ability to change it, giving you a NEW “Repair Scenario” and “Part Recommendation”. Repair Scenario and Part Recommendations: Verify the TV’s version and order the part directly from the Repair Scenario table. (Click ADD PART.) In this example, the part number is for all versions. * Do not run the call without the primary part since there is an 80-90% chance that it will fix the problem. If you receive the primary and the secondary is on B/O, run the call, but if you receive the secondary and the primary is on B/O, wait for the primary to come in, and then run the call. 10 S.A.R.A - Editing Symptomology Stopping REDO Stopping REDO Stopping REDO Stopping REDO: Troubleshooting a No Ice Condition By Keith Robinson, Manager, HA Product Support One of our larger redo categories involves the production of ice in our refrigerator models. Ice production can appear to the customer as a simple process - water + cold makes ice. But we know that this is a complex process, especially when we throw in the ice making automation used by Samsung refrigerators. Samsung uses two different ice making processes, based on the style of the ice maker: Flex Tray and Heated Mold. I offer the information below to refresh your memory about the troubleshooting techniques required to effectively repair a faulty Ice making system. Flex Tray Ice Maker Check the Ice Maker sensor at the Main PCB with the Freezer door closed. •• At 1°F, the voltage to the sensor should be ~3.7 VDC. •• At 1°F, the resistance of the sensor should be ~ 28K Ωs (with the sensor harness disconnected). •• Verify the actual temp readings at the ice maker near the sensor (at the cube next to ice maker head). •• Check the conversion chart for accurate voltage and resistance readings. •• A 10% variation in readings is acceptable. •• Readings that match the conversion chart mean the sensor is good. •• Unmatched readings mean the sensor is bad, and Ice Maker must be replaced. Flex Tray Ice Maker Sensor Reference Values Temperature -5.8°F -4.0°F -2.2°F -0.4°F 1.4°F 3.2°F 5.0°F 6.8°F 8.6°F 10.4°F 12.2°F 11 Stopping REDO Resistance (Ωs) 33.8K 32.2k 30.8K 29.4K 28.0K 26.8K 25.6K 24.4K 23.3K 22.3K 21.3K Voltage (V) 3.858 3.816 3.773 3.729 3.685 3.64 3.594 3.548 3.501 3.453 3.405 Stopping REDO Stopping REDO Stopping REDO: Troubleshooting a No Ice Condition continued Heated Mold Ice Maker Check the Ice Maker sensor at the Main PCB. •• At 1°F, the voltage to the sensor should be ~3.7 VDC. •• At 1°F, the resistance of the sensor should be ~ 50K Ωs (with the sensor harness disconnected). •• Verify the actual temp readings at the ice maker near the sensor (the cube next to ice maker head). •• Check the conversion chart for accurate voltage and resistance readings. •• A 10% variation in readings is acceptable. •• Readings that match the conversion chart mean the sensor is good. •• Unmatched readings mean the sensor is bad, and Ice Maker must be replaced. Heated Mold Ice Maker Sensor Reference Values Temperature Resistance (Ωs) Voltage (V) -5.8°F -4.0°F -2.2°F -0.4°F 1.4°F 3.2°F 5.0°F 6.8°F 8.6°F 10.4°F 12.2°F 60.8K 58.0K 55.4K 52.8K 50.4K 48.2K 46.0K 44.0K 42.0K 40.2K 38.4K 3.858 3.816 3.773 3.729 3.685 3.64 3.594 3.548 3.501 3.453 3.405 Low Fill or No Fill Conditions Check Fill Mode. •• Manually start a harvest cycle. Press the Ice Maker test switch. •• Water should fill the Ice Maker at the end of harvest cycle. All cube spaces should be full of water. •• If the water level is low or not all cubes are full, check the water supply. 12 Stopping REDO Stopping REDO Stopping REDO Stopping REDO: Troubleshooting a No Ice Condition continued •• If there is no fill at all, start a harvest again and check for 120VAC to the Water Valve at the end of harvest. •• If the correct voltage is present, but the water valve is not energized, check and/or replace the valve. •• If the correct voltage is not present, suspect the Main PCB or wiring to the valve. Low Ice Production Complaints Always use minimum expectations for a 24 hour period when evaluating an ice production complaint. 1. Normal Ice Production •• 12 Harvests in a 24 hour period is the average. •• Yield is approximately 84 to 108 cubes under optimal conditions. 2. Factors that can affect ice production and cause low ice levels: •• Numerous Defrost Cycles due to multiple door openings. •• High ambient temperatures and humidity. •• Abnormally high usage of ice. This can create an extended time for the ice bin to refill. 13 Stopping REDO CE Tech Tips Quick Tip: How to Properly Clean a Bluray Lens By Michael Vigliotti, Assistant Manager, Product Support Typically, when you are working on a Blu-ray player that cannot play discs, the problem is usually either with the Loader or the Main board. If your troubleshooting tells you that the problem is with the loader, you would normally just throw away the defective part and swap it out for a brand new one. Although this will fix the issue, it might not be necessary. A disc loading error could occur when there is dirt build-up on the Objective Lens (OL), and a quick cleaning could fix the issue without you having to replace parts. This is especially important when working on out of warranty cases and when you are trying to keep the cost down for the customer. Problem: Cannot play Blu-ray or DVD Disc Cause: We will focus on just one cause: a dirty Objective Lens (OL). Solution: Check the OL with a magnifying glass. If the lens is dirty, follow the procedure below. First, use a hand air blower and repeatedly spray air on the lens until all dirt has been removed. Be careful that the hand blower does not touch the lens during this process. A hand air blower is a common tool in camera and lens repair. If the dirt is not removed with air, you can use a cotton swab. You must lightly mist the tip of the cotton swab with liquid IPA. It is important to never use dry cotton since it will scratch the OL. 14 CE Tech Tips Quick Tip: How to Properly Clean a Blu-ray Lens continue When cleaning the OL, you must brush in a unidirectional manner. •• For BD OL, move the tip from Right to Left. •• For DVD OL, move the tip from Left to RIGHT. Continue the process, and brush slowly until the dirt is gone. Check with a magnifying glass to insure no dirt remains. Note: The OL is sensitive and easily scratched. Be very careful and never touch the OL directly with your hand or apply pressure to it. 15 CE Tech Tips Testing LED Panel Voltage from the Main PCB By Juan Morales, Regional Technical Trainer, Product Support T-CON boards operate on 12VDC, which originates at the SMPS, but is ultimately supplied from the Main PCB. This voltage can be tested at the fuse located on the T-CON board… But, did you know there is a test point on the Main PCB which can tell you if the SMPS is accurately supplying panel voltage? The test point is located near the LVDS connector, and is typically labeled “PANEL_VCC”. By testing at this location, you can verify that both your SMPS and Main PCB are working properly and supplying 12VDC to the T-CON board. If you can measure 12VDC at this test point, but you get nothing at the fuse located on the T-CON board, then verify the LVDS cable is connected properly. If you still don’t have voltage, suspect that you have a defective LVDS cable. You may find some Main PCBs don’t have this test point labeled. You can still test for 12VDC, but you’ll have to locate the last 5 pins on the LVDS connector (which are joined together), and carefully measure the voltage there. 16 CE Tech Tips IR Remote Failing Intermittently While LED TV Plays Streaming Video By Khaled Abuali, Manager, Product Support Engineering Group SUBJECT: IR Remote intermittently not working while the TV is streaming video through SmartHub. MODELS: UN46ES7100FXZA, UN55ES7100FXZA, UN60ES7100FXZA, UN55ES7150FXZA, UN60ES7150FXZA SYMPTOM: The TV intermittently (randomly) fails to respond to IR Remote commands while it is streaming video through SmartHub. REPAIR GUIDE: Replace the old Function PCB with the improved Function PCB: Part Number: BN96-24302A 17 CE Tech Tips Troubleshooting the New 2013 Plasma TV Main/Logic Board By Chuck Russo, Assistant Manager, Training New for ALL 2013 Plasma TVs is the combined Main/Logic Board. Even though the Main is now part of Main/Logic Board, it’s still possible to isolate the Main section from the Logic section during troubleshooting and trigger the Logic Test Patterns and the TV Power. This is true even if the Main section has failed and won’t trigger the TV Power On. Operating “Logic Test Patterns” without “Main” 18 CE Tech Tips Troubleshooting the New 2013 Plasma TV Main/ Logic Board continued Procedure 1. Unplug the AC Power Cable of the TV. 2. Short pins 3 and 4 on the Logic Test Jig. 3. Locate the PS_ON pin on the SMPS Connector and short the pin to a circuit ground pin on the same connector. (Sample: pin 1 to Pin 5). 4. Plug in the AC Power Cable of the TV 5. If the Logic section is OK, PS_ON will trigger VS_ON on the SMPS, turning on the high voltage and the TV. The Test Pattern cycling from Logic Section will then appear on the TV screen. Important Special Notes: Early repairs of some of the 2013 Plasma TVs have included the failure of the “Main” section of the Main/ Logic Board while the “Logic” section has remained operational. This procedure is very important as it verifies the failure and also determines the operational status of the rest of the Plasma TV circuitry and panel. 19 CE Tech Tips CE GSPN Updates By Jeff Brutman, Senior Staff, Publications We encourage you to use our GSPN site to find the latest service bulletins to aid you with your repairs: http://gspn3.samsungcsportal.com/ CE Service Bulletins uploaded to GSPN in June, 2013: Bulletin Number Subject SUBJECT: TV Resets (power cycles) or has no power. ASC20130606003 SYMPTOM: The TV power cycles or does not turn on. Standby LED may be blinking. SUBJECT: The IR Remote fails intermittently while the TV is streaming video from SmartHub. SYMPTOMS: ASC20130618001 The TV operates properly with all sources except video streaming from SmartHub. The IR Remote command fails intermittently and randomly while the TV is streaming video from SmartHub. 20 CE Tech Tips Applicable Models Plasma TVs: PN43F4500, PN51F4500, PN43F4550, PN51F4550, PN51F5300, PN60F5300, PN64F5300, PN64F5350 PN51F5350, PN60F5350 LED TVs: UN46ES7100FXZA, UN55ES7100FXZA, UN55ES7150FXZA, UN60ES7100FXZA, UN60ES7150FXZA CE GSPN Updates continued Bulletin Number Subject Applicable Models LED TVs: SUBJECT: Failure to Connect to a Wireless Router. SYMPTOM: ASC20130620001 Customers can connect wirelessly to the router at first, but when they check the network status or try to go to Smart Hub, the network connection fails. UN32F6300, UN40F6300, UN46F6300, UN50F6300, UN55F6300, UN60F6300, UN65F6300, UN40F6350, UN46F6350, UN50F6350, UN55F6350, UN60F6350, UN65F6350, UN40F6400, UN46F6400, UN50F6400, UN55F6400, UN60F6400, UN65F6400, UN75F6400, UN46F6800, UN50F6800, UN55F6800, UN46F7050, UN55F7050, UN60F7050,UN65F7050, UN46F7100, UN55F7100, UN60F7100, UN65F7100, UN75F7100, UN46F7450, UN55F7450, UN60F7450, UN46F7500, UN55F7500, UN60F7500, UN46F8000, UN55F8000, UN60F8000, UN65F8000, UN95F8000 SUBJECT: Failure to Connect to a Wireless Router. SYMPTOM: ASC20130620002 21 CE Tech Tips Customers can connect wirelessly to the router at first, but when they check the network status or try to go to Smart Hub, the network connection fails. Plasma TVs: PN51F8500, PN60F8500, PN64F8500, PN51F5500, PN60F5500, PN64F5500 HA Tech Tips E-84 and E-85 Communication Errors in Samsung Ovens By Jason Abrams, Assistant Manager, HA Product Support Subject: E-84 and E-85 Communication Errors Background: Range displays an E-84 or E-85 error code. Solution: First, perform the following three checks. If these do not correct the error, follow the troubleshooting chart on the next page to determine the cause of the error. 1. Disconnect power from the oven and then re-apply power. Instantaneous electrical noise can affect the MICOM signal. Resetting the power can resolve the issue. 2. Verify that the power cord is securely attached to the power outlet and that the outlet is not damaged. If one line of voltage is missing or unstable due to a loose connection at the outlet, these errors can occur. 3. Check the wiring connection of the low voltage transformer (LVT) on the main PCB. If the connection is damaged or not secure, a communication error will result. 22 HA Tech Tips E-84 and E-85 Communication Errors in Samsung Ovens continued E-84 or E-85 Error Troubleshooting Chart 23 HA Tech Tips Dryers - Stopping Rattling Noises from the Heater Duct By Dorian Rua, Assistant Manager, Training Dryer rattling noises can be caused by an out of balance or bent drum during normal operation. The out of balance drum can cause the heater duct to vibrate. After confirming that the drum is not bent or out of balance, follow the procedure below to reduce noise. The heater duct may be loose, causing it to vibrate against the chassis and create a rattling noise while the unit is running. to pull and bend the To help prevent or fix noise complaints, use your needle nose pliers chassis tabs to create a tighter fit against the heater duct, as shown in the images below. Be careful not to over tighten the tabs because you might bend or damage the heater duct. 24 HA Tech Tips New HA Fast Tracks Now Available! By Dorian Rua, Content Developer, Product Support The following Home Appliance Fast Track Troubleshooting manuals have been added to the GSPN Website. http://gspn3.samsungcsportal.com/index.jsp. An additional number will also be added in the coming days. Save yourself time and effort. Download Fast Tracks from GSPN and use them to help you with your repairs. 25 HA Tech Tips French Door Refrigerator Noise Complaints By Wes Sirois, Manager, HA Product Support SUBJECT: French Door Refrigerator noise complaints Symptom: Unusual humming or rattling noise, which goes away when a Fresh Food section door is opened. The noise can also be rather loud. Background: The noise occurs due to vibration at the auger motor assembly, usually from the fan motor. Factory Solution: Beginning with November 2012 production, the fan motor housing was modified to prevent noise from this area. Field Solution: Units produced in October of 2012 and before may develop this noise. If this occurs, replace the entire auger motor assembly. (Please consult the chart below, which explains how to determine the production date based on the serial number). Make sure all screws are tight and that the assembly is installed correctly. The tab at the front should be locked into the slot in the ice room (circled above). Part Needed: DA97-12540A ASSY CASE-FAN AUGER MOTOR Serial Number Example: S = 2009 C = 2012 G = 2015 26 HA Tech Tips Production Year Z = 2010 B =2011 D = 2013 F = 2014 H = 2016 J = 2017 Production Month 1 ~ 9 = January ~ September A = October, B = November C = December Water Valve Connector Installation Errors By K.T. Lee, Assistant Manager, HA Product Support SUBJECT: Water Valve Connector Installation Error Products: WF393*, WF395*, WF397*, WF398*, WF405* Symptom: Incorrect operation of the Water Supply (Fabric Dispenser) Cause: Water Valve Wire Connectors installed incorrectly. Solution: •• If the water valve wire connectors are installed incorrectly (reference pictures are below), reinstall the connectors into the correct slots. •• NOTE: Revised Models - from July, 13 on - will have their connectors marked with the correct color for easier assembly. Please reference the colors on the connectors during repair. Connectors Installed Incorrectly Correct Configuration Color Indicators Old Connectors 27 HA Tech Tips New Connectors Troubleshooting Washer 3E Errors By K.T. Lee, Assistant Manager, HA Product Support SUBJECT: 3E Error Message Symptom: 1. 3E – PBA Connector Terminal Motor Connection Loose •• SPIN NET Loose, MOTOR Internal Coil Damaged (Short, Nicked) •• HALL SENSOR Terminal Connection Loose, MOTOR has foreign material (screw) inside 2. 3E1 – Motor Overload due to excessive wash load. •• MOTOR HALL SENSOR terminal connection loose, PBA Part Defect Causes : Motor Defect - Coil Open Connector is not secure Main PCB Defect REPAIR PROCEDURE: Confirm Defect → Check Connectors → Check Resistance → Check PCB Connector → Check PCB Voltage → Check PCB Resistance Check 3 Pins in motor Check Connectors Check Motor Resistance Visually inspect housing placement and pin connector status. Resistance at each terminal - 8 Ohms Check connector for bad connection Check resistance at the motor’s 3 pin terminals. Visually inspect housing placement and pin connector status. About 2 ~ 4 M ohms On 4 Pin terminals, check between pins 1 and 2 for voltage value. Should be about 5V. Check with the Power On. 28 HA Tech Tips Check with the Power On. On 4 Pin terminals, check resistance between pins 1 and 3 and pins 1 and 4. Should be about 2 ~ 4 M ohms. Check with the Power On. Preventing Odors in Front Loading Washing Machines By K.T. Lee, Assistant Manager, HA Product Support Why Odor Develops Unlike top loading washers, front loading washers must be tightly sealed along every inch of the drum when operating. Because of this design requirement, front loaders are more susceptible to mold and mildew, which may cause unpleasant odors to develop. (This pertains to all front loading washers, not just Samsung models). Fortunately, there are a couple of easy maintenance measures you can take to prevent or correct these symptoms. Proper Usage 1. Always use High Efficiency (HE) detergents, and follow the manufacturer’s instructions regarding the recommended amount used per cycle. If more than the recommended amount is used, it can cause extra detergent and soil residue to accumulate inside the washer which can result in undesirable odors. 2. After use, always leave the washer door and the dispenser door slightly open and allow the washer to air-out and dry properly. This will prevent the build-up of odor-causing residue. 3. After use, wipe out the detergent drawer, the inner walls of the drum, and the door seal with a clean dry cloth. 4. Do not let clothing sit in the washer for long periods of time after washing cycles end. Wet clothing in a dark enclosed area is a breeding ground for mold and mildew. Please try to remove clothing in a timely manner. Periodic Maintenance (Performed once a month or every 30 cycles, whichever comes first) 1. Use the “Pure” cycle or the “Sanitize” cycle (or if these cycles are not present, use the highest temperature cycle available) to prevent the excessive build-up of residue. Add a cleaning detergent such as “Clorox Washing Machine Cleaner” or the “Affresh Washer Cleaner” for an improved cleaning cycle. When cleaning the washer using theses cycles, do not put clothing or any items into the washer since this can cause damage to the machine. 2. Cleaning the Door Seal a. Remove all clothing and items from the washer. b. Locate the rubber door seal on the outer ring of the washer drum. Pull the gasket back slightly to inspect areas under the seal. c. Use dilute liquid chlorine bleach (3/4 cup of liquid chlorine bleach and 1 gallon (3.8L) of warm tap water) with a damp cloth and wipe the area under and around the seal. Let it sit for 5 minutes. Wipe down the area thoroughly with a dry cloth and let it dry (leave the door open). IMPORTANT: Always wear rubber gloves when handling bleach or other cleaning products. Refer to the bleach manufacturer’s instructions for proper usage. Proper usage and maintenance will prolong the life of the washer and prevent odor and bacteria. 29 HA Tech Tips 2012 Top Load Washers Issues By Nick Webert, Regional Technical Trainer, Product Support Currently, there are two 2012 Top Load Washer pump issues that we want you to be aware of, so you can correct them and avoid “REDO”. The first issue is leaking coming from the pump mounted on the bottom of the outer basket. By now, many of you have replaced the broken pump housing that causes the unit to leak. We have found that broken housings are sometimes caused by a water level switch that is not set correctly. It is letting the washer add too much water on large loads, making the outer basket sink further than it should. This causes the pump to break during the wash cycles. Before you replace the housing, make sure you test the water level switch to confirm it is working correctly. On all Samsung washers, you can test the water level switch in Service Mode The display will show you the frequency of the water level switch and, as water is added to the unit, it will also show this change on the display. Please refer to each model’s Fast Track manual for the correct button selections. The second problem with the pump involves no draining. If you come across this issue, the “Fast Track” manual teaches you that you can turn the pumps on and off in the “Quick Test” mode. It is important to test for 120 volts AC at the board and also right at the pump itself. We are finding that 120 volts AC is present at the board, but only 7 to 10 volts AC is at the pump. If you find this issue, make sure you touch and wiggle the wiring at the pump. 30 HA Tech Tips 2012 Top Load Washers Issues continued Even though the wiring looks good, the internal wires may be broken, creating this loss in voltage. We are seeing this on the black wire, but have seen it on the yellow wire too. Make sure you move the wire and tug lightly on it to see if it becomes separated. Once the wire has let go completely, strip the wire and solder it back on the spade. Pay close attention to the slack in the wiring. This will help prevent the wiring harness from pulling away from the pump while the washer is in use. 31 HA Tech Tips HA GSPN Updates By Jeff Brutman, Senior Staff, Publications We encourage you to use our GSPN site to find the latest service bulletins to aid you with your repairs: http://gspn3.samsungcsportal.com/ HA Service Bulletins uploaded to GSPN in June, 2013: Bulletin Number Subject Applicable Models Subject: DW Basket Adjuster SVC Kit ASC20130606001 Background: The Left and Right Basket Adjusters used on the DMR78 and DMT800 dishwashers were previously only available as separate parts. If the basket adjuster failed due to the mounting hook breaking, you would have had to order 2 separate parts. Dishwashers: DMT800, DMR78 In an effort to help reduce service costs, the 2 separate parts have now been merged into one service kit. ASC20130606002 ASC20130613001 32 HA Tech Tips Symptom: Unusual humming or rattling noise, which stops when a Fresh Food section door is opened. The noise can also be rather loud. Background: The noise is caused by vibration at the auger motor assembly, usually coming from the fan motor. French Door Refrigerators: RF323TEDB, RF263BEAE, RF263TEAE, ALL COLORS SUBJECT: E-84 and E-85 Communication Errors Electric Ovens: Background: Range displays an E-84 or E-85 error code. NE597N0PBSR/AA, FE710DRS/XAA