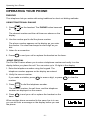
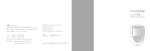
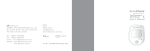
1
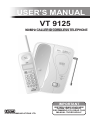
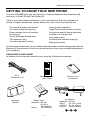
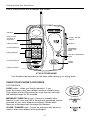
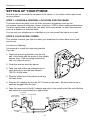
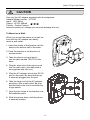
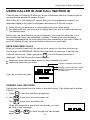
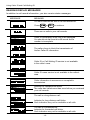
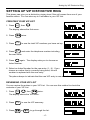
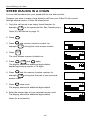
VTECH COMMUNICATIONS LTD.
Distributed in the U.S.A. by VTECH Communications, Beaverton, OR
Distributed in Canada by VTECH Electronics Canada Ltd., Richmond, B.C..
Copyright 1999 for VTECH COMMUNICATIONS LTD.
Printed in Malaysia
91-5081-10-00
ISSUE 0
USER’S MANUAL
VT 9125
900MHz CALLER ID CORDLESS TELEPHONE
IMPORTANT
VTECH COMMUNICATIONS LTD.
BEFORE USING YOUR NEW
PHONE, WE STRONGLY
RECOMMEND YOU READ THIS
MANUAL THOROUGHLY.
IMPORTANT SAFETY INSTRUCTIONS
IMPORTANT SAFETY INSTRUCTIONS
Read and understand all instructions.
Follow all warnings and instructions marked on the telephone.
Use only the battery type recommended in the Instruction Manual.Do not use a
lithium battery.
Unplug this telephone from the wall outlet before cleaning. Do not use liquid or
aerosol cleaners, just use a damp cloth for cleaning.
Do not use this telephone near water. For example, do not use near a bath tub,
wash bowl, kitchen sink, laundry tub, in a wet basement, or near a swimming
pool.
Do not place this telephone on an unstable cart, stand or table. It could fall
causing serious damage impeding operation.
Never place this telephone near or over a radiator or heat register.
Only operate this telephone using the type of power source listed on the marking
label. If you are not sure of the power supply of your home, consult your dealer
or local power company.
Do not overload wall outlets and extension cords as this can result in the risk of
fire or electrical shock.
Never push objects of any kind into this telephone as they can touch dangerous
voltage points or short out parts that could result in a risk of fire or electrical
shock.
Take the phone to a qualified technician when it requires repair work or service.
To reduce the risk of electrical shock, do not disassemble the telephone.
Opening or removing covers can expose you to dangerous voltages or other
risks. Incorrect reassembly can cause electrical shock during subsequent use.
Unplug this telephone from the wall outlet and refer servicing to qualified service
personnel under the following conditions:
If the power supply cord or plug is damaged or frayed.
If liquid is spilled into the unit.
If the unit is exposed to rain or water.
If the unit does not operate normally by following the operating instructions.
If the unit is dropped or the casing is damaged.
If the unit exhibits a distinct change in performance.
Avoid using the telephone during an electrical storm. There can be a slight risk of
electrical shock from lightning.
Do not use the telephone to report a gas leak if in the vicinity of the leak.
SAVE THESE INSTRUCTIONS
-i-
IMPORTANT SAFETY INSTRUCTIONS
CAUTION
To reduce the risk of fire or injury to persons,
read and follow these instructions:
TELEPHONE WIRING AND JACK INSTALLATION
Use caution when installing or modifying telephone lines.
Never install telephone wiring during an electrical storm.
Never install telephone jacks in wet locations unless the jack is specifically
designed for wet locations.
Never touch uninsulated telephone wires or terminals unless the telephone line
is disconnected at the network interface.
BATTERIES
Disconnect the telephone when replacing batteries or a battery pack.
Use only the battery or battery pack type listed in the Instruction Manual. Do not
use lithium batteries .
Do not dispose of batteries or a battery pack in a fire, as they can explode.
Check with local codes for proper battery disposal regulations.
Do not open or mutilate a battery or battery pack. Released electrolyte is
corrosive and can cause damage to the eyes or skin. It can be toxic if swallowed.
Avoid contact with rings, bracelets, keys or other metal objects when handling
batteries. These objects could short out the batteries or cause the conductor to
overheat resulting in burns.
Do not attempt to recharge a battery or battery pack by heating it. Sudden
release of battery electrolyte can cause burns or irritation to the eyes or skin.
Replace all batteries at one time (if your model has more than one). Mixing fresh
and discharged batteries can cause them to rupture.
Observe the proper polarity, or direction, of any battery. Reverse insertion of a
battery or battery pack can prevent charging, and can result in leakage or
explosion.
Remove the batteries or the battery pack if you do not plan to use the phone for
several months at a time. The batteries could leak over that time.
Discard any “dead” batteries or battery pack as soon as possible because they
are likely to leak into the phone.
Do not store this phone, or any batteries or battery pack, in a high temperature
area. Batteries stored in a freezer or refrigerator should be protected from
condensation during storage and defrosting. Batteries and battery packs should
be stabilized at room temperature before using.
Cordless Telephone only: Your battery pack is rechargeable and can be recycled
once it outlives its usefulness. Depending upon your local and state law, it might
be illegal to dispose of this battery into a municipal waste system. Check with
your local solid waste company for more information on your recycling options
for the battery pack.
- ii -
Table of Contents
TABLE OF CONTENTS
IMPORTANT SAFETY INSTRUCTIONS
i
TABLE OF CONTENTS
iii
GETTING TO KNOW YOUR NEW PHONE
Unpacking Your Phone
Using Your Phone’s Features
1
1
2
4
4
4
6
7
7
7
SETTING UP YOUR PHONE
Step 1. Choose a Central Location for the Base
Step 2. Plug in the Cords
Step 3. Add the Battery to the Handset
Step 4. Select Tone or Pulse Service
Step 5. Set Ringer On or Off
Step 6. Select Prompt Language
OPERATING YOUR PHONE
Dialing
Using Traditional Dialing
Using Pre-dial
Using Short-Cut Dialing Methods
Using Call Records
Using Redial
Using Speed Dialing
Storing Your Speed Dial List
Transferring a Caller ID Call Record
Using the Speed Dial List
Paging and Finding the Handset
Using Flash
Using Temporary Tone Service
Adjusting Handset Volume
Reading the Call Timer
Finding Clear Reception
Reaching Maximum Range
8
8
8
8
9
9
9
9
9
10
11
11
12
12
12
12
12
12
USING CALLER ID AND CALL WAITING ID
Receiving New Calls
Viewing Call Records
Dialing from Call Records
Saving Call Records
Deleting Call Records
Reading Display Messages
13
13
13
14
15
15
16
SETTING UP VIP DISTINCTIVE RING
Creating Your VIP List
Reviewing Your VIP List
17
17
17
SPEED DIALING IN A ChAIN
18
TROUBLESHOOTING
19
FCC REQUIREMENTS
21
23
LIMITED WARRANTY
- iii -
Getting to Know Your New Phone
GETTING TO KNOW YOUR NEW PHONE
Your new VT 9125 gives you the ultimate in cordless telephone sound quality with
the luxury of Caller ID and Call Waiting ID.
If this is your first cordless telephone, you’ll soon discover that your telephone is
similar to regular telephones, except without the cord. Some key features are:
50 name & number call records
9-number Personal Directory
Direct storage from call records
to Directory
Visual Message Waiting alert
VIP distinctive ring
3-position handset volume
Hearing-aid compatible
Page/Find handset locator function
Auto and manual channel selection
Audible out of range alert
Low battery alert
Bi-directional handset charging
Bilingual prompts
Unlike regular telephones, your cordless telephone does not work during power failures.
Because of this restriction, we do not recommend you have only cordless telephones in
your residence.
UNPACKING YOUR PHONE
In addition to this manual,check that you have the following accessories:
M1
M2
M3
M4
M5
M6
M7
M8
M9
M1
M2
M3
M4
M5
M6
M7
M8
M9
7Foot
Telephone Cord
Mounting
Bracket
Memory Number
Index Sheet
Battery Pack
Model No.: NP 600,
B-650 or
3N-600AACL
Rating:
3.6V 600mAh
-1-
Battery Cover
for Handset
AC Adapter
Model No.: NP 915
INPUT:
AC 120V, 60Hz
OUTPUT: DC 9V, 400mA
Polarity: Center Positive
Getting to Know Your New Phone
Your VT 9125 comes with a handset and a base.
Handset
Easy-to-read
character &
digit LCD
TONE / PULSE
Switch
Antenna
Caller ID Button
PHONE
OFF
CID
FLASH
Function Buttons
GHI
Dialing Buttons
1
ABC
2
DEF
3
4
JKL
5
MNO
6
7
TUV
8
WXYZ
PQRS
TONE
REDIAL
OPER0
CHAN
DELETE
MESSAGE /
NEW CALL
Light
9
IN USE / CHARGING
Light
#
MEM
Function Buttons
PAGE
Button
Charge Contacts
VT 9125 TELEPHONE
Your handset can be placed in the base either facing up or facing down.
USING YOUR PHONE’S FEATURES
ON THE BASE
PAGE button - Helps you find the handset. If you
press the button once, the handset sends an audible beep.
If you press and hold the button for more than two seconds,
the handset beeps for 20 seconds.
MESSAGE / NEW CALL light - Comes on steadily when
there is a new voice mail left in the optional answering service
provided by your local telephone company. Blinks when
there are unreviewed call recordsat the handset.
IN USE / CHARGE light - Comes on whenever this phone is
used or when the handset is being charged.
-2-
PAGE
Getting to Know Your New Phone
ON THE HANDSET
THE CALLER ID BUTTONS
CID button - Turns your call records on for review.
Also initiates menu programming.
# )- Scroll through
Call Review buttons( TONE
and
your call records after you press CID. These buttons
display the Name & Number Screen of your call records.
CID
0
TONE
#
OPER
CALL BACK# OPTIONS button ( OPER0 ) - Select the local
number or long distance number of a call record before
dialing.
Caller ID Buttons
THE FUNCTION BUTTONS
PHONE/ FLASH button - Turns the phone on so you can dial
or talk, and allows you to switch between a call and a
Waiting call. Lights up when you are talking on the handset.
PHONE
FLASH
OFF button - Ends a call, or any phone function. It also
clears the display of incoming caller’s information for privacy.
REDIAL button - Redials your last outbound call or inserts
a pause in a number when entering numbers into memory.
OFF
REDIAL
CHAN
MEM
DELETE
Function Buttons
CHAN button - Allows you to change among 20 channels for clearer reception.
DELETE button - Removes records from the Call Records or from memory dialing.
MEM button - Allows you to review stored numbers, and save numbers
in the Speed Dial List. After pressing CID, allows you to set Ringer, select prompt
Language and program numbers for VIP Distinctive Ring.
THE DIALING BUTTONS
Dialing buttons - Control manual dialing. If you use
Rotary / Pulse dialing,
TONE
1
ABC
2
DEF
3
4
JKL
5
MNO
6
PQRS
7
TUV
8
WXYZ
9
TONE
OPER
GHI
allows you to set your phone
for temporary tone service.
0
#
SWITCHES
Dialing Buttons
Volume switch - Allows you to adjust the handset volume
to LOW , MID , or HIGH .
LO
W
MID
HI
G
H
Volume Switch on Handset
-3-
Setting Up Your Phone
SETTING UP YOUR PHONE
Now that you’ve checked the contents of the carton, it only takes a few steps to set
up your phone.
STEP 1. CHOOSE A CENTRAL LOCATION FOR THE BASE
The base should be away from all other electronic equipment such as the
microwave, personal computer, stereo, television, VCR or other cordless telephones.
It is also a good idea to place the unit away from noisy areas, or from heat sources
such as a radiator or direct sunlight.
You can set your telephone on a tabletop or you can mount the phone on a wall.
STEP 2. PLUG IN THE CORDS
This section instructs you how to install your telephone for either desk-top or wall
mount use.
For Use on a Tabletop:
It is optional to install the mounting bracket.
If you do...
1. Place the mounting bracket over the top
half of the base with the hooks in the middle
square slots. (The mounting bracket fits
only one way into slots.)
2. Snap the bracket onto the phone.
3. Take one end of the long telephone line
cord and plug it into the jack labeled
TELCO on the base.
4. Plug the other end of the phone cord into
the wall outlet.
5. Plug the AC adapter tip into the DC 9V jack on the base. Be sure that the tip is
securely plugged into the jack.
6. Take the large end of the AC adapter and plug it into a wall outlet. Be sure that the
wall outlet is not controlled by a light switch.
120V WALL
OUTLET
TELEPHONE
WALL OUTLET
AC ADAPTER
DC9V
JACK
BASE
TELCO
JACK
TELEPHONE
CORD
-4-
Step 2. Plug in the Cords
CAUTION
Use only the AC adapter supplied with this telephone.
Adapter Model number : VT9125
Input : 120V 60Hz
Output : 9V DC 400mA
Polarity : Center Positive
Incorrect polarity or voltage can seriously damage the unit.
To Mount on a Wall:
When you mount the phone on a wall, be
sure that the AC adapter can easily
reach a wall outlet.
1. Insert the hooks of the bracket into the
holes in the bottom half of the base.
2. Push the bracket in the direction of
arrows shown.
3. Take the phone cord and plug it
into the jack marked TELCO on the
base.
4. Plug the other end of the phone cord
into the wall outlet. (the wall plate is
not supplied with this unit.)
5. Plug the AC adapter tip into the DC 9V
jack on the base. Be sure that the tip
is securely plugged into the jack.
6. Take the large end of the AC adapter
and plug it into a wall outlet. Be sure
that the wall outlet is not controlled by
a light switch.
7. Align the two holes in the bracket over
the wallplate posts.
8. Slide the phone down until the phone
is securely seated.
-5-
Setting Up Your Phone
STEP 3. ADD THE BATTERY TO THE HANDSET
If this is the first time you are installing the battery, the
battery cover is not on the handset. It is located in your
accessory packet. Skip step 1.
1. Remove the battery cover by sliding it out.
2. Locate the battery connector inside the battery well.
If you are replacing a dead battery, remove the old
battery by pulling firmly on the battery cords.
3. Insert the battery plug into the connector. It is polarized
and only inserts in one direction.
4. Place the battery in the battery well. Make sure that the
battery cords are on top of the battery. Do not lay the
battery on top of the battery cords otherwise you might
pinch the battery cords.
5. Replace the battery cover by sliding it in.
6. Replace the handset on the base and let the battery
charge for full 14 hours before using.
To save battery life, it is recommended to leave the handset
out of the base after the handset battery has been fully
charged. Return the handset to the base and recharge the
battery when the BATTERY icon comes on.
or
To ensure proper charging clean the charge contacts
on the handset and base with a soft cloth periodically.
Ni-Cd
IMPORTANT NOTE:
SPENT NICKEL-CADMIUM RECHARGEABLE
BATTERIES MUST BE RECYCLED OR
DISPOSED OF PROPERLY IN COMPLIANCE
WITH ALL APPLICABLE LAWS.
FOR DETAILED BATTERY RECYCLING
INFORMATION, CONTACT THE
RECHARGEABLE BATTERY RECYCLING
CORPORATION AT 1-800-822-8837
-6-
Step 4. Select Tone or Pulse Service
CAUTION
Risk of explosion if battery is replaced by an incorrect type.
To reduce the risk of fire or injury to persons or damage to the phone, replace
only with battery NP 600, B-650 or 3N-600AACL in this phone. Do not attempt
to open the sealed battery pack. All used Ni - Cad batteries must be recycled
or disposed of properly in accordance with all applicable laws.
STEP 4. SELECT TONE OR PULSE SERVICE
You can set the telephone to use either tone or
rotary / pulse service. Move the switch on the base
to match the service you have.
STEP 5. SET RINGER ON OR OFF
CID
1 .
1. Press
, MEM , then
The display shows the current ringer setting.
2. Press TONE
to change the setting if desired.
Otherwise go to step 3.
3. Press
to accept the setting.
MEM
See also Setting Up VIP Distinctive Ring on page 17.
STEP 6. SELECT PROMPT LANGUAGE
1. Press
CID
, then
.
MEM
2. Press
3. Press
TONE
ABC
once.
2 to check the language selected.
4. Press TONE to change the setting if desired.
Otherwise go to step 5.
5. Press
to accept the setting.
MEM
-7-
PULSE
TONE
Operating Your Phone
OPERATING YOUR PHONE
DIALING
This telephone lets you make calls using traditional or short-cut dialing methods.
USING TRADITIONAL DIALING
1. Press
lit.
PHONE
on the handset. The PHONE button becomes
FLASH
The channel number and the call timer are shown on the
display.
2. Use the number pad to dial the phone number.
The phone number appears on the display as you enter
the number. You also hear beeps for each digit as you
dial.
3. Listen for a connection.
4. Press
OFF
to end your call or replace the handset on the base.
USING PRE-DIAL
The Pre-Dial Feature allows you to enter a telephone number and verify it on the
display before you place the call. You can enter up to 16 digits in the display.
1. Enter the telephone number using the keypad. The
telephone number appears on the display as entered.
2. Verify the correct number.
If you make a mistake, press
number.
3. Press
PHONE
FLASH
to erase a digit, or press
DELETE
to dial the telephone number.
The channel number, the call timer, and the telephone
number are displayed on the screen.
4. Press
base.
OFF
to end your call or replace the handset on the
When another phone connected to the same line is in use,
you can tell from a message on the display before you use
the phone.
-8-
OFF
to clear the
Using Short-cut Dialing Methods
USING SHORT-CUT DIALING METHODS
USING CALL RECORDS
See Dialing From Call Recordson page 14.
USING REDIAL
Redial is a fast method of calling the last number that you dialed. This feature works
whether you dialed it manually, or it was from a call record or the speed dial list.
1. Press
REDIAL
.
The last telephone number you called is shown on the
display.
2. Verify the correct number.
3. Press
PHONE
to dial the telephone number.
FLASH
The channel number, the call timer, and the telephone
number are displayed on the screen.
USING SPEED DIALING
Another short-cut for dialing is using speed dialing. You need to create a speed dial
list before using this procedure. See Storing your Speed Dial List below.
1. Press
.
MEM
2. Press
TONE
# to scroll the list.
or
Or, enter the memory location number (1 - 9) using the
keypad. The display shows the telephone number stored.
3. Verify the correct number.
4. Press
PHONE
FLASH
.
See also Speed Dialing In A Chain on page 18.
STORING YOUR SPEED DIAL LIST
You can create a new entry or transfer a Caller ID call record into your Speed Dial
List. You can store up to 9 speed dial names and numbers in memory.
STORING A NEW ENTRY
1. Enter the telephone number. You can enter up to 16
characters maximum. You can also program pauses
using
. If you make a mistake, press
to erase
REDIAL
DELETE
OFF
a digit, or press
to clear the number.
2. Press and hold
the name.
until the display asks you to enter
MEM
Go to step 5 if you do not enter name.
-9-
Operating Your Phone
3. Press the number buttons to select the characters. Each button pressed will go
through a set of characters as shown below.
1:
2:
3:
4:
5:
6:
7:
8:
9:
0:
A
D
G
J
M
P
T
W
0
B
E
H
K
N
Q
U
X
Press
C
F
I
L
O
R
V
Y
2
3
4
5
6
S
8
Z
7
9
# when you get to the desired character on the button. If you want to
insert a space, press
#
again.
4. Repeat step 3 until you have entered the name. You can enter up to 15
characters maximum.
5. Press
again. The display asks you to choose an Index Number.
MEM
6. Select an Index Number for the new entry (1 - 9). If you
choose a number that is currently being used, the old
number is replaced with the new entry.
The phone beeps to indicate that the new Speed Dial entry is now saved.
TRANSFERING A CALLER ID CALL RECORD
A quick way to add to your Speed Dial List is to copy a Caller ID call record.
1. Press
2. Press
3. Press
CID
. The display shows the Call Record Summary.
or
TONE
NEW CALL#
# to find the desired call record.
0 to choose the desired number option,
OPER
for example, in 7, 10, or 11 digits.
4. Press and hold
until the display asks you to choose an Index Number.
MEM
5. Select an Index Number for the new entry (1 - 9). If you
choose a number that is currently being used the old
number is replaced with the new entry.
The phone beeps to indicate that the new Speed Dial
entry is now saved.
- 12 -
Using the Speed Dial List
USING THE SPEED DIAL LIST
REVIEWING SPEED DIAL ENTRIES
You can review the entries in your Speed Dial List. You can use this method to
check the contents of your Speed Dial List before you create a new entry.
1. Press
OFF
2. Press
to clear the display.
. The display shows the first entry in the list.
MEM
3. Press 1 - 9 on the keypad to directly access the entry.
Alternatively, press
TONE
or
# to go through the list.
DELETING A SPEED DIAL ENTRY
You can erase unwanted Speed Dial entries.
1. Find the Speed Dial entry you want to erase.
2. Press
and the Index Number of the entry.
DELETE
In this example, you would press
JKL
5 .
3. The display shows an erased record for 10 seconds.
If the Index Number you press does not match the Index
Number on the display, the entry is not erased.
PAGING AND FINDING THE HANDSET
If you ever misplace the handset, the base can help you find the location of the
handset.
PAGING THE HANDSET
Press
on the base. If the handset is lying idle, it
beeps for about 3 seconds. The display shows a Paging
message.
If the handset is in use, the handset emits a tone through the earpiece.
FINDING THE HANDSET
1. Press and hold
2. Press
OFF
for about 2 seconds. The handset beeps for 20 seconds.
on the handset or
on the base once you have found the
handset.
- 11 -
Operating Your Phone
USING FLASH
To access your custom calling services, like Call Waiting, while you are on the
telephone, press
PHONE
.
FLASH
USING TEMPORARY TONE SERVICE
If you have Rotary / Pulse service, you can temporarily set your telephone to tone
service for use with automated telephone services.
Press
TONE
after you connect with the automated service. The phone
automatically returns to rotary / pulse service after you hang up the call.
ADJUSTING HANDSET VOLUME
You can adjust the volume of the handset to LOW,MID,or
HIGH by moving the switch on the side of the handset.
The HIGH setting is primarily for hearing-aid compatibility. You might experience a
slight decline in audio clarity when the volume switch is on HIGH.
READING THE CALL TIMER
The call timer starts automatically when you make or
receive a call. It times the call up to a maximum of 59
minutes and 59 seconds, then starts again at zero.
FINDING CLEAR RECEPTION
Your phone automatically selects a channel at the beginning of the call for the best
reception.
If you are experiencing interference, you can either move
closer to the base, or press
on the handset until you
CHAN
find better reception.
REACHING MAXIMUM RANGE
The handset and base communicate up to a certain maximum range. This distance
can be affected by weather, power lines, or even other cordless telephones.
OUT OF RANGE
If you are out of range, you may lose your call and the display will go out. Move
closer to the base and try your call again.
The handset beeps whenever you are on the phone and the handset moves out of
range from the base. If you do not move closer to the base winthin 30 seconds, you
will lose your connection.
- 12 -
Using Caller ID and Call Waiting ID
USING CALLER ID AND CALL WAITING ID
Caller ID and Call Waiting ID allow you to see information about an incoming call so
you can decide whether to answer the call.
With Caller ID or Call Waiting ID service from your local telephone company, the
telephone displays the caller’s information and stores it in the call records.
Caller ID lets you know who is calling before you pick up the phone.
Call Waiting ID lets you know who is calling when you are on a call and hear the
Call Waiting beep.
Before you use these features on your telephone, you must first subscribe to the
services through your local telephone company. Contact your local telephone
company representative for more information and availability in your area. Caller ID
and Call Waiting ID may not be available in all areas or on all calls.
RECEIVING NEW CALLS
When you receive a new call, the call record is stored in a list after the first ring.
On the base, the MESSAGE / NEW CALL light blinks to alert you of having new
Caller ID call records. When you press
CID
, the Call Record Summary is
displayed. The Call Record Summary tells you:
How many new calls you have since you last reviewed your calls.
How many total calls you have.
Comes on before call review.
Number of new calls for review.
Number of old and new calls,
50 maximum.
If you do not have any calls
VIEWING CALL RECORDS
Call records are stored from the oldest to the most recent. (The oldest call is labeled
CALL# 1.)
1. Press
2. Use
CID
to see from the most recent call.
TONE
Use
to see the Call Record Summary.
# to see from the oldest call.
When you reach either end of the call records, you see
an “End of List” message.
Press
again.
TONE
or
# to scroll through the call records
- 13 -
Using Caller ID and Call Waiting ID
DIALING FROM CALL RECORDS
You can use your Call Records as a short-cut method of
dialing.
1. Press
CID
NEW CALL#
to see the Call Summary.
CALL#
2. Press
3. Press
or
TONE
0
OPER
#
to find the desired call record.
, and stop at the number you want to dial out.
Remove the area code.
Press
0
OPER
Add 1+ area code.
Press
0
OPER
Remove the 1.
Keep the area code.
Press
OPER
Press
OPER
0
Remove the area code.
Add 1 to local number.
0
When the call record contains a number other than 10-digit, you have no selection
of dialing number by pressing
4. Press
PHONE
FLASH
0
OPER
the second time.
.
The phone dials whatever number is shown on the display.
- 14 -
Saving Call Records
SAVING CALL RECORDS
Your phone stores up to 50 Call Records before the memory becomes full. When the
next call comes in, the oldest record drops off and makes room for the new call
record.
To save specific calls, transfer call records to the Speed Dial List or delete old call
records. For more information about saving call records to the Speed Dial List, see
Transferring a Caller ID Call Record on page 10.
DELETING CALL RECORDS
You can either delete a single record or you can delete all call records at one time.
TO DELETE A SINGLE RECORD:
1. Press
CID
NEW CALL#
to see the Call Record Summary.
CALL#
2. Use
TONE
3. Press
or
# to find the desired call record.
once, and the display asks if you want to
DELETE
erase this call record.
4. Press
again to erase the call record.
DELETE
If you do not wish to delete the call record, press
OFF
to cancel.
TO DELETE ALL CALL RECORDS:
1. Press
CID
2. Press
NEW CALL#
to see the Call Record Summary.
once, and the display asks if you want to
DELETE
delete all call records.
3. Press
again to erase all call records.
DELETE
If you do not wish to delete all call records, press
cancel.
- 15 -
OFF
to
Using Caller ID and Call Waiting ID
READING DISPLAY MESSAGES
In addition to call record information, you also receive status messages:
MESSAGE
MEANING
You have reached the end of the call records list.
Press
TONE
or
# to continue.
There are no calls in your call records.
Caller ID information is too long to be displayed.
You should not dial from this call record as the
number is incomplete.
The caller chose to block the transmission of
his/her Caller ID information.
Caller ID or Call Waiting ID service is not available
in the caller’s area.
Caller ID name service is not available in the caller’s
area.
Caller information is erroneous or corrupted in
transmission.
Indicator for repeated call blinks.
The caller has called more than once before you reviewed
your call records.
The call is a long distance call.
Indicator for long distance call blinks.
Such indication may not be available on all calls.
The call is a forwarded call.
Indicator for forwarded call blinks.
Such indication may not be available on all calls.
- 16 -
Setting Up VIP Distinctive Ring
SETTING UP VIP DISTINCTIVE RING
This phone can give you a distinctive ringing tone if the call comes from one of your
favorite callers. You can store up to 9 numbers in your VIP List.
CREATING YOUR VIP LIST
1. Press
CID
, then
.
MEM
The display shows the first menu.
2. Press
3. Press
4. Press
twice.
TONE
3
to see the total VIP numbers you have set up.
0
and enter the telephone number including
DEF
OPER
the area code.
5. Press
again. The display asks you to choose an
MEM
Index Number.
6. Select an Index Number for the new entry (1 - 9). If you
choose a number that is currently being used, the old
number is replaced with the new entry.
The phone beeps to indicate that the new VIP entry is now saved.
REVIEWING YOUR VIP LIST
You can review the entries in your VIP List. You can use this method to check the
contents of your VIP List.
1. Press
CID
,
MEM
, then
TONE
twice.
The display shows the VIP menu.
2. Press
3. Press
DEF
TONE
3
to see the VIP summary.
or
#
to go through the list.
- 17 -
Speed Dialing in a Chain
SPEED DIALING IN A CHAIN
You can dial numbers from your speed dial list one after another.
Suppose you want to make a long distance call from your Caller ID call records
through another carrier. Follow the steps below.
1. Copy the call record to an empty Index Number, for
example
TUV
8 , in the speed dial list. See Transferring a
Caller ID Call Record on page 10.
2. Press
3. Press
and memory location number, for
MEM
example
4. Press
.
OFF
7 , storing the local access number.
PQRS
PHONE
.
FLASH
The local access number is dialed out.
8 and
5. Press MEM ,
again.
MEM
The display shows the additional digits dialed,
displacing previous screen of 16 digits.
TUV
6. Press
MEM
example
and the memory location number, for
WXYZ
9 , storing the first part of your personal
access code.
7. Press MEM once more.
The display shows the additional digits dialed.
8. Enter the second part of your personal access code.
The display shows the additional digits dialed.
Listen for a connection.
- 18 -
Troubleshooting
TROUBLESHOOTING
Are you having a problem with your phone? Here are some of the most common
problems and their solutions.
SYMPTOM
No dial tone
CORRECTIVE ACTION
Verify that the line cord is connected and secure.
Check to see that you are not out of range from the
base.
Check that the AC adapter is plugged into the wall
outlet.
Check to see that the Ni-Cad Battery is connected
inside the battery compartment.
Check that the handset battery pack is fully
charged.
Phone doesn’t dial out
Check that the TONE / PULSE switch on the base is
set to the correct position. Call your local telephone
company to check the dialing service you have.
Phone doesn’t ring
Verify the ringer is set to ON at the handset.
Check to see that you are not out of range from the
base.
Verify that the line cord and AC adapter are
plugged in correctly.
Determine if you have too many communication
devices hooked to a single line. A communication
device can be a phone, modem, or facsimile (FAX)
machine. Contact your local telephone company’s
business office to help you calculate the limit for
your residence or business.
The phone has static or
fades in and out
Change channels. See Finding Clear Reception on
page 12.
Check to see that you are not out of range from the
base.
Adjust the base antenna.
Check that the handset battery pack is fully
charged.
Change the base location.
- 19 -
Troubleshooting
SYMPTOM
Caller ID /
Call Waiting ID
doesn't work
properly
CORRECTIVE ACTION
Verify that Caller ID service is active. Call your
local telephone company’s business office to
ensure that your services are active.
Determine if an extension phone is in use at the
same time.
Check to see that you are not out of range from
the base.
Visusal Message Waiting
Indication (VMWI) does
not show
Verify that VMWI service is active. Call your local
telephone company’s business office to ensure
that your services are active.
The CID button does
not work
Check to see that you are not out of range from
the base.
Check that the AC adapter is plugged into the
outlet.
Check that the handset is fully charged.
Check that the line cords are connected properly.
Charge light does
not work
Check the AC adapter. Be sure that the adapter is
not damaged and that it is securely plugged into a
working outlet. Also check that the wall outlet is
not controlled by a wall switch or a power strip.
Handset does not
charge
Check that the AC adapter is plugged in and
operating correctly.
Replace the battery as described in Step 3. Add
the Battery to the Handset on page 6.
Clean your charge contacts (on the handset and
on the base) by wiping them with a soft cloth with
a small amount of isopropyl alcohol.
Replace the battery.
Phone still does not
work after going
through above symptoms
Try resetting the phone. Unplug and plug in the AC
adapter. Disconnect and reconnect the handset
battery. Place the handset on the base for about 2
seconds or until you see the IN USE / CHARGE
light comes steadily on.
Still having problems? If you are having a problem not listed
here, or if after following the previous recommendations you are
still having problems, contact the Service Center. See the
WARRANTY for the service number.
- 20 -
FCC Requirements
FCC REQUIREMENTS
This product complies with Part 68 of FCC Rules. The Federal Communications
Commission (FCC) has established these rules that permit this device to be directly
connected to the telephone network. Standardized jacks are used for these
connections.
If this device is malfunctioning, it might also be harmful to the telephone network;
disconnect the unit until the source of the problem is determined and the device is
repaired.
The telephone company may make changes in its technical operations and
procedures; if such changes affect the use or compatibility of this device, the
telephone company is required to give adequate notice of the changes. You will be
advised of your right to file a complaint with the FCC.
If the telephone company requests information on what equipment is connected to
their lines, inform them of:
A. The telephone number to which this device is connected.
B. The FCC registration number and ringer equivalence number (REN) found on
the bottom of the unit.
The FCC requires that you connect your device to the telephone network through a
modular telephone outlet or jack. The appropriate outlet or jack is a USOC RJ-11C,
RJ-14C, RJ-11W or RJ-14W.
A label on the base of this equipment contains information about the FCC registration
number and the Ringer Equivalence Number (REN). The REN determines the
number of communication devices that can be connected to your telephone line. In
most areas, the sum of REN’s should not exceed five (5.0). If too many devices are
attached, they might not ring properly.
If you are using a cordless telephone product, some frequencies might cause
interference to nearby TVs and VCRs. To minimize this type of interference, do not
place the cordless base on top of or near a TV or VCR. If you continue to
experience interference, move the base further away from the TV and VCR.
This equipment may not be used on public coin telephone lines. Connection to party
line service is subject to state tariffs.
This product is hearing-aid compatible.
CAUTION
Changes or modification to this device could void the user’s authority to operate this
equipment.
- 21 -
FCC Requirements
This equipment has been tested and found to comply with limits for a Class B digital
device, pursuant to Part 15 of the FCC Rules. These limits are designed to provide
reasonable protection against harmful interference in a residential installation. This
equipment generates, uses, and can radiate radio frequency energy, and if not
installed and used in accordance with the instructions, may cause harmful
interference to radio communications. However, there is no guarantee that
interference will not occur in a particular installation. If this equipment does cause
interference to radio or television reception, which can be determined by turning the
equipment off and on, the user is encouraged to try to correct the interference by one
or more of the following measures:
Reorient or relocate the receiving antenna.
Increase the distance between the equipment and the receiver.
Connect the equipment into an outlet on a circuit different from that to which the
receiver is connected.
Consult the dealer or an experienced radio/TV technician for help.
- 22 -
Limited Warranty
LIMITED WARRANTY
WHAT DOES OUR WARRANTY COVER ?
Any defect in material or workmanship.
FOR HOW LONG AFTER THE ORIGINAL PURCHASE ?
To the original purchaser only - ONE YEAR.
WHAT WILL VTECH DO ?
To our option, repair or replace your unit.
HOW DO I SEND MY UNIT, IN OR OUT OF WARRANTY ?
Call VTECH Communications customer service for Return Authorization at:
1-800-595-9511
Properly pack your unit. Included any cables & accessories, which were originally
provided with the product. We recommend using the original carton and packing
materials.
Include in the package a copy of the sales receipt or other evidence of date of
original purchase (if the unit was purchased within the last twelve months).
Print your name and address, along with a description of the defect, and include
this in the package.
Include payment for any service or repair not covered by warranty, as determined
by VTECH Communications.
Ship the unit via UPS insured, or equivalent to:
VTECH COMMUNICATIONS
11035 SW 11TH STREET
BLDG. B SUITE 270
BEAVERTON, OR 97005
VTech Communications assumes no responsibility for units sent without prior Return Authorization.
WHAT DOES OUR WARRANTY NOT COVER?
Batteries
Damage from misuse, neglect, or acts of nature (lightning, floods, power surges, etc.)
Products which may have been modified or incorporated into other products
Products serviced by the owner or a service facility not expressly authorized by
VTECH Communications
Products purchased more than 12 months from current date
Unit purchased in “AS IS” condition, or units purchased as “Distressed Merchandise”.
HOW DOES STATE LAW RELATE TO THIS WARRANTY?
This warranty gives you specific rights. You may also have other rights that vary
from state to state.
- 23 -