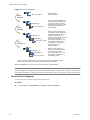
1
vSphere Basic System Administration
Update 1
ESX 4.0
ESXi 4.0
vCenter Server 4.0
This document supports the version of each product listed and
supports all subsequent versions until the document is replaced
by a new edition. To check for more recent editions of this
document, see http://www.vmware.com/support/pubs.
EN-000260-06
vSphere Basic System Administration
You can find the most up-to-date technical documentation on the VMware Web site at:
http://www.vmware.com/support/
The VMware Web site also provides the latest product updates.
If you have comments about this documentation, submit your feedback to:
[email protected]
Copyright © 2009–2011 VMware, Inc. All rights reserved. This product is protected by U.S. and international copyright and
intellectual property laws. VMware products are covered by one or more patents listed at
http://www.vmware.com/go/patents.
VMware is a registered trademark or trademark of VMware, Inc. in the United States and/or other jurisdictions. All other marks
and names mentioned herein may be trademarks of their respective companies.
VMware, Inc.
3401 Hillview Ave.
Palo Alto, CA 94304
www.vmware.com
2
VMware, Inc.
Contents
Updated Information 9
About This Book 11
Getting Started
1 vSphere Components 15
Components of vSphere 15
vSphere Client Interfaces 17
Functional Components 17
Managed Components 19
Access Privileges Components 21
vCenter Server Plug-Ins 21
vCenter Components That Require Tomcat 22
Optional vCenter Server Components 23
2 Starting and Stopping the vSphere Components 25
Start an ESX/ESXi Host 25
Reboot or Shut Down an ESX/ESXi Host 25
Stop an ESX Host Manually 26
Starting vCenter Server 26
Start the vSphere Client and Log In 27
Stop the vSphere Client and Log Out 28
vSphere Web Access 28
VMware Service Console 29
3 Using vCenter Server in Linked Mode 31
Linked Mode Prerequisites 31
Linked Mode Considerations 32
Join a Linked Mode Group After Installation 32
Reconciling Roles When Connecting vCenter Server to a Linked Mode Group 33
Isolate a vCenter Server Instance from a Linked Mode Group 34
Change the Domain of a vCenter Server System in a Linked Mode Group 34
Configure the URLs on a Linked Mode vCenter Server System 34
Linked Mode Troubleshooting 35
Monitor vCenter Server Services 37
4 Using the vSphere Client 39
Getting Started Tabs 40
Status Bar, Recent Tasks, and Triggered Alarms 40
Panel Sections 40
VMware, Inc.
3
vSphere Basic System Administration
View Virtual Machine Console 41
Searching the vSphere Inventory 41
Using Lists 42
Custom Attributes 43
Select Objects 44
Manage vCenter Server Plug-Ins 45
Save vSphere Client Data 46
5 Configuring Hosts and vCenter Server 47
Host Configuration 47
Configuring vCenter Server 48
Access the vCenter Server Settings 48
Configuring Communication Among ESX, vCenter Server, and the vSphere Client 49
Configure vCenter Server SMTP Mail Settings 49
Working with Active Sessions 49
SNMP and vSphere 50
System Log Files 65
6 Managing the vSphere Client Inventory 71
Understanding vSphere Client Objects 71
Add an Inventory Object 73
Moving Objects in the Inventory 74
Remove an Inventory Object 74
Browsing Datastores in the vSphere Client Inventory 75
7 Managing Hosts in vCenter Server 77
About Hosts 77
Add a Host 78
Completing the Add Host Process 79
Disconnecting and Reconnecting a Host 80
Remove a Host from a Cluster 81
Understanding Managed Host Removal 81
Remove a Managed Host from vCenter Server 82
Monitoring Host Health Status 83
Virtual Machine Management
8 Consolidating the Datacenter 89
Consolidation First Time Use 90
Consolidation Prerequisites 90
About Consolidation Services 93
Configuring Consolidation Settings 93
Find and Analyze Physical Systems 94
Viewing Analysis Results 95
Converting Physical Systems to Virtual Machines 95
Viewing Consolidation Tasks 96
Troubleshooting Consolidation 97
4
VMware, Inc.
Contents
9 Deploying OVF Templates 101
About OVF 101
Deploy an OVF Template 101
Browse VMware Virtual Appliance Marketplace 103
Export an OVF Template 103
10 Managing VMware vApp 105
Create a vApp 105
Populate the vApp 107
Edit vApp Settings 108
Configuring IP Pools 111
Clone a vApp 113
Power On a vApp 113
Power Off a vApp 114
Edit vApp Annotation 114
11 Creating Virtual Machines 115
Access the New Virtual Machine Wizard 115
Select a Path Through the New Virtual Machine Wizard
Enter a Name and Location 116
Select a Resource Pool 116
Select a Datastore 117
Select a Virtual Machine Version 117
Select an Operating System 117
Select the Number of Virtual Processors 117
Configure Virtual Memory 118
Configure Networks 118
About VMware Paravirtual SCSI Adapters 118
Select a SCSI Adapter 119
Selecting a Virtual Disk Type 119
Complete Virtual Machine Creation 122
Installing a Guest Operating System 122
Installing and Upgrading VMware Tools 123
116
12 Managing Virtual Machines 135
Changing Virtual Machine Power States 136
Adding and Removing Virtual Machines 139
Configure Virtual Machine Startup and Shutdown Behavior
140
13 Virtual Machine Configuration 143
Virtual Machine Hardware Versions 143
Virtual Machine Properties Editor 144
Adding New Hardware 159
Converting Virtual Disks from Thin to Thick 166
14 Working with Templates and Clones 169
Creating Templates
VMware, Inc.
169
5
vSphere Basic System Administration
Edit a Template 171
Change Template Name 172
Deploy Virtual Machines from Templates 172
Convert Templates to Virtual Machines 173
Deleting Templates 173
Regain Templates 174
Clone Virtual Machines 174
Create a Scheduled Task to Clone a Virtual Machine 175
15 Customizing Guest Operating Systems 177
Preparing for Guest Customization 177
Customize Windows During Cloning or Deployment 179
Customize Linux During Cloning or Deployment 180
Create a Customization Specification for Linux 181
Create a Customization Specification for Windows 181
Managing Customization Specification 183
Completing a Guest Operating System Customization 184
16 Migrating Virtual Machines 187
Cold Migration 188
Migrating a Suspended Virtual Machine 188
Migration with VMotion 188
Migration with Storage VMotion 197
Migrate a Powered-Off or Suspended Virtual Machine 198
Migrate a Powered-On Virtual Machine with VMotion 199
Migrate a Virtual Machine with Storage VMotion 200
Storage VMotion Command-Line Syntax 202
17 Using Snapshots 205
About Snapshots 205
Using the Snapshot Manager
Restore a Snapshot 209
208
System Administration
18 Managing Users, Groups, Roles, and Permissions 213
Managing vSphere Users 213
Groups 214
Removing or Modifying Users and Groups 215
Best Practices for Users and Groups 215
Using Roles to Assign Privileges 215
Permissions 219
Best Practices for Roles and Permissions 226
Required Privileges for Common Tasks 227
19 Monitoring Storage Resources 229
Working with Storage Reports
6
229
VMware, Inc.
Contents
Working with Storage Maps
231
20 Using vCenter Maps 233
vCenter VMotion Maps 234
vCenter Map Icons and Interface Controls 234
View vCenter Maps 235
Print vCenter Maps 235
Export vCenter Maps 235
21 Working with Alarms 237
Alarm Triggers 238
Alarm Actions 248
Alarm Reporting 253
Creating Alarms 253
Managing Alarms 257
Managing Alarm Actions 261
Managing Alarm Actions 261
Preconfigured VMware Alarms 264
22 Working with Performance Statistics 267
Statistics Collection for vCenter Server 267
Statistics Collection for Microsoft Windows Guest Operating Systems 274
vCenter Server Performance Charts 275
Monitoring and Troubleshooting Performance 279
23 Working with Tasks and Events 285
Managing Tasks 285
Managing Events 291
Appendixes
A Defined Privileges 297
Alarms 298
Datacenter 299
Datastore 299
Distributed Virtual Port Group 300
Distributed Virtual Switch 301
Extensions 302
Folders 302
Global 303
Host CIM 304
Host Configuration 304
Host Inventory 306
Host Local Operations 307
Host Profile 308
Network 308
Performance 309
VMware, Inc.
7
vSphere Basic System Administration
Permissions 310
Resource 310
Scheduled Task 312
Sessions 312
Tasks 313
vApp 313
Virtual Machine Configuration 315
Virtual Machine Interaction 319
Virtual Machine Inventory 322
Virtual Machine Provisioning 323
Virtual Machine State 326
B Installing the Microsoft Sysprep Tools 327
Install the Microsoft System Preparation Tools from a Microsoft Web Site Download 327
Install the Microsoft Sysprep Tools from the Windows Operating System CD 328
C Performance Metrics 331
Cluster Services Metrics 332
CPU Metrics 333
Disk Metrics 337
Management Agent Metrics 341
Memory Metrics 342
Network Metrics 350
Storage Utilization Metrics 352
System Metrics 353
Virtual Machine Operations Metrics
354
Index 357
8
VMware, Inc.
Updated Information
This vSphere Basic System Administration Guide is updated with each release of the product or when necessary.
This table provides the update history of the vSphere Basic System Administration Guide.
Revision
Description
EN-000260-06
Changed a point in “Configuring Communication Among ESX, vCenter Server, and the vSphere Client,”
on page 49 section.
EN-000260-05
n
n
EN-000260-04
n
n
n
n
EN-000260-03
n
n
n
n
n
n
EN-000260-02
n
n
VMware, Inc.
The topics “Windows Requirements for Guest Customization,” on page 178 and “Linux Requirements
for Guest Customization,” on page 179 now have reference to the vSphere Compatibility Matrixes
document for information on the list of operating system that are supported for guest OS cutomization.
The topic “About Snapshots,” on page 205 now reflects that VMware does not support snapshots of
virtual machines configured with bus-sharing.
In certain topics, removed references to Microsoft Outlook Express.
In “Upgrade VMware Tools Manually,” on page 131, updated Step 5 to show that you do not have to
power-off the virtual machines when upgrading VMware Tools manually.
In “Install VMware Tools on a Linux Guest with the Tar Installer,” on page 126, updated Step 10 to
remove information about RPM installation over a tar installation.
In “Install VMware Tools on a Linux Guest with the RPM Installer,” on page 127, updated Step 10 to
correct the information about installing the RPM package.
In “Specify an IP Address Range,” on page 111, updated the incorrect IPv4 address from 10.209.60.13
to 10.20.60.13.
In Chapter 17, “Using Snapshots,” on page 205, added information that you can use snapshot as a
restoration point during a linear or iterative process.
In “About Snapshots,” on page 205, added a link to a KB article.
In “Revert to Snapshot Command,” on page 209, added information about taking the snapshot when
the virtual machine is powered off.
In “Collection Intervals,” on page 269, updated that ESXi retains real-time statistics for one hour instead
of 30 minutes.
In “Disk Metrics,” on page 337, updated the Stats Type as rate and Unit as kiloBytesPerSecond in the
usage counter of the Table C-3.
In “Linux Requirements for Guest Customization,” on page 179 added new Linux Guest Operating
Systems.
In “Windows Requirements for Guest Customization,” on page 178 added new Windows Guest
Operating Systems.
9
vSphere Basic System Administration
Revision
Description
EN-000260-01
n
n
n
n
n
EN-000260-00
10
In “Edit vApp Startup and Shutdown Options,” on page 108 the tab name is changed from Start Up to
Start Order.
A note added to “View vApp License Agreement,” on page 109 clarifies the condition required to view
the vApp license agreement.
“Add a Paravirtualized SCSI Adapter,” on page 165 incorrectly stated that Paravirtual SCSI adapters
do not support bootable disk. This statement is deleted.
The alarms Virtual Machine CPU Ready, Virtual machine disk commands canceled, and Virtual
machine disk reset are removed from the Default VMware Alarms table in “Preconfigured VMware
Alarms,” on page 264.
“How Metrics Are Stored in the vCenter Server Database,” on page 273 now reflects that the maximum
number of years for which the vCenter Server Database can store statistical data is 5 years.
Initial release.
VMware, Inc.
About This Book
®
This manual, Basic System Administration, describes how to start and stop the VMware vSphere™ Client
components, build your vSphere environment, monitor and manage the information generated about the
components, and set up roles and permissions for users and groups using the vSphere environment. This
manual also provides information for managing, creating, and configuring virtual machines in your datacenter.
In addition, this manual provides brief introductions to the various tasks you can perform within the system
as well as cross-references to the documentation that describes all the tasks in detail.
Basic System Administration covers ESX, ESXi, and vCenter Server.
Intended Audience
The information presented in this manual is written for system administrators who are experienced Windows
or Linux system administrators and who are familiar with virtual machine technology and datacenter
operations.
Document Feedback
VMware welcomes your suggestions for improving our documentation. If you have comments, send your
feedback to [email protected].
VMware vSphere Documentation
The vSphere documentation consists of the combined VMware vCenter Server and ESX/ESXi documentation
set.
Abbreviations Used in Figures
The figures in this manual use the abbreviations listed in Table 1.
Table 1. Abbreviations
Abbreviation
Description
database
vCenter Server database
datastore
Storage for the managed host
dsk#
Storage disk for the managed host
hostn
vCenter Server managed hosts
SAN
Storage area network type datastore shared between
managed hosts
tmplt
Template
VMware, Inc.
11
vSphere Basic System Administration
Table 1. Abbreviations (Continued)
Abbreviation
Description
user#
User with access permissions
VC
vCenter Server
VM#
Virtual machines on a managed host
Technical Support and Education Resources
The following technical support resources are available to you. To access the current version of this book and
other books, go to http://www.vmware.com/support/pubs.
Online and Telephone
Support
To use online support to submit technical support requests, view your product
and contract information, and register your products, go to
http://www.vmware.com/support.
Customers with appropriate support contracts should use telephone support
for priority 1 issues. Go to
http://www.vmware.com/support/phone_support.html.
12
Support Offerings
To find out how VMware support offerings can help meet your business needs,
go to http://www.vmware.com/support/services.
VMware Professional
Services
VMware Education Services courses offer extensive hands-on labs, case study
examples, and course materials designed to be used as on-the-job reference
tools. Courses are available onsite, in the classroom, and live online. For onsite
pilot programs and implementation best practices, VMware Consulting
Services provides offerings to help you assess, plan, build, and manage your
virtual environment. To access information about education classes,
certification programs, and consulting services, go to
http://www.vmware.com/services.
VMware, Inc.
Getting Started
VMware, Inc.
13
vSphere Basic System Administration
14
VMware, Inc.
vSphere Components
1
VMware vSphere™ includes components and operations essential for managing virtual machines. vSphere
works with several client interfaces and offers many optional components and modules, such as VMware High
Availability (HA), VMware VMotion™, VMware Distributed Resource Scheduler (DRS), VMware Update
Manager, and VMware Converter Enterprise.
vSphere allows you to treat your virtual environment objects as managed components such as virtual machines,
hosts, datacenters, resource pools, and clusters. Functional components of vSphere provide the best way to
manage each of these managed components of your virtual environment.
Finally, vSphere provides powerful administration tools through access privileges components.
This chapter includes the following topics:
n
“Components of vSphere,” on page 15
n
“vSphere Client Interfaces,” on page 17
n
“Functional Components,” on page 17
n
“Managed Components,” on page 19
n
“Access Privileges Components,” on page 21
n
“vCenter Server Plug-Ins,” on page 21
n
“vCenter Components That Require Tomcat,” on page 22
n
“Optional vCenter Server Components,” on page 23
Components of vSphere
VMware vSphere is a suite of software components for virtualization.
To run your vSphere environment, you need the following components:
ESX/ESXi
A virtualization platform used to create the virtual machines as a set of
configuration and disk files that together perform all the functions of a physical
machine.
Through ESX/ESXi, you run the virtual machines, install operating systems,
run applications, and configure the virtual machines. Configuration includes
identifying the virtual machine’s resources, such as storage devices.
The server provides bootstrapping, management, and other services that
manage your virtual machines.
VMware, Inc.
15
vSphere Basic System Administration
Each ESX/ESXi host has a vSphere Client available for your management use.
If your ESX/ESXi host is registered with vCenter Server, a vSphere Client that
accommodates vCenter Server features is available.
vCenter Server
A service that acts as a central administrator for VMware ESX/ESXi hosts that
are connected on a network. vCenter Server directs actions on the virtual
machines and the virtual machine hosts (the ESX/ESXi hosts).
vCenter Server is a single Windows Service and is installed to run
automatically. vCenter Server runs continuously in the background,
performing its monitoring and managing activities even when no vSphere
Clients are connected and even if nobody is logged on to the computer where
it resides. It must have network access to all the hosts it manages and be
available for network access from any machine where the vSphere Client is run.
vCenter Server can be installed in a Windows virtual machine on an ESX/ESXi
host, allowing it to take advantage of the high-availability afforded by VMware
HA. See the Installation Guide for details on setting up this configuration.
Multiple vCenter Server systems can be joined together using Linked Mode to
allow them to be managed using a single vSphere Client connection.
vCenter Server plug-ins
Applications that provide additional features and functionality to vCenter
Server. Typically, plug-ins consist of a server component and a client
component. After the plug-in server is installed, it is registered with vCenter
Server and the plug-in client is available to vSphere clients for download. After
a plug-in is installed on a vSphere client, it might alter the interface by adding
views, tabs, toolbar buttons, or menu options related to the added functionality.
Plug-ins leverage core vCenter Server capabilities, such as authentication and
permission management, but can have their own types of events, tasks,
metadata, and privileges.
In addition to plug-ins that are available independently of vCenter Server,
some vCenter Server features are implemented as plug-ins, and can be
managed using the vSphere Client Plug-in Manager. These features include
vCenter Storage Monitoring, vCenter Hardware Status, and vCenter Service
Status.
vCenter Server database
A persistent storage area for maintaining status of each virtual machine, host,
and user managed in the vCenter Server environment. The vCenter Server
database can be remote or local to the vCenter Server system.
The database is installed and configured during vCenter Server installation.
If you are accessing your ESX/ESXi host directly through a vSphere Client, and
not through a vCenter Server system and associated vSphere Client, you do
not use a vCenter Server database.
16
Datastore
A virtual representation of combinations of underlying physical storage
resources in the datacenter. A datastore is the storage location for virtual
machine files. These physical storage resources can come from the local SCSI
disk of the server, the Fibre Channel SAN disk arrays, the iSCSI SAN disk
arrays, or Network Attached Storage (NAS) arrays. Datastores hide the
idiosyncrasies of the storage options and provide a uniform model for various
storage products required by virtual machines.
vCenter Server agent
On each managed host, software that collects, communicates, and executes the
actions received from vCenter Server. The vCenter Server agent is installed the
first time any host is added to the vCenter Server inventory.
VMware, Inc.
Chapter 1 vSphere Components
Host agent
On each managed host, software that collects, communicates, and executes the
actions received through the vSphere Client. It is installed as part of the
ESX/ESXi installation.
LDAP
vCenter Server uses LDAP (Lightweight Directory Access Protocol) to
synchronize data such as license and role information across vCenter Server
systems joined in Linked Mode.
vSphere Client Interfaces
There are several ways to access vSphere components.
vSphere interface options include:
vSphere Client
A required component and the primary interface for creating, managing, and
monitoring virtual machines, their resources, and their hosts. It also provides
console access to virtual machines.
vSphere Client is installed on a Windows machine with network access to your
ESX/ESXi or vCenter Server system installation. The interface displays slightly
different options depending on which type of server you are connected to.
While all vCenter Server activities are performed by a vCenter Server system,
you must use the vSphere Client to monitor, manage, and control the server.
A single vCenter Server system or ESX/ESXi host can support multiple,
simultaneously connected vSphere Clients.
vSphere Web Access
A Web interface through which you can perform basic virtual machine
management and configuration and get console access to virtual machines. It
is installed with your ESX/ESXi host. Similar to the vSphere Client, vSphere
Web Access works directly with a host or through vCenter Server. See the
vSphere Web Access Administrator’s Guide for additional information.
VMware Service Console
A command-line interface for configuring an ESX host. For an ESXi host, use
the vSphere Command-Line Interface.
vSphere Command-Line
Interface
A command-line interface for configuring an ESXi host. The vSphere
Command-Line Interface can also be used to perform Storage VMotion
operations on both ESX/ESXi hosts.
Functional Components
Functional components are used to monitor and manage your vSphere infrastructure.
The functional components are accessible from the vSphere Client Home page. Functional components are
divided into four categories: Inventory, Administration, Management, and Solutions and Applications.
Inventory
You use the Inventory functional components to view the objects managed by vCenter Server. Managed objects
include datacenters, resource pools, clusters, networks, datastores, templates, hosts, and virtual machines. The
inventory options are:
Search
Allows you to search the vSphere inventory for hosts, virtual machines,
networks, datastores, and folders matching specified criteria.
Hosts and Clusters
Provides a hierarchical view of hosts, clusters, and their child objects.
VMware, Inc.
17
vSphere Basic System Administration
VMs and Templates
Provides a view of all virtual machines and templates in the inventory, grouped
by datacenters and folders.
Datastores
Provides a view of all datastores in the inventory, grouped by datacenters and
folders.
Networks
Provides a view of all networks in the inventory, grouped by datacenters and
folders.
Administration
You use the Administration functional components to configure and monitor the state of your hosts or vCenter
Server systems. The options are:
Roles
Allows you to view and create roles used to grant access privileges to users.
Sessions
Allows you to view all vSphere Client sessions currently connected to the
selected vCenter Server system. If you have sufficient privileges, you can
terminate sessions. Sessions are available through vCenter Server only.
Licensing
Allows you to view and administer vSphere licenses. This is available through
vCenter Server only. To administer licenses for a standalone host, use the host
Configuration tab.
System Logs
Allows you to display and export log files.
vCenter Server Settings
Allows you to configure a number of settings for the selected vCenter Server
system. The vCenter Server settings are available through vCenter Server only.
vCenter Server Status
Provides a list of vSphere services with their current status. The status details
include warning and alert information.
Guided Consolidation
Analyzes computers in your enterprise and recommends the best candidates
to virtualize. The consolidation interface guides you through the conversion
process based on the computers you select for consolidation.
Management
You use the Management functional components to monitor and manage the objects in the vSphere inventory.
Management functional components are available through vCenter Server only. The options are:
18
Scheduled Tasks
Provides a list of activities and a means to schedule those activities. Scheduled
tasks are available through vCenter Server only.
Events
Provides a list of all the events that occur in the vCenter Server environment.
Use this option to view all events. To see only events relevant to a particular
object, use the Tasks & Events tab for that object. Events are available through
vCenter Server only.
Maps
Provides a visual representation of the status and structure of the vSphere
environment and the relationships between managed objects. This includes
hosts, networks, virtual machines, and datastores. Maps are available only
through vCenter Server.
Host Profiles
Allows you to view, create, apply, and check compliance for host profiles.
Customization
Specifications Manager
Allows you to create new virtual machine guest operating system
specifications and manage existing specifications.
VMware, Inc.
Chapter 1 vSphere Components
Solutions and Applications
You use the Solutions and Applications panel to access vCenter Server extensions installed in your vCenter
Server System. For example, you can access the VMware vCenter Guided Consolidation extension and the
VMware vCenter Update Manager from this panel.
NOTE This panel appears only if you purchased and installed VMware vSphere extensions that are sold
separately from the VMware vCenter Server product.
Managed Components
Managed components are objects in your virtual and physical infrastructure on which you can place
permissions, monitor tasks and events, and set alarms. You can group most managed components by using
folders to more easily manage them.
All managed components, with the exception of hosts, can be renamed to represent their purposes. For
example, they can be named after company departments or locations or functions. vCenter Server monitors
and manages the following components of your virtual and physical infrastructure:
Clusters
A collection of ESX/ESXi hosts and associated virtual machines intended to
work together as a unit. When you add a host to a cluster, the host’s resources
become part of the cluster’s resources. The cluster manages the resources of all
hosts.
If you enable VMware DRS on a cluster, the resources of the hosts in the cluster
are merged to allow resource balancing for the hosts in the cluster. If you enable
VMware HA on a cluster, the resources of the cluster are managed as a pool of
capacity to allow rapid recovery from host hardware failures.See the Resource
Management Guide.
Datacenters
Unlike a folder, which is used to organize a specific object type, a datacenter is
an aggregation of all the different types of objects needed to do work in virtual
infrastructure: hosts, virtual machines, networks, and datastores.
Within a datacenter there are four separate hierarchies.
n
Virtual machines (and templates)
n
Hosts (and clusters)
n
Networks
n
Datastores
The datacenter is the unit of virtualization (the namespace) of networks and
datastores. Within a datacenter, you cannot have two objects (for example, two
hosts) with the same name but you can have two objects with the same name
in different datacenters. Virtual machine names need not be unique within the
datacenter, but must be unique within each virtual machine folder.
If two virtual machines connect to networkA, they are connected to the same
network. Rules are different across datacenters. Theoretically, the same
physical network can appear in two datacenters and be called two different
names. Or networkA might have one meaning in datacenterA and a different
meaning in datacenterB. Moving objects between datacenters can create
problems or, at least, unpredictable results.
VMware, Inc.
19
vSphere Basic System Administration
To have a single namespace (that is, a single datacenter) for all networks and
datastores, use folders within the datacenter to organize the networks and
datastores. To have separate namespaces (separate datacenters) for networks
and datastores, create two datacenters.
Datastores
A virtual representation of combinations of underlying physical storage
resources in the datacenter. A datastore is the storage location for virtual
machine files. These physical storage resources can come from the local SCSI
disk of the server, the Fibre Channel SAN disk arrays, the iSCSI SAN disk
arrays, or Network Attached Storage (NAS) arrays. Datastores hide the
idiosyncrasies of the storage options and provide a uniform model for various
storage products required by virtual machines.
Folders
A top-level structure for vCenter Server only. Folders allow you to group
objects of the same type so you can easily manage them. For example, you can
use folders to set permissions across objects, to set alarms across objects, and
to organize objects in a meaningful way.
A folder can contain other folders, or a group of objects of the same type:
datacenters, clusters, datastores, networks, virtual machines, templates, or
hosts. For example, one folder can contain hosts and a folder containing hosts,
but it cannot contain hosts and a folder containing virtual machines.
The datacenter folders form a hierarchy directly under the root vCenter Server
and allow users to group their datacenters in any convenient way. Within each
datacenter is one hierarchy of folders with virtual machines and templates, one
with hosts and clusters, one with datastores, and one with networks.
Hosts
The physical computer on which the virtualization platform software, such as
ESX/ESXi, is installed and all virtual machines reside. If the vSphere Client is
connected directly to an ESX/ESXi host, only that host is available for
management.
NOTE When vCenter Server refers to a host, this means the physical machine
on which the virtual machines are running. All virtual machines within the
VMware vSphere environment are physically on ESX/ESXi hosts. The term host
in this Help system refers to the ESX/ESXi host that has virtual machines on it.
Networks
A set of virtual network interface cards (virtual NIC), virtual switches
(vSwitch), and port groups that connect virtual machines to each other or to
the physical network outside of the virtual datacenter. All virtual machines that
connect to the same port group belong to the same network in the virtual
environment, even if they are on different physical servers. You can monitor
networks and set permissions and alarms on port groups.
Resource pools
A structure that allows delegation of control over the resources of a host.
Resource pools are used to compartmentalize all resources in a cluster. You can
create multiple resource pools as direct children of a host or cluster and
configure them. Then delegate control over them to other individuals or
organizations. The managed resources are CPU and memory from a host or
cluster. Virtual machines execute in, and draw their resources from, resource
pools.
vCenter Server provides, through the DRS components, various options in
monitoring the status of the resources and adjusting or suggesting adjustments
to the virtual machines using the resources. You can monitor resources and set
alarms on them.
20
VMware, Inc.
Chapter 1 vSphere Components
Templates
A master copy of a virtual machine that can be used to create and provision
new virtual machines.
Virtual machines
A virtualized x86 or x64 personal computer environment in which a guest
operating system and associated application software can run. Multiple virtual
machines can operate on the same managed host machine concurrently.
vApps
VMware vApp is a format for packaging and managing applications. A vApp
can contain multiple virtual machines.
Access Privileges Components
vSphere provides access control to managed objects by using user and group permissions and roles.
Each user logs in to a vCenter Server system through the vSphere Client. Each user is identified to the server
as someone who has rights and privileges to selected objects, such as datacenters and virtual machines, within
the vSphere environment. The vCenter Server system has full rights and privileges on all hosts and virtual
machines within the vSphere environment. The server passes on only those actions and requests from a user
that the user has permission to perform. Access privileges affect which vSphere Client objects appear in the
inventory.
The server determines which access privileges and requests to allow based on the role assigned to the user or
the user’s group on each object. vCenter Server administrators can create custom roles with specific sets of
privileges, as well as use the sample roles that vCenter Server provides.
Users and Groups
Created through the Windows domain or Active Directory database or on the
ESX/ESXi host. The server, vCenter Server or ESX/ESXi, registers users and
groups as part of the assigning privileges process.
Roles
A set of access rights and privileges. Selected sample roles exist. You can also
create roles and assign combinations of privileges to each role.
Permissions
A permission consists of a user or group and a role assigned to a particular
inventory object.
vCenter Server Plug-Ins
vCenter Server plug-ins extend the capabilities of vCenter Server by providing additional features and
functionality.
Some plug-ins are installed as part of the base vCenter Server product.
vCenter Storage
Monitoring
Allows you to review information on storage usage and visually map
relationships between all storage entities available in vCenter Server.
vCenter Hardware
Status
Uses CIM monitoring to display the hardware status of hosts managed by
vCenter Server.
vCenter Service Status
Displays the status of vCenter services.
VMware, Inc.
21
vSphere Basic System Administration
Some plug-ins are packaged separately from the base product and require separate installation. Plug-ins and
the base product can be upgraded independently of each other. VMware modules include:
VMware Update Manager
Enables administrators to apply updates and patches across ESX/ESXi hosts
and all managed virtual machines. This module provides the ability to create
user-defined security baselines which represent a set of security standards.
Security administrators can compare hosts and virtual machines against these
baselines to identify and remediate systems that are not in compliance.
VMware Converter
Enterprise for vCenter
Server
Enables users to convert physical machines, and virtual machines in a variety
of formats, to ESX/ESXi virtual machines. Converted systems can be imported
into the vCenter Server inventory.
vShield Zones
vShield Zones is an application-aware firewall built for VMware vCenter
Server integration. vShield Zones inspects client-server communications and
inter-virtual-machine communication to provide detailed traffic analytics and
application-aware firewall partitioning. vShield Zones is a critical security
component for protecting virtualized datacenters from network-based attacks
and misuse.
VMware vCenter
Orchestrator
VMware vCenter Orchestrator is a workflow engine that enables you to create
and execute automated workflows within your VMware vSphere environment.
vCenter Orchestrator coordinates workflow tasks across multiple VMware
products and third-party management and administration solutions through
its open plug-in architecture. vCenter Orchestrator provides a library of
workflows that are highly extensible; any operation available in the vCenter
Server API can be used to customize vCenter Orchestrator workflows.
VMware Data Recovery
VMware Data Recovery is a disk-based backup and recovery solution that
provides complete data protection for virtual machines. VMware Data
Recovery is fully integrated with VMware vCenter Server to enable centralized
and efficient management of backup jobs and includes data de-duplication to
minimize disk usage.
vCenter Components That Require Tomcat
Several vCenter Server components require the Tomcat Web server to be running on the vCenter Server system.
The Tomcat Web server is installed as part of the vCenter Server installation.
The components that require Tomcat to be running include the following.
22
n
Linked Mode
n
CIM/Hardware Status tab
n
Performance charts
n
WebAccess
n
vCenter Storage Monitoring/Storage Views tab
n
vCenter Service Status
VMware, Inc.
Chapter 1 vSphere Components
Optional vCenter Server Components
Optional vCenter Server components are packaged and installed with the base product, but require a separate
license.
Optional features include:
VMotion
A feature that enables you to move running virtual machines from one
ESX/ESXi host to another without service interruption. It requires licensing on
both the source and target host. vCenter Server centrally coordinates all
VMotion activities.
VMware HA
A feature that enables a cluster with High Availability. If a host goes down, all
virtual machines that were running on the host are promptly restarted on
different hosts in the same cluster.
When you enable the cluster for HA, you specify the number of hosts you
would like to be able to recover. If you specify the number of host failures
allowed as 1, HA maintains enough capacity across the cluster to tolerate the
failure of one host. All running virtual machines on that host can be restarted
on remaining hosts. By default, you cannot power on a virtual machine if doing
so violates required failover capacity. See the VMware Availability Guide for
more information.
VMware DRS
A feature that helps improve resource allocation and power consumption
across all hosts and resource pools. VMware DRS collects resource usage
information for all hosts and virtual machines in the cluster and gives
recommendations (or migrates virtual machines) in one of two situations:
n
Initial placement – When you first power on a virtual machine in the
cluster, DRS either places the virtual machine or makes a recommendation.
n
Load balancing – DRS tries to improve resource utilization across the
cluster by performing automatic migrations of virtual machines (VMotion)
or by providing a recommendation for virtual machine migrations.
VMware DRS includes distributed power management (DPM) capabilities.
When DPM is enabled, the system compares cluster- and host-level capacity to
the demands of virtual machines running in the cluster. Based on the results of
the comparison, DPM recommends (or automatically implements) actions that
can reduce the power consumption of the cluster.
vSphere SDK package
APIs for managing virtual infrastructure and documentation describing those
APIs. The SDK also includes the vCenter Server Web Service interface, Web
Services Description Language (WSDL), and example files. This is available
through an external link. You can download the SDK package from the
VMware APIs and SDKs Documentation page on the VMware Web site.
VMware Data Recovery
VMware Data Recovery is a disk-based backup and recovery solution that
provides complete data protection for virtual machines. VMware Data
Recovery is fully integrated with VMware vCenter Server to enable centralized
and efficient management of backup jobs and includes data de-duplication to
minimize disk usage.
VMware, Inc.
23
vSphere Basic System Administration
24
VMware, Inc.
Starting and Stopping the vSphere
Components
2
You can start and stop each one of the major vSphere components, ESX/ESXi, and vCenter Server. You might
want to stop a component to perform maintenance or upgrade operations.
This chapter includes the following topics:
n
“Start an ESX/ESXi Host,” on page 25
n
“Reboot or Shut Down an ESX/ESXi Host,” on page 25
n
“Stop an ESX Host Manually,” on page 26
n
“Starting vCenter Server,” on page 26
n
“Start the vSphere Client and Log In,” on page 27
n
“Stop the vSphere Client and Log Out,” on page 28
n
“vSphere Web Access,” on page 28
n
“VMware Service Console,” on page 29
Start an ESX/ESXi Host
When you install ESX/ESXi, it starts itself through the installation reboot process. If your ESX/ESXi host is shut
down, you must manually restart it.
Procedure
u
On the physical box where ESX/ESXi is installed, press the power button until the power on sequence
begins.
The ESX/ESXi host starts, locates its virtual machines, and proceeds with its normal ESX/ESXi functions.
Reboot or Shut Down an ESX/ESXi Host
You can power off or restart (reboot) any ESX/ESXi host using the vSphere Client. You can also power off ESX
hosts from the service console. Powering off a managed host disconnects it from vCenter Server, but does not
remove it from the inventory.
Procedure
1
Shut down all virtual machines running on the ESX/ESXi host.
2
Select the ESX/ESXi host you want to shut down.
VMware, Inc.
25
vSphere Basic System Administration
3
4
From the main or right-click menu, select Reboot or Shut Down.
n
If you select Reboot, the ESX/ESXi host shuts down and reboots.
n
If you select Shut Down, the ESX/ESXi host shuts down. You must manually power the system back
on.
Provide a reason for the shut down.
This information is added to the log.
Stop an ESX Host Manually
You can manually shut down an ESX host.
Procedure
1
Log in to the ESX service console.
2
Run the shutdown command.
For example:shutdown -h now
ESX shuts down. When it is finished, a message indicates that it is safe to power off your system.
3
Press the power button until the machine powers off.
For information about accessing the service console, see “Connect to the Service Console,” on page 29.
Starting vCenter Server
vCenter Server runs as a Windows service. vCenter Server starts when you start the Windows machine on
which it is installed. It also restarts when that machine is rebooted.
Verify That vCenter Server Is Running
You can verify that the vCenter Server service is running.
Procedure
1
Go to the Services console for your version of Windows.
For example, select Control Panel > Administrative Tools > Services and click VMware VirtualCenter
Server.
The Status column indicates whether the service started.
2
Right-click the vCenter Server service and select Properties.
3
In the VMware vCenter Server Services Properties dialog box, click the General tab and view the service
status.
Restart the vCenter Server System
The vCenter Server service starts when the machine on which it is installed is booted. You can manually restart
the vCenter Server system.
If you have manually stopped the vCenter Server service or must start it for any reason, perform the steps
below.
26
VMware, Inc.
Chapter 2 Starting and Stopping the vSphere Components
Procedure
1
Go to the Services console for your version of Windows.
For example, select Control Panel > Administrative Tools > Services and click VMware VirtualCenter
Server.
2
Right-click VMware VirtualCenter Server, select Start, and wait for startup to complete.
3
Close the Properties dialog box.
Stop the vCenter Server System
vCenter Server is a Windows service. You can use the Windows interface to select the service and stop it.
You should not have to stop the vCenter Server service. The vCenter Server should operate without
interruption. Continuous operation ensures that all monitoring and task activities are performed as expected.
Procedure
1
Go to the Services console for your version of Windows.
For example, select Start > Control Panel > Administrative Tools > Services.
2
Click VMware VirtualCenter Server Service.
3
Right-click VMware VirtualCenter Server, select Stop, and wait for it to stop.
4
Close the Properties dialog box.
Start the vSphere Client and Log In
The vSphere Client is a graphical user interface to vCenter Server and to hosts.
A login screen appears when you start the vSphere Client. After you log in, the client displays the objects and
functionality appropriate to the server you are accessing and the permissions available to the user you logged
in as.
Procedure
1
Log in to your Windows system.
If this is the first time you are starting the vSphere Client, log in as the administrator:
n
If the managed host is not a domain controller, log in as either <local host name>\<user> or <user>,
where <user> is a member of the local Administrators group.
n
If the managed host is a domain controller, you must log in as <domain>\<user>, where <domain> is
the domain name for which the managed host is a controller and <user>is a member of that domain’s
Domain Administrators group. VMware does not recommend running on a domain controller .
2
Double-click a shortcut or select the vSphere Client from Start > Programs > VMware > vSphere Client.
3
Enter the host name or IP address of a vCenter Server system or ESX/ESXi host, depending on what you
want to access.
If you are logging in to a vCenter Server system that is part of a Connected Group, logging in to that server
connects you to all servers in that group.
NOTE Only previously entered server names appear in the Server drop-down menu.
VMware, Inc.
27
vSphere Basic System Administration
4
Enter a user name and password.
n
If you are logging in to a vCenter Server system, enter an appropriate Windows Active Directory user
name and password.
NOTE To automatically log in with your current Windows Active Directory credentials, you can select
the Use Windows session credentialscheck box. If the vSphere Client gets disconnected from the
vCenter Server, you are automatically logged in after reconnection if you have selected this check
box.
n
If you are logging in to an ESX host for the first time, enter the user name root and the password that
you provided during ESX installation.
If you are logging in to an ESXi host for the first time, enter the user name rootand leave the
Password field blank.
5
Click Login to continue.
You are now connected to the host or vCenter Server system.
Stop the vSphere Client and Log Out
When you no longer need to view or alter the activities that the vCenter Server system is performing, log out
of the vSphere Client.
NOTE Closing a vSphere Client session does not stop the server.
Procedure
u
Click the close box (X) , or select File > Exit.
The vSphere Client shuts down. The vSphere Client is logged out of the vCenter Server system. The server
continues to run all its normal activities in the background. Any scheduled tasks are saved and performed by
vCenter Server.
vSphere Web Access
vSphere Web Access is the Web interface through which you can manage your virtual machines. vSphere Web
Access is installed when you install ESX/ESXi.
As with the vSphere Client, vSphere Web Access can either be used to connect directly to an ESX/ESXi host or
to a vCenter Server system. The functionality of vSphere Web Access is a subset of vSphere Client functionality.
The vSphere Web Access console provides a remote mouse-keyboard-screen (MKS) for the virtual machines.
You can interact with a guest operating system running in a virtual machine and connect remotely to the virtual
machine’s mouse, keyboard, and screen.
Log In to vSphere Web Access
vSphere Web Access uses a Web interface and an Internet connection to access your ESX/ESXi host or vCenter
Server system.
vSphere Web Access does not have its own concept of users or permissions. Use the same login credentials
you would use to log in to the vSphere Client.
Procedure
1
Launch your Web browser.
2
Enter the URL of your ESX/ESXi or vCenter Server installation:
https://<host or server name>/ui
28
VMware, Inc.
Chapter 2 Starting and Stopping the vSphere Components
3
Type your user name and password, and click Log In.
After your user name and password are authorized by vSphere Web Access, the vSphere Web Access
home page appears.
Log Out of vSphere Web Access
Log out when you are finished with your vSphere Web Access activities.
Procedure
u
Click the Log Out link at the top right corner of every page.
Remote client devices are disconnected when you log out of vSphere Web Access.
VMware Service Console
In previous versions of ESX, the service console was one of the interfaces to ESX hosts. Many of the commands
are now deprecated. The service console is typically used only in conjunction with a VMware technical support
representative.
ESXi does not have a service console. Some service console commands are available for ESXi through the remote
command-line interface.
The vSphere SDK is used for scripted manipulation of your vSphere instead. The vSphere Client is the primary
interface to all nonscripted activities, including configuring, monitoring, and managing your virtual machines
and resources.
Using DHCP for the Service Console
The recommended setup is to use static IP addresses for the service console of an ESX host. You can set up the
service console to use DHCP, if your DNS server is capable of mapping the service console’s host name to the
dynamically generated IP address.
If your DNS server cannot map the host’s name to its DHCP-generated IP address, you must determine the
service console's numeric IP address. Another caution against using DHCP is that the numeric IP address might
change as DHCP leases run out or when the system is rebooted.
VMware does not recommend using DHCP for the service console unless your DNS server can handle the host
name translation.
CAUTION Do not use dynamic (DHCP) addressing when sharing the network adapter assigned to the service
console with virtual machines. ESX requires a static IP address for the service console when sharing a network
adapter.
Connect to the Service Console
If you have direct access to the system where ESX is running, you can log in to the physical console on that
system.
Whether you use the service console locally or through a remote connection, you must log in using a valid user
name and password.
NOTE Depending on the security settings for your ESX computer, you might be able to connect remotely to
the service console using SSH or Telnet. For more information on the security settings, see the ESX Configuration
Guide.
Procedure
u
VMware, Inc.
Press Alt+F2 to get to the login screen and log in.
29
vSphere Basic System Administration
Using Commands on the Service Console
The service console runs a modified version of Linux, and many of the commands available on Linux or UNIX
are also available on the service console.
Detailed usage notes for most service console commands are available as manual or man pages.
NOTE ESXi does not have a service console. However, many of the functions provided by the service console
are available through the vSphere CLI.
View the man Page for a Service Console Command
man pages provide information about commands, their usage, options, and syntax.
Procedure
u
At the service console command line, type the man command followed by the name of the command for
which you want to see information.
For example: man <command>
30
VMware, Inc.
Using vCenter Server in Linked Mode
3
You can join multiple vCenter Server systems using vCenter Linked Mode to allow them to share information.
When a server is connected to other vCenter Server systems using Linked Mode, you can connect to that
vCenter Server system and view and manage the inventories of all the vCenter Server systems that are linked.
Linked Mode uses Microsoft Active Directory Application Mode (ADAM) to store and synchronize data across
multiple vCenter Server systems. ADAM is installed automatically as part of vCenter Server installation. Each
ADAM instance stores data from all of the vCenter Server systems in the group, including information about
roles and licenses. This information is regularly replicated across all of the ADAM instances in the connected
group to keep them in sync.
When vCenter Server systems are connected in Linked Mode, you can:
n
Log in simultaneously to all vCenter Server systems for which you have valid credentials.
n
Search the inventories of all the vCenter Server systems in the group.
n
View the inventories off all of the vCenter Server systems in the group in a single inventory view.
You cannot migrate hosts or virtual machines between vCenter Server systems connected in Linked Mode.
For additional information on troubleshooting Linked Mode groups, see ESX and vCenter Server Installation
Guide.
This chapter includes the following topics:
n
“Linked Mode Prerequisites,” on page 31
n
“Linked Mode Considerations,” on page 32
n
“Join a Linked Mode Group After Installation,” on page 32
n
“Reconciling Roles When Connecting vCenter Server to a Linked Mode Group,” on page 33
n
“Isolate a vCenter Server Instance from a Linked Mode Group,” on page 34
n
“Change the Domain of a vCenter Server System in a Linked Mode Group,” on page 34
n
“Configure the URLs on a Linked Mode vCenter Server System,” on page 34
n
“Linked Mode Troubleshooting,” on page 35
n
“Monitor vCenter Server Services,” on page 37
Linked Mode Prerequisites
Prepare the system for joining a Linked Mode group.
All the requirements for standalone vCenter Server systems apply to Linked Mode systems. For more
information, see ESX and vCenter Server Installation Guide.
VMware, Inc.
31
vSphere Basic System Administration
The following requirements apply to each vCenter Server system that is a member of a Linked Mode group:
n
DNS must be operational for Linked Mode replication to work.
n
The vCenter Server instances in a Linked Mode group can be in different domains if the domains have a
two-way trust relationship. Each domain must trust the other domains on which vCenter Server instances
are installed.
n
When adding a vCenter Server instance to a Linked Mode group, the installer must be run by a domain
user who is an administrator on both the machine where vCenter Server is installed and the target machine
of the Linked Mode group.
n
All vCenter Server instances must have network time synchronization. The vCenter Server installer
validates that the machine clocks are not more than 5 minutes apart.
Linked Mode Considerations
There are several considerations to take into account before you configure a Linked Mode group.
n
Each vCenter Server user sees the vCenter Server instances on which they have valid permissions.
n
When first setting up your vCenter Server Linked Mode group, you must install the first vCenter Server
as a standalone instance because you do not yet have a remote vCenter Server machine to join. Subsequent
vCenter Server instances can join the first vCenter Server or other vCenter Server instances that have joined
the Linked Mode group.
n
If you are joining a vCenter Server to a standalone instance that is not part of a domain, you must add the
standalone instance to a domain and add a domain user as an administrator.
n
The vCenter Server instances in a Linked Mode group do not need to have the same domain user login.
The instances can run under different domain accounts. By default, they run as the LocalSystem account
of the machine on which they are running, which means they are different accounts.
n
During vCenter Server installation, if you enter an IP address for the remote instance of vCenter Server,
the installer converts it into a fully qualified domain name.
n
You cannot join a Linked Mode group during the upgrade procedure when you are upgrading from
VirtualCenter 2.x to vCenter Server 4.0. You can join after the upgrade to vCenter Server is complete. See
the Upgrade Guide.
Join a Linked Mode Group After Installation
If you have a system that is already running vCenter Server 4.0, you can join the machine to a Linked Mode
group.
Prerequisites
See “Linked Mode Prerequisites,” on page 31 and “Linked Mode Considerations,” on page 32.
Procedure
1
Select Start > All Programs > VMware > vCenter Server Linked Mode Configuration.
2
Click Next.
3
Select Modify linked mode configuration and click Next.
4
Click Join this vCenter Server instance to an existing linked mode group or another instance and click
Next.
5
Enter the server name and LDAP port number of a remote vCenter Server instance that is a member of
the group and click Next.
If you enter an IP address for the remote server, the installer converts it into a fully qualified domain name.
32
VMware, Inc.
Chapter 3 Using vCenter Server in Linked Mode
6
If the vCenter Server installer detects a role conflict, select how to resolve the conflict.
Option
Description
Yes, let VMware vCenter Server
resolve the conflicts for me
Click Next.
The role on the joining system is renamed to <vcenter_name> <role_name>,
where <vcenter_name> is the name of the vCenter Server system that is joining
the Linked Mode group, and <role_name> is the name of the original role.
No, I'll resolve the conflicts myself
To resolve the conflicts manually:
a Using the vSphere Client, log in to one of the vCenter Server systems
using an account with Administrator privileges.
b Rename the conflicting role.
c Close the vSphere Client session and return to the vCenter Server
installer.
d Click Back and click Next.
The installation continues without conflicts.
A conflict results if the joining system and the Linked Mode group each contain a role with the same name
but with different privileges.
7
Click Finish.
vCenter Server restarts. Depending on the size of your inventory, the change to Linked Mode might take
from a few seconds to a few minutes to complete.
The vCenter Server instance is now part of a Linked Mode group. After you form a Linked Mode group, you
can log in to any single instance of vCenter Server and view and manage the inventories of all the vCenter
Servers in the group. It might take several seconds for the global data (such as user roles) that are changed on
one machine to be visible on the other machines. The delay is usually 15 seconds or less. It might take a few
minutes for a new vCenter Server instance to be recognized and published by the existing instances, because
group members do not read the global data very often.
Reconciling Roles When Connecting vCenter Server to a Linked Mode
Group
When you join a vCenter Server system to a linked mode group, the roles defined on each vCenter Server
system in the group are replicated to the other systems in the group.
If the roles defined on each vCenter Server system are different, the roles lists of the systems are combined into
a single common list. For example, if vCenter Server 1 has a role named Role A and vCenter Server 2 has a role
named Role B, then both servers will have both Role A and Role B after they are joined in a linked mode group.
If two vCenter Server systems have roles with the same name, the roles are combined into a single role if they
contain the same privileges on each vCenter Server system. If two vCenter Server systems have roles with the
same name that contain different privileges, this conflict must be resolved by renaming at least one of the roles.
You can choose to resolve the conflicting roles either automatically or manually.
If you choose to reconcile the roles automatically, the role on the joining system is renamed to
<vcenter_name> <role_name> where <vcenter_name> is the name of the vCenter Server system that is joining the
Linked Mode group and <role_name> is the name of the original role.
If you choose to reconcile the roles manually, connect to one of the vCenter Server systems with the vSphere
Client and rename one instance of the role before proceeding to join the vCenter Server system to the Linked
Mode group.
If you remove a vCenter Server system from a linked mode group, the vCenter Server system retains all the
roles it had as part of the group.
VMware, Inc.
33
vSphere Basic System Administration
Isolate a vCenter Server Instance from a Linked Mode Group
You can isolate a vCenter Server instance from a Linked Mode group.
Procedure
1
Select Start > All Programs > VMware > vCenter Server Linked Mode Configuration.
2
Click Modify linked mode configuration and click Next.
3
Click Isolate this vCenter Server instance from linked mode group and click Next.
4
Click Continue and click Finish.
vCenter Server restarts. Depending on the size of your inventory, the change to Linked Mode might take
from a few seconds to a few minutes to complete.
The vCenter Server instance is no longer part of the Linked Mode group.
Change the Domain of a vCenter Server System in a Linked Mode Group
To change the domain of a vCenter Server system in a Linked Mode group, isolate the vCenter Server system
from the Linked Mode group first.
vCenter Server systems in a Linked Mode group can be in different domains as long as the domains have a
trust relationship.
Procedure
1
Isolate the vCenter Server system from the Linked Mode group.
2
Change the domain of the vCenter Server system.
Refer to Microsoft documentation for more information on changing the domain.
3
Rejoin the vCenter Server system to the Linked Mode group.
Configure the URLs on a Linked Mode vCenter Server System
If you connect a vCenter Server system to a Linked Mode group and the vCenter Server system has a machine
name that does not match the domain name, several connectivity problems arise. This procedure describes
how to correct this situation.
If you do not update the URLs, remote instances of vCenter Server cannot reach the vCenter Server system,
because the default vCenter Server URL entries are no longer accurate. The vCenter Server installer configures
default URL entries as follows:
n
For the Virtualcenter.VimApiUrl key, the default value is http(s)://<Fully qualified domain name
(FQDN) of VC machine>/sdk.
n
For the Virtualcenter.VimWebServicesUrl key, the default value is https://<FQDN of VC
machine>:<installed-webservices-port>/vws.
Procedure
1
Isolate the vCenter Server system from the Linked Mode group.
See “Isolate a vCenter Server Instance from a Linked Mode Group,” on page 34.
34
2
Change the domain name or the machine name to make them match.
3
From the vSphere Client, connect directly to the vCenter Server instance on which you have changed the
domain or machine name.
VMware, Inc.
Chapter 3 Using vCenter Server in Linked Mode
4
Select Administration > vCenter Server Settings and click Advanced Settings.
5
For the Virtualcenter.VimApiUrl key, change the value to point to the location where the vSphere Client
and SDK clients can access the vCenter Server system.
For example: http(s)://<machine-name/ip>:<vc-port>/sdk.
6
For the Virtualcenter.VimWebServicesUrl key, change the value to point to the location where
vCenter Server Webservices is installed.
For example: https://<machine-name/ip>:<webservices-port>/vws.
7
For the Virtualcenter.Instancename key, change the value so that the modified name appears in the
vCenter Server inventory view.
8
Rejoin the vCenter Server system to the Linked Mode group.
See “Join a Linked Mode Group After Installation,” on page 32.
Linked Mode Troubleshooting
If you are having trouble with your Linked Mode group, consider the following points.
n
When you have multiple vCenter Server instances, each instance must have a working relationship with
the domain controller and not conflict with another machine that is in the domain. Conflicts can occur, for
example, when you clone a vCenter Server instance that is running in a virtual machine and you do not
use sysprep or a similar utility to ensure that the cloned vCenter Server instance has a globally unique
identifier (GUID).
n
If the domain controller is unreachable, vCenter Server might be unable to start. You might be unable to
make changes to the Linked Mode configuration of the affected vCenter Server system.
If this occurs, resolve the problem with the domain controller and restart vCenter Server. If resolving the
problem with the domain controller is not possible, you can restart vCenter Server by removing the
vCenter Server system from the domain and isolating the system from its current Linked Mode group.
n
The DNS name of the machine must match with the actual machine name. Symptoms of machine names
not matching the DNS name are data replication issues, ticket errors when trying to search, and missing
search results from remote instances.
n
There is correct order of operations for joining a Linked Mode group.
a
Verify that the vCenter Server domain name matches the machine name. If they do not match, change
one or both to make them match.
b
Update the URLs to make them compatible with the new domain name and machine name.
c
Join the vCenter Server system to a Linked Mode group.
If you do not update the URLs, remote instances of vCenter Server cannot reach the vCenter Server
system, because the default vCenter Server URL entries are no longer accurate. See “Configure the
URLs on a Linked Mode vCenter Server System,” on page 34.
If a vCenter Server instance is no longer reachable by remote instances of vCenter Server, the following
symptom might occur:
VMware, Inc.
n
Clients logging in to other vCenter Server systems in the group cannot view the information that
belongs to the vCenter Server system on which you changed the domain name because the users
cannot log in to the system.
n
Any users that are currently logged in to the vCenter Server system might be disconnected.
n
Search queries do not return results from the vCenter Server system.
35
vSphere Basic System Administration
To resolve this issue, make sure that the Virtualcenter.VimApiUrl key points to the location where the
vSphere Client and SDK clients can access the vCenter Server system, and the
Virtualcenter.VimWebServicesUrl key points to the location where vCenter Server Webservices is
installed. For the Virtualcenter.Instancename key, change the value so that the modified name appears in
the vCenter Server inventory view.
n
n
n
If you cannot join a vCenter Server instance, you can resolve the problem with the following actions:
n
Ensure that the machine is grouped into the correct organizational unit in the corresponding domain
controller.
n
When you install vCenter Server, ensure that the logged in user account has administrator privileges
on the machine.
n
To resolve trust problems between a machine and the domain controller, remove the machine from
the domain and then add it to the domain again.
n
To ensure that the Windows policy cache is updated, run the gpupdate /force command from the
Windows command line. This command performs a group policy update.
If the local host cannot reach the remote host during a join operation, verify the following:
n
Remote vCenter Server IP address or fully qualified domain name is correct.
n
LDAP port on the remote vCenter Server is correct.
n
VMwareVCMSDS service is running.
Make sure your Windows and network-based firewalls are configured to allow Linked Mode.
Configuring a Windows Firewall to Allow a Specified Program Access
vCenter Server 4.0 uses Microsoft ADAM/AD LDS to enable Linked Mode, which uses the Windows RPC port
mapper to open RPC ports for replication. When you install vCenter Server in Linked Mode, the firewall
configuration on the local machine must be modified.
Incorrect configuration of firewalls can cause licenses and roles to become inconsistent between instances.
Prerequisites
n
The Windows version must be an earlier than Windows Server 2008. For Windows Server 2008, Windows
automatically configures the firewall to permit access.
n
There must be no network-based firewalls between vCenter Server Linked Mode instances. For
environments with network-based firewalls, see “Configuring Firewall Access by Opening Selected
Ports,” on page 37.
Procedure
36
1
Select Start > Run.
2
Type firewall.cpl and click OK.
3
Make sure that the firewall is set to allow exceptions.
4
Click the Exceptions tab.
5
Click Add Program.
6
Add an exception for C:\Windows\ADAM\dsamain.exe and click OK.
7
Click OK.
VMware, Inc.
Chapter 3 Using vCenter Server in Linked Mode
Configuring Firewall Access by Opening Selected Ports
vCenter Server 4.0 uses Microsoft ADAM/AD LDS to enable Linked Mode, which uses the Windows RPC port
mapper to open RPC ports for replication. When you install vCenter Server in Linked Mode, the firewall
configuration on any network-based firewalls must be modified.
Incorrect configuration of firewalls can cause licenses and roles to become inconsistent between instances.
Procedure
u
Configure Windows RPC ports to generically allow selective ports for machine-to-machine RPC
communication.
Choose one of the following methods.
n
Change the registry settings. See http://support.microsoft.com/kb/154596/en-us.
n
Use Microsoft's RPCCfg.exe tool. See http://support.microsoft.com/kb/908472/en-us.
Monitor vCenter Server Services
When you are logged in to a vCenter Server system that is part of a connected group, you can monitor the
health of services running on each server in the group.
Procedure
u
From the vSphere Client Home page, click vCenter Service Status.
The vCenter Service Status screen appears and enables you to view the following information:
VMware, Inc.
n
A list of all vCenter Server systems and their services, and vCenter Server plug-ins.
n
The status of all listed items.
n
The date and time when the last change in status occurred.
n
Any messages associated with the change in status.
37
vSphere Basic System Administration
38
VMware, Inc.
Using the vSphere Client
4
The vSphere Client serves as the principal interface for administering vCenter Server and ESX/ESXi.
The vSphere Client user interface is configured based on the server to which it is connected:
n
When the server is a vCenter Server system, the vSphere Client displays all the options available to the
vSphere environment, according to the licensing configuration and the user permissions.
n
When the server is an ESX/ESXi host, the vSphere Client displays only the options appropriate to single
host management.
When you first log in to the vSphere Client, it displays a Home page with icons that you select to access various
vSphere Client functions. When you log out of the vSphere Client, the client application remembers the view
that was displayed when it was closed, and will return you to that view when you next log in.
You perform many management tasks from the Inventory view, which consists of a single window containing
a menu bar, a navigation bar, a toolbar, a status bar, a panel section, and pop-up menus.
This chapter includes the following topics:
n
“Getting Started Tabs,” on page 40
n
“Status Bar, Recent Tasks, and Triggered Alarms,” on page 40
n
“Panel Sections,” on page 40
n
“View Virtual Machine Console,” on page 41
n
“Searching the vSphere Inventory,” on page 41
n
“Using Lists,” on page 42
n
“Custom Attributes,” on page 43
n
“Select Objects,” on page 44
n
“Manage vCenter Server Plug-Ins,” on page 45
n
“Save vSphere Client Data,” on page 46
VMware, Inc.
39
vSphere Basic System Administration
Getting Started Tabs
In the case where vCenter Server is newly installed and no inventory objects have been added, the Getting
Started tabs guide you through the steps of adding items to the inventory and setting up the virtual
environment.
Disable Getting Started Tabs
You can disable the Getting Started tabs if you no longer want to display them.
There are two ways to disable the tabs.
Procedure
n
Click the Close Tab link to disable Getting Started tabs for the type of object selected.
n
Change the vSphere Client settings to turn off display of all Getting Started tabs.
a
Select Edit > Client Settings.
b
Select the General tab.
c
Deselect the Show Getting Started Tabs check box and click OK.
Restore Getting Started Tabs
If you have turned off display of the Getting Started tabs, you can restore them to display these tabs for all
inventory objects.
Procedure
1
Select Edit > Client Settings.
2
Click the General tab.
3
Select Show Getting Started Tabs and click OK.
Status Bar, Recent Tasks, and Triggered Alarms
Use the status bar to view information about alarms and recently completed or active tasks.
The status bar appears at the bottom of the window. It contains icons to view triggered alarms or recent tasks.
The Tasks button displays any currently running or recently completed active tasks. Included is a progress
bar indicating the percentage complete of each task. The recent tasks and the triggered alarm panels display
across the bottom of the vSphere Client window.
Panel Sections
In the body of the vSphere Client page is a panel section. In most views, there is a left and a right panel: the
Inventory panel and the Information panel.
These panels can be resized.
40
Inventory panel
Displays a hierarchical list of vSphere objects when an Inventory or Maps view
appears.
Information panels
Display lists and charts. Depending on the navigation items or Inventory item
selected, the Information panel is divided into tabbed elements.
VMware, Inc.
Chapter 4 Using the vSphere Client
View Virtual Machine Console
The console of a powered-on virtual machine is available through a connected server. All console connections
to the virtual machine see the same display information. The message line indicates if others are viewing the
virtual machine.
Procedure
1
Select a powered-on virtual machine.
2
In the Information panel, click the Console tab.
3
(Optional) Click the pop-out icon in the navigation bar to pop out the virtual machine console in a separate
window.
4
(Optional) Press Ctrl+Alt+Enter to enter or exit full screen mode.
Searching the vSphere Inventory
The vSphere Client allows you to search your vSphere inventory for virtual machines, hosts, datastores,
networks, or folders that match specified criteria.
If the vSphere Client is connected to a vCenter Server system that is part of a connected group in vCenter
Linked Mode, then you can search the inventories of all vCenter Server systems in that group. You can only
view and search for inventory objects that you have permission to view. Because the search service queries
Active Directory for information about user permissions, you must be logged in to a domain account in order
to search all vCenter Server systems in Linked Mode. If you log in using a local account, searches return results
only for the local vCenter Server system, even if it is joined to other servers in Linked Mode.
NOTE If your permissions change while you are logged in, the search service might not immediately recognize
these changes. To ensure that your search is carried out with up-to-date permissions, log out of all your open
sessions and log in again before performing the search.
Perform a Simple Search
A simple search searches all the properties of the specified type or types of objects for the entered search term.
Procedure
1
Click the icon in the search field at the top right of the vSphere Client window and select the type of
inventory item to search for.
n
Virtual Machines
n
Folders
n
Hosts
n
Datastores
n
Networks
n
Inventory, which finds matches to the search criteria in any of the available managed object types.
2
Type one or more search terms into the search field and press Enter.
3
(Optional) If more items are found than can be displayed in the results pane, click Show all to display all
results.
VMware, Inc.
41
vSphere Basic System Administration
What to do next
If you are not satisfied with the results of the simple search and want to refine your search, perform an advanced
search.
Perform an Advanced Search
Using advanced search allows you to search for managed objects that meet multiple criteria.
For example, you can search for virtual machines matching a particular search string which reside on hosts
whose names match a second search string.
Procedure
1
Choose View > Inventory > Search to display the advanced search page.
2
Click the icon in the search field at the top right of the vSphere Client window and select the type of
inventory item to search for.
n
Virtual Machines
n
Folders
n
Hosts
n
Datastores
n
Networks
n
Inventory, which finds matches to the search criteria in any of the available managed object types.
3
Type one or more search terms into the search box.
4
To refine the search based on additional properties, do the following:
a
Click Show options.
b
From the drop-down menu, select the additional property that you want to use to restrict the search
results.
The available properties depend on the type of object you are searching for.
c
Select or type the appropriate options for the property you have selected.
d
To add more properties, click Add and repeat steps Step 4b through Step 4c.
An advanced search always finds objects that match all the properties in the list.
5
Click Search.
The search results appear below the search specification.
Using Lists
Many vSphere Client inventory tabs display lists of information.
For example, the Virtual Machines tab displays a list of all the virtual machines associated with a host or a
cluster. Sort any list in the vSphere Client by clicking the column label heading. A triangle in the column head
shows the sort order as ascending or descending.
You can also filter a list, sorting and including only selected items. A filter is sorted by a keyword. Select the
columns you want to include in the search for the keyword.
42
VMware, Inc.
Chapter 4 Using the vSphere Client
Filter a List View
You can filter the list view.
The list is updated based on whether filtering is on or off. For example, if you are in the Virtual Machines tab,
you have filtered the list, and the filtered text is “powered on”, you see a list only of virtual machines whose
state is set to powered on. If the state of any of these virtual machines changes to something else, they are
removed from the list. New virtual machines that are added are also being filtered. Filtering is persistent for
the user session.
Procedure
1
On any inventory panel displaying a list, click the arrow next to the filter box at the top right of the pane
and select the attributes on which to filter.
2
Type text directly into the filtering field to specify search criteria.
There is a one-second interval between keystrokes. If you type in the text and wait for one second, the
search starts automatically. The Filter field does not support boolean expressions or special characters and
is not case sensitive.
3
(Optional) Click Clear to change the filter.
Export a List
You can export a list.
Procedure
1
Select the list to export.
2
Select File > Export > Export List.
3
Type a filename, select a file type in the dialog box, and click Save.
Custom Attributes
Custom attributes can be used to associate user-specific meta-information with virtual machines and managed
hosts.
Attributes are the resources that are monitored and managed for all the managed hosts and virtual machines
in your vSphere environment. Attributes’ status and states appear on the various Inventory panels.
After you create the attributes, set the value for the attribute on each virtual machine or managed host, as
appropriate. This value is stored with vCenter Server and not with the virtual machine or managed host. Then
use the new attribute to filter information about your virtual machines and managed hosts. If you no longer
need the custom attribute, remove it. A custom attribute is always a string.
For example, suppose you have a set of products and you want to sort them by sales representative. Create a
custom attribute for sales person name, Name. Add the custom attribute, Name, column to one of the list views.
Add the appropriate name to each product entry. Click the column title Name to sort alphabetically.
The custom attributes feature is available only when connected to a vCenter Server system.
VMware, Inc.
43
vSphere Basic System Administration
Add Custom Attributes
You can create custom attributes to associate with virtual machines or managed hosts.
Procedure
1
Select Administration > Custom Attributes.
This option is not available when connected only to an ESX/ESXi host.
2
Click Add and enter the values for the custom attribute.
a
In the Name text box, type the name of the attribute.
b
In the Type drop-down menu, select the attribute type:Virtual Machine, Host, or Global.
c
In the Value text box, type the value you want to give to the attribute for the currently selected object.
d
Click OK.
After you have defined an attribute on a single virtual machine or host, it is available to all objects of
that type in the inventory. However, the value you specify is applied only to the currently selected
object.
3
(Optional) To change the attribute name, click in the Name field and type the name you want to assign to
the attribute.
4
Click OK.
Edit a Custom Attribute
You can edit custom attributes and add annotations for a virtual machine or host from the Summary tab for
the object. You can use annotations to provide additional descriptive text or comments for an object.
Procedure
1
Select the virtual machine or host in the inventory.
2
Click the Summary tab for the virtual machine or host.
3
In the Annotations box, click the Edit link.
The Edit Custom Attributes dialog box appears.
4
To edit an attribute that has already been defined, double-click the Value field for that attribute and enter
the new value.
5
Click OK to save your changes.
Select Objects
vCenter Server objects are datacenters, networks, datastores, resource pools, clusters, hosts, and virtual
machines.
Selecting an object does the following:
44
n
Allows you to view the status of the object.
n
Enables the menus so you can select actions to take on the object.
VMware, Inc.
Chapter 4 Using the vSphere Client
Procedure
u
Locate the object by browsing or search.
n
From the vSphere Client Home page, click the icon for the appropriate inventory view, and browse
through the inventory hierarchy to select the object.
n
Perform a search for the object, and double-click it in the search results.
Manage vCenter Server Plug-Ins
After the server component of a plug-in is installed and registered with vCenter Server, its client component
is available to vSphere clients. Client component installation and enablement are managed through the Plugin Manager dialog box.
The Plug-in Manager enables users to do the following:
n
View available plug-ins that are not currently installed on the client.
n
View installed plug-ins.
n
Download and install available plug-ins.
n
Enable and disable installed plug-ins.
Install Plug-Ins
You can install plug-ins using the Plug-in Manager.
Procedure
1
Launch the vSphere Client and log in to a vCenter Server system.
2
Select Plug-ins > Manage Plug-ins.
3
Select the Available tab in the Plug-in Manager dialog box.
4
Click Download and Install for the plug-in you want.
5
Follow the prompts in the installation wizard.
6
After installation is complete, verify that the plug-in is listed under the Installed tab and that it is enabled.
Disable and Enable Plug-Ins
You can disable or enable plug-ins using the Plug-in Manager.
Procedure
1
Launch the vSphere Client and log in to a vCenter Server system.
2
Select Plug-ins > Manage Plug-ins.
3
Select the Installed tab in the Plug-in Manager dialog box.
4
Select Enable to enable a plug-in, or deselect Enable to disable it.
Disabling a plug-in does not remove it from the client. You must uninstall the plug-in to remove it.
VMware, Inc.
45
vSphere Basic System Administration
Remove Plug-Ins
You can remove plug-ins through the operating system’s control panel.
Procedure
u
Consult your operating system’s documentation for instructions on how to use the Add/Remove Programs
control panel.
Troubleshooting Extensions
In cases were vCenter Server extensions are not working, you have several options to correct the problem.
vCenter Server extensions running on the tomcat server have extension.xml files which contain the URL where
the corresponding Web application can be accessesed (files are located in C:\Program
Files\VMware\Infrastructure\VirtualCenter Server\extensions). Extension installers populate these XML
files using the DNS name for the machine.
Example from the stats extension.xml file: <url>https://SPULOV-XP-VM12.vmware.com:
8443/statsreport/vicr.do</url>.
vCenter Server, extension servers, and the vSphere Clients that will use them must be located on systems under
the same domain. If they are not, or the DNS of the extension server is changed, the extension clients will not
be able to access the URL and the extension will not work.
You can edit the XML files manually by replacing the DNS name with an IP address. Re-register the extension
after editing its extension.xml file.
Save vSphere Client Data
The vSphere Client user interface is similar to a browser. Most user manipulations are persistent in vCenter
Server data displayed; therefore, you do not normally need to save the data.
If you need to save vSphere Client data, you can do one of the following:
Procedure
46
n
Use the Microsoft Windows Print Screen option to print a copy of the vSphere Client window.
n
Select File > Export and select a format in which to save the vCenter Server data. Open the data in an
appropriate application and print from that application.
VMware, Inc.
Configuring Hosts and vCenter Server
5
Configuring ESX hosts, vCenter Server systems, and the vSphere Client involves several tasks. This section
contains information about some of the most common tasks.
For complete information about configuring ESX hosts, vCenter Server, and the vSphere Client, see the
following manuals:
n
Introduction to vSphere
Provides an overview of the system architecture of vSphere.
n
ESX Configuration Guide
Provides information about how to configure ESX host networking, storage, and security.
n
ESXi Configuration Guide
Provides information about how to configure an ESXi host.
This chapter includes the following topics:
n
“Host Configuration,” on page 47
n
“Configuring vCenter Server,” on page 48
n
“Access the vCenter Server Settings,” on page 48
n
“Configuring Communication Among ESX, vCenter Server, and the vSphere Client,” on page 49
n
“Configure vCenter Server SMTP Mail Settings,” on page 49
n
“Working with Active Sessions,” on page 49
n
“SNMP and vSphere,” on page 50
n
“System Log Files,” on page 65
Host Configuration
Before you create virtual machines on your hosts, you must configure them to ensure that they have correct
licensing, network and storage access, and security settings. Each type of host has a manual that provides
information on the configuration for that host.
n
For information on configuring an ESX host, see the ESX Configuration Guide.
n
For information on configuring an ESXi host, see the ESXi Configuration Guide.
VMware, Inc.
47
vSphere Basic System Administration
Configuring vCenter Server
You use the vCenter Server Settings dialog box to configure a number of elements.
The vCenter Server Settings dialog box enables you to configure the following items:
Licensing
Assign vCenter Server a new or existing license key. Specify whether to use a
VMware License Server.
Statistics
Specify the amount of data collected for performance statistics.
Runtime Settings
View the unique runtime settings for a vCenter Server system. If you change
the DNS name of the vCenter Server, use this option to modify the vCenter
Server name to match.
Active Directory
Specify the active directory timeout, maximum number of users and groups to
display in the Add Permissions dialog box, and the frequency for performing
a synchronization and validation of the vCenter Server system’s known users
and groups.
Mail
Specify the SMTP server and mail account.
SNMP
Specify the SNMP receiver URLs, ports, and community strings.
Ports
Specify the HTTP and HTTPS ports for the Web Service to use
Timeout Settings
Specify how long, in seconds, the vSphere Client waits for a response from
vCenter Server before timing out.
Logging Options
Specify the amount of detail collected in vCenter Server log files.
Database
Specify the password required to access the vCenter Server database and the
maximum number of database connections to be created.
Database Retention
Policy
Specify when vCenter Server tasks and events should be deleted.
SSL Settings
Specify whether you want vCenter Server and the vSphere Client to verify the
SSL certificates of the remote host when establishing remote connections. The
vCenter requires verified host SSL certificates option is enabled by default,
and is required for the VMware Fault Tolerance feature to operate.
Advanced Settings
Specify advanced settings. VMware recommends that you do not change these
settings without contacting VMware technical support.
See the vSphere Client online Help for more information on these settings.
Access the vCenter Server Settings
Use the vCenter Server Settings dialog box to configure server settings.
Procedure
1
Select Administration > vCenter Server Settings.
2
If the vCenter Server system is part of a connected group, select the server to configure from the Current
vCenter Server drop-down menu.
Changes to the vCenter Server configuration apply to the current vCenter Server system only.
48
VMware, Inc.
Chapter 5 Configuring Hosts and vCenter Server
Configuring Communication Among ESX, vCenter Server, and the
vSphere Client
By default, the vSphere Client uses ports 80 and 443 to communicate with vCenter Server and ESX/ESXi hosts.
You can change these ports if necessary.
Configure your firewall to allow communication between the vSphere Client and vCenter Server by opening
ports 80 and 443.
vCenter Server acts as a web service. If your environment requires the use of a web proxy, vCenter Server can
be proxied like any other web service.
Configure vCenter Server SMTP Mail Settings
You can configure vCenter Server to send email notifications as alarm actions.
Prerequisites
Before vCenter Server can send email, you must perform the following tasks:
n
Configure the SMTP server settings for vCenter Server.
n
Specify email recipients through the Alarm Settings dialog box when you configure alarm actions.
To perform this task, the vSphere Client must be connected to a vCenter Server.
Procedure
1
Select Administration > vCenter Server Settings.
2
If the vCenter Server system is part of a connected group, in Current vCenter Server, select the vCenter
Server system to configure.
3
Select Mail in the navigation list.
4
For email message notification, set the SMTP server and SMTP port:
5
Option
Description
SMTP Server
The DNS name or IP address of the SMTP gateway to use for sending email
messages.
Sender Account
The email address of the sender, for example, [email protected].
Click OK.
Working with Active Sessions
You can view a list of users who are logged in to a vCenter Server system when your vSphere Client is connected
to that server. You can terminate sessions, and you can send a message to all users logged on to an active
session.
These features are not available when your vSphere Client is connected to an ESX/ESXi host.
View Active Sessions
You can view active sessions on the Home page of a vSphere Client.
Procedure
u
VMware, Inc.
From the Home page of a vSphere Client connected to a vCenter Server system, click the Sessions button.
49
vSphere Basic System Administration
Terminate Active Sessions
Terminating an active session ends the vSphere Client session and any remote console connections launched
by the user during that session.
Procedure
1
On the Home page of a vSphere Client connected to a vCenter Server system, click the Sessions button.
2
Right-click a session and select Terminate.
3
To confirm the termination, click OK.
Send a Message to All Active Users
You can a Message of the Day to all active session user and new users when they log into the vSphere Client.
The Message of the day text is sent as a notice message to all active session users and to new users when they
log in.
Procedure
1
On the Home page of a vSphere Client connected to a vCenter Server system, click the Sessions button.
2
Type a message in the Message of the day field.
3
Click Change.
SNMP and vSphere
Simple Network Management Protocol (SNMP) allows management programs to monitor and control a variety
of networked devices.
Managed systems run SNMP agents, which can provide information to a management program in at least one
of the following ways:
n
In response to a GET operation, which is a specific request for information from the management system.
n
By sending a trap, which is an alert sent by the SNMP agent to notify the management system of a particular
event or condition.
Management Information Base (MIB) files define the information that can be provided by managed devices.
The MIB files contain object identifiers (OIDs) and variables arranged in a hierarchy.
vCenter Server and ESX/ESXi have SNMP agents. The agent provided with each product has differing
capabilities.
Using SNMP Traps with vCenter Server
The SNMP agent included with vCenter Server can be used to send traps when the vCenter Server system is
started and when an alarm is triggered on vCenter Server. The vCenter Server SNMP agent functions only as
a trap emitter, and does not support other SNMP operations, such as GET.
The traps sent by vCenter Server are typically sent to other management programs. You must configure your
management server to interpret the SNMP traps sent by vCenter Server.
To use the vCenter Server SNMP traps, configure the SNMP settings on vCenter Server and configure your
management client software to accept the traps from vCenter Server.
The traps sent by vCenter Server are defined in VMWARE-VC-EVENT-MIB.mib. See “VMWARE-VC-EVENTMIB,” on page 62.
50
VMware, Inc.
Chapter 5 Configuring Hosts and vCenter Server
Configure SNMP Settings for vCenter Server
To use SNMP with vCenter Server, you must configure SNMP settings using the vSphere Client.
Prerequisites
To complete the following task, the vSphere Client must be connected to a vCenter Server. In addition, you
need the DNS name and IP address of the SNMP receiver, the port number of the receiver, and the community
identifier.
Procedure
1
Select Administration > vCenter Server Settings.
2
If the vCenter Server is part of a connected group, in Current vCenter Server, select the appropriate server.
3
Click SNMP in the navigation list.
4
Enter the following information for the Primary Receiver of the SNMP traps.
Option
Description
Receiver URL
The DNS name and IP address of the SNMP receiver.
Receiver port
The port number of the receiver to which the SNMP agent sends traps.
If the port value is empty, vCenter Server uses the default port, 162.
Community
The community identifier.
5
(Optional) Enable additional receivers in the Enable Receiver 2, Enable Receiver 3, and Enable Receiver
4 options.
6
Click OK.
The vCenter Server system is now ready to send traps to the management system you have specified.
What to do next
Configure your SNMP management software to receive and interpret data from the vCenter Server SNMP
agent. See “Configure SNMP Management Client Software,” on page 53.
Configure SNMP for ESX/ESXi
ESX/ESXi includes an SNMP agent embedded in hostd that can both send traps and receive polling requests
such as GET requests. This agent is referred to as the embedded SNMP agent.
Versions of ESX prior to ESX 4.0 included a Net-SNMP-based agent. You can continue to use this Net-SNMPbased agent in ESX 4.0 with MIBs supplied by your hardware vendor and other third-party management
applications. However, to use the VMware MIB files, you must use the embedded SNMP agent.
By default, the embedded SNMP agent is disabled. To enable it, you must configure it using the vSphere CLI
command vicfg-snmp. For a complete reference to vicfg-snmp options, see vSphere Command-Line Interface
Installation and Reference Guide.
Prerequisites
SNMP configuration for ESX/ESXi requires the vSphere CLI. For information on installing and using the
vSphere CLI, see vSphere Command-Line Interface Installation and Reference Guide.
Procedure
1
Configure SNMP Communities on page 52
Before you enable the ESX/ESXi embedded SNMP agent, you must configure at least one community for
the agent.
VMware, Inc.
51
vSphere Basic System Administration
2
Configure the SNMP Agent to Send Traps on page 52
You can use the ESX/ESX embedded SNMP agent to send virtual machine and environmental traps to
management systems. To configure the agent to send traps, you must specify a target address and
community.
3
Configure the SNMP Agent for Polling on page 53
If you configure the ESX/ESXi embedded SNMP agent for polling, it can listen for and respond to requests
from SNMP management client systems, such as GET requests.
Configure SNMP Communities
Before you enable the ESX/ESXi embedded SNMP agent, you must configure at least one community for the
agent.
An SNMP community defines a group of devices and management systems. Only devices and management
systems that are members of the same community can exchange SNMP messages. A device or management
system can be a member of multiple communities.
Prerequisites
SNMP configuration for ESX/ESXi requires the vSphere CLI. For information on installing and using the
vSphere CLI, see vSphere Command-Line Interface Installation and Reference Guide.
Procedure
u
From the vSphere CLI, type
vicfg-snmp.pl --server <hostname> --username <username> --password <password> -c <com1>.
Replace <com1> with the community name you wish to set. Each time you specify a community with this
command, the setings you specify overwrite the previous configuration. To specify multiple communities,
separate the community names with a comma.
For example, to set the communities public and internal on the host host.example.com, you might type
vicfg-snmp.pl --server host.example.com --username user --password password -c public,
internal.
Configure the SNMP Agent to Send Traps
You can use the ESX/ESX embedded SNMP agent to send virtual machine and environmental traps to
management systems. To configure the agent to send traps, you must specify a target address and community.
To send traps with the SNMP agent, you must configure the target (receiver) address, community, and an
optional port. If you do not specify a port, the SNMP agent sends traps to UDP port 162 on the target
management system by default.
Prerequisites
SNMP configuration for ESX/ESXi requires the vSphere CLI. For information on installing and using the
vSphere CLI, see vSphere Command-Line Interface Installation and Reference Guide.
52
VMware, Inc.
Chapter 5 Configuring Hosts and vCenter Server
Procedure
1
From the vSphere CLI, type
vicfg-snmp.pl --server <hostname> --username <username> --password <password> -t <target
address>@<port>/<community>.
Replace <target address>, <port>, and <community> with the address of the target system, the port number
to send the traps to, and the community name, respectively. Each time you specify a target with this
command, the settings you specify overwrite all previously specified settings. To specify multiple targets,
separate them with a comma.
For example, to send SNMP traps from the host host.example.com to port 162 on target.example.com using
the public community, type
vicfg-snmp.pl --server host.example.com --username user --password password -t
target.example.com@162/public.
2
(Optional) Enable the SNMP agent by typing
3
(Optional) Send a test trap to verify that the agent is configured correctly by typing
vicfg-snmp.pl --server <hostname> --username <username> --password <password> --enable.
vicfg-snmp.pl --server <hostname> --username <username> --password <password> --test.
The agent sends a warmStart trap to the configured target.
Configure the SNMP Agent for Polling
If you configure the ESX/ESXi embedded SNMP agent for polling, it can listen for and respond to requests
from SNMP management client systems, such as GET requests.
By default, the embedded SNMP agent listens on UDP port 161 for polling requests from management systems.
You can use the vicfg-snmp command to configure an alternative port. To avoid conflicting with other services,
use a UDP port that is not defined in /etc/services.
IMPORTANT Both the embedded SNMP agent and the Net-SNMP-based agent available in the ESX service
console listen on UDP port 161 by default. If you enable both of these agents for polling on an ESX host, you
must change the port used by at least one of them.
Prerequisites
SNMP configuration for ESX/ESXi requires the vSphere CLI. For information on installing and using the
vSphere CLI, see vSphere Command-Line Interface Installation and Reference Guide.
Procedure
1
From the vSphere CLI, type
vicfg-snmp.pl --server <hostname> --username <username> --password <password> -p <port>.
Replace <port> with the port for the embedded SNMP agent to use for listening for polling requests.
2
(Optional) If the SNMP agent is not enabled, enable it by typing
vicfg-snmp.pl --server <hostname> --username <username> --password <password> --enable.
Configure SNMP Management Client Software
After you have configured a vCenter Server system or an ESX/ESXi host to send traps, you must configure
your management client software to receive and interpret those traps.
To configure your management client software, you must specify the communities for the managed device,
configure the port settings, and load the VMware MIB files. Refer to the documentation for your management
system for specific instructions for these steps.
VMware, Inc.
53
vSphere Basic System Administration
Prerequisites
To complete this task, you must download the VMware MIB files from the VMware website:
http://communities.vmware.com/community/developer/managementapi.
Procedure
1
In your management software, specify the vCenter Server or ESX/ESXi system as an SNMP-based
managed device.
2
Set up appropriate community names in the management software.
These must correspond to the communities set for the SNMP agent on the vCenter Server system or
ESX/ESXi host.
3
(Optional) If you configured the SNMP agent to send traps to a port on the management system other
than the default UDP port 162, configure the management client software to listen on the port you
configured.
4
Load the VMware MIBs into the management software so you can view the symbolic names for the vCenter
Server or ESX/ESXi variables.
To prevent lookup errors, load the MIB files in the following order:
a
VMWARE-ROOT-MIB.mib
b
VMWARE-TC-MIB.mib
c
VMWARE-PRODUCTS-MIB.mib
d
VMWARE-SYSTEM-MIB.mib
e
VMWARE-ENV-MIB.mib
f
VMWARE-RESOURCES-MIB.mib
g
VMWARE-VMINFO-MIB.mib
h
VMWARE-OBSOLETE-MIB.mib (for use with versions of ESX/ESXi prior to 4.0)
i
VMWARE-AGENTCAP-MIB.mib
j
VMWARE-VC-EVENT-MIB.mib
The management software can now receive and interpret traps from vCenter Server or ESX/ESXi systems.
SNMP Diagnostics
Use SNMP tools to diagnose configuration problems.
You can use the following tools to diagnose problems with SNMP configuration:
54
n
Type vicfg-snmp.pl --server <hostname> --username <username> --password <password> --test at the
vSphere command-line interface to prompt the embedded SNMP agent to send a test warmStart trap.
n
Type vicfg-snmp.pl --server <hostname> --username <username> --password <password> --show to
display the current configuration of the embedded SNMP agent.
n
The SNMPv2-MIB.mib file provides a number of counters to aid in debugging SNMP problems. See
“SNMPv2 Diagnostic Counters,” on page 65.
n
The VMWARE-AGENTCAP-MIB.mib file defines the capabilities of the VMware SNMP agents by product
version. Use this file to determine if the SNMP functionality that you want to use is supported.
VMware, Inc.
Chapter 5 Configuring Hosts and vCenter Server
Using SNMP with Guest Operating Systems
You can use SNMP to monitor guest operating systems or applications running in virtual machines.
The virtual machine uses its own virtual hardware devices. Do not install agents in the virtual machine that
are intended to monitor physical hardware.
Procedure
u
Install the SNMP agents you normally would use for that purpose in the guest operating systems. No
special configuration is required on ESX.
VMware MIB Files
VMware MIB files define the information provided by ESX/ESXi hosts and vCenter Server to SNMP
management software. You can download these MIB files from the VMware Web site.
Table 5-1 lists the MIB files provided by VMware and describes the information that each file provides.
Table 5-1. VMware MIB Files
MIB File
Description
VMWARE-ROOT-MIB.mib
Contains VMware’s enterprise OID and top level OID assignments.
VMWARE-AGENTCAP-MIB.mib
Defines the capabilities of the VMware agents by product versions.
VMWARE-ENV-MIB.mib
Defines variables and trap types used to report on the state of physical hardware
components of the host computer.
VMWARE-OBSOLETE-MIB.mib
Defines OIDs that have been made obsolete to maintain backward compatibility
with earlier versions of ESX/ESXi. Includes variables formerly defined in the
files VMWARE-TRAPS-MIB.mib and VMWARE-VMKERNEL-MIB.mib.
VMWARE-PRODUCTS-MIB.mib
Defines OIDs to uniquely identify each SNMP agent on each VMware platform
by name, version, and build platform.
VMWARE-RESOURCES-MIB.mib
Defines variables used to report information on resource usage of the VMkernel,
including physical memory, CPU, and disk utilization.
VMWARE-SYSTEM-MIB.mib
The VMWARE-SYSTEM-MIB.mib file is obsolete. Use the SNMPv2-MIB to obtain
information from sysDescr.0 and sysObjec ID.0.
VMWARE-TC-MIB.mib
Defines common textual conventions used by VMware MIB files.
VMWARE-VC-EVENTS-MIB.mib
Defines traps sent by vCenter Server. Load this file if you use vCenter Server to
send traps.
VMWARE-VMINFO-MIB.mib
Defines variables for reporting information about virtual machines, including
virtual machine traps.
Table 5-2 lists MIB files included in the VMware MIB files package that are not created by VMware. These can
be used with the VMware MIB files to provide additional information.
Table 5-2. Other MIB Files
MIB File
Description
IF-MIB.mib
Defines attributes related to physical NICs on the host
system.
SNMPv2-CONF.mib
Defines conformance groups for MIBs.
SNMPv2-MIB.mib
Defines the SNMP version 2 MIB objects.
SNMPv2-TC.mib
Defines textual conventions for SNMP version 2.
VMware, Inc.
55
vSphere Basic System Administration
VMWARE-ROOT-MIB
The VMWARE-ROOT-MIB.mib file defines the VMware enterprise OID and top level OID assignments.
Table 5-3 lists the identification mapping defined in VMWARE-ROOT-MIB.mib.
Table 5-3. Definition Mapping for VMWARE-ROOT-MIB.mib
Label
Identification Mapping
vmware
enterprises 6876
vmwSystem
vmware 1
vmwVirtMachines
vmware 2
vmwResources
vmware 3
vmwProductSpecific
vmware 4
vmwLdap
vmware 40
vmwTraps
vmware 50
vmwOID
vmware 60
vmwareAgentCapabilities
vmware 70
vmwExperimental
vmware 700
vmwObsolete
vmware 800
VMWARE-ENV-MIB
The VMWARE-ENV-MIB.mib defines variables and trap types used to report on the state of physical components
of the host computer.
VMWARE-ENV-MIB.mib defines two traps:
n
vmwEnvHardwareEvent, which is sent when an ESXi host has detected a material change in the physical
condition of the hardware.
n
vmwESXEnvHardwareEvent, which is sent when an ESX host has detected a material change in the physical
condition of the hardware.
Table 5-4 lists the variables defined in VMWARE-ENV-MIB.mib.
Table 5-4. Variable Definitions in VMWARE-ENV-MIB
56
Variable
ID Mapping
Description
vmwEnv
vmwProductSpecific 20
Defines the OID root for this MIB
module.
vmwEnvNumber
vmwEnv 1
Number of conceptual rows in
vmwEnvTable.
vmwEnvLastChange
vmwEnv 2
The value of sysUptime when a
conceptual row was last added to or
deleted from vmwEnvTable.
vmwEnvTable
vmwEnv 3
This table is populated by monitoring
subsystems such as IPMI.
vmwEnvEntry
vmwEnvTable 1
One entry is created in the table for each
physical component reporting its status
to ESX/ESXi.
vmwEnvIndex
vmwEnvEntry 1
A unique identifier for the physical
component. This identifier does not
persist across management restarts.
VMware, Inc.
Chapter 5 Configuring Hosts and vCenter Server
Table 5-4. Variable Definitions in VMWARE-ENV-MIB (Continued)
Variable
ID Mapping
Description
vmwSubsystemType
vmwEnvEntry 2
The type of hardware component that is
reporting its environmental state.
vmwHardwareStatus
vmwEnvEntry 3
The last reported status of the
component.
vmwEventDescription
vmwEnvEntry 4
A description of the last reported event
for this hardware component.
vmwHardwareTime
vmwEnvEntry 5
The value of sysUptime when
vmwHardwareStatus was reported.
VMWARE-OBSOLETE-MIB
The VMWARE-OBSOLETE-MIB.mib file contains all previously published managed objects that have been made
obsolete. This file is provided to maintain compatibility with older versions of ESX/ESXi.
The variables defined in this file were originally defined in previous versions of the VMWARE-RESOURCESMIB.mib and VMWARE-TRAPS-MIB.mib files. Table 5-5 lists the variables defined in VMWARE-OBSOLETE-MIB.mib.
Table 5-5. Variables Defined in VMWARE-OBSOLETE-MIB
Variable
ID Mapping
Description
Obsolete variables originally from VMWARE-RESOURCES-MIB
vmwResources
vmware 3
vmwCPU
vmwResources 1
Defines the root OID for the subtree of
variables used to report CPU
information.
vmwCpuTable
vmwCPU 2
A table of CPU usage by each virtual
machine.
vmwCpuEntry
vmwCpuTable 1
An entry in cpuTable that records CPU
usage for a single virtual machine.
vmwCpuVMID
vmwCpuEntry 1
The identification number allocated to
the virtual machine by the VMkernel.
vmwCpuShares
vmwCpuEntry 2
The share of the CPU allocated to the
virtual machine by the VMkernel.
vmwCpuUtil
vmwCpuEntry 3
Amount of time the virtual machine has
been running on the CPU (in seconds).
vmwMemTable
vmwMemory 4
A table of memory usage by each virtual
machine.
vmwMemEntry
vmwMemTable 1
An entry in memTable that records
memory usage by a single virtual
machine.
vmwMemVMID
vmwMemEntry 1
The identification number allocated to
the virtual machine by the VMkernel.
vmwMemShares
vmwMemEntry 2
The shares of memory allocated to the
virtual machine by the VMkernel.
vmwMemConfigured
vmwMemEntry 3
The amount of memory the virtual
machine was configured with (in KB).
vmwMemUtil
vmwMemEntry 4
The amount of memory currently used
by the virtual machine (in KB).
vmwHBATable
vmwResources 3
A table used for reporting disk adapter
and target information.
VMware, Inc.
57
vSphere Basic System Administration
Table 5-5. Variables Defined in VMWARE-OBSOLETE-MIB (Continued)
58
Variable
ID Mapping
Description
vmwHBAEntry
vmwHBATable 1
A record for a single HBA connected to
the host machine.
vmwHbaIdx
vmwHBAEntry 1
Index for the HBA table.
vmwHbaName
vmwHBAEntry 2
A string describing the disk. Format:
<devname#>:<tgt>:<lun>.
vmwHbaVMID
vmwHBAEntry 3
The identification number allocated to
the running virtual machine by the
VMkernel.
vmwDiskShares
vmwHBAEntry 4
Share of disk bandwidth allocated to
this virtual machine.
vmwNumReads
vmwHBAEntry 5
Number of reads to this disk since the
disk module was loaded.
vmwKbRead
vmwHBAEntry 6
Kilobytes read from this disk since the
disk module was loaded.
vmwNumWrites
vmwHBAEntry 7
Number of writes to this disk since the
disk module was loaded.
vmwKbWritten
vmwHBAEntry 8
Number of kilobytes written to this disk
since the disk module was loaded.
vmwNetTable
vmwResources 4
A table used for reporting network
adapter statistics.
vmwNetEntry
vmwNetTable 1
A record for a single network adapter on
the virtual machine.
vmwNetIdx
vmwNetEntry 1
Index for the network table.
vmwNetName
vmwNetEntry 2
A string describing the network
adapter.
vmwNetVMID
vmwNetEntry 3
The identification number allocated to
the running virtual machine by the
VMkernel.
vmwNetIfAddr
vmwNetEntry 4
The MAC address of the virtual
machine’s virtual network adapter.
vmwNetShares
vmwNetEntry 5
Share of network bandwidth allocate d
to this virtual machine. This object has
not been implemented.
vmwNetPktsTx
vmwNetEntry 6
The number of packets transmitted on
this network adapter since the network
module was loaded. Deprecated in
favor of vmwNetHCPktsTx.
vmwNetKbTx
vmwNetEntry 7
The number of kilobytes sent from this
network adapter since the network
module was loaded. Deprecated in
favor of vmwNetHCKbTx.
vmwNetPktsRx
vmwNetEntry 8
The number of packets received on this
network adapter since the network
module was loaded. Deprecated in
favor of vmwNetHCPktsRx.
vmwNetKbRx
vmwNetEntry 9
The number of kilobytes received on
this network adapter since the network
module was loaded. Deprecated in
favor of vmwNetHCKbRx
VMware, Inc.
Chapter 5 Configuring Hosts and vCenter Server
Table 5-5. Variables Defined in VMWARE-OBSOLETE-MIB (Continued)
Variable
ID Mapping
Description
vmwNetHCPktsTx
vmwNetEntry 10
The number of packets transmitted on
this network adapter since the network
module was loaded. This counter is the
64-bit version of vmwNetPktsTx.
vmwNetHCKbTx
vmwNetEntry 11
The number of kilobytes sent from this
network adapter since the network
module was loaded. This counter is the
64-bit version of vmwNetKbTx.
vmwNetHCPktsRx
vmwNetEntry 12
The number of packets received on this
network adapter since the network
module was loaded. This counter is the
64-bit version of vmwNetPktsRx.
vmwNetHCKbRx
vmwNetEntry 13
The number of kilobytes received on
this network adapter since the network
module was loaded. This counter is the
64-bit versin of vmwNetKbRx.
Obsolete variables originally defined in VMWARE-TRAPS-MIB
vmID
vmwTraps 101
The ID of the affected virtual machine
generating the trap. If there is no virtual
machine ID (for example, if the virtual
machine has been powered off), the
vmID is -1.
vmConfigFile
vmwTraps 102
The configuration file of the virtual
machine generating the trap.
vpxdTrapType
vmwTraps 301
The trap type of the vCenter Server trap.
vpxdHostName
vmwTraps 302
The name of the affected host.
vpxdVMName
vmwTraps 303
The name of the affected virtual
machine.
vpxdOldStatus
vmwTraps 304
The prior status.
vpxdNewStatus
vmwTraps 305
The new status.
vpxdObjValue
vmwTraps 306
The object value.
Table 5-6 lists the traps defined in VMWARE-OBSOLETE-MIB.mib. These traps were originally defined in VMWARETRAPS-MIB.mib.
Table 5-6. Traps Defined in VMWARE-OBSOLETE-MIB
Trap
Description
ESX/ESXi Traps
vmPoweredOn
This trap is sent when a virtual machine is powered on from a suspended or powered off
state.
vmPoweredOff
This trap is sent when a virtual machine is powered off.
vmHBLost
This trap is sent when a virtual machine detects a loss in guest heartbeat. VMware Tools
must be installed in the guest operating system in order for this value to be valid.
vmHBDetected
This trap is sent when a virtual machine detects or regains the guest heartbeat. VMware
Tools must be installed in the guest operating system in order for this value to be valid.
vmSuspended
This trap is sent when a virtual machine is suspended.
vCenter Server Traps
vpxdTrap
VMware, Inc.
This trap is sent when an entity status has changed.
59
vSphere Basic System Administration
VMWARE-PRODUCTS-MIB
The VMWARE-PRODUCTS-MIB.mib file defines OIDs to uniquely identify each SNMP agent on each VMware
platform.
Table 5-7 lists identification mappings defined in VMWARE-PRODUCTS-MIB.mib.
Table 5-7. Identification Mappings for VMWARE-PRODUCTS-MIB.mib
Label
Identification Mapping
oidESX
vmwOID 1
vmwESX
vmwProductSpecific 1
vmwDVS
vmwProductSpecific 2
vmwVC
vmwProductSpecific 3
vmwServer
vmwProductSpecific 4
VMWARE-RESOURCES-MIB
The VMWARE-RESOURCES-MIB.mib file defines variables used to report information on resource usage.
Table 5-8 lists the identification mappings defined in VMWARE-RESOURCES-MIB.mib.
Table 5-8. Identification Mappings for VMWARE-RESOURCES-MIB
Variable
ID Mapping
Description
vmwCPU
vmwResources 1
Defines the root OID for the subtree of variables
used to report CPU information.
vmwNumCPUs
vmwCPU 1
The number of physical CPUs present on the
system.
vmwMemory
vmwResources 2
Defines the root OID for the subtree of variables
used to report memory information.
vmwMemSize
vmwMemory 1
Amount of physical memory present on the host (in
KB).
vmwMemCOS
vmwMemory 2
Amount of physical memory allocated to the service
console (in KB). This variable does not apply to ESXi
hosts, which do not have a service console.
vmwMemAvail
vmwMemory 3
The amount of memory available to run virtual
machines and to allocate to the hypervisor. It is
computed by subtracting vmwMemCOS from
vmwMemSize.
vmwStorage
vmwResources 5
Defines the root OID for the subtree of variables
used to report memory information.
vmwHostBusAdapterNumber
vmwStorage 1
The number of entries in the
vmwHostBusAdapterTable.
vmwHostBusAdapterTable
vmwStorage 2
A table of Host Bus Adapters found in this host.
vmwHostBusAdapterEntry
vmwHostBusAdapterTable 1
An entry in the Host Bus Adapter table holding
details for a particular adapter.
vmwHostBusAdapterIndex
vmwHostBusAdapterEntry 1
An arbitrary index assigned to this adapter.
vmwHbaDeviceName
vmwHostBusAdapterEntry 2
The system device name for this adapter.
CPU Subtree
Memory Subtree
Storage Subtree
60
VMware, Inc.
Chapter 5 Configuring Hosts and vCenter Server
Table 5-8. Identification Mappings for VMWARE-RESOURCES-MIB (Continued)
Variable
ID Mapping
Description
vmwHbaBusNumber
vmwHostBusAdapterEntry 3
The host bus number. For unsupported adapters,
returns -1.
vmwHbaStatus
vmwHostBusAdapterEntry 4
The operational status of the adapter.
vmwHbaModelName
vmwHostBusAdapterEntry 5
The model name of the adapter.
vmwHbaDriverName
vmwHostBusAdapterEntry 6
The name of the adapter driver.
vmwHbaPci
vmwHostBusAdapterEntry 7
The PCI ID of the adapter.
VMWARE-SYSTEM-MIB
The VMWARE-SYSTEM-MIB.mib file provides variables for identifying the VMware software running on a managed
system by product name, version number, and build number.
Table 5-9 lists the variables defined in VMWARE-SYSTEM-MIB.mib.
Table 5-9. Variables Defined in VMWARE-SYSTEM-MIB
Variable
ID Mapping
Description
vmwProdName
vmwSystem 1
The product name.
vmwProdVersion
vmwSystem 2
The product version number, in the format
<Major>.<Minor>.<Update>.
vmwProdBuild
vmwSystem 4
The product build number.
VMWARE-TC-MIB
The VMWARE-TC-MIB.mib file provides common textual conventions used by VMware MIB files.
VMWARE-TC-MIB.mib defines the following integer values for VmwSubsystemTypes:
n
unknown(1)
n
chassis(2)
n
powerSupply(3)
n
fan(4)
n
cpu(5)
n
memory(6)
n
battery(7)
n
temperatureSensor(8)
n
raidController(9)
n
voltage(10)
VMWARE-TC-MIB.mib defines the following integer values for VmwSubsystemStatus:
n
unknown(1)
n
normal(2)
n
marginal(3)
n
critical(4)
n
failed(5)
VMware, Inc.
61
vSphere Basic System Administration
VMWARE-VC-EVENT-MIB
The VMWARE-VC-EVENT-MIB.mib file provides definitions for traps sent by vCenter Server. These definitions were
provided by VMWARE-TRAPS-MIB.mib in earlier versions of VirtualCenter Server.
Table 5-10 lists the traps defined for vCenter Server.
Table 5-10. Alarms Defined in VMWARE-VC-EVENT-MIB
Trap
ID Mapping
Description
vpxdAlarmInfo
vmwVCNotifications 201
The vCenter Server SNMP agent sends
this trap when an entity's alarm status
changes.
vpxdDiagnostic
vmwVCNotifications 202
The vCenter Server SNMP agent sends
this trap when vCenter Server starts or
is restarted, or when a test notification
is requested. vCenter Server can be
configured to send this trap periodically
at regular intervals.
Table 5-11 lists the variables defined for the vCenter Server traps.
Table 5-11. Variables Defined in VMWARE-VC-EVENT-MIB
Variable
ID Mapping
Description
vmwVpxdTrapType
vmwVC 301
The trap type of the vCenter Server trap.
vmwVpxdTargetObjType
vmwVC 302
The name of the affected host.
vmwVpxdVMName
vmwVC 303
The name of the affected virtual machine.
vmwVpxdOldStatus
vmwVC 304
The prior status.
vmwVpxdNewStatus
vmwVC 305
The new status.
vmwVpxdObjValue
vmwVC 306
The object value.
VMWARE-VMINFO-MIB
The VMWARE-VMINFO-MIB.mib file defines variables and traps for reporting virtual machine information.
Table 5-12 lists the variables defined in VMWARE-VMINFO-MIB.mib.
Table 5-12. Identification Mappings for VMWARE-VMINFO-MIB
Variable
ID Mapping
Description
vmwVmTable
vmwVirtMachines 1
A table containing information on the virtual machines
that have been configured on the system.
vmwVmEntry
vmwVmTable 1
The record for a single virtual machine.
vmwVmIdx
vmwVmEntry 1
An index for the virtual machine entry.
vmwVmDisplayName
vmwVmEntry 2
The display name for the virtual machine.
vmwVmConfigFile
vmwVmEntry 3
The path to the configuration file for this virtual
machine.
vmwVmGuestOS
vmwVmEntry 4
The guest operating system running on the virtual
machine.
vmwVmMemSize
vmwVmEntry 5
The memory (in MB) configured for this virtual
machine.
vmwVmState
vmwVmEntry 6
The virtual machine power state (on or off).
Virtual Machine Variables
62
VMware, Inc.
Chapter 5 Configuring Hosts and vCenter Server
Table 5-12. Identification Mappings for VMWARE-VMINFO-MIB (Continued)
Variable
ID Mapping
Description
vmwVmVMID
vmwVmEntry 7
An identification number assigned to running virtual
machines by the VMkernel. Powered-off virtual
machines to not have this ID.
vmwVmGuestState
vmwVmEntry 8
The state of the guest operating system (on or off).
vmwVmCpus
vmwVmEntry 9
The number of virtual CPUs assigned to this virtual
machine.
vmwVmHbaTable
vmwVirtMachines 2
A table of HBAs visible to a virtual machine.
vmwVmHbaEntry
vmwVmHbaTable 1
Record for a single HBA.
vmwHbaVmIdx
vmwVmHbaEntry 1
A number corresponding to the virtual machine’s index
in the vmwVmTable.
vmwVmHbaIdx
vmwVmHbaEntry 2
Uniquely identifies a given HBA in this VM. May
change across system reboots.
vmwHbaNum
vmwVmHbaEntry 3
The name of the HBA as it appears in the virtual
machine settings.
vmwHbaVirtDev
vmwVmHbaEntry 4
The HBA hardware being emulated to the guest
operating system.
vmwHbaTgtTable
vmwVirtMachines 3
The table of all virtual disks configure for virtual
machines in vmwVmTable.
vmwHbaTgtEntry
vmwHbaTgtTable 1
A record for a specific storage disk. May change across
reboots.
vmwHbaTgtVmIdx
vmwHbaTgtEntry 1
A number corresponding to the virtual machine’s index
(vmwVmIdx) in the vmwVmTable.
vmwHbaTgtIdx
vmwHbaTgtEntry 2
This value identifies a particular disk.
vmwHbaTgtNum
vmwHbaTgtEntry 3
Identifies the disk as seen from the host bus controller.
Virtual Machine HBA Variables
Virtual Machine Network Variables
vmwVmNetTable
vmwVirtMachines 4
A table of network adapters for all virtual machines in
vmwVmTable.
vmwVmNetEntry
vmwVmNetTable 1
Identifies a unique network adapter in this table.
vmwVmNetVmIdx
vmwVmNetEntry 1
A number corresponding to the virtual machine’s index
in the vmwVmTable.
vmwVmNetIdx
vmwVmNetEntry 2
Identifies a unique network adapter in this table. May
change across sytem reboots.
vmwVmNetNum
vmwVmNetEntry 3
The name of the network adapter as it appears in the
virtual machine settings.
vmwVmNetName
vmwVmNetEntry 4
Identifies what the network adapter is connected to.
vmwVmNetConnType
vmwVmNetEntry 5
Obsolete. Do not use.
vmwVmNetConnected
vmwVmNetEntry 6
Reports true if the ethernet virtual device is connected
to the virtual machine.
vmwVmMAC
vmwVmNetEntry 7
Reports the configured virtual hardware MAC address.
If VMware Tools is not running, the value is zero or
empty.
Virtual Floppy Device Variables
vmwFloppyTable
VMware, Inc.
vmwVirtMachines 5
A table of floppy drives for all virtual machines in
vmwVmTable.
63
vSphere Basic System Administration
Table 5-12. Identification Mappings for VMWARE-VMINFO-MIB (Continued)
Variable
ID Mapping
Description
vmwFloppyEntry
vmwFloppyTable 1
Identifies a single floppy device. May change across
system reboots.
vmwFdVmIdx
vmwFloppyEntry 1
A number corresponding to the virtual machine’s index
in the vmwVmTable.
vmwFdIdx
vmwFloppyEntry 2
Identifies a specific virtual floppy device.
vmwFdName
vmwFloppyEntry 3
The file or device that this virtual floppy device is
connected to.
vmwFdConnected
vmwFloppyEntry 4
Reports true if the floppy device is connected.
Virtual DVD or CD-ROM Variables
vmwCdromTable
vmwVirtMachines 6
A table of DVD or CD-ROM drives for all virtual
machines in vmwVmTable.
vmwCdromEntry
vmwCdromTable 1
Identifies a specific CD-ROM or DVD drive. May
change across system reboots.
vmwCdVmIdx
vmwCdromEntry 1
A number corresponding to the virtual machine’s index
in the vmwVmTable.
vmwCdromIdx
vmwCdromEntry 2
Identifies the specific DVD or CD-ROM drive.
vmwCdromName
vmwCdromEntry 3
The file or device that the virtual DVD or CD-ROM
drive has been configured to use.
vmwCdromConnected
vmwCdromEntry 4
Reports true the CD-ROM device is connected.
vmwVmID
vmwTraps 101
Holds the same value as vmwVmVMID of the affected
virtual machine generating the trap, to allow polling of
the affected virtual machine in vmwVmTable.
vmwVmConfigFilePath
vmwTraps 102
The configuration file of the virtual machine generating
the trap.
Virtual Machine Trap Variables
Table 5-13 lists the traps defined in VMWARE-VMINFO-MIB.mib. These traps were formely defined in VMWARE-TRAPSMIB.mib.
Table 5-13. Traps Defined in VMWARE-VMINFO-MIB
64
Trap
ID Mapping
Description
vmwVmPoweredOn
vmwVmNotifications 1
This trap is sent when a virtual machine
is powered on from a suspended or
powered off state.
vmwVmPoweredOff
vmwVmNotifications 2
This trap is sent when a virtual machine
is powered off.
vmwVmHBLost
vmwVmNotifications 3
This trap is sent when a virtual machine
detects a loss in guest heartbeat.
VMware Tools must be installed in the
guest operating system in order for this
value to be valid.
vmwVmHBDetected
vmwVmNotifications 4
This trap is sent when a virtual machine
detects or regains the guest heartbeat.
VMware Tools must be installed in the
guest operating system in order for this
value to be valid.
vmwVmSuspended
vmwVmNotifications 5
This trap is sent when a virtual machine
is suspended.
VMware, Inc.
Chapter 5 Configuring Hosts and vCenter Server
SNMPv2 Diagnostic Counters
The SNMPv2-MIB.mib file provides a number of counters to aid in debugging SNMP problems.
Table 5-14 lists some of these diagnostic counters.
Table 5-14. Diagnostic Counters from SNMPv2-MIB
Variable
ID Mapping
Description
snmpInPkts
snmp 1
The total number of messages delivered to the SNMP entity
from the transport service.
snmpInBadVersions
snmp 3
The total number of SNMP messages that were delivered
to the SNMP entity and were for an unsupported SNMP
version.
snmpInBadCommunityNames
snmp 4
The total number of community-based SNMP messages
delivered to the SNMP entity that used an invalid SNMP
community name.
snmpInBadCommunityUses
snmp 5
The total number of community-based SNMP messages
delivered to the SNMP entity that represented an SNMP
operation that was not allowed for the community named
in the message.
snmpInASNParseErrs
snmp 6
The total number of ASN.1 or BER errors encountered by
the SNMP entity when decoding received SNMP messages.
snmpEnableAuthenTraps
snmp 30
Indicates whether the SNMP entity is permitted to generate
authenticationFailure traps. The value of this object
overrides any configuration information. It therefore
provides a means of disabling all authenticationFailure
traps.
snmpSilentDrops
snmp 31
The total number of Confirmed Class PDUs delivered to
the SNMP entity that were silently dropped because the
size of a reply containing an alternate Response Class PDU
with an empty variable-bindings field was greater than
either a local constraint or the maximum message size
associated with the originator of the request.
snmpProxyDrops
snmp 32
The total number of Confirmed Class PDUs delivered to
the SNMP entity that were silently dropped because the
transmission of the message to a proxy target failed in a
manner other than a time-out such that no Response Class
PDU could be returned.
System Log Files
In addition to lists of events and alarms, vSphere components generate assorted logs. These logs contain
information about activities in your vSphere environment.
View System Log Entries
You can view system logs generated by vSphere components.
The following task describes how to access and view system logs.
Procedure
1
From the Home page of a vSphere Client connected to either a vCenter Server system or an ESX/ESXi host,
click System Logs.
2
From the drop-down menu, select the log and entry you want to view.
VMware, Inc.
65
vSphere Basic System Administration
3
Select View > Filtering to refer to the filtering options.
4
Enter text in the data field.
5
Click Clear to empty the data field.
View System Logs on an ESXi Host
You can use the direct console interface to view the system logs on an ESXi host. These logs provide information
about system operational events.
Procedure
1
From the direct console, select View System Logs.
2
Press a corresponding number key to view a log.
vCenter Server agent (vpxa) logs appear if the host is managed by vCenter Server.
3
Press Enter or the spacebar to scroll through the messages.
4
(Optional) Perform a regular expression search.
a
Press the slash key (/).
b
Type the text to find.
c
Press Enter
The found text is highlighted on the screen.
5
Press q to return to the direct console.
External System Logs
VMware technical support might request several files to help resolve any issues you have with the product.
This section describes the types and locations of log files found on various ESX 4.0 component systems.
NOTE On Windows systems, several log files are stored in the Local Settings directory, which is located at
C:\Documents and Settings\<user name>\Local Settings\. This folder is hidden by default.
ESX/ESXi System Logs
You may need the ESX/ESXi system log files to resolve technical issues.
Table 5-15 lists log files associated with ESX systems.
Table 5-15. ESX/ESXi System Logs
Component
Location
ESX Server 2.x Service log
/var/log/vmware/vmware-serverd.log
ESX Server 3.x or ESX Service log
/var/log/vmware/hostd.log
vSphere Client Agent log
/var/log/vmware/vpx/vpxa.log
Virtual Machine Kernel Core file
/root/vmkernel-core.<date>
and
/root/vmkernel-log.<date>
These files are present after you reboot your machine.
66
Syslog log
/var/log/messages
Service Console Availability report
/var/log/vmkernel
VMkernel Messages
/var/log/vmkernel
VMware, Inc.
Chapter 5 Configuring Hosts and vCenter Server
Table 5-15. ESX/ESXi System Logs (Continued)
Component
Location
VMkernel Alerts and Availability report
/var/log/vmkernel
VMkernel Warning
/var/log/vmkwarning
Virtual Machine log file
vmware.log in the same directory as the .vmx file for the virtual machine
Virtual Machine Configuration file
<virtual_machine_name>/<virtual_machine_name>.vmx located on a
datastore associated with the managed host. Used the virtual machine
summary page in the vSphere Client to determine the datastore on which
this file is located.
vSphere Client System Logs
You may need the vSphere Client system log files to resolve technical issues.
Table 5-16 lists log files associated with the vSphere Client machine.
Table 5-16. vSphere Client System Logs
Component
Location
vSphere Client
Installation log
Temp directory on the vSphere Client machine.
Example: C:\Documents and Settings\<user name>\Local Settings\Temp\vmmsi.log or
C:\Users\<user name>\Local Settings\Temp\vmmsi.log
vSphere Client
Service log
\vpx directory in the Application Data directory on the vSphere Client machine.
Example: C:\Documents and Settings\<user name>\Local Settings\Application
Data\vpx\viclient-x.log or C:\Users\<user name>\Local Settings\Application
Data\vpx\viclient-x.log
x(=0, 1, ... 9)
Configure Syslog on ESXi Hosts
All ESX/ESXi hosts run a syslog service (syslogd), which logs messages from the VMkernel and other system
components to a file.
On an ESXi host, you can use the vSphere Client or the vSphere CLI command vicfg-syslog to configure the
following options:
Log file path
Specifies a datastore path to a file in which syslogd logs all messages.
Remote host
Specifies a remote host to which syslog messages are forwarded. In order to
receive the forwarded syslog messages, your remote host must have a syslog
service installed and correctly configured. Consult the documentation for the
syslog service installed on your remote host for information on configuration.
Remote port
Specifies the port on which the remote host receives syslog messages.
You cannot use the vSphere Client or vicfg-syslog to configure syslog behavior for an ESX host. To configure
syslog for an ESX host, you must edit the /etc/syslog.conf file.
For more information on vicfg-syslog, see the vSphere Command-Line Interface Installation and Reference Guide.
Procedure
1
In the vSphere Client inventory, select the host.
2
Click the Configuration tab.
3
Click Advanced Settings.
4
Select Syslog in the tree control.
VMware, Inc.
67
vSphere Basic System Administration
5
In the Syslog.Local.DatastorePath text box, enter the datastore path for the file to which syslog will log
messages.
The datastore path should be of the form [<datastorename>] </path/to/file>, where the path is relative to the
root of the volume backing the datastore. For example, the datastore path [storage1] var/log/messages
would map to the path /vmfs/volumes/storage1/var/log/messages.
If no path is specified, the default path is /var/log/messages.
6
In the Syslog.Remote.Hostname text box, enter the name of the remote host to which syslog data will be
forwarded.
If no value is specified, no data is forwarded.
7
In the Syslog.Remote.Port text box, enter the port on the remote host to which syslog data will be
forwarded.
By default, this option is set to 514, which is the default UDP port used by syslog. Changes to this option
take effect only if Syslog.Remote.Hostname is configured.
8
Click OK.
Changes to the syslog options take effect immediately.
Export Diagnostic Data
You can export all or part of your log file data.
When you export log file data, the vm-support script creates a file of the selected data and stores it in a location
you specify. The default file type is .txt if no other extension is specified. The file contains Type, Time, and
Description.
Procedure
1
From the vSphere Client connected to a vCenter Server system or ESX/ESXi host, select Administration
> Export Diagnostic Data.
2
If the vSphere Client is connected to a vCenter Server system, specify the host whose logs you want to
export and the location for storing the log files.
3
If the vSphere Client is connected to an ESX/ESXi host, specify the location for the log files.
4
Click OK.
Collecting Log Files
VMware technical support might request several files to help resolve technical issues. The following sections
describe script processes for generating and collecting some of these files.
Set Verbose Logging
You can specify how verbose log files will be.
Procedure
68
1
Select Administration > vCenter Server Settings.
2
Select Logging Options.
3
Select Verbose from the pop-up menu.
4
Click OK.
VMware, Inc.
Chapter 5 Configuring Hosts and vCenter Server
Collect vSphere Log Files
You can collect vSphere log files into a single location.
Select from the options:
Procedure
n
To view the viclient-*.log files, change to the directory, %temp%.
n
If you are running the vSphere Client connected to a vCenter Server system, download the log bundle.
The log bundle is generated as a .zip file. By default, the vpxd logs within the bundle are compressed
as .gz files. You must use gunzip to uncompress these files.
n
From the vCenter Server system, select Start > Programs > VMware > Generate vCenter Server log
bundle.
You can use this to generate vCenter Server log bundles even when you are unable to connect to the
vCenter Server using the vSphere Client.
The log bundle is generated as a .zip file. By default, the vpxd logs within the bundle are compressed
as .gz files. You must use gunzip to uncompress these files.
Collect ESX Log Files Using the Service Console
You can collect and package all relevant ESX system and configuration information, a well as ESX log files.
This information can be used to analyze the problems.
Procedure
u
Run the following script on the service console: /usr/bin/vm-support
The resulting file has the following format: esx-<date>-<unique-xnumber>.tgz
Turn Off Compression for vpxd Log Files
By default, vCenter Server vpxd log files are rolled up and compressed into .gz files. You can turn off this
setting to leave the vpxd logs uncompressed.
Procedure
1
Log in to the vCenter Server using the vSphere Client.
2
Select Administration > vCenter Server Settings.
3
In the Key text box, type log.compressOnRoll.
4
In the Value text box, type false.
5
Click Add, and click OK.
ESX/ESXi VMkernel Files
If the VMkernel fails, an error message appears and then the virtual machine reboots. If you specified a VMware
core dump partition when you configured your virtual machine, the VMkernel also generates a core dump
and error log.
More serious problems in the VMkernel can freeze the machine without an error message or core dump.
VMware, Inc.
69
vSphere Basic System Administration
70
VMware, Inc.
Managing the vSphere Client
Inventory
6
The topics in this section describe how to manage the objects in your vSphere environment.
The views and capabilities displayed vary depending on whether the vSphere Client is connected to a vCenter
Server system or an ESX/ESXi host. Unless indicated, the process, task, or description applies to all kinds of
vSphere Client connections.
This chapter includes the following topics:
n
“Understanding vSphere Client Objects,” on page 71
n
“Add an Inventory Object,” on page 73
n
“Moving Objects in the Inventory,” on page 74
n
“Remove an Inventory Object,” on page 74
n
“Browsing Datastores in the vSphere Client Inventory,” on page 75
Understanding vSphere Client Objects
Inventory objects in the vSphere Client include folders, datacenters, clusters, resource pools, datastores, and
networks. These objects are used to help manage or organize monitored and managed hosts, as well as virtual
machines.
Each object in the vSphere Client has a particular place in the overall object hierarchy. An object’s position in
the hierarchy is determined by the object’s functionality.
An object's name must be unique with its parent. vApp names must be unique within the Virtual Machines
and Templates view.
Identifying Objects in the vSphere Client Inventory
Inventory objects in the vSphere Client represent resources in your virtual infrastructure.
Objects in vSphere Client are as follows:
Root folder
In vCenter Server only. Child objects are datacenters or subfolders. The root
folder is set as a default for every vCenter Server system. You can change the
name, but not add or remove it.
In a vCenter Server Connected Group, there is one root folder for each vCenter
Server system in the group. The name of the root folder is the name of the
vCenter Server system which it represents.
Folders
VMware, Inc.
In vCenter Server only. Child objects are datacenters, hosts, clusters,
networking objects, datastores, virtual machines, templates, or subfolders.
71
vSphere Basic System Administration
Datacenters
In vCenter Server only. A datacenter contains folders, clusters, hosts, networks,
datastores and virtual machines. All actions taken upon managed hosts and
virtual machines are applied within their datacenter. Within a datacenter, you
can monitor and manage virtual machines separately from their hosts and use
VMotion.
Clusters
In vCenter Server only. Child objects are hosts, virtual machines, or resource
pools.
Hosts
Child objects of hosts are virtual machines or resource pools. Hosts are
ESX/ESXi systems. The term host refers to the virtualization platform that is
the host to one or more virtual machines. A host object is the default top
structure for a standalone ESX/ESXi machine.
When the vCenter Server system is connected to the vSphere Client, all
ESX/ESXi systems registered with vCenter Server are referred to as hosts.
ESX/ESXi systems directly connected to the vSphere Client are referred to as
standalone hosts.
Resource pools
Child objects of resource pools are virtual machines or other resource pools.
Resource pools are available on ESX/ESXi hosts as well as through vCenter
Server systems.
A vSphere Client resource pool is used to allocate host-provided CPU and
memory to the virtual machines resident to the host.
72
Virtual machines
Located within a host, virtual disks on a datastore, associated within a cluster
or resource pool. Can be listed as a child object to hosts, clusters, or resource
pools. Can be moved between hosts or clusters. When adding to a cluster or
resource pool, you must specify or have in the cluster or resource pool a
designated target host.
Templates
A template is a master copy of a virtual machine that can be used to create and
provision new virtual machines.
Networks
In vCenter Server only. Child object to datacenters and network folders. There
are two types of networks: vNetwork Standard Switches (vSwitches) and
vNetwork Distributed Switches. vNetwork Standard Switches are associated
with a single host and are discovered when hosts are added to the vSphere
environment. You can add and remove vNetwork Standard Switches through
the vSphere Client. vNetwork Distributed Switches span multiple hosts. You
can add and remove vNetwork Distributed Switches through the vSphere
Client.
Datastores
In vCenter Server only. Child object to datacenters and datastore folders.
Datastores are logical containers that hold virtual disk files and other files
necessary for virtual machine operations. Datastores exist on different types of
physical storage devices, including local storage, iSCSI and Fibre Channel
SANs, and NFS. You create datastores by formatting storage devices or by
mounting NFS volumes on your host. In addition, you can add a host with
existing datastores to the inventory.
Libraries
Central repositories for virtual machine provisioning media such as virtual
machine templates, ISO images, floppy images, VMDK files, guest
customization files, and so on.
VMware, Inc.
Chapter 6 Managing the vSphere Client Inventory
Viewing Object Relationships
One of the features of managing your virtual infrastructure with vSphere is viewing relationships between
inventory objects.
You can view the relationships between inventory objects relationships in the following ways:
Using the Maps feature
Shows the inventory object relationships in graphical form.
Clicking an object in the
inventory
Provides a list of tabbed content that lists related objects.
Selecting Hosts and
Clusters from the Home
page
Provides a view of the set of virtual machines that run on a particular host,
cluster, or resource pool. Each object has a tab that displays all the virtual
machines associated or contained within it.
For example, a datastore has a virtual machine tab that lists the virtual machines
that use the datastore. There is also a host tab that list the hosts that can access
the datastore.
When you view the hosts and clusters page, virtual machine folders are not
displayed. Because virtual machine names are unique within virtual machine
folders, you might see more than one virtual machine with the same name. To
view virtual machines as they are arranged in the folder hierarchy, use the VMs
and Templates view.
Selecting VMs and
Templates from the
Home page
Displays all virtual machines and templates. Through this view you can
organize virtual machines into folder hierarchies.
Selecting Datastores
from the Home page
Displays all datastores in the datacenter. Through this view you can organize
datastores into arbitrary folder hierarchies.
Selecting Networking
objects from the Home
page
Displays all abstract network devices, called vSwitches and vNetwork
Distributed Switches. Through this view you can organize networking devices
into arbitrary folder hierarchies.
Add an Inventory Object
You can add an inventory object only to its corresponding hierarchical parent. Objects you are allowed to add
are listed on the parent menus.
Add a Cluster, Resource Pool, Host, or Virtual Machine
Clusters, resource pools, hosts, and virtual machines can be added from the Hosts and Clusters view in vSphere
Client.
Procedure
1
From the vSphere Client, right-click the parent object in the inventory.
2
Select New <Object>, where <Object> is a folder, datacenter, cluster, resource pool, host, or virtual machine.
3
Complete the wizard and click Finish.
VMware, Inc.
73
vSphere Basic System Administration
Add a Folder or Datacenter
Folders and datacenters add organization to your inventory. Add folders or datacenters from any Inventory
view in the vSphere Client.
Procedure
1
From the vSphere Client, right-click the parent object in the inventory.
2
Select New <Object>, where <Object> is a folder, datacenter, cluster, resource pool, host, or virtual machine.
An icon representing the new object is added to the inventory.
3
Enter a name for the object.
Moving Objects in the Inventory
You can move most objects manually between folders, datacenters, resource pools, and hosts in the vSphere
Client inventory.
You cannot move the root folder. If you connect directly to a host using the vSphere Client, you cannot move
the host.
You can move inventory objects in the following ways:
n
Folders — move within a datacenter.
n
Datacenter — move between folders at a sibling or parent level.
n
Cluster — move between folders and within datacenters at a sibling or parent level.
n
Host — move between clusters and datacenters. When managed by vCenter Server, if a host is in a cluster,
all virtual machines on the host must be shut down and the host must be placed into maintenance mode
before it can be moved from the cluster.
n
Resource pools — move to other resource pools and folders.
n
Virtual machines — move to other resource pools, clusters, folders, datacenters, or hosts. When adding
to anything other than a host, you must specify a target host.
n
Networks — move between folders at a sibling or parent level. You cannot move a dvPort Group
independently of its parent Distributed Virtual Switch.
n
Datastores — move between folders at a sibling or parent level.
Remove an Inventory Object
Removing an object from the inventory discontinues the management of the object by vCenter Server.
When you remove an object (such as a folder, datacenter, cluster, or resource pool) from the inventory, vCenter
Server does the following:
n
Removes all of the object’s child inventory objects.
n
Removes all the tasks and alarms associated with the object.
n
Returns all processor and migration licenses assigned to the object to available status.
n
If the object is a host, ceases to manage the object’s virtual machines, but allows them to remain on the
host.
NOTE Removing a virtual machine from the inventory does not delete it from its datastore.
74
VMware, Inc.
Chapter 6 Managing the vSphere Client Inventory
Procedure
1
From the vSphere Client, right-click the object and select Remove.
2
In the confirmation dialog box that appears, confirm that you want to remove the object.
Browsing Datastores in the vSphere Client Inventory
The Datastore Browser allows you to manage the contents of datastores in the vSphere Client inventory.
To use the Datastore Browser, you need to have a role with the Browse Datastore privilege.
You can use the Datastore Browser to:
n
View or search the contents of a datastore.
n
Add a virtual machine or template stored on a datastore to the vSphere Client inventory.
n
Copy or move files from one location to another, including to another datastore.
n
Upload a file or folder from the client computer to a datastore.
n
Download a file from a datastore to the client computer.
n
Delete or rename files on a datastore.
The Datastore Browser operates in a manner similar to file system applications like Windows Explorer. It
supports many common file system operations, including copying, cutting, and pasting files. The Datastore
Browser does not support drag-and-drop operations.
Copying Virtual Machine Disks with the Datastore Browser
You can use the Datastore Browser to copy virtual machine disk files between hosts. Disk files are copied asis, without any format conversion. Disks copied from one type of host to a different type of host might require
conversion before they can be used on the new host.
You can download virtual disks from a datastore to local storage, but you cannot upload virtual disks from
local storage to a datastore, because the disk format cannot be verified during the upload.
VMware, Inc.
75
vSphere Basic System Administration
76
VMware, Inc.
Managing Hosts in vCenter Server
7
To access the full capabilities of your hosts and to simplify the management of multiple hosts, you should
connect your hosts to a vCenter Server system.
For information on configuration management of ESX/ESXi hosts, see the ESX Configuration Guide or ESXi
Configuration Guide.
The views and capabilities displayed vary depending on whether the vSphere Client is connected to a vCenter
Server system or an ESX/ESXi host. Unless indicated, the process, task, or description applies to all kinds of
vSphere Client connections.
This chapter includes the following topics:
n
“About Hosts,” on page 77
n
“Add a Host,” on page 78
n
“Completing the Add Host Process,” on page 79
n
“Disconnecting and Reconnecting a Host,” on page 80
n
“Remove a Host from a Cluster,” on page 81
n
“Understanding Managed Host Removal,” on page 81
n
“Remove a Managed Host from vCenter Server,” on page 82
n
“Monitoring Host Health Status,” on page 83
About Hosts
A host is a virtualization platform that supports virtual machines. A vCenter Server managed host is a host
that is registered with vCenter Server.
The task of managing a host is accomplished through the vSphere Client. This vSphere Client can be connected
either directly to an ESX/ESXi host or indirectly to hosts through a connection to a vCenter Server system.
When ESX/ESXi hosts are connected to the vSphere Client directly, you manage them individually as
standalone hosts. Most of the host configuration and virtual machine configuration features still apply.
Features that require multiple hosts, such as migration with VMotion of a virtual machine from one host to
another, are not available through the standalone host connection.
VMware, Inc.
77
vSphere Basic System Administration
When ESX/ESXi hosts are managed by vCenter Server, they are added to the vSphere environment through a
vSphere Client connected to a vCenter Server system. Managed hosts are hierarchically placed in datacenters,
folders, or clusters under the root vCenter Server system.
CAUTION If an ESX/ESXi host is connected with a vCenter Server system and you attached a vSphere Client
to manage the ESX/ESXi host directly, you receive a warning message but are allowed to proceed. This might
result in conflicts on the host, especially if the host is part of a cluster. This action is strongly discouraged.
All virtual machines on managed hosts are discovered and imported into vCenter Server. When you add
multiple managed hosts, vCenter Server identifies any naming conflicts that exist between virtual machines
and alerts the system administrator, who can then rename virtual machines as necessary.
When vCenter Server connects to a managed host, it does so as a privileged user. The individual vSphere Client
user does not necessarily need to be an administrative user on the managed host.
Add a Host
To manage ESX/ESXi hosts using vCenter Server, you must add the hosts to the vSphere environment through
the vSphere Client.
When you add a host, vCenter Server discovers and adds all the virtual machines contained within that
managed host to the environment.
Before you begin this task:
n
Ensure a communication channel through a firewall, if needed. If any managed host in the vCenter Server
environment is behind a firewall, ensure that the managed host can communicate with vCenter Server
and with all other hosts. See the ESX Server Configuration Guide or the ESXi Server Configuration Guide for
information on which ports are necessary.
n
Make sure NFS mounts are active. If NFS mounts are unresponsive, the operation fails.
NOTE If you are connecting your vSphere Client to an ESX/ESXi host directly, the tasks in this section do not
apply.
Add a Host to a vCenter Server Cluster
Use the vSphere Client to add a host to a cluster.
Procedure
1
In the vSphere Client, display the inventory and select the cluster where you will add the host.
2
From the File menu, select New > Add Host.
3
Enter the managed host connection settings and click Next.
a
Type the name or IP address of the managed host in the Host name field.
b
Enter the Username and Password for a user account that has administrative privileges on the selected
managed host.
vCenter Server uses the root account to log in to the system and then creates a special user account.
vCenter Server then uses this account for all future authentication.
4
(Optional) Select Enable Lockdown Mode to disable remote access for the administrator account after
vCenter Server takes control of this host.
This option is available for ESXi hosts only. Selecting this check box ensures that the host is managed only
through vCenter Server. Certain limited management tasks can be performed while in lockdown mode
by logging into the local console on the host.
78
VMware, Inc.
Chapter 7 Managing Hosts in vCenter Server
5
Confirm the Host Summary information and click Next.
6
Select whether to assign a new or existing license key to the host and click Next.
7
Specify what should happen to the resource pools on the host.
The options are:
n
Put all the host’s virtual machines into the cluster’s root resource pool.
n
Create new resource pool for the host’s virtual machines. The default resource pool name is derived
from the host’s name. Type over the text to supply your own name.
8
Click Next.
9
Click Finish.
Add a Host to a vCenter Server Datacenter
Use the vSphere Client to add a host to a datacenter.
Procedure
1
In the vSphere Client, display the inventory and select the datacenter or folder where you will add the
host.
2
Select File > New > Add Host.
3
Enter the managed host connection settings and click Next.
a
Type the name or IP address of the managed host in the Host name field.
b
Enter the Username and Password for a user account that has administrative privileges on the selected
managed host.
vCenter Server uses the root account to log in to the system and then creates a special user account.
vCenter Server then uses this account for all future authentication.
4
(Optional) Select Enable Lockdown Mode to disable remote access for the administrator account after
vCenter Server takes control of this host.
This option is available for ESXi hosts only. Selecting this check box ensures that the host is managed only
through vCenter Server. Certain limited management tasks can be performed while in lockdown mode
by logging into the local console on the host.
5
Confirm the Host Summary information and click Next.
6
Select whether to assign a new or existing license key to the host and click Next.
7
Select the location for the host's virtual machines and click Next.
Select a virtual machine folder, or the datacenter itself if you do not want to place the virtual machines
into a folder.
8
Click Finish.
Completing the Add Host Process
After you complete the Add Host wizard, vCenter Server verifies that the host is compatible and completes
the process of adding it to the vCenter Server inventory.
After you dismiss the Add Host wizard, vCenter Server finishes the process of adding a host by performing
the following steps.
1
Searches the network for the specified managed host and identifies all the virtual machines on the managed
host.
VMware, Inc.
79
vSphere Basic System Administration
2
Connects to the managed host.
If the wizard cannot connect to the managed host, the managed host is not added to the inventory.
3
Verifies that the managed host is not already being managed.
If the host is already being managed by another vCenter Server system, vCenter Server displays a message.
If the vCenter Server can connect to the managed host, but for some reason cannot remain connected, the
host is added, but is in a disconnected state.
4
Reads the number of processors on the managed host and allocates the appropriate number of licenses.
The number of processors is stored in the vCenter Server database and is verified upon each managed
host reconnection and vCenter Server system startup.
5
Verifies that the managed host version is supported.
If it is not, and the managed host version can be upgraded, vCenter Server prompts you to perform an
upgrade.
6
Imports existing virtual machines.
Disconnecting and Reconnecting a Host
You can disconnect and reconnect a host that is being managed by vCenter Server. Disconnecting a managed
host does not remove it from vCenter Server; it temporarily suspends all monitoring activities performed by
vCenter Server.
The managed host and its associated virtual machines remain in the vCenter Server inventory. By contrast,
removing a managed host from vCenter Server removes the managed host and all its associated virtual
machines from the vCenter Server inventory.
Disconnect a Managed Host
Use the vSphere Client to disconnect a managed host from vCenter Server.
Procedure
1
From the vSphere Client connected to a vCenter Server system, display the inventory and click the
managed host to disconnect.
2
Right-click the host and select Disconnect from the pop-up menu.
3
In the confirmation dialog box that appears, click Yes.
If the managed host is disconnected, the word “disconnected” is appended to the object name in
parentheses, and the object is dimmed. All associated virtual machines are similarly dimmed and labeled.
Reconnect a Managed Host
Use the vSphere Client to reconnect a managed host to a vCenter Server system.
Procedure
1
From the vSphere Client connected to a vCenter Server system, display the inventory and click the
managed host to reconnect.
2
Right-click the host and select Connect from the pop-up menu.
When the managed host’s connection status to vCenter Server is changed, the statuses of the virtual
machines on that managed host are updated to reflect the change.
80
VMware, Inc.
Chapter 7 Managing Hosts in vCenter Server
Reconnecting Hosts After Changes to the vCenter Server SSL Certificate
vCenter Server uses an SSL certificate to encrypt and decrypt host passwords stored in the vCenter Server
database. If the certificate is replaced or changed, vCenter Server cannot decrypt host passwords, and therefore
cannot connect to managed hosts.
If vCenter Server fails to decrypt a host password, the host is disconnected from vCenter Server. You must
reconnect the host and supply the login credentials, which will be encrypted and stored in the database using
the new certificate.
Remove a Host from a Cluster
When a host is removed from a cluster, the resources it provides are deducted from the total cluster resources.
The virtual machines deployed on the host are either migrated to other hosts within the cluster, or remain with
the host and are removed from the cluster, depending on the state of the virtual machines when the host is
removed from the cluster.
You can remove hosts from a cluster by selecting them in the inventory and dragging them to a new location
within the inventory. The new location can be a folder as a standalone host or another cluster.
Prerequisites
Before you can remove a host from a cluster, you must power off all virtual machines that are running on the
host, or migrate the virtual machines to a new host using VMotion.
Procedure
1
From the vSphere Client connected to a vCenter Server system, display the inventory.
2
Right-click the appropriate managed host icon in the inventory panel, and select Enter Maintenance
Mode from the pop-up menu.
3
In the confirmation dialog that appears, click Yes.
The host icon changes and the term “maintenance mode” is added to the name in parentheses.
4
Select the host icon in the inventory panel, and drag it to the new location.
The host can be moved to another cluster or another datacenter. When the new location is selected, a blue
box surrounds the cluster or datacenter name.
vCenter Server moves the host to the new location.
5
Right-click the host, and select Exit Maintenance Mode from the pop-up menu.
6
(Optional) Restart any virtual machines, as needed.
Understanding Managed Host Removal
Removing a managed host from vCenter Server breaks the connection and stops all monitoring and managing
functions of that managed host and of all the virtual machines on that managed host. The managed host and
its associated virtual machines are removed from the inventory.
Historical data for removed hosts remains in the vCenter Server database.
Removing a managed host differs from disconnecting the managed host from vCenter Server. Disconnecting
a managed host does not remove it from vCenter Server; it temporarily suspends all vCenter Server monitoring
activities. The managed host and its associated virtual machines remain in the vCenter Server inventory.
Removing a managed host from vCenter Server does not remove the virtual machines from the managed host
or datastore. It removes only vCenter Server’s access to the managed host and virtual machines on that
managed host.
VMware, Inc.
81
vSphere Basic System Administration
Figure 7-1 illustrates the process for removing a managed host from vCenter Server. In the example here, notice
the lost link between vCenter Server and the removed managed host, while the managed host files remain on
the datastore.
Figure 7-1. Removing a Host
1. Registered host and virtual machines
host A
VM1
VM1.dsk
VM2
VM2.dsk
vCenter
host B
VM3
VM3.dsk
VM4.dsk
VM4
shared datastore
2. Remove host. Virtual machines stay on the host’s datastore.
host A
vCenter
VM1
VM1.dsk
VM2
VM2.dsk
host B
VM3
VM3.dsk
VM4.dsk
VM4
shared datastore
Remove a Managed Host from vCenter Server
Remove a managed host from vCenter Server to stop all vCenter Server monitoring and management of that
host.
If possible, remove managed hosts while they are connected. Removing a disconnected managed host does
not remove the vCenter Server agent from the managed host.
Prerequisites
Make sure NFS mounts are active. If NFS mounts are unresponsive, the operation fails.
Procedure
1
From the vSphere Client connected to a vCenter Server system, display the inventory.
2
(Optional) If the host is part of a cluster, you must put it in maintenance mode.
a
Right-click the managed host in the inventory and select Enter Maintenance Mode from the pop-up
menu.
b
On the confirmation dialog, click Yes.
The host icon changes and the term “maintenance mode” is added to the name in parentheses.
3
82
Right-click the appropriate host in the inventory panel, and select Remove from the pop-up menu.
VMware, Inc.
Chapter 7 Managing Hosts in vCenter Server
4
In the confirmation dialog that appears, click Yes to remove the managed host.
vCenter Server removes the managed host and associated virtual machines from the vCenter Server
environment. vCenter Server then returns the status of all associated processor and migration licenses to
available.
Monitoring Host Health Status
You can use the vSphere Client to monitor the state of host hardware components, such as CPU processors,
memory, fans, and other components.
The host health monitoring tool allows you to monitor the health of a variety of host hardware components
including:
n
CPU processors
n
Memory
n
Fans
n
Temperature
n
Voltage
n
Power
n
Network
n
Battery
n
Storage
n
Cable/Interconnect
n
Software components
n
Watchdog
n
Other
The host health monitoring tool presents data gathered using Systems Management Architecture for Server
Hardware (SMASH) profiles. The information displayed depends on the sensors available on your server
hardware.
You can monitor a host’s health status either by connecting the vSphere Client directly to a host, or by
connecting to a vCenter Server system. You can also set alarms to trigger when the host health status changes.
Monitor Health Status When Directly Connected to a Host
When you connect the vSphere Client directly to a host, you can view the health status from the host’s
Configuration tab.
When you are connected to a host through vCenter Server, you must use the Hardware Status tab to monitor
the host health.
Procedure
1
Log in to the host using the vSphere Client, and display the inventory.
2
Click the Configuration tab, and click Health Status.
VMware, Inc.
83
vSphere Basic System Administration
If a component is functioning normally, the status indicator is green. The status indicator changes to yellow
or red if a system component violates a performance threshold or is not functioning properly. Generally, a
yellow indicator signifies degraded performance. A red indicator signifies that a component stopped operating
or exceeded the highest threshold. If the status is blank, then the health monitoring service cannot determine
thae status of the component.
The Reading column displays the current values for the sensors. For instance, the column displays rotations
per minute (RPM) for fans and degrees Celsius for temperature.
Monitor Health Status When Connected to vCenter Server
When you connect the vSphere Client to vCenter Server, you can view the health status from the Hardware
Status tab.
When you are connected to a host through vCenter Server, you must use the Hardware Status tab to monitor
the host health.
Prerequisites
To use the Hardware Status tab, you must enable vCenter Hardware Status plug-in.
Procedure
84
1
Log in to a vCenter Server system using the vSphere Client, and display the Hosts and Clusters view in
the inventory.
2
Select the host in the inventory and click the Hardware Status tab.
3
From the View dropdown menu, select the type of information to view.
Option
Description
Sensors
Displays all sensors arranged in a tree view. If the status is blank, then the
health monitoring service cannot determine the status of the component.
n Click Show all sensors to expand the tree view to show all sensors under
each group.
n Click Show all details to expand the tree view to show descriptive details
for every sensor.
n Click Hide all to collapse the tree view to show only the sensor groups.
Alerts and warnings
Displays only alerts and warnings.
System event log
Displays the system event log.
Click Reset event log to clear the event log.
VMware, Inc.
Chapter 7 Managing Hosts in vCenter Server
Troubleshoot the Hardware Health Service
The Hardware Health service is a vCenter Server extension that uses an Internet Explorer Webbrowser control
to display information about host hardware health. Use the information in this topic to troubleshoot problems
with Hardware Health.
Procedure
u
VMware, Inc.
Take the appropriate action based on the observed problem.
Problem
Action
The Hardware Status tab is not
visible in the vSphere Client.
Select Plug-ins > Plug-in Manager and verify that the Hardware Status plugin is enabled.
The Hardware Status tab displays
the following error message: the
remote name could not be
resolved <SERVER-NAME> where
<SERVER-NAME> is the domain
name of the vCenter Server system.
This error appears when the client system is unable to resolve the domain
name of the vCenter Server system. Either fix the domain name resolution
problem, or edit the file C:\Program
Files\VMware\Infrastructure\VirtualCenter
Server\extensions\cim-ui\extensions.xml on the vCenter Server
system and replace the vCenter Server domain name with its IP address.
The Hardware Status tab displays a
security alert.
Your Internet Explorer security settings are set too high. To change the
security settings:
a Launch Internet Explorer.
b Select Tools > Internet Options.
c Click the Security tab.
d Select the Local intranet Web content zone.
e Click Custom Level.
f Underneath Allow scripting of Internet Explorer Webbrowser
control, select Enable.
g Click OK to close the Security Settings dialog box, and click OK to close
the Internet Options dialog box.
85
vSphere Basic System Administration
86
VMware, Inc.
Virtual Machine Management
VMware, Inc.
87
vSphere Basic System Administration
88
VMware, Inc.
Consolidating the Datacenter
8
VMware vCenter Guided Consolidation, recommended for smaller IT environments, enables you to streamline
your datacenter by moving business applications, spread across multiple disparate physical systems, into a
centrally managed virtual environment. Use the consolidation feature to start building your virtual
environment, or to further consolidate your datacenter as it grows.
Multiple virtual machines can be hosted on a single physical system, enabling more efficient use of computing
resources. Consolidating your datacenter involves the following process:
Find
You search for and select the physical systems in your datacenter that you want
analyzed.
Analyze
Selected physical systems are analyzed and performance data on each selected
system is collected. Generally, the longer the duration of the analysis phase,
the higher the confidence in the vCenter Server’s recommendations.
Consolidate
Performance data is compared to the resources available on the virtual machine
host systems. The selected physical systems are converted to virtual machines
and imported into vCenter Server on the recommended hosts where they are
managed along with other components of your virtual environment.
Access the Guided Consolidation feature by clicking the Consolidation button.
This chapter includes the following topics:
n
“Consolidation First Time Use,” on page 90
n
“Consolidation Prerequisites,” on page 90
n
“About Consolidation Services,” on page 93
n
“Configuring Consolidation Settings,” on page 93
n
“Find and Analyze Physical Systems,” on page 94
n
“Viewing Analysis Results,” on page 95
n
“Converting Physical Systems to Virtual Machines,” on page 95
n
“Viewing Consolidation Tasks,” on page 96
n
“Troubleshooting Consolidation,” on page 97
VMware, Inc.
89
vSphere Basic System Administration
Consolidation First Time Use
The first time you use the Consolidation feature, VMware recommends that you specify consolidation settings.
These settings include default system credentials and active domains.
Default system credentials enable you to store a set of credentials so that you do not have to enter them each
time you add systems for analysis. You can override default credentials when necessary.
Active domains enable you to register domains with the Consolidation feature. Active domains are scanned
daily so that newly added systems are readily available.
Consolidation Prerequisites
Guided Consolidation requires that at least one host is managed through vSphere. It also requires that you
provide credentials to the target physical systems.
Guided Consolidation can convert systems that are configured to any locale. Before you use the feature, ensure
that the following prerequisites are met:
Guided Consolidation Server Host Requirements
Guided Consolidation server must be installed on a host that meets the following system requirements:
n
Located within the company's network and have access to target systems for performance data collection.
n
The Guided Consolidation host must have a name that can be resolved from any machine on the network
n
The Guided Consolidation host must have a static IP address.
n
Located in a domain and can access the Active Directory server.
n
One of the following operating systems installed:
n
Windows 2003 Server SP2
n
Windows XP Professional SP3
n
Windows Server 2008 (Ensure that Computer Browser Windows Service is enabled)
n
Windows Vista (Ensure that Computer Browser Windows Service is enabled)
n
.NET Framework 3.0 SP1 installed
n
Windows Management Instrumentation (WMI) and Remote Registry installed, enabled, and running on
host and all target systems
n
Minimum 1000MHz CPU
n
Minimum 1.8GB available RAM
n
3GB free disk space
n
Authorized and able to connect to all the servers to be analyzed and consolidated using the protocols and
ports listed in the section below, “Network Connections,” on page 91.
n
Access to general purpose ports that Windows uses for most of its communications for file/print sharing
and authentication
General Requirements
n
90
The following operating systems on systems targeted for analysis are supported:
n
Windows 2000 Professional/Server/Advanced
n
Windows XP Professional (32 bit and 64 bit)
VMware, Inc.
Chapter 8 Consolidating the Datacenter
n
Windows Server 2003 Standard/Web/Enterprise (32 bit and 64 bit)
n
Windows Vista (32 bit and 64 bit)
n
Windows Server 2008 (32 and 64 bit)
n
Credentials with Log on as service privileges on the system where the Guided Consolidation server is
installed must be provided at the time of installation. If Active Directory is deployed on your network,
the provided credentials must also have sufficient privileges to query the Active Directory database.
n
File and Printer Sharing must be enabled on the system where Guided Consolidation is installed and
enabled on all systems targeted for analysis. Windows XP Simple File Sharing is insufficient.
n
Guided Consolidation extension must be installed, enabled, and running on the vSphere Client.
n
At least one datacenter inventory object exists.
n
At least one host is registered with vCenter Server.
n
Guided Consolidation requires administrator access to the systems selected for analysis. Specifically, the
vCenter Collector Service uses these credentials to connect to and retrieve configuration and performance
data from the physical systems under analysis. Accounts must be fully-qualified and can be any of the
following:
n
account of the target system.
n
account of the target system domain.
n
account of a trusted domain of the target system.
Network Connections
The Guided Consolidation server must have access to the ports listed in the Table 8-1.
Table 8-1. Network Connections
Port
Protocol
Service
Description
MS Windows
135
TCP/UDP
Loc-srv/epmap
Microsoft DCE
Locator service, also
known as End-point
Mapper.
DHCP Server
DNS Server
WINS Server
137
TCP/UDP
Netbios-ns
NetBIOS names
service.
Firewall
administrators
frequently see larger
numbers of incoming
packets to port 137.
This is because of
Windows servers that
use NetBIOS (as well
as DNS) to resolve IP
addresses to names
using the
gethostbyaddr()
function. As users
behind the firewalls
visit Windows-based
Web sites, those
servers frequently
respond with
NetBIOS lookups.
WINS Server
DNS Server
VMware, Inc.
91
vSphere Basic System Administration
Table 8-1. Network Connections (Continued)
Port
Protocol
Service
Description
138
TCP/UDP
Netbios-dgm
NetBIOS datagram
MS Windows
Used by Windows, as
well as UNIX services
(such as SAMBA).
Port 138 is used
primarily by the SMB
browser service that
obtains Network
Neighborhood
information.
92
139
TCP/UDP
Netbios-ssn
NetBIOS Session
Windows File and
Printer sharing.
445
TCP/UDP
DNS
DNS Direct Hosting
port.
In Windows 2000 and
Windows XP,
redirector and server
components now
support direct
hosting for
communicating with
other computers
running Windows
2000 or Windows XP.
Direct hosting does
not use NetBIOS for
name resolution.
DNS is used for name
resolution, and the
Microsoft networking
communication is
sent directly over
TCP without a
NetBIOS header.
Direct hosting over
TCP/IP uses TCP and
UDP port 445 instead
of the NetBIOS
session TCP port 139.
Active Directory
VMware, Inc.
Chapter 8 Consolidating the Datacenter
About Consolidation Services
Guided Consolidation can be installed together with vCenter Server, or can be installed on a separate host. For
best performance, install Guided Consolidation on a separate host.
Guided Consolidation include the following services:
vCenter Collector
Service
Discovers domains and systems within domains. Collects performance data on
those systems.
vCenter Provider
Service
Helper service to vCenter Collector Service. Communicates with target systems
and passes the data back to vCenter Collector Service.
vCenter Guided
Consolidation
Coordinates all communication among Guided Consolidation components.
Saves the performance data collected by the vCenter Collector Service.
Analyzes the data and generates placement recommendations. Also
communicates with vCenter Server to perform conversion. Runs inside a
generic servlet container labeled VMware vCenter Management
Webservices. The services of other vCenter features and extensions might also
be present inside that servlet container.
Configuring Consolidation Settings
It is recommended that you specify Consolidation settings before using the feature. Consolidation settings are
located in the Configuration tab of the Guided Consolidation section of the vSphere Client.
The Configuration tab displays name, location, and health of Consolidation services. It also enables you to
configure the following settings:
Default system
credentials
Used by Guided Consolidation to access target physical systems. If necessary,
the default credentials can be overridden.
Active Domains
Guided Consolidation automatically scans active domains and caches
information about the systems in them. This information is updated daily. If
you intend to add systems for analysis by selecting them from a domain, you
must specify the domain as Active.
Specify Default Credentials
Default credentials are used to access systems selected for analysis when no other administrator credentials
are specified.
Procedure
1
Click Change in the Default System Credentials area of the Configuration tab.
2
Enter a domain-qualified user name and password.
For example: DOMAIN\username.
3
VMware, Inc.
Confirm the password and click OK.
93
vSphere Basic System Administration
Specify Active Domains
Specifying a domain as Active populates the Add to Analysis dialog box with a list of systems on that domain.
That information is updated daily as long as the domain remains active.
VMware recommends that you leave domains where new systems are frequently added as Active and that
you remove domains that do not frequently change after their information has been cached. Because scanning
active domains is resource intensive, VMware also recommends that no more than 50 domains are
simultaneously active.
NOTE In some cases it can take the system several hours to collect a domain's containment information.
Procedure
1
From the vSphere Client Home page, select Guided Consolidation > Configuration.
2
Click Add in the Active Domains section.
3
Select the domains you want to make active.
4
Click OK.
Find and Analyze Physical Systems
The Add to Analysis dialog box enables you to find systems in your environment and add them for analysis,
to manually search for physical systems, or to select systems from the list of systems found in active domains.
You can select systems and add them for analysis.
You can add systems manually by entering a computer name, IP address or range of IP addresses, or file name.
Alternatively, you can select a domain - it must be active - and select systems found within that domain. You
can analyze up to 100 systems simultaneously.
NOTE After adding a system for analysis, it can take up to one hour before the status of the newly added
system changes from Collecting System Information to Analyzing.
Procedure
1
In the Analysis tab, click Add to Analysis.
2
Specify the systems you want to analyze.
Option
Description
Manually specify the computers
Provide computer names, IP addresses, a range of IP addresses, or path to a
file that contains the computer names or IP addresses of the systems you
want according to the following rules:
n Separate multiple computer names, or IP address, with a comma.
n Multiple IP ranges are not permitted.
n If you chose to use a file, each computer name or IP address must be on
a separate line in the file. The file must be accessible to the vSphere Client.
Select the computers by domains
Select the systems you want to analyze.
3
Click Add to Analysis.
4
Select whether you want to use the configured default credentials, or whether you want to supply a
different set of credentials.
If you chose to override the default credentials, ensure that you enter a domain-qualified user name (for
example, DOMAIN\username) and password.
5
94
Click OK.
VMware, Inc.
Chapter 8 Consolidating the Datacenter
Viewing Analysis Results
Analysis results are displayed in the Analysis tab.
When analysis is complete, the following information appears:
n
Physical Computer– Displays the host name of the physical system being analyzed or imported.
n
CPU Info– Displays the number of CPUs and their clock speed.
n
Memory Info– Displays the amount of RAM on the system.
n
Status – Displays the progress of the analysis.
n
Confidence – Indicates the degree to which vCenter Server is able to gather performance data about the
system and how good a candidate the system is based on the available data.
n
CPU Usage – Displays the system’s average CPU usage over time.
n
Memory Usage – Displays the system’s average memory usage over time.
About the Confidence Metric
One important metric displayed in the Analysis tab is the Confidence metric. During the analysis phase,
performance data about each selected system is collected. This data is used to find a host with resources that
match the collected data to determine a recommendation for each candidate.
The recommendation indicates how well suited, based on the collected data, a candidate is to a particular
virtual machine host system. Confidence refers to the reliability of the recommendation and it is a function of
the duration of the analysis. Recommendations based on longer periods of analysis – and therefore more
performance data – receive a higher level of confidence.
NOTE After 24 hours of analysis, vCenter Server indicates a high level of confidence in its recommendations.
However, this can be misleading if a system’s workload varies significantly over weeks or months. To ensure
a high level of confidence in a recommendation, allow the duration of the analysis phase to encompass an
amount of time that includes representative peaks and troughs in the systems’ workload. Analysis can run up
to one month.
Converting Physical Systems to Virtual Machines
You can convert systems using auto-generated recommendations, or you can manually specify conversion
parameters.
About Disk Resizing
During the conversion process, physical disks are typically resized to conserve space on the datastore while
providing room for growth on the resultant virtual disk.
The following formula is used to resize converted disks:
amount of space used on physical disk * 1.25 = resultant virtual disk size
Virtual disks are set to a size of 4GB or larger.
VMware, Inc.
95
vSphere Basic System Administration
Convert Systems Manually
You can convert systems manually if you want to specify values other than the default values for the resultant
virtual machine's properties.
The option to convert systems manually is available only if the VMware Converter Enterprise Client is installed
and enabled on your vSphere Client. You can verify whether VMware Converter Enterprise Client is installed
and enabled through the Plug-in Manager.
Procedure
1
In the Analysis tab, right-click on a system and select Convert to Virtual Machine > Manually.
2
Complete the wizard to manually specify virtual machine properties.
Convert Systems Using Recommendations
Guided Consolidation recommendations are based on collected performance data and the capacity of available
hosts.
Procedure
1
In the Analysis tab, select the systems you want to consolidate and click Plan Consolidation.
2
Select a system.
3
(Optional) Change the name displayed in the Physical Computer column by double-clicking it and
entering a new name.
Your entry will be used as the name for the resultant virtual machine.
4
(Optional) Change destinations, if alternative destinations are available, by clicking in the Destinations
column and selecting a destination from the drop-down menu.
The number of stars displayed in the Destination Rating column indicate the degree to which the host
system can comfortably accommodate the estimated resource needs of the resultant virtual machine.
5
Click Consolidate.
A conversion task is instantiated.
What to do next
You can view task progress in the Recent Tasks pane. You view additional information about the task in the
Tasks tab.
Viewing Consolidation Tasks
A task is created for each system being converted.
Recent tasks are displayed in the Recent Tasks pane. The Tasks tab lists all consolidation tasks. You can view
detailed information about a task by selecting it. Information about events related to the selected task are
displayed in the Task Details pane.
You can filter the list of tasks by entering criteria in the search field and selecting any combination of the
following:
96
n
Name
n
Target
n
Status
n
Initiated by
VMware, Inc.
Chapter 8 Consolidating the Datacenter
n
Start Time
n
Complete Time
Troubleshooting Consolidation
The topics in this section contain information about identifying and solving problems with Guided
Consolidation.
Negative Impact on vCenter Server Performance
Analyzing many systems simultaneously can impact vCenter Server performance.
Problem
Although up to 100 systems can be simultaneously analyzed, you might notice performance issues on the
vCenter Server that are due to running Guided Consolidation.
Cause
Analysis is resource intensive and can negatively impact vCenter Server performance.
Solution
Reduce the number of systems that are being analyzed. If necessary, you can either disable Guided
Consolidation or uninstall the Guided Consolidation Service. If you disable Guided Consolidation, collected
data is preserved and no further data is collected. If you uninstall the Guided Consolidation Service, the data
that has been collected will no longer be usable.
Windows Systems Not Discovered
Guided Consolidation does not discover some Windows systems.
Problem
Windows systems that match all of the following conditions will not be discovered by Guided Consolidation
and will not be listed as candidates for analysis:
n
The system is not listed in Microsoft Windows Network. The following commands do not list the system:
NET VIEW
NET VIEW /DOMAIN:<the Workgroup or Domain the system belongs to>
n
The system is listed in Active Directory but does not have the operatingSystem attribute defined. This can
happen if the system never synchronizes with the Active Directory to which it belongs or was improperly
configured.
Solution
n
Enable the Computer Browser service on the machine where Guided Consolidation is installed and on
the systems that are not discovered.
n
Ensure that the Log On As credentials for VMware vCenter Collector Provider Service met the
prerequisites as mentioned in “Consolidation Prerequisites,” on page 90.
n
Manually enter the static IP address of the target system.
VMware, Inc.
97
vSphere Basic System Administration
Windows Operating Systems Prevent Guided Consolidation from Collecting
Performance Data
Guided Consolidation cannot collect performance data.
Problem
The default settings for some configurations of Windows XP, Windows Vista, and Windows Server 2008
prevent Guided Consolidation from collecting performance data against systems with those operating systems.
n
The system is not listed in Microsoft Windows Network. The following commands do not list the system:
NET VIEW
NET VIEW /DOMAIN:<the Workgroup or Domain the system belongs to>
n
The system is listed in Active Directory but does not have the operatingSystem attribute defined. This can
happen if the system never synchronizes with the Active Directory to which it belongs or was improperly
configured.
Solution
1
Set the Guided Consolidation target systems' Network access: Sharing and security model for local
accounts option to Classic - local users authenticate as themselves
2
Select Start > Run.
3
Run either gpedit.msc or secpol.msc
4
In the left pane, select one of the following depending on which command you ran in the previous step:
5
a
(gpedit.msc)Local Computer Policy > Computer Configuration > Windows Settings > Security
Settings > Local Policies > Security Options
b
(secpol.msc) Security Settings > Local Policies > Security Options > Double-click on Network
access: Sharing and security model for local accounts.
c
Double-click on Network access: Sharing and security model for local accounts. Ensure that Classic
- local users authenticate as themselves is selected.
Ensure the changed settings are applied.
n
Restart VMware vCenter Collector Provider Service.
n
Run gpupdate /force.
n
Reboot the Guided Consolidation host system.
Available Domains List Remains Empty
Analyzing many systems simultaneously can impact vCenter Server performance.
Problem
The list of available domains remains empty for Guided Consolidation installed on Windows Server 2008 and
Windows Vista.
98
VMware, Inc.
Chapter 8 Consolidating the Datacenter
Cause
Some configurations of Windows Vista and Windows Server 2008 prevent Guided Consolidation from
discovering LAN Manager Workgroups. The Link-layer discovery protocol (LLDP), introduced in Windows
2008 Server, is not backward compatible with LAN Manager-based protocols and can not discover machines
with earlier operating systems if those systems do not have the appropriate drivers installed. Additionally,
Guided Consolidation does not use LLDP to perform discovery and will not find systems that can only be
discovered through that protocol, or when the Computer Browser Windows Service is not running.
Solution
Ensure that the Computer Browser Windows Service is enabled on the Windows Vista or Windows Server
2008 system where Guided Consolidation is installed and that it is also enabled on all systems to be discovered.
Alternatively, manually enter the static IP address of the system to be analyzed.
Guided Consolidation Erroneously Reports Analysis Disabled
Under some conditions, temporary network errors can disable analysis on multiple systems.
Problem
Temporary network errors can sometimes cause Guided Consolidation to stop analysis on one or more systems,
even when the systems are reachable.
Solution
Right-click on the affected systems and select Resume Analysis.
Disable Guided Consolidation
You can disable Guided Consolidation.
Procedure
1
On the Guided Consolidation host system, open the Services control panel.
2
Stop theVMware vCenter Management Webservices (applicable when Guided Consolidation and
vCenter Server are not collocated), the VMware Collector for vCenter, and the VMware Provider for
vCenter services.
Uninstall Guided Consolidation
Uninstall Guided Consolidation to completely remove the feature. All collected data is also removed.
Procedure
1
Open the Add or Remove Programs control panel.
2
Remove vCenter Guided Consolidation for vCenter Server.
All vCenter Guided Consolidation services are removed.
CAUTION Do not uninstall the vCenter Collector Service alone. Doing so prevents Guided Consolidation from
operating and will require that you perform a clean installation of Guided Consolidation, which will delete
existing Guided Consolidation data.
VMware, Inc.
99
vSphere Basic System Administration
100
VMware, Inc.
Deploying OVF Templates
9
The VMware vSphere Client (vSphere Client) allows you to import and export virtual machines, virtual
appliances, and vApps stored in Open Virtual Machine Format (OVF). An appliance is a pre-configured virtual
machine that typically includes a preinstalled guest operating system and other software.
Deploying an OVF template allows you to add pre-configured virtual machines to your vCenter Server or
ESX/ESXi inventory. Deploying an OVF template is similar to deploying a virtual machine from a template.
However, you can deploy an OVF template from any local file system accessible from the vSphere Client
machine, or from a remote web server. The local file systems can include local disks (such as C:), removable
media (such as CDs or USB keychain drives), and shared network drives.
Exporting OVF templates allows you to create virtual appliances that can be imported by other users. You can
use the export function to distribute pre-installed software as a virtual appliance, or as a means of distributing
template virtual machines to users, including users who cannot directly access and use the templates in your
vCenter Server inventory.
This chapter includes the following topics:
n
“About OVF,” on page 101
n
“Deploy an OVF Template,” on page 101
n
“Browse VMware Virtual Appliance Marketplace,” on page 103
n
“Export an OVF Template,” on page 103
About OVF
OVF is a file format that allows for exchange of virtual appliances across products and platforms.
The OVF format offers the following advantages:
n
OVF files are compressed, allowing for faster downloads.
n
The vSphere Client validates an OVF file before importing it, and ensures that it is compatible with the
intended destination server. If the appliance is incompatible with the selected host, it cannot be imported
and an error message appears.
Deploy an OVF Template
You can deploy an OVF template from a local file system accessible to the vSphere Client machine, or from a
web URL.
NOTE To import a virtual machine that was created by another VMware product and is not in OVF format,
use the VMware vCenter Converter module. See the VMware Converter Enterprise for vCenter Server
documentation for more information.
VMware, Inc.
101
vSphere Basic System Administration
Procedure
1
In the vSphere Client, select File > Deploy OVF Template.
The Deploy OVF Template wizard appears.
2
Specify the source location and click Next.
Option
Description
Deploy from File
Browse your file system for an OVF or OVA template.
Deploy from URL
Specify a URL to an OVF template located on the internet. Example:
http://vmware.com/VMTN/appliance.ovf
3
View the OVF Template Details page and click Next.
4
If license agreements are packaged with the OVF template, the End User License Agreement page appears.
Agree to accept the terms of the licenses and click Next.
5
(Optional) Edit the name and select the folder location within the inventory where the vApp will reside.
Click Next.
NOTE When the vSphere Client is connected directly to an ESX/ESXi host, the option to select the folder
location does not appear.
6
Select the deployment configuration from the drop-down menu and click Next.
The option selected typically controls the memory settings, number of CPUs and reservations, and
application-level configuration parameters.
NOTE This page of the wizard is only shown if the OVF template contains deployment options.
7
Select the host or cluster on which you want to deploy the OVF template and click Next.
8
Select the host on which you want to run the deployed OVF template, and click Next.
This page is only shown if the destination is a resource pool associated with a cluster with DRS disabled
or in manual mode.
9
Navigate to, and select the resource pool where you want to run the OVF template and click Next.
This page is only displayed if the cluster contains a resource pool.
10
Select a datastore to store the OVF template file, and click Next.
Datastores are a unifying abstraction for storage locations such as Fibre Channel, iSCSI LUNs, or NAS
volumes. On this page, you select from datastores already configured on the destination cluster or host.
The virtual machine configuration file and virtual disk files are stored on the datastore. Select a datastore
large enough to accommodate the virtual machine and all of its virtual disk files.
11
102
For each network specified in the OVF template, select a network by right-clicking the Destination
Network column in your infrastructure to set up the network mapping and click Next.
VMware, Inc.
Chapter 9 Deploying OVF Templates
12
On the IP Allocation page, configure how IP addresses are allocated for the virtual appliance and click
Next.
Option
Description
Fixed
You will be prompted to enter the IP addresses in the Appliance
Properties page.
Transient
IP addresses are allocated from a specified range when the appliance is
powered on. The IP addresses are released when the appliance is powered
off.
DHCP
A DHCP server is used to allocate the IP addresses.
This page is not shown if the deployed OVF template does not contain information about the IP scheme
it supports.
13
Set the user-configurable properties and click Next.
The set of properties that you are prompted to enter depend on the selected IP allocation scheme. For
example, you are prompted for IP related information for the deployed virtual machines only in the case
of a fixed IP allocation scheme.
14
Review your settings and click Finish.
The progress of the import task appears in the vSphere Client Status panel.
Browse VMware Virtual Appliance Marketplace
Available vApps appear in the main panel.
To get to the Virtual Appliance Marketplace page, select File > Browse VA Marketplace from the main menu.
Procedure
u
Select an available vApp and click Download Now.
The OVF Template Details page appears.
Export an OVF Template
You can export a virtual machine, virtual appliance, or vApp to OVF format to make it available to other users
to import into their inventory.
Procedure
1
Select the virtual machine or vApp and select File > Export > Export OVF Template.
2
In the Export OVF Template dialog, perform the following steps:
a
Type the Name of the template.
For example, type MyVm
NOTE When exporting an OVF template with a name that contain asterisk (*) characters, those
characters turn into underscore characters (_).
b
Enter the Directory location where the exported virtual machine template is saved, or click “...” to
browse for the location.
For example, C:\OvfLib\.
VMware, Inc.
103
vSphere Basic System Administration
c
In the Optimized for field, determine how you want to store the files.
Select Web (OVF) to store the OVF template as a set of files (.ovf, .vmdk, and .mf) This format is
optimal if you plan to publish the OVF files on a web server or image library. The package can be
imported, for example, into the vSphere client by publishing the URL to the .ovf file.
Select Physical Media (OVA) to package the OVF template into a single .ova file. This might be
convenient to distribute the OVF package as a single file if it needs to be explicitly downloaded from
a web site or moved around using a USB key.
d
(Optional) To create a new folder for the OVF file, select the Create folder for OVF template checkbox.
For example, the following files might be created:
e
n
C:\OvfLib\MyVm\MyVm.ovf
n
C:\OvfLib\MyVm.mf
n
C:\OvfLib\MyVm-disk1.vmdk
(Optional) In Description, type a description for the virtual machine.
By default, the text from the Notes pane on the virtual machine’s Summary tab appears in this text
box.
The download process is shown in the Export window.
104
VMware, Inc.
Managing VMware vApp
10
You can use VMware vSphere as a platform for running applications, in addition to using it as a platform for
running virtual machines. The applications can be packaged to run directly on top of VMware vSphere. The
®
format of how the applications are packaged and managed is called VMware vApp.
A vApp is a container, like a resource pool and can contain one or more virtual machines. In addition, a vApp
also shares some functionality with virtual machines. A vApp can power on and power off, and can also be
cloned.
In the vSphere client, a vApp is both represented in the Host and Clusters view and the VM and Template
view. Each view has a specific summary page with the current status of the service and relevant summary
information, as well as operations on the service.
NOTE The vApp metadata resides in the vCenter Server's database, so a vApp can be distributed across multiple
ESX/ESXi hosts. This information can be lost if the vCenter Server database is cleared or if a standalone
ESX/ESXi host that contains a vApp is removed from vCenter Server. You should back up vApps to an OVF
package in order to avoid losing any metadata.
The distribution format for vApp is OVF.
This chapter includes the following topics:
n
“Create a vApp,” on page 105
n
“Populate the vApp,” on page 107
n
“Edit vApp Settings,” on page 108
n
“Configuring IP Pools,” on page 111
n
“Clone a vApp,” on page 113
n
“Power On a vApp,” on page 113
n
“Power Off a vApp,” on page 114
n
“Edit vApp Annotation,” on page 114
Create a vApp
After you create a datacenter and add a clustered DRS-enabled host to your vCenter Server system, you can
create a vApp.
You may create a new vApp under the following conditions:
n
VMware, Inc.
A host is selected in the inventory that is running ESX 3.0 or greater.
105
vSphere Basic System Administration
n
A DRS-enabled cluster is selected in the inventory.
vApps can be created on folders, hosts, resource pools, DRS-enabled clusters, and within other vApps.
Procedure
1
Start the New vApp Wizard on page 106
The New vApp wizard allows you to create a new vApp.
2
Name the vApp on page 106
The name you enter is used as the vApp’s display name in the inventory.
3
Select the vApp Destination on page 106
The destination is the host, cluster, resource pool, or vApp on which the vApp will run.
4
Allocate vApp Resources on page 107
Determine how much CPU and memory should be allocated for the vApp.
5
Complete the vApp Creation on page 107
The Ready to Complete page enables you to review the vApp’s configuration.
Start the New vApp Wizard
The New vApp wizard allows you to create a new vApp.
Procedure
u
Select File > New > vApp to open the New vApp wizard.
Name the vApp
The name you enter is used as the vApp’s display name in the inventory.
The name can be up to 80 characters long. This name must be unique within the folder. .
Procedure
1
On the Name and Folder page, enter a name for the vApp.
2
Select a location in the inventory for the vApp.
If you are creating a vApp from within another vApp, the vApp Inventory Location selection is
unavailable.
3
Click Next.
Select the vApp Destination
The destination is the host, cluster, resource pool, or vApp on which the vApp will run.
NOTE This step does not appear if you create a vApp from a host, cluster, resource pool, or another vApp
within the inventory.
Procedure
1
On the Destination page, select a host, cluster, or resource pool where this vApp will run and click Next.
If you selected a DRS-enabled cluster and the cluster is in DRS manual mode, select the host as the
destination for the vApp.
The message in the Compatibility panel indicates whether the validation for this destination succeeded
or if a specific requirement was not met.
106
VMware, Inc.
Chapter 10 Managing VMware vApp
2
Click Next.
Allocate vApp Resources
Determine how much CPU and memory should be allocated for the vApp.
Procedure
1
In the Resource Allocation page, allocate CPU and memory resources for this vApp.
2
Click Next.
Complete the vApp Creation
The Ready to Complete page enables you to review the vApp’s configuration.
Procedure
1
Review the new vApp settings on the Ready to Complete page.
2
(Optional) Click Back to edit or change any settings.
3
Click Finish to create the new vApp.
Populate the vApp
Virtual machines and other vApps can be added to and removed from a vApp.
Once a vApp is created, you can populate it with virtual machines or another vApp.
Create an Object Inside the vApp
Within a vApp, you can create a new virtual machine, resource pool, or another vApp.
Procedure
1
In the inventory, select the vApp in which you want to create the object machine.
2
Select the menu option to create a specific object.
Option
Description
Inventory > vApp > New Virtual
Machine
Creates a new virtual machine inside the vApp. Complete the Create New
Virtual Machine wizard. See Chapter 11, “Creating Virtual Machines,” on
page 115 for instructions on creating a new virtual machine.
Inventory > vApp > New Resource
Pool
Adds a resource pool inside the vApp. Complete the Create Resource Pool
window. See “Add a Cluster, Resource Pool, Host, or Virtual Machine,” on
page 73 for instructions on adding a new resource pool.
Inventory > vApp > New vApp
Creates a new vApp inside the currently selected vApp. Complete the New
vApp wizard. See “Create a vApp,” on page 105 for instructions on creating
a new vApp.
The new object appears as part of the vApp in the inventory.
Add an Object to a vApp
You can add an object, such as a virtual machine or another vApp, to an existing vApp.
An existing virtual machine or another vApp that is not already contained inside the vApp can be moved into
the currently selected vApp.
VMware, Inc.
107
vSphere Basic System Administration
Procedure
1
Display the object in the inventory.
2
Click and drag the object to the target object.
3
n
If the move is permitted, a box appears around the target-object, indicating it is selected.
n
If move is not permitted, a naught sign (zero with a slash) appears, and the object is not moved.
Release the mouse button.
Either the object moves to the new location or an error message indicates what needs to be done to permit
the move.
Edit vApp Settings
You can edit and configure several aspects of a vApp, including startup order, resources, and custom
properties.
Procedure
1
On the Summary page of the vApp, click Edit Settings.
2
Click the Options tab to edit or view the following vApp properties.
NOTE The IP allocation policy and properties are typically edited by the deployer, while the rest of the
settings are more advanced options typically edited by the vApp author.
3
Click the Start Up tab to edit vApp startup and shutdown options.
4
Click OK when finished.
Edit vApp Startup and Shutdown Options
You can change the order in which virtual machines within a vApp start up and shut down. You can also
specify delays and actions performed at startup and shutdown.
Procedure
1
On the Summary page of the vApp, click Edit Settings.
2
In the Start Order tab of the Edit Service Settings window, select a virtual machine and use the arrow
keys to change the startup order. This order will also be used for shutdown.
3
Specify the delay and action for startup and shutdown for each virtual machine.
4
Click OK when finished.
Edit vApp Resources
You can edit the CPU and memory resource allocation for the vApp.
Procedure
108
1
On the Summary page of the vApp, click Edit Settings.
2
Click Resources in the Options list.
3
Edit the CPU and memory resource allocation.
4
Click OK when finished.
VMware, Inc.
Chapter 10 Managing VMware vApp
Edit vApp Properties
You can edit any vApp property that is defined in Advanced Property Configuration.
Procedure
1
On the Summary page of the vApp, click Edit Settings.
2
Click Properties in the Options list.
3
Edit the vApp properties.
4
Click OK when finished.
View vApp License Agreement
You may view the license agreement for this vApp.
NOTE This option is only available if the vApp was imported and contains a license agreement.
Procedure
1
On the Summary page of the vApp, click Edit Settings.
2
Click View License Agreement in the Options list.
3
Click OK when finished.
Edit IP Allocation Policy
You can edit how IP addresses are allocated for the vApp.
Procedure
1
On the Summary page of the vApp, click Edit Settings.
2
Click IP Allocation Policy in the Options list.
3
Select one of the following options.
4
Option
Description
Fixed
IP addresses are manually configured. No automatic allocation is performed.
Transient
IP addresses are automatically allocated from a specified range when the
appliance is powered on. The IP addresses are released when the appliance
is powered off.
DHCP
A DHCP server is used to allocate the IP addresses. The addresses assigned
by the DHCP server is visible in the OVF environments of virtual machines
started in the vApp.
Click OK when finished.
View Additional OVF Sections
View additional OVF sections which are not recognized by vCenter Server.
These additional OVF sections originate from the OVF deployment process that created this vApp. Most of
the OVF descriptors are distributed in various vApp settings, but these unrecognized sections are visible here
for reference.
Procedure
1
VMware, Inc.
On the Summary page of the vApp, click Edit Settings.
109
vSphere Basic System Administration
2
Click View Additional OVF Sections in the Options list.
3
Click OK when finished.
Configure Advanced vApp Properties
You can edit and configure advanced settings, such as product and vendor information, custom properties,
and IP allocation.
Procedure
1
On the Summary page of the vApp, click Edit Settings.
2
Click Advanced in the Options list.
3
Specify the settings. The settings are displayed on the summary page of the virtual machine. The following
settings can be set and configured:
n
Product Name—the product name.
n
Version—the version of the vApp.
n
Full version—the full version of the vApp.
n
Product URL—the product's URL. If a product URL is entered, a user can click the product name on
the virtual machine summary page and go to the product's web page.
n
Vendor URL—the vendor's URL. If a vendor URL is entered, a user can click the vendor name on the
virtual machine summary page and go to the vendor's web page.
n
Application URL—the application URL. If properties are used for specifying the virtual machine IP
address, a dynamic application URL can be entered that points to a web page exposed by running
the virtual machine. If you enter a valid application URL, the state of the virtual machine changes to
a clickable Available link once the virtual machine is running.
If the virtual machine is configured to use the property called webserver_ip and the virtual machine has a
web server, you can enter http://${webserver_ip}/ as the Application URL.
4
Click View to test the Product URL and Vendor URL.
5
Click Properties to edit the custom vApp properties.
6
Click IP Allocation to edit the supported IP allocation schemes of this vApp.
7
Click OK when finished.
Define OVF Environment Properties
You can view or modify the OVF environment properties for the vApp.
Procedure
1
On the Summary page of the vApp, click Edit Settings.
2
Click Advanced in the Options list.
3
Edit the product information within the appropriate fields.
If permissions are set to read-only, the fields cannot be edited.
4
110
Click Properties.
VMware, Inc.
Chapter 10 Managing VMware vApp
5
6
In Advanced Property Configuration, you may perform the following actions.
n
ClickNew to add a new custom property.
n
Select the property and click Edit to edit a property.
n
Click Delete to delete a property.
Click OK when finished.
Edit Advanced IP Allocation Properties
You can edit the IP allocation scheme for the vApp.
Procedure
1
On the Summary page of the vApp, click Edit Settings.
2
Click Advanced in the Options list.
3
Click IP Allocation.
4
In the Advanced IP Allocation dialog, you may perform the following actions.
5
n
Select an IP allocation scheme.
n
Specify the IP protocols supported by the vApp: IPv4, IPv6, or both.
Click OK when finished.
Configuring IP Pools
IP pools provide a network identity to vApps. An IP pool is a network configuration that is assigned to a
network used by a vApp. The vApp can then leverage vCenter Server to automatically provide an IP
configuration to its virtual machines.
Specify an IP Address Range
You can set up an IP address range by specifying a host address range within a network.
IP pool ranges are configured with IPv4 and IPv6. These ranges are used by vCenter Server to dynamically
allocate IP addresses to virtual machines when a vApp is set up to use transient IP allocation.
Procedure
1
In the inventory, select the datacenter that contains the vApp.
2
On the IP Pools tab, right-click the IP pool you wish to edit and select Properties.
NOTE If no IP pools are present, click Add to add a new IP pool.
3
In the Properties dialog, select the IPv4 or the IPv6 tab, depending on your IP protocol.
4
Specify the IP Subnet and Gateway in the respective fields.
5
(Optional) Select the Enable IP Pool check box.
You must enable this setting to specify an IP address range.
6
(Optional) Type a comma-separated list of host address ranges in the Ranges field.
A range is specified as an IP address, a pound sign (#), and a number indicating the length of the range.
The gateway and the ranges must be within the subnet, but must exclude the gateway address.
For example, 10.20.60.4#10, 10.20.61.0#2 indicates that the IPv4 addresses can range from 10.20.60.4 to
10.20.60.13 and 10.20.61.0 to 10.20.61.1.
VMware, Inc.
111
vSphere Basic System Administration
7
Click OK when finished.
Select DHCP
You can specify that an IPv4 or IPv6 DHCP server is available on the network.
Procedure
1
In the inventory, select the datacenter that contains the vApp.
2
In the IP Pools tab, right-click the IP pool you wish to edit and select Properties.
NOTE If no IP pools are present, click Add to add a new IP pool.
3
In the Properties dialog, select the DHCP tab.
4
Select either the IPv4 DHCP Present or IPv6 DHCP Present check box to indicate that one of the DHCP
servers are available on this network.
5
Click OK when finished.
Specify DNS Settings
Specify the DNS settings for the vApp.
Procedure
1
In the inventory, select the datacenter that contains the vApp.
2
In the IP Pools tab, right-click the IP pool you wish to edit and select Properties.
NOTE If no IP pools are present, click Add to add a new IP pool.
3
In the Properties dialog, select the DNS tab.
4
Enter the DNS server information.
The servers are specified by IP addresses separated by a comma, semi-colon, or space.
The DNS information that can be set include:
5
n
DNS Domain
n
Host Prefix
n
DNS Search Path
n
IPv4 DNS Servers
n
IPv6 DNS Servers
Click OK when finished.
Specify a Proxy Server
Specify a proxy server for the vApp.
Procedure
1
In the inventory, select the datacenter that contains the vApp.
2
In the IP Pools tab, right-click the IP pool you wish to edit and select Properties.
NOTE If no IP pools are present, click Add to add a new IP pool.
3
112
In the Properties dialog, select the Proxy tab.
VMware, Inc.
Chapter 10 Managing VMware vApp
4
Enter the server name and port number for the proxy server.
The server name can optionally include a colon and a port number.
For example, web-proxy:3912 is a valid proxy server.
5
Click OK when finished.
Clone a vApp
Cloning a vApp is similar to cloning a virtual machine.
Prerequisites
To clone a vApp, the vSphere Client must be connected to the vCenter Server system.
A host must be selected in the inventory that is running ESX 3.0 or greater, or a DRS-enabled cluster.
Procedure
1
Select the vApp in the inventory.
2
Select Inventory > vApp > Clone
Complete each page in Clone vApp the wizard.
3
Select the vApp destination and click Next.
4
Specify a Host and click Next.
NOTE This step is only available if you select a cluster that is in DRS manual mode.
5
Name the vApp and click Next.
6
Select a datastore and click Next.
7
(Optional) Select a network and click Next.
8
Complete the vApp clone.
Power On a vApp
Each application within the service will be powered on according to how the startup order is set.
When powering on a vApp within a DRS cluster in manual mode, no DRS recommendations are generated
for virtual machine placements. The power on operation performs as if DRS is run in a semi-automatic or
automatic mode for the initial placements of the virtual machines. This does not affect VMotion
recommendations. Recommendations for individual powering on and powering off of virtual machines are
also generated for vApps that are running.
Procedure
u
In the Summary page for the service, click Power On.
If a delay is set in the start up settings, the vApp waits for the set length of time before powering up that
virtual machine.
In the Summary tab, the status indicates when the vApp has started and is available. Links to the product and
vendor Web sites are also found under General.
VMware, Inc.
113
vSphere Basic System Administration
Power Off a vApp
Each application within the service will be powered off according to how the shutdown order is set.
Procedure
u
In the Summary page for the service, click Power Off.
If a delay is set in the shutdown settings, the vApp waits for the set length of time before powering down
that virtual machine.
Edit vApp Annotation
You can add or edit notes for a particular vApp.
Procedure
114
1
Select the vApp in the inventory.
2
Click the Summary tab for the vApp.
3
In the Annotations box, click Edit.
4
Enter text in the Edit Service Annotation window.
5
Click OK.
VMware, Inc.
Creating Virtual Machines
11
This section discusses how to create virtual machines through the New Virtual Machine Wizard.
This chapter includes the following topics:
n
“Access the New Virtual Machine Wizard,” on page 115
n
“Select a Path Through the New Virtual Machine Wizard,” on page 116
n
“Enter a Name and Location,” on page 116
n
“Select a Resource Pool,” on page 116
n
“Select a Datastore,” on page 117
n
“Select a Virtual Machine Version,” on page 117
n
“Select an Operating System,” on page 117
n
“Select the Number of Virtual Processors,” on page 117
n
“Configure Virtual Memory,” on page 118
n
“Configure Networks,” on page 118
n
“About VMware Paravirtual SCSI Adapters,” on page 118
n
“Select a SCSI Adapter,” on page 119
n
“Selecting a Virtual Disk Type,” on page 119
n
“Complete Virtual Machine Creation,” on page 122
n
“Installing a Guest Operating System,” on page 122
n
“Installing and Upgrading VMware Tools,” on page 123
Access the New Virtual Machine Wizard
Use the New Virtual Machine Wizard to create a new virtual machine.
Procedure
1
VMware, Inc.
In the vSphere Client, select one of the following objects.
n
Resource pools
n
Clusters
n
Hosts
n
Virtual machine folders
115
vSphere Basic System Administration
2
Select File > New > Virtual Machine.
Select a Path Through the New Virtual Machine Wizard
You can create a new virtual machine using the common default settings or customize the options.
The Typical path shortens the process by skipping some choices that rarely need changing from their defaults.
This path includes the following steps.
1
“Enter a Name and Location,” on page 116
2
“Select a Resource Pool,” on page 116
3
“Select a Datastore,” on page 117
4
“Select an Operating System,” on page 117
5
“Create a Virtual Disk,” on page 120
The Custom path provides more flexibility and options. This path includes the following steps.
1
“Enter a Name and Location,” on page 116
2
“Select a Resource Pool,” on page 116
3
“Select a Datastore,” on page 117
4
“Select a Virtual Machine Version,” on page 117
5
“Select an Operating System,” on page 117
6
“Select the Number of Virtual Processors,” on page 117
7
“Configure Virtual Memory,” on page 118
8
“Configure Networks,” on page 118
9
“Select a SCSI Adapter,” on page 119
10
“Selecting a Virtual Disk Type,” on page 119
Enter a Name and Location
The name you enter is used as the virtual machine’s display name in the inventory. It is also used as the name
of the virtual machine’s files.
The name can be up to 80 characters long. This name must be unique within the folder. Names are caseinsensitive: the name my_vm is identical to My_Vm.
Procedure
1
In the Name and Location screen of the New Virtual Machine wizard, enter a name.
2
Select a folder or the root of the datacenter.
3
Click Next.
Select a Resource Pool
The resource pool option is available when resource pools are configured on the host.
Procedure
116
1
Navigate to the resource pool where you want to run the virtual machine.
2
Select it and click Next.
VMware, Inc.
Chapter 11 Creating Virtual Machines
Select a Datastore
Select a datastore that will contain the virtual machine and its virtual disk files.
For ESX/ESXi hosts, the datastores are configured on that host, including FC, NAS, and iSCSI volumes.
Procedure
u
Select a datastore large enough to hold the virtual machine and all of its virtual disk files and click Next.
Select a Virtual Machine Version
If the host or cluster where you chose to locate the virtual machine supports more than one VMware virtual
machine version, you have the option to select a version for your virtual machine.
Select one of the following versions:
n
Virtual machine version 4 — Compatible with ESX 3.0 and greater hosts. Recommended for virtual
machines that need to run on ESX 3.x hosts and for virtual machines that must share virtual hard disks
with other version 4 virtual machines.
n
Virtual machine version 7 — Compatible with ESX 4.0 and greater hosts. Provides greater virtual machine
functionality. Recommended for virtual machines that do not need to migrate to ESX 3.x hosts.
Select an Operating System
The guest operating system you select affects the supported devices and number of virtual CPUs available for
the virtual machine.
See the Guest Operating System Installation Guide for details.
The wizard does not install the guest operating system for you. The New Virtual Machine wizard uses this
information to select appropriate default values, such as the amount of memory needed.
Procedure
1
2
Select one of the following operating system families:
n
Microsoft Windows
n
Linux
n
Novell NetWare
n
Solaris
n
Other
If you select Other, enter a display name for your operating system.
Select the Number of Virtual Processors
VMware Virtual SMP™ is required to power on multiprocessor virtual machines. The number of licensed
CPUs on the host and the number of processors supported by the guest operating system limit the number of
virtual processors you can create.
The Virtual CPUs page appears for multiprocessor hosts.
Procedure
u
VMware, Inc.
Select the number of processors from the drop-down menu.
117
vSphere Basic System Administration
Configure Virtual Memory
Select the virtual memory size on the Configure Virtual Memory page.
Minimum memory size is 4MB. Maximum memory size depends on the host. The memory size must be a
multiple of 4MB. The maximum for best performance represents the threshold above which the host’s physical
memory is insufficient to run the virtual machine at full speed. This value fluctuates as conditions on the host
change (as virtual machines are powered on or off, for example).
Procedure
u
Select a size for the virtual memory by using the slider or by selecting the number using the up and down
arrows.
Configure Networks
Select the number of NICs for the virtual machine on the Configure Networks page.
Exercise caution when you configure a virtual machine to connect to multiple networks. Because virtual
machines share their physical network hardware with the host, the accidental or malicious bridging of two
networks by a virtual machine can occur. Spanning Tree protocol cannot protect against these occurrences.
Procedure
1
Select the number of network interface cards (NICs) you want to create on the virtual machine.
2
For each NIC, select a network, adapter type, and whether you want the NIC to connect when the virtual
machine is powered on.
About VMware Paravirtual SCSI Adapters
Paravirtual SCSI (PVSCSI) adapters are high-performance storage adapters that can result in greater
throughput and lower CPU utilization. Paravirtual SCSI adapters are best suited for high performance storage
environments. Paravirtual SCSI adapters are not suited for DAS environments.
Paravirtual SCSI adapters are available for virtual machines running hardware version 7 and greater. They are
supported on the following guest operating systems:
n
Windows Server 2008
n
Windows Server 2003
n
Red Hat Linux (RHEL) 5
The following features are not supported with Paravirtual SCSI adapters:
n
on Linux
n
Record/Replay
n
Fault Tolerance
n
MSCS Clustering
Paravirtual SCSI adapters have the following limitations:
n
118
Hot-add and Hot-remove requires a bus rescan from within the guest.
n
(Windows guests) In the Computer Management console, right-click Storage > Disk Management
and select Rescan Disks.
n
(Linux guests) See the Red Hat Linux Web site for the most current instructions.
VMware, Inc.
Chapter 11 Creating Virtual Machines
n
Disks on Paravirtual SCSI adapters might not experience performance gains if they have snapshots or if
memory on the ESX host is over committed.
n
If you upgrade from RHEL 5 to an unsupported kernel, you might not be able to access data on the disks
attached to a Paravirtual SCSI adapter. To regain access to such disks, run the VMware Tools configuration
(vmware-config-tools.pl) with kernel-version parameter and pass the kernel version after the kernel is
upgraded and before the virtual machine is rebooted. Run uname -r to determine the version of the running
kernel.
Select a SCSI Adapter
The Select SCSI Controller Type page enables you to select one of the following types of SCSI controllers. The
choice of SCSI controller does not affect whether your virtual disk is an IDE or SCSI disk.
The IDE adapter is always ATAPI. The default for your guest operating system is already selected. Older guest
operating systems default to the BusLogic adapter.
If you create an LSI Logic virtual machine and add a virtual disk that uses BusLogic adapters, the virtual
machine boots from the BusLogic adapters disk. LSI Logic SAS is available only for virtual machines with
hardware version 7. Disks with snapshots might not experience performance gains when used on LSI Logic
SAS and LSI Logic Parallel adapters.
Procedure
u
Choose one of the following SCSI controller types:
n
BusLogic Parallel
n
LSI Logic SAS
n
LSI Logic Parallel
n
VMware Paravirtual
Selecting a Virtual Disk Type
A virtual disk comprises one or more files on the file system that appear as a single hard disk to the guest
operating system. These disks are portable among hosts.
You can select among the following options:
n
“Create a Virtual Disk,” on page 120
n
“Use an Existing Virtual Disk,” on page 120
n
“Create Raw Device Mappings,” on page 121
n
“Do Not Create a Disk,” on page 121
VMware, Inc.
119
vSphere Basic System Administration
About Virtual Disk Formats
When you perform certain virtual machine management operations, such as create a virtual disk, clone a virtual
machine to a template, or migrate a virtual machine, you can specify a format for the virtual disk file.
The following disk formats are supported. You cannot specify the disk format if the disk resides on an NFS
datastore. The NFS server determines the allocation policy for the disk.
Thin Provisioned Format
Use this format to save storage space. For the thin disk, you provision as much
datastore space as the disk would require based on the value you enter for the
disk size. However, the thin disk starts small and at first, uses only as much
datastore space as the disk actually needs for its initial operations.
NOTE If a virtual disk supports clustering solutions such as Fault Tolerance,
you cannot make the disk thin.
If the thin disk needs more space later, it can grow to its maximum capacity
and occupy the entire datastore space provisioned to it. Also, you can manually
convert the thin disk into thick.
Thick Format
This is the default virtual disk format. The thick virtual disk does not change
its size and from the very beginning occupies the entire datastore space
provisioned to it. Thick format does not zero out the blocks in the allocated
space. It is not possible to convert the thick disk into thin.
Create a Virtual Disk
When you create a new disk, you can specify disk properties such as size, format, clustering features, and more.
Procedure
1
Specify the size of the disk in Megabytes, Gigabytes, or Terabytes.
You can change the size of the disk later, and add additional disks Virtual Machine Properties dialog box.
2
(Optional) If you want your disk to be in thin format, select Allocate and commit space on demand (Thin
Provisioning).
3
(Optional) If you want to use clustering features, select Support clustering features such as Fault
Tolerance.
4
Specify whether you want to store the virtual disk file on the same datastore as the virtual machine files,
or whether you want to store them on a separate datastore.
Use an Existing Virtual Disk
You can use an existing virtual disk.
Procedure
120
1
Browse to a virtual disk file, and click OK.
2
(Optional) Configure advanced options:
n
Select a virtual device node.
n
Enable Independent mode and select whether you want changes to the disk to persist, or whether
you want changes to be discarded when the virtual machine is powered off or reverted to a snapshot.
VMware, Inc.
Chapter 11 Creating Virtual Machines
Create Raw Device Mappings
For virtual machines running on an ESX/ESXi host, instead of storing virtual machine data in a virtual disk
file, you can store the data directly on a SAN LUN. This is useful if you are running applications in your virtual
machines that must know the physical characteristics of the storage device. Additionally, mapping a SAN LUN
allows you to use existing SAN commands to manage storage for the disk.
When you map a LUN to a VMFS volume, vCenter Server creates a file that points to the raw LUN.
Encapsulating disk information in a file allows vCenter Server to lock the LUN so that only one virtual machine
can write to it.
NOTE This file has a .vmdk extension, but the file contains only disk information describing the mapping to
the LUN on the ESX/ESXi system. The actual data is stored on the LUN.
You cannot deploy a virtual machine from a template and store its data on a LUN. You can only store its data
in a virtual disk file.
Procedure
1
Select a target LUN.
2
Select whether you want to store the LUN mapping file on the same datastore as the virtual machine files,
or whether you want to store them on a separate datastore.
3
Select a datastore.
4
Select a compatibility mode.
5
(Optional) Configure advanced options by selecting a virtual device node.
Virtual Disk Compatibility Modes
Virtual disk compatibility modes provide flexibility in how Raw Device Mappings (RDM) function.
Virtual Compatibility Mode
Virtual mode for an RDM specifies full virtualization of the mapped device. It appears to the guest operating
system exactly the same as a virtual disk file in a VMFS volume. The real hardware characteristics are hidden.
Virtual mode enables you to use VMFS features such as advanced file locking and snapshots. Virtual mode is
also more portable across storage hardware than physical mode, presenting the same behavior as a virtual disk
file. When you clone the disk, make a template out of it, or migrate it (if the migration involves copying the
disk), the contents of the LUN are copied into a virtual disk (.vmdk) file.
Physical Compatibility Mode
Physical mode for the RDM specifies minimal SCSI virtualization of the mapped device, allowing the greatest
flexibility for SAN management software. In physical mode, the VMkernel passes all SCSI commands to the
device, with one exception: the REPORT LUNs command is virtualized, so that the VMkernel can isolate the
LUN for the owning virtual machine. Otherwise, all physical characteristics of the underlying hardware are
exposed. Physical mode is useful to run SAN management agents or other SCSI target based software in the
virtual machine. Physical mode also allows virtual-to-physical clustering for cost-effective high availability.
LUNs attached to powered-on virtual machines and configured for physical compatibility cannot be migrated
if the migration involves copying the disk. Such LUNs cannot be cloned or cloned to a template either.
Do Not Create a Disk
When you create a virtual machine, you can select not to create a virtual disk.
Select this option if you want to create a virtual machine without a disk, or if you want to add disks to the
virtual machine later using the Virtual Machine Properties dialog box.
VMware, Inc.
121
vSphere Basic System Administration
Procedure
u
Select Do not create a disk.
Complete Virtual Machine Creation
The Ready to Complete page enables you to review your virtual machine’s configuration.
To perform additional configuration before completing the virtual machine, select the Edit the virtual machine
settings before completion check box and click Next.
Before you can use your new virtual machine, you must first partition and format the virtual drive, install a
guest operating system, then install VMware Tools. Typically, the operating system’s installation program
handles partitioning and formatting the virtual drive.
Installing a Guest Operating System
Installing a guest operating system inside your virtual machine is essentially the same as installing it on a
physical computer.
The basic steps for a typical operating system are described in this section. See Guest Operating System Installation
Guide for more information on individual guest operating systems.
NOTE It might be necessary to change the boot order in the virtual machine’s BIOS settings. However,
sometimes a virtual machine’s boot sequence progresses too quickly for a user to open a console to the virtual
machine and enter BIOS setup. If this happens, select the Boot Options option on the Options tab of the Virtual
Machine Properties dialog box, and select The next time the virtual machine boots, force entry into the BIOS
setup screen. The virtual machine will enter the BIOS setup the next time it boots.
Using PXE with Virtual Machines
You can boot a virtual machine from a network device and remotely install a guest operating system using a
preboot execution environment (PXE).
To do this, the virtual machine must meet the following requirements:
n
Have a virtual disk without operating system software, and with enough free disk space to store the
intended system software.
n
Have a network adapter connected to the network where the PXE server resides. (see “Network Adapter
Types,” on page 162)
n
BIOS must include the network adapter in the boot order.
NOTE vmnext3 adapters can enter neither UPT nor CDPT mode while booting from a PXE.
VMware has tested and supports the following PXE configurations with ESX Server:
122
n
Remote installation of a Windows Server 2003 guest operating system from a server running Windows
Server 2003 Automated Deployment Services
n
Remote installation of a Windows 2000 guest operating system from a server running Windows 2000
Server/Advanced Server Remote Installation Services
n
Remote installation of a Linux guest operating system from a Red Hat Enterprise Linux 3.0 AS PXE boot
server
n
Remote installation of a supported guest operating system from a Ghost image using Windows 2000 and
Ghost RIS Boot package
n
Remote installation of a supported guest operating system from an Altiris image using a Windows 2000
Altiris server
VMware, Inc.
Chapter 11 Creating Virtual Machines
n
Network booting a Linux virtual machine by connecting with the Linux Diskless option to a Red Hat
Enterprise Linux 3.0 AS server
NOTE Server does not support installation of a Windows XP guest operating system using PXE.
Install a Guest Operating System from Media
You can install a guest operating system from ISO or CD-ROM.
Procedure
1
Using the vSphere Client, log into the vCenter Server system or host on which the virtual machine resides.
2
Insert the installation CD-ROM for your guest operating system, or create an ISO image file from the
installation CD-ROM.
Using an ISO image is faster than using a CD-ROM.
3
Use the Virtual Machine Settings editor to connect the virtual machine’s CD-ROM drive to the ISO image
file and power on the virtual machine.
4
To power on your virtual machine, click the Power On button.
When a virtual machine is powered on, a green right arrow appears next to the virtual machine icon in
the inventory list.
5
Follow the installation instructions provided by the operating system vendor.
Installing and Upgrading VMware Tools
VMware Tools is a suite of utilities that enhances the performance of the virtual machine’s guest operating
system and improves management of the virtual machine.
Installing VMware Tools in the guest operating system is vital. Although the guest operating system can run
without VMware Tools, you lose important functionality and convenience.
When you install VMware Tools, you install:
n
The VMware Tools service (VMwareService.exe on Windows guests or vmware-guestd on Linux and Solaris
guests). This service synchronizes the time in the guest operating system with the time in the host operating
system. On Windows guests, it also controls grabbing and releasing the mouse cursor.
n
A set of VMware device drivers, including an SVGA display driver, the vmxnet networking driver for some
guest operating systems, the BusLogic SCSI driver for some guest operating systems, the memory control
driver for efficient memory allocation between virtual machines, the sync driver to quiesce I/O for
Consolidated Backup, and the VMware mouse driver.
n
The VMware Tools control panel, which lets you modify settings, shrink virtual disks, and connect and
disconnect virtual devices.
n
A set of scripts that helps you to automate guest operating system operations. The scripts run when the
virtual machine’s power state changes if you configure them to do so.
n
The VMware user process (VMwareUser.exe on Windows guests or vmware-user on Linux and Solaris
guests), which enables you to copy and paste text between the guest and managed host operating systems.
On Linux and Solaris guests, this process controls grabbing and releasing the mouse cursor when the
SVGA driver is not installed.
The VMware Tools user process is not installed on NetWare operating systems. Instead, the vmwtool
program is installed. It controls the grabbing and releasing of the mouse cursor. It also allows you copy
and paste text.
VMware, Inc.
123
vSphere Basic System Administration
You can optionally install WYSE Multimedia Redirector, which improves streaming video performance in
Windows guest operating systems running on WYSE thin client devices.
The installers for VMware Tools for Windows, Linux, Solaris, and NetWare guest operating systems are built
into ESX/ESXi as ISO image files. An ISO image file looks like a CD-ROM to your guest operating system and
even appears as a CD-ROM disc in Windows Explorer. You do not use an actual CD-ROM disc to install
VMware Tools, nor do you need to download the CD-ROM image or burn a physical CD-ROM of this image
file.
When you choose to install VMware Tools, vCenter Server temporarily connects the virtual machine’s first
virtual CD-ROM disk drive to the ISO image file that contains the VMware Tools installer for your guest
operating system. You are ready to begin the installation process.
Limitations
VMware Tools has the following limitations:
n
Shrink disk is not supported.
n
For Microsoft Windows NT, the default scripts for suspend and resume do not work.
n
The mouse driver installation fails in X windows versions earlier than 4.2.0.
NOTE If you do not have VMware Tools installed in your virtual machine, you cannot use the shutdown or
restart options. You can use only the Power options. If you want to shut down the guest operating system,
shut it down from within the virtual machine console before you power off the virtual machine.
Install VMware Tools on a Windows Guest
Install the most recent version of VMware Tools to enhance the performance of the virtual machine’s guest
operating system and improve virtual machine management.
To determine the status of VMware Tools, select the virtual machine and click the Summary tab. The VMware
Tools label indicates whether VMware Tools is installed and current, installed and not current, or not installed.
NOTE During VMware Tools installation, a Windows guest operating system might display a message
indicating that the package has not been signed. If this message appears, click Install Anyway to continue the
installation.
Prerequisites
n
A supported guest operating system must be installed on the virtual machine.
n
You must have an ESX/ESXi license or be using evaluation mode to power on the virtual machine.
Procedure
1
From the vSphere Client, right-click the virtual machine, select Power, and select Power On.
2
Click the Console tab to make sure that the guest operating system starts successfully, and log in if
necessary.
3
Right-click the virtual machine, select Guest, and select Install/Upgrade VMware Tools.
4
Select Interactive Tools Installation and click OK.
This step initiates the installation process by mounting the VMware Tools bundle on the guest operating
system.
5
124
If the New Hardware wizard appears, go through the wizard and accept the defaults.
VMware, Inc.
Chapter 11 Creating Virtual Machines
6
In the virtual machine console, do one of the following.
n
If autorun is enabled, click OK to confirm that you want to install VMware Tools and launch the
InstallShield wizard.
n
If autorun is not enabled, manually launch the VMware Tools installer by clicking Start > Run and
entering D:\setup.exe, where D: is your first virtual CD-ROM drive.
7
Follow the onscreen instructions.
8
Reboot for the changes to take effect.
What to do next
n
Verify the status of VMware Tools by checking the VMware Tools label on the virtual machine
Summary tab. The VMware Tools label should display the word OK.
n
For Windows 2000 and later, VMware Tools installs the VmUpgradeHelper tool to restore the network
configuration. From the Windows guest opertating system, start the VmUpgradeHelper service.
Install VMware Tools on a Linux Guest from the X Window System
Install the latest version of VMware Tools to enhance the performance of the virtual machine’s guest operating
system and improve virtual machine management.
Before you install or upgrade VMware Tools on a virtual machine, determine the status of VMware Tools. To
do this, select the virtual machine and click the Summary tab. The VMware Tools label indicates whether
VMware Tools is installed and current, installed and not current, or not installed.
Prerequisites
n
A supported guest operating system must be installed on the virtual machine.
n
You must have an ESX/ESXi license or be using evaluation mode to power on the virtual machine.
Procedure
1
From the vSphere Client, right-click the virtual machine, select Power, and select Power On.
2
Click the Console tab to make sure that the guest operating system starts successfully, and log in if
necessary.
3
Right-click the virtual machine, select Guest, and select Install/Upgrade VMware Tools.
4
Select Interactive Tools Installation and click OK.
This step initiates the installation process by mounting the VMware Tools bundle on the guest operating
system.
5
6
Do one of the following:
n
From the desktop, double-click the VMware Tools CD icon or the file manager window and doubleclick the RPM installer.
n
If the VMware Tools CD icon or file manager window does not appear, install VMware Tools from
the command line.
When prompted, enter the root password and click OK.
The installer prepares the packages.
7
Click Continue when the installer presents a dialog box that shows Completed System Preparation.
When the installer is done, VMware Tools is installed. There is no confirmation or finish button.
VMware, Inc.
125
vSphere Basic System Administration
8
In a terminal window, as root (su -), run the following command to configure VMware Tools: vmwareconfig-tools.pl
Respond to the questions the installer displays on the screen. Press Enter to accept the default values if
appropriate for your configuration.
9
Exit from the root account by issuing the exit command.
What to do next
Verify the status of VMware Tools by checking the VMware Tools label on the virtual machine Summary tab.
The VMware Tools label should display the word OK.
Install VMware Tools on a Linux Guest with the Tar Installer
Install the latest version of VMware Tools to enhance the performance of the virtual machine’s guest operating
system and improve virtual machine management.
Before you install or upgrade VMware Tools on a virtual machine, determine the status of VMware Tools.
Select the virtual machine and click the Summary tab. The VMware Tools label indicates whether VMware
Tools is installed and current, installed and not current, or not installed.
Prerequisites
n
A supported guest operating system must be installed on the virtual machine.
n
You must have an ESX/ESXi license or be using evaluation mode to power on the virtual machine.
Procedure
1
From the vSphere Client, right-click the virtual machine, select Power, and select Power On.
2
Click the Console tab to make sure that the guest operating system starts successfully, and log in if
necessary.
3
Right-click the virtual machine, select Guest, and select Install/Upgrade VMware Tools.
4
Select Interactive Tools Installation and click OK.
This step initiates the installation process by mounting the VMware Tools bundle on the guest operating
system.
5
In the virtual machine console, log in as root (su -) and, if necessary, create the /mnt/cdrom directory:
mkdir /mnt/cdrom
6
Mount the VMware Tools virtual CD-ROM image.
Some Linux distributions automatically mount CD-ROMs. If your distribution uses automounting, do not
use the mount and umount commands in this procedure.
Some Linux distributions use different device names or organize the /dev directory differently. Modify
the following commands to reflect the conventions used by your distribution:
mount /dev/cdrom /mnt/cdrom
cd /tmp
7
Change to a working directory (for example, /tmp).
cd /tmp
8
If you have a previous installation, delete the previous vmware-tools-distrib directory.
rm -rf /tmp/vmware-tools-distrib
The default location of this directory is: /tmp/vmware-tools-distrib.
126
VMware, Inc.
Chapter 11 Creating Virtual Machines
9
List the contents of the /mnt/cdrom/ directory, and note the filename of the VMware Tools tar installer.
ls /mnt/cdrom
10
Uncompress the tar installer.
tar zxpf /mnt/cdrom/VMwareTools-4.0.0-<xxxxxx>.tar.gz
Where <xxxxxx> is the build or revision number of the ESX/ESXi release.
If you attempt to install a tar installation over an RPM installation, the installer detects the previous
installation and must convert the installer database format before continuing.
11
Unmount the CD-ROM image:
umount /dev/cdrom
12
Run the VMware Tools tar installer.
cd vmware-tools-distrib
./vmware-install.pl
For each configuration question, press Enter to accept the default value.
13
Log off the root account.
exit
What to do next
After you install or upgrade VMware Tools on a virtual machine, verify the status of VMware Tools by checking
the VMware Tools label on the virtual machine Summary tab. The VMware Tools label should display the
word OK.
Install VMware Tools on a Linux Guest with the RPM Installer
Install VMware Tools to the latest version to enhance the performance of the virtual machine’s guest operating
system and improve virtual machine management.
Before you install or upgrade VMware Tools on a virtual machine, determine the status of VMware Tools. To
do this, select the virtual machine and click the Summary tab. The VMware Tools label indicates whether
VMware Tools is installed and current, installed and not current, or not installed.
NOTE RPM packages are not available with the ESXi installer. Only the tar package is available for ESXi hosts.
Prerequisites
The following items are prerequisites for completing this procedure:
n
A supported guest operating system must be installed on the virtual machine.
n
You must have an ESX/ESXi license or be using evaluation mode to power on the virtual machine.
Procedure
1
From the vSphere Client, right-click the virtual machine, select Power, and select Power On.
2
Click the Console tab to make sure that the guest operating system starts successfully, and log in if
necessary.
3
Right-click the virtual machine, select Guest, and select Install/Upgrade VMware Tools.
4
Select Interactive Tools Installation and click OK.
This step initiates the installation process by mounting the VMware Tools bundle on the guest operating
system.
VMware, Inc.
127
vSphere Basic System Administration
5
In the virtual machine console, log in as root (su -) and, if necessary, create the /mnt/cdrom directory:
mkdir /mnt/cdrom
6
Mount the VMware Tools virtual CD-ROM image.
Some Linux distributions automatically mount CD-ROMs. If your distribution uses automounting, do not
use the mount and umount commands in this procedure.
Some Linux distributions use different device names or organize the /dev directory differently. Modify
the following commands to reflect the conventions used by your distribution:
mount /dev/cdrom /mnt/cdrom
cd /tmp
7
Change to a working directory (for example, /tmp):
cd /tmp
8
If you have a previous installation, delete the previous vmware-tools-distrib directory:
rm -rf /tmp/vmware-tools-distrib
The default location of this directory is: /tmp/vmware-tools-distrib.
9
List the contents of the /mnt/cdrom/ directory, and note the filename of the VMware Tools rpm installer:
ls /mnt/cdrom
10
Install or upgrade the RPM package.
rpm -Uhv /mnt/cdrom/VMwareTools-4.0.0-<xxxxxx>.i386.rpm
Where <xxxxxx> is the build or revision number of the ESX/ESXi release.
The installation software searches for and updates existing RPM packages if found, or installs a new
package.
11
Unmount the CD-ROM image:
umount /dev/cdrom
12
Run the ./usr/bin/vmware-config-tools.pl script to configure tools.
13
Log off the root account:
exit
What to do next
After you install or upgrade VMware Tools on a virtual machine, verify the status of VMware Tools by checking
the VMware Tools label on the virtual machine Summary tab. The VMware Tools label should display the
word OK.
Install VMware Tools on a Solaris Guest
Install the latest version of VMware Tools to enhance the performance of the virtual machine’s guest operating
system and improve virtual machine management.
Before you install or upgrade VMware Tools on a virtual machine, determine the status of VMware Tools. To
do this, select the virtual machine and click the Summary tab. The VMware Tools label indicates whether
VMware Tools is installed and current, installed and not current, or not installed.
Prerequisites
128
n
A supported guest operating system must be installed on the virtual machine.
n
You must have an ESX/ESXi license or be using evaluation mode to power on the virtual machine.
VMware, Inc.
Chapter 11 Creating Virtual Machines
Procedure
1
From the vSphere Client, right-click the virtual machine, select Power, and select Power On.
2
Click the Console tab to make sure that the guest operating system starts successfully, and log in if
necessary.
3
Right-click the virtual machine, select Guest, and select Install/Upgrade VMware Tools.
4
Select Interactive Tools Installation and click OK.
This step initiates the installation process by mounting the VMware Tools bundle on the guest operating
system.
5
In the virtual machine console, log in as root (su -) and, if necessary, mount the VMware Tools virtual
CD-ROM image, as follows.
Usually, the Solaris volume manager mounts the CD-ROM under /cdrom/vmwaretools. If the CD-ROM is
not mounted, restart the volume manager using the following commands.
/etc/init.d/volmgt stop
/etc/init.d/volmgt start
6
After the CD-ROM is mounted, change to a working directory (for example, /tmp) and extract VMware
Tools.
cd /tmp
gunzip -c /cdrom/vmwaretools/vmware-solaris-tools.tar.gz | tar xf -
7
Run the VMware Tools tar installer.
cd vmware-tools-distrib
./vmware-install.pl
Respond to the configuration questions on the screen. Press Enter to accept the default values.
8
Log off of the root account.
exit
What to do next
Verify the status of VMware Tools by checking the VMware Tools label on the virtual machine Summary tab.
The VMware Tools label should display the word OK.
Install VMware Tools on a NetWare Guest
Install or upgrade VMware Tools to the latest version to enhance the performance of the virtual machine’s
guest operating system and improve virtual machine management.
Before you upgrade VMware Tools on a virtual machine, determine the status of VMware Tools. To do this,
select the virtual machine and click the Summary tab. The VMware Tools label indicates whether VMware
Tools is installed and current, installed and not current, or not installed.
Prerequisites
n
A supported guest operating system must be installed on the virtual machine.
n
You must have an ESX/ESXi license or be using evaluation mode to power on the virtual machine.
Procedure
1
From the vSphere Client, right-click the virtual machine, select Power, and select Power On.
2
Click the Console tab to make sure that the guest operating system starts successfully, and log in if
necessary.
VMware, Inc.
129
vSphere Basic System Administration
3
Right-click the virtual machine, select Guest, and select Install/Upgrade VMware Tools.
4
Select Interactive Tools Installation and click OK.
This step initiates the installation process by mounting the VMware Tools bundle on the guest operating
system.
5
In the virtual machine console, load the CD-ROM driver so the CD-ROM device mounts the ISO image
as a volume. To open the Netware Server Console, select Novell > Utilities > Server Console.
6
Do one of the following:
7
n
In the NetWare 6.5 Server Console, enter: LOAD CDDVD.
n
In the NetWare 6.0 or NetWare 5.1 Server Console, enter: LOAD CD9660.NSS.
In the Server Console, enter the following command.
vmwtools:\setup.ncf
When the installation finishes, the message VMware Tools for NetWare are now running appears in the Logger
Screen (NetWare 6.5 and NetWare 6.0 guests) or the Console Screen (NetWare 5.1 guests).
What to do next
Verify the status of VMware Tools by checking the VMware Tools label on the virtual machine Summary tab.
The VMware Tools label should display the word OK.
Display the VMware Tools Properties Dialog Box
Use the VMware Tools Properties dialog box to configure VMware Tools inside your virtual machine.
Instructions for displaying this dialog box vary, depending on the guest operating system.
Use this dialog box to configure time synchronization between host and guest, notifications of VMware Tools
updates (for Windows and Linux guests only), and specifying which scripts to run when the virtual machine’s
power state changes.
Procedure
n
On a Windows guest: Open a console to the virtual machine and double-click the VMware Tools icon in
the system tray from inside the guest operating system.
n
On a Linux or Solaris guest: Open a console to the virtual machine and open a terminal window and enter
the command:
/usr/bin/vmware-toolbox &
n
On a NetWare guest: Select Novell > Settings > VMware Tools for NetWare.
VMware Tools Upgrades
You can upgrade VMware Tools manually, or you can configure virtual machines to check for and install newer
versions of VMware Tools
The following are required for automatic upgrades:
130
n
Virtual machines must have a version of VMware Tools shipped with ESX Server 3.0.1 or greater installed.
n
Virtual machines must be hosted on an ESX Server 3.0.1 or greater, and the vCenter Server must be version
2.0.1 or greater.
n
Virtual machines must be running a Linux or Windows guest OS that is supported by ESX Server 3.0.1 or
greater and vCenter Server 2.0.1 or greater.
n
Virtual machines must be powered on.
VMware, Inc.
Chapter 11 Creating Virtual Machines
Upgrade VMware Tools Manually
You can manually upgrade VMware Tools.
Procedure
1
Launch the vSphere client and log in to the vCenter Server system.
2
Select the Inventory > Hosts and Clusters view.
3
Select the host or cluster that contains the virtual machines you want to upgrade.
4
Select the Virtual Machines tab.
5
Select the virtual machines you want to upgrade.
6
Right-click your selections and select Install/Upgrade Tools.
7
(Optional) Enter command-line options in the Advanced field.
Command-line options for Linux are documented in the Linux installer for Linux Tools. Command-line
options for Windows are documented in the MSI for Windows Tools and at the following Wikipedia entry:
http://en.wikipedia.org/wiki/Windows_Installer.
8
Click OK.
VMware Tools can also be manually upgraded from within the virtual machine’s operating system by opening
the VMware Tools Properties dialog box (double-click the icon in the system tray) and clicking Upgrade in the
Options tab.
Configure Virtual Machines to Automatically Upgrade VMware Tools
Virtual Machines can be configured so VMware Tools are automatically upgraded.
NOTE Automatic VMware Tools upgrade is not supported for virtual machines with Solaris or Netware guest
operating systems.
The following are required for automatic upgrades:
n
Virtual machines must have a version of VMware Tools shipped with ESX Server 3.0.1 or greater installed.
n
Virtual machines must be hosted on an ESX Server 3.0.1 or greater, and the vCenter Server must be version
2.0.1 or greater.
n
Virtual machines must be running a Linux or Windows guest OS that is supported by ESX Server 3.0.1 or
greater and vCenter Server 2.0.1 or greater.
n
Virtual machines must be powered on.
Procedure
1
Open the Virtual Machine Properties dialog box for the virtual machine you want to upgrade.
2
Select Options tab > VMware Tools.
3
Select the Check and upgrade Tools before each power-on option under Automatic VMware Tools
Upgrade.
4
Click OK.
The next time the virtual machine is powered on, it checks the ESX/ESXi host for a newer version of VMware
Tools. If one is available, it is installed and the guest operating system is restarted (if required).
VMware, Inc.
131
vSphere Basic System Administration
Custom VMware Tools Installation
You can use a custom VMware Tools installation path to install optional drivers or other software that might
improve the performance of particular virtual machines, such as WYSE Multimedia Support.
Procedure
1
Open a console to the virtual machine.
2
Power on the virtual machine.
3
After the guest operating system starts, right-click the virtual machine and select Install VMware Tools.
4
From inside the virtual machine, click OKto confirm that you want to install VMware Tools and launch
the InstallShield wizard.
n
If you have autorun enabled in your guest operating system (the default setting for Windows
operating systems), a dialog box appears.
n
If autorun is not enabled, run the VMware Tools installer. Click Start > Run and enter D:\setup.exe,
where D: is your first virtual CD-ROM drive.
5
Click Next.
6
Select Custom, and click Next.
7
Click the red X next to each optional feature you want to install, and select This feature will be installed
on local hard drive.
8
Click Next.
9
Click Finish.
WYSE Multimedia Support
If you are using a WYSE thin client device to conduct remote desktop sessions using VMware VDI, installing
WYSE Multimedia Support in the guest operating system improves the performance of streaming video. WYSE
Multimedia Support allows streaming video to be decoded on the client rather than on the host, thereby
conserving network bandwidth.
WYSE Multimedia Support is supported on the Windows 2003 and Windows XP guest operating systems only.
WYSE Multimedia Support is installed as part of a VMware Tools installation or upgrade.
Install WYSE Multimedia Support with VMware Tools
When you install VMware Tools in a Windows 2003 or Windows XP guest operating system for the first time,
you can install WYSE Multimedia Support at the same time by choosing a custom installation path.
Procedure
u
Follow the instructions for the custom installation path as described in “Custom VMware Tools
Installation,” on page 132. On the Custom Setup page, select WYSE Multimedia Redirector for
installation.
Install WYSE Multimedia Support Using Add or Remove Programs
For virtual machines that already have VMware Tools installed, WYSE Multimedia Support can be installed
as part of a VMware Tools upgrade using the Windows Add or Remove Programs feature.
Procedure
1
132
Open a console to a powered-on virtual machine.
VMware, Inc.
Chapter 11 Creating Virtual Machines
2
In the virtual machine, select Start > Settings > Control Panel > Add or Remove Programs.
3
In the list of programs, select VMware Tools and click Change.
4
Click Next.
5
Select Modify and click Next.
6
Click the red X next to WYSE Multimedia Redirector and select This feature will be installed on local
hard drive.
7
Click Next.
8
Click Modify to begin the installation.
9
Click Finish.
For virtual machines on ESX Server 3.0.1 or later hosts managed by vCenter Server 2.0.1 or later, WYSE
Multimedia Support can be installed as part of a VMware Tools upgrade started from the vSphere Client.
Install WYSE Multimedia Support as Part of a VMware Tools Upgrade
For virtual machines on ESX Server 3.0.1 or later hosts managed by vCenter Server 2.0.1 or later, WYSE
Multimedia Support can be installed as part of a VMware Tools upgrade started from the vSphere Client.
Procedure
1
Right-click a powered-on virtual machine and select Upgrade VMware Tools.
2
In the Advanced text box, type setup.exe /s /v”INSTALL_WYSE=1”.
3
Click OK.
VMware, Inc.
133
vSphere Basic System Administration
134
VMware, Inc.
Managing Virtual Machines
12
You can manage virtual machines directly through the ESX/ESXi host or through a vCenter Server system.
If you manage your virtual machines directly through an ESX/ESXi host (a single or standalone system), you
can manage only those virtual machines and their resources installed on that host.
If you manage your virtual machines through a vCenter Server system, you can manage multiple virtual
machines and their resources distributed over many ESX/ESXi hosts. Multiple vCenter Server systems can be
joined together in a vCenter Server Connected Group to allow them to be managed with a single vSphere Client
connection.
The vSphere Client is a flexible, configurable interface for managing your virtual machines through an
ESX/ESXi host or through vCenter Server.
Figure 12-1 illustrates the components in an ESX/ESXi Virtual Infrastructure.
Figure 12-1. vSphere Components with an ESX/ESXi Host
vSphere
Client
vSphere
Client
Host Agent
VM
VM
VM
ESX/ESXi host
datastore
Figure 12-2 illustrates the components in a vCenter Server Virtual Infrastructure.
VMware, Inc.
135
vSphere Basic System Administration
Figure 12-2. vSphere Components with a vCenter Server System
vSphere
Client
vSphere
Client
vSphere
Client
Tomcat
service
vCenter
Server
LDAP
server
vCenter
Agent
VM
VM
vSphere
Client
vSphere
Client
vCenter
database
vCenter
Agent
VM
VM
ESX/ESXi host
VM
vCenter
Agent
VM
VM
ESX/ESXi host
datastore
VM
VM
ESX/ESXi host
shared
datastore
This chapter includes the following topics:
n
“Changing Virtual Machine Power States,” on page 136
n
“Adding and Removing Virtual Machines,” on page 139
n
“Configure Virtual Machine Startup and Shutdown Behavior,” on page 140
Changing Virtual Machine Power States
The power state of a virtual machine indicates whether the virtual machine is active and functional.
There are several access points for making changes to power states:
136
n
Selecting the virtual machine and the power option from the Inventory > Virtual Machine menu.
n
Selecting Power on from the Commands area.
n
Selecting the power option from the right-click menu.
n
Scheduling a power state change using the Scheduled Tasks button in the navigation bar.
Power on
Powers on the virtual machine and boots the guest operating system if the guest
operating system is installed. When applied to a suspended virtual machine,
allows virtual machine activity to continue and releases the suspended state.
Power off
Powers off the virtual machine. The virtual machine does not attempt to shut
down the guest operating system gracefully.
Suspend
Pauses the virtual machine activity. All virtual machine operations are frozen
until you issue a resume command.
Reset
Shuts down the guest operating system and restarts it.
VMware, Inc.
Chapter 12 Managing Virtual Machines
The following power options perform extra functions in addition to the basic virtual machine power operations.
VMware Tools must be installed in the virtual machine to perform these functions:
Shut down guest
Shuts down the guest operating system gracefully.
Restart guest
Shuts down and restarts the guest operating system without powering off the
virtual machine.
Transitional Power States
Actions taken on a virtual machine require that the virtual machine be in specific power states.
When a power operation is performed on a virtual machine, the virtual machine power state changes and all
other commands are locked out until the first command is completed.
The figure below illustrates states, transitions, and state-changing commands for virtual machines.
Figure 12-3. Virtual Machine Power State Changes
powered off
power on
remove
power off
powered on
resume
suspend
state
suspended
command
Automatically Start or Shutdown Virtual Machines with Host Start or Shutdown
You can configure which virtual machines automatically start and shut down when the host is started or shut
down.
Procedure
1
Select the host in the inventory.
2
In the Configuration tab, select Virtual Machine Startup/Shutdown.
Configure vSphere Toolbar Power Controls
You can specify the behavior of vSphere power controls.
Procedure
1
Log in to vSphere client.
2
On the Home page, select VMs and Templates.
3
Right-click on a virtual machine and select Edit Settings.
4
Select the Options tab.
5
Select VMware Tools.
VMware, Inc.
137
vSphere Basic System Administration
6
In the right panel, enter the settings you want for the Power Controls, Run VMware Tools Scripts, and
Advanced options.
7
Click OK to save your settings and close the dialog box.
Power On or Power Off a Virtual Machine Manually
You can power on or off a virtual machine manually.
Powering on a virtual machine boots the guest operating system if the guest operating system is installed.
Powering off a virtual machine is analogous to pressing the off button on a computer without performing a
shut down from the operating system. The virtual machine does not attempt to shut down the guest operating
system gracefully.
Procedure
1
Log in to the vSphere Client.
2
Display the virtual machine in the inventory.
3
Select the virtual machine and do one of the following:
n
Click the power state button in the toolbar.
n
Right-click the virtual machine and select the power state option.
The shut down power state button in the toolbar performs a shut-down and not a power off by default.
You can configure this option in the virtual machine settings.
Suspend a Virtual Machine
The suspend and resume feature is most useful when you want to save the current state of your virtual machine
and pick up work later with the virtual machine in the same state.
The speed of the suspend and resume operations depends on how much data changed while the virtual
machine was running. In general, the first suspend operation takes a bit longer than subsequent suspend
operations take.
When you suspend a virtual machine, a file with a .vmss extension is created. This file contains the entire state
of the virtual machine. When you resume the virtual machine, its state is restored from the .vmss file.
Procedure
1
When you suspend a virtual machine, a file with a .vmss extension is created. This file contains the entire
state of the virtual machine. When you resume the virtual machine, its state is restored from the .vmss file.
If your virtual machine is running in full-screen mode, return to window mode by pressing Ctrl+Alt.
2
On the vSphere Client toolbar, click Suspend.
When the vSphere Client completes the suspend operation, it is safe to close the client.
3
Select File > Exit.
Resume a Suspended Virtual Machine
After you resume a virtual machine and do additional work in the virtual machine, you cannot return to the
state the virtual machine was in at the time you suspended. To preserve the state of the virtual machine so you
can return to the same state repeatedly, take a snapshot.
Procedure
1
138
Start the vSphere Client and display the virtual machine in the inventory.
VMware, Inc.
Chapter 12 Managing Virtual Machines
2
Do one of the following:
n
Select the virtual machine and click Power On in toolbar.
n
Right-click the virtual machine and select Power On in the context menu.
n
Select the virtual machine and in the Summary tab Commands window, select Power On.
Applications you were running at the time you suspended the virtual machine are running and the content
is the same as it was when you suspended the virtual machine.
Scheduling a Power State Change for a Virtual Machine
You can create a scheduled task to power on, power off, or suspend a virtual machine at a designated time.
When you create the scheduled task, vCenter Server verifies that you have the correct permissions to perform
the actions on the relevant datacenters, hosts, and virtual machines. Once the task is created, the task is
performed even if you no longer have permission to perform the task.
Adding and Removing Virtual Machines
You add virtual machines to the vCenter Server inventory through their managed hosts. You can remove
virtual machines from vCenter Server, from their managed host’s storage, or both.
Adding Existing Virtual Machines to vCenter Server
When you add a host to vCenter Server, it discovers all the virtual machines on that managed host and adds
them to the vCenter Server inventory.
If a managed host is disconnected, the already discovered virtual machines continue to be listed in the
inventory.
If a managed host is disconnected and reconnected, any changes to the virtual machines on that managed host
are identified, and the vSphere Client updates the list of virtual machines. For example, if node3 is removed
and node4 is added, the new list of virtual machines adds node4 and shows node3 as orphaned.
Remove Virtual Machines from vCenter Server
Removing a virtual machines from the inventory unregisters it from the host and vCenter Server. It does not
delete it from the datastore. Virtual machine files remain at the same storage location and the virtual machine
can be re-registered using the datastore browser.
Prerequisites
Power off the virtual machine.
Procedure
1
Display the virtual machine in the inventory.
2
Right-click the virtual machine and select Remove from Inventory.
3
To confirm that you want to remove the virtual machine from the inventory, click OK.
vCenter Server removes references to the virtual machine and no longer tracks its condition.
VMware, Inc.
139
vSphere Basic System Administration
Remove Virtual Machines from the Datastore
Use the Delete from Disk option to remove a virtual machine from vCenter Server and delete all virtual
machine files, including the configuration file and virtual disk files, from the datastore.
Prerequisites
Power off the virtual machine.
Procedure
1
Display the virtual machine in the inventory.
2
Right-click the virtual machine and select Delete from Disk.
3
Click OK in the confirmation dialog box.
vCenter Server deletes the virtual machine from its datastore. Disks that are shared with other virtual machines
are not deleted.
Return a Virtual Machine or Template to vCenter Server
If you removed a virtual machine or template from vCenter Server, but did not remove it from the managed
host’s datastore, you can return it to vCenter Server using the Datastore Browser.
Procedure
1
Display the datastore in the inventory.
2
Right-click the datastore and select Browse Datastore.
3
Navigate to the virtual machine or template to add to the inventory.
4
Right-click the virtual machine or template and select Add to Inventory.
5
Complete the Add to Inventory wizard to add the virtual machine or template.
Configure Virtual Machine Startup and Shutdown Behavior
You can configure a virtual machine to start up and shut down automatically, or you can disable this function.
You can also set the default timing and the startup order for specified virtual machines when the system host
starts.
Procedure
1
In the inventory, display the host where the virtual machine is located.
2
Select the host and click the Configuration tab.
3
Click Virtual Machine Startup/Shutdown, and click Properties.
4
Select Allow virtual machines to start and stop automatically with the system.
5
Click Continue immediately if the VMware Tools starts to have the operating system boot immediately
after VMware Tools starts.
6
To have the operating system start after a brief delay, enter a Default Startup Delay time.
This delay allows time for VMware Tools or the booting system to run scripts.
7
140
Select a shutdown action.
VMware, Inc.
Chapter 12 Managing Virtual Machines
8
Enter a Default Shutdown Delay value to delay shutdown for each virtual machine by a certain amount
of time.
This shutdown delay applies only if the virtual machine has not already shut down before the delay period
elapses. If the virtual machine shuts down before that delay time is reached, the next virtual machine starts
shutting down.
9
Use Move Up and Move Down to specify the order in which the virtual machines start when the system
starts.
10
To configure user-specified autostartup and autoshutdown behavior for any virtual machine, select the
virtual machine and click Edit.
VMware, Inc.
141
vSphere Basic System Administration
142
VMware, Inc.
Virtual Machine Configuration
13
You can configure virtual machines at any time—during the virtual machine creation process or after you
create the virtual machine and install the guest operating system.
You can configure virtual machines using two tools in the vSphere Client: the Virtual Machine Properties editor
and the Add Hardware wizard. These dialog boxes also allow you to control advanced virtual machine
configuration options. You can also upgrade the virtual hardware of a virtual machine or convert virtual disks
from thin to thick using these dialog boxes.
You must have sufficient permission to perform virtual machine configuration tasks.
This chapter includes the following topics:
n
“Virtual Machine Hardware Versions,” on page 143
n
“Virtual Machine Properties Editor,” on page 144
n
“Adding New Hardware,” on page 159
n
“Converting Virtual Disks from Thin to Thick,” on page 166
Virtual Machine Hardware Versions
All virtual machines have a hardware version. The hardware version of a virtual machine indicates the lowerlevel virtual hardware features supported by the virtual machine, such as BIOS, number of virtual slots,
maximum number of CPUs, maximum memory configuration, and other characteristics typical to hardware.
The default virtual machine hardware version of a newly created virtual machine is the most recent version
available on the host where the virtual machine is created. If you need to create a virtual machine with a
hardware version older than the highest supported in order to increase compatibility, you can use the custom
virtual machine creation path. The hardware version of a virtual machine can be lower than the highest version
supported by the ESX/ESXi host it is running on if:
n
You migrate a virtual machine created on an ESX/ESXi 3.x or earlier host to an ESX/ESXi 4.x host.
n
You create a new virtual machine on an ESX 4.x host using an existing virtual disk that was created on an
ESX/ESXi 3.x or earlier host.
n
You add a virtual disk created on an ESX/ESXi 3.x or earlier host to a virtual machine created on an
ESX/ESXi 4.x host.
Virtual machines with hardware versions lower than 4 can run on ESX/ESXi 4.x hosts but have reduced
performance and capabilities. In particular, you cannot add or remove virtual devices on virtual machines with
hardware versions lower than 4 when they reside on an ESX/ESXi 4.x host. To make full use of these virtual
machines, upgrade the virtual hardware as described in the Upgrade Guide.
VMware, Inc.
143
vSphere Basic System Administration
Table 13-1 lists virtual machine hardware versions, the ESX/ESXi versions on which they can be created, edited,
and run, the vCenter Server versions on which they are fully supported, and a brief description of the hardware
version’s capabilities.
Table 13-1. Virtual Machine Hardware Versions
Version 7
Version 4
Version 3
Compatible with vCenter
Server version
ESX/ESXi 4.x
create, edit, run
create, edit, run
run
vCenter Server 4.x
ESX Server 3.x
–
create, edit, run
run
VirtualCenter Server 2.x and
higher
ESX Server 2.x
–
–
create, edit, run
VirtualCenter Server 1.x and
higher
NOTE Virtual machine hardware version 4 may be listed as VM3 in documentation for earlier versions of ESX
and ESXi. Virtual machine hardware version 3 may be listed as VM2 in documentation for earlier versions of
ESX.
Determine the Hardware Version of a Virtual Machine
You can determine the hardware version of a virtual machine by looking in the Summary tab for the virtual
machine or the Virtual Machine Properties dialog box.
Procedure
1
Select the virtual machine in the inventory.
2
Select one of the two methods for viewing the version information.
Option
Description
Select the Summary tab.
The virtual machine hardware version appears at the top right corner of the
Summary tab.
Right-click and select Edit Settings.
The virtual machine hardware version appears at the top right corner of the
Virtual Machine Properties dialog box.
Virtual Machine Properties Editor
The Virtual Machine Properties editor allows you to change nearly every characteristic that you selected when
you created the virtual machine.
Edit an Existing Virtual Machine Configuration
You can edit almost all of the configuration for a virtual machine with the Virtual Machine Properties dialog
box.
Some properties of a virtual machine can be changed only while it is powered off, but you can open the
properties editor regardless of the power state. Some of the controls are read-only if the virtual machine is not
powered off.
NOTE If a virtual machine is on a host managed by vCenter Server, be sure to connect to vCenter Server when
adding or modifying virtual hardware for the virtual machine. If you connect the vSphere Client directly to
the host, add hardware operations might fail with the error message Cannot complete operation due to
concurrent modification by another operation.
Procedure
1
144
From the vSphere Client, click Inventory in the navigation bar.
VMware, Inc.
Chapter 13 Virtual Machine Configuration
2
Expand the inventory as needed, and select the virtual machine you want to edit.
3
(Optional) Power off the virtual machine.
4
Click the Edit Settings link in the Commands panel to display the Virtual Machine Properties dialog box.
The Virtual Machine Properties dialog box appears. There are three tabs: Hardware, Options, and
Resources.
5
Select a tab and edit the virtual machine configuration.
What to do next
Refer to the following sections for more information about the tabs in the Virtual Machine Properties dialog
box and editing existing virtual machines.
n
“Virtual Machine Hardware Configuration,” on page 145
n
“Virtual Machine Options,” on page 150
n
“Virtual Machine Resource Settings,” on page 155
Virtual Machine Hardware Configuration
You can add, edit, or remove hardware from your virtual machine.
The status of the device, such as edited or adding, appears in parentheses next to the hardware listing. The
selected guest operating system determines the devices that are available to be added to a given virtual
machine. The devices that can be added are:
n
Serial port
n
Parallel port
n
Floppy drive
n
DVD/CD-ROM drive
n
USB Controller
n
Ethernet adapter
n
Hard disk
n
SCSI device
Change the Video Card Configuration
Virtual video cards cannot be added or removed. You can configure a virtual video card to select the maximum
number of displays and set the amount of video memory allocated.
Procedure
1
In the vSphere Client inventory, right-click on a virtual machine and select Edit Settings.
2
Select the Hardware tab.
3
Select Video card.
4
Select the number of displays.
5
Select a memory option.
The default setting for total video RAM is 4MB, which is sufficient for a maximum screen resolution of
1176x885. For higher screen resolutions, set this option to 16MB.
VMware, Inc.
145
vSphere Basic System Administration
Change the DVD/CD-ROM Drive Configuration
Use the Hardware tab in the Virtual Machine Properties dialog box to configure a DVD/CD-ROM drive for a
virtual machine.
Procedure
1
In the Virtual Machine Properties Editor, click the Hardware tab.
2
Click the DVD/CD-ROM drive in the Hardware list.
3
Select or deselect the Connected check box to connect or disconnect the device.
4
If you do not want the CD-ROM drive connected when the virtual machine starts, deselect Connect at
power on.
5
Select whether to use a client device, host device, or ISO file.
Option
Description
Client Device
Select this option to connect the DVD/CD-ROM device to a physical DVD or
CD-ROM device on the system running the vSphere Client.
To connect the device, you must click the Connect CD/DVD button in the
toolbar when you power on the virtual machine.
Host Device
a
b
Datastore ISO File
a
b
6
Select this option to connect the DVD/CD-ROM device to a physical DVD
or CD-ROM device on the host.
Select the specific device from the drop-down list.
Select this option to connect the DVD/CD-ROM device to an ISO file
stored on a datastore accessible to the host.
Click Browse and select the ISO file.
For client devices, select the mode used for the connection.
n
Use Pass-through (raw) mode only for remote client device access.
n
Use ATAPI emulation to access a host CD-ROM device.
The host CD-ROM device is accessed through emulation mode. Pass-through mode is not functional
for local host CD-ROM access. You can write or burn a remote CD only through pass-through mode
access, but in emulation mode you can only read a CD-ROM from a host CD-ROM device.
7
Alternatively, select Use ISO Image to connect the virtual machine’s drive to an ISO image file.
8
If you selected Use ISO Image, click Browse to navigate to the file.
9
Under Virtual device node, use the drop-down menu to select the device node the drive uses in the virtual
machine.
10
Click OK to save your changes and close the dialog box.
Change the Floppy Drive Configuration
Use the Hardware tab in the Virtual Machine Properties dialog box to configure a floppy drive for a virtual
machine.
Procedure
146
1
In the Virtual Machine Properties Editor, click the Hardware tab.
2
Click the floppy drive in the Hardware list.
3
Under Device Status, select Connect at power on to connect this virtual machine to the floppy drive when
the virtual machine is powered on.
VMware, Inc.
Chapter 13 Virtual Machine Configuration
4
Select the device type to use for this virtual device.
Option
Description
Client Device
Select this option to connect the floppy device to a physical floppy device on
the system running the vSphere Client.
To connect the device, you must click the Connect Floppy button in the
toolbar when you power on the virtual machine.
Host Device
a
b
Use existing floppy image in
datastore
a
b
Create new floppy image in datastore
a
b
c
5
Select this option to connect the floppy device to a physical floppy device
on the host.
Select the specific device from the drop-down list.
Select this option to connect the virtual device to an existing floppy image
on a datastore accessible to the host.
Click Browse and select the floppy image.
Select this option to create a new floppy image on a datastore accessible
to the host.
Click Browse and browse to the location for the floppy image.
Enter a name for the floppy image and click OK.
Click OK to save your changes and close the dialog box.
Change the SCSI Device Configuration
You can change the physical device and the virtual device node of the SCSI device connection.
Procedure
1
In the Virtual Machine Properties Editor, click the Hardware tab.
2
Select the SCSI device in the Hardware list.
3
Under Connection, select the physical device you want to use.
Under Virtual device node, select the virtual device node where you want this device to appear in the
virtual machine.
4
Click OK to save your changes and close the dialog box.
Change the Virtual Disk Configuration
You can change the virtual device node, the size of the disk, and the persistence mode for virtual disk
configuration for a virtual machine.
NOTE The Manage Paths feature for RDM disks is not available for virtual machines on legacy hosts running
versions of ESX Server prior to release 3.0.
Procedure
1
In the Virtual Machine Properties Editor, click the Hardware tab.
2
Click the appropriate Hard Disk in the Hardware list.
3
Use the drop-down menu to change the virtual device node.
4
To change the size of the disk, enter a new value in the Provisioned Size text box.
5
For independent mode, which is unaffected by snapshots, select the check box. Then select Persistent or
Nonpersistent mode to determine the persistence of changes.
6
Click OK to save your changes and close the dialog box.
VMware, Inc.
147
vSphere Basic System Administration
Change the Memory Configuration
You can change the memory configuration of a virtual machine's hardware when the virtual machine is
powered on or powered off.
When you add memory to a virtual machine while it is powered on, the amount you add cannot exceed 16
times the amount of memory the virtual machine had when it was powered on.
Procedure
1
In the Virtual Machine Properties Editor, click the Hardware tab.
2
Click Memory in the Hardware list.
3
Adjust the amount of memory allocated to the virtual machine.
4
Click OK to save your changes and close the dialog box.
Change the Virtual Ethernet Adapter (NIC) Configuration
You can change the power-on connection setting, the MAC address, and the network connection for the virtual
Ethernet adapter configuration for a virtual machine.
Procedure
1
Click the Hardware tab.
2
Click the appropriate NIC in the Hardware list.
3
To connect the virtual NIC when the virtual machine is powered on, select Connect at power on.
4
Select an option for MAC address configuration.
n
Select Automatic to assign a MAC address automatically.
n
Select Manual and enter a MAC address to use a manual MAC address assignment.
5
Under Network connection, use the drop-down menu to select the network label you want the virtual
machine to use.
6
Click OK to save your changes and close the dialog box.
Change the Parallel Port Configuration
You can use a physical parallel port or an output file to configure a parallel port for a virtual machine.
Procedure
1
In the Virtual Machine Properties Editor, click the Hardware tab.
2
Click the appropriate Parallel port in the Hardware list.
3
Deselect the Connect at power on check box if you do not want the parallel port device to be connected
when the virtual machine powers on.
The default setting is Connect at power on.
4
5
148
Under Connection, select a button to indicate a physical parallel port or to connect the virtual parallel port
to a file.
n
If you select Use physical parallel port, select the port from the drop-down menu.
n
If you select Use output file, browse to the file location.
Click OK to save your changes and close the dialog box.
VMware, Inc.
Chapter 13 Virtual Machine Configuration
Change the SCSI Controller or SCSI Bus Sharing Configuration
You can set the SCSI controller type and the type of SCSI bus sharing for a virtual machine. SCSI bus sharing
can set to none, virtual, or physical sharing types.
You can change the SCSI controller configuration for a virtual machine on an ESX/ESXi host only.
CAUTION Changing the SCSI controller type might result in a virtual machine boot failure.
You can also specify whether the SCSI bus is shared. Depending on the type of sharing, virtual machines can
access the same virtual disk simultaneously on the same server or any server.
Procedure
1
In the Virtual Machine Properties Editor, click the Hardware tab.
2
Click the appropriate SCSI Controller in the Hardware list.
3
Under SCSI Controller Type, click Change Type.
4
Select the SCSI controller type.
5
Click OK.
6
Select the type of sharing in the SCSI Bus Sharing list:
7
Option
Description
None
Virtual disks cannot be shared by other virtual machines.
Virtual
Virtual disks can be shared by virtual machines on same server.
Physical
Virtual disks can be shared by virtual machines on any server.
Click OK to save your changes and close the dialog box.
Change the Serial Port Configuration
You can use a physical serial port, an output file, or a named pipe to configure a serial port for a virtual machine.
Procedure
1
In the Virtual Machine Properties Editor, click the Hardware tab.
2
Click the appropriate Serial port in the Hardware list.
3
If you selected Use physical serial port on the host, use the drop-down menu to select the port on the
host computer that you want to use for this serial connection.
4
If you selected Use output file, browse to the location of the file on the host that you want to use to store
the output of the virtual serial port.
5
If you selected Use named pipe, use the default pipe name or enter another pipe name of your choice in
the Pipe Name list.
For a serial pipe for a virtual machine on an ESX host for Linux, enter /tmp/<socket> or another UNIX
socket name of your choice.
Then decide whether you are connecting two virtual machines or connecting a virtual machine to an
application on the host.
VMware, Inc.
149
vSphere Basic System Administration
6
7
If you are connecting two virtual machines, you must configure a serial port as a named pipe in two virtual
machines: a server virtual machine and a client virtual machine.
a
For the server virtual machine, select Server in the Near end list.
b
For the client virtual machine, select Client in the Near end list.
c
Select A virtual machine in the Far end list.
If you are connecting to an application on the host, do the following:
a
Select Server or Client in the Near end list. In general, select Server if you plan to start this end of
the connection first.
b
Select An application in the Far end list.
By default, the serial port is connected when you power on the virtual machine. You might deselect the
Connect at power on check box (optional).
8
Under I/O Mode, decide whether to configure this serial port to use interrupt mode or polled mode.
Polled mode is of interest primarily to developers who are using debugging tools that communicate over
a serial connection.
Polled mode causes the virtual machine to consume a disproportionate share of processor (or CPU) time.
This makes the host and other guests run sluggishly. To maintain best performance for applications on
the host, select the Yield CPU on poll check box. This forces the affected virtual machine to use interrupt
mode, which yields processor (or CPU) time if the only task it is trying to do is poll the virtual serial port.
9
Click OK to save your changes and close the dialog box.
Change the Virtual Processor or CPU Configuration
You can configure more than one virtual processor or CPU for a virtual machine using VMware Virtual SMP
for ESX.
If the virtual machine is on an ESX/ESXi host, you can configure a virtual machine to have up to eight virtual
processors or CPUs. Virtual machines cannot have more virtual CPUs than the actual number of logical CPUs
on the host—that is, the number of physical processor cores if hyperthreading is disabled or two times the
number of physical processor cores if hyperthreading is enabled. For more information about using SMP,
consult the VMware Knowledge Base.
NOTE Not all guest operating systems support SMP, and some that do require reinstallation if the number of
CPUs changes.
Procedure
1
In the Virtual Machine Properties Editor, click the Hardware tab.
2
Click Virtual Processor or CPU in the Hardware list.
3
Select the number of virtual processors for the virtual machine.
4
Click OK to save your changes and close the dialog box.
Virtual Machine Options
The virtual machine options define a range of virtual machine properties such as name, vApp functionality,
its behavior with the guest operating system and VMware Tools, and other Advanced options.
150
VMware, Inc.
Chapter 13 Virtual Machine Configuration
You can change the following settings in the Options tab of the Virtual Machine Properties Editor:
General Options
Virtual machine display name and type of guest operating system. (Read-only)
location of virtual machine and its configuration file.
Appliance Options
Virtual machine options for functionality, product information, properties, and
OVF settings specific to virtual appliances.
VMware Tools
Power Controls behavior, VMware Tools scripts and automatic updates.
Power Management
Virtual machine Suspend behavior.
Advanced > General
Acceleration, logging, debugging and statistics.
Advanced > CPUID Mask
NX flag and advanced identification mask options.
Advanced >
Memory/CPU Hotplug
Hot add enablement for individual virtual machines.
Advanced > Boot
Options
Virtual machine boot options.
Advanced >
Paravirtualization
VMI paravirtualization enablement
Advanced > Fibre
Channel NPIV
Virtual node and port World Wide Names (WWNs).
Advanced > CPU/MMU
Virtualization
Settings for enabling Hardware Page Table Virtualization.
Advanced > Swapfile
Location
Swapfile location.
Change the General Settings of a Virtual Machine
Change the virtual machine name and guest operating system settings in the General Options in the Virtual
Machine Properties dialog box.
Procedure
1
Click the Options tab.
2
Select General Options in the Settings list.
The virtual machine name appears in the Virtual machine name field.
Changing the name does not change the name of any virtual machine files or the associated directory.
3
Select an operating system and version.
4
Click OK to save your changes and close the dialog box.
Change the VMware Tools Options for a Virtual Machine
You can change the power controls, the time VMware Tools scripts run, the upgrade check option, and the
time synchronization option with the VMware Tools settings for a virtual machine.
VMware Tools options cannot be changed while the virtual machine is powered on.
Procedure
1
VMware, Inc.
Click the Options tab.
151
vSphere Basic System Administration
2
Select VMware Toolsin the Settings list.
The stop button on the toolbar can be configured to power off the virtual machine, shut down the guest
operating system, or use the system default. The pause button on the toolbar can be configured to suspend
the virtual machine or use the system default. The reset button on the toolbar can be configured to reset
the virtual machine, restart the guest operating system, or use the system default.
3
Select the actions you want from the drop-down menus under Power Controls.
4
(Optional) Configure VMware Tools scripts to run when you change the virtual machine’s power state by
selecting options under Run VMware Tools scripts.
NOTE For ESX host virtual machines, there are no scripts for resuming and suspending virtual machines.
5
(Optional) Configure VMware Tools to check for and install updates before each power on by selecting
the Check and upgrade Tools before each power on option under Automatic VMware Tools Upgrade.
6
(Optional) Configure the guest operating system to synchronize time with the host by selecting the
Synchronize guest time with host option.
7
Click OK to save your changes and close the dialog box.
Change Power Management Settings for a Virtual Machine
Power Management allows you to determine how the virtual machine responds when the guest operating
system is placed on standby.
Procedure
1
Click the Options tab.
2
Select Power Management in the Settings list.
3
Under Guest Power Management, select either Suspend the virtual machine or Put the guest operating
system in standby mode and leave the virtual machine powered on.
4
(Optional) If you chose to leave the virtual machine on, select Wake on LAN for virtual machine traffic
on your virtual machine network by selecting the check box.
Not all guest operating systems support Wake on LAN. Only the following types of NICs support Wake
on LAN:
n
Flexible (VMware Tools required).
n
vmxnet
n
Enhanced vmxnet
n
vmxnet 3
Options are disabled if they are not supported.
5
Click OK to save your changes and close the dialog box.
Change Advanced Virtual Machine Settings
The virtual machine options define a range of virtual machine properties such as name, vApp functionality,
its behavior with the guest operating system and VMware Tools, and other Advanced options.
Procedure
1
152
Click the Options tab.
VMware, Inc.
Chapter 13 Virtual Machine Configuration
2
Select Advanced > General in the Settings list.
a
To disable acceleration, select the Disable acceleration check box.
You can enable and disable acceleration while the virtual machine is running.
In rare instances, you might find that when you install or run software inside a virtual machine, the
virtual machine appears to stop responding. Generally, the problem occurs early in the program’s
execution. In many cases, you can get past the problem by temporarily disabling acceleration in the
virtual machine.
This setting slows down virtual machine performance, so use it only for getting past the problem with
running the program. After the program stops encountering problems, deselect Disable
acceleration. You might then be able to run the program with acceleration.
3
b
To enable logging mode, select the Enable logging check box.
c
To enable debugging mode, select an option from the Debugging and Statistics section. Debugging
information and statistics can be helpful to VMware technical support in resolving issues.
d
To set advanced configuration parameters, click Configuration Parameters. Generally, you should
only change these settings if you intend to use experimental features or when instructed to do so by
a VMware technical support representative.
Select Advanced > CPUID Mask.
a
Specify whether you want to hide the host’s CPU NX flag from the guest operating system.
Hiding the NX flag prevents the guest operating system from making use of this CPU feature, but
enables the virtual machine to be moved to hosts that do not include the NX feature. When the NX
flag is visible, the guest operating system can make use of the feature, but the virtual machine can be
moved only to hosts with the NX capability.
b
Click Advanced to access the CPU Identification Mask dialog box. An explanation of the symbols in
this dialog box is available by clicking Legend.
NOTE The virtual machine must be powered off before you can change this setting.
4
5
Select Advanced > Memory/CPU Hotplug. VMware Tools must be installed for hotplug functionality to
work properly.
a
Select Enable memory hot add for this virtual machineto enable memory hot add, or select Disable
memory hot add for this virtual machine to disable this feature.
b
Select Enable CPU hot add only for this virtual machineto enable CPU hot add, select Enable CPU
hot add and remove for this virtual machineto enable CPU hot add and remove, or select Disable
CPU hot plug for this virtual machine to disable this feature.
Select Advanced > Boot Options.
a
Specify the duration in milliseconds you want to delay entering the boot sequence when the virtual
machine is powered on or restarted.
b
Select the option under Force BIOS Setup to have the virtual machine enter BIOS setup when it boots.
These options are useful when you need to enter the virtual machine’s BIOS setup because sometimes
the console attaches to the virtual machine after the boot sequence passes the point where you can
enter BIOS.
VMware, Inc.
153
vSphere Basic System Administration
6
Select Advanced > Paravirtualization. Select Support VMI Paravirtualization to enable VMI
Paravirtualization to enable it, or deselect it to disable this feature.
VMI is a paravirtualization standard that enables improved performance for virtual machines capable of
utilizing it. Currently, this feature is available only for those versions of the Linux guest operating system
which support VMI paravirtualization.
NOTE Enabling paravirtualization utilizes one of the virtual machine’s six virtual PCI slots. Also, enabling
paravirtualization can limit how and where the virtual machine can be migrated. Consider the following
before enabling this feature:
7
n
These hosts support VMI paravirtualization: ESX/ESXi 3.5 and greater, and Workstation 6.0 and
greater. Hardware version 4 virtual machines with paravirtualization enabled that are created on ESX
hosts can be migrated to Workstation hosts without loss of functionality.
n
A virtual machine with paravirtualization enabled and that is powered off can be moved manually
to a host that does not support paravirtualization. However, this can result in reduced performance.
n
A virtual machine with paravirtualization enabled and that is powered on or in a suspended power
state can not be migrated to a host that does not support paravirtualization.
n
Automated vCenter Server DRS migrations of virtual machines with paravirtualization enabled to
hosts that do not support paravirtualization are not allowed.
Select Advanced > Fibre Channel NPIV Settings.
N-port ID virtualization (NPIV) provides the ability to share a single physical Fibre Channel HBA port
among multiple virtual ports, each with unique identifiers. This allows control over virtual machine access
to LUNs on a per-virtual machine basis.
Each virtual port is identified by a pair of world wide names (WWNs): a world wide port name (WWPN)
and a world wide node name (WWNN). These WWNs are assigned by vCenter Server.
NPIV support is subject to the following limitations:
n
NPIV must be enabled on the SAN switch. Contact the switch vendor for information about enabling
NPIV on their devices.
n
NPIV is supported only for virtual machines with RDM disks. Virtual machines with regular virtual
disks continue to use the WWNs of the host’s physical HBAs.
n
The physical HBAs on the ESX host must have access to a LUN using its WWNs in order for any
virtual machines on that host to have access to that LUN using their NPIV WWNs. Ensure that access
is provided to both the host and the virtual machines.
n
The physical HBAs on the ESX host must support NPIV. If the physical HBAs do not support NPIV,
the virtual machines running on that host will fall back to using the WWNs of the host’s physical
HBAs for LUN access.
n
Each virtual machine can have up to 4 virtual ports. NPIV-enabled virtual machines are assigned
exactly 4 NPIV-related WWNs, which are used to communicate with physical HBAs through virtual
ports. Therefore, virtual machines can utilize up to 4 physical HBAs for NPIV purposes.
To view or edit a virtual machine’s WWNs:
154
a
To edit the virtual machine’s WWNs, power off the virtual machine.
b
Ensure that the virtual machine has a datastore containing a LUN that has been made available to the
host.
c
Select the Options tab.
d
Select Fibre Channel NPIV.
e
Currently assigned WWNs are displayed in the WWN Assignments box.
VMware, Inc.
Chapter 13 Virtual Machine Configuration
f
g
Do one of the following:
n
To leave WWNs unchanged, select Leave unchanged.
n
To have vCenter Server or the ESX host generate new WWNs, select Generate New WWNs.
n
To remove the current WWN assignments, select Remove WWN assignment.
Click OK to save your changes and close the dialog box.
NOTE A virtual machine with WWNs that are already in use on the storage network is prevented
from powering on. To solve this issue, generate new WWNs or remove them.
Provide the WWN assignments to your SAN administrator. The administrator needs those assignments
to configure virtual machine access to the LUN. For more information on how to configure NPIV for a
virtual machine, see the Fibre Channel SAN Configuration Guide.
8
Select Advanced > Virtualized MMU and specify whether to disable the feature, always use the feature
where available, or have the host system determine whether the feature should be used.
9
Select Advanced > Swapfile Location.
10
Select one of the following options:
n
Default — Store the virtual machine swapfile at the default location defined by the host or cluster
swapfile settings. See “Host Configuration,” on page 47 for more information on host swapfile
settings. See the Resource Management Guide for more information on cluster settings.
n
Always store with the virtual machine— Store the virtual machine swapfile in the same folder as the
virtual machine configuration file.
n
Store in the host’s swapfile datastore— Store the virtual machine swapfile in the swapfile datastore
defined by the host or cluster swapfile settings.
Virtual Machine Resource Settings
In the Virtual Machine Properties dialog box, you can adjust the host resource allocation for the selected virtual
machine. You can change CPU, memory, disk, and advanced CPU resources from this tab.
For more information on resources, see the Resource Management Guide.
CPU Resources
The CPU Resources panel of the Virtual Machine Properties dialog box lets you allocate processor resources
for a virtual machine, specifying reservations, limits, and shares.
You can edit some of the same information on the Resource Pools tab of the main vSphere Client window,
which you might do to edit resource settings at the same time you edited other virtual machine settings.
Change CPU Settings of a Virtual Machine
Use the Resources tab in the Virtual Machine Properties dialog box to change the CPU settings of a virtual
machine.
Procedure
1
Click the Resources tab.
2
Select CPU in the Settings list.
VMware, Inc.
155
vSphere Basic System Administration
3
Select a shares value, which represents a relative metric for allocating CPU capacity.
Option
Description
Shares
The values Low, Normal, High, and Custom are compared to the sum of all
shares of all virtual machines on the server and, on ESX/ESXi hosts, the
service console. Share allocation symbolic values can be used to configure
their conversion into numeric values.
Reservation
Guaranteed CPU allocation for this virtual machine.
Limit
Upper limit for this virtual machine’s CPU allocation. Select Unlimited to
specify no upper limit.
For more information on share values, see the Resource Management Guide.
4
Click OK to save your changes.
The Virtual Machine Properties dialog box closes.
Advanced CPU Settings
The Advanced CPU Resources panel of the Virtual Machine Properties dialog box lets you set low-level options
that involve scheduling the virtual machine processing to physical processor cores and hyperthreads.
This panel does not appear for virtual machines in a DRS cluster or when the host has only one processor core
and no hyperthreading.
NOTE Hyperthreading technology allows a single physical processor to behave like two logical processors.
The processor can run two independent applications at the same time. While hyperthreading does not double
the performance of a system, it can increase performance by better utilizing idle resources. For detailed
information about hyperthreading and its use in vSphere, see the Resource Management Guide (select Help >
Manuals).
ESX generally manages processor scheduling well, even when hyperthreading is enabled. The settings on this
page are useful only for fine-grained tweaking of critical virtual machines.
The Hyperthreading Sharing option provides detailed control over whether a virtual machine should be
scheduled to share a physical processor core (assuming hyperthreading is enabled on the host at all).
The Scheduling Affinity option allows fine-grained control over how virtual machine CPUs are distributed
across the host's physical cores (and hyperthreads if hyperthreading is enabled).
Change Advanced CPU Settings of a Virtual Machine
Set the hyperthreaded core sharing mode for a virtual machine's advanced CPU settings in the Resource tab
of the Virtual Machine Properties dialog box.
Procedure
156
1
Click the Resources tab.
2
Select Advanced CPUin the Settings list.
VMware, Inc.
Chapter 13 Virtual Machine Configuration
3
4
Select Hyperthreading Sharing Mode from the drop-down menu.
Option
Description
Any
(default) The virtual CPUs of this virtual machine can freely share cores with
other virtual CPUs of this or other virtual machines.
None
The virtual CPUs of this virtual machine have exclusive use of a processor
core whenever they are scheduled to it. The other hyperthread of the core is
halted while this virtual machine is using the core.
Internal
On a virtual machine with exactly two virtual processors, the two virtual
processors are allowed to share one physical core (at the discretion of the
host scheduler), but this virtual machine never shares a core with any other
virtual machine. If this virtual machine has any other number of processors
other than two, this setting is the same as the None setting.
Select to schedule affinity by selecting the Run on processor(s) button.
NOTE This option is not allowed when the virtual machine resides on a DRS cluster, and its values are
cleared when a virtual machine is migrated to a new host. The value of the option is only in tuning the
performance of a precise set of virtual machines on the same host.
The check boxes for the individual processors represent physical cores if hyperthreading is disabled or
logical cores (two per physical core) if hyperthreading is enabled. Checking all the boxes is the same as
not applying any affinity. You must provide at least as many processor affinities as the number of virtual
CPUs in the virtual machine.
5
Click OK to save your changes.
The Virtual Machine Properties dialog box closes.
Memory Resources
The Memory Resources panel lets you allocate memory resources for a virtual machine and specify
reservations, limits, and shares.
You can edit some of the same information on the Resource Pools tab of the main vSphere Client window,
which you might do to edit resource settings at the same time as other virtual machine settings.
Change the Memory Settings of a Virtual Machine
You can select a relative metric for allocating memory to all virtual machines on a host.
Procedure
1
Click the Resources tab.
2
Select Memory in the Settings list.
3
From the drop-down menu in the Resource allocation panel, select a relative metric for allocating memory
to all virtual machines.
Symbolic values Low, Normal, High, and Custom are compared to the sum of all shares of all virtual
machines on the server and, on an ESX host, the service console. Share allocation symbolic values can be
used to configure their conversion into numeric values.
4
In the Resource allocation panel, use the slider to select the amount of reserved memory and the memory
limit, or use the up and down arrows to enter the number of MBs allocated.
For more information on memory values, see the mem man page.
5
Click OK to save your changes.
The Virtual Machine Properties dialog box closes.
VMware, Inc.
157
vSphere Basic System Administration
Advanced Memory Resources
The Advanced Memory Resources page lets you set low-level options that involve distribution of virtual
machine memory to NUMA memory nodes.
This page appears only if the host utilizes the NUMA memory architecture. Because affinity settings are
meaningful only when used to tweak the performance of a specific set of virtual machines on one host, this
page also is not displayed when the virtual machine resides on a DRS cluster. The option values are cleared
when the virtual machine is moved to a new host.
NUMA memory node affinity enables fine-grained control over how virtual machine memory is distributed
to host physical memory. Checking all the boxes is the same as applying no affinity.
Consult the Resource Management Guide for details about NUMA and advanced memory resources.
NOTE Specify nodes to be used for future memory allocations only if you have also specified CPU affinity. If
you make manual changes only to the memory affinity settings, automatic NUMA rebalancing does not work
properly.
Associate Memory Allocations with a NUMA Node
Use the Resources tab in the Virtual Machine Properties dialog box to associate memory allocations with a
NUMA node.
Procedure
1
Select the Resources tab, and select Memory.
2
In the NUMA Memory Affinity panel, set memory affinity.
Disk Resources
The Disk Resources panel lets you allocate host disk I/O bandwidth to the virtual hard disks of this virtual
machine.
Disk I/O is a host-centric resource and cannot be pooled across a cluster. However, CPU and memory resources
are much more likely to constrain virtual machine performance than disk resources.
Change the Disk Settings of a Virtual Machine
You can adjust the host disk allocation for a virtual machine.
Procedure
1
Click the Resources tab.
2
Select Disk in the Settings list.
3
In the Resource Allocation panel, select the virtual hard disk from the list.
4
Click in the Shares field. Use the drop-down menu to change the value to allocate a number of shares of
its disk bandwidth to the virtual machine.
Shares is a value that represents the relative metric for controlling disk bandwidth to all virtual machines.
The values Low, Normal, High, and Custom are compared to the sum of all shares of all virtual machines
on the server and, on an ESX/ESXi host, the service console. Share allocation symbolic values can be used
to configure their conversion into numeric values.
5
158
Click OK to save your changes.
VMware, Inc.
Chapter 13 Virtual Machine Configuration
Adding New Hardware
You can add virtual hardware to a virtual machine using the Add Hardware wizard.
The virtual hardware that you add appears in the hardware list displayed in the Virtual Machine Properties
wizard. The selected guest operating system determines the devices that are available to add to a given virtual
machine.
Virtual machine hardware can be reconfigured while the virtual machine is running, if the following conditions
are met:
n
The virtual machine has a guest operating system that supports hot-plug functionality. See the Guest
Operating System Installation Guide.
n
The virtual machine is using hardware version 7.
n
Virtual CPUs can only be added while the virtual machine is running if CPU Hot Plug has been enabled
on the Options tab of the Virtual Machine Properties dialog box.
NOTE If a virtual machine is on a host managed by vCenter Server, be sure to connect to vCenter Server when
adding or modifying virtual hardware for the virtual machine. If you connect the vSphere Client directly to
the host, add hardware operations might fail with the error message Cannot complete operation due to
concurrent modification by another operation.
Rescan a Host
You rescan a host to ensure that it detects changes made to storage adapter or SAN configuration.
Procedure
1
Select a host.
2
Select the Configuration tab.
3
Click Network Adapters in the Hardware section.
4
Click Rescan.
5
Select New Storage Devices
6
Click OK.
Start the Add Hardware Wizard
The Add Hardware Wizard enables you to reconfigure a virtual machine’s hardware.
Procedure
1
In the vSphere Client, click Inventory in the navigation bar. Expand the inventory as needed, and click
the appropriate virtual machine.
2
To display the Virtual Machine Properties dialog box, click the Edit Settings link in the Commands panel.
3
Click the Hardware tab.
4
Click Add to start the Add Hardware wizard.
VMware, Inc.
159
vSphere Basic System Administration
Add a Serial Port to a Virtual Machine
When you add a serial port to a virtual machine, you can use a physical serial port on the host, an output file,
or a named pipe.
Procedure
1
Start the Add Hardware wizard.
2
Select Serial Port, and click Next.
3
Select the type of media you want the virtual port to access: use a physical serial port on the host, output
to a file, or connect to a named pipe.
4
Click Next.
5
If you selected Use physical serial port on the host, use the drop-down menu to select the port on the
host computer that you want to use for this serial connection.
6
If you selected Output to file, browse to the file on the host that you want to use to store the output of the
virtual serial port.
7
If you selected Connect to named pipe, enter a pipe name in the Pipe Name field and use the drop-down
menus to select the near and far ends of the pipe.
The options for the near end are client or server. The options for the far end are a process or a virtual
machine.
By default, the serial port is connected when you power on the virtual machine.
8
(Optional) Deselect the Connect at power on check box if you do not want the serial port to connect when
the virtual machine is powered on.
9
(Optional) Deselect the I/O mode Yield CPU on poll check box if you want to configure this serial port to
use interrupt mode as opposed to polled mode.
Polled mode is of interest primarily to developers who are using debugging tools that communicate over
a serial connection. Polled mode causes the virtual machine to consume a disproportionate share of CPU
time. This makes the host and other guests run sluggishly.
10
(Optional) To maintain best performance for applications on the host, select the Yield CPU on poll check
box.
This forces the affected virtual machine to use interrupt mode, which yields CPU time if the only task it
is trying to do is poll the virtual serial port.
11
Review the information on the Ready to Complete page, and click Finish.
Add a Parallel Port to a Virtual Machine
When you add a parallel port to a virtual machine, you can use a parallel port on the host or an output file.
Procedure
160
1
Start the Add Hardware wizard.
2
Select Parallel Port, and click Next.
3
Select Use physical parallel port on the host or Output to file, and click Next.
4
If you selected Use physical parallel port on the host, select the port from the drop-down menu. If you
selected Output to file, browse to the location of the file.
5
Under Device status, deselect the Connect at power on check box if you do not want the parallel port
device to be connected when the virtual machine powers on.
VMware, Inc.
Chapter 13 Virtual Machine Configuration
6
Click Next.
7
Review the information on the Ready to Complete page, and click Finish.
Add a DVD/CD-ROM Drive to a Virtual Machine
You can use a physical drive on a client or host or you can use an ISO image to add a DVD/CD-ROM drive to
a virtual machine.
If you are adding a CD/DVD-ROM drive that is backed by USB CD/DVD drive on the host, you must add the
drive as a SCSI device.
Procedure
1
Start the Add Hardware wizard.
2
Select DVD/CD-ROM Drive, and click Next.
3
Select either Use physical drive or Use ISO image.
n
If you selected Use physical drive, select either client or host as the device location. Select the drive
you want to use from the drop-down menu.
n
Select pass through and use the check box to indicate whether to connect exclusively to the virtual
machine, or select ATAPI emulation.
n
If you selected Use ISO Image, enter the path and filename for the image file, or click Browse to
navigate to the file.
4
If you do not want the CD-ROM drive connected when the virtual machine starts, deselect Connect at
power on.
5
Click Next.
6
Specify the virtual device node the drive uses in the virtual machine, and click Next.
7
Review the information on the Ready to Complete window, and click Finish or Back if you want to change
any information.
Add a Floppy Drive to a Virtual Machine
Use a physical floppy drive or a floppy image to add a floppy drive to a virtual machine.
Procedure
1
Start the Add Hardware wizard.
2
Select Floppy Drive, and click Next.
3
Select the type of floppy media to use:
4
VMware, Inc.
n
A physical floppy drive to give the guest access to the floppy on the host.
n
A floppy image, which is a file on the host that stores data in the same format as a physical floppy
disk.
n
A blank floppy image to create and use a blank floppy image.
Click Next.
161
vSphere Basic System Administration
5
Specify the location of the floppy drive or image.
n
If you selected Use a physical floppy drive, select either client or host as the device location and select
the drive from the drop-down menu.
n
If you selected Use a floppy image, browse to the floppy image.
n
If you selected Create a blank floppy image, browse to the floppy image.
6
To have the floppy drive connected to the virtual machine when you power it on, select Connect at power
on.
7
Click Next.
8
Review the information on the Ready to Complete page, and click Finish.
Add an Ethernet Adapter (NIC) to a Virtual Machine
When you add an Ethernet adapter to a virtual machine, you select the adapter type, the network label and
whether the device should connect when the virtual machine is powered on.
Procedure
1
Start the Add Hardware wizard.
2
Select Ethernet Adapter, and click Next.
3
In the Adapter Type section, select a type.
4
In the Network connection panel, select either a named network with a specified label or a legacy network.
5
To connect the virtual NIC when the virtual machine is powered on, select Connect at power on.
6
Click Next.
7
Review your selections and click Finish.
Network Adapter Types
When you configure a virtual machine, you can add network adapters (NICs) and specify the adapter type.
The type of network adapters that are available depend on the following factors:
162
n
The version of the virtual machine, which depends on what host created it or most recently updated it.
n
Whether or not the virtual machine has been updated to the latest version for the current host.
n
The guest operating system.
VMware, Inc.
Chapter 13 Virtual Machine Configuration
The following NIC types are supported:
Flexible
Supported on virtual machines that were created on ESX Server 3.0 or greater
and that run 32-bit guest operating systems. The Flexible adapter functions as
a Vlance adapter if VMware Tools is not installed in the virtual machine and
as a Vmxnet driver if VMware Tools is installed in the virtual machine.
e1000
Emulates the functioning of an E1000 network card. It is the default adapter
type for virtual machines that run 64-bit guest operating systems.
Enhanced vmxnet
An upgraded version of the Vmxnet device with enhanced performance. It
requires that VMware Tools be installed in the virtual machine.
vmxnet 3
Next generation Vmxnet device with enhanced performance and enhanced
networking features. It requires that VMware Tools be installed in the virtual
machine, and is available only on virtual machines with hardware version 7
and greater.
Network Adapters and Legacy Virtual Machines
This section discusses network adapters on legacy virtual machines.
If your virtual machine was created on ESX Server 3.0 or greater and runs a 32-bit guest operating system, the
default adapter type is Flexible. The Flexible adapter functions as a Vlance adapter if the adapter’s driver is
the stock driver the guest operating system. The Flexible adapter functions as a vmxnet adapter if the vmxnet
driver has been installed on the virtual machine as part of the VMware Tools installation.
If your virtual machine runs a 64-bit guest operating system, the default adapter type is E1000. If you change
a virtual machine from a 32-bit to a 64-bit guest operating system, or the reverse, you must remove the existing
network adapter and replace it with a new one, or the virtual machine will not power on.
If you do a hardware upgrade on a legacy virtual machine, the adapter type for that upgraded machine is as
follows:
n
If the adapter type was Vlance, the adapter type on the upgraded virtual machine is Flexible. That adapter
functions as a Vlance adapter would function. If you want to obtain significantly better performance, you
need only install the VMware Tools on the virtual machine as described in the previous step.
n
If the adapter type is vmxnet, the adapter type on the upgraded virtual machine is still vmxnet. However,
you cannot change this adapter’s type to Vlance, as you would have been able to do on a legacy virtual
machine.
Add a Hard Disk to a Virtual Machine
When you add a hard disk to a virtual machine, you can create a new virtual disk, add an existing virtual disk,
or add a mapped SAN LUN.
Procedure
1
Start the Add Hardware wizard.
2
Select Hard Disk, and click Next.
3
Select the type of storage for the virtual machine’s disk, and click Next.
You can store virtual machine data in a new virtual disk, an existing virtual disk, or a Mapped SAN LUN.
A virtual disk, which appears as a single hard disk to the guest operating system, is composed of one or
more files on the host file system. Virtual disks can easily be copied or moved on the same host or between
hosts.
VMware, Inc.
163
vSphere Basic System Administration
4
If you selected Create a new virtual disk, do the following:
a
Enter the disk capacity.
b
Select the location as either Store with the virtual machine or Specify a datastore.
c
If you selected Specify a datastore, browse for the datastore location, and click Next. Continue with
Step 7.
5
If you selected an existing disk, browse for the disk file path and click Next.
6
If you selected Mapped SAN LUN:
a
Select the LUN that you want to use for the raw disk, and click Next.
b
Select a datastore and click Next.
c
Select the compatibility mode: physical to allow the guest operating system to access the hardware
directly or virtual to allow the virtual machine to use VMware snapshots and other advanced
functions. Click Next.
7
Specify the virtual device node.
8
Set virtual disk mode options:
a
Select Independent to make the disk independent. Independent disks are not affected by snapshots.
b
If you selected Independent, select one of the two modes for independent disks:
n
Persistent – The disk operates normally except that changes to the disk are permanent even if the
virtual machine is reverted to a snapshot.
n
Nonpersistent – The disk appears to operate normally, but whenever the virtual machine is
powered off or reverted to a snapshot, the contents of the disk return to their original state. All
later changes are discarded.
9
Click Next.
10
Review the information, and click Finish.
Add a SCSI Device to a Virtual Machine
You can add a SCSI device to a virtual machine through the Add Hardware wizard.
Procedure
1
Start the Add Hardware wizard.
2
Select SCSI Device, and click Next.
3
Under Connection, use the drop-down menu to select the physical device you want to use.
4
To connect this virtual machine to the server’s SCSI device when the virtual machine is powered on, select
Connect at power on.
5
Under Virtual device node, select the virtual device node where you want this device to appear in the
virtual machine.
You can also select the check box to indicate that the virtual device is set up in the same way as the physical
unit.
6
164
Review the information in the Ready to Complete page, and click Finish.
VMware, Inc.
Chapter 13 Virtual Machine Configuration
Add a PCI Device
VMDirectPath I/O allows a guest operating system on a virtual machine to directly access physical PCI and
PCIe devices connected to a host. Each virtual machine can be connected to up to two PCI devices.
PCI devices connected to a host can be marked as available for passthrough from the Hardware Advanced
Settings in the Configuration tab for the host.
Prerequisites
®
To use VMDirectPath, the host must have Intel Virtualization Technology for Directed I/O (VT-d) or AMD
I/O Virtualization Technology (IOMMU) enabled in the BIOS. In order to add PCI devices to a virtual machine,
the devices must be connected to the host and marked as available for passthrough. In addition, PCI devices
can be added only to virtual machines with hardware version 7.
Procedure
1
Select the virtual machine from the inventory panel and click Virtual Machine > Edit Settings.
2
On the Hardware tab, click Add.
3
In the Add Hardware wizard, select PCI Device and click Next.
4
Select the passthrough device to connect to the virtual machine from the drop-down list and click Next.
5
Click Finish.
Add a Paravirtualized SCSI Adapter
Paravirtual SCSI (PVSCSI) adapters are high-performance storage adapters that can provide greater
throughput and lower CPU utilization. PVSCSI adapters are best suited for environments, especially SAN
environments, running I/O-intensive applications. PVSCSI adapters are not suited for DAS environments.
Prerequisites
An existing virtual machine with a guest operating system and VMware Tools installed.
Procedure
1
Right-click on the virtual machine and select Edit Settings.
2
Click Add.
3
Select SCSI Device and click Next.
4
Select a SCSI device.
5
Select an unused Virtual Device Node.
6
Click Next.
7
Review your selections and click Finish.
A new SCSI device and a new SCSI controller are created.
8
Select the new SCSI controller and click Change Type.
9
Select VMware Paravirtual and click OK.
VMware, Inc.
165
vSphere Basic System Administration
About VMware Paravirtual SCSI Adapters
Paravirtual SCSI (PVSCSI) adapters are high-performance storage adapters that can result in greater
throughput and lower CPU utilization. Paravirtual SCSI adapters are best suited for high performance storage
environments. Paravirtual SCSI adapters are not suited for DAS environments.
Paravirtual SCSI adapters are available for virtual machines running hardware version 7 and greater. They are
supported on the following guest operating systems:
n
Windows Server 2008
n
Windows Server 2003
n
Red Hat Linux (RHEL) 5
The following features are not supported with Paravirtual SCSI adapters:
n
on Linux
n
Record/Replay
n
Fault Tolerance
n
MSCS Clustering
Paravirtual SCSI adapters have the following limitations:
n
Hot-add and Hot-remove requires a bus rescan from within the guest.
n
(Windows guests) In the Computer Management console, right-click Storage > Disk Management
and select Rescan Disks.
n
(Linux guests) See the Red Hat Linux Web site for the most current instructions.
n
Disks on Paravirtual SCSI adapters might not experience performance gains if they have snapshots or if
memory on the ESX host is over committed.
n
If you upgrade from RHEL 5 to an unsupported kernel, you might not be able to access data on the disks
attached to a Paravirtual SCSI adapter. To regain access to such disks, run the VMware Tools configuration
(vmware-config-tools.pl) with kernel-version parameter and pass the kernel version after the kernel is
upgraded and before the virtual machine is rebooted. Run uname -r to determine the version of the running
kernel.
Converting Virtual Disks from Thin to Thick
If you created a virtual disk in the thin format, you can convert it to thick.
The thin provisioned disk starts small and at first, uses just as much storage space as it needs for its initial
operations. You can determine whether your virtual disk is in the thin format and, if required, convert it to
thick. After having been converted, the virtual disk grows to its full capacity and occupies the entire datastore
space provisioned to it during the disk’s creation.
For more information on thin provisioning and disk formats, see ESX Configuration Guide or ESXi Configuration
Guide.
Determine the Disk Format of a Virtual Machine
You can determine whether your virtual disk is in thick or thin format.
Procedure
166
1
Select the virtual machine in the inventory.
2
Click Edit Settings to display the Virtual Machine Properties dialog box.
VMware, Inc.
Chapter 13 Virtual Machine Configuration
3
Click the Hardware tab and select the appropriate hard disk in the Hardware list.
The Disk Provisioning section on the right shows the type of your virtual disk, either Thin or Thick.
4
Click OK.
What to do next
If your virtual disk is in the thin format, you can inflate it to its full size.
Convert a Virtual Disk from Thin to Thick
If you created a virtual disk in the thin format, you can convert it to thick.
Procedure
1
Select the virtual machine in the inventory.
2
Click the Summary tab and, under Resources, double-click the datastore for the virtual machine to open
the Datastore Browser dialog box.
3
Click the virtual machine folder to find the virtual disk file you want to convert. The file has the .vmdk
extension.
4
Right-click the virtual disk file and select Inflate.
The virtual disk in thick format occupies the entire datastore space originally provisioned to it.
VMware, Inc.
167
vSphere Basic System Administration
168
VMware, Inc.
Working with Templates and Clones
14
A template is a master copy of a virtual machine that can be used to create and provision new virtual machines.
This image typically includes a specified operating system and configuration that provides virtual counterparts
to hardware components. Typically, a template includes an installed guest operating system and a set of
applications.
Templates coexist with virtual machines at any level within the template and virtual machine domain. You
can order collections of virtual machines and templates into arbitrary folders and apply a variety of permissions
to both virtual machines and templates. Virtual machines can be transformed into templates without requiring
a full copy of the virtual machine files and the creation of a new object.
You can use templates to create new virtual machines by deploying the template as a virtual machine. When
complete, the deployed virtual machine is added to the folder chosen by the user.
To view templates, select the datacenter and click the Virtual Machines tab. All virtual machines and templates
for the datacenter are visible from here. Virtual machines and templates have different icons.
This chapter includes the following topics:
n
“Creating Templates,” on page 169
n
“Edit a Template,” on page 171
n
“Change Template Name,” on page 172
n
“Deploy Virtual Machines from Templates,” on page 172
n
“Convert Templates to Virtual Machines,” on page 173
n
“Deleting Templates,” on page 173
n
“Regain Templates,” on page 174
n
“Clone Virtual Machines,” on page 174
n
“Create a Scheduled Task to Clone a Virtual Machine,” on page 175
Creating Templates
Templates can be created by using an existing virtual machine or cloning a virtual machine or existing template.
You can create a template by:
n
Using an existing virtual machine in place. This process converts the original virtual machine.
n
Cloning a virtual machine to a template.
n
Cloning an existing template.
VMware, Inc.
169
vSphere Basic System Administration
Convert Virtual Machine to Template
You can use an existing virtual machine to convert into a template.
Procedure
1
Start the vSphere client, and log in to the vCenter Server system.
2
From the Home page, click VMs and Templates.
3
Expand the inventory as needed, and select a virtual machine.
4
Turn off the virtual machine using the shut-down or power-off options.
5
Right-click the virtual machine and select Convert to Template.
vCenter Server marks that virtual machine as a template and displays the task in the Recent Tasks pane.
Clone Virtual Machine to Template
You can clone an existing virtual machine into a template.
Procedure
1
Start the vSphere client, and log in to the vCenter Server system.
2
From the Home page, click VMs and Templates.
3
Power off the virtual machine.
4
Right-click the virtual machine and click Clone to Template.
The Clone Virtual Machine to Template wizard appears.
5
Give the new template a name, select its inventory location, and click Next.
6
Pass through the target location page and click Next.
7
Specify in which format to store the template’s virtual disks.
Option
Description
Same as Source
Use the format of the original virtual disk.
Thin Provisioned
Use the thin format to save storage space. The thin virtual disk starts small
and at first, uses just as much storage space as it needs for its initial
operations. When the virtual disk requires more space, it can grow to its
maximum capacity and occupy the entire datastore space originally
provisioned to it.
Only VMFS datastores version 3 and later support virtual disks in the thin
format.
Thick
Allocate a fixed amount of storage space to the virtual disk. The virtual disk
in the thick format does not change its size and from the very beginning
occupies the entire datastore space provisioned to it.
8
Click Next.
9
Click Finish.
vCenter Server displays the Tasks inventory panel for reference and adds the cloned template to the list
in the information panel.
170
VMware, Inc.
Chapter 14 Working with Templates and Clones
Clone Existing Template
You can clone an existing virtual machine template.
Procedure
1
Start the vSphere client, and log in to the vCenter Server system.
2
From the Home page, click VMs and Templates.
3
Select the datacenter that contains the template.
The virtual machines and templates associated with the datacenter appear in the datacenter panel.
4
Right-click the template and select Clone.
The Clone Template wizard appears.
5
Give the new template a unique name and description, and click Next.
6
Select the host or cluster, and click Next.
7
Select a datastore for the template and click Next.
8
Specify in which format to store the template’s virtual disks:
Option
Description
Same as Source
Use the format of the original virtual disk.
Thin Provisioned
Use the thin format to save storage space. The thin virtual disk starts small
and at first, uses just as much storage space as it needs for its initial
operations. When the virtual disk requires more space, it can grow to its
maximum capacity and occupy the entire datastore space provisioned to it.
Only VMFS datastores version 3 and later support virtual disks in the thin
format.
Thick
Allocate a fixed amount of storage space to the virtual disk. The virtual disk
in thick format does not change its size and from the very beginning occupies
the entire datastore space provisioned to it.
9
Click Next.
10
Review the information for your new virtual machine and click Finish.
You cannot use the new template until the cloning task completes.
vCenter Server adds the cloned template to the list in the Virtual Machines tab.
Edit a Template
You can edit templates. You might want to edit templates to upgrade or add applications, or change hardware.
You can edit your template (to upgrade an application, for example). You cannot edit templates as templates.
You must convert the template to a virtual machine, edit it, and convert the edited virtual machine to a template.
Procedure
1
Convert the template to a virtual machine.
2
Edit the virtual machine.
3
Convert the virtual machine to a template.
VMware, Inc.
171
vSphere Basic System Administration
Change Template Name
You can directly change the name of a template.
Procedure
1
Start the vSphere client, and log in to the vCenter Server system.
2
From the Home page, click VMs and Templates.
3
Right-click the template and select Rename.
The name of the virtual machine is now an editable field.
4
Change the name and click outside the field to save your changes.
Deploy Virtual Machines from Templates
This task deploys a virtual machine from an existing template.
Procedure
1
Start the vSphere client, and log in to the vCenter Server system.
2
From the Home page, click VMs and Templates.
3
Select the datacenter that contains the template, and click the Virtual Machines tab.
The virtual machines and templates associated with the datacenter appear in the datacenter panel.
4
Right-click the template, and select Deploy Virtual Machine from this Template.
The Deploy Template wizard appears.
5
Give the new virtual machine a name, select a location, and click Next.
6
On the Host / Cluster page, select the host on which you want to store the template and click Next.
7
Select a resource pool (if applicable) in which you want to run the virtual machine, and click Next.
Resource pools allow hierarchical management of resources within a host or cluster. Virtual machines and
child pools share the resources of their parent pool.
8
Select a datastore for the virtual machine and click Next.
You are choosing the datastore in which to store the files for the virtual machine. You should select one
that is large enough to accommodate the virtual machine and all of its virtual disk files so that they can
all reside in the same place.
The Advanced button allows you to store individual files in separate locations. To return to the datastore
selection page, click the Basic button.
9
In the Select Guest Customization Option page, perform one of these actions:
n
If you do not want to customize your guest operating system, select Do not customize and click
Next.
n
If you want to customize your guest operating system, click one of the other selections as appropriate.
You customize guest operating systems through the wizard or by using an existing customization
specification that you create.
NOTE Customization is not supported for all guest operating systems. Additionally, some guest
operating systems require Microsoft Sysprep tools.
172
VMware, Inc.
Chapter 14 Working with Templates and Clones
10
In the Ready to Complete page, review the information for your new virtual machine, select the Power
on the new Virtual Machine after creation check box if you want to power on the virtual machine
immediately, and click Finish.
After you click Finish, you cannot use or edit the virtual machine until the task completes. This might
take several minutes. The virtual machine is added to the datastore.
Convert Templates to Virtual Machines
You can convert a template into a virtual machine.
When a template that resides on a legacy VMFS2 datastore is converted to a virtual machine, the resulting
virtual machine must be registered on the host where the template was created. Select this host as the
destination for the new virtual machine.
Procedure
1
Start the vSphere Client, and log in to the vCenter Server system.
2
From the Home page, click VMs and Templates.
3
Select the datacenter that contains the template.
The virtual machines and templates associated with the datacenter appear in the datacenter panel.
4
Click the Virtual Machines tab.
5
Right-click the template and select Convert to Virtual Machine.
The template is converted to a virtual machine.
Deleting Templates
You can delete a template by removing it from the inventory or deleting the template from the disk.
Remove Templates from Inventory
This procedure unregisters the template. It does not remove the template files from the datastore.
Procedure
1
Start the vSphere client, and log in to the vCenter Server system.
2
From the Home page, click VMs and Templates.
3
Select the appropriate template.
4
Right-click the template, and select Remove from Inventory.
5
Click OK to confirm removing the template from the vCenter Server database.
The template is unregistered from the vCenter Server inventory.
Delete Template from Disk
Deleted templates are permanently removed from the system.
Procedure
1
Start the vSphere client, and log in to the vCenter Server system.
2
From the Home page, click VMs and Templates.
3
Select the datastore that contains the template, and click the Virtual Machine tab.
4
Right-click the template, and select Delete from Disk.
VMware, Inc.
173
vSphere Basic System Administration
5
Click OK to confirm removing the template from the vCenter Server database.
The template is deleted from the disk and cannot be recovered.
Regain Templates
Templates are associated with hosts, and the only way to regain or register templates after removing and
adding a host is to use the datastore browser to locate the template. Then use the inventory wizard to name
and register the .vmtx file as a template back into vCenter Server.
If you want the template to retain its original name, do not enter a name in the Add to Inventory wizard.
vCenter Server will use the original name if the field in the wizard is left blank.
Procedure
1
Start the vSphere client, and log in to the vCenter Server system.
2
From the Home page, click VMs and Templates.
3
Right-click the datastore that contains the template and select Browse Datastore.
4
Browse through the datastore folders to find the .vmtx file.
5
Right-click the .vmtx file and select Add to Inventory.
The Add to Inventory wizard appears.
6
Enter a template machine name, select a location, and click Next.
7
Select a host or cluster on which to store the template, and click Next.
8
Review your selections, and click Finish.
The template is registered to the host. You can view the template from the host’s Virtual Machine tab.
Clone Virtual Machines
A clone is a copy plus customization of a virtual machine. When you create a clone, vCenter Server provides
an option to customize the guest operating system of that virtual machine.
You can place the new clone on any host within any datacenter.
Procedure
1
Start the vSphere Client and log in to the vCenter Server system.
2
From the Home page, click VMs and Templates.
3
Expand the inventory as needed, and click the source virtual machine.
4
Power off the virtual machine.
5
Right-click the virtual machine and select Clone.
The Clone Virtual Machine wizard appears.
174
6
Enter a virtual machine name, select a location, and click Next.
7
Select a host or cluster on which to run the clone, and click Next.
8
If you select a cluster, you must select a specific host within the cluster, and click Next.
9
Select a resource pool in which to run the clone, and click Next.
10
Select the datastore location where you want to store the virtual machine files, and click Next.
VMware, Inc.
Chapter 14 Working with Templates and Clones
11
Click Advanced for more options, and click Next.
The Select Guest Customization Option page appears. You can choose to customize the guest operating
system using the wizard or using an existing customization specification. You can also choose not to
customize.
12
Select the appropriate button, and click Next.
13
Review your selections, and click Finish.
On the Ready to Complete New Virtual Machine page, you can select the check box to power on the new
virtual machine after creation. After you click Finish, you cannot use or edit the virtual machine until the
task completes. If the task involves the creation of a virtual disk, it could take several minutes to complete.
Create a Scheduled Task to Clone a Virtual Machine
This procedure creates a scheduled task to clone a virtual machine.
Procedure
1
Start the vSphere client, and log in to the vCenter Server system.
2
From the Home page, click Scheduled Tasks.
3
Select File > New > Scheduled Task, or click New.
The Select a Task to Schedule dialog box appears.
4
Select Clone a virtual machine from the drop-down menu, and click OK.
The Clone Virtual Machine wizard appears.
5
Select the virtual machine to clone and click Next.
6
Follow the wizard through the same steps as those in the previous task in which you cloned a virtual
machine.
7
Enter a name and a task description in the text box.
8
Select the frequency of the task.
9
Select Now or Later. If later, enter the time and date when you want the virtual machine to be deployed,
and click Next.
To see the calendar, click Later, and click the drop-down arrow to select a date from the calendar. A red
circle indicates today’s date, and a dark circle indicates the scheduled date.
10
Review the information on the Ready to Complete New Virtual Machine page, and click Finish.
Optionally, you can select the check box to power on the new virtual machine after it is created.
vCenter Server adds the new task to the scheduled task list and completes it at the designated time. When
it is time to perform the task, vCenter Server first verifies that the user who created the task still has
permission to complete the task. If the permission levels are not acceptable, vCenter Server sends a
message to the log and the task is not performed.
VMware, Inc.
175
vSphere Basic System Administration
176
VMware, Inc.
Customizing Guest Operating
Systems
15
The Guest Customization wizard lets you create specifications you can use to prepare the guest operating
systems of virtual machines to function in a target environment.
You can store specifications in the database to customize the guest operating system of a virtual machine during
the cloning or deploying process. Use the Customization Specification Manager to manage customization
specifications you create with the Guest Customization wizard.
This chapter includes the following topics:
n
“Preparing for Guest Customization,” on page 177
n
“Customize Windows During Cloning or Deployment,” on page 179
n
“Customize Linux During Cloning or Deployment,” on page 180
n
“Create a Customization Specification for Linux,” on page 181
n
“Create a Customization Specification for Windows,” on page 181
n
“Managing Customization Specification,” on page 183
n
“Completing a Guest Operating System Customization,” on page 184
Preparing for Guest Customization
Certain tasks must be performed before running the Guest Customization wizard.
You must perform the following tasks before running the Guest Customization wizard.
n
Create and configure a virtual machine.
n
Make sure that the virtual machine is registered in the vCenter Server inventory.
n
Verify that your system meets the virtual hardware requirements for guest customization listed in “Virtual
Hardware Requirements for Guest Customization,” on page 178.
n
Verify that your system meets the operating system requirements for guest customization listed in
“Windows Requirements for Guest Customization,” on page 178 and “Linux Requirements for Guest
Customization,” on page 179.
n
Understand the naming requirements for a guest operating system as described in “Naming Requirements
for a Guest Operating System,” on page 179.
n
If you are customizing a Windows guest operating system, verify that all required components are
installed on the Windows machine where vCenter Server is installed.
NOTE After deploying and customizing nonvolume-licensed versions of Windows XP or Windows 2003, you
might need to reactivate your Microsoft operating system on the new virtual machine.
VMware, Inc.
177
vSphere Basic System Administration
Virtual Hardware Requirements for Guest Customization
This topic describes the virtual machine hardware requirements for customizing the guest operating system.
Guest customization requires that the source virtual machine that you use to create a clone or template has the
following:
n
VMware Tools installed
n
32-bit or 64-bit hardware corresponding to the 32-bit or 64-bit operating system being installed
n
SCSI disks
About SCSI Disks
The guest operating system being customized must reside on a disk attached as SCSI 0:0 node in the virtual
machine configuration.
vCenter Server customization operates on the disk attached to the virtual SCSI node with the lowest address
on the SCSI controller with the lowest index.
Setting Up SCSI Disks
This section lists the requirements for setting up SCSI disks.
Consider the following requirements when setting up SCSI disks:
n
If a virtual machine has mixed IDE and SCSI disks, the first IDE disk is considered the boot disk, and
vCenter Server passes it to the customizer. “First” is in controller:device order, that is, ide0:0, ide0:1, scsi0:0,
scsi0:1, and so on.
n
On a Windows guest operating system, if the virtual machine resides on a host running ESX Server 3.0.x
or earlier, both the active partition (the partition containing boot.ini) and the system partition (the
partition containing the system directory, for example, \WINNT or \WINDOWS), are on the same virtual disk
and attached the SCSI 0:0 virtual SCSI node. It is not a requirement that active and system partitions be
the same partition.
n
On a Linux guest operating system, if the virtual machine resides on a host running ESX Server 3.0.x or
earlier, the virtual disk containing the system partition (the partition containing the /etc directory) must
reside on the SCSI 0:0 node.
Windows Requirements for Guest Customization
To customize a Windows guest operating system, the virtual machine must meet certain requirements.
The following are the requirements for Windows:
n
The guest operating system is not a primary or backup domain controller.
n
The clone or template has the Windows versions that is supported for Guest Customization. For a list of
Windows operating systems supported for guest customization, see the vSphere Compatibility Matrixes at
http://www.vmware.com/pdf/vsphere4/r40/vsp_compatibility_matrix.pdf on the VMware vSphere
documentation Web site.
Windows XP Home or Windows NT4 operating system guest customization is not supported.
n
The guest operating system has the most recent version of VMware Tools installed.
n
The Microsoft Sysprep tools are installed on the vCenter Server system.
Microsoft Sysprep tools have certain requirements and impose certain restrictions on the source machine.
178
VMware, Inc.
Chapter 15 Customizing Guest Operating Systems
n
If the virtual machine resides on a host running ESX Server 3.0.x or earlier, both the active partition (the
partition containing boot.ini) and the system partition (the partition containing the system directory, for
example, \WINNT or \WINDOWS), must be on the same virtual disk.
Linux Requirements for Guest Customization
To customize a Linux guest operating system, the virtual machine must meet certain requirements.
The following are the requirements for Linux:
n
The clone or template has the Linux versions that is supported for Guest Customization. For a list of Linux
operating systems supported for guest customization, see the vSphere Compatibility Matrixes at
http://www.vmware.com/pdf/vsphere4/r40/vsp_compatibility_matrix.pdf on the VMware vSphere
documentation Web site.
n
The guest operating system has the most recent version of VMware Tools installed.
n
Perl must be installed in the Linux guest operating system.
n
The clone or template has a root volume formatted with an ext2, ext3, or ReiserFS file system.
Naming Requirements for a Guest Operating System
In the Guest Customization wizard, on the Computer Name page, you must specify a name for this instance
of a guest operating system. On Linux systems, it is called the host name. The operating system uses this name
to identify itself on the network.
You can set the computer name using one of the following options:
Use a specific name
The name can contain alphanumeric characters and the underscore ( _ ) and
hyphen (-) characters. It cannot contain periods (.) or blank spaces and cannot
be made up of digits only. To ensure that the name is unique, select Append a
numeric value to ensure uniqueness. This appends a hyphen followed by a
numeric value to the virtual machine name. Names are case-insensitive.
Use the virtual
machine’s name
The computer name that vCenter Server creates is identical to the name of the
virtual machine on which the guest operating system is running.
Prompt the user for a
name in the Deploy
wizard
The vSphere Client populates the Deploy Virtual Machine wizard with a
prompt for the computer name after you complete all the steps in the wizard.
Use a custom
application configured
with vCenter Server to
generate a name
Enter a parameter that can be passed to the custom application.
Customize Windows During Cloning or Deployment
In the process of deploying a new virtual machine from a template or cloning an existing virtual machine, you
can customize Windows guest operating systems for the virtual machine.
Procedure
1
From the Clone Virtual Machine or Deploy Template wizard, select Guest Customization.
2
Type the virtual machine owner’s name and organization and click Next.
3
Specify the name that will identify the guest operating system on the network and click Next.
4
Type the Windows product key for the new guest operating system.
VMware, Inc.
179
vSphere Basic System Administration
5
(Optional) If you are customizing a server guest operating system:
a
Select Include Server License Information.
b
Select either Per seat or Per server.
For Per server, enter the maximum number of simultaneous connections you want the server to
accept.
6
Click Next.
7
Type a password for the administrator account, and confirm the password by typing it again.
NOTE You can change the administrator password only if the administrator password on the source
Windows virtual machine is blank. If the source Windows virtual machine or template already has a
password, the administrator password does not change.
8
To log users into the guest operating system as Administrator, select the check box, and select the number
of times to log in automatically.
9
Click Next.
10
Select the time zone for the virtual machine and click Next.
11
(Optional) On the Run Once page, specify commands to be run the first time a user logs into the guest
operating system and click Next.
12
Select the type of network settings to apply to the guest operating system and click Next:
13
n
Typical settings allow vCenter Server to configure all network interfaces from a DHCP server.
n
Custom settings require you to manually configure the network interface settings.
Select how the virtual machine will participate in the network by typing the following:
n
Workgroup (for example, MSHOME)
n
Windows Server Domain: Type the domain, the user name, and the password for a user account that
has permission to add a computer to the specified domain.
14
Click Next.
15
(Optional) Select Generate New Security ID (SID) and click Next.
16
(Optional) Save the customized options as an .xml file:
17
a
Select Save this customization specification for later use.
b
Specify the filename for the specification and click Next.
Click Finish to save your changes and exit the Guest Customization wizard.
You return to the Deploy Template or Clone Virtual Machine wizard.
Customize Linux During Cloning or Deployment
In the process of deploying a new virtual machine from a template or cloning an existing virtual machine, you
can customize Linux guest operating systems for the virtual machine.
Procedure
180
1
From the Clone Virtual Machine or Deploy Template wizard, select Guest Customization.
2
Specify a host name to identify the guest operating system on the network.
3
Enter the Domain Name for the computer and click Next.
4
Select the time zone for the virtual machine and click Next.
VMware, Inc.
Chapter 15 Customizing Guest Operating Systems
5
Select the type of network settings to apply to the guest operating system and click Next:
n
Typical settings allow vCenter Server to configure all network interfaces from a DHCP server.
n
Custom settings require you to manually configure the network interface settings.
6
Enter DNS and domain settings.
7
(Optional) Save the customized options as an .xml file:
8
a
Select Save this customization specification for later use.
b
Specify the filename for the specification, and click Next.
Click Finish to save your changes.
You return to the Deploy Template or Clone Virtual Machine wizard.
Create a Customization Specification for Linux
Use the Guest Customization wizard to save guest operating system settings in a specification that you can
apply to virtual machines in your inventory.
Procedure
1
In the vSphere Client, select View > Management > Customization Specifications Manager.
2
Click New.
3
In the Guest Customization wizard, select Linux from the Target Virtual Machine OS menu.
4
Under Customization Specification Information, enter a name for the specification and an optional
description and click Next.
5
Specify a host name to identify the guest operating system on the network.
6
Enter the Domain Name for the computer and click Next.
7
Select the time zone for the virtual machine and click Next.
8
Select the type of network settings to apply to the guest operating system and click Next:
n
Typical settings allow vCenter Server to configure all network interfaces from a DHCP server.
n
Custom settings require you to manually configure the network interface settings.
9
Enter DNS and domain settings.
10
Click Finish to save your changes.
The custom specification you created is listed in the Customization Specification Manager, and can be used to
customize virtual machine guest operating systems.
Create a Customization Specification for Windows
Use the Guest Customization wizard to save Windows guest operating system settings in a specification that
you can apply to virtual machines in your inventory.
Procedure
1
In the vSphere Client, select View > Management > Customization Specifications Manager.
2
Click New.
3
In the Guest Customization wizard, select Windows from the Target Virtual Machine OS menu.
4
To use a custom Sysprep Answer File, select the check box.
VMware, Inc.
181
vSphere Basic System Administration
5
Under Customization Specification Information, enter a name for the specification and an optional
description, and click Next.
6
Enter the virtual machine owner’s name and organization and click Next.
This information appears in the guest operating system System Properties.
7
Type the name that will identify the guest operating system on the network and click Next.
8
Type the Windows product key for the new guest operating system.
9
(Optional) If you are customizing a server guest operating system:
a
Select Include Server License Information.
b
Select either Per seat or Per server.
For Per server, enter the maximum number of simultaneous connections you want the server to
accept.
10
Click Next.
11
Type a password for the administrator account, and confirm the password by typing it again.
NOTE You can change the administrator password only if the administrator password on the source
Windows virtual machine is blank. If the source Windows virtual machine or template already has a
password, the administrator password does not change.
12
To log users into the guest operating system as Administrator, select the check box, and select the number
of times to log in automatically.
13
Click Next.
14
Select the time zone for the virtual machine and click Next.
15
(Optional) On the Run Once page, specify commands to be run the first time a user logs into the guest
operating system and click Next.
16
Select the type of network settings to apply to the guest operating system and click Next:
17
n
Typical settings allow vCenter Server to configure all network interfaces from a DHCP server.
n
Custom settings require you to manually configure the network interface settings.
Select how the virtual machine will participate in the network and clickNext.
n
Workgroup (for example, MSHOME)
n
Windows Server Domain: Type the domain, the user name, and the password for a user account that
has permission to add a computer to the specified domain.
18
(Optional) Select Generate New Security ID (SID) and click Next.
19
Click Finish to save your changes.
The custom specification you created is listed in the Customization Specification Manager. You can use it to
customize virtual machine guest operating systems.
182
VMware, Inc.
Chapter 15 Customizing Guest Operating Systems
Managing Customization Specification
Customization specifications are XML files that contain guest operating system settings for virtual machines.
You create customization specifications with the Guest Customization wizard, and manage specifications
using the Customization Specification Manager.
vCenter Server saves the customized configuration parameters in the vCenter Server database. If the
customization settings are saved, the administrator, and domain administrator, passwords are stored in
encrypted format in the database. Because the certificate used to encrypt the passwords is unique to each
vCenter Server system, reinstalling vCenter Server, or attaching a new instance of the server the database,
invalidates the encrypted passwords. The passwords must be re-entered before they can be used.
Edit Customization Specifications
You can edit existing specifications using the Customization Specification Manager.
Prerequisites
Before you begin, you must have at least one customization specification.
Procedure
1
In the vSphere Client, select View > Management > Customization Specifications Manager.
2
In the Customization Specification Manager, right-click a specification and select Edit.
3
Proceed through the Guest Customization wizard to change specification setting.
Export Customization Specifications
You can export customization specifications and save them as .xml files. To apply an exported specification to
a virtual machine, import the .xml file using the Customization Specification Manager.
Prerequisites
Before you begin, you must have at least one customization specification.
Procedure
1
In the vSphere Client, select View > Management > Customization Specifications Manager.
2
In the Customization Specification Manager, right-click a specification and select Export.
3
In the Save As dialog, enter a file name and location.
4
Click Save.
The specification is saved as an .xml file to the location you specified.
Remove a Customization Specification
You can remove customization specifications from the Customization Specification Manager.
Prerequisites
Before you begin, you must have at least one customization specification.
Procedure
1
In the vSphere Client, select View > Management > Customization Specifications Manager.
2
In the Customization Specification Manager, right-click a specification and select Remove.
VMware, Inc.
183
vSphere Basic System Administration
3
In the confirmation dialog box, select Yes.
The specification is removed from the list.
Copy a Customization Specification
You can copy an existing customization specification using the Customization Specification Manager.
Prerequisites
Before you begin, you must have at least one customization specification.
Procedure
1
In the vSphere Client, select View > Management > Customization Specifications Manager.
2
In the Customization Specification Manager, right-click a specification and select Copy.
A new specification is created, Copy of<specification name>.
Import a Customization Specification
You can import an existing specification using the Customization Specification Manager, and use the
specification to customize the guest operating system of a virtual machine.
Prerequisites
Before you begin, you must have at least one customization specification.
Procedure
1
In the vSphere Client, select View > Management > Customization Specifications Manager.
2
Click Import.
3
From the Open dialog, browse the .xml to import and click Open.
The imported specification is added to the list of customization specifications.
Completing a Guest Operating System Customization
When a new virtual machine boots for the first time, the final steps of the customization process take place.
This includes the following operations:
1
The guest operating system boots.
If the guest operating system pauses when the new virtual machine boots, it might be waiting for you to
correct errors, such as an incorrect product key or invalid user name. Open the virtual machine’s console
to determine whether the system is waiting for information.
2
The guest operating system runs finalization scripts.
NOTE The virtual machine might reboot a number of times.
The log in page appears when the process is complete.
184
VMware, Inc.
Chapter 15 Customizing Guest Operating Systems
View the Error Log on Windows
If the new virtual machine encounters customization errors while it is booting, the errors are reported using
the guest’s system logging mechanism.
Procedure
u
Click the Windows Start button and select Programs > Administrative Tools > Event Viewer.
Errors are logged to %WINDIR%\temp\vmware-imc.
View the Error Log on Linux
If the new virtual machine encounters customization errors while it is booting, the errors are reported using
the guest’s system logging mechanism.
Procedure
u
VMware, Inc.
Navigate to /var/log/vmware/customization.log.
185
vSphere Basic System Administration
186
VMware, Inc.
Migrating Virtual Machines
16
Migration is the process of moving a virtual machine from one host or storage location to another. Copying a
virtual machine creates a new virtual machine. It is not a form of migration.
In vCenter Server, you have the following migration options:
Cold Migration
Moving a powered-off virtual machine to a new host. Optionally, you can
relocate configuration and disk files to new storage locations. Cold migration
can be used to migrate virtual machines from one datacenter to another.
Migrating a Suspended
Virtual Machine
Moving a suspended virtual machine to a new host. Optionally, you can
relocate configuration and disk files to new storage location. You can migrate
suspended virtual machines from one datacenter to another.
Migration with VMotion
Moving a powered-on virtual machine to a new host. Migration with VMotion
allows you to move a virtual machine to a new host without any interruption
in the availability of the virtual machine. Migration with VMotion cannot be
used to move virtual machines from one datacenter to another.
Migration with Storage
VMotion
Moving the virtual disks or configuration file of a powered-on virtual machine
to a new datastore. Migration with Storage VMotion allows you to move a
virtual machine’s storage without any interruption in the availability of the
virtual machine.
Both migration of a suspended virtual machine and migration with VMotion are sometimes referred to as “hot
migration”, because they allow migration of a virtual machine without powering it off. Migration with
VMotion is sometimes referred to as "live migration".
You can move virtual machines manually or set up a scheduled task to perform the cold migration.
This chapter includes the following topics:
n
“Cold Migration,” on page 188
n
“Migrating a Suspended Virtual Machine,” on page 188
n
“Migration with VMotion,” on page 188
n
“Migration with Storage VMotion,” on page 197
n
“Migrate a Powered-Off or Suspended Virtual Machine,” on page 198
n
“Migrate a Powered-On Virtual Machine with VMotion,” on page 199
n
“Migrate a Virtual Machine with Storage VMotion,” on page 200
n
“Storage VMotion Command-Line Syntax,” on page 202
VMware, Inc.
187
vSphere Basic System Administration
Cold Migration
Cold migration is the migration of a powered-off virtual machine. With cold migration, you have the option
of moving the associated disks from one datastore to another. The virtual machines are not required to be on
shared storage.
The virtual machine you want to migrate must be powered off prior to beginning the cold migration process.
CPU compatibility checks do not apply when you migrate a virtual machine with cold migration.
A cold migration consists of the following tasks:
1
The configuration files, including the NVRAM file (BIOS settings), and log files, as well as the disks of the
virtual machine, are moved from the source host to the destination host’s associated storage area.
2
The virtual machine is registered with the new host.
3
After the migration is completed, the old version of the virtual machine is deleted from the source host.
Migrating a Suspended Virtual Machine
When migrating a suspended virtual machine, you also have the option of moving the associated disks from
one datastore to another. The virtual machines are not required to be on shared storage.
Migration of suspended virtual machines is supported in ESX Server 3.x and ESX Server 3i and later only.
Virtual machines created using ESX Server 2.x must be powered off before migration.
When you migrate a suspended virtual machine, the new host for the virtual machine must meet CPU
compatibility requirements, because the virtual machine must resume executing instructions on the new host.
Migration of a suspended virtual machine consists of the following steps:
1
The configuration files, including the NVRAM file (BIOS settings), log files, and the suspend file as well
as the disks of the virtual machine are moved from the source host to the destination host’s associated
storage area.
2
The virtual machine is registered with the new host.
3
After the migration is completed, the old version of the virtual machine is deleted from the source host.
Migration with VMotion
Migration with VMotion™ allows virtual machine working processes to continue throughout a migration.
The entire state of the virtual machine, as well as its configuration file, if necessary, is moved to the new host,
while the associated virtual disk remains in the same location on storage that is shared between the two hosts.
After the virtual machine state is migrated to the alternate host, the virtual machine runs on the new host.
The state information includes the current memory content and all the information that defines and identifies
the virtual machine. The memory content includes transaction data and whatever bits of the operating system
and applications are in the memory. The defining and identification information stored in the state includes
all the data that maps to the virtual machine hardware elements, such as BIOS, devices, CPU, MAC addresses
for the Ethernet cards, chip set states, registers, and so forth.
When you migrate a virtual machine with VMotion, the new host for the virtual machine must meet
compatibility requirements in order for the migration to proceed.
Migration with VMotion happens in three stages:
1
188
When the migration with VMotion is requested, vCenter Server verifies that the existing virtual machine
is in a stable state with its current host.
VMware, Inc.
Chapter 16 Migrating Virtual Machines
2
The virtual machine state information (memory, registers, and network connections) is copied to the target
host.
3
The virtual machine resumes its activities on the new host.
If any error occurs during migration, the virtual machines revert to their original states and locations.
Migration of a suspended virtual machine and migration with VMotion can be referred to as hot migration,
because they allow migration of a virtual machine without powering it off.
Host Configuration for VMotion
In order to successfully use VMotion, you must first configure your hosts correctly.
Ensure that you have correctly configured your hosts in each of the following areas:
n
Each host must be correctly licensed for VMotion. For more information on licensing, see the Installation
Guide.
n
Each host must meet shared storage requirements for VMotion.
n
Each host must meet the networking requirements for VMotion.
VMotion Shared Storage Requirements
Configure hosts for VMotion with shared storage to ensure that virtual machines are accessible to both source
and target hosts.
During a migration with VMotion, the migrating virtual machine must be on storage accessible to both the
source and target hosts. Ensure that the hosts configured for VMotion use shared storage. Shared storage is
typically on a storage area network (SAN), but can also be implemented using iSCSI and NAS shared storage.
See the VMware SAN Configuration Guide for additional information on SAN and the ESX Configuration
Guide or ESXi Configuration Guide for information on other shared storage.
VMotion Networking Requirements
Migration with VMotion requires correctly configured network interfaces on source and target hosts.
VMotion requires a Gigabit Ethernet (GigE) network between all VMotion-enabled hosts. Each host enabled
for VMotion must have a minimum of two Ethernet adapters, at least one of which must be a GigE adapter.
Recommended networking best practices are as follows:
n
Use one dedicated Ethernet adapter for the service console (on ESX hosts).
n
Use one dedicated GigE adapter for VMotion.
n
If only two Ethernet adapters are available:
n
For best security, dedicate the GigE adapter to VMotion, and use VLANs to divide the virtual machine
and management traffic on the other adapter.
n
For best availability, combine both adapters into a bond, and use VLANs to divide traffic into
networks: one or more for virtual machine traffic, one for the service console (on ESX hosts), and one
for VMotion.
Configure the virtual networks on VMotion-enabled hosts as follows:
n
On each host, configure a VMkernel port group for VMotion.
n
Ensure that virtual machines have access to the same subnets on source and destination hosts.
n
Ensure that the network labels used for virtual machine port groups are consistent across hosts. During a
migration with VMotion, vCenter Server assigns virtual machines to port groups based on matching
network labels.
VMware, Inc.
189
vSphere Basic System Administration
n
Use of Jumbo Frames is recommended for best VMotion performance.
CPU Compatibility and Migration
vCenter Server performs a number of compatibility checks before allowing migration of running or suspended
virtual machines to ensure that the virtual machine is compatible with the target hosts.
VMotion transfers the running state of a virtual machine between underlying ESX/ESXi systems. Successful
migration requires that the processors of the target host be able to execute using the equivalent instructions
that the processors of the source host were using when the virtual machine was migrated off of the source host.
Processor clock speeds and cache sizes, and the number of processor cores can vary, but processors must come
from the same vendor class (AMD or Intel) and use compatible feature sets to be compatible for migration with
VMotion.
Migrations of suspended virtual machines also require that the virtual machine be able to resume execution
on the target host using equivalent instructions.
When you initiate a migration with VMotion or a migration of a suspended virtual machine, the Migrate Virtual
Machine wizard checks the destination host for compatibility and produces an error message if there are
compatibility problems that will prevent migration.
When a virtual machine is powered on, it determines its available CPU feature set. The virtual machine’s CPU
feature set is based on the host’s CPU feature set. However, some of the host CPU features can be hidden from
the virtual machine if the host is part of a cluster using Enhanced VMotion Compatibility (EVC), or if a CPU
compatibility mask is applied to the virtual machine.
NOTE VMware, in partnership with CPU and hardware vendors, is working to maintain VMotion
compatibility across the widest range of processors. For additional information, search the VMware
Knowledge Base for the VMotion and CPU Compatibility FAQ.
CPU Compatibility Scenarios
vCenter's CPU compatibility checks compare the features available on the source and target host CPUs. A
mismatch in user-level features blocks migration. A mismatch in kernel-level features does not block migration.
When you attempt to migrate a virtual machine with VMotion, one of the following scenarios applies:
190
n
The destination host feature set matches the virtual machine’s CPU feature set. CPU compatibility
requirements are met, and migration with VMotion proceeds.
n
The virtual machine’s CPU feature set contains features not supported by the destination host. CPU
compatibility requirements are not met, and migration with VMotion cannot proceed.
n
The destination host supports the virtual machine’s feature set, plus additional user-level features (such
as SSE4.1) not found in the virtual machine’s feature set. CPU compatibility requirements are not met, and
migration with VMotion cannot proceed.
n
The destination host supports the virtual machine’s feature set, plus additional kernel-level features (such
as NX or XD) not found in the virtual machine’s feature set. CPU compatibility requirements are met, and
migration with VMotion proceeds. The virtual machine retains its CPU feature set as long as it remains
powered on, allowing it to migrate freely back to the original host. However, if the virtual machine is
rebooted, it acquires a new feature set from the new host, which might cause VMotion incompatibility if
you attempt to migrate the virtual machine back to the original host.
VMware, Inc.
Chapter 16 Migrating Virtual Machines
CPU Families and Feature Sets
Processors are grouped into families. Processors within a given family generally have similar feature sets.
Processor families are defined by the processor vendors. You can distinguish different processor versions
within the same family by comparing the processors’ model, stepping level, and extended features. In some
cases, processor vendors have introduced significant architectural changes within the same processor family,
such as the SSSE3 and SSE4.1 instructions, and NX/XD CPU security features.
By default, vCenter Server identifies mismatches on features accessible to applications as incompatible to
guarantee the stability of virtual machines after migrations with VMotion.
Server hardware’s CPU specifications will usually indicate whether or not the CPUs contain the features that
affect VMotion compatibility. If the specifications of a server or its CPU features are unknown, VMware’s
bootable CPU identification utility (available for download from the VMware website) can be used to boot a
server and determine whether its CPUs contain features such as SSE3, SSSE3, and NX/XD.
®
For more information on identifying Intel processors and their features, see Application Note 485: Intel Processor
Identification and the CPUID Instruction, available from Intel. For more information on identifying AMD
processors and their features, see CPUID Specification, available from AMD.
NX/XD Considerations
The AMD No eXecute (NX) and the Intel eXecute Disable (XD) technology serve the same security purpose.
They mark memory pages as data-only to prevent malicious software exploits and buffer overflow attacks.
Refer to the documentation for your guest operating system to determine whether it supports NX and XD.
In ESX/ESXi 3.0 and later, NX and XD technology is exposed by default for all guest operating systems that
can use it (trading off some compatibility for security by default). Hosts that were previously compatible for
VMotion in ESX Server 2.x might become incompatible after upgrading to ESX/ESXi 3.0 and later, because the
NX or XD is now exposed when it was previously suppressed, but you can use per-virtual machine CPU
compatibility masks to restore compatibility.
VMware, Inc.
191
vSphere Basic System Administration
SSE3 Considerations
Within the Intel P4 and AMD Opteron processor families, VMware places a restriction between processors that
do support the SSE3 instructions and processors that do not support the SSE3 instructions. Because they are
application level instructions that bypass the virtualization layer, these instructions could cause application
instability if mismatched after a migration with VMotion.
SSSE3 Considerations
Within the Intel P4 and Intel Core processor families, VMware places a restriction between processors that do
support the SSSE3 instructions and processors that do not support the SSSE3 instructions. Because they are
application level instructions that bypass the virtualization layer, these instructions could cause application
instability if mismatched after a migration with VMotion.
SSE4.1 Considerations
Within the Intel Core 2 processor family, VMware places a restriction between processors that do support the
SSE4.1 instructions and processors that do not support the SSE4.1 instructions because they are application
level instructions that bypass the virtualization layer, and could cause application instability if mismatched
after a migration with VMotion.
About Enhanced VMotion Compatibility
You can use the Enhanced VMotion Compatibility (EVC) feature to help ensure VMotion compatibility for the
hosts in a cluster. EVC ensures that all hosts in a cluster present the same CPU feature set to virtual machines,
even if the actual CPUs on the hosts differ. Using EVC prevents migrations with VMotion from failing because
of incompatible CPUs.
Configure EVC from the cluster settings dialog box. When you configure EVC, you configure all host processors
in the cluster to present the feature set of a baseline processor. EVC leverages AMD-V Extended Migration
technology (for AMD hosts) and Intel FlexMigration technology (for Intel hosts) to mask processor features so
that hosts can present the feature set of an earlier generation of processors. The baseline feature set must be
equivalent to, or a subset of, the feature set of the host with the smallest feature set in the cluster.
EVC masks only those processor features that affect VMotion compatibility. Enabling EVC does not prevent
a virtual machine from taking advantage of faster processor speeds, increased numbers of CPU cores, or
hardware virtualization support that might be available on newer hosts.
EVC cannot prevent virtual machines from accessing hidden CPU features in all circumstances. Applications
that do not follow CPU vendor recommended methods of feature detection might behave unexpectedly in an
EVC environment. VMware EVC cannot be supported with ill-behaved applications that do not follow the
CPU vendor recommendations. For more information about creating well-behaved applications, search the
VMware Knowledge Base for the article Detecting and Using New Features in CPUs.
EVC Requirements
Hosts in an EVC cluster must meet certain requirements.
To enable EVC on a cluster, the cluster must meet the following requirements:
192
n
You must be running vCenter Server 2.5 Update 2 or later.
n
All virtual machines in the cluster that are running on hosts with a feature set greater than the EVC mode
you intend to enable must be powered off or migrated out of the cluster before EVC is enabled. (For
example, consider a cluster containing an Intel Xeon Core 2 host and an Intel Xeon 45nm Core 2 host, on
which you intend to enable the Intel Xeon Core 2 baseline. The virtual machines on the Intel Xeon Core 2
host can remain powered on, but the virtual machines on the Intel Xeon 45nm Core 2 host must be powered
off or migrated out of the cluster.)
n
All hosts in the cluster must have CPUs from a single vendor, either AMD or Intel.
n
All hosts in the cluster must be running ESX/ESXi 3.5 Update 2 or later.
VMware, Inc.
Chapter 16 Migrating Virtual Machines
n
All hosts in the cluster must be connected to the vCenter Server system.
n
All hosts in the cluster must have advanced CPU features, such as hardware virtualization support (AMDV or Intel VT) and AMD No eXecute (NX) or Intel eXecute Disable (XD), enabled in the BIOS if they are
available.
n
All hosts in the cluster should be configured for VMotion. See “Host Configuration for VMotion,” on
page 189.
n
All hosts in the cluster must have supported CPUs for the EVC mode you want to enable. For specific host
processors supported, see Table 16-1.
Any host added to an existing EVC-enabled cluster must also meet the requirements listed above.
NOTE Hardware vendors sometimes disable particular CPU features in the BIOS by default. This can cause
problems in enabling EVC, because the EVC compatibility checks do not detect features that are expected to
be present for a particular CPU. If you cannot enable EVC on a system with a compatible processor, ensure
that all features are enabled in the BIOS.
Table 16-1 lists the processors supported in EVC Clusters.
Table 16-1. Processors Supported in EVC Clusters
Vendor
EVC Mode
Processors Supported
AMD
AMD Opteron Generation 1
AMD Opteron Generation 1
AMD Opteron Generation 2
AMD Opteron Generation 3
AMD Opteron Generation 2
AMD Opteron Generation 2
AMD Opteron Generation 3
Intel
AMD Opteron Generation 3
AMD Opteron Generation 3
Intel Xeon Core 2
Intel Xeon Core 2
Intel Xeon 45nm Core 2
Intel Xeon Core i7
Intel Xeon 32nm Core i7
Intel Xeon 45nm Core 2
Intel Xeon 45nm Core 2
Intel Xeon Core i7
Intel Xeon 32nm Core i7
Intel Xeon Core i7
Intel Xeon Core i7
Intel Xeon 32nm Core i7
Intel Xeon 32nm Core i7
Intel Xeon 32nm Core i7
Create an EVC Cluster
Create an EVC cluster to help ensure VMotion compatibility between the hosts in the cluster.
When you create an EVC cluster, use one of the following methods:
n
Create an empty cluster, enable EVC, and move hosts into the cluster.
n
Enable EVC on an existing cluster.
VMware recommends creating an empty EVC cluster as the simplest way of creating an EVC cluster with
minimal disruption to your existing infrastructure.
VMware, Inc.
193
vSphere Basic System Administration
Prerequisites
Before you create an EVC cluster, ensure that the hosts you intend to add to the cluster meet the requirements
listed in “EVC Requirements,” on page 192.
Procedure
1
Create an empty cluster, and enable EVC.
Select the CPU vendor and feature set appropriate for the hosts you intend to add to the cluster. For
information on configuring EVC, see the vSphere Client online Help.
Other cluster features such as VMware DRS and VMware HA are fully compatible with EVC. You can
enable these features when you create the cluster. For information on specific cluster options, see the
vSphere Client online Help.
2
Select a host to move into the cluster.
3
If the host feature set is greater than the baseline feature set that you have enabled for the EVC cluster, do
one of the following:
4
n
Power off all the virtual machines on the host.
n
Migrate the host’s virtual machines to another host using VMotion.
Move the host into the cluster.
You can power on the virtual machines on the host, or migrate virtual machines into the cluster with
VMotion, if the virtual machines meet CPU compatibility requirements for the cluster’s baseline feature
set. Virtual machines running on hosts with more features than the EVC cluster baseline must be powered
off before migration into the cluster.
5
Repeat Step 3 and Step 4 for each additional host that you want to move into the cluster.
Enable EVC on an Existing Cluster
Enable EVC on an existing cluster to help ensure VMotion compatibility between the hosts in the cluster.
Prerequisites
Before you enable EVC on an existing cluster, ensure that the hosts in the cluster meet the requirements listed
in “EVC Requirements,” on page 192.
Procedure
1
Select the cluster for which you want to enable EVC.
2
If virtual machines are running on hosts that have feature sets greater than the baseline feature set you
intend to enable, do one of the following tasks:
n
Power off all the virtual machines on the hosts with feature sets greater than the EVC baseline.
n
Migrate the cluster’s virtual machines to another host using VMotion.
Because these virtual machines are running with more features than the EVC cluster baseline you
intend to set, power off the virtual machines to migrate them back into the cluster after enabling EVC.
3
Ensure that the cluster contains hosts with CPUs from only one vendor, either Intel or AMD.
4
Edit the cluster settings and enable EVC.
Select the CPU vendor and feature set appropriate for the hosts in the cluster.
194
VMware, Inc.
Chapter 16 Migrating Virtual Machines
5
If you powered off or migrated virtual machines out of the cluster, power on the virtual machines in the
cluster, or migrate virtual machines into the cluster.
Any virtual machines running at a higher baseline than the EVC mode you enabled for the cluster must
be powered off before they can be moved back into the cluster.
Change the EVC Mode for an Existing Cluster
If all the hosts in a cluster are compatible with the new mode, you can change the EVC mode of an existing
EVC cluster. You can raise the EVC mode to expose more CPU features, or lower the EVC mode to hide CPU
features and increase compatibility.
To raise the EVC mode from a CPU baseline with fewer features to one with more features, you do not need
to turn off any running virtual machines in the cluster. Virtual machines that are running do not have access
to the new features available in the new EVC mode until they are powered off and powered back on. A full
power cycling is required. Rebooting the guest operating system or suspending and resuming the virtual
machine is not sufficient.
To lower the EVC mode from a CPU baseline with more features to one with fewer features, you must first
power off the virtual machines in the cluster, and power them back on after the new mode has been enabled.
Prerequisites
If you intend to lower the EVC mode, power off the currently running virtual machines in the cluster.
Procedure
1
Display the cluster in the inventory.
2
Right-click the cluster and select Edit Settings.
3
In the left panel, select VMware EVC.
The dialog box displays the current EVC settings.
4
To edit the EVC settings, click Change.
5
From the VMware EVC Mode drop-down menu, select the baseline CPU feature set you want to enable
for the cluster.
If the selected EVC Mode cannot be selected, the Compatibility pane displays the reason or reasons why,
along with the relevant hosts for each reason.
6
Click OK to close the EVC Mode dialog box, and click OK to close the cluster settings dialog box.
CPU Compatibility Masks
CPU compatibility masks allow per-virtual machine customization of the CPU features visible to a virtual
machine.
vCenter Server compares the CPU features available to a virtual machine with the CPU features of the
destination host to determine whether to allow or disallow migrations with VMotion.
Default values for the CPU compatibility masks are set by VMware to guarantee the stability of virtual
machines after a migration with VMotion.
In some cases, where a choice between CPU compatibility or guest operating system features (such as NX/XD)
exists, VMware provides check-box options to configure individual virtual machines through the virtual
machine’s Advanced Settings option. For more control over the visibility of CPU features, you can edit the
virtual machine’s CPU compatibility mask at the bit level.
CAUTION Manual edit of the CPU compatibility masks without the appropriate documentation and testing
might lead to an unsupported configuration.
VMware, Inc.
195
vSphere Basic System Administration
CPU compatibility masks cannot prevent virtual machines from accessing masked CPU features in all
circumstances. In some circumstances, applications can detect and use masked features even though they are
hidden from the guest operating system. In addition, on any host, applications that use unsupported methods
of detecting CPU features rather than using the CPUID instruction can access masked features. Virtual
machines running applications that use unsupported CPU detection methods might experience stability
problems after migration.
Virtual Machine Configuration Requirements for VMotion
A number of specific virtual machine configurations can prevent migration of a virtual machine with VMotion.
The following virtual machine configurations can prevent migration with VMotion:
n
You cannot use migration with VMotion to migrate virtual machines using raw disks for clustering
purposes.
n
You cannot use migration with VMotion to migrate a virtual machine that uses a virtual device backed
by a device that is not accessible on the destination host. (For example, you cannot migrate a virtual
machine with a CD drive backed by the physical CD drive on the source host.) Disconnect these devices
before migrating the virtual machine.
n
You cannot use migration with VMotion to migrate a virtual machine that uses a virtual device backed
by a device on the client computer. Disconnect these devices before migrating the virtual machine.
Swapfile Location Compatibility
Virtual machine swapfile location affects VMotion compatibility in different ways depending on the version
of ESX/ESXi running on the virtual machine's host.
Virtual machines on hosts running ESX Server 3.0.x have a virtual machine swap file located with the virtual
machine configuration file. Virtual machines on these hosts can be migrated with VMotion only if the
destination host can access the VMFS volume where the swap file is located.
You can configure ESX 3.5 or ESXi 3.5 or later hosts to store virtual machine swapfiles in one of two locations:
with the virtual machine configuration file, or on a local swapfile datastore specified for that host. You can also
set individual virtual machines to have a different swapfile location from the default set for their current host.
The location of the virtual machine swapfile affects VMotion compatibility as follows:
n
Migrations between hosts running ESX/ESXi version 3.5 and later: Migrations with VMotion and
migrations of suspended and powered-off virtual machines are allowed.
During a migration with VMotion, if the swapfile location specified on the destination host differs from
the swapfile location specified on the source host, the swapfile is copied to the new location. This can result
in slower migrations with VMotion. If the destination host cannot access the specified swapfile location,
it stores the swapfile with the virtual machine configuration file.
n
Migrations between a host running ESX/ESXi version 3.5 and later and a host running an earlier version
of ESX Server: Migrations of suspended and powered-off virtual machines are allowed. If the virtual
machine is configured to use a local swapfile datastore, attempting to migrate it to a host that does not
support this configuration produces a warning, but the migration can proceed. When the virtual machine
is powered on again, the swapfile is located with the virtual machine.
Migrations with VMotion are not allowed unless the destination swapfile location is the same as the source
swapfile location. In practice, this means that virtual machine swapfiles must be located with the virtual
machine configuration file.
See the vSphere Client online Help for more information on configuring swapfile policies.
196
VMware, Inc.
Chapter 16 Migrating Virtual Machines
Migrating Virtual Machines with Snapshots
Migration of virtual machines with snapshots is possible if the virtual machine resides on shared storage
accessible to source and destination hosts.
Some restrictions apply when migrating virtual machines with snapshots. You cannot migrate a virtual
machine with snapshots with Storage VMotion. Otherwise, migrating a virtual machine with snapshots is
permitted, regardless of the virtual machine power state, as long as the virtual machine is being migrated to
a new host without moving its configuration file or disks. (The virtual machine must reside on shared storage
accessible to both hosts.)
If the migration involves moving the configuration file or virtual disks, the following additional restrictions
apply:
n
The starting and destination hosts must be running ESX 3.5 or ESXi 3.5 or later.
n
All of the virtual machine files and disks must reside in a single directory, and the migrate operation must
move all the virtual machine files and disks to a single destination directory.
Reverting to a snapshot after migration with VMotion might cause the virtual machine to fail, because the
migration wizard cannot verify the compatibility of the virtual machine state in the snapshot with the
destination host. Failure occurs only if the configuration in the snapshot uses devices or virtual disks that are
not accessible on the current host, or if the snapshot contains an active virtual machine state that was running
on hardware that is incompatible with the current host CPU.
Migration with Storage VMotion
Using Storage VMotion, you can migrate a virtual machine and its disk files from one datastore to another
while the virtual machine is running.
You can choose to place the virtual machine and all its disks in a single location, or select separate locations
for the virtual machine configuration file and each virtual disk. The virtual machine does not change execution
host during a migration with Storage VMotion.
During a migration with Storage VMotion, you can transform virtual disks from thick-provisioned to thinprovisioned or from thin-provisioned to thick-provisioned.
Storage VMotion has a number of uses in administering virtual infrastructure, including the following
examples of use:
n
Upgrading ESX/ESXi without virtual machine downtime. During an upgrade from ESX Server 2.x to
ESX/ESXi 3.5 or later, you can migrate running virtual machines from a VMFS2 datastore to a VMFS3
datastore, and upgrade the VMFS2 datastore without any impact on virtual machines. You can then use
Storage VMotion to migrate virtual machines back to the original datastore without any virtual machine
downtime.
n
Storage maintenance and reconfiguration. You can use Storage VMotion to move virtual machines off of
a storage device to allow maintenance or reconfiguration of the storage device without virtual machine
downtime.
n
Redistributing storage load. You can use Storage VMotion to manually redistribute virtual machines or
virtual disks to different storage volumes to balance capacity or improve performance.
Storage VMotion Requirements and Limitations
A virtual machine and its host must meet resource and configuration requirements for the virtual machine
disks to be migrated with Storage VMotion.
Storage VMotion is subject to the following requirements and limitations:
n
VMware, Inc.
Virtual machines with snapshots cannot be migrated using Storage VMotion.
197
vSphere Basic System Administration
n
Virtual machine disks must be in persistent mode or be raw device mappings (RDMs). For virtual
compatibility mode RDMs, you can migrate the mapping file or convert to thick-provisioned or thinprovisioned disks during migration as long as the destination is not an NFS datastore. For physical
compatibility mode RDMs, you can migrate the mapping file only.
n
Migration of virtual machines during VMware Tools installation is not supported.
n
The host on which the virtual machine is running must have a license that includes Storage VMotion.
n
ESX/ESXi 3.5 hosts must be licensed and configured for VMotion. ESX/ESXi 4.0 and later hosts do not
require VMotion configuration in order to perform migration with Storage VMotion.
n
The host on which the virtual machine is running must have access to both the source and target datastores.
n
A particular host can be involved in up to two migrations with VMotion or Storage VMotion at one time.
n
vSphere supports a maximum of eight simultaneous VMotion, cloning, deployment, or Storage VMotion
accesses to a single VMFS3 datastore, and a maximum of four simultaneous VMotion, cloning,
deployment, or Storage VMotion accesses to a single NFS or VMFS2 datastore. A migration with VMotion
involves one access to the datastore. A migration with Storage VMotion involves one access to the source
datastore and one access to the destination datastore.
Migrate a Powered-Off or Suspended Virtual Machine
You can use the Migration wizard to migrate a powered-off virtual machine or suspended virtual machine.
Procedure
1
Display the virtual machine you want to migrate in the inventory.
2
Right-click on the virtual machine and select Migrate from the pop-up menu.
3
Select whether to change the virtual machine’s host, datastore, or both.
4
Option
Description
Change host
Move the virtual machine to another host.
Change datastore
Move the virtual machine’s configuration file and virtual disks.
Change both host and datastore
Move the virtual machine to another host and move its configuration file and
virtual disks.
To move the virtual machine to another host, select the destination host or cluster for this virtual machine
migration and click Next.
Any compatibility problem appears in the Compatibility panel. Fix the problem, or select another host or
cluster.
Possible targets include hosts and DRS clusters with any level of automation. If a cluster has no DRS
enabled, select a specific host in the cluster rather than selecting the cluster itself.
198
5
Select the destination resource pool for the virtual machine migration and click Next.
6
If you chose to move the virtual machine’s configuration file and virtual disks, select the destination
datastore:
n
To move the virtual machine configuration files and virtual disks to a single destination, select the
datastore and click Next.
n
To select individual destinations for the configuration file and each virtual disk, click Advanced. In
the Datastore column, select a destination for the configuration file and each virtual disk, and click
Next.
VMware, Inc.
Chapter 16 Migrating Virtual Machines
7
If you chose to move the virtual machine’s configuration file and virtual disks, select a disk format and
click Next.
Option
Description
Same as Source
Use the format of the original virtual disk.
If you select this option for an RDM disk in either physical or virtual
compatibility mode, only the mapping file is migrated.
Thin provisioned
Use the thin format to save storage space. The thin virtual disk uses just as
much storage space as it needs for its initial operations. When the virtual disk
requires more space, it can grow in size up to its maximum allocated capacity.
This option is not available for RDMs in physical compatibility mode. If you
select this option for a virtual compatibility mode RDM, the RDM is
converted to a virtual disk. RDMs converted to virtual disks cannot be
converted back to RDMs.
Thick
Allocate a fixed amount of hard disk space to the virtual disk. The virtual
disk in the thick format does not change its size and from the beginning
occupies the entire datastore space provisioned to it.
This option is not available for RDMs in physical compatibility mode. If you
select this option for a virtual compatibility mode RDM, the RDM is
converted to a virtual disk. RDMs converted to virtual disks cannot be
converted back to RDMs.
Disks are converted from thin to thick format or thick to thin format only when they are copied from one
datastore to another. If you leave a disk in its original location, the disk format is not converted, regardless
of the selection made here.
8
Review the summary and click Finish.
vCenter Server moves the virtual machine to the new host. Event messages appear in the Events tab. The data
displayed on the Summary tab shows the status and state throughout the migration. If errors occur during
migration, the virtual machines revert to their original states and locations.
Migrate a Powered-On Virtual Machine with VMotion
You can use the Migration wizard to migrate a powered-on virtual machine from one host to another using
VMotion technology. To relocate the disks of a powered-on virtual machine, migrate the virtual machine using
Storage VMotion.
Prerequisites
Before migrating a virtual machine with VMotion, ensure that your hosts and virtual machines meet the
requirements for migration with VMotion.
n
“Host Configuration for VMotion,” on page 189
n
“Virtual Machine Configuration Requirements for VMotion,” on page 196
Procedure
1
Display the virtual machine you want to migrate in the inventory.
2
Right-click on the virtual machine, and select Migrate from the pop-up menu.
3
Select Change host and click Next.
4
Select a destination host or cluster for the virtual machine.
Any compatibility problem appears in the Compatibility panel. Fix the problem, or select another host or
cluster.
Possible targets include hosts and fully automated DRS clusters. You can select a non-automated cluster
as a target. You are prompted to select a host within the non-automated cluster.
VMware, Inc.
199
vSphere Basic System Administration
5
Select a resource pool and click Next.
6
Select the migration priority level and click Next.
7
Option
Description
High Priority
vCenter Server reserves resources on both the source and destination hosts
to maintain virtual machine availability during the migration. High priority
migrations do not proceed if resources are unavailable.
Low Priority
vCenter Server does not reserve resources on the source and destination
hosts to maintain availability during the migration. Low priority migrations
always proceed. However, the virtual machine might become briefly
unavailable if host resources are unavailable during the migration.
Review the page and click Finish.
A task is created that begins the virtual machine migration process.
Migrate a Virtual Machine with Storage VMotion
Use migration with Storage VMotion to relocate a virtual machine’s configuration file and virtual disks while
the virtual machine is powered on.
You cannot change the virtual machine’s execution host during a migration with Storage VMotion.
Procedure
200
1
Display the virtual machine you want to migrate in the inventory.
2
Right-click on the virtual machine, and select Migrate from the pop-up menu.
3
Select Change datastore and click Next.
4
Select a resource pool and click Next.
5
Select the destination datastore:
n
To move the virtual machine configuration files and virtual disks to a single destination, select the
datastore and click Next.
n
To select individual destinations for the configuration file and each virtual disk, click Advanced. In
the Datastore column, select a destination for the configuration file and each virtual disk, and click
Next.
VMware, Inc.
Chapter 16 Migrating Virtual Machines
6
Select a disk format and click Next:
Option
Description
Same as Source
Use the format of the original virtual disk.
If you select this option for an RDM disk in either physical or virtual
compatibility mode, only the mapping file is migrated.
Thin provisioned
Use the thin format to save storage space. The thin virtual disk uses just as
much storage space as it needs for its initial operations. When the virtual disk
requires more space, it can grow in size up to its maximum allocated capacity.
This option is not available for RDMs in physical compatibility mode. If you
select this option for a virtual compatibility mode RDM, the RDM is
converted to a virtual disk. RDMs converted to virtual disks cannot be
converted back to RDMs.
Thick
Allocate a fixed amount of hard disk space to the virtual disk. The virtual
disk in the thick format does not change its size and from the beginning
occupies the entire datastore space provisioned to it.
This option is not available for RDMs in physical compatibility mode. If you
select this option for a virtual compatibility mode RDM, the RDM is
converted to a virtual disk. RDMs converted to virtual disks cannot be
converted back to RDMs.
Disks are converted from thin to thick format or thick to thin format only when they are copied from one
datastore to another. If you choose to leave a disk in its original location, the disk format is not converted,
regardless of the selection made here.
7
Review the page and click Finish.
A task is created that begins the virtual machine migration process.
About Migration Compatibility Checks
During migration, the Migrate Virtual Machine wizard checks the destination host for compatibility with the
migrating virtual machine using a number of criteria.
When you select a host, the Compatibility panel at the bottom of the Migrate Virtual Machine wizard displays
information about the compatibility of the selected host or cluster with the virtual machine’s configuration.
If the virtual machine is compatible, the panel displays the message, Validation succeeded. If the virtual
machine is not compatible with either the host’s or cluster’s configured networks or datastores, the
compatibility window can display both warnings and errors:
n
Warning messages do not disable migration. Often the migration is justified and you can continue with
the migration despite the warnings.
n
Errors can disable migration if there are no error-free destination hosts among the selected destination
hosts. In this case, the Next button is disabled.
For clusters, the network and datastore configurations are taken into account when checking compatibility
issues. For hosts, the individual host’s configuration is used. A possible problem might be that VMotion is not
enabled on one or both hosts.
A specific host CPU feature’s effects on compatibility are dependent on whether ESX/ESXi exposes or hides
them from virtual machines.
n
Features that are exposed to virtual machines are not compatible when they are mismatched.
n
Features that are not exposed to virtual machines are compatible regardless of mismatches.
Specific items of virtual machine hardware can also cause compatibility issues. For example, a virtual machine
using an enhanced vmxnet virtual NIC cannot be migrated to a host running a version of ESX that does not
support enhanced vmxnet.
VMware, Inc.
201
vSphere Basic System Administration
Storage VMotion Command-Line Syntax
In addition to using the Migration wizard, you can initiate migrations with Storage VMotion from the vSphere
Command-Line Interface (vSphere CLI) using the svmotion command.
For more information about installing and using the vSphere CLI, see vSphere Command-Line Interface Installation
and Reference.
You can run the svmotion command in either interactive or noninteractive mode.
n
To use the command in interactive mode, type svmotion --interactive. You are prompted for all the
information necessary to complete the storage migration. When the command is invoked in interactive
mode, all other parameters given are ignored.
n
In noninteractive mode, the svmotion command uses the following syntax:
svmotion [Standard CLI options] --datacenter=<datacenter name> --vm ‘<VM config datastore
path>:<new datastore>’ [--disks ‘<virtual disk datastore path>:<new datastore>, <virtual disk
datastore path>:<new datastore>]’
Square brackets indicate optional elements.
On Windows systems, use double quotes instead of single quotes around the values specified for the --vm and
--disks options.
For more information on the standard CLI options, see the vSphere Command-Line Interface Installation and
Reference.
Table 16-2 describes the parameters for the svmotion command.
Table 16-2. svmotion Command Parameters
Parameter
Description
<datacenter>
The datacenter that contains the virtual machine to be migrated. You must quote the name
if it contains white space or other special characters.
<VM config datastore
path>
The datastore path to the virtual machine’s configuration file. If the path contains white
space or other special characters, you must quote it.
<new datastore>
The name of the new datastore to which the virtual machine configuration file or disk is to
be moved. Do not include brackets around the name of the new datastore.
--disks
If you do not specify this parameter, all virtual disks associated with a virtual machine are
relocated to the same datastore as the virtual machine configuration file. By specifying this
parameter, you can choose to locate individual virtual disks to different datastores.
To keep a virtual disk on its current datastore, use the --disks option for that disk with its
current datastore as the <new datastore>.
<virtual disk datastore
path>
The datastore path to the virtual disk file.
Determine the Path to a Virtual Machine Configuration File
The path to the virtual machine configuration file is a necessary argument to the svmotion command.
You must specify the datastore path to the virtual machine’s configuration file in the <VM config datastore
path> svmotion command.
Procedure
202
1
In the vSphere Client inventory, select the virtual machine and click the Summary tab.
2
Click Edit Settings to display the Virtual Machine Properties dialog box.
VMware, Inc.
Chapter 16 Migrating Virtual Machines
3
Click the Options tab, and select General Options.
The path to the virtual machine configuration file appears in the Virtual Machine Configuration File text box.
Determine the Path to a Virtual Disk File
You must specify the virtual disk datastore path as part of the svmotion command.
Procedure
1
In the vSphere Client inventory, select the virtual machine to which the virtual disk belongs, and click the
Summary tab.
2
Click Edit Settings to display the Virtual Machine Properties dialog box.
3
Click the Hardware tab, and select the virtual disk from the list of devices.
The path to the virtual disk file appears in the Disk File text box.
Storage VMotion Examples
The examples show how to use the Storage VMotion command-line interface to relocate a virtual machine and
all its disks, or to relocate the virtual machine configuration file while leaving the disks in place.
The examples in this section are formatted on multiple lines for readability. The command should be issued
on a single line.
An example of relocating all of a virtual machine’s disks to a datastore named new_datastore:
svmotion --url=https://myvc.mycorp.com/sdk
--username=me
--password=secret
--datacenter=DC1
--vm='[old_datastore] myvm/myvm.vmx: new_datastore'
An example of relocating a virtual machine to new_datastore, while leaving the disks, myvm_1.vmdk and
myvm_2.vmdk on old_datastore:
svmotion --datacenter='My DC'
--vm='[old_datastore] myvm/myvm.vmx:
new_datastore'
--disks='[old_datastore] myvm/myvm_1.vmdk:
old_datastore,
[old_datastore] myvm/myvm_2.vmdk:
old_datastore'
VMware, Inc.
203
vSphere Basic System Administration
204
VMware, Inc.
Using Snapshots
17
Snapshots are useful when you need to revert repeatedly to the same state but you do not want to create
multiple virtual machines. With snapshots, you can create restore positions in a linear process. You can also
preserve a baseline before diverging a virtual machine in a process tree.
You can use a snapshot as a restoration point during a linear or iterative process, such as installing update
packages, or during a branching process, such as installing different versions of a program. Taking snapshots
ensures that each installation begins from an identical baseline.
This chapter includes the following topics:
n
“About Snapshots,” on page 205
n
“Using the Snapshot Manager,” on page 208
n
“Restore a Snapshot,” on page 209
About Snapshots
A snapshot captures the entire state of the virtual machine at the time you take the snapshot.
Snapshots are useful when you need to revert repeatedly to the same state but you don't want to create multiple
virtual machines.
A snapshot includes the following information:
n
Contents of the virtual machine’s memory
n
Virtual machine settings
n
State of all the virtual machine’s virtual disks
NOTE VMware does not support snapshots of raw disks, RDM physical mode disks, independent disks, or of
virtual machines configured with bus-sharing.
If you require bus-sharing, consider running backup software within your guest operating system as an
alternative solution. If your virtual machine currently has snapshots and it is preventing you from configuring
bus-sharing, delete the snapshots.
Snapshots operate on individual virtual machines. In a team of virtual machines, taking a snapshot preserves
the state only of the active virtual machine. When you revert to a snapshot, you return all these items to the
state they were in at the time you took that snapshot. If you want the virtual machine to be suspended, powered
on, or powered off when you launch it, make sure that it is in the correct state when you take that snapshot.
While snapshots provide a point-in-time image of the disk that backup solutions can use, do not use snapshots
for your own virtual machine backups. Large numbers of snapshots are difficult to manage, take up large
amounts of disk space, and are not protected in the case of hardware failure.
VMware, Inc.
205
vSphere Basic System Administration
Because you cannot revert to a snapshot with dynamic disks, quiesced snapshots are not used when backing
up dynamic disks.
Backup solutions, like VMware Data Recovery, use the snapshot mechanism to freeze the state of a virtual
machine. However, the Data Recovery backup method has additional capabilities that mitigate the limitations
of snapshots.
Multiple snapshots refers to the ability to create more than one snapshot of the same virtual machine.
Multiple snapshots are not simply a way of saving your virtual machines. With multiple snapshots, you can
save many positions to accommodate many kinds of work processes.
When taking a snapshot, the state of the virtual disk at the time the snapshot is taken will be preserved. When
this occurs, the guest cannot write to the vmdk file. The delta disk is an additional vmdk file to which the guest
is allowed to write. The delta disk represents the difference between the current state of the virtual disk and
the state that existed at the time the previous snapshot was taken. If more than one snapshot exists, delta disks
can represent the difference (or delta) between each snapshot. For example, a snapshot can be taken, and then
the guest could write to every single block of the virtual disk, causing the delta disk to grow as large as the
entire virtual disk.
When a snapshot is deleted, the changes between snapshots and previous disk states are merged, and all the
data from the delta disk that contains the information about the deleted snapshot is written to the parent disk
and merges with the base disk only when you choose to do so. This can involve a large amount of disk input
and output. This may reduce the virtual machine performance until consolidation is complete.
The amount of time it takes to commit or delete snapshots depends on how much data the guest operating
system has written to the virtual disks since the last snapshot was taken. The required time is directly
proportional to the amount of data (committed or deleted) and the amount of RAM allocated to the virtual
machine.
For additional information about snapshot behavior, see the Knowledge Base article at
http://kb.vmware.com/kb/1015180.
Relationship Between Snapshots
The relationship between snapshots is like that of a parent to a child. In the linear process, each snapshot has
one parent and one child, except for the last snapshot, which has no children.
The snapshots taken form a tree. Each time you revert and take another, a branch (child) is formed.
In the process tree, each snapshot has one parent, but one snapshot may have more than one child. Many
snapshots have no children.
You can revert to a parent or a child.
Snapshots and Other Activity in the Virtual Machine
When you take a snapshot, be aware of other activity going on in the virtual machine and the likely effect of
reverting to that snapshot.
In general, it is best to take a snapshot when no applications in the virtual machine are communicating with
other computers. The potential for problems is greatest if the virtual machine is communicating with another
computer, especially in a production environment.
For example, if you take a snapshot while the virtual machine is downloading a file from a server on the
network, the virtual machine continues downloading the file, communicating its progress to the server. If you
revert to the snapshot, communications between the virtual machine and the server are confused and the file
transfer fails.
206
VMware, Inc.
Chapter 17 Using Snapshots
Take a Snapshot
You can take a snapshot while a virtual machine is powered on, powered off, or suspended. If you are
suspending a virtual machine, wait until the suspend operation has finished before taking a snapshot.
You must power off the virtual machine before taking a snapshot if the virtual machine has multiple disks in
different disk modes. For example, if you have a special purpose configuration that requires you to use an
independent disk, you must power off the virtual machine before taking a snapshot.
Procedure
1
Select Inventory > Virtual Machine > Snapshot > Take Snapshot.
You can also right-click the virtual machine and select Snapshot > Take Snapshot.
The Take Virtual Machine Snapshot window appears.
2
Type a name for your snapshot.
3
(Optional) Type a description for your snapshot.
4
(Optional) Select the Snapshot the virtual machine’s memory check box if you want to capture the
memory of the virtual machine.
5
(Optional) Select the Quiesce guest file system (Needs VMware Tools installed) check box to pause
running processes on the guest operating system so that file system contents are in a known consistent
state when the snapshot is taken. This applies only to virtual machines that are powered on.
6
Click OK.
When the snapshot has been successfully taken, it is listed in the Recent Tasks field at the bottom of the
vSphere Client.
7
Click the target virtual machine to display tasks and events for this machine or, while the virtual machine
is selected, click the Tasks & Events tab.
Change Disk Mode to Exclude Virtual Disks from Snapshots
Deleting a snapshot involves committing the existing data on the snapshot disk to the parent disk.
Prerequisites
You must power off and delete any existing snapshots before you attempt to change the disk mode.
Procedure
1
Select Inventory > Virtual Machine > Edit Settings.
2
Click the Hardware tab, and select the hard disk you want to exclude.
3
Under Mode, select Independent. Independent disks are not affected by snapshots.
You have the following persistence options for an independent disk:
VMware, Inc.
Option
Description
Persistent
Disks in persistent mode behave like conventional disks on your physical
computer. All data written to a disk in persistent mode are written
permanently to the disk.
Nonpersistent
Changes to disks in nonpersistent mode are discarded when you power off
or reset the virtual machine. Nonpersistent mode enables you to restart the
virtual machine with a virtual disk in the same state every time. Changes to
the disk are actually written to and read from a redo log file that is deleted
when you power off or reset.
207
vSphere Basic System Administration
4
Click OK.
Using the Snapshot Manager
The Snapshot Manager lets you review all snapshots for the active virtual machine and act on them directly.
The Snapshot Manager window contains the following areas: Snapshot tree, Details region, Command buttons,
Navigation region, and a You are here icon.
n
Snapshot tree – Displays all snapshots for the virtual machine.
n
You are here icon – Represents the current operational state of the virtual machine. The You are here icon
is always selected and visible when you open the Snapshot Manager.
You cannot go to or select the You are here state. You are here always represents the current and active
state.
n
Command Buttons – The Snapshot Manager has three command buttons in the left pane: Go to, Delete,
and Delete All.
n
Details – Displays the name and description of the selected snapshot. These fields are blank if you have
not selected a snapshot.
n
Navigation Region – Contains buttons for navigating out of the dialog box:
n
Close – Closes the Snapshot Manager.
n
Help – Opens the help system.
Restore a Snapshot
The Go to button allows you to restore the state of any snapshot.
Procedure
1
Select Inventory > Virtual Machine > Snapshot > Snapshot Manager.
2
In the Snapshot Manager, select a snapshot by clicking it.
3
Click the Go to button to restore the virtual machine to any arbitrary snapshot.
NOTE Virtual machines running certain kinds of workloads might take several minutes to resume
responsiveness after reverting from a snapshot. This delay may be improved by increasing the guest
memory.
4
Click Yes in the confirmation dialog box.
Delete a Snapshot
You can permanently remove a snapshot from vCenter Server.
Procedure
208
1
Select Inventory > Virtual Machine > Snapshot > Snapshot Manager.
2
In the Snapshot Manager, select a snapshot by clicking it.
VMware, Inc.
Chapter 17 Using Snapshots
3
Click Delete to permanently remove a snapshot from vCenter Server.
Clicking Delete Allpermanently removes all snapshots from the virtual machine.
NOTE Delete commits the snapshot data to the parent and removes the selected snapshot. Delete All
commits all the immediate snapshots before the You are here current state to the base disk and removes
all existing snapshots for that virtual machine. When using the Delete All option in Snapshot Manager,
the snapshot farthest from the base disk is committed to its parent, causing that parent snapshot to grow.
When that commit is complete, that snapshot is removed and the process starts over on the newly updated
snapshot to its parent. This continues until every snapshot has been committed. This method can be
relatively slow since data farthest from the base disk might be copied several times. More importantly,
this method can aggressively use disk space if the snapshots are large, which is especially problematic if
a limited amount of space is available on the datastore. The space issue is troublesome in that you might
chose to delete snapshots explicitly to free up storage. This issue is resolved in ESX 4.0 Update 2 in that
the order of snapshot consolidation has been modified to start with the snapshot closest to the base disk
instead of farthest. The end result is that copying data repeatedly is avoided.
4
Click Yes in the confirmation dialog box.
Restore a Snapshot
To return a virtual machine to its original state, you can restore a snapshot.
Do one of the following:
Procedure
n
The Inventory > Virtual Machine > Snapshot menu contains the command Revert to Snapshot.
n
The Snapshot Manager has a Go to button.
Parent Snapshot
The parent snapshot is the most recently saved version of the current state of the virtual machine.
If you have just taken a snapshot, that stored state is the parent snapshot of the current state (You are here). If
you revert or go to a snapshot, that snapshot becomes the parent of the current state (You are here).
The parent snapshot is always the snapshot appearing immediately above the You are here icon in the Snapshot
Manager.
NOTE The parent snapshot is not always the snapshot you took most recently.
Revert to Snapshot Command
Reverting snapshots immediately activates the parent snapshot of the current state of the virtual machine.
The current disk and memory states are discarded and restored as they were when you took that snapshot. If
your parent snapshot was taken when the virtual machine was powered off, choosing Snapshot > Revert to
Snapshot moves the powered-on virtual machine to that parent state, that is, to a powered-off state.
If the snapshot was taken while the virtual machine was powered on and the virtual machine settings are set
to revert to snapshot when powering off, the virtual machine moves to a suspended state when it reverts to
the parent snapshot. If the no memory option is set, the virtual machine moves to a suspended state, even if
the revert operation is performed, but not through the powered-off action. If the memory option is set, the
power-off revert action puts the virtual machine in a suspended state. This process is illustrated in
Figure 17-1.
NOTE Virtual machines running certain kinds of workloads might take several minutes to resume
responsiveness after reverting from a snapshot. This delay may be improved by increasing the guest memory.
VMware, Inc.
209
vSphere Basic System Administration
Figure 17-1. Revert to Snapshot
VM
You are here
take a
snapshot
VM
snapshot_a
You are here
take a
snapshot
VM
snapshot_a
snapshot_b
You are here
go to
snapshot_a
VM
snapshot_a
snapshot_b
You are here
Virtual machine
with no snapshots
The new snapshot (snapshot_a)
is now the parent snapshot of the
You are here state. The parent
snapshot of the You are here state
is the parent snapshot of the
virtual machine.
When you take a snapshot from
the snapshot_a state, snapshot_a
becomes the parent of the new
snapshot (snapshot_b) and
snapshot_b is the parent snapshot
of the You are here state.
If you take a snapshot now, the
new snapshot will be based on
the snapshot_b state, whose
parent snapshot is the
snapshot_b state.
When you go to snapshot_a,
snapshot_a becomes the parent
of the You are here state.
If you take a snapshot now, the
new snapshot will be based on
the snapshot_a state.
When you revert a virtual machine, the virtual machine returns to the parent snapshot
of the virtual machine (that is, the parent of the current You are here state).
Revert to Snapshot is a shortcut to the parent snapshot of You are here
NOTE vApp metadata for virtual machines within vApps does not follow the snapshot semantics for virtual
machine configuration. vApp properties that are deleted, modified, or defined after a snapshot is taken remain
intact (deleted, modified, or defined) after the virtual machine reverts to that snapshot or any prior snapshots.
Revert to Parent Snapshot
You can revert any snapshot to the parent snapshot state.
Procedure
u
210
Select Inventory > Virtual Machine > Snapshot > Revert to Snapshot.
VMware, Inc.
System Administration
VMware, Inc.
211
vSphere Basic System Administration
212
VMware, Inc.
Managing Users, Groups, Roles, and
Permissions
18
Use users, groups, roles, and permissions to control who has access to your vSphere managed objects and what
actions they can perform.
vCenter Server and ESX/ESXi hosts determine the level of access for the user based on the permissions that are
assigned to the user. The combination of user name, password, and permissions is the mechanism by which
vCenter Server and ESX/ESXi hosts authenticate a user for access and authorize the user to perform activities.
The servers and hosts maintain lists of authorized users and the permissions assigned to each user.
Privileges define basic individual rights that are required to perform actions and read properties. ESX/ESXi
and vCenter Server use sets of privileges, or roles, to control which users or groups can access particular
vSphere objects. ESX/ESXi and vCenter Server provide a set of pre-established roles. You can also create new
roles.
The privileges and roles assigned on an ESX/ESXi host are separate from the privileges and roles assigned on
a vCenter Server system. When you manage a host using vCenter Server, only the privileges and roles assigned
through the vCenter Server system are available. If you connect directly to the host using the vSphere Client,
only the privileges and roles assigned directly on the host are available.
This chapter includes the following topics:
n
“Managing vSphere Users,” on page 213
n
“Groups,” on page 214
n
“Removing or Modifying Users and Groups,” on page 215
n
“Best Practices for Users and Groups,” on page 215
n
“Using Roles to Assign Privileges,” on page 215
n
“Permissions,” on page 219
n
“Best Practices for Roles and Permissions,” on page 226
n
“Required Privileges for Common Tasks,” on page 227
Managing vSphere Users
A user is an individual authorized to log in to a host or vCenter Server.
Several users can access the vCenter Server system from different vSphere Client sessions at the same time.
vSphere does not explicitly restrict users with the same authentication credentials from accessing and taking
action within the vSphere environment simultaneously.
VMware, Inc.
213
vSphere Basic System Administration
You manage users defined on the vCenter Server system and users defined on individual hosts separately.
Even if the user lists of a host and a vCenter Server system appear to have common users (for instance, a user
called devuser), these users should be treated as separate users who have the same name. The attributes of
devuser in vCenter Server, including permissions, passwords, and so forth, are separate from the attributes of
devuser on the ESX/ESXi host. If you log in to vCenter Server as devuser, you might have permission to view
and delete files from a datastore. If you log in to an ESX/ESXi host as devuser, you might not have these
permissions.
vCenter Server Users
Authorized users for vCenter Server are those included in the Windows domain list referenced by vCenter
Server or local Windows users on the vCenter Server system. The permissions defined for these users apply
whenever a user connects to vCenter Server.
You cannot use vCenter Server to manually create, remove, or otherwise change vCenter Server users. To
manipulate the user list or change user passwords, use the tools you use to manage your Windows domain or
Active Directory. For more information on creating users and groups for use with vCenter Server, see your
Microsoft documentation.
Any changes you make to the Windows domain are reflected in vCenter Server. Because you cannot directly
manage users in vCenter Server, the user interface does not provide a user list for you to review. You see these
changes only when you select users to configure permissions.
vCenter Servers connected in a Linked Mode group use Active Directory to maintain the list of users, allowing
all vCenter Server systems in the group to share a common set of users.
Host Users
Users authorized to work directly on an ESX/ESXi host are added to the internal user list by default when
ESX/ESXi is installed or by a system administrator after installation.
If you log in to an ESX/ESXi host as root using the vSphere Client, you can use the Users and Groups tab to
perform a variety of management activities for these users. You can add users, remove users, change
passwords, set group membership, and configure permissions.
CAUTION See the Authentication and User Management chapter of the ESX Configuration Guide or ESXi
Configuration Guide for information about root users and your ESX/ESXi host before you make any changes to
the default users. Mistakes regarding root users can have serious access consequences.
Each ESX/ESXi host has two default users:
n
The root user has full administrative privileges. Administrators use this log in and its associated password
to log in to a host through the vSphere Client. Root users have a complete range of control activities on
the specific host that they are logged on to, including manipulating permissions, creating groups and users
(on ESX/ESXi hosts only), working with events, and so on.
n
The vpxuser user is a vCenter Server entity with root rights on the ESX/ESXi host, allowing it to manage
activities for that host. The vpxuser is created at the time that an ESX/ESXi host is attached to vCenter
Server. It is not present on the ESX host unless the host is being managed through vCenter Server.
Groups
You can efficiently manage some user attributes by creating groups. A group is a set of users that you manage
through a common set of permissions.
A user can be a member of more than one group. When you assign permissions to a group, all users in the
group inherit those permissions. Using groups can significantly reduce the time it takes to set up your
permissions model.
214
VMware, Inc.
Chapter 18 Managing Users, Groups, Roles, and Permissions
The group lists in vCenter Server and an ESX/ESXi host are drawn from the same sources as the user lists. If
you are working through vCenter Server, the group list is called from the Windows domain. If you are logged
on to an ESX/ESXi host directly, the group list is called from a table maintained by the host..
Create groups for the vCenter Server system through the Windows domain or Active Directory database.
Create groups for ESX/ESXi hosts using the Users and Groups tab in the vSphere Client when connected
directly to the host.
NOTE If you use Active Directory groups, make sure that they are security groups and not distribution groups.
Permisions assigned to distribution groups are not enforced by vCenter Server. For more information on
security groups and distribution groups, see the Microsoft Active Directory documentation.
Removing or Modifying Users and Groups
When you remove users or groups, you also remove permissions granted to those users or groups. Modifying
a user or group name causes the original name to become invalid.
See the Security chapter in the ESX Configuration Guide or ESXi Configuration Guide for information about
removing users and groups from an ESX/ESXi host.
To remove users or groups from vCenter Server, you must remove them from the domain or Active Directory
users and groups list.
If you remove users from the vCenter Server domain, they lose permissions to all objects in the vSphere
environment and cannot log in again. Users who are currently logged in and are removed from the domain
retain their vSphere permissions only until the next validation period (the default is every 24 hours). Removing
a group does not affect the permissions granted individually to the users in that group, or those granted as
part of inclusion in another group.
If you change a user’s name in the domain, the original user name becomes invalid in the vCenter Server
system. If you change the name of a group, the original group becomes invalid only after you restart the vCenter
Server system.
Best Practices for Users and Groups
Use best practices for managing users and groups to increase the security and manageability of your vSphere
environment.
VMware recommends several best practices for creating users and groups in your vSphere environment:
n
Use vCenter Server to centralize access control, rather than defining users and groups on individual hosts.
n
Choose a local Windows user or group to have the Administrator role in vCenter Server.
n
Create new groups for vCenter Server users. Avoid using Windows built-in groups or other existing
groups.
Using Roles to Assign Privileges
A role is a predefined set of privileges. Privileges define basic individual rights required to perform actions
and read properties.
When you assign a user or group permissions, you pair the user or group with a role and associate that pairing
with an inventory object. A single user might have different roles for different objects in the inventory. For
example, if you have two resource pools in your inventory, Pool A and Pool B, you might assign a particular
user the Virtual Machine User role on Pool A and the Read Only role on Pool B. This would allow that user to
power on virtual machines in Pool A, but not those in Pool B, although the user would still be able to view the
status of the virtual machines in Pool B.
VMware, Inc.
215
vSphere Basic System Administration
The roles created on an ESX/ESXi host are separate from the roles created on a vCenter Server system. When
you manage a host using vCenter Server, only the roles created through vCenter Server are available. If you
connect directly to the host using the vSphere Client, only the roles created directly on the host are available.
vCenter Server and ESX/ESXi hosts provide default roles:
System roles
System roles are permanent. You cannot edit the privileges associated with
these roles.
Sample roles
VMware provides sample roles for convenience as guidelines and suggestions.
You can modify or remove these roles.
You can also create completely new roles.
All roles permit the user to schedule tasks by default. Users can schedule only tasks they have permission to
perform at the time the tasks are created.
NOTE Changes to permissions and roles take effect immediately, even if the users involved are logged in,
except for searches, where permissions changes take effect after the user has logged out and logged back in
again.
Default Roles for ESX/ESXi and vCenter Server
vCenter Server, ESX, and ESXi provide default roles. These roles group together privileges for common areas
of responsibility in a vSphere environment.
You can use the default roles to assign permissions in your environment, or use them as a model to develop
your own roles.
Table 18-1 lists the default roles for ESX/ESXi and vCenter Server.
Table 18-1. Default Roles
216
Role
Role Type
Description of User Capabilities
No Access
system
Cannot view or change the assigned object.
vSphere Client tabs associated with an object appear without content.
This role can be used to revoke permissions that would otherwise be
propagated to an object from a parent object.
This role is available in ESX/ESXi and vCenter Server.
Read Only
system
View the state and details about the object.
View all the tab panels in the vSphere Client except the Console tab.
Cannot perform any actions through the menus and toolbars.
This role is available on ESX/ESXi and vCenter Server.
Administrator
system
All privileges for all objects.
Add, remove, and set access rights and privileges for all the vCenter
Server users and all the virtual objects in the vSphere environment.
This role is available in ESX/ESXi and vCenter Server.
Virtual Machine Power
User
sample
A set of privileges to allow the user to interact with and make hardware
changes to virtual machines, as well as perform snapshot operations.
Privileges granted include:
n All privileges for the scheduled task privileges group.
n Selected privileges for global items, datastore, and virtual machine
privileges groups.
n No privileges for folder, datacenter, network, host, resource, alarms,
sessions, performance, and permissions privileges groups.
Usually granted on a folder that contains virtual machines or on
individual virtual machines.
This role is available only on vCenter Server.
VMware, Inc.
Chapter 18 Managing Users, Groups, Roles, and Permissions
Table 18-1. Default Roles (Continued)
Role
Role Type
Description of User Capabilities
Virtual Machine User
sample
A set of privileges to allow the user to interact with a virtual machine’s
console, insert media, and perform power operations. Does not grant
privileges to make virtual hardware changes to the virtual machine.
Privileges granted include:
n All privileges for the scheduled tasks privileges group.
n Selected privileges for the global items and virtual machine
privileges groups.
n No privileges for the folder, datacenter, datastore, network, host,
resource, alarms, sessions, performance, and permissions privileges
groups.
Usually granted on a folder that contains virtual machines or on
individual virtual machines.
This role is available only on vCenter Server.
Resource Pool
Administrator
sample
A set of privileges to allow the user to create child resource pools and
modify the configuration of the children, but not to modify the resource
configuration of the pool or cluster on which the role was granted. Also
allows the user to grant permissions to child resource pools, and assign
virtual machines to the parent or child resource pools.
Privileges granted include:
n All privileges for folder, virtual machine, alarms, and scheduled
task privileges groups.
n Selected privileges for resource and permissions privileges groups.
n No privileges for datacenter, network, host, sessions, or
performance privileges groups.
Additional privileges must be granted on virtual machines and
datastores to allow provisioning of new virtual machines.
Usually granted on a cluster or resource pool.
This role is available only on vCenter Server.
VMware Consolidated
Backup User
sample
This role is designed for use by the VMware Consolidated Backup
product and should not be modified.
This role is available only on vCenter Server.
Datastore Consumer
sample
A set of privileges to allow the user to consume space on the datastores
on which this role is granted. To perform a space-consuming operation,
such as creating a virtual disk or taking a snapshot, the user must also
have the appropriate virtual machine privileges granted for these
operations.
Usually granted on a datastore or a folder of datastores.
This role is available only on vCenter Server.
Network Consumer
sample
A set of privileges to allow the user to assign virtual machines or hosts
to networks, provided that the appropriate permissions for the
assignment are also granted on the virtual machines or hosts.
Usually granted on a network or folder of networks.
This role is available only on vCenter Server.
Create a Role
VMware recommends that you create roles to suit the access control needs of your environment.
If you create or edit a role on a vCenter Server system that is part of a connected group in Linked Mode, the
changes you make are propagated to all other vCenter Server systems in the group. Assignments of roles to
specific users and objects are not shared across linked vCenter Server systems.
Prerequisites
You must be logged in as a user with Administrator privileges.
VMware, Inc.
217
vSphere Basic System Administration
Procedure
1
On the vSphere Client Home page, click Roles.
2
Right-click the Roles tab information panel and click Add.
3
Type a name for the new role.
4
Select privileges for the role and click OK.
Clone a Role
You can make a copy of an existing role, rename it, and later edit it. When you make a copy, the new role is
not applied to the same users or groups and objects.
If you create or modify a role on a vCenter Server system that is part of a connected group in Linked Mode,
the changes you make are propagated to all other vCenter Server systems in the group. However, assignments
of roles to specific users and objects are not shared across linked vCenter Server systems.
Prerequisites
You must be logged in as a user with Administrator privileges.
Procedure
1
On the vSphere Client Home page, click Roles.
2
To select the role to duplicate, click the object in the list of Roles.
3
To clone the selected role, select Administration > Role > Clone.
A duplicate of the role is added to the list of roles. The name is Copy of <rolename>.
Edit a Role
When you edit a role, you can change any of the privileges selected for that role. When completed, these new
privileges are applied to any user or group assigned the edited role.
If you create or edit a role on a vCenter Server system that is part of a connected group in Linked Mode, the
changes you make are propagated to all other vCenter Server systems in the group. However, assignments of
roles to specific users and objects are not shared across linked vCenter Server systems.
Prerequisites
You must be logged in as a user with Administrator privileges.
Procedure
1
On the vSphere Client Home page, click Roles.
2
To select the role to edit, click the object in the list of Roles.
3
Select Administration > Role > Edit Role.
4
Select privileges for the role and click OK.
Remove a Role
When you remove a role, if it is not assigned to any users or groups, the definition is removed from the list of
possible roles. When you remove a role that is assigned to a user or group you can remove all assignments or
replace them with an assignment to another role.
CAUTION Be sure that you understand how users will be affected before removing all assignments or replacing
them. Users that have no permissions granted to them cannot log in to vCenter Server.
218
VMware, Inc.
Chapter 18 Managing Users, Groups, Roles, and Permissions
Prerequisites
You must be logged in as a user with Administrator privileges.
If you are removing a role from a vCenter Server system that is part of a connected group in Linked Mode,
check the usage of that role on the other vCenter Server systems in the group before proceeding. Removing a
role from one vCenter Server system also removes the role from all other vCenter Server systems in the group,
even if you choose to reassign permissions to another role on the current vCenter Server system.
Procedure
1
On the vSphere Client Home page, click Roles.
2
To select the role to remove, click the object in the list of roles.
3
Select Administration > Role > Remove.
4
Click OK.
The role is removed from the list and is no longer available for assigning to users or groups.
If the role is assigned to a user or group, a warning message appears.
5
Select a reassignment option and click OK.
Option
Description
Remove Role Assignments
Removes any configured user or group and role pairings on the server. If a
user or group does not have any other permissions assigned, they lose all
privileges.
Reassign affected users to
Reassigns any configured user or group and role pairings to the selected new
role.
Rename a Role
Renaming a role does not change that role’s assignments.
If you create or modify a role on a vCenter Server system that is part of a connected group in Linked Mode,
the changes you make are propagated to all other vCenter Server systems in the group. However, assignments
of roles to specific users and objects are not shared across linked vCenter Server systems.
Prerequisites
You must be logged in as a user with Administrator privileges.
Procedure
1
On the vSphere Client Home page, click Roles.
2
To select the role to rename, click the object in the list of roles.
3
Select Administration > Role > Rename.
4
Type the new name.
Permissions
In vSphere, a permission consists of a user or group and an assigned role for an inventory object, such as a
virtual machine or ESX/ESXi host. Permissions grant users the right to perform the activities specified by the
role on the object to which the role is assigned.
For example, to configure memory for an ESX/ESXi host, a user must be granted a role that includes the
Host.Configuration.Memory Configuration privilege. By assigning different roles to users or groups for
different objects, you can precisely control the tasks that users can perform in your vSphere environment.
VMware, Inc.
219
vSphere Basic System Administration
Figure 18-1. The Conceptual Structure of a Permission
role
user or group
permission =
object
By default, all users who are members of the Windows Administrators group on the vCenter Server system
have the same access rights as any user assigned to the Administrator role on all objects. When connecting
directly to an ESX/ESXi host, the root and vpxuser user accounts have the same access rights as any user
assigned the Administrator role on all objects.
All other users initially have no permissions on any objects, which means they cannot view these objects or
perform operations on them. A user with Administrator privileges must assign permissions to these users to
allow them to perform necessary tasks.
Many tasks require permissions on more than one object. Some general rules can help you determine where
you must assign permissions to allow particular operations:
n
Any operation that consumes storage space, such as creating a virtual disk or taking a snapshot, requires
the Datastore.Allocate Space privilege on the target datastore, as well as the privilege to perform the
operation itself.
n
Moving an object in the inventory hierarchy requires appropriate privileges on the object itself, the source
parent object (such as a folder or cluster), and the destination parent object.
n
Each host and cluster has its own implicit resource pool that contains all the resources of that host or
cluster. Deploying a virtual machine directly to a host or cluster requires the Resource.Assign Virtual
Machine to Resource Pool privilege.
Hierarchical Inheritance of Permissions
When you assign a permission to an object, you can choose whether the permission propagates down the object
hierarchy. Propagation is set per permission, not universally applied. Permissions defined for a child object
always override those propagated from parent objects.
Figure 18-2 illustrates the vSphere inventory hierarchy, and the paths by which permissions can propagate.
220
VMware, Inc.
Chapter 18 Managing Users, Groups, Roles, and Permissions
Figure 18-2. vSphere Inventory Hierarchy
root folder
data center folder
data center
VM folder
template
virtual machine
host folder
network folder
datastore folder
network
datastore
host
resource pool
cluster
host
virtual machine
Most inventory objects inherit permissions from a single parent object in the hierarchy. For example, a datastore
inherits permissions from either its parent datastore folder or parent datacenter. However, virtual machines
inherit permissions from both the parent virtual machine folder and the parent host, cluster, or resource pool
simultaneously. This means that to restrict a user’s privileges on a virtual machine, you must set permissions
on both the parent folder and the parent host, cluster or resource pool for that virtual machine.
You cannot set permissions directly on a vNetwork Distributed Switches. To set permissions for a vNetwork
Distributed Switch and its associated dvPort Groups, set permissions on a parent object, such a folder or
datacenter, and select the option to propagate these permissions to child objects.
Permissions take several forms in the hierarchy:
Managed entities
VMware, Inc.
Can have permissions defined on them.
n
Clusters
n
Datacenters
n
Datastores
n
Folders
221
vSphere Basic System Administration
Global entities
n
Hosts
n
Networks (except vNetwork Distributed Switches)
n
dvPort Groups
n
Resource pools
n
Templates
n
Virtual machines
n
vApps
Derive their permissions from the root vCenter Server system.
n
Custom fields
n
Licenses
n
Roles
n
Statistics intervals
n
Sessions
Multiple Permission Settings
Objects might have multiple permissions, but at most one for each user or group.
Permissions applied on a child object always override permissions applied on a parent object. Virtual machine
folders and resource pools are equivalent levels in the hierarchy. If a user or group is assigned propagating
permissions on both a virtual machine's folder and its resource pool, the user has the privileges propagated
from the resource pool and from the folder.
If multiple group permissions are defined on the same object and the user belongs to two or more of those
groups, two situations are possible:
n
If no permission is defined for the user on that object, the user is assigned the union of privileges assigned
to the groups for that object.
n
If a permission is defined for the user on that object, the user's permission takes precedence over all group
permissions.
Example 1: Inheritance of Multiple Permissions
This example illustrates how an object can inherit multiple permissions from groups granted permission on a
parent object.
In this example, two permissions are assigned on the same object for two different groups.
n
Role 1 can power on virtual machines.
n
Role 2 can take snapshots of virtual machines.
n
Group A is granted Role 1 on VM Folder, with the permission set to propagate to child objects.
n
Group B is granted Role 2 on VM Folder, with the permission set to propagate to child objects.
n
User 1 is not assigned specific permission.
User 1, who belongs to groups A and B, logs on. User 1 can both power on and take snapshots of VM A and
VM B.
222
VMware, Inc.
Chapter 18 Managing Users, Groups, Roles, and Permissions
Figure 18-3. Example 1: Inheritance of Multiple Permissions
group A + role 1
group B + role 2
VM Folder
VM A
user 1 has permissions
of role 1 and role 2
VM B
Example 2: Child Permissions Overriding Parent Permissions
This example illustrates how permissions assigned on a child object override permissions assigned on a parent
object. You can use this overriding behavior to restrict user access to particular areas of the inventory.
In this example, permissions are to two different groups on two different objects.
n
Role 1 can power on virtual machines.
n
Role 2 can take snapshots of virtual machines.
n
Group A is granted Role 1 on VM Folder, with the permission set to propagate to child objects.
n
Group B is granted Role 2 on VM B.
User 1, who belongs to groups A and B, logs on. Because Role 2 has been assigned at a lower point in the
hierarchy than Role 1, it overrides Role 1 on VM B. User 1 can power on VM A, but not take snapshots. User
1 can take snapshots of VM B, but not power it on.
Figure 18-4. Example 2: Child Permissions Overriding Parent Permissions
group A + role 1
VM Folder
VM A
group B + role 2
VM B
user 1 has permissions
of role 1 only
user 1 has permissions
of role 2 only
Example 3: User Permissions Overriding Group Permissions
This example illustrates how permissions assigned directly to an individual user override permissions assigned
to a group that the user is a member of.
In this example, permissions are assigned to a user and to a group on the same object.
n
Role 1 can power on virtual machines.
n
Group A is granted Role 1 on VM Folder.
n
User 1 is granted No Access role on VM Folder.
User 1, who belongs to group A, logs on. The No Access role granted to User 1 on VM Folder overrides the
group permission. User 1 has no access to VM Folder or VMs A and B.
Figure 18-5. Example 3: User Permissions Overriding Group Permissions
group A + role 1
user 1 + no access
VM Folder
VM A
user 1 has no access to the folder
or the virtual machines
VM B
VMware, Inc.
223
vSphere Basic System Administration
Permission Validation
vCenter Server regularly validates its users and groups against the Windows Active Directory domain.
Validation occurs whenever the vCenter Server system starts and at regular intervals specified in the vCenter
Server settings.
For example, if user Smith was assigned permissions and in the domain the user’s name was changed to Smith2,
vCenter Server concludes that Smith no longer exists and removes permissions for that user when the next
validation occurs.
Similarly, if user Smith is removed from the domain, all permissions are removed when the next validation
occurs. If a new user Smith is added to the domain before the next validation occurs, the new user Smith
receives all the permissions the old user Smith was assigned.
Assign Permissions
After you create users and groups and define roles, you must assign the users and groups and their roles to
the relevant inventory objects. You can assign the same permissions at one time on multiple objects by moving
the objects to a folder and setting the permissions on the folder.
Prerequisites
Required privilege: Permissions.Modify permission on the parent object of the object whose permissions you
want to modify.
Procedure
1
Select an object and click the Permissions tab.
2
Right-click the Permissions tab and select Add Permission.
3
Select a role from the Assigned Role drop-down menu.
This menu displays all the roles that are assigned to the object. When the role appears, the privileges
contained in the role are listed in the section below the role title for reference purposes.
4
(Optional) Deselect the Propagate to Child Objects check box.
If you deselect this check box, the role is applied only to the selected object, and does not propagate to the
child objects.
5
Click Add to open the Select Users or Groups dialog box.
6
Identify the user or group to assign to this role.
a
Select the domain where the user or group is located from the Domain drop-down menu.
b
Type a name in the Search box or select a name from the Name list.
c
Click Add.
The name is added to either the Users or Groups list.
d
Repeat Step 6a through Step 6c to add additional users or groups.
e
Click OK when finished.
7
Verify the users and groups are assigned to the appropriate permissions, and click OK.
8
To finish the task, click OK.
The server adds the permission to the list of permissions for the object.
The list of permissions references all users and groups that have roles assigned to the object, and indicates
where in the vCenter Server hierarchy the role is assigned.
224
VMware, Inc.
Chapter 18 Managing Users, Groups, Roles, and Permissions
Adjust the Search List in Large Domains
If you have domains with thousands of users or groups, or if searches take a long time to complete, adjust the
search settings for use in the Select Users or Groups dialog box.
NOTE This procedure applies only to vCenter Server user lists. ESX/ESXi user lists cannot be searched in the
same way.
Procedure
1
From the vSphere Client connected to a vCenter Server system, select Administration > vCenter Server
Management Server Configuration.
2
Click the Active Directory list item.
3
Change the values as needed.
4
Option
Description
Active Directory Timeout
Specifies in seconds the maximum amount of time vCenter Server allows the
search to run on the selected domain. Searching very large domains can take
a very long time.
Enable Query Limit
To specify no maximum limit on the number of users and groups that
vCenter Server displays from the selected domain, deselect the check box.
Users & Groups value
Specifies the maximum number of users and groups vCenter Server displays
from the selected domain in the Select Users or Groups dialog box.
Click OK.
Change Permission Validation Settings
vCenter Server periodically validates its user and group lists against the users and groups in the Windows
Active Directory domain, and removes users or groups that no longer exist in the domain. You can change the
interval between validations.
Procedure
1
From the vSphere Client connected to a vCenter Server system, select Administration > vCenter Server
Management Server Configuration.
2
Click the Active Directory list item.
3
Deselect the Enable Validation check box to disable validation.
Validation is enabled by default. Users and groups are always validated when vCenter Server system
starts, even if validation is disabled.
4
If validation is enabled, enter a value in the Validation Period text box to specify a time, in minutes,
between validations.
Change Permissions
After a user or group and role pair is set for an inventory object, you can change the role paired with the user
or group or change the setting of the Propagate check box. You can also remove the permission setting.
Procedure
1
From the vSphere Client, select an object in the inventory.
2
Click the Permissions tab.
3
Click the line item to select the user or group and role pair.
VMware, Inc.
225
vSphere Basic System Administration
4
Select Inventory > Permissions > Properties.
5
In the Change Access Role dialog box, select a role for the user or group from the drop-down menu.
6
To propagate the privileges to the children of the assigned inventory object, click the Propagate check box
and click OK.
Remove Permissions
Removing a permission for a user or group does not remove the user or group from the list of those available.
It also does not remove the role from the list of available items. It removes the user or group and role pair from
the selected inventory object.
Procedure
1
From the vSphere Client, click the Inventory button in the navigation bar.
2
Expand the inventory as needed and click the appropriate object.
3
Click the Permissions tab.
4
Click the appropriate line item to select the user or group and role pair.
5
Select Inventory > Permissions > Delete.
vCenter Server removes the permission setting.
Best Practices for Roles and Permissions
Use best practices for roles and permissions to maximize the security and manageability of your vCenter Server
environment.
VMware recommends the following best practices when configuring roles and permissions in your vCenter
Server environment:
226
n
Where possible, grant permissions to groups rather than individual users.
n
Grant permissions only where needed. Using the minimum number of permissions makes it easier to
understand and manage your permissions structure.
n
If you assign a restrictive role to a group, check that the group does not contain the Administrator user or
other users with administrative privileges. Otherwise, you could unintentionally restrict administrators'
privileges in parts of the inventory hierarchy where you have assigned that group the restrictive role.
n
Use folders to group objects to correspond to the differing permissions you want to grant for them.
n
Use caution when granting a permission at the root vCenter Server level. Users with permissions at the
root level have access to global data on vCenter Server, such as roles, custom attributes, vCenter Server
settings, and licenses. Changes to licenses and roles propagate to all vCenter Server systems in a Linked
Mode group, even if the user does not have permissions on all of the vCenter Server systems in the group.
n
In most cases, enable propagation on permissions. This ensures that when new objects are inserted in to
the inventory hierarchy, they inherit permissions and are accessible to users.
n
Use the No Access role to masks specific areas of the hierarchy that you don’t want particular users to
have access to.
VMware, Inc.
Chapter 18 Managing Users, Groups, Roles, and Permissions
Required Privileges for Common Tasks
Many tasks require permissions on more than one object in the inventory.
Table 18-2 lists common tasks that require more than one privilege. It lists the privileges required to perform
the tasks and, where applicable, the appropriate sample roles. You can use the listed Applicable Roles on the
listed inventory objects to grant permission to perform these tasks, or you can create your own roles with the
equivalent required privileges.
Table 18-2. Required Privileges for Common Tasks
Task
Required Privileges
Applicable Role
Create a virtual machine
On the destination folder or datacenter:
n Virtual Machine.Inventory.Create
n Virtual Machine.Configuration.Add New Disk (if
creating a new virtual disk)
n Virtual Machine .Configuration.Add Existing Disk
(if using an existing virtual disk)
n Virtual Machine.Configuration.Raw Device (if using
a RDM or SCSI pass-through device)
Virtual Machine
Administrator
On the destination host, cluster, or resource pool:
Resource.Assign Virtual Machine to Resource Pool
Virtual Machine
Administrator
On the destination datastore or folder containing a
datastore:
Datastore.Allocate Space
Datastore Consumer or
Virtual Machine
Administrator
On the network that the virtual machine will be assigned
to:
Network.Assign Network
Network Consumer or
Virtual Machine
Administrator
On the destination folder or datacenter:
n Virtual Machine.Inventory.Create
n Virtual Machine.Configuration.Add New Disk
Virtual Machine
Administrator
On a template or folder of templates:
Virtual Machine.Provisioning.Deploy Template
Virtual Machine
Administrator
On the destination host, cluster or resource pool:
Resource.Assign Virtual.Machine to Resource Pool
Virtual Machine
Administrator
On the destination datastore or folder of datastores:
Datastore.Allocate Space
Datastore Consumer or
Virtual Machine
Administrator
On the network that the virtual machine will be assigned
to:
Network.Assign Network
Network Consumer or
Virtual Machine
Administrator
On the virtual machine or a folder of virtual machines:
Virtual Machine.State.Create Snapshot
Virtual Machine Power User
or Virtual Machine
Administrator
On the destination datastore or folder of datastores:
Datastore.Allocate Space
Datastore Consumer or
Virtual Machine
Administrator
On the virtual machine or folder of virtual machines:
n Resource.Assign Virtual Machine to Resource Pool
n Virtual Machine.Inventory.Move
Virtual Machine
Administrator
On the destination resource pool:
Resource.Assign Virtual Machine to Resource Pool
Virtual Machine
Administrator
Deploy a virtual machine
from a template
Take a virtual machine
snapshot
Move a virtual machine into a
resource pool
VMware, Inc.
227
vSphere Basic System Administration
Table 18-2. Required Privileges for Common Tasks (Continued)
Task
Required Privileges
Applicable Role
Install a guest operating
system on a virtual machine
On the virtual machine or folder of virtual machines:
Virtual Machine Power User
or Virtual Machine
Administrator
n
n
n
n
n
n
n
n
n
Migrate a virtual machine
with VMotion
Cold migrate (relocate) a
virtual machine
Migrate a Virtual Machine
with Storage VMotion
Move a host into a cluster
228
Virtual Machine.Interaction.Answer Question
Virtual Machine.Interaction.Console Interaction
Virtual Machine.Interaction.Device Connection
Virtual Machine.Interaction.Power Off
Virtual Machine.Interaction.Power On
Virtual Machine.Interaction.Reset
Virtual Machine.Interaction.Configure CD Media (if
installing from a CD)
Virtual Machine.Interaction.Configure Floppy
Media (if installing from a floppy disk)
Virtual Machine.Interaction.Tools Install
On a datastore containing the installation media ISO
image:
Datastore.Browse Datastore (if installing from an ISO
image on a datastore)
Virtual Machine Power User
or Virtual Machine
Administrator
On the virtual machine or folder of virtual machines:
n Resource.Migrate
n Resource.Assign Virtual Machine to Resource Pool
(if destination is a different resource pool from the
source)
Datacenter Administrator or
Resource Pool Administrator
or Virtual Machine
Administrator
On the destination host, cluster, or resource pool (if
different from the source):
Resource.Assign Virtual Machine to Resource Pool
Datacenter Administrator or
Resource Pool Administrator
or Virtual Machine
Administrator
On the virtual machine or folder of virtual machines:
n Resource.Relocate
n Resource.Assign Virtual Machine to Resource Pool
(if destination is a different resource pool from the
source)
Datacenter Administrator or
Resource Pool Administrator
or Virtual Machine
Administrator
On the destination host, cluster, or resource pool (if
different from the source):
Resource.Assign Virtual Machine to Resource Pool
Datacenter Administrator or
Resource Pool Administrator
or Virtual Machine
Administrator
On the destination datastore (if different from the source):
Datastore.Allocate Space
Datastore Consumer or
Virtual Machine
Administrator
On the virtual machine or folder of virtual machines:
Resource.Migrate
Datacenter Administrator or
Resource Pool Administrator
or Virtual Machine
Administrator
On the destination datastore:
Datastore.Allocate Space
Datastore Consumer or
Virtual Machine
Administrator
On the host:
Host.Inventory.Add Host to Cluster
Datacenter Administrator or
Virtual Machine
Administrator
On the destination cluster:
Host.Inventory.Add Host to Cluster
Datacenter Administrator or
Virtual Machine
Administrator
VMware, Inc.
Monitoring Storage Resources
19
If you use vCenter Server to manage your ESX/ESXi hosts, you can review information on storage usage and
visually map relationships between all storage entities available in vCenter Server.
In the vSphere Client, for any inventory object except networking, the storage usage data appears in the Storage
Views tab. To view this tab, you must have the vCenter Storage Monitoring plug-in, which is generally installed
and enabled by default.
You can display storage information as reports or storage topology maps.
Reports
Reports display relationship tables that provide insight about how an
inventory object is associated with storage entities. They also offer summarized
storage usage data for the object’s virtual and physical storage resources. Use
the Reports view to analyze storage space utilization and availability,
multipathing status, and other storage properties of the selected object and
items related to it.
Maps
Maps display storage topology maps that visually represent relationships
between the selected object and its associated virtual and physical storage
entities.
For more information on virtual and phisical storage resources and how virtual mahcines access sotrage, see
ESX Configuration Guide or ESXi Configuration Guide.
This chapter includes the following topics:
n
“Working with Storage Reports,” on page 229
n
“Working with Storage Maps,” on page 231
Working with Storage Reports
Reports help you monitor storage information.
You can display and review statistics for different categories depending on the inventory object. For example,
if the inventory object is a datastore, you can display information for all virtual machines that reside on the
datastore, all hosts that have access to the datastore, the LUNs on which the datastore is deployed, and so on.
When you display the report tables, the default column headings depend on the inventory object you select.
You can customize the tables by adding or removing columns. Reports are updated every 30 minutes. You can
manually update the reports by clicking Update.
You can search for specific information you need to see by filtering report tables based on storage attributes
and keywords.
VMware, Inc.
229
vSphere Basic System Administration
Display Storage Reports
You display storage reports to review storage information for any inventory object except networking. For
example, if the inventory object is a virtual machine, you can review all datastores and LUNs that the virtual
machine uses, status of all paths to the LUNs, adapters that the host uses to access the LUNs, and so on.
Procedure
1
Display the object, for which you want to view reports, in the inventory.
For example, display virtual machines if you want to review storage information for a specific virtual
machine.
2
Select the object and click Storage Views > Reports.
3
To display information for a specific category, click Show all [Category of Items] and select the
appropriate category from the list.
For example, if you want to see all datastores that the virtual machine is using, select Show all
Datastores.
4
To see the description of each column, move the cursor over the column heading.
Export Storage Reports
You can export storage usage data for an object in various formats, including XML, HTML, or Microsoft Excel.
Perform the following task in the vSphere Client.
Procedure
1
Display the object in the inventory.
2
Select the object and click Storage Views > Reports.
3
To display information for a specific category, click Show all [Category of Items]and select the appropriate
category from the list.
4
Right-click below the table and select Export List.
5
Specify a file name, type, and location.
6
Click Save.
Filter Storage Reports
To search for specific information, you can filter reports based on any number of storage attributes you select
and keywords you enter in the search field.
Procedure
1
In the inventory, display the object for which to filter the reports.
2
Select the object and click Storage Views > Reports.
3
To display information for a specific category, click Show all [Category of Items]and select the appropriate
category from the list.
4
Click the search field arrow and select the attributes to include in the search.
5
Type a keyword into the box and press Enter.
The table is updated based on your search criteria. For example, if you are reviewing reports for datastores in
a datacenter, you can display information for only those datastores that have NFS format by selecting the File
System Type attribute and entering NFS as a key word. Filtering is persistent for the user session.
230
VMware, Inc.
Chapter 19 Monitoring Storage Resources
Customize Storage Reports
You display storage reports in the vSphere Client. When you display the reports tables, the default column
headings depend on the inventory object you select. You can customize the tables by adding or removing
columns.
Procedure
1
Display the object in the inventory for which you want to customize reports.
2
Select the object and click Storage Views > Reports.
3
To display information for a specific category, click Show all [Category of Items]and select the appropriate
category from the list.
4
To add a column, right-click any column heading and select an item to display from the list.
5
To hide a column, right-click the column heading and deselect it in the list.
Working with Storage Maps
Storage maps help you visually represent and understand the relationships between an inventory object and
all virtual and physical storage resources available for this object. Map views are object-centric and display
only items relevant to the specific object.
Map views are updated every 30 minutes. You can manually update the maps by clicking the Update link.
You can customize a map view by selecting or deselecting options in the Show area, or by hiding specific items
or changing their position on the map.
You can reposition the map by dragging it, and zoom in or out of the map or its particular section.
Display Storage Maps
For any inventory object except networking, you can display storage maps that graphically represent the
relationships between the object, for example, a virtual machine, and all resources, such as datastores, LUNs,
hosts, and so on, available for this object.
Procedure
1
Display the object in the inventory.
2
Select the object and click Storage Views > Maps.
Export Storage Maps
You can export maps to various graphic files, including JPEG, TIFF, and GIF.
Procedure
1
Display a storage map.
2
Right-click the map and select Export Map from the menu.
3
Type a file name, type, and location.
4
Click Save.
The image file is saved to the format and directory you specified.
VMware, Inc.
231
vSphere Basic System Administration
Hide Items on Storage Maps
You can hide any number of items in a storage map.
Procedure
1
Display a storage map.
2
Right-click the item you want to hide and select Hide Node from the menu.
Move Items on Storage Maps
You might need to move individual items on the storage map to make the map visually more clear.
Procedure
232
1
Display a storage map.
2
Click the item you want to move and drag it to the new location.
VMware, Inc.
Using vCenter Maps
20
A vCenter map is a visual representation of your vCenter Server topology. Maps show the relationships
between the virtual and physical resources available to vCenter Server.
Maps are available only when the vSphere Client is connected to a vCenter Server system.
The maps can help you determine such things as which clusters or hosts are most densely populated, which
networks are most critical, and which storage devices are being utilized. vCenter Server provides the following
map views.
Virtual Machine
Resources
Displays virtual machine-centric relationships.
Host Resources
Displays host-centric relationships.
Datastore Resources
Displays datastore-centric relationships.
VMotion Resources
Displays hosts available for VMotion migration.
You can use a map view to limit or expand the scope of a map. You can customize all map views, except
VMotion Resources maps. If you are accessing map views using the navigation bar, all vCenter Server resources
are available for display. If you are using the Maps tab of a selected inventory item, only items related to that
item are displayed. For virtual machine inventory items, the VMotion Resources view is the only map view
available on the Maps tab.
You can customize a map view by selecting or deselecting objects in the inventory pane or by selecting or
deselecting options in the Map Relationships area.
You can reposition the map by dragging it (click and hold anywhere on the map and drag the map to the new
location). A grey box in the overview area represents the section of the total map that is viewable and moves
as you drag the map. You can resize the grey box to zoom in or out of a section of the map.
You can double-click any object in a map to switch to the Map tab for that item (providing a Map tab is available
for that type of object).
Right-click on any object in a map to access its context menu.
This chapter includes the following topics:
n
“vCenter VMotion Maps,” on page 234
n
“vCenter Map Icons and Interface Controls,” on page 234
n
“View vCenter Maps,” on page 235
n
“Print vCenter Maps,” on page 235
n
“Export vCenter Maps,” on page 235
VMware, Inc.
233
vSphere Basic System Administration
vCenter VMotion Maps
VMotion resource maps provide a visual representation of hosts, datastores, and networks associated with the
selected virtual machine.
VMotion resource maps also indicate which hosts in the virtual machine’s cluster or datacenter are compatible
with the virtual machine and are potential migration targets. For a host to be compatible, it must meet the
following criteria.
n
Connect to all the same datastores as the virtual machine.
n
Connect to all the same networks as the virtual machine.
n
Have compatible software with the virtual machine.
n
Have a compatible CPU with the virtual machine.
NOTE The VMotion map provides information as to whether VMotion might be possible, and if not, what an
administrator might do to remedy the situation. It does not guarantee that a particular VMotion migration will
be successful.
vCenter Map Icons and Interface Controls
Resource maps are visual representations of your datacenter topology. Each icon in a resource map represents
a managed object or its current state. Controls in the Maps tab enable you to work with the current resource
map.
Map Icons
The icons in a resource map represent the objects in the inventory and their current state. Table 20-1 describes
the map icons.
Table 20-1. Resource Map Icons
Icon
Description
Host icon.
A host that is compatible for VMotion migration. The color of the circle varies in intensity based on the load of
the current host. Heavily used hosts are pale; low-load hosts are saturated green.
A host that is not compatible for VMotion migration.
Virtual machine icon. When the virtual machine is powered on, the icon contains a green triangle.
Network icon.
Datastore icon.
234
VMware, Inc.
Chapter 20 Using vCenter Maps
Map Interface Controls
Use the controls in the Maps tab to customize map relationships, refresh map views, and move the focus of
the current map. Table 20-2 describes the controls located on the Maps tab.
Table 20-2. Resource Map Interface Controls
Map Interface Panel
Description
Overview panel
Thumbnail graphic of the full-scale map.
Map Relationships panel
Displayed when more than one map view is available. The Map Relationships panel lets you
customize map relationships for hosts and virtual machines. Use the checkboxes to enable or
disable relationships for the selected object and display them in the current resource map.
Refresh link
Maps do not auto-refresh. Click Refresh to synchronize your map with the current state of the
inventory and to center the map view.
Inventory panel
When selecting through the Inventory navigation bar, a selected item stays highlighted to
indicate map focus.
When selecting through the Maps navigation bar, all items in the inventory are listed with a
check box. You can select or deselect any inventory items you do not want included in the map.
View vCenter Maps
Resource maps enable you to view the relationships among hosts, clusters, and virtual machines. You can view
a resource map for an entire vCenter Server system or for a specific object, such as a datacenter or cluster. Maps
for specific objects show only the object relationships for that object.
Procedure
1
Display the object in the inventory.
2
Select the object and click the Maps tab.
For example, to display the resource map for your entire vCenter Server system, select the vCenter Server
in the inventory panel. To display the resource map for a host, select the host in the inventory panel.
Print vCenter Maps
You can print resource maps to any standard printer.
Perform this procedure on the vSphere Client Map tab.
Procedure
1
Select File > Print Maps > Print.
2
In the printer Name list, select the printer.
3
Click Print.
Export vCenter Maps
Exporting a resource map saves the map to an image file.
Perform this procedure on the vSphere Client Map tab.
Procedure
1
If necessary, view the resource map.
2
Select File > Export > Export Maps.
VMware, Inc.
235
vSphere Basic System Administration
236
3
Navigate to the location to save the file.
4
Type a name for the file and select a file format.
5
Click Export.
VMware, Inc.
Working with Alarms
21
Alarms are notifications that occur in response to selected events, conditions, and states that occur with objects
in the inventory. You use the vSphere Client to create and modify alarms.
The vCenter Server system is configured with a set of predefined alarms that monitor clusters, hosts,
datacenters, datastores, networks, and virtual machines. it is also configured with alarms that monitor vCenter
Server licensing.
Each predefined alarm monitors a specific object and applies to all objects of that type. For example, by default,
the Host CPU Usage alarm is set automatically on each host in the inventory and triggers automatically when
any host's CPU usage reaches the defined CPU value.
If the predefined vCenter Server alarms do not account for the condition, state, or event you need to monitor,
you can define custom alarms.
When you set an alarm on a parent object, such as a vCenter Server, a datatcenter, or a cluster, all applicable
child objects inherit the alarm. You can also set an alarm on a folder to propagate the same alarm to all objects
contained in that folder. You cannot change or override an alarm that is set on a child object from its parent
object. You must change the alarm on the child object itself.
Alarms are composed of a trigger and an action.
Trigger
A set of conditions that must be met for an alarm warning and alert to occur.
Most triggers consist of a condition value and a length of time that value is true.
For example, the virtual machine memory alarm triggers a warning when
memory usage is over 75% for one hour and over 90% for five minutes.
VMware uses colors to denote alarm severity:
VMware, Inc.
n
Normal – green
n
Warning – yellow
n
Alert – red
237
vSphere Basic System Administration
You can set alarms to trigger when the state changes from green to yellow,
yellow to red, red to yellow, and yellow to green. Triggers are defined for the
default VMware alarms. You can change the trigger conditions (thresholds,
warning values, and alert values) for the default alarms.
Action
The operation that occurs in response to the trigger. For example, you can have
an email notification sent to one or more administrators when an alarm is
triggered. The default vCenter Server alarms are not preconfigured with
actions. You must manually set what action occurs when the triggering event,
condition, or state occurs.
NOTE Some alarms contain triggers that are not supported in the vSphere Client and cannot be changed.
However, you can still configure the alarm actions, enable or disable the alarm, and change the alarm name.
If your environment requires changes to these alarm triggers, create custom alarms by using the vSphere Client
or the VMware vSphere APIs.
This chapter includes the following topics:
n
“Alarm Triggers,” on page 238
n
“Alarm Actions,” on page 248
n
“Alarm Reporting,” on page 253
n
“Creating Alarms,” on page 253
n
“Managing Alarms,” on page 257
n
“Managing Alarm Actions,” on page 261
n
“Managing Alarm Actions,” on page 261
n
“Preconfigured VMware Alarms,” on page 264
Alarm Triggers
You configure alarm triggers to generate warnings and alerts when the specified criteria is met. Alarms have
two types of triggers: condition or state triggers, and event triggers.
Condition or State
Triggers
Monitor the current condition or state of virtual machines, hosts, and
datastores. This includes power states, connection states, and performance
metrics, such as CPU and disk usage. To set alarms on other objects in the
inventory, including datacenters, clusters, resource pools, and networking
objects, use event triggers.
NOTE You can set a condition or state alarm at the datacenter level that
monitors all virtual machines, hosts, or datastores in the datacenter.
Event Triggers
238
Monitors events that occur in response to operations occuring with any
managed object in the inventory, the vCenter Server system, or the license
server. For example, an event is recorded each time a virtual machine is cloned,
created, deleted, deployed, and migrated.
VMware, Inc.
Chapter 21 Working with Alarms
Condition and State Triggers
Use condition triggers and state triggers to set alarms on performance metrics, power states, and connection
states for virtual machines, hosts, and datastores. To set alarms on other objects in the inventory, you must use
event triggers.
Condition and state triggers use one of the following operator sets to monitor an object:
n
Is equal to and Is not equal to
n
Is above and Is below
To define a condition or state trigger, you choose the appropriate operator set and enter the values for the
warning and alert status. You can use any number of triggers for an alarm. When you use more than one trigger,
you choose whether to trigger the alarm when any conditions are satisfied or when all conditions are satisfied.
For example, you can create a host alarm that has two condition triggers, one for CPU usage and one for memory
usage:
Table 21-1. Example – Setting Condition Triggers
Warning
Alert
Trigger
Condition
Operator
Value
Operator
Value
1
CPU usage
Is above
75%
Is above
90%
2
Memory usage
Is above
75%
Is above
90%
If you trigger the alarm when all conditions are satisfied, the alarm will trigger the warning only when both
CPU usage and memory usage values are above 75%. Likewise, it will trigger the alert only when both CPU
usage and memory usage are above 90%.
NOTE Unexpected results might occur when you have an alarm with multiple triggers with opposing warning
and alert conditions, and you set the alarm to trigger when all conditions are satisfied. For example, an alarm
has two triggers that set warnings and alerts for the virtual machine power state.
Table 21-2. Example – Opposing Warning and Alert Conditions
Trigger
Warning
Alert
1
Powered Off
Powered On
2
Powered On
Powered Off
If you choose to trigger the alarm when all conditions are satisfied, the alarm triggers a warning. This is because
the vServer System uses the AndAlarmExpression operator to validate the condition statuses for each trigger.
When they are all satisfied, the first condition is satisfied, and therefore is used: Warning & Alert = warning.
Condition and State Trigger Components
Condition and State triggers are comprised of a trigger type, a triggering condition and length, and warning
and alert values.
Table 21-3 describes each component of Condition and State triggers.
Table 21-3. Condition and State Trigger Components
Trigger Component
Description
Trigger type
The condition or state to monitor, for example, VM CPU Usage (%).
Condition
The qualifier used to set the threshold for the trigger, for example, Is Above and Is
Below.
VMware, Inc.
239
vSphere Basic System Administration
Table 21-3. Condition and State Trigger Components (Continued)
Trigger Component
Description
Warning
The value that must be reached for the alarm to transition from a normal state to a
warning state, and to trigger the alarm.
Condition Length
For condition triggers, after the warning condition is reached, the amount of time the
warning condition stays true in order for the warning to trigger.
State triggers do not have condition lengths. As soon as the state condition occurs, the
warning is triggered.
Alert
The value that must be reached for the alarm to transition from the warning state to an
alert state and to trigger the alarm.
Condition Length
For condition triggers, after the alert value is reached, the amount of time the alert
condition stays true in order for the alarm to trigger.
State triggers do not have condition lengths. As soon as the state condition occurs, the
alert is triggered.
For condition triggers to generate a warning or an alert, the value you set must be reached and for the specified
condition length. For example, you can configure a condition trigger to generate a warning and an alert under
the following conditions:
n
A virtual machine’s CPU usage must be above 75% for more than 10 minutes to generate a warning.
n
A virtual machine’s CPU usage must be above 95% for more than 5 minutes to generate a warning.
The 10 minute and 5 minute time conditions in this example help distinguish an erratic condition from a true
scenario. You set time requisites to ensure that the metric conditions are valid and not caused by incidental
spikes.
Triggered alarms reset when the triggering condition or state is no longer true. For example, if you have an
alarm defined to trigger a warning when host CPU is above 75%, the condition will reset to normal when the
value falls below the 75% and the warning alarm will no longer be triggered. The threshold condition is
dependent on any tolerance range you set for the threshold.
Virtual Machine Condition and State Triggers
VMware provides default triggers that you can use to define alarms on virtual machines when they undergo
certain conditions and states.
Table 21-4 lists the Condition and State triggers you can set on virtual machines.
Table 21-4. Virtual Machine Condition and State Alarm Triggers
240
Trigger Type
Trigger Name
Description
Condition
CPU Ready Time (ms)
The amount of time the virtual machine was ready during the collection
interval, but could not get scheduled to run on the physical CPU. CPU ready
time is dependent on the number of virtual machines on the host and their
CPU loads.
Condition
CPU Usage (%)
Amount of virtual CPU (MHz) used by the virtual machine. CPU limits are
ignored in the calculation. The calculation is:
VM CPU Usage (%) = VM CPU [MHz] / (# of vCPUs x clock rate of the physical
CPU [MHz]) x 100
Condition
Disk Aborts
Number of SCSI commands that were not completed on each physical disk
of the virtual machine.
Condition
Disk Resets
Number of SCSI-bus reset commands issued on each physical disk of the
virtual machine.
Condition
Disk Usage (KBps)
Sum of the data read and written across all disk instances on the virtual
machine.
VMware, Inc.
Chapter 21 Working with Alarms
Table 21-4. Virtual Machine Condition and State Alarm Triggers (Continued)
Trigger Type
Trigger Name
Description
Condition
Fault Tolerance
Secondary VM Latency
Status Changed
Amount of wallclock time that the virtual CPU of the secondary virtual
machine is behind the virtual CPU of the primary virtual machine.
n Low – 0-2 seconds
n Moderate – 2-6 seconds
n High – More than 6 seconds
State
Heartbeat
Current status of the guest operating system heartbeat:
n Gray – VMware Tools are not installed or not running.
n Red – No heartbeat. Guest operating system may have stopped
responding.
n Yellow – Intermittent heartbeat. A Yellow status may be caused by heavy
guest OS usage.
n Green – Guest operating system is responding normally.
Condition
Memory Usage (%)
Amount of configured RAM (MB) used by the virtual machine. The
calculation is:
VM Memory Usage (%) = Active Memory [MB] / configured RAM of VM [MB]
x 100
Condition
Network Usage (Kbps)
Sum of data transmitted and received across all virtual NIC instances on the
virtual machine.
Condition
Snapshot Size (GB)
Aggregate size (KB) of all snapshots taken for the current virtual machine.
State
State
Current state of the virtual machine:
n Powered On – The virtual machine is powered on.
n Powered Off – The virtual machine is powered off.
n Suspended – The virtual machine is suspended.
Condition
Total Disk Latency (ms)
Average amount of time taken to process a SCSI command issued by the Guest
OS to the virtual machine. The calculation is:
Total Disk Latency = kernelLatency + deviceLatency
n Low – 0-2 seconds
n Moderate – 2-6 seconds
n High – More than 6 seconds
Condition
Total Size on Disk (GB)
Aggregate amount of disk space occupied by all virtual machines on the host.
Host Condition and State Triggers
VMware provides preconfigured alarms that trigger when hosts undergo certain conditions and states.
Table 21-5 lists the default Condition and State triggers you can set on hosts.
VMware, Inc.
241
vSphere Basic System Administration
Table 21-5. Host Condition and State Triggers
Trigger Name
Description
Trigger Type
Connection State
Current connection state of the host:
State
n
n
n
Connected – The host is connected to the server. For ESX/ESXi hosts,
this is always the state.
Disconnected – A user has explicitly shut down the host. In this state,
vCenter Server does not expect to receive heartbeats from the host.
The next time a heartbeat is received, the host is returned to a
connected state and an event is logged.
Not Responding – vCenter Server is not receiving heartbeat messages
from the host. After the heartbeat messages are received again, the
state automatically changes to Connected. This state is often used to
trigger an alarm on the host.
Console SwapIn Rate
(KBps)
Rate at which the service console kernel is swapping in memory. The
Console Swapin Rate indicates memory pressure in the service console.
A high value is generally a precursor to timeout operations. To fix the
problem, consider adding more memory or ending the memory-intensive
task.
Condition
Console SwapOut Rate
(KBps)
Rate at which the service console kernel is swapping out memory. The
Console Swapout Rate indicates memory pressure in the service console.
A high value is generally a precursor to timeout operations. To fix the
problem, consider adding more memory or ending the memory-intensive
task.
Condition
CPU Usage (%)
Amount of physical CPU (MHz) used by the ESX/ESXi host. The
calculation is:
Host CPU Usage (%) = CPU usage [MHz] / (# of physical CPUs x clock
rate [MHz]) x 100
Condition
Disk Usage (KBps)
Sum of the data read from and written to all disk instances on the host.
Condition
Memory Usage (%)
Amount of physical RAM (MB) consumed by the ESX/ESXi host. The
calculation is:
Host Memory Usage (%) = Consumed Memory [MB] / physical RAM of
server [MB] x 100
Condition
Network Usage (kbps)
Sum of data transmitted and received for all the NIC instances of the host.
Condition
Power State
Current power state of the host:
n Powered On – The host is powered on.
n Powered Off – The host is powered off.
n Suspended – The host is suspended.
State
Swap Pages Write (KBps)
Rate at which host memory is swapped out to the disk.
Condition
Datastore Condition and State Triggers
VMware provides preconfigured alarms that trigger when datastores undergo certain conditions and states.
Table 21-6 lists the default Condition and State triggers you can set on datastores.
242
VMware, Inc.
Chapter 21 Working with Alarms
Table 21-6. Datastore Condition and State Triggers
Trigger Type
Trigger Name
Description
Condition
Datastore Disk
Overallocation (%)
Amount of overallocated disk space in the datastore.
Condition
Datastore Disk Usage
(%)
Amount of disk space (KB) used by the datastore.
NOTE This alarm controls the Status value for datastores in vSphere
Client. If you disable this alarm, the datastore status will be displayed as
Unknown.
State
Datastore State to All
Hosts
n
n
Connected to all hosts – The datastore is connected to at least one
host.
Disconnected from all hosts – The datastore is disconnected from at
least one host.
Event Triggers
Event triggers monitor events that occur in response to actions related to managed objects, the vCenter Server
system, and the License Server.
Event triggers use arguments, operators, and values to monitor operations that occur in the vServer System.
Because the occurrance of the event gives you information about the operation occurring in your environment,
you usually will not need to configure arguments for them. However, some events are general and
configuration might be required to set the alarm on the desired information. For example, the Hardware Health
Changed event occurs for a variety of different subsystems on a host.The preconfigured datacenter alarm Host
Hardware Fan Health uses the Hardware Health Changed event with the following two arguments to set a
warning condition when a fan is not operating:
Table 21-7. Example – Event Arguments, Operators, and Values
Argument
Operator
Value
group
equal to
Fan
newState
equal to
Yellow
NOTE Due to the large number of events tracked by vCenter Server, the event table for each object does not
contain definitive lists of events. Instead, it provides a subset of the events available for alarm triggers.
Event Trigger Components
Event triggers are composed of a trigger type, a trigger status, and triggering conditions.
Table 21-8 describes the components of event alarm triggers.
VMware, Inc.
243
vSphere Basic System Administration
Table 21-8. Event Trigger Components
Trigger Component
Description
Trigger type
Event to monitor. Events can be generated by a user action or the system, for example,
Account Password Change and Alarm Email Sent.
Status
The value that must be met for the alarm to trigger:
n Normal
n Warning
n Alert.
Conditions
Specifications that define the trigger.
Event conditions include the following components:
n Argument – The event attribute to monitor.
n Operator – The qualifier used to set the trigger value, for example Starts with and
Doesn’t start with.
n Value – The value that must be met to trigger the event.
Conditions are not configurable for all events.
For example, you have a subset of hosts in the same datacenter named with the identifying prefix, QA_. To
trigger an alarm when any of these hosts lose network connectivity, create an alarm on the datacenter to monitor
the event Lost Network Connectivity. The trigger conditions are:
n
Argument — host.name
n
Operator — Starts with
n
Value – QA_
When storage connectivity is lost on a host named QA_Host1, the event triggers.
Event triggers do not rely on thresholds or durations. They use the arguments, operators, and values to identify
the triggering condition. When the triggering conditions are no longer true, a triggered alarm resets
automatically, and no longer triggers.
Virtual Machine Event Triggers
VMware provides preconfigured alarms that trigger when events occur on virtual machines.
Table 21-9 lists events you can use to trigger alarms on virtual machines.
Table 21-9. Virtual Machine Event Triggers
244
Event Category
Available Events
Customization
Customization started, Customization succeeded, Cannot complete Sysprep,
Unknown error.
Deployment
VM created, VM auto renamed, VM being closed, VM being creating, VM
deploying, VM emigrating, VM hot migrating, VM migrating, VM reconfigured,
VM registered, VM removed, VM renamed, VM relocating, VM upgrading.
Cannot complete clone, Cannot migrate, Cannot relocate, Cannot upgrade.
DRS
DRS VM migrated, VM powered on, No maintenance mode DRS recommendation.
Fault tolerance
Secondary VM added, Secondary VM disabled, Secondary VM enabled, Secondary
VM started.
vCenter cannot start secondary VM, vCenter cannot update secondary VM
configuration, vCenter disabled fault tolerance.
Fault tolerance state changed, Fault tolerance turned off, Fault tolerance VM
deleted.
No compatible host for secondary VM.
Reached maximum Secondary VM (with FT turned On) restart count.
VMware, Inc.
Chapter 21 Working with Alarms
Table 21-9. Virtual Machine Event Triggers (Continued)
Event Category
Available Events
General messages and information
VM error, VM error message, VM information, VM information message, VM
warning, VM warning message, VM migration error, VM migration warning, VM
configuration missing.
HA
HA enabled VM reset, No HA enabled port groups, Cannot resent HA enabled VM,
VM HA updated error.
Naming and IDs
UUID: Assigned, Changed, Conflict. Assign a new instance, Instance changed,
Instance conflict.
MAC: Assigned, Changed, Conflict. VM static MAC conflict.
WWN: Assigned, Changed, Conflict.
Power and connection states
VM connected, VM disconnected, VM discovered, VM powered off, VM powered
on, VM starting, VM stopping, VM suspended, VM restarted on alternate host, VM
resuming.
Guest reboot, guest shutdown, guest standby.
Cannot power off, Cannot power on, Cannot reboot guest OS, Cannot reset, Cannot
shut down the guest OS, Cannot standby guest OS, Cannot suspend.
Remote console connected, Remote console disconnected.
Record, Replay
Start a recording session, Start a replay session.
Resource Pool
Resource pool moved, Resource pool relocated.
Host Event Triggers
VMware provides preconfigured alarms that trigger when events occur on hosts.
Table 21-10 lists events you can use to trigger alarms on hosts.
Table 21-10. Host Event Triggers
Event Category
Available Events
Accounts
Account created, Account removed, Account updated.
Access and security
Administrator access disabled, Administrator access enabled.
Administrator password not changed. VIM account password changed.
License expired, No license.
Connection and mode
Host connected, Host disconnected.
Host entered maintenance mode, Host exited maintenance mode, Host entering standby
mode, Host exiting standby mode.
Cannot connect host, cannot get host short name, Host already managed, Incorrect Ccagent,
Incorrect user name, Incompatible version, Ccagent upgrade, Network error, No access.
Connection lost, Cannot reconnect host, Host connection failure, Network connectivity
lost, Network uplink redundancy degraded, Network uplink redundancy lost, Cannot
connect to storage.
DRS
DRS entering standby mode, DRS exited standby mode, DRS exiting standby mode. Cannot
complete DRS resource configuration, Resource configuration synchronized.
DVS
Distributed Virtual Switch joined the port group, Distributed Virtual Switch left the port
group, Distributed Virtual Switch does not exist in vCenter or does not contain this host.
General error information
Host error, Host information, Host warning.
HA
Host HA agent disabled, HA agent enabled, Disabling HA, Enabling HA agent, HA agent
error, HA agent configured.
Host has extra HA networks, Host has no available HA networks, Host is missing HA
networks, No redundant management network for host, No HA enabled port groups.
Hardware health
Hardware health changed
Inventory
Host added, Host not in cluster. No datastores configured.
VMware, Inc.
245
vSphere Basic System Administration
Table 21-10. Host Event Triggers (Continued)
Event Category
Available Events
IP address
Host IP changed, IP inconsistent, IP to short name not completed, Cannot get short host
name, Short name to IP not completed, Duplicate IP detected.
vCenter Agent
Cannot complete vCenter Agent, Cannot uninstall vCenter Agent.
Datastore Event Triggers
VMware provides preconfigured alarms that trigger when events occur on datastores.
Table 21-11 lists events you can use to trigger alarms on datastores.
Table 21-11. Datastore Event Triggers
Event Category
Available Events
Datastore modification
Datastore capacity increased.
Local datastore created, Datastore deleted, Datastore discovered, Datastore
removed from host.
File system operations
File or directory copied to datastore, File or directory deleted from datastore, File
or directory moved to datastore.
NAS
NAS datastore created.
VMFS
VMFS datastore created, VMFS datastore expanded, VMFS datastore extended.
Datacenter Event Triggers
VMware provides preconfigured alarms that trigger when events occur on datacenters.
Table 21-12 lists events you can use to set alarms on datacenters.
Table 21-12. Datacenter Event Triggers
246
Event Category
Available Events
Alarms
Alarm created, reconfigured, removed. Alarm email sent, email send failed. Alarm
script completed, script not completed. Alarm SNMP trap sent, SNMP trap not
completed. Alarm status changed.
Authentication, Permissions, and
Roles
Already authenticated. Permission added, removed, updated. Profile created,
removed. Role added, created, removed.
Custom Fields
Custom field definition added, removed, renamed. Custom field value changed.
cannot complete customization network setup.
Customization
Customization Linux identity failed, network setup failed.
Datacenter
Datacenter created, renamed.
Datastore
Datastore renamed, datastore renamed on host.
DRS
DRS invocation not completed, DRS recovered from failure.
DVS
vNetwork Distributed Switch merged, renamed, configuration on some hosts
differed from that of the vCenter Server.
HA and DRS
HA agent found, DRS invocation not completed, DRS recovered from failure.
Hosts
Host add failed, inventory full, short name inconsistent, cannot add host.
Licensing
License added, assigned, expired, insufficient, removed, unassigned. License server
available, unavailable. Unlicensed virtual machines, all virtual machines licensed.
Scheduled Tasks
Scheduled task created, completed, cannot complete, email sent, email not sent,
reconfigured, removed, started.
Templates
Upgrading template, template upgraded, cannot upgrade template.
VMware, Inc.
Chapter 21 Working with Alarms
Table 21-12. Datacenter Event Triggers (Continued)
Event Category
Available Events
User Operations
User assigned to group, removed from group, login, logout, upgrade.
Virtual Machines
VM cloned, created, relocated, upgraded.
vServer
Server license expired, session started, session stopped.
Cluster Event Triggers
VMware provides preconfigured alarms that trigger when events occur on clusters.
Table 21-13 lists events that you can use to set alarms on clusters.
Table 21-13. Cluster Event Triggers
Event Category
Available Events
Cluster creation, modification, and
compliance
Cluster created, Cluster deleted, Cluster overcommitted, Cluster reconfigured.
Cluster status changed, Cluster compliance checked.
High Availability (HA)
HA agent unavailable, HA disabled, HA enabled, HA host failed, HA host isolated,
All HA hosts isolated.
DRS
DRS enabled, DRS disabled.
dvPort Group Event Triggers
VMware provides preconfigured alarms that trigger when events occur on dvPort group alarms.
Table 21-14 lists events you can use to set alarms on dvPort groups.
Table 21-14. dvPort Group Event Triggers
Event Category
Available Events
Distributed Virtual Port Group
Distributed virtual group created, Distributed virtual group
deleted, Distributed virtual group reconfigured, Distributed
virtual group renamed.
vNetwork Distributed Switch Event Triggers
VMware provides preconfigured alarms that trigger when events occur on on vNetwork distributed switches.
Table 21-15 lists the events you can use to set alarms on vNetwork distributed switches.
Table 21-15. vNetwork Distributed Switch Event Triggers
Event Category
Available Events
Distributed Virtual Switch creation, modification, and
upgrade.
Distributed Virtual Switch created, Distributed Virtual
Switch deleted, Distributed Virtual Switch reconfigured,
Distributed Virtual Switch upgraded, Upgrade is available,
Upgrade is in progress, Cannot complete the upgrade.
Distributed Virtual Switch port and distributed virtual port
group operations
Distributed Virtual Switch port moved into the distributed
virtual port group, Distributed Virtual Switch moved out of
the distributed virtual port group.
VMware, Inc.
247
vSphere Basic System Administration
Table 21-15. vNetwork Distributed Switch Event Triggers (Continued)
Event Category
Available Events
Port
Port blocked, Port unblocked, Port connected, Port
disconnected, Port created, Port deleted, Port link up, Port
link down, Port reconfigured.
Host
Host joined the Distributed Virtual Switch, Host left the
Distributed Virtual Switch.
Host and vCenter Server configuration was synchronized,
Host and vCenter Server configuration differs.
Network Event Triggers
VMware provides preconfigured alarms that trigger when events occur on networks.
Table 21-16 lists the events you can use to trigger alarms on networks.
Table 21-16. Network Event Triggers
Event Category
Available Events
dvPort group creation and
modification
dvPort group created, dvPort group deleted, dvPort group reconfigured, dvPort
group renamed.
Alarm Actions
Alarm actions are operations that occur in response to triggered alarms. For example, email notifications are
alarm actions.
VMware provides a list of preconfigured actions you can associate with an alarm. These actions are specific to
the object on which you set the alarm. For example, preconfigured alarm actions for hosts include rebooting
the host and putting the host in maintenance mode. Alarm actions for virtual machines include powering on,
powering off, and suspending the virtual machine.
Although the actions are preconfigured, you must manually set up certain aspects of the action, such as having
the action occur when a warning is triggered or when an alert is triggered, and whether to repeat the action.
You can configure alarm actions to repeat in the following ways:
n
At a specified time interval after an alarm triggers. For example, if an alarm triggers because a physical
host is not responding, you can have an email message sent every 10 minutes until the host is returned to
a connected state or until the alarm trigger is suppressed.
n
Until the alarm is explicitly acknowledged by an administrator. When you acknowledge an alarm, the
alarm actions are suppressed. The alarm trigger is not reset. It remains in its current state until the
triggering condition, state, or event is no longer valid.
Some alarm actions, such as sending notification emails or traps, and running a script, require additional
configuration.
NOTE The default VMware alarms do not have actions associated with them. You must manually associate
actions with the default alarms.
Default vSphere Alarm Actions
VMware provides default alarm actions that you can associate with an alarm. When the alarm triggers, the
action occurs.
Table 21-17 lists the default vSphere alarm actions.
248
VMware, Inc.
Chapter 21 Working with Alarms
Table 21-17. Default vSphere Alarm Actions
Action
Description
Alarm Object
Send a notification email
SMTP sends an email message. The SMTP must be ready
when the email message is sent. You can set SMTP
through vCenter Server.
datacenter, datastore, cluster,
host, resource pool, virtual
machine, network, vNetwork
distributed switch, dvPort group
Send a notification trap
SNMP sends a notification trap. vCenter Server is the
default SNMP notification receiver. An SNMP trap
viewer is required to view a sent trap. The default
hardware health alarms are configured to send 39SNMP
traps.
datacenter, datastore, cluster,
host, resource pool, virtual
machine
Run a command
Performs the operation defined in the script you specify.
It runs as separate process and does not block vCenter
Server processes.
datacenter, datastore, cluster,
host, resource pool, virtual
machine, network, vNetwork
distributed switch, dvPort group
Enter or exit maintenance
mode
Puts the host in and out of maintenance mode.
Maintenance mode restricts virtual machine operations
on the host. You put a host in maintenance mode when
you need to move or service it.
host
Enter or exit standby
Suspends or resumes the guest operating system on the
virtual machine.
host
Reboot or shut down host
Reboots or shuts down the host.
host
Suspend the virtual
machine
Suspends the virtual machine when the alarm triggers.
You can use the suspend feature to make resources
available on a short-term basis or for other situations in
which you want to put a virtual machine on hold without
powering it down.
virtual machine
Power on or power off the
virtual machine
Power on starts the virtual machine and boots the guest
operating system if the guest operating system is
installed.
Power off is analogous to pulling the power cable on a
physical machine. It is not a graceful shutdown of the
guest operating system, but is used when a shut down
might not succeed. For example, a shut down will not
work if the guest operating system is not responding.
virtual machine
Reset the virtual machine
Pauses activity on the virtual machine. Transactions are
frozen until you issue a Resume command.
virtual machine
Migrate the virtual
machine
Powers off the virtual machine and migrates it according
to the settings you define when you created the alarm
action.
virtual machine
Reboot or shutdown the
guest
Reboot shuts down and restarts the guest operating
system without powering off the virtual machine.
Shutdown shuts down the guest operating system
gracefully.
virtual machine
VMware, Inc.
249
vSphere Basic System Administration
Disabling Alarm Actions
You can disable an alarm action from occurring without disabling the alarm itself. For example, if you have
an alarm set to trigger when a host is disconnected, and you put the host in maintenance mode, you can disable
the alarm action from firing because you know the host is not available. The alarm is still enabled, so it triggers,
but the action does not.
You disable alarm actions for a selected inventory object. You can also disable alarm actions across multiple
objects at one time from the object tab. For example, to disable the alarm actions for multiple virtual machines
on a host, go to the Virtual Machines tab of the host. When you disable the alarm actions for an object, they
continue to occur on child objects.
When you disable alarm actions, all actions on all alarms for the object are disabled. You cannot disable a subset
of alarm actions.
SNMP Traps as Alarm Actions
The SNMP agent included with vCenter Server can be used to send traps when alarms are triggered on a
vCenter Server. The default hardware health alarms send SNMP traps by default.
When an SNMP trap notification occurs, only one trap is triggered and one notification is sent.Table 21-18
describes the trap information provided in the body of an SNMP notification.
Table 21-18. SNMP Trap Notification Details
Trap Entry
Description
Type
The state vCenter Server is monitoring for the alarm. Options include Host Processor (or CPU)
usage, Host Memory usage, Host State, Virtual Machine Processor (or CPU) usage, Virtual Machine
Memory usage, Virtual Machine State, Virtual Machine Heartbeat.
Name
The name of the host or virtual machine that triggers the alarm.
Old Status
The alarm status before the alarm was triggered.
New Status
The alarm status when the alarm is triggered.
Object Value
The object value when the alarm is triggered.
NOTE To use SNMP with vCenter Server, you must configure SNMP settings using the vSphere Client.
Email Notifications as Alarm Actions
The SMTP agent included with vCenter Server can be used to send email notifications when alarms are
triggered on vCenter Server. When an alarm is triggered, any number of email notification are sent. You define
the recipient list when you set up the alarm actions for an alarm.
Table 21-19 describes the information provided in the body of an SMTP notification.
Table 21-19. SMTP Email Notification Details
250
Email Entry
Description
Target
Object for which the alarm was triggered.
Old Status
Previous alarm status. Applies only to state triggers.
New Status
Current alarm status. Applies only to state triggers.
Metric Value
Threshold value that triggered the alarm. Applies only to metric condition triggers.
VMware, Inc.
Chapter 21 Working with Alarms
Table 21-19. SMTP Email Notification Details (Continued)
Email Entry
Description
Alarm Definition
Alarm definition in vCenter Server, including the alarm name and status.
Description
Localized string containing a summary of the alarm. For example:
Alarm New_Alarm on host1.vmware.com changed from Gray to Red.
If the alarm was triggered by an event, the information in Table 21-20 is also included in the body of the email.
Table 21-20. Event Details in Email
Detail
Description
Event Details
VMODL event type name.
Summary
Alarm summary, including the event type, alarm name, and target object.
Date
Time and date the alarm was triggered.
UserName
Person who initiated the action that caused the event to be created. Events caused by an
internal system activity do not have a UserName value.
Host
Host on which the alarm was triggered.
Resource Pool
Resource pool on which the alarm was triggered.
Datacenter
Datacenter on which the alarm was triggered.
Arguments
Arguments passed with the alarm and their values.
Running Scripts as Alarm Actions
You can write scripts and attach them to alarms so that when the alarm triggers, the script runs.
Use the alarm environment variables to define complex scripts and attach them to multiple alarms or inventory
objects. For example, you can write a script that enters the following trouble ticket information into an external
system when an alarm is triggered:
n
Alarm name
n
Object on which the alarm was triggered
n
Event that triggered the alarm
n
Alarm trigger values
When you write the script, include the following environment variables in the script:
n
VMWARE_ALARM_NAME
n
VMWARE_ALARM_TARGET_NAME
n
VMWARE_ALARM_EVENTDESCRIPTION
n
VMWARE_ALARM_ALARMVALUE
You can attach the script to any alarm on any object without changing the script.
Alarm Environment Variables
To simplify script configuration for alarm actions, VMware provides environment variables for VMware
alarms.
Table 21-21 lists the default environment variables defined for alarms. Use these variables to define more
complex scripts and attach them to multiple alarms or inventory objects so the action occurs when the alarm
triggers.
VMware, Inc.
251
vSphere Basic System Administration
Table 21-21. Alarm Environment Variables
Supported Alarm
Type
Variable Name
Variable Description
VMWARE_ALARM_NAME
Name of the triggered alarm.
Condition, State,
Event
VMWARE_ALARM_ID
MOID of the triggered alarm.
Condition, State,
Event
VMWARE_ALARM_TARGET_NAME
Name of the entity on which the
alarm triggered.
Condition, State,
Event
VMWARE_ALARM_TARGET_ID
MOID of the entity on which the
alarm triggered.
Condition, State,
Event
VMWARE_ALARM_OLDSTATUS
Old status of the alarm.
Condition, State,
Event
VMWARE_ALARM_NEWSTATUS
New status of the alarm.
Condition, State,
Event
VMWARE_ALARM_TRIGGERINGSUMMARY
Multiline summary of the alarm.
Condition, State,
Event
VMWARE_ALARM_DECLARINGSUMMARY
Single-line declaration of the alarm
expression.
Condition, State,
Event
VMWARE_ALARM_ALARMVALUE
Value that triggered the alarm.
Condition, State
VMWARE_ALARM_EVENTDESCRIPTION
Description text of the alarm status
change event.
Condition, State
VMWARE_ALARM_EVENTDESCRIPTION
Description of the event that
triggered the alarm.
Event
VMWARE_ALARM_EVENT_USERNAME
User name associated with the event.
Event
VMWARE_ALARM_EVENT_DATACENTER
Name of the datacenter in which the
event occurred.
Event
VMWARE_ALARM_EVENT_COMPUTERESOURCE
Name of the cluster or resource pool
in which the event occurred.
Event
VMWARE_ALARM_EVENT_HOST
Name of the host on which the event
occurred.
Event
VMWARE_ALARM_EVENT_VM
Name of the virtual machine on
which the event occurred.
Event
VMWARE_ALARM_EVENT_NETWORK
Name of the network on which the
event occurred.
Event
VMWARE_ALARM_EVENT_DATASTORE
Name of the datastore on which the
event occurred.
Event
VMWARE_ALARM_EVENT_DVS
Name of the vNetwork Distributed
Switch on which the event occurred.
Event
Alarm Command-Line Parameters
VMware provides command-line parameters that function as a substitute for the default alarm environment
variables. You can use these parameters when running a script as an alarm action for a condition, state, or
event alarm.
The command-line parameters enable you to pass alarm information without having to change an alarm script.
For example, use these parameters when you have an external program for which you do not have the source.
You can pass in the necessary data by using the substitution parameters, which take precedence over the
environment variables. You pass the parameters through the vSphere Client Alarm Actions Configuration
dialog box or on a command line.
252
VMware, Inc.
Chapter 21 Working with Alarms
Table 21-22 lists the command-line substitution parameters for scripts that run as alarm actions.
Table 21-22. Command-Line Parameters for Alarm Action Scripts
Variable
Description
{eventDescription}
Text of the alarmStatusChange event. The {eventDescription} variable is
supported only for Condition and State alarms.
{targetName}
Name of the entity on which the alarm is triggered.
{alarmName}
Name of the alarm that is triggered.
{triggeringSummary}
Summary info of the alarm trigger values.
{declaringSummary}
Summary info of the alarm declaration values.
{oldStatus}
Alarm status before the alarm is triggered.
{newStatus}
Alarm status after the alarm is triggered.
{target}
Inventory object on which the alarm is set.
Alarm Reporting
Alarm reporting further restricts when a condition or state alarm trigger occurs by adding a tolerance range
and a trigger frequency to the trigger configuration.
Tolerance Range
The tolerance range specifies a percentage above or below the configured threshold point, after which the alarm
triggers or clears. A nonzero value triggers and clears the alarm only after the triggering condition falls above
or below the tolerance range. A 0 (zero) value triggers and clears the alarm at the threshold point you
configured.
vCenter Server uses the following calculation to trigger an alarm:
Condition threshold + Tolerance Range = Trigger alarm
For example, an alarm is defined to trigger a warning state when a host’s CPU usage is above 70%. If you set
the tolerance range to 5%, the warning state triggers only when CPU usage is above 75% (70 + 5) and resets to
a normal state only when CPU usage falls below 65% (70 - 5).
The tolerance range ensures you do not transition alarm states based on false changes in a condition.
Trigger Frequency
The trigger frequency is the time period during which a triggered alarm action is not reported again. When
the time period has elapsed, the alarm action occurs again if the condition or state is still true. By default, the
trigger frequency for the default VMware alarms is set to 5 minutes.
For example, if the Host CPU Usage alarm triggers for a warning state at 2 p.m. and an alert state occurs at
2:02 p.m, the alert state is not reported at 2:02 p.m. because the frequency prohibits it. If the warning state is
still true at 2:05 p.m., the alarm is reported. This guards against repeatedly reporting insignificant alarm
transitions.
Creating Alarms
Creating an alarm involves setting up general alarm settings, alarm triggers, trigger reporting, and alarm
actions.
Required Privilege: Alarms.Create Alarm
VMware, Inc.
253
vSphere Basic System Administration
You create an alarm by using the Alarm Settings dialog box. You can open this dialog box by selecting the
object in the inventory and using any of the following methods.
n
Select File > New > Alarm.
n
Select Inventory > <object_type> > Alarm > Add Alarm.
n
Right-click the object and select Alarm > Add Alarm.
n
In the Alarms tab, click the Definitions tab, right-click in the pane, and select New > Alarm.
n
Select the object in the inventory and press Ctrl+A.
Prerequisites
To set up an alarm on an object, the vSphere Client must be connected to a vCenter Server system. In addition,
you must have proper user permissions on all relevant objects to create alarms. After an alarm is created, it
will be enabled even if the user who created it no longer has permissions.
Procedure
1
Alarm Settings – General on page 254
Use the General tab of the Alarm Settings dialog box to set up general alarm information, such as the
alarm name, description, monitoring type, and status.
2
Alarm Settings – Triggers on page 255
In the Alarm Settings dialog box, use the Triggers tab to add, edit, or remove alarm triggers. The
procedure for setting up triggers depends on whether you are setting the trigger for a condition or state
or for an event.
3
Alarm Settings – Reporting on page 257
In the Alarm Settings dialog box, use the Reporting tab to define a tolerance range and trigger frequency
for condition or state triggers. Reporting further restricts when the trigger occurs.
Alarm Settings – General
Use the General tab of the Alarm Settings dialog box to set up general alarm information, such as the alarm
name, description, monitoring type, and status.
Procedure
1
If necessary, display the Alarm Settings dialog box.
a
Display the object in the Inventory panel.
b
Select the object and press Ctrl-M.
2
On the General tab, enter an alarm name and alarm description.
3
In the Alarm Type box, define the type of alarm to create.
a
In the Monitor list, select the object on which to create the alarm.
The objects in the Monitor list are determined by the object selected in the inventory.
b
Select how to monitor the object: for specific conditions or states, or for specific events.
This determines which triggers are available for the alarm.You can monitor hosts, virtual machines,
and datastores for conditions, states, and events. All other objects are monitored only for events.
4
(Optional) To enable the alarm, select Enable this alarm.
You can enable an alarm at anytime after you create it.
5
254
(Optional) To define the alarm triggers, click the Triggers tab.
VMware, Inc.
Chapter 21 Working with Alarms
6
(Optional) To save general edits without updating the alarm triggers or alarm actions, click OK.
NOTE You cannot save an alarm if it does not have triggers defined for it.
Alarm Settings – Triggers
In the Alarm Settings dialog box, use the Triggers tab to add, edit, or remove alarm triggers. The procedure
for setting up triggers depends on whether you are setting the trigger for a condition or state or for an event.
n
Set Up a Condition or State Trigger on page 255
Condition and state triggers monitor performance metrics and object states, such as CPU usage and
connection states. You can only monitor hosts, virtual machines, and datastores with condition and state
triggers.
n
Set Up an Event Trigger on page 256
Event triggers monitor events that occur on managed objects, vCenter Server, and the License Server.
An event is recorded for any action that is of interest to vCenter Server.
Set Up a Condition or State Trigger
Condition and state triggers monitor performance metrics and object states, such as CPU usage and connection
states. You can only monitor hosts, virtual machines, and datastores with condition and state triggers.
Procedure
1
2
If necessary, display the Triggers tab of the Alarm Settings dialog box.
a
Display the object in the Inventory panel.
b
Select the object and press Ctrl-M to open the Alarm Settings dialog box.
c
Click the Triggers tab.
Click Add.
A default condition trigger is added to the triggers list.
3
4
If you do not want to use the default trigger, replace it.
a
Select the default trigger.
b
Double-click the Trigger Type list arrow to open the trigger list.
c
Select a trigger.
For a condition trigger, define the condition lengths.
Double-click each attribute field—Condition, Warning, Condition Length, Alert, Condition Length—
and select or enter values. Not all condition triggers have condition lengths.
State triggers occur immediately when the state is reached. You cannot define condition lengths for state
alarms.
5
6
(Optional) Define multiple conditions for the same trigger type.
a
Repeat Step 2 through Step 3, and select the same trigger you just configured.
b
Set values for each attribute.
(Optional) To define additional condition or state triggers, repeat Step 2 through Step 5.
NOTE You cannot use the VM Total Size on Disk and VM Snapshot Size triggers in combination with
other triggers.
VMware, Inc.
255
vSphere Basic System Administration
7
8
Below the triggers list, select one of the following options to specify how to trigger the alarm.
n
If any conditions are satisfied (default).
n
If all conditions are satisfied.
Click OK.
Set Up an Event Trigger
Event triggers monitor events that occur on managed objects, vCenter Server, and the License Server. An event
is recorded for any action that is of interest to vCenter Server.
Procedure
1
2
If necessary, display the Triggers tab of the Alarm Settings dialog box.
a
Display the object in the Inventory panel.
b
Select the object and press Ctrl-M to open the Alarm Settings dialog box.
c
Click the Triggers tab.
Click Add.
A default event trigger is added to the triggers list.
3
To replace the default event, double-click the event name and in the Event list, select an event.
If you know the event name, you can type it in the Event field to filter the list.
4
To change the default status for the event trigger, double-click the status name and in the Status list, select
a status.
NOTE To set an alarm to trigger when more than one status has been reached, configure each event status
separately. For example, to trigger a warning when a host's hardware health changes and an alert when
a host's hardware health changes, configure two Hardware Health Changed events, one with a warning
status and one with an alert status.
5
(Optional) To configure custom conditions for the event trigger, in the Condition column, click
Advanced to open the Trigger Conditions dialog box.
a
Click Add.
A default argument is added to the Event Arguments list.
256
b
To replace the default argument, double-click the argument name and in the argument list, select an
argument.
c
To replace the default operator, double-click the operator name and select an operator from the list.
d
Click the Value field and type a value.
e
(Optional) To define multiple conditions for the same trigger, repeat Step 5.
f
Click OK.
6
(Optional) To define additional event triggers, repeat this task.
7
Click OK.
VMware, Inc.
Chapter 21 Working with Alarms
Alarm Settings – Reporting
In the Alarm Settings dialog box, use the Reporting tab to define a tolerance range and trigger frequency for
condition or state triggers. Reporting further restricts when the trigger occurs.
Procedure
1
2
If necessary, display the Reporting tab of the Alarm Settings dialog box.
a
Display the object in the Inventory panel.
b
Select the object and press Ctrl-M to open the Alarm Settings dialog box.
c
Click the Reporting tab.
Enter a Tolerance.
A 0 value triggers and clears the alarm at the threshold point you configured. A non-zero value triggers
the alarm only after the condition reaches an additional percentage above or below the threshold point.
Condition threshold + Reporting Tolerance = trigger alarm
Tolerance values ensure you do not transition alarm states based on false changes in a condition.
3
Select a Frequency.
The frequency sets the time period during which a triggered alarm is not reported again. When the time
period has elapsed, the alarm will report again if the condition or state is still true.
4
Click OK.
Managing Alarms
You can change alarms, disable alarms, reset alarms, and acknowledge triggered alarms. In addition, you can
export a list of alarms to a file.
To manage alarms the vSphere Client must be connected to a vCenter Server system.
Acknowledge Triggered Alarms
Acknowledging a triggered alarm suppresses the alarm actions from occurring. It does not reset the alarm to
a normal state.
Required privilege: Alarm.Alarm Acknowledge
Procedure
1
Display the inventory panel.
2
If necessary, select View > Status Bar to display the status pane.
3
In the status bar, click Alarms to display the Triggered Alarms panel.
4
Right-click the alarm and select Acknowledge Alarm.
5
(Optional) To acknowledge multiple alarms at one time, shift-click each alarm to select it, right-click the
selection, and select Acknowledge Alarm.
Change Alarm Attributes
You can rename alarms and change alarm triggers, reporting, and actions.
Required privilege: Alarm.Modify Alarm
VMware, Inc.
257
vSphere Basic System Administration
Procedure
1
Display the object in the inventory on which the alarm is defined.
2
Select the object and click the Alarms tab.
3
Click Definitions.
The Defined in column lists the object on which the alarm is defined. If the value is not This object, click
the object name. The alarms list for the object opens in the Alarms tab.
4
Double-click the alarm to open the Alarm Settings dialog box.
5
Edit the alarm general settings, triggers, reporting, or actions, as needed.
For help on how to configure the values on each tab, click Help.
6
Click OK.
vCenter Server verifies the configuration of the alarm and updates the alarm for the selected object.
Disable Alarms
You disable alarms from the object on which they were defined. You can enable a disabled alarm at any time.
Required privilege: Alarm.Modify Alarm
Procedure
1
Display the object in the inventory.
2
Select the object and click the Alarms tab.
3
Click Definitions.
If the Defined in column does not contain This object for the alarm to disable, it was not defined on the
object selected in the inventory. To open the alarm definitions for that object, click the linked object in the
Defined in column.
4
Double-click the alarm to open the Alarm Settings dialog box.
5
Deselect Enable this alarm.
6
Click OK.
Export a List of Alarms
You can export, to a system file, a list of alarms defined on any managed object in the inventory. The list of
alarms for an object includes alarms set on all child objects.
Required privilege: Read-Only
Procedure
258
1
Display the object in the inventory.
2
Select the object and click the Alarms tab.
3
Click Definitions.
4
Select File > Export > Export List.
5
In the Save As dialog box, specify the directory, file name, and file type for the exported file.
6
Click Save.
VMware, Inc.
Chapter 21 Working with Alarms
Identifying Triggered Alarms
You can identify triggered alarms in the vSphere Client Inventory panel, the Status bar, and the Alarms tab.
Table 21-23. Triggered Alarm Indicators in the vSphere Client
vSphere Client Location
Triggered Alarm Indicator
Inventory panel
An icon on the object where the alarm was triggered.
Status bar, Triggered Alarms panel
A list of alarms triggered on all inventory objects. Doubleclick an alarm to select the object in the inventory on which
the alarm was triggered.
Alarms tab
A list of alarms triggered on the selected inventory object.
Remove Alarms
You remove alarms from the object on which they were defined. You cannot remove an alarm from a child
object that inherited the alarm and you cannot remove the default VMware alarms.
When an alarm is removed, it is removed from vCenter Server and cannot be retrieved.
Required privilege: Alarm.Remove Alarm
Procedure
1
Display the object in the inventory.
2
Select the object and click the Alarms tab.
3
Click Definitions.
If the Defined in column does not contain This object for the alarm to disable, it was not defined on the
object selected in the inventory. To open the alarm definitions for that object, click the linked object in the
Defined in column.
4
Select the alarm and select Edit > Remove.
5
Click Yes.
Reset Triggered Event Alarms
An alarm triggered by an event might not reset to a normal state if vCenter Server does not retrieve the event
that identifies the normal condition. In such cases, reset the alarm manually to return it to a normal state.
Required privilege: Alarm.Set Alarm Status
Procedure
1
Locate the triggered alarm in the Triggered Alarms panel or on the Alarms tab for the object.
2
Right-click the alarm and select Reset Alarm to Green.
VMware, Inc.
259
vSphere Basic System Administration
View Alarms
You view alarms that have been triggered on objects and those that have been defined on objects in the vSphere
Client Alarms tab.
The Alarms tab is available only when the vSphere Client is connected to a vCenter Server system. It has two
views, Triggered Alarms and Definitions.
Triggered Alarms
Lists the alarms triggered on the selected object, including the status of the
alarm, the date and time it was last triggered, and if the alarm was
acknowledged.
Definitions
Lists the alarms associated with the selected object, including the alarm
description and the object on which the alarm was defined.
There vSphere Client offers several different options for viewing alarms.
n
View Alarms Defined on an Object on page 260
The vSphere Client Alarms tab contains a list of alarms definitions for the object selected in the inventory.
n
View Alarms Triggered on an Object on page 260
You view triggered alarms on an object on the object’s Alarms tab.
n
View All Alarms Triggered in vCenter Server on page 260
You view triggered alarms in the Alarms tab of the Status bar.
View Alarms Defined on an Object
The vSphere Client Alarms tab contains a list of alarms definitions for the object selected in the inventory.
Procedure
1
Display the object in the inventory.
2
Select the object and click the Alarms tab.
3
Click Definitions.
The Defined In column displays the object on which the alarm was created.
View Alarms Triggered on an Object
You view triggered alarms on an object on the object’s Alarms tab.
Procedure
1
Display the object in the inventory.
2
Select the object and click the Alarms tab.
3
Click Triggered Alarms.
View All Alarms Triggered in vCenter Server
You view triggered alarms in the Alarms tab of the Status bar.
Procedure
260
1
Display the vSphere Client inventory.
2
If necessary, select View > Status Bar to display the status pane at the bottom of the vSphere Client.
3
In the Status bar, click Alarms.
VMware, Inc.
Chapter 21 Working with Alarms
The list of triggered alarms displays in the status pane.
What to do next
You can also view alarms for a selected inventory object in the Triggered Alarms pane of the Alarms tab.
Managing Alarm Actions
You can change alarm actions on the preconfigured vSphere alarms and on custom alarms. Use the vSphere
Client to disable alarm actions, identify disabled alarm actions, remove alarm actions, and run commands as
alarm actions.
To manage alarm actions, the vSphere Client must be connected to a vCenter Server system.
Disable Alarm Actions
Disabling an alarm action stops the action from occuring when the alarm triggers. It does not disable the alarm
from triggering.
When you disable alarm actions on a selected inventory object, all actions for all alarms are disabled on that
object. You cannot disable a subset of alarm actions. The alarm actions will continue to fire on the child objects.
Required privilege: Alarm.Disable Alarm Action
Procedure
1
Display the object in the inventory.
2
Right-click the object and select Alarm > Disable Alarm Actions.
The actions defined for the alarm will not occur on the object until they are enabled.
Enable Alarm Actions
Enabling alarm actions resumes all actions set for triggered alarms.
Required privilege: Alarm.Disable Alarm Actions
Procedure
1
Display the object in the inventory on which the alarm is defined.
2
Right-click the object and select Alarm > Enable Alarm Actions.
Managing Alarm Actions
You can change alarm actions on the preconfigured vSphere alarms and on custom alarms. Use the vSphere
Client to disable alarm actions, identify disabled alarm actions, remove alarm actions, and run commands as
alarm actions.
To manage alarm actions, the vSphere Client must be connected to a vCenter Server system.
Identifying Disabled Alarm Actions
The vSphere Client uses visual indicators to denote whether alarm actions are enabled or disabled.
When an object is selected in the inventory, you can identify its disabled alarm actions in the following areas
of the vSphere user interface:
n
In the General pane of the object's Summary tab.
n
In the Alarm Actions Disabled pane of the Alarms tab.
VMware, Inc.
261
vSphere Basic System Administration
n
In the Alarm Actions column of the object's child object tabs. For example, if you select a host in the
inventory, the Virtual Machines tab displays whether alarm actions are enabled or disabled for each
virtual machine on the host.
Remove Alarm Actions
Removing an alarm action stops the action from occurring. It does not stop the alarm itself.
Remove an alarm action if you are certain you will not use again. If you are not sure, disable the alarm action
instead.
Required privilege: Alarm.Remove Alarm
Procedure
1
Display the object in the inventory on which the alarm is defined.
2
Select the object and click the Alarms tab.
3
Click Definitions.
4
Right-click the alarm and select Edit Settings from the context menu.
If the Edit Settings option is not available, the object you selected is not the owner of the alarm. To open
the correct object, click the object link in the Defined In column for the alarm. Then repeat this step.
5
In the Alarm Settings dialog box, click the Actions tab.
6
Select the action and click Remove.
7
Click OK.
Run a Command as an Alarm Action
You can run a script when an alarm triggers by configuring a command alarm action.
Required privilege: Alarm.Modify Alarm
NOTE Alarm commands run in other processes and do not block vCenter Server from running. They do,
however, consume server resources such as processor and memory.This procedure assumes you are adding
the alarm action to an existing alarm.
This procedure assumes you are adding the alarm action to an existing alarm.
Procedure
1
262
If necessary, open the Alarm Settings dialog box.
a
Select the object in the inventory on which the alarm is set.
b
Click the Alarms tab.
c
Click Definitions.
d
Double-click the alarm in the list.
2
Click the Actions tab.
3
Click Add.
4
Double-click the default action and select Run a command.
VMware, Inc.
Chapter 21 Working with Alarms
5
Double-click the Configuration field and do one of the following, depending on the command file type:
n
If the command is a .exe file, enter the full pathname of the command. For example, to run the
cmd.exe command in the C:\tools directory, type:c:\tools\cmd.exe.
n
If the command is a .bat file, enter the full pathname of the command as an argument to the
c:\windows\system32\cmd.exe command. For example, to run the cmd.bat command in the
C:\tools directory, type:c:\windows\system32\cmd.exe /c c:\tools\cmd.bat.
If your script does not make use of the alarm environment variables, include any necessary parameters
in the configuration field. For example:
c:\tools\cmd.exe AlarmName targetName
c:\windows\system32\cmd.exe /c c:\tools\cmd.bat alarmName targetName
For .bat files, the command and its parameters must be formatted into one string.
6
Click OK.
When the alarm triggers, the action defined in the script is performed.
Configure SNMP Settings for vCenter Server
To use SNMP with vCenter Server, you must configure SNMP settings using the vSphere Client.
Prerequisites
To complete the following task, the vSphere Client must be connected to a vCenter Server. In addition, you
need the DNS name and IP address of the SNMP receiver, the port number of the receiver, and the community
identifier.
Procedure
1
Select Administration > vCenter Server Settings.
2
If the vCenter Server is part of a connected group, in Current vCenter Server, select the appropriate server.
3
Click SNMP in the navigation list.
4
Enter the following information for the Primary Receiver of the SNMP traps.
Option
Description
Receiver URL
The DNS name and IP address of the SNMP receiver.
Receiver port
The port number of the receiver to which the SNMP agent sends traps.
If the port value is empty, vCenter Server uses the default port, 162.
Community
The community identifier.
5
(Optional) Enable additional receivers in the Enable Receiver 2, Enable Receiver 3, and Enable Receiver
4 options.
6
Click OK.
The vCenter Server system is now ready to send traps to the management system you have specified.
What to do next
Configure your SNMP management software to receive and interpret data from the vCenter Server SNMP
agent. See “Configure SNMP Management Client Software,” on page 53.
VMware, Inc.
263
vSphere Basic System Administration
Configure vCenter Server SMTP Mail Settings
You can configure vCenter Server to send email notifications as alarm actions.
Prerequisites
Before vCenter Server can send email, you must perform the following tasks:
n
Configure the SMTP server settings for vCenter Server.
n
Specify email recipients through the Alarm Settings dialog box when you configure alarm actions.
To perform this task, the vSphere Client must be connected to a vCenter Server.
Procedure
1
Select Administration > vCenter Server Settings.
2
If the vCenter Server system is part of a connected group, in Current vCenter Server, select the vCenter
Server system to configure.
3
Select Mail in the navigation list.
4
For email message notification, set the SMTP server and SMTP port:
5
Option
Description
SMTP Server
The DNS name or IP address of the SMTP gateway to use for sending email
messages.
Sender Account
The email address of the sender, for example, [email protected].
Click OK.
Preconfigured VMware Alarms
VMware provides preconfigured alarms for the vCenter Server system that trigger automatically when
problems are detected. You only need to set up actions for these alarms.
Table 21-24 lists the preconfigured alarms available for the vCenter Server system.
Table 21-24. Default VMware Alarms
264
Alarm Name
Description
Cannot Connect to Network
Monitors network connectivity on a vSwitch.
Cannot Connect to Storage
Monitors host connectivity to a storage device.
Cluster High Availability Error
Monitors high availability errors on a cluster.
Datastore Usage On Disk
Monitors datastore disk usage.
NOTE This alarm controls the Status value for datastores in vSphere Client. If you
disable this alarm, the datastore status is displayed as Unknown.
Exit Standby Error
Monitors whether a host cannot exit standby mode.
Health Status Changed
Monitors changes to service and extension health status.
Host Battery Status
Monitors host batteries.
Host Connection and Power State
Monitors host connection and power state.
Host Connection Failure
Monitors host connection failures.
Host CPU Usage
Monitors host CPU usage.
Host Error
Monitors host error and warning events.
Host Hardware Fan Status
Monitors host fans.
VMware, Inc.
Chapter 21 Working with Alarms
Table 21-24. Default VMware Alarms (Continued)
Alarm Name
Description
Host Hardware Power Status
Monitors host power.
Host Hardware System Board Status
Monitors host system boards.
Host Hardware Temperature Status
Monitors host temperature.
Host Hardware Voltage
Monitors host voltage.
Host Memory Status
Monitors host memory.
Host Memory Usage
Monitors host memory usage.
Host Processor Status
Monitors host processors.
Host Service Console SwapIn Rate
Monitors host service console memory swapin rate.
Host Service Console SwapOut Rate
Monitors host service console memory swapout rate.
Host Status for Hardware Objects
Monitors the status of host hardware objects.
Host Storage Status
Monitors host connectivity to storage devices.
License Error
Monitors license errors.
License Inventory Monitoring
Monitors the license inventory for compliancy.
Migration Error
Monitors whether a virtual machine cannot migrate or relocate, or is orphaned.
No Compatible Host For Secondary
Virtual Machine
Monitors whether there are no compatible hosts available to place a secondary virtual
machine.
Timed Out Starting Secondary
Virtual Machine
Monitors timeouts when starting a Secondary virtual machine.
Virtual Machine CPU Usage
Monitors virtual machine CPU usage.
Virtual Machine Error
Monitors virtual machine error and warning events.
Virtual Machine Fault Tolerance
Secondary Latency Status Changed
Monitors changes in latency status of a fault tolerance secondary virtual machine.
Virtual Machine Fault Tolerance
State Changed
Monitors changes in the fault tolerance state of a virtual machine.
Virtual Machine High Availability
Error
Monitors high availability errors on a virtual machine.
Virtual Machine Memory Usage
Monitors virtual machine memory usage.
Virtual Machine Total Disk Latency
Monitors virtual machine total disk latency.
VMware, Inc.
265
vSphere Basic System Administration
266
VMware, Inc.
Working with Performance Statistics
22
You can configure how statistics are collected and archived for your vCenter Server system. This determines
the data available in the performance charts, which you use to monitor and troubleshoot performance in your
environment.
This chapter includes the following topics:
n
“Statistics Collection for vCenter Server,” on page 267
n
“Statistics Collection for Microsoft Windows Guest Operating Systems,” on page 274
n
“vCenter Server Performance Charts,” on page 275
n
“Monitoring and Troubleshooting Performance,” on page 279
Statistics Collection for vCenter Server
You can collect statistical data for all managed objects in your vCenter Server system. Statistical data consists
of CPU, memory, disk, network, system, and virtual machine operations metrics.
Table 22-1 lists each metric group and describes the type of data collected.
Table 22-1. Metric Groups
Metric group
Description
CPU
CPU utilization per host, virtual machine, resource pool, or compute resource.
Memory
Memory utilization per host, virtual machine, resource pool, or compute resource. The value obtained is
one of the following:
n For virtual machines, memory refers to guest physical memory. Guest physical memory is the amount
of physical memory presented as a virtual-hardware component to the virtual machine, at creation
time, and made available when the virtual machine is running.
n For hosts, memory refers to machine memory. Machine memory is the random-access memory (RAM)
that is installed in the hardware that comprises the ESX/ESXi system.
Disk
Disk utilization per host, virtual machine, or datastore. Disk metrics include input/output (I/O)
performance (such as latency and read/write speeds), and utilization metrics for storage as a finite
resource.
Network
Network utilization for both physical and virtual network interface controllers (NICs) and other network
devices, such as the virtual switches (vSwitch) that support connectivity among all components (hosts,
virtual machines, VMkernel, and so on).
VMware, Inc.
267
vSphere Basic System Administration
Table 22-1. Metric Groups (Continued)
Metric group
Description
System
Overall system availability, such as system heartbeat and uptime. These counters are available directly
from ESX and from vCenter Server.
Virtual
Machine
Operations
Virtual machine power and provisioning operations in a cluster or datacenter.
For a complete list of all statistics available for ESX/ESXi hosts and collected by vCenter Server, see the
PerformanceManager API documentation pages in the vSphere API Reference.
Data Counters
vCenter Server and ESX/ESXi hosts use data counters to query for statistics. A data counter is a unit of
information relevant to a given object.
For example, network metrics for a virtual machine include one counter that tracks the rate at which data is
transmitted and another counter that tracks the rate at which data is received across a NIC instance.
To ensure performance is not impaired when collecting and writing the data to the database, cyclical queries
are used to collect data counter statistics. The queries occur for a specified collection interval. At the end of
each interval, the data calculation occurs.
Each data counter is comprised of several attributes that are used to determine the statistical value collected.
Table 22-2 lists data counter attributes.
Table 22-2. Data Counter Attributes
268
Attribute
Description
Unit of
Measurement
Standard in which the statistic quantity is measured. One of:
n KiloBytes (KB) – 1024 bytes
n KiloBytes per second (KBps) – 1024 bytes per second
n Kilobits (kb) – 1000 bits
n Kilobits per second (kbps) – 1000 bits per second
n Megabytes (MB)
n megabytes per second (MBps)
n megabits (Mb), megabits per second (Mbps)
n megahertz (MHz)
n microseconds (µs)
n milliseconds (ms)
n number (#)
n percent (%)
n seconds (s)
Description
Text description of the data counter.
Statistics Type
Measurement used during the statistics interval. The statistics type is related to the unit of
measurement. One of:
n Rate – Value over the current statistics interval
n Delta – Change from previous statistics interval.
n Absolute – Absolute value (independent of the statistics interval).
VMware, Inc.
Chapter 22 Working with Performance Statistics
Table 22-2. Data Counter Attributes (Continued)
Attribute
Description
Rollup Type
Calculation method used during the statistics interval to roll up data. This determines the type of
statistical values that are returned for the counter. One of:
n Average – Data collected during the interval is aggregated and averaged.
n Minimum – The minimum value is rolled up.
n Maximum – The maximum value is rolled up.
The Minimum and Maximum values are collected and displayed only in collection level 4.
Minimum and maximum rollup types are used to capture peaks in data during the interval. For
real-time data, the value is the current minimum or current maximum. For historical data, the
value is the average minimum or average maximum.
n
n
Collection level
For example, the following information for the CPU usage chart shows that the average is
collected at collection level 1 and the minimum and maximum values are collected at collection
level 4.
n Counter: usage
n Unit: Percentage (%)
n Rollup Type: Average (Minimum/Maximum)
n Collection Level: 1 (4)
Summation – Data collected is summed. The measurement displayed in the chart represents the
sum of data collected during the interval.
Latest – Data collected during the interval is a set value. The value displayed in the performance
charts represents the current value.
Number of data counters used to collect statistics. Collection levels range from 1 to 4, with 4 having
the most counters.
Collection Intervals
Collection intervals determine the time period during which statistics are aggregated and rolled up, and the
length of time the statistics are archived in the vCenter database.
By default, vCenter Server has four collection intervals: Day, Week, Month, and Year. Each interval specifies
a length of a time statistics are archived in the vCenter database. You can configure which intervals are enabled
and for what period of time. You can also configure the number of data counters used during a collection
interval by setting the collection level. Together, the collection interval and collection level determine how
much statistical data is collected and stored in your vCenter Server database.
Real-time statistics are not stored in the database. They are stored in a flat file on ESX/ESXi hosts and in memory
on the vCenter Server systems. ESX/ESXi hosts collect real-time statistics only for the host or the virtual
machines available on the host. Real-time statistics are collected directly on an ESX/ESXi host every 20 seconds
(60 seconds for ESX Server 2.x hosts). If you query for real-time statistics in the vSphere Client for performance
charts, vCenter Server queries each host directly for the data. It does not process the data at this point. It only
passes the data to the vSphere Client. The processing occurs in a separate operation. On ESX/ESXi hosts, the
statistics are kept for one hour, after which 180 data points (15 - 20 second samples) will have been collected.
The data points are aggregated, processed, and returned to vCenter Server. At this point, vCenter Server
archives the data in the database as a data point for the Day collection interval.
To ensure performance is not impaired when collecting and writing the data to the database, cyclical queries
are used to collect data counter statistics. The queries occur for a specified collection interval. At the end of
each interval, the data calculation occurs.
Table 22-3 lists the default collection intervals available for the vCenter Server.
VMware, Inc.
269
vSphere Basic System Administration
Table 22-3. Collection Intervals
Collection
Interval/Archive
Length
Collection
Frequency
1 Day
5 Minutes
Real-time statistics are rolled up to create one data point every 5 minutes. The
result is 12 data points every hour and 288 data points every day. After 30
minutes, the six data points collected are aggregated and rolled up as a data
point for the 1 Week time range.
You can change the interval duration and archive length of the 1 Day
collection interval by configuring the statistics settings.
1 Week
30 Minutes
1 Day statistics are rolled up to create one data point every 30 minutes. The
result is 48 data points every day and 336 data points every week. Every 2
hours, the 12 data points collected are aggregated and rolled up as a data point
for the 1 Month time range.
You cannot change the default settings of the 1 Week collection interval.
1 Month
2 Hours
1 Week statistics are rolled up to create one data point every 2 hours. The
result is 12 data points every day and 360 data points every month (assuming
a 30-day month). After 24 hours, the 12 data points collected are aggregated
and rolled up as a data point for the 1 Year time range.
You cannot change the default settings of the 1 Month collection interval.
1 Year
1 Day
1 Month statistics are rolled up to create one data point every day. The result
is 365 data points each year.
You can change the interval duration and archive length of the 1 Year
collection interval by configuring the statistics settings.
Default Behavior
Configure Collection Intervals
You can change the frequency at which statistic queries occur, the length of time statistical data is stored in the
vCenter Server database, and the amount of statistical data collected. By default, all collection intervals are
enabled and query for statistics at collection level 1.
Prerequisites
To configure statistics settings, the vSphere Client must be connected to a vCenter Server system.
NOTE Not all attributes are configurable for each collection interval.
Procedure
1
Select Administration > vCenter Server Settings.
2
If your environment uses multiple vCenter Servers, in Current vCenter Server, select the server.
3
In the navigation panel, select Statistics.
4
In the Statistics Intervals section, select or deselect a collection interval to enable or disable it.
Enabling a longer interval automatically enables all shorter intervals. If you disable all collection levels,
statistical data is not archived in the vCenter Server database.
270
VMware, Inc.
Chapter 22 Working with Performance Statistics
5
(Optional) To change a collection interval attribute, select its row in the Statistics Interval section and click
Edit to open the Edit Collection Interval dialog box.
a
In Keep Samples for, select an archive length.
This option is configurable only for the Day and Year intervals.
b
In Statistics Interval, select an interval duration.
This option is configurable only for the Day interval.
c
In Statistics Level select a new level interval level.
Level 4 uses the highest number of statistics counters. Use it only for debugging purposes.
The statistics level must be less than or equal to the statistics level set for the preceeding statistics
interval. This is a vCenter Server dependency.
6
(Optional) In the Database Size section, estimate the effect of the statistics settings on the database.
a
Enter the number of Physical Hosts.
b
Enter the number of Virtual Machines.
The estimated space required and number of database rows required are calculated and displayed.
c
7
If necessary, make changes to your statistics collection settings.
Click OK.
Enable or Disable Collection Intervals
Enabling and disabling collection intervals controls the amount of statistical data saved to the vCenter Server
database.
Prerequisites
To configure statistics settings, the vSphere Client must be connected to a vCenter Server system.
Procedure
1
Select Administration > vCenter Server Settings.
2
If your environment uses multiple vCenter Servers, in Current vCenter Server, select the appropriate
server.
3
In the vCenter Server Settings dialog box, select Statistics.
4
In the Statistics Intervals section, select or deselect a collection interval to enable or disable it.
NOTE When you disable a collection interval, all subsequent intervals are automatically disabled.
5
(Optional) In the Database Size section, estimate the effect of the statistics settings on the database.
a
Enter the number of Physical Hosts.
b
Enter the number of Virtual Machines.
The estimated space required and number of database rows required are calculated and displayed.
c
6
VMware, Inc.
If necessary, make changes to your statistics collection settings.
Click OK.
271
vSphere Basic System Administration
Collection Levels
Each collection interval has a default collection level that determines how many data counters are used when
collecting statistics data.
The collection level establishes which metrics are retrieved and recorded in the vCenter Server database. You
can assign a collection level of 1- 4 to each collection interval, with level 4 having the largest number of counters.
By default, all collection intervals use collection level 1.
The collection level for an interval cannot be greater than the collection level set for the preceding collection
interval. For example, if the Month interval is set to collection level 3, the Year interval can be set to collection
level 1, 2, or 3, but not to collection level 4. This is a vCenter Server dependency.
Table 22-4 describes each collection level and provides recommendations on when to use them.
Table 22-4. Collection Levels
Level
Metrics
Level 1
n
n
n
n
n
n
n
Level 2
n
n
n
n
n
Level 3
n
n
n
Level 4
Best Practice
Cluster Services (VMware Distributed Resource Scheduler) –
all metrics
CPU – cpuentitlement, totalmhz, usage (average), usagemhz
Disk – capacity, maxTotalLatency, provisioned, unshared,
usage (average), used
Memory – consumed, mementitlement, overhead,
swapinRate, swapoutRate, swapused, totalmb, usage
(average), vmmemctl (balloon)
Network – usage (average)
System – heartbeat, uptime
Virtual Machine Operations – numChangeDS,
numChangeHost, numChangeHostDS
Use for long-term performance
monitoring when device statistics are
not required.
Level 1 is the default Collection Level
for all Collection Intervals.
Level 1 metrics
CPU – idle, reservedCapacity
Disk – All metrics, excluding numberRead and numberWrite.
Memory – All metrics, excluding memUsed and maximum
and minimum rollup values.
Virtual Machine Operations – All metrics
Use for long-term performance
monitoring when device statistics are
not required but you want to monitor
more than the basic statistics.
Level 1 and Level 2 metrics
Metrics for all counters, excluding minimum and maximum
rollup values.
Device metrics
Use for short-term performance
monitoring after encountering
problems or when device statistics are
required.
Due to the large quantity of
troubleshooting data retrieved and
recorded, use level 3 for the shortest
time period possible— the Day or Week
collection interval.
All metrics supported by the vCenter Server, including minimum
and maximum rollup values.
Use for short-term performance
monitoring after encountering
problems or when device statistics are
required.
Due to the large quantity of
troubleshooting data retrieved and
recorded, use level 4 for the shortest
amount of time possible.
Generally, you need to use only collection levels 1 and 2 for performance monitoring and analysis. Levels 3
and 4 provide granularity that is generally useful only for developers. Unless vCenter Server is set to a collection
level that contains a data counter, the data for that counter is not stored in the database nor is it rolled up into
a past-day statistic on the ESX/ESXi host. The counter will not appear in the performance charts.
272
VMware, Inc.
Chapter 22 Working with Performance Statistics
Using Collection Levels Effectively
Using collection level 1 is generally adequate for monitoring performance. There are some instances in which
you might need to collect more performance statistics, for example, to troubleshoot performance problems.
Before you increase the collection level for an interval, view charts in real-time. Viewing real-time data has less
impact on performance because metrics are retrieved directly from the source without being written to the
vCenter Server database.
If you change to collection level 3 or 4 to diagnose problems, reset the collection level to its previous state as
soon as possible. At collection level 4, try to limit the collection period to the Day interval to not have an impact
on the database. If you need to save the data for longer than one day, increase interval to two or three days
rather than using the Week interval. For example, if you need to record data over the weekend, set the interval
to three days. Use a week interval only when you need the duration to be more than three days.
Table 22-5 lists the circumstances in which you might want to increase the collection level for your vCenter
Server.
Table 22-5. Collection Level Scenarios
Use Collection
Level
To do this
2
n
n
3
n
n
4
n
n
Identify virtual machines that can be co-located because of complimentary memory sharing.
Detect the amount of active memory on a host to determine whether it can handle additional virtual
machines.
Compare ready and wait times of virtual CPUs to determine the effectiveness of VSMP.
Diagnose problems with devices, or compare performance among multiple devices.
Determine whether a device is being saturated.
Troubleshoot errors.
How Metrics Are Stored in the vCenter Server Database
The metrics gathered for each collection interval are stored in their own database tables.
At the end of an interval, one of two things can occur.
n
If the next interval is disabled, the data in the table that is older than the interval duration is purged.
n
If the next interval is enabled, the data is aggregated into groups and is rolled up to the database table of
the subsequent collection interval. For example, the day interval has a 5 minute collection frequency, and
the week interval has a 30 minute collection frequency. When the day interval completes, it aggregates
the 5 minute queries into groups of six (equaling 30 minutes) and rolls the 30-minute data block to the
week interval database table. The day-old data is then purged from the database to make room for new
queries.
You control how long statistical data is stored in the vCenter Server database by enabling or disabling a
collection interval. When you disable a collection interval, all subsequent intervals are automatically disabled.
For example, when you disable the week interval, the month and year intervals are also disabled. Data is purged
at the end of the day interval cycle because no rollups can occur. The oldest data is purged first.
NOTE You must manually enable each collection interval to use it again. Also, you can only enable a collection
interval if all previous collection intervals are enabled. For example, to enable the month interval, the day and
week intervals must be enabled.
By default, statistics are stored in the vCenter Server database for one year. You can increase this to five years.
To save statistical data for longer than five years, archive it outside of the vCenter Server database.
VMware, Inc.
273
vSphere Basic System Administration
Estimate the Statistics Impact on the vCenter Server Database
After you configure collection intervals, you can verify that the vCenter Server database has enough space to
archive the data collected.
Perform the following task in the vSphere Client.
Procedure
1
2
3
If necessary, open the Statistics tab of the vCenter Server Settings dialog box.
a
Select Administration > vCenter Server Settings.
b
In the navigation panel, click Statistics.
(Optional) Edit a statistics interval.
a
Select the interval to change.
b
Click Edit.
c
In the Edit Statistics Interval dialog box, change the settings as necessary.
d
Click OK.
Enter the number of physical hosts and virtual machines in your inventory.
The vCenter Server uses a database calculator to determine the estimated size required for your statistics
configuration. The value appears in the Estimated space required field after you enter values.
4
Click OK.
Statistics Collection for Microsoft Windows Guest Operating Systems
In a virtualized environment, physical resources are shared among multiple virtual machines.
Some virtualization processes dynamically allocate available resources depending on the status, or utilization
rates, of virtual machines in the environment. This can make obtaining accurate information about the resource
utilization (CPU utilization, in particular) of individual virtual machines, or applications running within virtual
machines, difficult. VMware now provides virtual machine-specific performance counter libraries for the
Windows Performance utility. Application administrators can view accurate virtual machine resource
utilization statistics from within the guest operating system's Windows Performance utility.
Enable Statistics Collection for Guest Operating System Performance Analysis
VMware-specific performance objects are automatically loaded into Microsoft Windows Perfmon and enabled
when VMware Tools is installed. To display a performance chart for any performance object, you must add
counters.
View Performance Statistics for Windows Guest Operating Systems
You can display VMware-specific statistics using the Microsoft Windows Perfmon utility.
Prerequisites
A virtual machine with a Microsoft Windows operating system and VMware Tools installed.
Procedure
274
1
Open a console to the virtual machine and log in.
2
Select Start > Run.
VMware, Inc.
Chapter 22 Working with Performance Statistics
3
Enter Perfmon and press Enter.
4
In the Performance dialog box, click the Add button or press Ctrl+I.
5
In the Add Counters dialog box, select Use local computer counters.
6
Select a virtual machine (virtual machine performance object names begin with VM) performance object.
7
Select the counters that you would like to display for that object.
8
If the performance object has multiple instances, select the instances you would like to display.
9
Click Add.
The Performance dialog box displays data for the selected performance object.
10
Click Close to close the Add Counter dialog box and return to the Performance dialog box.
vCenter Server Performance Charts
The performance charts graphically display CPU, memory, disk, network, and storage metrics for devices and
entities managed by vCenter Server. Chart types include line charts, pie charts, bar charts, and stacked charts.
You view the performance charts for an object that is selected in the inventory on the vSphere Client
Performance tab. You can view overview charts and advanced charts for an object. Both the overview charts
and the advanced charts use the following chart types to display statistics:
Line charts
Display metrics for a single inventory object. The data for each performance
counter is plotted on a separate line in the chart. For example, a network chart
for a host can contain two lines: one showing the number of packets received,
and one showing the number of packets transmitted.
Bar charts
Display storage metrics for datastores in a selected datacenter. Each datastore
is represented as a bar in the chart, and each bar displays metrics based on file
type (virtual disks, snapshots, swap files, and other files).
Pie charts
Display storage metrics for a single datastore or virtual machine. Storage
information is based on file type or virtual machine. For example, a pie chart
for a datastore displays the amount of storage space occupied by the fivelargest virtual machines on that datastore. A pie chart for a virtual machine
displays the amount of storage space occupied by virtual machine files.
Stacked charts
Display metrics for children of the selected parent object. For example, a host's
stacked CPU usage chart displays CPU usage metrics for each virtual machine
on the host. The metrics for the host itself are displayed in separate line charts.
Stacked charts are useful in comparing resource allocation and usage across
multiple hosts or virtual machines. Each metric group appears on a separate
chart for a managed entity. For example, hosts have one chart that displays
CPU metrics and one that displays memory metrics.
Overview Performance Charts
The overview performance charts enable you to view CPU, memory, network, disk, and storage metrics for
an object at the same time.
All overview charts for an object appear in the same panel in the Performance tab. This allows you to do sideby-side comparisions of resource usage for clusters, datacenters, datastores, hosts, resource pools, and virtual
machines. You can perform the following tasks with the overview performance charts.
n
VMware, Inc.
View all charts for an object in one panel. The single-panel view enables you to make side-by-side
comparisons of different resource statistics, for example, CPU usage and memory usage.
275
vSphere Basic System Administration
n
View real-time and historic data.
n
View thumbnail charts for child objects. Thumbnail charts provide a quick summary of resource usage
for each child object of a datacenter, datastore, cluster, or host.
n
Open the overview charts for a child object by clicking the object name in the thumbnail section.
View the Overview Performance Charts
You can view CPU, memory, disk, network, and storage statistics for an object in the overview performance
charts. These charts support a subset of data counters supported by vCenter Server.
Prerequisites
The vSphere Client must be connected to a vCenter Server system.
Procedure
1
Display the object in the inventory.
2
Select the object and click the Performance tab.
3
Click Overview.
The overview charts for the object appear.
View the Overview Performance Charts Help
The Performance Chart Help contains information on how to work with overview charts, including how to
analyze chart data and how to set the time range for the chart data. It also describes the metric counters
displayed in each overview chart.
Procedure
1
Display the object in the inventory panel.
2
Select the object and click the Performance tab.
3
Click Overview.
4
Click the Help icon (?).
5
To view the Help for a specific chart, click the Help icon for that chart.
Advanced Performance Charts
With the advanced performance charts, you can see data point information for a plotted metric, export chart
data to a spreadsheet, and save chart data to a file. You can customize the advanced chart views.
NOTE You cannot view datastore metrics in the advanced charts. They are only available in the overview
charts.
View the Advanced Performance Charts
You can view CPU, memory, disk, and network statistics for an object in the advanced performance charts.
These charts support additional data counters not supported in the overview performance charts.
Prerequisites
When connected directly to an ESX/ESXi host, the advanced performance charts display only real-time statistics
and past day statistics. To view historical data, the vSphere Client must be connected to a vCenter Server
system.
276
VMware, Inc.
Chapter 22 Working with Performance Statistics
Procedure
1
Select a host, cluster, resource pool, or virtual machine in the inventory panel.
2
Click the Performance tab.
3
Click Advanced.
4
To view a different chart, select an option from the Switch to list.
The default charts are configured to show the following information.
Option
Description
CPU
Shows the CPU usage in MHz. Available for clusters, resource pools, hosts,
and virtual machines.
Memory
Shows the amount of memory granted. Available for clusters, resource pools,
hosts, and virtual machines.
Disk
Shows the aggregated storage performance statistics. Available for hosts and
virtual machines.
Network
Shows the aggregated network performance statistics. Available for hosts
and virtual machines.
System
Shows statistics for overall system availability, including CPU usage by the
service console and other aapplications. Available for hosts and virtual
machines.
Cluster Services
Shows aggregate CPU, aggregate memory, and failover statistics for DRS
and HA clusters and hosts that are part of DRS clusters.
The amount of historical data displayed in a chart depends on the collection interval and collection level
set for vCenter Server.
Save Chart Data to a File
You can save data from the Advanced performance charts to a file in various graphics formats or in Microsoft
Excel format.
Procedure
1
In the Performance tab, click Advanced.
2
Click Save.
3
In the Save Performance Chart dialog box, navigate to the location to save the file.
4
Enter a name for the file.
5
Select a file type.
6
Click Save.
The file is saved to the location and format you specified.
Export Performance Data to a Spreadsheet
You can export performance data from the Advanced charts to a Microsoft Office Excel file. You use the vSphere
Client to export data.
Prerequisites
Before you view or export performance data, verify that the time is set correctly on the ESX/ESXi host, the
vCenter Server system, and the client machine. Each host and client machine can be in different time zones,
but the times must be correct for their respective time zones.
VMware, Inc.
277
vSphere Basic System Administration
Procedure
1
Display the object in the inventory.
2
Select File > Report > Performance.
If performance data is not available for the selected inventory object, the Export Performance option is not
available.
3
Enter a filename and location.
4
Select the date and time range for the chart.
5
In Chart Options, select the chart type.
6
Select the metric groups to display in the chart.
You can also specify the objects using the All or None buttons.
7
(Optional) To customize the options, click Advanced, select the objects and counters to include in the chart,
and click OK.
8
Specify the size of the chart in the exported file.
9
Click OK to export the data.
Customize Advanced Chart Views
You can customize a performance chart by specifying the objects to monitor, the counters to include, the time
range, and chart type. You can customize preconfigured chart views and create new chart views.
Changes to chart options take effect immediately. New views are added to the Switch to menu.
Procedure
1
Display the object in the inventory.
2
Select the object and click the Performance tab.
3
Click Advanced.
4
Click Chart Options.
5
In Chart Options, select a metric group for the chart.
6
Select a time range for the metric group.
If you choose Custom, do one of the following.
n
Select Last and set the number of hours, days, weeks, or months for the amount of time to monitor
the object.
n
Select From and select the beginning and end dates.
You can also customize the time range options by customizing the statistics collection interval setting.
7
Select the chart type.
When selecting the stacked graph option, consider the following.
8
n
You can select only one item from the list of measurements.
n
Per-virtual-machine stacked graphs are available only for hosts.
n
Click a counter description name to display information about the counter’s function and whether
the selected metric can be stacked for per-virtual-machine graphs.
In Objects, select the inventory objects to display in the chart.
You can also specify the objects using the All or None buttons.
278
VMware, Inc.
Chapter 22 Working with Performance Statistics
9
In Counters, select the data counters to display in the chart.
You can also specify counters using the All or None buttons.
Click a counter name to display information about the counter in the Counter Description panel.
10
Click Apply to see the results.
11
Click OK.
To view the chart in its own window, click the pop-up chart button (
additional charts while keeping this chart open.
). This enables you to view
Delete a Custom Advanced Chart View
You can delete custom chart views from the vSphere Client.
Procedure
1
Display the vSphere Client inventory panel.
2
Select any object in the datacenter to enable the Performance tab.
3
Click the Performance tab and click Advanced.
4
Click Chart Options to open the Customize Performance Charts dialog box.
5
Click Manage Chart Settings.
6
Select a chart and click Delete.
The chart is deleted, and it is removed from the Switch to menu.
7
Click OK.
Monitoring and Troubleshooting Performance
You monitor CPU, memory, disk, network, and storage metrics by using the performance charts located on
the Performance tab of the vSphere Client. Use the following guidelines to identify and resolve potential
performance problems.
n
CPU Performance on page 280
Use the vSphere Client CPU performance charts to monitor CPU usage for hosts, clusters, resource pools,
virtual machines, and vApps. Use the guidelines below to identify and correct problems with CPU
performance.
n
Disk I/O Performance on page 280
Use the vSphere Client disk performance charts to monitor disk I/O usage for clusters, hosts, and virtual
machines. Use the guidelines below to identify and correct problems with disk I/O performance.
n
Memory Performance on page 281
Use the vSphere Client memory performance charts to monitor memory usage of clusters, hosts, virtual
machines, and vApps. Use the guidelines below to identify and correct problems with memory
performance.
n
Network Performance on page 282
Use the network performance charts to monitor network usage and bandwidth for clusters, hosts, and
virtual machines. Use the guidelines below to identify and correct problems with networking
performance.
n
Storage Performance on page 283
Use the vSphere Client datastore performance charts to monitor datastore usage. Use the guidelines
below to identify and correct problems with datastore performance.
VMware, Inc.
279
vSphere Basic System Administration
CPU Performance
Use the vSphere Client CPU performance charts to monitor CPU usage for hosts, clusters, resource pools,
virtual machines, and vApps. Use the guidelines below to identify and correct problems with CPU
performance.
A short spike in CPU usage or CPU ready indicates that you are making the best use of the host resources.
However, if both values are constantly high, the hosts are probably overcommitted. Generally, if the CPU
usage value for a virtual machine is above 90% and the CPU ready value is above 20%, performance is impacted.
Table 22-6. CPU Performance Enhancement Advice
#
Resolution
1
Verify that VMware Tools is installed on every virtual machine on the host.
2
Compare the CPU usage value of a virtual machine with the CPU usage of other virtual machines on the host or in
the resource pool. The stacked bar chart on the host’s Virtual Machine view shows the CPU usage for all virtual
machines on the host.
3
Determine whether the high ready time for the virtual machine resulted from its CPU usage time reaching the CPU
limit setting. If so, increase the CPU limit on the virtual machine.
4
Increase the CPU shares to give the virtual machine more opportunities to run. The total ready time on the host might
remain at the same level if the host system is constrained by CPU. If the host ready time doesn't decrease, set the CPU
reservations for high-priority virtual machines to guarantee that they receive the required CPU cycles.
5
Increase the amount of memory allocated to the virtual machine. This decreases disk and or network activity for
applications that cache. This might lower disk I/O and reduce the need for the ESX/ESXi host to virtualize the hardware.
Virtual machines with smaller resource allocations generally accumulate more CPU ready time.
6
Reduce the number of virtual CPUs on a virtual machine to only the number required to execute the workload. For
example, a single-threaded application on a four-way virtual machine only benefits from a single vCPU. But the
hypervisor's maintenance of the three idle vCPUs takes CPU cycles that could be used for other work.
7
If the host is not already in a DRS cluster, add it to one. If the host is in a DRS cluster, increase the number of hosts
and migrate one or more virtual machines onto the new host.
8
Upgrade the physical CPUs or cores on the host if necessary.
9
Use the newest version of ESX/ESXi, and enable CPU-saving features such as TCP Segmentation Offload, large
memory pages, and jumbo frames.
Disk I/O Performance
Use the vSphere Client disk performance charts to monitor disk I/O usage for clusters, hosts, and virtual
machines. Use the guidelines below to identify and correct problems with disk I/O performance.
The virtual machine disk usage (%) and I/O data counters provide information about average disk usage on a
virtual machine. Use these counters to monitor trends in disk usage.
The best ways to determine if your vSphere environment is experiencing disk problems is to monitor the disk
latency data counters. You use the Advanced performance charts to view these statistics.
280
n
The kernelLatency data counter measures the average amount of time, in milliseconds, that the VMkernel
spends processing each SCSI command. For best performance, the value should be 0-1 milliseconds. If the
value is greater than 4ms, the virtual machines on the ESX/ESXi host are trying to send more throughput
to the storage system than the configuration supports. Check the CPU usage, and increase the queue depth
or storage.
n
The deviceLatency data counter measures the average amount of time, in milliseconds, to complete a SCSI
command from the physical device. Depending on your hardware, a number greater than 15ms indicates
there are probably problems with the storage array. Move the active VMDK to a volume with more
spindles or add disks to the LUN.
VMware, Inc.
Chapter 22 Working with Performance Statistics
n
The queueLatency data counter measures the average amount of time taken per SCSI command in the
VMkernel queue. This value must always be zero. If not, the workload is too high and the array cannot
process the data fast enough.
Table 22-7. Disk I/O Performance Enhancement Advice
#
Resolution
1
Increase the virtual machine memory. This should allow for more operating system caching, which can reduce I/O
activity. Note that this may require you to also increase the host memory. Increasing memory might reduce the need
to store data because databases can utilize system memory to cache data and avoid disk access.
To verify that virtual machines have adequate memory, check swap statistics in the guest operating system. Increase
the guest memory, but not to an extent that leads to excessive host memory swapping. Install VMware Tools so that
memory ballooning can occur.
2
Defragment the file systems on all guests.
3
Disable antivirus on-demand scans on the VMDK and VMEM files.
4
Use the vendor's array tools to determine the array performance statistics. When too many servers simultaneously
access common elements on an array, the disks might have trouble keeping up. Consider array-side improvements
to increase throughput.
5
Use Storage VMotion to migrate I/O-intensive virtual machines across multiple ESX/ESXi hosts.
6
Balance the disk load across all physical resources available. Spread heavily used storage across LUNs that are
accessed by different adapters. Use separate queues for each adapter to improve disk efficiency.
7
Configure the HBAs and RAID controllers for optimal use. Verify that the queue depths and cache settings on the
RAID controllers are adequate. If not, increase the number of outstanding disk requests for the virtual machine by
adjusting the Disk.SchedNumReqOutstanding parameter. For more information, see the Fibre Channel SAN
Configuration Guide.
8
For resource-intensive virtual machines, separate the virtual machine's physical disk drive from the drive with the
system page file. This alleviates disk spindle contention during periods of high use.
9
On systems with sizable RAM, disable memory trimming by adding the line MemTrimRate=0 to the virtual
machine's .VMX file.
10
If the combined disk I/O is higher than a single HBA capacity, use multipathing or multiple links.
11
For ESXi hosts, create virtual disks as preallocated. When you create a virtual disk for a guest operating system, select
Allocate all disk space now. The performance degradation associated with reassigning additional disk space does
not occur, and the disk is less likely to become fragmented.
12
Use the most current ESX/ESXi host hardware.
Memory Performance
Use the vSphere Client memory performance charts to monitor memory usage of clusters, hosts, virtual
machines, and vApps. Use the guidelines below to identify and correct problems with memory performance.
To ensure best performance, the host memory must be large enough to accommodate the active memory of
the virtual machines. Note that the active memory can be smaller than the virtual machine memory size. This
allows you to over-provision memory, but still ensures that the virtual machine active memory is smaller than
the host memory.
A virtual machine's memory size must be slightly larger than the average guest memory usage. This enables
the host to accommodate workload spikes without swapping memory among guests. Increasing the virtual
machine memory size results in more overhead memory usage.
If a virtual machine has high ballooning or swapping, check the amount of free physical memory on the host.
A free memory value of 6% or less indicates that the host cannot meet the memory requirements. This leads
to memory reclamation which may degrade performance. If the active memory size is the same as the granted
memory size, demand for memory is greater than the memory resources available. If the active memory is
consistently low, the memory size might be too large.
VMware, Inc.
281
vSphere Basic System Administration
If the host has enough free memory, check the resource shares, reservation, and limit settings of the virtual
machines and resource pools on the host. Verify that the host settings are adequate and not lower than those
set for the virtual machines.
If the memory usage value is high, and the host has high ballooning or swapping, check the amount of free
physical memory on the host. A free memory value of 6% or less indicates that the host cannot handle the
demand for memory. This leads to memory reclamation which may degrade performance.
If memory usage is high or you notice degredation in performance, consider taking the actions listed below.
Table 22-8. Memory Performance Enhancement Advice
#
Resolution
1
Verify that VMware Tools is installed on each virtual machine. The balloon driver is installed with VMware Tools
and is critical to performance.
2
Verify that the balloon driver is enabled. The VMkernel regularly reclaims unused virtual machine memory by
ballooning and swapping. Generally, this does not impact virtual machine performance.
3
Reduce the memory space on the virtual machine, and correct the cache size if it is too large. This frees up memory
for other virtual machines.
4
If the memory reservation of the virtual machine is set to a value much higher than its active memory, decrease the
reservation setting so that the VMkernel can reclaim the idle memory for other virtual machines on the host.
5
Migrate one or more virtual machines to a host in a DRS cluster.
6
Add physical memory to the host.
Network Performance
Use the network performance charts to monitor network usage and bandwidth for clusters, hosts, and virtual
machines. Use the guidelines below to identify and correct problems with networking performance.
Network performance is dependent on application workload and network configuration. Dropped network
packets indicate a bottleneck in the network. To determine whether packets are being dropped, use esxtop or
the advanced performance charts to examine the droppedTx and droppedRx network counter values.
If packets are being dropped, adjust the virtual machine shares. If packets are not being dropped, check the
size of the network packets and the data receive and transfer rates. In general, the larger the network packets,
the faster the network speed. When the packet size is large, fewer packets are transferred, which reduces the
amount of CPU required to process the data. When network packets are small, more packets are transferred
but the network speed is slower because more CPU is required to process the data.
NOTE In some instances, large packets can result in high network latency. To check network latency, use the
VMware AppSpeed performance monitoring application or a third-party application.
If packets are not being dropped and the data receive rate is slow, the host is probably lacking the CPU resources
required to handle the load. Check the number of virtual machines assigned to each physical NIC. If necessary,
perform load balancing by moving virtual machines to different vSwitches or by adding more NICs to the host.
You can also move virtual machines to another host or increase the host CPU or virtual machine CPU.
Table 22-9. Networking Performance Enhancement Advice
282
#
Resolution
1
Verify that VMware Tools is installed on each virtual machine.
2
If possible, use vmxnet3 NIC drivers, which are available with VMware Tools. They are optimized for high
performance.
3
If virtual machines running on the same ESX/ESXi host communicate with each other, connect them to the same
vSwitch to avoid the cost of transferring packets over the physical network.
4
Assign each physical NIC to a port group and a vSwitch.
VMware, Inc.
Chapter 22 Working with Performance Statistics
Table 22-9. Networking Performance Enhancement Advice (Continued)
#
Resolution
5
Use separate physical NICs to handle the different traffic streams, such as network packets generated by virtual
machines, iSCSI protocols, VMotion tasks, and service console activities.
6
Ensure that the physical NIC capacity is large enough to handle the network traffic on that vSwitch. If the capacity
is not enough, consider using a high-bandwidth physical NIC (10Gbps) or moving some virtual machines to a vSwitch
with a lighter load or to a new vSwitch.
7
If packets are being dropped at the vSwitch port, increase the virtual network driver ring buffers where applicable.
8
Verify that the reported speed and duplex settings for the physical NIC match the hardware expectations and that
the hardware is configured to run at its maximum capability. For example, verify that NICs with 1Gbps are not reset
to 100Mbps because they are connected to an older switch.
9
Verify that all NICs are running in full duplex mode. Hardware connectivity issues might result in a NIC resetting
itself to a lower speed or half duplex mode.
10
Use vNICs that are TSO-capable, and verify that TSO-Jumbo Frames are enabled where possible.
Storage Performance
Use the vSphere Client datastore performance charts to monitor datastore usage. Use the guidelines below to
identify and correct problems with datastore performance.
NOTE The datastore charts are available only in the overview performance charts.
The datastore is at full capacity when the used space is equal to the capacity. Allocated space can be larger
than datastore capacity, for example, when you have snapshots and thin-provisioned disks. You can provision
more space to the datastore if possible, or you can add disks to the datastore or use shared datastores.
If snapshot files are consuming a lot of datastore space, consider consolidating them to the virtual disk when
they are no longer needed. Consolidating the snapshots deletes the redo log files and removes the snapshots
from the vSphere Client user interface. For information on consolidating the datacenter, see the vSphere Client
Help.
VMware, Inc.
283
vSphere Basic System Administration
284
VMware, Inc.
Working with Tasks and Events
23
The topics in this section describe vSphere tasks and events and provide information on how to work with
them.
This chapter includes the following topics:
n
“Managing Tasks,” on page 285
n
“Managing Events,” on page 291
Managing Tasks
Tasks represent system activities that do not complete immediately, such as migrating a virtual machine. They
are initiated by high-level activities you perform with the vSphere Client in real-time and those you schedule
to occur at a later time or on a recurring basis.
For example, powering off a virtual machine is a task. You can perform this task manually every evening, or
you can set up a scheduled task to power off the virtual machine every evening for you.
NOTE The functionality available in the vSphere Client depends on whether the vSphere Client is connected
to a vCenter Server system or an ESX/ESXi host. Unless indicated, the process, task, or description applies to
both kinds of vSphere Client connections. When the vSphere Client is connected to an ESX/ESXi host, the
Tasks option is not available; however, you can view recent tasks in the Status Bar at the bottom of the
vSphere Client.
Viewing Tasks
You can view tasks that are associated with a single object or all objects in the vSphere Client inventory. The
Tasks & Events tab lists completed tasks and tasks that are currently running.
By default, the tasks list for an object also includes tasks performed on its child objects. You can filter the list
by removing tasks performed on child objects and by using keywords to search for tasks.
If you are logged in to a vCenter Server system that is part of a Connected Group, a column in the task list
displays the name of the vCenter Server system on which the task was performed.
View All Tasks
You view completed tasks and running tasks on the vSphere Client Tasks & Events tab.
Procedure
1
VMware, Inc.
Display the object in the inventory.
285
vSphere Basic System Administration
2
3
Display the tasks for a single object or the entire vCenter Server.
n
To display the tasks for an object, select the object.
n
To display the tasks in the vCenter Server, select the root folder.
Click the Tasks & Events tab.
The task list contains tasks performed on the object and its children.
4
(Optional) To view detailed information for a task, select the task in the list.
Details appear in the Task Details pane.
View Recent Tasks
You view recent tasks for vCenter Server or an ESX/ESXi host in the vSphere Client Recent Tasks pane.
Procedure
1
Display the Inventory panel.
2
Select the object.
3
If necessary, select View > Status to display the status bar at the bottom of the vSphere Client.
4
In the status bar, Click Tasks.
The list of completed tasks appears in the Recent Tasks pane of the Status Bar.
View Scheduled Tasks
You view scheduled tasks in the vSphere Client Scheduled Tasks pane. The scheduled task list includes tasks
that are scheduled to run and those that have already run.
Procedure
u
In the navigation bar, select Home > Management > Scheduled Tasks.
Filter Tasks for a Host or Datacenter
Filtering the task list removes tasks performed on child objects.
Procedure
1
Select the host or datacenter in the inventory and click the Tasks & Events tab.
2
In View, click Tasks to display the tasks list.
3
If the Show all entries list and the search field are not displayed under the Tasks and Events buttons,
select View > Filtering.
4
Click Show all entries and select Show host entries or Show datacenter entries, depending on the object
selected.
Use Keywords to Filter the Tasks List
You can filter the tasks list based on any task attribute, including task name, target, status, initiator, change
history, and time. Filtering is inclusive, not exclusive. If the keyword is found in any of the selected columns,
the task is included in the filtered list.
Procedure
286
1
Display the object in the inventory.
2
Select the object and click the Tasks & Events tab.
VMware, Inc.
Chapter 23 Working with Tasks and Events
3
If the Name, Target or Status contains search field is not displayed, select View > Filtering.
4
Click the search field arrow and select the attributes to include in the search.
5
Type a keyword into the box and press Enter.
Cancel a Task
Canceling a task stops a running task from occurring. Canceling a scheduled task does not cancel subsequent
runs. To cancel a scheduled task that has not run, reschedule it.
NOTE You can only cancel a subset of tasks by using the vSphere Client, and you cannot cancel tasks on an
ESX Server version 2.0.1 host.
Required privileges:
n
Manual tasks: Tasks.Update Task
n
Scheduled tasks:Scheduled Task.Remove Task
n
Appropriate permissions on the host where the task is running
Prerequisites
To cancel a task, the vSphere Client must be connected to a vCenter Server system.
Procedure
1
Locate the task in the Recent Tasks pane of the Status Bar.
By default, the Status Baris displayed at the bottom of the vSphere Client. If it is not visible, select View
> Status Bar.
2
Right-click the appropriate task and select Cancel.
If the cancel option is unavailable, the selected task cannot be canceled.
The vCenter Server system or ESX/ESXi host stops the progress of the task and returns the object to its previous
state. The vSphere Client displays the task with a Canceled status.
Schedule Tasks
You can schedule tasks to run once in the future or multiple times, at a recurring interval.
The vSphere Client must be connected to a vCenter Server system to create and manage scheduled tasks. The
tasks you can schedule are listed in the following table.
Table 23-1. Scheduled Tasks
Scheduled Task
Description
Add a host
Adds the host to the specified datacenter or cluster.
Change the power state of a virtual machine
Powers on, powers off, suspends, or resets the state of the virtual machine.
Change resource settings of a resource pool
or virtual machine
Changes the following resource settings:
n CPU – Shares, Reservation, Limit.
n Memory – Shares, Reservation, Limit.
Check compliance of a profile
Checks that a host's configuration matches the configuration specified in a
host profile.
Clone a virtual machine
Makes a clone of the virtual machine and places it on the specified host or
cluster.
Create a virtual machine
Creates a new virtual machine on the specified host.
VMware, Inc.
287
vSphere Basic System Administration
Table 23-1. Scheduled Tasks (Continued)
Scheduled Task
Description
Deploy a virtual machine
Creates a new virtual machine from a template on the specified host or
cluster.
Export a virtual machine
Exports virtual machines that vCenter Server manages to managed formats
or hosted formats. The export process converts the source to a virtual
machine in the format you specify.
This scheduled task is available only when VMware vCenter Converter is
installed.
Import a virtual machine
Imports a physical machine, virtual machine, or system image into a virtual
machine that vCenter Server manages.
This scheduled task is available only when VMware vCenter Converter is
installed.
Migrate a virtual machine
Migrate a virtual machine to the specified host or datastore by using
migration or migration with VMotion.
Make a snapshot of a virtual machine
Captures the entire state of the virtual machine at the time the snapshot is
taken.
Scan for Updates
Scans templates, virtual machines, and hosts for available updates.
This task is available only when VMware vCenter Update Manager is
installed.
Remediate
Downloads any new patches discovered during the scan operation and
applies the newly configured settings.
This task is available only when VMware vCenter Update Manager is
installed.
You create scheduled tasks by using the Scheduled Task wizard. For some scheduled tasks, this wizard opens
the wizard used specifically for that task. For example, if you create a scheduled task that migrates a virtual
machine, the Scheduled Task wizard opens the Migrate Virtual Machine wizard, which you use to set up the
migration details.
Scheduling one task to run on multiple objects is not possible. For example, you cannot create one scheduled
task on a host that powers on all virtual machines on that host. You must create a separate scheduled task for
each virtual machine.
After a scheduled task runs, you can reschedule it to run again at another time.
Create a Scheduled Task
To schedule a task, use the Scheduled Task wizard.
Required privilege: Schedule Task.Create Tasks
You can schedule a limited number of tasks by using the vSphere Client. If the task to schedule is not available,
use the VMware Infrastructure API. See the vSphere SDK Programming Guide.
CAUTION Do not schedule multiple tasks to be performed at the same time on the same object. The results are
unpredictable.
Prerequisites
The vSphere Client must be connected to a vCenter Server system to schedule tasks.
Procedure
1
In the navigation bar, click Home > Management > Scheduled Tasks.
The current list of scheduled tasks appears.
2
288
In the toolbar, click New.
VMware, Inc.
Chapter 23 Working with Tasks and Events
3
In the Select a Task to Schedule dialog box, select a task and click OK to open the wizard for that task.
NOTE For some scheduled tasks, the wizard opens the wizard used specifically for that task. For example,
to migrate a virtual machine, the Scheduled Task wizard opens the Migrate Virtual Machine Wizard,
which you use to set up the migration details.
4
Complete the wizard that opens for the task.
5
Click OK to open the Scheduled Task wizard.
6
Enter a task name and task description and click Next.
7
Select a Frequency and specify a Start Time.
You can schedule a task to run only once during a day. To set up a task to run multiple times in one day,
set up additional scheduled tasks.
Option
Action
Once
n
n
To run the scheduled task immediately, select Now and click Next.
To run the scheduled task at a later time and date, select Later and enter
a Time. Click the Date arrow to display the calendar and click a date.
After Startup
In Delay, enter the number of minutes to delay the task.
Hourly
a In Start Time, enter the number of minutes after the hour to run the task.
b In Interval, enter the number of hours after which to run the task.
For example, to start a task at the half-hour mark of every 5th hour, enter
30 and 5.
Daily
n
Weekly
a Enter the Interval and Start Time.
b Select each day on which to run the task.
For example, to run the task at 6 am every Tuesday and Thursday, enter 1
and 6 am, and select Tuesday and Thursday.
Monthly
a
b
Enter the Start Time and Interval.
For example, to run the task at 2:30 pm every four days, enter 2:30 and 4.
c
Enter the Start Time.
Specify the days by using one of the following methods.
n Enter a specific date of the month.
n Select first, second, third, fourth, or last, and select the day of the
week.
last runs the task on the last week in the month that the day occurs.
For example, if you select the last Monday of the month and the
month ends on a Sunday, the task runs six days before the end of the
month.
In Interval, enter the number of months between each task run.
8
Click Next.
9
Set up email notifications and click Next.
10
Click Finish.
The vCenter Server system adds the task to the list in the Scheduled Tasks window.
VMware, Inc.
289
vSphere Basic System Administration
Canceling Scheduled Tasks
Canceling a task stops a running task from occurring, regardless of whether the task was a real-time task or a
scheduled task. The operation cancels only the running task. If the task being canceled is a scheduled task,
subsequent runs are not canceled.
Tasks that aren’t running can be cleared when they are in a queued or scheduled state. In such cases, because
the cancel operation is not available, either remove the task or reschedule it to run at a different time. Removing
a scheduled task requires that you recreate it to run it in the future, rescheduling does not.
You can cancel the following tasks:
n
Connecting to a host
n
Cloning a virtual machine
n
Deploying a virtual machine
n
Migrating a powered off virtual machine. This task is cancelable only when the source disks have not been
deleted.
If your vSphere uses virtual services, you can also cancel the following scheduled tasks:
n
Change the power state of a virtual machine
n
Make a snapshot of a virtual machine
Change or Reschedule a Task
After a scheduled task is created, you can change the timing, frequency, and specifics of the task. You can edit
and reschedule tasks before or after they run.
Required privilege:Schedule Task.Modify Task
Procedure
1
In the vSphere Client navigation bar, click Home > Management > Scheduled Tasks.
2
Select the task.
3
In the toolbar, click Properties.
4
Change task attributes as necessary.
5
Click Next to advance through the wizard.
6
Click Finish.
Remove a Scheduled Task
Removing a scheduled task removes all future occurrences of the task. The history associated with all
completed occurrences of the task remains in the vCenter Server database.
Prerequisites
To remove scheduled tasks, the vSphere Client must be connected to the vCenter Server system.
Required privilege:Scheduled Task.Remove Task
Procedure
290
1
In the vSphere Client navigation bar, click Home > Management > Scheduled Tasks.
2
Select the task.
3
Select Inventory > Scheduled Task > Remove.
VMware, Inc.
Chapter 23 Working with Tasks and Events
4
Click OK.
The task is removed from the list of scheduled tasks.
Policy Rules for Task Operations
The vCenter Server and ESX/ESXi hosts adhere to certain rules when managing tasks in the system.
vCenter Server and ESX/ESXi hosts use the following rules to process tasks:
n
The user performing the task in the vSphere Client must have the correct permissions on the relevant
objects. After a scheduled task is created, it will be performed even if the user no longer has permission
to perform the task.
n
When the operations required by manual tasks and scheduled tasks conflict, the activity due first is started
first.
n
When a virtual machine or host is in an incorrect state to perform any activity, manual or scheduled,
vCenter Server or the ESX/ESXi host does not perform the task. A message is recorded in the log.
n
When an object is removed from the vCenter Server or the ESX/ESXi host, all associated tasks are also
removed.
n
The vSphere Client and vCenter Server system use UTC time to determine the start time of a scheduled
task. This ensures vSphere Client users in different time zones see the task scheduled to run at their local
time.
Events are logged in the event log at start and completion of a task. Any errors that occur during a task are
also recorded in the event log.
CAUTION Do not schedule multiple tasks to be performed at the same time on the same object. The results are
unpredictable.
Managing Events
An event is an action that occurs on an object in vCenter Server or on a host.
Events include user actions and system actions that occur on managed objects in the vSphere Client inventory.
For example, events are created when a user logs in to a virtual machine and when a host connection is lost.
Each event records an event message. An event message is a predefined description of an event. Event messages
contain information such as the user who generated the event, the time the event occurred, and the type of
event message (information, error, or warning). Event messages are archived in vCenter Server.
Typically, event details include the name of the object on which the event occurred and describes the action
that occurred. The object of the event is a link to the object’s individual event page.
NOTE When actions occur on a folder, for example, when an alarm is created on a folder, the related event (in
this case the AlarmCreatedEvent) is visible only in the parent datacenter.
Viewing Events
You can view events associated with a single object or with all objects in the vSphere Client inventory.
The events listed for a selected object include events associated with the child objects. Detailed information
about a selected event appears in the Event Details panel below the event list.
NOTE When the vSphere Client is connected directly to an ESX/ESXi host, the Tasks & Events tab is labeled
Events.
VMware, Inc.
291
vSphere Basic System Administration
View Events Associated with One Object
The events listed for a selected object include events associated with its child objects.
Required privilege: Read-only
Procedure
1
Display the object in the vSphere Client inventory.
2
Select the object and click the Tasks & Events tab.
3
Click Events.
A list of events appears.
4
(Optional) Select an event in the list to see the Event Details, including a list of related events.
View Events Associated with All Objects
The most recent events appear at the top of the Events list. Events are identified by Information type, Error
type, and Warning type.
Required privilege: Read-only
Procedure
1
2
View the events associated with all objects in the inventory.
n
In the navigation bar, click Home > Management > Events.
n
In the inventory, select the root node, click the Tasks & Events tab, and click Events.
(Optional) To see details about an event in the list, select the event.
The Event Details panel shows the details.
3
(Optional) To see events related to a target object in the list, click the target object’s name.
The Tasks & Events tab for the selected object appears.
Filter Events on a Host or Datacenter
By default, the events list for an object includes events performed on its child objects. You can remove all child
events associated with a host or a datastore and display only the events performed on the object itself.
Procedure
292
1
Display the host or datacenter in the inventory.
2
Select the host or datacenter and click the Tasks & Events tab.
3
Click Events to display the events list.
4
If the Show all entries list and search field are not visible under the Tasks and Events buttons, select
View > Filtering.
5
Click Show all entries and select Show host entries or Show datacenter entries, depending on the object
selected.
VMware, Inc.
Chapter 23 Working with Tasks and Events
Use Keywords to Filter the Events List
You can display events based on any attribute, including event name, target, type, user, change history, and
time. Filtering is inclusive, not exclusive. If the keyword is found in any of the selected columns, the event is
included in the list.
Procedure
1
2
Select the object on which to filter the events.
n
To filter events associated with one object, select the object in the inventory, click the Events tab, and
click Events.
n
To filter events associated with all objects, in the navigation bar, click Home > Management >
Events.
If the Name, Target or Status contains search field is not visible, select View > Filtering.
The search field appears.
3
Click the search field arrow and select the attributes to include in the search.
4
Type a keyword in the field and press Enter.
The events that match the search are retrieved and displayed in the events list.
Trigger an Alarm on an Event
You can configure an alarm to trigger when an event occurs in the vCenter Server System.
Procedure
1
In the inventory, select the object on which to create the alarm.
For example, to create an alarm for all hosts in a cluster, display the cluster. To create an alarm for a single
host, display the host.
2
Select File > New > Alarm.
3
Complete the information on the General tab.
a
Enter an alarm name and description.
b
In Alarm Type, select the object to monitor and select Monitor for specific events occurring on this
object.
4
Click the Triggers tab and set up the alarm triggers.
5
Click to the Actions tab and set up the alarm actions.
The vCenter Server verifies the configuration of the alarm and adds the alarm to the list of alarms for the
selected object.
For help on configuring the values on each tab, click Help.
Export Events
You can export all or part of the events log file when the vSphere Client is connected to a vCenter Server system.
Required Privilege: Read-only
Procedure
1
VMware, Inc.
Select File > Export > Export Events.
293
vSphere Basic System Administration
2
If your vSphere environment has multiple vCenter Servers, in thevCenter Server list, select the server
where the events occurred.
3
In File name, type a name for the event file.
NOTE If you do not specify a file extension, the file is saved as a text file.
4
In Events, specify the event attributes on which to filter.
a
In Type, select User or System.
b
If you selected User, select a user option.
c
5
6
7
n
All users
n
These users
n
To specify a subset of users, click Search and specify the users to include.
In Severity, select the event level: Error, Info, or Warning.
In Time, specify the time range during which the events to export occurred.
n
To specify an hour, day, week, or month time period, select Last and set the number and time
increment.
n
To specify a calendar time span, select From and set the from and to dates.
In Limits, set the number of events to export.
n
Select All matching events.
n
Select most recent matching events and enter the number.
Click OK.
vCenter Server creates the file in the specified location. The file contains the Type, Time, and Description of
the events.
294
VMware, Inc.
Appendixes
VMware, Inc.
295
vSphere Basic System Administration
296
VMware, Inc.
Defined Privileges
A
The following tables list the default privileges that, when selected for a role, can be paired with a user and
assigned to an object. The tables in this appendix use VC to indicate vCenter Server and HC to indicate host
client, a standalone ESX/ESXi host.
When setting permissions, verify all the object types are set with appropriate privileges for each particular
action. Some operations require access permission at the root folder or parent folder in addition to access to
the object being manipulated. Some operations require access or performance permission at a parent folder
and a related object.
vCenter Server extensions might define additional privileges not listed here. Refer to the documentation for
the extension for more information on those privileges.
This appendix includes the following topics:
n
“Alarms,” on page 298
n
“Datacenter,” on page 299
n
“Datastore,” on page 299
n
“Distributed Virtual Port Group,” on page 300
n
“Distributed Virtual Switch,” on page 301
n
“Extensions,” on page 302
n
“Folders,” on page 302
n
“Global,” on page 303
n
“Host CIM,” on page 304
n
“Host Configuration,” on page 304
n
“Host Inventory,” on page 306
n
“Host Local Operations,” on page 307
n
“Host Profile,” on page 308
n
“Network,” on page 308
n
“Performance,” on page 309
n
“Permissions,” on page 310
n
“Resource,” on page 310
n
“Scheduled Task,” on page 312
n
“Sessions,” on page 312
VMware, Inc.
297
vSphere Basic System Administration
n
“Tasks,” on page 313
n
“vApp,” on page 313
n
“Virtual Machine Configuration,” on page 315
n
“Virtual Machine Interaction,” on page 319
n
“Virtual Machine Inventory,” on page 322
n
“Virtual Machine Provisioning,” on page 323
n
“Virtual Machine State,” on page 326
Alarms
Alarms privileges control the ability to set and respond to alarms on inventory objects.
Table A-1. Alarms Privileges
298
Pair with
Object
Effective on
Object
VC only
All inventory
objects
Object on which
an alarm is
defined
Creates a new alarm.
When creating alarms with a custom
action, privilege to perform the action
is verified when the user creates the
alarm.
User interface element– Alarms tab
context menu, File > New > Alarm
VC only
All inventory
objects
Object on which
an alarm is
defined
Disable alarm action
Stops the alarm action from occurring
after an alarm has been triggered. This
does not disable the alarm from
triggering.
User interface element – Inventory >
object_name > Alarm > Disable All
Alarm Actions
VC only
All inventory
objects
Object on which
an alarm is
defined
Modify alarm
Changes the properties of an existing
alarm.
User interface element – Alarms tab
context menu
VC only
All inventory
objects
Object on which
an alarm is
defined
Remove alarm
Deletes an existing alarm.
User interface element – Alarms tab
context menu
VC only
All inventory
objects
Object on which
an alarm is
defined
Set alarm status
Changes the status of the configured
event alarm. The status can change to
Normal, Warning, or Alert.
User interface element – Alarm
Settingsdialog box, Triggers tab
VC only
All inventory
objects
Object on which
an alarm is
defined
Privilege Name
Description
Used
Acknowledge alarm
Suppresses all alarm actions from
occurring on all triggered alarms.
User interface element – Triggered
Alarms panel
Create alarm
VMware, Inc.
Appendix A Defined Privileges
Datacenter
Datacenter privileges control the ability to create and edit datacenters in the vSphere Client inventory.
Table A-2. Datacenter Privileges
Pair with
Object
Privilege Name
Description
Affects
Effective on Object
Create
datacenter
Creates a new datacenter.
User interface element– Inventory context
menu, toolbar button, and File > New
Datacenter
VC only
Datacenter
folders or
root object
Datacenter folder or root
object
IP pool
configuration
Allows configuration of a pool of IP
addresses.
VC only
Datacenters,
Datacenter
folders, or
root object
Datacenter
Move datacenter
Moves a datacenter.
Privilege must be present at both the source
and destination.
User interface element – Inventory dragand-drop
VC only
Datacenters,
Datacenter
folders, or
root object
Datacenter, source and
destination
Remove
datacenter
Removes a datacenter.
In order to have permission to perform this
operation, you must have this privilege
assigned to both the object and its parent
object.
User interface element– Inventory context
menu, Inventory > Datacenter > Remove,
Edit > Remove
VC only
Datacenters,
Datacenter
folders, or
root object
Datacenter plus parent
object
Rename
datacenter
Changes the name of a datacenter.
User interface element – Inventory object,
Inventory context menu, Edit > Rename,
Inventory > Datacenter > Rename
VC only
Datacenters,
Datacenter
folders, or
root object
Datacenter
Datastore
Datastore privileges control the ability to browse, manage, and allocate space on datastores.
Table A-3. Datastore Privileges
Privilege Name
Description
Affects
Effective on
Object
Pair with
Object
Allocate space
Allocates space on a datastore for a virtual
machine, snapshot, clone, or virtual disk.
HC and VC
Datastores
Datastores
Browse datastore
Browses files on a datastore.
User interface element – Add existing disk,
browse for CD-ROM or Floppy media,
serial or parallel port files
HC and VC
Datastores
Datastores,
Datastore
folders
Low level file
operations
Carries out read, write, delete, and rename
operations in the datastore browser.
HC and VC
Datastores
Datastores
Move datastore
Moves a datastore between folders.
Privileges must be present at both the
source and destination.
User interface element – Inventory dragand-drop
VC only
Datastore,
source and
destination
Datastores,
Datastore
folders
VMware, Inc.
299
vSphere Basic System Administration
Table A-3. Datastore Privileges (Continued)
Privilege Name
Description
Affects
Effective on
Object
Pair with
Object
Remove datastore
Removes a datastore.
This privilege is deprecated.
In order to have permission to perform this
operation, you must have this privilege
assigned to both the object and its parent
object.
User interface element– Inventory
datastore context menu, Inventory >
Datastore > Remove
HC and VC
Datastores
Datastores,
Datastore
folders
Remove file
Deletes a file in the datastore.
This privilege is deprecated. Assign the
Low level file operations
User interface element – Datastore Browser
toolbar button and Datastore context menu
HC and VC
Datastores
Datastores
Rename datastore
Renames a datastore.
User interface element– Datastore
Properties dialog Change button, host
Summary tab context menu
HC and VC
Datastores
Datastores
Distributed Virtual Port Group
Distributed virtual port group privileges control the ability to create, delete, and modify distributed virtual
port groups.
Table A-4. Distributed Virtual Port Group Privileges
300
Pair with
Object
Effective on
Object
HC and VC
Datacenter,
Network folder
vNetwork
Distributed
Switch
Delete a distributed virtual port group.
In order to have permission to perform this
operation, you must have this privilege
assigned to both the object and its parent
object.
HC and VC
vNetwork
Distributed
Switch,
Network folder,
Datacenter
vNetwork
Distributed
Switch
Modify
Modify the configuration of a distributed
virtual port group.
HC and VC
vNetwork
Distributed
Switch,
Network folder,
Datacenter
vNetwork
Distributed
Switch
Policy operation
Set the policy of a distributed virtual port
group.
HC and VC
vNetwork
Distributed
Switch,
Network folder,
Datacenter
vNetwork
Distributed
Switch
Scope operation
Set the scope of a distributed virtual port
group.
HC and VC
vNetwork
Distributed
Switch,
Network folder,
Datacenter
vNetwork
Distributed
Switch
Privilege Name
Description
Affects
Create
Create a distributed virtual port group.
Delete
VMware, Inc.
Appendix A Defined Privileges
Distributed Virtual Switch
Distributed Virtual Switch privileges control the ability to perform tasks related to the management of
vNetwork Distributed Switches.
Table A-5. Distributed Virtual Switch Privileges
Pair with
Object
Effective on
Object
HC and VC
Datacenter,
Network folder
Datacenter,
Network
folder
Remove a vNetwork Distributed Switch.
In order to have permission to perform this
operation, you must have this privilege
assigned to both the object and its parent
object.
HC and VC
vNetwork
Distributed
Switch,
Network folder,
Datacenter
vNetwork
Distributed
Switch
Host operation
Change the host members of a vNetwork
Distributed Switch.
HC and VC
vNetwork
Distributed
Switch,
Network folder,
Datacenter
vNetwork
Distributed
Switch
Modify
Change the Configuration of a vNetwork
Distributed Switch.
HC and VC
vNetwork
Distributed
Switch,
Network folder,
Datacenter
vNetwork
Distributed
Switch
Move
Move a vNetwork Distributed Switch into
another folder.
VC only
vNetwork
Distributed
Switch,
Network folder,
Datacenter
vNetwork
Distributed
Switch
Policy operation
Change the policy of a vNetwork Distributed
Switch.
HC and VC
vNetwork
Distributed
Switch,
Network folder,
Datacenter
vNetwork
Distributed
Switch
Port configuration
operation
Change the configuration of a port in a
vNetwork Distributed Switch.
HC and VC
vNetwork
Distributed
Switch,
Network folder,
Datacenter
vNetwork
Distributed
Switch
Port setting
operation
Change the setting of a port in a vNetwork
Distributed Switch.
HC and VC
vNetwork
Distributed
Switch,
Network folder,
Datacenter
vNetwork
Distributed
Switch
VSPAN operation
Change the VSPAN configuration of a
vNetwork Distributed Switch.
HC and VC
vNetwork
Distributed
Switch,
Network folder,
Datacenter
vNetwork
Distributed
Switch
Privilege Name
Description
Affects
Create
Create a vNetwork Distributed Switch.
Delete
VMware, Inc.
301
vSphere Basic System Administration
Extensions
Extensions privileges control the ability to install and manage extensions.
Table A-6. Extension Privileges
Pair with
Object
Effective on
Object
VC only
Root vCenter
Server
Root vCenter
Server
Unregisters an extension (plug-in)
VC only
Root vCenter
Server
Root vCenter
Server
Updates an extension (plug-in)
VC only
Root vCenter
Server
Root vCenter
Server
Privilege Name
Description
Affects
Register extension
Registers an extension (plug-in)
Unregister
extension
Update extension
Folders
Folders privileges control the abililty to create and manage folders.
Table A-7. Folder Privileges
302
Privilege Name
Description
Affects
Pair with
Object
Effective on
Object
Create folder
Creates a new folder.
User interface element– Taskbar button, File
menu, context menu
VC only
Folders
Folders
Delete folder
Deletes a folder.
In order to have permission to perform this
operation, you must have this privilege
assigned to both the object and its parent
object.
User interface element– File menu, context
menu
VC only
Folders plus
parent object
Folders
Move folder
Moves a folder.
Privilege must be present at both the source
and destination.
User interface element – Inventory drag-anddrop
VC only
Folders, source
and destination
Folders
Rename folder
Changes the name of a folder.
User interface element – Inventory pane object
text field, context menu, File menu
VC only
Folders
Folders
VMware, Inc.
Appendix A Defined Privileges
Global
Global privileges control a number of global tasks related to tasks, scripts, and extensions.
Table A-8. Global Privileges
Privilege Name
Description
Affects
Pair with
Object
Effective on
Object
Act as vCenter
Server
Prepare or initiate a VMotion send operation
or a VMotion receive operation.
No user vSphere Client interface elements are
associated with this privilege.
VC only
Any object
Root vCenter
Server
Cancel task
Cancel a running or queued task.
User interface element – Recent tasks pane
context menu, Tasks & Events context menu.
Can currently cancel clone and clone to
template.
HC and VC
Any object
Inventory object
related to the
task
Capacity planning
Enable the use of capacity planning for
planning consolidation of physical machines
to virtual machines.
User interface element - Consolidation button
in toolbar.
VC only
Root vCenter
Server
Root vCenter
Server
Diagnostics
Get list of diagnostic files, log header, binary
files, or diagnostic bundle.
User interface element – File > Export > Export
Diagnostic Data, Admin System Logs tab
VC only
Any object
Root vCenter
Server
Disable methods
Allows servers for vCenter Server extensions
to disable certain operations on objects
managed by vCenter Server.
No user vSphere Client interface elements are
associated with this privilege.
VC only
Any object
Root vCenter
Server
Enable methods
Allows servers for vCenter Server extensions
to enable certain operations on objects
managed by vCenter Server.
No user vSphere Client interface elements are
associated with this privilege.
VC only
Any object
Root vCenter
Server
Global tag
Add or remove global tags.
HC and VC
Any object
Root host or
vCenter Server
Health
View the health of vCenter Server
components.
User interface element – vCenter Service
Status on the Home page.
VC only
Root vCenter
Server
Root vCenter
Server
Licenses
See what licenses are installed and add or
remove licenses.
User interface element – Licenses tab,
Configuration > Licensed Features
HC and VC
Any object
Root host or
vCenter Server
Log Event
Log a user-defined event against a particular
managed entity.
User interface element – Should ask for a
reason when shutting down or rebooting a
host.
HC and VC
Any object
Any object
Manage Custom
Attributes
Add, remove, or rename custom field
definitions.
User interface element – Administration >
Custom Attributes
VC only
Any object
Root vCenter
Server
VMware, Inc.
303
vSphere Basic System Administration
Table A-8. Global Privileges (Continued)
Privilege Name
Description
Affects
Pair with
Object
Effective on
Object
Proxy
Allows access to an internal interface for
adding or removing endpoints to or from the
proxy.
No user vSphere Client interface elements are
associated with this privilege.
VC only
Any object
Root vCenter
Server
Script Action
Schedule a scripted action in conjunction with
an alarm.
User interface element – Alarm Settings dialog
box
VC only
Any object
Any object
Service Managers
Allows use of the resxtop command in the
vSphere CLI.
No user vSphere Client interface elements are
associated with this privilege.
HC and VC
Root host or
vCenter Server
Root host or
vCenter Server
Set Custom
Attributes
View, create, or remove custom attributes for
a managed object.
User interface element – Any list view shows
the fields defined and allows setting them
VC only
Any object
Any object
Settings
Read and modifie runtime VC configuration
settings.
User interface element – Administration >
vCenter Server Management Server
Configuration
VC only
Any object
Root vCenter
Server
System tag
Add or remove system tag.
VC only
Root vCenter
Server
Root vCenter
Server
Host CIM
Host CIM privileges control the use of CIM for host health monitoring.
Table A-9. Host CIM Privileges
Privilege Name
Description
Affects
Pair with
Object
Effective on
Object
CIM interaction
Allow a client to obtain a ticket to use for CIM
services.
HC and VC
Hosts
Hosts
Host Configuration
Host configuration privileges control the ability to configure hosts.
Table A-10. Host Configuration Privileges
304
Privilege Name
Description
Affects
Pair with
Object
Effective on
Object
Advanced settings
Set advanced options in host
configuration.
User interface element – Host
Configuration tab > Advanced Settings,
Inventory hierarchy context menu
HC and VC
Hosts
Hosts
Change date and time
settings
Sets time and date settings on the host.
User interface element – Host
Configuration tab > Time Configuration
HC and VC
Hosts
Hosts
VMware, Inc.
Appendix A Defined Privileges
Table A-10. Host Configuration Privileges (Continued)
Privilege Name
Description
Affects
Pair with
Object
Effective on
Object
Change PciPassthru
settings
Change PciPassthru settings for a host.
HC and VC
Hosts
Hosts
Change settings
Allows setting of lockdown mode on ESXi
hosts only.
User interface element – Host
Configuration tab > Security Profile >
Lockdown Mode > Edit
HC and VC
Hosts
Hosts (ESXi only)
Change SNMP
settings
Configure, restart, and stop SNMP agent.
No user vSphere Client interface elements
are associated with this privilege.
HC and VC
Hosts
Hosts
Connection
Change the connection status of a host
(connected or disconnected).
User interface element– Right-click Host
VC only
Hosts
Hosts
Firmware
Update the host firmware on ESXi hosts.
No user vSphere Client interface elements
are associated with this privilege.
HC and VC
Hosts
Hosts (ESXi only)
Hyperthreading
Enable and disable hyperthreading in a
host CPU scheduler.
User interface element – Host
Configuration tab > Processors
HC and VC
Hosts
Hosts
Maintenance
Put the host in and out of maintenance
mode. Shut down and restart a host.
User interface element– Host context
menu, Inventory > Host > Enter
Maintenance Mode
HC and VC
Hosts
Hosts
Memory configuration
Set configured service console memory
reservation. This setting is applicable only
on ESX hosts.
User interface element – Host
Configuration tab > Memory
HC and VC
Hosts
Hosts
Network
configuration
Configure network, firewall, and
VMotion network.
User interface element – Host
Configuration tab > Networking,
Network Adapter, DNS and Routing
HC and VC
Hosts
Hosts
Query Patch
Query for installable patches and install
patches on the host.
HC and VC
Hosts
Hosts
Security profile and
firewall
Configure internet services, such as SSH,
Telnet, SNMP, and host firewall.
User interface element– Host
Configuration tab > Security Profile
HC and VC
Hosts
Hosts
Storage partition
configuration
Manages VMFS datastore and diagnostic
partitions. Scan for new storage devices.
Manage iSCSI.
User interface element– Host
Configuration tab > Storage, Storage
Adapters, Virtual Machine Swapfile
LocationHost Configuration tab
datastore context menu
HC and VC
Hosts
Hosts
VMware, Inc.
User interface element – Host
Configuration tab > Advanced Settings,
Inventory hierarchy context menu
305
vSphere Basic System Administration
Table A-10. Host Configuration Privileges (Continued)
Privilege Name
Description
Affects
Pair with
Object
Effective on
Object
System Management
Allows extensions to manipulate the file
system on the host.
No user vSphere Client interface elements
are associated with this privilege.
HC and VC
Hosts
Hosts
System resources
Update the configuration of the system
resource hierarchy.
User interface element – Host
Configuration tab > System Resource
Allocation
HC and VC
Hosts
Hosts
Virtual machine
autostart
configuration
Change auto-start and auto-stop order of
virtual machines on a single host.
User interface element– Host
Configuration tab > Virtual Machine
Startup or Shutdown
HC and VC
Hosts
Hosts
Host Inventory
Host inventory privileges control adding hosts to the inventory, adding hosts to clusters, and moving hosts in
the inventory.
Table A-11. Host Inventory Privileges
306
Pair with
Object
Effective on
Object
VC only
Datacenters,
Clusters, Host
folders
Clusters
Add a standalone host.
User interface element – Toolbar button,
Inventory context menu, Inventory >
Datacenter > Add Host, File > New > Add
Host, Hosts tab context menu
VC only
Datacenters,
Host folders
Host folders
Create cluster
Create a new cluster.
User interface elements – Toolbar button,
inventory context menu, Inventory >
Datacenter > New Cluster, File > New >
Cluster
VC only
Datacenters,
Host folders
Host folders
Modify cluster
Change the properties of a cluster.
User interface element – Inventory context
menu, Inventory > Cluster > Edit Settings,
Summary tab
VC only
Datacenters,
Host folders,
Clusters
Clusters
Move cluster or
standalone host
Move a cluster or standalone host between
folders.
Privilege must be present at both the source
and destination.
User interface element– Inventory hierarchy
VC only
Datacenters,
Host folders,
Clusters
Clusters
Move host
Move a set of existing hosts into or out of a
cluster.
Privilege must be present at both the source
and destination.
User interface element– Inventory hierarchy
drag-and-drop
VC only
Datacenters,
Host folders,
Clusters
Clusters
Privilege Name
Description
Affects
Add host to cluster
Add a host to an existing cluster.
User interface element – Inventory context
menu, File > New > Add Host
Add standalone
host
VMware, Inc.
Appendix A Defined Privileges
Table A-11. Host Inventory Privileges (Continued)
Pair with
Object
Effective on
Object
VC only
Datacenters,
Host folders,
Clusters, Hosts
Clusters, Hosts
Remove a host.
In order to have permission to perform this
operation, you must have this privilege
assigned to both the object and its parent
object.
User interface element – Inventory drag-anddrop out of cluster, context menu, Inventory >
Host > Remove
VC only
Datacenters,
Host folders,
Clusters, Hosts
Hosts plus parent
object
Rename a cluster.
User interface element– Inventory single click,
inventory hierarchy context menu, Inventory
> Cluster > Rename
VC only
Datacenters,
Host folders,
Clusters
Clusters
Privilege Name
Description
Affects
Remove cluster
Delete a cluster or standalone host.
In order to have permission to perform this
operation, you must have this privilege
assigned to both the object and its parent
object.
User interface element – Inventory context
menu, Edit > Remove, Inventory > Cluster >
Remove
Remove host
Rename cluster
Host Local Operations
Host local operations privileges control actions performed when the vSphere Client is connected directly to a
host.
Table A-12. Host Local Operations Privileges
Privilege Name
Description
Affects
Pair with
Object
Effective on
Object
Add host to
vCenter
Install and uninstall vCenter agents, such as
vpxa and aam, on a host.
No user vSphere Client interface elements are
associated with this privilege.
HC only
Root host
Root host
Create virtual
machine
Create a new virtual machine from scratch on
a disk without registering it on the host.
No user vSphere Client interface elements are
associated with this privilege.
HC only
Root host
Root host
Delete virtual
machine
Delete a virtual machine on disk, whether
registered or not.
No user vSphere Client interface elements are
associated with this privilege.
HC only
Root host
Root host
Manage user
groups
Manage local accounts on a host.
User interface element – Users & Groups tab
(only present if the vSphere Client logs on to
the host directly)
HC only
Root host
Root host
Reconfigure
virtual machine
Reconfigure a virtual machine.
HC only
Root host
Root host
VMware, Inc.
307
vSphere Basic System Administration
Host Profile
Host Profile privileges control operations related to creating and modifying host profiles.
Table A-13. Host Profile Privileges
Privilege Name
Description
Affects
Pair with Object
Effective on Object
Clear
Clear profile related
information. Apply a profile to a
host.
User interface element –
Inventory > Host > Host
Profile > Apply Profile
HC and VC
Root vCenter Server
Root vCenter Server
Create
Create a host profile.
User interface element – Create
Profilebutton on Profiles tab
HC and VC
Root vCenter Server
Root vCenter Server
Delete
Delete a host profile.
User interface element – Delete
host profile button when a
profile is selected
HC and VC
Root vCenter Server
Root vCenter Server
Edit
Edit a host profile.
User interface element – Edit
Profile button when a profile is
selected
HC and VC
Root vCenter Server
Root vCenter Server
View
View a host profile.
User interface element – Host
Profiles button on vSphere
Client Home page
HC and VC
Root vCenter Server
Root vCenter Server
Network
Network privileges control tasks related to network management.
Table A-14. Network Privileges
308
Pair with
Object
Effective on
Object
HC and VC
Networks,
Network folders
Networks,
Virtual
Machines
HC and VC
Networks,
Network folders
Networks,
Virtual
Machines
Privilege Name
Description
Affects
Assign network
Assign a network to a virtual machine.
Configure
Configure a network.
VMware, Inc.
Appendix A Defined Privileges
Table A-14. Network Privileges (Continued)
Privilege Name
Description
Affects
Pair with
Object
Effective on
Object
Move network
Move a network between folders.
Privilege must be present at both the source
and destination.
User interface element – Inventory drag-anddrop
HC and VC
Networks
Networks
Remove
Remove a network.
This privilege is deprecated.
In order to have permission to perform this
operation, you must have this privilege
assigned to both the object and its parent
object.
User interface element– Inventory network
context menu, Edit > Remove, Inventory >
Network > Remove
HC and VC
Networks,
Network
folders, and
Datacenters
Networks
Pair with
Object
Effective on
Object
Root vCenter
Server
Root vCenter
Server
Performance
Performance privileges control modifying performance statistics settings.
Table A-15. Performance Privileges
Privilege Name
Description
Affects
Modify intervals
Creates, removes, and updates performance
data collection intervals.
User interface element– Administration >
vCenter Server Management Server
Configuration > Statistics
VC only
VMware, Inc.
309
vSphere Basic System Administration
Permissions
Permissions privileges control the assigning of roles and permissions.
Table A-16. Permissions Privileges
Pair with
Object
Effective on
Object
HC and VC
All inventory
objects
Any object plus
parent object
Update a role's name and its privileges.
User interface element – Roles tab context
menu, toolbar button, File menu
HC and VC
Root vCenter
Server
Any object
Reassign all permissions of a role to another
role.
User interface element – Delete Role dialog
box, Reassign affected users radio button and
associated menu
HC and VC
Root vCenter
Server
Any object
Privilege Name
Description
Used
Modify
permission
Define one or more permission rules on an
entity, or updates rules if already present for
the given user or group on the entity.
In order to have permission to perform this
operation, you must have this privilege
assigned to both the object and its parent
object.
User interface element – Permissions tab
context menu, Inventory > Permissions menu
Modify role
Reassign role
permissions
Resource
Resource privileges control the creation and management of resource pools, as well as the migration of virtual
machines.
Table A-17. Resource Privileges
310
Pair with
Object
Effective on
Object
VC only
Datacenters,
Host folders,
Clusters
Clusters
Assign a vApp to a resource pool.
User interface element – New
vApp wizard
HC and VC
Datacenters,
Host folders,
Clusters,
Resource pools,
Hosts
Resource pools
Assign virtual machine
to resource pool
Assign a virtual machine to a
resource pool.
User interface element – New
Virtual Machine wizard
HC and VC
Datacenters,
Host folders,
Clusters,
Resource pools,
Hosts
Resource pools
Create resource pool
Create a new resource pool.
User interface element – File
menu, context menu, Summary
tab, Resources tab
HC and VC
Datacenters,
Host folders,
Clusters,
Resource pools,
Hosts
Resource pools,
clusters
Privilege Name
Description
Affects
Apply recommendation
Ask the server to go ahead with
a suggested VMotion.
User interface element – Cluster
DRS tab
Assign vApp to resource
pool
VMware, Inc.
Appendix A Defined Privileges
Table A-17. Resource Privileges (Continued)
Pair with
Object
Effective on
Object
VC only
Datacenters,
Virtual machine
folders, Virtual
machines
Virtual
machines
Change the allocations of a
resource pool.
User interface element –
Inventory > Resource Pool >
Remove, Resources tab
HC and VC
Resource pools
plus parent
object
Resource pools
Move resource pool
Move a resource pool.
Privilege must be present at both
the source and destination.
User interface element – Dragand-drop
HC and VC
Resource pools,
source and
destination
Resource pools
Query VMotion
Query the general VMotion
compatibility of a virtual
machine with a set of hosts.
User interface element –
Required when displaying the
migration wizard for a poweredon VM, to check compatibility
VC only
Root folder
Root folder
Relocate
Cold migrate a virtual machine's
execution to a specific resource
pool or host.
User interface element–
Inventory context menu, Virtual
Machine Summary tab,
Inventory > Virtual Machine >
Migrate, drag-and- drop
VC only
Virtual
machines
Virtual
machines
Remove resource pool
Delete a resource pool.
In order to have permission to
perform this operation, you must
have this privilege assigned to
both the object and its parent
object.
User interface element – Edit >
Remove, Inventory > Resource
Pool > Remove, inventory
context menu, Resources tab
HC and VC
Resource pools
plus parent
object
Resource pools
Rename resource pool
Rename a resource pool.
User interface element – Edit >
Rename, Inventory > Resource
Pool > Rename, context menu
HC and VC
Resource pools
Resource pools
Privilege Name
Description
Affects
Migrate
Migrate a virtual machine's
execution to a specific resource
pool or host.
User interface element–
Inventory context menu, Virtual
Machine Summary tab,
Inventory > Virtual Machine >
Migrate, drag-and- drop
Modify resource pool
VMware, Inc.
311
vSphere Basic System Administration
Scheduled Task
Scheduled task privileges control creation, editing, and removal of scheduled tasks.
Table A-18. Scheduled Task Privileges
Privilege Name
Description
Affects
Pair with
Object
Effective on
Object
Create tasks
Schedule a task. Required in addition to the
privileges to perform the scheduled action at
the time of scheduling.
User interface element – Scheduled Tasks
toolbar button and context menu
VC only
Any object
Any object
Modify task
Reconfigure the scheduled task properties.
User interface element – Inventory >
Scheduled Tasks > Edit, Scheduled Tasks tab
context menu
VC only
Any object
Any object
Remove task
Remove a scheduled task from the queue.
User interface element – Scheduled Tasks
context menu, Inventory > Scheduled Task >
Remove, Edit > Remove
VC only
Any object
Any object
Run task
Run the scheduled task immediately.
Creating and running a task also requires
permission to perform the associated action.
User interface element – Scheduled Tasks
context menu, Inventory > Scheduled Task >
Run
VC only
Any object
Any object
Sessions
Sessions privileges control the ability of extensions to open sessions on the vCenter Server.
Table A-19. Session Privileges
312
Pair with
Object
Effective on
Object
VC only
Root vCenter
Server
Root vCenter
Server
Set the global log in message.
User interface element – Sessions tab,
Administration > Edit Message of the Day
VC only
Root vCenter
Server
Root vCenter
Server
Validate session
Verifies session validity.
VC only
Root vCenter
Server
Root vCenter
Server
View and stop
sessions
View sessions. Force log out of one or more
logged-on users.
User interface element– Sessions tab
VC only
Root vCenter
Server
Root vCenter
Server
Privilege Name
Description
Affects
Impersonate User
Impersonate another user. This capability is
used by extensions.
Message
VMware, Inc.
Appendix A Defined Privileges
Tasks
Tasks privileges control the ability of extensions to create and update tasks on the vCenter Server.
Table A-20. Tasks Privileges
Pair with
Object
Effective on
Object
VC only
Root vCenter
Server
Root vCenter
Server
VC only
Root vCenter
Server
Root vCenter
Server
Privilege Name
Description
Affects
Create task
Allows an extension to create a user-defined
task.
Update task
Allows an extension to updates a user-defined
task.
vApp
vApp privileges control operations related to deploying and configuring a vApp.
Table A-21. vApp Privileges
Privilege Name
Description
Affects
Pair with Object
Effective on Object
Add virtual machine
Add a virtual machine to a
vApp.
User interface element – dragand-drop in the Virtual
Machines and Templates or
Hosts and Clusters inventory
view
HC and VC
Datacenters, clusters,
hosts, virtual
machine folders,
vApps
vApps
Assign resource pool
Assign a resource pool to a
vApp.
User interface element – dragand-drop in the Hosts and
Clusters inventory view
HC and VC
Datacenters, clusters,
hosts, virtual
machine folders,
vApps
vApps
Assign vApp
Assign a vApp to another vApp
User interface element – dragand-drop in the Virtual
Machines and Templates or
Hosts and Clusters inventory
view
HC and VC
Datacenters, clusters,
hosts, virtual
machine folders,
vApps
vApps
Clone
Clone a vApp.
User interface element –
Inventory > vApp > Clone
HC and VC
Datacenters, clusters,
hosts, virtual
machine folders,
vApps
vApps
Delete
Delete a vApp.
In order to have permission to
perform this operation, you
must have this privilege
assigned to both the object and
its parent object.
User interface element –
Inventory > vApp > Delete
from Disk
HC and VC
Datacenters, clusters,
hosts, virtual
machine folders,
vApps
vApps
Export
Export a vApp from vSphere.
User interface element – File >
Export > Export OVF Template
HC and VC
Datacenters, clusters,
hosts, virtual
machine folders,
vApps
vApps
VMware, Inc.
313
vSphere Basic System Administration
Table A-21. vApp Privileges (Continued)
Privilege Name
Description
Affects
Pair with Object
Effective on Object
Import
Import a vApp into vSphere.
HC and VC
Datacenters, clusters,
hosts, virtual
machine folders,
vApps
vApps
User interface element – File >
Deploy OVF Template
314
Move
Move a vApp to a new
inventory location.
User interface element – dragand-drop in the Virtual
Machines and Templates or
Hosts and Clusters inventory
view
HC and VC
Datacenters, clusters,
hosts, virtual
machine folders,
vApps
vApps
Power Off
Power off a vApp.
User interface element –
Inventory > vApp > Power Off
HC and VC
Datacenters, clusters,
hosts, virtual
machine folders,
vApps
vApps
Power On
Power on a vApp.
User interface element –
Inventory > vApp > Power On
HC and VC
Datacenters, clusters,
hosts, virtual
machine folders,
vApps
vApps
Rename
Rename a vApp.
User interface element –
Inventory > vApp > Rename
HC and VC
Datacenters, clusters,
hosts, virtual
machine folders,
vApps
vApps
Unregister
Unregister a vApp.
In order to have permission to
perform this operation, you
must have this privilege
assigned to both the object and
its parent object.
User interface element –
Inventory > vApp > Remove
from Inventory
HC and VC
Datacenters, clusters,
hosts, virtual
machine folders,
vApps
vApps
vApp application
configuration
Modify a vApp's internal
structure, such as product
information and properties.
User interface element – Edit
vApp Settings dialog box,
Options tab, Advanced option
HC and VC
Datacenters, clusters,
hosts, virtual
machine folders,
vApps
vApps
vApp instance
configuration
Modify a vApp's instance
configuration, such as policies.
User interface element – Edit
vApp Settings dialog box,
Options tab, Properties option
and IP Allocation Policy
option
HC and VC
Datacenters, clusters,
hosts, virtual
machine folders,
vApps
vApps
VMware, Inc.
Appendix A Defined Privileges
Table A-21. vApp Privileges (Continued)
Privilege Name
Description
Affects
Pair with Object
Effective on Object
vApp resource
configuration
Modify a vApp's resource
configuration.
In order to have permission to
perform this operation, you
must have this privilege
assigned to both the object and
its parent object.
User interface element – Edit
vApp Settings dialog box,
Options tab, Resources option
HC and VC
Datacenters, clusters,
hosts, virtual
machine folders,
vApps
vApps
View OVF
Environment
View the OVF environment of a
powered-on virtual machine
within a vApp.
User interface element – Virtual
Machine Properties dialog box,
Options tab, OVF Settings
option, View button
HC and VC
Datacenters, clusters,
hosts, virtual
machine folders,
vApps
vApps
Virtual Machine Configuration
Virtual Machine Configuration privileges control the ability to configure virtual machine options and devices.
Table A-22. Virtual Machine Privileges
Pair with
Object
Effective on
Object
HC and VC
Datacenters,
Hosts,
Clusters,
Virtual
machine
folders,
Resource
pools, Virtual
machines
Virtual
machines
Create a new virtual disk to add to a virtual
machine.
User interface element – Virtual Machine
Properties dialog box
HC and VC
Datacenters,
Hosts,
Clusters,
Virtual
machine
folders,
Resource
pools, Virtual
machines
Virtual
machines
Add or removes any non-disk device.
User interface element – Virtual Machine
Properties dialog box
HC and VC
Datacenters,
Hosts,
Clusters,
Virtual
machine
folders,
Resource
pools, Virtual
machines
Virtual
machines
Privilege Name
Description
Affects
Add existing disk
Add an existing virtual disk to a virtual
machine.
User interface element – Virtual Machine
Properties dialog box
Add new disk
Add or remove
device
VMware, Inc.
315
vSphere Basic System Administration
Table A-22. Virtual Machine Privileges (Continued)
316
Pair with
Object
Effective on
Object
HC and VC
Datacenters,
Hosts,
Clusters,
Virtual
machine
folders,
Resource
pools, Virtual
machines
Virtual
machines
Change the number of virtual CPUs.
User interface element – Virtual Machine
Properties dialog box
HC and VC
Datacenters,
Hosts,
Clusters,
Virtual
machine
folders,
Resource
pools, Virtual
machines
Virtual
machines
Change resource
Change resource configuration of a set of VM
nodes in a given resource pool.
HC and VC
Datacenters,
Hosts,
Clusters,
Virtual
machine
folders,
Resource
pools, Virtual
machines
Virtual
machines
Disk change
tracking
Enable or disable change tracking for the
virtual machine's disks.
HC and VC
Datacenters,
Hosts,
Clusters,
Virtual
machine
folders,
Resource
pools, Virtual
machines
Virtual
machines
Disk lease
Leases disks for VMware Consolidated
Backup.
No user vSphere Client interface elements are
associated with this privilege.
HC and VC
Datacenters,
Hosts,
Clusters,
Virtual
machine
folders,
Resource
pools, Virtual
machines
Virtual
machines
Extend virtual
disk
Expand the size of a virtual disk.
HC and VC
Datacenters,
Hosts,
Clusters,
Virtual
machine
folders,
Resource
pools, Virtual
machines
Virtual
machines
Privilege Name
Description
Affects
Advanced
Add or modify advanced parameters in the
virtual machine's configuration file.
User interface element – Virtual Machine
Properties dialog box > Options tab >
Advanced - General option > Configuration
Parameters button
Change CPU count
VMware, Inc.
Appendix A Defined Privileges
Table A-22. Virtual Machine Privileges (Continued)
Pair with
Object
Effective on
Object
HC and VC
Datacenters,
Hosts,
Clusters,
Virtual
machine
folders,
Resource
pools, Virtual
machines
Virtual
machines
Change the amount of memory allocated to the
virtual machine.
User interface element – Virtual Machine
Properties dialog box > Memory
HC and VC
Datacenters,
Hosts,
Clusters,
Virtual
machine
folders,
Resource
pools, Virtual
machines
Virtual
machines
Modify device
settings
Change the properties of an existing device.
User interface element – Virtual Machine
Properties dialog box > SCSI/IDE node
selection
HC and VC
Datacenters,
Hosts,
Clusters,
Virtual
machine
folders,
Resource
pools, Virtual
machines
Virtual
machines
Query unowned
files
Query unowned files.
HC and VC
Datacenters,
Hosts,
Clusters,
Virtual
machine
folders,
Resource
pools, Virtual
machines
Virtual
machines
Raw device
Add or removes a raw disk mapping or SCSI
pass through device.
Setting this parameter overrides any other
privilege for modifying raw devices, including
connection states.
User interface element – Virtual Machine
Properties > Add/Remove raw disk mapping
HC and VC
Datacenters,
Hosts,
Clusters,
Virtual
machine
folders,
Resource
pools, Virtual
machines
Virtual
machines
Remove disk
Remove a virtual disk device.
User interface element – Virtual Machine
Properties dialog box > Hard Disk (but not a
raw disk mapping)
HC and VC
Datacenters,
Hosts,
Clusters,
Virtual
machine
folders,
Resource
pools, Virtual
machines
Virtual
machines
Privilege Name
Description
Affects
Host USB device
Attach a host-based USB device to a virtual
machine.
Adding USB devices to virtual machines on
ESX/ESXi hosts is not supported.
Memory
VMware, Inc.
317
vSphere Basic System Administration
Table A-22. Virtual Machine Privileges (Continued)
318
Pair with
Object
Effective on
Object
HC and VC
Datacenters,
Hosts,
Clusters,
Virtual
machine
folders,
Resource
pools, Virtual
machines
Virtual
machines
Edit the guest operating system information
for a virtual machine
User interface element – Virtual Machine
Properties dialog box Options tab,
HC and VC
Datacenters,
Hosts,
Clusters,
Virtual
machine
folders,
Resource
pools, Virtual
machines
Virtual
machines
Settings
Change general VM settings.
User interface element – Virtual Machine
Properties dialog box Options tab, General
Options option
HC and VC
Datacenters,
Hosts,
Clusters,
Virtual
machine
folders,
Resource
pools, Virtual
machines
Virtual
machines
Swapfile
placement
Change the swapfile placement policy for a
virtual machine.
User interface element – Virtual Machine
Properties dialog box Options tab, Swapfile
Location option
HC and VC
Datacenters,
Hosts,
Clusters,
Virtual
machine
folders,
Resource
pools, Virtual
machines
Virtual
machines
Upgrade virtual
hardware
Upgrade the virtual machine’s virtual
hardware version from a previous version of
VMware.
User interface element – context menu, File
menu (appears only if vmx file shows a lower
configuration number)
HC and VC
Datacenters,
Hosts,
Clusters,
Virtual
machine
folders,
Resource
pools, Virtual
machines
Virtual
machines
Privilege Name
Description
Affects
Rename
Rename a virtual machine or modifies the
associated notes of a virtual machine.
User interface element– Virtual Machine
Properties dialog box, inventory, inventory
context menu, File menu, Inventory menu
Reset guest
information
VMware, Inc.
Appendix A Defined Privileges
Virtual Machine Interaction
Virtual Machine Interaction privileges control the ability to interact with a virtual machine console, configure
media, perform power operations, and install VMware Tools.
Table A-23. Virtual Machine Interaction
Pair with
Object
Effective on
Object
HC and VC
Datacenters,
Hosts,
Clusters,
Virtual
machine
folders,
Resource
pools, Virtual
machines
Virtual
machines
Perform backup operations on virtual
machines.
HC and VC
Datacenters,
Hosts,
Clusters,
Virtual
machine
folders,
Resource
pools, Virtual
machines
Virtual
machines
Configure CD
media
Configure a virtual DVD or CD-ROM device.
User interface element – Virtual Machine
Properties dialog box > DVD/CD-ROM
HC and VC
Datacenters,
Hosts,
Clusters,
Virtual
machine
folders,
Resource
pools, Virtual
machines
Virtual
machines
Configure floppy
media
Configure a virtual floppy device.
User interface element – Virtual Machine
Properties dialog box, Summary tab Edit
Settings
HC and VC
Datacenters,
Hosts,
Clusters,
Virtual
machine
folders,
Resource
pools, Virtual
machines
Virtual
machines
Console
interaction
Interact with the virtual machine’s virtual
mouse, keyboard, and screen.
User interface element– Console tab, toolbar
button, Inventory > Virtual Machine > Open
Console, inventory context menu
HC and VC
Datacenters,
Hosts,
Clusters,
Virtual
machine
folders,
Resource
pools, Virtual
machines
Virtual
machines
Privilege Name
Description
Affects
Answer question
Resolve issues with VM state transitions or
runtime errors.
User interface element – Summary tab,
Inventory menu, context menu
Backup operation
on virtual machine
VMware, Inc.
319
vSphere Basic System Administration
Table A-23. Virtual Machine Interaction (Continued)
320
Pair with
Object
Effective on
Object
HC and VC
Datacenters,
Hosts,
Clusters,
Virtual
machine
folders,
Resource
pools, Virtual
machines
Virtual
machines
Defragment all disks on the virtual machine.
HC and VC.
Datacenters,
Hosts,
Clusters,
Virtual
machine
folders,
Resource
pools, Virtual
machines
Virtual
machines
Device connection
Change the connected state of a virtual
machine’s disconnectable virtual devices.
User interface element– Virtual Machine
Properties dialog box, Summary tab Edit
Settings
HC and VC
Datacenters,
Hosts,
Clusters,
Virtual
machine
folders,
Resource
pools, Virtual
machines
Virtual
machines
Disable Fault
Tolerance
Disable the Secondary virtual machine for a
virtual machine using Fault Tolerance.
User interface element – Inventory > Virtual
Machine > Fault Tolerance > Disable Fault
Tolerance
VC only
Datacenters,
Hosts,
Clusters,
Virtual
machine
folders,
Resource
pools, Virtual
machines
Virtual
machines
Enable Fault
Tolerance
Enable the Seocondary virtual machine for a
virtual machine using Fault Tolerance.
User interface element – Inventory > Virtual
Machine > Fault Tolerance > Enable Fault
Tolerance
VC only
Datacenters,
Hosts,
Clusters,
Virtual
machine
folders,
Resource
pools, Virtual
machines
Virtual
machines
Power Off
Power off a powered-on virtual machine, shuts
down guest.
User interface element – Inventory > Virtual
Machine > Power > Power Off, Summary tab,
toolbar button, virtual machine context menu
HC and VC
Datacenters,
Hosts,
Clusters,
Virtual
machine
folders,
Resource
pools, Virtual
machines
Virtual
machines
Privilege Name
Description
Affects
Create screenshot
Create a virtual machinescreen shot.
Defragment all
disks
VMware, Inc.
Appendix A Defined Privileges
Table A-23. Virtual Machine Interaction (Continued)
Pair with
Object
Effective on
Object
HC and VC
Datacenters,
Hosts,
Clusters,
Virtual
machine
folders,
Resource
pools, Virtual
machines
Virtual
machines
Record a session on a virtual machine.
No vSphere Client user interface elements are
associated with this privilege.
HC and VC
Datacenters,
Hosts,
Clusters,
Virtual
machine
folders,
Resource
pools, Virtual
machines
Virtual
machines
Replay session on
Virtual Machine
Replay a recorded session on a virtual
machine.
No vSphere Client user interface elements are
associated with this privilege.
HC and VC
Datacenters,
Hosts,
Clusters,
Virtual
machine
folders,
Resource
pools, Virtual
machines
Virtual
machines
Reset
Resets virtual machine and reboots the guest
operating system.
User interface element – Inventory > Virtual
Machine > Power > Reset, Summary tab,
toolbar button, virtual machine context menu
HC and VC
Datacenters,
Hosts,
Clusters,
Virtual
machine
folders,
Resource
pools, Virtual
machines
Virtual
machines
Suspend
Suspends a powered-on virtual machine, puts
guest in standby mode.
User interface element – Inventory > Virtual
Machine > Power > Suspend, Summary tab,
toolbar button, virtual machine context menu
HC and VC
Datacenters,
Hosts,
Clusters,
Virtual
machine
folders,
Resource
pools, Virtual
machines
Virtual
machines
Test failover
Test Fault Tolerance failover by making the
Secondary virtual machine the Primary virtual
machine.
User interface element – Inventory > Virtual
Machine > Fault Tolerance > Test Failover
VC only
Datacenters,
Hosts,
Clusters,
Virtual
machine
folders,
Resource
pools, Virtual
machines
Virtual
machines
Privilege Name
Description
Affects
Power On
Power on a powered-off virtual machine,
resumes a suspended virtual machine.
User interface element– Inventory > Virtual
Machine > Power > Power On, Summary tab,
toolbar button, virtual machine context menu
Record session on
Virtual Machine
VMware, Inc.
321
vSphere Basic System Administration
Table A-23. Virtual Machine Interaction (Continued)
Pair with
Object
Effective on
Object
VC only
Datacenters,
Hosts,
Clusters,
Virtual
machine
folders,
Resource
pools, Virtual
machines
Virtual
machines
Turn off Fault Tolerance for a virtual machine.
User interface element – Inventory > Virtual
Machine > Fault Tolerance > Turn Off Fault
Tolerance
VC only
Datacenters,
Hosts,
Clusters,
Virtual
machine
folders,
Resource
pools, Virtual
machines
Virtual
machines
Turn On Fault
Tolerance
Turn on Fault Tolerance for a virtual machine.
User interface element – Inventory > Virtual
Machine > Fault Tolerance > Turn On Fault
Tolerance
VC only
Datacenters,
Hosts,
Clusters,
Virtual
machine
folders,
Resource
pools, Virtual
machines
Virtual
machines
VMware Tools
install
Mounts and unmounts the VMware Tools CD
installer as a CD-ROM for the guest operating
system.
User interface element– Inventory > Virtual
Machine > Guest > Install/Upgrade VMware
Tools,virtual machine context menu
HC and VC
Datacenters,
Hosts,
Clusters,
Virtual
machine
folders,
Resource
pools, Virtual
machines
Virtual
machines
Privilege Name
Description
Affects
Test restart
Secondary VM
Terminate a Secondary virtual machine for a
virtual machine using Fault Tolerance.
User interface element – Inventory > Virtual
Machine > Fault Tolerance > Test Restart
Secondary
Turn Off Fault
Tolerance
Virtual Machine Inventory
Virtual Machine Inventory privileges control adding, moving, and removing virtual machines.
Table A-24. Virtual Machine Inventory Privileges
322
Pair with
Object
Effective on
Object
HC and VC
Datacenters,
Clusters,
Hosts, Virtual
machine
folders
Clusters, Hosts,
Virtual machine
folders
HC and VC
Datacenters,
Clusters,
Hosts, Virtual
machine
folders
Clusters, Hosts,
Virtual machine
folders
Privilege Name
Description
Affects
Create from
existing
Create a virtual machine based on an existing
virtual machine or template, by cloning or
deploying from a template.
Create new
Create a new virtual machine and allocates
resources for its execution.
User interface element– File menu, context
menu, Summary tab - New Virtual Machine
links
VMware, Inc.
Appendix A Defined Privileges
Table A-24. Virtual Machine Inventory Privileges (Continued)
Pair with
Object
Effective on
Object
VC only
Datacenters,
Clusters,
Hosts, Virtual
machine
folders,
Virtual
machines
Virtual machines
Add an existing virtual machine to a vCenter
Server or host inventory.
HC and VC
Datacenters,
Clusters,
Hosts, Virtual
machine
folders
Clusters, Hosts,
Virtual machine
folders
Remove
Delete a virtual machine, removing its
underlying files from disk.
In order to have permission to perform this
operation, you must have this privilege
assigned to both the object and its parent
object.
User interface element – File menu, context
menu, Summary tab
HC and VC
Datacenters,
Clusters,
Hosts, Virtual
machine
folders,
Virtual
machines
Virtual machines
Unregister
Unregister a virtual machine from a vCenter
Server or host inventory.
In order to have permission to perform this
operation, you must have this privilege
assigned to both the object and its parent
object.
HC and VC
Datacenters,
Clusters,
Hosts, Virtual
machines,
virtual
machine
folders
Virtual machines
Privilege Name
Description
Affects
Move
Relocate a virtual machine in the hierarchy.
Privilege must be present at both the source
and destination.
User interface element – Inventory hierarchy
drag-and-drop in Virtual Machines &
Templates view
Register
Virtual Machine Provisioning
Virtual Machine Provisioning privileges control activities related to deploying and customizing virtual
machines.
Table A-25. Virtual Machine Provisioning Privileges
Pair with
Object
Effective on
Object
n/a
Datacenters,
Hosts,
Clusters,
Resource
pools, Virtual
machine
folders, Virtual
machines
Virtual
machines
n/a
Datacenters,
Hosts,
Clusters,
Resource
pools, Virtual
machine
folders, Virtual
machines
Virtual
machines
Privilege Name
Description
Affects
Allow disk access
Open a disk on a virtual machine for random
read and write access. Used mostly for remote
disk mounting.
No user vSphere Client interface elements are
associated with this privilege.
Allow read-only disk
access
Open a disk on a virtual machine for random
read access. Used mostly for remote disk
mounting.
No user vSphere Client interface elements are
associated with this privilege.
VMware, Inc.
323
vSphere Basic System Administration
Table A-25. Virtual Machine Provisioning Privileges (Continued)
324
Pair with
Object
Effective on
Object
HC and VC
Datacenters,
Hosts,
Clusters,
Resource
pools, Virtual
machine
folders, Virtual
machines
Root folders
Write files associated with a virtual machine,
including vmx, disks, logs, and nvram.
No user vSphere Client interface elements are
associated with this privilege.
HC and VC
Datacenters,
Hosts,
Clusters,
Resource
pools, Virtual
machine
folders, Virtual
machines
Root folders
Clone template
Clone a template.
User interface element– Inventory > Virtual
Machine > Template > Clone, context menu,
Virtual Machines tab
VC only
Datacenters,
Hosts,
Clusters,
Resource
pools, Virtual
machine
folders,
Templates
Templates
Clone virtual
machine
Clone an existing virtual machine and
allocates resources.
User interface element – Inventory > Virtual
Machine > Clone, context menu, Summary
tab
VC only
Datacenters,
Hosts,
Clusters,
Resource
pools, Virtual
machine
folders, Virtual
machines
Virtual
machines
Create template from
virtual machine
Create a new template from a virtual machine.
User interface element – Inventory > Virtual
Machine > Template > Clone to Template,
context menu, Summary tab items
VC only
Datacenters,
Hosts,
Clusters,
Resource
pools, Virtual
machine
folders, Virtual
machines
Virtual
machines
Customize
Customize a virtual machine’s guest
operating system without moving the virtual
machine.
User interface element– Clone Virtual
Machine wizard: Guest Customization
VC only
Datacenters,
Hosts,
Clusters,
Resource
pools, Virtual
machine
folders, Virtual
machines
Virtual
machines
Deploy template
Deploy a virtual machine from a template.
User interface element – “Deploy to template”
File menu, context menu items, Virtual
Machines tab
VC only
Datacenters,
Hosts,
Clusters,
Resource
pools, Virtual
machine
folders,
Templates
Templates
Privilege Name
Description
Affects
Allow virtual
machine download
Read files associated with a virtual machine,
including vmx, disks, logs, and nvram.
No user vSphere Client interface elements are
associated with this privilege.
Allow virtual
machine files upload
VMware, Inc.
Appendix A Defined Privileges
Table A-25. Virtual Machine Provisioning Privileges (Continued)
Pair with
Object
Effective on
Object
VC only
Datacenters,
Hosts,
Clusters,
Resource
pools, Virtual
machine
folders, Virtual
machines
Virtual
machines
Mark an existing template as a VM.
User interface element – “Convert to Virtual
Machine...” context menu items, Virtual
Machines tab
VC only
Datacenters,
Hosts,
Clusters,
Resource
pools, Virtual
machine
folders,
Templates
Templates
Modify
customization
specification
Create, modify, or delete customization
specifications.
User interface element – Customization
Specifications Manager
VC only
Root vCenter
Server
Root vCenter
Server
Promote disks
Promote a virtual machine's disks.
VC only
Datacenters,
Hosts,
Clusters,
Resource
pools, Virtual
machine
folders, Virtual
machines
Virtual
machines
Read customization
specification
View the customization specifications defined
on the system.
User interface element – Edit > Customization
Specifications
VC only
Root vCenter
Server
Root vCenter
Server
Privilege Name
Description
Affects
Mark as template
Mark an existing, powered off virtual machine
as a template.
User interface element – Inventory > Virtual
Machine > Template > Convert to Template,
context menu items, Virtual Machines tab,
Summary tab
Mark as virtual
machine
VMware, Inc.
325
vSphere Basic System Administration
Virtual Machine State
Virtual machine state privileges control the ability to take, delete, rename, and restore snapshots.
Table A-26. Virtual Machine State Privileges
326
Pair with
Object
Effective on
Object
HC and VC
Datacenters,
Clusters,
Hosts,
Resource
pools, Virtual
machine
folders,
Virtual
machines
Virtual machines
Remove a snapshot from the snapshot history.
User interface element – virtual machine
context menu, toolbar button, Inventory menu
HC and VC
Datacenters,
Clusters,
Hosts,
Resource
pools, Virtual
machine
folders,
Virtual
machines
Virtual machines
Rename Snapshot
Rename this snapshot with either a new name
or a new description or both.
No user vSphere Client interface elements are
associated with this privilege.
HC and VC
Datacenters,
Clusters,
Hosts,
Resource
pools, Virtual
machine
folders,
Virtual
machines
Virtual machines
Revert to snapshot
Set the VM to the state it was in at a given
snapshot.
User interface element – virtual machine
context menu, toolbar button, Inventory >
Virtual Machine > Snapshot > Revert to
Snapshot, Virtual Machines tab
HC and VC
Datacenters,
Clusters,
Hosts,
Resource
pools, Virtual
machine
folders,
Virtual
machines
Virtual machines
Privilege Name
Description
Affects
Create snapshot
Create a new snapshot from the virtual
machine’s current state.
User interface element – virtual machine
context menu, toolbar button, Inventory >
Virtual Machine > Snapshot > Take Snapshot
Remove Snapshot
VMware, Inc.
Installing the Microsoft Sysprep Tools
B
The Microsoft System Preparation tools enable you to customize guest Windows operating systems.
Using System Preparation tools is especially useful when you clone virtual machines. The guest operating
system customization feature in vCenter Server leverages the functionality of the System Preparation tools.
Ensure that your vCenter Server system meets the following requirements before you customize your virtual
machine’s Windows guest operating systems:
n
Install Microsoft System Preparation tools. Microsoft includes the system tool set on the installation CDROM discs for Windows 2000, Windows XP, and Windows 2003. System Preparation tools are built into
the Windows Vista operating system.
n
Ensure that the correct versions of the System Preparation tools are installed for each guest operating
system you want to customize.
n
Ensure that the password for the local administrator account on the virtual machines is set to blank (““).
NOTE Customization operations will fail if the correct version of sysprep tools is not found.
This appendix includes the following topics:
n
“Install the Microsoft System Preparation Tools from a Microsoft Web Site Download,” on page 327
n
“Install the Microsoft Sysprep Tools from the Windows Operating System CD,” on page 328
Install the Microsoft System Preparation Tools from a Microsoft Web
Site Download
You can download and install Microsoft System Preparation tools from the Microsoft Web site.
Ensure you download the correct version for the guest operating system that you want to customize.
Procedure
1
Open a browser window and navigate to the Microsoft Download Center.
2
Navigate to the page that contains the download link to the version of the tools you want.
3
Click Download and save the file to your local disk.
4
Open and expand the .cab file, using a tool such as Winzip.exe or another tool capable of reading Microsoft
CAB files.
VMware, Inc.
327
vSphere Basic System Administration
5
Extract the files to the provided directory.
The following System Preparation tools support directories were created during vCenter Server
installation:
C:\<ALLUSERSPROFILE>\Application Data\Vmware\VMware VirtualCenter\sysprep
...\1.1\
...\2k\
...\xp\
...\svr2003\
...\xp-64\
...\svr2003-64\
where <ALLUSERSPROFILE> is usually \Documents And Settings\All Users\. This is where vpxd.cfg is
also located.
Select the subdirectory that corresponds to your operating system.
6
Click OK to expand the files.
After you have extracted the files from the .cab file, you should see:
...\<guest>\deptool.chm
...\<guest>\readme.txt
...\<guest>\setupcl.exe
...\<guest>\setupmgr.exe
...\<guest>\setupmgx.dll
...\<guest>\sysprep.exe
...\<guest>\unattend.doc
where <guest> is 2k, xp, svr2003, xp-64, or svr2003-64.
What to do next
You are now ready to customize a new virtual machine with a supported Windows guest operating system
when you clone an existing virtual machine.
Install the Microsoft Sysprep Tools from the Windows Operating
System CD
You can install the Microsoft Sysprep tools from a CD.
Procedure
1
Insert the Windows operating system CD into the CD-ROM drive (often the D: drive).
2
Locate the DEPLOY.CAB file in the CD directory, \Support\Tools.
3
Open and expand the DEPLOY.CAB file, using a tool such as Winzip.exe or another tool capable of reading
Microsoft CAB files.
4
Extract the files to the directory appropriate to your Sysprep guest operating system.
The following Sysprep support directories were created during vCenter Server installation:
C:\<ALLUSERSPROFILE>\Application Data\Vmware\VMware VirtualCenter\sysprep
...\1.1\
...\2k\
...\xp\
...\svr2003\
...\xp-64\
...\svr2003-64\
328
VMware, Inc.
Appendix B Installing the Microsoft Sysprep Tools
where <ALLUSERSPROFILE> is usually \Documents And Settings\All Users\. This is where vpxd.cfg is
also located.
Select the subdirectory that corresponds to your operating system.
5
Click OK to expand the files.
After you have extracted the files from the .cab file, you should see:
...\<guest>\deptool.chm
...\<guest>\readme.txt
...\<guest>\setupcl.exe
...\<guest>\setupmgr.exe
...\<guest>\setupmgx.dll
...\<guest>\sysprep.exe
...\<guest>\unattend.doc
where <guest> is 2k, xp, svr2003, xp-64, or svr2003-64.
6
Repeat this procedure to extract Sysprep files for each of the Windows guest operating systems (Windows
2000, Windows XP, or Windows 2003) you plan to customize using vCenter Server.
What to do next
You are now ready to customize a new virtual machine with a supported Windows guest operating system
when you clone an existing virtual machine.
VMware, Inc.
329
vSphere Basic System Administration
330
VMware, Inc.
Performance Metrics
C
Performance metrics are collected on ESX/ESXi servers and vCenter Servers for managed objects and the
physical and virtual devices associated with these objects. Each object and device has its own set of data
counters that provide the metadata for the metrics.
The performance metrics for VMware vSphere are organized into tables for each metric group: cluster services,
CPU, disk, management agent, memory, network, system, and virtual machine operations. Each table contains
the following information:
Counter
Lists the display name of each data counter.
Label
Indicates the name of the data counter as displayed in the APIs and advanced
performance charts. In some cases the labels are different in the overview
performance charts.
Description
Provides a brief description of the metric.
Stats Type
Measurement used during the statistics interval. The Stats Type is related to
the unit of measurement and can be one of the following:
Unit
n
Rate - Value over the current statistics interval.
n
Delta - Change from previous statistics interval.
n
Absolute - Absolute value, independent of the statistics interval .
How the statistic quantity is measured across the collection interval, for
example, kiloBytes (KB) and kiloBytesPerSecond (KBps).
NOTE For some statistics, the value is converted before it is displayed in the
overview performance charts. For example, memory usage is displayed in
KiloBytes by the APIs and the advanced performance charts, but it is displayed
in MegaBytes in the overview performance charts.
Rollup Type
VMware, Inc.
Indicates the calculation method used during the statistics interval to roll up
data. Determines the type of statistical values that are returned for the counter.
For real-time data, the value shown is the current value. One of:
n
Average - Data collected is averaged.
n
Minimum - The minimum value collected is rolled up.
n
Maximum - The maximum value collected is rolled up.
n
Summation - Data collected is summed.
n
Latest - Data collected is the most recent value.
331
vSphere Basic System Administration
Collection Level
Indicates the minimum value to which the statistics collection level must be set
for the metric to be gathered during each collection interval. You can assign a
collection level of 1 to 4 to each collection interval enabled on your vCenter
Server, with 4 containing the most data counters.
VHRCD
Indicates the entity for which the counter applies. One of:
n
V – virtual machines
n
H – hosts
n
R – resource pools
n
C – compute resources
n
D – datastores
Calculations for all metrics listed in the data counter tables are for the duration of the data collection cycle.
Collection cycle durations are specified with the Statistics Collection Interval setting.
NOTE The availability of some data counters in the vSphere Client depends on the statistics Collection Level
set for the vCenter Server. The entire set of data counters are collected and available in vCenter Server. You
can use the vShpere Web Services SDK to query vCenter Server and get statistics for all counters. For more
information, see the VMware vSphere API Reference.
This appendix includes the following topics:
n
“Cluster Services Metrics,” on page 332
n
“CPU Metrics,” on page 333
n
“Disk Metrics,” on page 337
n
“Management Agent Metrics,” on page 341
n
“Memory Metrics,” on page 342
n
“Network Metrics,” on page 350
n
“Storage Utilization Metrics,” on page 352
n
“System Metrics,” on page 353
n
“Virtual Machine Operations Metrics,” on page 354
Cluster Services Metrics
The cluster-services metric group (clusterServices) tracks performance statistics for clusters configured by
using VMware DRS (distributed resource scheduler), VMware HA (high availability), or both.
Table C-1 lists the cluster services data counters.
NOTE The cluster services metrics appear only in the advanced performance charts.
332
VMware, Inc.
Appendix C Performance Metrics
Table C-1. Cluster Services Data Counters
Entity
Counter
Label
Description
V H R C
cpufairness
CPU Fairness
Fairness of distributed CPU resource allocation.
n Stats Type: absolute
n Unit: number
n Rollup Type: latest
n Collection Collection Level: 1
n VC/ESX: Yes/No
ο •
ο
ο
effectivecpu
Effective CPU
Resources
Total available CPU resources of all hosts within a cluster.
Effective CPU = Aggregate host CPU capacity – VMkernel CPU + Service
Console CPU + other service CPU)
n Stats Type: rate
n Unit: megaHertz
n Rollup Type: average
n Collection Level: 1
n VC/ESX: Yes/No
ο ο
ο
•
effectivemem
Effective
Memory
Resources
Total amount of machine memory of all hosts in the cluster that is
available for virtual machine memory (physical memory for use by the
Guest OS) and virtual machine overhead memory.
Effective Memory = Aggregate host machine memory – (VMkernel
memory + Service Console memory + other service memory)
n Stats Type: absolute
n Unit: megaBytes
n Rollup Type: average
n Collection Level: 1
n VC/ESX: Yes/No
ο ο
ο
•
failover
Current
Failover Level
Number of VMware HA failures that can be tolerated.
n Stats Type: absolute
n Unit: number
n Rollup Type: latest
n Collection Level: 1
n VC/ESX: Yes/No
ο ο
ο
•
memfairness
Memory
Fairness
Aggregate available memory resources of all hosts within a cluster.
n Stats Type: absolute
n Unit: number
n Rollup Type: latest
n Collection Level: 1
n VC/ESX: Yes/No
ο •
ο
ο
CPU Metrics
The cpu metric group tracks CPU utilization for hosts, virtual machines, resource pools, and compute
resources.
Table C-2 lists the CPU data counters.
NOTE The performance charts display a subset of the CPU data counters. The entire set is collected and available
in vCenter Server. You can use the vSphere Web Services SDK to query vCenter Server and get statistics for
those counters. For more information, see the VMware vSphere API Reference.
VMware, Inc.
333
vSphere Basic System Administration
Table C-2. CPU Data Counters
Counter
Label
Description
V H R C
cpuentitlement
Worst Case Allocation
Amount of CPU resources allocated to the virtual machine
or resource pool based on the total cluster capacity and the
resource configuration (reservations, shares, and limits) on
the resource hierarchy.
cpuentitlement is computed based on an ideal scenario in
which all virtual machines are completely busy and the load
is perfectly balanced across all hosts.
This counter is for internal use only and is not useful for
performance monitoring.
n Stats Type: absolute
n Unit: megaHertz
n Rollup Type: latest
n Collection Level: 1
n VC/ESX: No/Yes
• ο • ο
(virtual machine
Resource Allocation
tab)
334
guaranteed
CPU Guaranteed
Not supported for ESX 4.x systems, except through vCenter
Server. CPU time that is reserved for the entity. For virtual
machines, this measures CPU time that is reserved, per
virtual CPU (vCPU).
This counter has been deprecated and should not be used to
monitor performance.
n Stats Type: delta
n Unit: millisecond
n Rollup Type: latest
n Collection Level: 3
n VC/ESX: Yes/No
• ο ο ο
idle
CPU Idle
Total time that the CPU spent in an idle state (meaning that
a virtual machine is not runnable). This counter represents
the variance, in milliseconds, during the interval.
n Stats Type: delta
n Unit: millisecond
n Rollup Type: summation
n Collection Level: 2
n VC/ESX: Yes/Yes
• ο ο ο
ready
CPU Ready
Percentage of time that the virtual machine was ready, but
could not get scheduled to run on the physical CPU. CPU
ready time is dependent on the number of virtual machines
on the host and their CPU loads.
n Stats Type: rate
n Unit: percentage
n Rollup Type: summation
n Collection Level: 1
n VC/ESX: Yes/Yes
• ο ο ο
reservedCapacity
CPU Reserved
Capacity
Total CPU capacity reserved by the virtual machines.
n Stats Type: absolute
n Unit: megaHertz
n Rollup Type: average
n Collection Level: 2
n VC/ESX: Yes/Yes
ο • ο •
VMware, Inc.
Appendix C Performance Metrics
Table C-2. CPU Data Counters (Continued)
Counter
Label
Description
V H R C
system
CPU System
Amount of time spent on system processes on each virtual
CPU in the virtual machine. This is the host view of the CPU
usage, not the guest operating system view.
n Stats Type: delta
n Unit: millisecond
n Rollup Type: summation
n Collection Level: 3
n VC/ESX: Yes/Yes
• ο ο ο
totalmhz
CPU Total
Total amount of CPU resources of all hosts in the cluster. The
maximum value is equal to the frequency of the processors
multiplied by the number of cores.
totalmhz = CPU frequency × number of cores
ο ο ο •
For example, a cluster has two hosts, each of which has four
CPUs that are 3GHz each, and one virtual machine that has
two virtual CPUs.
VM totalmhz = 2 vCPUs × 3000MHz = 6000MHz
Host totalmhz = 4 CPUs × 3000MHz = 12000MHz
Cluster totalmhz = 2 x 4 × 3000MHz = 24000MHz
n
n
n
n
n
VMware, Inc.
Stats Type: rate
Unit: megaHertz
Rollup Type: average
Collection Level: 1
VC/ESX: Yes/Yes
335
vSphere Basic System Administration
Table C-2. CPU Data Counters (Continued)
Counter
Label
Description
V H R C
usage
CPU Usage
CPU usage as a percentage during the interval.
• • • •
Amount of actively used virtual CPU,
as a percentage of total available CPU.
This is the host's view of the CPU
usage, not the guest operating system
view. It is the average CPU utilization
over all available virtual CPUs in the
virtual machine. For example, if a
virtual machine with one virtual CPU
is running on a host that has four
physical CPUs and the CPU usage is
100%, the virtual machine is using one
physical CPU completely.
VM
virtual CPU usage = usagemhz ÷
(# of virtual CPUs × core
frequency)
Host
Actively used CPU of the host, as a
percentage of the total available CPU.
Active CPU is approximately equal to
the ratio of the used CPU to the
available CPU.
available CPU = # of physical
CPUs × clock rate
100% represents all CPUs on the host.
For example, if a four-CPU host is
running a virtual machine with two
CPUs, and the usage is 50%, the host is
using two CPUs completely.
Cluster
Sum of actively used CPU of all virtual
machines in the cluster, as a percentage
of the total available CPU.
CPU Usage = CPU usagemhz ÷
effectivecpu
n
n
n
n
n
336
Stats Type: rate
Unit: percent
Rollup Type: average (min/max)
Collection Level: 1(4)
VC/ESX: Yes/Yes
VMware, Inc.
Appendix C Performance Metrics
Table C-2. CPU Data Counters (Continued)
Counter
Label
Description
V H R C
usagemhz
CPU Usage in MHz
The amount of CPU used, in megahertz, during the interval.
• • • •
VM
Amount of actively used virtual CPU.
This is the host's view of the CPU
usage, not the guest operating system
view.
Host
Sum of the actively used CPU of all
powered on virtual machines on a host.
The maximum possible value is the
frequency of the processors multiplied
by the number of processors. For
example, if you have a host with four
2GHz CPUs running a virtual machine
that is using 4000MHz, the host is using
two CPUs completely.
4000 ÷ (4 × 2000) = 0.50
n
n
n
n
n
Stats Type: rate
Unit: megaHertz
Rollup Type: average(min/max)
Collection Level: 1(4)
VC/ESX: Yes/Yes
used
CPU Used
Amount of used CPU time.
n Stats Type: delta
n Unit: millisecond
n Rollup Type: summation
n Collection Level: 3
n VC/ESX: Yes/Yes
• ο ο ο
wait
CPU Wait
Amount of CPU time spent in wait state.
n Stats Type: delta
n Unit: millisecond
n Rollup Type: summation
n Collection Level: 3
n VC/ESX: Yes/Yes
• ο ο ο
Disk Metrics
The disk metric group tracks statistics for disk input/output (I/O) performance.
Disk I/O counters support metrics for both physical devices and virtual devices. A host reads data from a LUN
(logical unit number) associated with the physical storage media. A virtual machine reads data from a virtual
disk, which is the virtual hardware presented to the Guest OS running on the virtual machine. The virtual disk
is a file in VMDK format.
Table C-3 lists the disk data counters.
NOTE Some counters listed in Table C-3 subsume other counters. For example, kernelLatency includes both
queueReadLatency and queueWriteLatency and the disk usage statistic include both read and write statistics.
In addition, only a subset of the disk counters appear in the overview performance charts. To view all disk
data counters, use the advanced performance charts.
VMware, Inc.
337
vSphere Basic System Administration
Table C-3. Disk Data Counters
Entity
338
Counter
Label
Description
V H R C
commands
Disk Commands
Issued
Number of SCSI commands issued during the collection
interval.
n Stats Type: delta
n Unit: number
n Rollup Type: summation
n Collection Level: 2
n VC/ESX: Yes/Yes
• • ο ο
commandsAborted
Disk Command
Aborts
Number of SCSI commands aborted during the collection
interval.
n Stats Type: delta
n Unit: number
n Rollup Type: summation
n Collection Level: 2
n VC/ESX: Yes/Yes
• • ο ο
deviceLatency
Physical Device
Command
Latency
Average amount of time, in milliseconds, to complete a SCSI
command from the physical device.
n Stats Type: absolute
n Unit: millisecond
n Rollup Type: average
n Collection Level: 2
n VC/ESX: Yes/Yes
o • ο ο
deviceReadLatency
Physical Device
Read Latency
Average amount of time, in milliseconds, to complete read from
the physical device.
n Stats Type: absolute
n Unit: millisecond
n Rollup Type: average
n Collection Level: 2
n VC/ESX: Yes/Yes
o • ο ο
deviceWriteLatency
Physical Device
Write Latency
Average amount of time, in milliseconds, to write to the
physical device (LUN).
n Stats Type: absolute
n Unit: millisecond
n Rollup Type: average
n Collection Level: 2
n VC/ESX: Yes/Yes
o • ο ο
kernelLatency
Kernel Disk
Command
Latency
Average amount of time, in milliseconds, spent by VMkernel
processing each SCSI command.
n Stats Type: absolute
n Unit: millisecond
n Rollup Type: average
n Collection Level: 2
n VC/ESX: Yes/Yes
o • ο ο
kernelReadLatency
Kernel Disk Read
Latency
Average amount of time, in milliseconds, spent by VMKernel
processing each SCSI read command.
n Stats Type: absolute
n Unit: millisecond
n Rollup Type: average
n Collection Level: 2
n VC/ESX: Yes/Yes
o • ο ο
VMware, Inc.
Appendix C Performance Metrics
Table C-3. Disk Data Counters (Continued)
Entity
Counter
Label
Description
V H R C
kernelWriteLatency
Kernel Disk Write
Latency
Average amount of time, in milliseconds, spent by VMKernel
processing each SCSI write command.
n Stats Type: absolute
n Unit: millisecond
n Rollup Type: average
n Collection Level: 2
n VC/ESX: Yes/Yes
o • ο ο
maxTotalLatency
Highest Disk
Latency
Highest latency value across all disks used by the host. Latency
measures the time taken to process a SCSI command issued by
the guest OS to the virtual machine. The kernel latency is the
time VMkernel takes to process an IO request. The device
latency is the time it takes the hardware to handle the request.
Total latency = kernelLatency + deviceLatency
ο • ο ο
n
n
n
n
n
numberRead
Disk Read
Requests
VM
Number of times data was read from each
virtual disk on the virtual machine.
Host
Number of times data was read from each
LUN on the host during the collection
interval.
n
n
n
n
n
numberWrite
Disk Write
Requests
Number of times data was written to each
virtual disk on the virtual machine.
Host
Number of times data was written to each
LUN on the host during the collection
interval.
n
n
n
n
VMware, Inc.
Queue Command
Latency
• • ο ο
Stats Type: delta
Unit: number
Rollup Type: summation
Collection Level: 3
VC/ESX: Yes/Yes
VM
n
queueLatency
Stats Type: absolute
Unit: millisecond
Rollup Type: average
Collection Level: 1
VC/ESX: Yes/Yes
• • ο ο
Stats Type: delta
Unit: number
Rollup Type: summation
Collection Level: 3
VC/ESX: Yes/Yes
Average amount of time spent in the VMkernel queue, per SCSI
command, during the collection interval.
n Stats Type: absolute
n Unit: millisecond
n Rollup Type: average
n Collection Level: 2
n VC/ESX: Yes/Yes
o • ο ο
339
vSphere Basic System Administration
Table C-3. Disk Data Counters (Continued)
Entity
Counter
Label
Description
V H R C
queueReadLatency
Queue Read
Latency
Average amount of time taken during the collection interval per
SCSI read command in the VMKernel queue.
n Stats Type: absolute
n Unit: millisecond
n Rollup Type: average
n Collection Level: 2
n VC/ESX: Yes/Yes
o • ο ο
queueWriteLatency
Queue Write
Latency
Average amount time taken during the collection interval per
SCSI write command in the VMKernel queue.
n Stats Type: absolute
n Unit: millisecond
n Rollup Type: average
n Collection Level: 2
n VC/ESX: Yes/Yes
o • ο ο
read
Disk Read Rate
VM
Rate at which data is read from each
virtual disk on the virtual machine.
Host
Rate at which data is read from each LUN
on the host.
• • ο ο
read rate = # blocksRead per
second × blockSize
n
n
n
n
n
340
Stats Type: rate
Unit: kiloBytesPerSecond
Rollup Type: average
Collection Level: 2
VC/ESX: Yes/Yes
totalLatency
Disk Command
Latency
Average amount of time taken during the collection interval to
process a SCSI command issued by the Guest OS to the virtual
machine. The sum of kernelLatency and deviceLatency.
n Stats Type: absolute
n Unit: millisecond
n Collection Level: 2
n Rollup Type: average
n VC/ESX: Yes/Yes
o • ο ο
totalReadLatency
Disk Read
Latency
Average amount of time taken during the collection interval to
process a SCSI read command issued from the Guest OS to the
virtual machine. The sum of kernelReadLatency and
deviceReadLatency.
n Stats Type: absolute
n Unit: millisecond
n Collection Level: 2
n Rollup Type: average
n VC/ESX: Yes/Yes
o • ο ο
VMware, Inc.
Appendix C Performance Metrics
Table C-3. Disk Data Counters (Continued)
Entity
Counter
Label
Description
V H R C
totalWriteLatency
Disk Write
Latency
Average amount of time taken during the collection interval to
process a SCSI write command issued by the Guest OS to the
virtual machine. The sum of kernelWriteLatency and
deviceWriteLatency.
n Stats Type: absolute
n Unit: millisecond
n Collection Level: 2
n Rollup Type: average
n VC/ESX: Yes/Yes
o • ο ο
usage
Disk Usage
Aggregated disk I/O rate. For hosts, this metric includes the
rates for all virtual machines running on the host during the
collection interval.
n Stats Type: rate
n Unit: kiloBytesPerSecond
n Collection Level: 1(4)
n Rollup Type: average (min/max)
n VC/ESX: Yes/Yes
• • ο ο
write
Disk Write Rate
VM
Rate at which data is written to each
virtual disk on the virtual machine.
Host
Rate at which data is written to each LUN
on the host.
• • ο ο
Write rate =
blocksWritten/second * blockSize
n
n
n
n
n
Stats Type: rate
Unit: kiloBytesPerSecond
Collection Level: 2
Rollup Type: average
VC/ESX: Yes/Yes
Management Agent Metrics
The management agent metric group tracks consumption of resources by the various management agents
(hostd, vpxd, and so on) running on the ESX/ESXi host.
Table C-4 lists the management agent data counters.
NOTE The management agent metrics appear only in the advanced performance charts.
VMware, Inc.
341
vSphere Basic System Administration
Table C-4. Management Agent Metrics
Entity
Counter
Label
Description
V H R
C
memUsed
Memory
Used
Amount of total configured memory available for use.
n Stats Type: absolute
n Unit: kiloBytes
n Rollup Type: average
n Collection Level: 3
ο • ο
ο
swapUsed
Memory
Swap Used
Sum of the memory swapped by all powered-on virtual machines on the
host.
n Stats Type: absolute
n Unit: kiloBytes
n Rollup Type: average
n Collection Level: 3
ο • ο
ο
swapIn
Memory
Swap In
Amount of memory swapped in for the Service Console. Use this counter
to determine whether to increase the amount of memory dedicated to the
service console.
n Stats Type: rate
n Unit: kiloBytesPerSecond
n Rollup Type: average
n Collection Level: 3
ο • ο
ο
swapOut
Memory
Swap Out
Amount of memory swapped out for the Service Console. Use this counter
to determine whether to decrease the amount of memory dedicated to the
service console.
n Stats Type: rate
n Unit: kiloBytesPerSecond
n Rollup Type: average
n Collection Level: 3
ο • ο
ο
Memory Metrics
The memory metric group tracks memory statistics for virtual machines, hosts, resource pools, and compute
resources.
Interpret the data counter definitions in the context of the entity to which it applies, as follows:
n
For virtual machines, memory refers to guest physical memory. Guest physical memory is the amount of
physical memory presented as a virtual-hardware component to the virtual machine, at creation time, and
made available when the virtual machine is running.
n
For hosts, memory refers to machine memory. Machine memory is the random-access memory (RAM)
that is actually installed in the hardware that comprises the ESX/ESXi host.
Table C-5 lists the memory data counters.
NOTE Only a subset of memory counters appear in the overview charts. To view all memory data counters,
use the advanced performance charts.
342
VMware, Inc.
Appendix C Performance Metrics
Table C-5. Memory Data Counters
Entity
Counter
Label
Description
V H R C
active
Memory Active
Amount of memory actively used, as estimated by VMkernel.
Active memory is based on the current workload of the virtual
machine or host.
• •
•
•
• •
•
•
VM
Amount of guest physical memory in use by
the virtual machine. Active memory is
estimated by VMkernel statistical sampling
and represents the actual amount of
memory the virtual machine needs.
Host
Sum of the active guest physical memory of
all powered on virtual machines on the
host, plus memory used by basic VMKernel
applications on the host.
n
n
n
n
consumed
Memory
Consumed
Stats Type: absolute
Unit: KiloBytes
Rollup Type: average (min/max)
Collection Level: 2(4)
Amount of guest physical memory
consumed by the virtual machine for guest
memory. Consumed memory does not
include overhead memory. It includes
shared memory and memory that might be
reserved, but not actually used. It does not
include overhead memory.
VM
vm consumed memory = memory granted memory saved due to memory sharing
Host
Amount of machine memory used on the
host. Consumed memory includes memory
used by virtual machines, the service
console, VMkernel, and vSphere services,
plus the total consumed memory for all
running virtual machines.
host consumed memory = total host
memory - free host memory
Cluster
n
n
n
n
VMware, Inc.
Amount of host machine memory used by
all powered on virtual machines in the
cluster. A cluster's consumed memory
consists of virtual machine consumed
memory and overhead memory. It does not
include host-specific overhead memory,
such as memory used by the service console
or VMkernel.
Stats Type: absolute
Unit: KiloBytes
Rollup Type: average (min/max)
Collection Level: 1(4)
343
vSphere Basic System Administration
Table C-5. Memory Data Counters (Continued)
Entity
Counter
Label
Description
granted
Memory
Granted
VM
The amount of guest physical memory that
is mapped to machine memory. Includes
shared memory amount. The amount of
guest physical memory currently mapped
to machine memory, including shared
memory, but excluding overhead.
Host
The total of all granted metrics for all
powered-on virtual machines, plus
memory for vSphere services on the host.
n
n
n
n
344
V H R C
• •
•
•
Stats Type: absolute
Unit: kiloBytes
Rollup Type: average (min/max)
Collection Level: 2(4)
heap
Memory Heap
Amount of VMkernel virtual address space dedicated to VMkernel
main heap and related data.
This counter is for internal use only and is not useful for
performance monitoring.
n Stats Type: absolute
n Unit: kiloBytes
n Rollup Type: average (min/max)
n Collection Level: 2(4)
ο •
ο
ο
heapfree
Memory Heap
Free
Amount of free address space in the VMkernel’s main heap. Heap
Free varies, depending on the number of physical devices and
various configuration options. There is no direct way for the user
to increase or decrease this statistic.
This counter is for internal use only and is not useful for
performance monitoring.
n Stats Type: absolute
n Unit: kiloBytes
n Rollup Type: average (min/max)
n Collection Level: 2(4)
• ο
ο
ο
mementitlement
Worst Case
Allocation
(virtual
machine
Resource
Allocation tab)
Memory allocation as calculated by the VMkernel scheduler based
on current estimated demand, and the reservation, limit, and
shares policies set for all virtual machines and resource pools in
the host or cluster.
This counter is for internal use only and is not useful for
performance monitoring.
n Stats Type: absolute
n Unit: megaBytes
n Rollup Type: latest
n Collection Level: 1
ο •
ο
ο
memUsed
Memory Used
Amount of used memory. Sum of the memory used by all powered
on virtual machines and vSphere services on the host.
n Stats Type: absolute
n Unit: kiloBytes
n Rollup Type: average (min/max)
n Collection Level: 3
ο •
ο
ο
VMware, Inc.
Appendix C Performance Metrics
Table C-5. Memory Data Counters (Continued)
Entity
Counter
Label
Description
V H R C
overhead
Memory
Overhead
Amount of additional machine memory allocated to a virtual
machine for overhead. The overhead amount is beyond the
reserved amount.
• ο
ο
ο
ο •
ο
•
• •
ο
ο
o •
ο
ο
VM
Amount of machine memory used by the
VMkernel to run the virtual machine.
Host
Total of all overhead metrics for poweredon virtual machines, plus the overhead of
running vSphere services on the host.
n
n
n
n
reservedCapacity
Memory
Reserved
Capacity
shared
Memory
Shared
Total amount of memory reservation used by powered on VMs
and vSphere services on the host. Includes overhead amount.
n Stats Type: absolute
n Unit: megaBytes
n Rollup Type: average
n Collection Level: 2
VM
Amount of guest physical memory that is
shared with other virtual machines
(through the VMkernel’s transparent pagesharing mechanism, a RAM de-duplication
technique). The value of shared includes the
size of the zero memory area.
Host
Sum of the shared memory values of all
powered-on virtual machines, plus the
amount for the vSphere services on the host.
The host’s Memory Shared may be larger
than the amount of machine memory if
memory is overcommitted (the aggregate
virtual machine configured memory is
much greater than machine memory). The
value of this statistic reflects how effective
transparent page sharing and memory
overcommitment are for saving machine
memory.
n
n
n
n
sharedcommon
Memory
Shared
Common
Stats Type: absolute
Unit: kiloBytes
Rollup Type: average (min/max)
Collection Level: 2(4)
Amount of machine memory that is shared by all powered-on
virtual machines and vSphere services on the host.
Memory Shared - Memory Shared Common = Host memory
saved by sharing
n
n
n
n
VMware, Inc.
Stats Type: absolute
Unit: kiloBytes
Rollup Type: average (min/max)
Collection Level: 1(4)
Stats Type: absolute
Unit: kiloBytes
Rollup Type: average (min/max)
Collection Level: 2(4)
345
vSphere Basic System Administration
Table C-5. Memory Data Counters (Continued)
Entity
Counter
Label
Description
V H R C
state
Memory State
Amount of free machine memory on the host. VMkernel has four
free-memory thresholds that affect the mechanisms used for
memory reclamation.
• •
ο
ο
• •
ο
ο
• •
ο
ο
0 (High)
Free memory >= 6% of machine memory
- service console memory
1 (Soft)
Free memory >= 4% of machine memory
- service console memory
2 (Hard)
Free memory >= 2% of machine memory
- service console memory
3 (Low)
Free memory >= 1% of machine memory
- service console memory
For 0 and 1, swapping is favored over ballooning. For 2 and 3,
ballooning is favored over swapping.
n Stats Type: absolute
n Unit: number
n Rollup Type: latest
n Collection Level: 2
swapin
Memory Swap
In
Amount of memory that has been swapped in to memory from
disk.
VM
Total amount of memory data that has been
read in from the virtual machine’s swap file
to machine memory by the VMkernel. This
statistic refers to VMkernel swapping and
not to guest OS swapping.
Host
Sum of memory swapin of all powered on
VMs on the host.
n
n
n
n
swapinRate
346
Memory Swap
In Rate
Stats Type: absolute
Unit: kiloBytes
Rollup Type: average (min/max)
Collection Level: 1(4)
Rate at which memory is swapped from disk into active memory
during the current interval. This counter applies to virtual
machines and is generally more useful than the swapin counter to
determine if the virtual machine is running slow due to swapping,
especially when looking at real-time statistics.
n Stats Type: rate
n Unit: kiloBytesPerSecond
n Rollup Type: average (min/max)
n Collection Level: 1(4)
VMware, Inc.
Appendix C Performance Metrics
Table C-5. Memory Data Counters (Continued)
Entity
Counter
Label
Description
V H R C
swapout
Memory Swap
Out
Amount of memory that has been swapped out to disk.
• •
ο
ο
VM
Total amount of memory data that has been
written out to the virtual machine’s swap
file from machine memory by the
VMkernel. This statistic refers to VMkernel
swapping and not to guest OS swapping.
Host
Sum of Memory Swap Out of all powered
on VMs on the host.
n
n
n
n
Stats Type: absolute
Unit: kiloBytes
Rollup Type: average (min/max)
Collection Level: 2(4)
swapoutRate
Memory Swap
Out Rate
Rate at which memory is being swapped from active memory to
disk during the current interval. This counter applies to virtual
machines and is generally more useful than the swapout counter
to determine if the virtual machine is running slow due to
swapping, especially when looking at real-time statistics.
n Stats Type: rate
n Unit: kiloBytesPerSecond
n Rollup Type: average (min/max)
n Collection Level: 1(4)
• •
ο
ο
swapped
Memory
Swapped
Current amount of guest physical memory swapped out to the
virtual machine’s swap file by the VMkernel. Swapped memory
stays on disk until the virtual machine needs it. This statistic refers
to VMkernel swapping and not to guest OS swapping.
swapped = swapin +swapout
n Stats Type: absolute
n Unit: kiloBytes
n Rollup Type: average (min/max)
n Collection Level: 2(4)
• ο
ο
ο
swaptarget
Memory Swap
Target
Amount of memory available for swapping.
Target value for the virtual machine swap size, as determined by
the VMkernel. The VMkernel sets a target for the level of swapping
for each virtual machine, based on a number of factors.
If Memory Swap Target is greater than Memory Swap, then the
VMkernel will start swapping, causing more virtual machine
memory to be swapped out. This will generally happen quickly. If
Memory Swap Target is less than Memory Swap, then the
VMkernel will stop swapping.
Since swapped memory stays swapped until the virtual machine
accesses it, Memory Swapped can be greater than Memory Swap
Target, possibly for a prolonged period of time. This simply means
that the swapped memory is not currently needed by the virtual
machine and is not a cause for concern.
n Stats Type: absolute
n Unit: kiloBytes
n Rollup Type: average (min/max)
n Collection Level: 2(4)
• ο
ο
ο
VMware, Inc.
347
vSphere Basic System Administration
Table C-5. Memory Data Counters (Continued)
Entity
348
Counter
Label
Description
V H R C
swapunreserved
Memory Swap
Unreserved
Amount of memory that is unreserved by swap.
n Stats Type: absolute
n Unit: kiloBytes
n Rollup Type: average (min/max)
n Collection Level: 2(4)
ο •
ο
•
swapused
Memory Swap
Used
Amount of memory that is used by swap. Sum of Memory
Swapped of all powered on virtual machines and vSphere services
on the host.
n Stats Type: absolute
n Unit: kiloBytes
n Rollup Type: average (min/max)
n Collection Level: 1(4)
ο •
•
•
sysUsage
Memory Used
by VMkernel
Amount of memory used by the VMkernel. Amount of machine
memory used by the VMkernel for “core” functionality (such as its
own internal uses, device drivers, etc). It does not include memory
used by VMs or by vSphere services.
n Stats Type: absolute
n Unit: kiloBytes
n Rollup Type: average (min/max)
n Collection Level: 2(4)
• •
•
•
totalmb
Memory Total
Total amount of machine memory of all hosts in the cluster that is
available for virtual machine memory (physical memory for use
by the Guest OS) and virtual machine overhead memory.
Memory Total = Aggregate host machine memory - (VMkernel
memory + Service Console memory + other service memory)
n Stats Type: absolute
n Unit: megaBytes
n Rollup Type: average
n Collection Level: 1
n VC/ESX: Yes/No
ο ο
ο
•
unreserved
Memory
Unreserved
Amount of memory that is unreserved. Memory reservation not
used by the Service Console, VMkernel, vSphere services and other
powered on VMs’ user-specified memory reservations and
overhead memory.
NOTE This statistic is no longer relevant to virtual machine
admission control, as reservations are now handled through
resource pools.
n Stats Type: absolute
n Unit: kiloBytes
n Rollup Type: average (min/max)
n Collection Level: 2(4)
ο •
ο
ο
VMware, Inc.
Appendix C Performance Metrics
Table C-5. Memory Data Counters (Continued)
Entity
Counter
Label
Description
V H R C
usage
Memory Usage
Memory usage as percentage of total configured or available
memory.
• •
ο
ο
• •
•
•
VM
memory usage = memory active ÷
virtual machine physical memory
size
Host
memory usage = memory consumed ÷
host configured memory size
Cluster
memory usage = memory consumed +
memory overhead ÷ effectivemem
n
n
n
n
vmmemctl
Memory
Balloon
Stats Type: absolute
Unit: percent
Rollup Type: average (min/max)
Collection Level: 1(4)
Amount of memory allocated by the virtual machine memory
control driver, which is installed with VMware Tools.
VM
Amount of guest physical memory that is
currently reclaimed from the virtual
machine through ballooning. This is the
amount of guest physical memory that has
been allocated and pinned by the balloon
driver.
Host
Sum of Memory Balloon of all powered on
virtual machines and vSphere services on
the host. If the balloon target value is greater
than the balloon value, the VMkernel
inflates the balloon, causing more virtual
machine memory to be reclaimed. If the
balloon target value is less than the balloon
value, the VMkernel deflate the balloon,
which allows the virtual machine to
consume additional memory if needed.
Virtual machines initiate memory reallocation. Therefore, it is
possible to have a balloon target value of 0 and balloon value
greater than 0.
n Stats Type: absolute
n Unit: kiloBytes
n Rollup Type: average (min/max)
n Collection Level: 1(4)
VMware, Inc.
349
vSphere Basic System Administration
Table C-5. Memory Data Counters (Continued)
Entity
Counter
Label
Description
V H R C
vmmemctltarget
Memory
Balloon Target
Amount of memory that can be used by memory control.
This is the target value for the virtual machine’s Memory Balloon
value, as determined by the VMkernel. The VMkernel sets a target
for the level of ballooned memory for each virtual machine, based
on a number of factors.
If Memory Balloon Target is greater than Memory Balloon, the
VMkernel inflates the balloon, causing more virtual machine
memory to be reclaimed and Memory Balloon to increase.
If Memory Balloon Target is less than Memory Balloon, the
VMkernel deflates the balloon, allowing the virtual machine to
map/consume additional memory if it needs it. Memory Balloon
decreases as the VMkernel deflates the balloon.
n Stats Type: absolute
n Unit: kiloBytes
n Rollup Type: average (min/max)
n Collection Level: 2(4)
• ο
ο
ο
zero
Memory Zero
Amount of memory that is zeroed out (contains only 0s). This
statistic is included in Memory Shared.
• •
ο
ο
VM
Amount of guest physical zero memory that
is shared through transparent page sharing.
Zero memory is simply memory that is all
zeroes.
Host
Sum of Memory Zero of all powered on
VMs and vSphere services on the host.
n
n
n
n
Stats Type: absolute
Unit: kiloBytes
Rollup Type: average (min/max)
Collection Level: 2(4)
Network Metrics
The network metric group tracks network utilization for both physical and virtual NICs (network interface
controllers) and other network devices, such as the virtual switches (vSwitch), that support connectivity among
all vSphere components (virtual machines, VMkernel, host, and so on).
Table C-6 lists the network data counters.
Table C-6. Network Data Counters
Entity
350
Counter
Label
Description
V H R C
droppedRx
droppedRx
Number of receive packets dropped during the collection interval.
n Stats Type: delta
n Unit: number
n Rollup Type: summation
n Collection Level: 2
• • ο ο
droppedTx
droppedTx
Number of transmit packets dropped during the collection interval.
n Stats Type: delta
n Unit: number
n Rollup Type: summation
n Collection Level: 2
• • ο ο
VMware, Inc.
Appendix C Performance Metrics
Table C-6. Network Data Counters (Continued)
Entity
Counter
Label
Description
V H R C
packetsRx
Network
Packets
Received
Number of packets received during the collection interval.
• • ο ο
VM
Number of packets received by each vNIC
(virtual network interface controller) on the
virtual machine.
Host
Total number of packets received on all virtual
machines running on the host.
n
n
n
n
packetsTx
Network
Packets
Transmitted
Number of packets transmitted during the collection interval.
VM
Number of packets transmitted by each vNIC on
the virtual machine.
Host
Number of packets transmitted across each
physical NIC instance on the host.
n
n
n
n
received
Network Data
Receive Rate
VM
Rate at which data is received across each vNIC
on the virtual machine.
Host
Rate at which data is received across each
physical NIC instance on the host.
n
n
n
• • ο ο
Stats Type: delta
Unit: number
Rollup Type: summation
Collection Level: 3
Average rate at which data was received during the collection interval.
This represents the bandwidth of the network.
n
VMware, Inc.
Stats Type: delta
Unit: number
Rollup Type: summation
Collection Level: 3
• • ο ο
Stats Type: rate
Unit: megabitsPerSecond
Rollup Type: average
Collection Level: 3
351
vSphere Basic System Administration
Table C-6. Network Data Counters (Continued)
Entity
Counter
Label
Description
V H R C
transmitted
Network Data
Transmit Rate
Average rate at which data was transmitted during the collection interval.
This represents the bandwidth of the network.
• • ο ο
VM
Rate at which data is transmitted across each
vNIC on the virtual machine.
Host
Rate at which data is transmitted across each
physical NIC instance on the host.
n
n
n
n
usage
Network
Usage
Stats Type: rate
Unit: megabitsPerSecond
Rollup Type: average
Collection Level: 3
Sum of the data transmitted and received during the collection interval.
VM
Sum of data transmitted and received across all
virtual NIC instances connected to the virtual
machine.
Host
Sum of data transmitted and received across all
physical NIC instances connected to the host.
n
n
n
n
• • ο ο
Stats Type: rate
Unit: Mbps
Rollup Type: average(min/max)
Collection Level: 1(4)
Storage Utilization Metrics
The disk metric group tracks statistics for datastore utilization.
Table C-7 lists the storage utilization data counters.
NOTE Storage metrics appear only in the overview performance charts.
Legend:
352
n
D = Datastores
n
V = Virtual Machines
n
F = Filetypes
VMware, Inc.
Appendix C Performance Metrics
Table C-7. Storage Utilization Data Counters
Entity
Counter
Label
Description
D
V
F
capacity
Storage
Capacity
Configured size of the datastore.
n Stats Type: absolute
n Unit: kiloBytes
n Rollup Type: latest
n Collection Level: 1
•
ο
ο
provisioned
Allocated
Amount of physical space allocated by an administrator for the datastore.
Provisioned space is not always in use; it is the storage size up to which
files on a datastore or virtual machine can grow. Files cannot expand
beyond this size.
n Stats Type: absolute
n Unit: kiloBytes
n Rollup Type: latest
n Collection Level: 1
•
•
ο
unshared
Not-shared
Amount of datastore space that belongs only to the virtual machine and is
not shared with other virtual machines. Only unshared space is guaranteed
to be reclaimed for the virtual machine if, for example, it is moved to a
different datastore and then back again. The value is an aggregate of all
unshared space for the virtual machine, across all datastores.
n Stats Type: absolute
n Unit: kiloBytes
n Rollup Type: latest
n Collection Level: 1
•
•
ο
used
Used
Amount of space actually used by a virtual machine or a datastore. The
used amount can be less than the amount provisioned at any given time,
depending on whether the virtual machine is powered-off, whether
snapshots have been created, and other such factors.
n Stats Type: absolute
n Unit: kiloBytes
n Rollup Type: latest
n Collection Level: 1
•
•
•
System Metrics
The system metric group tracks statistics for overall system availability. These counters are available directly
from ESX and from vCenter Server.
Table C-8 lists the system data counters.
NOTE The system metrics appear only in the advanced performance charts, and only for hosts and virtual
machines.
VMware, Inc.
353
vSphere Basic System Administration
Table C-8. System Data Counters
Entity
Counter
Label
Description
V H R C
heartbeat
Heartbeat
Number of heartbeats issued per virtual machine
during the interval.
n Stats Type: delta
n Unit: number
n Rollup Type: sum
n Collection Level: 1
•
• ο ο
resourceCpuUsage
Resource CPU Usage
Amount of CPU used during the interval by the Service
Console and other applications.
n Stats Type: rate
n Unit: megaHertz
n Rollup Type: average
n Collection Level: 3(4)
•
• ο ο
uptime
Uptime
Total time elapsed, in seconds, since last system
startup.
n Stats Type: absolute
n Unit: second
n Rollup Type: latest
n Collection Level: 1
•
• ο ο
Virtual Machine Operations Metrics
The virtual machine operations metric group (vmop) tracks virtual machine power and provisioning
operations in a cluster or datacenter.
Table C-9 lists the virtual machine operations data counters.
NOTE The vmops metrics appear only in the advanced performance charts.
Table C-9. Virtual Machine Operations Data Counters
354
Counter
Label
Description
numChangeDS
VM datastore change
count (non-poweredon VMs)
Number of datastore change operations for powered-off and suspended
virtual machines.
n Stats Type: absolute
n Unit: number
n Rollup Type: latest
n Collection Level: 1
numChangeHost
VM host change count
(non-powered-on
VMs)
Number of host change operations for powered-off and suspended
VMs.
n Stats Type: absolute
n Unit: number
n Rollup Type: latest
n Collection Level: 1
numChangeHostDS
VM host and
datastore change
count (non-poweredon VMs)
Number of host and datastore change operations for powered-off and
suspended virtual machines.
n Stats Type: absolute
n Unit: number
n Rollup Type: latest
n Collection Level: 1
VMware, Inc.
Appendix C Performance Metrics
Table C-9. Virtual Machine Operations Data Counters (Continued)
Counter
Label
Description
numClone
VM clone count
Number of virtual machine clone operations.
n
n
n
n
Stats Type: absolute
Unit: number
Rollup Type: latest
Collection Level: 1
numCreate
VM create count
Number of virtual machine create operations.
n Stats Type: absolute
n Unit: number
n Rollup Type: latest
n Collection Level: 1
numDeploy
VM template deploy
count
Number of virtual machine template deploy operations.
n Stats Type: absolute
n Unit: number
n Rollup Type: latest
n Collection Level: 1
numDestroy
VM delete count
Number of virtual machine delete operations.
n Stats Type: absolute
n Unit: number
n Rollup Type: latest
n Collection Level: 1
numPoweroff
VM power off count
Number of virtual machine power off operations.
n Stats Type: absolute
n Unit: number
n Rollup Type: latest
n Collection Level: 1
numPoweron
VM power on count
Number of virtual machine power on operations.
n Stats Type: absolute
n Unit: number
n Rollup Type: latest
n Collection Level: 1
numRebootGuest
VM guest reboot
count
Number of virtual machine guest reboot operations.
n Stats Type: absolute
n Unit: number
n Rollup Type: latest
n Collection Level: 1
numReconfigure
VM reconfigure count
Number of virtual machine reconfigure operations.
n Stats Type: absolute
n Unit: number
n Rollup Type: latest
n Collection Level: 1
numRegister
VM register count
Number of virtual machine register operations.
n Stats Type: absolute
n Unit: number
n Rollup Type: latest
n Collection Level: 1
VMware, Inc.
355
vSphere Basic System Administration
Table C-9. Virtual Machine Operations Data Counters (Continued)
Counter
Label
Description
numReset
VM reset count
Number of virtual machine reset operations.
n
n
n
n
numShutdownGuest
VM guest shutdown
count
Number of virtual machine guest shutdown operations.
n Stats Type: absolute
n Unit: number
n Rollup Type: latest
n Collection Level: 1
numStandbyGuest
VM standby guest
count
Number of virtual machine standby guest operations.
n Stats Type: absolute
n
n
n
356
Stats Type: absolute
Unit: number
Rollup Type: latest
Collection Level: 1
Unit: number
Rollup Type: latest
Collection Level: 1
numSuspend
VM suspend count
Number of virtual machine suspend operations.
n Stats Type: absolute
n Unit: number
n Rollup Type: latest
n Collection Level: 1
numSVMotion
Storage VMotion
count
Number of migrations with Storage VMotion (datastore change
operations for powered-on virtual machines).
n Stats Type: absolute
n Unit: number
n Collection Level: 1
n Rollup Type: latest
numUnregister
VM unregister count
Number of virtual machine unregister operations.
n Stats Type: absolute
n Unit: number
n Collection Level: 1
n Rollup Type: latest
numVMotion
VMotion count
Number of migrations with VMotion (host change operations for
powered-on virtual machines).
n Stats Type: absolute
n Unit: number
n Collection Level: 1
n Rollup Type: latest
VMware, Inc.
Index
A
access
permissions 215
privileges 297
access privileges components 21
Active Directory, vCenter Server settings 48
Active Directory Application Mode 31
Active Directory Timeout 225
active sessions, send messages 50
ADAM 31
adapters
Ethernet 145, 162
paravirtual SCSI 118, 165, 166
SCSI 119
Add Hardware wizard 159
adding, hosts 78, 79
admin option, definition 17
advanced search 42
alarm action scripts, environment variables 251
alarm actions
about disabling 250
default 248
disabled, identifying 261
disabling 261
email notification 49, 264
enabling 261
removing 262
run a command 262
running scripts 251
substitution parameters 252
alarm triggers
condition-state components 239
condition/state triggers 239
datastore conditions/states 242
event 243
event trigger components 243
host conditions/states 241
setting for conditions/states 255
setting for events 256
virtual machine conditions/states 240
alarms
about 237
acknowledging triggered alarms 257
actions 248
alarm reporting 253
VMware, Inc.
changing 257
creating 253
definition 17
disabling 258
disabling actions 261
exporting alarm definitions 258
general settings 254
identifying triggered alarms 259
managing 257
managing actions 261
preconfigured vSphere alarms 264
privileges 298
removing 259
reporting settings 257
resetting triggered event alarms 259
setting up triggers 255
SMTP settings 250
SNMP traps 250
triggering on events 293
triggers 238
viewing 40, 260
viewing triggered alarms 260
analysis
confidence metric 95
guided consolidation 94
annotations, adding 44
attributes, editing 44
automatic shutdown 137
automatic start 137
B
baselines, security 21
best practices
groups 215
permissions 226
roles 226
users 215
boot settings 152
BusLogic 119
C
cable/interconnect, health monitoring 83
charts
customizing advanced charts 278
357
vSphere Basic System Administration
exporting data 277
saving data to a file 277
clones, concept 169
cloning
templates 169, 171
vApps 113
virtual machines 170, 174
cluster services metrics 332
clusters
adding 73
EVC 193, 194
event triggers 247
removing hosts 81
requirements for enabling EVC 192
shared storage 189
cold migration 187, 188
collection intervals
about 269
configuring 270
enabling and disabling 271
collection levels
about 272
best practices 272
guidelines 273
command-line interface, remote 30
commands, service console 30
communities, SNMP 52
components
access privileges 21
datastore 15
ESX/ESXi 15
functional 17
host agent 15
license server 15
managed 19
vCenter Server 15
vCenter Server agent 15
vCenter Server database 15
vSphere 15
condition and state triggers 238
condition/state alarm triggers
datastores 242
hosts 241
virtual machines 240
configuration files, virtual machines 202
console, service, the 29
consoles, virtual machines 41
consolidation
analysis results 95
cache 97
confidence metric 95
credentials 93
first use 90
limits 97
358
prerequisites 90
services 90, 93
settings 90, 93
tasks 96
troubleshooting 97
conversion recommendations 96
converting, virtual machines to templates 170
converting physical systems, disk resizing 95
core dumps 69
CPU
advanced settings 156
compatibility masks 195
configuration 150
performance 280
CPU compatibility
EVC 192
for VMotion 190
masks 195
SSE3 192
SSE4.1 considerations 192
SSSE3 192
CPU families 191
CPU features
kernel level 190
user-level 190
CPU Identification Mask 152
CPU metrics 333
CPU settings 155
CPUs, health monitoring 83
creating vApps 105
credentials
consolidation 93
vCenter Guided Consolidation 93
custom attributes
adding 44
editing 44
customization specifications 183
D
data counters
cluster services 332
cpu 333
disk 337
management agent 341
memory 342
network 350
storage 352
system 353
virtual machine operations 354
database, vCenter Server 15, 48
databases, preparing 31
datacenters
adding 74
VMware, Inc.
Index
event triggers 246
privileges 299
topology maps 233
Datastore Browser 75
datastores
about 15, 19
condition/state alarm triggers 242
event triggers 246
performance 283
privileges 299
relocate virtual machine files 197
select 117
deploying, OVF templates 101
DHCP 29
DHCP settings 112
diagnostic data
export 66
exporting 68
diagnostics, SNMP 65
Directory Services 34
disk formats
thick provisioned 120
thin provisioned 120
disk I/O, performance 280
disk metrics 337
disk resizing 95
disks
clustering features 120
format 166, 167
independent 207
modes 163
resources 158
sharing 120
thin vs. thick 170
think vs. thick 171
virtual 119, 120
distributed virtual port groups, privileges 300
distribution groups, Active Directory 214
DNS 35
DNS settings, networks, DNS settings 112
Do Not Create A Disk option 121
domain, changing for vCenter Server 34
domain controller 35
domains, active 94
DVD/CD-ROM,, See optical drives
dvPorts, event triggers 247
E
e1000 162
editing vApp properties 108
educational support 11
email notification, setting up 49, 264
VMware, Inc.
Enhanced VMotion Compatibility, See EVC
enhanced vmxnet 162
environment variables, alarm actions 251
error logs, VMkernel 69
ESX
configuring SNMP 51
shut down 26
ESX/ESXi
about 15
adding to vCenter Server 78
diagram 135
hosts 77
manage 135
rebooting 25
shutdown 25
syslog service 67
ESX/ESXi hosts, start 25
ESXi, configuring SNMP 51
Ethernet adapters 145, 162
EVC
configuring 195
creating a cluster 193
enabling on a cluster 194
requirements 192
supported processors 192
EVC mode 195
event triggers
clusters 247
datacenters 246
datastores 246
dvPort groups 247
hosts 245
networks 248
virtual machines 244
vNetwork distributed switch 247
events
about 291
about viewing 291
definition 17
exporting 293
filtering for hosts and datacenters 292
filtering using keywords 293
viewing 292
exporting
diagnostic data 68
lists 43
logs 68
OVF templates 101, 103
vCenter Server data 46
extensions
privileges 302
troubleshooting 46
359
vSphere Basic System Administration
F
fans, monitoring 83
Fibre Channel NPIV 150, 152
filtering, lists 43
firewall
configure communication 49
network-based 37
Windows 36
floppy drives 145, 146, 161
folders
adding 74
privileges 302
functional components 17
G
Getting Started tabs
disabling 40
restoring 40
global data 32, 34
global privileges 303
gpupdate /force command 35
group policy update 35
groups
best practices 215
definition 21
modifying 215
removing 215
requirements 31
searching 225
guest customization
completing customization 184
copying specifications 184
creating Linux specifications 181
creating Windows specifications 181
editing specifications 183
exporting specifications 183
importing specifications 184
Linux customization during cloning or
deployment 180
Linux requirements 179
removing specifications 183
SCSI disks 178
setting up SCSI disks 178
viewing Linux error log 185
viewing Windows error log 185
virtual hardware requirements 178
Windows customization during cloning or
deployment 179
Windows requirements 178
guest operating system, installation 122
guest operating systems
customization prerequisites 177
install 122
360
installing 123
naming requirements 179
selecting 117
SNMP 55
GUID 35
Guided Consolidation, recommendations 96
H
hardware
add 159
health troubleshooting 85
virtual machine 145, 159
hardware health, troubleshooting 85
HBA 152
health status, monitoring 83, 84
host disk allocation 158
host health 83
host profiles, privileges 308
hosts
about 19, 77
adding 73, 78, 79
CIM privileges 304
condition/state alarm triggers 241
configuration privileges 304
configuring 47
connecting to vCenter Server 80
custom attributes 43
definition 19
disconnecting 80
disconnecting from vCenter Server 80
ESX/ESXi 25
event triggers 245
hardware monitoring 83
health status 83, 84
inventory privileges 306
local operations privileges 307
managing 77
reconnecting 80, 81
removing from cluster 81
removing from vCenter Server 81, 82
rescanning 159
shutdown 26
hot add enablement 152
HTTP and HTTPS ports, vCenter Server
settings 48
hyperthreaded core sharing 156
hyperthreading 156
I
IDE,ATAPI 119
image files, ISO 146
independent disks 207
VMware, Inc.
Index
information panels 40
installing
guest operating system over PXE 122
Microsoft Sysprep Tools 327
plug-ins 45
VirtualCenter Server 31
VMware Tools 123
interfaces 17
Internet Explorer, security settings 85
inventory
definition 17
objects, add 73
searching 41
selecting objects 44
topology maps 233
inventory objects
adding 73
moving 74
naming 71
removing 74
inventory panels 40
IP address configuration 111
IP pools 111
ISO image files 146
K
kernel-level CPU features 190
L
LDAP 32
legacy virtual machines, network adapters 163
license server
diagram 135
vCenter Server settings 48
Linked Mode
and databases 32
and permissions 32
groups 31
reachability 34, 35
requirements 31
roles 33
troubleshooting 35–37
Linux
guest, customize 177
install VMware Tools on 125
Linux guest, VMware Tools upgrade (rpm
installer) 127
lists
exporting 43
filtering 43
load balancing 23
Lockdown mode 78, 79
VMware, Inc.
log files
collecting 68, 69
ESX 69
export 66
external 66
turning off compression 69
logging in
vSphere Client 27
vSphere Web Access 28
logging out
vSphere Client 28
vSphere Web Access 28
logs
collecting 69
ESX 66
ESXi 66
export 68
vCenter Server settings 48
vSphere Client 67
LSI logic 119
LUNs 121, 163
M
mail, vCenter Server settings 48
man pages, service console 30
managed components 19
managed devices, MIB files 55
managed entities, permissions 220
management agent metrics 341
maps
definition 17
exporting 231
hiding items 232
moving items on a 232
storage 231
viewing 73
memory
health monitoring 83
performance 281
resources 157
virtual 118
memory affinity 158
memory allocation 157
memory metrics 342
metrics
cluster services 332
cpu 333
disk 337
management agent 341
memory 342
network 350
performance 331
storage 352
361
vSphere Basic System Administration
system 353
virtual machine operations 354
MIB files 55
Microsoft Sysprep Tools
installing 327
installing from CD 328
installing from Web 327
migrating
powered-off virtual machines 198
powered-on virtual machines 199
suspended virtual machines 198
virtual machine disks 200
virtual machines with Storage VMotion 200
with VMotion 199
migration
about 187
compatibility checks 201
of suspended virtual machines 188
relocate virtual machine files 197
Storage VMotion 197
with snapshots 197
with VMotion 188
modules, See plug-ins
monitoring
collection levels 273
performance 279
reports 229
N
naming requirements, guest operating
systems 179
NetWare 129
network adapters
e1000 162
flexible 162
legacy virtual machines 163
vmxnet 162
vmxnet3 162
network metrics 350
networks
DHCP settings 112
event triggers 248
health monitoring 83
IP address configuration 111
performance 282
privileges 308
requirements for VMotion 189
NICs
configuration 148
e1000 162
flexible 162
vmxnet 162
vmxnet3 162
362
NPIV 150, 152
NUMA 157, 158
NUMA memory 158
NX 191
O
object identifiers (OIDs) 55
object relationships, viewing 73
objects
inventory 71, 73
selecting 44
Open Virtual Machine Format (OVF) 101
operating system, guest 122
optical drives 145, 161
OVF, browsing virtual appliance
marketplace 103
OVF templates
deploying 101
exporting 103
P
panels 40
parallel port 148
paravirtual SCSI 119
paravirtual SCSI adapter 165
paravirtual SCSI adapters 118, 166
paravirtualization 152
PCI 152
PCI devices 165
performance
advanced charts 276
archiving statistics in vCenter database 273
collection intervals, enabling and
disabling 271
collection levels
about 272
using effectively 273
configuring collection intervals 270
CPU 280
data counters 268
Disk I/O 280
memory 281
metrics 331
monitoring 279
network 282
overview charts 275
performance chart types 275
privileges 309
statistics collection 267
statistics impact on vCenter Server
database 274
storage 283
VMware, Inc.
Index
troubleshooting 279
virtual machine 274
performance charts
advanced charts
about 276
deleting views 279
viewing 276
chart types 275
customizing advanced charts 278
exporting data 277
overview charts
about 275
viewing 276
viewing Help 276
saving data to a file 277
performance statistics, Windows guest operating
systems 274
permissions
access 215
assigning 215, 224
best practices 226
changing 225
inheritance 220, 222, 223
overriding 223
privileges 310
removing 226
search 41
settings 222
validating 224, 225
vNetwork Distributed Switches 220
physical compatibility mode 121
plug-ins
disabling 45
downloading 45
enabling 45
installing 45
managing 45
privileges 302
removing 46
troubleshooting 46
viewing installed 45
ports
for SNMP 53
parallel 160
power, health monitoring 83
power controls 137
power management 23
power off, shutdown, versus 138
power states
transitional 137
virtual machines 136
preboot execution environment 122
printing, vSphere Client window 46
VMware, Inc.
privileges
alarms 298
assigning 215
configuration 304
datacenter 299
datastores 299
distributed virtual port groups 300
extension 302
folders 302
global 303
host CIM 304
host inventory 306
host local operations 307
host profiles 308
network 308
performance 309
permission 310
plug-ins 302
required for common tasks 227
resource 310
scheduled tasks 312
sessions 312
tasks 313
vApps 313
virtual machine 322
virtual machine configuration 315
virtual machine interaction 319
virtual machine provisioning 323
virtual machine state 326
vNetwork Distributed Switches 301
processors, health monitoring 83
proxy server settings, networks, proxy server
settings 112
PXE 122
R
raw device mappings, migrating 197
RDMs, See raw device mappings
recommendations, Guided Consolidation 96
reconnecting hosts 81
registry settings 36, 37
remote, command-line interface 30
remote access, disabling 78, 79
removing, plug-ins 46
reporting, alarms 253
reports
exporting 230
filtering 230
monitoring 229
storage 231
storage, displaying 230
required privileges, for common tasks 227
rescanning, hosts 159
363
vSphere Basic System Administration
reservation 155
reset 136
resource maps
exporting 235
icons 234
interface controls 234
printing 235
viewing 235
VMotion resources 234
resource pools
adding 73
selecting 116
resources
CPU 155
definition 19
management 23
memory 157
privileges 310
storage 229
virtual machine settings 155
restart
vCenter Server 26
virtual machines 136
resume, virtual machines 138
roles
best practices 226
cloning 218
copy 218
creating 217
default 216
editing 218
in linked mode groups 33
privileges, lists of 297
removing 218, 226
renaming 219
RPCCfg.exe 36, 37
rpm installer 127
RPM installer 125
runtime settings, vCenter Server settings 48
S
SAN LUNs 163
scheduled tasks
about 287
about canceling 290
canceling 287
clone virtual machine 175
creating 288
definition 17
privileges 312
process rules 291
removing 290
rules 291
364
scheduling affinity 156
SCSI
adapter 119
paravirtual 119
SCSI bus sharing 149
SCSI controller type 149
SCSI device 147
SDK 34, 35
search lists, adjusting for large domains 225
searching
advanced search 42
inventory objects 41, 42
simple search 41
searching inventory, permissions 41
security, baselines 21
security groups, Active Directory 214
security settings, Internet Explorer 85
select a datastore 117
serial port 149, 160
service console
commands 30
connection 29
DHCP 29
man pages 30
remote command-line interface, versus 30
services
consolidation 93
syslogd 67
vCenter Server 37
VMware Tools 123
sessions
privileges 312
viewing 49
vSphere Client, terminating 50
shares 155, 158
sharing, disks 120
shutdown, power off, versus 138
shuttting down virtual machines
automatically 137
simple search 41
SMASH 83
SMP, virtual 117
SMTP
configuring email 49, 264
configuring email notifications 250
vCenter Server settings 48
snapshots
about 205
activity in virtual machine 206
deleting 208
exclude virtual disks from 207
manage 208
parent 209
relationship between 206
VMware, Inc.
Index
restoring 208
revert to 209
revert to parent 210
reverting to 209
taking 207
virtual machines, migrate 197
SNMP
communities 52
configuring 50, 51, 263
configuring for ESX 51
configuring for ESXi 51
configuring traps 52, 250
diagnostics 54, 65
GET 53
guest operating systems 55
management software 53
polling 53
ports 53
traps 50
vCenter Server settings 48
VMWARE-ENV-MIB 56
VMWARE-OBSOLETE-MIB 57
VMWARE-PRODUCTS-MIB 60
VMWARE-RESOURCES-MIB 60
VMWARE-ROOT-MIB 56
VMWARE-SYSTEM-MIB 61
VMWARE-TC-MIB 61
VMWARE-VC-EVENT-MIB 62
VMWARE-VMINFO-MIB 62
Solaris 128
SSE3, CPU compatibility 192
SSE4.1, CPU compatibilty 192
SSH 29
SSL, vCenter Server 48
SSL certificate 81
SSSE3, CPU compatibility 192
standby 136
starting, vSphere Client 27
starting virtual machines automatically 137
startup 140
statistics
about vCenter Server data 267
archiving statistics in vCenter database 273
collection intervals, enabling and
disabling 271
collection levels
about 272
using effectively 273
data counters 268
performance 331
vCenter Server database calculator 274
vCenter Server settings 48
VMware, Inc.
status bar 40
storage
customizing reports 231
health monitoring 83
maps 231
monitoring 229
performance 283
reports, displaying 230
storage maps, displaying 231
storage metrics 352
storage resources, monitoring 229
Storage VMotion
command-line syntax 202
examples 203
limitations 197
requirements 197
streaming multimedia, WYSE 132
substitution parameters, alarm action
scripts 252
suspend, virtual machines 138
swapfile 150
syslog 67
Sysprep Tools
installing 327
installing from CD 328
installing from Web 327
system logs
configuring 68
definition 17
ESX 66
ESXi 66
VMkernel 69
system metrics 353
Systems Management Architecture for Server
Hardware, See SMASH
T
tabs, Getting Started 40
tar installer 126
tasks
about 285
canceling 287
clone virtual machine 175
definition 17
filtering on hosts and datacenters 286
filtering with keywords 286
guidelines 291
privileges 313
removing scheduled tasks 290
rescheduling 290
rules 291
scheduled, about 287
scheduling 288
365
vSphere Basic System Administration
viewing 40, 285
viewing all tasks 285
viewing recent tasks 286
viewing scheduled tasks 286
technical support 11
Telnet 29
temperature, monitoring 83
templates
about 17
cloning 170, 171
concept 169
converting virtual machines to 170
create 169
creating 170
delete 173
deleting 173
deploy virtual machines 172
edit 171
removing from inventory 173
renaming 172
return to vCenter Server 140
returning to inventory 174
unregister 173
virtual machines, convert to 173
thick provisioned disks 170, 171
thin provisioned disks 166, 170, 171
Thin Provisioning 120
time zones 290
timeout, vCenter Server settings 48
Tomcat Web server 22
traps, configuring SNMP traps 52
triggered alarms
acknowledging 257
identifying 259
triggers, condition and state 239
troubleshooting
available domains list 98, 99
collecting performance data 98
consolidation 97
CPU performance 280
datastore performance 283
disable guided consolidation 99
Disk I/O performance 280
extensions 46
hardware health 85
Linked Mode 34, 35
log files 65, 68
memory performance 281
network performance 282
performance 279
plug-ins 46
366
uninstall Guided Consolidation 99
vCenter Server performance 97
U
updated information 9
upgrading, VMware Tools 123–126, 131
upgrading,VMware Tools 127
upgradingi, VMware Tools 123–126, 131
URLs, configuring 34, 35
user-level CPU features 190
users
Active Directory 214
best practices 215
definition 21
host 214
removing 224
searching 225
vCenter 214
utilities, VMware Tools 123
V
vApps
adding objects to 107
cloning 113
creating
allocating resources 107
completing creation 107
selecting destination 106
creating new objects inside 107
DNS settings 112
edit properties
network configuration 109
resources 108
view license agreement 109
editing annotaton 114
editing properties
advanced IP allocation 111
advanced properties 110
startup options 108
view additional OVF sections 109
editing properties;custom properties 110
IP address configuration 111
IP pools 111
managing 105
naming 106
populating 107
powering off 114
powering on 113
privileges 313
proxy server settings 112
wizard 106
vCenter Colletor Service 93
VMware, Inc.
Index
vCenter database, archiving statistics,
about 273
vCenter Guided Consolidation
active domains 94
analysis 94
credentials 93
disk resizing 95
overview 89
populating the Add to Analysis dialog box 94
vCenter Guided Consolidation,manual
conversion 96
vCenter Linked Mode 31, 214
vCenter Provider Service 93
vCenter Server
about 15
active sessions, view 49
adding hosts 78
agent 15
changing domain 34
communication through firewall 49
configuration 48
configuring 47
configuring SNMP 51, 263
configuring URLs 34, 35
custom attributes 43
database 15, 48
diagram 135
events 291
joining a group 32, 34
performance statistics 267
plug-ins 15, 21
removing hosts 81
requirements for joining a group 31
restarting 26
SNMP 50
start 26
stop 26, 27
templates, unregister 173
verify on Windows 26
vCenter Server components, Tomcat
requirements 22
vCenter Server database
collection intervals, enabling and
disabling 271
configuring collection intervals 270
statistics impact calculation 274
vCenter Server services, monitoring 37
vCenterServer.VimApiUrl 34, 35
vCenterServer.VimWebServicesUrl 34, 35
verbose logging, configuring 68
version, virtual machine 117
video cards, changing the configuration 145
virtual compatibility mode 121
VMware, Inc.
virtual device node 147
virtual disks
configuration 147
determining path 203
formats 120
migrating 203
sharing 120
thick format 166
thin format 166
virtual Ethernet adapter configuration 148
virtual machine
creating 115
hardware 159
memory 157
virtual machine configuration
Fibre Channel NPIV 150
swapfile location 150
virtual machine hardware, virtual disks 147
virtual machine hardware version,
determining 144
virtual machine operations metrics 354
virtual machine wizard 116
virtual machines
about scheduling power states 139
acceleration 152
add existing 139
adding 73
adding, about 139
advanced settings 152
automatic start and shutdown 137
boot settings 152
cloning 174
completing 122
condition/state alarm triggers 240
configuration files 202
configuration privileges 315
configure 143
convert 21
copy disks 75
CPU compatibility masks 195
CPU configuration 150
CPU settings, resource 155
CPU, settings, advanced 156
CPUID Mask settings 152
creating 115
custom attributes 43
definition 19
deploy from templates 172
disk settings 158
editing 144
Ethernet adapter 162
event triggers 244
367
vSphere Basic System Administration
Fibre Channel NPIV settings 152
floppy drives 146, 161
guest operating system 122
guest operating system customization 177
guest operating system settings 151
hard disks 163
hardware 145, 159
hardware version 143
hot add enablement 152
interaction privileges 319
inventory privileges 322
log settings 152
memory 148
memory settings 157
migrating 188, 198, 200
migrating with VMotion 188
migration 187
name 116, 151
NIC 162
NICs 118
optical drives 161
options 150
parallel port 160
paravirtualization settings 152
performance 274
power management settings 152
power states 136
properties 143, 144
provisioning privileges 323
remove from the datastore 140
remove from vCenter Server 139
requirements for VMotion 196
resource settings 155
resume 138
return to vCenter Server 140
scheduled task to clone 175
SCSI devices 164
security compliance 21
selecting guest operating systems 117
serial port 160
shutdown 140
snapshots 205
startup 140
state privileges 326
statistic collection settings 152
suspend 138
templates, convert from 173
templates, convert to 169
upgrade version 143
version 117
view console 41
368
virtual disks 203
VMware Tools settings 151
See also templates, clones
virtual memory 118
virtual video cards 145
VMI paravirtualization 152
VMkernel, logs 69
VMotion
compatibility checks 190, 201
migrating virtual machines with 199
network requirements 189
NX and XD considerations 191
requirements 189
resource maps 234
SSE3 considerations 192
SSE4.1 192
SSSE3 considerations 192
storage requirements 189
swapfile considerations 196
virtual machine requirements 196
VMware Converter Enterprise, about 21
VMware Data Recovery 23
VMware DRS 23
VMware High Availability (HA) 23
VMware SDK 23
VMware Server 15
VMware Service Console 17
VMware Tools
automate upgrades 130
custom install 132
installing 123, 124
Linux 125
NetWare 129
properties 130
RPM installer 125, 126
settings 151
Solaris 128
tar installer 126
upgrading 123, 124, 131
WYSE 132
VMware Tools upgrade, Linux (rpm
installer) 127
VMware Update Manager 21
VMware vCenter Management Webservices 93
VMware vCenter Orchestrator 23
VMware Virtual SMP 117
VMWARE-ENV-MIB, definitions 56
VMWARE-OBSOLETE-MIB, definitions 57
VMWARE-PRODUCTS-MIB, definitions 60
VMWARE-RESOURCES-MIB, definitions 60
VMWARE-ROOT-MIB, definitions 56
VMWARE-SYSTEM-MIB, definitions 61
VMware, Inc.
Index
VMWARE-TC-MIB, definitions 61
VMWARE-VC-EVENT-MIB, definitions 62
VMWARE-VMINFO-MIB, definitions 62
vmxnet 162
vmxnet3 162
vNetwork distributed switches, event
triggers 247
vNetwork Distributed Switches
permission 220
privileges 301
vpxd, log files 69
vShield 23
vSphere
components 25
components of 15
diagram 135
vSphere Client
about 39
communication through firewall 49
diagram 135
logging in 27
logging out 28
logs 67
panels 40
printing data 46
sessions 49, 50
starting 27
stop 28
vSphere Web Access
logging in 28
logging out 28
VWS 34, 35
W
watchdog, health monitoring 83
Web Service, vCenter Server settings 48
Windows
guest operating system customization 177
performance statistics 274
WWN 152
WYSE, install 132, 133
WYSE multimedia 132
X
X terminal 125
XD 191
VMware, Inc.
369
vSphere Basic System Administration
370
VMware, Inc.