1
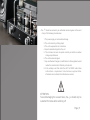
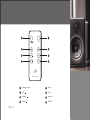
v 30 Blackline We hope you enjoy this product as much as we have enjoyed developing it. Please unpack the products carefully and take a moment to read the instructions. Contents • v 30 vacuum tube stereo amplifier • 1 x Line out RCA cable • 1 x Power Cord MUTE TRE TRE BASS BASS • 1 x Replacement audio valve • 1 x Line out USB cable • 1 x Dusting Brush v 30 Blackline • 1 x Remote control • 1 x Line out 3.5mm cable • 2 x full range stereo loudspeakers • 2 x desk stands Page | 2 • 2 x 1.5mtr polarised speaker connection cables • 1 x Cotton gloves Please read the following precautions before attempting to operate the v 30 amplifier All safety and operating instructions should be read thoroughly before attempting to operate this equipment • Retain Instructions for future reference • Follow all instructions detailed in this manual • Observe all safety warnings stated in this manual • This unit should NOT be situated in close proximity to water. • Avoid placement near bathtubs, sinks, washing machines, etc. • Avoid exposure to direct sunlight or to extremes of temperature or humidity • Do not place near direct heat sources such as radiators, stoves, gas fires, naked flames or candles. Page | 3 • Ensure that the unit is placed on a clean, dry and flat surface before operation • Do not drop unit, apply excessive force to the controls or place heavy objects on top of the unit. • Do not allow excessive levels of dust to gather on the v30. Use the supplied brush to carefully remove dust. • To clean, use a soft dry cloth. If necessary, use a damp cloth without any solvents • Ensure that the area in which the unit is situated has adequate ventilation. • Do not place the v 30 in a position where its ventilation may become obstructed. • Avoid placement on beds, sofas, rugs, enclosed bookcases/ cabinets and any other area which may cause interference to the ventilation of the product thus causing it to overheat Page | 4 • Ensure that the unit is connected to the correct power supply as indicated on the unit. • Unplug the v 30 when not in use for a long period. • Always make sure power cables are placed safely and are not obstructing a walkway • This product can get hot. Do not touch the tubes and keep away from babies and children • To avoid risk of electric shock, do not attempt to remove the cover or the baseplate of the unit. There are no user serviceable parts inside. • When this product is moved from a cool to a warm place, condensation may occur on the surface of the vacuum tubes. In this instance, allow at least 1hour before attempting to operate the unit. This will avoid leakage or blowout of the vacuum tubes due to sudden heat • The v 30 should be serviced by an authorised service engineer in the event of any of the following circumstances 1. The power supply or cord sustains damage 2. The unit is struck by a falling object 3. The unit is exposed to rain or moisture. 4. Liquid is inadvertently spilt on the unit 5. The unit does not seem to operate normally or exhibits a sudden change in performance 6. The unit has been dropped 7. Any unauthorised changes or modifications to this equipment would render the manufacturer’s Warranty null and void 8. In the unlikely event that either the LEFT or RIGHT audio tubes malfunctions a replacement tube has been supplied. More information can be found in the Maintenance section. ATTENTION: To avoid damaging the vacuum tubes, the v 30 should only be re-started 5 minutes after switching off. Page | 5 1 2 MUTE 3 4 5 TRE TRE 6 7 BASS BASS 8 v 30 Blackline Page | 6 1 Power on/off 2 Mute 3 VOL 4 VOL+ 5 treble 6 treble + 7 BASS 8 BASS + v 30 Connections AUX INPUT Cd.MP3.Mobilephone... SPEAKER LINE USB Computer USB TV Line out cable- (RCA – mini jack) Page | 7 Connections Amplifier Loudspeakers Before attempting to make any connections to or from the v 30 , firstly ensure that the amplifier and all connecting devices are switched OFF. When making connections to other devices from the v 30 , take the time to ensure that they are correct, for instance, (L) Left to (L) left, and (R) right to (R) right. Always turn the power switch to the OFF position when making connections or disconnecting the v 30. When using the USB plug to connect to a PC or Laptop the software will automatically install. A message window or beep will confirm successful installation. Do not switch on the v 30 until after you have connected the AC power lead Connect the speakers to the v 30 using the supplied high quality speaker cables. Please note that if the speaker cables are not connected properly you may hear no sound, or if the polarities are reversed, you will hear oddities in the signal path with an unnatural loss of bass frequencies. Make sure the terminals on the loudspeakers and the rear of the v 30 are firmly screwed in to prevent wires from becoming loose. If wires touch each other, the speakers and/or the v 30 could be damaged. Page | 8 The supplied speaker cable has a red line running along the length to determine the (+) side Maintenance • Switch off the v 30 amplifier when not in use • Allow unit to cool completely before cleaning • Clean using a soft cloth or the supplied dusting brush • Do not attempt to clean the products with chemical solvents as this may damage the finish of the v 30 In the unlikely event that either of the audio driver tubes (Left and Right) malfunctions, the replacement tube can be fitted by following these instructions. 1. Power off the v 30 amplifier and leave for at least 1 hour to cool down. 2. Carefully (trying to avoid scratching the top plate) unscrew the four round headed nuts holding the top plate in place. 3. Carefully remove the top plate 4. Using your index finger and thumb gently wriggle the tube to be replaced whilst gently lifting up. 5. Once removed, note the orientation of tube socket pin receptacle in the tube base. 6. Fit the replacement tube carefully ensuring the pins are aligned with the tube base and push home fully. 7. Replace the top plate and secure with the 4 top round headed nuts Page | 9 Troubleshooting If your v 30 system fails to operate normally, please check the following points to determine if the fault can be corrected with one of the suggestions below. If you feel your system is still faulty after reading this, please contact your authorised dealer or Service centre or email [email protected] Page | 10 No Power Power adaptor is not connected properly Mains supply is off If using Remote, battery needs replacing No sound from speakers Volume control is turned down Speaker cables not connected Source selection incorrect Make sure power adapter is firmly plugged in. Test with another appliance /different socket. Replace battery Check volume control on front of v30 and volume control on remote control Check connections on rear of v30 and speakers Check Source selection Low or dead battery Remote not being pointed in the correct direction, or within range Replace battery Point the remote control in the direction of the v30 within 20ft (6.1M) Distorted sound Volume level is set too high Source device sound level is set too high Decrease volume of v30 Decrease output level of source device Acoustic image has insufficient low range tonal quality The speakers have not been wired correctly and are “out of phase” with each other Ensure that the red (+) and black (-) wires have been correctly connected at the speakers and v30. The speaker cable has a red line running along the length to determine the (+) side Radio interference Equipment is situated too close to a radio Move the speakers or amplifier away from the radio. Remote control not working Page | 11 Specifications & Features Amplifier Power Output Freq. Response. Harmonic distortion Signal to noise ratio Input Impedance Input Sensitivity Output impedance Vacuum tube Type Audio Inputs Power Supply Short circuit protection Thermal overload protection 20w per channel 20Hz – 20 KHz +/- 1.5dB 0.5% 86dB 47K Ω 1.0V +/- 25% 4/8Ω 6n1 x 2 6e2 x 1 RCA/USB mini B/3.5mm mini jack AC 220-240V/50-60Hz Dimensions: H: 140mm W: 255mm D: 200 mm Weight 3.5Kg Page | 12 Loudspeakers High Frequency Unit Low Frequency Unit Frequency Range Crossover Frequency Max RMS Power ¾” Soft Dome 3.5” Paper cone 55 – 20000Hz 12dB/Octave @3.0KHz 30 watts per channel Wall mountable Fully Shielded drive units Dimensions: H: 175mm W: 112mm D: 145mm Weight: 2.5Kg each E&OE Page | 13 Blue Aura Worldwide Guarantee This entitles you to have the unit repaired free of charge, during the first two years after purchase, at any authorised Blue Aura distributor provided that it was originally purchased from an authorised Blue Aura dealer or distributor. The manufacturer can take no responsibility for defects arising from accident, misuse, abuse, wear and tear, neglect or through unauthorised adjustment and/or repair; neither can they accept responsibility for damage or loss occurring during transit to or from the person claiming under the guarantee. The warranty covers: Parts and labour costs for two years from the purchase date. After two years you must pay for both parts and labour costs, the warranty does not cover transportation costs at any time. Page | 14 Claims under guarantee: This equipment should be packed in the original packing and returned to the dealer from whom it was purchased, or failing this, directly to the Blue Aura distributor in the country of residence. It should be sent carriage prepaid by a reputable carrier. No responsibility can be accepted for the unit whilst in transit to the dealer or distributor and customers are therefore advised to insure the unit against loss or damage whilst in transit. All Blue Aura products undergo exhaustive tests and inspections both before and during manufacture to ensure we deliver products of the highest quality. However, for complete peace of mind please register your product within 30 days to take advantage of our extended 12 month guarantee. Please register your product on line at http://www.blueaura.co.uk/register or return the completed registration card to Blue Aura PO Box 293, St Neots, Cambridgeshire PE19 (EW Page | 15 ■ v30man_v01 Product Registration Model Serial Number Date of purchase Customer details Name Address line 1 Address line 2 Town Country Postcode/zip code Telephone Dealer details (if applicable) Blue Aura PO Box 293 St Neots PE19 9EW Dealer name Address line 1 Address line 2 Town County Postcode Page | 16 Country