1
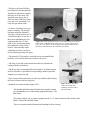
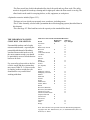
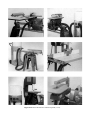
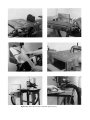
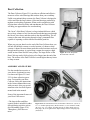
Dust Collection
The Dust Collector (Figure 25-1) provides an efficient and effective
means to collect wood shavings and sawdust from your workshop.
Unlike conventional shop vacuums, the Dust Collector is designed to
collect and filter the large volume of dust and shavings produced by
modern woodworking equipment. When used in conjunction with
efficient dust collection chutes and attachments, the Dust Collector
will help you approach dust-free woodworking.
The “heart” of the Dust Collector is a large industrial blower which
moves large volumes of air. Sawdust and wood shavings pass through
the blower, slow down, and then settle in the disposable bag. The air
returns to the room after passing through a large, permanent filter
capable of capturing even the smallest wood dust particles.
When you put your hand over the end of the Dust Collector hose you
will not feel the high vacuum, or sealed suction, of a home or shop
vacuum. A home vacuum cleaner needs this sealed suction to move air
through small openings. A typical shop vacuum also requires a high
sealed suction when used for water pickup. The large airflow of the
Dust Collector can be felt by placing a few fingers into the end of the
hose. The airflow of the Dust Collector is much higher than any home
or shop vacuum.
Figure 25-1. The Shopsmith
DC3300 Dust Collector.
ASSEMBLY AND FEATURES
Use the standard accessories or
your choice of optional accessories shown in Figures 25-2 and
25-3 for dust collection operations. To assemble your Dust
Collector, follow the instructions
in the Owners Manual that came
with your unit. Also, pay special
attention to the electrical requirements listed in the manual.
Some of the important features of
your Dust Collector are:
• The large airflow and filter
capacity make it suitable for other
dust producing activities such as
drywall sanding (Figure 25-4).
Through use, you'll discover
more.
Figure 25-2. The standard acessories for the Dust Collector are: (A) two 21/2” x 8’ flexible pickup hoses, (B) floor nozzle, (C) two extension wands,
(D) 2-1/2” to 1-1/3” reducer, (E) utility nozzle, (F) elbow brush, (G) two
inlet plugs, (H) six 30-gallon waste disposal bags, and two inlet plug caps
(not shown).
• The heavy polyester/felt filter
hood filters out sawdust particles
from the air and returns virtually
dust-free air to the room. The
standard seven square feet of
filter area allows the Dust Collector to move air at normally 330
cubic feet per minute (cfm).
• A choice of hookups gives you
greater versatility. For portabie
operation using the standard 3way inlet, you can connect one 21/2a diameter hose or use two or
three hoses simultaneously. For
equipment that has a 4" dust
chute or for a permanent piping
dust collection system, an optional 4" inlet assembly can be
substituted. Its elbow can be set
at four different positions 90¡ apart.
Figure 25-3. Some optional accessories for the Dust Collector are:(B) 24”
Filter Hood, (C) Banfsaw Dust Chute, (D) 2-1/2” Hose Connector (coupler), (E) 2-1/2” Elbow, (F) Six 30-gallon waste disposal bags, and (G)
Remote Foot Switch and 4” inlet assembly (not shown).
• The powerful 1/2 hp motor is enclosed to keep out harmful dust
particles, is fan cooled, and has no brushes to wear out.
• The large 4-vane fan creates maximum airflow to eliminate the
settling of debris in the hoses.
• The heavy duty, see-through collection bag has a 30 gallon capacity
and is 4 mils thick. A quickrelease strap and bag retainer clips make
changeovers a oneperson job.
• The oversize wheels and casters provide easy mobility while making
the Dust Collector relatively tip-proof.
• Standard accessories include (Figure 25-2):
-The durable and kinkresistant flexible hoses attach to stationary or handheld power woodworking equipment having 2-1/4a
dust chutes.
Figure 25-4. Use your Dust
Collector for other dust
producing activities such as
drywall sanding.
-The reducer allows you to connect equipment with 1-1/4" chutes found on older models of the
Mark V Model 500 and Belt Sander.
-The two extension wands eliminate back bending for floor cleanup.
-The floor nozzle has a built in brush and roller wheels for quick and easy floor work. The utility
nozzle is designed for bench top cleaning and for tight spots where the floor nozzle is too big. The
elbow brush can be used for sweeping shelves, walls, equipment, or workpieces.
• Optional accessories include (Figure 25-3):
-The hose rack, on which you can neatly store your hoses, including extras.
-The 4" Inlet Assembly, used to build a permanent dust collection piping system (described later in
this chapter).
-The extra large 24" filter hood has twice the capacity as the standard filter hood,
THE IMPORTANCE OF EFFICIENT DUST COLLECTION
Uncontrolled sawdust can be both a
nuisance and a hazard—especially the
potential health hazard of breathing
sawdust. Because this involves even
the most common woods, you should
be particularly aware of woods that are
known to be toxic.
For your safety, please refer to the list
of toxic woods and the reactions they
may cause (Table 25-1). Not everyone
is sensitive to these woods, but you
should still be very careful when
working with them.
Table 25-1: Toxic Woods and Possible Reactions
Respiratory
Skin and
Wood
Allments
Eye Allergies
Arborvitae
X
Ayan
X
Blackwood, African
X
Boxwood
X
X
Cashew
X
Cedar, Western Red
X
X
Cocobolo
X
Cocus
X
Dahoma
X
Ebony
X
X
Greenheart
X
X
Guarea
X
Ipe (lapacho)
X
X
Iroko
X
X
Katon
X
Mahogany, African
X
X
Mahogany, American
X
Makore
X
X
Mansonia
X
X
Obeche
X
X
Opepe
X
X
Peroba Rosa
X
X
Peroba, White
X
X
Ramin
X
Rosewood, Brazilian
X
Rosewood, East Indian
X
Satinwood, Ceylon
X
Satinwood, West Indian
X
Sequoia, Redwood
X
Sneezewood
X
Stavewood
X
Sucupira
X
Teak
X
Wenge
X
X
Note: This table has been reprinted from Fine Woodworking Magazine,
copyright 1983, The Taunton Press, Inc., 63 South Main Street, Box 355,
Newtown, CT 06470.
DUST COLLECTOR SAFETY
Before you get ready to use the Dust Collector, read these important safety considerations:
• Ground the Dust Collector. The Dust Collector comes equipped with an approved 3conductor cord and
a 3-prong grounding type plug to fit the proper grounding type receptacle. The green conductor in the
cord is the grounding wire. Never connect the green wire to a live terminal.
• Avoid dangerous environments. Electric shock could occur if the Dust Collector is used on wet surfaces. Do not expose it to rain, snow or wet floors. Store it indoors.
• Do not operate the Dust Collector without the 3-way inlet or the 4" inlet assembly securely mounted in
place. The powerful suction can actually pull body parts into the intake opening and cause contact with
the motor fan.
• Do not pick up water or wet materials with the Dust Collector.
• Position the hose(s) out of the way so you won't trip over them.
• Do not pick up hot or burning materials such as cigarettes and ashes. They could ignite a fire in the bag.
These materials should be properly disposed of in a fire-proof container.
• Do not attach the Dust Collector to a tool used for metal grinding or sharpening. Sparks generated
during grinding could ignite dust and shavings inside the bag. They may also damage the hose and the
fittings.
• Do not reach across a power tool to turn off the Dust Collector. Turn off the power tool and then go
around to the Dust Collector and turn it off.
• Do not force the Dust Collector to do a job for which it was not designed.
• Check damaged parts. A damaged part should be properly repaired or replaced before further use. If a
strange noise or vibration develops, immediately turn off the power, unplug the Dust Collector and
correct the problem.
• Avoid unintentional starting. Make sure the switch is in the "Off" position before plugging in or unplugging the Dust Collector.
• Turn off and unplug the Dust Collector before changing bags and performing maintenance or service.
• Do not stand or lean on the Dust Collector. You could fall onto it, or it could tip over, injuring you and/
or damaging the Dust Collector.
• Use only recommended Shopsmith replacement parts and accessories on your Dust Collector. NEVER
use nonShopsmith replacement parts or accessories. Using nonShopsmith parts may cause a hazardous
condition and will void your warranty.
• Do not leave the Dust Collector running unattended.
• Do not drag the cord across sharp tools or edges which could damage the cord. Do not try to move or
unplug the Dust Collector by pulling on the cord. NOTE: Static electrical discharge sometimes builds up
on the Dust Collector, hoses and wands. It is rarely a safety problem, but it can give you an unpleasant
sting—especially when you're not expecting it while using the Dust Collector. When the Dust Collector is
operating under “dry” conditions (dry air and/or dry wood), static electricity can build up in the flexible
hose(s). To keep static electricity to a minimum, before and during vacuuming, maintain hand contact
with a metal surface of the nearest turned off machine.
PORTABLE USE
Position the Dust Collector conveniently near the power equipment. Connect the hose(s) to the 3-way
inlet and to the dust chute(s) on power equipment. See Figure 25-5 for the various hose connection
points.
FLEXIBLE HOSE AIRFLOW (2-1/2" x 8' SIZE)
No. Used
Airflow (CFM)
1
2
3
107
100 Each
95 Each
CFM = Cubic feet per minute.
Push the plug caps onto the inlet plugs. Then place an inlet plug assembly in any inlet not being used.
These plugs help to muffle noise and slightly increase the suction power. If you desire, you can leave
inlets open to help filter dust from the air.
Remember that all materials picked up pass through the blower. While the fan will not be damaged by
small scraps which you may occasionally pick up, don't make a practice of picking up scraps. They will
pass through the fan and be struck at high velocity by the fan blades and flung against the blower fan
housing with a loud noise. In some instances, large scraps could even become jammed in the fan.
When the Dust Collector is attached to woodworking equipment by the hoses, there is no occasion for
large scraps to be sucked into the blower. However, when sweeping the floor and cleaning up, pick up
large wood scraps before you use the dust collector. Caution: Do not sweep into the Dust Collector
scraps or solid objects the ske (or larger) of those shown below. They may damage or jam the fan.
Figure 25-5. Dust Collector hose connection points (1 of 2).
Figure 25-5. Dust Collector hose connection points (2 of 2).
Figure 25-6. Suggested permanent piping system (overhead view).
PERMANENT PIPING SYSTEM
For some workshops, it may be more convenient to install permanent piping rather than to move the Dust
Collector to various locations throughout the shop.
The optional 4" inlet assembly is the link to a permanent installation. It replaces the 3-way inlet of the
Dust Coliector to connect to a permanent piping system along the walls of your workshop. With a permanent setup using PVC (polyvinyl chloride) pipes and 2-1/2" diameter flexible hoses, you can conveniently
work with as many as three machines in succession without moving the Dust Collector or changing hose
connections.
Inlet Installation
Warning: Turn off and unplug the Dust Collector. Remove the cover plate and 3-way inlet from the
Dust Collector. Attach the 4" inlet assembly with the four screws that attach the 3-way inlet.
The elbow of the inlet assembly can be set at four positions 90-degrees apart. If necessary to change the
position of the elbow, take out its two attaching screws. Turn the elbow to the desired position, making
sure that the mounting holes of the elbow and inlet line up. Reinstall the two screws securely.
System Requirements
In planning a permanent system, keep in mind that long lengths of flexible hose will reduce airflow. Also,
smooth piping causes much less resistance to airflow and is strongly recommended for the main collection
line of your system. Rigid PVC pipe and various fittings are available at most home centers or plumbing
supply distributors, and are best suited for permanent systems.
Figure 25-6 illustrates a suggested permanent piping system. The following requirements should be met
in building an efficient dust removal system:
• Make your system simple, compact and efficient. Avoid long runs, sharp turns and restrictions.
• The overall length of the PVC piping should not exceed 25 feet. This length permits use of:
-Two 90-degree elbows (including the 4" inlet assembly). Elbows reduce airflow. So, for each
additional elbow used, you should reduce the overall length of your system. Refer to the chart in
Figure 25-6 to determine the amount of piping reduction recommended for the addition of certain
fittings.
-One 4" dia. x 8' long flexible hose from Dust Collector (not available through Shopsmith). This
will make it more convenient when changing bags or moving the Dust Coilector. However, it will
reduce airflow slightly.
-Three 2-1/2" dia. x 8' long flexible hoses to connect to machinery. If you're planning a system
that will connect more than three machines, have provisions for plugging or switching the hoses.
Only connect three hoses at a time. Failure to do this would cause the machine at the end of the
line to have insufficient airflow, with too little suction to remove sawdust from the machine.
• Use Schedule 10 (thin wall) PVC pipe and fittings. If Schedule 10 plumbing is not available, thicker
walled pipe and fittings (higher Schedule number such as 40 or 60) may be used. However, because of
the resulting differences in diameters, the flexible hose and piping connections will have to be taped
securely with duct tape to prevent reduced airflow due to leakage.
• If multiple-size “Y” fittings are not available, 4" x 4" x 4" “Y”, fittings may be used. Wooden “doughnut” reducers can then be made to adapt the 4'' I. D. branch of each “Y” to accept the 2-1/4" (outer
diameter) male fitting of the 2-1/2" diameterflexible hoses. (See Figure 25-7.)
• 90-degree elbows should be used only where absolutely necessary. Long sweep elbows are recommended. Do not use 90-degree tees in place of the “Y” fittings.
• Mount the PVC piping on your shop walls at the same height as the inlet of the Dust Collector. Use
nylon straps and screws, wire and screws, or L-brackets, screws and wire to support the pipe. Place
supports at each fitting or every 4 feet, whichever is closer.
• Avoid vertical lines.
• Limit the length of flexible hoses.
• Locate equipment which produces high volumes of chips and
sawdust closest to the Dust Collector.
• Plug or cap unused openings, but keep at least two 2-1/2"
openings in use at all times to ensure sufficient airflow in 4" pipe
sections.
• Use duct tape, PVC cement or silicone around all permanent
joints to prevent air leakage.
CLEANING THE FILTER HOOD
Figure 25-7. How to make a “doughnut”
reducer:
1. Make a 4” diameter wooden disc on a
bandsaw (see illustration for the range of
thicknesses).
2. Drill a hole 2-1/4” through the cneter of
the disc.
3. Disc sand the outer circumference of the
wooden disc to get a slight taper.
During operation, dust will build up on the inside surface of the
filter hood. After every 8 to 10 hours of Dust Collector operation, vacuum the exterior of the filter hood. Just before you
change the collection bag, tap the top and sides of the filter hood
to dislodge the dust buildup. If you're generating a lot of fine dust, tap off the dust buildup more often.
After every 15 to 30 hours of operation, wash the filter hood to maintain optimum performance. Before
washing, dislodge the dust buildup and remove the retaining strap. Then, hand or machine wash the hood
in cold water using a mild detergent. Line dry or tumble dry on no heat. When the hood is dry, reinstall
the retaining strap assembly.
CLEARING THE AIR
When cleaning up and before you open the door(s) of your shop to adjacent rooms, use the Dust Collector to remove the remaining airborn sawdust.
If your Dust Collector is portable, use one hose for vacuuming, with the remaining two inlets open to pull
in the dusty air. If you have a permanent piping system, disconnect the flexible hoses from the equipment
and then turn on the Dust Collector. How long it takes depends on the size of your workshop and the
amount of airborne sawdust.