1
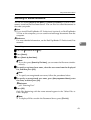
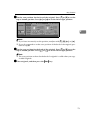
2SHUDWLQJ,QVWUXFWLRQV
*HQHUDO6HWWLQJV*XLGH
1
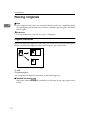
:KDW<RX&DQ'RZLWK7KLV0DFKLQH
2
*HWWLQJ6WDUWHG
3
&RPELQHG)XQFWLRQ2SHUDWLRQV
4
'RFXPHQW6HUYHU
5
8VHU7RROV6\VWHP6HWWLQJV
6
3DSHU7UD\6HWWLQJV
7
7URXEOHVKRRWLQJ
8
5HPDUNV
9
6HFXULW\
10 6SHFLILFDWLRQ
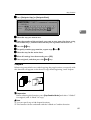
)RUVDIHDQGFRUUHFWRSHUDWLRQRIWKLVPDFKLQHSOHDVHEHVXUHWRUHDGWKH6DIHW\,QIRUPDWLRQ
EHIRUH\RXXVHLW
7\SHIRU/'$ILFLR
7\SHIRU/'$ILFLR
3ULQWHGLQ-DSDQ
(1 86$ %
Introduction
7KLVPDQXDOFRQWDLQVGHWDLOHGLQVWUXFWLRQVRQWKHRSHUDWLRQDQGPDLQWHQDQFHRIWKLVPDFKLQH7RJHW
PD[LPXPYHUVDWLOLW\IURPWKLVPDFKLQHDOORSHUDWRUVVKRXOGFDUHIXOO\UHDGDQGIROORZWKHLQVWUXFWLRQVLQ
WKLVPDQXDO3OHDVHNHHSWKLVPDQXDOLQDKDQG\SODFHQHDUWKHPDFKLQH
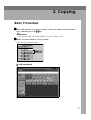
Notes
6RPHLOOXVWUDWLRQVLQWKLVPDQXDOPLJKWEHVOLJKWO\GLIIHUHQWIURPWKHPDFKLQH
&HUWDLQRSWLRQVPD\QRWEHDYDLODEOHLQVRPHFRXQWULHV)RUGHWDLOVSOHDVHFRQWDFW\RXUORFDOGHDOHU
Laser Safety:
&'5+5HJXODWLRQV
7KLVHTXLSPHQWFRPSOLHVZLWKUHTXLUHPHQWVRI&)5VXEFKDSWHU-IRUFODVVODVHUSURGXFWV7KLV
HTXLSPHQWFRQWDLQV$O*D$VIRXUEHDPODVHUGLRGHDUUD\PLOOLZDWWQDQRPHWHUZDYHOHQJWK
IRUHDFKHPLWWHU7KLVHTXLSPHQWGRHVQRWHPLWKD]DUGRXVOLJKWVLQFHWKHEHDPLVWRWDOO\HQFORVHGGXU
LQJDOOFXVWRPHUPRGHVRIRSHUDWLRQDQGPDLQWHQDQFH
Warning:
8VHRIFRQWUROVDGMXVWPHQWRUSHUIRUPDQFHRISURFHGXUHVRWKHUWKDQWKRVHVSHFLILHGLQWKLVPDQXDO
PD\UHVXOWLQKD]DUGRXVUDGLDWLRQH[SRVXUH
7KHPRGHOQDPHVRIWKHPDFKLQHVGRQRWDSSHDURQWKHIROORZLQJSDJHV&KHFNWKHW\SHRI\RXUPD
FKLQHEHIRUHUHDGLQJWKLVPDQXDO)RUGHWDLOVVHHS³0DFKLQH7\SHV´
7\SH/'$ILFLR
7\SH/'$ILFLR
&HUWDLQW\SHVPD\QRWEHDYDLODEOHLQVRPHFRXQWULHV)RUGHWDLOVFRQWDFW\RXUORFDOGHDOHU
7ZRNLQGVRIVL]HQRWDWLRQDUHHPSOR\HGLQWKLVPDQXDO:LWKWKLVPDFKLQHUHIHUWRWKHLQFKYHUVLRQ
)RUJRRGFRS\TXDOLW\WKHPDQXIDFWXUHUUHFRPPHQGVWKDW\RXXVHPDQXIDFWXUHUJHQXLQHWRQHU
7KHVXSSOLHUVKDOOQRWEHUHVSRQVLEOHIRUDQ\GDPDJHRUH[SHQVHWKDWPD\UHVXOWIURPXVHRISDUWVRWKHU
WKDQPDQXIDFWXUHUJHQXLQHSDUWV
Power Source
9+]$
%HVXUHWRFRQQHFWWKHSRZHUFRUGWRDSRZHUVRXUFHDVDERYH)RUGHWDLOVDERXWWKHSRZHUVRXUFH
VHHS³3RZHU&RQQHFWLRQ´
,QDFFRUGDQFHZLWK,(&WKLVPDFKLQHXVHVWKHIROORZLQJV\PEROVIRUWKHPDLQSRZHUVZLWFK
aPHDQV32:(521
cPHDQV67$1'%<
Note to users in the United States of America
Notice:
7KLVHTXLSPHQWKDVEHHQWHVWHGDQGIRXQGWRFRPSO\ZLWKWKHOLPLWVIRUD&ODVV%GLJLWDOGHYLFHSXUVX
DQWWR3DUWRIWKH)&&5XOHV7KHVHOLPLWVDUHGHVLJQHGWRSURYLGHUHDVRQDEOHSURWHFWLRQDJDLQVW
KDUPIXOLQWHUIHUHQFHLQDUHVLGHQWLDOLQVWDOODWLRQ7KLVHTXLSPHQWJHQHUDWHVXVHVDQGFDQUDGLDWHUDGLR
IUHTXHQF\HQHUJ\DQGLIQRWLQVWDOOHGDQGXVHGLQDFFRUGDQFHZLWKWKHLQVWUXFWLRQVPD\FDXVHKDUPIXO
LQWHUIHUHQFHWRUDGLRFRPPXQLFDWLRQV+RZHYHUWKHUHLVQRJXDUDQWHHWKDWLQWHUIHUHQFHZLOOQRWRFFXU
LQDSDUWLFXODULQVWDOODWLRQ,IWKLVHTXLSPHQWGRHVFDXVHKDUPIXOLQWHUIHUHQFHWRUDGLRRUWHOHYLVLRQUH
FHSWLRQZKLFKFDQEHGHWHUPLQHGE\WXUQLQJWKHHTXLSPHQWRIIDQGRQWKHXVHULVHQFRXUDJHGWRWU\WR
FRUUHFWWKHLQWHUIHUHQFHE\RQHPRUHRIWKHIROORZLQJPHDVXUHV
5HRULHQWRUUHORFDWHWKHUHFHLYLQJDQWHQQD
,QFUHDVHWKHVHSDUDWLRQEHWZHHQWKHHTXLSPHQWDQGUHFHLYHU
&RQQHFWWKHHTXLSPHQWLQWRDQRXWOHWRQDFLUFXLWGLIIHUHQWIURPWKDWWRZKLFKWKHUHFHLYHULV
FRQQHFWHG
&RQVXOWWKHGHDOHURUDQH[SHULHQFHGUDGLR79WHFKQLFLDQIRUKHOS
Warning
&KDQJHVRUPRGLILFDWLRQVQRWH[SUHVVO\DSSURYHGE\WKHSDUW\UHVSRQVLEOHIRUFRPSOLDQFHFRXOGYRLG
WKHXVHU
VDXWKRULW\WRRSHUDWHWKHHTXLSPHQW
Note to users in Canada
Note:
7KLV&ODVV%GLJLWDODSSDUDWXVFRPSOLHVZLWK&DQDGLDQ,&(6
Remarque concernant les utilisateurs au Canada
Avertissement:
&HWDSSDUHLOQXPpULTXHGHODFODVVH%HVWFRQIRUPHjODQRUPH10%GX&DQDGD
&RS\ULJKW
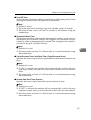
Manuals for This Machine
The following manuals describe the operational procedures of this machine. For
particular functions, see the relevant parts of the manual.
1RWH
❒ Manuals provided are specific to machine type.
❒ Adobe Acrobat Reader is necessary to view the manuals as a PDF file.
❒ Two CD-ROMs are provided:
• CD-ROM 1 “Operating Instructions for Printer / Scanner”
• CD-ROM 2 “Scanner Driver & Document Management Utilities”
❖ *HQHUDO6HWWLQJV*XLGHWKLV0DQXDO
Provides an overview of the machine.
It also describes System Settings (such as paper trays and user codes settings),
Document Server functions, and troubleshooting.
❖ 1HWZRUN*XLGH3')ILOH&'520
Describes procedures for configuring the machine and computers in a network environment.
❖ &RS\5HIHUHQFH
Describes operations, functions, and troubleshooting for the machine's copier
function.
❖ 3ULQWHU5HIHUHQFH
Describes system settings and operations for the machine's printer function.
❖ 3ULQWHU5HIHUHQFH3')ILOH&'520
Describes operations, functions, and troubleshooting for the machine's printer function.
❖ 6FDQQHU5HIHUHQFH3')ILOH&'520
Describes operations, functions, and troubleshooting for the machine's scanner function.
❖ 0DQXDOVIRU'HVN7RS%LQGHU9/LWH
DeskTopBinder V2 Lite is a utility included on the CD-ROM labeled “Scanner
Driver & Document Management Utilities”.
• DeskTopBinder V2 Lite Setup Guide (PDF file - CD-ROM2)
Describes installation of, and the operating environment for DeskTopBinder V2 Lite in detail. This guide can be displayed from the >6HWXS@ dialog box when DeskTopBinder V2 Lite is installed.
• DeskTopBinder V2 Lite Introduction Guide (PDF file - CD-ROM2)
Describes operations of DeskTopBinder V2 Lite and provides an overview
of its functions. This guide is added to the >6WDUW@ menu when DeskTopBinder V2 Lite is installed.
i
• Auto Document Link Guide (PDF file - CD-ROM2)
Describes operations and functions of Auto Document Link installed with
DeskTopBinder V2 Lite. This guide is added to the >6WDUW@ menu when
DeskTopBinder V2 Lite is installed.
❖ 0DQXDOVIRU6FDQ5RXWHU9/LWH
ScanRouter V2 Lite is a utility included on the CD-ROM labeled “Scanner
Driver & Document Management Utilities”.
• ScanRouter V2 Lite Setup Guide (PDF file - CD-ROM2)
Describes installation of, settings, and the operating environment for ScanRouter V2 Lite in detail. This guide can be displayed from the >6HWXS@ dialog box when ScanRouter V2 Lite is installed.
• ScanRouter V2 Lite Management Guide (PDF file - CD-ROM2)
Describes delivery server management and operations, and provides an
overview of ScanRouter V2 Lite functions. This guide is added to the >6WDUW@
menu when ScanRouter V2 Lite is installed.
❖ 2WKHUPDQXDOV
• PS3 Supplement (PDF file - CD-ROM1)
• Unix Supplement (Available from an authorized dealer, or as a PDF file on
our Web site.)
ii
TABLE OF CONTENTS
0DQXDOVIRU7KLV0DFKLQH L
1RWLFH &RS\ULJKWVDQG7UDGHPDUNV 7UDGHPDUNV ,QIRUPDWLRQDERXW,QVWDOOHG6RIWZDUH +RZWR5HDG7KLV0DQXDO 6DIHW\,QIRUPDWLRQ 6DIHW\'XULQJ2SHUDWLRQ 3RVLWLRQVRI/DEHOVDQG+DOOPDUNVIRUR:$51,1*DQGR&$87,21
(1(5*<67$53URJUDP 0DFKLQH7\SHV 1. What You Can Do with This Machine
$YDLODEOH)XQFWLRQV &RSLHU0RGH 3ULQWHU0RGH 6FDQQHU0RGH 'RFXPHQW6HUYHU0RGH 8VHU0DQDJHPHQW 6HFXULW\)XQFWLRQV 2. Getting Started
*XLGHWR&RPSRQHQWV ([WHUQDO2SWLRQV &RQWURO3DQHO 'LVSOD\3DQHO 7XUQLQJ2QWKH3RZHU 7XUQLQJ2QWKH0DLQ3RZHU 7XUQLQJ2QWKH3RZHU 7XUQLQJ2IIWKH3RZHU 7XUQLQJ2IIWKH0DLQ3RZHU 3. Combined Function Operations
&KDQJLQJ0RGHV 6DYLQJ(QHUJ\ -RE/LVW
0XOWL$FFHVV
iii
4. Document Server
5HODWLRQVKLSEHWZHHQ'RFXPHQW6HUYHUDQG2WKHU)XQFWLRQV 'RFXPHQW6HUYHU'LVSOD\ 8VLQJWKH'RFXPHQW6HUYHU 6WRULQJ'DWD &KDQJLQJWKH)LOH1DPH8VHU1DPHRU3DVVZRUG 7R&KHFN'HWDLOVRI6WRUHG'RFXPHQWV 6HDUFKLQJIRU6WRUHG'RFXPHQWV 3ULQWLQJ6WRUHG'RFXPHQWV 3ULQW6HOHFWHG3DJHV
(GLW)LOH 'HOHWLQJ6WRUHG'RFXPHQWV 9LHZLQJ6WRUHG'RFXPHQWVRQWKH:HE%URZVHU 'RZQORDGLQJ6WRUHG'RFXPHQWV )XQFWLRQV$YDLODEOHLQ'RFXPHQW6HUYHU0RGH
6HWWLQJVIRUWKH'RFXPHQW6HUYHU
5. User Tools (System Settings)
8VHU7RROV0HQX6\VWHP6HWWLQJV $FFHVVLQJ8VHU7RROV6\VWHP6HWWLQJV &KDQJLQJWKH'HIDXOW ([LWLQJ8VHU7RROV 6HWWLQJV<RX&DQ&KDQJHZLWK8VHU7RROV *HQHUDO)HDWXUHV 7LPHU6HWWLQJ .H\2SHUDWRU7RROV 8VHU&RGHV 5HJLVWHULQJD1HZ8VHU&RGH &KDQJLQJD8VHU&RGH
'HOHWLQJD8VHU&RGH 'LVSOD\LQJWKH&RXQWHUIRU(DFK8VHU&RGH 3ULQWLQJWKH&RXQWHUIRU(DFK8VHU&RGH
&OHDULQJWKH&RXQWHU (PDLO'HVWLQDWLRQ
5HJLVWHULQJDQ(PDLO$GGUHVV &KDQJLQJD5HJLVWHUHG(PDLO'HVWLQDWLRQ 'HOHWLQJD5HJLVWHUHG(PDLO$GGUHVV 5HJLVWHULQJ(PDLO'HVWLQDWLRQVWRD*URXS
5HJLVWHULQJD1HZ*URXS 5HJLVWHULQJ(PDLO'HVWLQDWLRQVWRD*URXS 'HOHWLQJDQ(PDLO'HVWLQDWLRQIURPD*URXS
'LVSOD\LQJWKH'HVWLQDWLRQV5HJLVWHUHGLQ*URXSV &KDQJLQJD*URXS1DPH 'HOHWLQJD*URXS (QWHULQJ7H[W $YDLODEOH&KDUDFWHUV .H\V (QWHULQJ7H[W
iv
6. Paper Tray Settings
$FFHVVLQJ3DSHU7UD\6HWWLQJV &KDQJLQJ3DSHU7UD\6HWWLQJV ([LWLQJ3DSHU7UD\6HWWLQJV
6HWWLQJV<RX&DQ&KDQJHZLWK8VHU7RROV 7UD\3DSHU6HWWLQJV 'HVLJQDWLRQ6KHHW )URQW&RYHU %DFN&RYHU
6OLS6KHHWV 6HSDUDWLRQ6KHHWV 7. Troubleshooting
,I<RXU0DFKLQH'RHV1RW2SHUDWHDV<RX:DQW *HQHUDO 'RFXPHQW6HUYHU B/RDGLQJ3DSHU /RDGLQJ3DSHULQ7UD\7DQGHP7UD\ /RDGLQJ3DSHULQ7UD\DQG /RDGLQJ3DSHULQWKH/DUJH&DSDFLW\7UD\7UD\7UD\DQG7UD\
/RDGLQJ3DSHULQWKH2SWLRQDO$×7UD\.LW /RDGLQJ3DSHULQWKH,QWHUSRVHU 3DXVLQJ&RS\:KHQ8VLQJ)LQLVKHU%±6KHHW6WDSOHV D$GGLQJ7RQHU 5HSODFLQJ7RQHU x&OHDULQJ0LVIHHGV &KDQJLQJWKH3DSHU6L]H &KDQJLQJWKH3DSHU6L]HRIWKH2SWLRQDO$×7UD\8QLW7UD\
&KDQJLQJWKH3DSHU6L]HLQ7UD\RU &KDQJLQJWKH3DSHU6L]HRIWKH/DUJH&DSDFLW\7UD\7UD\DQG d$GGLQJ6WDSOHV %RRNOHW)LQLVKHU %RRNOHW)LQLVKHU6DGGOH6WLWFK )LQLVKHU%6KHHW6WDSOHV e5HPRYLQJ-DPPHG6WDSOHV %RRNOHW)LQLVKHU %RRNOHW)LQLVKHU6DGGOH6WLWFK )LQLVKHU%6KHHW6WDSOHV y5HPRYLQJ3XQFK:DVWH v
8. Remarks
'R
VDQG'RQ
WV 7RQHU +DQGOLQJ7RQHU
7RQHU6WRUDJH 8VHG7RQHU :KHUHWR3XW<RXU0DFKLQH 0DFKLQH(QYLURQPHQW 0RYLQJ
3RZHU&RQQHFWLRQ $FFHVVWRWKH0DFKLQH 0DLQWDLQLQJ<RXU0DFKLQH &OHDQLQJWKH([SRVXUH*ODVV
&OHDQLQJWKH$XWR'RFXPHQW)HHGHU 2WKHU)XQFWLRQV ,QTXLU\ &KDQJLQJWKH'LVSOD\/DQJXDJH &RXQWHU 9. Security
6HFXULW\ 3ULPDU\6HFXULW\)XQFWLRQV ([WHQGHG6HFXULW\)XQFWLRQ 7HPSRUDULO\'LVDEOLQJ'RFXPHQW6HFXULW\ 2SHUDWLQJ(QYLURQPHQWDQG1RWHV 2SHUDWLQJ(QYLURQPHQW )RU$GPLQLVWUDWRU
)RU8VHU 10.Specification
0DLQ0DFKLQH 'RFXPHQW6HUYHU $XWR'RFXPHQW)HHGHU 2SWLRQV %RRNOHW)LQLVKHU )LQLVKHU%6KHHW6WDSOHV /DUJH&DSDFLW\7UD\ 0XOWL%\SDVV7UD\7UD\ ,QWHUSRVHU 3XQFK8QLW 2WKHUV &RS\3DSHU 5HFRPPHQGHG3DSHU6L]HVDQG7\SHV
1RQUHFRPPHQGHG3DSHU 3DSHU6WRUDJH ,1'(; vi
Notice
,PSRUWDQW
Do not make copies of any item for which copying is prohibited by law.
Copying the following items is normally prohibited by local law:
Bank bills, revenue stamps, bonds, stock certificates, bank drafts, checks, passports, driver's licenses.
This machine is equipped with a function that prevents making counterfeit bank
bills. Due to this, images similar to bank bills may not be copied properly.
1
Copyrights and Trademarks
7UDGHPDUNV
Ethernet is a registered trademark of Xerox Corporation.
Microsoft, Windows and Windows NT are registered trademarks of Microsoft
Corporation in the United States and/or other countries.
Novell, NetWare and NDS are registered trademarks of Novell, Inc.
PostScript® is a registered trademark of Adobe Systems Incorporated.
Other product names used herein are for identification purposes only and may
be trademarks of their respective companies. We disclaim any and all rights to
those marks.
The proper names of the Windows operating systems are as follows:
• The product name of Windows® 95 is Microsoft® Windows 95.
• The product name of Windows® 98 is Microsoft® Windows 98.
• The product name of Windows® Me is Microsoft® Windows Millennium Edition (Windows Me).
• The product names of Windows® XP are as follows:
Microsoft® Windows® XP Professional
Microsoft® Windows® XP Home Edition
• The product names of Windows® 2000 are as follows:
Microsoft® Windows® 2000 Advanced Server
Microsoft® Windows® 2000 Server
Microsoft® Windows® 2000 Professional
• The product names of Windows NT® 4.0 are as follows:
Microsoft® Windows NT® Server 4.0
• Microsoft® Windows NT® Workstation 4.0
,QIRUPDWLRQDERXW,QVWDOOHG6RIWZDUH
H[SDW
• The software including controller, etc. (hereinafter “software”) installed on
this product uses the expat Version 1.95.2 (hereinafter “expat”) under the conditions mentioned below.
• The product manufacturer provides warranty and support to the software of
the product including the expat, and the product manufacturer makes the initial developer and copyright holder of the expat, free from these obligations.
• Information relating to the expat is available at:
http://expat.sourceforge.net/
2
Copyright (c) 1998, 1999, 2000 Thai Open Source Software Centre, Ltd. and Clark
Cooper.
Permission is hereby granted, free of charge, to any person obtaining a copy of
this software and associated documentation files (the “Software”), to deal in the
Software without restriction, including without limitation the rights to use,
copy, modify, merge, publish, distribute, sublicense, and/or sell copies of the
Software, and to permit persons to whom the Software is furnished to do so, subject to the following conditions:
The above copyright notice and this permission notice shall be included in all
copies or substantial portions of the Software.
THE SOFTWARE IS PROVIDED “AS IS”, WITHOUT WARRANTY OF ANY
KIND, EXPRESS OR IMPLIED, INCLUDING BUT NOT LIMITED TO THE
WARRANTIES OF MERCHANTABILITY, FITNESS FOR A PARTICULAR
PURPOSE AND NONINFRINGEMENT. IN NO EVENT SHALL THE AUTHORS OR COPYRIGHT HOLDERS BE LIABLE FOR ANY CLAIM, DAMAGES OR OTHER LIABILITY, WHETHER IN AN ACTION OF CONTRACT,
TORT OR OTHERWISE, ARISING FROM, OUT OF OR IN CONNECTION
WITH THE SOFTWARE OR THE USE OR OTHER DEALINGS IN THE SOFTWARE.
$XWKRUV1DPH/LVW
All product names mentioned herein are trademarks of their respective owners.
The following notices are required to satisfy the license terms of the software
that we have mentioned in this document:
• This product includes software developed by the University of California,
Berkeley and its contributors.
• This product includes software developed by Jonathan R. Stone for the NetBSD Project.
• This product includes software developed by the NetBSD Foundation, Inc.
and its contributors.
• This product includes software developed by Manuel Bouyer.
• This product includes software developed by Charles Hannum.
• This product includes software developed by Charles M. Hannum.
• This product includes software developed by Christopher G. Demetriou.
• This product includes software developed by TooLs GmbH.
• This product includes software developed by Terrence R. Lambert.
• This product includes software developed by Adam Glass and Charles Hannum.
• This product includes software developed by Theo de Raadt.
• This product includes software developed by Jonathan Stone and Jason R.
Thorpe for the NetBSD Project.
• This product includes software developed by the University of California,
Lawrence Berkeley Laboratory and its contributors.
3
• This product includes software developed by Christos Zoulas.
• This product includes software developed by Christopher G. Demetriou for
the NetBSD Project.
• This product includes software developed by Paul Kranenburg.
• This product includes software developed by Adam Glass.
• This product includes software developed by Jonathan Stone.
• This product includes software developed by Jonathan Stone for the NetBSD
Project.
• This product includes software developed by Winning Strategies, Inc.
• This product includes software developed by Frank van der Linden for the
NetBSD Project.
• This product includes software developed for the NetBSD Project by Frank
van der Linden.
• This product includes software developed for the NetBSD Project by Jason R.
Thorpe.
• The software was developed by the University of California, Berkeley.
• This product includes software developed by Chris Provenzano, the University of California, Berkeley, and contributors.
4
How to Read This Manual
6\PEROV
In this manual, the following symbols are used:
R:$51,1*
This symbol indicates a potentially hazardous situation that might result in
death or serious injury if you use the machine without following the instructions
under this symbol. Be sure to read the instructions, all of which are included in
the Safety Information section.
R&$87,21
This symbol indicates a potentially hazardous situation that may result in minor
or moderate injury or damage; not injury if you use the machine without following the instructions under this symbol. Be sure to read the instructions, all of
which are included in the Safety Information section.
* The statements above are notes for your safety.
,PSRUWDQW
If this instruction is not followed, paper might misfeed, originals damaged, or
data lost. Be sure to read this.
3UHSDUDWLRQ
This symbol indicates prior knowledge or preparation is required before operation.
1RWH
This symbol indicates precautions for operation, or actions to take after misoperation.
/LPLWDWLRQ
This symbol indicates numerical limits, functions that cannot be used together,
or conditions in which a particular function cannot be used.
5HIHUHQFH
This symbol indicates a reference.
>
@
Keys that appear on the machine's display panel.
{
}
Keys built into the machine's control panel.
1RWLFH
• The image of the display panel may differ depending on installed options.
5
Safety Information
When using this machine, the following safety precautions should always be followed.
6DIHW\'XULQJ2SHUDWLRQ
In this manual, the following important symbols are used:
R:$51,1*
,QGLFDWHVDSRWHQWLDOO\KD]DUGRXVVLWXDWLRQZKLFKLILQVWUXFWLRQV
DUHQRWIROORZHGFRXOGUHVXOWLQGHDWKRUVHULRXVLQMXU\
R&$87,21
,QGLFDWHVDSRWHQWLDOO\KD]DUGRXVVLWXDWLRQZKLFKLILQVWUXFWLRQVDUHQRW
IROORZHGPD\UHVXOWLQPLQRURUPRGHUDWHLQMXU\RUGDPDJHWRSURSHUW\
R:$51,1*
&RQQHFWWKHSRZHUFRUGGLUHFWO\LQWRDZDOORXWOHWDQGQHYHUXVHDQH[
WHQVLRQFRUG
'LVFRQQHFWWKHSRZHUSOXJE\SXOOLQJWKHSOXJQRWWKHFDEOHLIWKH
SRZHUFDEOHRUSOXJEHFRPHVIUD\HGRURWKHUZLVHGDPDJHG
7RDYRLGKD]DUGRXVHOHFWULFVKRFNRUODVHUUDGLDWLRQH[SRVXUHGRQRW
UHPRYHDQ\FRYHUVRUVFUHZVRWKHUWKDQWKRVHVSHFLILHGLQWKLVPDQ
XDO
7XUQRIIWKHSRZHUDQGGLVFRQQHFWWKHSRZHUSOXJE\SXOOLQJWKHSOXJ
QRWWKHFDEOHLIDQ\RIWKHIROORZLQJRFFXUV
<RXVSLOOVRPHWKLQJLQWRWKHPDFKLQH
<RXVXVSHFWWKDW\RXUPDFKLQHQHHGVVHUYLFHRUUHSDLU
7KHH[WHUQDOKRXVLQJRI\RXUPDFKLQHKDVEHHQGDPDJHG
'RQRWLQFLQHUDWHVSLOOHGRUXVHGWRQHU7RQHUGXVWPLJKWLJQLWHZKHQ
H[SRVHGWRDQRSHQIODPH
'LVSRVDORIWRQHUFDQWDNHSODFHDWRXUDXWKRUL]HGGHDOHU
'LVSRVHRIWKHXVHGWRQHUERWWOHLQDFFRUGDQFHZLWKORFDOUHJXODWLRQV
'RQRWUHPRYHWKHWRQHUERWWOHIXVHUXQLWGXSOH[XQLWDQGSDSHUWUD\
DOODWRQFH7KHPDFKLQHPLJKWIDOODQGFDXVHLQMXU\0DNHVXUHWRILUVW
UHWXUQHDFKFRPSRQHQWEDFNWRLWVRULJLQDOSRVLWLRQEHIRUHFKHFNLQJ
RWKHUFRPSRQHQWV
6
R&$87,21
3URWHFWWKHPDFKLQHIURPGDPSQHVVRUZHWZHDWKHUVXFKDVUDLQDQGVQRZ
8QSOXJWKHSRZHUFRUGIURPWKHZDOORXWOHWEHIRUH\RXPRYHWKHPDFKLQH
:KLOHPRYLQJWKHPDFKLQH\RXVKRXOGWDNHFDUHWKDWWKHSRZHUFRUGZLOOQRW
EHGDPDJHGXQGHUWKHPDFKLQH
:KHQ\RXGLVFRQQHFWWKHSRZHUSOXJIURPWKHZDOORXWOHWDOZD\VSXOOWKH
SOXJQRWWKHFDEOH
'RQRWDOORZSDSHUFOLSVVWDSOHVRURWKHUVPDOOPHWDOOLFREMHFWVWRIDOOLQVLGH
WKHPDFKLQH
.HHSWRQHUXVHGRUXQXVHGDQGWRQHUERWWOHRXWRIWKHUHDFKRIFKLOGUHQ
)RUHQYLURQPHQWDOUHDVRQVGRQRWGLVSRVHRIWKHPDFKLQHRUH[SHQGHG
VXSSO\ZDVWHDWKRXVHKROGZDVWHFROOHFWLRQSRLQWV'LVSRVDOFDQWDNHSODFH
DWDQDXWKRUL]HGGHDOHU
7KHLQVLGHRIWKHPDFKLQHFRXOGEHYHU\KRW'RQRWWRXFKWKHSDUWVZLWKD
ODEHOLQGLFDWLQJWKH³KRWVXUIDFH´2WKHUZLVHDQLQMXU\PLJKWRFFXU
2XUSURGXFWVDUHHQJLQHHUHGWRPHHWKLJKVWDQGDUGVRITXDOLW\DQGIXQFWLRQ
DOLW\DQGZHUHFRPPHQGWKDW\RXXVHRQO\WKHH[SHQGDEOHVXSSOLHVDYDLOD
EOHDWDQDXWKRUL]HGGHDOHU
7
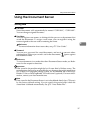
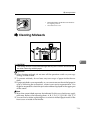
Positions of Labels and Hallmarks for
RWARNING and RCAUTION
This machine has labels and markings for RWARNING,RCAUTION at the positions shown below. For safety, please follow the instructions and handle the
machine as indicated.
Finisher 3000B(Staple Cartridge)
ZJBH470E
8
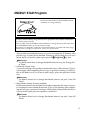
ENERGY STAR Program
As an ENERGY STAR Partner, we have determined
that this machine model meets the ENERGY STAR
Guidelines for energy efficiency.
The ENERGY STAR Guidelines intend to establish an international energy-saving system for
developing and introducing energy-efficient office equipment to deal with environmental issues, such as global warming.
When a product meets the ENERGY STAR Guidelines for energy efficiency, the Partner shall
place the ENERGY STAR logo onto the machine model.
This product was designed to reduce the environmental impact associated with office equipment by means of energy-saving features, such as Low-power mode.
• Low Power Mode
This product automatically lowers its power consumption 15 minutes after
the last copy or print job has finished. Printing is still possible in Low Power
Mode, but if you want to make copies press the {(QHUJ\6DYHU} key first.
5HIHUHQFH
For details about how to change the default interval, see p.66 “Energy Saver Timer”.
• Off Mode (Copier only)
To conserve energy, this product automatically turns off 90 minutes (Type 2:
120 minutes) after completing the last copy or print job. Printing is still possible in Off Mode, but if you want to make copies, press the operation switch
first.
5HIHUHQFH
For details about how to change the default interval, see p.66 “Auto Off
Timer”.
• Sleep Mode (Printer, Scanner installed)
If the printer features are installed, this product automatically lowers its power consumption even further 90 minutes (Type 2: 120 minutes) after completing the last copy or print job. Printing is still possible in Sleep Mode, but if you
want to make copies press the operation switch first.
5HIHUHQFH
For details about how to change the default interval, see p.66 “Auto Off
Timer”.
9
• Duplex Priority
The ENERGY STAR Program recommends use of the Duplex function. By
conserving paper, this function has environmental benefits. For applicable
machines, duplex function (one-sided original → two-sided copies) is selected when the operation switch or the main power switch is turned on, the {(Q
HUJ\6DYHU} key is pressed, or when the machine resets automatically.
5HIHUHQFH
To change the settings of the Duplex Priority mode, see “Duplex Mode Priority”, Copy Reference.
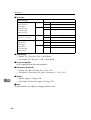
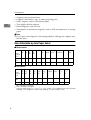
6SHFLILFDWLRQ
Low Power
Mode
Off Mode
Sleep Mode
Duplex Priority
Copying function only
Multiple function printer
with copying, printing, scanning functions
Type 1
Type 2
Type 1
Type 2
Power consumption
340 W
350 W
345 W
355 W
Default interval
15 minutes
15 minutes
Recovery
Time
40 sec.
40 sec.
Power consumption
6W
--
Default interval
90 minutes
Recovery
Time
360 sec. or less
--
Power consumption
--
50 W
Default interval
--
90 minutes
Recovery
Time
--
360 sec. or less
120 minutes
--
120 minutes
1 Sided → 2 Sided
❖ 5HF\FOHG3DSHU
In accordance with the ENERGY STAR Program, we recommend use of environmentally friendly recycled paper. Contact your sales representative for
recommended paper.
10
Machine Types
This machine comes in two models that differ by copy speed. To determine
which model you have, see the machine's inside front cover.
Type 1
Copy speed
Type 2
90 copies/minute (A4K, 81/2" 105 copies/minute (A4K,
81/2" × 11"K)
× 11"K)
11
12
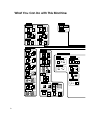
1. What You Can Do with This
Machine
Available Functions
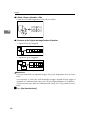
You can use this machine as a copier, printer, or scanner. This machine also has
a Document Server function which has File Merge, Insert Printing and On Demand Printing functions.
GXMFPZ2E
&RSLHU0RGH
In copier mode you can make basic copies and also copy using more sophisticated techniques, such as reduction/enlargement or combining several originals
onto one copy. You can install several options for using sort, staple, and saddle
stitch functions.
3ULQWHU0RGH
You can print documents under various environments.
6FDQQHU0RGH
You can use this machine as a network scanner.
It is also possible to e-mail the scanned image as an attached file via the LAN, or
Internet.
13
:KDW<RX&DQ'RZLWK7KLV0DFKLQH
'RFXPHQW6HUYHU0RGH
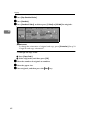
You can save the documents from copy and printer functions to the hard disk.
Documents can be printed later, or the machine can be controlled from the computer.
Scanned, copied, or printed documents can be stored on the hard disk, or you
can view the document's thumbnails on the computer. The documents can also
be downloaded to the computer. *1
*1
The stored documents can be viewed, printed, or downloaded using the Web browser. These functions are also available when DeskTopBinder V2 Professional/Lite is
installed in the computer.
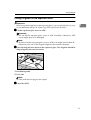
The machine shown below is equipped with options.
GXDOCU3E
1RWH
❒ You can save the following:
• Data from documents scanned using the Auto Document Feeder (ADF),
and the exposure glass
• Data sent from a computer
,PSRUWDQW
❒ Do not turn off the main power switch when the On indicator is lit or blink-
ing. If you turn it off during an operation, the memory or hard disk might be
damaged.
❒ The machine should not be subjected to strong impacts. Strong shocks damage the hard disk or delete stored files.
14
$YDLODEOH)XQFWLRQV
❖ 2Q'HPDQG3ULQWLQJ
If you save a document in the Document Server, you can print it out at any
time using print settings such as duplex and stapling.
❖ )LOH3ULQWLQJ
You can merge and print documents stored in the Document Sever, sent from
a computer, or scanned.
❖ 2SHUDWLRQIURPFRPSXWHU
If you install DeskTopBinder V2 Professional (optional) or DeskTopBinder
V2 Lite on the computer, you can check the contents of stored documents,
print copies for confirmation and perform other operations. These operations
are also possible using the Web browser.
You can also perform operations on data stored in the Document Server from
the computer, rather than from the machine.
5HIHUHQFH
For more detailed information, see the DeskTopBinder V2 Professional/Lite manuals.
For more information about the Web browser, see p.52 “Viewing Stored
Documents on the Web Browser” and Network Guide.
15
:KDW<RX&DQ'RZLWK7KLV0DFKLQH
8VHU0DQDJHPHQW
You can limit users of the machine, and restrict certain functions with user
codes.
You can limit the user of the key operator tools to the key operator only. See p.69
“Key Operator Code”.
8VLQJWKH8VHU&RGH
The user is requested to enter a registered user code to operate the machine. You
can check machine use by each user.
❖ 0DQDJLQJLWHPV
• You can set the functions permitted to each user, as shown below.
• You can output list of usage amounts for each user.
The functions you can restrict are as follows:
Function
Limitation
Usage amount management
Copy
❍
❍
Printer
❍
❍/Auto program
Scanner
❍
❍(manages the number of
scannes)
Document Server
*1
❍
(depending on the mode to
store the document) *1
When you print the documents by pressing the {'RFXPHQW6HUYHU} key, the copy counter
shows the number of copies for the documents stored in copy and Document Server
mode, and the print counter shows the number of documents stored in printer mode.
5HIHUHQFH
p.69 “User Code Management” and p.75 “User Codes”
6HFXULW\)XQFWLRQV
The security functions protect the documents from being copied without permission or unauthorized access through the network. See p.149 “Security”.
❖ 6HFXULW\)XQFWLRQV
• Protecting stored documents (setting passwords)
• Protecting data remaining in memory
• Authenticating administrator (setting the key operator code). See p.69
“Key Operator Code”.
16
❖ ([WHQGHG6HFXULW\)XQFWLRQ
By setting a password, documents will be protected from illegitimate accesses. See p.74 “Extended Security”.
2. Getting Started
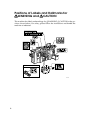
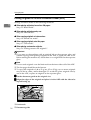
Guide to Components
ZJBH030N
1. Exposure glass
7. Paper tray
Place single-page originals here face
down for copying.
Place copy paper here.
Tray 1 is a tandem tray where paper on
the left side automatically moves to the
right when paper there has run out.
2. Auto Document Feeder (ADF)
The ADF automatically feeds a stack of
originals one by one.
8. Main power switch
This indicator lights when you press the
operation switch.
Press to turn the main power on or off.
We recommend you only turn this switch
off when the machine is not going to be
used for an extended period of time (e.g.
over a vacation). See p.24 “Turning On
the Power”.
5. Operation switch
9. Toner cover
Press when you want to use the machine. The
On indicator lights when this switch is
pressed. See p.24 “Turning On the Power”.
10. Suspend/Resume switch
3. Control panel
See p.20 “Control Panel”.
4. On indicator
6. Front cover
Open to remove misfed paper.
Open to change the toner bottle.
Press to momentarily stop copying.
Pressing again resumes the stopped operation.
17
*HWWLQJ6WDUWHG
ZJBH040E
1. Ventilation hole
Prevents overheating. Do not obstruct
the ventilation hole by placing or leaning
an object near it. If the machine overheats, a fault might occur.
18
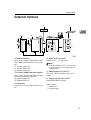
([WHUQDO2SWLRQV
External Options
4
5
*1
*2
*4
*5
6
*3
1
2
3
1. Booklet finisher
4. A3/11" × 17" tray unit
Sorts, stacks, staples, and punches copies.
The saddle stitch function is also available.
*1: Finisher upper tray
*2: Finisher shift tray 1
*3: Finisher shift tray 2
Holds A3/11" × 17" size paper.
2. Finisher 3000B (100-sheet staples)
Sorts, stacks, staples, and punches copies
(optional punch unit required)
*4: Finisher upper tray
*5: Finisher shift tray
3. Interposer
Inserts cover or slip sheets between copies.
1RWH
❒ If you install the A3/11" × 17" tray unit
on your machine, you cannot use it as
a tandem tray.
5. Multi bypass tray (Tray 7)
This tray can be used the same way as
others.
6. Large Capacity Tray (LCT)
Holds 4,550 sheets of paper.
Other options:
• Punch Unit
• Output Jogger
19
*HWWLQJ6WDUWHG
Control Panel
ZJAS060N
1. Status indicator
Machine status is described by this indicator. By default, this indicator is turned
off. You can select the status indicator lit
or not. See p.63 “Status Indicator”.
1RWH
❒ If the status indicator is blinking red,
paper jam has occurred in the current
copy job. Bring up the current job
screen.
The main power
switch is turned off
or ready to make
copies.
2. {6FUHHQ&RQWUDVW} knob
Flashing green
Scanning originals
Lit green
Copying (ready to
scan originals)
Press to change the language of the display.
Flashing red
Toner has nearly
run out.
Off
Lit red
Paper jam or other
malfunction
Adjusts display panel brightness.
3. {/DQJXDJH6HOHFWLRQ} key
4. {&KHFN0RGHV} key
Press to check settings.
5. {,QWHUUXSW} key
Press to make interrupt copies during a
copy run. See “Interrupt Copy”, Copy Reference.
6. {(QHUJ\6DYHU} key
20
Switch to and from Energy Saver mode.
See p.28 “Saving Energy”.
&RQWURO3DQHO
7. {&OHDU0RGHV} key
17. {-RE/LVW} key
Press to clear previously entered copy job
settings.
Shows the job list for a copy job or jobs
stored in the Document Server.
8. {3URJUDP} key
18. {1HZ-RE} key
Press to register or recall a program.
See “Program”, Copy Reference.
Use this key to set up the next copy job
while a copy job or storing data in the
Document Server is in progress.
9. {6WRS} key
Press to stop a job in progress such as
scanning originals, or printing.
10. {6WDUW} key
Press to start copying, scanning, or printing documents.
11. {6DPSOH&RS\} key
Press to make a single set of copies or
prints before starting a long copy run. By
checking a sample set and making necessary changes to image quality settings before starting a multiple copy run, you can
save time and paper. See p.46 “Sample
copy”.
12. {&OHDU} key
Press to delete a number entered.
13. {} key
Show errors and machine status.
B: Data In indicator. See p.32 “Multi-Access”.
L: Service Call indicator
x: Misfeed indicator. See p.113 “x
Clearing Misfeeds”.
M: Open Cover indicator
d: Add Staple indicator. See p.127 “d
Adding Staples”.
D: Add Toner indicator. See p.111 “D
Adding Toner”.
20. {&RXQWHU} key
Press to see the total number of copies
made. See p.148 “Counter”.
21. {8VHU7RROV} key
Use to enter the number of copies.
Press to access the User Tools menu
where you can customize default settings. See p.57 “User Tools (System Settings)”.
15. Function keys
22. {7UD\3DSHU6HWWLQJV} key
Press to enter a value or confirm a setting.
14. Number keys
Press the appropriate key to select one of
the functions.
• Copier
• Document Server
• Printer
• Scanner
19. Indicators
Specify the paper tray settings for delivery. See p.93 “Paper Tray Settings”.
23. Display panel
Shows operation status, error messages,
and function menus. See p.23 “Display
Panel”.
16. Function status indicators
These show the status of the functions.
• Green: active.
• Red: interrupted. Press the function
key to change the display, and then
follow the displayed instructions.
21
*HWWLQJ6WDUWHG
1RWH
❒ You can adjust the angle of the control
panel.
22
&RQWURO3DQHO
'LVSOD\3DQHO
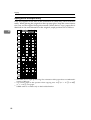
The display panel shows machine status, error messages, and function menus.
,PSRUWDQW
❒ A force or impact of more than 30 N (about 3 kgf) will damage the display
panel.
The default is to display the screen for copying when you first turn the power on.
The function items displayed serve as selector keys. You can select or specify an
item by lightly pressing them.
When you select or specify an item on the display panel, it is highlighted like
this:
. Keys appearing as
cannot be used.
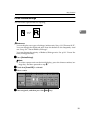
❖ ,QLWLDO&RS\'LVSOD\
4
3
2
5
6
7
1
8
1. Original mode, Image Density
and Special Original mode.
6. Sort, Stack, Staple or Punch
2. Operational messages.
3. Operational status.
4. The number of originals, copies,
7. Functions you can select. Press an
and printed pages.
8. This indicator shows when toner
5. You can register up to two fre-
mode.
item to bring up its function menu
e.g. press >5HGXFH(QODUJH@ to bring up
the Reduce/Enlarge menu.
has nearly run out.
quently used reduce/enlarge ratios
other than the fixed reduce/enlarge
ratios.
23
*HWWLQJ6WDUWHG
Turning On the Power
This machine has two power switches.
❖ 2SHUDWLRQVZLWFKULJKWIURQWVLGHRIWKHH[SRVXUHJODVV
Press to activate the machine. Once the machine has warmed up, you can
make copies.
❖ 0DLQSRZHUVZLWFKOHIWVLGHRIWKHPDFKLQH
When the machine will not be used for an extended period of time, turn off
the main power switch.
1RWH
❒ This machine automatically goes into Low Power mode, or turns itself off if
you do not use it for a specified period of time. See p.66 “Auto Off Timer” and
p.66 “Energy Saver Timer”.
7XUQLQJ2QWKH0DLQ3RZHU
A Make sure the power cord is firmly plugged into the wall outlet.
B Turn on the main power switch.
Make sure that the main powr indicator lights up.
,PSRUWDQW
❒ Do not turn off the main power immediately after switching it on. Doing
so may result in damage to the hard disk or memory, leading to malfunction.
24
7XUQLQJ2QWKH3RZHU
7XUQLQJ2QWKH3RZHU
A Press the operation switch to make the On indicator light up.
1RWH
❒ If the power is not turned on when the operation switch is pressed, check
the main power switch is on. If off, turn it on.
7XUQLQJ2IIWKH3RZHU
A Press the operation switch to make the On indicator go out.
1RWH
❒ Even if you press the operation switch, the indicator remains lit and blinks
in the following cases:
• When communication with external equipment is in progress.
• When the hard disk is active.
7XUQLQJ2IIWKH0DLQ3RZHU
,PSRUWDQW
❒ Do not turn off the main power switch when the On indicator is lit or blink-
ing. Doing so may result in damage to the hard disk or memory, leading to
malfunction.
❒ Pull out the power cord after turning off the main power switch. Not doing
so may result in damage to the hard disk or memory, leading to malfunction.
A Make sure the On indicator is unlit.
B Turn off the main power switch.
Make sure that the main power indicator goes out.
25
*HWWLQJ6WDUWHG
26
3. Combined Function
Operations
Changing Modes
1RWH
❒ You cannot switch modes when accessing user tools or during interrupt cop-
ying.
❒ The default display is the screen for copying, which appears when you turn
the power on. You can change this setting. For details about such settings, see
p.62 “Function Priority”.
ZJBH490N
27
&RPELQHG)XQFWLRQ2SHUDWLRQV
6DYLQJ(QHUJ\
- Low Power Mode
If you do not operate the machine for a specified period of time after an operation, or when you press the {(QHUJ\6DYHU} key, the display disappears and the
machine goes into Low Power mode. When you press the {(QHUJ\6DYHU} key
again, the machine returns to the “Ready” status. In Low Power mode, the machine uses less electricity.
1RWH
❒ You can change the Panel Off Timer. See p.67 “Panel Off Timer”.
- System Reset
The machine automatically returns to its initial condition when a job is finished,
after a specified period of time. This function is called “System Reset”.
1RWH
❒ You can change the System Reset Timer. See p.67 “System Auto Reset Timer”.
- Auto Off
The machine automatically turns itself off after a job is finished, after a specified
period of time. This function is called “Auto Off”.
1RWH
❒ You can change the Auto Off Timer. See p.66 “Auto Off Timer”.
❒ Auto Off Timer will not operate in the following cases:
•
•
•
•
•
•
•
•
•
28
When a warning message appears
When the service call message appears
When paper is jammed
When the cover is open
When the “Adding Toner” message appears
When toner is being added
When the User Tools or Counter screen is displayed
When fixed warm-up is in progress
When printer or other functions are operating
&KDQJLQJ0RGHV
• When operations have been interrupted during printing
• When the Data In indicator is on or blinking
• When the sample print or confidential print screen is displayed
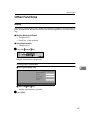
-RE/LVW
In the Job List, you can check and delete the contents of jobs in the print queue
and jobs currently printing.
1RWH
❒ In the Job List, jobs reserved using copy mode and Document Server mode
are displayed. When >3ULQW3ULRULW\@ in System Settings is set to >-RE2UGHU@, jobs
reserved using copy mode, printer mode, Document Server mode, Web
browser, DeskTopBinder V2 Professional (optional) or DeskTopBinder V2
Lite are displayed.
❒ You can set the length of interval between the end of a job and the start of a
new job with the User Tools. See p.65 “Time Interval between Printing Jobs”.
Even if you have set the interval, you can start printing a job before the set
time has elapsed by pressing >6WDUW3ULQWLQJ@.
5HIHUHQFH
For setting the time interval, see p.65 “Time Interval between Printing Jobs”.
For setting Web browser, see Web browser's Help menu, and for setting
DeskTopBinder V2 Professional (optional) or DeskTopBinder V2 Lite, see the
manuals.
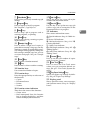
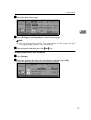
&KHFNLQJWKHOLVW
A Press the {-RE/LVW} key.
The job list appears.
29
&RPELQHG)XQFWLRQ2SHUDWLRQV
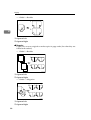
B Select the number of the job you want to check.
The icons below show the operation mode of stored documents.
Job printed using copy mode.
Job printed using printer
mode.
Job printed using Document
Server mode.
Job printed using DeskTopBinder V2
Professional/Lite
Job printed using Web browser.
1RWH
❒ If more than ten jobs are registered, press >U3UHYLRXV@ or >T1H[W@ to scroll
the screen.
C Press >'HWDLO@.
D Check the contents of the list.
E Press >2.@.
The display returns to the job list menu.
&KDQJLQJWKHRUGHURIMREV
A Press the {-RE/LVW} key.
B Select the number of the job you want to change the order.
1RWH
❒ You can change the order of jobs only in standby mode.
C Press >&KDQJH2UGHU@.
D Change the order using >U3UHYLRXV@ or >T1H[W@.
E Press >2.@.
30
&KDQJLQJ0RGHV
'HOHWLQJMREV
A Press the {-RE/LVW} key.
The job list appears.
B Select the number of the job to be deleted.
1RWH
❒ You can delete a job during printing.
C Press >'HOHWH-RE@.
D Press ><HV@.
The display returns to the job list menu.
31
&RPELQHG)XQFWLRQ2SHUDWLRQV
Multi-Access
You can carry out another job using a different function while the current job is
being performed. Performing multiple functions simultaneously like this is
called “Multi-Access”.
This allows you to handle jobs efficiently, regardless of how the machine is being
used. For example:
• While making copies, you can scan documents to store in the Document Server.
• While printing documents saved in the Document Server, the machine can receive print data.
• While printing print data, you can set coppying operations.
1RWH
❒ You can set the priority of functions, see p.63 “Print Priority”. As default, the
“Display Mode” is set to first priority.
- Sample operations
The tables on the following pages show sample operations for when “Print Priority” is set to “Interleave”. See p.63 “Print Priority”.
|: Simultaneous operations are available.
$: Operation is enabled when the relevant function key is pressed and remote
switching (of the scanner) is done.
❍: Operation is enabled when the {,QWHUUXSW} key is pressed to interrupt the current operation.
→: Operation is performed automatically once the current operation ends.
×: The operation must be started once the current operation ends. (Simultaneous
operations are not available.)
32
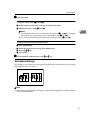
0XOWL$FFHVV
Interrupt Copying Copy
DeskTopBinder V2
Professional/Lite
Printing from Document Server
Printing from Document Server
Scanning a document
to Store in Document Server
Operations for document Server Document Server
Scanner
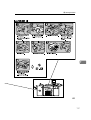
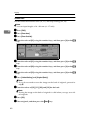
Operations for scanning
| → → ❍ ❍ | | → $ $ $ $ *2
| | *3
| → → ❍ ❍ | | | $ $ $ $ *2
| |
Operations for copying
❍ ❍ ❍ ×
×
| | | ×
×
×
×
×
|
Copying
❍ ❍ ❍ ×
×
| → → ×
×
×
×
×
→
*1
*1
*1
*1
*4
Scanning
Stapling
Stapling
❍ ❍ | | | $ $ $ $
Sort
*2
*1
*3
*2
| |
Sort print
| | | ❍ ❍ | → → | | | |
| |
Stapling
| → | ❍ ❍ | → → | | | |
*4
Operations for scanning $ $ $ ❍ ❍ | | | ×
| | *3
*3
×
$ $
$ |
×
×
×
×
|
Operations for Document $ $ $ ❍ ❍ | | | $ $ ×
Server
×
×
|
$ ×
Scanning a document to
store in Document Server
×
×
|
Scanning
×
×
×
×
$ |
| | | | | → → → | | | |
Data reception
Print
Print
×
*1
Scanner Printer
Printing
Operations for copying
×
Data reception
Sort
×
Copying
Stapling
Copy
Operations for copying
Operations for copying
Mode before you select
Document Server
Printer
Interrupt Copying
Mode after you select
×
×
| | | ×
❍ ❍ | | | $ ×
×
Printing from Document $ | | ❍ ❍ | | | | | | | *5
*3
*5
Server
| |
*5
33
&RPELQHG)XQFWLRQ2SHUDWLRQV
*1
*2
*3
*4
*5
DeskTopBinder V2
Professional/Lite
Printing from Document Server
Printing from Document | | | | | | | | | | | |
*3
Server
| ×
Printing from Document | | | | | | | | | | | |
*3
Server
| ×
Simultaneous operations are only available after the preceding job documents are all
scanned and >1HZ-RE@ appears.
You can scan a document after the preceding job documents are all scanned.
During stapling, printing automatically starts after the current job.
Stapling is not available.
Simultaneous operations are possible when you press >1HZ-RE@.
1RWH
❒ Stapling cannot be used at the same time for multiple functions.
34
Printing from Document Server
Scanning a document
to Store in Document Server
Operations for document Server Document Server
Scanning
Scanner
Operations for scanning
Stapling
Print
Printing
Data reception
Copying
Operations for copying
Sort
Stapling
Copy
Web Browser DeskTopBinder V2
Professional/Lite
Mode before you select
Operations for copying
Printer
Interrupt Copying
Mode after you select
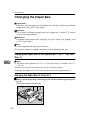
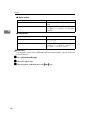
4. Document Server
Relationship between Document Server
and Other Functions
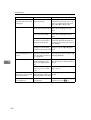
The following table describes the relationship between the Document Server
and other machine functions.
Function name
From where
documents are
stored
Displaying a
list *1
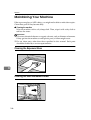
Printing stored
documents *2
Sending
document
Copier
Copier/Document Server
Enabled
Enabled
Disabled
Printer
Personal compuEnabled
ter
Enabled
Disabled
Scanner
Scanner
Disabled
Enabled *4
*1
*2
*3
*4
Disabled *3
You can also display stored documents from a Web browser. See p.52 “Viewing
Stored Documents on the Web Browser”.
You can print stored documents from a Web browser. See p.44 “Printing Stored Documents”. If DeskTopBinder V2 Professional (optional) or DeskTopBinder V2 Lite is
installed on your computer, all the stored documents can also be printed from your
computer.
You can display stored documents from scanner mode. See “Viewing a List of Stored
Files”, Scanner Reference.
You can e-mail stored documents from scanner mode. See “Using E-mail with the
Document Server”, Scanner Reference.
35
'RFXPHQW6HUYHU
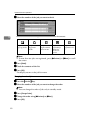
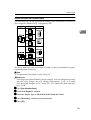
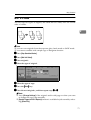
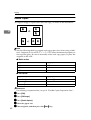
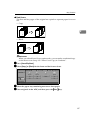
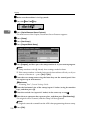
'RFXPHQW6HUYHU'LVSOD\
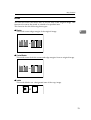
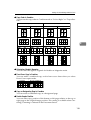
❖ 'RFXPHQW6HUYHU0DLQ'LVSOD\
7
2
3
1
8
6
5
4
ZJBS100N
1. Operating status and messages.
2. The title of the currently selected
screen.
3. The numbers of originals, copies,
and printed pages.
4. The operation keys.
5. The stored operation mode.
6. Icons to show the operation
mode.
is appeared when setting
the password.
7. Pressing >2UGHU@ displays the documents in the selected order.
8. Press a desired key, and the documents are sorted in the order of the
pressed key.
The icons below show the operation mode when documents stored in the
Document Server.
Function
Icon
36
Copier
Printer
Scanner
--
8VLQJWKH'RFXPHQW6HUYHU
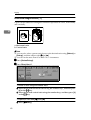
Using the Document Server
6WRULQJ'DWD
❖ )LOH1DPH
Saved documents will automatically be named “COPY0001”, “COPY0002”.
You can change assigned file names.
❖ 8VHU1DPH
You can register user names to distinguish the person or department that
saved the documents. To assign a user name, you can register it using the
name assigned to the user code or entering the name.
5HIHUHQFH
For more information about user codes, see p.75 “User Codes”.
❖ 3DVVZRUG
You can set a password for saved documents, and use it to prevent others
printing them. When a password is set for the documents, appears against
the document name.
5HIHUHQFH
To store documents in a mode other than Document Server mode, see References for the respective functions.
,PSRUWDQW
❒ Data stored in the machine might be lost if some kind of failure occurs. The
manufacturer shall not be responsible for any damage that might result from
loss of data. For long-term storage of data, we recommend use of DeskTopBinder V2 Lite or DeskTopBinder V2 Professional (optional). For more information, contact your local manufacture.
1RWH
❒ Data stored in the Document Server is set to be deleted after 3 days (72 hours)
by the factory default setting. You can specify the period after which the
stored data is deleted automatically. See p.73 “Auto Delete File” .
37
'RFXPHQW6HUYHU
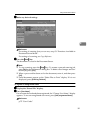
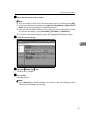
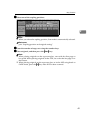
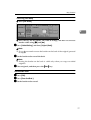
A Press the {'RFXPHQW6HUYHU} key.
ZJAS343N
B Press >6FDQ2ULJLQDO@ when the list appears.
C Enter a file name, user name, or password if necessary.
1RWH
❒ If you do not register a file name, one is automatically assigned.
5HIHUHQFH
p.39 “To register or change a user name”
p.40 “To change a file name”
p.41 “To set or change a password”
D Place originals.
5HIHUHQFH
For more information about types of originals that can be placed and how
to place them, see Copy Reference.
38
8VLQJWKH'RFXPHQW6HUYHU
E Make any desired settings.
5HIHUHQFH
For setting of scanning that you can use, see p.53 “Functions Available in
Document Server Mode”.
For settings of scanning, see Copy Reference.
F Press the {6WDUW} key.
The document is saved in the Document Server.
1RWH
❒ To stop scanning, press the {6WRS} key. To resume a paused scanning job,
press >1R@ in the confirmation dialog box. To delete saved images and cancel the job, press ><HV@.
❒ When a password has been set for the document, enter it, and then press
>2.@.
❒ Saved documents appear on the “Select Files to Print” display. If it is not
displayed, press >6FDQQLQJ)LQLVKHG@.
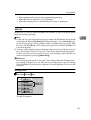
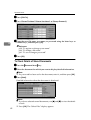
7RUHJLVWHURUFKDQJHDXVHUQDPH
A Display the “Stored File” display.
B Press >8VHU1DPH@.
If user names have already been registered, the “Change User Name” display
appears. To use an unregistered user name, press >1RQSURJUDPPHG1DPH@.
5HIHUHQFH
p.75 “User Codes”
39
'RFXPHQW6HUYHU
,IUHJLVWHUHGXVHUQDPHVDUHXVHG
A Select a registered user name from the list, and then press >2.@.
To change your user name to an unregistered user name, proceed to the
next step.
5HIHUHQFH
p.75 “Registering a New User Code”
,IWKHUHDUHQRUHJLVWHUHGXVHUQDPHV
A Enter the new user name, and then press >2.@.
B Enter the user name, and then press >2.@.
1RWH
❒ You can type up to 20 characters for user name.
5HIHUHQFH
p.91 “Entering Text”
,IQRUHJLVWHUHGXVHUQDPHVDUHXVHG
A Press >1RQSURJUDPPHG1DPH@.
B Enter the new user name, and then press >2.@.
5HIHUHQFH
p.91 “Entering Text”
7RFKDQJHDILOHQDPH
A Bring up the “Stored File” display.
B Press >)LOH1DPH@.
The “Change File Name” display appears.
C Press >'HOHWH$OO@ to delete the previous file name.
40
1RWH
❒ You can also use >%DFNVSDFH@ to delete unnecessary characters.
8VLQJWKH'RFXPHQW6HUYHU
D Enter a new file name, and then press >2.@.
1RWH
❒ A string of up to 20 characters can be entered as a file name. Note that only
16 characters of each file name will appear in the document list.
5HIHUHQFH
p.91 “Entering Text”
7RVHWRUFKDQJHDSDVVZRUG
A Bring up the “Stored File” display.
B Press >3DVVZRUG@.
C Enter the password using the number keys (four-digits), and then press
>2.@ or the {} key.
&KDQJLQJWKH)LOH1DPH8VHU1DPHRU3DVVZRUG
A Press the {'RFXPHQW6HUYHU} key.
B Select the document for which the user name, file name, or password is to
be changed.
1RWH
❒ If a password has already been set for the document, enter it, and then
press >2.@.
41
'RFXPHQW6HUYHU
C Press >(GLW)LOH@.
D Press >&KDQJH)LOH1DPH@, >&KDQJH8VHU1DPH@, or >&KDQJH3DVVZRUG@.
E Enter the new file name, user name, or password using the letter keys or
number keys, and then press >2.@.
5HIHUHQFH
p.39 “To register or change a user name”
p.40 “To change a file name”
p.41 “To set or change a password”
F Press >2.@.
7R&KHFN'HWDLOVRI6WRUHG'RFXPHQWV
A Press the {'RFXPHQW6HUYHU} key.
B Select the document for which you want to display detailed information.
1RWH
❒ If a password has been set for the document, enter it, and then press >2.@.
C Press >'HWDLO@.
Detailed information about the document is displayed.
1RWH
❒ If you have selected several documents, use >U@ and >T@ to view the details
of each.
❒ Press >2.@. The “Select Files” display appears.
42
8VLQJWKH'RFXPHQW6HUYHU
6HDUFKLQJIRU6WRUHG'RFXPHQWV
You can use either >6HDUFKE\8VHU1DPH@ or >6HDUFKE\)LOH1DPH@ to search for documents stored on the Document Server. You can also list stored documents in
the order you prefer.
1RWH
❒ If you install DeskTopBinder V2 Professional (optional) or DeskTopBinder
V2 Lite on the computer, you can search and rearrange documents from the
computer.
5HIHUHQFH
For more detailed information, see the DeskTopBinder V2 Professional/Lite
manuals.
7RVHDUFKE\XVHUQDPH
A Press the {'RFXPHQW6HUYHU} key.
B Press >6HDUFK@.
C Press >6HDUFKE\8VHU1DPH@.
1RWH
❒ If you also press >6HDUFKE\)LOH1DPH@, you can enter the file name simulta-
neously.
D To specify a registered user name, select the user name from the displayed
list, and then press >2.@.
1RWH
❒ To specify an unregistered user name, follow the procedures below.
E To specify an unregistered user name, press >1RQSURJUDPPHG1DPH@, enter
the name, and then press >2.@.
5HIHUHQFH
p.91 “Entering Text”
F Press >2.@.
Only files beginning with the name entered appear in the “Select Files to
Print” display.
1RWH
❒ To display all files saved in the Document Server, press >)LOH/LVW@.
43
'RFXPHQW6HUYHU
7RVHDUFKE\ILOHQDPH
A Press the {'RFXPHQW6HUYHU} key.
B Press >6HDUFK@.
C Press >6HDUFKE\)LOH1DPH@.
1RWH
❒ If you also press >6HDUFKE\8VHU1DPH@, you can enter the user name simul-
taneously.
D Enter the file name, and then press >2.@.
E Press >2.@.
Only files beginning with the name entered appear in the “Select Files” display.
5HIHUHQFH
p.91 “Entering Text”
1RWH
❒ To display all files saved in the Document Server, press >)LOH/LVW@.
3ULQWLQJ6WRUHG'RFXPHQWV
You can print documents stored in the Document Server with the procedures below.
1RWH
❒ You can print stored documents from a network computer with the Web
browser. For details about how to start the Web browser, see Network Guide.
3ULQWLQJIURPWKHOLVW
A Press the {'RFXPHQW6HUYHU} key.
B Select the document to be printed.
44
8VLQJWKH'RFXPHQW6HUYHU
1RWH
❒ If a password has been set for the document, enter the password, and then
press >2.@.
❒ You can select up to 30 documents.
❒ If sizes, resolutions or quality of selected documents are not the same, the
documents may not be printed.
❒ If you want to change the order of printing, cancel the selection, and select
documents in the desired order.
❒ If you press >'HOHWH)LOH@, selection of all documents will be canceled.
❒ When multiple documents are printed at the same time, print settings
made for the document printed first are applied to all other documents.
C Enter the required number of copies using the number key.
1RWH
❒ Up to 9999 can be entered.
D Press the {6WDUW} key.
&KDQJHWKHSULQWVHWWLQJVZKHQSULQWLQJ
A Select the document to be printed.
B Press >3ULQW6HWWLQJV@.
The “Print Settings” display appears. User names, file names, and print order
of documents appear.
1RWH
❒ The print settings made for printing in copier or printer mode are stored
by pressing >6DYH3ULQW6HWWLQJV@, and applied to the next printing.
❒ When multiple documents are printed at the same time, print settings
❒
❒
❒
❒
made for the document printed first are applied to all other documents.
When you press >6DYH 3ULQW 6HWWLQJV@, the changed print settings and the
number of print are stored.
If you print more than one set using the sort function, you can check the
print result by printing out only the first set. See p.46 “Sample copy”.
If you select multiple files, you can confirm file names or print order you
selected in step A by scrolling through the list with >T@ and >U@.
Press >)LOH/LVW@ to return to the “File List” display.
C Enter the required number of copies using the number keys.
1RWH
❒ Up to 9999 can be entered.
45
'RFXPHQW6HUYHU
D Press the {6WDUW} key.
The machine starts printing.
6WRSSLQJSULQWLQJ
A Press the {6WRS} key.
B Press >6WRS@.
&KDQJLQJWKHQXPEHURIFRSLHVGXULQJSULQWLQJ
1RWH
❒ The number of copies can only be changed when the sort function is selected
in print settings.
A Press the {6WRS} key.
B Press >&KDQJH4XDQWLW\@.
C Use the number keys to enter a new number of copies.
D Press the {} key.
E Press >&RQWLQXH@.
Printing restarts.
3UHVHWFRS\
You can set the next job while printing a document stored in the Document Server.
5HIHUHQFH
For details about settings, see “Preset Job”, Copy Reference.
6DPSOHFRS\
If you print multiple sets using the sort function, you can check the print order
or print settings are correct by printing out only the first set using the {6DPSOH
&RS\} key.
1RWH
❒ This function can be used only when the sort function is selected.
46
8VLQJWKH'RFXPHQW6HUYHU
A Select the document to be printed.
1RWH
❒ If a password has been set for the document, enter it, and then press >2.@.
❒ You can search for a document using >6HDUFKE\8VHU1DPH@ or >6HDUFKE\)LOH
1DPH@. See p.43 “Searching for Stored Documents”.
❒ You can sort document names in the list by user name, file name, or date.
To sort the documents, press >8VHU1DPH@, >)LOH1DPH@, or >'DWH7LPH@.
❒ To cancel a document selection, press the highlighted document again.
B Check the print settings.
C Press the {6DPSOH&RS\} key.
The first set is printed.
D Press >3ULQW@.
Printing restarts.
1RWH
❒ Press >6XVSHQG@ to cancel printing and return to the Print Settings menu
where you can change the settings.
47
'RFXPHQW6HUYHU
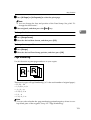
3ULQW6HOHFWHG3DJHV
You can print the first page or selected pages of the document selected in the Select Files to Print display to check content.
A Select the document to be printed.
1RWH
❒ If a password has been set for the document, enter it, and then press >2.@.
❒ You can search for a document using >6HDUFKE\8VHU1DPH@ or >6HDUFKE\)LOH
1DPH@. See p.43 “Searching for Stored Documents”.
❒ You can sort document names in the list by user name, file name, or date.
To sort documents, press >8VHU1DPH@, >)LOH1DPH@, or >'DWH7LPH@.
❒ To cancel a document selection, press the highlighted document again.
B Press >3ULQW6HOHFWHG3DJH@.
3ULQWLQJWKHILUVWSDJH
You can print only the first page of the selected document to check content. If
two or more documents are selected, the first page of each is printed.
A Press >VW3DJH2QO\@.
3ULQWLQJWKHVSHFLILHGSDJHV
You can print specified pages of the selected document to check content.
/LPLWDWLRQ
❒ You cannot print specified pages if two or more documents are selected.
A Press >6SHFLI\3DJH@.
B Enter the first page number to be printed using the number keys.
C Press >3DJHWR3DJH@.
D Enter the last page number to be printed using the number keys.
C Press the {6WDUW} key.
48
8VLQJWKH'RFXPHQW6HUYHU
(GLW)LOH
&RPELQLQJ)LOHV
You can combine two or more files stored in the Document Server.
Follow the procedure below to combine files.
1RWH
❒ You cannot recover the original files from the new file.
❒ You cannot combine files if they are currently being used by another function.
❒ You can combine up to 30 files.
A Press the {'RFXPHQW6HUYHU} key.
B Select documents you want to combine.
1RWH
❒ If the password has been set for the document, enter it, and then press >2.@.
❒ The files are combined in the order of being selected.
❒ The print settings for the file selected first are stored.
C Press >(GLW)LOH@.
D Press >&RPELQH)LOHV@.
E Enter the new file name.
1RWH
❒ For setting the file name, see p.40 “To change a file name”.
❒ If you do not set the file name, the name of the file selected first will be the
name of the combined file.
F Press >2.@.
49
'RFXPHQW6HUYHU
,QVHUWLQJ'RFXPHQWV
You can insert a file into files already stored in the Document Server.
Follow the procedure below to insert a file.
1RWH
❒ You cannot recover the original file from the new file.
❒ You cannot insert files into a file that is currently being used by another func-
tion.
A Press the {'RFXPHQW6HUYHU} key.
B Select the document to be inserted in.
1RWH
❒ If a password has been set for the document, enter it, and then press >2.@.
C Press >(GLW)LOH@.
D Press >,QVHUW)LOH@.
E Select the document you want to insert into.
F Enter the page number to insert the file using the number keys.
G Press >%HIRUH6SHFLILHG3DJH@ or >$IWHU6SHFLILHG3DJH@.
H Press >2.@.
'HOHWLQJ3DJHV
Follow the procedure below to delete pages from a file stored on the Document
Server.
3UHSDUDWLRQ
To check the page numbers, print the file. See p.44 “Printing Stored Documents”.
A Press the {'RFXPHQW6HUYHU} key.
B Select the document containing the pages you want to delete.
1RWH
❒ If a password has been set for the document, enter it, and then press >2.@.
C Press >(GLW)LOH@.
D Press >'HOHWH3DJHV@.
E Enter the number of the page you want to delete using the number keys.
50
8VLQJWKH'RFXPHQW6HUYHU
F If you want to delete a series of pages, press >3DJHWR3DJH@, and then enter
the number of the last page you want to delete.
1RWH
❒ If you want to delete only one page, proceed to step G.
❒ If you enter the last page number, the whole file will be deleted.
G Press >2.@.
H Press ><HV@ in the confirmation dialog box.
'HOHWLQJ6WRUHG'RFXPHQWV
,PSRUWDQW
❒ You can store up to 3,000 documents in the Document Server. No more doc-
uments can be stored when there are 3,000 documents in the Document Server. You should delete unnecessary documents.
1RWH
❒ You can delete all stored documents at once with User Tools. See p.73 “Delete
All Files”.
❒ You can delete stored documents from a network computer using the Web
browser. For details about how to start the Web browser, see Network Guide.
A Press the {'RFXPHQW6HUYHU} key.
B Select the document to be deleted.
1RWH
❒ If a password has been set for the document, enter it, and then press >2.@.
❒ You can delete multiple documents at once. See p.73 “Delete All Files”.
❒ You can search for a document by user name or file name, using >6HDUFKE\
8VHU1DPH@ or >6HDUFKE\)LOH1DPH@ respectively. See p.43 “Searching for
Stored Documents”.
❒ You can sort document names in the list by the user name, file name, or
date. To sort documents, press >8VHU1DPH@, >)LOH1DPH@, or >'DWH7LPH@.
❒ If you cannot find the document using its name, you can print the first
page of a document to check its contents. See p.48 “Print Selected Pages”.
❒ Press the selected line again to cancel the print job.
C Press >'HOHWH)LOH@.
D Press ><HV@ to delete the document.
51
'RFXPHQW6HUYHU
9LHZLQJ6WRUHG'RFXPHQWVRQWKH:HE%URZVHU
5HIHUHQFH
For settings of the Web Browser, see Network Guide. For details about the Web
Browser, see Help menu.
A Start the Web browser.
B Enter “http:// (the IP address of this machine) /” in the [Address] box.
The top page appears on the Web browser.
C Click >'RFXPHQW6HUYHU@.
The Document Server File List appears.
1RWH
❒ The Document Server File List can be displayed without showing thumbnails. Click >'HWDLOV@.
D Click the Properties icon of the document you want to check.
The information of that document appears.
E Confirm the content of the document.
1RWH
❒ To enlarge the preview of the document, click >3UHYLHZ@.
'RZQORDGLQJ6WRUHG'RFXPHQWV
1RWH
❒ An option is required to download documents stored in copier or printer
mode.
A Start the Web browser.
B Enter “http:// (the IP address of this machine) /” in the [Address] box.
The top page appears on the Web browser.
C Click >'RFXPHQW6HUYHU@.
The Document Server File List appears.
D Click the Properties icon of the document you want to download.
1RWH
❒ The Document Server File List can be displayed as thumbnails. Click
>7KXPEQDLO@.
E Select PDF, JPEG, or Multi-pageTIFF as the file format by clicking one of
52
the icons.
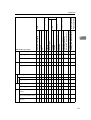
)XQFWLRQV$YDLODEOHLQ'RFXPHQW6HUYHU0RGH
Functions Available in Document Server
Mode
Functions that you can use during scanning or printing documents in Document
Server mode are as shown below.
Function
Key Display
Web Browser
Scanning
Printing
Batch Mode
❍
×
—
Mixed Sizes
❍
×
—
Custom Size Originals
❍
×
—
SADF Mode
❍
×
—
Thin Mode
❍
×
—
Face Up
❍
×
—
Auto Image Density
❍
×
—
Dark Background
❍
×
—
Manual Image Density
❍
×
—
Original Type Setting
❍
×
—
Number of Sets
×
❍
❍
Program
×
×
—
Auto Paper Select
❍
❍
❍
Manual Paper Select
❍
❍
❍
Reduce/Enlarge
❍
×
—
Create Margin
❍
×
—
Zoom
❍
×
—
Auto Reduce/Enlarge
❍
×
—
Size Magnification
❍
×
—
Directional Magnification (%)
❍
×
—
Directional Size Magnification (inch)
❍
×
—
Sort
×
❍
❍
Stack
×
❍
❍
Staple
×
❍
❍
Punch
×
❍
❍
1 Sided → 2 Sided/2 Sided → 2 Sided
❍
×
—
1 Sided Combine
❍
×
—
2 Sided Combine
❍
×
—
53
'RFXPHQW6HUYHU
Function
54
Key Display
Web Browser
Scanning
Printing
Book → 1 Sided
×
❍
❍
Book → 2 Sided
×
❍
❍
2 Sided → 1 Sided
×
❍
❍
1 Sided → Booklet
2 Sided → Booklet
×
❍
❍
1 Sided → Magazine
2 Sided → Magazine
×
❍
❍
Mix 1 & 2 Sided
×
×
—
Specify Pages to Print in Duplex
×
❍
❍
Repeat
×
×
—
Double Copy
×
❍
❍
Centering
❍
❍
❍
Cornering
×
❍
❍
Scanning Position
❍
×
—
Border Erase
❍
×
—
Center Erase
❍
×
—
Center/Border Erase
❍
×
—
3 Edges Full Bleed
×
❍
❍
Inside Erase
❍
×
—
Outside Erase
❍
×
—
Margin Adjustment
×
❍
❍
Background Numbering
×
❍
❍
Preset Stamp
×
❍
❍
User Stamp
×
❍
❍
Date Stamp
×
❍
❍
Stamp Text
×
❍
❍
Page Numbering
×
❍
❍
Covers
×
❍
❍
Designate
×
❍
❍
Chapter
×
❍
❍
Designation Sheet Copy
×
❍
❍
Blank Slip Sheets
×
❍
❍
Slip Sheets
×
❍
❍
)XQFWLRQV$YDLODEOHLQ'RFXPHQW6HUYHU0RGH
1RWH
❒ “Cornering” and “Specify Pages to Print in Duplex” are enabled only in Doc-
ument Server mode.
❒ You can select the printing position from eight types using “Cornering” when
you print a document stored in the Document Server.
❒ You can print the specified pages of documents stored in the Document Server using “Specify Pages to Print in Duplex”.
55
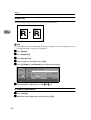
'RFXPHQW6HUYHU
Settings for the Document Server
❖ &RSLHU'RFXPHQW6HUYHU)HDWXUHV6HHS´*HQHUDO)HDWXUHVµ&RS\5HIHUHQFH
General Features
Items
Default
Function: Scanning
--
Function: Printing
--
❖ 6\VWHP6HWWLQJV6HHS´*HQHUDO)HDWXUHVµS´7LPHU6HWWLQJµDQGS´.H\
2SHUDWRU7RROVµ
Items
Default
Warm Up Notice
ON
Copy Count Display
Up
Output: Document Server
OFF
Paper Tray Priority: Copier
Tray 1
Timer Setting
Copier/Document Server
Auto Reset Timer
60 seconds
Key Operator Tools
Auto Delete File
After 3 days
Delete All Files
--
Password Management for
Stored Files
Do not Unlock
General Features
56
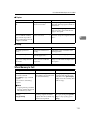
5. User Tools (System Settings)
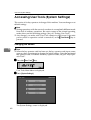
User Tools Menu (System Settings)
$ These items must be set to use the function. Be sure to set them before using
the corresponding function.
❍ These items must be set if required.
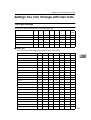
❖ *HQHUDO)HDWXUHV6HHS´*HQHUDO)HDWXUHVµ
Default
Copier/
Printer
Document Server
Scanner
Panel Tone
Medium
❍
❍
❍
Warm Up
Notice
ON
❍
Copy Count
Display
Up
❍
Function
Priority
Copier
❍
❍
❍
Print Priority
Display Mode
❍
❍
Function Reset
Timer
3 seconds
❍
❍
Interleave Print
10 sheet(s)
Status Indicator
ON
Screen Color
Setting
B&G
Output Tray
Setting
❍
According to
Function Setting
Output: Copier
*Not
Registered
Output:
Document Server
*Not
Registered
Output: Printer
*Not
Registered
Paper Tray
Priority: Copier
Tray1
Paper Tray
Priority: Printer
Tray1
Job List Display
Time
15 seconds
Time Interval
between
Printing Jobs
3 seconds
❍
❍
❍
57
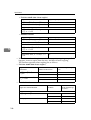
8VHU7RROV6\VWHP6HWWLQJV
Default
ADF Original
Table Elevation
Copier/
Printer
Document Server
Scanner
When original is ❍
Set
ADF Feed Speed Normal
Optimum for
Thick Paper
Off
<F/F4> Size
Setting
81/2 × 13
❖ 7LPHU6HWWLQJ6HHS´7LPHU6HWWLQJµ
Default
Copier
Printer
Scanner
Auto Off Timer
90 minutes
(Type 2: 120
minutes)
❍
Energy Saver
Timer
15 minutes
❍
Panel Off Timer
1 minute
❍
❍
❍
System Auto
Reset Timer
60 seconds
❍
❍
❍
Copier/
Document
Server Auto
Reset Timer
60 seconds
❍
Scanner Auto
Reset Timer
60 seconds
Set Date
--
$
❍
Set Time
--
$
❍
Weekly Timer
Code
Off
❍
Weekly Timer:
Monday –
Sunday
--
❍
❍
❖ ,QWHUIDFH6HWWLQJV6HH1HWZRUN*XLGH
❖ )LOH7UDQVIHU6HH1HWZRUN*XLGH
58
❍
❍
8VHU7RROV0HQX6\VWHP6HWWLQJV
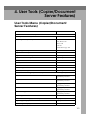
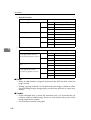
❖ .H\2SHUDWRU7RROV6HHS´.H\2SHUDWRU7RROVµ
Default
Copier
Printer
Scanner
User Code Man- OFF ( >$XWR3UR
JUDP@ for printer
agement
mode only)
❍
❍
❍
Key Counter
Management
❍
❍
❍
❍
❍
❍
❍
OFF
External change
-Unit Management
Key Operator
Code
OFF
Display User
Code
Do not Display
Display/Print
Counter
--
❍
❍
Display/Clear/
Print Counter per
User Code
--
❍
❍
Print Address
Book
--
Address Book
Management
--
❍
❍
❍
Address Book:
-Program/Change/
Delete Group
❍
Address Book:
Change Order
--
❍
Address Book:
Edit Title
--
❍
❍
❍
Select Title
Title 1
❍
❍
❍
Auto Delete File After 3 days
❍
❍
❍
Delete All Files
--
❍
❍
❍
Password Management for
Stored Files
Do not Unlock
❍
❍
❍
Key Operator's
E-mail Address
--
Machine E-mail
Address
--
AOF
(Always ON)
ON
Extended
Security
Off
❍
59
8VHU7RROV6\VWHP6HWWLQJV
Accessing User Tools (System Settings)
This section is for key operators in charge of this machine. You can change or set
default settings.
1RWH
❒ Setting operations with the user tools are done in a completely different mode
from that of ordinary operations. Be sure to return to the normal operating
mode when you finish making settings. See p.61 “Exiting User Tools”.
❒ Any changes you make with User Tools remain in effect even if the main
power switch or operation switch is turned off, or the {&OHDU0RGHV} key is
pressed.
&KDQJLQJWKH'HIDXOW
1RWH
❒ When the key operator code has been set, the key operator code input screen
appears when you attempt to change the initial settings. Enter the registered
key operator code. For details about key operator codes, see p.69 “Key Operator Tools”.
A Press the {8VHU7RROV} key.
ZJBS050N
User Tools Main Menu is displayed.
B Press >6\VWHP6HWWLQJV@.
The System Settings screen is displayed.
60
$FFHVVLQJ8VHU7RROV6\VWHP6HWWLQJV
C Select an item you want to set.
5HIHUHQFH
p.57 “User Tools Menu (System Settings)”
D Change the default following the instructions on the display, and then
press >2.@.
([LWLQJ8VHU7RROV
A After changing User Tools settings, press >([LW@ on the User Tools Main
Menu.
User Tool changes are complete, and the machine is ready to copy.
1RWH
❒ You can also exit User Tools by pressing the {8VHU7RROV} key.
61
8VHU7RROV6\VWHP6HWWLQJV
Settings You Can Change with User Tools
5HIHUHQFH
To access User Tools, see p.60 “Accessing User Tools (System Settings)”.
*HQHUDO)HDWXUHV
❖ 3DQHO7RQH
The beeper (key tone) sounds when a key is pressed.
1RWH
❒ Default: Medium
❖ :DUP8S1RWLFH&RSLHU'RFXPHQW6HUYHU
Specify whether or not the beeper sounds when the machine becomes ready
for copying after Low Power mode is deactivated, or the power is turned on.
1RWH
❒ Default: ON
❒ If the “Panel Tone” setting is “OFF”, the beeper does not sound, whatever
the “Warm Up Notice” setting.
❖ &RS\&RXQW'LVSOD\&RSLHU'RFXPHQW6HUYHU
The copy counter can be set to show the number of copies made (count up) or
the number of copies remaining (count down).
1RWH
❒ Default: Up (count up)
❖ )XQFWLRQ3ULRULW\
You can specify the mode to be displayed immediately after the operation
switch or System Reset mode is turned on.
1RWH
❒ Default: Copier
62
6HWWLQJV<RX&DQ&KDQJHZLWK8VHU7RROV
❖ 3ULQW3ULRULW\
Print priority is given to the mode selected.
5HIHUHQFH
p.32 “Multi-Access”
1RWH
❒ Default: Display mode
❒ When the optional booklet finisher, or Finisher 3000B (100-Sheet Staples) is
installed, you can specify an output tray to which documents are delivered. For more information about how to specify an output tray for each
function, see the following descriptions:
• p.64 “Output: Copier”
• p.65 “Output: Document Server”
• p.65 “Output: Printer”
❖ )XQFWLRQ5HVHW7LPHU
You can set the length of time the machine waits before changing modes
when using the multi-access function (see p.32 “Multi-Access”). This is useful
if you make many copies and you have to change the settings for each copy.
If you set a large value, you can prevent jobs from other functions interrupting the copy job.
1RWH
❒ Default: 3 seconds
❒ The Function Reset Timer setting is ignored if “Interleave” is set for “Print
Priority” (see p.63 “Print Priority”).
❒ When you select “Set Time”, enter the time (3–30 seconds in 1 second increments) using the number keys.
❖ ,QWHUOHDYH3ULQW
You can set the timing for functions to switch when >3ULQW3ULRULW\@ has been set
to >,QWHUOHDYH@.
1RWH
❒ Default: 10 sheets
❒ Depending on printing time, set values may change.
❒ The timing for functions can be set from 1 to 20 sheets.
❖ 6WDWXV,QGLFDWRU
You can specify whether the statue indicator shows the machine status or not.
1RWH
❒ Default: ON
63
8VHU7RROV6\VWHP6HWWLQJV
❖ 6FUHHQ&RORU6HWWLQJ
You can select the screen color among from four types: Blue & Green Type,
Blue & Purple Type, Green Type, or Gray Type.
1RWH
❒ Default: Blue & Green Type
❖ 2XWSXW7UD\6HWWLQJ
You can set the way or timing for switching the output tray.
• Output Tray
You can set the way for switching the output tray from According to Function Setting or Auto Change.
1RWH
❒ Default: According to Function Setting
❒ Auto Change can be used when Print Priority is set to Job Order. See
p.63 “Print Priority”.
• Change Output Tray
You can set the timing for switching the output tray, when the Output Tray
has been set to Auto Change, from When Tray is Full or Per Job.
1RWH
❒ Default: When Tray is Full
❖ 2XWSXW&RSLHU
You can specify a tray to which documents are delivered.
1RWH
❒ Default: Not Registered
❒ The default settings of the tray set as output tray may vary depending on
64
the installed optional finisher.
6HWWLQJV<RX&DQ&KDQJHZLWK8VHU7RROV
❖ 2XWSXW'RFXPHQW6HUYHU
You can specify a tray to which documents are delivered.
1RWH
❒ Default: Not Registered
❒ For details about output trays, see p.64 “Output: Copier”.
❒ The default of the output tray may vary depending on the installed option-
al finisher.
❖ 2XWSXW3ULQWHU
You can specify a tray to which documents are delivered.
1RWH
❒ Default: Not Registered
❒ The output trays set on the printer driver have priority over the output tray
specified above.
❒ The default of the output tray may vary depending on the installed optional finisher.
❖ 3DSHU7UD\3ULRULW\&RSLHU&RSLHU'RFXPHQW6HUYHU
You can specify the paper tray for delivery.
1RWH
❒ Default: Tray 1
❖ 3DSHU7UD\3ULRULW\3ULQWHU3ULQWHU
You can specify the paper tray for delivery.
1RWH
❒ Default: Tray 1
❖ -RE/LVW'LVSOD\7LPH
You can set the length of time the job list screen is displayed before automatically returning to the default screen.
1RWH
❒ Default: 15 seconds
❒ When you select “On”, enter the time from 10 to 999 seconds in 1 second
increments using the number keys.
❖ 7LPH,QWHUYDOEHWZHHQ3ULQWLQJ-REV
You can set the length of interval between the end of a job and the start of a
new job.
1RWH
❒ Default: 3 seconds
❒ If you select “Set Time”, enter the time, 0 - 999 seconds (in 1 second incre-
ments), using the number keys.
65
8VHU7RROV6\VWHP6HWWLQJV
❖ $')2ULJLQDO7DEOH(OHYDWLRQ
You can set the timing for elevating the ADF original table.
1RWH
❒ Default: When original is set
❖ $'))HHG6SHHG
When you use thick paper, you can slow down the printing speed to avoid
fusing the image by selecting >VORZ@.
1RWH
❒ Default: Normal
❖ 2SWLPXPIRU7KLFN3DSHU
You can set the optimum for thick paper to On or Off.
❖ ))!6L]H6HWWLQJ
You can specify the paper size for F/F4.
1RWH
❒ Default: 81/2 × 13
7LPHU6HWWLQJ
❖ $XWR2II7LPHU
The machine turns off automatically to conserve energy after a specified
amount of time has passed following job completion. This function is called
“Auto Off”. The machine status after Auto Off operation is called “Off mode”
or “Sleep mode”.
For Auto Off Timer, specify the time to elapse before Auto Off is activated.
1RWH
❒ Default: 90 minutes (Type 2: 120 minutes)
❒ Auto Off Timer function will not operate if an error message appears.
❒ The time can be set from 10 seconds to 240 minutes using the number keys.
❖ (QHUJ\6DYHU7LPHU
Set the amount of time the machine waits before switching to Low Power
mode after copying has finished or the last operation is performed.
1RWH
❒ Default: 15 minutes
❒ The time can be set from 10 seconds to 240 minutes using the number keys.
66
6HWWLQJV<RX&DQ&KDQJHZLWK8VHU7RROV
❖ 3DQHO2II7LPHU
Set the amount of time the machine waits before switching the panel off after
copying has finished or the last operation is performed.
1RWH
❒ Default: 1 minute
❒ The warm up time for making a copy from standby mode is 5 seconds.
❒ The interval time can be set from 10 seconds to 240 minutes using the
number keys.
❖ 6\VWHP$XWR5HVHW7LPHU
The System Auto Reset Timer setting automatically switches to the screen of
the function set in Function Priority. This happens if no operations are performed or when an interrupted job is cleared. This setting sets the system reset interval. See p.62 “Function Priority”.
1RWH
❒ Default: 60 seconds
❒ The time can be set from 10 to 999 seconds in 1 second increments using
the number keys.
❖ &RSLHU'RFXPHQW6HUYHU$XWR5HVHW7LPHU&RSLHU'RFXPHQW6HUYHU
Specifies the time to elapse before copier and Document Server functions are
reset.
1RWH
❒ Default: 60 seconds
❒ If “OFF” is selected, the machine will not automatically switch to the user
code entry screen, and you will not be able to restrict who uses the machine.
❒ The time can be set from 10 to 999 seconds in 1 second increments using
the number keys.
❖ 6FDQQHU$XWR5HVHW7LPHU6FDQQHU
Specifies the time to elapse before the scanner function is reset.
1RWH
❒ Default: 60 seconds
❒ If “OFF” is selected, the machine will not automatically switch to the user
code entry screen, and you will not be able to limit who uses the machine.
❒ The time can be set from 10 to 999 seconds in 1 second increments using
the number keys.
67
8VHU7RROV6\VWHP6HWWLQJV
❖ 6HW'DWH
Set the date for the copier's internal clock.
1RWH
❒ To change between year, month, and day, press >←
←@ and >→
→ @.
❒ Enter the year, month, and day using the number keys.
❖ 6HW7LPH
Set the time for the copier's internal clock.
1RWH
❒ Enter the time in 24-hour system (in 1 second increments).
❒ To change between hours, minutes, and seconds, press >←
←@ and >→
→ @.
❒ Enter the hours, minutes, and seconds using the number keys.
❖ :HHNO\7LPHU&RGH
Set an eight-digit code to turn the main power on and off at the time set in
“Weekly Timer”.
1RWH
❒ Default: OFF
❒ If “ON” is selected, enter the Weekly Time Code with number keys. Not
doing so may result in the machine being disabled, even if the power is
turned on.
❖ :HHNO\7LPHU0RQGD\6XQGD\
Set the power on and off timer using the number keys.
1RWH
❒ Enter the time in 24-hour system (in 1 second increments).
❒ Enter the hour and minute using the number keys.
68
6HWWLQJV<RX&DQ&KDQJHZLWK8VHU7RROV
.H\2SHUDWRU7RROV
The key operator must set the following items. For settings or more information,
contact the key operator.
Recommended to use Key Operator Code. See p.69 “Key Operator Code”.
❖ 8VHU&RGH0DQDJHPHQW
Allows you to restrict who uses the machine by setting codes for users.
User codes must be registered for user code management. See p.75 “User
Codes”.
1RWH
❒ Default: Copier/OFF, Document Server/OFF, Printer/Auto Program, Scan-
ner/OFF
❒ By using “Auto Program” for the printer, you can keep a print log for each
user code entered from the driver.
❖ .H\&RXQWHU0DQDJHPHQW
Use the key counter to specify whether users are restricted or not.
1RWH
❒ Default: Copier/OFF, Document Server/OFF, Printer/OFF, Scanner/OFF
❖ ([WHUQDO&KDUJH8QLW0DQDJHPHQW
You can set whether to use the key operator code.
1RWH
❒ Default: Copier/Off, Document Server/Off, Scanner/Off, Printer/Off
❖ .H\2SHUDWRU&RGH
If you want to use the key operator code, register the code.
1RWH
❒ Default: OFF
❒ If you select ON, enter the key operator code (max. eight-digits) using the
number keys, and then select Part of Initial Settings, All Initial Settings or
All Functions to set the access limit.
• If you selected Part of Initial Settings
A key operator code is only required for the Timer Setting, Key Operator Tools initial settings. MENU PROTECT will be set for
CHANGE/CONTROL in the printer initial settings. If you set MENU
PROTECT, you can set the key operator code in a part of the printer initial settings. See “Printer Features Parameters”, Printer Reference 2.
• If you selected All Initial Settings
A key operator code will be required to access all the items in the System
Settings, Copier/Document Server functions, Printer functions, and
Scanner functions.
69
8VHU7RROV6\VWHP6HWWLQJV
• If you selected All Functions
A key operator code is required for all functions. When you turn the
power on, you have to enter the key operator code to use the machine.
❒ If you set the key operator code, you will need to enter it to access the Key
Operator Code screen.
❖ 'LVSOD\8VHU&RGH
You can have entered user codes displayed.
1RWH
❒ Default: Do not display
❒ When Do not display is selected, the entered user code will not appear but
“p” appears instead.
❒ When Display is selected, the entered user code will appear. In copy mode,
user codes appear on the Job List screen.
❖ 'LVSOD\3ULQW&RXQWHU
Allows you to view and print the various counters.
• Display/Print Counter
Displays counters for each functions (Total, Copier, Printer, A3/DLT, Duplex, Staple, GPC, GPC Printer).
• Print Counter List
Prints out a list of counters for each functions.
• To print the counter list
A Press the {8VHU7RROV} key.
B Press >6\VWHP6HWWLQJV@.
C Press >.H\2SHUDWRU7RROV@.
D Press >'LVSOD\3ULQW&RXQWHU@.
E Press >3ULQW&RXQWHU/LVW@.
F Press the {6WDUW} key.
G Press >([LW@.
❖ 'LVSOD\&OHDU3ULQW&RXQWHUSHU8VHU&RGH
Allows you to view and print the various counters accessed with user codes
and to set the values to 0.
1RWH
❒ Press >U3UHYLRXV@ and >T1H[W@ to show all counters.
70
• Print Counter for All User Codes
Prints the counter values for all user codes.
• Clear Counter for All User Codes
Sets the counter value for all user codes to 0.
• Print Counter per User Code
Prints the counter values for each user code.
• Clear Counter per User Code
Sets the counter value for each user code to 0.
6HWWLQJV<RX&DQ&KDQJHZLWK8VHU7RROV
5HIHUHQFH
For details about the Print List for Each User Code, see p.79 “Printing the
Counter for Each User Code”.
❖ 3ULQW$GGUHVV%RRN
Allows you to print the address book. You can select an item to print Print in
Title 1 Order, Print in Title 2 Order, Print in Title 3 Order, or Print Group Dial
List.
❖ $GGUHVV%RRN0DQDJHPHQW
Adds, changes, or deletes user codes (max. eight-digits). For details about operations, see p.75 “User Codes”.
❒
❒
❒
❒
❒
1RWH
You can register up to 2,000 user names.
You can register up to 500 user codes.
You can also register user codes from SmartNetMonitor for Admin.
Even if you change the user codes, the counter values are not cleared.
If you clear a user code, the counter values associated with it are also automatically cleared.
• >3URJUDP&KDQJH@
This registers new user codes. You can register and change user codes
and user names.
• >8VHU1DPH@
User (destination) name, key display, registration number, title selection
• >8VHU&RGH@
User code, available functions
• >(PDLO$GGUHVV@
E-mail address, register as a sender, sender's password, enter password
• >*URXS@
Switch title, registration number
• >'HOHWH@
Deletes a user.
❖ $GGUHVV%RRN3URJUDP&KDQJH'HOHWH*URXS
You can register multiple e-mail addresses in a group.
Then you can easily control the registered e-mail address for each group.
For details about registering e-mail destinations, see p.86 “Registering E-mail
Destinations to a Group”.
• >3URJUDP&KDQJH@
This registers new groups, or changes a group name, key display, title selection, programmed user, or registration number.
• >'HOHWH@
Deletes a group.
71
8VHU7RROV6\VWHP6HWWLQJV
❖ $GGUHVV%RRN&KDQJH2UGHU
Changes the order of registered users (destinations).
1RWH
❒ You can rearrange the order of items on the same page, but you cannot
A
B
C
D
E
move the items to another page. For example, you cannot move an item
from “PLANNING” (>234@) to “DAILY” (>&'@).
Press the {8VHU7RROV} key.
Press >6\VWHP6HWWLQJV@.
Press >.H\2SHUDWRU7RROV@.
Press >$GGUHVV%RRN&KDQJH2UGHU@.
Press the user (destination) key to be moved.
1RWH
❒ You can select a user using the number keys.
F
Press the user (destination) key in the place you want to move it to.
The user (destination) selected in step E moves to the place selected in
step F, and the keys for all other users will shift too.
1RWH
❒ You can select a user with the number keys.
❖ $GGUHVV%RRN(GLW7LWOH
You can edit the title to search for a desired user easily.
A Press the {8VHU7RROV} key.
B Press >6\VWHP6HWWLQJV@.
C Press >.H\2SHUDWRU7RROV@.
D Press >$GGUHVV%RRN(GLW7LWOH@.
E Press the title key to be changed.
F Enter the new name, and then press >2.@.
G Press >2.@.
❖ 6HOHFW7LWOH
Specifies the title to select a user.
1RWH
❒ Default: Title 1
72
6HWWLQJV<RX&DQ&KDQJHZLWK8VHU7RROV
❖ $XWR'HOHWH)LOH
Specifies whether documents stored in the Document Server are deleted or
not after a specified period of time.
1RWH
❒ Default: Yes After 3 day (s)
❒ If you select “On”, documents stored after this setting will be deleted.
❒ If you select “Off”, documents will not be deleted automatically. A mes-
sage “Are you sure you want to delete all stored files?” appears.
❒ If you select “On”, enter a number of days in the range of 1 - 180.
❒ The default is 3 days, which means documents will be deleted three days
(72 hours) after they are stored.
❖ 'HOHWH$OO)LOHV
All documents stored in the Document Server will be deleted.
1RWH
❒ Even if a password has been set, all documents will be deleted.
❒ A confirmation dialog box will appear. To delete all documents, select
><HV@.
❖ 3DVVZRUG0DQDJHPHQW)RU6WRUHG)LOHV
• Unlocking a locked document
When a document is locked due to entering a wrong password, this function unlocks the document to allow access.
• Temporarily disabling document security
Documents having a password can temporarily be accessed without entering the password.
1RWH
❒ Default : Do not Unlock
❒ Only when you forget the password, select “Unlock”. After you access
the document, be sure to select “Do not Unlock”.
5HIHUHQFH
p.150 “Unlocking a Locked Document”, p.151 “Temporarily Disabling
Document Security”
❖ .H\2SHUDWRU
V(PDLO$GGUHVV
By registering the operator's e-mail address, you can send an e-mail in case of
difficulty. Specify whether or not to use this function.
1RWH
❒ Default: blank
73
8VHU7RROV6\VWHP6HWWLQJV
❖ 0DFKLQH(PDLO$GGUHVV
Specify whether or not to use this function.
1RWH
❒ Default: blank
❖ $2)$OZD\V21
Specify whether or not to use Auto Off.
1RWH
❒ Default: ON
❖ ([WHQGHG6HFXULW\
Specify whether or not to use security function.
1RWH
❒ Default : Off
❒ You have to set the six-digit key operator code to set Extended Security.
See p.69 “Key Operator Code”.
❒ When the Extended Security function is On, a security mark
the lower right of the display panel.
5HIHUHQFH
For details about security, see p.149 “Security”.
74
appears at
8VHU&RGHV
User Codes
By registering user codes, you can limit users to the following functions and
check their use of each function.
• Copier
• Document Server
• Scanner
• Printer
1RWH
❒ The number of copies scanned in scanner mode is counted for each user code.
So you can check each user's usage.
❒ To register the user code of the printer driver automatically, select Auto Program for the printer in User Code Management. If you use the user code set
in User Tools, select >2II@. Set the user codes registered in User Tools for the
printer driver. See p.69 “User Code Management”.
5HIHUHQFH
For details about setting the user codes for the printer driver, see Printer Reference or the printer driver Help menu.
,PSRUWDQW
❒ The functions associated with each user code are the same. If you change or
delete user codes, management data and restrictions related to that code will
become invalid.
5HJLVWHULQJD1HZ8VHU&RGH
A Press the {8VHU7RROV} key.
B Press >6\VWHP6HWWLQJV@.
C Press >.H\2SHUDWRU7RROV@.
D Press >$GGUHVV%RRN0DQDJHPHQW@.
E Press >1HZ3URJUDP@.
1RWH
❒ To assign a user code to a registered user, press the user key whose user
code is to be registered, or enter the number using the number keys.
75
8VHU7RROV6\VWHP6HWWLQJV
F Set the user information.
1RWH
❒ To register a user code to a registered user, proceed to step G.
7RUHJLVWHUDXVHUQDPHDQGNH\GLVSOD\
A Press >&KDQJH@ on the right of the user name or key display.
The user name or key name entry screen appears.
B Enter the user name or key display, and then press >2.@.
1RWH
❒ You can use the user name as the user name assigned to the documents
in Document Server mode. In this case, entry of the user code is not required. See p.35 “Document Server”.
5HIHUHQFH
p.91 “Entering Text”
7RVHOHFWWKHWLWOH
A Press the key for the classification you want to use from “Select Title”.
1RWH
❒ The keys you can select are as follows.
• >)UHT@… Added to the page that is displayed first.
• >$%@,>&'@,>()@,>*+@,>,-.@,>/01@,>234@,>567@,>89:@,>;<=@… Added to
the list of items in the title selected.
❒ You can only select one page for “Select Title”.
G Press >8VHU&RGH@.
H Enter the user code using the number keys, and then press [#] or the {}
key.
1RWH
❒ If you make a mistake, press >&OHDU@ or the {&OHDU} key, and then enter the
user code again.
76
8VHU&RGHV
I Select the functions to be used with the user code from “Available Functions”.
J To continue registering user codes, press >&RQWLQXHWR3URJUDP@, and then repeat the procedure from step F.
K Press >2.@.
L Press >([LW@.
M Press the {8VHU7RROV} key.
&KDQJLQJD8VHU&RGH
A Press the {8VHU7RROV} key.
B Press >6\VWHP6HWWLQJV@.
C Press >.H\2SHUDWRU7RROV@.
D Press >$GGUHVV%RRN0DQDJHPHQW@.
E Select the registered user code you want to change, or enter the registered
number using the number keys.
F Enter the new information for the item you want to change.
&KDQJLQJDXVHUGHVWLQDWLRQQDPHRUNH\GLVSOD\
A Press >&KDQJH@ to the right of the user (destination) name or key display.
B Enter the user (destination) name, and then press >2.@.
5HIHUHQFH
p.91 “Entering Text”
&KDQJLQJDWLWOH
A Press the key for the classification you want to use from “Select Title”.
&KDQJLQJDXVHUFRGH
A Press >8VHU&RGH@.
B Press >&KDQJH@, and then enter the new user code using the number keys.
C Press the {} key.
77
8VHU7RROV6\VWHP6HWWLQJV
7RFKDQJHDYDLODEOHIXQFWLRQV
A Press >8VHU&RGH@.
B Press the key to select the functions to be enabled.
1RWH
❒ Press the key making it highlighted, then the key is enabled.
G Press >2.@.
H Press >([LW@.
I Press the {8VHU7RROV} key.
'HOHWLQJD8VHU&RGH
,PSRUWDQW
❒ This operation also deletes user codes registered for multiple functions. User
control with the deleted user code will be disabled.
A Press the {8VHU7RROV} key.
B Press >6\VWHP6HWWLQJV@.
C Press >.H\2SHUDWRU7RROV@.
D Press >$GGUHVV%RRN0DQDJHPHQW@.
7RGHOHWHDXVHUGHVWLQDWLRQ
A Press >'HOHWH@.
B Select the user (destination) you want to delete.
Press the user (destination) key, or enter the registered number using the
number keys.
C Press ><HV@ in the confirmation screen.
7RGHOHWHWKHXVHUFRGH
A Select a user (destination) whose user code is to be deleted.
Press the user (destination) key to be deleted, or enter the registered
number using the number keys.
B Press >8VHU&RGH@.
C Press >&OHDU@ to delete the user code, and then press >@.
D Press >2.@.
78
8VHU&RGHV
E Press >([LW@.
F Press the {8VHU7RROV} key.
'LVSOD\LQJWKH&RXQWHUIRU(DFK8VHU&RGH
You can check the counter for each function's user code.
A Press the {8VHU7RROV} key.
B Press >6\VWHP6HWWLQJV@.
C Press >.H\2SHUDWRU7RROV@.
D Press >'LVSOD\&OHDU3ULQW&RXQWHUSHU8VHU&RGH@.
3ULQWLQJWKH&RXQWHUIRU(DFK8VHU&RGH
You can print out the counter for each user code using >3ULQW&RXQWHU@ or >6FDQQHU
&RXQWHU@. Also, you can print out using both together.
A Press the {8VHU7RROV} key.
B Press >6\VWHP6HWWLQJV@.
C Press >.H\2SHUDWRU7RROV@.
D Press >'LVSOD\&OHDU3ULQW&RXQWHUSHU8VHU&RGH@.
7RSULQWWKHQXPEHURIFRSLHVFRXQWHUIRUHDFKXVHUFRGH
A Select a user code from the left side of the display.
1RWH
❒ Press >$OORQ7KH3DJH@ if you want to select all user codes on the page.
B Press >3ULQW&RXQWHU/LVW@ of “Per User Code”.
1RWH
❒ Enter the user code, and then press >@ if the user code is registered.
79
8VHU7RROV6\VWHP6HWWLQJV
7RSULQWWKHQXPEHURIFRSLHVFRXQWHUIRUDOOXVHUFRGHV
A Press >3ULQW&RXQWHU/LVW@ of “All User Codes”.
1RWH
❒ Enter the user code, and then press >@ if the user code is registered.
E Press >3ULQW&RXQWHU@ or >6FDQQHU&RXQWHU@.
F Press >3ULQW@.
&OHDULQJWKH&RXQWHU
A Press the {8VHU7RROV} key.
B Press >6\VWHP6HWWLQJV@.
C Press >.H\RSHUDWRU7RROV@.
D Press >'LVSOD\&OHDU3ULQW&RXQWHUSHU8VHU&RGH@.
E Select the user code to clear.
7RFOHDUWKHQXPEHURIFRSLHVFRXQWHUIRUHDFKXVHUFRGH
A Select a user code from the left side of the display.
1RWH
❒ Press >$OORQ7KH3DJH@ if you want to select all user codes on the page.
B Press >&OHDU@ for “Per User Code”.
7RFOHDUWKHQXPEHURIFRSLHVFRXQWHUIRUDOOXVHUFRGHV
A Press >&OHDU@ for “All User Codes”.
F Press >3ULQW&RXQWHU@ or >6FDQQHU&RXQWHU@.
G Press >2.@.
80
(PDLO'HVWLQDWLRQ
E-mail Destination
By registering an e-mail destination, you can send scanned documents by email.
• It is easy to select an e-mail destination if you register “User (destination)
name” and “Key name” for the e-mail destination.
• You can register an e-mail destination as a group.
• You can use the e-mail destination as the Sender's address. In this case, you
can set a password in order to prevent use by unauthorized people.
5HIHUHQFH
E-mail destination can also be registered using SmartNetMonitor for Admin
(printer/scanner option required). See Network Guide.
5HJLVWHULQJDQ(PDLO$GGUHVV
A Press the {8VHU7RROV} key.
ZJBS050N
B Press >6\VWHP6HWWLQJV@.
C Press >.H\2SHUDWRU7RROV@.
D Press >$GGUHVV%RRN0DQDJHPHQW@.
E Press >1HZ3URJUDP@.
1RWH
❒ To register an e-mail destination to a registered user, press the user key
you want to register, or enter the registered number using the number
keys.
F Set the user's information.
1RWH
❒ To register an e-mail destination to a registered user, proceed to step G.
7RUHJLVWHUWKHXVHUGHVWLQDWLRQQDPHDQGNH\QDPH
A Press >&KDQJH@ on the right of “User (Destination) Name” or “Key Display”.
The user (destination) name or key name entry dialog box appears.
81
8VHU7RROV6\VWHP6HWWLQJV
B Enter the user (destination) name or key name, and then press >2.@.
1RWH
❒ You can use the user name when selecting an address to send e-mail to.
❒ You can register the user code following the user name. For more de-
tails, see p.75 “User Codes”.
5HIHUHQFH
p.91 “Entering Text”
7RVHOHFWWKHWLWOH
A To associate a user with a title, press the title key from “Select Title”.
1RWH
❒ The keys you can select are as follows.
• >)UHT@… Added to the page that is displayed first.
• >$%@,>&'@,>()@,>*+@,>,-.@,>/01@,>234@,>567@,>89:@,>;<=@… Added to
the list of items in the title selected.
❒ You can only select one page for “Select Title”.
G Press >(PDLO$GGUHVV@.
H Enter the items you want to change.
&KDQJLQJWKHHPDLODGGUHVV
A Press >&KDQJH@ on the right of the “E-mail Address”.
The e-mail address entry dialog box appears.
B Enter the e-mail address.
1RWH
❒ You can use the e-mail address as the Sender's address. In this case, you
can set a password in order to prevent use by other people.
82
(PDLO'HVWLQDWLRQ
(QWHULQJDQHPDLODGGUHVV
A When you finish entering address, press >2.@.
8VLQJDVDVHQGHU
You can use the entered e-mail address as a sender's address.
A Press >2Q@ on the right of the “Register as Sender”.
6HWWLQJDSDVVZRUG
If you set Sender's Password to On, set the password.
A Press >2Q@ on the right of “Sender's Password”.
B Press >&KDQJH@ on the right of the “Enter Password”.
C Enter the password using the number keys, and then press [#] or the {}
key.
I Press >2.@.
1RWH
❒ When a group is registered, other e-mail destinations can be added to the
group. See p.87 “Registering E-mail Destinations to a Group”.
&KDQJLQJD5HJLVWHUHG(PDLO'HVWLQDWLRQ
A Press the {8VHU7RROV} key.
B Press >6\VWHP6HWWLQJV@.
C Press >.H\2SHUDWRU7RROV@.
D Press >$GGUHVV%RRN0DQDJHPHQW@.
The registered user list appears.
E Select the user of the registered e-mail address you want to change.
Press the user key you want to change, or enter the registered number using
the number keys.
F Press >(PDLO$GGUHVV@.
83
8VHU7RROV6\VWHP6HWWLQJV
G Enter the items.
7RFKDQJHWKHHPDLODGGUHVV
A Press >&KDQJH@ on the right of the e-mail address.
B Enter the e-mail address, and then press >2.@.
5HIHUHQFH
p.91 “Entering Text”
7RFKDQJHWKHSDVVZRUG
A Press >&KDQJH@ on the right of “Enter Password”.
B Enter the new password using the number keys, and then press [#] or the
{} key.
H Press >2.@.
1RWH
❒ To change the user name, see p.77 “Changing a user (destination) name or
key display”.
'HOHWLQJD5HJLVWHUHG(PDLO$GGUHVV
A Press the {8VHU7RROV} key.
B Press >6\VWHP6HWWLQJV@.
C Press >.H\2SHUDWRU7RROV@.
D Press >$GGUHVV%RRN0DQDJHPHQW@.
7RGHOHWHRQO\WKHHPDLODGGUHVV
A Select the user whose e-mail address you want to delete.
Press the user key you want to delete or enter the registered number using
the number keys.
B Press >(PDLO$GGUHVV@.
C Press >&KDQJH@ on the right of the “E-mail Address”.
D Press >'HOHWH$OO@.
E Press >2.@.
F Press >([LW@.
84
(PDLO'HVWLQDWLRQ
7RGHOHWHDOOWKHXVHULQIRUPDWLRQV
A Press >'HOHWH@.
B Select the user you want to delete.
Press the user key you want to delete, or enter the registered number using
the number keys.
C Press ><HV@.
E Press >([LW@.
85
8VHU7RROV6\VWHP6HWWLQJV
Registering E-mail Destinations to a Group
Registering groups has the following benefits:
• You can easily control the registered e-mail destinations for each group.
• You can send the same messages to multiple addresses in a group in bulk.
To divide e-mail destinations into groups, the groups must be registered beforehand.
5HIHUHQFH
E-mail destination can also be registered into groups using SmartNetMonitor
for Admin (printer/scanner option required). See Network Guide.
5HJLVWHULQJD1HZ*URXS
A Press the {8VHU7RROV} key.
ZJBS050N
B Press >6\VWHP6HWWLQJV@.
C Press >.H\2SHUDWRU7RROV@.
D Press >$GGUHVV%RRN3URJUDP&KDQJH'HOHWH*URXS@.
E Press >1HZ3URJUDP@.
F Press >&KDQJH@ on the right of the “Group (Destination) Name”.
G Enter the group (destination) name, and then press >2.@.
H When you want to change the key display, press >&KDQJH@ on the right of the
key display. Enter the key display name, and then press >2.@.
1RWH
❒ For entering the group name, the key display name is automatically set.
I Press the appropriate button in Select Title to sort the group. Proceed to
step J if sorting is unnecessary.
J Press >2.@.
86
5HJLVWHULQJ(PDLO'HVWLQDWLRQVWRD*URXS
5HJLVWHULQJ(PDLO'HVWLQDWLRQVWRD*URXS
You can register the e-mail destination to a group.
1RWH
❒ When registering a new e-mail destination, you can register groups at the
same time.
A Press the {8VHU7RROV} key.
B Press >6\VWHP6HWWLQJV@.
C Press >.H\2SHUDWRU7RROV@.
D Press >$GGUHVV%RRN0DQDJHPHQW@.
E Select the user (destination) key that you want to register in a group.
F Press >*URXS@.
G Select a group to which you want to register the e-mail destinations.
H Press >2.@.
87
8VHU7RROV6\VWHP6HWWLQJV
'HOHWLQJDQ(PDLO'HVWLQDWLRQIURPD*URXS
A Press the {8VHU7RROV} key.
B Press >6\VWHP6HWWLQJV@.
C Press >.H\2SHUDWRU7RROV@.
D Press >$GGUHVV%RRN0DQDJHPHQW@.
E Select the user (destination) key to delete from a group.
Press the user (destination) key that you want to delete, or enter the registered
number using the number keys.
F Press >*URXS@.
G Press the group key you want to delete.
The user is deleted.
H Press >2.@.
88
5HJLVWHULQJ(PDLO'HVWLQDWLRQVWRD*URXS
'LVSOD\LQJWKH'HVWLQDWLRQV5HJLVWHUHGLQ*URXSV
You can confirm the user (destination) of each group.
A Press the {8VHU7RROV} key.
B Press >6\VWHP6HWWLQJV@.
C Press >.H\2SHUDWRU7RROV@.
D Press >$GGUHVVERRN3URJUDP&KDQJH'HOHWH*URXS@.
E Select a group where the data you want to confirm is registered.
F Press >3URJUDPHG8VHUV@.
All user names (e-mail destinations) are displayed.
G Press >2.@.
89
8VHU7RROV6\VWHP6HWWLQJV
&KDQJLQJD*URXS1DPH
A Press the {8VHU7RROV} key.
B Press >6\VWHP6HWWLQJV@.
C Press >.H\2SHUDWRU7RROV@.
D Press >$GGUHVV%RRN3URJUDP&KDQJH'HOHWH*URXS@.
E Press the group key you want to change.
F Enter the item you want to change.
7RFKDQJHDJURXSQDPHRUWKHNH\GLVSOD\
A Press >&KDQJH@ in “Group (Destination) Name” or “Key Display”.
B Enter the group name or key display, and then press >2.@.
7RFKDQJHDWLWOH
A Press the title key in “Select Title” of the group you want to sort.
7RFKDQJHDUHJLVWUDWLRQQXPEHU
A Press >&KDQJH@ in “Registration No.”.
B Enter the registration number using the number keys.
C Press [#] or the {} key.
G Press >2.@.
'HOHWLQJD*URXS
A Press the {8VHU7RROV} key.
B Press >6\VWHP6HWWLQJV@.
C Press >.H\2SHUDWRU7RROV@.
D Press >$GGUHVV%RRN3URJUDP&KDQJH'HOHWH*URXS@.
E Press >'HOHWH@.
F Press the group key you want to delete.
G Press ><HV@.
90
(QWHULQJ7H[W
Entering Text
This section describes how to enter characters. When you enter a character, it is
shown at the position of the cursor. If there is a character at the cursor position,
the entered character is shown before that.
$YDLODEOH&KDUDFWHUV
• Alphabetic characters
ABCDEFGHIJKLMNOPQRSTUVWXYZabcdefghijklmnopqrstuvwxyz
• Symbols
• Numerals
0123456789
.H\V
91
8VHU7RROV6\VWHP6HWWLQJV
1RWH
❒ When entering uppercase or lowercase letters continuously, use >6KLIW/RFN@ to
lock the case.
(QWHULQJ7H[W
(QWHULQJOHWWHUV
A Press >6KLIW@ to switch between uppercase and lowercase.
B Press the letters you want to enter.
'HOHWLQJFKDUDFWHUV
A Press >%DFNVSDFH@ or >'HOHWH$OO@ to delete characters.
92
6. Paper Tray Settings
Accessing Paper Tray Settings
This section is for paper settings in charge of this machine. You can change or
preset the functions of the paper tray, Tray 1 to Tray 6, multi bypass tray (Tray
7), and the interposer.
1RWH
❒ After using Paper Tray Settings, be sure to set the same size and type of paper
in the tray. For loading paper, See p.102 “B Loading Paper”.
&KDQJLQJ3DSHU7UD\6HWWLQJV
A Press the {7UD\3DSHU6HWWLQJV} key.
The Tray Paper Settings screen appears.
B Select the tray number on the screen.
93
3DSHU7UD\6HWWLQJV
C Change settings, and then press >2.@.
([LWLQJ3DSHU7UD\6HWWLQJV
A Press the {7UD\3DSHU6HWWLQJV} key.
1RWH
❒ You can exit paper tray settings by pressing >([LW@ on the tray paper settings
display.
94
6HWWLQJV<RX&DQ&KDQJHZLWK8VHU7RROV
Settings You Can Change with User Tools
7UD\3DSHU6HWWLQJV
You can set the following items for each paper tray.
Tray 1
Tray 2 Tray 3
Tray 4 Tray 5 Tray 6 Tray 7
Interposer
Paper Type
❍
❍
❍
❍
❍
❍
❍
×
Paper Size
×
❍
❍
×
×
×
❍
❍
Thick Paper Setting
×
×
×
❍
❍
×
❍
×
Copy Method in Duplex
❍
❍
❍
❍
❍
❍
❍
×
Apply Auto Paper Select
❍
❍
❍
❍
❍
❍
❍
×
❖ 3DSHU7\SH
You can set the following paper type for each paper tray.
Tray 1 Tray 2 Tray 3 Tray 4 Tray 5 Tray 6 Tray 7
Recycled Paper
❍
❍
❍
❍
❍
❍
❍
Special Paper
❍
❍
❍
❍
❍
❍
❍
Letterhead
❍
❍
❍
❍
❍
❍
❍
Color Paper 1
❍
❍
❍
❍
❍
❍
❍
Color Paper 2
❍
❍
❍
❍
❍
❍
❍
Yellow
❍
❍
❍
❍
❍
❍
❍
Green
❍
❍
❍
❍
❍
❍
❍
Blue
❍
❍
❍
❍
❍
❍
❍
Purple
❍
❍
❍
❍
❍
❍
❍
Ivory
❍
❍
❍
❍
❍
❍
❍
Orange
❍
❍
❍
❍
❍
❍
❍
Pink
❍
❍
❍
❍
❍
❍
❍
Red
❍
❍
❍
❍
❍
❍
❍
Gray
❍
❍
❍
❍
❍
❍
❍
Preprinted Paper
❍
❍
❍
❍
❍
❍
❍
Prepunched Paper
❍
❍
❍
❍
❍
❍
❍
Label
×
×
×
×
❍
×
×
Bond Paper
❍
❍
❍
❍
❍
❍
❍
Cardstock
❍
❍
❍
❍
❍
❍
❍
OHP (Transparency)
×
❍
❍
❍
❍
❍
❍
Translucent Paper
×
❍
❍
❍
❍
❍
❍
Tab Stock
×
×
×
❍
❍
×
❍
95
3DSHU7UD\6HWWLQJV
1RWH
❒ The number of tab stock shifts can be set to millimeters, when >7DE6WRFN@
has been selected.
❒ “Thick Paper Setting” and “Tab Stock” can be set simultaneously. Thick
Paper Setting and Color Sheet can be set simultaneously.
❖ 3DSHU6L]H
5HIHUHQFH
You can select the size of the copy paper loaded in Tray 2, 3, 7, and the interposer. For the paper sizes you can load for each tray, see p.170 “Copy
Paper”.
,PSRUWDQW
❒ If the specified paper size differs from the size of paper actually set in the
paper tray, a misfeed might occur because the paper size is not detected
correctly.
1RWH
❒ For Tray 2 and Tray 3, setting of the selector knob takes priority. When set-
ting paper of a size not indicated on the selector knob, set the knob to the
p mark.
❖ 7KLFN3DSHU6HWWLQJ
You can set the thick paper setting to >2Q@ or >2II@.
❖ &RS\0HWKRGLQ'XSOH[
You can select the copying method in duplex mode; 2 Sided Copy or 1 Sided
Copy.
❖ $SSO\$XWR3DSHU6HOHFW
You can set the Auto Select mode to >2Q@ or >2II@.
96
6HWWLQJV<RX&DQ&KDQJHZLWK8VHU7RROV
'HVLJQDWLRQ6KHHW
You can specify and display the paper tray to set designation sheets. After selecting, you can also specify the display timing and copying method for two sided
copying.
❖ 'LVSOD\6HWWLQJ
You can select On Mode Select or Always Display.
❖ &RS\LQJ0HWKRGLQ'XSOH[
You can select 2 Sided Copy or 1 Sided Copy.
1RWH
❒ When you select the interposer, you cannot set details.
❒ When you select On Mode Select, settings for Designation Sheet 1 - 8 ap-
pear only when you select the designation sheet function.
❒ Copy Method in Duplex is enabled only when you select On Mode Select.
❒ When you select Always Display, appears.
)URQW&RYHU
You can specify and display the paper tray to set front cover sheets. After selecting the paper tray, you can also specify the display timing and copying method
for two sided copying.
❖ 'LVSOD\6HWWLQJ
You can select On Mode Select or Always Display.
❖ &RS\LQJ0HWKRGLQ'XSOH[
You can select 2 Sided Copy or 1 Sided Copy.
1RWH
❒ When you select the interposer, you cannot set details.
❒ When you select On Mode Select, settings for Front Cover appear only
when you select the front cover function.
❒ Copy Method in Duplex is enabled only when you select On Mode Select.
❒ When you select Always Display, appears.
97
3DSHU7UD\6HWWLQJV
%DFN&RYHU
You can specify and display the paper tray to set back cover sheets. After selecting the paper tray, you can also specify the display timing and copying method
for two sided copying.
❖ 'LVSOD\6HWWLQJ
You can select On Mode Select or Always Display.
❖ &RS\LQJ0HWKRGLQ'XSOH[
You can select 2 Sided Copy or 1 Sided Copy.
1RWH
❒ When you select the interposer, you cannot set details.
❒ When you select On Mode Select, settings for Back Cover appear only
when you select the back cover function.
❒ Copy Method in Duplex is enabled only when you select On Mode Select.
❒ When you select Always Display, appears.
6OLS6KHHWV
You can specify and display the paper tray in which to set slip sheets. After selecting, you can also specify the display timing and copying method for two-sided copying.
1RWH
❒ When >2Q 0RGH 6HOHFW@ is selected, the cover settings options are only dis-
played when the cover function or slip sheet function is selected.
❒ OHP transparencies cannot be copied when using the interposer.
❒ You can select the interposer.
6HSDUDWLRQ6KHHWV
You can specify and display the paper tray in which to set separation sheets. After selecting, you can also specify the display timing and copying method for
two-sided copying.
1RWH
❒ When >2Q 0RGH 6HOHFW@ is selected, the cover settings options are only dis-
played when the cover function or slip sheet function is selected.
❒ When you select Always Display, appears.
98
7. Troubleshooting
If Your Machine Does Not Operate as You
Want
*HQHUDO
Machine Status
Problem/Cause
Please wait.
Wait for the machine.
This message appears
when you turn on the operation switch or change the
toner bottle.
The machine is preparing
for copying images.
The display panel is off.
Action
Wait for 30 to 40 seconds.
The screen contrast knob is Set the screen contrast knob to the
turned to the dark position. light position for proper viewing of
the display panel.
The machine is in Low
Power mode.
Press the {(QHUJ\6DYHU} key to cancel Low Power mode.
The operation switch is
turned off.
Turn on the operation switch.
Nothing happens when the The main power switch is
operation switch is turned turned off.
on.
Turn on the main power switch.
Memory is full.
Press >'HOHWH)LOH@ to delete unnecesThe number of scanned
pages exceeds the capacity sary documents.
of the hard disk.
See p.51 “Deleting Stored Documents”
The function status indicator is red.
The function associated
with the red indicator has
been interrupted.
Press the function key corresponding to the indicator. Follow the instructions displayed in the display
panel.
The operation switch continues blinking and does
not turn off when pressed.
This occurs in the following cases:
• The machine is in communication with external equipment.
• The hard disk is in operation.
Check that the computer does not
control the machine when you turn
off the main power switch.
99
7URXEOHVKRRWLQJ
Machine Status
Problem/Cause
Action
The original images are
printed on the reverse side
of the paper.
You may have loaded the
paper incorrectly.
Load paper into the LCT another
with the print side up, or into a paper tray with the print side down.
See p.102 “B Loading Paper”
Misfeeds occur frequently.
The side guides of the pa- Check the side guides are locked.
per tray may not be locked. See p.122 “Changing the Paper
Size”
The end guide of the paper Check that the end guide is locked.
tray may not be locked.
See p.122 “Changing the Paper
Size”
You may have loaded paper whose size cannot be
detected automatically.
When you use paper of a size that
cannot be detected automatically,
set the paper size. See p.95 “Tray Paper Settings”.
The saddle stitching staple Reset the saddle stitching staple cartridge. See p.127 “d Adding Stacartridge for the booklet
finisher has been removed. ples”
100
An error message remains,
even if misfed paper is removed.
Clear misfed paper and open and
When a misfeed message
close the front cover. See p.113 “x
appears, it remains until
you open and close the cov- Clearing Misfeeds”
er, as required.
Cannot duplex print
You cannot use the paper
in the multi bypass tray
(Tray 7) for duplex printing.
For duplex printing, select Tray 1-3
in copier mode or with the printer
driver.
The setting for the Paper
Type: Tray 1-3 is “1 Side
Copy”.
Select “2 Sided Copy” for Paper
Type: Tray 1-3
During saddle stitching,
paper comes out open and
not neatly stacked.
Depending on the type of Select a paper type with low repaper, the paper opens as it bound.
rebounds when it is folded.
The user code entry dialog
box is displayed.
Users are restricted by user Enter the user code (up to 8-digits),
management.
and then press the {} key.
,I<RXU0DFKLQH'RHV1RW2SHUDWHDV<RX:DQW
'RFXPHQW6HUYHU
Problem
Action
“Scanned pages exceeded max. number. Do
The number of scanned pages exceeds the cayou want to store the scanned pages as a file?” pacity per file of the Document Server.
appears.
If you want to store scanned originals as a file,
press ><HV@. The originals are stored as a file in
the Document Server.
If you don't want scanned originals to be
stored, press >1R@. The scanning data will be
cleared.
You forgot your password.
You can confirm your password.
Press >8QORFN@ for “Temporarily Unlock Files”
in >3DVVZRUG0DQDJHPHQWIRU6WRUHG)LOHV@ of User
Tools. You can check the password when you
have selected the file.
You can delete all the saved documents at
once with the User Tools.
Make sure that no important documents are
saved in the Document Server before deleting
all saved documents.
See p.51 “Deleting Stored Documents”.
You cannot find out what is saved in a file.
Check the date or time column in the “Document Server: Files” display.
Check the contents of the document by printing the first page of it. Press the desired document in the “Document Server: Files” display,
and press >3ULQWVHOHFWHG3DJH@ followed by the
{6WDUW} key.
Memory becomes full frequently.
Press >'HOHWH)LOH@ to delete selected documents,
thereby increasing available memory.
You want to check print before making a large
print run.
Check print quality by printing out only the
first set using the {6DPSOH&RS\} key.
“Cannot copy. Original is being scanned by
other functions.” appears.
The Copy function is in use. To cancel the job
in process, first press >([LW@, and then press the
{&RS\} key. Next press the {6WRS} key. When
the message “>6WRS@ key was pressed. Stop
printing?” appears, press >6WRS@.
101
7URXEOHVKRRWLQJ
B Loading Paper
1RWH
❒ You can change the paper size in tray 2, 3, 4 and 5. See p.122 “Changing the
Paper Size”.
❒ Fan the paper before loading.
❒ Straighten curled or warped paper before loading.
5HIHUHQFH
For details about paper types and sizes, see p.170 “Copy Paper”.
/RDGLQJ3DSHULQ7UD\7DQGHP7UD\
,PSRUWDQW
❒ When paper on the right side in tray 1 runs out, paper on the left will auto-
matically move to the right. While the paper is moving, the machine instructs
you to wait. At this time, do not pull out the tray.
1RWH
❒ You can load paper even while making copies using paper in tray 1. During
copying, you can pull out the left half of the tray.
Load the same size and orientation paper in the other half of the tray.
A Pull out the paper tray until it stops.
102
B/RDGLQJ3DSHU
B Square the paper, and then load it in the tray.
:KHQWKHZKROHWUD\LVSXOOHGRXW
A Load the paper.
,PSRUWDQW
❒ Confirm that the top of the stack is not higher than the limit mark inside
the tray.
❒ Align the right edge of the copy paper stack in the right tray to the right
edge of the tray, and the left one to the left edge of the tray.
:KHQWKHOHIWKDOIRIWKHWUD\LVSXOOHGRXW
A Load the paper in the left tray.
,PSRUWDQW
❒ Confirm that the top of the stack is not higher than the limit mark inside
the tray.
❒ Align the left edge of the paper stack to the left edge of the tray.
C Gently push the paper tray in until it stops.
103
7URXEOHVKRRWLQJ
/RDGLQJ3DSHULQ7UD\DQG
A Pull out the paper tray until it stops.
B Square the paper, and then load it in the tray.
,PSRUWDQW
❒ Confirm that the top of the stack is not higher than the limit mark inside
the tray.
❒ Align the right edge of the copy paper stack to the right edge of the tray.
C Gently push the paper tray in until it stops.
104
B/RDGLQJ3DSHU
/RDGLQJ3DSHULQWKH/DUJH&DSDFLW\7UD\7UD\7UD\DQG7UD\
A Pull out the LCT until it stops.
B Place the paper in the tray along the edge on the left.
,PSRUWDQW
❒ Do not stack paper over the limit mark.
Align the left edge of the copy paper stack to the left edge of the tray.
1RWH
❒ Tray 4 and Tray 5 can hold up to 1,000 sheets, and Tray 6 can hold up to
2,550 sheets.
C Push the LCT in until it stops.
105
7URXEOHVKRRWLQJ
/RDGLQJ3DSHULQWKH2SWLRQDO$×
×7UD\.LW
A Pull out the A3/11" × 17" Tray until it stops.
B Place the paper in the tray along the edge on the left.
,PSRUWDQW
❒ Do not stack paper over the limit mark.
❒ Make sure that the paper stack is flush to the right side fence.
C Push the paper tray in until it stops.
106
B/RDGLQJ3DSHU
/RDGLQJ3DSHULQWKH,QWHUSRVHU
,PSRUWDQW
❒ Load paper on the side already printed (the side you want as front).
❒ Load paper in the interposer in the same orientation as paper in the paper
tray.
❒ The staple or punch position will be on the left side of the paper, when you
are facing the machine.
❒ Do not place anything on top of or leave originals on the sensor. This may
lead to paper jams or the paper size not being correctly scanned.
A Load the paper.
ZJBY610E
1RWH
❒ To set the paper in the interposer, align the orientation of originals in the
ADF as shown below.
ADF
Interposer
GCNTP0E
❒ Make sure the top of the stack is not higher than the limit mark inside the
tray.
107
7URXEOHVKRRWLQJ
B Adjust the paper guides to the paper size.
ZJBY620E
108
B/RDGLQJ3DSHU
2ULHQWDWLRQ)L[HG3DSHURU7ZR6LGHG3DSHU
Orientation-fixed (top to bottom) or two-sided paper (for example, letterhead,
punched, or copied paper) might not be printed correctly depending on how the
originals and paper are placed. Select [Letterhead setting] in system settings,
and then place the original and paper as shown below. See Copy Reference. When
printing with the printer function, the placing orientation is the same.
109
7URXEOHVKRRWLQJ
Pausing Copy When Using Finisher 3000B
(100–Sheet Staples)
You can pause a large volume of copies when using Finisher 3000B (100–Sheet
Staples).
1RWH
❒ You can suspend copy only when the output tray is specified as the finisher
shift tray. See p.64 “Output: Copier”.
A Press the {6XVSHQG5HVXPH} key.
The key lights up.
B Remove the stack of paper from the finisher shift tray.
C Press the {6WDUW} key.
The key turns off, and then copying restarts.
110
D$GGLQJ7RQHU
D Adding Toner
When D is displayed, it is time to supply toner.
R:$51,1*
'RQRWLQFLQHUDWHXVHGWRQHURUWRQHUFRQWDLQHUV7RQHUGXVWPLJKWLJ
QLWHZKHQH[SRVHGWRDQRSHQIODPH'LVSRVHRIXVHGWRQHUFRQWDLQHUV
LQDFFRUGDQFHZLWKORFDOUHJXODWLRQV
R&$87,21
.HHSWRQHUXVHGRUXQXVHGDQGWRQHUFRQWDLQHUVRXWRIUHDFKRIFKLOGUHQ
R&$87,21
2XUSURGXFWVDUHHQJLQHHUHGWRPHHWKLJKVWDQGDUGVRITXDOLW\DQGIXQFWLRQ
DOLW\DQGZHUHFRPPHQGWKDW\RXXVHRQO\WKHH[SHQGDEOHVXSSOLHVDYDLOD
EOHDWDQDXWKRUL]HGGHDOHU
,PSRUWDQW
❒ If you use toner brands other than those recommended, a fault might occur.
❒ When changing toner, do not turn off the operation switch or your settings
❒
❒
❒
❒
❒
will be cleared.
Always add toner when the machine instructs you to.
Do not use recycled toner. This will damage the machine.
During toner adding, the toner bottle is rotating. Do not touch the toner bottle.
If toner remains in the bottle, you cannot remove the bottle. Do not remove
the bottle forcibly.
Be sure to set the new toner bottle in the lower hole first.
1RWH
❒ If both toner bottles are empty, D will appear.
❒ You can still make about 200 copies after D appears, but replace the toner ear❒
❒
❒
❒
ly to copy degradation.
If one of the toner bottle is empty, you can keep copying by using the other
bottle.
You can change the toner bottle during copying.
If toner remains in the bottle, you cannot pull it out.
When you change one toner bottle, do not touch the other one.
5HIHUHQFH
For how to store toner, see p.142 “Toner Storage”.
111
7URXEOHVKRRWLQJ
Replacing Toner
• Open the toner cover.
5HIHUHQFH
For the location of the toner cover, see
p.17 “Guide to Components”.
• Push the green button to release the toner
bottle.
ZJBT010E
• Gently pull out the toner bottle gently.
ZJBT020E
1RWH
❒ Do not shake the toner bottle strongly or
toner might spill out.
ZJBT030E
• Remove the outer cap.
1RWH
❒ Do not remove the inner cap.
ZJBT040E
• Place the toner bottle in position, and then
push it in until the green button clicks.
,PSRUWDQW
❒ Be sure to set the new toner bottle in the
lower hole first.
1RWH
❒ If you cannot get it to click in, pull out
ZJBT050E
112
the toner bottle a little, slightly rotate it
to the left or right, then try again.
x&OHDULQJ0LVIHHGV
• Return the button under the toner bottle to
its original position.
• Close the toner cover.
ZJBT060E
x Clearing Misfeeds
ZJBH060E
R&$87,21
7KHIXVLQJVHFWLRQRIWKLVPDFKLQHPLJKWEHYHU\KRW&DXWLRQVKRXOGEHWDN
HQZKHQUHPRYLQJPLVIHGSDSHU
,PSRUWDQW
❒ When clearing misfeeds, do not turn off the operation switch or your copy
settings will be cleared.
❒ To prevent misfeeds, do not leave any torn scraps of paper inside the machine.
❒ If paper misfeeds occur repeatedly or you cannot remove the misfed paper in
spite of following the instructions, contact your service representative. You
might be requested to check the jam code number displayed in the upper part
of the screen.
1RWH
❒ More than one misfeed area may be indicated. In this case, check every appli-
cable area. Refer to the following charts: A, B, C, D, U, P, Q, R (R1 – R6), V, Z
❒ You can find a sticker explaining how to remove misfeed paper inside of the
front cover or inside of the finisher.
113
7URXEOHVKRRWLQJ
114
x&OHDULQJ0LVIHHGV
Disconnect multi bypass
tray (Tray 7).
115
7URXEOHVKRRWLQJ
116
x&OHDULQJ0LVIHHGV
117
7URXEOHVKRRWLQJ
118
x&OHDULQJ0LVIHHGV
119
7URXEOHVKRRWLQJ
120
x&OHDULQJ0LVIHHGV
121
7URXEOHVKRRWLQJ
Changing the Paper Size
3UHSDUDWLRQ
Be sure to select the paper size with Paper Tray Settings. Otherwise, misfeeds
might occur. See p.170 “Copy Paper”.
,PSRUWDQW
❒ If you want to change the paper size set in paper tray 1 or the LCT, contact
your service representative.
5HIHUHQFH
For details about paper sizes and types, see p.93 “Paper Tray Settings” and
p.170 “Copy Paper”.
1RWH
❒ Fan the paper before placing it in the tray.
❒ If paper is curled or warped, straighten it before placing in the tray.
&KDQJLQJWKH3DSHU6L]HRIWKH2SWLRQDO$×
×7UD\8QLW
7UD\
1RWH
❒ The fence of the optional, A3/11" × 17" tray unit (Tray 1) is fixed to A4, 81/2"
× 11" size.
❒ When you set tab stock in the tray, always use the end fence.
To change the paper size of this tray, contact your service representative.
&KDQJLQJWKH3DSHU6L]HLQ7UD\RU
A Make sure the paper tray is not being used, and then Pull the paper tray fully out.
Remove the paper from the tray.
122
&KDQJLQJWKH3DSHU6L]H
B Press the lock button, and then adjust the back and side fences to the new
paper size while pushing the release lever.
C Square the paper and load it in the paper tray, and then press the lock button.
,PSRUWDQW
❒ Confirm that the top of the stack is not higher than the limit mark inside
the tray.
❒ Align the right edge of the copy paper stack to the right edge of the tray.
D Set the paper size selector knob inside the tray to the new size.
123
7URXEOHVKRRWLQJ
,PSRUWDQW
❒ Problems might occur if the size of the paper set does not match the paper
size selector, such as:
• Misfeeds
• Parts of the image are not copied
7RDGMXVWWKHSDSHUVL]HWRRQHQRWDYDLODEOHRQWKHSDSHUVL]HVHOHFWRU
A Set the paper size selector knob to the p mark on the left.
B Press the {7UD\3DSHU6HWWLQJV} key.
C Press >3DSHU6L]H@.
D Select the size, and then press >2.@.
E Press >([LW@ or press the {7UD\3DSHU6HWWLQJV} key to exit the Tray Paper Setting.
E Gently push the paper tray until it stops.
F Check the paper size displayed on the display panel.
&KDQJLQJWKH3DSHU6L]HRIWKH/DUJH&DSDFLW\7UD\7UD\DQG
A Make sure that the paper tray is not being used, and then pull the tray fully
out.
124
&KDQJLQJWKH3DSHU6L]H
B Pull out the screws fixing the side fence.
C Set the side fences to the size you want.
D Fasten the side fence with the screws.
125
7URXEOHVKRRWLQJ
E Set the end fence along the paper size.
F Square the paper and set it in the tray.
,PSRUWDQW
❒ Do not load over the lowest level mark.
G Set the paper size selector in the innermost part of the tray to the new paper
size.
126
d$GGLQJ6WDSOHV
d Adding Staples
1RWH
❒ When removing jammed staples, staples might not be ejected the first few
times you try to use the stapler.
,PSRUWDQW
❒ If you use a staple cartridge other than that recommended, staple failure or
staple jams might occur.
❒ A paper jam will occur if the machine staples using the booklet finisher without the saddle stitch stapler cartridge. Make sure the cartridge is set.
5HIHUHQFH
For details about the type of finisher, see p.19 “External Options”.
%RRNOHW)LQLVKHU
• Open the finisher front cover.
• Pull out the staple unit.
• Gently pull out the cartridge.
• Pull up the upper unit of the cartridge
while holding both sides of the cartridge.
127
7URXEOHVKRRWLQJ
• Take out the empty refill in the direction of
the arrow.
• Align the arrows on the new refill and the
cartridge, and then push in the refill until it
clicks.
• Gently push down the upper unit into the
cartridge.
• Pull out the ribbon.
• Push the cartridge down until it clicks.
• Return the staple unit to its original position.
• Close the finisher front cover.
128
d$GGLQJ6WDSOHV
%RRNOHW)LQLVKHU6DGGOH6WLWFK
• Open the finisher front cover.
• Pull out the staple unit.
• Pull lever S2.
• Gently pull out the cartridge.
• Pull up the upper unit of the cartridge
while holding both sides of the cartridge.
• Take out the empty refill in the direction of
the arrow.
129
7URXEOHVKRRWLQJ
• Align the arrows on the new refill and the
cartridge, and then push in the refill until it
clicks.
• Gently push down the upper unit into the
cartridge.
• Pull out the ribbon.
• Push the cartridge down until it clicks.
• Return lever S2 to its original position.
• Return the staple unit to its original position.
• Close the finisher front cover.
130
d$GGLQJ6WDSOHV
)LQLVKHU%6KHHW6WDSOHV
• Open the finisher front cover.
• Pull out the cartridge lever.
• Pull out the cartridge.
• Put the cartridge down on a level surface.
• Raise the cover up.
• Set the new refill.
131
7URXEOHVKRRWLQJ
• Lower the cover until it clicks.
• Pull out the ribbon.
• Turn the cartridge around.
• Reinstall the cartridge.
• Push the cartridge in until it clicks.
• Close the finisher front cover.
132
e5HPRYLQJ-DPPHG6WDSOHV
e Removing Jammed Staples
,PSRUWDQW
❒ A paper jam will occur if the machine staples using the booklet finisher with-
out the saddle stitch stapler cartridge. Make sure the cartridge is set.
1RWH
❒ Staples might jam due to curled copy paper. If this happens, try turning the
paper over in the tray. If there is no improvement, change to a stiffer paper.
❒ When removing jammed staples, staples might not be ejected the first few
times you try to use the stapler.
%RRNOHW)LQLVKHU
• Open the finisher front cover.
• Pull out the staple unit.
• Gently pull out the cartridge.
• Open the face plate.
• Remove jammed staples.
133
7URXEOHVKRRWLQJ
• Pull down the face plate of the cartridge
until it clicks.
• Push the cartridge down until it clicks.
• Return the staple unit to its original position.
• Close the finisher front cover.
%RRNOHW)LQLVKHU6DGGOH6WLWFK
• Open the finisher front cover.
• Pull out the staple unit.
• Pull lever S2.
• Gently pull out the cartridge.
134
e5HPRYLQJ-DPPHG6WDSOHV
• Open the face plate of the cartridge.
• Remove jammed staples.
• Pull the face plate of the cartridge down
until it clicks.
• Push the cartridge down until it clicks.
• Return lever S2 to its original position.
• Return the staple unit to its original position.
• Close the front cover of the finisher.
135
7URXEOHVKRRWLQJ
)LQLVKHU%6KHHW6WDSOHV
• Open the finisher front cover.
• Turn knob R9 until the markings align.
• Pull lever R8 and pull the staple unit completely out.
• Turn knob R9 to rotate the staple unit.
• Pull out the cartridge lever.
• Pull out the cartridge.
• Push the buttons on the both sides of the
cartridge and open the face plate.
136
e5HPRYLQJ-DPPHG6WDSOHV
• Remove jammed staples.
• Lower the face plate until it clicks.
• Reinstall the cartridge.
• Push the cartridge in until it clicks.
• Close the finishers front cover.
137
7URXEOHVKRRWLQJ
y Removing Punch Waste
1RWH
❒ When the “Hole punch receptacle is full.” message appears, you cannot use
the Punch function.
The procedures shown below is an example using the Finisher 3000B.
A Open the finisher's front cover.
ZJBP020E
B Pull out the punch waste box, and then remove punch waste.
C Reinstall the punch waste box.
138
y5HPRYLQJ3XQFK:DVWH
D Close the front cover of the finisher.
The “Hole punch receptacle is full.” message disappears.
1RWH
❒ If the message is still displayed, reinstall the punch waste box.
139
7URXEOHVKRRWLQJ
140
8. Remarks
Do's and Don'ts
R&$87,21
8QSOXJWKHSRZHUFRUGIURPWKHZDOORXWOHWEHIRUH\RXPRYHWKHPDFKLQH
:KLOHPRYLQJWKHPDFKLQH\RXVKRXOGWDNHFDUHWKDWWKHSRZHUFRUGZLOOQRW
EHGDPDJHGXQGHUWKHPDFKLQH
• Do not turn off the main power switch while the On indicator is lit or blinking. This may cause damage to the hard disk or memory.
• Do not touch areas on or around the fusing unit. These areas get hot.
• After making copies continuously, the exposure glass may become warm—
this is not a malfunction.
• When you use this machine for a long time in a confined space without good
ventilation, you may detect an odd smell. To keep the workplace comfortable,
we recommend that you keep it well ventilated.
• The area around the ventilation hole may become warm. This is caused by exhaust air and is not a malfunction.
• Do not turn off the operation switch while copying or printing. Make sure all
copying or printing has finished.
• The machine might fail to produce good copy images if condensation forms
inside due to rapid temperature change.
• Do not open the covers of the machine while copying or printing. If you do,
misfeeds might occur.
• Do not move the machine while copying or printing.
• If you operate the machine improperly or a failure occurs, settings might be
lost. Be sure to make a note of your machine settings.
• The manufacturer shall not be liable for any loss or damage resulting from
failure of the machine, loss of settings, or use of the machine.
141
5HPDUNV
Toner
+DQGOLQJ7RQHU
R:$51,1*
'RQRWLQFLQHUDWHXVHGWRQHURUWRQHUFRQWDLQHUV7RQHUGXVWPLJKWLJ
QLWHZKHQH[SRVHGWRDQRSHQIODPH'LVSRVHRIXVHGWRQHUFRQWDLQHUV
LQDFFRUGDQFHZLWKORFDOUHJXODWLRQV
R&$87,21
.HHSWRQHUXVHGRUXQXVHGDQGWRQHUFRQWDLQHUVRXWRIUHDFKRIFKLOGUHQ
R&$87,21
2XUSURGXFWVDUHHQJLQHHUHGWRPHHWKLJKVWDQGDUGVRITXDOLW\DQGIXQFWLRQ
DOLW\DQGZHUHFRPPHQGWKDW\RXXVHRQO\WKHH[SHQGDEOHVXSSOLHVDYDLOD
EOHDWDQDXWKRUL]HGGHDOHU
,PSRUWDQW
❒ If you use toner other than the recommended type, an error might occur.
5HIHUHQFH
If you want to add toner, see p.111 “D Adding Toner”.
7RQHU6WRUDJH
When storing toner, the following precautions should always be followed:
• Store toner containers in a cool, dry place free from direct sunlight.
• Store on a flat surface.
8VHG7RQHU
1RWH
❒ Toner cannot be re-used.
142
:KHUHWR3XW<RXU0DFKLQH
Where to Put Your Machine
0DFKLQH(QYLURQPHQW
Your machine's location should be carefully chosen because environmental conditions greatly affect its performance.
2SWLPXPHQYLURQPHQWDOFRQGLWLRQV
R&$87,21
.HHSWKHPDFKLQHDZD\IURPKXPLGLW\DQGGXVW2WKHUZLVHDILUHRUDQHOHF
WULFVKRFNPLJKWRFFXU
'RQRWSODFHWKHPDFKLQHRQDQXQVWDEOHRUWLOWHGVXUIDFH,ILWWRSSOHVRYHU
DQLQMXU\PLJKWRFFXU
R&$87,21
,I\RXXVHWKHPDFKLQHLQDFRQILQHGVSDFHPDNHVXUHWKHUHLVDFRQWLQXRXV
DLUWXUQRYHU
Temperature: 10 – 32°C (50 – 89.6°F)(humidity to be 54% at 32°C, 89.6°F)
Humidity: 15 – 80% (temperature to be 27°C, 80.6°F at 80%)
A strong and level base.
The machine must be level within 5 mm, 0.2" both front to rear and left to
right.
• To avoid possible buildup of ozone, be sure to locate this machine in a large
well ventilated room that has an air turnover of more than 30 m3/hr/person.
•
•
•
•
(QYLURQPHQWVWRDYRLG
• Areas exposed to direct sunlight or strong light (more than 1,500 lux).
• Areas directly exposed to cool air from an air conditioner or heated air from
a heater. (Sudden temperature changes might cause condensation withinside
the machine.)
• Areas around machines generating ammonia such as a diazo copy machine.
• Places where the machine might be subjected to frequent strong vibration.
• Dusty areas.
• Areas with corrosive gases in the atmosphere.
143
5HPDUNV
0RYLQJ
R&$87,21
8QSOXJWKHSRZHUFRUGIURPWKHZDOORXWOHWEHIRUH\RXPRYHWKHPDFKLQH
:KLOHPRYLQJWKHPDFKLQH\RXVKRXOGWDNHFDUHWKDWWKHSRZHUFRUGZLOOQRW
EHGDPDJHGXQGHUWKHPDFKLQH
,PSRUWDQW
❒ When moving the machine, the following precautions should always be fol-
lowed:
• Turn off the main power. See p.25 “Turning Off the Main Power”.
• Unplug the power cord from the wall outlet. When you do, grip the plug
to avoid damaging the cord and causing fire or electric shock.
• Close all covers and trays including the front cover and multi bypass tray
(Tray 7).
/LPLWDWLRQ
❒ Move the machine carefully. If you do not, the machine might be damaged or
a stored file might be deleted.
❒ Protect the machine from impacts. Shock could damage the hard disk and
cause stored files to be deleted. As a precautionary measure, files should be
copied to another local computer.
3RZHU&RQQHFWLRQ
R:$51,1*
&RQQHFWWKHPDFKLQHRQO\WRWKHSRZHUVRXUFHGHVFULEHGRQWKHLQVLGH
IURQWFRYHURIWKLVPDQXDO&RQQHFWWKHSRZHUFRUGGLUHFWO\LQWRDZDOO
RXWOHWDQGGRQRWXVHDQH[WHQVLRQFRUG
'RQRWGDPDJHEUHDNRUPDNHDQ\PRGLILFDWLRQVWRWKHSRZHUFRUG
'RQRWSODFHKHDY\REMHFWVRQLW'RQRWSXOOLWKDUGQRUEHQGLWPRUH
WKDQQHFHVVDU\7KHVHDFWLRQVFRXOGFDXVHDQHOHFWULFVKRFNRUILUH
R&$87,21
8QSOXJWKHSRZHUFRUGIURPWKHZDOORXWOHWEHIRUH\RXPRYHWKHPDFKLQH
:KLOHPRYLQJWKHPDFKLQH\RXVKRXOGWDNHFDUHWKDWWKHSRZHUFRUGZLOOQRW
EHGDPDJHGXQGHUWKHPDFKLQH
R&$87,21
:KHQ\RXGLVFRQQHFWWKHSRZHUSOXJIURPWKHZDOORXWOHWDOZD\VSXOOWKH
SOXJQRWWKHFDEOH
144
:KHUHWR3XW<RXU0DFKLQH
• When the main power switch is in the Stand-by position, the optional anticondensation heaters are on. In case of emergency, unplug the machine's
power cord.
• When you unplug the power cord, the anti-condensation heaters turn off.
• Make sure that the plug is firmly inserted in the outlet.
• Voltage must not fluctuate by more than 10%.
• The socket-outlet should be installed near the equipment and be easily accessible.
$FFHVVWRWKH0DFKLQH
Position the machine near the power source, providing clearance as shown.
1. Rear: more than 20 cm (7.8")
2. Right: more than 3 cm (1.1")
3. Front: more than 55.5 cm (21.6")
4. Left: more than 40 cm (15.7")
1RWH
❒ For the required space when options are installed, contact your service repre-
sentative.
145
5HPDUNV
Maintaining Your Machine
If the exposure glass or ADF is dirty, you might not be able to make clear copies.
Clean these parts if they become dirty.
❖ &OHDQLQJWKHPDFKLQH
Wipe the machine with a soft, damp cloth. Then, wipe it with a dry cloth to
remove the water.
,PSRUWDQW
❒ Do not use chemical cleaners or organic solvents, such as thinners or benzene.
If they get into the machine or melt plastic parts, a failure might occur.
❒ Do not clean parts other than those specified in this manual. Such parts
should be cleaned by a service representative.
&OHDQLQJWKH([SRVXUH*ODVV
ND1C0200
&OHDQLQJWKH$XWR'RFXPHQW)HHGHU
A1P0100E
146
2WKHU)XQFWLRQV
Other Functions
,QTXLU\
The inquiry function lets you confirm the telephone numbers to contact for repairs or order toner. Be sure to contact your service engineer to verify the following:
❖ 0DFKLQH0DLQWHQDQFH5HSDLU
• Telephone No.
• Serial No. of the machine
❖ 6DOHV5HSUHVHQWDWLYH
• Telephone No.
A Press the {&RXQWHU} key.
ZJBS051N
Inquiry information is displayed.
3ULQWLQJLQTXLU\LQIRUPDWLRQ
A Press >3ULQW,QTXLU\/LVW@.
B Press the {6WDUW} key.
Inquiry information is printed.
B Press >([LW@.
147
5HPDUNV
&KDQJLQJWKH'LVSOD\/DQJXDJH
You can change the language used on the display. English is set as the default.
A Press the {/DQJXDJH6HOHFWLRQ} key.
1RWH
❒ If you want to return the display language to “English”, repeat step A and
press >(QJOLVK@.
&RXQWHU
'LVSOD\LQJWKHWRWDOFRXQWHU
You can display the total number of sheets used for all functions and the total
number of sheets used for copying.
You can also print the counter list.
A Press the {&RXQWHU} key.
ZJBS051N
B To print a counter list, press >3ULQW&RXQWHU/LVW@.
C Press the {6WDUW} key.
A counter list is printed.
148
9. Security
Security
Confidential information is always at risk of being copied without permission or
subject to unauthorized access through the network. To protect documents from
these types of risks, not only can passwords be set, but also the Extended Security function can be used to strengthen security.
For those who require ample document protection, we recommend that the Extended Security function be used.
3ULPDU\6HFXULW\)XQFWLRQV
❖ 3URWHFWLQJ6WRUHG'RFXPHQWV
Protects documents with a password when using Document Server or Locked
Print. Furthermore, the Extended Security function can protect against a password-guessing attack. See p.149 “Extended Security Function”.
❖ 3URWHFWLQJ,PDJH'DWD5HPDLQLQJLQ0HPRU\
Protects image data remaining in memory. When a copying or printing job is
completed or a job is cancelled, the data is secure.
❖ $XWKHQWLFDWLQJ$GPLQLVWUDWRU
Protects essential functions for administrating document security with an access code. See p.69 “Key Operator Code”
([WHQGHG6HFXULW\)XQFWLRQ
By setting a password, operations with documents such as printing, deleting, or
delivering can be restricted to authorized users and access denied to others.
However, a password is breakable. When the Extended Security function is
used, entering the wrong password 10 times will lock a document, protecting it
from illegitimate accesses.
For unlocking documents, see p.150 “Unlocking a Locked Document”.
The documents that can be protected by the Extended Security function are as
follows. All documents must be set with a password to be protected by this function.
❖ 'RFXPHQWVVWRUHGLQWKH'RFXPHQW6HUYHUE\WKHIROORZLQJIXQFWLRQV
• Document Server mode
• Copier function
• Scanner function
• Printer driver
149
6HFXULW\
❖ 'RFXPHQWVVWRUHGIURPWKHSULQWHUGULYHUXVLQJ/RFN3ULQWIXQFWLRQ
5HIHUHQFH
For information about Document Server, see p.35 “Document Server”.
For information about Locked Print, see “Locked Print”, Printer Reference,
or the printer driver Help.
1RWH
❒ Once a document has been locked, it will not accept even the correct pass-
word until it is unlocked.
❒ When Extended Security function is on, settings for the delivery server
cannot be changed. Turn the function off when changing the settings.
6HWWLQJ([WHQGHG6HFXULW\
3UHSDUDWLRQ
The Extended Security setting is not available unless the access code set in the
Access Code settings of the System Settings is six or more digits. See p.69
“Key Operator Code”.
A Press the {8VHU7RROV&RXQWHU} key.
B On the display panel, press >6\VWHP6HWWLQJV@, and then press >.H\2SHUDWRU
7RROV@.
C Press >([WHQGHG6HFXULW\@. Press >2Q@, and then >2.@.
The Extended Security function is enabled and the security mark
at the lower right of the display panel.
appears
D Press the {8VHU7RROV&RXQWHU} key to finish.
8QORFNLQJD/RFNHG'RFXPHQW
Unlock a document that was locked due to entering the wrong password multiple times and make it available for authorized users to access again.
A Press the {8VHU7RROV&RXQWHU} key.
B On the display panel, press >6\VWHP6HWWLQJV@, and then press >3DVVZRUG0DQ
DJHPHQWIRU6WRUHG)LOHV@.
C Press >2.@ under >8QORFN)LOHV@.
The document is unlocked.
D Press the {8VHU7RROV&RXQWHU} key to finish.
150
6HFXULW\
7HPSRUDULO\'LVDEOLQJ'RFXPHQW6HFXULW\
In the event you forget a password, document protection can be temporarily disabled, making documents available for operations such as setting new passwords or deleting.
,PSRUWDQW
❒ After operations are complete, be sure to press “Do not Unlock” under “Tem-
porarily Unlock Files”, making the document protected by password again.
1RWH
❒ For a document stored using Locked Print, only document deletion is availa-
ble while protection is disabled.
A Press the {8VHU7RROV&RXQWHU} key.
B On the display panel, press >6\VWHP6HWWLQJV@, and then press >3DVVZRUG0DQ
DJHPHQWIRU6WRUHG)LOHV@.
C Press >8QORFN@ under “Temporarily Unlock Files”.
1RWH
❒ Protection can be disabled for only three minutes. Access the document,
set a new password, and perform any other necessary operations to the
document within that time. Documents will automatically return to the
password-protected condition after three minutes.
D Press the {8VHU7RROV&RXQWHU} key to finish.
151
6HFXULW\
Operating Environment and Notes
Security for this machine is assured on the premises that the machine is used under the following conditions:
2SHUDWLQJ(QYLURQPHQW
• The condition of the machine is normal. (For example, it is not damaged,
modified, or lacking components.)
• When the machine is connected to a network, the machine is protected from
illegitimate access including unauthorized packet sniffing.
• The machine is managed by an administrator with thorough knowledge of
the machine and capable of providing the proper conditions under which users can use the machine safely.
)RU$GPLQLVWUDWRU
• This machine does not protect against illegitimate actions on the network. To
avoid any risks on the network, further security is required.
• Security of this machine cannot be assured if any hardware component is detached or replaced with an inappropriate component. If these things have the
possibility of occurring, other security measures are necessary.
• Regularly check that the Extended Security function is on. While the machine
is in this mode, the security mark is displayed at the lower right of the display panel. Be sure to check it particularly after the machine is moved or a
power failure occurs. See p.150 “Setting Extended Security”.
• Avoid using a single number or consecutive numbers for an access code such
as “00000000” or “12345678”. Since the numbers like this are easy to guess, using them will not provide the appropriate level of security.
• Remote document management using SmartNetMonitor for Admin is not
available when the Extended Security function is on.
• User code is a function to help manage the use of the machine. It is not to protect confidential documents from others. See p.75 “User Codes”.
• As for using the delivery function, the security of this machine can assure
only the protection of documents having a password set and stored in the
Document Server. Be sure to select the destination correctly when delivering
documents.
152
2SHUDWLQJ(QYLURQPHQWDQG1RWHV
)RU8VHU
• Be careful not to let anyone know your password, especially when entering a
password or recording it. Keep any record of your password in a safe place.
• Avoid using a single number or consecutive numbers for a password such as
“0000” or “1234”. Since the numbers like this are easy to guess, using them
will not provide the appropriate level of security.
• A document accessed with a correct password remains selected even after operations are completed and can be accessed by other users. To avoid this, be
sure to press the {&OHDU0RGHV} key to cancel the selection of the document.
• The user name that is used when adding a document to the Document Server
is to identify the document creator and type. It is not to protect confidential
documents from others.
• Before scanning documents using the scanner function, make sure that all
other operations are completed.
153
6HFXULW\
154
10. Specification
Main Machine
❖ &RQILJXUDWLRQ
Console
❖ 3KRWRVHQVLWLYLW\W\SH
OPC drum (∅100)
❖ 2ULJLQDOVFDQQLQJ
One-dimensional solid scanning system through CCD
❖ &RS\SURFHVV
Dry electrostatic transfer system
❖ 'HYHORSPHQW
Dry two-component magnetic brush development system
❖ )XVLQJ
Heating roll pressure system
❖ 5HVROXWLRQ
1200 dpi
❖ ([SRVXUHJODVV
Stationary original exposure type
❖ 2ULJLQDOUHIHUHQFHSRVLWLRQ
Rear left corner
❖ :DUPXSWLPH
Less than 360 seconds (23°C)
❖ 2ULJLQDOV
Sheet/Book/Objects
❖ 2ULJLQDOVL]H
A3L - A5KL, 11" × 17"L - 51/2" × 81/2" KL
❖ &RS\SDSHUVL]H
See p.170 “Copy Paper” about paper size for each tray
❖ &RS\SDSHUZHLJKW
• Tray 1 - Tray 3, Tray 6 : 52 - 162 g/m2, 16 lb. Bond - 90 lb. Index
• Tray 4, Tray 5, Tray 7: 52 - 216 g/m2, 16 lb. Bond - 80 lb. Cover
155
6SHFLILFDWLRQ
❖ 1RQUHSURGXFWLRQDUHD
• Leading edge: More than 4 ± 2 mm
• Trailing edge: More than 2 + 2/−1.7 mm
• Left edge: More than 2 ± 1.5 mm
• Right edge: More than 2 ± 1.5 mm
❖ )LUVWFRS\WLPH
Type 1
3.5 seconds (for Face Up)
5 seconds (for Face Down)
Type 2
3.2 seconds (for Face Up)
4.5 seconds (for Face Down)
❖ &RS\LQJVSHHG
Type 1
90 copies/minute
41 copies/minute
(A4 K, 81/2" × 11"K) (A3 L)
42 copies/minute
(11" × 17"L)
Type 2
105 copies/minute
49 copies/minute
(A4 K, 81/2" × 11"K) (A3 L)
51 copies/minute
(11" × 17"L)
❖ 5HSURGXFWLRQUDWLR
Preset reproduction ratios:
Metric version
Inch version
400 %
400 %
200 %
200 %
141 %
155 %
122 %
129 %
115 %
121 %
Full Size
100 %
100 %
Reduction
93 %
93 %
82 %
85 %
75 %
78 %
71 %
73 %
65 %
65 %
50 %
50 %
25 %
25 %
Enlargement
Zoom: From 25 % to 400 % in 1 % steps.
❖ 0D[LPXPQXPEHURIFRQWLQXRXVFRS\VHWV
1 – 9999 copies
156
0DLQ0DFKLQH
❖ &RS\SDSHUFDSDFLW\
• Tray 1 (Tandem tray) : 2,200 sheets (1,100 sheets × 2) (80 g/m2, 20 lb Bond)
• Tray 2 (550-sheet tray) : 550 sheets (80 g/m2, 20 lb Bond)
• Tray 3 (550-sheet tray) : 550 sheets (80 g/m2, 20 lb Bond)
• Tray 4 (LCT): 1,000 sheets (80 g/m2, 20 lb Bond)
• Tray 5 (LCT): 1,000 sheets (80 g/m2, 20 lb Bond)
• Tray 6 (LCT): 2,550 sheets (80 g/m2, 20 lb Bond)
• Tray 7: 500 sheets (80 g/m2, 20 lb Bond)
❖ 3RZHUFRQVXPSWLRQ7\SHFRSLHVPLQXWHPRGHO
Main machine only
Full system *1
Warm-up
2.2 kW
2.3 kW
Stand-by
0.65 kW
0.7 kW
Copying
2.7 kW
2.8 kW
Maximum
2.8 kW
2.9 kW
*1
Main machine with the finisher, LCT, Multi bypass tray (Tray 7), ADF, interposer
❖ 3RZHUFRQVXPSWLRQ7\SHFRSLHVPLQXWHPRGHO
Main machine only
Full system *1
Warm-up
2.2 kW
2.3 kW
Stand-by
0.65 kW
0.7 kW
Copying
2.8 kW
2.9 kW
Maximum
2.9 kW
3.0 kW
*1
Main machine with the finisher, LCT, Multi bypass tray (Tray 7), ADF, interposer
❖ 'LPHQVLRQV:×
×'×
×+XSWRH[SRVXUHJODVV
2,096 × 858.5 × 1,476 mm, 82.5" × 33.78" × 58.1"
❖ 6SDFHIRUPDLQPDFKLQH:×
×'
• 1,202 × 858.5 mm, 47.3" × 33.78" (ADF external extender is not used, optional output tray is installed.)
• 2,218 × 858.5 mm, 87.3" × 33.78" (ADF external extender is used for larger
size originals, optional finisher proof tray is installed.)
• 2,314 × 858.5 mm, 91.1" × 33.78" (ADF external extender is used for larger
size originals, optional finisher proof tray is installed.)
157
6SHFLILFDWLRQ
❖ 1RLVHHPLVVLRQ7\SH
Sound power level
Main machine only
Complete system *3
When printing
74 dB (A)
78 dB (A)
Stand-by
60 dB (A)
59 dB (A)
Main machine only
Complete system *3
During printing
60 dB (A)
68 dB (A)
Stand-by
45 dB (A)
46 dB (A)
Sound pressure level *2
*1
*2
*3
The above measurements are ISO 7779 actual values.
Measured at the position of the bystander/operator. During printing.
Main machine with full options.
❖ 1RLVHHPLVVLRQ7\SH
Sound power level
Main machine only
Complete system *3
When printing
76 dB (A)
79 dB (A)
Stand-by
60 dB (A)
59 dB (A)
Main machine only
Complete system *3
During printing
61 dB (A)
68 dB (A)
Stand-by
45 dB (A)
46 dB (A)
Sound pressure level *2
*1
*2
*3
The above measurements are ISO 7779 actual values.
Measured at the position of the bystander/operator. During printing.
Main machine with full options.
❖ :HLJKW
Approx. 270 kg, 594 lb (main machine with the ADF)
158
0DLQ0DFKLQH
'RFXPHQW6HUYHU
❖ +''
80 GB
❖ +'''RFXPHQW6HUYHU
45 GB
❖ &DSDFLW\
• Copy: Approx. 3,000 (ITUT-No.4 chart)
• Batch mode: Approx. 3,000 (ITUT-No.4 chart)
• Printer: Approx. 15,000 (600 dpi)
• Scanner: Approx. 3,000 (200 dpi/Text) (ITUT-No.4 chart) *1
❖ 0D[LPXPQXPEHURIVWRUHGGRFXPHQWV
3,000
❖ 0D[LPXPSDJHVRIVWRUHGGRFXPHQWV
15,000
❖ 0D[LPXPQXPEHURISDJHVSHUGRFXPHQW
2,000
❖ &DSDFLW\0HPRU\6RUWLQJ
6.75 GB (A4/81/2" × 11" : Approx. 333 sheets-3000 sheets at maximum) *2
❖ &DSDFLW\2WKHUV
10.0 GB
*1
*2
Scanning Condition: ITUT-No.4 chart/200 dpi/Text/A4/MMR
The capacity will change when the multiple functions are used.
159
6SHFLILFDWLRQ
$XWR'RFXPHQW)HHGHU
❖ 0RGH
ADF mode, Batch mode, SADF mode, Mixed Sizes mode, Thin mode
❖ 2ULJLQDOVL]H
• A3L–A5KL
• 11" × 17"L– 81/2" × 51/2"KL
❖ 2ULJLQDOZHLJKW
• 1-sided originals: 52 - 156 g/m2 (14 - 42 lb. Bond)
• 2-sided originals: 52 - 128 g/m2 (14 - 34 lb. Bond) (Duplex)
• Thin paper mode: 40 - 156 g/m2 (11 -42 lb. Bond)
❖ 1XPEHURIRULJLQDOVWKDWFDQEHVHW
100 sheets (80 g/m2, 20 lb. Bond) of less than 12 mm, 0.5"
❖ &RS\LQJVSHHG
80 copies/minute (A4K, 81/2" × 11"K, 1 to 1 copying)
❖ 3RZHU6RXUFH
Supplied from the main machine.
1RWH
❒ Specifications are subject to change without notice.
160
2SWLRQV
Options
%RRNOHW)LQLVKHU
Finisher Upper Tray:
❖ 3DSHUVL]H
A3L, B4L, A4KL, B5KL, A5KL, 11" × 17"L, 81/2" × 14"L, 81/2" ×
11"KL, 51/2" × 81/2"KL, 12" × 18"L
❖ 3DSHUZHLJKW
52 – 163 g/m2, 14 – 43 lb. Bond
❖ 6WDFNFDSDFLW\
• 250 sheets (A4KL, B5KL, A5KL, 81/2" × 11"KL, 51/2" × 81/2"KL)
(80 g/m2, 20 lb. Bond)
• 50 sheets (A3L, B4L, 11" × 17"L, 81/2" × 14"L, 12" × 18"L) (80 g/m2, 20
lb. Bond)
Finisher Shift Tray 1:
❖ 3DSHUVL]H
A3L, B4L, A4KL, B5KL, A5KL, 11" × 17"L, 81/2" × 14"L, 81/2" ×
11"KL, 51/2" × 81/2"KL, 12" × 18"L
❖ 3DSHUZHLJKW
52 – 216 g/m2, 14 – 58 lb. Bond
❖ 6WDFNFDSDFLW\
• 500 sheets (A4KL, B5KL, A5K, 81/2" × 11"KL) (80 g/m2, 20 lb. Bond)
• 250 sheets (A3L, B4L, 11" × 17"L, 81/2" × 14"L, 12" × 18"L) (80 g/m2, 20
lb. Bond)
• 100 sheets (A5L, 51/2" × 81/2"L) (80 g/m2, 20 lb. Bond)
❖ 6WDSOHSDSHUVL]H
A3L, B4L, A4KL, B5KL, 11" × 17"L, 81/2" × 14"L, 81/2" × 11"KL
❖ 6WDSOHSDSHUZHLJKW
64 – 90 g/m2, 17 – 28 lb. Bond
❖ 6WDSOHFDSDFLW\
Without Mixed Size mode:
• 50 sheets (A4KL, B5KL, 81/2" × 11"KL) (80 g/m2, 20 lb. Bond)
• 30 sheets (A3L, B4L, 11" × 17"L, 81/2" × 14"L) (80 g/m2, 20 lb. Bond)
With Mixed Size mode:
• 30 sheets (A4K/A3L, B5K/B4L, 81/2" × 11"K/11" × 17"L) (80 g/m2,
20 lb. Bond)
161
6SHFLILFDWLRQ
❖ 6WDFNFDSDFLW\DIWHUVWDSOLQJ
Without Mixed Size mode:
• 50–10 sets (10–50 sheets) (A4K, 81/2" × 11"K)(80 g/m2, 20 lb. Bond)
• 50 sets (2–9 sheets) (A4K, 81/2" × 11"K)(80 g/m2, 20 lb. Bond)
• 25–16 sets (10–30 sheets) (other paper size)(80 g/m2, 20 lb. Bond)
• 25 sets (2–9 sheets) (other paper size)(80 g/m2, 20 lb. Bond)
With Mixed Size mode:
• 16 sets (2–30 sheets) (A4K/A3L, B5K/B4L, 81/2" × 11"K/11" × 17"L)
(80 g/m2, 20 lb. Bond)
❖ 6WDSOHSRVLWLRQ
4 position (Top, Top Slant, Bottom, 2 Staples)
Finisher Shift Tray 2:
❖ 3DSHUVL]H
A3L, B4L, A4KL, B5KL, A5KL, 11" × 17"L, 81/2" × 14"L, 81/2" ×
11"KL, 51/2" × 81/2"KL, 12" × 18"L
❖ 3DSHUZHLJKW
52 – 216 g/m2, 14 – 58 lb. Bond
❖ 6WDFNFDSDFLW\
• 2,500 sheets (A4K, 81/2" × 11"K) (80 g/m2, 20 lb. Bond)
• 1,250 sheets (A3L, B4L, A4L, B5KL, 11" × 17"L, 81/2" × 14"L, 81/2" ×
11"L, 12" × 18"L) (80 g/m2, 20 lb. Bond)
• 500 sheets (A5K) (80 g/m2, 20 lb. Bond)
• 100 sheets (A5L, 51/2" × 81/2"L) (80 g/m2, 20 lb. Bond)
❖ 6WDSOHSDSHUVL]H
A3L, B4L, A4KL, B5KL, 11" × 17"L,81/2" × 14"L, 81/2" × 11"KL
❖ 6WDSOHSDSHUZHLJKW
64 – 90 g/m2, 17 – 28 lb. Bond
❖ 6WDSOHFDSDFLW\
Without Mixed Size mode:
• 50 sheets (A4KL, B5KL, 81/2" × 11"KL) (80 g/m2, 20 lb. Bond)
• 30 sheets (A3L, B4L, 11" × 17"L, 81/2" × 14"L) (80 g/m2, 20 lb. Bond)
With Mixed Size mode:
• 30 sheets (A4K/A3L, B5K/B4L, 81/2" × 11"K/11" × 17"L) (80 g/m2,
20 lb. Bond)
162
2SWLRQV
❖ 6WDFNFDSDFLW\DIWHUVWDSOLQJ
Without Mixed Size mode:
• 250–50 sets (10–50 sheets) (A4K, 81/2" × 11"K)(80 g/m2, 20 lb. Bond)
• 250 sets (2–9 sheets) (A4K, 81/2" × 11"K)(80 g/m2, 20 lb. Bond)
• 125–25 sets (10–50 sheets) (A4L, B5KL, 81/2" × 11"L)(80 g/m2, 20 lb.
Bond)
• 125 sets (2–9 sheets) (A4L, B5KL, 81/2" × 11"L)(80 g/m2, 20 lb. Bond)
• 125–40 sets (10–30 sheets) (other paper size)(80 g/m2, 20 lb. Bond)
• 125 sets (2–9 sheets) (other paper size)(80 g/m2, 20 lb. Bond)
With Mixed Size mode:
• 50 sets (2–30 sheets) (A4K/A3L, B5K/B4L, 81/2" × 11"K/11" × 17"L)
(80 g/m2, 20 lb. Bond)
❖ 6WDSOHSRVLWLRQ
4 position (Top, Top Slant, Bottom, 2 Staples)
❖ 6DGGOHVWLWFKSDSHUVL]H
A3L, B4L, A4L, 11" × 17"L, 81/2" × 11"L
❖ 6DGGOHVWLWFKSDSHUZHLJKW
64 – 90 g/m2, 17 – 28 lb. Bond
❖ 6DGGOHVWLWFKFDSDFLW\
1 set (15 sheets)
❖ 6WDFNFDSDFLW\DIWHUVDGGOHVWLWFKLQJ
• 25 sets (2–5 sheets) (A4L, 81/2" × 11"L)(80 g/m2, 20 lb. Bond)
• 15 sets (6–10 sheets) (A4L, 81/2" × 11"L)(80 g/m2, 20 lb. Bond)
• 10 sets (11–15 sheets) (A4L, 81/2" × 11"L)(80 g/m2, 20 lb. Bond)
• 30 sets (2–5 sheets) (other paper size)(80 g/m2, 20 lb. Bond)
• 20 sets (6–10 sheets) (other paper size)(80 g/m2, 20 lb. Bond)
• 10 sets (11–15 sheets) (other paper size)(80 g/m2, 20 lb. Bond)
❖ 6DGGOHVWLWFKSRVLWLRQ
Center 2 position
❖ 3RZHUFRQVXPSWLRQ
Approx. 72 W (power is supplied from the mainframe)
❖ 'LPHQVLRQV:×
×'×
×+
700 × 620 × 960 mm, 27.6" × 24.5" × 37.8"
❖ :HLJKW
Approx. 62 kg, 136.7 lb.
1RWH
❒ Specifications are subject to change without notice.
163
6SHFLILFDWLRQ
)LQLVKHU%6KHHW6WDSOHV
Finisher Upper Tray:
❖ 3DSHUVL]H
A3L, B4L, A4KL, B5KL, A5KL, 11" × 17"L, 81/2" × 14"L, 81/2" ×
11"KL, 51/2" × 81/2"KL, 12" × 18"L
❖ 3DSHUZHLJKW
52 – 216 g/m2, 14 – 58 lb. Bond
❖ 6WDFNFDSDFLW\
• 500 sheets (A4KL, B5KL, A5KL, 81/2" × 11"KL, 51/2" × 81/2"KL)
(80 g/m2, 20 lb. Bond)
• 250 sheets (A3L, B4L, 11" × 17"L, 81/2" × 14"L, 12" × 18"L) (80 g/m2, 20
lb. Bond)
Finisher Shift Tray:
❖ 3DSHUVL]H
A3L, B4L, A4KL, B5KL, A5KL, 11" × 17"L, 81/2" × 14"L, 81/2" ×
11"KL, 51/2" × 81/2"KL, 12" × 18"L
❖ 3DSHUZHLJKW
52 – 216 g/m2, 14 – 58 lb. Bond
❖ 6WDFNFDSDFLW\
• 3,000 sheets (A4K, B5K, 81/2" × 11"K) (80 g/m2, 20 lb. Bond)
• 1,500 sheets (A3L, B4L, A4L, B5L, 11" × 17"L, 81/2" × 14"L, 81/2" ×
11"L, 12" × 18"L) (80 g/m2, 20 lb. Bond)
• 500 sheets (A5K, 51/2" × 81/2"K) (80 g/m2, 20 lb. Bond)
• 100 sheets (A5L, 51/2" × 81/2"L) (80 g/m2, 20 lb. Bond)
❖ 6WDSOHSDSHUVL]H
A3L, B4L, A4KL, B5KL, 11" × 17"L,81/2" × 14"L, 81/2" × 11"KL
❖ 6WDSOHSDSHUZHLJKW
64 – 80 g/m2, 17 – 20 lb. Bond
❖ 6WDSOHFDSDFLW\
• 100 sheets (A4KL, B5KL, 81/2" × 11"KL) (80 g/m2, 20 lb. Bond)
• 50 sheets (A3L, B4L, 11" × 17"L, 81/2" × 14"L) (80 g/m2, 20 lb. Bond)
164
2SWLRQV
❖ 6WDFNFDSDFLW\DIWHUVWDSOLQJ
• 200–30 sets (10–100 sheets) (A4KL, B5KL, 81/2" × 11"KL)(80 g/m2, 20
lb. Bond)
• 150 sets (2–9 sheets) (A4KL, B5KL, 81/2" × 11"KL)(80 g/m2, 20 lb.
Bond)
• 150–30 sets (10–50 sheets) (A3L, B4L, 11" × 17"L, 81/2" × 14"L)(80 g/m2,
20 lb. Bond)
• 150 sets (2–9 sheets) (A3L, B4L, 11" × 17"L, 81/2" × 14"L)(80 g/m2, 20 lb.
Bond)
❖ 6WDSOHSRVLWLRQ
4 position (Top, Top Slant, Bottom, 2 Staples)
❖ 3RZHUFRQVXPSWLRQ
Approx. 100 W (supplied from the main machine)
❖ 'LPHQVLRQV:×
×'×
×+
800 × 730 × 980 mm, 31.5" × 28.7" × 38.6"
❖ :HLJKW
Approx. 65 kg, 143.3 lb.
1RWH
❒ Specifications are subject to change without notice.
/DUJH&DSDFLW\7UD\
❖ 3DSHUVL]H
See p.170 “Copy Paper” about paper size for tray 4, 5, and 6.
❖ 3DSHUZHLJKW
Tray 4, 5: 52 – 216 g/m2, 16 – 18 lb. Bond
Tray 6: 52 – 163 g/m2, 16 – 90 lb. Bond
❖ 3DSHUFDSDFLW\
Tray 4, 5: 1,000 sheets (80 g/m2, 20 lb. Bond)
Tray 6: 2,550 sheets (80 g/m2, 20 lb. Bond)
❖ 3RZHUFRQVXPSWLRQ
85 W or less (supplied from the main machine)
❖ 'LPHQVLRQV:×
×'×
×+RSWLRQXQLW
540 × 730 × 980 mm, 21.3" × 28.8" × 38.6"
❖ :HLJKW
Approx. 82 kg (180 lb) or less
1RWH
❒ Specifications are subject to change without notice.
165
6SHFLILFDWLRQ
0XOWL%\SDVV7UD\7UD\
❖ 3DSHUVL]H
See p.170 “Copy Paper” about paper size for multi bypass tray (tray 7).
❖ 3DSHUZHLJKW
52 - 216 g /m2, 16 lb. Bond - 80 lb. Cover
❖ 3DSHUFDSDFLW\
500 sheets (80 g/m2, 20 lb Bond)
❖ 3RZHUFRQVXPSWLRQ
75 W or less (supplied from the main machine)
❖ 'LPHQVLRQV:×
×'×
×+
680 × 561 × 181 mm, 26.8" × 22.1" × 7.2"
❖ :HLJKW
Approx. 18 kg (39.7 lb) or less
1RWH
❒ Specifications are subject to change without notice.
,QWHUSRVHU
❖ 3DSHUVL]H
A3L, B4L, A4KL, B5KL, A5KL, 11" × 17"L, 81/2" × 14"L, 8 1/2" ×
11"KL, 5 1/2" × 8 1/2"KL
❖ 3DSHUZHLJKW
64 – 216 g/m2, 20 – 58 lb. Bond
❖ 3DSHUFDSDFLW\
200 sheets (80 g/m2, 20 lb. Bond)
❖ 3RZHUFRQVXPSWLRQ0D[
Approx. 48 W (supplied from the main machine)
❖ 'LPHQVLRQV:×
×'×
×+
500 × 620 × 200 mm, 19.7" × 24.4" × 7.9"
❖ :HLJKW
Approx. 12 kg, 26.5 lb.
1RWH
❒ Specifications are subject to change without notice.
166
2SWLRQV
3XQFK8QLW
Booklet Finisher:
❖ 3DSHUVL]H
Punch unit type
2 & 4 holes type
2 holes
4 holes
4 holes type
2 & 3 holes type
4 holes
2 holes
3 holes
L
A3-A5, 11" × 17"-51/2" × 81/2"
K
A4-A5, 81/2" × 11", 51/2" × 81/2"
L
A3, B4, 11" × 17"
K
A4, B5, 81/2" × 11"
L
A3-A5, 11" × 17"-51/2" × 81/2"
K
A4-A5, 81/2" × 11", 51/2" × 81/2"
L
A3-A5, 11" × 17"-51/2" × 81/2"
K
A4-A5, 81/2" × 11", 51/2" × 81/2"
L
A3, B4, 11" × 17"
K
A4, B5, 81/2" × 11"
❖ 3DSHUZHLJKW
52 – 163 g/m2, 14 lb. – 43 lb. Bond
❖ 3RZHUFRQVXPSWLRQ
26.4 W (supplied from the main machine)
❖ 'LPHQVLRQV:×
×'×
×+
142 × 456 × 92 mm, 55.9" × 179.5" × 36.2"
❖ :HLJKW
Approx. 2.9 kg, 6.4 lb
Finisher 3000B (100-Sheet Staples):
167
6SHFLILFDWLRQ
❖ 3DSHUVL]H
Punch unit type
2 holes type
(metric version)
4 holes type
(metric version)
2 & 4 holes type
(metric version)
2 holes
4 holes
4 holes type
(narrow 2 × 2 version)
4 holes
2 holes type
(inch version)
3 holes type
(inch version)
2 & 3 holes type
(inch version)
2 holes
3 holes
L
A3-A5, 11" × 17"-51/2" × 81/2"
K
A4-A5, 81/2" × 11", 51/2" × 81/2"
L
A3, 11" × 17"
K
A4, 81/2" × 11"
L
A3-B5, 11" × 17"-81/2" × 11"
K
A4-A5, 81/2" × 11", 51/2" × 81/2"
L
A3-A5, 11" × 17"-51/2" × 81/2"
K
A4-A5, 81/2" × 11", 51/2" × 81/2"
L
A3, B4, 11" × 17"
K
A4, B5, 81/2" × 11"
❖ 3DSHUZHLJKW
• 4 holes: 52 – 128 g/m2, 14 lb. – 34 lb. Bond
• 2 & 3 holes: 52 – 163 g/m2, 14 lb. – 43 lb. Bond
❖ 3RZHUFRQVXPSWLRQ
60 W (supplied from the main machine)
❖ 'LPHQVLRQV:×
×'×
×+
• 4 holes: 92 × 463 × 100 mm, 3.6" × 18.2" × 3.9"
• 2 & 3 holes, 2 & 4 holes: 105 × 463 × 100 mm, 4.1" × 18.2" × 3.9"
❖ :HLJKW
• 4 holes: Approx. 2.4 kg, 5.3 lb
• 2 & 3 holes, 2 & 4 holes: Approx. 2.6 kg, 5.7 lb
1RWH
❒ Specifications are subject to change without notice.
168
2WKHUV
Others
❖ $×
×7UD\8QLWRSWLRQDO
You can load A3L or 11" × 17"L paper in tray 1 using this unit.
❖ 2XWSXW-RJJHURSWLRQDO
You can tidy the printout with Finisher 3000B (100–Sheet Staples).
169
6SHFLILFDWLRQ
Copy Paper
5HFRPPHQGHG3DSHU6L]HVDQG7\SHV
The following limitations apply to each tray:
Tray
Metric version
Tray 1 *1 (Tandem tray)
A4K, 81/2" × 11" K A4K, 81/2" × 11" K 52 – 163 g/m2, 1,000 sheets
16 lb. Bond – + 1,000
90 lb. Index
sheets
Paper capacity
A3L, B4L,
A4KL, 81/2" × 11"
KL, 81/2" × 14" L
Tray 2, 3 *2
52 – 163 g/m2, 500 sheets
A3L, B4L, A4K
L, B5KL, A5KL, 16 lb. Bond –
11" × 17"L, 81/2" × 90 lb. Index
14"L, 81/2" × 11"K
L, 51/2" × 81/2"K
L, 71/4" × 101/2"L
, 81/2" × 13"L, 8" ×
13"L, 81/4" × 13"L,
11" × 15"L, 10" ×
14"L, 8" × 101/2"L,
8" × 10"L, 12" × 18"
L, 8KL, 16KKL
A3L, B4L, A4K
L, B5KL, A5KL,
11" × 17"L, 81/2" ×
14"L, 81/2" × 11"K
L, 51/2" × 81/2"K
L, 71/4" × 101/2"L,
81/2" × 13"L, 8" ×
13"L, 81/4" × 13"L,
11" × 15"L, 10" ×
14"L, 8" × 101/2"L,
8" × 10"L, 12" × 18"
L, 8KL, 16KKL
52 – 163 g/m2, 1,000 sheets
16 lb. Bond –
90 lb. Index
Main machine
Custom size
Custom size
vertical: 5.5" – 12"
vertical: 139 – 305
mm
holizontal: 5.5" – 18"
holizontal: 139 – 458
mm
*4
A4K, A5KL, 81/2" A4K, A5KL, 81/2" 52 – 216 g/m2, 1,000 sheets
16 lb. Bond –
× 11" K, 51/2" ×
× 11" K, 51/2" ×
1
80 lb. Cover
8 /2" KL, B5K
81/2" KL, B5 K
*3 *4
A4K, A5KL, 81/2" A4K, A5KL, 81/2" 52 – 163 g/m2, 2,550 sheets
16 lb. Bond –
× 11" K, 51/2" ×
× 11" K, 51/2" ×
90 lb. Index
81/2" KL, B5K
81/2" KL, B5K
Tray 6 *1
LCT
Paper
weight
Tray 1 *1 (Op- A3L, B4L,
tional A3/11" × A4KL, 81/2" × 11"
17" Tray Kit)
KL, 81/2" × 14"L
Tray 4, 5 *3
170
Inch version
&RS\3DSHU
Metric version
Inch version
Tray 7
A3L, B4L, A4K
L, B5KL, A5KL,
11" × 17"L, 81/2" ×
14"L, 81/2" × 11"K
L, 51/2" × 81/2"K
L, 71/4" × 101/2"L,
81/2" × 13"L, 8" ×
13"L, 81/4" × 13"L,
11" × 15"L, 10" × 14"
L, 8" × 101/2"L, 8"
× 10"L, 12" × 18"L,
8KL, 16KKL
A3L, B4L, A4K
52 – 216 g /m2, 500 sheets
L, B5KL, A5KL, 16 lb. Bond –
11" × 17"L, 81/2" × 80 lb. Cover
14"L, 81/2" × 11"K
L, 51/2" × 81/2"K
L, 71/4" × 101/2"L,
81/2" × 13"L, 8" ×
13"L, 81/4" × 13"L,
11" × 15"L, 10" ×
14"L, 8" × 101/2"L,
8" × 10"L, 12" × 18"
L, 8KL, 16KKL
Custom size
vertical: 139 – 305 mm
holizontal: 139 – 458
mm
Custom size
vertical: 5.5" – 12"
holizontal: 5.5" – 18"
Multi bypass tray (Tray 7)
Tray
*1
*2
*3
*4
Paper
weight
Paper capacity
The paper tray fence is fixed. If you want to change the size of paper set in this tray,
contact your service representative.
If you want to copy onto custom size paper, select the size using the Tray Paper Setting function. See p.93 “Paper Tray Settings”.
If you want to copy onto OHP transparencies or thick paper, select OHP or Thick Paper mode. See p.93 “Paper Tray Settings”.
When setting copy paper, make sure the stack height does not exceed the limit mark.
The maximum number of sheets you can set at once depends on the paper's thickness
and condition.
,PSRUWDQW
❒ Feeding damp or curled paper into the machine might cause a misfeed, staple
jam, mis-stapling, a marked edge or irregular output. Try turning over the paper stack in the paper tray. If there is no improvement, change to a stiffer paper.
❒ When you use damp or curled adhesive labels, misfeeds might occur.
❒ When you set Index tabs, use the end fence for Index tabs.
1RWH
❒ If you load paper of the same size in two or more trays, the machine automat-
ically shifts to the other tray when the tray in use runs out of paper. This function is called Auto Tray Switching. This saves interrupting a copy run to
replenish paper even when making a large number of copies. You can turn off
this function. See “Auto Tray Switching” and “Selecting Copy Paper”, Copy
Reference.
❒ When you use OHP transparencies, shuffle them each time.
❒ When you load OHP transparencies, check the front and back of the sheets,
and place them correctly, or misfeeds might occur.
❒ When you want to copy onto translucent paper or paper lighter than 20 lbs,
80 g/m2, set the paper as shown in the following illustration. Not doing so
might cause a paper jam, marked edges or the paper edges to be folded.
171
6SHFLILFDWLRQ
1. Direction of paper grain
2. How to set the copy paper in the
paper tray
❒ If you want to set 20 lbs, 80g/m2 or heavier paper, set the paper as shown in
the following illustration.
1. Direction of paper grain
2. How to set the copy paper in the
paper tray
❒ If you load recycled or special paper in the paper trays and use the Tray Paper
Settings, this function is not available with these trays unless their settings are
identical.
❒ Feeding B5K, A5K, or 81/2" × 51/2"K paper into the machine might cause a
marked edge or a misfeed. In this case, change the orientation or turn over the
paper stack in the paper tray.
172
&RS\3DSHU
1RQUHFRPPHQGHG3DSHU
R&$87,21
'RQRWXVHDOXPLQXPIRLOFDUERQSDSHURUVLPLODUFRQGXFWLYHSDSHUWRDYRLG
DILUHRUPDFKLQHIDLOXUH
,PSRUWDQW
❒ Do not use any of the following kinds of paper or a fault might occur.
•
•
•
•
•
•
•
•
•
•
Paper for inkjet printers
Thermal fax paper
Art paper
Aluminum foil
Carbon paper
Conductive paper
Colored OHP transparencies
Paper with perforations
Envelope
Fancy paper
1RWH
❒ Do not use the following kinds of paper or a misfeed might occur.
• Bent, folded, or creased paper
• Torn paper
• Slippery paper
• Perforated paper
• Rough paper
• Thin flexible paper
• Paper coated with a lot of paper dust
❒ Copying onto rough grain paper can result in blurred copy image and reduced solid fill.
173
6SHFLILFDWLRQ
3DSHU6WRUDJH
1RWH
❒ When storing paper, the following precautions should always be followed:
• Do not store paper where it will be exposed to direct sunlight.
• Avoid storing paper in humid (greater than 70%) areas.
• Store on a flat surface.
❒ Do not store paper vertically.
❒ Under extremely high or low conditions of temperature/humidity, store paper in vinyl bags.
174
INDEX
$
A3/11" × 17" Tray Unit, 169
Access to the Machine, 145
Adding
Staples, 127
Adding Staples
Booklet Finisher (Saddle Stitch), 129
Finisher 3000B (100-Sheet Staples),
131
Finisher 3000M (50-Sheet Staples),
Booklet Finisher, 127
Address Book
Change Order, 72
Edit Title, 72
Program/Change/Delete Group, 71
Address Book Management, 71
ADF Original Table Elevation, 66
Auto Delete File, 73
Auto Document Feeder (ADF), 17
Auto Off, 28
Auto Off Timer, 66
Available Functions, 13
Copier Mode, 13
Document Server Mode, 14
Printer Mode, 13
Scanner Mode, 13
&
Changing
Display Language, 148
E-mail Destination, 83
File Name, 40
Group Name, 90
Modes, 27
Paper Size, 122
User Code, 77
Changing the Paper Size
Tray 2, 122
Tray 3, 122
Checking
Job List, 29
Stored Documents, 42
Clearing
Counter, 80
E-mail Destination, 84
User Code, 78
Clearing Misfeeds, 113
Clear key, 21
Clear Modes/Energy Saver key, 20
Combined Function Operations, 27
Control Panel, 20
Control panel, 17
Copier/Document Server Auto Reset
Timer, 67
Copy Count Display (Copier/Document
Server), 62
Copy Paper, 170
Counter
Clearing, 80
Displaying, 148
Counter for Each User Code
Displaying, 79
Printing, 79
'
Delete All Files, 73
Deleting
E-mail Destination from a Group, 88
Group, 90
Job List, 31
Display/Clear/Print Counter per User
Code, 70
Displaying
Counter, 148
Counter for Each User Code, 79
E-mail Destination, 89
Display Language
Changing, 148
Display Panel, 21
Display panel, 23
Display/Print Counter, 70
Document feeder
Cleaning, 146
Document Server, 35
Deleting, 51
Settings, 56
Using, 37
Document Server Mode
File Printing, 15
On Demand Printing, 15
Operation from a Computer, 15
Do's And Don'ts, 141
Duplex Priority, 10
(
E-mail Destination, 81
175
Changing, 83
Clearing, 84
Displaying, 89
Registering, 81
Energy Saver Timer, 66
ENERGY STAR Program, 9
Entering Text, 91
Exiting
User Tools, 61
Exposure glass, 17
Cleaning, 146
External Options, 19
)
File Name
Changing, 40
Front Cover, 17
Function Priority, 62
Function Reset Timer, 63
*
General Features, 62
Group
Deleting, 90
Group Name
Changing, 90
,
Indicators, 21
Inquiry, 147
Interleave Print, 63
Interrupt key, 20
Jammed Staples
Removing, 133
Job List, 29
Checking, 29
Deleting, 31
Job List Display Time, 65
.
Key Counter Management, 69
Key Operator Code, 69
Key Operator Tools, 69
/
Large Capacity Tray (LCT), 19
Loading Paper, 102
176
Interposer, 107
Large Capacity Tray (Tray 4, Tray 5,
and Tray 6), 105
Tray 1 (Tandem Tray), 102
Tray 2, 104
Tray 3, 104
Low Power Mode, 28
0
Machine Environment, 143
Machine Types, 11
Main Machine, 155
Main Power
Turning Off, 25
Turning On, 24
Main power switch, 17, 24
Maintaining Your Machine, 146
Misfeeds, 113
Moving, 144
Multi-Access, 32
1
Number keys, 21
2
Off Mode, 9
On indicator, 17
Operation switch, 17, 24
Option, 19
Output
Copier, 64
Document Server, 65
Printer, 65
Output Jogger, 169
3
Panel Off Timer, 67
Panel Tone, 62
Paper tray, 17
Paper Tray Priority
Copier, 65
Printer, 65
Password
Setting or changing, 41
Power
Turning Off, 25
Turning On, 25
Power Connection, 144
Printing
Counter for Each User Code, 79
Saved Documents, 44
Printing Saved Documents
Changing, 46
Stopping, 46
Print Priority, 63
Print Selected Pages, 48
Program key, 21
Punch Waste
Removing, 138
5
Registering
E-mail Destination, 81
E-mail Destinations to a Group, 86, 87
New Group, 86
User Code, 75
Registering or changing
User Name, 39
Remarks, 141
Removing
Jammed Staples, 133
Punch Waste, 138
Removing Jammed Staples
Booklet Finisher, 133
Booklet Finisher (Saddle Stitch), 134
Finisher 3000B (100-Sheet Staples),
136
6
Safety information, 6
Sample Copy, 46
Sample Copy key, 21
Saved Documents
Printing, 44
Searching, 43
Saving Energy, 28
Auto Off, 28
Low Power Mode, 28
System Reset, 28
Scanner Auto Reset Timer, 67
Screen Contrast Knob, 20
Searching
by File Name, 44
by User Name, 43
Saved Documents, 43
Select Title, 72
Set Date, 68
Set Time, 68
Setting or changing
Password, 41
Settings
Document Server, 56
Sleep Mode, 9
Specification, 155
Main Machine, 155
Staples
Adding, 127
Start key, 21
Stop, 21
Stored Documents
Checking, 42
Storing Data, 37
Suspend Copy
Finisher 3000B (100–Sheet Staples),
110
System Auto Reset Timer, 67
System Reset, 28
7
Text
Deleting, 92
Entering, 92
Timer Setting, 66
Toner, 142
Handling, 142
Storing, 142
Toner Cover, 17
Troubleshooting, 99
Turning Off
Main Power, 25
Power, 25
Turning On
Main Power, 24
Power, 25
8
User Code
Changing, 77
Clearing, 78
Registering, 75
User Code Management, 69
User Codes, 75
User Management, 16
Using, 16
User Name
Registering or changing, 39
User Tools
Exiting, 61
User Tools/Counter key, 21
User Tools Menu (System Settings), 57
User Tools (System Settings), 57
Using
Document Server, 37
User Management, 16
177
9
Ventilation hole, 18
:
Warm Up Notice (Copier/Document
Server), 62
Weekly Timer, 68
Weekly Timer Code, 68
Where to Put Your Machine, 143
178
(1
86$
%
Operating Instructions
Copy Reference
1
Placing Originals
2
Copying
3
Troubleshooting
4
User Tools (Copier/Document Server Features)
5
Specifications
For safe and correct operation of this machine, please be sure to read the Safety Information
in the General Settings Guide before you use it.
Type for 4090/9002/LD090 Aficio 2090
Type for 40105/10512/LD0105 Aficio 2105
Printed in Japan
EN USA B071-8607
Introduction
This manual contains detailed instructions on the operation and maintenance of this machine. To get
maximum versatility from this machine all operators should carefully read and follow the instructions in
this manual. Please keep this manual in a handy place near the machine.
Notes
Some illustrations in this manual might be slightly different from the machine.
Certain options might not be available in some countries. For details, please contact your local dealer.
Warning:
Use of controls or adjustment or performance of procedures other than those specified in this manual
might result in hazardous radiation exposure.
The model names of the machines do not appear on the following pages. Check the type of your machine before reading this manual. (For details, see p.2 “Machine Types”.)
•
Type 1 : 4090/9002/LD090/Aficio 2090
•
Type 2 : 40105/10512/LD0105/Aficio 2105
Certain types may not be available in some countries. For details, contact your local dealer.
Two kinds of size notation are employed in this manual. With this machine refer to the inch version.
For good copy quality, the manufacturer recommends that you use manufacturer-genuine toner from
the supplier.
The manufacturer shall not be responsible for any damage or expense that may result from use of parts
other than manufacturer-genuine parts.
Power Source
•
208 - 240V, 60Hz, 20A
Be sure to connect the power cord to a power source as above. For details about the power source,
see “Power Connection”, General Settings Guide.
In accordance with IEC 60417, this machine uses the following symbols for the main power switch:
a means POWER ON.
c means STAND BY.
Manuals for This Machine
The following manuals describe the operational procedures of this machine. For
particular functions, see the relevant parts of the manual.
Note
❒ Manuals provided are specific to machine type.
❒ Adobe Acrobat Reader is necessary to view the manuals as a PDF file.
❒ Two CD-ROMs are provided:
• CD-ROM 1 “Operating Instructions for Printer / Scanner”
• CD-ROM 2 “Scanner Driver & Document Management Utilities”
❖ General Settings Guide
Provides an overview of the machine.
It also describes System Settings (such as paper trays and user codes settings),
Document Server functions, and troubleshooting.
❖ Network Guide (PDF file - CD-ROM1)
Describes procedures for configuring the machine and computers in a network environment.
❖ Copy Reference (this manual)
Describes operations, functions, and troubleshooting for the machine's copier
function.
❖ Printer Reference 1
Describes system settings and operations for the machine's printer function.
❖ Printer Reference 2 (PDF file - CD-ROM1)
Describes operations, functions, and troubleshooting for the machine's printer function.
❖ Scanner Reference (PDF file - CD-ROM1)
Describes operations, functions, and troubleshooting for the machine's scanner function.
i
❖ Manuals for DeskTopBinder V2 Lite
DeskTopBinder V2 Lite is a utility included on the CD-ROM labeled “Scanner
Driver & Document Management Utilities”.
• DeskTopBinder V2 Lite Setup Guide (PDF file - CD-ROM2)
Describes installation of, and the operating environment for DeskTopBinder V2 Lite in detail. This guide can be displayed from the [Setup] dialog box when DeskTopBinder V2 Lite is installed.
• DeskTopBinder V2 Lite Introduction Guide (PDF file - CD-ROM2)
Describes operations of DeskTopBinder V2 Lite and provides an overview
of its functions. This guide is added to the [Start] menu when DeskTopBinder V2 Lite is installed.
• Auto Document Link Guide (PDF file - CD-ROM2)
Describes operations and functions of Auto Document Link installed with
DeskTopBinder V2 Lite. This guide is added to the [Start] menu when
DeskTopBinder V2 Lite is installed.
❖ Manuals for ScanRouter V2 Lite
ScanRouter V2 Lite is a utility included on the CD-ROM labeled “Scanner
Driver & Document Management Utilities”.
• ScanRouter V2 Lite Setup Guide (PDF file - CD-ROM2)
Describes installation of, settings, and the operating environment for ScanRouter V2 Lite in detail. This guide can be displayed from the [Setup] dialog box when ScanRouter V2 Lite is installed.
• ScanRouter V2 Lite Management Guide (PDF file - CD-ROM2)
Describes delivery server management and operations, and provides an
overview of ScanRouter V2 Lite functions. This guide is added to the [Start]
menu when ScanRouter V2 Lite is installed.
❖ Other manuals
• PS3 Supplement (PDF file - CD-ROM1)
• Unix Supplement (Available from an authorized dealer, or as a PDF file on
our Web site.)
ii
iii
What You Can Do with This Machine
Page 101
Page 94
Page 45
Page 45
Page 109
Page 103
Page 95
Page 98
Stamp Text
Page 108
Introducing New Product in this year
Page 86
Scanning Position
Page 72
Page 86
Page 74
Page 53
Page 56
Page 53
Page 56
Page 88
Page 75
Page 89
Page 56
Page 75
Page 93
Page 56
Page 81
Page 83
Page 91
Insert Designation Sheet
iv
Page 92
Page 82
Page 85
Page 46
Page 46
Page 42
Page 50
Page 35
Page 63
Page 36
Page 63
Page 39
inch
Page 56
inch
Page 60
Page 65
Page 56
Page 40
Page 60
Page 65
Page 41
inch
inch
inch
Page 60
inch
Page 60
Page 65
Page 60
Page 60
Page 65
Mix 1 & 2 Sided
Page 71
COPY3E
v
TABLE OF CONTENTS
Manuals for This Machine ......................................................................................i
What You Can Do with This Machine..................................................................iv
How to Read This Manual .....................................................................................1
Machine Types .......................................................................................................2
Functions that Require Options ........................................................................... 3
Control Panel.......................................................................................................... 4
1. Placing Originals
Originals ................................................................................................................. 7
Sizes and Weights of Recommended Originals......................................................... 7
Sizes Detectable by Auto Paper Select ..................................................................... 8
Missing Image Area ................................................................................................... 9
Placing Originals..................................................................................................10
Original Orientation ..................................................................................................10
Placing Originals on the Exposure Glass.................................................................13
Placing Originals in the Auto Document Feeder (ADF)............................................ 14
2. Copying
Basic Procedure...................................................................................................19
Auto Start ................................................................................................................. 21
Interrupt Copy .......................................................................................................... 21
Left Original Beeper ................................................................................................. 22
Job Preset ................................................................................................................ 22
Deleting a job ........................................................................................................... 24
Copying onto Special Paper..................................................................................... 25
Copying from the Multi Bypass Tray (Tray 7) ................................................... 27
Copy Functions.................................................................................................... 31
Adjusting Copy Image Density ................................................................................. 31
Selecting Original Type Setting................................................................................32
Selecting Copy Paper .............................................................................................. 33
Preset Reduce/Enlarge ............................................................................................35
Zoom ........................................................................................................................36
Auto Reduce/Enlarge ...............................................................................................37
Size Magnification .................................................................................................... 39
Directional Magnification (%) ...................................................................................40
Directional Size Magnification (inch) ........................................................................ 41
Sort...........................................................................................................................42
Stack ........................................................................................................................46
Staple ....................................................................................................................... 46
Punch ....................................................................................................................... 50
Duplex ......................................................................................................................53
1 Sided Combine......................................................................................................56
2 Sided Combine......................................................................................................60
Series Copies........................................................................................................... 63
Copying Book Originals............................................................................................65
Mix 1 & 2 Sided ........................................................................................................ 71
vi
Scanning Position .................................................................................................... 72
Margin Adjustment ...................................................................................................74
Erase........................................................................................................................75
3 Edges Full Bleed ...................................................................................................81
Double Copies.......................................................................................................... 82
Image Repeat........................................................................................................... 83
Centering..................................................................................................................85
Covers......................................................................................................................86
Designate ................................................................................................................. 88
Chapters...................................................................................................................89
Designation Sheet Copy ..........................................................................................91
Insert Designation Sheet ..........................................................................................92
Slip Sheets ...............................................................................................................93
Background Numbering ........................................................................................... 94
Preset Stamp ........................................................................................................... 95
User Stamp .............................................................................................................. 98
Date Stamp ............................................................................................................ 101
Page Numbering ....................................................................................................103
Stamp Text.............................................................................................................108
Copy face up ..........................................................................................................109
Customize function.................................................................................................109
Storing Originals in the Document Server ...................................................... 110
Programs ............................................................................................................ 112
Storing a Program .................................................................................................. 112
Changing a stored program ................................................................................... 113
Deleting a Program ................................................................................................114
Recalling a Program............................................................................................... 114
3. Troubleshooting
If Your Machine Does Not Operate as You Want ............................................ 115
When a Message is Displayed............................................................................... 115
If You Cannot Make Clear Copies..................................................................... 116
If You Cannot Make Copies As You Want ....................................................... 117
When Memory Is Full .............................................................................................119
4. User Tools (Copier/Document Server Features)
User Tools Menu (Copier/Document Server Features) .................................. 121
Accessing User Tools (Copier/Document Server Features).......................... 125
Exiting User Tools .................................................................................................. 125
Settings You Can Change with User Tools ..................................................... 126
General Features - General ................................................................................... 126
General Features - Image Adjustment ................................................................... 128
General Features - Display/Tone ...........................................................................129
Reproduction Ratio ................................................................................................131
Edit .........................................................................................................................131
Stamp..................................................................................................................... 136
Input/Output ........................................................................................................... 139
vii
5. Specifications
Combination Chart............................................................................................. 141
Supplementary Specifications.......................................................................... 142
INDEX....................................................................................................... 154
viii
How to Read This Manual
Symbols
In this manual, the following symbols are used:
R WARNING:
This symbol indicates a potentially hazardous situation that might result in
death or serious injury if you use the machine without following the instructions
under this symbol. Be sure to read the instructions, all of which are included in
the Safety Information section, General Settings Guide.
R CAUTION:
This symbol indicates a potentially hazardous situation that might result in minor or moderate injury or property damage that does not involve personal injury
if you use the machine without following the instructions under this symbol. Be
sure to read the instructions, all of which are included in the Safety Information
section, General Settings Guide.
• WARNINGS and CAUTIONS are notes for your safety.
Important
If this instruction is not followed, paper might misfeed, originals might be damaged, or data might be lost. Be sure to read this.
Preparation
This symbol indicates the information or preparation required before operating.
Note
This symbol indicates precautions in operation or actions to take after mal-operation.
Limitation
This symbol indicates numerical limits, functions that cannot be used together,
or conditions in which a particular function cannot be used.
Reference
This symbol indicates a reference.
[
]
Keys that appear on the machine's display panel.
{
}
Keys built into the machine's control panel.
Notice
• The image of the display panel may differ depending on installed options.
1
Machine Types
This machine comes in two models that differ by in copy speed. To determine
which model you have, see the inside front cover.
Copy speed
2
Type 1
Type 2
90 copies/minute
(A4K, 81/2" × 11"K)
105 copies/minute
(A4K, 81/2" × 11"K)
Functions that Require Options
Options
*1
Staple
Staple (Saddle Stitch)
Punch
Booklet finisher
Stack
Large Capacity Tray (LCT)
Shift Sort
Functions
Copying onto Tab Stock
Available functions depend on the configuration of your machine and which options you have. See the table below.
❍Required options
❍
❍
❍
❍
❍
❍
*1
Finisher 3000B (100-sheet staples)
❍
❍
❍
❍
*1
To use the Punch function, you need the optional punch unit.
3
Control Panel
ZJAS060N
4
1. Status indicator
2. {Screen Contrast}} knob
Machine status is described by this indicator. By default, this indicator is turned
off. You can select to light the status indicator. For more information, see “Control
Panel”, General Settings Guide.
Adjusts the brightness of the display panel.
Colour
Status
Off
Main Power Switch
is tumed off or
ready to make copies
3. {Language Selection}} key
Press to change the language of the display.
4. {Check Modes}} key
Press to check the entered copy job settings.
5. {Interrupt}} key
Press to make interrupt copies during a
copy run. See p.21 “Interrupt Copy”.
Flashing green
Scanning originals
Lit green
Copying (Ready to
scan originals)
Flashing red
Toner has nearly
run out
Press to switch to and from Energy Saver
mode.
Lit red
Paper jam or other
malfunctions
7. {Clear Modes}} key
6. {Energy Saver}} key
Press to clear any previously entered
copy job settings.
8. {Program}} key
19. Indicators
Press to register or recall a program. See
p.112 “Programs”.
These indicators show the status of the
machine. See “Control Panel”, General
Settings Guide.
B: Data In indicator.
L: Service Call indicator
x: Misfeed indicator.
M: Open Cover indicator
d: Add Staple indicator.
D: Add Toner indicator.
9. {Stop}} key
Press to stop a copy job or storing data in
the machine in progress.
10. {Start}} key
Press to start copying or storing data in
the machine.
11. {Sample Copy}} key
Press to make a single sample copy set
before starting a long copy run. By checking the finished set and making any necessary changes to image quality settings
before you make multiple copies, you can
save time and paper. See p.43 “Sample
copy”.
20. {Counter}} key
Press to check the total number of copies
made.
See “Counter”, General Settings Guide.
21. {User Tools}} key
12. {Clear}} key
Press to access the User Tools menu
where you can customize default settings.
Press to delete a number entered.
22. {Tray Paper Settings}} key
13. {#}} key
Press to enter a value or confirm a setting.
Specify the tray to supply paper for output.
14. Number keys
23. Display panel
Use to enter the desired number of copies
and data for selected modes.
15. Function keys
Shows operation status, error messages,
and function menus. See “Display Panel”, General Settings Guide.
Press the appropriate key to select any of
the following function keys:
• Copier
• Document Server
• Printer
• Scanner
16. Function status indicator
These show the status of the functions.
• Green: the function is active.
• Red: the function has been interrupted.
17. {Job List}} key
Shows the job list for a copy job or jobs
stored in the Document Server.
18. {New Job}} key
Use this key to set up the next copy job
while a copy job or storing data in the
Document Server is in progress.
5
6
1. Placing Originals
Originals
Sizes and Weights of Recommended Originals
❖ Metric version
Where original is set
Original size
Original weight
Exposure glass
Up to A3
--
Auto Document Feeder
(ADF)
1-sided originals:
52 – 128 g/m2
A3L – A5KL
52 – 105 g/m2
2-sided originals:
A3L – A5KL
40 – 128 g/m2
Thin Paper mode:
A3L – A5KL
❖ Inch version
Where original is set
Original size
Original weight
Exposure glass
Up to 11" × 17"
--
Auto Document Feeder
(ADF)
1-sided originals:
14 – 34 lb. Bond
11" × 17"L – 5 /2" × 8 /2"KL
1
1
2-sided originals:
14 – 28 lb. Bond
11" × 17"L – 5 /2" × 8 /2"KL
1
1
11 – 34 lb. Bond
Thin Paper mode:
11" × 17"L –
51/
2"
×
81/
2"KL
Non-recommended originals for the Auto Document Feeder (ADF)
Setting the following types of originals in the ADF can cause misfeeds or damage to the originals. Place these kinds of originals on the exposure glass instead.
• Originals of inappropriate weight or size, see above
• Stapled or clipped originals
• Perforated or torn originals
• Curled, folded, or creased originals
• Pasted originals
• Coated originals, such as thermal fax paper, art paper, aluminum foil, carbon
paper, or conductive paper
7
Placing Originals
•
•
•
•
•
•
1
Originals with perforated lines
Originals with indexes, tags, or other projecting parts
Sticky originals, such as translucent paper
Thin, highly flexible originals
Bound originals, such as books
Transparent or translucent originals, such as OHP transparencies or tracing
paper
Note
❒ If you place such originals as becoming faded by rubbing, the originals may
become dirty.
Sizes Detectable by Auto Paper Select
❖ Metric version
A4
K
L
B5
K
L
A5K
11 " × 81/2" × 81/2" ×
17"L 13"L *2 11"KL
A5
L
8KL
Size A3
L
Where
Original
Is Set
B4
L
Exposure
glass
❍
❍
❍
❍
×
❍
×
❍
×
×
×
ADF
❍
❍
❍
❍
❍
❍
❍
❍
❍
❍
❍
81/2"
× 13"
L *2
81/2" × 8" ×
11"KL 10"L
*1
16K
KL
*1
❖ Inch version
Size A4
K
Where
L
Original
Is Set
51/2" × 51/2" ×
81/2"
81/2"
L
K
Exposure
Glass
×
❍
×
×
❍
×
❍
×
❍
×
ADF
❍
❍
❍
❍
❍
❍
❍
❍
❍
❍
*1
*2
8
11" × 11" × 10" × 81/2"
14"
15"
17"
× 14"
L
L
L
L
8K = 390 mm × 267 mm
16K = 267 mm × 195 mm
You can select from 81/2" × 13", 81/4" × 13", and 8" × 13" with the User Tools (System
Settings). See “Original: <F/F4> Size Setting”, General Settings Guide.
Originals
❖ Exposure glass
Positioning
mark
Horizontal size
Vertical size
1
Maximum scanning area
A3
(297x420 mm)
11"x17"
(279x432 mm)
CP01AEE
❖ ADF
Maximum scanning area
(297x432 mm)
Sizes difficult to detect
It is difficult for the machine to automatically detect the sizes of the following
types of originals, so select the paper size manually instead.
• Originals with indexes, tags, or other projecting parts
• Transparent or translucent originals, such as OHP transparencies or tracing
paper
• Dark originals, with many letters and drawings
• Originals that partially consist of solid images
• Originals that have solid images running to their edges
• Originals other than those marked ❍ in the table p.8 “Sizes Detectable by
Auto Paper Select”.
Missing Image Area
Even if you correctly place originals in the ADF or on the exposure glass, 5 mm
(0.2") margins on all four sides might not be reproduced.
9
Placing Originals
Placing Originals
Note
❒ Place originals only after any correction fluid or ink have completely dried.
Not taking this precaution may result in a dirtied exposure glass and blemished copies.
1
Reference
For document sizes you can set, see p.7 “Originals”.
Original Orientation
When you place the original into the ADF, lay it face up so you can see the print.
When you place the original on the exposure glass, lay it face down.
1
2
1. ADF
2. Exposure glass
You can place the original orientation in the following ways.
❖ Standard Orientation
Select this when the original orientation is the same as the copy paper orientation.
10
Placing Originals
❖ 90°° Turn
This function rotates the copy image by 90°. If you cannot place originals as
described because the size is A3 or A4, or because of specific circumstances,
you cannot staple copies. In such cases, select [
].
Example: When you want to staple copies, but you cannot select [
] because the original size is A3K (11" × 17"K), selecting [
] enables you to
staple copies correctly.
1
GCGSET4E
Note
❒ It is recommended you use this function together with the Auto Paper Select
or Preset Reduce/Enlarge function.
A Select the original orientation (
or
).
11
Placing Originals
Reverse orientation
This function rotates the copy image by 180° (
or
).
This is useful for copying torn originals. For example, if the left side of the original is damaged and is difficult to set, position it as shown below.
1
GCGSET5E
A Press [Reverse Orientation].
Note
❒ It is recommended you use this function together with the Auto Paper Select or Preset Reduce/Enlarge function.
❒ Copy results may differ depending on the combination of selected functions.
12
Placing Originals
Placing Originals on the Exposure Glass
Reference
When you place originals on the exposure glass, you can specify the way copies are delivered. See p.139 “Eject Copy Face Up/Down in Glass”.
1
A Lift the exposure glass cover or ADF.
Important
❒ Do not lift the exposure glass cover or ADF forcefully. Otherwise, ADF
cover might open or be damaged.
Note
❒ Be sure to lift the exposure glass cover or ADF to an angle of more than 30°.
Otherwise, the size of the original might not be correctly detected.
B Place the original face down on the exposure glass. The original should be
aligned against the rear left corner.
1
2
ND1C01EE
1. Positioning mark
2. Left scale
Note
❒ Start with the first page to be copied.
C Lower the ADF.
13
Placing Originals
Placing Originals in the Auto Document Feeder (ADF)
Settings should be made in the following situations:
1
❖ When placing originals of more than 100 pages:
See p.15 “Batch mode”.
❖ When placing originals one by one:
See p.16 “SADF mode”.
❖ When copying originals of various sizes:
See p.16 “Mixed size mode”.
❖ When copying originals onto thin paper
See p.17 “Thin mode”.
❖ When placing custom size originals:
See p.18 “Placing custom size originals”.
Important
❒ If you turn on the machine with an original left on the exposure glass and
started copying while placing originals in the ADF, a paper jam will occur.
Before turning the machine on, check there is no original left on the exposure
glass.
Note
❒ Do not stack originals over the limit mark on the inner side wall of the ADF.
❒ The last page should be on the bottom.
❒ To copy thin originals of 40 to 52 g/m2 (35 to 45 kg), two or more originals
may be fed at a time, and be damaged. To avoid this, place originals one by
one in the ADF, or place an original on the exposure glass.
A Set the document guide to the original size.
B Align the edges of the original and place it in the ADF with the side to be
copied facing up.
TJAH050E
14
1. Limit mark
2. Document guide
Placing Originals
Note
❒ Once the bottom plate of the ADF rises, do not place or insert originals in
the ADF.
❒ Straighten curls in the original before placing it in the ADF.
❒ To prevent multiple sheets being fed at once, fan stacks of originals before
placing then in the ADF.
❒ Place the original squarely.
❒ You can set the rise time of the bottom plate of the ADF. See “ADF Original
Table Elevation”, General Settings Guide.
1
Batch mode
In batch mode, the machine copies originals of more than 100 pages as a single
document, even if it is placed in the ADF in sections.
Important
❒ Place special originals, such as translucent paper, individually.
A Press [Special Original].
Note
❒ You can also set to display [Batch] in initial settings. See p.129 “Special
Original Display”.
B Press [Batch], and then [OK].
C Place the first section of the original, and then press the {Start}} key.
D After the first section of the original has been fed, place the next, and then
press the {Start}
} key.
→2 Sided function is used, press the {#}
} key afE If Sort, Combine, or 1 Sided→
ter all of the originals have been fed.
Note
❒ If you want to copy subsequent originals in this mode, repeat step D.
15
Placing Originals
SADF mode
In SADF mode, each page is automatically fed when placed, even when an original is placed page by page.
1
A Press [Special Original].
Note
❒ You can also set to display [SADF] in initial settings. See p.129 “Special
Original Display”.
B Press [SADF], and then [OK].
C Place one page of the original, and then press the {Start}} key.
The Auto Feed indicator appears on the display.
D After all of the originals have been fed, make sure the Auto Feed indicator
is lit, and then place the next page of originals.
The second and subsequent pages of originals will be fed automatically without pressing the {Start}
} key.
TJAH010E
Reference
You can set the period to make the Auto Feed indicator keep lit after an
original is fed, to indicates that it is ready for another original. See p.139
“SADF Auto Reset”.
Mixed size mode
When you place different size originals in the ADF at the same time, the machine
automatically checks their sizes and makes copies.
Note
❒ When placing originals of different sizes in the ADF and making copies without using the Mixed Size mode, parts of the original image might not be copied or paper jams may occur.
16
Placing Originals
❒ The sizes of originals that can be placed together with this function are as follows:
Metric version
A3L, B4L, A4KL, B5KL, A5KL, 11" × 17"L, 81/2" × 13"L, 81/2"
× 11"K, 8 KL, 16 K KL
Inch version
A4KL, 11" × 17"L , 81/2" × 14"L, 81/2" × 11"KL , 51/2" × 81/2KL,
8" × 10"L, 11" × 15"L, 10" × 14"L, 81/2" × 13"
1
A Press [Special Original].
Note
❒ You can also set to display [Mixed Size] in initial settings. See p.129 “Special
Original Display”.
B Press [Mixed Sizes] and then [OK].
C Align the rear and left edges of originals as shown in the illustration.
1
B4 A3
2
2
CP19AE
1. Place into the ADF.
2. Vertical size
D Adjust the guide to the widest original size.
E Place aligned originals face up into the ADF.
F Press the {Start}} key.
Thin mode
Use Thin mode for copying thin originals using the ADF.
A Press [Special Original].
Note
❒ You can also set to display [Thin Paper] in initial settings. See p.129 “Special
Original Display”.
B Press [Thin Paper], and then [OK].
C Place originals face up into the ADF.
D Press the {Start}} key.
17
Placing Originals
Placing custom size originals
When placing custom size originals in the ADF, specify the size of the originals.
1
Note
❒ Paper with a vertical length of 128–297 mm (5.1" – 11.6") and a horizontal
length of 128–432 mm (5.1" – 17.0") can be placed with this function.
A Press [Special Original].
Note
❒ You can also set to display [Custm Size] in initial settings. See p.129 “Special
Original Display”.
B Press [Custm Size], and then [OK].
C Enter the horizontal size of the original using the number keys, and then
press the {#}
} key.
Note
❒ If you make a mistake, press [Clear], and then enter the value again.
D Enter the vertical size of the original using the number keys, and then press
the {#}
} key.
Note
❒ To store the specified size, press [Program], and then [Exit] in the confirmation dialog box.
E Press [OK].
F Place originals, and then press the {Start}} key.
Note
❒ You can also select the Special Original function by pressing [Output/Cstmz.
Function].
18
2. Copying
Basic Procedure
A When the machine is set for user codes, enter a user code using the number
keys, and then press the {#}
} key.
Reference
For Users Codes, see “User Codes”, General Settings Guide.
B Make sure the machine is in Copy mode.
Press the copy function key.
ZJAS342N
❖ Initial copy display
19
Copying
C Make sure no previous settings remain.
Note
❒ To clear previous settings, press the {Clear Modes}
} key.
D Place originals.
Reference
See p.10 “Placing Originals”.
2
E Make the desired settings.
F Enter the required number of copies using the number keys.
Note
❒ The maximum copy quantity can be set between 1 and 9999 (default: 9999).
See p.126 “Max. Number of Sets”.
G Press the {Start}} key.
The machine starts copying.
Note
❒ When placing an original on the exposure glass or in the ADF using batch
or SADF mode, press the {#}
} key after all have been scanned.
Reference
You can select to have copies delivered either face up or face down. See
p.139 “Eject Copy Face Up/Down in Glass” in “Input Output”.
- How to Operate
❖ To stop the machine during a multi-copy run.
Press the {Stop}
} key.
❖ To return the machine to the default condition after copying.
Press the {Clear Modes}
} key.
❖ When clearing entered values.
Press the {Clear}
} key, or [Clear] on the display.
❖ To confirm settings.
Press the {Check Modes}
} key.
20
Basic Procedure
Auto Start
If you press the {Start}
} key during the warm-up period, the {Start}
} key will blink
and your copies will be made as soon as warm-up finishes.
A Make any adjustments to copy settings during the warm-up period.
B Place originals.
C Press the {Start}} key.
2
Copying Starts automatically when the {Start}
} key indicator flashes red and
green indicating copy-readiness.
Interrupt Copy
Use this function to interrupt a long copy job to make urgently needed copies.
Note
❒ The procedure for making interrupt copies depends on the kind of operation
the machine is currently carrying out.
❒ You can use Document Server mode during Interrupt Copy.
❒ The previous copy job settings will be restored and the machine will continue
copying from where it left off.
A Press the {Interrupt}} key.
When the machine stops scanning
A Remove copied originals and place originals you want to copy.
B Press the {Start}
} key.
The machine starts making copies.
C When the copy job is finished, remove originals and copies.
D Press the {Interrupt}
} key again.
The Interrupt indicator goes out.
E When the display prompts you, place the remaining originals again before interrupting.
F Press the {Start}
} key.
When the machine continues copying
A Place the originals you want to copy.
B Press the {Start}
} key.
The machine stops the other job and starts copying the new original.
21
Copying
C When copying is complete, remove originals and copies.
D Press the {Interrupt}
} key again.
The Interrupt indicator goes out.
Left Original Beeper
The error message appears if you leave originals on the exposure glass after
copying.
2
Job Preset
You can set up next copy content during copy.
If a long copy job is in progress and you do not want to wait for it to finish, you
can use this function to set up the next copy job in advance. When the current
copy job is finished, the next job will start automatically. You can set up to 10
copy jobs.
Note
❒ If the status indicator of the control panel is blinking in red, paper jam is occurring in the current copy job. Display the current job screen.
Reference
You can set the length of interval between the end of a job and the start of a
new job with the User Tools. For setting the time interval, see “Time Interval
between Printing Jobs”, General Settings Guide.
You can select the display when you press the {New Job}
} key or [New Job]. See
p.126 “Reverse Job Mode”.
A Press the {New Job}} key or [New Job] when “Copying” appears.
B Set up the next copy job.
C Place the originals in the ADF, and then press the {Start}} key.
All originals are scanned.
After the current copy job, the next job starts automatically.
Note
❒ Each copy job set up is stored with a job number in the preserved job
screen.
22
Basic Procedure
- Job Preset display
The preset jobs appear as shown below.
1
2
3
4
5
2
1. Job being printed
2. Job number
3. Waiting Job
4. Job set up with other functions
5. Scroll keys
Note
❒ When more than ten jobs are set up including jobs for other functions.
Editing job preset
You can check and change the contents of preset jobs. You also can delete preset
jobs.
A Select the job number you want to check or change.
B Press [Change Job Settings].
To check job contents
A Check contents.
B Press [OK].
The copy screen returns.
23
Copying
To change job contents after checking
A Check job contents.
B Change contents, and then press [OK].
C Press [Yes] in the confirmation dialog box.
2
You return to the copy screen.
To delete a job after checking its contents
A Check job contents.
B Press [Delete Job].
A confirmation message appears.
Note
❒ To interrupt copying, press [Stop Printing] at the right bottom of the display,
and then proceed to step C.
C Press [Yes].
You return to the copy screen.
Deleting a job
A Select the number of you want to delete.
B Press [Delete Job].
C Press [Yes] in the confirmation dialog box.
You return to the copy screen.
24
Basic Procedure
Copying onto Special Paper
Copying onto OHP transparencies
To make copies onto OHP transparencies, you need to specify the paper type.
For details, see “Paper Tray Settings”, General Settings Guide.
2
A Select the paper tray in which the OHP transparencies are loaded.
Note
❒ You can not set the OHP transparencies into the optional A3/11" × 17" tray
unit if it is installed in Tray 1.
B Place originals, and then press the {Start}} key.
Important
❒ When copying onto OHP transparencies, remove copied sheets one by
one.
Copying onto tab stock
You can copy onto tab stock.
Preparation
Before using this function, set the tray for tab stock and set the position of the
index tab. See “Paper Type”, General Settings Guide.
You can set the tab stock in the LCT (Trays 4-5) and multi bypass tray (Tray 7).
Check the position of the index tab to avoid the image being sheared. See “Paper Tray Settings”, General Settings Guide.
25
Copying
Important
❒ Set the tab stock in the tray placing the tab side outwards.
❒ When you set tab stock in the tray, always use the end fence.
2
❒ Tab stocks are always brought from top.
❒ When a paper jam has occurred, check the order of originals and tab stock,
and then restart copying.
A Select the paper tray where the tab stock is set.
B Place originals, and then press the {Start}} key.
26
Copying from the Multi Bypass Tray (Tray 7)
Copying from the Multi Bypass Tray (Tray 7)
The multi bypass tray (Tray 7) can be used the same way as other trays. Also,
thick paper of larger than A4 (81/2" × 11") size is available.
Note
❒ You cannot use the label paper in the multi bypass tray (Tray 7).
2
❒ The sizes of paper you can use with the multi bypass tray (Tray 7) are as follows.
Metric version
• Vertical: 139 – 305 mm
• Horizontal: 139 – 458 mm
Inch version
• Vertical: 5.5" – 12.0"
• Horizontal: 5.5" – 18”
❒ The machine can automatically detect the following sizes as standard size
copy paper.
Metric version
A3L, B4L, A4LK, B5K, A5KL, 11" × 17"L, 11" × 81/2"K, 51/2" ×
81/2"L, 8" × 13"L
Inch version
A3L, B4L, A4K, B5K, A5L, 11" × 17"L, 81/2" × 11"LK, 51/2" ×
81/2"LK, 8" × 13"L
❒ The maximum number of sheets you can load into the bypass tray depends
on paper type. The number should not exceed the upper limit.
❒ If you want to use a size of paper other than those in the above table, be sure
to specify the size. See p.29 “When copying onto regular size paper”.
A) to the paper size.
A Set the side fences (A
1
2
1
ZJAY040N
B Place paper in the multi bypass tray (Tray 7).
27
Copying
B).
C Fit the side fence to the paper, and then set the end fence (B
1
2
2
1
ZJAY050N
Note
❒ To remove the end fence, slide it to the left.
ZJUH070J
D Press the elevator switch on the multi bypass tray (Tray 7).
ZJAY060N
Note
❒ The green lamp of the elevator switch is blinking while the tray is going up
and down, and keeps lit when it stops.
❒ Press the elevator switch to move down original table if you want to either
add paper or remove jammed ones.
28
Copying from the Multi Bypass Tray (Tray 7)
E Select Tray 7 on the control panel.
Setting the tab stock in multi bypass tray (Tray 7)
A Set the side fences to the paper size.
1
2
2
1
ZJAY010N
B Set the tab stock in the multi bypass tray (Tray 7), and fit the side fences
to the tab stock.
C Attach the back fence to the end fence, and then set the end fence.
ZJAY020N
D Select [Tab Stock] in special paper settings.
Reference
p.30 “When copying onto special paper”
When copying onto regular size paper
A Press the {#}
} key.
B Press [Select Regular Size].
C Select the paper size.
D Press [OK].
When copying onto custom size paper
A Press the {#}
} key.
B Press [Program Custom Size].
29
Copying
C Enter the vertical size of the paper using the number keys, and then
press [#] or the {#}
} key.
D Enter the horizontal size of the paper using the number keys, and then
press [#] or the {#}
} key.
Note
❒ To register the custom size entered, press [Program], and then press [Exit].
2
When copying onto special paper
A Press the {#}
} key.
B Select paper type in “Special paper”.
Note
❒ When you select [Tab Stock], press [-] or [+] to set the amount of shifting
the tab stock.
C Press [OK].
F Place originals, and then press the {Start}} key.
G When the copy job is finished, press the {Clear Modes}} key to clear the settings.
30
Copy Functions
Copy Functions
Adjusting Copy Image Density
Three types of adjustment are available:
2
❖ Auto image density
The machine automatically adjusts image density.
❖ Manual image density
You can adjust the density of the original in nine increments.
❖ Combined auto and manual image density
Use when copying originals with dirty backgrounds (such as newspaper
print). You can adjust foreground density while leaving the background unchanged.
Auto image density
A Make sure [Auto Image Density] is selected.
Manual image density
A Press [Auto Image Density] to cancel it.
B Press [Lighter] or [Darker] to adjust image density.
Combined auto and manual image density
A Make sure [Auto Image Density] is selected.
B Press [Lighter] or [Darker] to adjust the density.
31
Copying
Selecting Original Type Setting
Select one of the following six types to match originals:
❖ Text
Select this mode when originals contain only text (no pictures).
❖ Photo
Delicate tones in photographs and pictures can be reproduced with this
mode.
2
❖ Text/Photo
Select Text/Photo when originals contain photographs or pictures with text.
❖ Pale
Select this mode for originals that have light lines written in pencil, or for
faintly copied slips. Faint lines will be clearly copied.
❖ Generation
If originals are copies (generation copies), copy image can be reproduced
sharply and clearly.
❖ Dark Background
When you copy originals with dark background such as color tab stock (orange, green, or blue), you can remove the background color in three levels.
Note
❒ [Dark Background] appears only when you set Dark Background to [On] and
Original Type Display to [Hide] with the User Tools. See p.128 “Dark Background” and p.129 “Original Type Display”.
❒ If you select this mode, the auto image density function is disabled, but
[Lighter] or [Darker] is enabled.
Reference
You can hide the original type display. See p.126 “Original Type Priority”.
You can set the picture quality for each original type. See p.128 “General Features - Image Adjustment”.
A Press the appropriate key to select the original type.
32
Copy Functions
When the original type keys are not displayed
A Press [Original Type].
B Select the type, and then press [OK].
When the dark background is selected
2
A Select the density of the background in three levels.
B Press [OK].
Selecting Copy Paper
There are two ways to select copy paper:
❖ Auto Paper Select
The machine automatically selects a suitable size of copy paper, based on
original size and reproduction ratio.
Reference
For Auto Paper Selection, see p.8 “Sizes Detectable by Auto Paper Select”.
❖ Manual Paper Select
Choose the tray containing the paper you want to copy onto, bypass tray or
the LCT.
Reference
For manual paper selection, see p.9 “Sizes difficult to detect”.
You can hide the paper type display.
Only the paper trays set to [Off] or [Recycled Paper] in “Paper Type” and
also set to [On] in “Apply Auto Paper Select” can be selected in Auto Paper
Select mode. See “Paper Tray Settings”, General Settings Guide.
33
Copying
Auto Paper Select
A Make sure that [Auto Paper Select] is selected.
Note
❒ Trays with a key mark
will not be automatically selected. See “Paper
Tray Settings”, General Settings Guide.
2
Manual Paper Select
A Select the paper tray, multi bypass tray (Tray 7), or LCT.
The indicator corresponding to the selected paper tray is highlighted.
When the paper type keys are not displayed
A Press [Auto Paper Select].
B Select the paper type.
- Rotated copy
If the orientation in which an original is placed (L or K) is different from that
of the paper you are copying onto, this function rotates the original image by 90°
and fits it on the copy paper. This function works when Auto Paper Select or
Auto Reduce/Enlarge is selected. See p.33 “Auto Paper Select”.
R
R
Note
❒ This function is enabled when [Auto Paper Select] or [Auto Reduce/Enlarge] is selected. See p.33 “Selecting Copy Paper” and p.37 “Auto Reduce/Enlarge”.
❒ The default for “Auto Tray Switching” is “With image rotation”. You cannot
use the Rotated Copy function if this setting is changed to “Without image rotation” or [Off]. See p.127 “Auto Tray Switching”.
❒ Depending on the settings for the Staple or Punch function, you cannot use
Rotated Copy. See p.46 “Staple”, or p.50 “Punch”.
34
Copy Functions
Preset Reduce/Enlarge
You can select a preset ratio for copying.
2
Reference
You can display two types of enlarge/reduce ratio. See p.131 “Shortcut R/E”.
You can change the displayed ratio from the default to the frequently used
one. See p.131 “Preset Reduce/Enlarge”.
You can change the priority of Reduce/Enlarge ratio. See p.131 “Preset Reduce/Enlarge Priority”.
A Press [Reduce/Enlarge].
Note
❒ To select a preset ratio on the initial display, press the shortcut reduce/enlarge key, and then proceed to step D.
B Check that [Preset R/E] is selected.
C Select a ratio.
D Place originals, and then press the {Start}} key.
35
Copying
- Create Margin Mode
Use “Create Margin” to reduce the image to 93% of its original size and to place
the reduced image at the center. By combining it with the Reduce/Enlarge function, you can also provide the Reduce/Enlarge copy with a margin.
Reference
For setting margins, see p.131 “Create Margin Ratio”.
2
A
Press [Create Margin].
B
If you do not want to combine it with the Reduce/Enlarge function, place
originals, and then press the {Start}
} key.
Zoom
You can change the reproduction ratio (25% to 400%) in increments of 1%.
Note
❒ You can select a preset ratio nearest the desired ratio, then adjust the ratio
with [n
n] or [o
o].
A Press [Reduce/Enlarge].
36
Copy Functions
B Enter the ratio.
To select a ratio with [n
n] and [o
o]
A Select a preset ratio that is closest to the desired ratio.
B Adjust the ratios with [n
n] or [o
o].
2
Note
❒ To change the ratio in 1% increments, just press [n
n] or [o
o]. To change
the ratio in 10% increments, press and hold down [n
n] or [o
o].
❒ If you have entered a ratio incorrectly, readjust using [n
n] or [o
o].
To enter a ratio using the number keys
A Press [Input Ratio].
B Enter the desired ratio using the number keys.
C Press the {#}
} key.
D Press [OK].
C Place originals, and then press the {Start}} key.
Auto Reduce/Enlarge
The machine can select an appropriate reproduction ratio based on the paper
and original sizes you select.
Note
❒ When using Auto Reduce/Enlarge, see the following table for usable original
sizes and orientations.
37
Copying
❖ Metric version
2
Where original is placed
Original size and orientation
Exposure glass
A3L, B4L, A4KL, A5K, B5KL, 81/2" ×
13"L
ADF
A3L, B4L, A4KL, B5KL, A5KL, 81/2"
× 11"KL, 81/2" × 13"L, 11" × 17"L, 8KL,
16KKL
❖ Inch version
Where original is placed
Original size and orientation
Exposure glass
11" × 17"L, 81/2" × 14"L, 81/2" × 11"KL,
51/2" × 81/2"K
ADF
A3L, A4KL, 11" × 17"L, 11" × 15"L, 81/2"
× 14"L, 81/2" × 11"KL, 10" × 14"L, 51/2" ×
81/2"KL, 8" × 13"L, 8" × 10"L
Reference
For originals whose size is difficult to detect automatically, see p.9 “Sizes difficult to detect”.
A Press [Auto Reduce/Enlarge].
B Select the paper tray.
C Place originals, and then press the {Start}} key.
38
Copy Functions
Size Magnification
This function calculates an enlargement or reduction ratio based on the lengths
of the original and copy.
2
A inch
a inch
Note
❒ Measure and specify the lengths of the original and copy by comparing “A”
with “a.”
❒ You can enter sizes within the following ranges.
Metric version
1 – 999 mm (in 1 mm increments)
Inch version
0.1" – 99.9" (in 0.1" increments)
A Press [Reduce/Enlarge].
B Press [Size Mag.].
C Enter the length of the original using the number keys, and then press [#]
or the {#}
} key.
D Enter the length of the copy using the number keys, and then press [#] or
the {#}
} key.
Note
❒ To change the length after pressing [#] or the {#}
} key, select [Original] or
[Copy], and then enter the desired length.
E Place originals, and then press the {Start}} key.
39
Copying
Directional Magnification (%)
Copies can be reduced or enlarged at different reproduction ratios, horizontally
and vertically.
2
a: Horizontal ratio
b: Vertical ratio
Note
❒ You can also select a preset ratio closest to the desired ratio using [Reduce] or
[Enlarge], and then adjust with [n
n] or [o
o].
❒ You can set the ratio from 25 to 400% in 1% increments.
A Press [Reduce/Enlarge].
B Press [Direct. Mag.%].
To enter a ratio using the number keys
A Enter the desired horizontal ratio using the number keys, and then press
[#] or the {#}
} key.
B Enter the desired vertical ratio using the number keys, and then press [#]
or the {#}
} key.
To specify a ratio with [n
n] and [o
o]
A Press [n
no Key].
40
Copy Functions
B Adjust the horizontal ratio using [n
n] or [o
o].
Note
❒ Pressing [n
n] or [o
o] changes the ratio in 1% increments. Pressing and
holding down [n
n] or [o
o] changes it in 10% increments.
❒ If you have entered a ratio incorrectly, readjust using [n
o].
n] or [o
C Adjust the vertical ratio using [n
n] or [o
o].
2
C Place originals, and then press the {Start}} key.
Directional Size Magnification (inch)
Optimal reproduction ratios are automatically selected when you enter the required horizontal and vertical lengths of the original and copy image.
1. Horizontal original size
2. Vertical original size
3. Horizontal copy size
4. Vertical copy size
Note
❒ Specify the vertical and horizontal sizes of the original and those of the copy,
as shown in the illustration.
❒ You can enter sizes within the following ranges.
Metric version
Vertical: 1 – 999 mm (in 1 mm increments)
Horizontal: 1 – 999 mm (in 1 mm increments)
Inch version
Vertical: 0.1” – 99.9” (in 0.1” increments)
Horizontal: 0.1” – 99.9” (in 0.1” increments)
A Press [Reduce/Enlarge].
B Press [Dir. Size Mag.”].
41
Copying
C Enter the horizontal size of the original using the number keys, and then
press [#] or the {#}
} key.
2
D Enter the horizontal size of the copy using the number keys, and then press
[#] or the {#}
} key.
E Enter the vertical size of the original using the number keys, and then press
{#}
}.
F Enter the vertical size of the copy using the number keys, and then press [#]
or the {#}
} key.
Note
❒ To change a length, press the key you want to change and enter the new
value.
G Place originals, and then press the {Start}} key.
Sort
Each time copies of a set or those of a different job are delivered, the next copy
set is shifted when delivered, so that you can separate sets or jobs.
2
3
123
123 123
1
Note
❒ You can select whether to shift or not. See p.139 “Sort/Stack Shift Tray Setting”.
Reference
For setting conditions, see p.139 “Memory Full Auto Scan Restart”, p.139
“Sort/Stack Shift Tray Setting”, and p.127 “Auto Tray Switching”.
42
Copy Functions
A Press [
].
2
B Enter the number of copy sets using the number keys.
Note
❒ The maximum number of sets is 9999.
❒ To confirm the type of finishing, press the {Sample Copy}
} key. See p.43
“Sample copy”.
C Place originals, and then press the {Start}} key.
Note
❒ When placing an original on the exposure glass, start with the first page to
be copied. When placing an original in the ADF, set so that the last page is
on the bottom.
❒ When placing an original on the exposure glass or in the ADF using batch
} key after all the originals have been scanned.
and SADF mode, press the {#}
Sample copy
Use this function to check copy settings before making a long copy run.
Note
❒ This function can be used only when the Sort function has been turned on.
A Select Sort and any other required functions, and then place originals.
B Press the {Sample Copy}} key.
One copy set is made as a sample.
C If the sample is acceptable, press [Print].
The number of copies made is the number specified, minus one for the proof copy.
Note
❒ If you press [Suspend] after checking the results, return to step A to adjust
copy settings as necessary. You can change the settings for Staple, Punch,
Margin Adjust, and Designate. However, depending on the combination
of functions, you may not be able to change certain settings.
❒ Changing the image density which can do either lighter or darker for certain levels affects to print the rest of the pages.
43
Copying
Changing the number of sets
You can change the number of copy sets during copying.
Note
❒ This function can only be used when the Sort function is operative.
A When “Copying” is displayed, press the {Stop}} key.
B Press [Change Quantity].
2
Note
❒ If you set one set of copy, you cannot change the number of sets.
C Enter the number of copy sets using the number keys, and then press the
{#}
} key.
Note
❒ The number of sets you can enter depends on when the {Stop}
} key is
pressed.
D Press [Continue].
Copying starts again.
When memory is full
If the amount of data of the scanned originals exceeds the capacity of memory,
scanning is interrupted.
Note
❒ The number of pages that can be stored in memory is about 2000 pages of A4
size originals. It depends on the type of originals or memory settings.
Reference
In Sort mode, you can complete scanning and copying by copying the
scanned pages stored in memory until it becomes full, and then scanning and
copying the remained originals. See p.139 “Memory Full Auto Scan Restart”.
A Press the {Start}} key.
All scanned pages are copied, and data stored in memory are cleared.
B Remove the copies, and then continue copying following the instructions
on the display.
44
Copy Functions
Shift tray off in sort/stack
A Press [Output/Cstmz. Function].
B Press [Sort/Stack Shift Tray Off].
2
C Place originals, and then press the {Start}} key.
Separation
Use this function to have separation sheets inserted between sets.
Preparation
Before selecting this function, set the tray for separation sheets. See “Paper
Tray Settings”, General Settings Guide.
Reference
You can select to have separation sheets inserted between every set, or every
so many sets. See p.139 “Input/Output”.
A Press [Output/Cstmz. Function].
B Press [Insert Separation Seet Per 1 sets(s)] or [Insert Separation Sheet Per Job].
C Place originals, and then press the {Start}} key.
45
Copying
Stack
This function collates copies of pages from a multi-page original. Stacks of each
page's copies are shifted for ease of separation.
1
2
3
222
111 333
2
A Press [ ].
B Enter the number of copies using the number keys.
C Place originals, and then press the {Start}} key.
Note
❒ When placing originals on the exposure glass, start with the first page to
be copied. When placing originals in the ADF, set so that the last page is on
the bottom.
❒ When placing originals on the exposure glass or in the ADF using batch
mode, press the {#}
} key after all have been scanned.
Staple
Each copy set can be stapled together.
GCSTAP1E
Important
❒ If you staple copies without the stapler cartridge for Saddle Stitch when using
the booklet finisher, a paper misfeed may occur.
46
Copy Functions
Note
❒ The following types of paper cannot be stapled:
•
•
•
•
•
•
•
Translucent paper
OHP transparencies
Label paper (adhesive labels)
Coated paper
Curled paper
Highly flexible paper
Paper of mixed sizes (differing horizontal dimensions, such as A4 L and
A3 L)
2
Reference
You can change the stapling position set on the staple keys. See p.139 “Select
Staple Position”.
You can store the stapling position for the customize function, see p.109 “Customize function”.
47
Copying
Stapling position and original setting
Place all originals in the ADF in the orientation in which they can be read normally. When placing the original on the exposure glass, keep the same orientation, but set the original facing downwards. When there is copy paper that is
identical in size and orientation to the original, staple positions are as follows:
Saddle Stich
Right 2
Top Right
Top 2
Left 2
Bottom Left
Top Left slant
Top Left
2
GCSTAP3E
*1
*2
*3
48
This table shows staple positioning. The orientation of the paper does not indicate direction of delivery.
You cannot staple at this position when copying onto A3K (11" × 17"K) or B4K
(81/2" × 14"K) size paper.
Saddle stitch is available only on the booklet finisher.
Copy Functions
A Select one of the stapling positions.
2
Note
❒ When you select the stapling position, Sort mode is automatically selected.
Reference
p.48 “Stapling position and original setting”
B Enter the number of copy sets using the number keys.
C Place originals, and then press the {Start}} key.
Note
❒ When placing originals on the exposure glass, start with the first page to
be copied. When placing originals in the ADF, set so that the last page is on
the bottom.
❒ When placing originals on the exposure glass or in the ADF using batch or
SADF mode, press the {#}
} key after all have been scanned.
49
Copying
Punch
The optional finisher and punch unit are required to use this function.
This function makes punch holes in copies.
❖ 2 holes
2
❖ 3 holes
❖ 4 holes
Note
❒ The 4 - hole punch type is only capable of punching in the 4 - hole format.
50
Copy Functions
Reference
You can change the punch type set on the punch keys. See p.140 “Select Punch
Type”.
When you want to punch on the right, see p.130 “Customize Function: Copy”.
Punch hole positions
Orientation in which original is set
Exposure glass
2 holes
2
Punch hole positions
ADF
K
L
K
L
3 holes
K
Standard
L
K
L
4 holes
K
L
K
L
51
Copying
Orientation in which original is set
Exposure glass
2 holes
Punch hole positions
ADF
K
L
2
K
L
3 holes
K
90º Turn
L
K
L
4 holes
K
L
K
L
The above table shows the punch hole positions. The orientation of the paper
does not indicate direction of delivery.
A Select the punch position.
52
Copy Functions
B Place the originals, and then press the {Start}} key.
Note
❒ For 90° turn punch type, press [
].
Duplex
2
There are two types of duplex.
Note
❒ You cannot use the following copy paper with this function:
• Paper smaller than A5, 51/2" × 81/2"
• Paper thicker than 163 g/m2, 40 lb.
• Paper thinner than 64 g/m2, 17 lb.
• Tab stock
• Translucent paper
• Label paper (adhesive labels)
• OHP transparencies
❖ 1 Sided → 2 Sided
Copies 2 one–sided pages onto 1 two–sided page.
1
1
2
2
❖ 2 Sided → 2 Sided
Copies 1 two–sided page onto 1 two–sided page.
1
1
2
2
53
Copying
Originals and copy orientation
You can select the orientation to copy two-sided originals onto two-sided pages.
• Top to Top
2
Duplex1
• Top to Bottom
Duplex2
Note
❒ The Default is [Top to Top]. You can change the default orientation with the
User Tools. See p.126 “Original Orientation in Duplex Mode”.
A Press [Dup./Combine/Series].
B Check that [Duplex] is selected.
C Press [Orientation], and then select orientation for Original and Copy.
D Press [OK].
E Place originals, and then press the {Start}} key.
54
Copy Functions
Original orientation and completed copies
The resulting copy image will differ according to the orientation in which you
place originals (widthwise K, or lengthwise L).
2
The above table shows the orientation of images on the front and back of copies,
not the direction of delivery.
Note
❒ The paper used for duplex is 64 to 163 g/m2.
Reference
The images are copied shifted by the set margin. You can change the position
and size of the margin. See p.74 “Margin Adjustment”, p.132 “1→2 sided
Auto Back Side Margins:T to T”, and p.132 “1→2 sided Auto Back Side Margins :T to B”.
A Press [Dup./Combine/Series].
B Check that [Duplex] is selected.
→2 Sided/2 Sided→
→ 2 Sided).
C Select the duplex type (1 Sided→
D Press [Orientation], and then select orientation.
E Press [OK].
55
Copying
F Place originals, and then press the {Start}} key.
Note
❒ When placing originals on the exposure glass, start with the first page to
be copied. When placing originals in the ADF, set so that the last page is on
the bottom.
❒ When placing originals on the exposure glass or in the ADF using batch or
SADF mode, press the {#}
} key after all have been scanned.
2
1 Sided Combine
Combine several pages onto one side of a sheet.
❖ 1 Sided, 2 Pages → Combine 1 Side
Copies 2 one-sided originals to one side of a sheet.
1
2
1
2
❖ 1 Sided, 4 Pages → Combine 1 Side
Copies 4 one-sided originals to one side of a sheet.
1
2
3
4
1 2
3 4
GCSHVY8E
56
Copy Functions
❖ 1 Sided, 8 Pages → Combine 1 Side
Copies 8 one-sided originals to one side of a sheet.
1
2
1 2 3 4
5 6 7 8
7
2
8
GCSHVY3E
❖ 2 Sided, 1 Page → Combine 1 Side
Copies 1 two-sided original to one side of a sheet.
1
1
2
2
GCSHVYOE
❖ 2 Sided, 2 Pages → Combine 1 Side
Copies 2 two-sided originals to one side of a sheet.
1
3
2
4
1 2
3 4
GCSHVYBE
57
Copying
❖ 2 Sided, 4 Pages → Combine 1 Side
Copies 4 two–sided originals to one side of a sheet.
1
3
1 2 3 4
5
2
7
4
2
5 6 7 8
6
8
GCSHVY4E
❖ Orientation of the Original and Image Position of Combine
• Open to Left R Originals
• Open to Top S Originals
Reference
You can insert lines to separate images. See p.134 “Separation Line in Combine”.
You can erase a 3 mm (0.1 inch) boundary margin around all four edges of
originals in Combine mode. See p.132 “Erase Original Shadow in Combine”.
You can set the copy order in Combine mode. See p.135 “Copy Order in Combine”.
A Press [Dup./Combine/Series].
58
Copy Functions
B Press [Combine].
2
C Check that [Combine 1 Sided] is selected, and then press [1 Sided] or [2 Sided].
To change the copy order
A Press [Copy Order].
B Select copy order, and then press [OK].
D Select the number of originals to combine.
E Select the paper size.
F Place originals, and then press the {Start}} key.
59
Copying
2 Sided Combine
Combines various pages of originals onto one sheet sides.
❖ 1 Sided, 4 Pages → Combine 2 Side
Copies 4 one-sided originals to one sheet with two pages per side.
2
1
2
1
2
3
4
3
4
❖ 1 Sided, 8 Pages → Combine 2 Side
Copies 8 one-sided originals to one sheet with four pages per side.
1
2
7
1 2
5 6
3 4
7 8
1
2
8
GCSHVYAE
1. Front
2. Back
❖ 1 Sided, 16 Pages → Combine 2 Side
Copies 16 one-sided originals to one sheet with eight pages per side.
1
1 2 3 4
2
5 6 7 8
1
15
16
9 10 11 12
13 14 15 16
2
GCSHVY5E
1. Front
2. Back
60
Copy Functions
❖ 2 Sided, 4 Pages → Combine 2 Side
Copies 2 two-sided originals to one sheet with two pages per side.
1
1
3
2
2
4
4
3
2
❖ 2 Sided, 8 Pages → Combine 2 Side
Copies 4 two-sided originals to one sheet with four pages per side.
1
3
5
2
7
4
6
8
1 2
5 6
3 4
7 8
1
2
GCSHVY2E
1. Front
2. Back
❖ 2 Sided, 16 Pages → Combine 2 Side
Copies 8 two-sided originals to one sheet with eight pages per side.
1
1 2 3 4
3
5 6 7 8
2
4
1
13
15
14
16
9 10 11 12
13 14 15 16
2
GCSHVY6E
1. Front
2. Back
Reference
p.58 “Orientation of the Original and Image Position of Combine”.
For related initial settings, see p.132 “Erase Original Shadow in Combine”,
p.135 “Copy Order in Combine”, and p.134 “Separation Line in Combine”.
61
Copying
A Press [Dup./Combine/Series].
B Press [Combine].
C Press [Combine 2 Sided], and then press [1 Sided] or [2 Sided] for originals.
2
Reference
To change the orientation of original and copy, press [Orientation]. See p.54
“Originals and copy orientation”.
To change the copy order
A Press [Copy Order].
B Select copy order, and then press [OK].
D Select the number of originals to combine.
E Select the paper size.
F Place originals, and then press the {Start}} key.
62
Copy Functions
Series Copies
Separately copies the front and back of a two-sided original, or the two facing
pages of a bound original onto two sheets.
❖ 2 Sided → 1 Sided
You can make one-sided copies from two-sided originals.
1
1
2
2
2
❖ Book → 1 Sided
You can make one-sided copies from two facing pages of a bound original
(book).
1
2
1
2
Note
❒ See the following table when you select original and copy paper sizes with a
100 % ratio.
❖ Metric version
Original
Copy paper
A3L
A4 K × 2 sheets
B4L
B5 K × 2 sheets
A4L
A5 K × 2 sheets
63
Copying
❖ Inch version
Original
Copy paper
11" × 17"L
81/2" × 11" K × 2 sheets
81/2" × 11"L
51/2" × 81/2" K × 2 sheets
A Press [Dup./Combine/Series].
B Press [Series].
C Press [2 Sided → 1 Sided] or [Book → 1 Sided].
2
Reference
If you select [2 Sided → 1 Sided] and want to change the orientation, press
[Orientation]. See p.54 “Originals and copy orientation”.
D Check that [Auto Paper Select] is selected.
Note
❒ The default is “Top to Top”. You can change this setting with the User
Tools. See p.126 “Original Orientation in Duplex Mode”.
E Place originals, and then press the {Start}} key.
Note
❒ When all originals are scanned, press the {#}
} key.
64
Copy Functions
Copying Book Originals
A book is made by copying two or more originals in page order.
❖ Book → 2 Sided
Copies a two-page spread original onto both sides of a sheet.
2
1
2
1
2
❖ Multi → 2 Sided
Copies each two-page spread original as it is onto both sides of a sheet.
1
2
1
2
3
3
❖ Booklet
Make copies in page order for a folded booklet.
• 1 Sided → Booklet
1
2
3
1
2
1
3
4
4
2
3
2
4
1
GCBOOK9E
1. Open to Left
2. Open to Right
65
Copying
• 2 Sided → Booklet
1
2
3
1
1
3
2
2
4
4
3
2
2
4
1
GCBOOK7E
1. Open to Left
2. Open to Right
❖ Magazine
Copies two or more originals to make copies in page order (for when they are
folded and stacked).
• 1 Sided → Booklet
1
2
17
2
8
5
1
4
6
3
7
8
22
7
1
4
5
3
8
6
GCBOOK10E
1. Open to Left
2. Open to Right
• 2 Sided → Magazine
17
2
5
4
1
8
3
1
6
3
5
2
7
4
22
6
7
4
5
8
1
8
3
6
GCBOOK8E
1. Open to Left
2. Open to Right
66
Copy Functions
Note
❒ The machine sets the reproduction ratio automatically to match the paper size
and copies the originals together onto the paper.
❖ Metric version
Original
Copy paper
A3L
A4 (2-sided)
B4L
B5 (2-sided)
A4L
A5 (2-sided)
2
❖ Inch version
Original
Copy paper
11" × 17"L
81/2" × 11" (2-sided)
81/2" × 11"L
51/2" × 81/2" (2-sided)
Book → 2 Sided
A Press [Dup./Combine/Series].
B Press [Book].
C Press [Left and Right → 2 Sided].
Reference
To change the orientation of original and copy, press [Orientation]. See p.54
“Originals and copy orientation”.
D Place originals, and press the {Start}} key.
67
Copying
Multi → 2 Sided
A Press [Dup./Combine/Series].
B Press [Book].
C Press [Front and Back → 2 Sided].
2
Reference
To change the orientation of original and copy, press [Orientation]. See p.54
“Originals and copy orientation”.
D Place originals, and press the {Start}} key.
Booklet
❖ How to fold copies to make a booklet
Fold the copy so that a crease is in the center and open as shown in the following illustrations:
1
2
3
1
3
1
GCBOOK2E
1. Open to left
2. Open to right
Note
❒ In this mode, the machine automatically sets the reproduction ratio to match
the paper size and copies the originals together onto the paper.
Reference
You can erase a 3 mm (0.1 inch) boundary margin around all four edges of
originals in Combine mode. See p.132 “Erase Original Shadow in Combine”.
You can insert lines to separate images. See p.134 “Separation Line in Combine”.
A Set the orientation with the User Tools.
Reference
p.135 “Orientation: Booklet, Magazine”
68
Copy Functions
B Press [Dup./Combine/Series].
C Press [Book].
D Press [1 Sided] or [2 Sided] for originals.
2
E Press [Booklet].
F Select the paper size.
G Place originals, and then press the {Start}} key.
Note
❒ When placing originals on the exposure glass or in the ADF in Batch mode,
press the {#}
} key after all originals are scanned.
Magazine
❖ How to fold and stack copies to make a magazine
Fold and stack copies to make a magazine, and open as shown in the following illustrations:
• Open to left
7
1
5
3
5
1 3
GCBOOK5E
69
Copying
• Open to right
5
7
3
5
1
3 1
2
GCBOOK6E
Note
❒ In this mode, the machine sets the reproduction ratio automatically to match
the paper size and copies the originals together onto the paper.
Reference
You can erase a 3 mm (0.1 inch) boundary margin around all four edges of
originals in Combine mode. See p.132 “Erase Original Shadow in Combine”.
You can insert lines to separate images. See p.134 “Separation Line in Combine”.
A Set the orientation with the User Tools.
Reference
p.135 “Orientation: Booklet, Magazine”
B Press [Dup./Combine/Series].
C Press [Book].
D Press [1 Sided] or [2 Sided].
E Press [Magazine].
F Select the paper size.
G Place originals, and then press the {Start}} key.
70
Note
❒ When placing originals on the exposure glass or in the ADF in batch or
SADF mode, press the {#}
} key after all originals are scanned.
Copy Functions
Mix 1 & 2 Sided
You can copy two types of original, one-sided and two-sided, onto one or both
sides of a sheet.
1
1
2
2
2
3
4
2
1
3
4
3
4
GCMIXSE
Note
❒ You can scan originals from the exposure glass, batch mode or SADF mode.
❒ You cannot combine with sample copy or designate function.
A Press [Dup./Combine/Series].
B Press [Mix 1&2 Sided].
C Place originals.
D Select the type of original.
E Select the type of copy.
F Press the {Start}} key.
G Place the next originals, and then repeat steps D to F.
Note
❒ Press [Change Settings] if the originals end in odd page or when you want
to change the copy page manually.
❒ [Specify Pages to Print in Duplex] function is available for jobs stored by selecting [Store File].
71
Copying
Scanning Position
You can move the scanned position of each originals.
1
2
1. Point where the machine starts
scanning.
Note
❒ You can move the scanned position up from 0 to 30 mm (in 1 mm increments),
0 to 1.2 inch (in 0.1 inch increments) upward, downward, left and right.
❒
1
4
2
3
1. Top: 0 – 30 mm (0" – 1.2")
2. Right: 0 – 30 mm (0" – 1.2")
3. Bottom: 0 – 30 mm (0" – 1.2")
4. Left: 0 – 30 mm (0" – 1.2")
A Press [Edit].
B Press [Scan Position].
72
Copy Functions
C Set the scan position for the face of the original. Press [↑↑] or [↓↓] to set the
top or bottom position. Press [←
←] or [→
→] to set the left or right position.
2
Note
❒ If you have incorrectly set the position, readjust with [↑
↑], [↓
↓], [←
←], or [→
→].
❒ If you do not need to set the scan position of the back of the original, proceed to step E.
D Set the scan position for the back of the original. Press [↑↑] or [↓↓] to set the
top or bottom position. Press [←
←] or [→
→] to set the left or right position.
Note
❒ The scan position set here for the back of originals is valid when you copy
2-sided originals.
E Place originals, and then press the {Start}} key.
73
Copying
Margin Adjustment
You can shift the image to the left, right, top or bottom to make a binding margin.
2
A
A
Reference
For initial settings, see p.131 “Front Page Margin : Left/Right”, p.131 “Back
Side Margins : Left/Right”, p.132 “Front Side Margin : Top/Bottom”, and
p.132 “Back Side Margin : Top/Bottom”.
Note
❒ You can change the width of the binding margin up to 30 mm in 1 mm increments (1.2 inch in 0.1 inch steps) upward, downward, left and right.
A Press [Edit].
B Press [Margin Adj.].
←] and [→
→] when setting the
C Set a binding margin for a front page. Press [←
left and right margins, and [↓
↓] and [↑
↑] when setting the top and bottom margins.
Note
❒ To change the value entered, press [←
←], [→
→], [↓
↓], and [↑
↑] to set the new value.
❒ If you do not need to specify margins for the back side pages, proceed to
step E.
←] and [→
→] when setD Set a binding margin for the back side pages. Press [←
ting the left and right margins, and [↓
↓] and [↑
↑] when setting the top and bottom margins.
Note
❒ Margin on the back side of the page is available only when [Duplex], [1 Sided
Combine] or [2 Sided Combine] is selected.
E Place originals, and then press the {Start}} key.
74
Copy Functions
Erase
This function erases the center and/or all four sides of the original image. This
function also erases the inside or outside of a specified area.
This function has the following three types:
❖ Border
This mode erases edge margin of the original image.
2
❖ Center/Border
This mode erases both the center and edge margins from an original image.
❖ Inside
This mode blanks out a designated area of the copy image.
75
Copying
❖ Outside
This mode blanks out all areas of the copy image except the area you specify.
2
Reference
The erase width in the [Border], [Center], and [Center/Border] modes is set to
10 mm (0.4") by default. You can change this settings with the User Tools.
See p.132 “Erase Border Width”.
Note
❒ The relation between the original orientation and the erased part is as follows:
L original
K original
2
2
1
1
1. Erased part
2. 2 – 99 mm (0.1" – 3.9")
Border Erase
A Press [Edit].
B Press [Erase Border].
C Set an erase border width.
Selecting [Same Width]
A Press [Same Width].
B Set an erase border width using [n
n] and [o
o].
Note
❒ To change the value entered, press [n
n] and [o
o] to set the new value.
76
Copy Functions
Selecting [Diff. Width]
A Press [Diff. Width].
2
B Press the key for the border you want to change, and then set an erase
border width using [n
n] and [o
o].
D Press [2-sided Setting], and then [Original (Back)].
Note
❒ If you do not need to erase the border on the back of the original, proceed
to step F.
E Set the border to be erased the back.
Note
❒ Erasing the border on the back is valid only when you copy two-sided
originals.
F Place originals, and then press the {Start}} key.
Center/border erase
A Press [Edit].
B Press [Erase Cntr/Brdr.].
C Set the border to be erased.
77
Copying
Selecting [Same Width]
A Press [Same Width].
2
B Press [Center], and then set the erase center width using [n
n] and [o
o].
C Press [Border], and then set the erase border width using [n
n] and [o
o].
Selecting [Diff. Width]
A Press [Diff. Width].
B Press the key for the part you want to change, and then set an erase margin width with [n
n] and [o
o].
D Press [2-sided Setting] and [Original (Back)].
Note
❒ If you do not need to erase the center or border on the back of the original,
proceed to step F.
E Set the center or border to be erased on the back.
Note
❒ Erasing the center or border on the back is valid only when you copy twosided originals.
F Place originals, and then press the {Start}} key.
78
Copy Functions
Inside erase
Decide where the machine starts (X1, Y1) and stops erasing (X2, Y2).
Note
❒ You can input lengths of 0 – 432 mm (0 – 17 inch).
A Press [Edit].
B Press [Erase Area].
C Press [Erase Inside 1] or [Erase Inside 2].
D Enter the value of [X1] using the number keys, and then press [#] or the {#}}
2
key.
E Enter the value of [Y1] using the number keys, and then press [#] or the {#}}
key.
F Enter the value of [X2] using the number keys, and then press [#] or the {#}}
key.
G Enter the value of [Y2] using the number keys, and then press [#] or the {#}}
key.
H Press [2-sided Setting] and [Original (Back)].
Note
❒ If you do not need to erase the image on the back, proceed to step K.
I Enter the values of [X1], [Y1], [X2], and [Y2] for the back.
Note
❒ Erasing the image on the back of originals is valid when you copy two-sided originals.
J Press [OK].
K Place originals, and then press the {Start}} key.
79
Copying
Outside erase
Decide where the machine starts (X1, Y1) and stops erasing (X2, Y2).
Note
❒ You can input lengths of 0 – 432 mm (0 – 17 inch).
A Press [Edit].
B Press [Erase Area].
C Press [Erase Outside].
D Enter the value of [X1] using the number keys, and then press [#] or the {#}}
2
key.
E Enter the value of [Y1] using the number keys, and then press [#] or the {#}}
key.
F Enter the value of [X2] using the number keys, and then press [#] or the {#}}
key.
G Enter the value of [Y2] using the number keys, and then press [#] or the {#}}
key.
H Press [2-sided Setting] and [Original (Back)].
Note
❒ If you do not need to erase the image on the back of originals, proceed to
step K.
I Enter the values of [X1], [Y1], [X2], and [Y2] for the back.
Note
❒ Erasing the image on the back of originals is valid when you copy two-sided originals.
J Press [OK].
K Place originals, and then press the {Start}} key.
80
Copy Functions
3 Edges Full Bleed
You can make full image copy by cutting down the top, bottom, and right side
margins. This function is useful for densely-filled originals.
2
A Press [Edit].
B Press [Edit Image].
C Press [3 Edges Full Bleed].
D Place originals, and then press the {Start}} key.
81
Copying
Double Copies
An original image is copied twice onto one copy, as shown in the illustration.
2
Note
❒ See the following table for original and copy paper sizes when using a 100%
ratio. Originals of size A5L (51/2" × 81/2"L) cannot be detected properly on
the exposure glass. Be sure to manually select such copy paper, or place the
originals in the ADF.
❖ Metric version
Original size and orientation
Copy paper size and orientation
A5L
A4K
A4K
A3L
A5K
A4L
❖ Inch version
Original size and orientation
Copy paper size and orientation
51/2" × 81/2"L
81/2" × 11"K
51/2" × 81/2"K
81/2" × 11"L
81/2" × 11"K
11" × 17"L
Reference
For selecting a separation line, see p.133 “Double Copies Separation Line”.
82
A Press [Edit].
B Press [Edit Image].
C Press [Double Copies].
D Select the paper size.
E Place originals, and then press the {Start}} key.
Copy Functions
Image Repeat
The original image is copied repeatedly.
2
Note
❒ The number of repeated images depends on original size, copy paper size,
and reproduction ratio. See the following table.
Metric version
Inch version
Original / Copy paper
Original / Copy Paper
A5K/A4K
51/2" × 81/2"K/81/2" × 11"K
A5L/A4L
51/2" × 81/2"L/81/2" × 11"L
71%
65%
35%
32%
A5K/A4L
51/2" × 81/2"K/81/2" × 11"L
A5L/A4K
51/2" × 81/2"L/81/2" × 11"K
4 repeats
Repeat 1
16 repeats
Repeat 2
2 repeats
100%
Repeat 3
83
Copying
Metric version
Inch version
8 repeats
50%
Repeat 4
2
32 repeats
25%
Repeat 5
Reference
For selecting a separation line, see p.133 “Image Repeat Separation Line”.
A Select the size of the copy paper and the reproduction ratio.
B Press [Edit].
C Press [Edit Image].
D Press [Image Repeat].
E Place an original, and then press the {Start}} key.
84
Copy Functions
Centering
You can make copies with the image moved to the center of the paper.
2
Note
❒ Original sizes and orientations for centering are shown below.
❖ Metric version
Where Original Is Set
Paper Size and Orientation
Exposure glass
A3L, B4L, A4KL, 81/2" × 13" L *1
Document feeder
A3L, B4L, A4KL, A5KL, 11" × 17"L, 82/1" ×
11"KL, 81/2" × 13" L *1
*1
You can select from 81/2" × 13", 81/4" × 13" and 8" × 13" with the User Tools (System
Settings). See “Original: <F/F4> Size Setting”, General Settings Guide.
❖ Inch version
Where Original Is Set
Paper Size and Orientation
Exposure glass
11" × 17"L, 81/2" × 14"L, 81/2" × 11"KL
Document feeder
A4KL, 11" × 17"L, 11" × 15"L, 81/2" × 14"L, 81/2" ×
11"KL, 51/2" × 81/2"KL, 81/2" × 13" L *1
*1
You can select from 81/2" × 13", 81/4" × 13" and 8" × 13" with the User Tools (System
Settings). See “Original: <F/F4> Size Setting”, General Settings Guide.
A Select the paper.
B Press [Edit].
C Press [Edit Image].
D Press [Centring].
E Place originals, and then press the {Start}} key.
85
Copying
Covers
Using this function, you can create cover sheets by adding additional pages of
different paper or copying existing pages on different paper.
Preparation
Before selecting this function, set the tray for the front cover paper. See “Front
Cover” or “Back Cover”, General Settings Guide.
2
Note
❒ When selecting [Copy], select whether the front and back covers are copied
one-sided or two-sided. See “Front Cover” or “Back Cover”, General Settings
Guide.
Reference
You can select the orientation of the back cover, Face up or Face down. See
p.131 “Copy Back Cover”.
To place paper when using the interposer, see “Loading Paper in the Interposer”, General Settings Guide.
❖ Front Cover
The first page of your originals is copied on special cover paper, or a cover
sheet is inserted before the first copy.
• Copy
1
2
3
1
2
3
• Blank
1
86
2
3
1
2
3
Copy Functions
❖ Back Covers
The first and last pages of the original are copied on separate paper for cover
use.
• Copy
1
2
3
2
4
4
1
2
3
GCCOVE1J
• Blank
Reference
When you select Front Cover copier mode, you can make a combined copy
on the front cover. See p.135 “Front Cover Copy in Combine”.
A Press [Cover/Slip Sheet].
B Select [Copy] or [Blank] for the front and back cover sheet.
C Select the paper tray containing non-cover sheet paper.
D Place originals in the ADF, and then press the {Start}} key.
87
Copying
Designate
The following functions are explained in this section:
❖ Designate: Copy
Use this function to designate certain pages of your original to be copied onto
slip sheets.
2
❖ Designate: Blank
Use this function to insert the slip sheet into certain pages of your original.
Note
❒ When selecting [Designate : Copy], set the same designation sheet as the copy
paper in the same orientation.
❒ You can not select the inteposer as the copy paper.
❒ Except to the tray selecting for copy paper, you can use for designation sheets.
❒ You can specify up to 100 designate locations.
Reference
To place paper when using the interposer. See “Loading paper in the Interposer”, General Settings Guide.
A Press [Cover/Slip Sheet].
B Press [Designate].
88
Copy Functions
C Press [Designate: Copy] or [Designate: Blank].
2
D Select the tray you want to use.
E Enter the number of the originals you want to copy onto slip sheets using
the number keys, and then select the tray the slip sheets have been set.
F Press the {#}} key.
G To specify another page number, repeat steps E and F.
H Select the tray for the main sheet.
I When all settings have been made, press [OK].
J Place originals, and then press the {Start}} key.
Chapters
When using one-sided to two-sided copying, the page locations you specify with
this function will appear on the front of copy sheets beginning a new chapter.
GCSHOW0E
Preparation
Before selecting this function, press [Dup./Combine/Series] and select “1 Sided”
for original, and “2 Sided” for copy.
Note
❒ You can specify up to 100 chapter locations.
❒ This function can be combined with the 2 Sided or Combine function.
89
Copying
A Press [Cover/Slip Sheet].
B Press [Designate].
C Press [Chapter].
2
D Press the chapter number to set.
E Enter the page location of the first page of the first chapter using the number keys, and then press the {#}
} key.
This display shows example settings.
Note
❒ To change the value entered, press the {Clear}
} key, and then enter the new
value.
F To specify another page location, repeat step E.
G Select the tray for main sheet.
H When you finish specifying the page location, press [OK].
Note
❒ To change the number entered, select the desired item, and then enter the
new number.
I Place originals, and then press the {Start}} key.
90
Copy Functions
Designation Sheet Copy
You can copy designated pages onto slip sheets.
1
2
3
4
1
2
3
2
4
GCCOVE2J
Note
❒ When this function is combined with the 2 Sided function, the first page of the
designated pages is copied on the front side of a slip sheet.
❒ You can specify up to 100 locations.
A Press [Cover/Slip Sheet].
B Press [Designate].
C Press [Designation Sheet Copy].
D Enter the sheet number of the originals using the number keys, and then
press the {#}
} key.
E Press [Page to Page].
Note
❒ If you do not need to copy consecutive originals, proceed to step G.
F Enter the sheet number of the last original using the number keys.
G Select the tray for designate sheet are set, and then press the {#}} key.
H To specify another page location, repeat step D to G.
I Select the tray for main sheets.
J After all settings, press [OK].
K Place originals, and then press the {Start}} key.
91
Copying
Insert Designation Sheet
You can insert a slip sheet before or after the designated page.
2
1
1
5
5
9
9
GCDESG0E
Preparation
Before selecting this function, set the tray for slip sheets. See “Paper Tray Settings”, General Settings Guide.
Note
❒ Set the same slip sheet as the copy paper in the same orientation.
❒ You can specify up to 100 chapter locations.
Reference
When you use the interposer, see “Loading Paper in Interposer”, General Settings Guide.
A Press [Cover/Slip Sheet].
B Press [Designate].
C Press [Insert Designation Sheet Copy].
D Press the chapter number you want to select.
E Press [Before] or [After] to select to insert the designation sheet, and then enter the page number using the number key.
F Press [Number of Sheets], and enter the number of the sheets to be inserted
using the number key.
G Select the tray for designation sheet.
92
Copy Functions
H Press the {#}} key.
I You can repeat ster E to I to select where you want to insert it.
J Select the tray for main sheets.
K After finishing all, press [OK].
L Place the originals, and press the {Start}} key.
2
Slip Sheets
Every time an original page changes, a slip sheet is inserted. This function can
be used to insert a slip sheet automatically between each OHP transparency copied or used as a stack function. You can also copy onto inserted slip sheets.
1
2
3
1
1
2
2
3
3
ZGCCOVE5
Preparation
Before selecting this function, specify the paper tray for slip sheets. See “Slip
Sheet”, General Settings Guide.
If “1 Sided → 2 Sided”is selected, change it to “1 Sided → 1 Sided”.
Note
❒ Load slip sheets of the same size, and in the same orientation as the copy paper or OHP transparency.
❖ When inserting slip sheets between OHP transparencies
• Copy
2
1
2
2
1
1
93
Copying
• Blank
2
1
2
12
A Press [Cover/Slip Sheet].
B Select [Copy] or [Blank] for the slip sheet.
C Select the paper tray that contains paper for copying originals.
D Place originals, and then press the {Start}} key.
Background Numbering
Use this function to have numbers printed on the background of copies.
Reference
You can change settings (e.g., size, density) of the numbers with the User
Tools. See p.136 “Background Numbering”.
A Press [Stamp].
B Check that [Background No.] is selected.
94
Copy Functions
C When you want to start the number another 1, press [Change].
D Enter the number to start counting from using the number keys, and then
press the {#}
} key.
2
E Place originals, and then press the {Start}} key.
Preset Stamp
Messages you use frequently can be stored in memory and stamped on copies.
One of the following eight messages can be stamped on copies with a frame
around it: “COPY”, “URGENT”, “PRIORITY”, “For Your Info.”, “PRELIMINARY”, “For Internal Use Only”, “CONFIDENTIAL”, and “DRAFT”.
95
Copying
Stamp position and original orientation
2
Note
❒ Only one message can be stamped at a time. You can combine a message of
the user stamp and that of the preset stamp.
Reference
You can change certain Preset Stamp settings (e.g., density) with the User
Tools. See p.136 “Preset Stamp”.
You can change the stamp language with the User Tools. See p.136 “Preset
Stamp”.
A Press [Stamp].
B Press [Preset Stamp].
96
Copy Functions
C Select the desired message.
2
D Press [All Pages] or [1st Page only] to select the print page.
Note
❒ You can change the position, size, and density of the stamp. See p.97
“Changing stamp position, size, and density”.
E Place originals, and then press the {Start}} key.
Changing stamp position, size, and density
A Press [Change].
B Select the position for print, size, and density, and then press [OK].
97
Copying
User Stamp
Copies using the registered stamp.
2
Preparation
Before using this function, you have to program a user stamp.
See p.99 “To program the user stamp”.
Stamp position and original orientation
98
Copy Functions
Note
❒ Only one message can be stamped at a time. You can combine a message of
the user stamp and that of the preset stamp.
Reference
You can change the stamp position and stamp page. See p.99 “To change the
stamp position”.
A Press [Stamp].
B Press [User Stamp].
C Select the stamp type you require.
D Press [All Pages] or [1st Page only] to select the print page.
E Place originals, and then press the {Start}} key.
2
To change the stamp position
A Press [Change].
B Select the desired position, and then press [OK].
To program the user stamp
Note
❒ Maximum User Stamp area: 100 mm × 200 mm (3.9" × 7.8")
a
b
1
ZGVX040E
1. Placing the original on the exposure glass
a: 10 – 297 mm (0.4" – 11.7")
b: 10 – 432 mm (0.4" – 17")
❒ Up to five frequently used messages can be stored in memory.
99
Copying
A Make sure the machine is in Copy mode.
B Press the {User Tools}} key.
ZJBS050N
2
C Press [Copier/Document Server Features].
The main menu of the Copier/Document Server Features appears.
D Press [Stamp].
E Press [User Stamp].
F Press [Program/Delete Stamp].
G Press [Program], and then press the stamp number (1–5) you want to program.
Note
❒ Stamp numbers with m already have settings made for them.
❒ If the stamp number is already being used, the machine will ask you if you
want to overwrite it — press [Yes] or [No].
H Enter the user stamp name using the letter keys on the control panel. You
can register up to 10 characters.
Reference
“Entering Text”, General Settings Guide.
I Enter the horizontal size of the stamp (up to 17 inches) using the number
keys, and then press [#].
J Enter the vertical size (up to 11.7 inches) in the same way as step I.
K Place the user stamp on the exposure glass, and then press [Start Scanning].
The original will be scanned, and the stamp will be registered.
Note
❒ Originals cannot be scanned from the ADF when programming the user stamp.
100
L Press [Exit].
Copy Functions
To delete the user stamp
Important
❒ You cannot restore a deleted stamp.
A Make sure the machine is in Copy mode.
B Press the {User Tools}} key.
2
ZJBS050N
C Press [Copier/Document Server Features].
D Press [Stamp].
E Press [User Stamp].
F Press [Program/Delete Stamp].
G Press [Delete], and then press the number of the stamp (1–5) you want to delete.
A confirmation message appears.
H Press [Yes].
I Press [Exit].
The display returns to the main menu of the Copier/Document Server Features.
Date Stamp
Use this function to print a date on copies.
101
Copying
You can select from the following date formats:
• MM/DD/YYYY
• MM.DD.YYYY
• DD/MM/YYYY
• DD.MM.YYYY
2
Stamp position and original orientation
Reference
Select the stamp format with the User Tools. See p.137 “Stamp Format”.
You can change the font of the date stamp. See p.137 “Stamp Font”.
You can change the stamp size. See p.137 “Stamp Size”.
When the date is stamped on the dark images, you can superimpose the date
stamp. See p.137 “Superimpose”.
A Press [Stamp].
B Press [Date Stamp].
102
Copy Functions
C Press [All Pages] or [1st Page only] to select the print page.
Note
❒ You can change the font and position of the Date Stamp. See p.103 “To
change the date format”.
D Place originals, and then press the {Start}} key.
2
To change the date format
A Press [Change Format].
B Select the desired date format, and then press [OK].
To change the stamp position
A Press [Change].
B Select the desired Date Stamp position, and then press [OK].
Page Numbering
Use this function to print page numbers on your copies.
There are six types of Page Numbering (“n” is the total number of original pages):
• P1,P2,…Pn
• 1/n,2/n,...n/n
• -1-,-2-,...-n• P.1,P.2,...P.n
• 1, 2…n
• 1–1,1–2,..1–n
Note
❒ You can select whether the page numbering printed negative where it overlaps black parts of the negative. See p.137 “Page Numbering”.
103
Copying
Stamp position and orientation of originals
2
Reference
You can set the priority page number format. See p.137 “Stamp Format”.
You can change the font of the stamp. See p.138 “Stamp Font”.
You can change the stamp size. See p.138 “Stamp Size”.
You can set the position of the duplex back page number printed in Duplex
mode. See p.138 “Back Side Stamp Position in Duplex”.
You can set how pages are numbered when you use the Combine function and
Page Numbering function together. See p.138 “Page Numbering in Combine”.
You can set not to print the page number on slip sheets when you use the Designate function. See p.138 “Stamp on Designated Slip Sheet”.
When you use [1 Sided Combine]/[2 Sided Combine], you can stamp page number per copy paper.
When the page number is stamped on the dark images, you can superimpose
the page number. See p.138 “Superimpose”.
You can change the initial settings for stamp position. See p.138 “Stamp Position”.
104
Copy Functions
A Press [Stamp].
B Press [Page Numbering].
C Select the format.
2
Note
❒ You can specify the stamp position, pages to be stamped, and numbering.
See p.105 “Changing the stamp position”, and p.105 “Specifying the first
printing page and start number”.
D Place originals, and then press the {Start}} key.
Changing the stamp position
A Press the left bottom [Change].
B Select the desired position, and then press [OK].
Specifying the first printing page and start number
If you selected (P1,P2…, -1-,-2-…, P.1, P.2…, 1, 2…, )
Note
❒ Below gives an example based on when (P1, P2...) is selected. The steps are
the same for other cases.
A Press the right bottom [Change].
105
Copying
B Press [First Page], and then enter the original sheet number to start printing
from using the number keys.
2
Note
❒ To change the number entered, press [Clear], and then enter a new number.
C Press [Numbering from], and then enter the number to start numbering from
using the number keys.
D Press [Numbering to], and then enter the number to end numbering with using the number keys.
Note
❒ If you want to print to the last page, press [To the End].
E Press the {#}} key.
F When page designation is complete, press [OK].
Note
❒ To change settings after pressing [OK], press the right bottom [Change], and
then enter the numbers again.
If you selected (1/5, 2/5…)
A Press the right bottom [Change].
B Press [First Page], and then enter the original sheet number to start printing
from using the number keys.
Note
❒ To change the number entered, press [Clear], and then enter a new number.
C Press [Numbering from], and then enter the page number to start numbering
from using the number keys.
D Press [Numbering to], and then enter the number to end numbering with using the number keys.
106
Copy Functions
E Press [Total Pages], and then enter the total number of original pages using
the number keys.
F Press the {#}} key.
G Press [OK].
Note
❒ To change settings after pressing [OK], press the right bottom [Change], and
then enter the numbers again.
2
If you selected (1–1, 1–2,…)
A Press the right bottom [Change].
B Press [First Page], and then enter the original sheet number to start printing
from using the number keys.
Note
❒ To change the number entered, press [Clear], and then enter a new number.
C Press [First Chapter No.], and then enter the chapter number to start numbering from using the number keys.
D Press [Numbering from], and then enter the number to start numbering from
using the number keys.
E Press the {#}} key.
F If page designation is complete, press [OK].
Note
❒ To change settings after pressing [OK], press the right bottom [Change], and
then enter the numbers again.
107
Copying
Stamp Text
You can stamp important text on copies up to 64 letters.
Introducing the New Product of this year
2
GCSTMT0E
Note
❒ If the Main Power is turned off, the text is cleared. To save the typed text, you
can register them. See p.112 “Programs”.
A Press [Stamp].
B Press [Stamp Text].
C Press [Change Text].
D Enter stamp text, and then press [OK].
E Press [All Pages] or [1st Page only] to select the print page.
F Place originals, and then press the {Start}} key.
To change the stamp position
A Press [Change].
B Select the desired position, and then press [OK].
108
Copy Functions
Copy face up
Use this function to reverse the order of copies.
Reference
If you want copies to be delivered face down when placing originals on the
exposure glass, select [Face down] for both ”Eject Copy Face Up/Down in
Glass Mode” of User Tools. See p.139 “Input/Output”.
2
A Press [Output/Cstmz. Function].
B Press [Reverse Edition Face Up/Down].
C Place originals, and then press the {Start}} key.
Customize function
You can store the frequently used functions.
Preparation
You can register the function key which can use often for your convinience.
See p.130 “Customize Function: Copy”.
A Press [Output/Cstmz. Function].
B Select the function you want to use by pressing the corresponding key.
109
Copying
Storing Originals in the Document Server
The Document Server enables you to save documents in memory and print them
as required.
Important
❒ Data stored in the machine might be lost if some kind of failure occurs. The
manufacturer shall not be responsible for any damage that might result from
loss of data.
2
Note
❒ Data stored in the Document Server is deleted after 3 days (72 hours), the default setting. You can set stored data to be automatically deleted, or specify a
period after which the stored data is automatically deleted. See “Auto Delete
File”, General Settings Guide.
Reference
For details about the Document Server, see “Document Server”, General Settings Guide.
For information about functions you can use with Document Server, see p.141
“Combination Chart”.
A Press [Store file].
B Enter a file name, user name, or password if neccessary.
Select the user name registered
A Press [User Name].
B Select the user name, and press [OK].
Entering the user name not registered
A Press [User Name].
B Press [Non-programmed Name].
C Enter the new user name using the letter leys, and press OK.
110
Storing Originals in the Document Server
Entering file names
A Press [File Name].
B Press [Delete All], and delete the default name.
Note: You can change the file name to use [Back Space].
C Enter the file name, and press [OK].
2
Setting password
A Press [Password].
B Enter the password using the number keys and press [OK].
C Press [OK].
D Place originals.
Reference
For more information about types of originals that can be placed and how
to place them, see p.10 “Placing Originals”.
E Make scanning settings for the original.
F Press the {Start}} key.
Copies are delivered, and scanned data is stored on the hard disk.
Note
❒ To stop scanning, press the {Stop}
} key. To resume a paused scanning job,
press [Yes] in the confirmation dialog box. To delete saved images and cancel a job, press [No].
❒ To check a document that has been stored, press the {Document Server}
} key
to display the document selection screen.
111
Copying
Programs
You can store frequently used copy job settings in memory and recall them for
future use.
Note
❒ You can store up to 25 programs.
2
❒ You can select standard mode or program No. 25 as the mode to be set when
modes are cleared or reset, or immediately after the operation switch is
turned on. See p.126 “Change Initial Mode”.
❒ Paper settings are stored based on size. So, if paper of the same size is set for
more than one tray, the paper tray prioritized with User Tools (System Settings) will be selected first. See “Paper Tray Settings”, General Settings Guide.
❒ Programs are not cleared by turning the power off or by pressing the {Clear
Modes}
} key. They are canceled only when you delete or overwrite them with
another program.
Storing a Program
A Edit the copy settings.
B Press the {Program}} key.
ZJAS040N
C Press [Register].
D Press the program number you want to store.
Note
❒ Program numbers with m against them already have settings made for
them.
Reference
p.113 “Changing a stored program”
112
Programs
E Enter the program name using the letter keys on the display panel.
You can enter up to 40 characters.
Reference
For details about entering characters, see “Entering Text”, General Settings
Guide.
Note
❒ If you do not want to enter the program name, proceed to step F.
2
F Press [OK].
When the settings are successfully stored, the m indicator before the program number goes on, followed by the program name. The screen returns to
the initial copy display after a short time.
Changing a stored program
A Check the program settings.
Reference
When you want to check the contents of a program, recall the program. See
p.114 “Recalling a Program”.
B Repeat steps A to D of “Storing a Program”.
C Press [Register].
Repeat steps E and F of ”Storing a Program”.
Note
❒ This overwrites the previous program.
113
Copying
Deleting a Program
A Press the {Program}} key.
B Press [Delete].
C Press the number of the program you want to delete.
D Press [Yes] in the confirmation dialog box.
2
The program is deleted, and the screen returns to the initial copy display.
Recalling a Program
A Press the {Program}} key.
B Press [Recall].
C Press the number of the program you want to recall.
Stored settings are displayed.
Note
❒ Only programs with m against them contain a program.
114
3. Troubleshooting
If Your Machine Does Not Operate as You
Want
When a Message is Displayed
The following chart contains explanations of common messages. If other messages appear, follow the instructions as they are displayed.
Message
Causes
Cannot detect original size. The size of the originals
placed is difficult to detect.
See p.9 “Sizes difficult to
detect”.
Solutions
Place the original on the exposure
glass. See p.13 “Placing Originals on
the Exposure Glass”.
If the original size is difficult to detect, select the size manually.
Do not use Auto Reduce/Enlarge
mode.
Original is not placed.
Place originals.
Check original orientation.
There is no copy paper in
the same orientation as the
originals.
Place the original in the same orientation as the copy paper.
Check paper size.
Incorrect paper size is set.
If you press the {Start}
} key, copy
onto the selected paper will start.
It is over stapling capacity.
The number of sheets per
Check the stapler capacity. See p.46
set is over the staple capac- “Staple”.
ity.
Cannot staple paper of this
size.
The Staple function cannot
be used with the paper size
selected.
Select a paper size that can be used
in Staple mode. See p.46 “Staple”.
Maximum number of sets
is
.
The number of copies exceeds the maximum copy
quantity.
You can change the maximum copy
quantity. See p.126 “Max. Number
of Sets”.
Cannot copy. Original is
being scanned by other
functions.
The Document Server or
Scanner function is in use.
To cancel the job in process, press
[Exit], and then press the {Document
} or {Scanner}
} key. Next, press
Server}
the {Stop}
} key. When the message ”
[Stop] was pressed. Stop storing?”
appears, press [Stop].
115
Troubleshooting
If You Cannot Make Clear Copies
Problem
Causes
Copies appear dirty.
The image density is too dark. Adjust the image density. See
p.31 “Adjusting Copy Image
Density”.
Auto Image Density is not selected.
The reverse side of an original
image is copied.
3
Select Auto Image Density.
The image density is too dark. Adjust the image density. See
p.31 “Adjusting Copy Image
Density”.
Auto Image Density is not selected.
A shadow appears on copies
when copying pasted originals.
Solutions
Select Auto Image Density.
The image density is too dark. Adjust the image density. See
p.31 “Adjusting Copy Image
Density”.
Change the orientation of the
original.
Fix mending tape to the pasted part.
The same copy area is dirty
whenever making copies.
The exposure glass or the ADF
belt is dirty.
Clean them. See “Maintaining
Your Machine”, General Settings Guide.
Copies are too light.
The image density is too light. Adjust the image density. See
p.31 “Adjusting Copy Image
Density”.
Damp or rough grain copy pa- Use dry paper without a
per is being used.
rough grain.
Toner cartridge is almost emp- Add toner. See “Replacing
ty.
Toner”, General Settings
Guide.
Parts of the image are not cop- The original is not set correctied.
ly.
An incorrect paper size is selected.
Select the proper paper size.
Copies are blank.
The original is not set correctly.
Place originals correctly. See
p.7 “Placing Originals”.
A moiré pattern is produced
on copies.
Original has a dot pattern image or many lines.
Place the original on the exposure glass at a slight angle.
R
116
Place originals correctly. See
p.7 “Placing Originals”.
y;
;yy;y;y;y;y;y;
y;y;y;y;y;
If You Cannot Make Copies As You Want
If You Cannot Make Copies As You Want
This section explains causes and remedies when copy results are not as expected.
❖ Basic
Problem
Causes
Solutions
Copies are not stapled.
There are staples jammed
in the stapler.
Remove jammed staples. See General Settings Guide.
The number of copies exceeds the capacity of the
stapler.
Check the stapler capacity. See p.145
“Staple”.
Copy paper is curled.
Turn the copy paper over in the
tray.
Originals are not set correctly.
Check the correct position to place
the originals. See p.46 “Staple”.
Staples are wrongly positioned.
You cannot combine sever- Selected functions cannot
al functions.
be used together.
3
Check the combination of functions
and make the settings again.
Reference
p.141 “Combination Chart”
Paper frequently jams.
The paper size setting is in- Set the paper size correctly. See “Pacorrect.
per Tray Settings”, General Settings
Guide.
Check that the side fences and back
fence are set in the paper tray.
Originals jam.
Different size originals are
placed in the ADF.
Set the Mixed 1&2 Sided function.
See p.71 “Mix 1 & 2 Sided”.
Problem
Causes
Solutions
In Double Copies mode,
parts of the original image
are not copied.
The combination of original and copy paper is not
correct.
Select A3L (11" × 17"L) for A4 K
(81/2" × 11"K) originals and A4L
(81/2" × 11"L) for A5K (51/2" ×
81/2"K) originals.
In Border, Center, or Center/Border mode, parts of
the original image are not
copied.
You set a wide erased mar- Make the margin width narrower.
gin.
You can adjust it between 2–99 mm
(0.1"–3.9"). See p.132 “Erase Border
Width”and p.132 “Erase Center
Width”.
❖ Edit
Originals are not scanned
correctly.
Place the originals correctly.
117
Troubleshooting
3
Problem
Causes
Solutions
In Margin Adjustment
mode, parts of the original
image are not copied.
You set a wide erased mar- Set a narrower margin with User
gin.
Tools. You can set the width between 0–30 mm (0"–1.2"). See p.131
There is a lack of margin
“Front Page Margin : Left/Right”,
space on the opposite side
p.132 “Front Side Margin : Top/Botof the binding position.
tom”, p.131 “Back Side Margins :
Left/Right”, and p.132 “Back Side
Margin : Top/Bottom”.
In Image Repeat mode, the
original image is not copied repeatedly.
You selected copy paper
the same size as the originals, or you did not select
the proper reproduction
ratio.
Select copy paper larger than the
originals.
Problem
Causes
Solutions
You cannot make a book
from Booklet or Magazine
mode by folding copies.
You selected a setting
Change the setting.
(“Open to left”or “Open to
right”) that does not match
the orientation of originals.
When using Combine,
parts of the image are not
copied.
You specified a reproduction ratio that does not
match the sizes of your
originals and copy paper.
Select the proper reproduction ratio.
❖ Combine
When you specify a reproduction
ratio using Manual Paper Select
mode, make sure that the ratio
matches your originals and the copy
paper.
Note
❒ Select the correct reproduction
ratio before using Combine
mode.
Copies are not in correct or- You placed the originals in
der.
the incorrect order.
When placing a stack of originals in
the ADF, the last page should be on
the bottom.
If you are placing originals on the
exposure glass, start with the first
page to be copied.
118
If You Cannot Make Copies As You Want
❖ Duplex
Problem
Causes
Copies are not in correct or- You placed the originals in
der.
the incorrect order.
Solutions
When placing a stack of originals in
the ADF, the last page should be on
the bottom.
If you are placing originals on the
exposure glass, start with the first
page to be copied.
When using 1 Sided Combine or 2 Sided Combine,
copy is made Top to Bottom even though From Left
to Right is selected.
The orientation of the orig- Place the originals in the correct oriinals is incorrect.
entation. See p.10 “Original Orientation” .
3
❖ Stamp
Problem
Causes
Solutions
The stamp position is
wrong.
The paper orientation is
wrong.
Check the paper orientation and
stamp position.
Nothing is stamped.
The stamp size is larger
than the paper size.
Set the stamp size appropriately.
The stamp text in back side The back side stamp posicopy is not stamped in Du- tion is incorrect with the
plex mode.
paper size.
Reset the back side stamp position.
See p.138 “Back Side Stamp Position
in Duplex”.
When Memory Is Full
Message
Causes
Solutions & Reference
Memory is full. ## originals
have been scanned.
The scanned original exceeds
the number of pages that can
be stored in memory.
Press [Output] to copy scanned
originals and clear the scanning data. Press [Print Inquiry
List] to clear the scanning data
and not copy.
The machine checks if the remaining original should be
copied, after the scanned original has been printed.
To continue copying, remove
all copies, then press [Continue]. To stop copying, press
[Stop].
Press [Print] to copy scanned
originals.
Do not remove remaining
originals.
Note
❒ Copying will stop and this
message will be displayed
when memory is full.
Press [Continue] to continue
printing.
[Stop] [Continue]
119
Troubleshooting
3
120
4. User Tools (Copier/Document
Server Features)
User Tools Menu (Copier/Document
Server Features)
User tools item names
Default
General Features - General (see p.126 “General Features - General”)
Auto Paper Select Priority
On
Auto Image Density Priority
Text: On
Text/Photo: On
Photo: Off
Pale: On
Generation Copy: On
Original Type Priority
Text
Duplex Mode Priority
1 Sided → 2 Sided
Original Orientation in Duplex Mode
Top to Top
Copy Orientation in Duplex Mode
Top to Top
Change Initial Mode
Standard
Reverse Job Mode
Reset
Max. Number of Sets
9999 Sheets
Manual Original Counter Reset
On
Auto Tray Switching
With image rotation
General Features - Image Adjustment (see p.128 “General Features - Image Adjustment”)
Text
Copy Quality: Normal/Image Density: Normal
Text/Photo
Copy Quality: Normal/Image Density: Normal
Photo
Copy Quality: Normal/Image Density: Normal
Pale
Copy Quality: Normal/Image Density: Normal
Generation Copy
Copy Quality: Normal/Image Density: Normal
Dark Background
Off
General Features - Display/Tone (see p.129 “General Features - Display/Tone”)
Original Type Display
Display
Special Original Display
Hide
121
User Tools (Copier/Document Server Features)
User tools item names
Default
Paper Display
Display
Panel Features Default
Off
Image Adjustment Priority
Off
Tone: Original Remains
On
Job End Call
On
Customize Function: Copy
Customize Function: Store Document Server
Customize Function: Print Document Server
Special Original Display Defaults
Reproduction Ratio (see p.131 “Reproduction Ratio”)
4
Preset Reduce/Enlarge
Preset Reduce/Enlarge Priority
73%
Shortcut R/E
Metric version
• Shortcut R/E 1: 71%
• Shortcut R/E 2: 122%
Inch version
• Shortcut R/E 1: 73%
• Shortcut R/E 2: 129%
Create Margin Ratio
93%
Edit (see p.131 “Edit”)
Copy Back Cover
Outside
Front Page Margin: Left/Right
Metric version: Left 5 mm
Inch version: Left 0.2 inch
Back Side Margin: Left/Right
Metric version: Right 5 mm
Inch version: Right 0.2 inch
Front Side Margin: Top/Bottom
Metric version: Top/Bottom
0 mm
Inch version: Top/Bottom 0
inch
Back Side Margin: Top/Bottom
Metric version: Top/Bottom
0 mm
Inch version: Top/Bottom 0
inch
1 → 2 Sided Auto Back Side Margin: T to T
Metric version: Right 5 mm
Inch version: Right 0.2 inch
122
User Tools Menu (Copier/Document Server Features)
User tools item names
Default
1 → 2 Sided Auto Back Side Margin: T to B
Metric version: Top/Bottom
0 mm
Inch version: Top/Bottom 0
inch
Erase Border Width
Metric version: 10 mm
Inch version: 0.4 inch
Erase Original Shadow in Combine
On
Erase Center Width
Metric version: 10 mm
Inch version: 0.4 inch
Image Repeat Separation Line
None
Double Copies Separation Line
None
Separation Line in Combine
None
Copy Order in Combine
From left to right
Orientation: Booklet, Magazine
Open to left
Front Cover Copy in Combine
Combine
Copy on Designating Page in Combine
Combine
Double Copies Position
Same Position
4
Stamp (see p.136 “Stamp”)
Background Numbering
Preset Stamp
Size
Normal
Density
Normal
Stamp Language
English
Stamp Priority
Copy
Stamp Format
Top Right/1×/Normal/All
pages
(COPY/URGENT/PRIORITY/For Your Info./PRELIMINARY/For Internal Use
Only)
User Stamp
Date Stamp
Program/Delete Stamp
Stamp Format : 1–5
Top Right/All pages
Stamp Format
MM/DD/YYYY
Stamp Font
Font 1
Stamp Position
Top Left
Page Numbering in Combine All pages
Stamp Size
Auto
Superimpose
Off
123
User Tools (Copier/Document Server Features)
User tools item names
Page Numbering
Default
Stamp Format
P1, P2...
Stamp Font
Font 1
Stamp Size
Auto
Back Side Stamp Position in
Duplex
Opposite position to Front
Page Numbering in Combine Per original
4
Stamp Text
Stamp on Designated Sheet
Sheet
Off
Superimpose
Off
Stamp Position: P1, P2…
Top Right
Stamp Position: 1/5, 2/5…
Top Right
Stamp Position: -1-, -2-…
Bottom Center
Stamp Position: P.1, P.2…
Top Right
Stamp Position: 1, 2…
Top Right
Stamp Position: 1-1, 1-2…
Bottom Center
Stamp Font
Font 1
Stamp Position
Top Right
Page Numbering in Combine All Pages
Stamp Size
Auto
Superimpose
Off
Input/Output (see p.139 “Input/Output”)
SADF Auto Reset
5 seconds
Eject Copy Face Up/Down in Glass Mode
Face up
Auto Sort
Off
Memory Full Auto Scan Restart
Off
Sort/Stack Shift Tray Setting
On
Insert Separation Sheet
Per 1 set(s)
Select Staple Position
124
Finisher 3000B (100–sheet
staples)
Top Left/Top Left
slant/Top2/Left2
Booklet Finisher
Top Left/Saddle
stich/Top2/Left2
Select Punch Type
3 Holes
Letterhead Setting
Off
Accessing User Tools (Copier/Document Server Features)
Accessing User Tools (Copier/Document
Server Features)
This section is for key operators in charge of this machine. You can change defaults.
Note
❒ Settings with the user tools are completely different function from the ordinary copier function. Be sure to return to the copier function when you finish
the settings.
❒ Selected keys are highlighted.
❒ Any changes you make with User Tools remain in effect even if the main
power switch or operation switch is turned off, or the {Clear Modes}
} key is
pressed.
4
Reference
For details about system settings, see “User Tools”, General Settings Guide.
A Press the {User Tools}} key.
ZJBS050N
Note
❒ When the access code is set, the access code input screen is displayed when
changing the initial settings. Enter the registered access code. For details
about the access code, see “Key Operator Tools”, General Settings Guide.
B Press [Copier/Document Server Features].
C Select the item you want to set.
Setting screens for the selected item is displayed.
Reference
p.121 “User Tools Menu (Copier/Document Server Features)”
D Change the settings by following the instructions on the display panel, and
then press [OK].
Exiting User Tools
A After changing User Tools settings, press [Exit] on the User Tools main menu.
User Tool changes are complete, and the machine is ready to copy.
Note
❒ You can also exit User Tools by pressing the {User Tools}
} key.
125
User Tools (Copier/Document Server Features)
Settings You Can Change with User Tools
General Features - General
❖ Auto Paper Select Priority
You can select to have “Auto Paper Select” selected when the machine is
turned on or reset, or when modes are cleared. See p.33 “Selecting Copy Paper”.
❖ Auto Image Density Priority
You can turn the Auto Image Density on or off for each original type (Text,
Text/Photo, Photo, Pale, Generation Copy, and Dark Background).
4
❖ Original Type Priority
You can select the type of originals effective when the machine is turned on
or reset, or when modes are cleared.
❖ Duplex Mode Priority
You can select the type of Duplex function effective when the machine is
turned on or reset, or when modes are cleared.
❖ Original Orientation in Duplex Mode
You can set original orientation when making two-sided copies.
❖ Copy Orientation in Duplex Mode
You can set copy orientation when making two-sided copies.
❖ Change Initial Mode
You can select the initial mode or Program No. 25 as the mode effective when
the machine is turned on or reset, or when modes are cleared.
❖ Reverse Job Mode
You can select the display when you press the {New Job}
} key or [New Job],
keeping the previous one displayed or resetting the display.
❖ Max. Number of Sets
The maximum copy quantity can be set between 1 and 9999.
❖ Manual Original Counter Reset
You can select whether to turn the Manual Original Counter display on or off.
The Original Counter can be reset by touching this key.
126
Settings You Can Change with User Tools
❖ Auto Tray Switching
If you load paper of the same size and type in two or more trays, the machine
automatically shifts to the other tray when the tray in use runs out (when
Auto Paper Select is selected.) This function is called “Auto Tray Switching”.
This setting specifies whether to use “Auto Tray Switching” or not.
Note
❒ [With image rotation] Use this to copy with Auto Tray Switching.
3
1
4
2
4
ZGVX020E
1. Original
2. Paper (Tray 1)
3. Paper (Another tray)
4. Paper (Another tray)
❒ [Without image rotation] Only copies with Auto Tray Switching if you load
paper of the same size and in the same orientation in two or more trays. If
the paper is not the same size or in the same orientation, copying is interrupted and the message “Load paper.” appears.
3
4
1
2
ZGVX030E
1. Original
2. Paper (Tray 1)
3. Paper (Another tray)
4. Paper (Another tray)
❒ [OFF] When a paper tray runs out, copying is interrupted and the message
“Load paper.” appears.
127
User Tools (Copier/Document Server Features)
General Features - Image Adjustment
You can select the copy quality and image density for each original type (Text,
Text/Photo, Photo, Pale, Generation Copy, and Dark Background).
❖ Text
• Copy Quality
You can select the sharpness of text.
• Image Density
You can select one of three original image density levels.
❖ Text/Photo
• Copy Quality
When there are photo(s) and text on the original, you can determine which
takes priority.
• Image Density
You can select one of three original image density levels.
4
❖ Photo
• Copy Quality
For a photo original, you can adjust the finish quality level to match the
photo original.
• Image Density
You can select one of three original image density levels.
❖ Pale
• Copy Quality
You can select the quality level for a pale original.
• Image Density
You can select one of three original image density levels.
❖ Generation Copy
• Copy Quality
You can select a quality level that will not thicken the lines of the finished
image.
• Image Density
You can select one of three original image density levels.
❖ Dark Background
You can select to display [Dark Background] on the initial display. Keep the
Original Type Display to set to [Hide]. See p.129 “Original Type Display”.
128
Settings You Can Change with User Tools
General Features - Display/Tone
❖ Original Type Display
You can have original types shown on the initial display.
Note
❒ If you select “Hide”, the display is shown as below.
4
❖ Special Original Display
You can have the special original types shown on the initial display.
Note
❒ If you select “Hide”, the display is shown as below.
❖ Paper Display
You can select to have available paper trays and sizes shown on the initial display.
Note
❒ If you select “Hide”, the display is shown as below.
129
User Tools (Copier/Document Server Features)
❖ Panel Features Default
You can specify the other tab function that is selected automatically just after
the machine is turned on or when modes are cleared.
❖ Image Adjustment Priority
You can select the function that is priority detected in Image Adjustment
mode.
❖ Tone: Original Remains
The beeper (key tone) sounds when you forget to remove originals from the
exposure glass after copying.
Note
❒ If the “Panel Tone” in User Tools (System Settings) is “Off”, the beeper
does not sound irrespective of the “Tone: Original Remains” setting. See
“Panel Tone”, General Settings Guide.
4
❖ Job End Call
You can select to have the beeper sound when copying is complete.
Note
❒ If the “Panel Tone” in User Tools (System Settings) is “On”, the machine
beeps to notify you if it did not complete a job, for reasons such as: copying
was interrupted, the paper tray ran out of paper or a paper jam occurred.
❖ Customize Function: Copy
You can register frequently used functions for copying in function keys. You
can also change registered functions.
❖ Customize Function: Store Document Server
You can register frequently used functions for storing data in the Document
Server in function keys. You can also change registered functions.
❖ Customize Function: Print Document Server
You can register frequently used functions for printing data stored in the Document Server in function keys. You can also change registered functions.
❖ Special Original Display Defaults
You can have special originals shown on the initial display.
130
Settings You Can Change with User Tools
Reproduction Ratio
❖ Preset Reduce/Enlarge
You can set the Reduce/Enlarge ratios first displayed.
❖ Preset Reduce/Enlarge Priority
You can select a Reduce/Enlarge ratio that is detected as priority in preset Reduce/Enlarge mode.
❖ Shortcut R/E
You can register up to two frequently used Reduce/Enlarge ratios other than
the fixed Reduce/Enlarge ratio and have them shown on the initial display.
You can also change registered Reduce/Enlarge ratios.
4
❖ Create Margin Ratio
You can set a Reduce/Enlarge ratio when registering “Create Margin” in a
shortcut key.
Note
❒ You can enter a ratio between 90 and 99 (in increments of 1%) using the
number keys.
Edit
❖ Copy Back Cover
When copying the back cover, you can specify to have the back cover outside
(outside page) or inside (inside page).
❖ Front Page Margin : Left/Right
You can specify left and right margins on the front side of copies in Margin
Adjust mode.
Note
❒ You can enter a margin width of between 0 and 30 mm in 1 mm increments
(0 inch and 1.2 inch in 0.1 inch steps) using the number keys.
❖ Back Side Margins : Left/Right
You can specify left and right margins on the back side of copies in Margin
Adjust mode.
Note
❒ You can enter a margin width of between 0 and 30 mm in 1 mm increments
(0 inch and 1.2 inch in 0.1 inch increments) using the number keys.
131
User Tools (Copier/Document Server Features)
❖ Front Side Margin : Top/Bottom
You can specify top and bottom margins on the front side of copies in Margin
Adjust mode.
Note
❒ You can enter a margin depth of between 0 and 30 mm in 1 mm increments
(0 inch and 1.2 inch in 0.1 inch increments) using the number keys.
❖ Back Side Margin : Top/Bottom
You can specify top and bottom margins on the back side of copies in Margin
Adjust mode.
Note
❒ You can enter a margin depth of between 0 and 30 mm in 1 mm increments
(0” and 1.2” in 0.1” increments) using the number keys.
4
❖ 1→
→2 sided Auto Back Side Margins:T to T
In 1 sided → 2 sided Duplex mode, you can specify the margins on the back
side.
Note
❒ You can enter a margin width of between 0 and 30 mm in 1 mm increments
(0” and 1.2” in 0.1” increments) using the number keys.
❖ 1→
→2 sided Auto Back Side Margins :T to B
In 1 sided → 2 sided Duplex mode, you can specify the margins on the back
side.
Note
❒ You can enter a margins depth of between 0 and 30 mm in 1 mm increments (0 inch and 1.2 inch in 0.1 inch increments) using the number keys.
❖ Erase Border Width
Specify the width of erased border margins using this function.
Note
❒ You can enter a width of between 2 and 99 mm in 1 mm increments (0.1
inch and 3.9 inch in 0.1 inch increments) using the number keys.
❖ Erase Original Shadow in Combine
In Combine Copy mode, you can erase a 3 mm (0.1 inch) boundary margin
around all four edges of originals.
❖ Erase Center Width
You can specify the width of the erased center area using this function.
Note
❒ You can enter a width of between 2 and 99 mm in 1 mm increments (0.1
inch and 3.9 inch in 0.1 inch increments) using the number keys.
132
Settings You Can Change with User Tools
❖ Image Repeat Separation Line
You can select a separation line in Image Repeat mode.
• None
• Solid
• Broken A
4
• Broken B
• Crop Marks
Note
❒ An image of approximately 1.5 mm (0.06 inch) will not be copied as the
width of the separation line, when specifying solid or broken lines.
❖ Double Copies Separation Line
You can select a separation line in Double Copy mode.
• None
• Solid
• Broken A
133
User Tools (Copier/Document Server Features)
• Broken B
• Crop Marks
Note
❒ An image of approximately 1.5 mm (0.06 inch) will not be copied as the
width of the separation line, when specifying solid or broken lines.
❖ Separation Line in Combine
You can select a separation line in Combine mode. See p.56 “1 Sided Combine”, and p.60 “2 Sided Combine”.
• None
4
• Solid
• Broken A
• Broken B
• Crop Marks
Note
❒ An image of approximately 1.5 mm (0.06 inch) will not be copied as the
width of the separation line, when specifying solid or broken lines.
134
Settings You Can Change with User Tools
❖ Copy Order in Combine
You can set the copy order in Combine mode to “Left to Right” or “Top to Bottom”.
Top to Top
From Left to Right
Top to Bottom
From Right to Left
From Left to Right
From Right to Left
4
1 2
5 6
2 1
6 5
1 3
5 7
3 1
7 5
3 4
7 8
4 3
8 7
2 4
6 8
4 2
8 6
GCCOMB100E
❖ Orientation: Booklet, Magazine
You can select the type of originals for Booklet or Magazine mode.
❖ Front Cover Copy in Combine
You can make a combined copy on the front cover sheet when you select
Front Cover copier mode.
Combine
Do not Combined
GCST019E
❖ Copy on Designating Page in Combine
You can make a combined copy on a designated page.
❖ Double Copies Position
You can select copy position of the bottom or left page relative to the top or
right page as the original image position. This setting is available when Centering/Cornering is selected in the Document Server.
135
User Tools (Copier/Document Server Features)
Stamp
Background Numbering
❖ Size
You can set the size of the numbers.
❖ Density
You can set the density of the numbers.
Preset Stamp
4
❖ Stamp Language
You can select the language of the message that is printed in Stamp mode.
❖ Stamp Priority
You can select the priority stamp type when [Preset Stamp] is pressed. See
“Preset Stamp”.
❖ Stamp Format
You can adjust the size, density, and print page for the stamp.
• Stamp Position
You can set the position at which the stamp is printed.
Press the arrow keys to adjust the position.
• Stamp Size
You can set the size of the stamp.
• Density
You can set the pattern used to print the stamp.
Note
❒ Normal: The stamp is printed on the image. You cannot confirm which
parts overlap the image.
❒ Lighter: The image can be seen through the stamp.
❒ Lightest: You can see the image even clearer than in the “Lighter” setting.
• Page Stamp
You can have the stamp printed on the first or all pages.
136
Settings You Can Change with User Tools
User Stamp
❖ Program/Delete Stamp
You can register/change/delete the designs you like as user stamps.
Note
❒ You can register up to five custom stamps of your favorite designs. See
p.99 “To program the user stamp”.
Reference
For how to delete stamps, see p.101 “To delete the user stamp”.
❖ Stamp Format
You can adjust the position and print page for registered User Stamps 1 to 5.
• Stamp Position
Set the position where the stamp is printed.
• Page to Stamp
Set to have the stamp printed on all or only the first page.
4
Date Stamp
❖ Stamp Format
You can select the date format for Date Stamp mode.
❖ Stamp Font
You can select the Date Stamp font.
❖ Stamp Position
You can set where the stamp is printed.
❖ Page to Stamp
You can have the date printed on the first or all pages.
❖ Stamp Size
You can set the Date Stamp size.
❖ Superimpose
You can have Date Stamp printed as a negative where it overlaps black parts
of the image.
Page Numbering
❖ Stamp Format
You can select the priority page number format when [Page Numbering] is
pressed.
137
User Tools (Copier/Document Server Features)
❖ Stamp Font
You can select the font of the page numbers printed in Page Numbering
mode.
❖ Stamp Size
You can set the size of the stamp printed in Page Numbering mode.
❖ Back Side Stamp Position in Duplex
You can set where the duplex back page number printed in Duplex mode.
❖ Page Numbering in Combine
You can set how pages are numbered when you use the Combine function
and Page Numbering function together.
❖ Stamp on Designated Slip Sheet
You can print the page number on slip sheets when you use the Designate
function set to “Copy” and Page Numbering function together.
4
❖ Superimpose
You can have page numbers printed as a negative where they overlap black
parts of the image.
❖ Stamp Position
P1, P2...Stamp Position: 1/5, 2/5...Stamp Position: -1-, -2-...Stamp Position:
P.1, P.2...Stamp Position: 1, 2...Stamp Position: 1–1, 1–2...
You can set where the stamp is printed.
Press the arrow keys to adjust the position.
Stamp Text
❖ Stamp Font
You can select the font of the text in Stamp Text mode.
❖ Stamp Position
You can set the position at which the stamp is printed.
Press the arrow keys to adjust the position.
❖ Page to Stamp
You can set how pages are numbered when you use the Combine function
and Stamp Text function together.
❖ Stamp Size
You can select the size of the stamp printed in Stamp Text mode.
❖ Superimpose
You can have page numbers printed as a negative where they overlap black
parts of the image.
138
Settings You Can Change with User Tools
Input/Output
❖ SADF Auto Reset
When you set one original at a time in the ADF, the Auto Feed indicator lights
for a selected time after an original is fed, showing it is ready for another original.
Note
❒ You can adjust this time from 3 seconds to 99, in 1 second increments.
❖ Eject Copy Face Up/Down in Glass
You can specify the way copies are delivered when copying an original from
the exposure glass.
4
❖ Auto Sort
You can have Sort mode selected when the machine is turned on or reset, or
if the mode is cleared.
❖ Memory Full Auto Scan Restart
If memory becomes full while scanning, the machine can make copies of those
already scanned, and then automatically resume scanning remaining originals.
You can enable or disable this function.
Note
❒ If you select [Off]:
• When memory becomes full, the machine stops operations allowing
you to remove copies delivered to the output tray.
❒ If you select [On]:
• You can leave the machine unattended to make all the copies, but resulting pages will not be sequentially ordered.
❖ Sort/Stack Shift Tray Setting
You can select to turn Shift Tray Setting on or off in sort or stack mode.
❖ Insert Separation Sheet
You can set the number of sets between Separation Sheets.
Note
❒ You can set the number from 1 set to 999 sets.
❖ Select Staple Position
You can register a frequently-used type of stapling in the top left staple key
on the initial display. You can also change the registered type.
139
User Tools (Copier/Document Server Features)
❖ Select Punch Type
You can select the type of punch.
Note
❒ The 4–hole punch type can only punch in the 4–hole format.
❖ Letterhead Setting
If you select “On” in this function, the machine rotates the image to the correct
position.
Note
❒ Orientation-fixed (top to bottom) or 2-sided paper might not be printed
correctly, depending on how the originals and paper are placed.
Reference
When using letterhead paper, pay attention to the paper orientation. See
“Orientation-Fixed Paper or 2-Sided Paper”, General Settings Guide.
4
140
5. Specifications
Combination Chart
The combination chart given below shows modes that can be used together.
When using the chart, note the explanations of the symbols, as given in the following table.
In the chart without mark means it enable to use together.
$
These modes cannot be used together. The second mode selected
will be the mode you work in.
×
These modes cannot be used together. The first mode selected will
be the mode you work in.
The following tables show the combinations of functions.
2 Sided
Staple
Punch
1 Sided 2 Sided/2 Sided
1 Sided Combine
2 Sided Combine
Book 1 Sided
Book 2 Sided
2 Sided 1 Sided
1 Sided Booklet
2 Sided Booklet
1 Sided Magazine
2 Sided Magazine
Mix 1 & 2 Sided
Repeat
Double Copy
Centering
Scanning Position
Border Erase
Center Erase
Center/Border Erase
3 Edges Full Bleed
Inside Erase
Outside Erase
Margin Adjustment
Background Numbering
Preset Stamp
User Stamp
Date Stamp
Stamp Text
Page Numbering
Covers
Designate
Chapter
Designation Sheet Copy
Blank Slip Sheets
Slip Sheets
Document Server
Sort
Separation
Stack
Function
Function selected first
Function
Original Orientation ( Standard Orientation)
Batch Mode
Mixed Sizes
Custom Size Originals
SADF Mode
Thin Mode
Face Up
Auto Image Density
Dark Background
Manual Image Density
Original Type Setting
Auto Paper Select
Manual Paper Select
Reduce/Enlarge
Create Margin
Zoom
Auto Reduce/Enlarge
Size Magnification
Directional Magnification(%)
Directional Size Magnification(inch)
Function selected after
Original Orientation
(Standard Orientation)
Batch Mode
Mixed Sizes
Custom Size Originals
SADF Mode
Thin Mode
Face Up
Auto Image Density
Dark Background
Manual Image Density
Original Type Setting
Auto Paper Select
Manual Paper Select
Reduce/Enlarge
Create Margin
Zoom
Auto Reduce/Enlarge
Size Magnification
Directional Magnification(%)
Directional Size Magnification (inch)
Sort
Separation
Stack
Staple
Punch
1 Sided 2 Sided/2 Sided 2 Sided
1 Sided Combine
2 Sided Combine
Book 1 Sided
Book 2 Sided
2 Sided 1 Sided
1 Sided Booklet
2 Sided Booklet
1 Sided Magazine
2 Sided Magazine
Mix 1 & 2 Sided
Repeat
Double Copy
Centering
Scanning Position
Border Erase
Center Erase
Center/Border Erase
3 Edges Full Bleed
Inside Erase
Outside Erase
Margin Adjustment
Background Numbering
Preset Stamp
User Stamp
Date Stamp
Stamp Text
Page Numbering
Covers
Designate
Chapter
Designation Sheet Copy
Blank Slip Sheets
Slip Sheets
Document Server
*1 You cannot use Top 2 and Saddle stich of Staple position with Standard
Punch position. You cannot use Top, Top Slant or Bottom with 90 turn
Punch position.
ZJBX130E
141
Specifications
Supplementary Specifications
❖ Mixed Size mode
• Copy and scanning speed may be reduced.
❖ Multi Bypass Tray Copy
• The following paper sizes can be selected:
A3L, B4L, A4LK, B5KL, A5KL, 11" × 17"L, 11" × 15"L, 10" × 14"L,
81/2" × 14"L, 81/2" × 13"L, Letter (81/2" × 11")KL, 81/4" × 13"L, 51/2" ×
81/ 2"KL, 8" × 13"L, 8" × 10 1/ 2"L, 8" × 10"L, 12" × 18"L, 71/4" ×
101/2"LK, 8KL, 16KKL
• You can place copy paper up to the indicated with the limit mark.
❖ Preset Reduce/Enlarge
• You can select one of 12 preset ratios (five enlargement ratios, seven reduction ratios).
• You can select a ratio regardless of original size or copy paper. With certain
ratios, part of the image might not be copied or margins will appear.
• Copies can be reduced or enlarged as follows:
• Metric version
5
Ratio (%)
Original → Copy paper size
400 (enlarge area by 16)
--
200 (enlarge area by 4)
A5→A3, A6→A4, B6→B4
141 (enlarge area by 2)
A4→A3, A5→A4, A6→A5, B5→B4, B6→B5
122
F→A3, A4→B4
115
B4→A3
93
--
82
F→A4, B4→A4
75
B4→F4, B4→F
1
142
71 (reduce area by /2)
A3→A4, A4→A5
65
A3→F
50 (reduce area by 1/4)
A3→A5, F→A5
25
--
Supplementary Specifications
• Inch version
Ratio (%)
Original → Copy paper size
400 (enlarge area by 16)
--
200 (enlarge area by 4)
51/2" × 81/2"→11" × 17"
155 (enlarge area by 2)
51/2" × 81/2"→81/2" × 14"
129
81/2" × 11"→11" × 17"
121
81/2" × 14"→11" × 17"
93
--
85
F→81/2" × 11"
78
81/2" × 14"→81/2" × 11"
73
11" × 15"→81/2" × 11"
65
11" × 17"→81/2" × 11"
50 (reduce area by 1/4)
11" × 17"→51/2" × 81/2"
25
--
5
❖ Zoom
• Specifiable reproduction ratios are between 25 – 400%.
• You can select a ratio regardless of original size or copy paper. With certain
ratios, parts of the image might not be copied or margins will appear.
❖ Auto Reduce/Enlarge
• Specifiable reproduction ratios are between 25 – 400%.
❖ Size Magnification
• If the calculated ratio is over maximum or under the minimum ratio, it is
automatically adjusted to within available range. However, with certain
ratios, parts of the image might not be copied or margins will appear.
• Specifiable reproduction ratios are between 25 – 400%.
❖ Directional Size Magnification
• Specifiable reproduction ratios are between 25 – 400%.
• When entering a percentage ratio, you can specify any value within the
permitted range, regardless of original size or copy paper. However, depending on settings and other conditions, part of the image may not be
copied, or margins will appear.
• When entering a size in mm, if the calculated ratio is over maximum or under minimum ratio, it is automatically adjusted to within available range.
However, with some ratios, parts of the image might not be copied or margins will appear.
143
Specifications
❖ Sort
The number of copies that can be placed on the tray is as follows. When the
number exceeds capacity, remove copies from the tray.
Finisher 3000B(100– sheet staples)
Paper size and orientation
5
Number of
copies
Finisher upper tray
A4KL, B5KL, A5KL, 81/2" × 11"KL, 51/2" × 81/2"KL
500 sheets
A3L, B4L, 11" × 17"L, 81/2" × 14"L, 12" × 18"L
250 sheets
Finisher shift tray
A4K, B5K, 81/2" × 11"K
3, 000
sheets
A3L, B4L, A4L, B5L, 11" × 17"L, 81/2" × 14"L, 81/2" × 11"L, 12"
× 18"L
1, 500
sheets
A5K, 51/2" × 81/2"K
500 sheets
A5L, 51/2" × 81/2"L
100 sheets
Finisher upper tray
A4KL, B5KL, A5KL, 81/2" × 11"KL, 51/2" × 81/2"KL
250 sheets
A3L, B4L, 11" × 17"L, 81/2" × 14"L, 12" × 18"L
50 sheets
Booklet finisher
Finisher shift tray 1
A4KL, B5KL, A5K, 81/2" × 11"KL
500 sheets
A3L, B4L, 11" × 17"L, 81/2" × 14"L, 12" × 18"L
250 sheets
A5L, 5 /2" × 8 /2"LK
100 sheets
1
1
Finisher shift tray 2
A4K, 81/2" × 11"K
2, 500
sheets
A3L, B4L, A4L, B5KL, 11" × 17"L, 81/2" × 14"L, 81/2" × 11"L,
12" × 18"L
1, 250
sheets
A5K
500 sheets
A5L, 51/2" × 81/2"L
100 sheets
Paper weight is 80 g/m2 (20 lb).
Note
❒ When using Staple function, tray capacity may be reduced.
• Paper sizes and orientations that can be used with the Sort function are
A3L, B4L, A4KL, B5KL, A5KL, 11" × 17"L, 81/2" × 14"L, 81/2" ×
11"KL and 51/2" × 81/2"KL.
144
Supplementary Specifications
• Paper sizes and orientations that can be used with the Shift Sort function
are as follows:
Paper size and orientation
Finisher 3000B (100–sheet
staples)
A3L, B4L, A4KL, B5KL, A5KL, 11" × 17"L, 81/2" ×
11"KL, 51/2" × 81/2"KL, 81/2" × 14"L, 12" × 18"L
Booklet finisher
A3L, B4L, A4KL, B5KL, A5KL, 11" × 17"L, 81/2" ×
11"KL, 51/2" × 81/2"KL
❖ Stack
• Paper sizes and orientations that can be used with the Stack function are as
follows:
Paper size and orientation
Finisher 3000B (100–sheet
staples)
A3L, B4L, A4KL, B5KL, A5KL, 11" × 17"L, 81/2" ×
11"KL, 51/2" × 81/2"KL, 81/2" × 14"L, 12" × 18"L
Booklet finisher
A3L, B4L, A4KL, B5KL, A5KL, 11" × 17"L, 81/2" ×
11"KL, 51/2" × 81/2"KL
5
❖ Staple
In the following cases, copies will be delivered to the shift tray without stapling:
• When the number of sheets for one set is above stapler capacity.
• When memory reaches 0% during copying.
• When using Double copies, or “1 Sided → 1 Sided”, “1 Sided → 2 Sided”,
“2 Sided → 1 Sided” or “2 Sided → 2 Sided” in Combine mode, select K
original for L copy and L original for K copy.
• When using Double copies, or “1 Sided 2 Pages→ 1 Sided Combine” and
“1 Sided 4 Pages→ 2 Sided Combine” in Combine mode, select K original
for L copy and L original for K copy.
• When using “Left 2” or “Top 2” with Double copies, or “1 Sided → 1 Sided”, “1 Sided → 2 Sided”, “2 Sided → 1 Sided”, or “2 Sided → 2 Sided” in
Combine mode, select K original for L copy and L originals for K copy.
• If you use the Auto Paper Select function in Mixed Size mode, the machine
selects the proper size of paper and staples it even if you place different sizes of originals. Set the size of paper you want to use in the paper tray beforehand. The sizes of the paper you can staple in Mixed Size mode are as
follows:
• A3L and A4 K
• B4 L and B5 K
• 11” × 17”L and Letter (81/2” × 11”)K
The sizes and orientations of paper you can staple and stapler capacity are
as follows.
145
Specifications
• Finisher 3000B (100–sheet staples)
Paper sizes and orientations
Stapler capacity (sheets)
A4KL, B5KL, 81/2" × 11"KL
100
A3L, B4L, 11" × 17"L, 81/2" × 14"L
50
In Mixed Size Mode
A4K/A3L, B5K/B4L, 81/2" ×
11"K/11" × 17"L
50
• Booklet finisher
Paper sizes and orientation
Stapler capacity (sheets)
1
A4KL, B5KL, 8 /2" × 11"KL
50
A3L, B4L, 11" × 17"L, 81/2" × 14"L
30
In Mixed Size Mode
A4K/A3L, B5K/B4L, 81/2" ×
11"K/11" × 17"L
5
30
Saddle stitch
A3L, B4L, A4L, 11" × 17"L, 81/2" ×
11"L
15
• When the number of copies exceeds tray capacity, copying stops. If this
happens, remove copies from the tray, and then resume copying.
The finisher capacities after stapling are as follows.
• Finisher 3000B (100–sheet staples)
Paper sizes and
Number of the sheets
Number of stapled copies
(sets)
A4KL, B5KL, 8 /2" ×
11"KL
10-100 sheets
200-30
2-9 sheets
150
A3L, B4L, 11" × 17"L,
81/2" × 14"L
10-50 sheets
150-30
2-9 sheets
150
orientation
1
• Booklet finisher
Paper sizes and orientation
Maximum number
of sheets
Maximum number
of the stapled copies (sets)
10-50 sheets
50-10
2-9 sheets
50
10-30 sheets
25-16
2-9 sheets
25
Finisher Shift Tray 1
A4K, 81/2" × 11"K
Other paper size
146
Supplementary Specifications
Paper sizes and orientation
Maximum number
of sheets
Maximum number
of the stapled copies (sets)
In the Mixed Size Mode
2-30 sheets
16
10-50 sheets
250-50
2-9 sheets
250
10-50 sheets
125-25
2-9 sheets
125
10-30 sheets
125-40
2-9 sheets
125
2-30 sheets
50
2-5 sheets
25
6-10 sheets
15
11-15 sheets
10
2-5 sheets
30
6-10 sheets
20
11-15 sheets
10
Finisher Shift Tray 2
A4K, 81/2" × 11"K
A4L, B5KL, 81/2" × 11"L
Other paper size
In the Mixed Size Mode
Saddle stitch
A4L, 81/2" × 11"L
Other paper size
5
• You cannot change stapling positions during copying.
• When the original image is rotated, stapling position turns by 90 degrees.
• When [Top] or [Bottom] is selected and paper with the same orientation as
the original is not loaded, the image is rotated and paper of the same size
and different orientation is selected.
• With certain stapling settings, you cannot use the Rotate function.
• When [Saddle Stitch] is selected, copies are stapled using the saddle stitch
stapler, folded in half and then delivered.
• When [Saddle Stitch] is selected with the Magazine function, copies are stapled using the saddle stitch stapler, folded like a magazine and then delivered.
❖ Punch
• With certain Punch function settings, the Rotate function cannot be used.
• Since punch holes are made in each copy, positions vary slightly.
• Punchable paper sizes are as follows:
147
Specifications
• Booklet Finisher
Punch unit type
2 & 4 holes type
2 holes
4 holes
4 holes type
2 & 3 holes type
4 holes
2 holes
3 holes
L
A3–A5, 11" × 17"–51/2" × 81/2"
K
A4–A5, 81/2" × 11", 51/2" × 81/2"
L
A3, B4, 11" × 17"
K
A4, B5, 81/2" × 11"
L
A3–A5, 11" × 17"–51/2" × 81/2"
K
A4–A5, 81/2" × 11", 51/2" × 81/2"
L
A3–A5, 11" × 17"–51/2" × 81/2"
K
A4–A5, 81/2" × 11", 51/2" × 81/2"
L
A3, B4, 11" × 17"
K
A4, B5, 81/2" × 11"
L
A3–A5, 11" × 17"–51/2" × 81/2"
K
A4–A5, 81/2" × 11", 51/2" × 81/2"
L
A3, 11" × 17"
K
A4, 81/2" × 11"
L
A3–B5, 11" × 17"–81/2" × 11"
K
A4–A5, 81/2" × 11", 51/2" × 81/2"
L
A3–A5, 11" × 17"–51/2" × 81/2"
K
A4–A5, 81/2" × 11", 51/2" × 81/2"
L
A3, B4, 11" × 17"
K
A4, B5, 81/2" × 11"
• Finisher 3000B (100–sheet staples)
5
Punch unit type
2 holes type(metric version)
2 holes
4 holes type(metric version)
2 & 4 holes type(metric version)
4 holes
4 holes type(narrow 2× 2 version)
4 holes
2 holes type(inch version)
3 holes type(inch version)
2 & 3 holes type(inch version)
2 holes
3 holes
❖ Duplex
• When an odd number of originals is placed in the ADF, the back of the last
page is blank.
• During copying in Mixed 1 & 2 Sided mode, the image is shifted to allow
for the binding margin. Image quality on the front and back of copies may
differe.
❖ Combine
• If the calculated ratio is under the minimum ratio, it is automatically adjusted to within available range. However, with certain ratios, parts of the
image might not be copied.
• You cannot use custom size paper.
148
Supplementary Specifications
• In this mode, the machine automatically selects the ratio. This ratio depends on copy paper size and the number of originals.
• Specifiable reproduction ratios are between 25 – 400%.
• If the orientation of originals is different from that of the copy paper, the
machine will automatically rotate the image by 90 degrees to make copies
properly.
• If the number of originals placed is less than the number specified for combining, the last page is left blank, as shown in the illustration.
❖ Copying Book Originals
• The machine sets the reproduction ratio automatically to fit paper size and
copies originals together onto the paper.
• The machine uses ratios in the range of 25 to 400%
• If the calculated ratio is under the available minimum, it will be adjusted
to minimum ratio. However, with certain ratios, parts of the image might
not be copied.
• Even if the orientation of originals is different from that of the copy paper,
the machine will automatically rotate the image by 90 degrees to make
copies properly.
• If you mix originals of different sizes or place originals in different orientations, you cannot use this function.
• Four originals are copied onto each sheet of copy paper with this function.
If the number of originals scanned is less than a multiple of four, the last
page will be blank.
• Copying to make a magazine may take some time after scanning originals.
• If the booklet finisher is installed and you select [Magazine] and [Staple (Saddle Stitch)], copies are stacked, stapled at the center, folded in half, and then
delivered.
5
149
Specifications
❖ Repeat
Depending on paper size, ratio, and orientation, parts of repeated images
may not be copied.
• If you use this function with “Custom Size Original”, you can make multiple copies of an image section by specifying the image area's vertical and
horizontal length from the base point. In this case, place your original on
the exposure glass. See p.18 “Placing custom size originals”.
1. Base point
2. Horizontal length
3. Vertical length
5
❖ Centering
Although the original is set at a different orientation to the paper, the machine
will not rotate the image by 90 degrees (Rotate copy).
❖ Erase
The width of the erased margin varies depending on the reproduction ratio.
If the size of the original is different to sizes listed in the following chart, the
erased margin might be shifted.
• Metric version
Where original is set
Paper size and orientation
Exposure glass
A3L, B4L, A4KL, B5KL, A5L, 81/2" × 14"L,
81/2" × 13"L
ADF
A3L, B4L, A4KL, B5KL, A5KL, 81/2" × 13"L
• Inch version
Where original is set
Paper size and orientation
Exposure glass
11" × 17"L, 81/2" × 14"L, 81/2" × 11"KL, 10" ×
14"L, 8" × 10"L
ADF
11" × 17"L, 81/2" × 14"L, 81/2" × 11"KL, 10" ×
14"L, 51/2" × 81/2"L
You can erase two parts using “Erase Inside 1” with “Erase Inside 2”.
150
Supplementary Specifications
❖ Margin Adjustment
If you set a binding margin too wide, part of the image may not be copied.
When making copies in Combine mode, the binding margin is added to copies after the combination is finished.
❖ Preset Stamp
• You can change the size and density of the stamp with User Tools.
Depending on paper size, if you change the stamp size, part of the stamp
may not be printed.
• When you use this function with the Magazine or Booklet function, you
can print the stamp only on the first page.
❖ Date Stamp
• When using Combine mode, the date stamp is printed as follows:
03/03/2003
5
• When using the Magazine or Booklet function, the date stamp is printed as
follows:
03/03/2003
03/03/2003
❖ Page Numbering
When page numbering is used with Combine mode, page numbers are printed as follows:
• Page Numbering per original:
Combined with 1 Sided/2 Sided in the Combine function
Combined with the Magazine or Booklet function
151
Specifications
• Page Numbering per copy:
Combined with 1 Sided/2 Sided in the Combine function
If you combine this function with the Duplex (Top to Top) function and select
the “P1, P2” or “1/n, 2/n” format, page numbers on the back are printed as
follows:
5
1
2
GCSTMPBE
1. Front
2. Back
❖ Front Cover, Front/Back Cover
• In “Cover Sheet Tray” of User Tools (System Settings), if you selected [On
Mode Select] for [Display Setting], the machine refers to the settings in “Cover
Sheet Tray” to ascertain whether the front and back covers are copied onesided or two-sided. If you selected [Always Display] for [Display Setting], the
machine refers to the settings in “Paper Type” to ascertain whether the
front and back covers are copied one-sided or two-sided. See “Paper Tray
Settings” “Paper Type” and “Cover Sheet Tray”, General Settings Guide.
• If Blank mode is selected, the cover is not counted as a copy.
❖ Designate
• When [Combine (1 Sided→
→2 Sided)] has been selected, specified pages will always be copied on the front of copies, as in Chapters mode.
• In “Cover Sheet Tray” of User Tools (System Settings), if you selected [On
Mode Select] for [Display Setting], the machine refers to the settings in “Cover
Sheet Tray” to ascertain whether the front and back covers are copied onesided or two-sided. If you selected [Always Display] for [Display Setting], the
machine refers to the settings in “Paper Type” to ascertain whether the
front and back covers are copied one-sided or two-sided. See “Paper Tray
Settings” “Paper Type” and “Cover Sheet Tray”, General Settings Guide.
• If Blank mode is selected, the designate sheet is not counted as a copy.
152
Supplementary Specifications
❖ Slip Sheets
When not copying onto slip sheets, the sheets are not counted as copies.
• In “(Cover Sheet Tray)” of Tray Paper Settings, if you selected [On Mode Select] for [Display Setting], the machine refers to the settings in “Cover Sheet
Tray” to ascertain whether the front and back covers are copied one-sided
or two-sided. If you selected [Always Display] for [Display Setting], the machine refers to the settings in “Paper Type” to ascertain whether the front
and back covers are copied one-sided or two-sided. See “Paper Tray Settings” “Paper Type” and “Cover Sheet Tray”, General Settings Guide.
• Tab stock are possible to use as slip sheets.
5
153
INDEX
C
1 sided → 2 sided, 53
1 sided combine
1 sided 2 pages → combine 1 side, 56
1 sided 4 pages → combine 1 side, 56
1 sided 8 pages → combine 1 side, 57
2 sided 1 page → combine 1 side, 57
2 sided 2 pages → combine 1 side, 57
2 sided 4 pages → combine 1 side, 58
2 sided → 2 sided, 53
2 sided combine
1 sided 16 pages → combine 2 side, 60
1 sided 4 Pages → combine 2 side, 60
1 sided 8 pages → combine 2 side, 60
2 sided 16 pages → combine 2 side, 61
2 sided 4 pages → combine 2 side, 61
2 sided 8 pages → combine 2 side, 61
A
Adjusting
copy image density, 31
Auto
image density, 31
paper select, 33
paper select priority, 121
reduce/enlarge, 37, 143
start, 21
tray switching, 127
Auto paper select, 34
Auto Reduce/Enlarge, 143
B
Basic procedure, 19
Batch mode, 15
Booklet Finisher, 148
Booklet finisher, 146
Book originals, copying, 65
Border erase, 76
Bypass tray, 27
154
Center/border erase, 77
Centering, 150
Change
date format, 103
stamp position, 99, 103
Changing
number of sets, 44
stamp density, 97
stamp position, 105
stamp position, size and density, 97
stamp size, 97
stored program, 113
Chapters, 89
Clear key, 5
Clear Modes/Energy Saver key, 4
Combination chart, 141
Combine, 148
Combined auto and manual image density, 31
Control Panel, 4
Copier/document server features, 121
Copy functions, 31
1 sided combine, 56
2 sided combine, 60
adjusting copy image density, 31
auto reduce/enlarge, 37
centering, 85
covers, 86
date stamp, 101
directional magnification (%), 40
directional magnification (inch), 41
double copies, 82
duplex, 53
image repeat, 83
margin adjustment, 74
page numbering, 103
preset reduce/enlarge, 35
preset stamp, 95
selecting copy paper, 33
selecting original type setting, 32
series copies, 63
size magnification, 39
slip sheets, 93
sort, 42
stack, 46
Staple, 46
user stamp, 98
zoom, 36
Copying, 19
auto start, 21
Book Originals, 149
interrupt copy, 21
job preset, 22
L eft original beeper, 22
Copying Book Originals, 149
Copying from the bypass tray
onto custom size paper, 29
onto special paper, 30
onto standard size paper, 29
Copying from the multi bypass tray (Tray 7)
onto custom size paper, 27
Covers
Front, 86
front/back, 87
Create margin mode, 36
D
Date stamp, 137, 151
change position, 103
change style, 103
font, 138
position, 138
position and original orientation, 102
size, 138
stamp format, 137
superimpose, 138
Deleting
program, 114
user stamp, 101
Designate, 152
Directional Size Magnification, 143
Display Panel, 5
Document server, 110
Duplex, 148
E
Edit, 122, 131
1→2 sided auto back side margins − T to
B, 132
1→2 sided auto back side margins − T to
T, 132
back side margin − left/right, 131
back side margin − top/bottom, 132
copy order in combine, 135
double copies separation line, 133
erase border width, 132
erase center width, 132
erase original shadow in combine, 132
front cover copy in combine, 135
front page margin − left/right, 131
front side margin − top/bottom, 132
image repeat separation line, 133
separation line in combine, 134
Erase, 75, 150
border, 75
border width, 132
center/border, 75
center width, 132
original shadow in combine, 132
Exposure glass, 7
F
Finisher 3000B (100–sheet staples), 146, 148
Finisher 3000B(100–sheet staples), 146
Font, 137
Format, 137
Front Cover, Front/Back Cover, 152
155
G
General features, 121, 126
auto paper select priority, 126
auto tray switching, 127
change initial mode, 126
copy orientation in duplex mode, 126
duplex mode priority, 126
max. number of sets, 126
original orientation in duplex mode, 126
original type priority, 126
Generation, 32
I
Inch version, 150
Input/Output, 139
auto sort, 139
letterhead setting, 140
memory full auto scan restart, 139
SADF auto reset, 139
Interrupt key, 4
M
Manual image density, 31
Manual paper select, 34
Manuals for This Machine, i
Margin Adjustment, 151
Messages, 115
Metric Version, 150
Mixed Size mode, 142
Mixed size mode, 16
Multi Bypass tray copy, 142
N
Number keys, 5
O
OHP Transparencies, 25
Original
beeper, 22
combine, 58
copy orientation, 54
orientation, 10
orientation and completed copies, 55
orientation in duplex mode, 126
type priority, 126
Originals, 7
156
P
Page numbering, 137, 151
duplex back page stamping position, 138
first printing page, 105
font, 138
page numbering in combine, 138
position, 105
position and original orientation, 98
size, 138
stamp format, 137
stamp on designated slip sheet, 138
stamp position, 138
start number, 105
superimpose, 138
Pale, 32
Photo, 32
Placing
custom size originals, 18
originals, 7, 10, 13, 14, 18
originals in document feeder, 14
originals on exposure glass, 13
Preset Reduce/Enlarge, 142
Preset stamp, 136, 151
changing density, 97
changing position, 97
changing size, 97
format, 136
language, 136
position and original orientation, 96
priority, 136
Program key, 5
Programs, 112
Punch, 147
Punching copies, 50
R
Recalling a program, 114
Repeat, 150
Reproduction ratio, 122, 131
create margin ratio, 131
shortcut R/E, 131
Rotated copy, 34
S
SADF mode, 16
Sample copy, 43
Sample Copy key, 5
Screen Contrast Knob, 4
Selecting
copy paper, 33
original type setting, 32
Size, 137
Size Magnification, 143
Slip Sheets, 153
Sort, 144
Specifications, 141
Stack, 46, 145
Stamp, 136
date stamp, 101
format, 136, 137
language, 136
page numbering, 103
position, 137
position and orientation of originals, 104
position and original orientation, 98, 102
preset stamp, 95
priority, 136
setting, 137
user stamp, 98
Staple, 145
Stapling position and original setting, 48
Start key, 5
Stop, 5
Storing
originals, 110
program, 112
Superimpose, 137
Supplementary specifications, 142
Erase, 150
Margin Adjustment, 151
System indicators, 5
T
Text, 32
Thin mode, 17
Troubleshooting, 115
you cannot make clear copies, 116
you cannot make copies as you want, 117
your machine does not operate as you
want, 115
Types of duplex copies, iv
U
User stamp, 137
changing position, 99
delete, 101
format, 137
position and original orientation, 98
program, 99
program/delete, 137
User tools, 121
User Tools/Counter key, 5
W
What you can do with this machine, iv
Z
Zoom, 143
157
MEMO
158
MEMO
159
MEMO
160
EN
USA
B071-8607