1
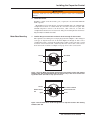
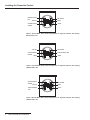
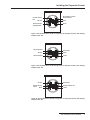
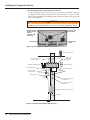
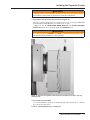
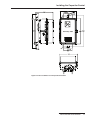
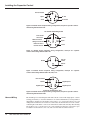
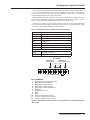
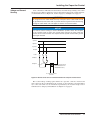
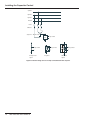
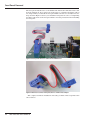
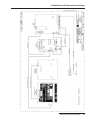
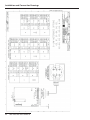
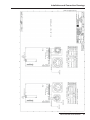
S&C IntelliCap® 2000 Automatic Capacitor Control
Installation
Table of Contents
SectionPage
SectionPage
Introduction
Installing the Capacitor Control
Qualified Persons . . . . . . . . . . . . . . . . . . . . . . . . . . . . . .
Read this Instruction Sheet . . . . . . . . . . . . . . . . . . . . . .
Retain this Instruction Sheet. . . . . . . . . . . . . . . . . . . . . .
Warranty. . . . . . . . . . . . . . . . . . . . . . . . . . . . . . . . . . . . .
2
2
2
2
On-Site Installation. . . . . . . . . . . . . . . . . . . . . . . . . . . . . 6
Meter Base Mounting. . . . . . . . . . . . . . . . . . . . . . . . . . . 7
Bracket Mounting . . . . . . . . . . . . . . . . . . . . . . . . . . . . . 12
Harness Wiring. . . . . . . . . . . . . . . . . . . . . . . . . . . . . . . 14
Voltage Sensing Source. . . . . . . . . . . . . . . . . . . . . . . . 16
Voltage and Current Sensing . . . . . . . . . . . . . . . . . . . . 17
Energize and Test the Control. . . . . . . . . . . . . . . . . . . . 19
Communication Equipment. . . . . . . . . . . . . . . . . . . . . . 20
Connecting Communication Hardware. . . . . . . . . . . . . 21
Safety Information
Understanding Safety-Alert Messages. . . . . . . . . . . . . . 3
Following Safety Instructions . . . . . . . . . . . . . . . . . . . . . 3
Replacement Instructions and Labels . . . . . . . . . . . . . . 3
Pre-Installation Instructions
Applicable Software . . . . . . . . . . . . . . . . . . . . . . . . . . . . 4
Pre-Installation Checklist. . . . . . . . . . . . . . . . . . . . . . . . . 4
Optional In-Shop Setup Steps . . . . . . . . . . . . . . . . . . . . 5
Front Panel Removal. . . . . . . . . . . . . . . . . . . . . . . . . . 22
Installation and Connection Drawings. . . . . . . . . . 23
NOTICE
T h e l a te s t I n te l l i Ca p 2 0 0 0 I n s t r u c t i o n S h e e t s a re p o s te d a s P D F fi l e s a t s a n d c . c o m /
support/product-literature.asp IntelliCap 2000 soft ware (all revisions) can be downloaded at
sandc.com/support/automation-customer-support-portal.asp If you need assistance, please contact
[email protected] or phone (800) 621-5546.
October 20, 2014© S&C Electric Company
Instruction Sheet 1024-510
Introduction
Qualified Persons
WARNING
The equipment covered by this publication must be installed, operated, and maintained by
qualified persons who are knowledgeable in the installation, operation, and maintenance
of overhead electric power distribution equipment along with the associated hazards.
A qualified person is one who is trained and competent in:
• The skills and techniques necessary to distinguish exposed live parts from non-live
parts of electrical equipment.
• The skills and techniques necessary to determine the proper approach distances
corresponding to the voltages to which the qualified person will be exposed.
• The proper use of the special precautionary techniques, personal protective equipment, insulating and shielding materials, and insulated tools for working on or near
exposed energized parts of electrical equipment.
These instructions are intended only for such qualified persons. They are not intended
to be a substitute for adequate training and experience in safety procedures for this type
of equipment.
Read this
Instruction Sheet
Thoroughly and carefully read this instruction sheet before programming, operating, or
maintaining your S&C IntelliCap 2000. Familiarize yourself with the safety information
on page 3. The latest version of this instruction sheet is available online in PDF format
at sandc.com/support/product-literature.asp
Retain this
Instruction Sheet
This instruction sheet is a permanent part of your S&C IntelliCap 2000. Designate a
location where you can easily retrieve and refer to this publication.
Warranty
The standard warranty contained in seller’s standard conditions of sale, as set forth in
Price Sheet 150, applies to IntelliCap 2000 Controls, except that the first and second
paragraphs of said warranty are replaced by the following:
(1) General: Seller warrants to immediate purchaser or end user for a period of
10 years from the date of shipment that the equipment delivered will be of the kind and
quality specified in the contract description and will be free of defects of workmanship and
material. Should any failure to conform to this warranty appear under proper and normal
use within ten years after the date of shipment the seller agrees, upon prompt notification thereof and confirmation that the equipment has been stored, installed, operated,
and maintained in accordance with recommendations of the seller and standard industry
practice, to correct the nonconformity either by repairing any damaged or defective parts
of the equipment or (at seller’s option) by shipment of necessary replacement parts. The
seller’s warranty does not apply to any equipment that has been disassembled, repaired,
or altered by anyone other than the seller. This limited warranty is granted only to the
immediate purchaser or, if the equipment is purchased by a third party for installation in
third-party equipment, and end user of the equipment. The seller’s duty to perform under
any warranty may be delayed, at the seller’s sole option, until the seller has been paid
in full for all goods purchased by the immediate purchaser. No such delay shall extend
the warranty period.
2 S&C Instruction Sheet 1024-510 Safety Information
Understanding
Safety-Alert Messages
There are several types of safety-alert messages which may appear throughout this
instruction sheet as well as on labels attached to the IntelliCap 2000. Familiarize yourself with these types of messages and the importance of the various signal words, as
explained below.
DANGER
“DANGER” identifies the most serious and immediate hazards which will likely result
in serious personal injury or death if instructions, including recommended precautions,
are not followed.
WARNING
“WARNING” identifies hazards or unsafe practices which can result in serious personal
injury or death if instructions, including recommended precautions, are not followed.
CAUTION
“CAUTION” identifies hazards or unsafe practices which can result in minor personal
injury or product or property damage if instructions, including recommended precautions, are not followed.
NOTICE
“NOTICE” identifies important procedures or requirements that can result in product or
property damage if instructions are not followed.
Following
Safety Instructions
If you do not understand any portion of this instruction sheet and need
assistance, contact your nearest S&C Sales Office or S&C Authorized Distributor.
Their telephone numbers are listed on S&C’s website sandc.com Or call
S&C Headquarters at (773) 338-1000; in Canada, call S&C Electric Canada Ltd.
at (416) 249-9171.
NOTICE
Read this instruction sheet thoroughly and carefully
before installing or operating your S&C IntelliCap 2000
Automatic Capacitor Control.
Replacement
Instructions and
Labels
If you need additional copies of this instruction sheet, contact your nearest
S&C Sales Office, S&C Authorized Distributor, S&C Headquarters, or
S&C Electric Canada Ltd.
It is important that any missing, damaged, or faded labels on the equipment
be replaced immediately. Replacement labels are available by contacting your
nearest S&C Sales Office, S&C Authorized Distributor, S&C Headquarters, or
S&C Electric Canada Ltd.
S&C Instruction Sheet 1024-510 3
Pre-Installation Instructions
Applicable Software
This instruction sheet was prepared for use with IntelliCap 2000 Software:
IC2000Installer-1.1.x or higher.
You can find software identification on the IntelliLink® Software Setup > General >
Software Versions screen. For questions regarding the applicability of information in
this instruction sheet to future product releases, please contact S&C Electric Company.
Pre-Installation
Checklist
Before you install the IntelliCap 2000 Control, carry out the following steps in the shop.
1. Inspect the control for visible damage.
Make sure there is no obvious damage to the control enclosure or any internal
components.
2. Required sensor cable(s).
With VAR, neutral current, or neutral voltage sensing, the control may require a
connection cable for the sensors. Be sure you have the correct sensor cables for
this installation.
3. Required setup software and equipment.
To install IntelliRupter Software on your computer you will need:
a.A portable PC computer with Microsoft® Windows® 7,an Intel® Core™ i7
Processor with 8GB of Ram (recommended), or a Dual-Core Processor with 4GB
Ram (minimum), a wireless card when using the WiFi configuration option
(onboard or USB), an internet browser, and access to sandc.com
Windows® XP can no longer be supported by S&C since Microsoft® has discontinued that operating system. However, if up wish to attempt to use it you will
need Microsoft® Windows® XP Service Pack 3 (or higher).
b. Administrative Privileges.
c. Microsoft.Net Framework Version 4.5. You can verify that it has been installed on
your computer by opening C:\Windows\Microsoft.Net\Framework with
Windows Explorer. If v4.5 has not been installed, download it from this link:
microsoft.com/net.
Those attempting to use Windows XP SP3 should note that Windows XP SP3 uses
Microsoft .Net v4.0 and .Net v4.02. Install v4.0 first, then v4.02. If the correct version of .Net is not detected by the installer, it will not install IntelliLink6.
d.Windows Installer 3.1 (Only required by Microsoft® Windows® XP Service
Pack 3.)
To verify that you have Windows Installer 3.1:
• Click the Windows Start button and open Settings > Control Panel
• Double Click: Add or Remove Programs
• Scroll down the list and verify that Windows Installer 3.1 is present.
e. Windows WZC–Wireless Zero Configuration (recommended)
To verify that you have Windows Wireless Zero Configuration:
• Click the Windows Start button and open Settings > Control Panel
• Double Click: Administrative Tools
• Double Click: Services
• Scroll down the list and verify that Wireless Zero Configuration is present.
f. Windows PowerShell 2.0 is set for an execution policy of AllSigned. Execution
policies of RemoteSigned and Unrestricted will also work. Policy selection
should be based on security policy set forth by your IT department. The AllSigned
execution policy will result in the appearance of a dialog, shown in Figure 1 on
page 5, after a firmware upgrade has begun. In order to perform the firmware upgrade the Run once or Always run button must be selected. Selection should be
based on the security policy set forth by your IT department. Windows PowerShell 2.0 is preinstalled on Windows 7 and 8, but will need to be downloaded for
Windows XP. Windows PowerShell 2.0 can be downloaded from this link:
4 S&C Instruction Sheet 1024-510 Pre-Installation Instructions
support.microsoft.com/kb/968929.
To set and verify the execution policy you will need to be logged in as an administrator. The procedure is as follows:
• Click the Windows Start button and open All Programs > Accessories >
Windows PowerShell > Windows PowerShell (x86) to start the application
• In the PowerShell console type: set-executionpolicy AllSigned to set the policy
• In the PowerShell console type: get-executionpolicy to verify the policy setting.
4. Communication equipment for this control.
Depending on the location of your installation, you may also need one or more
repeater radios to enable communication between the control and the SCADA
Master Station. For more details, see the manufacturer’s documentation for your
communication system.
5. Do one of the following:
•Go to the installation site and install the IntelliCap 2000, then configure the control
as described in Setup Instruction Sheet 1024-530.
•Complete the configuration steps summarized below, while you are in the shop,
then install the control at the site.
Optional In-Shop
Setup Steps
The following steps can be completed while you are still in the shop or later at the
installation site.
1. Install the IntelliLink software on your computer.
For details, see Install the IntelliLink Software in the Setup Instruction Sheet
1024-530. Select Always Run in the Confirmation dialog box, see Figure 1.
Figure 1. Firmware Upgrade Confirmation dialog box.
2. If this control is part of a SCADA system, configure the communication
equipment.
3. Configure the control software.
You can complete most of the software setup while you are still in the shop. For an
explanation of how to configure the software, see Setting Up the Capacitor Control
in the Setup Instruction Sheet 1024-530.
S&C Instruction Sheet 1024-510 5
Installing the Capacitor Control
On-Site Installation
1. Read the following warnings before you install or operate this equipment.
WARNING
This control is connected to capacitors operating at primary voltage levels. High
voltage may be present in the wiring to the control or the control itself during certain malfunctions of the capacitor bank wiring or grounding system, or due to a
malfunction of the capacitor bank itself. For this reason, access to the control should be
treated with the same safety precautions that would be applied when accessing other
high voltage lines and equipment. Follow all locally approved safety procedures when
working on or around this control.
When open circuited, current transformers can produce high voltages that can
result in injury or death. Proper shorting hardware and operating procedures are
required for safe operation. The current transformer must be shorted before installing
or removing the control. This control does NOT provide for shorting of the current
transformer.
WARNING
Do not energize the 110- to 240-Vac power source entering the control enclosure until
all wiring is complete.
Do not plug the sensor cable into the control until called for in the instructions.
Do not enable communications by connecting radios, fiber optic cables, or
dedicated phone lines until this is called for in the instructions.
Before attempting to access an existing installation, check carefully for visible or
audible signs of electrical or physical malfunction—do this before touching or operating the control or any other part of the installation. These warning signs include such
things as smoke, fire, open fuses, crackling noises, loud buzzing, etc. If a malfunction is
suspected, treat all components of the installation, including the control and associated
mounting hardware, as if they were elevated to primary (HIGH) voltage.
You must follow the sequence of installation steps outlined in this instruction sheet to
insure a safe and successful control installation.
2. Remove the load fuse.
Remove the 10-A fuse near the lower right corner of the faceplate. See Figure 2.
Load fuse
Test points
Terminal strip
Figure 2. Load fuse on the faceplate.
6 S&C Instruction Sheet 1024-510 Installing the Capacitor Control
WARNING
Leave the 10-A fuse out until instructed to replace it later in the installation
process.
3. Install the control.
Install the control on the meter base, pole, or panel, in a location with minimum
traffic exposure.
All IntelliCap 2000 Controls have an internal terminal strip; the terminal strip
configuration is shown on a label inside the enclosure below the faceplate. The
terminal strip wires connect to the meter base, cable connector, or cable wire
configurations shown below. A meter base with pole mounting bracket and meter
ring assembly is available from S&C.
Meter Base Mounting
1. Confirm that your meter base socket is wired correctly for this control.
The required socket wiring for a four-jaw plug is shown in Figure 3. The wiring for
each type of six-jaw meter base is shown in Figures 4 through 10. The correct
configuration for the control is also indicated by a label on the back of the control
enclosure. A meter base mount control may also have sensor cable connectors on
the bottom of the enclosure. See Figure 11 on page 10 for connector locations.
AC line
Open
AC neutral
Close
Figure 3. Four-Jaw Meter Base Socket Configuration for Capacitor Controls with Catalog
Number Suffix -J40. Catalog Number Suffix -J41 reverses only ac line and ac neutral. Catalog Number Suffix -J42 reverses only open and close.
AC line
Neutral sensor
hot
Open
AC / sensor neutrals
Current sensor hot
Close
Figure 4. Six-Jaw Meter Base Socket Configuration for Capacitor Controls with Catalog
Number Suffix -J60.
S&C Instruction Sheet 1024-510 7
Installing the Capacitor Control
Current sensor
hot
AC line
AC neutral
Current sensor
neutral
Close
Open
Figure 5. Six-Jaw Meter Base Socket Configuration for Capacitor Controls with Catalog
Number Suffix -J61.
AC line
Current sensor
neutral
Open
AC neutral
Current sensor hot
Close
Figure 6. Six-Jaw Meter Base Socket Configuration for Capacitor Controls with Catalog
Number Suffix -J62.
Current sensor
neutral
AC line
AC neutral
Current sensor
hot
Close
Open
Figure 7. Six-Jaw Meter Base Socket Configuration for Capacitor Controls with Catalog
Number Suffix -J63.
8 S&C Instruction Sheet 1024-510 Installing the Capacitor Control
Current sensor
hot
AC line
Current sensor
hot (alternate)
AC neutral & current
sensor neutral
Open
Close
Figure 8. Six-Jaw Meter Base Socket Configuration for Capacitor Controls with Catalog
Number Suffix -J64.
Not connected
AC neutral
AC line
Open
Not connected
Close
Figure 9. Six-Jaw Meter Base Socket Configuration for Capacitor Controls with Catalog
Number Suffix -J65.
AC line
Neutral sensor
return
Open
AC neutral
Neutral sensor hot
Close
Figure 10. Six-Jaw Meter Base Socket Configuration for Capacitor Controls with Catalog
Number Suffix -J68.
S&C Instruction Sheet 1024-510 9
Installing the Capacitor Control
2. Connect ground lug on the bottom of the control.
Use the ground lug on the bottom of the control enclosure to ground the enclosure.
See Figures 11 and 12. The ground lug will accommodate up to #2 copper or aluminum, solid or stranded wire. Ground impedance must be 25 ohms or less to properly
protect the equipment.
WARNING
The control must be properly grounded. You must read and understand all applicable
grounding codes and requirements for your service area before installing this device.
Neutral current/
neutral voltage
lockout
indicator LED
(optional)
Sensor input
connectors
Ground lug
Temperature
sensor
Figure 11. Ground Lug on the bottom of the enclosure.
Single-phase current sensor
Current sensor
connection to
junction box
Current sensor connection
to common neutral
Single-phase voltage transformer
Junction
box
VT sensing/power cable
Cap bank connection
to common neutral
Capacitor bank switch
Switch close/open cable
Neutral sensor
Common neutral
Neutral sensor connection
to junction box
Junction box connection
to control
S&C IntelliCap 2000 Automatic Capacitor Control
Ground lug
Figure 12. Grounding the IntelliCap 2000 enclosure.
10 S&C Instruction Sheet 1024-510 Installing the Capacitor Control
WARNING
If lightning arresters are installed their ground path must not go through the Neutral
Current Sensor. Connect them to ground on the earth side of the Sensor.
3. Plug control into the meter base socket. See Figure 13.
When the control is plugged into an energized meter base, all faceplate LEDs light
momentarily. The LCD will start to scroll after a few seconds.
Make sure that the OPERATION MODE MANUAL and SCADA CONTROL
LOCAL LEDs are lit. If not, press the applicable CHANGE button.
WARNING
The control must be set to MANUAL and LOCAL to avoid unexpected operation of the
capacitor bank during installation or setup operations.
Figure 13. Side view of capacitor control enclosure and meter base, with a snap ring
and crimp lock.
4. Lock control to meter base.
Use your standard procedure for a locking ring, snap ring, crimp lock, etc., and lock
the control to the meter base.
5. Go to “Connecting Sensors,” on page 16.
S&C Instruction Sheet 1024-510 11
Installing the Capacitor Control
Bracket Mounting
Attach the control to the pole with either lag bolts for a wood pole, or metal straps for a
concrete or metal pole. See Figure 13 on page 11. Then connect the cable as described
below.
For a Metal or Concrete Pole
1. Pass a stainless-steel strap, or clamp, through the two upper mounting slots
in the bracket. Pass a second strap through the two lower mounting slots.
See Figure 14 on page 13.
2. Lift the control into position on the pole, then support the control while you
tighten the upper and lower straps around the pole. Go to Step 5.
For a Wood Pole
1. Use two ½-inch through-bolts or lag bolts, and flat washers if necessary.
Drill a hole for the top bolt, or start the top lag screw.
2. Support the control and install the top bolt to hold the control on the pole, or
hang the control on the top lag screw.
3. Vertically align the control on the pole and drill the bottom hole. Install the
bottom bolt, or lag screw.
4. Tighten the two bolts or lag screws.
5. Confirm that the cable from the switch and power source is wired correctly
for the connector on your control.
The wiring options for the connector are shown in Figures 15 through 18 on page 14.
The configuration used in this control is also shown on a label inside the enclosure.
The bracket mounted control has additional sensor cable connector(s) mounted on
the bottom of the enclosure. See Figure 11 on page 10.
6. Connect ground lug on the bottom of the control.
Use the ground lug on the bottom of the control enclosure to ground the enclosure.
See Figures 11 and 12 on page 10. The ground lug will accommodate up to #2 copper
or aluminum, solid or stranded wire.
WARNING
The control must be properly grounded. You must read and understand all
applicable grounding codes and requirements for your service area before installing
this device.
7. Connect the cable from the junction box to the connector on the bottom of
the capacitor control.
When an energized cable is connected to the control, all faceplate LEDs light
momentarily. The LCD will start to scroll after a few seconds.
Make sure that the OPERATION MODE MANUAL and SCADA CONTROL
LOCAL LEDs are lit. If not, press the applicable CHANGE button.
WARNING
The control must be set to MANUAL and LOCAL to avoid unexpected operation of the
capacitor bank during installation or setup operations. Note that if the control uses dialup software, it may still be operated remotely.
8. Go to “Connecting Sensors,” starting on page 17.
12 S&C Instruction Sheet 1024-510 Installing the Capacitor Control
IntelliCap® 2000
Figure 14. Enclosure dimensions with pole-mount bracket.
S&C Instruction Sheet 1024-510 13
Installing the Capacitor Control
Not connected
Open
Ac line
Close
Ac neutral
Connector Configuration—M1
Figure 15. Bracket mount receptacle wiring configuration, five-pin for capacitor controls
with Catalog Number Suffix -M1.
Ac neutral and shield ground
F
Ac line
B
Neutral current/
voltage sensor hot
Return for line &
neutral sensors
A
E
Line current
sensor hot
D
G
Open
C
Close
Connector wiring
Configuration—M3
Figure 16. Bracket mount receptacle
configuration, seven-pin for capacitor
controls with Catalog Number Suffix -M3.
Shield
Sensor
return
Sensor
hot
Connector Configuration—M5
Figure 17. Bracket mount receptacle wiring configuration, three-pin for capacitor
controls with Catalog Number Suffix -M5, -M7, or -K1.
Not connected
Return
Digital input 1
Digital input 3
Digital input 2
Connector Configuration—M11
Figure 18. Bracket mount receptacle wiring configuration, five-pin for capacitor controls
with Catalog Number Suffix -M11.
Harness Wiring
The IntelliCap 2000 Standard plus VAR and Current Control with single-phase current
sensing provided by a customer furnished 0-5A Current Transformer, Catalog Number
240164-J67 is designed for mounting on the surface of a control panel. It has a special
wiring harness which has seven three-foot wires that exit from the bottom of the control.
A shorting block should be connected to this harness and mounted nearby. The shorting
block allows you to safely remove the control without leaving the CT circuits open.
See Table 1 for the harness color code, and each wire is labeled on the harness.
14 S&C Instruction Sheet 1024-510 Installing the Capacitor Control
Connected to a potential transformer, the PT wires provide voltage sensing and power
to the control and internal relays. Average IntelliCap 2000 power consumption is
0.5 watt. Control power is used to wett the open and close relay contacts to operate the
capacitor bank switches, or the interposing relays.
The IntelliCap 2000 relay contacts are rated at 20 A @ 250 Vac. In addition they have
been tested to operate three Joslyn Vacuum Switches (36 A). If you need 125 Vdc to operate the capacitor switches, install interposing relays rated for 125 Vdc.
Control power used to wett the Open and Close relays is not fused in the IntelliCap
2000, and an external fuse must be installed when necessary. Polarity and phase angle
corrections can be adjusted with the control software.
Table 1. Catalog Number 238164-67 VAR and Neutral Input Wiring
Catalog Number 240164-J67 VAR and Neutral Input Wiring
Black
Station Power Hot (+)
Blue
Close
Red
Open
Red
CT Return (–)
Red
CT Hot (+)
White
PT/AC—Neutral
Black
PT/AC—Line
Wiring for Neutral Input
Orange
Neutral Sensor Hot (+)
White
Neutral Sensor Return (–)
TEST POINTS
Phase Current
Sensor Hot (+)
Load
AC-Line
3
2
4
1
2
3
4
5
6
AC-Neutral &
Sensor Return(s)(–)
7
FUSE
8
9
INPUT TERMINAL BLOCK
1
10 11 12
Jumper
INPUT TERMINALS
1 AC Neutral (connected to terminal 12)
2 Digital Input 3—User Defined
3 Digital Input 2—Operator Close
4 Digital Input 1—Operator Open
5 CT or Phase Current Sensor Hot (+)
6 CT Return
7 Neutral Sensor Hot (+)
8Open
9Close
10 AC-Line—Motor Operator Power
11 AC-Line—Control Power & Sensing
12 AC-Neutral and Sensor Return(s)(–)
Figure 19. Terminal Block wiring and test point configuration for Catalog Number Suffix
-JB1 or -JB2.
S&C Instruction Sheet 1024-510 15
Installing the Capacitor Control
Voltage Sensing
Source
When equipped with option suffix “-K1,” an IntelliCap 2000 can derive its voltage sensing from an external voltage sensor and will ship from the factory configured to use
an external voltage sensor. The available sensor input ranges are 0-5 V, or 0-10 V. The
external sensor positive input connects to the left spade terminal, and neutral to the
right terminal. See Figure 20.
Figure 20. External voltage sensor input spade terminals.
Jumper H2
Pin 1
Figure 21. External voltage sensor input spade terminals.
A unit with Suffix “-K1” can be configured to obtain its voltage sensing signal from the
control power, but will require a hardware configuration change to match the software
setting. Voltage is sensed on Pins 11 and 12 of the Input Terminal Block. See Figure 19
on page 15, Figure 21 above, and the Warning below. WARNING
The setting for Option “-K1” requires a hardware jumper change to operate
properly. Connecting Control Power to Terminal 11 will cause damage to the control
if jumper H2 on the PSIO board is not in the proper position. To change a control from
external sensing to Control Power will require the front panel to be removed so the position
of jumper H2 on the PSIO board can be changed. See front panel removal on page 22.
The jumper positions are:
• Pins 1 and 2 = Control Power
• Pins 2 and 3 = External Sensor, Maximum input voltage = 20 Vac
16 S&C Instruction Sheet 1024-510 Installing the Capacitor Control
Voltage and Current
Sensing
Some controls have VAR and/or neutral current or neutral voltage sensing connected in
the meter socket. Other controls use connector(s) on the bottom of the control enclosure,
or terminal block J6. See Figures 11, and 12 on page 10, and Figure 19 on page 15.
WARNING
Do not ground sensor cable shields at the top of the pole. Sensor cable shields should
be grounded only at the control end—to prevent extraneous ground current from flowing
through the cable shields. This rule applies to all S&C connectorized cables.
NOTICE
For neutral current sensing on 4-wire distribution systems where the starpoint
of the capacitor bank is tied to the neutral and/or ground, you must install the
neutral current sensor between the starpoint and the system neutral and/or ground.
See Figure 22 below.
A phase
B phase
C phase
Neutral
Fuses
Switches
Starpoint
Neutral current sensor
(CT terminated on an
imbedded resistor)
To capacitor control
0-10 Vac
Figure 22. Neutral current sensor installation between the starpoint and the neutral.
The neutral voltage sensing option allows the capacitor control to monitor and
take action if it detects abnormal levels of voltage on the starpoint of an ungrounded,
wye-connected bank. Use the information provided by the neutral voltage sensor
manufacturer to design your installation. See Figure 23 on page 18.
S&C Instruction Sheet 1024-510 17
Installing the Capacitor Control
A phase
B phase
C phase
Neutral
Fuses
Switches
Starpoint
Sensor
option
To cap control
To cap control
Lindsey sensor
option
To cap control
PT option
To cap control
S&C sensor
option
Figure 23. Neutral voltage sensor and wye-connected bank with starpoint.
18 S&C Instruction Sheet 1024-510 Installing the Capacitor Control
Energize and Test
the Control
1. Test the faceplate functions.
At this point, you can test most of the faceplate LEDs and buttons. See Figure 24.
Figure 24. IntelliCap 2000 faceplate.
a. Observe that the LCD shows: **UnitOK**. If the LCD shows: *ACTIVE
ALARMS*, check the capacitor bank for a problem. The alarm condition must
be corrected before the IntelliCap 2000 will operate correctly.
b. If the display is blank or if there is an error message, see the Troubleshooting
Instruction Sheet 1024-550.
c. Press the LAMP TEST button and check that all the faceplate LEDs illuminate.
2. Replace the load fuse.
3. Check the close/open relays by operating the capacitor bank.
a. Make sure the LOCAL and MANUAL LEDs are lit.
b. Follow your company procedures. NOTE: The IntelliCap 2000 has manual operation delay, that can be set from 1 to 300 seconds, or disabled. The default setting
is 30 seconds. Press the CLOSE or OPEN button on the faceplate to operate the
capacitor bank. Check visually to verify that the faceplate LEDs correctly
indicate each capacitor bank switch position.
c. Check visually to verify that the switch position indicators on the capacitor bank
switches for all three phases match the CLOSE or OPEN indication of the
faceplate LED.
The CLOSE and OPEN LEDs indicate the last requested operation. Neither
LED will be lit until the bank is switched for the first time.
S&C Instruction Sheet 1024-510 19
Installing the Capacitor Control
NOTICE
The capacitor bank CLOSE command is blocked for a period of 5 minutes after an
OPEN command. This delay provides time for the capacitor charge to bleed off. For more
details, see Switching the Capacitor Bank in the Operating Instruction Sheet 1024-540.
4. Check Neutral Current/Voltage indication on the faceplate LCD.
a. If Neutral Sensing is installed, observe that the LCD shows: ** UNIT OK**.
b. Press the ENTER faceplate button twice. The LCD will show: DATA.
c. Use the NEXT faceplate button to scroll the data to: NCAlrmLvl=, and note the
value displayed.
d. Use the NEXT faceplate button to scroll the data to: NeutRmsAmps=. If the displayed value is greater than the NCAlrmLvl= value, check the capacitor bank for a
problem indicated by Neutral Voltage or Neutral Current. This condition must be
corrected before the IntelliCap 2000 will operate correctly.
5. Set the control for Local/Manual Service.
At this stage the capacitor control is ready for local, manual operation.
WARNING
Be sure to leave the control in LOCAL (not REMOTE) and MANUAL (not AUTO) mode
until the software in the capacitor control is set up for this installation.
Communication
Equipment
If this capacitor control uses a radio, check that the radio has power.
For most installation, the radio is installed in the enclosure door.
The IntelliCap 2000 has two remote communication access ports, an Ethernet Port,
and a serial SCADA PORT. When used with suitable communication equipment and
protocol, you can remotely monitor and control the capacitor control installation.
S&C supports the IntelliCap 2000 with a variety of communication hardware
options.
Supported Manufacturers and hardware options include the following:
• SpeedNet™ Radio
• UtiliNet® Radio
• Cellnet® Radio
• Microwave Data Systems
• Hayes™ compatible modems
• Cellular transceivers
• Fiber Optic transceivers
• For other options contact S&C Electric Company
DNP 3.0 is the standard protocol for the IntelliCap 2000 control.
All 8-bit, asynchronous SCADA communications (at up to 9600 BAUD) are handled
directly by control software.
Most communication equipment can be mounted inside the capacitor
control enclosure (in the door). This eliminates clutter and provides better reliability for
the installation.
Depending on the location of the capacitor bank site, you may also need one or more
repeater radios to enable communication between this control and the SCADA
master station.
For more information, see Instruction Sheet 1024-561 DNP Points List and
Implementation, or contact your local S&C Sales Office.
20 S&C Instruction Sheet 1024-510 Installing the Capacitor Control
All IntelliCap 2000 controls are radio ready. This gives you the flexibility to add communiConnecting
Communication Hardware cation hardware later. Serial and Ethernet connectors are provided.
The SCADA PORT connector provides a data and power (12-Vdc) connection for the
radio. Wiring for the six-pin IDC 0.156” header in the control is shown in
Figure 25.
The cable from the radio is terminated with an ITW MAS-CON 0.156” center line IDC
connector (or equivalent).
SCADA PORT:
Pin 1 +12 Vdc
Pin 2 CTS
Pin 3 TXD
Pin 4 RTS
Pin 5 RXD
Pin 6 GND
Ethernet Port
Figure 25. Ethernet Port and pinout for the SCADA PORT.
S&C Instruction Sheet 1024-510 21
Front Panel Removal
The front panel is installed close to the PS/IO board underneath it. The ribbon data cable
is shown in Figure 26. If you remove the front panel, be careful that the ribbon cable is
not crimped when you reinstall the front panel. Make sure that it is carefully bent to the
shape shown in Figure 27 before you reinstall the front panel. Be sure to avoid pinching
the ribbon cable between the front panel and the enclosure protrusions when reinstalling
the front panel.
Figure 26. Front panel harness installed on the PS/IO board.
Figure 27. Harness to connect front panel, bent so it will not be crimped.
This completes hardware installation and testing. Continue with Setup Instruction
Sheet 1024-530.
22 S&C Instruction Sheet 1024-510 Installation and Connection Drawings
S&C Instruction Sheet 1024-510 23
Installation and Connection Drawings
24 S&C Instruction Sheet 1024-510 Installation and Connection Drawings
S&C Instruction Sheet 1024-510 25
Installation and Connection Drawings
26 S&C Instruction Sheet 1024-510 Installation and Connection Drawings
S&C Instruction Sheet 1024-510 27
Installation and Connection Drawings
28 S&C Instruction Sheet 1024-510 Installation and Connection Drawings
S&C Instruction Sheet 1024-510 29