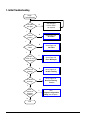
1
Quick Troubleshooting Guide Compaq Deskpro Family of Personal Computers Compaq Deskpro EN, EN SFF, and EP Models Compaq Deskpro 6000, 4000, 4000SFF/Net PC, and 2000 Models Notice The information in this guide is subject to change without notice. COMPAQ COMPUTER CORPORATION SHALL NOT BE LIABLE FOR TECHNICAL OR EDITORIAL ERRORS OR OMISSIONS CONTAINED HEREIN; NOR FOR INCIDENTAL OR CONSEQUENTIAL DAMAGES RESULTING FROM THE FURNISHING, PERFORMANCE, OR USE OF THIS MATERIAL. This guide contains information protected by copyright. No part of this guide may be photocopied or reproduced in any form without prior written consent from Compaq Computer Corporation. 1999 Compaq Computer Corporation. All rights reserved. Printed in the U.S.A. Compaq and Deskpro are registered in the U. S. Patent and Trademark Office. PREMIER•SOUND is a trademark of Compaq Computer Corporation. Microsoft, MS-DOS, Windows, Windows NT, and other names of Microsoft products referenced herein are trademarks or registered trademarks of Microsoft Corporation. Intel and Pentium are registered trademarks of Intel Corporation. Celeron and MMX are trademarks of Intel Corporation. Product names mentioned herein may be trademarks and/or registered trademarks of their respective companies. The software described in this guide is furnished under a license agreement or nondisclosure agreement. The software may be used or copied only in accordance with the terms of the agreement. Quick Troubleshooting Guide Compaq Deskpro Family of Personal Computers First Edition (June 1999) Part Number 120205-001 Compaq Computer Corporation Printer's Mark C ONTENTS Preface Symbols and Conventions .................................................................................................... ix Technician Notes ................................................................................................................. ix System Serial Number.......................................................................................................... ix Locating Additional Information ........................................................................................... x chapter 1 General Service Information Troubleshooting Procedures ............................................................................................... 1-1 Tools Required................................................................................................................... 1-1 Protecting Yourself and the Computer................................................................................ 1-1 Clearing CMOS.................................................................................................................. 1-2 Customer Responsibilities .................................................................................................. 1-2 POST Power-On Sequence ................................................................................................. 1-3 Compaq Drive Protection System....................................................................................... 1-3 Accessing DPS Through Compaq Diagnostics for Windows ......................................... 1-4 Compaq Configuration Record Utility................................................................................ 1-4 chapter 2 Troubleshooting Flowcharts 1. Initial Troubleshooting ................................................................................................... 2-2 2. No Power, Part 1 ............................................................................................................ 2-3 3. No Power, Part 2 ............................................................................................................ 2-4 4. No Power, Part 3 ............................................................................................................ 2-5 5. No Video, Part 1............................................................................................................. 2-6 6. No Video, Part 2............................................................................................................. 2-7 7. No Video, Part 3............................................................................................................. 2-8 8. Error Messages Part 1..................................................................................................... 2-9 9. Error Messages, Part 2.................................................................................................. 2-10 10. Error Messages, Part 3................................................................................................ 2-11 11. No O/S Loading ......................................................................................................... 2-12 12. No O/S Loading from Hard Drive, Part 1 ................................................................... 2-13 13. No O/S Loading from Hard Drive, Part 2 ................................................................... 2-14 14. No O/S Loading from Hard Drive, Part 3 ................................................................... 2-15 15. No O/S Loading from Diskette Drive ......................................................................... 2-16 16. No O/S Loading from CD-ROM Drive ....................................................................... 2-17 17. No O/S Loading from Network................................................................................... 2-18 18. Non-Functioning Device ............................................................................................ 2-19 appendix A Further Troubleshooting Preliminary Checklist......................................................................................................... a-1 Solving Minor Problems..................................................................................................... a-2 Diskette Drive............................................................................................................... a-3 Display ......................................................................................................................... a-4 SCSI ............................................................................................................................. a-5 Printer........................................................................................................................... a-5 Hard Drive.................................................................................................................... a-6 Hardware Installation ......................................................................................................... a-7 CD-ROM...................................................................................................................... a-8 Memory........................................................................................................................ a-9 Network...................................................................................................................... a-10 Resolving Audio Hardware Conflicts ............................................................................... a-12 Troubleshooting Using Compaq Intelligent Manageability Features................................. a-12 table B POST Error Messages preface ABOUT THIS GUIDE This Troubleshooting Guide can be used for reference when servicing the Compaq Deskpro 2000 Series of Personal Computers with MMX technologies and later models. Only authorized technicians trained by Compaq should attempt to repair this equipment. Compaq Computer Corporation reserves the right to make changes to the these models without notice. Symbols and Conventions The following text and symbols mark special messages throughout this guide: CAUTION: Text set off in this manner indicates that failure to follow directions could result in damage to equipment or loss of data.. ! ✎ WARNING: Text set off in this manner indicates that failure to follow directions in the warning could result in bodily harm or loss of life. Text set off in this manner presents commentary, sidelights, clarifying information, or specific instructions Technician Notes ! WARNING: Only authorized technicians trained by Compaq should attempt to repair this equipment. All troubleshooting and repair procedures are detailed to allow only subassembly/module level repair. Because of the complexity of the individual boards and subassemblies, no one should attempt to make repairs at the component level or to make modifications to any printed wiring board. Improper repairs can create a safety hazard. Any indications of component replacement or printed wiring board modifications may void any warranty. CAUTION: To properly ventilate your system, you must provide at least 3 inches (7.6 cm) of clearance at the front and back of the computer. CAUTION: The computer is designed to be electrically grounded. To ensure proper operation, plug the AC power cord into a properly grounded AC outlet only. System Serial Number The serial number is located on the top of the system unit cover at the right front corner and also on the rear of the computer. For the purpose of AssetControl, the serial number is embedded in the CMOS on the system board. Preface ix Locating Additional Information The following documentation is available to support these products: n n n n n n Preface User Documentation Technical Training Guides Compaq Service Advisories and Bulletins Compaq QuickFind Technical Reference Guide Compaq Service Quick Reference Guide QTG ORDERING INFORMATION To order additional copies of the Quick Troubleshooting Guide, use the following part numbers: Part Number Description 153837-001 Quick Troubleshooting Guide, quantity of 1 153838-001 Quick Troubleshooting Guide, quantity of 5 To place an order, Compaq authorized dealers, resellers, and service providers should use their normal ordering procedures for spare parts. All other customers in the U.S. and Canada should call 1-800-952-7689 to place an order. In other countries, contact your local Compaq office for availability. EMAIL COMMENTS AND SUGGESTIONS TO: [email protected] Preface xi chapter 1 GENERAL SERVICE INFORMATION The information in this book was prepared for the Compaq Deskpro 2000 Series of Personal Computers with MMX technologies and later models. While some of this information may apply to earlier models, not all features are available on all computers. Troubleshooting Procedures The flowcharts listed in Chapter 2 use the building-block concept, where flowchart 1 is the first flowchart to which you should refer. If, during the debug process, you find yourself in a bind, refer back to flowchart 1 to determine which potential problems you can rule out. Tools Required n n n Torx T-15 screwdriver Write-protected bootable diskette Anti-static wrist strap Protecting Yourself and the Computer n n n n n Turn the computer off before disconnecting or installing any cables. When the computer is connected to an AC power source there is always voltage applied to the system board. You must disconnect the power cord from the power source before opening the computer to prevent system board or component damage. For personal safety and to ensure that the computer does not overheat, Compaq recommends that you install the computer cover or access panel before turning on the computer. The screws used in the computer are of different thread sizes and lengths; using the wrong screw in an application may damage the unit. All data stored on a hard drive is lost when the drive is formatted. Quick Troubleshooting Guide 1-1 Clearing CMOS 1. Turn off the computer and any peripheral devices that are connected to it. 2. Disconnect the power cord from the electrical outlet and then from the computer. CAUTION: The cooling fan is off only when the computer is turned off and the power cable has been disconnected. The cooling fan is always on in all other instances, such as when the computer is “On,” in “Standby,” or “Suspend” mode. CAUTION: When the computer is connected to an AC power source there is always voltage applied to the system board. You must disconnect the power cord from the power source before opening the computer to prevent system board or component damage. 3. Remove the computer cover. 4. Reset the computer by one of the following methods depending on the model. n If the system board has a CMOS reset button, press the button and then release it to reset the CMOS. n If the system board uses jumpers, remove the E50 jumper from pins 1 and 2 for 60 seconds; then replace the jumper. Customer Responsibilities Check the service contract and verify that the customer has taken care of these items: 1-2 n Installing the operating system. n Providing and running all virus check programs. n Running Diagnostics on the hard drive. n Reloading the operating system as required. n Copying over the operating system files as required. n Reformatting the hard drive as required. General Service Information POST Power-On Sequence When a Compaq Personal Computer is turned on, the computer reads its first instructions from memory. It finds the instructions from the power-on restart vector addressed in ROM and begins executing those instructions. The instructions begin with a series of ROM-resident diagnostic tests called the Power-On Self-Test (POST) to determine if the computer is operational and ready to accept an operating system. The normal checking procedure for POST includes: 1. BIOS memory is tested and initialized (the first 128K of RAM is not displayed). If the system does not pass the first memory check, an immediate error message is displayed and the initialization process stops. The cause of a failure at this stage might be a problem with the ROM, the system board, the CPU, or memory. 2. The system board and bus devices are quick-tested to determine if the interrupt controllers, DMA controllers, keyboard controller, video display controller, interval timers, diskette drive controller, serial and parallel port controller, and fixed disk controller are all properly installed and are functioning properly. 3. The remaining memory is tested and the count displayed on the monitor only when starting the machine from the off mode. You should verify that the memory displayed corresponds with the memory installed in the computer. 4. The keyboard, drives, and their controllers are initialized and tested. Test results are shown via the LEDs on the keyboard and computer case. 5. CMOS memory is checked for configuration, time, and date. If the CMOS memory parameters do not match the actual system configuration, a "162-System Options" error will be displayed with instructions for restarting the computer. 6. The speaker will sound two short beeps or will display the Compaq splash screen when the POST has been successfully completed. Refer to the POST error messages when error messages are displayed on the screen or when beep patterns are sounded. Compaq Drive Protection System The Compaq Drive Protection System (DPS) is a diagnostic tool built into the hard drives installed in select Compaq Deskpro computers. DPS is designed to help diagnose problems that might result in unwarranted hard drive replacement. When Compaq Deskpro Computers are built, each installed hard drive is tested using DPS and a permanent record of key information is written onto the drive. Each time DPS is run, test results are written to the hard drive. This information may be used to help diagnose the hard drive and the computer system. Running DPS will not affect any programs or data stored on the hard drive. The test resides in the hard drive firmware and can be executed even if the computer will not boot to an operating system. The time required to execute the test depends on the manufacturer and size of the hard drive; in most cases, the test will take approximately 2 minutes per gigabyte. DPS should be used when you suspect a hard drive problem. If the computer reports a SMART Hard Drive Detect Imminent Failure message, there is no need to run DPS; instead, back up the information on the hard drive and replace the hard drive. Quick Troubleshooting Guide 1-3 Accessing DPS Through Compaq Diagnostics for Windows To access DPS through Compaq Diagnostics for Windows, perform the following steps: 1. Turn on the computer and select My Computer→Control Panel→Compaq Diagnostics. A choice of five possible headings appears in the Diagnostics screen: Overview, Test, Status, Log, and Error. 2. Select Test→Type of Test A choice of three tests appear: Quick Test, Complete Test, and Custom Test. 3. Select Custom Test. A choice of two test modes is offered: Interactive Mode and Unattended Mode. 4. Select Interactive Test→Storage→Hard Drives. 5. Select the specific drive(s) to be tested→Drive Protection System Test→Begin Testing. When the test has been completed, one of three messages will be displayed for each of the drives tested: n n n Test Succeeded. Completion Code 0. Test Aborted. Completion Code 1 or 2. Test Failed. Drive Replacement Recommended. Completion Code 3 through 14. If the test failed, the completion code should be recorded for help in diagnosing the computer problem. Compaq Configuration Record Utility Compaq Configuration Record Utility is an online information-gathering tool similar to other Compaq management tools that run on computers. It gathers critical hardware and software information from various sources to give a complete view of the computer. Configuration Record Utility delivers comprehensive configuration capture, provides a means for automatically identifying and comparing configuration changes, and has the ability to maintain a computer configuration history. The information can be saved as a history of multiple sessions This utility was developed to allow resolution of problems without taking the computer off-line and to assist in maximizing computer availability. The information obtained by the utility is useful in troubleshooting computer problems, and streamlines the service process by enabling quick and easy identification of computer configurations, which is the first step in resolving service cases. The Compaq Configuration Record Utility is accessed via an icon in the Control Panel. When running the utility, information is automatically gathered on such items as the operating system version number, operating system parameters, and the operating system startup files. The utility then combines this information with information on the hardware configuration to deliver a comprehensive view of the computer. 1-4 General Service Information chapter 2 TROUBLESHOOTING FLOWCHARTS 1. Initial Troubleshooting, 2-2 2. No Power, Part 1, 2-3 3. No Power, Part 2, 2-4 4. No Power, Part 3. 2-5 5. No Video, Part 1, 2-6 6. No Video, Part 2, 2-7 7. No Video, Part 3, 2-8 8. Error Messages, Part 1, 2-9 9. Error Messages, Part 2, 2-10 10. Error Messages, Part 3, 2-11 11. No O/S Loading, 2-12 12. No O/S Loading from Hard Drive, Part 1, 2-13 13. No O/S Loading from Hard Drive, Part 2, 2-14 14. No O/S Loading from Hard Drive, Part 3, 2-15 15. No O/S Loading from Diskette Drive, 2-16 16. No O/S Loading from CD-ROM Drive , 2-17 17. No O/S Loading from Network, 2-18 18. Non-Functioning Device, 2-19 Quick Troubleshooting Guide 2-1 1. Initial Troubleshooting Begin Troubleshooting 115/230V set right? N Set voltage to 115V or 230V as required N Go to Page 2-3, No Power Y Is there power? Y N Is there video? Go to Page 2-6, No Video Y Beeps, LEDs, or error messages? Y Go to Page 2-9, Error Messages N Is the O/S loading? N Go to Page 2-12, No O/S Loading Y All drives working? N Go to Page 2-19, Non-Functioning Device Y New options or software added? N End 2-2 Troubleshooting Flowcharts Y Run Compaq Configuration Utility, see Chapter 1 2. No Power, Part 1 No Power (Power LED is off) Power cord connected? N Turn computer off. Plug power cord into computer and power outlet. Y Using power strip or UPS? Y Ensure power strip or UPS are turned on. N Active outlet? N Turn computer off. Plug power cord into different active wall outlet. Y Turn off power, disconnect power cord, and open the computer. Go to Page 2-4, No Power, Part 2 Restart computer and return to start of this chart. Caution: Power is continuous to the system board and power supply even when the power switch is turned off. To prevent damage to the unit, disconnect the power cord from the power source or the unit before beginning disassembly procedures. Quick Troubleshooting Guide 2-3 3. No Power, Part 2 Continued from page 2-3, No Power, Part 1. Power supply connected to system board? N Caution: Power is continuous to the system board and power supply even when the power switch is turned off. To prevent damage to the unit, disconnect the power cord from the power source or the unit before beginning disassembly procedures. Plug power connector into system board. Replace power supply. Y N System board have 5V Aux LED? Y 5V Aux LED on? Plug in power cord. N Y 1. Press power button on. 2. Check for fan rotation. 3. Press power button off. Replace power supply. N Does fan spin? N 1. Unplug power to all drives. 2. Remove all installed cards. 3. Press power button on. Does fan spin? Y Y 1. Add drives back one-ata-time to find faulty drive. 2. Add cards back one-ata-time to find faulty card. Go to Page 2-5, No Power, Part 3 N Power on? Y Done 2-4 Troubleshooting Flowcharts 4. No Power, Part 3 Continued from pages 2-3 or 2-4, No Power, Parts 1 or 2 Drive power and data cables connected? N Reseat drive power and data cable connectors. Y Loose or damaged components? Y Reseat loose components and replace damaged items in the computer. N Reinstall cover and restart computer. N Power LED on? Y Done Replace power switch. Caution: Power is continuous to the system board and the power supply even when the power switch is turned off. To prevent damage to the unit, disconnect the power cord from the power source or the unit before beginning disassembly procedures. Power LED on? Y Done N Replace system board. Quick Troubleshooting Guide 2-5 5. No Video, Part 1 Caution: Power is continuous to the system board and power supply even when the power switch is turned off. To prevent damage to the unit, disconnect the power cord from the power source or the unit before beginning disassembly procedures. No video Beeps or flashing CPU or keyboard lights? Y Go to Page 2-9, Error Messages, Part 1 N Y Monitor LED on? LED color? Green (note 1) Amber N Video adapter connected? Contrast and brightness turned up? N Turn contrast and brightness up. Y Y Go to Page 2-7, No Video, Part 2 (note 2) N Monitor plugged in and turned on? Y Reconnect monitor (note 3). Plug in, turn on, and return to Page 2-2, Initial Troubleshooting. Video OK? Replace monitor. Notes: 1. Older monitors do not support the amber LED. 2. If more than one adapter is installed, monitor must be connected to primary controller. 3. Turn off and unplug computer before reconnecting cables. 2-6 Troubleshooting Flowcharts Done N N Plug in and turn on monitor, then return to Page 2-2, Initial Troubleshooting Y 6. No Video, Part 2 From Page 2-6, No Video, Part 1 Turn off power, disconnect power cord, and open the computer. Reseat processor, riser board, video card, and memory, then clear CMOS. Caution: Power is continuous to the system board and power supply even when the power switch is turned off. To prevent damage to the unit, disconnect the power cord from the power source or the unit before beginning disassembly procedures. Replace cover and power cord, then restart computer. Video OK, computer starts? N Same symptoms? Y Y N Message “System option not set”? Y F1 “System option not set” routine N Done Turn off computer and disconnect power. Replace components in system one at a time starting with hard drive. Test system after each replacement for video or beeps. Go to page 2-8, No Video, Part 3 Notes: 1. System boards without a piezo speaker, or chassis without an internal speaker require an external speaker. 2. Some power supplies require a load greater than the system board alone to function properly. When disconnecting drives, disconnect the data cables but leave the power cables attached. 3. Remove auxiliary video card if integrated video. 4. Remove cache module on Deskpro 2000 models (if installed). Quick Troubleshooting Guide 2-7 7. No Video, Part 3 From Page 2-7, No Video, Part 2 Caution: Power is continuous to the system board and power supply even when the power switch is turned off. To prevent damage to the unit, disconnect the power cord from the power source or the unit before beginning disassembly procedures. Restart computer. See codes or flashing lights or hear beeps? N Y Integrated video? N Replace video card. Y N Turn off computer and disconnect power. Replace components in system one at a time starting with hard drive. Test system after each replacement for video or beeps. Replace system board. Video OK? Done. 2-8 Troubleshooting Flowcharts Click Find Here to FindCode Error Code Error 8. Error Messages Part 1 Beeps, CPU or Keyboard Lights, or POST error messages. Caution: Power is continuous to the system board and power supply even when the power switch is turned off. To prevent damage to the unit, disconnect the power cord from the power source or the unit before beginning disassembly procedures. Power LED has no color showing. Computer is off. Power LED glows green. Computer is on. Power LED blinks green 1x/second. Normal suspend mode. Power LED glows red. CPU not installed/fetching code. Power LED blinks red 4x/second. CPU thermal shutdown. Power LED blinks red 1x/two or more seconds. Power supply crow bar. Power and hard drive LEDs glow red. Riser board not seated. Num Lock LED flashing green. Memory error. Caps Lock LED flashing green. No video. Scroll Lock LED flashing green. System board failure, prior to video. Audible. 1L 3S. System ROM is bad; system is running in FailSafe Boot Block Mode Audible. 2S. Power-ON successful. Continued on page 2-10, Error Messages, Part 2. Quick Troubleshooting Guide 2-9 Click Find Here to FindCode Error Code Error 9. Error Messages, Part 2 Continued from page 2-9, Error Messages, Part 1 Caution: Power is continuous to the system board and power supply even when the power switch is turned off. To prevent damage to the unit, disconnect the power cord from the power source or the unit before beginning disassembly procedures. 1S 2L. Num Lock blinking. System memory not present or incompatible. Unplug, open computer, and check memory modules. Ensure memory modules are correct type and that they match in size and speed. 1L 2S. Cap Lock blinking. Video controller not present or incorrectly initialized. Ensure monitor is plugged in. Unplug, open computer, and check video card. Reseat card and ensure it is in the proper expansion slot. 1L 3S. All keyboard LEDs blinking. ROM Failure. Create ROMPaq diskette and reload ROM. Download ROMPaq from Compaq website at www.compaq.com. 2L 1S. Scroll Lock blinking. System HW failure prior to video. Unplug, open computer, and check for physical damage. Ensure all cables and cards are seated. Look for burn marks or smoke. No beeps. HD and Power LED blinking. Riser not detected. Unplug, open computer, and check and reseat riser board. Continued on page 2-11, Error Messages, Part 3. Notes: Short (S) and long (L) beeps will only be heard if the system has a speaker. LEDs will only function on PS/2 keyboards, not USB. x = Numbers 1 - 9 2-10 Troubleshooting Flowcharts Click Find Here to FindCode Error Code Error 10. Error Messages, Part 3 Continued from page 2-10, Error Messages, Part 2 Caution: Power is continuous to the system board and power supply even when the power switch is turned off. To prevent damage to the unit, disconnect the power cord from the power source or the unit before beginning disassembly procedures. Error 162, 2S Beeps. System Option not set. Select F1. If error occurs after reboot, unplug and open computer and check CMOS jumper setting. Error 163. Time & Date Not Set. Set time and date in F10 or boot to O/S and set time and date. If error occurs after reboot, unplug and open computer, then check CMOS setting. Error 2xx. Memory Error. See Appendix B for specific definitions. Unplug, open computer, and reseat memory modules. Ensure modules are correct type and that they match in size and speed. Error 30x. Keyboard Error. See Appendix B for specific definitions. Do not type on keyboard before POST. Ensure keyboard connected to proper connector. Error 6xx. Floppy Error. See Appendix B for specific definitions. Unplug, open computer, check diskette drive, and check and reseat power and data cables. Error 91x. Misc. Connection Error. See Appendix B for specific definitions. Unplug, open computer, and check hood lock coil, thermal sensor pigtail, and riser for good connection. Error 178x. Fixed Disk Error. See Appendix B for specific definitions. Unplug, open computer, check the hard drive, and check and reseat power and data cables. Error 1800. Thermal Alert. System overheating. Let computer cool off. Ensure processor has heatsink installed and that speed setting on system board is correct. Remove obstructions to air vents. All other POST error messages - refer to Appendix B for definitions and solutions. Notes: Short (S) and long (L) beeps will only be heard if the system has a speaker. LEDs will only function on PS/2 keyboards, not USB. x = Numbers 1 - 9 Quick Troubleshooting Guide 2-11 11. No O/S Loading O/S not loading from: Factory recommended booting priority 1. CD-ROM drive 2. Diskette drive CD-ROM drive, go to Page 2-17 3. Hard drive 4. Network Diskette drive, go to Page 2-16 NOTE: Before beginning, always check drive jumpers, cable connections, cable ends, and drives for bent or damaged pins. Hard drive, go to Page 2-13 Network, go to Page 2-18 2-12 Troubleshooting Flowcharts 12. No O/S Loading from Hard Drive, Part 1 O/S not loading from hard drive N Boot from network? NonSystem Disk Message? Fail Pass Go to Page 2-14, No O/S Loading from Hard Drive, Part 2 Go to Page 2-18, No O/S Loading from Network Y Change boot priority through Computer Setup and reboot. Go to Page 2-16, No O/S Loading from Diskette Drive N N Boot from CD? Boot from hard drive? Boot from diskette? Y Y Remove CD and reboot. Y Remove diskette and reboot. Done N Go to Page 2-19, Non-Functioning Device Factory Recommended Booting Priority Boot from hard drive? N Boot from hard drive? N 1. CD-ROM drive if bootable drive 2. Diskette drive 3. Hard drive Y Done Y Done 4. Network NOTE: Before beginning, always check drive jumpers, cable connections, cable ends and drives for bent or damaged pins. Quick Troubleshooting Guide 2-13 13. No O/S Loading from Hard Drive, Part 2 Continued from Page 2-13, No O/S Loading from Hard Drive, Part 1 N Diskette in diskette drive? N Replace hard drive Hard drive partition? Remove diskette and reboot. Hard drive formatted? Y Done Create partition, then format hard drive to bootable C:\ prompt. N Format hard drive and bring to a bootable C:\ prompt. N Y Y N Done Go to Page 2-16, No O/S Loading from Diskette Drive 2-14 N Y Y Boot from diskette drive? Go to Page 2-15, No O/S Loading from Hard Drive, Part 3 Run FDISK Y Boot from hard drive? Y Access hard drive? Troubleshooting Flowcharts Computer boot? Load O/S using Restore CD if applicable (see note). N Go to Page 2-15, No O/S Loading from Hard Drive, part 3 Note: Refer to the “Customer Responsibilities” section of this document and the customer service contract. 14. No O/S Loading from Hard Drive, Part 3 Continued from Page 2-14, No O/S Loading from Hard Drive, Part 2 System files on hard drive? Install O/S and reboot (see note) N Y Y Virus on hard drive? Y Boot from hard drive? Clean virus. (see note) N N Run DPS test. Y Run SCANDISK, check for bad sectors. Y Done Boot from hard drive? N Can bad sectors be fixed? N Apply Restore CD if applicable. Replace hard drive. (see note) Y Fix bad sectors. Boot from hard drive? N Replace hard drive. Y Done Note: Refer to the “Customer Responsibilities” section of this document and the customer service contract. Quick Troubleshooting Guide 2-15 15. No O/S Loading from Diskette Drive O/S not loading from diskette drive Y Bootable diskette in drive? Non-System Disk message? N Boot from another device? N Install bootable diskette and reboot computer. Y N Go to Page 2-19, Non-Functioning Device N Enable drive and cold boot computer. Check diskette for system files. Try different diskette. Y Diskette drive enabled in Computer Setup? Bootable diskette in drive? N Install bootable diskette and reboot computer. Y Y Diskette drive boot order correct? Y Clear CMOS Notes: Factory Recommended Booting Priority 1. CD-ROM drive if bootable 2. Diskette drive N 3. Hard drive Change boot priority. (see notes) 2-16 Troubleshooting Flowcharts Go to Page 2-19, Non-Functioning Device 4. Network 16. No O/S Loading from CD-ROM Drive No O/S Loading from CD-ROM drive Bootable CD in drive? Y CD in drive? N Install bootable CD and reboot computer. Y N Try another bootable CD. Install bootable CD. Y Done Boots from CD? Notes: Factory Recommended Booting Priority N 1. CD-ROM drive if bootable 2. Diskette drive Booting from another device? N Go to Page 2-19, Non-Functioning Device 3. Hard drive 4. Network Y Booting order correct? Y Clear CMOS Go to Page 2-19, Non-Functioning Device N Correct boot order. (see notes) Quick Troubleshooting Guide 2-17 17. No O/S Loading from Network No O/S loading from network C F12 prompt during POST? Select F12 when prompted? Y Y WOL or Network cable attached? N N N Network jack functional? Y N N Reboot computer. Select F12 when prompted. Compaq supported NIC? Y Attach network or WOL cable. Connect to working network jack. Go to Page 19, Non-Functioning Device Turn off power, disconnect power cord, open computer, and install Compaq-compatible NIC. Y Boots from network? Boots from another device? Y Done Notes: Y Factory Recommended Booting Sequence 1. CD-ROM drive N Correct boot order. (see notes) 2-18 To C N Y Boot order correct ? N Troubleshooting Flowcharts 2. Diskette drive Go to Page 2-19, Non-Functioning Device 3. Hard drive 4. Network 18. Non-Functioning Device Non-functioning device. Turn off power, disconnect power cord, and open the computer. Caution: Power is continuous to the system board and power supply even when the power switch is turned off. To prevent damage to the unit, disconnect the power cord from the power source or the unit before beginning disassembly procedures. Unplug the power and data cable from the non-functioning device. Inspect cables and plugs for bent or broken pins or other damage. For a NIC or SCSI controller, remove the expansion card and inspect leads. Any physical damage? Y Fix or replace broken item. N Reattach drive. Close computer, plug in power, and reboot. Hard drive or CD-ROM drive • RUN DPS HARD DRIVE TEST. (hard drive only) • Check IDE drive jumper settings for Cable Select and Primary/Secondary status. • Check SCSI drive ID and termination. • Correct any conflicts. Drive boots properly? NIC Possible bad NIC, replace card. If integrated NIC, replace system board. Clear CMOS N Go to Page 2-12, No O/S Loading. N Drive boots properly? Y Done Y Done Diskette drive Possible bad diskette drive. Replace drive. Quick Troubleshooting Guide 2-19 appendix A FURTHER TROUBLESHOOTING Preliminary Checklist This section describes some simple, preliminary tests and guidelines for troubleshooting the computer without using the diagnostics. If you encounter some minor problem with the computer or a software application, go through the following checklist for possible solutions before running any of the diagnostic utilities: n n n n n n n n n n n n n n Are the computer and monitor connected to a working electrical outlet? Is the computer turned on? Is the green power light illuminated? Is the monitor turned on? Is the green monitor light illuminated? Turn up the monitor brightness and contrast controls if the monitor is dim. Press and hold any key. If the system beeps, then the keyboard should be operating correctly. Check all cables for loose or incorrect connections. Reconfigure the computer after installing a non Plug and Play expansion board or other option, such as a diskette drive. Are all of the necessary device drivers installed? Have all printer drivers been installed for each application? Remove all diskettes from the diskette drives before you turn on the system. Are all switches set correctly? Is the NIC Remote Wakeup cable (featured on some models) connected between the NIC and the riser/system board? Quick Troubleshooting Guide A-1 Solving Minor Problems Problem Possible Solution Computer will not turn on. 1. Ensure computer is properly connected to an external power source. 2. A PCI or ISA card that has been installed is defective. Remove any adapter card that was just installed. 3. See Flowchart 1. Computer appears locked up and won’t turn off when the power button is pressed. Software control of the power button may not be functional. Press and hold the button for four seconds, then release. This invokes the hardware override for the power button. Computer date and time display is incorrect. Reset the date and time using Control Panel. If the problem persists, the real-time clock (RTC) battery may need to be replaced. Computer powered off unexpectedly. 1. The unit temperature was exceeded because the unit is in an exceedingly hot environment or the fan is blocked. Let the unit cool down. 2. The fan may not be functioning correctly. 3. The unit temperature was exceeded because the computer was running with the cover or side panel removed. Replace cover or side panel, and let the computer cool down before turning power back on. Computer appears to pause periodically. Network driver is loaded and no network connection is established. Establish a network connection, or use Computer Setup or Windows Device Manager to disable the network controller. Cannot remove computer cover or side panel. 1. Smart Lock, featured on some computers, is locked. Unlock using Computer Setup. 2. The Smart Cover FailSafe Key, a device for manually disabling the Smart Cover Lock, is available from Compaq. You’ll need the FailSafe Key in cases of forgotten password, power loss, or computer malfunction. Computer does not boot up and power and hard drive LEDs are blinking. 1. Ensure that the riser board is properly seated (if applicable). Computer does not boot up and Num Lock LED is blinking; you may hear one short and two long beeps. 1. System memory may be improperly installed or may be bad. The Caps Lock LED is flashing; you may hear one long and two short beeps. 1. The video controller is not present or is incorrectly initialized. Computer does not boot up and the Scroll Lock LED is flashing; you may hear two long and one short beeps. 1. System board hardware failure (prior to video). Replace system board. ✎ A-2 2. See Flowchart 11. 2. See Flowchart 11. 2. If a video board has been added, remove and reseat it. 3. See Flowchart 4. 2. See Flowchart 1. If the standard keyboard has been replaced with a Universal Serial Bus (USB) keyboard, you will hear the beep sequences mentioned above but will not see the flashing lights. Further Troubleshooting Diskette Drive Problem Possible Solution Diskette drive light stays on. 1. Diskette is damaged. In Windows 95 or 98, run ScanDisk. In Windows NT, run Error-checking. 2. Diskette is incorrectly inserted. Remove the diskette and reinsert. 3. Software program may be damaged. Check the program diskettes. 4. Drive button is not pushed in. Push in drive button. 5. Drive cable is not properly connected. Reconnect drive cable. Diskette drive cannot write to a diskette. 1. Diskette is not formatted. Format the diskette. 2. Diskette is write-protected. Either use another diskette that is not write-protected or disable the write protection on the diskette. 3. Writing to the wrong drive. Check the drive letter in the path statement. 4. Not enough space is left on the diskette. Use another diskette. 5. Diskette write control is enabled. Check the Removable Media write settings in Computer Setup. Cannot format diskette. Invalid media reported. When formatting a diskette in DOS, you may need to specify diskette capacity. For example, to format a 1.44-MB diskette, type the following command at the DOS prompt: FORMAT A:/F:1440 Diskette drive cannot read a diskette. 1. Diskette is not formatted. Format the diskette. 2. Using the wrong diskette type for the drive type. Check the drive type and use a compatible diskette. 3. Reading the wrong drive. Check the drive letter in the path statement. 4. Diskette drive has been disabled by Computer Setup, Windows NT, Windows 95, or Windows 98 utilities. Run Computer Setup and enable the diskette drive. A problem has occurred with a disk transaction. The directory structure is bad, or there is a problem with a file. Run ScanDisk. Non-system disk message. The system is trying to start from a nonsystem diskette. Remove the diskette from the drive. Drive not found. 1. Check the cables for loose connections. 2. If a second diskette drive has been installed, follow the computer reconfiguration directions in the “Hardware Installation Problems” section. 3. See Flowchart 18. System has misidentified the diskette drive type. If a diskette drive other than a 3.5-inch, 1.44-MB drive has been installed, ensure that the drive type is identified correctly under Computer Setup. Quick Troubleshooting Guide A-3 Display Problem Possible Solution Screen is blank 1. Monitor is not turned on and the monitor light is not on. Turn on the monitor and check that the monitor light is on. 2. Screen save has been initiated. Press any key or move the mouse to light the screen. 3. The cable connections are not correct. Check the cable connection from the monitor to the computer and check the electrical outlet. 4. The brightness need adjusting. Adjust the brightness control. 5. The QuickBlank feature has been enabled through Computer Setup. Run Computer Setup to disable it. 6. The energy saver feature has been enabled. Press any key or click the mouse button and, if one has been set, type the password. 7. The RGB (Red, Green, Blue) input switch on the back of the monitor is incorrectly set. Set the monitor's input switch to 75 ohms and set sync switch to External (if applicable). 8. System ROM is bad and system is running in FailSafe Boot Block mode (indicated by one long beep and three short beeps). Reflash the ROM using a ROMPaq diskette. 9. If a fixed-sync monitor is used, be sure that the monitor can accept the same sweep rate as the resolution chosen. 10.See Flowchart 5. Graphics colors are wrong. 1. Either the cabling or the monitor impedance is incorrect. 2. Ensure that the Red, Green, and Blue BNC cables are connected to the corresponding monitor connectors. 3. Be sure the monitor's RGB inputs are set to 75 ohms. Characters are dim. 1. Adjust the monitor's brightness and contrast controls. 2. Check that the video cable is securely connected to the graphics card and monitor. 3. Set the RGB switch (and sync options, if available) to 75 ohms, with the sync set to External. Refer to the documentation included with the monitor. Monitor does not function properly when used with the energy saver features. Monitor without the energy saver feature is being used with energy saver features enabled. Disable the monitor energy saver features. Blurry display or requested resolution cannot be set. If the graphics controller was upgraded, the correct display drivers may not be loaded. Install the correct display drivers on the diskette included in the upgrade kit. continued A-4 Further Troubleshooting Display Problems Continued Problem Possible Solution The picture is broken up; it rolls, jitters, or blinks. 1. Enure the monitor cable is securely connected to the computer. Screen goes blank. A screen blanking utility may be installed or energy saver features may be enabled. Press any key or type password. Monitor overheats. There is not enough ventilation space for proper airflow. Leave at least 3 inches (7.6 cm) of ventilation space. Be sure there is nothing on top of the monitor obstructing the air flow. Cursor will not move using arrow keys on the numeric keypad. The Num Lock key is on. Press the key to turn it off. The Num Lock light should not be on when you want to use the arrow keys. Problem Possible Solution System with IDE and SCSI drives will not boot from SCSI hard drive. The IDE drive needs to be disabled. Under the Computer Setup Advanced menu, disable the primary IDE controller. System will not boot from a SCSI drive. 1. The SCSI drive is not configured correctly. 2. In a two-monitor system or if another monitor is in close proximity, move the monitors apart to be sure they are not interfering with one other's magnetic field. SCSI 2. Ensure that drive cabling and jumpers are set correctly. To boot a SCSI drive, the drive ID number must be set to 0. 3. See Flowchart 11. Printer Problem Possible Solution Printer will not print. 1. Printer is not turned on and online. Turn the printer on and make sure it is online. 2. The correct printer drivers for the application are not installed. Install the correct printer drivers for the application. 3. If the computer is on a network, you may not have made the connection to the printer. Make the proper network connections to the printer. Printer will not turn on. Reconnect all cables and check the power cord and electrical outlet. Prints garbled information. 1. The correct printer drivers for the application are not installed. Install the correct printer driver for the application. 2. The cables may not be connected properly. Reconnect all cables. Printer is off line. The printer may be out of paper. Check the paper tray and refill it if it is empty. Select online. Quick Troubleshooting Guide A-5 Hard Drive This section identifies some quick checks for hard drive-related problems. The information provided by the diagnostics tests includes: error code, system serial number, drive serial number, drive model, and drive firmware revision. Specific details of the drive failure are not included. When you run the diagnostics, the test results are stored in a log. After completing the test, you can print this log to a local printer or save it to a file. Alternatively, before running the test, you can configure the test options to send the results to a local printer or file. Solutions for some typical hard drive problems are presented in the following table: Problem Possible Solution Hard drive error occurs. 1. Hard disk has bad sectors or has failed. Use a utility to locate and block usage of bad sectors. If necessary, reformat the hard disk. 2. See Flowchart 18. Disk transaction problem. 1. Either the directory structure is bad or there is a problem with a file. System Tools In Windows 95, run ScanDisk. Click Start ScanDisk. In Windows NT, right-click Start, click Explore, and select a drive. Select File Properties Tools,. Under Error-checking, click Check Now. à à à à 2. See Flowchart 18. Drive not found. 1. Cable could be loose. Check cable connections. 2. The system may not have automatically recognized a newly installed device. See reconfiguration directions in the “Hardware Installation Problems” section. If system still does not recognize the new device, check to see if the device is listed within Computer Setup. If it is listed, the probable cause is a driver problem. If it is not listed, the probable cause is a hardware problem. 3. Check drive jumper settings. If the drive is a secondary drive that has just been installed on the same controller as the primary drive, verify that the jumpers for both drives are set correctly. 4. See Flowchart 18. Second Ultra ATA hard drive does not perform optimally. A-6 Further Troubleshooting The cable is not compatible with the drive type. Reinstall the second Ultra ATA hard drive using an 80-conductor cable. Hardware Installation You may need to reconfigure the computer when you add or remove hardware, such as an additional diskette drive. If you install a Plug and Play device, Windows 95 automatically recognizes the device and configures the computer. If you install a non-Plug and Play device, you must reconfigure the computer after completing installation of the new hardware. In Windows 95, select the Add New Hardware icon in the Control Panel and follow the instructions that appear on the screen. To reconfigure the computer in Windows NT Workstation 4.0 after installing new hardware, use the utility provided with the hardware. Problem Possible Solutions A new device is not automatically recognized as part of the computer system. 1. The computer needs to be reconfigured to recognize the new device. Follow the reconfiguration instructions above. If system still does not recognize the new device, but the device is listed within Computer Setup, use Computer Setup to address any resource conflicts. 2. When the system advised you of changes to the configuration, you did not accept them. Reboot the computer and follow the instructions for accepting the changes. 3. A Plug and Play board may not automatically configure when added if the default configuration conflicts with other devices. Use Windows 95 Device Manager to deselect the automatic settings for the board and choose a basic configuration that doesn’t cause a resource conflict. You can also use Computer Setup to reconfigure or disable devices to resolve the resource conflict. 4. The cables for the new external device are loose or the power cables are unplugged. Check all cables, and check that pins in the cable or connector are not bent down. 5. The power switch for the new external device is not turned on. Turn off the computer, turn on the external device, and then turn the computer on to integrate the new device with the computer. 6. If the drive is a secondary drive that has just been installed on the same controller as the primary drive, verify that the jumpers for both drives are set correctly. Quick Troubleshooting Guide A-7 CD-ROM Problem Possible Solution Cannot read compact disc. 1. CD is not properly seated in the drive. Eject the CD, correctly seat it in the drive, then reload. 2. CD is loaded upside down. Eject CD, turn it over, then reload. 3. See Flowchart 18. System will not boot from CD-ROM drive. 1. The CD-ROM boot is not enabled through the Computer Setup utility. Run the Computer Setup utility and set the drive priorities. 2. Ensure that drive cabling and jumpers are set correctly. To boot a SCSI drive, the drive ID number must be set to 0. 3. See Flowchart 16. Cannot eject compact disc (tray-load unit). CD is not properly seated in the drive. Turn off the computer and insert a thin metal rod into the emergency eject hole and push firmly (a straightened paper clip can be used). Slowly pull the tray out from the drive until the tray is fully extended, then remove the CD. Cannot eject compact disc (slot-load unit). 1. Remove the drive from the chassis. 2. Remove the front bezel from the drive. 3. Remove the top and bottom drive covers. 4. Release the clamping mechanism to retrieve the CD. CD-ROM device is not detected; driver is not loaded. 1. CD-ROM drive is not connected properly or not properly terminated. Open the computer and check the drive cable. 2. See Flowchart 18. A-8 Further Troubleshooting Memory Problem Possible Solution System won't boot or does not function properly after installing additional memory modules Memory module is not the correct type or speed grade for the system. Replace module with an industry-standard, SPD-compliant 168-pin synchronous dynamic random access memory (SDRAM) DIMM that meets the following criteria (if you do not know the system bus speed, run Computer Setup to determine it): System Bus Out of Memory error. 66 MHz 100 MHz Rated for 66 MHz or faster operation. Rated for 100 MHz or faster operation. Has an access time (CLK to Q) of 9nS or less. Has an access time (CLK to Q) of 6nS or less. Supports CAS latency 2 or 3 operation. Supports CAS latency 2 or 3 operation. 1. Memory configuration may not be set up correctly; check memory configuration using Device Manager. 2. The computer has run out of memory for the application. Check the application documentation to determine the memory requirements. Memory count during POST is wrong. Memory modules may not have been installed incorrectly or nonSDRAM DIMM modules may have been used. Insufficient memory error during operation. 1. Too many Terminate and Stay Resident programs (TSRs) are installed. Delete any unnecessary TSRs. 2. There is not enough memory for the application. Check the memory requirements for the application or add more memory. Quick Troubleshooting Guide A-9 Network Some common causes and solutions for network problems are listed in the following table. These guidelines do not discuss the process of debugging network cabling. Problem Possible Solution The Remote Wakeup feature is not functioning. 1. The feature is not available when using an AUI network connection; use an RJ-45 network connection. 2. Remote Wakeup is not enabled. Use the network control application to enable Remote Wakeup. 3. Check that WOL cable is connected (if applicable) Network driver does not detect network controller. Network controller is disabled. Run Computer Setup and enable network controller. Network status link light does not turn on or flashes. 1. No active network is detected. Check cabling and network equipment for proper connection. 2. Network connection is not set up properly. Use the network control application to verify that the device is working properly. 3. System is configured for AUI connection; link LED does not apply to AUI connections. 4. Network driver is not properly loaded. Reinstall network drivers. 5. System cannot autosense the network. Disable autosensing capabilities and force the system into the correct operating mode. Diagnostics reports a failure. 1. The cable is not securely connected or is attached incorrectly. Ensure that the cable is securely attached to the network connector and that the other end of the cable is securely attached to the correct device. 2. There is a problem with the cable or a device at the other end of the cable. Ensure that the cable and device at the other end are operating correctly. 3. The network controller is defective. Replace the controller or the system board. 4. Network controller interrupt with an expansion board. Under the Computer Setup Advanced menu, change the resource settings for the board. Diagnostics passes, but the computer does not communicate with the network. 1. Network drivers are not loaded, or driver parameters do not match current configuration. Make sure the network drivers are loaded and that the driver parameters match the configuration of the network controller. 2. The network controller is not configured for this computer. In Windows 95 or Windows NT, select the Network icon at the Control Panel. 3. Network controller interrupt with an expansion board. Under the Computer Setup Advanced menu, change the resource settings for the board. continued A-10 Further Troubleshooting Network Problem Continued Problem Possible Solution Network controller stopped working when an expansion board was added to the computer. 1. Network drivers are not loaded or driver parameters do not match the current configuration. Make sure that the drivers are loaded and that the driver parameters match the configuration of the network controller. 2. The cable is not securely connected or is attached incorrectly. Ensure that the cable is securely attached to the network connector and that the other end of the cable is securely attached to the correct device. 3. Network controller interrupt with an expansion board. Under the Computer Setup Advanced menu, change the resource settings for the board. 4. Network drivers were accidentally deleted when the drivers for the new expansion board were installed, or the files containing the network drivers are corrupted. Reinstall the network drivers, using backup diskettes. Network controller stopped working without apparent cause. 1. The files containing the network drivers are corrupted. Reinstall the network drivers, using backup diskettes. 2. The cable is not securely connected or is attached incorrectly. Ensure that the cable is securely attached to the network connector and that the other end of the cable is securely attached to the correct device. 3. The network controller is defective. Replace the network controller or system board. Cannot connect to the network server when attempting Remote System Installation The network controller is not configured properly. Run Computer Setup and modify the Embedded NIC Settings. Quick Troubleshooting Guide A-11 Resolving Audio Hardware Conflicts Hardware conflicts occur when two or more peripheral devices contend for the same signal lines or channels. Conflicts between the audio interface and another peripheral device may be due to the settings of the base I/O addresses, interrupts, or DMA channels. The audio interface typically has the following settings: Item Setting Base I/O address 220H FM Synthesizer I/O address 388-38Bh Interrupt IRQ 5 8-bit DMA Channel 1 To resolve hardware conflicts: 1. Change the hardware settings of your audio card or the peripheral card in your system if the peripheral card is using the audio interface setting. You can change settings for integrated audio using Computer Setup. 2. If you are unsure of the settings of the peripheral cards, you can isolate the source of the problem by temporarily removing all cards and other essential cards such as the disk controller. After that, add the cards back one at a time until the card that is causing the conflict is found. Problem Possible Solution Sound does not come out of the speaker. Software volume control is turned down in Microsoft Sound System Control Panel, or CD-ROM volume control on the front or back of the computer is turned down. 1. Click Start, then select Programs, Accessories, Multimedia, Volume Control. 2. Turn the CD-ROM volume control knob on the front or back of the computer to increase the volume. Troubleshooting Using Compaq Intelligent Manageability Features The Local Alert Pop-Up Dialog notifies you of an impending or actual hardware failure. If the computer is connected to a network and the Compaq Insight Management Agents are installed and configured, an Simple Network Management Protocol (SNMP) trap (message) is sent to the specified SNMP-compliant management application. The Local Alert Pop-Up Dialog also tells you the steps you need to take prior to a hardware failure to avoid loss of data and damage to the computer. The system administrator can create a customized action message that might include contact telephone or pager numbers. To close the Local Alert Pop-Up Dialog, click the Close button. To retrieve fault information after closing the dialog, run Compaq Insight Personal Edition. For more detailed information, refer to the online Intelligent Manageability Guide. A-12 Further Troubleshooting Click Here to Find Error Code appendix B POST ERROR MESSAGES An error message results if the Power-On Self-Test (POST) encounters a problem. This test runs when the system is turned on, checking assemblies within the computer and reporting any errors found. Screen Message Beeps* Probable Cause Recommended Action 101-Option ROM Error 1L, 1S System ROM checksum. 1. Verify the correct ROM. 2. Flash the ROM if needed. 3. If an expansion card was recently added, remove it and see if the problem remains. 4. If the message disappears, there may be a problem with the expansion card. 5. Replace the system board. 1. Clear CMOS. 2. Remove expansion boards. 3. Replace the system board. 1. Clear CMOS. 2. Remove expansion boards. 3. Replace the system board. 102-System Board Failure 103-System Board Failure None None 162-System Options Not Set 2S 163-Time & Date Not Set 2S * L = Long, S = Short DMA, timers, etc. DMA, timers, etc. Configuration incorrect. Run Computer Setup (F10 Setup) RTC (real-time clock) battery may need to be replaced. Battery life is approximately 5 years. Reset the date and time under Control Panel. If the problem persists, replace the RTC battery. Invalid time or date in configuration memory. Set the date and time under Control Panel. RTC (real-time clock) battery may need to be replaced. Battery life is approximately five years. If the problem persists, replace the RTC battery. CMOS jumper may not be properly installed. Check for proper placement of the CMOS jumper. continued Quick Troubleshooting Guide B-1 ClickHere Hereto to FindCode Error Click Find Error Find ErrorCode Code POST Error Messages Continued Screen Message Beeps* Probable Cause Recommended Action 164-Memory Size Error 2S Memory configuration is incorrect. 1. Run Computer Setup (F10 Setup) or Windows utilities. 2. Make sure memory module(s) (if any) are installed properly. 3. Verify proper memory module type. 183-Invalid Processor Jumper Setting 2S System board jumper improperly set. Reset system board jumpers to match processor and bus speeds. 201-Memory Error None RAM failure. 1. Run computer Setup (F10 Setup) or Windows utilities. 2. Ensure memory and continuity modules are installed correctly. 3. Verify proper memory module type. 4. Remove and replace memory module(s) one at a time to isolate faulty module. 5. Replace the faulty memory module(s). 6. If error persists after replacing memory modules, replace the system board. 202-Memory Type Mismatch None Memory modules do not match each other. Replace memory modules with matched sets. 207-ECC Corrected Single Bit Errors in DIMM/SIMM Pair(s) X,X,... in Memory Socket(s) y,y 2S Single Bit ECC error. 1. Verify proper memory module type. 2. Try another memory socket. 3. Replace memory module if problem persists. 213-Incompatible DIMM Module in DIMM Socket(s) X,X 2S 1. Verify proper memory module type. 2. Try another memory socket. 3. Replace DIMM with a module conforming to the SPD standard. * L = Long, S = Short B-2 POST Error Messages A DIMM module in DIMM socket identified in the error message is missing critical SPD information, or is incompatible with the chipset. continued ClickHere Hereto to FindCode Error Click Find Error Find ErrorCode Code POST Error Messages Continued Screen Message Beeps* Probable Cause Recommended Action 301-Keyboard Error None Keyboard failure. 1. Reconnect keyboard with computer turned off. 2. Check connector for bent or missing pins. 3. Ensure that none of the keys are depressed. 4. Replace keyboard. 1. Reconnect the keyboard with computer turned off. 2. Ensure that none of the keys are depressed. 3. Replace keyboard. 4. Replace system board. 304-Keyboard or System Unit Error None Keyboard failure. 401-Parallel Port 1 Address Assignment Conflict 2S IRQ address conflicts with another device. Reset the IRQ. 403-Parallel Port 3 Address Assignment Conflict 2S IRQ address conflicts with another device. Reset the IRQ. 404-Parallel Port Address Conflict Detected 2S Both external and internal ports are assigned to parallel port X. 1. Remove any parallel expansion cards. 2. Clear CMOS. 3. Reconfigure card resources and/or run Computer Setup (F10 Setup). 410-Audio Interrupt Conflict 2S IRQ address conflicts with another device. Reset the IRQ. 411-Network Interface Card Interrupt Conflict 2S IRQ address conflicts with another device. Reset the IRQ. 501-Display Adapter Failure 1L, 2S Graphics display controller. 1. Reseat the graphics card (if applicable). 2. Clear CMOS. 3. Verify the monitor is attached and turned on. 4. Replace the graphics controller. * L = Long, S = Short continued Quick Troubleshooting Guide B-3 ClickHere Hereto to FindCode Error Click Find Error Find ErrorCode Code POST Error Messages Continued Screen Message Beeps* Probable Cause Recommended Action 601-Diskette Controller Error None Diskette controller circuitry or floppy drive circuitry incorrect. 1. Run Computer Setup (F10 Setup). 2. Check and/or replace cables. 3. Clear CMOS. 4. Replace diskette drive. 5. Replace the system board. 602-Diskette Boot Record Error None Diskette in drive A not bootable. Replace the diskette. 605-Diskette Drive Type Error 2S Mismatch in drive type. 1. Run Computer Setup (F10 Setup) or Windows NT, Windows 95, or Windows 98 utilities. 2. Disconnect any other diskette controller devices (tape drives). 3. Clear CMOS. 610-External Storage Device Failure None External tape drive not connected. Reinstall tape drive or press F1 and allow system to reconfigure without the drive. 611-Primary Floppy Port Address Assignment Conflict 2S Configuration error. 1. Run Computer Setup (F10 Setup). 2. Remove expansion cards. 3. Clear CMOS. 1. Run Computer Setup (F10 Setup). 2. Remove expansion cards 3. Clear CMOS. 612-Secondary Floppy Port Address Assignment Conflict 660-Display Cache is Detected Unreliable None 912-Computer Cover Has Been Removed Since Last System Start Up None * L = Long, S = Short B-4 2S POST Error Messages Configuration error. Integrated video controller Replace system board if minimal display cache not working video degrading is an issue. properly and will be disabled. No action required. continued ClickHere Hereto to FindCode Error Click Find Error Find ErrorCode Code POST Error Messages Continued Screen Message Beeps* Probable Cause Recommended Action 914-Hood Lock Coil is not Connected None Hood lock mechanism is missing or not connected. 1. Reconnect or replace hood locking mechanism. 2. Reseat or replace hood locking mechanism cable. 916-Thermal Sensor from Processor Heatsink is not Connected. None Processor heatsink cable not Reseat or replace the processor connected to system board. heatsink cable going to the system board. 917-Expansion Riser not Detected None Riser board not seated or not Install riser board if missing or installed. remove and reseat to ensure good connection. 1151-Serial Port 1 Address Conflict Detected 2S Both external and internal serial ports are assigned to COM1. 1152-Serial Port 2 Address Conflict Detected 1155- Serial Port Address Conflict Detected 2S 2S Both external and internal serial ports are assigned to COM2. Both external and internal serial ports are assigned to same IRQ. 1. Remove any Comm port expansion cards. 2. Clear CMOS. 3. Reconfigure card resources and/or run Computer Setup (F10 Setup).Run Computer Setup or Windows utilities. 1. Remove any Comm port expansion cards. 2. Clear CMOS. 3. Reconfigure card resources and/or run Computer Setup (F10 Setup).Run Computer Setup or Windows utilities. 1. Remove any Comm port expansion cards. 2. Clear CMOS. 3. Reconfigure card resources and/or run Computer Setup (F10 Setup).Run Computer Setup or Windows utilities. 1201-System Audio Address 2S Conflict Detected Device IRQ address conflicts Reset the IRQ. with another device. 1202-MIDI Port Address Conflict Detected Device IRQ address conflicts Reset the IRQ. with another device. 1203-Game Port Address Conflict Detected * L = Long, S = Short 2S Device IRQ address conflicts Reset the IRQ. with another device. continued Quick Troubleshooting Guide B-5 ClickHere Hereto to FindCode Error Click Find Error Find ErrorCode Code POST Error Messages Continued Screen Message Beeps* Probable Cause Recommended Action 1720-SMART Hard Drive Detects Imminent Failure None Hard drive is about to fail. (Some hard drives have a firmware patch that will fix an erroneous error message.) 1. Determine if hard drive is giving correct error message. Run the Drive Protection System test available. 2. Apply firmware patch if applicable. 3. Back up contents and replace hard drive. 1. Determine if hard drive is giving correct error message. Run the Drive Protection System test available. 2. Apply firmware patch if applicable. 3. Back up contents and replace hard drive. Internal and external hard drive controllers are both assigned to the primary address. 1. Remove any Comm port expansion cards. 2. Clear CMOS. 3. Reconfigure card resources and/or run Computer Setup (F10 Setup). Internal and external hard drive controllers are both assigned to the primary address. 1. Remove any Comm port expansion cards. 2. Clear CMOS. 3. Reconfigure card resources and/or run Computer Setup (F10 Setup). Hard drive/format error. 1. Run Computer Setup (F10 Setup). 2. Clear CMOS. 3. Check cables/jumper settings. 4. Run hard drive diagnostics. 5. Disconnect additional drives. 6. Run the Drive Protection System test if available. 7. Replace the hard drive. 1721-SMART SCSI Hard Drive Detects Imminent Failure 1771-Primary Disk Port Address Assignment Conflict 1772-Secondary Disk Port Address Assignment Conflict 1780-Disk 0 Failure * L = Long, S = Short B-6 POST Error Messages None 2S 2S None Hard drive is about to fail. (Some hard drives have a firmware patch that will fix an erroneous error message.) continued ClickHere Hereto to FindCode Error Click Find Error Find ErrorCode Code POST Error Messages Continued Screen Message Beeps* Probable Cause Recommended Action 1781-Disk 1 Failure None Hard drive/format error. 1. Run Computer Setup (F10 Setup). 2. Clear CMOS. 3. Check cable seating/jumper settings. 4. Run hard drive diagnostics. 5. Disconnect additional drives. 6. Run the Drive Protection System test if available. 7. Replace the hard drive. 1. Run Computer Setup (F10 Setup). 2. Clear CMOS. 3. Check cable seating /jumper settings. 4. Run hard drive diagnostics. 5. Disconnect additional drives. 6. Run the Drive Protection System test if available. 7. Replace the hard drive. 8. Replace the system board. 1. Run Computer Setup (F10 Setup). 2. Clear CMOS. 3. Check cable seating /jumper settings. 4. Run hard drive diagnostics. 5. Disconnect additional drives. 6. Confirm drive is supported on this computer (Large drive ROM support.) 7. Run the Drive Protection System test if available. 8. Replace the hard drive. 9. Replace the system board. 1782-Disk Controller Failure 1790-Disk 0 Failure * L = Long, S = Short None None Hard drive circuitry error. Hard drive error or wrong drive type. continued Quick Troubleshooting Guide B-7 ClickHere Hereto to FindCode Error Click Find Error Find ErrorCode Code POST Error Messages Continued Screen Message Beeps* Probable Cause Recommended Action 1791-Disk 1 Failure None Hard drive error or wrong drive type. 1. Run Computer Setup (F10 Setup). 2. Clear CMOS. 3. Check cable seating /jumper settings. 4. Run hard drive diagnostics. 5. Disconnect additional drives. 6. Confirm drive is supported on this computer (Large drive ROM support). 7. Run the Drive Protection System test if available. 8. Replace the hard drive. 9. Replace the system board. 1. Run Computer Setup (F10 Setup). 2. Clear CMOS. 3. Check cable seating /jumper settings. 4. Run hard drive diagnostics. 5. Disconnect additional drives. 6. Run the Drive Protection System test if available. 7. Replace the hard drive. 1. Run Computer Setup (F10 Setup). 2. Clear CMOS. 3. Check cable seating /jumper settings. 4. Run hard drive diagnostics. 5. Disconnect additional drives. 6. Run the Drive Protection System test if available. 7. Replace the hard drive. 1792-Secondary Disk Controller Failure 1793-Secondary Controller or Disk Failure * L = Long, S = Short B-8 POST Error Messages None None Hard drive circuitry error. Hard drive circuitry error. continued ClickHere Hereto to FindCode Error Click Find Error Find ErrorCode Code POST Error Messages Continued Screen Message Beeps* Probable Cause Recommended Action 1800-Temperature Alert None Internal temperature exceeds specification. 1. Check that computer air vents are not blocked and cooling fan is running. 2. Verify processor speed selection. 3. Replace the processor. 4. Replace the system board. 1801 None Processor not supported by ROM Bios. Upgrade Bios to proper version. Audible 1L, 3S System ROM is bad; system is running in Failsafe Boot Block mode. Reflash the ROM using a ROMPaq diskette. Refer to the “Failsafe Boot Block ROM” section of the Software Reference Guide. Audible 2S Power-on successful. None Flashing Caps Lock LED on Keyboard 1L. 2S Graphics controller not present or incorrectly initialized. 1. Clear CMOS. 2. If graphics card has been added, remove and reseat. Flashing Num Lock LED on Keyboard 1S, 2L System memory not present 1. Check memory module. 2. Remove and reseat memory module. 3. See “Memory Problems” in Appendix A. Num Lock LED on Keyboard None Failed Boot Block. Reflash the ROM using a ROMPaq diskette. Flashing Scroll Lock LED on Keyboard 2L, 1S System board hardware failure (prior to video) Replace system board. Green Power LED Blinks Once per Second None Computer in normal Suspend None mode. Green Power LED ON None Computer on. Invalid Electronic Serial Number None Electronic serial number has Run Computer Setup (F10 Setup). become corrupted. If Setup already has data in the field or will not allow the serial number to be entered, download and run SP5572.EXE (SNZERO.EXE). * L = Long, S = Short None continued Quick Troubleshooting Guide B-9 ClickHere Hereto to FindCode Error Click Find Error Find ErrorCode Code POST Error Messages Continued Screen Message Beeps* Probable Cause Recommended Action Flashing Power and Hard Drive Green LEDs None Unseated riser board. 1. Remove riser board. 2. Wipe connector. 3. Reinstall riser board. Red Power LED Blinks Every None 2 Seconds Red Power LED Blinks Every None Second Red power LED ON * L = Long, S = Short B-10 POST Error Messages None Power supply overloaded. System memory error. Processor unseated. 1. Push in power button. LED should be green. 2. Remove all AC power from computer, wait 30 seconds, then apply power. 3. Remove load from power supply by removing options one at a time until computer runs. 4. Check for damage to system board. 5. Replace system board. 6. Replace power supply. 1. Check memory module. 2. Remove and reseat memory module. 3. See the "Solving Memory Problems" section of this guide. Reseat processor in system board.