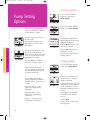
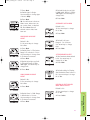
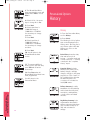
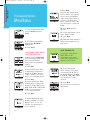
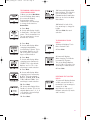
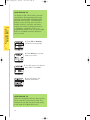
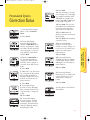
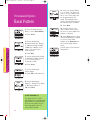
1
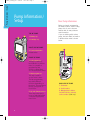
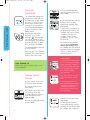
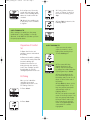
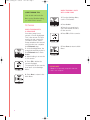
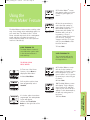
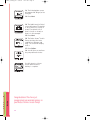
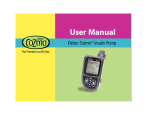
4070889_Cover
8/10/04
10:35 AM
Page 1
Deltec Cozmo® Insulin Pump
Step-by-Step Training Guide
4070889_Cover
8/10/04
10:35 AM
Page 2
DELTEC COZMO® INSULIN PUMP
STEP-BY-STEP TRAINING GUIDE
Table of Contents
Introduction.................................................... 3
Pump Information and Setup ........................4-8
Basic Pump Information ...............................4
Cartridge Assembly and Fill...........................5
Battery ........................................................5
Screensaver and Backlight ............................6
Cartridge Removal/Insertion .......................6-7
Preparation of Comfort Set............................7
Fill Tubing ...................................................7
Fill Cannula .................................................8
Home Screens .................................................9
Standard Home Screens ...............................9
Optional Home Screens .....................9 and 25
Pump Setting Options ..............................10-11
Set Time and Date......................................10
Set Beep or Vibrate ....................................10
Program Lock and Unlock ...........................11
Personalized Options / Alerts.....................12-14
Low Cartridge Alert.....................................12
Delivery Limit Alarm ...................................12
Glucose Reminder Alert ..............................12
Review or Edit Custom Alerts .................12-13
Activation of Alerts
BG Alert 1
BG Alert 2
BG Alert 3
BG Alert 4
Reminder 1
Reminder 2
Reminder 3
Reminder 4
Low Blood Glucose Alert .............................13
High Blood Glucose Alert ............................13
2
Automatic Off Alarm...................................13
Site Reminder Alert....................................13
Turn Site Reminder Home Screen On/Off
Review or Edit Missed Meal Bolus Alert ...13-14
Personalized Options / History ...................14-15
Bolus History .............................................14
Complete History........................................14
Delivery Summary ......................................14
Average Delivery Summary ..........................14
Basal as Percent of TDD .............................15
Average Basal as Percent of TDD .................15
Blood Glucose History.................................15
Average Blood Glucose History ....................15
Display BG Home Screen ............................15
Personalized Options / Regional Settings.........15
Time Format ..............................................15
Date Format...............................................15
Number Format..........................................15
Personalized Options / Meal Bolus.............16-18
Program a Meal Bolus Using Units-Insulin....16
Changing Bolus Maximum
Changing Bolus Increment
Set Bolus Duration
Meal Bolus in Menu
(extended/combination)
Touch Bolus
Changing Touch Bolus Increments
Program a Meal Bolus Using Grams-Carbs ....17
Insulin-to-Carb Ratio
Changing Carbohydrates Increment
Changing Bolus Maximum
Changing Bolus Increment
Bolus Duration
Meal Bolus in Menu
(Extended/Combination)
Program a Touch Bolus ...............................17
Changing Touch Bolus Increments
Review or Edit Custom Bolus .................17-18
Breakfast
Lunch
Dinner
Midmorning
Afternoon
Bedtime
4070889_inside_die
8/10/04
10:33 AM
Page 1
Personalized Options / Basal Pattern...............20
Maximum Basal Rate..................................20
Review or Edit Basal Pattern .......................20
Select Name and Patterns 1-4 ....................20
Personalized Options / Temporary Rate ......21-22
Temporary Rate in Menu .............................21
Program Temporary Rate Using Percent or
Units/Hour............................................21
Running Temporary Rate Reminder ..............21
Give Reminder When Temporary Rate
Complete..............................................21
Display Temporary Rate Home Screen ..........21
Review or Edit Custom Temporary Rate .....21-22
Temp Rate 1
Temp Rate 2
Temp Rate 3
Temp Rate 4
Using the Meal MakerTM Feature ................23-24
Programming the Meal MakerTM Feature........23
Entering Food Item’s Carb Grams ................23
Total Carb Grams Screen.............................23
Bolus Calculation Screen ............................24
Bolus Delivery ............................................24
Review.......................................................25
Review Checklist ........................................25
Optional Home Screens ..............................25
Insulin on Board (IOB)
Blood Glucose (BG)
Site Reminder (SR)
Temporary Rate (TR)
Table of Contents /
Introduction
Personalized Options / Correction Bolus..........19
Correction Bolus Display — Main Menu and
Meal Bolus ...........................................19
Blood Glucose Measured in mg/dl or mmol/L...19
Edit or Review Correction Factor by
Time of Day ..........................................19
Duration of Insulin Action ...........................19
Target Blood Glucose ..................................19
Display Insulin On Board Home Screen..........19
Introduction
Smart design and a friendly user interface
make the Deltec Cozmo® Insulin Pump easy to
personalize and use for more effective diabetes
management. Most major functions are easily
accessible, so important information is right at
the user’s fingertips.
This self-directed guide will assist you in
learning how to set up and use the Deltec
Cozmo® Insulin Pump.
The Deltec Cozmo® Insulin Pump is menudriven. Words on the screen correspond to the
keys below the words.
Highlighted menu items are
either boxed on the screen or
shown in bold.
Boxed
Bold
A checkmark
appears next
to a menu item that has been
set or programmed.
Checkmark
USER TRAINING TIPS
The Deltec Cozmo® Insulin
Pump must contain a cartridge
in order for you to practice
setting up features and using
the pump.
The pump must also have a
programmed basal rate or it
will alert the user to program
a basal rate.
3
Pump Information / Setup
4070889_inside_die
8/10/04
10:33 AM
Page 2
Pump Information/
Setup
Basic Pump Information
Before you begin programming
the Deltec Cozmo® Insulin Pump,
please look it over to become
familiar with its many features
and information.
TOP OF PUMP
2
1. Battery cap
1
2. Cartridge cap
If you are training with a demo
pump, the back label information
is different than what is shown
below.
RIGHT SIDE OF PUMP
3
7
3. Touch bolus button
Raised button
4
6
5
FRONT OF PUMP
4. Left program key
This key is used to go
back (Back) to a previous
menu, to complete a
programming step
(Done), to review (Rev)
or to stop (Stop) the pump.
5. Right program key
This key is used to
access menu screens.
The two programming
keys have different
functions depending on
the menu. The word above
the key corresponds to
its function.
6. Up and down arrow keys
These keys allow you to
move up and down within
a selected (highlighted)
menu item.
4
8
9
BACK SIDE OF PUMP
7. IR window
8. Serial number
9. Manufacturer’s address
and 24/7 toll-free customer
service number (USA only)
4070889_inside_die
8/10/04
10:33 AM
Page 3
7. Cover the cartridge tip with
the white cartridge cap. Turn
the cap clockwise to tighten.
USER TRAINING TIPS
For today’s training session:
8. Turn plunger counterclockwise to remove it.
Discard plunger.
• Your demo pump contains a
cartridge.
• You will use air OR saline
9. Set cartridge aside.
Battery
Your demo pump has a basal
rate programmed into it, and
you will learn how to set and
change basal rates.
The Deltec Cozmo® Insulin
Pump uses one AAA alkaline
battery.
2002-09-16 D. Zurn
«cozmo-turn-batt-cover.eps»
Cartridge
Assembly and Fill
1. Open the cartridge package
by peeling back the upper
edge of the clear plastic cover.
Remove the contents. There
are 3 items in the package:
a needle with a clear cover,
a 300-unit (3 ml) cartridge
with plunger, and a white
cartridge cap.
2. Attach the covered needle
to the cartridge by turning the
needle/cover clockwise.
Remove the needle cover.
3. Prepare the cartridge by
sliding the plunger up and
down several times to distribute the invisible plunger
lubricant, similar to sliding an
insulin syringe plunger.
Pump Information / Setup
to fill a new cartridge and
infusion set tubing. You will
not be inserting an infusion
set into yourself.
D. Zurn, 2001-08-29
needle-attach.ai
1. Use a coin to remove the
battery cap. Insert the coin in
the center of the battery cap
and turn counter-clockwise.
Remove the battery cap.
2. Insert the battery into the
battery compartment, positive
(+) side down. Replace the
battery cap by using the coin
to turn clockwise.
2002-09-16 D. Zurn
«cozmo-insert-AAA.eps»
3. The pump will vibrate first.
Then listen for 6 beeps. This
is a self-test and indicates the
pump is working properly.
4. Refer to the pump screen
display. This is a home screen.
After 15 seconds, the screensaver display appears.
4. Pull the plunger down to
prepare to fill the cartridge
with 100 to 300 units of air or
saline.
5. Draw up the desired
amount. If using saline, knock
out bubbles.
6. Replace the needle cover
and turn the needle cover
counter-clockwise to remove
the needle. Discard in a
sharps container.
5
4070889_inside_die
8/10/04
Pump Information / Setup
Basal Rate
Time
10:33 AM
Page 4
Screensaver
and Backlight
5. From the Cartridge Menu
press the right program key to
select Load.
The screensaver displays the
current time of day and current basal rate or alert. When
the user is at a home screen
and no keys or buttons are
pressed for 15 seconds, the
screensaver display appears,
allowing the pump to save
battery power.
6. The pump will then tell you
to detach set from body,
install filled cartridge, then
press Load.
• Pressing the down arrow
key turns on the screen
backlight
. The backlight
can only be turned on from
the screensaver. The backlight
automatically turns off when
the screensaver reactivates.
• The backlight blinks when the
motor is running.
• Press any key on the keypad to
deactivate the screensaver and
return to the home screen.
7. Remove the cartridge from
the pump by first turning the
cartridge cap 1/4-turn counterclockwise. Then turn the
cartridge 1/4-turn counterclockwise to remove it from
the pushrod.
8. Insert the new cartridge
into the pump. Do not push
down on the cartridge! Attach
the cartridge onto the pushrod
by gently turning the cartridge
1
/4-turn clockwise to lock it
onto the pushrod.
PLEASE NOTE
USER TRAINING TIP
Pressing the down arrow key turns on the
screen backlight.
If the pushrod is not near the
top of the cartridge chamber,
please follow the prompts on
the screen display: Not ready.
Pushrod must move forward.
Remove the cartridge,
then press OK.
Cartridge Removal/
Insertion
The screen display will then
read: Fast Forward. Please
wait.
1. Press any key to go to any
of the three Home Screens.
You will hear and see the
pushrod move forward (from
the bottom to the top of the
chamber) automatically.
Resume the cartridge load
process below.
2. From the Home Screen
select Menu.
3. From this menu with icons,
use the down arrow key
(located under the screen) to
scroll through the menu,
highlight Load.
4. Press the right program key
to select Load.
6
9. Refer to the pump screen.
Press Load.
You will hear and see the
motor automatically load the
cartridge into the pump. When
the cartridge has completed
4070889_inside_die
8/10/04
10:33 AM
Page 5
the load process, the motor
sound will stop and you will
return to the Cartridge Menu,
where the Load box will be
checked.
10. Attach the cartridge cap
to the pump. Turn clockwise
to tighten.
3. If using saline, when you
see 4 or 5 drops of saline at
the end of the tubing, press
Stop.
4. Press Back to return to the
Cartridge Menu.
USER TRAINING TIP
After cartridge is loaded, turn the pump
upside down. If the cartridge is correctly
attached, it will NOT fall out when you turn
the pump upside down.
Preparation of Comfort
Set
1. Open the infusion set
package, remove and unwind
the tubing.
USER TRAINING TIP
If the user sees air when
saline (or insulin) is in the
tubing after pressing Stop:
1. Press Start again.
2. Remove the white cartridge
cover from the newly filled and
inserted cartridge tip.
3. Attach the infusion set
tubing through the opening
hole in the cartridge cap and
firmly tighten it onto the
cartridge tip with the luer lock.
Fill Tubing
Once you’ve loaded the
cartridge, the prompt
automatically moves to the
Fill Tubing selection.
1. Press Select.
2. Press Start.
2. The screen will then
display: Continue to fill
tubing? Use the arrow keys
to change No to Yes. Press the
right program key to Select.
3. Press Stop when the air
has moved through and out
the tubing and you see 4 or 5
drops of saline at the end of
the tubing.
4. Press Back to return to the
Load Cartridge Menu. (If no
keys are pressed, pump will
automatically return to
Cartridge Menu.)
5. Then, the pump screen will
return to the sleep screen if no
keys are pressed and display
the word “Alert” next to the
time. Pressing any key will
return to the Cartridge Menu
screen with Fill cannula
highlighted.
7
4070889_inside_die
8/10/04
10:33 AM
Page 6
WHEN TRAINING A USER
WITH A NEW PUMP
USER TRAINING TIPS
User should now insert site.
1. From the Cartridge Menu,
scroll to Fill Cannula.
Once you’ve filled the tubing,
you must fill the cannula.
2. Press Select.
Fill Cannula
3. Press the up arrow key to
select the desired amount to
fill the cannula.
WHEN TRAINING WITH
A DEMO PUMP
4. Press Fill to fill the cannula.
Your demo pump has an
amount of insulin highlighted.
This is the amount of insulin
used in the last cannula fill.
The Deltec Cozmo® Insulin
Pump remembers this amount
each time the user completes
the Fill Cannula step.
5. Press Done to return to Main
Menu.
1. In the Cartridge Menu, the
prompt automatically moves to
the Fill Cannula menu. Press
Select.
2. Attach tubing to access site
to fill cannula.
3. Press Fill to deliver the
amount displayed.
The pump will fill the cannula,
then return to the Cartridge
Menu.
4. Press Done to return to the
Main Menu.
8
PLEASE NOTE
If Done is not pressed, pump will alert that
Load is not complete.
4070889_inside_die
8/10/04
10:33 AM
Page 8
Insulin in
cartridge
Power in
battery
Standard Home Screens
Home Screen 1
Current basal pattern
Current basal rate
Home Screens
Current basal pattern
and rate
All programming, operating and alarm/alert
information is shown in the Home Screen
display.
ALL HOME SCREENS
DISPLAY
1. Insulin remaining icon:
amount of insulin in the
cartridge
2. Battery icon: battery power
3. A personalized pump name,
or Cozmo if no name has been
programmed
5. Stop (above left program
key)
6. Up and down arrow icon
7. Menu (above right program
key)
The Deltec Cozmo® Insulin
Pump has three standard
Home Screens, plus four
optional screens that can
be enabled by the user.
The following additional
information is displayed on
each Home Screen:
Stop
delivery
Home screen
number
Home Screen 2
Last program bolus
Amount of bolus and time
of delivery
Last programmed bolus amount and
time programmed; if active, extended
or combination bolus active will
appear on this screen
Home Screens
4. The Home Screen number
Enter
Main Menu
Stop delivery or quick access to
review Bolus History
Home Screen 3
Cozmo or personalized name
Current date and time
Personalized text
Date and time (2 additional lines of
custom text may be entered using
CoZmanagerTM PC Communications
Software)
Optional Home Screens
When optional Home Screens
are selected, use the up and
down arrow keys to view.
Illustrations of these screens
can be seen on page 25.
9
4070889_inside_die
8/10/04
10:33 AM
Page 9
To Set Time and Date
Pump Setting
Options
Users can easily personalize
options on their Deltec Cozmo®
Insulin Pump. To begin:
1. Press any key to move to a
Home Screen.
2. Press right program key
below Menu to move to the
Main Menu.
Pump Setting Options
3. Use the up and down arrow
keys to move between the
menu choices. When you make
your choice, the menu item is
highlighted, or boxed.
4. Press Select to enter into
the menu you have chosen.
After entering into a menu,
you can change the item that
is highlighted by using the up
and down arrow keys.
As you add personalized
options, they will be added to
the Main Menu. These choices
include:
• Correction Bolus — See
page 19 for programming
information
• Temporary Rate — See
page 21 for programming
information
• History — See page 14 for
programming information
1. Go to the Main Menu.
2. Scroll to and select
Pump Settings.
3. From the Pump Settings
menu, select Time and Date.
4. Change the highlighted
(darkened) item using the up
and down arrow keys.
5. Press Next to move to the
next set of numbers.
6. Press Done when you’ve
made your choices.
You will return to the Pump
Settings menu.
Set Beep or Vibrate
1. From the Pump Settings
menu, select Beep/Vibrate.
2. Beep is the default. Use
the arrow keys to change to
Vibrate, if desired.
3. Volume default is high. Use
arrow keys to select medium
or low. Volume can only be
adjusted if the Beep option is
chosen.
4. Key Beep: Yes is default.
Set to No for this training
session.
5. Press Next.
You will return to the Pump
Settings menu.
10
4070889_inside_die
8/10/04
10:33 AM
Page 10
TO UNLOCK PROGRAM LOCK
USER TRAINING TIP
Set the user’s pump to Beep.
After using the pump for a few
weeks, the user may want to
switch to Vibrate.
Program Lock
When the pump is in lock
mode, pump functions cannot
be used until the pump is
unlocked, but basal insulin
delivery will continue.
1. Go to any Home Screen and
select Menu.
2. Lock Code will appear. Use
up arrow key to enter 17.
Press Next.
3. This brings up the Main
Menu. Select Pump Settings.
TO SET PROGRAM LOCK
1. From the Pump Settings
Menu select Program Lock.
2. Enter code. Use up arrow
key until you reach 17. This is
the default code, and it is
NOT changeable.
The pump will not allow you to turn
the lock on or off unless you know
the proper code. Enter code number
17 (this code number cannot be
changed), then press Next.
4. Scroll to Program Lock and
press Select.
5. Enter code. Use the up
arrow key until you reach 17.
Press Next.
6. Change Yes to No.
7. Press Next.
Pump Setting Options
The pump is now unlocked,
and you will return to the
Pump Settings menu.
3. Press Next.
4. Choose Yes to lock program.
5. Press Back until you reach
a Home Screen. This activates
the lock program.
11
4070889_inside_die
8/10/04
10:33 AM
Page 12
DELIVERY LIMIT ALARM
Personalized Options
Alerts
Default is 40 u. Range is
1-150 u. These numbers
represent the hourly insulin
delivery limit.
1. 40 u will be displayed.
Use the up and down arrow
keys to change, if desired.
2. Press Next.
Alerts
GLUCOSE REMINDER ALERT
1. From the Pump Settings
Menu, select Personalize.
Default is 2 hours. Range is
1 to 4 hours in 15 minute
increments.
1. After: 02:00 hr will be
displayed.
2. This brings up the
Personalize Menu. Alerts will
be highlighted. Press Select.
2. Use the arrow keys to
change No to Yes.
The screens that follow
personalize the following:
4. Use arrow keys to set
amount of time.
Personalized Options
Alerts
• Low Cartridge Alert
• Delivery Limit Alarm
• Glucose Reminder Alert
• Review or Edit Custom Alerts?
• Low Blood Glucose Alert
• High Blood Glucose Alert
• Automatic Off Alarm
• Site Reminder Alert
• Review or Edit Missed Meal
Bolus Alert?
To Program Alerts
LOW CARTRIDGE ALERT
Default is 20 u. Range is
5-50 u.
1. 20 u will be displayed.
Use the up and down arrow
keys to change, if desired.
2. Press Next.
12
3. Press Next.
5. Press Next.
REVIEW OR EDIT
CUSTOM ALERTS?
Default is No.
1. Use the arrow key to
change No to Yes.
2. Press Select.
At this point, the user can
choose to create up to four
custom blood glucose (BG)
alerts and four additional
reminder alerts. Program BG
Alert 1 as a sample.
3. Press Edit to select
BG Alert 1.
4. Use alert default is No.
Use arrow keys to change
No to Yes.
5. Press Next.
6. Time default is 12:00 AM.
Range is 12:00 AM to 11:55 PM.
Use arrow keys to change time
in 5-minute increments.
4070889_inside_die
8/10/04
10:33 AM
Page 13
7. Press Next.
8. Default type is Single.
Use arrow keys to change type
of alert to Daily.
9. Press Next.
5. Default blood glucose limit
is 200 mg/dl. Range is 150 to
300 mg/dl. Use arrow keys to
change limit.
6. Press Next.
10. You will return to Custom
Alerts menu, where user can
set custom alerts, as desired.
AUTOMATIC OFF ALARM
11. Press Done when all
desired custom alerts have
been set.
1. Use arrow keys to change
No to Yes.
Default is No.
2. Press Next.
LOW BLOOD GLUCOSE
ALERT
Default is No.
1. Use arrow keys to change
No to Yes.
2. Press Next.
3. Default time is 15 minutes.
Range is 5 minutes to 1 hour.
Use arrow keys to change time
in 5-minute increments.
4. Press Next.
5. Default blood glucose limit
is 70 mg/dl. Range is 50 to
100 mg/dl. Use arrow keys to
change limit.
6. Press Next.
HIGH BLOOD GLUCOSE
ALERT
3. Default is 8 hours.
Range is 1 to 24 hours.
Use arrow keys to change
time.
4. Press Next.
SITE REMINDER ALERT
1. Site Reminder Alert default
is No. Use arrow keys to
change No to Yes.
2. Press Next.
3. Default setting for Display
Site Reminder Home Screen is
No. Use arrow keys to change
No to Yes.
Default is No.
1. Use arrow keys to change
No to Yes.
2. Press Next.
REVIEW OR EDIT MISSED
MEAL BOLUS ALERT
Default is No.
2. Press Select.
4. Press Next.
13
Personalized Options
Alerts
3. Default time is 1:30. Range
is 30 minutes to 2 hours.
Use arrow keys to change time
in 5-minute increments.
1. Use arrow keys to change
No to Yes.
4070889_inside_die
8/10/04
10:33 AM
Page 14
3. The Missed Meal Bolus
Alert programming screen will
appear. Press Edit to choose
Alert 1.
4. Default is No. Use arrow
keys to change No to Yes.
Personalized Options
History
5. Press Next.
6. Default start time is
12:00 AM. Range is
12:00 AM to 11:30 PM.
Use arrow keys to change
start time.
1. From the Personalize Menu,
scroll to History.
7. Press Next.
2. Press Select.
8. Default end time is
12:00 AM. Range is
12:00 AM to 11:30 PM.
Use arrow keys to change
end time.
The following is a list of options
that can be displayed in the
History menu. Choosing Yes to
any of these options will add
History as a choice on the
Main Menu.
9. Press Next.
10. You will return to the
Missed Meal Bolus Alert
screen.
11. To program additional
alerts, scroll to the next alert,
press Edit and follow the
above steps.
12. Press Done when all
Missed Meal Bolus Alerts have
been programmed.
You will return to the
Personalize Menu.
Personalized Options
History / Regional Settings
History
Bolus History shows the date,
time and amount of all
boluses — including meal and
correction boluses — currently
contained in the “complete
history” report.
Complete History includes
delivery totals, alerts, errors,
battery changes, cartridge
changes, changes to the pump
program, etc. Each “event” in
the complete history includes
the date and time of its
occurrence. It includes the
last 4,000 events.
Delivery Summary is a daily
breakdown of insulin delivery
and includes the daily total,
meal bolus, carbohydrates,
correction bolus and basal
amounts.
Avg Delivery Summary looks
at parameters described in
delivery summary, totals them
over a number of days (2 to
30), and calculates an
average.
14
4070889_inside_die
8/10/04
10:33 AM
Page 15
Personalized Options
History / Regional Settings
Basal as Percent of TDD shows
what percent of the total
amount of insulin delivered
each day is basal insulin.
Personalized Options
Regional Settings
Avg Basal as Percent of TDD
looks at what percent of the
total amount of insulin
delivered over a number of
days (2 to 30) is basal insulin
and calculates an average.
Blood Glucose
History
Blood Glucose History allows
you to add and view the
results of your BG test if you
decide to add the BG Home
Screen.
Regional Settings
1. From the Personalize Menu,
scroll to Regional Settings.
2. Press Select.
Average Blood Glucose History
provides an average over a
selected period of time if you
have entered the above
information.
3. Default Time Format is
12 Hour. Use arrow keys to
change to 24 Hour, if desired.
Display BG home screen? can
be turned on in Pump Settings
/ Personalized / History.
5. Default Date Format is
mm/dd/yy. Use arrow keys to
change date format to
dd/mm/yy, if desired.
3. For today’s demonstration,
change all of the No default
settings to Yes.
4. Press Next after each
selection.
When completed, you will
return to the Personalize
Menu.
When you view your Main
Menu later, you will see
History as a new menu item
with these options.
4. Press Next.
6. Press Next.
7. Default for Number Format
Decimal place is Period. Use
arrow keys to change to
Comma, if desired.
8. Press Next.
You will return to the
Personalize Menu.
15
Personalized Options
Meal Bolus
4070889_inside_die
8/10/04
10:33 AM
Page 18
8. Press Next.
Personalized Options
Meal Bolus
1. From the Personalize Menu,
scroll to Delivery and press
Select.
9. Screen will display: Meal
Bolus In Menu. This asks the
user to select an Extended
and/or Combination Bolus as
choices in the Meal Bolus
Menu. Default for both is No.
Use arrow keys to change No
to Yes.
10. Press Next after each
selection.
11. Screen will display: Touch
Bolus. Default is Yes.
12. Press Next.
2. The Delivery Setup Menu
appears with Meal Bolus
highlighted.
13. Extended and Combination
Bolus will now appear in your
bolus menu.
3. Press Select.
USER TRAINING TIP
TO PROGRAM A MEAL BOLUS
USING UNITS-INSULIN
1. Once you select Meal Bolus
from the Delivery Setup menu,
the screen will display:
Units-Insulin as the default
setting.
Pressing the Touch Bolus
button while on the
Screensaver or any Home
screen will allow the user to
program a Touch Bolus.
2. Press Next.
3. Screen will display: When
changing bolus maximum is:
Default is 15.00 u. Range is
1.00 to 75.00 u. Use arrow
keys to choose desired amount.
4. Press Next.
5. Screen will display: When
changing bolus increment by:
Default is 0.10 u. Options are
0.05, 0.10, 0.50, 1.00, 2.00,
5.00 u. Use arrow keys to
choose desired amount.
6. Press Next.
7. Screen will display: Bolus
Duration. Default is 1 minute.
Options are 1, 2, 3, 4 or 5
minutes. Use arrow keys to
choose minutes.
16
14. Screen will display:
When changing Touch Bolus
increment by: 0.10. This is
the default. Options are 0.05,
0.10, 0.50, 1.00, 2.00, 5.00 u.
Use arrow keys to make
selection.
15. Press Next.
You will return to the Delivery
Setup Menu.
4070889_inside_die
8/10/04
10:34 AM
Page 19
TO PROGRAM A MEAL BOLUS
USING GRAMS-CARBS
1. Once you select Meal Bolus
from the Delivery Setup menu,
the screen will display:
Program bolus using:
Units-Insulin. Use arrow keys
to change Units-Insulin to
Grams-Carbs.
2. Press Next.
4. Press Next.
5. Screen will display: When
changing Carbohydrates
increment by: 5 grams. This is
the default. Options are 1-5,
10 or 15 grams. Use arrow
keys to make selection.
6. Press Next.
7. Screen will display: When
changing bolus maximum is:
15.00 u. This is the default.
Options are 1 to 75 u. Use
arrow keys to make selection.
8. Press Next.
9. Screen will display: When
changing bolus increment by:
0.10 u. This is the default.
Options are 0.05, 0.10, 0.50,
1.00, 2.00 and 5.00 u. Use
arrow keys to make selection.
10. Press Next.
11. Screen will display: Bolus
Duration 1 minute. This is the
default. Options are 1, 2, 3, 4
or 5 minutes. Use arrow keys
to make selection.
14. Default for both is No.
Use arrow keys to change No
to Yes.
Personalized Options
Meal Bolus
3. Screen will display: Insulin
to Carb Ratio: 1 unit per 15.0
grams. This is the default. You
can use arrow keys to choose
desired ratio amount.
13. Screen will display: Meal
Bolus In Menu. This asks the
user if s/he wants to have
Extended and/or Combination
Bolus as choices in the Meal
Bolus Menu.
15. Press Next after each
selection.
TO PROGRAM A TOUCH
BOLUS
1. Menu will display: Touch
Bolus. Default is Yes.
2. Press Next.
3. Screen will display:
When changing Touch Bolus
increment by: 5 grams.
This is the default. Options
are 1-5, 10 or 15 grams. Use
arrow keys to make selection.
4. Press Next.
REVIEW OR EDIT CUSTOM
BOLUS
1. Screen will display: Review
or Edit custom bolus? No is
the default. Use arrow keys to
change No to Yes.
2. Continue to set up to 6
different carb ratios (3 meals
and 3 snacks).
12. Press Next.
17
4070889_inside_die
8/10/04
10:34 AM
Page 20
Personalized Options
Correction Bolus
USER TRAINING TIP
The Review or Edit custom bolus screen will
only display in the pump when grams-carbs
have been selected. With CoZmanager™ PC
Communications System, 12 Custom Meal
Boluses can be set using units of insulin or
different insulin-to-carb ratios and names;
however, the method of delivery must be set
to extended or combination. There is no
programmable feature to set up a Custom Meal
Bolus for a standard meal bolus delivery in
units of insulin.
3. Press Edit for Breakfast.
Follow the screen prompts.
4. Press Next when you have
made your choices.
5. You will return to the Custom
Bolus Menu. Press Done.
6. You will return to the
Delivery Setup Menu.
USER TRAINING TIP
Notice the checkmark in the box after you have
set the carb ratio for the meal or snack. This
indicates the user will have these meals and/or
snacks listed in the Meal Bolus menu.
18
4070889_inside_die
8/10/04
10:34 AM
Page 22
12. Press Edit.
Personalized Options
Correction Bolus
1. From the Delivery Setup
Menu, scroll to Correction
Bolus.
2. Press Select.
14. Press Next. The user can
personalize up to 24 different
correction factors by time of
day at half-hour start times.
15. Press Done when all
desired correction factors have
been entered.
16. Press Back after reviewing
correction factors.
17. Screen will display:
Duration of insulin action.
Default is 3 hours. Range is 2
to 8 hours in 15-minute increments. Use arrow keys to
make selection.
4. Press Next.
18. Press Next.
5. Default for Meal Bolus is
No. Use the arrow keys to
change No to Yes. This will
allow the user to program a
correction bolus with a meal
bolus.
19. Screen will display:
Target Blood Glucose. Default
is 150 mg/dl. Range is 80 to
200 mg/dl. Use arrow keys to
make selection.
20. Press Next.
6. Press Next.
7. When Yes is set, the following screen will display: Blood
glucose (BG) measured in:
Default is mg/dl. Can choose
mmol/L. Use arrow keys to
make selection.
8. Press Next.
9. Screen will display:
Correction Factor 40 mg/dl
Edit or review? Default is No.
Use arrow key to change No
to Yes.
21. Screen will display:
Display insulin on board home
screen? Default is No. Use
arrow keys to change No
to Yes.
22. Press Next.
You will return to the Delivery
Setup Menu.
10. Press Next.
11. Screen will display:
Correction Factor. The two
column headings are Time
and mg/dl. The default time
setting is Midnight and the
default mg/dl is 40.
19
Personalized Options
Correction Bolus
3. Screen will display:
Correction Bolus Display.
Default for Main Menu is No.
Use the arrow keys to change
No to Yes. This will allow the
user to program a correction
bolus without a meal bolus.
13. Use arrow keys to change
factor. Range is 5 to 30 mg/dl
in 1 mg/dl increments; 30 to
100 mg/dl in 5 mg/dl increments; and 100 to 400 mg/dl
in 10 mg/dl increments.
4070889_inside_die
8/10/04
10:34 AM
Page 23
Personalized Options
Basal Pattern
11. Users can name Patterns
1, 2, 3 and 4. Use the arrow
keys to choose a pattern number or one of five names that
are programmed into the
pump. Personalized names
can be set with CoZmanager™
PC Communication Software.
12. Press Next.
1. From the Delivery Setup
Menu, scroll to Basal Pattern.
2. Press Select.
Personalized Options
Basal Pattern / Temp Rate
3. Screen will display:
Maximum basal rate. Default
is 2.00 u/hr. Range is 0.0035.00 u/hr in 0.05 u increments. Use arrow keys to
make selection.
4. Press Next.
5. Screen will display: Review
or Edit Basal Pattern. Default
is No. Use arrow keys to
change No to Yes.
6. Press Select.
7. Screen will display:
Select pattern.
8. Press Edit to edit Pattern 1.
9. Screen will display:
Pattern 1. Default for In Menu
is Yes. Name Pattern 1.
10. Press Next.
USER TRAINING TIP
The Deltec Cozmo® Insulin
Pump must have a programmed
Basal Pattern or the pump will
alert the user. Make sure you
enter appropriate rates for
each pattern desired.
20
13. You will return to the
Select Pattern menu, where
the user can select additional
patterns, if desired.
14. Press Done when you have
selected the pattern(s) to appear
as choices in the Basal
Pattern menu. Basal rates are
set from the Basal Pattern
menu.
You will return to the Delivery
Setup Menu.
4070889_inside_die
8/10/04
10:34 AM
Page 24
Personalized Options
Temporary Rate
1. From the Delivery Setup
Menu, scroll to Temporary
Rate.
2. Press Select.
3. Screen will display:
Temporary Rate In menu.
Default is No. Use arrow key
to change No to Yes.
11. Screen will display:
Display Temporary rate home
screen? Default is No. Can
change No to Yes.
12. Press Next.
13. Screen will display:
Review or Edit Custom
Temporary Rate? Default is
No. Can change No to Yes.
14. Press Select.
If No is selected, you will
return to the Delivery Setup
Menu.
If Yes is selected:
1. Press Select.
4. Press Next.
5. Screen will display:
Program Temp Rate using:
Default is Percent. Can choose
Units/Hr.
6. Press Next.
8. Press Next.
9. Screen will display: Give
reminder when Temporary Rate
complete? Default is Yes. Can
change Yes to No.
10. Press Next.
3. Press Edit.
4. Screen will display: Custom
Temp Rate: Temp Rate 1.
5. Scroll to In Menu. Default
is No. Use arrow keys to
change No to Yes.
6. Press Next.
7. Default Rate is 100%.
Range is 1 to 250% in 5%
increments. Use arrow keys to
make selection.
8. Press Next.
21
Personalized Options
Basal Pattern / Temp Rate
7. Screen will display: When
running Temporary Rate.
Default Reminder is Yes. Can
change Yes to No. Default for
How often is 00:15 hr. Can
choose 15 minutes to 2 hours
in 15-minute increments. Use
arrow keys to make selection.
2. Choose Temp Rate 1.
The user can program four
Custom Temporary Rates with
one of four pattern numbers or
one of three names. Eight
additional Custom Temporary
Rates can be programmed
with CoZmanager™ PC
Communications Software.
4070889_inside_die
8/10/04
10:34 AM
Page 25
9. Default Duration is 00:30.
Range is 30 minutes to 72
hours in 30-minute increments. Use arrow keys to
make selection.
10. Press Next.
11. Default Name is Temp
Rate 1. Use arrow keys to
select the pattern number or
name.
12. Press Next.
13. You will return to the
Custom Temporary Rate
menu, where the user can
set additional temporary rates,
if desired.
14. Press Done when Custom
Temporary Rates have been
set.
Personalized Options
Personalized Options
Temporary Rate
15. Allow the pump to return
to the screensaver screen, or
press Back until you return to
the Main Menu.
22
4070889_inside_die
8/10/04
10:34 AM
Page 26
Using the
Meal Maker Feature
5. The Meal Maker™ screen
will appear, asking you for the
number of grams (gms) for
Item 1.
™
The Meal Maker™ feature makes counting carbs
easy. Users simply enter carbohydrate grams for
each meal item. The Deltec Cozmo® Insulin
Pump automatically totals all the carbohydrate
grams and then calculates the amount of
insulin required, based on the user’s personal
insulin-to-carb ratio(s).
USER TRAINING TIP
The Meal Maker™ feature is
accessible when grams-carbs
is the selected method of
bolus delivery.
6. Use the up arrow key to
select the total number of
grams (gms) for Item 1. For
demonstration purposes,
please enter the number 15.
Numbers will scroll up in
increments of 5 up to
225 gms. Please note that as
you scroll up, Total gms
changes from 0 to ????? gms
until you press Next to enter
the Item amount.
7. Press Next.
USER TRAINING TIP
The increments will be the
same as the increments for
the keypad bolus.
TO BEGIN USING
MEAL MAKER
1. From one of the Home
Screens, choose Menu to
display the Main Menu.
2. Select Meal Bolus.
3. If any bolus options have
been programmed, select
Standard.
9. Press Next.
10. The Meal Maker™ screen
will display: Total = 40 gms,
Item 1-gms as 15 and Item
2-gms as 25. Item 3 will also
appear. For this demonstration,
we will only enter grams for
two items.
11. Press Done.
4. Press the Touch Bolus
Button on the right side of the
pump.
23
Personalized Options
Temporary Rate
If no bolus options have been
programmed, the carbohydrates
screen will appear.
8. The Meal Maker™ screen
will ask for the number of
grams (gms) for Item 2. It also
lists total grams as 15 and
gms for Item 1 as 15. Use the
up arrow key to select 25 gms
for Item 2.
4070889_inside_die
8/10/04
10:34 AM
Page 27
12. The Carbohydrates screen
will appear with 40 gm (as the
total gm).
13. Press Next.
0.30 u insulin on board
14. The Add Correction Bolus?
screen will appear. The default
is Yes if there is no insulin on
board. The default is No if
there is insulin on board, as
there is in this example.
15. Press Next.
16. The Deltec Cozmo® Insulin
Pump calculates the bolus
needed for a 40 gram carb
meal. The screen will display
2.65 u.
17. Press Deliver.
18. You will then see and hear
the pump deliver the bolus.
You will return to a Home
Screen when the bolus
delivery is complete.
li d O ti
Review
P
Congratulations! You have just
programmed personalized options in
your Deltec Cozmo® Insulin Pump!
24
4070889_inside_die
8/10/04
10:34 AM
Page 28
Review
Follow the pump screen
prompts to complete the
following assignments. Refer
to the Deltec Cozmo® Insulin
Pump User Manual for
additional guidance.
Deliver a meal bolus.
Deliver a touch bolus.
Deliver a correction bolus.
Review
Optional Home Screens
See pages 9 –13 for
instructions on accessing
Home Screens 1, 2 and 3.
Insulin on Board (IOB)
See page 19 for how to turn
on this screen.
Time Remaining
Insulin Amount Remaining
Blood Glucose (BG)
See page 12 for how to turn
on this screen.
Last Blood Glucose
Enter BG Value, Review BG History,
Stop delivery
Site Reminder (SR)
See page 13 for how to turn
on this screen.
Next Site Reminder
Set an extended OR
combination bolus.
Change, add and delete basal
rates to basal pattern in use.
Add a second basal pattern to
Basal Pattern menu. (Hint:
You are setting a personalized
delivery of insulin, another
basal pattern.)
Temporary Rate (TR)
See page 21 for how to turn
on this screen.
Deliver and stop a bolus
before it is complete.
Set a temporary basal rate.
Set a site change reminder.
Enter a blood glucose value in
Blood Glucose menu screen.
(Hint: begin on BG Screen.)
Stop the extended/combination bolus you set.
Stop the temporary rate
you set.
Review bolus history.
Scroll through the Standard
and Optional Home Screens.
You may have programmed up
to four Optional Home Screens.
Review each Optional Home
Screen.
Turn on the backlight.
Deliver a bolus while using the
backlight.
Do you have any questions?
For additional help call 1-800-826-9703
25
8/10/04
Notes
4070889_inside_die
Notes
26
10:34 AM
Page 30
4070889_Cover
8/10/04
10:35 AM
Page 27
Notes
27
4070889_Cover
8/10/04
10:35 AM
Page 28
Smiths Medical MD, Inc.
St. Paul, MN 55112 USA
www.DeltecCozmo.com
Customer Service (USA ONLY): 1-800-826-9703
Fax: 1-800-209-2145
U.S. and foreign patent(s) pending.
Deltec Cozmo and Deltec Cozmo logo design are trademarks of the Smiths Medical family of companies.
The ® indicates the trademark is registered in the U.S. Patent and Trademark Office and certain other countries.
©2004 Smiths Medical family of companies. All rights reserved.
7/04
19582