1
Sears
OWNERS
MANUAL
MODEL NO.
572.36578
CAUTION:
Read Rules for
Safe Operation
and Instructions
115 VOLT A.C.
SAW CHAIN
SHARPENER
Carefully
Introduction
Assembly
Operation
Maintenance
Repair Parts
Sold by SE_RS, ROEBUCK AND CO_, Chicago,
FORM NO 380223
IL 60684
UoS A,
PRINTED IN U,S A
FULL
ONE
YEAR WARRANTY
ON CRAFTSMAN
SAW CHAIN
SHARPENER
_ --_._
For one year from the date of purchase, Sears will reptace this Craftsman Saw Chain Sharpener,
free of charge, if it falls to work properly_
WARRANTY
SERVICE
IS AVAILABLE
CRAFTSMAN
SAW CHAIN SHARPENER
STORE IN THE UNITED STATES
BY
RETURNING
THE
TO THE NEAREST SEARS
This warranty gives you specific legal rights, and you may also have
other rights which vary from state to state.
SEARS, ROEBUCK & COo
SEARS TOWER
DEPT. 6981731A
CHICAGO, IL 60684
INTRODUCTION
WE SUGGEST
YOU TAKE A FEW MINUTES
TO READ THE INSTRUCTIONS
CONTAINED
IN THIS MANUAL
BEFORE USING YOUR CRAFTSMAN
SAW CHAIN SHARPENER
THIS WILL HELP YOU OBTAIN
THE FULL
BENEFITS
OF THE QUALITY
AND CONVENIENCE
BUILT INTO THE TOOL
RULES
FOR
SAFE
OPERATION
WARNING
When using electric
shock, and personal
tools, basic safety precautions
injury, including
the following:
READ
should
AND SAVE ALL THE
1_ KEEP WORK AREA CLEAN -- Cluttered areas
and benches invite injuries
2 AVOID DANGEROUS ENVIRONMENT -- Don't
expose tools to rain Don't use power tools in damp
or wet Iocations. Don't use power tools in the presence of flammable liquids or gases. Avoid chemical
or corrosive environments. Keep work area well lit.
3 GUARD AGAINST ELECTRIC SHOCK -- Prevent
body contact with grounded surfaces. For example;
pipes, radiators, ranges, refrigerator enclosures.
4. KEEP CHILDREN AWAY -- Do not let visitors
contact tool or extension cord All visitors should
be kept away from work area_
5. STORE IDLE TOOLS -- When not tn use, tools
should be stored in dry, and high or locked-up placeout of reach of children_
6. DON'T FORCE TOOL _ it will do the job better
and safer at the rate for which it was intended.
7. USE RIGHT TOOL -_. Don't force small tool or
attachment to do the job of a heavy-duty tool Don't
use tool for purpose not intended - for example don't use circular saw for cutting tree limbs or logs.
8 DRESS PROPERLY _ Do not wear loose clothing or jewelry., They can be caught in moving parts.
Non-skid footwear is recommended when working
outdoors_ Wear gloves to prevent cutting your fingers
when ,touching or rotating chain. Wear protective
hair covering to contain long hair.
9. USE SAFETY GLASSES -- Also use face or dust
mask tf cutting operation is dusty.
10. DON'T ABUSE CORD -- Never carry tool by
cord or yank it to disconnect from receptacle Keep
cord from heat, oil, and sharp edges.
11_ SECURE WORK _ Use clamps or a vise to hold
work., It's safer than using your hand and it frees both
hands to operate tool
always
FOLLOWING
be followed
to reduce
the risk of fire, electric
INSTRUCTIONS
12_ DON'T OVER-REACH
and balance at all times.
--
Keep
proper
footing
13 MAINTAIN
TOOLS WITH CARE _ Keep tools
sharp and clean for better and safer performance.
Fotlow
instructions
for lubricating
and changing
accessories.
Inspect tool cords periodically
and if
damaged,
have repaired
by authorized
service
facility.
Inspect
extension
cords periodically
and
replace if damaged_
Keep handles dry, clean, and
free from oil and grease
14. DISCONNECT
TOOLS
_ When
not in use,
before servicing,
and when changing
accessories,
such as blades, bits, cutters.
15 REMOVE ADJUSTING
KEYS AND WRENCHES
Form habit of checking
to see that keys and adjusting
wrenches
are removed
from
tool
before
turning it on_
16. AVOID
UNINTENTIONAL
STARTING
_ Don't
carry plugged-in
tool with finger on switch_ Be sure
switch is off when plugging
ino
17 OUTDOOR
USE EXTENSION
CORDS _ When
tool is used outdoors,
use only extension
cords
intended
for use outdoors and so marked
18. STAY ALERT _ Watch what you are doing Use
common
sense.. Do not operate tool when you are
tired
Don't
use power
tools
after taking
drugs,
alcohol or medications..
!9,. CHECK
FOR DAMAGED
PARTS
-- Before
further
use of the tool, check
for damaged
parts,
Check for alignment
of moving
parts, binding
of
moving parts, breakage of parts, mounting,
and any
other conditions
that may affect its operation.
A part
that is damaged
should
be properly
repaired
or
replaced
by an authorized
service
center
before
further
use of the tool
Have defective
switches
replaced by authorized
service center.
Do not use
tool if switch does not turn it on and off.
PAGE 2
GROUNDING
INSTRUCTIONS
This too! shou}d be grounded while in use to protect
the operator from electricshock, Thetool is equipped
with a three-conductor
cord and three-prong
grounding type plug to fit the proper grounding type
receptacle. The green (or green and yellow) conductor in the cord is the grounding wire, Never
connect the green (or green and yellow) wire to a
live terminal. Your unit is for use on less than 150
volts, and it has a plug like that shown in Figure A,,
An adapter, Figures B and C, is available for con_
necting Figure A plugs to two-prong receptacles°
The green-colored rigid ear, lug, etc,., must be connected to a permanent ground such as a properly
grounded outlet box, Adapters are not allowed in
Canada by the Canadian electrical code..
Use only three-wire extension cords which have
three-prong grounding-type
plugs and three-pole
receptacles which accept the toot's plugo Replace or
repair damaged or worn cords immediately_
COVER OF GROUNDED
OUTLET BOX
GROUNDING
TEMPORARY _..f_
ADAPTER I
OPERATING
INSTRUCTIONS
ADJUSTING
SHARPENER
SETTtNG
DEPTH
SHARPENED
TROUBLE
CHAIN
POWER
60-Hz,
SUPPLY_Tool
CUTTER
..................................................................................
SHOOTING
PARTS LIST
AND
HOW TO ORDER
.......................................................................................
on
115V, AC,
.....................................................................................
4
4-5_6
6
8
9
9
ILLUSTRATION
REPAIR
operates
use only
OF CONTENTS
......................................................................................
EXAMPLES
servicing
INSTRUCTIONS
...........................................................................................
GAUGES
MEANS
REPLACEMENT PARTS--When
identica! replacement parts,
........................................................................................
SHARPENING
GROUNDING
Figure C
READ AND SAVE ALL THE PRECEEDING
TABLE
_._ "',_
BLADE
....................................................................................
PARTS ..............................................................................
PAGE 3
11
12
IMPORTANT
OPERATING
INSTRUCTIONS
Check to see that the carton contains the following
items illustrated on pages 4 and 5.
One Chuck Cap - Part Number 660113
One Co!let - Part Number 480
One Chuck Wrench - Part Number 500045
Two Spacers
One Guide Gauge
Three Grinding Stones Part Numbers 36581, 82 & 83
Sharpener - Part Number 36578
IMPORTANT:
If any of these parts are missing,
please IMMEDIATELY
notify the Sears retail or
catalog store from which you purchased the sharpener so corrective action can be taken as quickly as
possible,,
Read this manual carefully, It will help you use your
tool correctly
and help you
select
the correct
accessory
for your job
Your Craftsman Saw Chain Sharpener will sharpen
nearly all popular sizes of chain if you follow these
simple instructions
ALWAYS UNPLUG TOOL BEFORE CHANGING
GRINDING STONES OR SERVICING YOUR TOOL.
CHUCK--Consists
of a chuck cap and collet. To
loosen, first unplug the sharpener from the power'
supply, then depress the chuck lock pin and rotate
the shaft by hand until the lock pin engages the shaft
preventing further rotation. NOTE: Do not depress
pin while the tool is running. With the lock pin
depressed, use the chuck wrench to loosen the chuck
cap Insert shank of grinding stone into colteL With
the lock pin depressed, tighten the chuck cap with
the wrench until the shank is gripped by the collet.
Avoid excessive tightening of the chuck cap.
- Read before using.Chain
Saw Sharpener
Just prior to the tool stopping it wdl start to run
sporadically, it will lose power and it may run at a
reduced speed and make unusual noises
BALANCING GRINDING STONES--It is important
that all grinding stones be in good balance (much
the same as the tires on your automobfle)_ To true
up or balance a grinding stone, slightly loosen chuck
cap and give the grinding stone or cotter a ¼ turn,
Retighten chuck cap and run the tool, You should
be able to tell by the sound and feel if your grinding
stone is running in balance.. Continue adjusting in
this fashion until best balance is achieved.
BEARINGS--Your tool is equipped with oil impregnated sleeve bearings. Under normal use not more
than 2 drops of SAE No 5 or lighter, non-detergent
otl can be added to each oil hole for each 100 hours
of use,
STONE DIAMETER--Do
not use grinding stones
other than the 3 listed in the chain identification
chart.
SAFETY--Protect your eyes when grinding with the
tool .... always wear an approved type of safety
glasses.
ADJUSTING
SHARPENER
1, First, determine the type or pitch of chain on your
saw Most chains are marked with a number on the
drive link, see Figure 1 tf your chain is not marked,
refer to your Chain Saw Owners Manual for the recommended chain number.
Figure 1
_\CUTTING
EDGE TO BE SHARPENED
© ©
c
CHUCK LOCK PIN -_J"
. I
_'_
j___j_-_,.,--_
CHUCK
WRENCH
/
-_
TO LOOSEN
A'_
_"_'_---
2,, Refer to chart for the correct grinding
stone Many
chains in use in the US,, today are Oregon® chains
so you may find your chain number in the Oregon®
column rather than the column under your chain saw
manufacturer,
CHUCK
CAP
\COLLET
CAUTION--Any
servicing
of this tool
(including
brush
replacement)
should
be performed
by an
authorized
Sears service representative,
MAINTENANCE--The
brushes in this tool are selflimiting. This means that when the brushes are worn
out, they stop making contact with the commutator
and the toot wilt stop running This is done to
e_iminate the possibility of a piece of the brush
and/or the spring getting loose inside the toot when
the brushes are worn out.
PAGE
3 When you have determined the correct grinding
stone for your chain from chart, assemble attachment as shown in Figure 3,
If you use the _" dia (pink) stone, assembte both
spacers between the guide and the clamp.
rB]lf you use the ¾_"dia. (orange) stone, assemble
with only one spacer betweeh the guide and the
clamp
[_ If you use the _"
are needed
4
alia (blue) stone, no spacers
4 Securely mount the correct grinding stone in your
tool with approximately
Y," of the shank exposed
between the chuck cap and thestone, Figure2 Using
the appropriate side (see column 2 of chart) of the
guide gauge furnished, check to see if the guide is
properly positioned with repect to the grinding stone,
see Figure 4. If it is not, use a screwdriver or the end
of the guide gauge to loosen the two guide mounting
screws just enough so the guide can be moved It has
elongated holes to allow for adjustment, Adjust the
guide with respect to the grinding stone using the
guide gauge and tighten the screws. If you should
find the elongated holes do not provide enough
adjustment, loosen the clamp knob and rotate the
clamp a quarter of the way around the nose of the
tool. Tighten the cJamp knob and make the adjust _
ment,
F}gure 2
SHARPENER ASSEMBLY
Figure 3
SCREWS
GUIDE
w
o
O
When using
!
]
I
the 7/_ *° die,
sharpening
m
w
stone (_nk),
o
assemble with
bolh spacers
between
guide
<
0
t_
and
<
clamp,,
[]
When using the %="
die, sharpening
spacers
Flgur_ 4
When using
He" dim,
sharpening
stone
(orange),
assemble with
one spacer
between
guide end
clamp,
itone (blue) no
are needed.
(AS assembled at
factory.)
/
m
©
CLAMP
Slzck end of g_uge can be uled
when top of gauge ts to be altgne(_
with top of Irene
IMPORTANT
Use of any accessories or attachments other
than those su pplied by Sears may be hazardous
PAGE 5
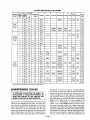
CHAIN
IDENTIFICATION
CHART
10_ Tilt
Grinding
Stone
Guide
Gauge
Side
Depth
Gauge
Seffing
1
,025
..........
'
" D25 "
Blue
Cat No
'
•
,025
025
Yell
or
No
7'
SherpenlngAngle
=,Oregon_
Yes
Yes
Yes
Yes
"
Csdton
Homet'lte
McCulloch
SM250
Oral
Cat
365
t6
Stthl
13M
Windsor
(Ref)
2SAP
30°
33LG
325
30"
30"
34LG
50K
.325
35LG
.325
!
,025
Sabre
30='
36581
1
Poulan
,
............
I
......
NO
30"
91G
375N50
MM370
P100
375C50
MP370
P101
......
.375
1
.025
NO
30°
91SG
I
,025
Yes
30"
1gAP
350
50R
,375
1
025
.025
Yes
Yes
30°
30Q
20AP
2lAP
2
030
Yes
30=
76LG
2
,030
Yes
30 °
77LG
.375
2
.030
Yes
30_'
78LG
,375
030
Yes
35°
28
SM408
.030
Yes
35 ='
27
SM403
Yes
35'_
28
_325
325
K tC
23M
50J
.325
58J
.325
.375
L
2
i
.404
I
2
',' 2..............
030
2
.025
Yes
30 =
50LP
B3LR
'
_030
No
35 _,
50CP
BtSE
2
025
Yes
30 °
51LP
030
No
35 _'
5tCP
025
Yes
30 °
52LP
r.....
P27
46M
.404
43M
.404
SPR400
.404
P50
SPR408
B2S, E
50B
404
585
,404
404
F......
PM408
45C
SPR403
485
.404
I
PM403
Pink
Cat No
36583
I P52
240
SPM370G
PM370G
I
-
,025
Yes
2
025
2
_025
2
2
2 ........
30 _
72LG
Yes
30 °
73LP
No
35 =
73DP
,025
Yes
30"
73LG
025
Yes
30 °
75LP
025 .....
NO
I T
" TOp of guide
to be aligned
SHARPENING
with
A2L
SPR378G
38C58
A2CE,S
33M
.375
50A
.375
PM378G
375
355
48
35M
58A
,375
375
SPR373G
A3L
75DP
30"
75La
See Figure
18
A04
375
35 °
top of stone
63B
335
PM373G
A3C.E,S
365
36M
.375
63A
,375
,375
4
CHAIN
sharpened,
as shown in Figure 5. The guide should
be laid flat on the tooth with the proper index line
aligned by eye with the guide bar, See column
5 on
chart on page 6 for proper index line. Some chains
are sharpened
with the grinding stone held horizontalty and some are sharpened
with the stone tilted
slightly
(10°)._ See column
4 of chart on page 6 and
Figure 7 for identification
of cutter teeth and tilt
angle
Two or three light strokes
across the chain
are usually
enough
unless the cutters
have been
damaged_ if the cutters have been severely damaged.
it may be necessary to take the chain to Sears Service
Department
for machine grinding.
Keeping the chain
saw in the same position,
sharpen
the teeth on the
far side of the c|_ain with the tool positioned,
as
IF YOUR SAW IS ELECTRIC, BE SURE IT IS
UNPLUGGED! IF GASOLINE POWERED, BE
SURE THE SWITCH IS OFF AND/OR THE
SPARK PLUG LEAD IS DISCONNECTED.
Set your saw on a flat solid surface so it wil! not slip
while you are sharpening
the chain The chain tension should
be adjusted as specified
in the Chain
Saw Owners Manual,. If it is too loose, the teeth will
move, resulting
in a poor sharpening
job, The saw
should be positioned
so that you are looking at the
side of the guide bar with the motor or engine to your
righ[ Cutter teeth on the near side of the chain are
PAGE
6
35 ° LINE
SHARPEN CUTTER TEETH
ONLY _ NOT THE
DEPTH GAUGE
GUIDE
ONE OF THESE LINES TO BE
PARALLEL WITH CHAIN
GUIDE BAR
SEE COLUMN 5
OF CHART
CHECK CHAIN TYPE(FIGURE
11) OR
COLUMN 4 OF CHART. FOR PROPER TILT
TO BE USED WHEN SHARPENING.
F_gure5
35 ° LINE
GUIDE
EDGE OR LINE TO
BE PARALLEL WITH CHAIN
GUIDE BAR. SEE COLUMN 5
OF CHART. (EDGE tS AT 35=)
SHARPEN CUTTER TE£TH
ONLY -- NOT THE
DEPTH GAUGE
CHECK CHAIN TYPE (FIGURE 11)
OR COLUMN 4 OF CHART FOR PROPER
TILT TO BE USED WHEN SHARPENING°
Figure S
GASOLINE POWERED, BE SURE THE SWITCH
THE SPARK PLUG LEAD IS DISCONNECTED,
shown in Figure 6, in this position, the angular edge
of the guide or other index fine should be aligned
with the guide bar,
When all of the teeth on the top of the bar have been
sharpened,
advance the chain, using a glove or rag
PAGE
IS OFF AND/OR
to protect your hand, by pulling the chain toward the
end of the bar, Repeat this until all the teeth have
been sharpened., CAUTION: IT tS IMPORTANT TO
TRY TO SHARPEN ALL TEETH EQUALLY. UNEVEN
TEETH MAY CAUSE EXCESSIVE WEAR TO THE
BAR AND A ROUGH CUT.
7
CUTTER CONFIGURATION
CHISEL
-- END VIEW
MICRO CHISEL
SEMI
THESE TWO SHAPES OF CUTTER TEETH ARE SHARPENED
WITH THE GRINDING STONE TILTED AS SHOWN_
CHIPPER
&
MICRO BIT
CHISEL
THESE TWO SHAPES OF CUTTER TEETH ARE SHARPENED
WITH THE GRINDING STONE HELD HORIZONTAL.
10°
NEAR SIDE TOOTH
NEAR SIDE TOOTH
GRINDING
GRINDING STONE
STONE
-r
FAR SiDE TOOTH
Figure i'
AFTER EVERY THIRD OR FOURTH
SHARPENING,
THE DEPTH GAUGES
OF YOUR CHAIN SHOULD
BE
CHECKED WITH YOUR SEAR'S DOUBLE ENDED DEPTH GAUGE FILE GUIDE (CATALOG
NO. 32-36557) AND
FILED IF NECESSARY.
ONE END OF GAUGE IS FOR .025 SETTINGS
AND THE OTHER END IS FOR .030
SETTINGS.
REFER TO THE CHART ON PAGE 6 FOR THE PROPER SETTING
FOR YOUR CHAIN
IF FILING
1S NECESSARY,
FOLLOW THE PROCEDURE
SHOWN IN FIGURE 8
NOTE: FILE GUIDE IS NOT INCLUDED
WITH MODEL NO.. 572.36577 SAW CHAIN SHARPENER,.
Depth Gauge Setting
FIGURE 8
2. if depth gauge projeclJk
ttle It lard,
PAGE 8
3, Round off Iro!! comer to
maintain odglnel ihepe.
TROUBLE
SHOOTING
IF YOUR SAW DOES NOT CUT AS WELl. AS IT SHOULD
AFTER SHARPENING
OR tT DOES NOT CUT
STRAIGHT,
YOU MAY HAVE A WORN OR DAMAGED
GUIDE BAR, A WORN SPROCKET,
OR DAMAGED
LINKS IN THE CHAIN
THIS CAN BE CHECKED
AND REPAIRED
FOR YOU AT YOUR SEARS SERVICE
DEPARTMENT
HOWEVER,
BEFORE DOING THIS, CHECK FOR CUTTER PROBLEMS,
SHARPENING
ERRORS_IF
YOUR CUTTERS LOOK LIKE THESE, RE-SHARPEN THEM.
/
Top plate angle not 35 °
caused by holding
sharpener at wrong angle.
/
Hook in side plate-caused
by pressing
sharpener
down
too
or holding sharpener
\
\
\
Backslope
caused
in side
plate--
by holding
sharpener too high Chain
won't
feed properly; cutters
hard.
too
low
wear
fast
at heel
Most chain problems
are caused by three things: Incorrect grinding,
lack of lubrication,
and loose chain tension.
Here are some of the most common
signs to look for if your saw chain is not performing
right
CAUSE
CONDITION
RESULT
REMEDY
Hook in side plate cutting
edge
Sharpener held too low or
the stone was too small,
Rough cutting
Chain grabs.
Cutters dull quickly or won't
hold a cutting edge,
Sharpen cutters to
recommended
angle, Check
stone size, Hold
sharpener correctly
Blunt
Sharpener hefd too high or
stone was tOO large
Cutters cut slow Requires ......
extra pressure to cut Will
cause excessive wear on
bottom of chain parts
Grind cutters to recom- ..........
mended angle Check stone
size Hold sharpener
correctly
top plate cutting angle
..........................J ........................................
Top plate angle less than
recommended
Sharpener held at less than
recommended
angle
Stow cutting
Requires
pressure to cut
extra
Grind
angle
to recommended
Top plate angle more
recommended
Sharpener held at more than
recommended
angle
Cutting angle is very sharp.
but will dull fast Cutting
action rough and erratic
- Grind
angle
to recommended
Excessive heel wear on
cutters and tie straps
One or a combination
of the
following:
Blunt top ptate
grinding,, Forcing dull chain
to cut, Forcing chain to cut
frozen wood. Low depth
gauges Lack of lubrication
Heel of cutter wears off
rapidly
In cold weather
cracks will appear
s,arpen
u.ers ProPerlY
'
Concave wear on bottom of
cutters and connecting
tie
straps
Tight chain tension on hardnose bar Heavy undercutting
or boring with hard-nose bar.
concave
all parts
Use SPr0cket--n0se bar
Reduce amount of cutting
with nose or top of bar
than
PAGE 9
wear On bottom Of
..............................
Use plenty of lubrication.
Don't force chain tocut Keep
cutters sharp
CUTTER
PROBLEMS
What to do if chain cuts slow or won't hold its edge:
1+ Remove chain from bar,
2+ Clean chain with solvent to remove pitch and resin,
3. Compare each cutter to these pictures,
tf your chain is not cutting cuts slowly, won't hold an edge, or it cuts crooked, your problem could be caused by
one or more of the fo owmg conditions:
RESULT
REMEDY
Severe damage on either side
of top and/or side plates
CONDITION
Cutters hit or cut material
other than wood. (Possibly
dirt, rock or sand)
Chain won't cut, Chain cuts
crooked if only one side has
damage to the cutters
Grind damaged area out of
all cutters If only one side
is damaged, grind it first,
Grind other side of cutter to
the same length
Reset
depth gauges
Light damage on cutting
edges of top and/or side
plates
Cutters came in contact with
light abrasive material
Very slow cutting_if at arl
Have to force chain to cut
Grind damaged area out of
all cutters
Feathered
Sharpener held tow or the
stone was too small
Poor stay-sharp
Rapid
dulling Will cut fast for short
time+ then becomes dull
:Use proper size stone
, sharpener correctly
Sharpener held too high, or
the stone was too large
Cutters won't feed into wood
Slow cutting, Have to force
chain to cut Will cause
excessive bottom wear
•Sharpen cutters to recom+
mended angle Check stone
size Hold sharpener
correctly,
top plate cutting
edge
Backslope on side plate
cutting edge.
HANGER
CAUSE
Hold
-,..,
STORAGE
Your Craftsman Saw Chain Sharpener includes a
hanger for +convenience and ease of storage as shown
in Figure 9,
PAGE 10
CRAFTSMAN
CHAIN
SHARPENER
--
MODEL
NUMBER
572.36578
The Model Number will be found on a plate attached to the Motor Housing Always
mention the Model Number' in all correspondence regarding your Saw Chain Sharpener
or when ordering repair parts
SEE BACK PAGE FOR PARTS ORDERING
Code
No.
'_1
Part
No.
'
48o'
Description
Chuck Cap
298008
Ground Screw
Rectifier Complete
1/8 Collel
15
99o10o
3
660217
Housin_ap
_;ew
16
660046
Switch
4
990136
Front Brg. Bracket (Complete)
!7
660014
Cord
5
990816
Thrust Washer Assortment
18
50OO45
Wrench
19
600614
Sherp_nIng
6
990805
Bearing
7
990810
Housing Complete
8
.........9
990815
;
--" t--O'_11
Pad
No.
Description
8_113
......2 -
INSTRUCTIONS
Housing
990141
i;!,,
20
21
Screws, 1 long-2 short
' Armature wlFan
..............................
22
36582"
3/16" Grinding Wheel, Orange
36583"
7/32" Grinding Wheel, Pink (2)
23
990869
Gage & 2 Spacers
990813
Brush Cap (Pr.)
24
380223
Owners Manual (not' shown)
99o827
BrUshes
wiS_nts'_P';._
...........
25
1-610542-03_
660240
Rear Big. Bracket
(Complete)
"Replacement sharpening stones are available from your nearest
Sears store or catalog outlet
tNot
included
Sharpener,
Attachment
5/32" Grfnding Wheel, Blue {2)
Field w/Magne=
99011"2....
t
Bracket Clips (Pr.)
with
Model
57236578
Craftsman
Saw
Chain
PAGE 1 !
Depth Gauge Filing Guide
Catalog No. 32-36557
(2)
CRRI:TSMRI! °
Sears
SAW CHAIN
SHA PENE
OWNERS
MANUAL
MODEL NO.
572.36578
The model Number will be found on the plate attached to the
tool. Always mention the Model Numberwhen requesting service
or repair parts for your Saw Chain Sharpener.
All parts listed herein may be ordered
from any SEARS,
ROEBUCK AND COo retail or catalog store, if the parts you need
are not stocked locally, your order will be electronically transmitted to a Sears Repair Parts Distribution Center for expedited
handling,
HOW TO ORDER
REPAIR PARTS
WHEN
ORDERING
REPAIR
FOLLOWING INFORMATION:
PARTS,
ALWAYS
GIVE
THE
1. PART NUMBER
2. PART DESCRIPTION
3. MODEL NUMBER
572°36578
4. NAME of ITEM-Electric Saw
Chain Sharpener
Your Sears merchandise takes on added value when you discover that Sears has over 2000 Service Units throughout the
country°
So|d by SEARS, ROEBUCK AND CO.., Chicago,
PAGE I 2
IL 60684
U S..A..