1
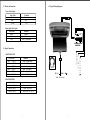
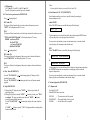
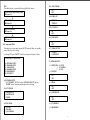
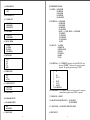
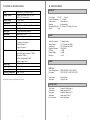
MOBILE
CAR
ENTERTAINMENT
SYSTEMS
General Information
TABLE OF CONTENTS
9" ROOF MOUNT
16:9 MONITOR with INTEGRATED DVD
I N S T R U C T I O N S
Before operating the unit, please read these instructions carefully.
OT01007510-0306
General Information
W elcome ...................................................................................................
Precautions ...............................................................................................
Important Notes .......................................................................................
1
2
2
1. INSTALLATION GUIDE
1.1 Precautions ......................................................................................
1.2 Electrical Connections .....................................................................
1.3 Signal Connections ..........................................................................
1.4
Typical Wiring Diagrams .................................................................
3
4
4
5
2. FUNCTION KEYS
6
....................................................................................
3. REMOTE CONTROL UNIT
3.1 Frequently Used Buttons .................................................................
3.2 Replacement of Battery ...................................................................
3.3 Precautions ......................................................................................
7
8
8
4. LOADING AND UNLOADING DISCS
4.1 Loading of Discs ..............................................................................
4.2 Unloading Disc .................................................................................
9
9
5. OPERATING THE MONITOR
5.1 Open / Close /Po wer On the Display Monitor .................................
5.2 Signal Source ON / OFF ( ) ..........................................................
5.3 Function Mode (MENU) .................................................................
5.4 Door Light ON / OFF ......................................................................
5.5 Courtesy Light ON / OFF ................................................................
10
10
10
10
10
6. DVD FUNCTIONS
6.1 DVD playback (DVD) .......................................................................
6.2 Audio CD playback (CD) ..................................................................
6.3.1 Fast forward or reverse (DVD/MP3/CD) .......................................
6.3.2 Next track or previous track (DVD/MP3/CD) ................................
6.4 Play / Pause (DVD/MP3/CD) ............................................................
6.5 Stop (DVD/MP3/CD) ........................................................................
6.6 Search function (DVD/MP3/CD) ......................................................
6.7 Advanced playback (DVD/MP3/CD) ................................................
6.7.1 Repeat mode ...................................................................................
6.7.2 Camera angle (DVD) .....................................................................
6.7.3 Audio function (DVD) ...................................................................
6.7.4 Subtitle (DVD) ...............................................................................
11
11
11
12
12
12
13
13
13
14
14
14
GENERAL INFORMATION
General Information
WELCOME
TABLE OF CONTENTS
6.7.5 DVD menu (DVD) .........................................................................
6.7.6 Title menu (DVD) ...........................................................................
6.7.7 Display function (DVD/MP3/CD) ..................................................
6.7.8 Setup menu (DVD) .........................................................................
(A) Setup Menu ....................................................................................
(B) General Setup .................................................................................
(C) Speaker Setup .................................................................................
(D) Audio Setup ....................................................................................
(E) Karaoke Setup .................................................................................
(F) Preferences Page .............................................................................
(G) Exit Setup .......................................................................................
7. REGION MANAGEMENT INFORMATION
8. ACCESSORIES SUPPLIED
...........................................
20
......................................................................
21
9. TECHNICALSPECIFICATIONS
10. SPECIFICATIONS
15
15
15
16
16
16
17
18
18
19
19
..............................................................
22
...................................................................................
23
Thank you for your purchase of this Roof Mount Monitor with integrated DVD. Prior
to operating this unit, please read this instruction manual and retain it for future
references.
PRECAUTIONS
To avoid serious damage to the unit, to the car and/or to yourself, you should follow
the instructions in this manual.
* Should there be a need to replace a burnt fuse, turn off the unit and disconnect all
power supply. Use only the correct rating fuse to avoid electrical damage to the unit.
* During operation, if the unit should over-heat or malfunction, switch off the unit
and see your dealer. Do not disassemble the unit. There are no user-serviceable parts
in this unit.
To avoid serious injury to yourself and prevent damage to the LCD panel, please
observe the following:
* Do not drop the LCD panel or subject it to direct impact. Impact will cause damage
to the LCD panel and/or to the back light element.
* Should the LCD panel brake or leak fluid, please avoid all contact with the unit. If
you should come into contact with the leaked fluid, please wash the affected area
thoroughly with water and seek immediate medical attention.
This unit is designed using high quality electronic components and manufactured
under a stringent quality control system. This unit will provide you with numerous
hours of quality performance if utilized as specified. Please follow these maintenance
procedures:
* The battery of the remote control unit has an estimated life cycle of six (6) months.
To ensure proper functionality, replace the battery on a timely manner.
* Do not use any chemical solvent, cleaning agent or corrosive detergent when wiping
the display. If chemicals are used, you will cause irreversible damage to the TFT
screen. A soft, damp, lens cleaning cloth should be used to wipe the screen of
fingerprints and debris.
* Do not drop the monitor or impact it with hard objects. This may cause permanent
irreversible damage to the LCD panel and/or the back light element.
* When operating the unit, avoid contact with the LCD panel.
* Prevent a metal or foreign object being locked between the LCD screen and the
enclosure. Objects may impair smooth running of the tray and may cause electrical
problems.
1
* Keep unit away from equipment with strong magnets such as large loudspeakers.
1. INSTALLATION GUIDE:
* To prevent malfunction, do not play discs other than the ones listed below.
Examples: DVD audio discs, DVD-ROMs, CD-ROMs, Photo CDs and DVDs with
region numbers other than this player's region number.
1.1 Precautions:
IMPORTANT NOTES:
* When the unit is used in conjunction with a Radio/TV tuner, please assure that
the receiver is manufactured to receive television broadcast signals that are
transmitted via terrestrial radio waves. Reception quality will change and vary
according to geographic location and climatic control.
* We strongly advise for the display screen to be installed at a location, where
the attentiveness of the driver will not be affected while driving.
* Avoid installing the monitor at a location, where it will be under direct sunlight or
a hot air vent. Operating temperature of the unit is from 32-92 degrees Fahrenheit.
If the internal temperature of the vehicle is higher than the normal operating
temperature, please allow cool off periods for the unit.
* Install the unit at a dry location, where it is away from condensation.
* Only correct size of fasteners or installation cables should be used during
installation. Failure to do so may cause a mechanical failure and create a fire hazard.
* When in doubt, the authorized dealer should be contacted.
1. This unit should be installed by a qualified service technician.
2. This product is designed to operate with +12V DC, negative ground battery
system.
3. Disconnect the ground wire from the battery terminal prior to connecting the unit
to the electrical system.
4. The wiring from some other products or accessories might bear similar color code
as this product; however, they might be of other function. Please refer to the
electrical connection diagrams of this product prior to installing to avoid improper
connection.
5. Use proper installation and fastening materials to prevent electrical damage to the
unit.
6. Do not connect the yellow wire and red wire together of this product directly to the
+12V. Connect the red wire of this product to the ACC of the ignition key switch
and yellow wire to +12V. Failure to do so may result in permanent drainage of the
battery charge.
7. Only supplied accessories should be used to avoid damage to the unit during
installation.
8. Ensure that the display monitor is suitably installed at a location, such that it will
not obstruct the rear view mirror and/or the air condition vents.
9. Do not install this unit at a declining angle exceeding 30 degrees.
10. Do not install screws over the plane surface, which may affect monitor eject or
retract function.
* To avoid electrical shock to yourself and others, do not disassemble the unit,
for there are no user-serviceable parts within.
* The picture quality of this LCD unit depends strictly on its installed location. To
achieve the best picture quality, adjust the brightness control or viewing angle of
the unit until the optimum level is reached.
NOTICE OF INTENDED USE
THIS VIDEO ENTERTAINMENT SYSTEM IS DESIGNED TO ENABLE VIEWING OF VIDEO
RECORDINGS ONLY FOR REAR-SEAT OCCUPANTS.
MOBILE VIDEO PRODUCTS ARE NOT INTENDED FOR VIEWNG BY THE DRIVER WHILE
THE VEHICLE IS IN MOTION. SUCH USE MAY DISTRACT THE DRIVER OR INTERFERE
WITH THE DRIVER’S SAFE OPERATION OF THE VEHICLE, AND THUS RESULT IN
SERIOUS INJURY OR DEATH. SUCH USE MAY ALSO VIOLATE STATE LAW.
THE MANUFACTURER DISCLAIMS ANY LIABILITY FOR ANY BODILY INJURY OR
PROPERTY DAMAGE THAT MAY RESULT FROM ANY IMPROPER OR UNINTENDED USE.
2
3
1.4 Typical Wiring Diagrams:
1.2 Electrical Connection:
Power Cable (4 pin)
Color Code
Black
Red
Yellow
Function
Ground
A
CC
+12V
Dome Light Cable (3pin)
Color Code
Black
Red
Gray
Function
Ground
B+
Door - Light Sensor
ADAPTOR
ADAPTOR
1.3 Signal Connection:
)
A
C
C
)
Wireless Headphone
(Optional)
B
+
(
RED ( B+)
BLACK ( GND )
GRAY ( Door Swi t ch)
ADAPTOR VIDEO
Color Code
Yellow 1 (RCA)
Yellow 2 (RCA)
Yellow 3 (RCA)
Function
Video - In (V-IN 1)
Video - In (V-IN 2)
Video - Out (V - OUT 1)
4
B
L
A
C
K
G
N
D
(
Function
Audio - Right (Input)
Audio - Left (Input)
Audio - Right (Input)
Audio - Left (Input)
Audio - Right (Output)
Audio - Left (Output)
(
Color Code
Red
1 (RCA)
White 1 (RCA)
Red
2 (RCA)
White 2 (RCA)
Red
3 (RCA)
White 3 (RCA)
Y
E
L
L
O
W
)
R
E
D
ADAPTOR AUDIO
5
2. FUNCTION KEYS:
3. REMOTE CONTROL UNITS:
5
3.1 Frequently Used Buttons:
6
10 11 12 13
14
15 16 17 18
POWER
MONITOR
MODE
1
14
2
SETUP
3
4
DISPLAY
VIDEO
MENU
15
16
LEFT
5
UP
RIGHT
TITLE
18
ENTER
6
PREV
DOWN
F.REV
PLAY/
PAUSE
17
NEXT
MENU
7
19
20
8
21
F.FWD
STOP
9
22
10
23
SUBTITLE
AUDIO
MUTE
11
REPEAT
1/ALL
12
24
25
1
2
3
4
5
6
7
8
GOTO
ANGLE
9
0
13
1
3
4
3
2
7
9
8
DISPLAY FUNCTION KEYS:
1. LCD Display
2. VIDEO Select Button ( )
3. UP/DOWN Button ( / )
4. VIDEO MENU Button ( )
UNIT FUNCTION KEYS:
5. Door Light ON / OFF Button(
6. Courtesy Light (
)
7. IR Sensor
8. OPEN/CLOSE Button
9. IR Transmitter
)
6
26
27
9
DVD FUNCTION KEYS:
10. PLAY/PAUSE Button (
11. STOP Button (
)
12. DVD MENU Button ( )
13. AUDIO Button (
)
14. LEFT Button ( )
15. UP Button ( )
16. ENTER Button (
)
17. RIGHT Button ( )
18. DOWN Button ( )
)
1. POWER Button
2. UP Button (Display)
3. DVD SETUP Button (DVD)
4. UP CURSOR Button (DVD)
5. LEFT CURSOR Button (DVD)
6. ENTER Button (DVD)
7. PREVIOUS/PREVERSE SKIP Button (DVD)
8. DOWN CURSOR Button (DVD)
9. PREVERSE SCAN Button (DVD)
10. PLAY/PAUSE Button (DVD)
11. SUBTITLE ON/OFF Button (DVD)
SUBTITLE SELECTION Button
12. AUDIO SELECTION Button (DVD)
7
13. NUMERIC Buttons (DVD)
14. MODE Button (Display)
15. DOWN Button (Display)
16. VIDEO MENU Button (Display)
17. DISPLAY Button (DVD)
18. TITLE Button (DVD)
19. RIGHT CURSOR Button (DVD)
20. MENU/PBC Button (DVD)
21. NEXT/FORWARD SKIP Button (DVD)
22. REPEAT Button (DVD)
25. MUTE Button (DVD)
26. ANGLE Button (DVD)
27. GO TO Button (DVD)
4. LOADING AND UNLOADING DISC:
3.2 Replacement of battery:
You can use single side and dual layer DVD, VCD, CD-audio & CD-R compatible
12cm disc.
Remote Controller
4.1 Loading Discs:
Battery
Battery Holder
1. Press "
" to open the case
2. Load with the recorded side (the shiny side) facing up.With double-sided discs,
load with the side you want to watch facing up. Ensure that disc is seated properly
before pushing tray back into its locking position.
3. Push to close the case.
1. Use a small coin to open the battery clip.
2. Remove old battery and replace it with the positive “+” sign facing upward.
3. Push battery clip into compartment until it is locked.
3.3 Precautions:
1. Properly dispose of used battery.
2. Do not misuse battery by shorting the positive “+” and negative “-” terminal or put
it into fire. Overheating may cause the battery to explode and cause a fire hazard.
3. Remove the used battery from the compartment to prevent leakage.
4. To avoid accidents, prevent children from playing with the battery.
4.2 Unloading Disc:
1. Press "
" to open the case
2. Remove the disc from the desk.(Avoid touching the recorded surface)
3. Push to close the case,until you hear a click sound from the mechanism.
8
9
5. OPERATING THE MONITOR:
6. BASIC FUNCTIONS:
5.1 OPEN/CLOSE/POWER ON THE DISPLAY MONITOR
6.1 DVD playback (DVD)
(1)Select video source (DVD).
(2)Load a disc into the unit.
(3)DVD playback commences.
The disc will start to play if the disc does not have any menu recorded on it.
If the disc has one or more titles recorded on it, a menu screen will appear on the
TV monitor.
To open/close the display monitor, push & pull the "OPEN/CLOSE" button to the
desired position.
5.2 SIGNAL SOURCE (MODE)
Press remote (MODE) button or "VIDEO Select Source" (
input signal AV1, AV2 or DVD.
) button to select the
5.3 FUNCTION MODE (MENU)
Press remote "VIDEO MENU" button or monior "MENU" (
the screen set up sequence as follows:
COLOR
) button to activate
(4) Press
/ / /
to select the preferred title.
(5) Press the "ENTER" button, the selected item will now
start playing.
(6) Return to the menu screen.
Press the DVD "MENU" button, the menu screen will appear.
After operation, press "POWER" (
TITLE MENU
1.Fish
2.Bird
3.Dog
) button to put the unit into standby mode.
¡÷ BRIGHT ¡÷ TINT ¡÷ DIMMER ¡÷ FORMAT
RESET
COLOR: Color adjustment
BRIGHT: Brightness setting
TINT: Adjustment to color saturation
DIMMER: ON/OFF
FORMAT: Format Selection
RESET: Reset COLOR, BRIGHTNESS, and TINT to factory settings.
Once the desired setting is selected, press the cursor key to the desired setting. If a
key is not activated within 5 seconds, this function mode will turn off.
Once the correct function is selected, press the cursor key i.e. or to the desired
setting. If no key is depressed, this function mode will turn OFF in about 5 seconds.
5.4 DOOR LIGHT ON/OFF (
)
Engage this switch to have the door open switch activate the dome lights.
Note: This function can be operational only when the Gray wire of the dome light
assembly is connected to the door switch.
5.5 COURTESY LIGHT ON/OFF (
)
Activate this switch to “ON/OFF” to activate the dome light.
Note:
When “WRONG REGION” appears, it means that the corresponding operation is
prohibited either by the player or by the disc.
6.2 Audio CD playback (CD)
(1) Press the remote control’s "POWER" ( ) button or the monitor "POWER" (
button to switch on the unit’s power.
(2) Insert a disc into the unit.
(3) Press "PLAY/PAUSE" (
) button to start the playback of the disc.
6.3.1 Fast forward or reverse (DVD/MP3/CD)
(1) Press the "FF" (
) button during playback.
Each time this button is pressed, the unit will go into a rapid advance playback
mode.The OSD will be shown on the TV screen, depending on the speed of the
playback selected.
CD playback
FF 1X
FF 2X
FF 3X
FF 4X
PLAY
Press "PLAY" button, the speedwill go back to standard.
MP3/DVD playback
FF 2X
FF 4X
FF 6X
FF 8X
PLAY
Press "PLAY" button, the speedwill go back to standard.
(2) Press the FR (
) button during playback.
Each time this button is pressed, the unit will go into a rapid reverse playback
mode.The OSD will be shown on the TV screen, depending on the speed of the
playback selected.
CD playback
FR 1X
FR 2X
FR 3X
FR 4X
PLAY
Press PLAY button, the speedwill go back to standard.
10
)
11
DVD playback
FR 2X
FR 4X
FR 6X
FR 8X
PLAY
Press PLAY button, the speed will go back to standard.
Note:
Resume playback function is not available for Audio CDs.
6.6 Search function "GO TO" (DVD/MP3/CD)
6.3.2 Next track or previous track (DVD/MP3/CD)
Press (
Search function enables you to locate a specific location by entering the
time/track/chapter or title.
) during playback
MP3, Audio CD
The player will skip forward to the next track each time the button is pressed.
"NEXT" will be displayed on the TV screen.
Audio CD/MP3
When "GO TO" button is pressed the following will be displayed:
GOTO _ _¡G_ _
DVD
The player will skip forward to the next title/ chapter each time the button is pressed.
"TITLE aa/bb CHAPTER cc/ddd" will be displayed on the TV screen.
WHERE aa:Current TITLE
bb:Total TITLE
cc:Current CHAPTER
ddd:Total CHAPTER
Press (
Use the numeric keys to enter the desired disc time and pressing the ENTER button
will cause the player to start playing at the selected time.
If you are not in search mode, you may use the numeric keys to enter the desired
track; the player will commence at the selected track.
DVD
When "SEARCH" button is pressed the following will be displayed:
) during playback
MP3, Audio CD
The player will skip to the beginning of the previous track each time the button is
pressed."PREVIOUS" will be displayed on the TV screen.
(1)
TITLE xx/xx
CHAPTER xxx/xxx
TITLE xx/xx
xx¡Gxx¡Gxx
(2)
DVD
The player will skip to the beginning of the previous chapter each time the button is
pressed.
6.4 Play / Pause (DVD/MP3/CD)
Press the "PLAY/PAUSE" (
placed in the pause mode.
Press the "PLAY/PAUSE" (
playback.
) button, during playback. The player will be
Use the numeric keys to enter the desired title or chapter or chapter time and pressing
the "ENTER" button will cause the player to start playing at the selected title,
chapter or chapter time.
If you are not in search mode, you may use the numeric keys to enter the desired
chapter; the player will commence at the selected chapter.
) button again, the player will return to normal
6.7 Advanced playback (DVD/MP3/CD)
6.7.1 Repeat mode
6.5 Stop (DVD/MP3/CD)
(1) During Audio CD playback, when "STOP" ( ) button is pressed, the CD
playback will stop.
(2) During DVD playback, when the "STOP" ( ) button is pressed, press "PLAY
to continue". The player records the point where the "STOP" ( ) button is
pressed (Resume playback function).
Press the "PLAY/PAUSE" (
) button again, the play will resume from this
point.
For Audio CD/ MP3
When REPEAT button is pressed,
REP ONE
= The current track will be repeated
FOLDER REP = The current folder will be repeated
FOLDER
= All the folders will be repeated
If "STOP" ( ) button is pressed. "STOP" will apppear and the resume playback
function will be cleared.
12
13
For DVD
When REPEAT button is pressed,
Note:
(1) The "SUBTITLE" works only for discs that have multiple subtitle.
(2) In some cases, the subtitle will not changed immediately to the one selected.
CHAPTER REPEATION = The current chapter will be repeated
TITLE REPEAT
= The current title will be repeated
REPEAT OFF
= Repeat mode will be switched off
6.7.5 DVD menu (DVD)
Most DVD discs have unique menu structures call DVD menu.The DVD menu’s
contents and operation may differ from disc to disc.
6.7.2 Camera angle (DVD)
Some DVD discs may contain scenes, which have more than one viewing angle.
For these discs, the same scene can be viewed from a different angle by using the
"ANGLE" button.
(1) During DVD playback, press the "ANGLE" button.
“
x/y” will appear, x represents the current camera angle, and y represents
the total number available camera angles.
(2) Press the "ANGLE" button until the preferred angle is selected. The ANGLE
selection will cycle through all available camera angle.
Note:
This function will only work on discs where multiple camera angles have been recorded.
(2) Use
/ / /
make a selection.
to select the preferred item or use the numeric buttons(s) to
(3) Press "ENTER" button, the selected item will start playing.
6.7.6 Title menu (DVD)
Some DVD discs may have more than one title. If the disc has a title menu recorded
on it, the TITLE button can be used to access it.
(1) During DVD playback, press the "TITLE" button.
A list of the titles may be displayed.
6.7.3 Audio function (DVD)
The audio function works only for discs that have multiple audio soundtracks.
AUDIO STEREO
(1) During DVD playback, press the "MENU" button.The DVD menu available on
the disc will be displayed.
AUDIO LL
AUDIO RR
(2) Use
/
/
/
to select the preferred item.
(3) Press "ENTER" button, the selected title will start playing.
6.7.7 Display function (DVD/MP3/CD)
During DVD playback, press the AUDIO button. "AUDIO x/y" will appear, x
represents the current audio stream and y represents the total available audio streams.
Press the "AUDIO" button until the preferred audio stream is selected.The "AUDIO"
selection will cycle through all available audio streams.
The display function enables you to view the status, current title number, track
number and the total playing time of the disc on the TV screen.
Audio CD
When the display key is pressed, the following OSD will be shown.
6.7.4 Subtitle (DVD)
During DVD playback, you may change the subtitle language from the one selected
at the initial setting to a different language, if available.
(1) Pressing "SUBTITLE ON/OFF" button, the following will appear.
AUDIO STEREO
Current
Track
SINGLE ELAPSED
SINGLE REMAIN
TOTAL ELAPSED
TOTAL REMAIN
Total Tracks
01/15
01/15
01/15
01/15
01 : 40
02 : 39
01 : 40
42 : 19
AUDIO RR
MP3
(1) During DVD playback and SUBTITLE ON, press the "SUBTITLE" button.
"SUBTITLE x/y" will appear, x represents the current subtitle and y represents
the total available subtitle.Press the "SUBTITLE" button until the preferred
subtitle is selected. The "SUBTITLE" selection will cycle through all available
subtitles.
14
SINGLE ELAPSED
SINGLE REMAIN
00 : 00 : 15
00 : 02 : 37
15
Time
DVD
When the display key is pressed, the following OSD will be shown.
TITLE XX/XX CHAPTER XXX/XXX
HH : mm : SS
(b-3) ANGLE MARK
ON
OFF
(b-4) OSD LANG
TITLE REMAIN
HH : mm : SS
ENGLISH
CHINESE
(b-5) CAPTIONS
SINGLE ELAPSED
HH : mm : SS
ON
OFF
SINGLE REMAIN
HH : mm : SS
(b-6) SCR SAVER
ON
OFF
6.7.8 Setup menu (DVD)
When the player is in stop mode, pressing SETUP button will allow you to modify
some of the player’s basic settings.
(A) During STOP, press "SETUP" button, the setup menu will appear as below.
(b-7) VIDEO OUTPUT
S-VIDEO
COMPONENT
SETUP MENU—MAIN PAGE
(C) SPEAKER SETUP
(1)
(2)
(3)
(4)
(5)
(6)
GENERAL SETUP
SPEAKER SETUP
AUDIO SETUP
KARAOKE SETUP
PREFERENCES
EXIT SETUP
(c-1) DOWNMIX ¡÷ (1) LT/RT
¡÷ (2) STEREO
¡÷ (3) OFF
(c-2) CENTER
ON
OFF
(B) GENERAL SETUP
USE "UP/DOWN" BUTTON to select "GENERAL SETUP" and press
"ENTER" button. The display and the options are as following.
(c-3) REAR
ON
OFF
(b-1) TV DISPLAY
(1) NORMAL/PS
(2) NORMAL/LB
(3) WIDE
(c-4) SUBWOUFER
ON
OFF
(b-2) PIC MODE
(c-5) CNTR DELAY
(1) AUTO
(2) HI-RES
(3) N-FLICKER
(c-6) REAR DELAY
16
17
(c-6) REAR DELAY
(F) PREFERENCES PAGE
ON
OFF
(f-1) AUDIO — (1) ENGLISH
(2) FRENCH
(3) SPANISH
(4) CHINESE
(5) JAPANESE
(D) AUDIO SETUP
(d-1) AUDIO OUT
(f-2) SUBTITLE — (1) ENGLISH
(2) FRENCH
(3) SPANISH
(4) CHINESE
(5) JAPANESE
(6) OFF (e-3) DISC MENU— (1) ENGLISH
(2) FRENCE
(3) SPANISH
(4) CHINESE
(5) JAPANESE
(6) OFF
ANALOG
SPDIF/RAW
SPDIF/PCM)
(d-2) OP MODE
LINE OUT
RF REMOD
(d-3) DUAL MONO
STERO
L-MONO
R-MONO
MIX-MONO
(f-4) LOCALE — (1) CHIN
A
(2) FRENCH
(3) HONG KONG
(4) JAPAN
(5) TAIWAN
(6) GBR
(7) USA
(d-5) DYNAMIC
FULL
6/8
4/8
2/8
OFF
(f-5) PARENTAL— Use "UP/DOWN" buttons to select the PARENTAL item,
then press "ENTER". The player will request for parental
password. The original password setting is "1234".
(d-6) PRO LOGIC
1
2
3
4
5
6
7
8
NO
OFF
ON
AUTO
(d-7) LPCM OUTPUT
LPCM 48K
LPCM 96K
G
PG
PG 13
PG-R
NC-17
ADULT
PARENTAL
(f-6) PASSWORD — Use the numeric keys to enter the password. To change the
password, the original password "1234" is required.
(d-8) MAIN PAGE
(f-7) DEFAULTS — RESET
(E) KARAOKE SETUP
(f-8) SMART NAV (FOR MP3 ONLY) — (1) NO MENU
(2) WITH MENU
(e-1) KARAOKE MOVE
OFF
KARAOKE
(f-9) MAIN PAGE — GO BACK TO THE MAIN PAGE
(G) EXIT SETUP
(e-2) MAIN PAGE
18
19
7. REGION MANAGEMENT INFORMATION:
This DVD/CD player is designed and manufactured to respond to the Region
Management Information that is recorded on a DVD disc. If the Region number
described on the DVD disc does not correspond to the Region number of this player,
this player will not be able to play the DVD disc.
This DVD/CD player is set to work only in a particular world region as labeled on the
player.
Region Number:Country under the Region
1.
Canada, U.S, U.S Territories
2.
Japan, Europe, South Africa, Middle East (including Egypt)
3.
Southeast Asia, East Asia (including Hong Kong)
4.
Australia, New Zealand, Pacific Islands,Central America,
Mexico, South America, Caribbean
5.
Former Soviet Union, Indian Subcontinent, Africa
(also North Korea, Mongolia)
6.
China
20
8. ACCESSORIES SUPPLIED:
Item
1
2
3
4
5
6
7
8
9
Item Description
Metal plate
Adaptor
Fastener screws, (B4 x 6)
Fastener screws, (B4 x 10)
Remote controller
Operating manual
Power supply cable assembly, 4P, 600mm #18
Interconnecting cable assembly, doom light
Source Cable MD 9 pin-13pin
21
Quantity
1
1
6
6
1
1
1
1
1
9. TECHNICAL SPECIFICATIONS:
Type
Display System
Display Format
Aspect Ratio
Resolution
Active Area
Back Light
Mechanism
Display Angle
Source
Wireless Audio
Dome Light
Operating Voltage
Operating Current
Operating Temperature
Roof Mount Color Display Monitor
9-inch Active Matrix Color TFT LCD
NTSC / PAL Auto Switch
336,960 pixels
16 : 9
336,960 dots / 480 (W) x 234 (H) dots x 3 RGB
198 (W) x 111 (H) mm
10,000 hours normal operation
Manual Open / Close
Horizontal: Up/Down < 110¢X
Composite video input x 2
Composite video output x 1
Audio L/R input x 2
Audio L/R output x 1
Infrared audio transmitter (Support IR receiver
stereo head phone, L-channel: 2.3MHz /
R-channel: 2.8MHz)
Effective listening angle: 30¢X
Effective range: 4 meter
3W x 2 with door sensor connection
DC 11~16V
1.7A, Typical
0¢XC to 60¢XC
All specifications are subjected to change without prior notification
10. SPECIFICATIONS:
GENERAL
Power Supply
: 14V DC
Typical
Current Consumption : 1.7 A Typical
Remote control
: Infrared remote
Mounting
: Roof mounting
Dimension (WxDxH) : W 319 mm x D 261 mm x H 50 mm
Weight
: 1.8kg
AUDIO
Audio Characteristic
Analog Output
Analog input
Frequency Response
S/N Ratio
Dynamic Range
Distortion
: 2-Channel Analog
: 1.8V/ 10 kohm load (1kHz)
: 1.8V/ 600 ohm load (1kHz)
: 20Hz-20kHz
: >=70dB
: >=60dB
: <=0.4%
VIDEO
DVD Video
Video decompression
Disc format
: MPEG-2(ISO/IEC-13818), MPEG-1
: DVD, CD, MP3, CD-R, C-RW, SVCD
Video Output
Video Input
: 1.0Vpp/75 ohm
: 1.0Vpp/75 ohm
CONNECTORS
Video output
Audio output
Video input
Audio input
Power connector
22
: Composite Video Output x1
: Analog output (L/R) x1
: Composite Video input x 2
: Analog input (L/R) x 2
: Power supply input
23