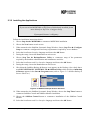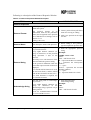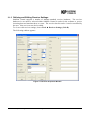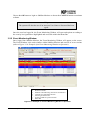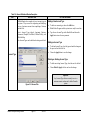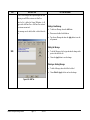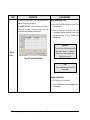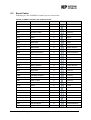
1
™
SaMSon
Security Monitoring Software
User Manual
ISRAEL Office:
Email: [email protected]
P.O. Box 42, Tefen Industrial Park, Tefen 24959
Tel: 972-4-987-3066 / Fax: 972-4-987-3692
P.N.: Book : 088
USA Office: KP ELECTRONICS, INC.
Email: [email protected]
109 Tudor Drive, North Wales, PA 19454
Tel: (215) 542-7460, (888)542-7460
Fax: (215) 542-7461
Web Site: www.kpsystems.com
Approved: Amir S.
Rev: 1.7.0
25/07/05
NOTICE
The information in this document has been carefully checked and is considered reliable. No
responsibility is assumed for inaccuracies.
KP ELECTRONIC SYSTEMS LTD. reserves the right to introduce changes in its products to improve
reliability, function or design.
KP ELECTRONIC SYSTEMS LTD. does not assume any liability arising from the application or use of
any of its products or any product described in this document, nor does it convey any license under its
patent rights or the rights of others.
This document contains proprietary information and may not be reproduced in any form without prior
written consent of KP ELECTRONIC SYSTEMS LTD. Copyright 2003 by KP ELECTRONIC
SYSTEMS LTD., P.O. Box 42, Tefen Industrial Park, Tefen 24959, Israel.
KP ELECTRONIC SYSTEM LTD PRODUCTS IN THIS MANUAL
SaMSon Security Monitoring Software™
SaMSon Central Module™
SaMSon Monitor Module™
RCI3300™, Radio Communication Interface (refer to RCI3300 User Manual)
RCI4000™, Radio Communication Interface (refer to RCI4000 User Manual)
DTRCI4000™ Desk Top RCI (refer to DTRCI4000 User Manual)
RCI5000™ Radio Communication Interface (refer to RCI5000 User Manual)
DTRCI5000™ Desk Top RCI (refer to DTRCI5000 User Manual)
*Other names and brands may be claimed as property of others.
SaMSon Security Monitoring Software
Page 2
24/12/03
Table of Contents
1
ABOUT SAMSON
1.1
SAMSON CENTRAL
1.2
SAMSON MONITOR
1.3
SAMSON FEATURES
1.3.1
SaMSon Central
1.3.2
SaMSon Monitor
1.4
THE SAMSON USER MANUAL
2
GETTING STARTED
.......................................................................................................................10
................................................................................................................11
...............................................................................................................12
..............................................................................................................13
............................................................................................................13
...........................................................................................................14
..............................................................................................16
................................................................................................................17
2.1
SYSTEM REQUIREMENTS
.......................................................................................................18
2.1.1
Receiver
..........................................................................................................................18
2.1.2
Minimum Computer Hardware Requirements
..........................................................18
2.1.3
Minimum Software Requirements
...............................................................................18
2.2
INSTALLING THE HARDWARE
................................................................................................19
2.2.1
KP Hardware
.................................................................................................................19
2.2.2
Alternative Receivers
.....................................................................................................19
2.3
INSTALLING SAMSON SECURITY MONITORING SOFTWARE
..............................................20
2.3.1
Navigating the Installation CD
....................................................................................21
2.3.2
Installing the Applications
...........................................................................................23
2.3.2.1
2.3.2.2
Installation for a Stand Alone System
Installation for a Network
2.4
FIRST TIME SETUP
2.4.1
Hardware Key
2.4.2
Server Name
3
SETUP PROCEDURES
................................................................................24
...................................................................................................25
..................................................................................................................26
................................................................................................................26
...................................................................................................................26
.............................................................................................................27
3.1
SAMSON CENTRAL
................................................................................................................28
3.1.1
Log in
..............................................................................................................................29
3.1.2
Defining Software and Hardware Parameters
...........................................................30
3.1.3
Adding and Editing Event Codes
.................................................................................31
3.1.3.1
3.1.3.2
3.1.3.3
3.1.3.4
3.1.4
3.1.4.1
3.1.4.2
3.1.4.3
3.1.4.4
3.1.4.5
3.1.4.6
3.1.4.7
3.1.5
3.1.5.1
3.1.5.2
3.1.5.3
3.1.5.4
3.1.6
Adding a New Event Code
...................................................................................................33
Editing an Event Code
.........................................................................................................34
Deleting an Event
................................................................................................................34
Exiting the Edit Event Codes Window
................................................................................35
Defining and Editing Protocol Properties and Received Codes
...............................35
Adding a New Protocol
.......................................................................................................39
Adding Received Codes
.......................................................................................................39
Editing a Protocol
...............................................................................................................40
Editing Received Codes
.......................................................................................................40
Deleting a Protocol
.............................................................................................................41
Deleting a Received Code
...................................................................................................41
Exiting the Protocol Properties or Received Code Table Window
..................................41
Defining and Editing Receiver Settings
......................................................................42
Adding a New Receiver
.......................................................................................................45
Editing a Receiver
...............................................................................................................46
Deleting a Receiver
.............................................................................................................46
Exiting the Receiver Properties Window
...........................................................................46
SMS Modem settings
SaMSon Security Monitoring Software
.....................................................................................................47
Page 3
24/12/03
3.1.7
Finalizing Setup Procedures for SaMSon Central
....................................................47
3.1.8
Log Out
...........................................................................................................................48
3.2
SAMSON MONITOR
...............................................................................................................49
3.2.1
Login
...............................................................................................................................49
3.2.2
Event Monitoring Window
...........................................................................................50
3.2.3
Operator Permission
.....................................................................................................55
3.2.3.1
3.2.3.2
3.2.3.3
3.2.3.4
3.2.3.5
3.2.4
3.2.5
3.2.6
3.2.6.1
3.2.7
3.2.7.1
3.2.8
3.2.9
3.2.10
3.2.11
3.2.12
4
Adding an Operator
.............................................................................................................57
Editing an Operator
............................................................................................................58
Changing Password
.............................................................................................................58
Deleting an Existing Operator
............................................................................................58
Exiting the Operator Permission Window
.........................................................................59
General Definitions
.......................................................................................................59
Account Number Set-up
...............................................................................................76
Creating a New Customer Account Card
...................................................................76
Using a Template
.................................................................................................................78
Completing a New Account Card
................................................................................79
Closing and Saving Account Card Details
...................................................................... 106
Editing an Account
.....................................................................................................107
Disabling an Account
..................................................................................................107
Freezing an Account
...................................................................................................108
Finalizing Set-up Procedures for SaMSon Monitor
...............................................109
Exiting SaMSon Monitor
...........................................................................................109
DAILY OPERATIONS
............................................................................................................110
4.1
SAMSON CENTRAL
..............................................................................................................111
4.2
SAMSON MONITOR
.............................................................................................................112
4.2.1
Commencing Operations
............................................................................................112
4.2.2
Change of Operator Duty
...........................................................................................113
4.3
SAMSON MONITOR ACCOUNT MANAGEMENT
.................................................................114
4.3.1
Opening an Existing Customer Account Card
.........................................................114
4.3.1.1
Closing and Saving Account Card Details
...................................................................... 115
4.3.2
Changing Account Status
...........................................................................................116
4.3.3
Un-Restored Events (Manual Restore)
.....................................................................117
SAMSON MONITOR EVENT MANAGEMENT ............................................................................................................118
4.3.4
Receiving an Event
......................................................................................................118
4.3.4.1
4.3.4.2
4.3.4.3
4.3.5
4.3.5.1
4.3.5.2
4.3.5.3
4.3.5.4
4.3.5.5
4.3.5.6
4.3.5.7
5
Deactivating the New Event Indicator
............................................................................. 119
Deactivating the Audio Siren
............................................................................................ 119
Switching Screens
............................................................................................................. 119
Processing an Event
....................................................................................................119
Event Details
...................................................................................................................... 121
Adding Comments
.............................................................................................................. 121
Logging Patrol Personnel
................................................................................................. 122
Accessing Customer Phone Details
.................................................................................. 123
Accessing Other Customer Details
................................................................................... 124
Placing an Event on Hold
................................................................................................. 124
Saving the Event
................................................................................................................ 124
ADMINISTRATION AND MAINTENANCE ACTIVITIES
............................................126
5.1
SAMSON CENTRAL
..............................................................................................................127
5.1.1
Reset of Operator’s Log in
.........................................................................................127
5.1.2
Daily Log File
..............................................................................................................128
5.1.3
Help
...............................................................................................................................128
SaMSon Security Monitoring Software
Page 4
24/12/03
5.1.4
Exiting Samson Central
5.2
SAMSON MONITOR
5.2.1
Technical Data
5.2.1.1
5.2.1.2
5.2.2
Adding and Editing Technical Data
Deleting Technical Data
Event Exchange
5.2.2.1
5.2.2.2
5.2.3
5.2.4
5.2.5
................................................................................. 130
................................................................................................... 130
...........................................................................................................130
SaMSon Monitor Remains Open
SaMSon is Closed and Re-opened
...................................................................................... 130
.................................................................................... 131
Manual Event
..............................................................................................................131
Manual Dialing and sending SMS
............................................................................132
Reporting
......................................................................................................................133
5.2.5.1
5.2.5.2
5.2.6
Reports Generator
Navigating the Reports Viewer
Data Management
5.2.6.1
5.2.6.2
5.2.7
5.2.8
..............................................................................................128
.............................................................................................................129
.............................................................................................................129
............................................................................................................. 133
......................................................................................... 154
.......................................................................................................155
Backing Up Data
Restoring Data
............................................................................................................... 155
................................................................................................................... 157
Help
...............................................................................................................................158
Exiting SaMSon Monitor
...........................................................................................158
6
COMPUTER SHUT DOWN
7
TROUBLESHOOTING
...................................................................................................160
...........................................................................................................161
7.1
ERROR MESSAGES
...............................................................................................................161
7.1.1
Login troubleshotting
..................................................................................................161
7.1.2
Connection troubleshotting
........................................................................................161
7.1.3
Database Error
............................................................................................................162
7.1.4
Save Error
....................................................................................................................162
7.1.5
Backup Error
...............................................................................................................162
7.1.6
Schedule Attention
......................................................................................................163
7.1.7
Hardware Connection Error
......................................................................................163
7.2
CONTACTING KP ELECTRONIC SYSTEMS LTD
..........................................................164
8
APPENDIX
8.1
8.2
8.3
8.4
8.5
9
.................................................................................................................................165
SAMSON CENTRAL SHORTCUT KEYS
................................................................................165
SAMSON MONITOR SHORTCUT KEYS
................................................................................165
EVENT CODES
......................................................................................................................167
OPERATOR PERMISSION
.......................................................................................................172
INTERNAL EVENT MESSAGES
..............................................................................................173
INDEX
.........................................................................................................................................176
SaMSon Security Monitoring Software
Page 5
24/12/03
Figures
FIGURE 1-1: SAMSON LOGO ...........................................................................................................................................................10
FIGURE 2-1: SAMSON CONFIGURATION FOR STAND ALONE .......................................................................................................17
FIGURE 2-2: SAMSON CONFIGURATION FOR NETWORK ..............................................................................................................17
FIGURE 2-3: SAMSON SETUP W INDOW .........................................................................................................................................21
FIGURE 2-4: SAMSON SYSTEMATIC SETUP W INDOW...................................................................................................................22
FIGURE 2-5: SAMSON BACKUP & RESTORE SHORTCUTS............................................................................................................23
FIGURE 2-6: SAMSON CENTRAL DESKTOP SHORTCUTS ..............................................................................................................24
FIGURE 2-7: SAMSON MONITOR DESKTOP SHORTCUTS .............................................................................................................24
FIGURE 2-8: SERVER NAME W INDOW .............................................................................................................................................26
FIGURE 3-1: MESSAGE W INDOW .....................................................................................................................................................28
FIGURE 3-2: LOGIN W INDOW ...........................................................................................................................................................29
FIGURE 3-3: TOOLS PULL DOWN MENU .........................................................................................................................................30
FIGURE 3-4: EVENT CODES T ABLE .................................................................................................................................................31
FIGURE 3-5: PROTOCOL PROPERTIES W INDOW ............................................................................................................................35
FIGURE 3-6: RECEIVED CODES TABLE............................................................................................................................................38
FIGURE 3-7: RECEIVER PROPERTIES W INDOW..............................................................................................................................42
FIGURE 3-8: SMS MODEM SETTING ..................................................................................................................................................47
FIGURE 3-9: LOGIN W INDOW ...........................................................................................................................................................49
FIGURE 3-10: EXAMPLE OF AN EVENT MONITORING W INDOW IN OPERATION ...........................................................................50
FIGURE 3-11: OPERATOR PERMISSION W INDOW ..........................................................................................................................56
FIGURE 3-12: PASSWORD W INDOW ................................................................................................................................................58
FIGURE 3-13: GENERAL DEFINITION W INDOW ...............................................................................................................................60
FIGURE 3-14: ACCOUNT TAB ...........................................................................................................................................................61
FIGURE 3-15: HOLIDAY T AB .............................................................................................................................................................62
FIGURE 3-16: HOLIDAY T AB .............................................................................................................................................................62
FIGURE 3-17: PHONE LIST TYPE TAB .............................................................................................................................................63
FIGURE 3-18: OPTIONS TAB ............................................................................................................................................................64
FIGURE 3-19: GLOBAL PHONE LIST TAB.........................................................................................................................................66
FIGURE 3-20: PATROL PERSONNEL TAB ........................................................................................................................................67
FIGURE 3-21: ACTION AID TAB ........................................................................................................................................................68
FIGURE 3-22: PRIORITY T AB .............................................................................................................................................................69
FIGURE 3-23: EQUIPMENT TAB ........................................................................................................................................................70
FIGURE 3-24: GROUP TEXT BOX .....................................................................................................................................................70
FIGURE 3-25: PART TEXT BOX ........................................................................................................................................................71
FIGURE 3-26: SMS TAB ...................................................................................................................................................................72
FIGURE 3-27: CLASSIFICATION TAB ..................................................................................................................................................73
FIGURE 3-28: EVENT CAUSE TAB....................................................................................................................................................74
FIGURE 3-29: NEW ACCOUNT SET-UP WINDOW............................................................................................................................77
FIGURE 3-30: TEMPLATE W INDOW FOR ADDING A NEW ACCOUNT .............................................................................................78
FIGURE 3-31: NEW ACCOUNT CARD W INDOW...............................................................................................................................79
FIGURE 3-32: PHONE W INDOW .......................................................................................................................................................83
FIGURE 3-33: GLOBAL PHONE LIST W INDOW ................................................................................................................................84
FIGURE 3-34: NOTES W INDOW ........................................................................................................................................................85
FIGURE 3-35: TEST MODE TAB IN THE MISCELLANEOUS WINDOW .............................................................................................86
FIGURE 3-36: MAILING T AB IN THE MISCELLANEOUS W INDOW ..................................................................................................87
FIGURE 3-37: MISCELLANEOUS WINDOW .......................................................................................................................................88
FIGURE 3-38: DEVIATION T AB IN THE SCHEDULE W INDOW ..........................................................................................................90
FIGURE 3-39: SCHEDULE T AB IN THE SCHEDULE W INDOW ..........................................................................................................91
FIGURE 3-40: SCHEDULE W INDOW .................................................................................................................................................91
FIGURE 3-41: SPECIAL SCHEDULE TAB IN THE SCHEDULE W INDOW ..........................................................................................92
FIGURE 3-42: SPECIAL SCHEDULE W INDOW ..................................................................................................................................92
FIGURE 3-43: FOR ALL DAY EVENTS IN SPECIAL SCHEDULE WINDOW ..........................................................................................92
SaMSon Security Monitoring Software
Page 6
24/12/03
FIGURE 3-44: SELECTIVE SCHEDUAL (CONSIDER) WINDOW ..........................................................................................................94
FIGURE 3-45: ACTION LOG W INDOW .............................................................................................................................................96
FIGURE 3-46: ZONE TAB IN ZONE/USER W INDOW ........................................................................................................................97
FIGURE 3-47:ZONE SMS DISPLAY LIST ..........................................................................................................................................97
FIGURE 3-48: ZONE W INDOW ..........................................................................................................................................................97
FIGURE 3-49: ZONE GRAPHIC..........................................................................................................................................................99
FIGURE 3-50: USER TAB IN ZONE/U SER W INDOW ...................................................................................................................... 100
FIGURE 3-51: USER SMS DISPLAY LIST ....................................................................................................................................... 101
FIGURE 3-52: USER W INDOW ........................................................................................................................................................ 100
FIGURE 3-53:TEMPLATE TAB IN ZONE/USER WINDOW.................................................................................................................. 102
FIGURE 3-54: APPROACH PATH W INDOW .................................................................................................................................... 103
FIGURE 3-55: SPECIAL C ODES W INDOW ...................................................................................................................................... 104
FIGURE 3-56: HISTORY WINDOW .................................................................................................................................................... 105
FIGURE 3-57: CLOSING THE ACCOUNT ......................................................................................................................................... 106
FIGURE 3-58: MINIMIZING THE EVENT MONITORING WINDOW ................................................................................................... 106
FIGURE 3-59: DISABLE ACCOUNT W INDOW ................................................................................................................................. 107
FIGURE 3-60: FREEZE ACCOUNT W INDOW .................................................................................................................................. 108
FIGURE 4-1: INCOMING EVENTS C OUNTER ON THE EVENTS CENTRAL W INDOW ..................................................................... 112
FIGURE 4-2: LOGIN W INDOW ......................................................................................................................................................... 113
FIGURE 4-3: OPEN ACCOUNT W INDOW ........................................................................................................................................ 114
FIGURE 4-4: CLOSING THE ACCOUNT ........................................................................................................................................... 115
FIGURE 4-5: MINIMIZING THE EVENT MONITORING W INDOW ..................................................................................................... 115
FIGURE 4-6: CHANGE STATUS W INDOW ....................................................................................................................................... 116
FIGURE 4-7: UN-R ESTORED EVENT W INDOW .............................................................................................................................. 117
FIGURE 4-8: EVENT MONITORING W INDOW WITH EVENTS ......................................................................................................... 118
FIGURE 4-9: EVENTS ON HOLD SECTION IN THE EVENT MONITORING W INDOW DISPLAYING EVENTS ON HOLD ................ 119
FIGURE 4-10: PROCESS ACCOUNT W INDOW ............................................................................................................................... 120
FIGURE 4-11: EVENT DETAILS ......................................................................................................................................................... 121
FIGURE 4-12: COMMENTS W INDOW .............................................................................................................................................. 122
FIGURE 4-13: ACTION DISPLAYED IN THE ACTION LOG W INDOW .............................................................................................. 122
FIGURE 4-14: ACTION DISPLAYED IN THE ACTION LOG W INDOW .............................................................................................. 123
FIGURE 4-15: PATROL PERSON D ISPLAYED IN THE ACTION LOG W INDOW .............................................................................. 123
FIGURE 4-16: SAVE W INDOW ........................................................................................................................................................ 124
FIGURE 4-17: QUICK LOG MESSAGE ............................................................................................................................................... 125
FIGURE 5-1: RESET OF OPERATOR’S LOG IN W INDOW ............................................................................................................... 127
FIGURE 5-2: EXAMPLE LOG FILE ................................................................................................................................................... 128
FIGURE 5-3: TECHNICAL DATA WINDOW ..................................................................................................................................... 129
FIGURE 5-4: EVENTS EXCHANGE W INDOW .................................................................................................................................. 131
FIGURE 5-5: MANUAL EVENT W INDOW ......................................................................................................................................... 132
FIGURE 5-6: DIAL W INDOW ............................................................................................................................................................ 132
FIGURE 5-7: SEND SMS TO NUMBER WINDOW................................................................................................................................ 133
FIGURE 5-8: REPORT TYPES W INDOW ......................................................................................................................................... 134
FIGURE 5-9: ACCOUNT D ETAILS REPORT ..................................................................................................................................... 135
FIGURE 5-10: DISABLED ACCOUNTS R EPORT.............................................................................................................................. 137
FIGURE 5-11: OPERATORS REPORT ............................................................................................................................................. 139
FIGURE 5-12: ACCOUNT STATUS REPORT ....................................................................................................................................... 140
FIGURE 5-13: LITE HISTORY REPORT ........................................................................................................................................... 142
FIGURE 5-14: STATISTICS REPORT ............................................................................................................................................... 143
FIGURE 5-15: LITE STATISTICS REPORT ....................................................................................................................................... 145
FIGURE 5-16: OPEN/CLOSED T IME STATISTICS R EPORT ........................................................................................................... 146
FIGURE 5-17: UN-RESTORED EVENTS R EPORT .......................................................................................................................... 147
FIGURE 5-18: GENERAL DEFINITIONS REPORT............................................................................................................................ 148
FIGURE 5-19: RECEIVER SETTINGS REPORT ............................................................................................................................... 149
FIGURE 5-20: PROTOCOL PROPERTIES REPORT......................................................................................................................... 150
FIGURE 5-21: EVENT CODES REPORT .......................................................................................................................................... 151
SaMSon Security Monitoring Software
Page 7
24/12/03
FIGURE 5-22MODIFICATION FOLLOW-U P ....................................................................................................................................... 152
FIGURE 5-23: REPORTS VIEWER ................................................................................................................................................... 154
FIGURE 5-24: SAMSON BACKUP AND R ESTORE W INDOW ........................................................................................................ 155
FIGURE 5-25: B ACKUP WINDOW ................................................................................................................................................... 156
FIGURE 5-26: SCHEDULE WINDOW ............................................................................................................................................... 157
FIGURE 5-27: R ESTORE W INDOW ................................................................................................................................................. 158
FIGURE 7-1: LOG UN FAILED MESSAGE......................................................................................................................................... 161
FIGURE 7-2: CONNECTION FAIL ..................................................................................................................................................... 161
FIGURE 7-3: DATABASE ERROR ..................................................................................................................................................... 162
FIGURE 7-4: SAVE ERROR.............................................................................................................................................................. 162
FIGURE 7-5: BACKUP ERROR ......................................................................................................................................................... 162
FIGURE 7-6: SCHEDULE ATTENTION ............................................................................................................................................. 163
FIGURE 7-7: HARDWARE CONNECTION ERROR ........................................................................................................................... 163
SaMSon Security Monitoring Software
Page 8
24/12/03
Tables
TABLE 2-1: SYSTEM INSTALLATION ..................................................................................................................................................20
TABLE 2-2: SAMSON SETUP WINDOW N AVIGATION .......................................................................................................................22
TABLE 3-1: MENU BAR OPTIONS .......................................................................................................................................................28
TABLE 3-2: EVENT CODES TABLE DESCRIPTION ..............................................................................................................................32
TABLE 3-3: PROTOCOL PROPERTIES WINDOW DESCRIPTION ...........................................................................................................36
TABLE 3-4: RECEIVED CODES TABLE DESCRIPTION ........................................................................................................................39
TABLE 3-5: RECEIVER PROPERTIES DESCRIPTION ............................................................................................................................43
TABLE 3-6: EVENT MONITORING WINDOW DESCRIPTION ...............................................................................................................51
TABLE 3-7: DESCRIPTION OF THE O PERATION PERMISSION WINDOW.............................................................................................56
TABLE 3-8: GENERAL DEFINITIONS WINDOW DESCRIPTION ...........................................................................................................61
TABLE 3-9: NEW ACCOUNT SET-UP DESCRIPTION ...........................................................................................................................76
TABLE 3-10: NEW ACCOUNT SET-UP WINDOW D ESCRIPTION .........................................................................................................77
TABLE 3-11: ACCOUNT CARD DESCRIPTION ....................................................................................................................................80
TABLE 4-1: UN-RESTORED EVENTS WINDOW DESCRIPTION.......................................................................................................... 117
TABLE 5-1: TECHNICAL D ATA WINDOW DESCRIPTION .................................................................................................................. 129
TABLE 5-2: REPORT TYPE D ESCRIPTION ......................................................................................................................................... 135
TABLE 5-3: REPORTS VIEWER DESCRIPTION .................................................................................................................................. 154
TABLE 8-1: SAMSON CENTRAL SHORT CUT KEYS DESCRIPTION ................................................................................................. 165
TABLE 8-2: SAMSON MONITOR SHORT CUT KEYS DESCRIPTION ................................................................................................. 165
TABLE 8-3: SAMSON CENTRAL’ S PRE-SET EVENT CODES ............................................................................................................ 167
TABLE 8-4: DESCRIPTION OF SAMSON FUNCTIONS, O PERATOR PERMISSION WINDOW .............................................................. 172
TABLE 8-5: SAMSON INTERNAL EVENT MESSAGES ...................................................................................................................... 173
SaMSon Security Monitoring Software
Page 9
24/12/03
1
About SaMSon
SaMSon Security Monitoring Software is an innovative application for security alarm
monitoring and central station management.
Figure 1-1: SaMSon Logo
Crucial security and system information is received in real-time and immediately displayed for
rapid alarm processing and service maintenance.
SaMSon makes alarm monitoring easier, faster and more precise.
The SaMSon application is divided into three modules: SaMSon Central and SaMSon Monitor
and SaMSon Reports.
SaMSon Security Monitoring Software
Page 10
24/12/03
1.1
SaMSon Central
SaMSon Central is used by central station administrators for reading real-time data messages
from receiver hardware. These messages are then transferred to SaMSon Monitor software for
operator response. SaMSon Central also displays hardware and system faults, and messaging
difficulties.
SaMSon Security Monitoring Software
Page 11
24/12/03
1.2
SaMSon Monitor
SaMSon Monitor is used by central station operators to view and respond to emergency and
system events. SaMSon Monitor is a real-time translation of incoming data messages from
SaMSon Central. The messages indicate events occurring in the field.
Using an easy Windows® interface, operators can react quickly and accurately to emergencies.
SaMSon Security Monitoring Software
Page 12
24/12/03
1.3
SaMSon Features
SaMSon Security Monitoring Software offers central station managers and operators a number
of features for efficiently responding to events and managing data.
1.3.1 SaMSon Central
Secured Access - SaMSon Central requires a User Name and Password in order to access
authorized internal system settings. Security is partitioned according to user level and user
clasification (refer to Section 3.2.3 Operator Permission).
Event Codes – Event codes are a three letter mnemonic shortcut describing the actual events
sent by the end units. This event code finds a meaningful interpretation to the numerical or
alphanumerical event received from the end unit. Pre-set event codes are installed within the
software. These codes are viewed or partially changed, or new codes added and changed,
depending on central station requirements (refer to Section 3.1.3 Adding and Editing Event
Codes).
Protocol Properties - SaMSon Central has a number of protocols to choose from depending on
the receiver hardware in use. The correct protocol must be defined within SaMSon Central in
order for it to receive events. These protocols are selected, viewed or partially changed, or new
protocols added and changed, depending on central station requirements (refer to Section 3.1.4
Defining and Editing Protocol Properties and Received Codes).
Main – The main protocols list through which messages are received from end units in
the field . This protocols list include also Internal Protocols (genrated automatically by
receiver, to report receiver’s status and/or faults) if existent.
Heartbeat – A unique protocol through which the receiver sends verification messages in
a pre-set period in order to maintain communications and indicate that hardware is
functional.
Received Codes - Received Codes are the actual events received from the end units and sent to
SaMSon Central by the receiver using one of the defined protocols. A table of standard pre-set
codes is available. Received Codes are customizable depending on central station requirements
(refer to Section 3.1.4 Defining and Editing Protocol Properties and Received Codes).
Receiver Settings - SaMSon Central supports various hardware receivers. The hardware in use
must be selected within SaMSon Central in order for the software to receive events. Receiver
details can be viewed and changed, or a new receiver added depending on central station
requirements (refer to Section 3.1.5 Defining and Editing Receiver Settings).
System Maintenance - Communication, system and set-up errors are detected. Documentation
can be forwarded to KP ELECTRONIC SYSTEMS LTD for service records and follow-up (refer
to Section 7.1 Error Messages).
Log Files - SaMSon Central provides users with a log of daily activities for record keeping or
system administration purposes (refer to Section 5.1.2 Daily Log File).
Follow Up - All changes that were made in the software, are saved in a database. All changes
can be seen in the Modification Follow-Up Report .
SaMSon Security Monitoring Software
Page 13
24/12/03
Syncronization - In the system there is a sycronization feature that prevents modifying /adding
data on the same object simultaneously
Help Menu - An easy-to-follow Help Menu enables easy access to information and set-up
details (refer to Section 5.1.3 Help).
1.3.2 SaMSon Monitor
Secured Access - SaMSon Monitor requires a User Name and Password from all operators
before access to the software is allowed. Access is partitioned and customizable according to
level of responsibility and is changed according to central station requirements (refer to Section
3.2.3 Operator Permission).
General Definitions - SaMSon Monitor is equipped with a number of global definitions that
allow the user to customize features according to central station requirements. Once set,
definitions appear within customers' individual account cards and also within internal system
operations (refer to Section 3.2.4 General Definitions).
Event Monitoring - The main window in SaMSon Monitor, the Event Monitoring Window,
displays all incoming events and related information about the event. The Event Monitoring
Window is separated into several easy-view displays. The upper section shows Customer
Account Details, the middle section displays Incoming Events and a lower section is used for
Events on Hold for Operator (refer to Section 3.2.2 Event Monitoring Window).
Customer Account Details Section - Main customer account details are viewed on the
top level of the Event Monitoring Window. It provides the operator with a quick view of
customer information according to the event selected. This section is designed to allow
rapid operator access and shorter response time.
Incoming Events Section - The Incoming Events Section of the Event Monitoring
Window is designed to give operators an overall view of all events last received. Each
event is displayed and color-coded by priority. It is a quick view of event and account
information. By opening the unprocessed event, the operator can access full customer
account details.
Events on Hold for Operator Section - The Events on Hold for Operator Section of the
Event Monitoring Window displays all active events that are selected by the operator
logged in at that time. It also displays any other events linked to the same account card.
If SaMSon is working on a network, each workstation displays the events processed by
the operator logged in at that station. When processing the event, the operator can access
full customer information on the Customer Account Card.
Account Administration - SaMSon Monitor provides easy customer account administration.
Major customer details are viewed on the Customer Account Card with minor details available
via a number of quick view tabs located on the Customer Account Window. New accounts are
created and existing accounts are opened, changed and saved as required (refer to Section 4.3
Samson Monitor Account Management).
SaMSon Security Monitoring Software
Page 14
24/12/03
Disabling Accounts - If an account is no longer required, it can be disabled. The account
number is then released and ready to be used again for a new account. The disabled
account is not deleted from the system but is stored and can be accessed later for
reporting.
Freezing Accounts - Existing accounts can be temporarily disabled if the account must
remain in the system but not currently active.
Test Mode - Technicians are able to check system functionality without activating actual
event code priority. All events will appear in auto-log priority.
Scheduling - SaMSon Monitor displays a schedule in each Customer Account. The
schedule is defined according to the customers’ daily activities. The schedule also
includes special schedules according to customers' irregular activities and any global
activities such as holidays.
Change Status - The operator can manually change the open/close status of accounts (refer to
Section 4.3.2 Changing Account Status).
Un-restored Events (Manual Restore) - The operator can manually restore any events that
have not received an automatic restore of a corresponding alarm event (refer to Section 4.3.3 UnRestored Events (Manual Restore)
Manual Event - All events can be manually generated for system checking and simulation (refer
to Section 5.2.3 Manual Event).
Reporting - SaMSon Monitor is equipped with a full range of account, equipment and event
reports (refer to Section 5.2.5 Reporting).
Data Management - All software data can be saved and stored for emergency backup should a
situation occur where the system fails or data is lost (refer to Section5.2.6 Data Management).
Offline - SaMSon allows the user to work offline for a maximum period of 30 seconds whereby
events are received but not immediately displayed (refer to Section 3.2.2 Event Monitoring
Window).
Dialing and Sending SMS - The software is equipped with automatic dialing and with short text
messeging Once an event appears, an SMS is automaticlly sent to the customer, also the user
can immediately call the customer without entering account details or opening the event,
ensuring rapid response (refer to Section 3.2.2 Event Monitoring Window).
Periodic Test - SaMSon software will alert operators if alarm units have not sent a signal in a
given time (refer to Section 3.2.7 Completing a New Account Card).
False Alarm Follow-up - SaMSon software contains automatic follow-up of false alarms that
are logged by the operator in an account over a required period of time (refer to Section Section
3.2.7 Completing a New Account Card).
System Maintenance - SaMSon Monitor receives system errors from SaMSon Central and
displays them on the Event Monitoring Window, notifying the operator that an action is required
(refer to Section 3.2.2 Event Monitoring Window).
Help Menu - An easy-to-follow Help Menu enables easy access to information and set-up
details (refer to Section 5.2.7 Help).
Follow Up - All changes that were realized in the software, are saved into the database. All
changes can be seen in the Modification Follow-Up Report .
SaMSon Security Monitoring Software
Page 15
24/12/03
Syncronization - In the system there is a sycronization feature that prevents adding /changing
data on the same object simultaneously
Classification – Each operator is classified by an area. The operator will only get events from
the area to which he was classified to, and he is the only one that can see these events. If the
operator wasn’t classified by an area, he will see all the incoming events.
Report Viewer – The report Viewr is the tool enabling the user to see saved reports.
1.4
The SaMSon User Manual
This manual discusses the installation, set-up, daily operations and maintenance of both SaMSon
Central and SaMSon Monitor Modules.
SaMSon Security Monitoring Software
Page 16
24/12/03
2
Getting Started
SaMSon Security Monitoring Software is designed to accommodate the needs of various sized
central monitoring stations. Compatible with a number of industry-standard receiving units and
Windows® operating systems, the software can be installed as a stand-alone application for smaller,
private, security offices or can be networked for larger central monitoring stations requiring
multiple operators.
Figure 2-1: SaMSon Configuration for Stand Alone
Figure 2-2: SaMSon Configuration for Network
(1- SQL Server
(2- Samson Central
(3- Samson Monitor
SaMSon Security Monitoring Software
Page 17
24/12/03
2.1
System Requirements
2.1.1 Receiver
A central station receiver receives messages from End units and relays them to the to SaMSon
Software.
Recommended equipment includes KP ELECTRONIC SYSTEMS LTD’s
RCI4000™, DTRCI4000™, RCI5000™, or DTRCI5000™ Receiver Communication Interface
units. The SaMSon application is also compatible with a wide variety of industry-standard radio,
line or cellular receivers.
2.1.2 Minimum Computer Hardware Requirements
SaMSon runs on Microsoft Windows® operating systems. To install SaMSon and begin using
the application, you will need the following computer hardware:
•
An Intel Pentium III® processor or equivalent
•
RAM sufficient to meet your operating system’s requirements plus 256 MB application
memory
•
10 GB available hard disk space for server, 50MB for workstation
•
A CD-ROM drive
•
Floppy disk drive
•
Serial Port RS232 for each receiver connected to the server
•
Parallel port or USB port for Hardware Key and printer
•
A 17" color monitor capable of 1024-by-768 pixel resolution and 16 Bit-color display
•
Modem with microphone (optional)
Important
It is recommended that you use a dedicated computer in order to avoid any software conflict
that may affect SaMSon operations.
2.1.3 Minimum Software Requirements
SaMSon requires the following software for successful operations:
•
Microsoft Windows 2000, Window 2000 Server, Windows XP, Windows XP Server, or
Windows NT4
•
Microsoft SQL Server 2000 Desktop Engine (MSDE2000®) for less than 500 accounts
(supplied with SaMSon installation CD)
or
•
Microsoft SQL Server 2000® for more than 500 accounts or network configuration
Important:
If SQL Server 2000 is already installed, MSDE2000 is not required.
SaMSon Security Monitoring Software
Page 18
24/12/03
2.2
Installing the Hardware
2.2.1 KP Hardware
If using KP ELECTRONIC SYSTEMS LTD’s RCI3300 or RCI4000/DTRCI4000 or
RCI5000/DTRCI5000 Radio Communication Interface units, refer to the User Manuals supplied
with each unit.
2.2.2 Alternative Receivers
For alternative receiving equipment, refer to respective user manuals for installation instructions.
SaMSon Security Monitoring Software
Page 19
24/12/03
2.3
Installing SaMSon Security Monitoring Software
The SaMSon Security Monitoring Software CD contains four applications. They are as follows:
•
Microsoft SQL Server 2000 Desktop Engine Setup (MSDE2000)
•
Configure Setup
•
Backup/Restore Utility
•
SaMSon Central
•
SaMSon Monitor
•
SaMSon Report Viewer
To begin using SaMSon, you must install the correct applications and configure the software to
the specific requirements of your system.
Installation will depend on whether you are using SaMSon for a stand alone system or for a
network. Use Table 2-1: System Installation as an installation guide.
Table 2-1: System Installation
STAND ALONE SYSTEM
NETWORK
SOFTWARE
(refer to Figure 2-1: SaMSon
Configuration for Stand
Alone)
(Refer to Figure 2-2: SaMSon
Configuration for Network )
Microsoft SQL Server 2000
Desktop Engine Setup
(MSDE2000)
• Server connected to receiver
hardware
• Not required
Configure Setup
• Server connected to receiver
hardware
• Server connected to receiver
hardware
• Server connected to receiver
hardware
• Server connected to receiver
hardware
SaMSon Central
• Server connected to receiver
hardware
• Server connected to receiver
hardware
SaMSon Monitor
• Server connected to receiver
hardware
• Operator workstations
Backup/Restore Utility
Important:
Check with your system administrator to ensure that MSDE2000 or SQL
Server 2000 are NOT already installed on your server before
commencing installation procedures.
SaMSon Security Monitoring Software
Page 20
24/12/03
Please don’t insert Hardware Key before installation of SaMSon Central
is finished ,or before you are asked to do that during installation
procedure.
2.3.1 Navigating the Installation CD
Insert the CD marked SaMSon Security Monitoring Software in the server directly connected to
the receiver hardware.
Once inserted, the disk will automatically commence set-up procedures.
The following SaMSon Setup Window will open on your screen.
Figure 2-3: SaMSon Setup Window
If setup does not automatically begin after two minutes, run the setup manually using the
following instructions:
1. Choose Start ► Run on the Windows Task Bar
2. Browse to find the SaMSon CD.
SaMSon Security Monitoring Software
Page 21
24/12/03
3. Click to open files
4. Choose the Autorun.exe file to begin installation
The SaMSon Setup Window offers several activities:
Table 2-2: SaMSon Setup Window Navigation
BUTTON
Install
Report Viewer
Film
Website
User Manual
Exit
DESCRIPTION
Commences the setup procedures for installing software
Installation of Report Viewer
A short film about KP ELECTRONIC SYSTEMS LTD
Directs you to KP ELECTRONIC SYSTEMS LTD’S website
A copy of the SaMSon User Manual
Exit from the Installation CD
Choose the Install button to commence installation procedures, or choose the Exit button to
close the Setup Window.
By choosing the Install button, the following Systematic Setup Window will open on your
screen.
Figure 2-4: SaMSon Systematic Setup Window
SaMSon Security Monitoring Software
Page 22
24/12/03
2.3.2 Installing the Applications
Important:
If your server has MSDE2000 or SQL Server 2000 already installed, please
move directly to Step Two: Configure Setup.
If prompted, Restore is obligatory.
Follow the installation instructions below:
1. Choose Step One ► MSDE2000 to commence MSDE2000 installation
2. Choose the Next button at each screen
3. When returned to the SaMSon Systematic Setup Window, choose Step Two ► Configure
Setup to commence configuration and setup of parameters required by server database
4. Select the Installation Interface language and choose the OK button
5. During the setup, choose the Next button at each screen
6. Choose Step Two ► Backup/Restore Utility to commence setup of the parameters
required by the database administration and maintenance activities
7. Select the Installation and User Interface language and choose the OK button
8. During the setup, choose the Next button at each screen
9. Check that the SaMSon Backup & Restore icon appears on the Desktop. Also check that a
new KP ELECTRONIC SYSTEMS LTD ►SaMSon Utility (which divides to ►Backup
& Restore appears in the Start ► Programs menu (refer to Figure 2-5: SaMSon Backup &
Restore Shortcuts ).
Figure 2-5: SaMSon Backup & Restore Shortcuts
10. When returned to the SaMSon Systematic Setup Window, choose the Step Three button to
commence SaMSon Central and SaMSon Monitor installation
11. Choose the SaMSon Central button to commence installation of the SaMSon Central
Module
12. Select the Installation and User Interface language and choose the OK button
SaMSon Security Monitoring Software
Page 23
24/12/03
13. During the setup, choose the Next button at each screen
14. After Setup is complete, check that the SaMSon Central icon appears on the Desktop. Also
check that a new KP ELECTRONIC SYSTEMS LTD ►SaMSon Central (which divides
to ►SaMSon Central appears in the Start ► Programs menu (refer to Figure 2-6:
SaMSon Central Desktop Shortcuts ).
Figure 2-6: SaMSon Central Desktop Shortcuts
15. Refer to the following Section 2.3.2.1 Installation for a Stand Alone System to continue
instructions for stand alone system installation or refer to Section 2.3.2.2 Installation for a
Network to continue network installation instructions
2.3.2.1
Installation for a Stand Alone System
If SaMSon is operating on only one computer, please continue to follow the installation
instructions below:
1. When returned to the SaMSon Systematic Setup Window, choose the SaMSon Monitor
button to commence installation of the SaMSon Monitor Module
2. Select the Installation and User Interface language and choose the OK button
3. During the setup, choose the Next button at each screen
4. Once installation is complete, choose the Back button to return to the Setup Window and
choose the Exit button to close the Setup function
5. Check that the SaMSon Monitor icon appears on the Desktop. Also check that a new KP
ELECTRONIC SYSTEMS LTD ►SaMSon Monitor (which divides to ►SaMSon
Monitor and ► SaMSon Reports directories) appears in the Start ► Programs menu
(refer to Figure 2-7: SaMSon Monitor Desktop Shortcuts).
Figure 2-7: SaMSon Monitor Desktop Shortcuts
6. Refer to Section 2.4 First Time Setup to commence setup and operations of software.
SaMSon Security Monitoring Software
Page 24
24/12/03
2.3.2.2
Installation for a Network
For multiple workstations, the SaMSon Monitor Module is installed on each workstation
designated for central station operations (refer to Figure 2-2: SaMSon Configuration for
Network).
Continue to follow the installation instructions:
1. Once SaMSon Central is installed on the server, choose the Back button to return to the
Setup Window and choose the Exit button to close the SaMSon Setup Window
2. Remove the CD and insert it in the operator workstation and choose the Install button
3. Choose the SaMSon Monitor button to commence installation of the SaMSon Monitor
Module
4. Select the Installation and User Interface language and choose the OK button
5. During the setup, choose the Next button at each screen
6. Once installation is complete, choose the Back button to return to the Setup Window and
choose the Exit button to close the SaMSon Setup Window
7. Check that the SaMSon Monitor icon appears on the Desktop. Also check that a new KP
ELECTRONIC SYSTEMS LTD ►SaMSon Monitor (which divides to ►SaMSon
Monitor and ► SaMSon Reports directories) appears in the Start ► Programs menu
(refer to Figure 2-7: SaMSon Monitor Desktop Shortcuts ).
8. Refer to Section 2.4 First Time Setup to commence setup and operations of software
SaMSon Security Monitoring Software
Page 25
24/12/03
2.4
First Time Setup
A Hardware Key is required on the Server which contains the installation of SaMSon Central. In
addition, the allocation of a Server Name is also required in order to commence operations of
SaMSon.
2.4.1 Hardware Key
The Hardware Key is provided with your purchase of SaMSon Security Monitoring Software.
The Key is supplied according to the number of accounts purchased.
Warning:
Once SaMSon Central is installed, any attempt to open the software without
a Hardware Key will initiate an error message.
Plug the Hardware Key into either the USB Connector or the Parallel Port of the server.
2.4.2 Server Name
For first time startup, the user is asked for a Server Name to be defined within the system (refer
to Figure 2-8: Server Name Window).
Figure 2-8: Server Name Window
Type the correct Server Name in the blank text box or choose the Local button and the Server
Name is automatically retrieved from the computer.
Choose the OK button.
SaMSon Central is now ready for setup and operations (refer to Section 3 Setup Procedures for
SaMSon Central setup procedures).
For Network: Server Name must also be defined once on each workstation that contains a copy
of SaMSon Monitor.
Type the Server Name as it appears on the server which contains an installation of SaMSon
Central.
Choose the OK button.
SaMSon Monitor is also now ready for setup and operations (refer to Section 3 Setup Procedures
for instructions on SaMSon Monitor setup procedures).
SaMSon Security Monitoring Software
Page 26
24/12/03
3
Setup Procedures
SaMSon Security Monitoring Software is equipped with easy setup procedures in order to
organize the software according to individual central station requirements.
It is recommended that you read the instructions carefully in order to avoid any errors once
SaMSon Central and SaMSon Monitor commence operations.
SaMSon Security Monitoring Software
Page 27
24/12/03
3.1
SaMSon Central
Once SaMSon Central is installed on the server, event codes, and protocol and receiver hardware
parameters are defined within SaMSon Central and a basic system configuration is created.
Some of the parameters may require changes or additions according to individual central station
requirements.
To enter SaMSon Central, choose Start ► Programs ► KP Electronic Systems ► SaMSon
Central ► SaMSon Central or, go to the Desktop and choose the SaMSon Central Shortcut
Icon .
The Message Window will appear on the screen (system or event messages will begin to appear
within the Message Window).
Figure 3-1: Message Window
Messages from end units will appear with a) date and time b) COM on which message is
received, and c) a numerical message string consisting of receiver number, line, account number,
partition (if applicable), received code and zone/user number (if applicable).
Help:
If a Hardware Key Error Message appears on the screen, refer to Section 2.4
First Time Setup for instructions on activating the Hardware Key.
Following is a brief description of the Menu Bar options within the Message Window.
Table 3-1: Menu Bar Options
OPTION
File
Tools
Help
DESCRIPTION
Access and exit from the software
Define and maintain event codes, protocols and receiver hardware configuration, and
view log files
Provides information about SaMSon Central and software assistance
SaMSon Security Monitoring Software
Page 28
24/12/03
As required, the Message Window can be minimized and then accessed by choosing the SaMSon
Central Icon
in the Task Bar. The Message Window can be closed by exiting SaMSon
Central (refer to Section 5.1.4 Exiting Samson Central).
Warning:
SaMSon Central must remain operating at all times to maintain ongoing
communications between the receiver hardware and SaMSon Monitor. If
SaMSon Central is closed, new events will not be received by SaMSon
Monitor.
3.1.1 Log in
Authorized users can define or change event codes, protocol descriptions and receiver hardware
parameters within SaMSon Central according to individual hardware and central station
requirements. To do so, you must log in to the software.
To Log in to SaMSon Central, choose File ► Log in (Ctrl+L).
The following Log in Window will appear requiring User Name and Password.
Figure 3-2: Login Window
Important:
SaMSon Central and SaMSon Monitor installations are both supplied with a
pre-set User Name (kp) and Password (kp) as displayed in Figure 3-2: Login
Window.
Login is case sensitive.
The pre-set Username and Password allows access to all software options.
To ensure that options within the software are accessible by authorized users
only, it is recommended that partitioned security passwords be configured
within SaMSon Monitor (refer to Section 3.2.3 Operator Permission).
SaMSon Security Monitoring Software
Page 29
24/12/03
Enter the User Name and Password that has been assigned to you within SaMSon Monitor by the
central station administrator, or enter the pre-set User Name and Password.
Choose the OK button to return to the Message Window, or choose CANCEL to return to the
Message Window without user access.
Help:
The system will alert you if an incorrect User Name or Password has been
typed.
Once you have logged in, options according to the user level assigned to you are now highlighted
in black and accessible within the Menu Bar. Options that appear in gray are not accessible
according to your user level.
3.1.2 Defining Software and Hardware Parameters
A set of pre-set event codes, protocol descriptions and receiver settings are defined within
SaMSon Central.
To review software and hardware parameters, choose Tools on the Menu Bar.
A pull down menu of options appears (refer to Figure 3-3: Tools Pull Down Menu).
Figure 3-3: Tools Pull Down Menu
The options that you have access to according to your user level are highlighted in black. To
change access, refer to Section 3.2.3 Operator Permission.
SaMSon Security Monitoring Software
Page 30
24/12/03
3.1.3 Adding and Editing Event Codes
When SaMSon Central is installed, a set of pre-set event codes are automatically installed within
the software and recognized by SaMSon Monitor. Event codes are a three letter mnemonic
shortcut describing the actual events sent by the end units. This event code finds a meaningful
interpretation to the numerical or alphanumerical event received from the end unit.
Pre-set codes can be viewed or modified by the user as required. New codes can also be added.
Any changes or additions are global and affect all customer accounts.
To view, add, edit or delete event codes, choose Edit Event Codes Table (Ctrl+T).
An Event Codes Table appears listing the pre-set codes within the system (refer to Figure 3-4:
Event Codes Table).
Figure 3-4: Event Codes Table
Help:
Each column within the Edit Event Codes Table can be sorted by choosing
the top row containing the column subject. Column width can change by
dragging the border between the column subjects.
For a full list and description of SaMSon Central’s event codes refer to Appendix, Section 8.3
Event Codes at the back of this manual.
SaMSon Security Monitoring Software
Page 31
24/12/03
Following is a brief description of the Event Codes Table.
Table 3-2: Event Codes Table Description
FIELD
DESCRIPTION
ACTION REQUIRED
A three letter mnemonic shortcut that
identifies the event (eg. ALR - Alarm).
Event Code
Used to define a Received Code in
Protocol Properties in SaMSon Central,
or in the Special Code option of the
account card in SaMSon Monitor.
This field is displayed in the Incoming
Events section, Account Card and
Reports in SaMSon Monitor.
• Pre-set codes are fixed; they
cannot be deleted or edited
• New codes can be added, edited
and deleted as required (changes
will automatically update within
SaMSon Central and SaMSon
Monitor)
A short description of the event.
This field is displayed in the Incoming
Events section, Account Card and
Reports in SaMSon Monitor.
Description
Important:
• Both pre-set and newly added
codes can be edited.
Any description changes should be
logical and match the allocated
event type (refer to example below).
Example of Description
Event
Current
Description
New Description
Description
Event Type
ALR
Alarm
Alarm
ALR
Factory Alarm
ALR
Closing Procedures
Each event is allocated a priority
number to indicate its importance and
to prioritize it according to the
response required.
Priority
The priority number will determine the
order the events appear in the Event
Monitoring Window in SaMSon
Monitor.
Defined from one (highest priority) to
nine (lowest priority).
SaMSon Security Monitoring Software
Page 32
P Correct
O Incorrect
•
Alarm
Alarm
Both pre-set and newly added
codes can be edited
Help:
Codes that occur with priority 1 to
7 require operators’ intervention
within SaMSon Monitor. Codes
that occur with priority 8 and 9
have automatic closure (auto-log)
and do not require operator
24/12/03
FIELD
DESCRIPTION
ACTION REQUIRED
intervention. Priority 9 is also
automatically assigned to
Undefined Accounts (i.e. accounts
that do not have a customer
assigned to them). This priority
cannot be changed by the user.
This field is displayed in the Incoming
Events section, Account Card and
Reports in SaMSon Monitor.
Selection indicates whether an audio
alarm is activated.
Siren
•
Both pre-set and newly added
codes can be edited
Each group has a matching action, e.g.
Open and Close, Alarm and Alarm
Restore
•
Event Types are fixed; they cannot
be deleted or edited
Important:
•
New Event Types cannot be
added.
•
Defined from pull down menu and
includes: Open, Close, Alarm,
Alarm Restore, General, General
Restore, Status, Status Restore,
and Internal
The siren sounds upon arrival of an
event.
Group under which similar events are
organized
All events within the system must have
a group assigned to them
Event Type
To keep track of a customer’s open
and close operations, all open
operations must be defined as Open
type, and all close operations must
be defined as Close type.
To keep track of restore operations
for several events, the event to be
restored must be defined as Alarm type,
and the expected restore must be
defined as Alarm Restore type.
3.1.3.1
Adding a New Event Code
To add a new Event Code, choose the Add button.
The cursor will automatically move down to the last event on the table and a blank row with a
star (*) will appear to acknowledge that new data is required.
Enter a new three-letter Event Code (in capital letters).
Add a general event description.
SaMSon Security Monitoring Software
Page 33
24/12/03
Note:
A pre-set priority, siren, event description and event type will appear and
can be changed according to your preference.
Select a priority, indicate if siren is required, and select an event type from the pull down menu.
Choose the Apply button to save the details.
Important:
For any event codes to be active, the user must assign a received code to
acknowledge the event code (refer to Section 3.1.4 Defining and Editing
Protocol Properties and Received Codes).
This event is now a global event within the system and affects all customer accounts, similar to
pre-set event codes.
3.1.3.2
Editing an Event Code
To edit an existing event, highlight the row that requires editing by choosing the gray box
corresponding to the event row.
Choose the Edit button.
The fields that were gray and inaccessible are now black and accessible on screen.
Replace the existing data with the new details and ensure that priority, siren indication and event
type are correct.
If changes to pre-set events are required, ensure that descriptions are logical and match the Event
Type (refer to examples and explanation shown in Table 3-2: Event Codes Table Description).
Choose the Apply button to save the changes.
Help:
The Event Code and Event Type fields of SaMSon Central’s pre-set events
cannot be edited or altered.
3.1.3.3
Deleting an Event
To delete an existing event, highlight the row that requires deleting by selecting the gray box
corresponding to the event row.
Choose Delete ►Apply to delete and save the changes.
Help:
SaMSon Central’s pre-set events cannot be deleted.
SaMSon Security Monitoring Software
Page 34
24/12/03
3.1.3.4
Exiting the Edit Event Codes Window
Once changes are made and saved choose the OK button to exit from the Event Code Window
and return to SaMSon Central’s Message Window.
3.1.4 Defining and Editing Protocol Properties and Received Codes
SaMSon Central has a number of pre-set protocols to choose from depending on the receiver
hardware in use. The correct protocol must be defined within SaMSon Central in order for it to
receive events.
Protocols have a number of Received Codes assigned to them. Received Codes are the actual
events received from the end units. They are sent to SaMSon Central by the receiver using the
protocol.
Protocols and corresponding received codes can be added, modified or deleted.
To view or edit protocol and received code settings, choose Tools ► Edit Protocol
Descriptions (Ctrl+P).
The following Protocol Properties Window appears:
Figure 3-5: Protocol Properties Window
SaMSon Security Monitoring Software
Page 35
24/12/03
Following is a description of the Protocol Properties Window.
Table 3-3: Protocol Properties Window Description
FIELD
DESCRIPTION
ACTION REQUIRED
Protocol Properties
A list of possible protocols to be used
within the system.
Protocol Format
The protocol appears as an • Choose protocol from pull down
menu for viewing or editing
abbreviated name in the pull-down
menu (and recognized in the protocol • Add a new protocol in the open
box in Edit Receiver Settings, refer to
text box
Section 3.1.5.2
Editing a Receiver)
Protocol Name
Full descriptive name of the protocol
The protocol string is used to define
the protocol structure
Every alpha numeric character (or
group of characters) of the protocol
string represents a byte of the
protocol
Protocol String
Necessary to see each character of the
protocol within the protocol string
In the protocol definitions table the
letters that represent each element are
displayed
If a constant ASCII character is used,
use the back slash (\) and the ASCII
code in three character format (\xxx)
• When adding a new protocol,
type description in open text box
• Enter the appropriate protocol
string
Example:
\010RL AAAA cc\013
where:
\010 – ASCII code of LF
R – represents the Receiver number
L – represents the Line/System
number
< > - space
AAAA – represents the Account
Number (address)
< > - space
cc – represents the Receive Code
If a fixed character is required, use
the $ and the character
The data string used to acknowledge
the protocol
Acknowledge String
Every alpha numeric character (or
group of characters) of the
acknowledge string represents a byte
of the protocol
• Enter the appropriate
acknowledge string
Example:
\006
where:
\006 – ASCII code of ACK
Used for communications between
the server and the receiver
SaMSon Security Monitoring Software
Page 36
24/12/03
FIELD
DESCRIPTION
ACTION REQUIRED
Assigns protocol for use as a Heart
Beat protocol
Heart Beat
A unique protocol through which
the receiver sends verification • Select to indicate if protocol is a
Heart Beat protocol
messages in a pre-set period in
order to maintain communications
and indicate that hardware is
functional.
Used if a Receiver Code appears as a
Zone
• Select to indicate if Receiver
Code appears as a Zone
R = Receiver Num
Represents the receiver number that
is received
Range 0 – F
L = Line/System Num
Represents the received line or
system number
Range 0 – F
A = Account Num
Represents the account number
Range 0 – 9
P = Partition
Represents the partition number
Range 0 – F
Z = Zone/User Name
Represents the zone/user name
Range 0 – 9
C = Received Code
Represents the received code
Range: all characters
c = Received Code
Represents the received code
Range 0 – F
\xxx = ASCII
Represents an ASCII character
Range \000 - \255
$x = Fixed Character
Represents a fixed character
Example $5 or $G
Receiver Code =
Zone
Protocol Definitions
Once a protocol is defined within SaMSon Central, appropriate received codes must be assigned
to the protocol in order to receive the actual events from the end units.
Important:
If the protocol in use is a Heart Beat protocol, received codes do not need to
be assigned.
The Received Code Table can be accessed via the Protocol Properties Window.
Choose the Received Code Table button in the lower right hand corner of the Protocol
Properties Window (refer to Figure 3-5: Protocol Properties Window).
The following Received Codes Table will open.
SaMSon Security Monitoring Software
Page 37
24/12/03
Figure 3-6: Received Codes Table
Help:
Column width can change by dragging the border between the column
subjects.
Important:
Received Codes are only used if the protocol is not a heart beat protocol. If
you have identified the protocol as a heart beat protocol, the Received Code
Table cannot be accessed (refer to Table 3-3: Protocol Properties Window
Description for explanation about heart beat protocols).
To return to the Protocol Properties window, choose the Protocol
Properties button in the lower right hand corner.
SaMSon Security Monitoring Software
Page 38
24/12/03
Following is a description of the Received Codes Table.
Table 3-4: Received Codes Table Description
FIELD
DESCRIPTION
Protocol Format
Abbreviated name of the protocol as it
appears on the protocol pull-down menu
(and recognized in the protocol box in
Edit Receiver Settings, refer to Section
3.1.5.2
Editing a Receiver)
Protocol Name
Full descriptive name of the protocol
ACTION REQUIRED
• Choose from pull down menu of
existing protocols or add new
protocol in open text box
• Description
from
Properties Table
Protocol
Identifying code for each received
event, according to the protocol in use
Important:
When choosing the Event
Code related to this Received
Code, always take note of
the Event Type
Received Code
Event Code
Event
Description
This field is displayed in the Incoming
Events section, Account Card and
Reports in SaMSon Monitor.
Identifying code for each event as it
appears in the Event Codes Table (refer
to Section 3.1.3 Adding and Editing
Event Codes)
Description of the event
• Type code in open text box
• Choose from pull down menu
• Automatically defined from the
Event Code Table
Choose the Protocol Properties Table button in the lower right hand corner (refer to Figure
3-6: Received Codes Table) to return to the Protocol Properties Window.
3.1.4.1
Adding a New Protocol
New protocols can be defined in the system by choosing the Add button.
Blank fields will appear and the system is now ready for new data (refer to Table 3-4: Received
Codes Table Description as a guide).
Type in new data in the blank fields and choose the Apply button to save the new protocol.
3.1.4.2
Adding Received Codes
Once a new protocol has been added to the system, received codes need to be assigned (with the
exception of heart beat protocols which do not require received codes).
To add new received codes choose the Received Code Table button.
SaMSon Security Monitoring Software
Page 39
24/12/03
Choose the Add button.
Blank fields will appear and the system is now ready for new data (refer to Table 3-4: Received
Codes Table Description as a guide).
Type in a new received code and assign an Event Code from the pull down menu (refer to
Section 3.1.3 Adding and Editing Event Codes).
An Event Description is automatically assigned.
Choose the Apply button to save the new data.
Choose the Protocol Properties button to return to the Protocol Properties Table.
Important:
If a specific customer requires a variation to any event codes assigned to
received codes, they can be defined within the Special Code button of the
customers' account card, rather than added as a global event in SaMSon
Central (refer to Table 3-11: Account Card Description).
3.1.4.3
Editing a Protocol
To edit an existing protocol, choose the protocol from the pull down menu in Protocol Format
and choose the Edit button.
The fields that were grayed and inaccessible are now black and accessible on screen.
Make the appropriate changes and choose the Apply button to save.
3.1.4.4
Editing Received Codes
Received codes for a protocol can also be edited if required.
To edit an existing protocol’s received codes, go to the Protocol Properties Window and choose
the Received Code Table button.
Choose the protocol from the pull down menu in Protocol Format and choose the Edit button.
The fields that were grayed and inaccessible are now black and accessible on screen.
Make the appropriate changes and choose the Apply button.
Choose the Protocol Properties button to return to the Protocol Properties Table.
SaMSon Security Monitoring Software
Page 40
24/12/03
3.1.4.5
Deleting a Protocol
To delete an existing protocol, choose the protocol from the pull down menu in Protocol Format.
Choose Delete ► Apply to delete and save the changes.
Warning:
It is recommended to not delete existing protocols. By deleting protocols,
all associated data and received codes to the protocol will be deleted.
3.1.4.6
Deleting a Received Code
To delete an existing received code, go to the Received Codes Table by choosing the Received
Codes Table button.
Highlight the row that requires deleting by choosing the gray box corresponding to the received
code row.
Choose Delete ►Apply to delete and save the changes.
Warning:
By deleting a received code, the system will not recognize the code anymore
and will process it as an Undefined Signal.
3.1.4.7
Exiting the Protocol Properties or Received Code Table Window
Once changes are made and saved choose the OK button to exit from the Protocol
Properties/Received Code Table Window and return to SaMSon Central’s Message Window.
SaMSon Security Monitoring Software
Page 41
24/12/03
3.1.5 Defining and Editing Receiver Settings
SaMSon Central supports a number of industry-standard receiver hardware. The receiver
hardware in use must be selected within SaMSon Central in order for the software to receive
incoming data and translate these to events. The receiver details can be viewed or modified by
the user. New receivers can also be added.
To view or edit receiver settings, choose Tools ► Receiver Settings (Ctrl+R)
The following window appears:
Figure 3-7: Receiver Properties Window
SaMSon Security Monitoring Software
Page 42
24/12/03
Following is a brief description of the Receiver Properties Window.
Table 3-5: Receiver Properties Description
FIELD
DESCRIPTION
A list of possible receivers to be used
within the system
Receiver Name
The receiver appears as an abbreviated
name in the pull-down menu
The number of receivers that can be
used or added to the system is
determined by the number of COM
ports available in the server
Description
Full descriptive name of the receiver
ACTION REQUIRED
• Choose receiver name from
pull down menu
• Add new receiver in open text
box
• Type description in open text
box
In the case of dual communication
networks where two or more receivers
are in use, the receiver numbers can be
matched together in order to
collaborate the messages and prevent
the same message coming from both
receivers to the same account
Receiver Number
Two characters (RR) that make up part
of the account number for each
customer e.g.: RR-LL-AAAAAA-PP
where RR = receiver number (refer to
Section 3.2.5 Account Number Set-up)
• Two digits with range 0 – F
In most cases, the two-digit RR number
indicates the receiver number
If the field is left empty, the real
receiver number is used
The receiver number makes up part of
the customer account number (refer to
Section 3.2.5 Account Number Set-up)
SaMSon Security Monitoring Software
Page 43
24/12/03
FIELD
DESCRIPTION
ACTION REQUIRED
If more than one Line/System is in use,
numbers can be matched together in
order to collaborate messages and
prevent the same message coming from
every line/system to the same account
Line/System
Number
The real line/system numbers are
masked with matching numbers
• One digit with range 0 – F
If no value is entered, the real numbers
are used
The line/system number makes up part
of the customer account number (refer
to refer to Section 3.2.5 Account
Number Set-up)
Manufacturer’s
Data
List of manufacturer’s contact details
Serial
Communication
Port
Choice of serial COM port connected
to the receiver (1 – 8)
Parity
The Parity (odd, even, mark, space,
none) at which the receiver transmits
input to the software (refer to the
Receiver User Manual for the correct
parity selection)
Stop Bits
The number of stop bits (1, 1.5, 2) the
receiver transmits as input to the
software (refer to Receiver User
Manual for the correct number of stop
bits)
Baud Rate
The baud rate (from 110 – 115200) of
the receiver being used for input to the
software (refer to the Receiver User
Manual for the correct baud rate)
Data Bits
The number of data bits (from 4 - 8)
the receiver transmits as input to the
software (refer to the Receiver User
Manual for the correct number of data
bits)
SaMSon Security Monitoring Software
Page 44
• An extended window will
appear with full manufacture’s
contact details
• Window is opened/closed by
choosing the Manufacturer’s
Data button
• Choose from scroll down menu
24/12/03
FIELD
DESCRIPTION
ACTION REQUIRED
The period of time in which the
receiver confirms status to the server
(refer to the Receiver User Manual for
the correct Heart Beat period)
Heart Beat
Period
The pre-set time within the software is
20 seconds
• Enter the number of seconds
If no event is received from the
receiver during a period of time equal
to three times the defined period, the
software reports a receiver fault
The main protocols list used for
receiving events
Important:
Main Protocol
If the correct protocol is selected,
SaMSon Central will display in the
Message Window, details associated
with that protocol. If an incorrect
protocol has been selected data will
not appear logically.
• Choose protocol from the pull
down menu, and click the Add
button.
The protocol used for receiving the
receiver's Heart Beat
Heart Beat
Protocol
3.1.5.1
Important:
If an incorrect protocol has been
selected data will not appear
logically.
Adding a New Receiver
To add a new receiver to the existing list, choose the Add button.
Empty fields will appear, selection menus will become accessible and the system is ready for
new data.
Type in or choose new receiver properties (refer to Table 3-5: Receiver Properties Description
as a guide)
Choose the Apply button to save the new receiver.
SaMSon Security Monitoring Software
Page 45
24/12/03
3.1.5.2
Editing a Receiver
To edit an existing receiver, choose the receiver from the pull down menu in Receiver Name and
choose the Edit button.
The fields that were grayed and inaccessible are now black and accessible on screen.
Make the appropriate changes and choose the Apply button to save.
Help:
Each Line/System Numbers can be removed.
Highlighting the row that requires removing by choosing the gray box
corresponding to the Line/System row.
Choose the Delete button on your keyboard and the Line/System is
permanently removed.
3.1.5.3
Deleting a Receiver
To delete an existing receiver, select the receiver from the pull down menu in Receiver Name.
Choose Delete ► Apply to delete and save the changes.
Warning:
By deleting the receiver that is in operation, the software is unable to
function.
3.1.5.4
Exiting the Receiver Properties Window
Once changes are made and saved choose OK to exit from the Receiver Settings Window and
return to SaMSon Central’s Message Window.
SaMSon Security Monitoring Software
Page 46
24/12/03
3.1.6 SMS Modem settings
SaMSon Central supports cellular modem in order to send SMS message to customer while an
event is received.. The message is automaticlly send to the customer cellular phone.
Figure 3-8: SMS Modem setting
Serial Communication Port
Choice of serial COM port
Parity
The Parity (odd, even, mark, space, none)
Stop Bits
The number of stop bits (1, 1.5, 2)
Baud Rate
The baud rate (from 110 – 115200)
Data Bits
The number of data bits (from 4 - 8)
3.1.7 Finalizing Setup Procedures for SaMSon Central
In order for SaMSon Monitor to operate efficiently, all parameters must be correctly defined
within SaMSon Central. A brief system check is recommended to ensure that the following are
in order:
P
If required, all additional event codes, besides software pre-set codes, are defined
P
Additional event codes have clear and logical descriptions, priority levels and event types
are assigned in accordance with central station requirements
P
Suitable protocols have been defined within the system
P
Received codes for each protocol are defined (excluding Heart Beat protocols)
SaMSon Security Monitoring Software
Page 47
24/12/03
P
Suitable receiver hardware parameters are defined
If all parameters have been entered correctly, SaMSon Central is ready for operation and
received messages will appear in the Message Window according to the event.
3.1.8 Log Out
It is recommended that once the system parameters are defined or changed, the user log out of
SaMSon Central in order to avoid unauthorized entry by another user.
To log out of SaMSon Central, choose File ► Log out (Ctrl+L)
All SaMSon Central functions are now security protected and access to functions is restricted
according to user levels defined in SaMSon Monitor.
Refer to Section 5.1.4 Exiting Samson Central if you wish to exit SaMSon Central.
Warning:
SaMSon Central must remain operating at all times to maintain ongoing
communications between the receiver hardware and SaMSon Monitor.
If SaMSon Central is closed, SaMSon Monitor will not receive new events.
SaMSon Security Monitoring Software
Page 48
24/12/03
3.2
SaMSon Monitor
Once SaMSon Monitor is installed on the server/workstation, software parameters are ready to
be defined.
3.2.1 Login
To enter SaMSon Monitor, choose Start ► Programs ► KP Electronic Systems ► SaMSon
Monitor ► SaMSon Monitor or, go to the Desktop and choose the SaMSon Monitor Shortcut
Icon .
A Log in Window will appear requiring User Name and Password.
SaMSon Monitor requires authorized entry to access the software. The following Login
Window will appear requiring User Name and Password.
Figure 3-9: Login Window
Important:
SaMSon Central and SaMSon Monitor installations are both supplied with a
pre-set User Name (kp) and Password (kp) as displayed in Figure 3-9: Login
Window.
Login is case sensitive.
The pre-set Username and Password allows access to all software options.
To ensure that options within the software are accessible by authorized users
only, it is recommended that partitioned security passwords be configured
within SaMSon Monitor (refer to Section 3.2.3 Operator Permission).
Enter the User Name and Password that has been assigned within SaMSon Monitor by the
central station administrator or pre-set User Name and Password.
SaMSon Security Monitoring Software
Page 49
24/12/03
Choose the OK button to login to SaMSon Monitor or choose the CANCEL button to terminate
software.
Help:
The system will alert the user if an incorrect User Name or Password has been
typed.
Once the user has logged in, the Event Monitoring Window will open and options according to
the security level granted are highlighted and accessible within the Menu Bar.
3.2.2 Event Monitoring Window
Once logged into SaMSon Monitor, the Event Monitoring Window will appear on the screen.
The Event Window is the main window within SaMSon Monitor and consists of seven sections
(refer to Figure 3-10: Example of an Event Monitoring Window in Operation).
1.
2.
3.
4.
5.
6.
7.
Menu Bar
Shortcut Tool Bar
SaMSon Central Warning and New Event Indicator
Customer Account Details Section
Incoming Events Section
Events on Hold for Operator Section
Status Bar
Figure 3-10: Example of an Event Monitoring Window in Operation
SaMSon Security Monitoring Software
Page 50
24/12/03
Help:
Each column within the Incoming Events and Events on Hold Sections can be
sorted by choosing the top row containing the column subject. Column width can
change by dragging the border between the column subjects.
Following is a brief description of the options/fields possible within each section.
Table 3-6: Event Monitoring Window Description
SECTION
OPTIONS
DESCRIPTION
Window management
File
Access and operator login, exit from the
software, event exchange, close account
Account
Customer account options including creating
a new account, opening, editing, disabling,
freezing or saving existing accounts, restoring
un-restored events, changing account status
Reports
Generating or viewing a variety of reports for
administration and maintenance purposes
Tools
Software options include technical data
information, manual dialing, and sending
SMS , general definitions and operator access
levels within the software
Event Monitor
Maximizes the Event Monitoring Window,
generates manual events and hide/unhide
signals of undefined accounts
Window
Tools for viewing the Windows within the
software
Help
Presents information about SaMSon Monitor
and offers software assistance
Menu Bar
Shortcut Tool Bar
Allows the user to login to SaMSon Monitor
and view options according to their user
security level
Log In
All masseges from Event on Hold will
forward to Incoming Events
SaMSon Security Monitoring Software
New Account
Create a new account
Open Account
Open and view an existing account
Edit Account
Edit an existing account
Event Monitor
Maximize the Event Window to full screen
view
Save Account
Save account details
Page 51
24/12/03
SECTION
SaMSon Central
Warning Message
New Event Indicator
Font Size
FIELDS
DESCRIPTION
SaMSon Central Warning Message
• A warning message that alerts the operator of the current status
of SaMSon Central and receiver hardware
• Messages appear in red and pass across the operators’ screens
giving operators a real-time update
New Event Indicator
• A color-coded indicator blinks notifying the operator that a
new event is received
• Color indicates the priority of the event as defined in Table
3-8: General Definitions Window Description.
• Indicator will disappear from the screen by clicking on it or by
clicking F10
• Indicator will appear again if the event is received again
Font Size
• Font size of the Incoming Events and Events on Hold, can be
change by choosing option from the combo-box
COM
The serial COM port through which the event
was received
Account
Customer’s account number
Name
Customer’s name
Customer Details
Section
Status
The status of the account at the time of
operations (Open, Close, Not Available or
Freeze)
All data that appears in the
Customer details section is
taken from the customer’s
account card. Details
appear according to the
event that is chosen from
the Incoming Events or
Events on Hold sections
Address
Customer’s site address
Phone
Customer’s main contact phone number
Call Button
A quick dial call button for contacting
customers on phone number supplied in the
Phone field of the Event Monitoring Window
Password
A security question asked by the operator to
the customer in order to confirm the
customer’s identity
Answer
A corresponding response to the security
question to confirm customer’s identity
Notes
Additional miscellaneous information
concerning the customer
SaMSon Security Monitoring Software
Page 52
24/12/03
SECTION
FIELDS
DESCRIPTION
The software can appear offline where
messages are received but screen data is not
updated.
Offline Button
Incoming Events
Section
When the button is pressed, the incoming
events section will instantly scroll down to
display the last event received.
Incoming Events
Section
Displays incoming
emergency, administration
and system events.
Last Event Button
If SaMSon Monitor is
installed on a network,
messages are viewed by all
operators on their
respective screens, who
are currently logged into
the network.
SaMSon Security Monitoring Software
Offline button can be clicked on or off at any
time. If activated, software will deactivate
automatically after a 30 second period. Time
can not be changed by the user.
If the last event does not appear it is because it
is located beyond the limitation set on the
maximum number of events displayed in the
monitor.
Refer to the Options Tab in Table 3-8:
General Definitions Window Description to
review the maximum number of events
permitted to appear in the Incoming Events
Section
Man.
Three-star (***) indication that a manual event
is received
Pass
Events marked on the Pass column, indicates
the event is allready in process
Classif.
The account classification
Account
The customer’s account number
Z/U
Zone/User
Rec Code
The Received Code as defined in SaMSon
Central
Event Description
The Event Description as defined in SaMSon
Central or as defined in the Special Codes
button in some customer account cards (refer
Table 3-8: General Definitions Window
Description)
Event
A three letter abreviation of the event as
defined in SaMSon Central or as defined in the
Special Codes button in some customer
account cards (refer Table 3-8: General
Definitions Window Description)
Name
The customer name
Page 53
24/12/03
SECTION
Events on Hold for
Operator Section
Displays incoming
emergency, administration
and system events placed
on hold for the current
operator logged into the
server/workstation.
If SaMSon Monitor is
installed on a network,
each operator can only
view his or her own events
on the screen.
Operator can see all events
under his handling
Status Bar
SaMSon Security Monitoring Software
FIELDS
DESCRIPTION
Priority
The Priority number of the event as defined in
SaMSon Central or as defined in the Special
Codes button in some customer account cards
(refer Table 3-8: General Definitions Window
Description)
Event Date
Date of the received event
Operator
Name of operator who has selected and is
processing the event
Hold Date
Date the event is placed on hold
Event Closing
Date
Date the event is processed and closed
Man.
Three-star (***) indication that a manual event
is received
Classif.
The account classification
Account
The account number
Z/U
Zone/User
Rec Code
The Received Code as defined in SaMSon
Central
Event Description
The Event Description as defined in SaMSon
Central or as defined in the Special Codes
button in some customer account cards (refer
Table 3-8: General Definitions Window
Description
Event
A three letter abreviation of the event as
defined in SaMSon Central or as defined in the
Special Codes button in some customer
account cards (refer Table 3-8: General
Definitions Window Description)
Name
The customer name
Priority
The Priority number of the event as defined in
SaMSon Central or as defined in the Special
Codes button in some customer account cards
(refer Table 3-8: General Definitions Window
Description)
Event Date
Date of the received event
Hold Date
Date the event is placed on hold
Date and Time
Displays the current date and time according
to regional settings of the server
Page 54
24/12/03
SECTION
FIELDS
DESCRIPTION
Displays the User Name and calssification of
the operator currently logged into the
workstation
Operator
Account Details
If an account is open at any time but is
minimized or not displayed, the account
number will appear in the lower right hand
corner of the screen
The account is opened by double clicking on
this message
Once SaMSon Monitor is open, the Event Monitoring Window will remain open on the screen
and can not be minimized.
3.2.3 Operator Permission
SaMSon Monitor contains five customizable operating levels. They are as follows:
•
Operator Level 1
•
Operator Level 2
•
Supervisor
•
System Administrator
•
Technician
Each level allows pre-set access to functions within SaMSon Central and SaMSon Monitor. This
access can be customized according to the Operator.
To change existing operator permission or to add a new operator choose Tools ► Preferences
► Operator Permission
Warning:
The Operator Permission Window will appear displaying the pre-set User Name (kp)
and Password (kp) and allows operators access to all software functions.
It is recommended changing the pre-set password in order to ensure secure access to
the system.
SaMSon Security Monitoring Software
Page 55
24/12/03
Figure 3-11: Operator Permission Window
Following is a brief description of the Operator Permission Window.
Table 3-7: Description of the Operation Permission Window
FIELD
DESCRIPTION
ACTION REQUIRED
Name
Identifying name of operator
• Choose operator name from pull
down menu or add new name in open
text box
User Name
Operators log in name
• When adding a new Operator or
editing an existing Operator, type the
User Name in the open text box
• Choose operator level from pull down
menu when adding or editing a new
operator
Level
Level of responsibility
Help:
Functions are pre-set but not fixed and
can be customised
Last Change
Classification
Date of creation of new operator
or modification of existing
operator details
• Automatically changes to the current
date when you save
Classified operator by area
• General Classification is set by the
admenistrator
in
the
General
Defenition, and is allocate to each
operator. If the operator is not
classified by area, the operator will
see all Incoming Events
SaMSon Security Monitoring Software
Page 56
24/12/03
FIELD
DESCRIPTION
ACTION REQUIRED
Access to:
Checklist of functions within
SaMSon Central and SaMSon
Monitor (refer to 8.4 Operator
Permission)
• Select the check box to allocate
access to each function
• Deselect the check box to deactivate
access
Change
Password
To change operator passwords
• Type new password and confirm the
new password in the Password
Window
3.2.3.1
Adding an Operator
To add a new operator, choose the Add button.
Blank fields will appear and the system is now ready for new data.
Type the new Operator’s details in the blank fields.
Select the operator’s level and assign the functions allocated to the operator by checking each
box (refer to Appendix, Section 8.4 Operator Permission for a description of Permission Levels).
Select the operator’s classification (if needed)
Note:
Any functions that have not been checked in the Operator Permission
Window will appear be inaccessible in both SaMSon Central and SaMSon
Monitor
Choose the Apply button to save the new User Name.
Warning:
If you do not choose the Apply button before choosing the OK button, all
data will be erased and you will automatically return to the Event
Monitoring Window without saving the new User Name.
Once you choose the Apply button to save the changes, the following Password Window will
appear requesting a new password and confirmation.
SaMSon Security Monitoring Software
Page 57
24/12/03
Figure 3-12: Password Window
Type the new password in the Password Window.
Type the new password again to confirm, and choose the OK button to return to the Operator
Permission Window.
Warning:
Before editing or deleting an operator, make sure the operator did not
log into the system, otherwise the administrator cannot modify or delete
the operator.
3.2.3.2
Editing an Operator
To edit an Operator, select the Operator’s name from the Name pull down menu.
Choose the Edit button.
The fields that were grayed and inaccessible are black and accessible on screen.
Make the appropriate changes and choose the Apply button to save the changes.
3.2.3.3
Changing Password
To change an existing Password, select the Operator’s name from the Name pull down menu
Choose the Change Password button.
Type the new password in the Password Window.
Type the new password again to confirm, and choose the OK button to return to the Operator
Permission Window.
3.2.3.4
Deleting an Existing Operator
To delete an existing Operator select the name from the pull down menu and choose the Delete
button.
SaMSon Security Monitoring Software
Page 58
24/12/03
The software will confirm whether you wish to delete the user.
Choose the OK button to confirm or choose the Cancel button and return to the Operator
Permission Window.
Important:
At least one Operator must appear in the operator permission table.
It is impossible to delete the last remaining Operator.
3.2.3.5
Exiting the Operator Permission Window
Once changes are made and saved, choose the OK button to exit the Operator Permission
Window and return to the Event Monitoring Window.
Important:
Same account card cannot be modified simoultaneasly by two different
operators.
3.2.4 General Definitions
When SaMSon Monitor is installed, pre-set, global software parameters are defined within
SaMSon Monitor. The parameters can be modified and enable the user to customise the
software according to central station requirements.
To review the software parameters, choose Tools ► Preferences ► General Definition on the
Menu Bar to view the General Definition Window.
The General Definition Window consists of ten tabs containing various types of parameters
(refer to Figure 3-13: General Definition Window).
SaMSon Security Monitoring Software
Page 59
24/12/03
Figure 3-13: General Definition Window
Click on the Tab Label to select and view a tab, or choose the Close button to close the General
Definitions Window and return to the Event Monitoring Window.
Refer to Table 3-8: General Definitions Window Description for a brief description of each Tab
and the changes that can be made.
SaMSon Security Monitoring Software
Page 60
24/12/03
Table 3-8: General Definitions Window Description
TAB
DESCRIPTION
ACTION REQUIRED
SaMSon Monitor has a number of pre-set account types in
the system. They are used for categorising and identifying
the type of customer account when completing a Customer
Account Card.
Adding a New Account Type
Pre-set Account Types include: Apartment, Business,
Commercial, Hospital, Hotel/Motel, Medical Facility, and
Office Building.
New Account Types can be added and existing ones deleted.
Account Type
•
To add a new account type, choose the Add button
•
Blank fields will appear and the system is now ready for new data
•
Type the new Account Type in the blank fields and choose the
Apply button to save the new parameter
Editing an Account Type
•
To edit an Account Type, select the type and make the changes in
the open text box below the list
•
Choose the Apply button to save the changes
Deleting an Existing Account Type
•
To delete an existing Account Type, select the one to be deleted
•
Choose Delete ► Apply to delete and save the changes
Important:
Any Account Types that are currently in use in a
customer account card can not be deleted from the
system.
Figure 3-14: Account Tab
SaMSon Security Monitoring Software
Page 61
24/12/03
TAB
DESCRIPTION
ACTION REQUIRED
Adding a New Holiday
SaMSon Monitor has the option to set Holiday dates that
are global for all accounts and affect customers’ who have
the schedule activated for their open/close schedules.
•
To add a new holiday, choose the Add button
•
The Holiday Information Window will open and the system is now
ready for new data
By choosing the Holiday Tab, a full description of the
holidays and their beginning and ending dates are
displayed.
New Holidays can be added and existing ones deleted.
Important:
Holidays defined within General Definitions
will take priority over any regular open/close
scheduling in customer account cards.
Special Schedules defined in customer
account cards will take priority over holidays.
Holiday
Figure 3-16: Holiday Tab
•
Enter a date, time and description of the holiday and choose the OK
button to add the new holiday or choose Cancel to return to the
Holiday Tab without changes
•
The new holiday will appear in the Holiday Tab
Help:
Holiday schedules indicate that the property is closed
Editing an Existing Holiday
•
To edit an existing Holiday, select the Holiday to be edited.
•
Choose the Edit button
•
Replace the existing data with the new details
Deleting an Existing Holiday
Page 62
To delete a holiday, choose the holiday to be deleted.
•
Choose the Delete button.
Help:
Figure 3-15: Holiday Tab
SaMSon Security Monitoring Software
•
Column width Column width can change by dragging the
border the border between the column subjects.
24/12/03
TAB
DESCRIPTION
ACTION REQUIRED
SaMSon Monitor has a number of global phone types for
grouping various phone numbers within customer accounts
providing easy access and identification (refer to the Phone
button in Table 3-11: Account Card Description).
Choose the Phone List Type Tab to view the pre-set Types
within the software.
Adding a New Phone List Type
•
To add a new phone list type, choose the Add button
•
Data can now be added to the blank row
•
Type the new Phone List Type and choose the Apply button to save
the new parameter
They include: General, Emergency, Open/Close and Not
Restore.
Pre-set Phone List groups can be edited and new Phone List
Types can be added, edited and deleted.
Phone List
Type
Editing the Phone List Type
•
To edit the Phone List Type, select the type and make the changes
in the open text box below the list
•
Choose the Apply button to save the changes
Deleting an Existing Type
•
To delete a phone list type, choose the field to be deleted
•
Choose Delete ► Apply to delete and save the changes
Important:
Pre-set Phone List Types within the software can not be
deleted from the system.
Figure 3-17: Phone List Type Tab
SaMSon Security Monitoring Software
Page 63
24/12/03
TAB
DESCRIPTION
ACTION REQUIRED
Choose the Options Tab to view a selection of options for
software administration purposes.
Changing Options
Figure 3-18: Options Tab
Options
Following is a brief description of the options available:
Maximum Number of Events Displayed on Monitor
SaMSon Monitor retains an unlimited number of processed
and unprocessed events within the software. However, only
a limited number is displayed on the Event Monitoring
Window at any given time.
The user can define the number to be displayed, with a
range between 50 – 999. The pre-set number is 100.
Events are displayed according to priority, with highest
priority appearing first.
If the number of incoming events exceeds the maximum
number to be displayed (as defined by the user), the lower
priority events are the first events to be automatically
removed from the display based on first-in first-out and
depending on event date and processed date (closed).
SaMSon Security Monitoring Software
Page 64
24/12/03
•
To change the numbers, type the desired number or use the up/down
arrows
•
Choose the Apply button to save the changes
TAB
DESCRIPTION
ACTION REQUIRED
To view ALL events that are received in the software
including those not displayed, a historical report can be
carried out (refer to Section 5.2.5 Reporting).
Filter Repetition
Administrator can change the time of Filter Repeation.
The default for this time is 90 seconds.
In a system where messages sent repeatedly several times
from end-units this feature, while active, will filter the
repeated messages, as a result of this only one signal will
shown on the operators monitor.
The filter time out should be set to the optimum value
that represents the time needed for the transmitter to
send all repetitions.
Attention: Setting the time out too long could cause a
new message lose!
SMS Repetition
Administrator can change the time of SMS Repeation if the
messagse was failed in sending..
The default for this number is 3.
If the message wasn’t send after all the numbered trials,
it is indicate that there is a problem in the user modem.
Options
cont/…
Country /Region
Changing Options
Administrator must insert his country / region number
•
To change the numbers, type the desired number or use the up/down
arrows
•
Choose the Apply button to save the changes
Use modem for SMS
Administrator commences or cancels the Use modem
for SMS checkbox by selecting or deselecting the Use
modem for SMS box
Foreground SaMSon Monitor on event reception
If this option is checked (þ) , and the SaMSon Monitor
window is in the task bar, the window will jump on top
when the event is received
Maximum Amount of Historical Months
SaMSon Security Monitoring Software
Page 65
24/12/03
This option defines the period of time (in months) that
events are historically stored within the software. The pre-
Changing Options
•
To operate this option, checke or uncheck
•
Choose the Apply button to save the changes
TAB
DESCRIPTION
ACTION REQUIRED
SaMSon Monitor offers a number of Global Phone Numbers
that exist for all customers.
Global Phone Numbers can vary depending on central
station requirements but might include Police, Ambulance,
or other external maintenance and emergency support
organizations used by the Central Station.
They appear in a pull down menu on the Phone Tab of each
customer account card (refer to the Phone button in Table
3-11: Account Card Description).
New phone numbers can be added to the list and existing
ones deleted.
Global Phone
List
Adding a New Global Phone List
•
To add a new Global Phone List, choose the Add button
•
Blank fields will appear and the system is now ready for new data
•
Type the new data in the blank fields and choose the Apply button
to save the new phone list
Editing the Global Phone List
•
To edit the Global Phone List, select the Name and make the
changes in the open Name, Number and Notes text boxes below the
list
•
Choose the Apply button to save the changes
Deleting an Existing Global Phone List
Figure 3-19: Global Phone List Tab
SaMSon Security Monitoring Software
Page 66
24/12/03
•
To delete an existing Global Phone List, highlight the one to be
deleted
•
Choose Delete ► Apply to delete and save the changes
TAB
DESCRIPTION
ACTION REQUIRED
SaMSon Monitor lists details of central station patrol
personnel working in the field.
New Patrol Personnel can be added to the list and existing
ones deleted.
When processing an event, the Operator can choose the F6
button on the keyboard to enter the Patrol Personnel
responding to the event. The Patrol Person’s name and time
of response will appear in the Action Log section of the
customer account card (refer to Section 0 SaMSon Monitor
Event Management).
Adding New Patrol Personnel
•
To add new patrol personnel, choose the Add button
•
Blank fields are now ready for new data
•
Type the new data and choose the Apply button to save the new
parameter
Editing a Patrol Personnel
Patrol
Personnel
•
To edit a Patrol Personnel, select the patrol person and make the
changes in the Number, Name and Notes text boxes below the
Patrol Personnel list
•
Choose the Apply button to save the changes
Deleting an Existing Patrol Personnel
Figure 3-20: Patrol Personnel Tab
SaMSon Security Monitoring Software
Page 67
24/12/03
•
To delete patrol personnel, choose the field to be deleted
•
Choose Delete ► Apply to delete and save the changes
TAB
DESCRIPTION
ACTION REQUIRED
A list of actions that an operator might take when
processing an event appear in a scroll-down menu.
Once the list is defined in General Definitions, it will
appear in the Action Log section of the customer account
card when an operator is using the Comments function
(refer to Section 4.3.5.2 Adding Comments).
Adding a New Action Aid
•
To add a new action, choose the Add button
•
Blank fields will appear and the system is now ready for new data
•
Type the new Action Aid in the blank fields and choose the Apply
button to save the new parameter
New actions can be added, edited or deleted from the list.
Editing an Action Aid
Action Aid
•
To edit an Action Aid, select the aid and make the changes in the
open text box below the Action Aid list
•
Choose the Apply button to save the changes
Deleting an Existing Action Aid
•
To delete an existing Action Aid, choose the field to be deleted
•
Choose Delete ► Apply to delete and save the changes
Help:
The pre-set list of Action Aids within the software can be
deleted from the system.
Figure 3-21: Action Aid Tab
SaMSon Security Monitoring Software
Page 68
24/12/03
TAB
DESCRIPTION
ACTION REQUIRED
Color Codes
Changing Color Codes
Each event code that is defined in SaMSon Central, has a
priority number assigned to it.
•
To change the pre-set color code, choose the priority number from 1
to 7
For easy identification of the event and its priority, the
priority is color-coded according to its priority level.
•
The pre-set color-coding assigned to the priority will appear in the
right hand side
•
Choose either the Back Color or the Fore Color and a color
definition box will appear with a selection of colors from which to
choose
•
Select the appropriate color and choose the OK button to return to
the Priority Tab
•
The color will now appear in the box
Changing Siren Sound
Priority
Figure 3-22: Priority Tab
Sound Alarm
This option provides the user with a number of alarm
sounds from which to choose.
The alarm sound will only be heard when an event is
received in the Event Monitoring Window, and if the type
of event has a Siren activation defined within SaMSon
Central
Each priority has its own sound.
SaMSon Security Monitoring Software
Page 69
24/12/03
•
Choose the
button and select a sound from the folder
•
Choose the
button to listen to the sound
TAB
DESCRIPTION
ACTION REQUIRED
Help:
Color codes for priority 1 to 7 can be changed
according to user requirements.
Colors indicate events that require operator
intervention.
Codes with priority 8 and 9 have a pre-set color
code that can not be changed by the user . Codes 8
and 9 indicate events that are automatically
logged and do not require operator intervention
(e.g. Undefined Accounts).
The Equipment Tab lists types of equipment in operation
within the system.
Equipment
Adding a New Group
•
To add a new Group to the list, choose the Add New Group button
•
A blank text box will appear
The details from the Equipment Tab is used in conjunction
with the Technical Data feature in SaMSon Monitor (refer
to Section 5.2.1 Technical Data).
Groups and Parts can be added, edited and deleted from the
system at any time.
Figure 3-24: Group Text Box
•
Enter the name of the Group to be added to the list
•
Choose the OK button or choose the Cancel button to return to the
Equipment Tab
•
The New Group will appear in the directory
Removing an Existing Group
SaMSon Security Monitoring Software
Page 70
Figure 3-23: Equipment Tab
24/12/03
•
To delete an existing Group from the list, highlight the Group to be
deleted by clicking on the group
•
Choose the Remove Group button
•
The Group and any connected Parts will disappear from the
directory
Adding a New Part
TAB
DESCRIPTION
ACTION REQUIRED
Figure 3-25: Part Text Box
•
Enter the name of the Part to be added to the list
•
Choose the OK button or choose the Cancel button to return to the
Equipment Tab
•
The new Part will appear in the directory
Editing an Existing Part
Equipment
cont/…
•
To edit an existing Part, highlight the Part that requires editing
•
Choose the Edit Part button and replace the existing data with the
new details
Removing an Existing Part
•
To delete an existing Part from the list, highlight the Part to be
deleted
•
Choose Remove Part button
•
The Part will disappear from the directory
Disabling an Existing Part
•
To disable an existing Part from the list, highlight the Part to be
disabled
•
Choose the Disable Part button
•
SaMSon Security Monitoring Software
Page 71
24/12/03
A red cross will appear next to the Part to indicate that it is disabled
TAB
DESCRIPTION
ACTION REQUIRED
A list of SMS messages that an operator might take when
choosing to send SMS to a customer via Zone/User.
Once the list is defined in General Definitions, it will
appear in the Add Zone/User or Edit Zone/User section of
the customer account card .
New messages can be added, edited or deleted from the
list.
Adding a New Message
•
To add a new Message, choose the Add button
•
Data can now be added to the blank row
•
Type the new Message and choose the Apply button to save the
new parameter
Editing the Message
SMS
•
To edit the Message, select the type and make the changes in the
open text box below the list
•
Choose the Apply button to save the changes
Deleting an Existing Message
Figure 3-26: SMS Tab
SaMSon Security Monitoring Software
Page 72
24/12/03
•
To delete a Message, choose the field to be deleted
•
Choose Delete ► Apply to delete and save the changes
TAB
DESCRIPTION
ACTION REQUIRED
Adding a New Classification
•
To add a new Classification, choose the Add button
•
Data can now be added to the blank row
•
Type the new Classification and choose the Apply button to save
the new parameter
Editing the Classification
Classification
•
To edit the Classification, select the type and make the changes in
the open text box below the list
•
Choose the Apply button to save the changes
Deleting an Existing Classification
•
To delete a Classification, choose the field to be deleted
•
Choose Delete ► Apply to delete and save the changes
Figure 3-27: Classification Tab
Each operator is classified by an area. The operator will get
events only from the area which was classified for him, and
he is the only one that can see these events. If the operator
was not classified by an area, he will see all incoming
events.
SaMSon Security Monitoring Software
Page 73
24/12/03
Important:
Pre-set Classification within the software can not be
deleted from the system.
TAB
DESCRIPTION
ACTION REQUIRED
The Event Cause is used in the customer account card when
processing and saving the event. The Operator can choose
an event cause from the list (refer to Section 4.3.5
Processing an Event) to rapidly explain the reason for the
event (eg. an event that was received was a false alarm, or
an alarm was generated in order to test the system).
The Operator can also view all events grouped together by
the same Event Cause by using the Event History button in
the customer’s account card (refer to Table 3-11: Account
Card Description).
SaMSon Monitor has a number of Event Causes already
pre-set in the system. Pre-set Event Causes can be edited
but can not be deleted. New Event Causes can be added,
edited and deleted.
Event Cause
Adding an Event Cause
•
To add an Event Cause, choose the Add button
•
Enter the new Event Cause in the blank text
box.
•
Choose the Apply button to save the new
Event Cause
Editing an Event Cause
•
To edit an Event Cause, select the event and make the changes in
the open text box below the Event Cause list
•
Choose the Apply button to save the changes
Deleting an Event Cause
•
To delete an Event Cause, choose the Event Cause to be deleted
•
Choose Delete ► Apply to save the changes
Help:
Pre-set Event Causes within the software can not be
deleted from the system.
Figure 3-28: Event Cause Tab
SaMSon Security Monitoring Software
Page 74
24/12/03
TAB
DESCRIPTION
ACTION REQUIRED
False Alarm Identifier
False Alarm Identifier
The False Alarm Identifier allows the user to identify
specific Event Causes as false alarms (refer to the False
Alarm Tab in the Miscellaneous Option in Table 3-11:
Account Card Description)
•
To activate the False Alarm Identity, choose the Event Type
and choose the False Alarm check box.
•
By choosing again, the False Alarm Identifier is disengaged.
SaMSon Monitor is now ready for daily operations in accordance to the parameters established in SaMSon Central and
the hardware configured for central station operations.
SaMSon Security Monitoring Software
Page 75
24/12/03
3.2.5 Account Number Set-up
An account number is allocated to each customer within SaMSon Monitor and determines the
management of the software. The Account Number is a ten/twelve digit number using seperators
(-), which consists of the following structure:
RR-LL-AAAAAA-PP
Refer to the following table for a full description of the Account Number and its structure:
Table 3-9: New Account Set-up Description
FIELD
RR
DESCRIPTION
Receiver number configured to system
Number can be the original receiver number or a masked number in order to
coordinate dual communication systems
Two character format using zero (0) if required (refer to Table 3-5: Receiver
Properties Description)
Line/system in configured to the system
LL
AAAAAG
PP
Number can be the original line/system number or a masked number in
order to coordinate dual communication systems
Two character format using zero (0) if required (refer to Table 3-5: Receiver
Properties Description)
Address number of end unit
Six (6) character format using zero (0) if required
A - indicate digits number
G - indicates digits number or characters from A to Z
Original Partion number of end unit partiion (area)
Two (2) character format using zero (0) if required
3.2.6 Creating a New Customer Account Card
Important:
It is impossible to simultaneously create a New Customer Account Card
To add a new customer to the software, a new account card must be created.
To do so, go to the menu bar and select Account ► New Account (Ctrl+N) or choose the New
Account Icon in the Shortcut Task Bar.
A New Account Set-up Window will open on the screen (refer to Figure 3-29: New Account Setup Window).
SaMSon Security Monitoring Software
Page 76
24/12/03
Figure 3-29: New Account Set-up Window
The operator has a choice to either open a new account or use an existing template (refer to
Section 3.2.6.1 Using a Template).
Table 3-10: New Account Set-up Window Description provides a brief description of the New
Account Set-up Window and the actions required for setting up a new account.
Table 3-10: New Account Set-up Window Description
FIELD
DESCRIPTION
ACTION REQUIRED
Receiver
• Select the appropriate receiver number from
the pull down menu as defined in SaMSon
Central
A list of receiver numbers
or
configured to the system (refer • If the desired receiver number does not appear
to
Table
3-5:
Receiver
in the list, enter the hardware’s original
Properties Description)
receiver number (two character format using 0
if requried)
• Refer to Section 3.2.5 Account Number Set-up
for instructions on establishing an Account
Number
Line/System
• Select the appropriate line/system number from
A list of line/system configured
the pull down menu
to the system (refer to Table
3-5:
Receiver
Properties • Refer to Section 3.2.5 Account Number Set-up
for instructions on establishing an Account
Description)
Number
Account
Partition
• Add a new number for a new account (total of
six numbers with range from 000000 –
999999)
The account number that is
assigned to the customer
• Refer to Section 3.2.5 Account Number Set-up
for instructions on establishing an Account
Number
Separation of customer’s area
(if required within the protocol • Enter the partition number (if applicable)
in use)
SaMSon Security Monitoring Software
Page 77
24/12/03
FIELD
Templates
DESCRIPTION
ACTION REQUIRED
Provides the user the option to • Choose the Template button in order to view
choose a template from an
template details (refer to Section 3.2.6.1
existing account in order to
Using a Template)
clone the system parameters
To create a new account, choose the correct Receiver from the pull down menu or enter a new
number as required.
Choose the correct Line/System from the pull down menu.
Enter a new Account Number and Partition (if applicable) based on the structure explained in
Section 3.2.5 Account Number Set-up.
Choose the OK button and the Edit Account Window will open displaying a blank account ready
to receive new account details (refer to Section 3.2.7 Completing a New Account Card).
3.2.6.1
Using a Template
SaMSon Monitor uses a pre-set account card as a template for cloning account parameters and
using them on a new account.
Alternatively, other customer accounts in the system can be used as a template for cloning and
creating a new account.
Choose the Templates button and the following window will appear requiring data.
Figure 3-30: Template Window for Adding a New Account
Choose from the Existing Account Template pull down menu to find the number of the account
you wish to clone, or select the pre-set Account Number 00-0F-999999.
Choose the checkbox of the subject you wish to clone on the right side of the Template Window.
Allocate a New Account Address and Partition (if applicable) based on the structure explained in
Section 3.2.5 Account Number Set-up.
SaMSon Security Monitoring Software
Page 78
24/12/03
Select the number of the receiver through which the new account is reporting.
Type the Line/System of the receiver system through which the new account is reporting.
Choose the Clone button and the Edit Account Window will open displaying a new account card
with cloned details or choose Cancel to return to the New Account Set-up Window.
3.2.7 Completing a New Account Card
Once a new account card is opened, it is ready for customer details to be added. The account
card is divided into three sections (refer to Figure 3-31: New Account Card Window).
1.
2.
3.
4.
5.
Account Details
Account Numbers
Account Options
Footer Bar
Header Bar
Figure 3-31: New Account Card Window
Table 3-11: Account Card Description explains each section and the actions required in order to
establish a new customer account card.
SaMSon Security Monitoring Software
Page 79
24/12/03
Table 3-11: Account Card Description
FIELD
DESCRIPTION
ACTION REQUIRED
Account Details
Account
Customer’s account number
Type
Type of customer account
Name
Customer’s name
Main Phone
Customer’s main phone number
Question
A security question asked by the operator to the customer in order to
confirm the customer’s identity
Note:
Answer
A corresponding response to the security question to confirm
customer’s identity
Details can only be changed when operator is
in Edit Account mode.
State
Customer’s regional location
City
Customer’s city location
Address
Customer’s address
Classification
Customer’s classification
Periodic Test
•
Period of time in which SaMSon Monitor will confirm whether any
event has been received from the customer.
•
Details can be changed when operator is in Edit
Account mode
•
Type the appropriate information according to
customer details
The operator is alerted with a No Test event if no signals were received
during this period
Account Numbers
Identification
Account Identification number
Number
Type the appropriate information according to customer
details or choose the appropriate selection from the list.
Note:
Details can only be changed when operator is
in Edit Account mode.
SaMSon Security Monitoring Software
Page 80
24/12/03
FIELD
DESCRIPTION
ACTION REQUIRED
Status
Current status of the account (Open, Close, Not applicable and Freeze)
Main Number
Main Number of the account
Secondary
Number
Secondary Number of the account
Periodic Test
SaMSon software will alert operators if alarm units have not sent
a signal in a given time
•
Click on the
button, and edit your number
•
Click on the
number
button, and edit or delete your
•
Checked the option first, and select Minute (M)
or Hour (H) or Day (D), and change the
numbers, type the desired number or use the
up/down arrows
•
Account Options
SaMSon Security Monitoring Software
Page 81
24/12/03
FIELD
Phone
DESCRIPTION
ACTION REQUIRED
A list of customer’s contact phone numbers which are grouped
according to the type of phone number (as defined in the Phone List
Type Tab in Section 3.2.4 General Definitions).
Adding a New Phone Number
•
To add a phone number, select the group under which
the phone number is to appear by choosing from the
Phone List Type pull down menu located on the left
hand side of the window
•
Choose a blank row with the cursor and a blank row
ready for data
•
Choose from any existing numbers in the pull down
menu or add a new phone number and contact details
(e.g. person’s position, location etc)
Note:
•
The Call button is only active when the operator is in Open Account
mode, or when the Operator is processing the account (refer to
Section 0 SaMSon Monitor Event Management).
The number will now appear in the table according to
the type of number that was selected
•
Operator commences or cancels SMS checkbox
by selecting or deselecting the SMS box. This
list will appear in the Zone / User SMS list ( see
Global software phone numbers (as defined in the Global Phone List
Tab in Section 3.2.4 General Definitions) can also be added to the
customer’s contact phone numbers.
A Call button allows automatic dial-up of customer’s phone numbers.
The phone number that is selected will appear in the call box. When
the Call button is pressed, the displayed number is automatically
dialed.
SaMSon Security Monitoring Software
Page 82
24/12/03
FIELD
DESCRIPTION
ACTION REQUIRED
figure 3-46: Zone display SMS list)
Sending manual SMS message
•
To send an SMS to a phone number, highlight
the number to be sended and choose the SMS
button
Deleting an Existing Phone Number
•
To delete a phone number, highlight the number to be
deleted and choose the Delete button
Important:
Phone cont/…
SaMSon Security Monitoring Software
When deleting a phone number from the list,
it will automaticlly deleted from Zone/User
SMS list.
Figure 3-32: Phone Window
Page 83
24/12/03
FIELD
DESCRIPTION
ACTION REQUIRED
Adding a Global Phone Number
•
Select the group under which the phone number is to
appear by choosing from the Phone List Type pull down
menu located on the left hand side of the window
•
Choose the Global Phone List button and select the
phone number to be added to the customer’s account
card
Figure 3-33: Global Phone List Window
•
Choose the Add button and the phone number will now
appear in the customer’s phone number list
Note:
Phone details can only be changed when
operator is in Edit Account mode.
SaMSon Security Monitoring Software
Page 84
24/12/03
FIELD
DESCRIPTION
ACTION REQUIRED
A general notes page for communicating operator instructions or special
customer requests.
Entering Text
Choose the field to commence typing.
Help:
Text will not wrap automatically,
press Enter to create a new paragraph.
Notes
Notes can only be changed when
operator is in Edit Account mode.
Figure 3-34: Notes Window
SaMSon Security Monitoring Software
Page 85
24/12/03
FIELD
DESCRIPTION
ACTION REQUIRED
Test Mode
Commencing Test Mode
Test Mode enables technicians to check system functionality without
activating actual event code priority; all events will appear in auto-log priority
i.e. an event will automatically close (refer to Appendix, Section 8.5 Internal
Event Messages).
•
Operator commences or cancels Test Mode by
selecting or deselecting the Start check box
•
Enter the Operator Name in the Operator text
box
•
Notes can be made in the blank text box for
administration purposes
Help:
Miscellaneous
Test Mode is activated when operator
is in Edit or Open Account modes
Figure 3-35: Test Mode Tab in the Miscellaneous Window
Important:
Test Mode status is automativaly reset after two hours.
SaMSon Security Monitoring Software
Page 86
24/12/03
FIELD
DESCRIPTION
ACTION REQUIRED
Mailing Fields
Adding a Mailing Address
The customer’s mailing address for billing/mailing purposes.
•
Type in the customers
details in the blank fields
Help:
Mailing Fields can only be changed
when operator is in Edit Account
mode
Figure 3-36: Mailing Tab in the Miscellaneous Window
SaMSon Security Monitoring Software
Page 87
24/12/03
FIELD
DESCRIPTION
ACTION REQUIRED
False Alarm
SaMSon Software enables automatic follow-up of the number of false
alarms that are logged by the operator in an account in a period of time.
If the number of false alarms exceeds the pre-set amount fo that
account, a warning message will appear notifying the operator.
If the Number of Months for Checking is set at zero (0), the False
Alarm Follow-up is not active.
Refer to the Event Cause Tab in Section 3.2.4 General Definitions to
define which Event Causes will be classed as False Alarms.
Miscellaneous
cont/…
Activating False Alarm Follow-up
•
Use the scroll bar or type the number of false alarms
permissable before alert is sent to the operator.
Help
False Alarm details can only be changed when
operator is in Edit Account mode.
Figure 3-37: Miscellaneous Window
SaMSon Security Monitoring Software
Page 88
24/12/03
FIELD
DESCRIPTION
ACTION REQUIRED
A choice of regular and exceptional scheduling for day-to-day
operations and random occasions.
If the customer requires scheduled Open/Close monitoring, it can be
activated by the operator.
There are three tabs used to create a customer schedule.
Important:
Whenever this operation is activated, it automatically
keeps track of the customer’s schedule (Early Open/Close,
Late Open/Close, Open after Close, Not Yet Open, Not Yet
Close)
Schedule
Warning:
Do not activate this operation if no
tracking is required.
If this operation is not activated,
you are unable to select the tabs
described below
Activating the Schedule Function
•
Schedule
cont/…
SaMSon Security Monitoring Software
Page 89
24/12/03
Choose the Schedule Follow-up check box if schedule is
required
FIELD
DESCRIPTION
ACTION REQUIRED
Deviation Tab
The Deviation Tab defines the period of time for early and late
deviation of the customer’s scheduled Open and Close times.
Setting the Deviation Times
Schedule
cont/…
•
Figure 3-38: Deviation Tab in the Schedule Window
SaMSon Security Monitoring Software
Page 90
24/12/03
Choose the number of minutes for deviation using the
up/down arrows or type the number of minutes (maximum
120 minutes)
FIELD
DESCRIPTION
ACTION REQUIRED
Schedule Tab
The Scheduled Tab defines the customer’s routine operational
scheduling.
Adding a New Schedule
•
Choose the Add button and the following Schedule Window
will open
Figure 3-40: Schedule Window
Figure 3-39: Schedule Tab in the Schedule Window
•
Choose the day and Open/Close times from the pull down
menu.
•
Choose the Add button to add the new
Help:
The Schedule indicates that the property is open
Deleting a Schedule
Multiple schedule-periods can occur on the same day.
•
Scheduled periods can continue to the following day. Enter the
day that the schedule begins.
To delete an existing Schedule, select the schedule to be
deleted.
•
Choose the Delete
E.g. Sunday 23:00 to 03:00 (Monday)
Help:
Schedule details can only be changed when
operator is in Edit Account mode
SaMSon Security Monitoring Software
Page 91
24/12/03
FIELD
DESCRIPTION
ACTION REQUIRED
Adding a Special Schedule
•
Special Schedule Tab
Choose the Add button and the following
The Special Schedule Tab defines any special schedules for rare
occasions that the customer may require.
Figure 3-42: Special Schedule Window
Schedule
cont/…
•
Figure 3-41: Special Schedule Tab in the Schedule Window
Choose the date from the pull down menu and the
Begin/End times from the scroll bar menus.
• Enter a description of the special schedule.
• Choose the Add button to add the new special schedule
For All Day Events
•
For events that will occur all day, select the For All Day
check box
Help:
The Special Schedule indicates that the property is open.
Multiple special schedule periods can occur on the same
day.
Figure 3-43: For All Day Events in Special Schedule Window
SaMSon Security Monitoring Software
Page 92
24/12/03
FIELD
DESCRIPTION
ACTION REQUIRED
Schedule
cont/…
SaMSon Security Monitoring Software
•
The Special Schedule For All Day Events Window will
open
•
The Need Be box will activate registering whether the
event should be Open or Closed.
•
Choose the dates from the pull down menu (begin date
will commence at 00:00:00 and end date will end at
23:59:59).
•
Enter a description of the special schedule.
•
Choose the Add button to add the new special schedule
Deleting a Special Schedule
Page 93
24/12/03
•
To delete an existing Special Schedule, select the
schedule to be deleted.
•
Choose the Delete button
•
Schedule details can only be changed when operator is
in Edit Account mode
FIELD
DESCRIPTION
ACTION REQUIRED
Selective Schedule (Consider) Function
The Selective Schedual Function refer to unusual customer’s
scheduled Open and Close times.
After choosing the Schedule Follow-Up function,
the default for Selective Schedule is All, followes
after unusual close and open schedule
•
Choose the Open only radio button in order
to get internal events for unusual open
schedule only
•
Choose the Close only radio button in order
to get internal events for unusual close
schedule only
Figure 3-44: Selective Schedual (Consider) Window
Schedule
cont/…
The user can choose either getting internal events for unusual open
schedule, unusual close schedule or for unusual close and open.
Scheduling Precedence
The customer’s Schedules and Special Schedules are linked to global
SaMSon Monitor Holidays, and are prioritized by importance.
If Global Holidays are defined within the General Definitions section
of SaMSon Monitor (refer to Section 3.2.4 General Definitions) these
holidays will take precedence over the customer’s normal scheduling.
However, if any Special Schedules are defined within the customer’s
account card, they will receive highest priority over both the regular
Open/Close schedule and any Global Holidays.
SaMSon Security Monitoring Software
Page 94
24/12/03
Important:
System scheduling precedence ensures that all
other times are disregarded and the Special
Schedule time is observed.
FIELD
DESCRIPTION
ACTION REQUIRED
Daily Software Schedule Preparation
At the time 00:00 each day, Samson Central automatically builds a
new schedule for each customer considering the following:
• Daily Schedules defined within the customer’s account
• Global Holidays defined within SaMSon Monitor’s General
Definitions
• Special Schedules defined within the customer’s account
• Open/Close events related to the customer’s account that were
received one day prior to, or following, the current date
• Open/Close events received one day prior to the current date, which
were not processed
SaMSon Security Monitoring Software
Page 95
24/12/03
Help:
Overlaps of Open/Close events or schedules
within the account are automatically calculated
considering the scheduling precedence. A new
schedule is built and influences the customer’s
Open/Close procedures for the day.
FIELD
DESCRIPTION
ACTION REQUIRED
A log of system actions or manual actions taken by the operator when
processing the event.
Refer to Section 4.3.5 Processing an Event for a full description on
processing an event.
•
Action Log
Figure 3-45: Action Log Window
SaMSon Security Monitoring Software
Page 96
24/12/03
Action Log can only be changed when operator is in
Processing Account mode
FIELD
DESCRIPTION
ACTION REQUIRED
The Zones/User window is divided into three main sections according
to zone or user or templates.
Zone Details The Zone Tab displays details of zones within the
customer’s property.
Adding a New Zone
• Choose the Add button to add new data
• The Zone window is displayed
Zone/Users
Figure 3-46: Zone Tab in Zone/User Window
In order to see the phone numbers and SMS mesaages
related to this zone, click the + sign and see all.
Figure 3-48: Zone Window
• Enter the zone details in the blank fields
• Operator commences or cancels SMS checkbox
by selecting or deselecting the Use SMS box
• Select the phone number from the pull down
menu. The operator has a choice to either
write a new message or use an existing
template
Figure 3-47:Zone SMS display list
SaMSon Security Monitoring Software
Page 97
24/12/03
• Choose the Add SMS button to add the message
• Choose the Apply button to continue
• Choose the Close button to return to the Zone tab
FIELD
DESCRIPTION
ACTION REQUIRED
Important:
If the zone number is between 0 and 9, enter
only one character
For example: 5 (not 05)
Help:
Only accessible when operator is in Edit
Account mode
Deleting a Zone
Important:
Open/Close codes must be defined only in “Users “
•
Choose the Zone to be deleted
All others codes must be defined in “Zones”.
•
Choose the Delete button
It is not exist in the special code table, it should be
defined according to system defenition codes, else, it
should be defines according to special codes table.
Waiting for Restore Function
Zone/Users
cont/…
A Waiting for Restore function is accessible from the Zone Tab. If
SaMSon does not receive an alarm restore in the set period of time, a
Failed to Restore event occurs within the software in order to notify
the operator that the alarm is still active.
Important:
This function only applies to Event Types classed as Alarm and
Alarm Restore.
Alarm events to be restored must be of the Alarm type, and
Restore events must be of the Alarm Restore type
SaMSon Security Monitoring Software
Page 98
24/12/03
Editing a Zone
• Choose the zone to be edited by clicking to the left of
the relevant row
• Choose the Edit button to make the required changes
• The Zone window is displayed (refer to Figure 3-48:
Zone Window)
• In order to make zone changes, open the pull down box
and choose the zone from the list
• Choose the Apply button to continue
• Choose the Close button to return to the Zone tab
Activating the Restore Function
• Choose the Zone to be defined as Waiting for Restore
• Select the Edit button
• The Zone window is displayed (refer to refer to Figure
3-48: Zone Window)
• Select the Waiting for Restore box
• Enter the waiting period in minutes (maximum 120
minutes)
• Choose the Zone Number from which the Restore will
FIELD
DESCRIPTION
ACTION REQUIRED
Adding Graphics to a Zone
Graphics
•
Choose the zone to which the graphic is to be added by
clicking to the left of the relevant row
•
Click the small button to the right of the Map button.
•
Choose the appropriate graphic in the Open window and
click on the Open button
•
The Map button is enabled (appears in color)
•
Click the box to the right of the Map button again to
choose a different graphic
You can add a graphic for each zone from the Zone Tab.
Zone/Users
cont/…
Viewing the Graphic
Figure 3-49: Zone Graphic
•
Choose the zone to which the graphic is to be added by
clicking to the left of the relevant row
•
Click the Map button.
Deleting the Graphic
SaMSon Security Monitoring Software
Page 99
24/12/03
•
Click the Clear Map button to the right of the Map
button
•
The graphic is detached from the zone and the Map
button is disabled
FIELD
DESCRIPTION
ACTION REQUIRED
Adding a New User
• Choose the Add button to add new data
• The User window is displayed
User Details
Displays details of users who have access to the property.
Zone/Users
cont/…
Figure 3-52: User Window
Figure 3-50: User Tab in Zone/User Window
• In order to see the phone numbers and SMS mesaages
related to this user, click the + sign and see all. (see
figure 3-50)
• Enter the user details in the blank fields
• Operator commences or cancels SMS checkbox
by selecting or deselecting the Use SMS box
• Select the phone number from the pull down
menu. The operator has a choice to either
write a new message or use an existing
template
• Choose the Add SMS button to add the message
SaMSon Security Monitoring Software
Page 100
24/12/03
FIELD
DESCRIPTION
ACTION REQUIRED
• Choose the Apply button to continue
• Choose the Close button to return to the User tab
Important:
If the user number is between 0 and 9, enter
only one character
For example: 5 (not 05)
•
Help:
Figure 3-51: User SMS display list
Only accessible when operator is in Edit
Account mode
Editing a User
• Choose the user to be edited by clicking to the left of
the relevant row
• Choose the Edit button to make the required changes
• The User window is displayed (refer to Figure 3-48:
Zone Window)
• In order to make user changes, open the pull down box
and choose the user from the list
• Choose the Apply button to continue
• Choose the Close button to return to the User tab
Deleting a User
•
•
SaMSon Security Monitoring Software
Page 101
24/12/03
Choose the User to be deleted
Choose the Delete button
FIELD
DESCRIPTION
ACTION REQUIRED
Templates
Adding a Template
When adding / changing an account card, you can drag users
zones from existing template in the system.
Searching a template in the system can be done by:
1. Scrolling the list (you can sort the list by clicking on
the header tab).
2. Search by name by typing in the text box
3. Search by primary number by typing in the text box.
4. Search by secondary number by typing in the text box
When the desired template is choosen , its zone and user
details will appear in the columns
Zone/Users
Templates
Check the User box and the Zone box in order to choose the
data to drag from the template.
Figure 3-53:Template Tab in Zone/User Window
Approach
Path
Instructions on approach and navigation of property. This feature
is used for communications between central station and patrol
personnel.
SaMSon Security Monitoring Software
Page 102
24/12/03
Adding a New Approach Path
•
Enter Approach Path details in the open text box
FIELD
DESCRIPTION
ACTION REQUIRED
Help:
Only accessible when operator is in Edit
Account mode
Figure 3-54: Approach Path Window
•
Click the small button to the right of the Map button.
•
Choose the appropriate graphic in the Open window
and click on the Open button
•
The Map button is enabled (appears in color)
•
Click the box to the right of the Map button again to
choose a different graphic
Click the MAP button in order to nevegate to the Account Area.
Clicking the F5 key will open the Approch MAP .
This F5 option is valid only in the Processing Account Card.
Viewing the Graphic
•
Choose the zone to which the graphic is to be added by
clicking to the left of the relevant row
•
Click the Map button.
Deleting the Graphic
SaMSon Security Monitoring Software
Page 103
24/12/03
•
Click the Clear Map button to the right of the Map
button
•
The graphic is detached from the zone and the Map
button is disabled
FIELD
DESCRIPTION
ACTION REQUIRED
Customers may require special Event Codes depending on the
hardware in use or the type of property.
The Special Code button is used for defining special codes as
requested by the customer. Using pre-set software event codes,
exceptions are made according to customer needs.
Adding a New Special Code
•
Enter the Received Code that requires a special Event
Code assigned to it
•
Choose the Event Code from the pull down menu.
Corresponding description, priority and siren activation
will appear according to what is defined within
SaMSon Central
Important:
If the correct Event Codes does not appear in
the list refer to Section 3.1.3 Adding and
Editing Event Codes for instructions on
adding a new event code
Special
Code
Figure 3-55: Special Codes Window
Help:
Only accessible when operator is in Edit
Account mode
Deleting a Special Code
SaMSon Security Monitoring Software
Page 104
24/12/03
•
Select the Special Code to be deleted
•
Choose the Delete button and choose Apply button to
save the changes
History
An Operator can choose the History button in order to customers
one month back history with its Action Log.
Click the History button, and wait few seconds while the
software is loading the data.
In order to see the event action log, click the + sign.
History
The Event Action Log is open
Figure 3-56: History Window
SaMSon Security Monitoring Software
Page 105
24/12/03
To complete a new customer account card, enter data in all the required fields according to the
instructions provided in the Account Card Description Table.
Once fields are filled and the Customer Account Card is completed, check that all information is
correct. Any of the fields can be changed at any time by choosing the appropriate box and
replacing or deleting the data.
3.2.7.1
Closing and Saving Account Card Details
in the Task Bar or choose from the Account menu Save Account .
Choose the Save button
The software will ask you if you wish to save the account card.
Choose Yes to save the changes or choose No to return to the Customer Account Card without
saving changes.
Select the Close button located in the upper right-hand corner or choose from the File menu
Close Account (refer to Figure 3-57: Closing the Account).
Figure 3-57: Closing the Account
The software will ask you again to confirm that you wish to save the account card.
Choose the Yes button to save the changes, choose the No button to return to the Event
Monitoring Window without saving changes or choose the Cancel button to return to the
Customer Account Card.
Help:
Once the Edit Account Window is closed, the Events Monitoring Window
will automatically maximize to original size on the screen.
The Events Monitoring Window can also be maximized at any time while
editing a Customer Account Card by using the Events Monitoring icon in
the Shortcut Task Bar and minimized again by clicking in the right hand
corner (refer to Figure 3-58: Minimizing the Event Monitoring Window)
Figure 3-58: Minimizing the Event Monitoring Window
SaMSon Security Monitoring Software
Page 106
24/12/03
3.2.8
Editing an Account
To edit an existing account and customer details, go to the menu bar and select Account ► Edit
Account (Ctrl+F3) or choose the Edit Account Icon in the Shortcut Task Bar . Refer to
Table 3-11: Account Card Description for a full description on adding, deleting and editing
account details.
Refer to Section 3.2.7.1 Closing and Saving Account Card Details for instructions on saving
editions to the Customer Account Card.
3.2.9
Disabling an Account
If an account is no longer needed, it can be disabled. The account number is then released and
ready to be used again for a new account. The disabled account is not deleted from the system
but is stored and can be accessed later if necessary by generating a report (refer to Section 5.2.5
Reporting).
To disable an account, go to the Menu Bar and choose Account ► Disable Account (Ctrl+W)
or use the Disable Account Icon in the Shortcut Task Bar.
The following Disable Account Window will appear displaying the account to be disabled:
Figure 3-59: Disable Account Window
Select the account and choose the Disable button.
The software will ask you if you are sure.
Choose Yes to disable the account or choose No to return to the Disable Account Window.
Choose the Close button to close the Disable Account Window and return to the Event
Monitoring Window.
Once the account is disabled, the old details can only be viewed in Reports (refer to Section 5.2.5
Reporting for full details).
SaMSon Security Monitoring Software
Page 107
24/12/03
3.2.10 Freezing an Account
If existing accounts must remain in the system but inactive for a period, these account are frozen
and reactivated at any time.
To freeze an account, go to the Menu Bar and choose Account ► Freeze Account (Ctrl+F).
The following Freeze Account Window will appear displaying the account to be frozen:
Figure 3-60: Freeze Account Window
Select the account and choose the Freeze Account button.
The software will ask you if you are sure.
Choose Yes to freeze the account or choose No to return to the Freeze Account Window.
Choose the Close button to close the Freeze Account Window and return to the Event
Monitoring Window.
All events received from this account become low priority and the status of the account will
appear as frozen (refer to Appendix, Section 8.5 Internal Event Messages).
The user can un-freeze the account by re-entering the Freeze Account Window and selecting the
account. The Freeze button will now appear as an Un-Freeze button.
Choose the Un-freeze button.
The software will ask you if you are sure.
Choose Yes to un-freeze the account or choose No to return to the Freeze Account Window.
Choose the Close button to close the Freeze Account Window and return to the Event
Monitoring Window.
The account will return to normal status.
SaMSon Security Monitoring Software
Page 108
24/12/03
3.2.11 Finalizing Set-up Procedures for SaMSon Monitor
Before completing SaMSon Monitor Set-up, a brief system check is recommended to ensure that
the following are in order:
P All users within SaMSon Central and SaMSon Monitor are correctly defined and the
appropriate user level and functions assigned.
P All general definitions are defined according to central station requirements.
P All customer account cards are created for all existing customers
P Events received from SaMSon Central are visible on the Incoming Events Section of the
Event Monitoring Window.
If all parameters have been entered correctly, SaMSon Monitor is ready for daily operations.
3.2.12 Exiting SaMSon Monitor
To exit SaMSon Monitor, choose File ► Exit (Ctrl+E).
The software will ask you to confirm Exit, choose the Yes button to continue Exiting or choose
the No button to return to the software.
Warning:
SaMSon Monitor must remain operating at all times to display
incoming emergency and system events.
If SaMSon Monitor is closed, new events will not be viewed by central
station personnel.
SaMSon Security Monitoring Software
Page 109
24/12/03
4
Daily Operations
The following SaMSon Security Monitoring Software instructions allow central station
administrators and operators an easy and rapid means of processing security events and handling
customer accounts.
SaMSon Security Monitoring Software
Page 110
24/12/03
4.1
SaMSon Central
Once SaMSon Central is installed and parameters defined, the software will operate without any
intervention from central station administrators. Some parameters may occasionally need
changing depending on the removal or addition of new receiving equipment or event codes (refer
to Section 3 Set-up Procedures).
If require, You can perform a Reset of Operator’s Log in (refer to Section 5.1.1 Reset of
Operator’s Log in)
Daily log files are available for tracking communication/system errors and events (refer to
Section 5.1.2 Daily Log File).
SaMSon Security Monitoring Software
Page 111
24/12/03
4.2
SaMSon Monitor
SaMSon Monitor software is operational once general definitions and user access are established
within SaMSon Monitor. All incoming emergency, maintenance and system events will appear
in the Incoming Events section within the Events Central Window. Details of the event
including account number, name, priority, and arrival time are displayed. A counter indicates
the number of events in the Incoming Events Section at any given time (refer to Figure 4-1:
Incoming Events Counter on the Events Central Window).
Figure 4-1: Incoming Events Counter on the Events Central Window
Central station operators can login to the software and commence opening and viewing customer
accounts, and monitoring and responding to system and customer events.
4.2.1 Commencing Operations
When an operator commences work within SaMSon Monitor, they must ensure that the software
is open and operational. If SaMSon is closed, refer to Section 3.2.1 Login to open the SaMSon
Monitor software.
SaMSon Security Monitoring Software
Page 112
24/12/03
4.2.2 Change of Operator Duty
If an Operator finishes their rostered duty and a new Operator commences on the same
workstation, the second Operator must log in to the software following the instructions below.
To Log in to SaMSon Central, choose File ► Log in (Ctrl+L) in the Event Monitoring Window
The following Log in Window will appear requiring User Name and Password.
Figure 4-2: Login Window
Important:
Login is case sensitive.
The new Operator can now commence working with the software according to the Operator
Permission Level and access assigned to them.
Any event that was in process by the first Operator will automatically move to incoming
messeges, and it will appear with pass sign (***)
SaMSon Security Monitoring Software
Page 113
24/12/03
4.3
SaMSon Monitor Account Management
4.3.1 Opening an Existing Customer Account Card
To view an existing account card and customer details, go to the menu bar and select Account ►
Open Account (Ctrl+O) or choose the Open Account Icon in the Shortcut Task Bar.
The Events Monitoring Window will minimize and an Open Account Window will open on the
screen requesting information in order to locate the account (refer to Figure 4-3: Open Account
Window).
Figure 4-3: Open Account Window
Mark Search by Name in order select an account choose an account details from the list. you
can either select the Receiver or Line/Systemor Account Number and Partition (if applicable).
Choose the OK button and the corresponding account will appear on the screen.
Once an existing account card is open, Customer Details can be viewed and only the Test Mode
function can be modified. Refer to Table 3-11: Account Card Description for a full description.
Note:
When the operator opens an account, Test Mode in the Miscellaneous
Option is the only function that can be modified in Open Account mode.
All other Customer Details can only be changed within the Edit Account
mode.
SaMSon Security Monitoring Software
Page 114
24/12/03
4.3.1.1
Closing and Saving Account Card Details
Select the Close button located in the upper right-hand corner or choose from the File menu
Close Account . (refer to Figure 4-4: Closing the Account).
Figure 4-4: Closing the Account
The software will ask you again to confirm that you wish to save the account card.
Choose the Yes button to save, choose the No button to return to the Event Monitoring Window
without saving details, or choose the Cancel button to return to the Edit Customer Account
Window to change customer details again.
Help:
Once the Edit Account Window is closed, the Events Monitoring Window
will automatically maximize to original size on the screen.
The Events Monitoring Window can also be maximized at any time by using
the Events Monitoring icon in the Shortcut Task Bar and minimized again
by clicking in the right hand corner (refer to Figure 4-5: Minimizing the
Event Monitoring Window)
Figure 4-5: Minimizing the Event Monitoring Window
SaMSon Security Monitoring Software
Page 115
24/12/03
4.3.2 Changing Account Status
The status of the account (Open or Close) can be manually changed by the operator if it appears
different from the real situation.
To change an account status, go to the Menu Bar and choose Account ► Change Status
(Ctrl+H).
The following Change Status Window appears displaying events whose status requires changing:
Figure 4-6: Change Status Window
Choose the account whose status is to be changed.
Choose the status from the pull down menu.
The software will ask you if you are sure.
Choose Yes to change the status of the account or choose No to return to the Change Status
Window.
The Manual Close/Open event will appear in the Incoming Section of the Event Monitoring
Window (refer to Appendix, Section 8.5 Internal Event Messages).
SaMSon Security Monitoring Software
Page 116
24/12/03
4.3.3 Un-Restored Events (Manual Restore)
If any un-restored events are appear in SaMSon, the operator can manually restore them.
To manually restore an event, go to the Menu Bar and choose Account ► Un-restored Events
(Ctrl+X).
The following Un-restored Events Window appears displaying events that remain un-restored
within SaMSon:
Figure 4-7: Un-Restored Event Window
Below is a brief description of the Un-Restored Events Window.
Table 4-1: Un-restored Events Window Description
FIELD
Account
Zone
Restore Zone
Restore Will Be
Name
City
Address
DESCRIPTION
Customer account number
Zone number waiting for corresponding restore
Expected corresponding restore zone
Time that restore is expected according to time defined in
Waiting for Restore function within the customer’s account
card
Customer’s name
Customer’s city location
Customer’s address
Choose the un-restored account and zone to be manually restored.
Choose the Restore Event button and the event will be removed from the list.
Choose the Close button to close the Un-restore Event Window and return to the Event
Monitoring Window.
The Manual Restore event will appear in the Incoming Section of the Event Monitoring
Window.
SaMSon Security Monitoring Software
Page 117
24/12/03
SaMSon Monitor Event Management
4.3.4 Receiving an Event
Once SaMSon Monitor is operating, emergency, system and maintenance events appear in the
Incoming Events section of the Event Monitoring Window (refer to Figure 4-8: Event
Monitoring Window with Events).
Figure 4-8: Event Monitoring Window with Events
These events require a response from the operator and will continue to be received until they are
processed.
For each new event received, a color-coded indicator blinks, notifying the operator. The color
indicates the priority of the event according to the priorities set in Section 3.1.3
SaMSon Security Monitoring Software
Page 118
24/12/03
Adding and Editing Event Codes and the colour code set in Table 3-8: General Definitions
Window Description.
If an event received contains a siren defined within the Event Code, the siren will commence
sounding (refer to Section 3.1.3 Adding and Editing Event Codes).
A chosen event, with high priority , which was not closed, will blink on the Incoming Events
Monitor.
4.3.4.1
Deactivating the New Event Indicator
The indicator will disappear from the screen by clicking on it. It will appear again, if the event is
received again.
4.3.4.2
Deactivating the Audio Siren
To stop the siren from sounding, press the F10 on the keyboard.
To deactivate the siren for a particular Event Code refer to Section 3.1.3.2 Editing an Event.
4.3.4.3
Switching Screens
To switch to Incoming Events screen press F11 and F12 to switchto Events on
Hold screen
4.3.5 Processing an Event
Once an event is received in the Incoming Events Section of the Event Monitoring Window, the
operator can open the corresponding account card in Processing Account mode, in order to
commence processing the event (refer to Figure 4-10: Process Account Window).
In opening the event, a copy display of the event automatically appears in the Events on Hold for
Operator Section of the Event Monitoring Window. Now the event can only be processed from
the Events on Hold Section and only by the operator who chose the event, and is logged into that
workstation.
Figure 4-9: Events on Hold Section in the Event Monitoring Window Displaying
Events on Hold
SaMSon Security Monitoring Software
Page 119
24/12/03
Afterwards, if any other events related to the same account are received in the Incoming Events
Section (during the same period), a copy display of these events will also appear in the Events on
Hold Section. Additionally, these events can only be processed in the Events on Hold Section
and only by the operator who chose the event and is logged into that workstation
Help:
Events can be exchanged from one operator to another by using the Event
Exchange function (refer to Section 5.2.2 Event Exchange).
Once the event is open, the operator can access customer account details, place the event on hold
for later processing, provide comments regarding any actions taken, or save and close the event.
When the account card is opened, any attempt to close the account will initiate a response from
SaMSon Monitor prompting the user to Hold or Save the event.
To commence processing the event, double click on the event row in the Incoming Event Section
of the Event Monitoring Window.
The Event Monitoring Window minimizes and the corresponding Customer Account Card opens
in Process Account mode and displays all information concerning the customer including their
location, contact numbers, schedules and response instructions (refer to Figure 4-10: Process
Account Window).
Figure 4-10: Process Account Window
SaMSon Security Monitoring Software
Page 120
24/12/03
The Action Log details are displayed within the card. Other details can be viewed by choosing
any of the buttons on the left hand side. If the operator wishes to return to the Action Log at any
time, choose the F4 button on the keyboard or choose the Action Log button on the left hand
side.
4.3.5.1
Event Details
Priority Numberappears on the screen with its priority color.
Zone / User description, number and notes, also appear in the upper part of the screen.
Figure 4-11: Event Details
There is an option to move from Account Details to Account Numbers and vice versa with the
F4 key.
The details will appear in the Account Card status bar, and in the screen header.
4.3.5.2
Adding Comments
When the Customer Account Card is open, an Action Log appears displaying system and/or
operator actions for that event.
If you wish to add further comments or wish to provide a brief summary of the actions taken for
that event, you can choose the Comments button or choose the F7 button on your keyboard.
The following Comments Window will appear.
SaMSon Security Monitoring Software
Page 121
24/12/03
Figure 4-12: Comments Window
Selecting one of the actionsprovides a brief explanation of the action taken for that event.
If the appropriate action does not appear in the list, click in the upper text box and freeely add
comments.
Choose the OK button and the new action and comments will appear in the Action Log of the
Comments Window.
.
Figure 4-13: Action Displayed in the Action Log Window
4.3.5.3
Logging Patrol Personnel
If the operator dispatches a patrol person in response to an event, the person’s identity can be
recorded within the Action Log for that event.
SaMSon Security Monitoring Software
Page 122
24/12/03
Choose the F6 button on the keyboard and the following window will appear:
Figure 4-14: Action Displayed in the Action Log Window
Select the Patrol Person’s name from the list and choose the Add button.
If the person does not appear in the list, refer to to Section 3.2.4 General Definitions for
instructions on adding new Patrol Personnel.
Once a patrol person has been added, their number will appear in the Action Log of the
Customer’s Account Card.
Figure 4-15: Patrol Person Displayed in the Action Log Window
4.3.5.4
Accessing Customer Phone Details
If the operator needs to contact the customer at any stage during the course of processing the
event, the Operator can choose the Phone button on the left hand side of the Customer Account
Card, or choose the F5 button on the keyboard.
SaMSon Security Monitoring Software
Page 123
24/12/03
4.3.5.5
Accessing Other Customer Details
If the operator needs to acces any othe information within the Customers Account Card they can
choose the buttons on the left hand side.
4.3.5.6
Placing an Event on Hold
Once an event is opened, it can be placed on Hold during the course of processing. The event
will remain on hold until such time the Operator completes the processing.
To place an event on hold, choose the Hold button on the Customer Account Card or choose the
F3 button on your keyboard.
The customer account card automatically closes and the Event Monitoring Window maximizes
to full screen.
Within the Incoming Events section, the event now appears with the operator’s User Name in the
Operator Column and the event appears on hold within the Events on Hold Section.
The event can be accessed again for processing by double-clicking on the event row within the
Events on Hold Section.
4.3.5.7
Saving the Event
When a response is made to an event, the event is then saved and closed for administration
purposes and reporting.
To do so, choose the Save button in the Action Log section of the Customer Account, or choose
the F2 button on your keyboard.
The following window will appear:
Figure 4-16: Save Window
SaMSon Security Monitoring Software
Page 124
24/12/03
Choose the Event Cause from the scroll down menu to provide a brief explanation why the event
occurred.
Choose the OK button to close the Save Window and return to the Event Monitoring Window,
or choose the Cancel button to return to the Customer Account.
Help:
If an appropriate Event Cause does not appear in the pull down menu refer to
Table 3-8: General Definitions Window Description for instructions on
adding a new Event Cause.
The event is now categorised according to its Event Cause and can be viewed in the History
button within the Customer’s Account Card.
Saving Events in Quick Log: Within the Save Window, a Quick Log of any other open events
for the customer’s account are also displayed.
These events can be saved and closed using the same Event Cause as the current event in
processing.
Choose the Close check boxes and select the Event Cause from the scroll down menu if not
already selected.
Choose the OK button to close the Save Window. An attention message will appear. Click OK
to return to the Event Monitoring Window, or choose the Cancel button to return to the
Customer Account Card.
Figure 4-17: Quick Log Message
The events selected are now categorised according to the Event Cause and can be viewed in the
History button within the Customer’s Account Card.
Important:
Quick Log events are saved and closed without any Operator actions recorded in them. Only
system actions will appear.
SaMSon Security Monitoring Software
Page 125
24/12/03
5
Administration and Maintenance Activities
SaMSon Security Monitoring software is equipped with a number of administration and maintenance
activities for record keeping and account management.
SaMSon Security Monitoring Software
Page 126
24/12/03
5.1
SaMSon Central
5.1.1 Reset of Operator’s Log in
If the operator’s User Name is blocked in SaMSon Monitor, it can be released from SaMSon
Central.
Go to SaMSon Central ►Tools ► Reset of Operator’s Log in
The Reset of Operator’s Log in window is displayed.
Figure 5-1: Reset of Operator’s Log in Window
Choose the operator to be released from the pull-down list of blocked operators.
Click the Reset button and then the OK button to return to SaMSon Central.
You can now log in to SaMSon Monitor with the release User name.
Warning:
Do not enter the system in parallel more than once with the same
User Name
SaMSon Security Monitoring Software
Page 127
24/12/03
5.1.2 Daily Log File
A daily log file is available in SaMSon Central in order to view and save daily communication
activities and events.
Go to SaMSon Central ►Tools ► View Daily Log Files
Following is an example of a daily log file from an operational system.
Figure 5-2: Example Log File
The log displays all the information that is viewed in SaMSon Central's Message Window.
The daily log file will automatically delete sixty days after its initial creation. Each daily log can
be printed or saved to disk prior to automatic deletion.
To view, save or print the log file, choose Tools ► View Daily Log (Ctrl+F)
Use the save and print functions according to Microsoft Notepad®.
5.1.3 Help
SaMSon Central is equipped with software Help and system information.
To view assistance for selected topics choose Help ► Contents.
For further information about SaMSon Central choose Help ► About (Ctrl+A).
Choose the OK button to return to SaMSon Central’s Message Window or choose the Sys Info
button to view system information.
5.1.4 Exiting Samson Central
To exit SaMSon Central, choose File ► Exit (Ctrl+E).
Warning:
SaMSon Central must remain open at all times to maintain ongoing
communications between the receiver hardware and SaMSon Monitor.
If SaMSon Central is closed, new events will not be received by
SaMSon Monitor.
SaMSon Security Monitoring Software
Page 128
24/12/03
5.2
SaMSon Monitor
SaMSon Monitor includes a number of tools that enable efficient central station administration and
management.
5.2.1 Technical Data
Technical data can be recorded and referred to for system and equipment maintenance.
To record technical data related to the system go to the Menu Bar and choose Tools ►
Technical Data (Ctrl+T).
The Technical Data Window will appear on the screen (refer to Figure 5-3: Technical
Data Window).
Figure 5-3: Technical Data Window
Following is description of the Technical Data Window.
Table 5-1: Technical Data Window Description
FIELD
DESCRIPTION
Select Account
Customer account
• Select from list in pull down
menu
Group
Equipment group
• Select from list in pull down
menu. Equipment group can
be added in Equipment Tab
(refer to Section 3.2.4
General Definitions)
Part
Equipment part
• Automatically appears when
Equipment Group is selected
S/N
Serial number of the
equipment
• Type data in open text box
SaMSon Security Monitoring Software
Page 129
ACTION REQUIRED
24/12/03
FIELD
Location
Install From
Disable From
Last Update
Technician Name
Notes
5.2.1.1
DESCRIPTION
Installation location of the
equipment
Date equipment was
installed
ACTION REQUIRED
• Type data in open text box
• Type date in open text box in
date format (dd/mm/yyyy)
Date equipment was
disabled
• Type date in open text box in
date format (dd/mm/yyyy)
Date additions or changes
are made.
Name of the technician
working on the equipment.
• Automatically inserts current
date
Any additional notes
• Type data in open text box
• Type data in open text box
Adding and Editing Technical Data
To add details within a customer account, select the account from the pull down menu.
Choose the Add button.
A new row will appear with empty fields ready for new data.
Choose the correct group from the pull down menu. The corresponding part will also be added.
Enter the serial number, location, installation date or disable date. The date for Last Update will
automatically update to the current date.
Enter the Technicians Name details and any notes as required.
Choose the OK button to save the new details and close the Technical Data Window or choose
the Cancel button to return to Event Monitoring Window without saving the details.
Details can be modified at any time by selecting the field and replacing the existing data.
5.2.1.2
Deleting Technical Data
To delete existing details within a customer account, click on the row to be deleted.
Choose Delete ►OK to delete, save and close the Technical Data Window.
5.2.2 Event Exchange
Events can be exchanged between operators, as required.
5.2.2.1
SaMSon Monitor Remains Open
Operators Working on the Same Workstation - If an operator leaves a workstation and
still possesses any unprocessed events, they will automatically transfer to the new
operator logged in to that workstation (refer to Section 4.2.2 Change of Operator Duty).
Operators Working on a Different Workstation - If an operator possesses any
unprocessed events they can be transferred to another operator on another workstation.
To exchange events, choose File ► Events Exchange
The following window will appear:
SaMSon Security Monitoring Software
Page 130
24/12/03
Figure 5-4: Events Exchange Window
Choose the current operator’s User Name from the pull down menu labeled From Operator.
Choose the new operator’s User Name from the pull down menu labeled To Operator.
Only operators with the same classification will appear in this list.
Classification is deleted / transferd by clicking the arrows, or double click on the classification.
Choose the Events Exchange button to complete the exchange of events on hold, from one
operator to another.
5.2.2.2
SaMSon is Closed and Re-opened
If an operator possesses any events on hold, and SaMSon is Closed, once SaMSon is re-opened
the events will reappear under the original operator’s login.
A new operator can login and retrieve the events that are on hold by using the Event Exchange
function.
5.2.3 Manual Event
SaMSon Monitor is equipped with a manual event function that allows the central station
operator to manually generate an event for testing and simulation purposes.
To manually generate an event, choose Event Monitor ► Manual Event
The following Manual Event Window will appear:
SaMSon Security Monitoring Software
Page 131
24/12/03
Figure 5-5: Manual Event Window
Mark Search by Name in order to select an account or choose by account details from the list
Select the, Received Code and Zone/Users (if applicable, depending on the protocol in use) from
the pull down menu.
Choose the Send button.
The simulated message will appear in the Incoming Events Section or will appear in the Events
on Hold for Operator Section (if other events have already occurred and are on hold for the same
account).
A three-star (***) sign in the Man. column indicates that the event is a manual event.
5.2.4 Manual Dialing and sending SMS
SaMSon Monitor is equipped with a manual dialing function that allows the central station
operator to manually dial a number as required.
To manually dial a phone number, choose Tools ► Manual Dialing and sending SMS
(Ctrl+D)
The following Dial Window will appear:
Figure 5-6: Dial Window
SaMSon Security Monitoring Software
Page 132
24/12/03
Dial the phone number required and choose the Call button. If you want to send SMS message,
choose the Send SMS button.
The following Send SMS to number Window will appear:
Figure 5-7: Send SMS to number window
Choose the Send button to send the message.
Once dial-up has commenced, choose the Talk button and lift the phone receiver.
5.2.5 Reporting
SaMSon Monitor is capable of generating a number of reports for system, event and
administration purposes. Reports can be customized according to specific central station
requirements.
To view and generate reports, choose the Reports button on the Menu Bar or go to Start ►
Programs ► KP Electronic Systems ► SaMSon Monitor ► SaMSon Reports
Help:
You will be required to Log in to SaMSon Monitor if you are not
already logged in to the software
Two options are available:
•
Reports Generator – enables the user to customize reports according to the desired
information
•
Reports Viewer - a view icon
5.2.5.1
appears in the right hand corner for viewing Reports
Reports Generator
When choosing the Reports Generator, the following window will appear:
SaMSon Security Monitoring Software
Page 133
24/12/03
Figure 5-8: Report Types Window
Following is a description of each report type and the actions required.
SaMSon Security Monitoring Software
Page 134
24/12/03
Table 5-2: Report Type Description
REPORT TYPE
DESCRIPTION
ACTION REQUIRED
Information Tab
Selecting Account Information to be Viewed
Reports are generated according to customer account
details. Reports can be generated for all customer
accounts within the database, or by a specific customer
account.
•
Select the check box(es) corresponding to the information
that you wish to appear in the report
•
Select the Account List check box in order to get a report
with Account name, Main number and Secondary number
Only!
•
If no check boxes are selected, only basic customer account
information will appear
•
If Zone /User check box is selected, and the Zone /User
defined SMS information, the report will include this data.
•
Reports can now be generated for a) all accounts, b) specific
customer accounts, or c) selection by account details (in the
Query Builder section)
Account Details
Generating a Report for All Accounts
•
Choose the Show Report button and the generated report
will appear in a new window displaying details for all valid
accounts
•
Refer to Section 5.2.5.2 Navigating the Reports for
instructions on Navigating the Report Viewer
Generating a Report for Individual Accounts
Figure 5-9: Account Details Report
SaMSon Security Monitoring Software
Page 135
24/12/03
•
If you require a report for specific customers, select the
Activate check box in the Choose Individual Account
section
•
Select from the list the customer account for which you wish
to generate a report, and then click Add.
REPORT TYPE
DESCRIPTION
ACTION REQUIRED
•
Repeat this action to add additional customer accounts.
•
Choose the Show Report button and the generated report
will appear in a new window displaying details for the
selected customer accounts
•
Refer to Section 5.2.5.2 Navigating the Reports for
instructions on Navigating the Report Viewer
Generating a Report According to Customer Account
Details
The Account Details Window is seperated into three
sections. Following is a brief explanation of each section.
Account Details
cont/…
•
Choose an account detail in the Query Builder section
•
Include Information About - General information about
the customer account to be included in the report
Define a condition by using the drop-down list of signs and
entering a value in the text box
•
Choose Individual Account - Displays all current or
disabled customer accounts
To add more conditions, select OR/AND in the right-hand
drop-down box and select an additional account detail
•
Query Builder – Displays the parameters used to
determine the conditions to generate the report
Choose the Add button to save the query, or choose the
Clear button to delete the condition you have built
•
Choose the Show Report button and the generated report
will appear in a new window
•
Refer to Section 5.2.5.2 Navigating the Reports for
instructions on Navigating the Report Viewer
SaMSon Security Monitoring Software
Page 136
24/12/03
Selecting Disabled Account Information to be Viewed
Reports are generated according to disabled customer
account details. Reports can be generated for all disabled
accounts within the database, or by a specific disabled
account.
•
Select the check box(es) corresponding to the information
that you wish to appear in the report
•
Select the Account List check box in order to get a report
with Account name, Main number and Secondary number
Only!
•
If no check boxes are selected, only basic customer account
information will appear
•
Reports can now be generated for a) all disabled accounts, b)
specific customer accounts, or c) selection by account details
(in the Query Builder section)
Generating a Report for All Disabled Accounts
Disabled
Account
Details
•
Choose the Show Report button and the generated report
will appear in a new window displaying details for all
disabled accounts
•
Refer to Section 5.2.5.2 Navigating the Reports for
instructions on Navigating the Report Viewer
Generating a Report for Individual Disabled Accounts
Figure 5-10: Disabled Accounts Report
SaMSon Security Monitoring Software
Page 137
24/12/03
•
If you require a report for specific customers, select the
Activate check box in the Choose Individual Account
section
•
Select from the list the customer account for which you wish
to generate a report, and then click Add.
•
Repeat this action to add additional customer accounts.
•
Choose the Show Report button and the generated report
will appear in a new window displaying details for the
selected customer accounts
•
Refer to Section 5.2.5.2 Navigating the Reports for
instructions on Navigating the Report Viewer
REPORT TYPE
DESCRIPTION
ACTION REQUIRED
The Disbaled Account Details Window is seperated into
three sections. Following is a brief explanation of each
section.
Disabled
Account
Details cont/…
Generating a Report According to Disabled Customer
Account Details
•
Choose an account detail in the Query Builder section
•
Define a condition by using the drop-down list of signs and
entering a value in the text box
Include Information About - General information about
the customer account to be included in the report
•
To add more conditions, select OR/AND in the right-hand
drop-down box and select an additional account detail
Choose Individual Account - Displays all current or
disabled customer accounts
•
Choose the Add button to save the query, or choose the
Clear button to delete the condition you have built
Query Builder – Displays the parameters used to
determine the conditions to generate the report
•
Choose the Show Report button and the generated report
will appear in a new window
•
Refer to Section 5.2.5.2 Navigating the Reports for
instructions on Navigating the Report Viewer
Generating a Report for All Opertators
Operators
Reports are generated according to operators defined
within SaMSon Monitor.
•
Choose the Show Report button and the generated report
will appear in a new window displaying details of all
Operators
•
Refer to Section 5.2.5.2 Navigating the Reports for
instructions on Navigating the Report Viewer
Generating a Report for Individual Operators
•
Select an operator from the Individual Operator list and
click Add
The selected operator is displayed in the lower part of the
window
•
SaMSon Security Monitoring Software
Page 138
24/12/03
Repeat this action to add more operators.
REPORT TYPE
DESCRIPTION
ACTION REQUIRED
Operators
cont/…
Figure 5-11: Operators Report
SaMSon Security Monitoring Software
Page 139
24/12/03
•
Click the Show Report button and the generated report will
appear in a new window
•
Refer to Section 5.2.5.2 Navigating the Reports for
instructions on Navigating the Report Viewer
REPORT TYPE
DESCRIPTION
ACTION REQUIRED
Account Status
Figure 5-12: Account Status Report
This report displays the accounts by the selected status
SaMSon Security Monitoring Software
Page 140
24/12/03
•
Choose the required Account Status.
•
Click the Show Report button and the generated report will
appear in a new window.
REPORT TYPE
DESCRIPTION
ACTION REQUIRED
History/Statistics Tab
•
The History Window is seperated into four sections.
Following is a brief explanation of each section.
Help:
By choosing the Clear button, all selected items are
deleted and you may commence a new selection.
Selected Period of Time – the report time period
History cont/…
Choose the sorting arrangements for the report from the Sort
By pull-down list
Sort By – report data is organised by topic. Multiple
topics can be used in parallel.
Select Data Conditions – any number of Received Event
details with multipe items can be included
Selected Items – A viewing window displaying single or
multiple Received Event details to be used in generating
the report
Summary History report is generated according to event
cause category for either valid or disabled accounts
If no selection is made, reports are automatically
sorted by received event date
•
Choose the Show Report button and the generated report
will appear in a new window
•
Refer to Section 5.2.5.2 Navigating the Reports for
instructions on Navigating the Report Viewer
Generating a Report for All Accounts
•
Select the period required in the Selected Period section
(dates are pre-set for the last seven days)
•
Choose the Show Report button and the generated report
will appear in a new window displaying statistics of all
received events that occurred during the selected period
•
Refer to Section 5.2.5.2 Navigating the Reports for
instructions on Navigating the Report Viewer
Lite History
Generating a Report for Individual Accounts
•
SaMSon Security Monitoring Software
Page 141
24/12/03
Select the period required in the Selected Period section
(dates are pre-set for the last seven days)
REPORT TYPE
DESCRIPTION
ACTION REQUIRED
•
Select an account number from the Account Number list
and click Add
The selected account is displayed in the lower part of the
window
•
Repeat this action to add more accounts.
Help:
By choosing the Clear button, all selected items are
deleted and you may commence a new selection.
Figure 5-13: Lite History Report
SaMSon Security Monitoring Software
Page 142
•
Choose the undefined check box in order to get all undefined
accounts report
•
Click the Show Report button and the generated report will
appear in a new window
•
Refer to Section 5.2.5.2 Navigating the Reports for
instructions on Navigating the Report View
•
24/12/03
Generating a Statistics Report
Comprehensive reports are generated according to
statistical information for either valid or disabled
accounts.
•
Select the period required in the Selected Period section
(dates are pre-set for the last seven days)
•
Select the required grouping from the Group Information
By pull down menu
•
Select the check box/es for the type of information that you
wish to include in the report
•
All valid accounts appear in the Account Number section
•
Select the Show Disabled Accounts check box if you wish
to generate a report for disabled accounts
•
Select the Choose Individual Account check box if you
wish to generate a report on a specific account and choose
the account number from the list
•
If choosing an individual account, choose the Add button
and the account will appear in the Selected Items viewer
(any number of accounts can be added)
•
Choose the Activate check boxes on any of the Received
Event fields and select a field within each one
Statistics
Figure 5-14: Statistics Report
Help:
By choosing the Clear button, all selected items are
deleted and you may commence a new selection.
SaMSon Security Monitoring Software
Page 143
24/12/03
The Statistics Window is seperated into five sections.
Following is a brief explanation of each section.
•
Choose the Add button and the item will appear in the
Selected Items viewer (any number of items in the Received
Event section can be added)
•
Choose the Show Report button and the generated report
will appear in a new window
•
Refer to Section 5.2.5.2 Navigating the Reports for
instructions on Navigating the Report Viewer
Group Information By – report data is categorised by
topic
Include Information About – General information to be
included in the report
Selected Period of Time – the report time period
Statistics
cont/…
Select Data Conditions – any number of Received Event
fields with multipe items can be included
Selected Items – A viewing window displaying single or
multiple Received Event fields to be used in generating
the report
SaMSon Security Monitoring Software
Page 144
24/12/03
Summary statistical reports are generated according to
event cause category for either valid or disabled accounts
Generating a Report for All Accounts
•
Select the period required in the Selected Period section
(dates are pre-set for the last seven days)
•
To generate a report for disabled accounts, select the Show
Disabled Accounts check box
•
Choose the Show Report button and the generated report
will appear in a new window displaying statistics of all
received events that occurred during the selected period
•
Refer to Section 5.2.5.2 Navigating the Reports for
instructions on Navigating the Report Viewer
Generating a Report for Individual Accounts
Lite Statistics
•
Select the period required in the Selected Period section
(dates are pre-set for the last seven days)
•
To generate a report for a disabled account, select the Show
Disabled Accounts check box
•
Select an account number from the Account Number list
and click Add
Figure 5-15: Lite Statistics Report
The selected account is displayed in the lower part of the
window
•
Repeat this action to add more accounts.
Help:
By choosing the Clear button, all selected items are
deleted and you may commence a new selection.
SaMSon Security Monitoring Software
Page 145
24/12/03
•
Click the Show Report button and the generated report will
appear in a new window
•
Refer to Section 5.2.5.2 Navigating the Reports for
instructions on Navigating the Report View
Statistical reports of open or closed periods are generated
for the selected time range
Generating a Report for All Accounts
•
Select the period required in the Selected Period section
(dates are pre-set for the last seven days)
•
Select either Open or Closed Time to determine the required
type of report
•
To generate a report for disabled accounts, select the Show
Disabled Accounts check box
•
Choose the Show Report button and the generated report
will appear in a new window displaying statistics of the open
or closed periods for the selected time range
•
Refer to Section 5.2.5.2 Navigating the Reports for
instructions on Navigating the Report Viewer
Generating a Report for Individual Accounts
Open/Closed
Time Statistics
Figure 5-16: Open/Closed Time Statistics Report
•
Select the period required in the Selected Period section
(dates are pre-set for the last seven days)
•
Select either Open or Closed Time to determine the required
type of report
•
To generate a report for a disabled account, select the Show
Disabled Accounts check box
•
Select an account number from the Account Number list
and click Add
The selected account is displayed in the lower part of the
window
•
Repeat this action to add more accounts.
Help:
By choosing the Clear button, all selected items are
deleted and you may commence a new selection.
SaMSon Security Monitoring Software
Page 146
24/12/03
This report contains a list of all events defined as Waiting
for Restore for which no Restore event has been received
within the defined period
•
Click the Show Report button and the generated report will
appear in a new window
•
Refer to Section 5.2.5.2 Navigating the Reports for
instructions on Navigating the Report View
Generating a Report for All Accounts
•
Select the period required in the Selected Period section
(dates are pre-set for the last seven days)
•
Choose the Show Report button and the generated report
will appear in a new window displaying a list of all unrestored events that occurred during the selected period
•
Refer to Section 5.2.5.2 Navigating the Reports for
instructions on Navigating the Report Viewer
Generating a Report for Individual Accounts
Un-Restored
Events
•
Select the period required in the Selected Period section
(dates are pre-set for the last seven days)
•
Select an account number from the Account Number list
and click Add
The selected account is displayed in the lower part of the
window
•
Repeat this action to add more accounts.
Help:
Figure 5-17: Un-Restored Events Report
By choosing the Clear button, all selected items are
deleted and you may commence a new selection.
SaMSon Security Monitoring Software
Page 147
24/12/03
•
Click the Show Report button and the generated report will
appear in a new window
•
Refer to Section 5.2.5.2 Navigating the Reports for
instructions on Navigating the Report View
Miscellaneous Tab
Reports are generated according to General Definitions
defined within SaMSon Monitor.
General
Definitions
Figure 5-18: General Definitions Report
SaMSon Security Monitoring Software
Page 148
24/12/03
Generating a General Definition Report
•
Select the definitions to appear in the report
•
Choose the Show Report button and the generated report
will appear in a new window
•
Refer to Section 5.2.5.2 Navigating the Reports for
instructions on Navigating the Report Viewer
Reports are generated according to Receiver Settings
defined within SaMSon Central.
Generating a Report for All Receivers
•
Choose the Show Report button and the generated report
will appear in a new window displaying details of all
Receivers
•
Refer to Section 5.2.5.2 Navigating the Reports for
instructions on Navigating the Report Viewer
Generating a Report for Individual Receivers
•
Receiver
Settings
Select an operator from the Individual Receiver list and
click Add
The selected receiver is displayed in the lower part of the
window
Figure 5-19: Receiver Settings Report
SaMSon Security Monitoring Software
Page 149
24/12/03
•
Repeat this action to add more receivers.
•
Click the Show Report button and the generated report will
appear in a new window
•
Refer to Section 5.2.5.2 Navigating the Reports for
instructions on Navigating the Report Viewer
Generating a Report for All Protocols
Reports are generated according to Protocol Descriptions
and Received Codes defined within SaMSon Central.
•
Choose the Show Report button and the generated report
will appear in a new window displaying details of all
Protocols
•
Refer to Section 5.2.5.2 Navigating the Reports for
instructions on Navigating the Report Viewer
Generating a Report for Specific Protocols
•
Select an operator from the Individual Protocol list and
click Add
The selected protocol is displayed in the lower part of the
window
Protocol
Descriptions
•
Repeat this action to add more protocols.
•
Click the Show Report button and the generated report will
appear in a new window
•
Refer to Section 5.2.5.2 Navigating the Reports for
instructions on Navigating the Report Viewer
Including the Received Code Table
•
Figure 5-20: Protocol Properties Report
SaMSon Security Monitoring Software
Page 150
24/12/03
Select the Received Code Table check box to include
information about corresponding received codes within the
Report
Generating an Event Codes Report Based on Single
Items
Generates reports according to Event Codes defined
within SaMSon Central.
•
Select the Event Code detail on which the report will be
based
•
Choose a specific value of the Event Code detail to generate
the report
•
Choose the Show Report button and the generated report
will appear in a new window
•
Refer to Section 5.2.5.2 Navigating the Reports for
instructions on Navigating the Report Viewer
Generating an Event Codes Report Based on Multiple
Items
Event Codes
•
Select an Event Code field on which the report will be based
•
Choose a specific detail within the field to generate the
report
•
Click the Add button and the selected detail will appear in
lower part of the window
Help:
By choosing the Clear button, all selected items are
deleted and you may commence a new selection.
Figure 5-21: Event Codes Report
SaMSon Security Monitoring Software
Page 151
24/12/03
The Event Codes Window is seperated into three sections.
Following is a brief explanation of each section.
Event Codes
cont/…
Select By – any number of Event Codes fields with
multipe items can be included
Sort By – report data is organised by topic. Multiple
topics can be used in parallel.
Select By Display – displays the values of the selected
Event Code detail
Modification
Follow-Up
Figure 5-22Modification Follow-Up
This report shows all the changes that were donein the
system
SaMSon Security Monitoring Software
Page 152
24/12/03
•
Mulitple selections of event code details can be added as
required
•
The report will be generated based on the selected details
Sorting
•
Select the Event Codes fields by which to sort the report
•
Multiple sorting is possible
•
Refer to Section 5.2.5.2 Navigating the Reports for
instructions on Navigating the Report Viewer
•
Choose the Modification Follow-Up option and click
Choose.
•
Choose time period for the report.
•
Check for choosing per Group / Section
•
Check for choosing per Action Type / Operator.
•
Click on Show Report button.
•
Refer to Section 5.2.5.2 Navigating the Reports for
instructions on Navigating the Report Viewer
SaMSon Security Monitoring Software
Page 153
24/12/03
5.2.5.2
Navigating the Reports Viewer
When choosing a report the following Reports Viewer appears:
Figure 5-23: Reports Viewer
Below is a brief description about navigating the Reports Viewer.
Table 5-3: Reports Viewer Description
FIELD
DESCRIPTION
Indicates the number of pages and arrows for scrolling through
pages
Changing view size of report on screen
Used for opening an existing report
Saving the report
Cancel the report
Close and exit the Report Viewer
SaMSon Security Monitoring Software
Page 154
24/12/03
5.2.6 Data Management
All events can be saved and stored for emergency Backup should there be a
situation where data is lost.
Important:
All Backup and Restore operations must be performed only
locally on the server. Do not use the Remote Desktop and
Terminal Service
5.2.6.1
Backing Up Data
To backup data, double-click the SaMSon Data Utility icon on the desktop, or
Go to Start ► Program Files ► KP Electronic Systems ► SaMSon Utility
► Backup & Restore
The SaMSon Backup and Restore window opens (refer to Figure 5-24:
SaMSon Backup and Restore Window).
Figure 5-24: SaMSon Backup and Restore Window
Click the Backup radio button.
In the Log in window, enter your User Name and Password and click OK.
If you have permission to perform backups, the Backup window is displayed (refer to
Figure 5-25: Backup Window)
SaMSon Security Monitoring Software
Page 155
24/12/03
Figure 5-25: Backup Window
Note that the status bar at the bottom of the window indicates the current status of the
operation being performed.
Note:
If you do not have permission to perform backups, a message
notifies you of this and the Backup window fails to open
Click on the button to the right of the Location field and choose the appropriate
location.
The location appears in the Location field, and the file name appears in the Backup
File field. You can manually enter a different location and/or file name to retain the
previous backup files.
Click the Backup button to perform the backup.
If there is insufficient space on the selected location, a message tells you to choose a
different location.
If the file already exists, you are asked whether you want to overwrite it.
Click the Verify button to make sure that the backup file is in order.
To schedule recurring backups at a defined interval, click the Schedule button in the
Backup window. The Schedule window is displayed (refer to Figure 5-26: Schedule
Window).
Warning:
When choosing the Schedule option, the previous backup file is
overwritten.
SaMSon Security Monitoring Software
Page 156
24/12/03
Figure 5-26: Schedule Window
Schedule the recurring backups according to the instructions that appear in the
window.
5.2.6.2
Restoring Data
If data is lost for any reason during central station operations, you can retrieve and/or
view the lost data.
To restore data, double-click the SaMSon Data Utility icon on the desktop, or
Go to Start ► Program Files ► KP Electronic Systems ► SaMSon Utility
► Backup & Restore
The SaMSon Backup and Restore window opens (refer to Figure 5-24:
SaMSon Backup and Restore Window).
Click the Restore radio button.
The Restore Window opens (refer to Figure 5-27: Restore Window).
Click the box to the right of the Backup field to choose the file that you want to
restore.
Click the Local button to enter the Local Server name in the Server field, or manually
enter a different server name.
Enter your SQL Password and click Connect.
The Restore and Restore View buttons are enabled, and the Connect button changes
to Disconnect.
Click the Restore button to retrieve the data of the selected file.
If the selected file in invalid, a message is displayed.
Click the Restore View button to view reports containing the data of the selected file.
For an explanation about reports refer to Section 5.2.5 Reporting
SaMSon Security Monitoring Software
Page 157
24/12/03
Note:
You must always close the reports before closing the SaMSon
Backup Restore utility
Figure 5-27: Restore Window
5.2.7 Help
SaMSon Monitor is equipped with software Help and system information.
To view assistance for selected topics choose Help ► Contents.
For further information about SaMSon Monitor choose Help ► About (Ctrl+A).
Choose the OK button to return to SaMSon Monitor’s Message Window or choose the
Sys Info button to view system information.
5.2.8 Exiting SaMSon Monitor
To exit SaMSon Monitor, choose File ► Exit (Ctrl+E).
Warning:
SaMSon Monitor must remain open at all times to view incoming
messages from the receiver hardware and SaMSon Central.
SaMSon Security Monitoring Software
Page 158
24/12/03
If SaMSon Monitor is closed, new events will continue to be
received by the SaMSon Central but cannot be viewed for
response.
SaMSon Security Monitoring Software
Page 159
24/12/03
6
Computer Shut Down
If at any time the computer must be shut down, it is important that you exit
both SaMSon Central and SaMSon Monitor.
Warning:
If you do not exit both SaMSon Security Monitoring
Software modules prior to performing computer shutdown, data within SaMSon Central or SaMSon Monitor
may become corrupted.
Uninterrupted Power Supply (UPS) is recommended.
SaMSon Security Monitoring Software
Page 160
24/12/03
7
Troubleshooting
Before contacting KP ELECTRONIC SYSTEMS LTD Technical Support by phone,
by fax, or online, please read all relevant information in the manual and in the
software Help menus. Check the Manual Index for references to related topics, where
further information may be covered.
If you were able to previously perform a task but cannot perform it now, consider what
changes may have occurred in the system. Perhaps new software was installed or
settings changed.
7.1
Error Messages
7.1.1 Login troubleshotting
If the following message appears, refer to the solution described in Section
5.1.1 Reset of Operator’s Log in
Figure 7-1: Log un failed Message
7.1.2 Connection troubleshotting
If the following message appears, it indicats connection problem with
SQL server.
Figure 7-2: Connection Fail
In order to solve this problem, check one of the following:
• Check if SQL SERVER is running
• Else, insert in the SERVER UTILITY program (on the software
installation disk), the correct SERVER name
• Else re-install SQL SERVER
SaMSon Security Monitoring Software
Page 161
24/12/03
7.1.3 Database Error
If the following message appears, refer to the solution described in
figure 7-3.
Figure 7-3: Database Error
7.1.4 Save Error
If the following message appears it means that the update details
saving was failed.
Figure 7-4: Save Error
In order to solve this problem, check one of the following:
• Save again
• Else, close Account Card and re-open
7.1.5 Backup Error
If the following message appears, refer to the solution described in
figure 7-5
Figure 7-5: Backup Error
SaMSon Security Monitoring Software
Page 162
24/12/03
7.1.6 Schedule Attention
If the following message appears, refer to the solution described in
figure 7-6
Figure 7-6: Schedule Attention
7.1.7 Hardware Connection Error
If the following message appears there it indicats on hardware
problems (COM port, Cellular Modem)
Figure 7-7: Hardware Connection Error
In order to solve the COM port problem, check the following:
• COM connection between RCI to PC
In order to solve the Cellular Modem problem, check the following:
• Disconnect Modem from electricity and connect again
• Else, Connection cable between Modem and PC
SaMSon Security Monitoring Software
Page 163
24/12/03
7.2
Contacting KP ELECTRONIC SYSTEMS LTD
When contacting KP ELECTRONIC SYSTEMS LTD, please read the following
checklist:
§
Define the problem before calling
§
Be able to repeat the steps that led to the problem and identify when and how the
problem occurred (the support representative needs your help to understand the
problem and help you solve it)
§
Turn on your computer and launch the application, if possible
§
Have a pen or pencil and paper to write down instructions from Technical Support
Have the following information available when calling Technical Support:
§
System information of the computer available from the Help Menu in both
SaMSon Central and SaMSon Monitor
Providing this information will help the Technical Support representative pinpoint and
solve your problem quickly.
For Technical Support, please contact:
KP ELECTRONIC SYSTEMS LTD
Tel: +972 4 987 3066
Fax: +972 987 3692
Email: [email protected]
SaMSon Security Monitoring Software
Page 164
24/12/03
8
Appendix
8.1
SaMSon Central Shortcut Keys
Below is a quick view of SaMSon Central Short Cut Keys
Table 8-1: SaMSon Central Short Cut Keys Description
KEY
Ctrl+L
Ctrl+E
Ctrl+T
Ctrl+P
Ctrl+R
Ctrl+O
Ctrl+F
8.2
FUNCTION
Log in
Exit
Edit Event Codes Table
Edit Protocol Descriptions
Edit receiver Settings
Restore of Operator’s Log in
View Daily Log File
SaMSon Monitor Shortcut Keys
Below is a quick view of SaMSon Monitor Short Cut Keys
Table 8-2: SaMSon Monitor Short Cut Keys Description
KEY
F1
F2
F3
F4
F5
F6
F10
F11
F12
Ctrl+L
Ctrl+A
Ctrl+E
Ctrl+N
Ctrl+O
Ctrl+S
Ctrl+F3
Ctrl+W
Ctrl+F
Ctrl+H
Ctrl+R
Ctrl+T
Ctrl+D
Ctrl+G
FUNCTION
Comments
Save
Hold
Action
Phone
Patrol Personnel
Stop Siren
Jump to Incoming Events
Jump to Event On Hold
Log out
Close Account
Exit
New Account
Open Account
Save Account
Edit Account
Disable Account
Freeze Account
Change Status
Un-Restored Event
Technical Data
Manual Dialing
General Definition
SaMSon Security Monitoring Software
Page 165
24/12/03
KEY
Ctrl+P
FUNCTION
Operator Permission
SaMSon Security Monitoring Software
Page 166
24/12/03
8.3
Event Codes
Following is a list of SaMSon Central’s pre-set event codes:
Table 8-3: SaMSon Central’s Pre-set Event Codes
EVENT CODE
DESCRIPTION
AAP
Access Approved
8
General
ACD
Access Denied
4
Alarm
ACR
CS Power Restore
8
General Restore
ACT
Access Trouble
5
General
AFA
Air Flow Alarm
3
Alarm
ALR
Alarm
2
Alarm
AMS
Arm Stay
5
Close
AOP
Auto Open
4
Open
BDS
Bell Disabled
5
Status
BLR
Bell Restore
8
Status Restore
BLT
Bell Trouble
5
Status
BPR
Bypassed Restore
8
General Restore
BSY
CS Busy Seconds
9
General
BTF
Battery Test Fail
5
Status
BTM
Battery Missing
5
Status
BTP
Battery Present
8
Status Restore
BTR
Battery Restore
8
Status Restore
BUR
Burglary
2
Alarm
BYP
Bypassed
5
General
CAN
Canceled
5
General
CBR
Call Back Request
5
General
CDR
Card Restore
8
General Restore
CDT
Card Trouble
6
General
CLG
Close Group
5
Close
CLO
Close
8
Close
COF
Comm Fail
3
Internal
COR
Comm Restore
8
Internal
CPR
CPM Reset
8
General Restore
CSE
CS Unknown Error
7
General
CSF
CS Failure
3
General
CSS
CS Status Message
7
General
CST
CS Test Signal
8
General Restore
DIA
Diagnostics
9
General
SaMSon Security Monitoring Software
PRIORITY
Page 167
SIREN
EVENT TYPE
24/12/03
EVENT CODE
DESCRIPTION
DIS
Disarmed
8
Open
DTC
Date Change
9
General
DTR
CS Time Reset
9
General Restore
DUR
Duress
1
General
DWF
Download Fail
5
General
DWS
Download Success
8
General Restore
ECL
Recent Close
7
Close
ERR
Code Error
7
General
ETC
Early Close
4
Internal
ETO
Early Open
4
Internal
EXF
Exit Fault Alarm
3
General
EXP
Expansion Alarm
5
General
EXR
Expansion Restore
8
General Restore
EXT
Expansion Test
8
General Restore
FCE
Force Closed Early
4
Close
FCL
Force Closed Late
4
Close
FDM
Fire Detector Missing
5
Alarm
FDR
Faulty Data Received
9
General
FIR
Fire Alarm
1
Alarm
FRA
Frozen Account
8
Internal
FRB
Fire Trouble
4
Alarm
FRM
Force Armed
6
Close
FRR
Fire Restore
8
Alarm Restore
FRS
Fire Shunted
7
Alarm
FRT
Fire Status
7
Alarm
FTB
Fuse Trouble
4
General
FTR
Fuse Restored
9
General Restore
FWE
Fire Walk End
8
General Restore
FWS
Fire Walk Start
8
General
GAS
Gas Alarm
2
Alarm
GSR
Gas Alarm Restore
8
Alarm Restore
GSW
Gurd Swith
7
General
GTA
Glass Tamper Alrm
4
Alarm
HLD
Holdup Alarm
1
Alarm
HLR
Holdup Alarm Restore
8
Alarm Restore
HTA
High Temp Alarm
3
Alarm
HTR
High Temp. Restore
8
Alarm Restore
SaMSon Security Monitoring Software
PRIORITY
Page 168
SIREN
EVENT TYPE
24/12/03
EVENT CODE
DESCRIPTION
ILA
Invalid Local Access
4
General
IRA
Invald Remote Access
4
General
IVR
Invalid Report
4
General
KCL
Keyswitch Closing
8
Close
KOP
Keyswitch Opening
8
Open
LBR
Battery Restore
8
Status Restore
LBT
Battery Test
8
Status Restore
LCF
CS Line Card Fail
3
General
LCR
CS Line Card Restore
8
General Restore
LG5
CS Log 50% Full
5
General
LG9
CS Log 90% Full
4
General
LGO
CS Log Overflow
3
General
LGR
CS Log Reset
8
General Restore
LGT
CS Log Trouble
4
General
LOB
Low Battery
5
Status
LOF
Log Overflow
5
Status
LSD
Listen In Done
9
General
LSN
Listen In Report
9
General
LTA
Low Temp. Alarm
3
Alarm
LTC
Late Close
4
Internal
LTH
Log Threshold
9
Status Restore
LTO
Late Open
4
Internal
LTR
Low Temp. Restore
8
Alarm Restore
MCL
Manual Close
8
Internal
MDR
Medical Alarm Restore
8
Alarm Restore
MED
Medical Alarm
1
Alarm
MOP
Manual Open
8
Internal
MRS
Manual Restore
8
Internal
NOD
No Data In Signal
9
General
NOR
No Restore
4
Internal
NOT
No Test
4
Internal
NRR
Sensor Reset
8
Alarm Restore
NSR
No Signal Received
5
General
NYC
Not Yet Closed
4
Internal
NYO
Not Yet Open
4
Internal
OAC
Open After Closing
4
Internal
OPD
Open-Deleted User
4
Internal
SaMSon Security Monitoring Software
PRIORITY
Page 169
SIREN
EVENT TYPE
24/12/03
EVENT CODE
DESCRIPTION
OPG
Open Group
8
Open
OPN
Open
8
Open
PAI
Paper In
7
Status Restore
PAN
Panic Alarm
1
Alarm
PAO
Paper Out
7
Status
PAR
Partial Arm
5
Open
PCH
Parameters Changed
7
General
PGI
Programmer In
9
Status
PGO
Programmer Out
9
Status Restore
PHE
Invalid Dialer Phone Num
4
General
PIN
Personal Id Number
9
General
PNR
Panic Alarm Restore
8
Alarm Restore
POF
AC Power Fail
5
Status
PRF
CS Printer Fail
5
General
PRL
CS Printer Offline
5
General
PRO
CS Printer Online
8
General Restore
PRR
CS Printer Restore
9
General Restore
PRS
CS Phone Restore
8
General Restore
PRT
CS Printer Trbl
7
General
PTB
Phone Trouble
5
Status
PTR
Phone Trouble Restore
8
Status Restore
PTS
AC Power Test
7
Status
PWR
AC Power Restore
9
Status Restore
PWT
AC Power Trouble
5
Status
RCL
Remote Closing
5
Close
RDS
Relay Disabled
5
General
RES
Restore
8
Alarm Restore
RFE
Radio RF Error
4
Status
RFR
Radio Trouble Restore
8
Status Restore
RFT
Radio Trouble
4
Status
RLR
Relay Reset
7
General
RMC
Remote Command
7
General
RMO
Remote Opening
5
Open
RMR
Remote Reset
7
General
RST
CS System Reset
8
General Restore
SDR
System Restore
8
General Restore
SDS
System Disabled
2
General
SaMSon Security Monitoring Software
PRIORITY
Page 170
SIREN
EVENT TYPE
24/12/03
EVENT CODE
DESCRIPTION
SGE
Signal Error
4
General
SHU
Shunted
7
General
SLR
Special Restore
8
General Restore
SLT
Special Test
8
General
SPK
Sprinkler Alarm
4
Alarm
SPR
Sprinkler Restore
8
Alarm Restore
SPT
CS Phone Trouble
4
General
SRU
Relay Set
7
General
STR
Status Restore
8
General Restore
STT
Status Trouble
7
General
SUP
Supervisory
9
General
TAM
Tamper Alarm
3
Alarm
TMB
Tamper Trouble
4
General
TMC
Time Changed
9
Status
TMP
Temperature Alarm
3
Alarm
TMR
Tamper Restore
8
Alarm Restore
TRB
Trouble
5
Status
TRE
CS Transmission Error
5
General
TRR
Transmission Error
4
General
TRS
Trouble Restore
8
Status Restore
TSM
Test Mode
9
Internal
TST
Test Signal
8
Status
UCA
User Code - Add
6
General
UCC
User Code - Changed
6
General
UCD
User Code - Deleted
6
General
UNA
Undefined Account
9
Internal
UNS
Undefined Signal
7
Internal
UNZ
Unknown Zone/User
7
Internal
USR
User Alarm
3
Alarm
UST
User Tamper Alarm
3
Alarm
WAT
Water Alarm
4
Alarm
WTR
Water Alarm Restore
8
Alarm Restore
XCT
Extend Close Time
5
General
SaMSon Security Monitoring Software
PRIORITY
Page 171
SIREN
EVENT TYPE
24/12/03
8.4
Operator Permission
Following is a description of SaMSon functions as they are displayed in the
Operator Permission Window.
Table 8-4: Description of SaMSon Functions, Operator Permission Window
FUNCTION
Edit Operators
DESCRIPTION (Permission to:)
Edit operator security access (Tools ► Preferences ►
Operator Permission, SaMSon Monitor)
New Account
Add a new customer account card (Account ►New Account,
SaMSon Monitor)
Edit Account
Edit an existing customer account card (Account ►Edit
Account, SaMSon Monitor)
Disable Account
Disable an existing customer account (Account ►Disable
Account, SaMSon Monitor)
Freeze Account
Freeze an existing customer account (Account ►Freeze
Account, SaMSon Monitor)
Add new definitions or edit existing global definitions (Tools
► Preferences ► General Definition, SaMSon Monitor)
General Definitions
Report Generator
Generate reports (Reports ►Report Generator, SaMSon
Monitor)
Report Viewer
Displays reports (Reports ► Report Viewer, SaMSon
Monitor)
Saving data (Start ► Programs ► KP Electronic Systems ►
SaMSon Utility ► Backup & Restore, Desktop)
Reset of Operator’s Log in (Tools ► Reset of Operator’s
Log in, SaMSon Central)
Backup Data
Reset of Operator’s
Log in
Edit Protocol
Properties
Adding or editing protocols (Tools ► Edit Protocol
Descriptions, SaMSon Central)
Edit Receiver
Properties
Adding or editing receiver (Tools ► Edit Receiver Settings,
SaMSon Central)
Technical Data
Adding or editing technical data (Tools ►Technical Data,
SaMSon Monitor)
Edit Event Codes
Adding or editing event codes (Tools ► Edit Event Codes
Table, SaMSon Central)
Exit SaMSon Central
Exit from SaMSon Central (File ►Exit, SaMSon Central)
Change Status
Changing open/close status of accounts (Account ► Change
Status, SaMSon Monitor)
Hide Undefined Event
Hide/unhide undefined events (Event Monitor ► Hide
Undefined Events, SaMSon Monitor)
Un-restored Event
Restore of un-restored events (Account ►Un-restored Event,
SaMSon Monitor)
Transfers unprocessed events from one operator to another
(File ► Events Exchange, SaMSon Monitor)
Events Exchange
Exit SaMSon Monitor
SaMSon Security Monitoring Software
Exit from SaMSon Monitor (File ►Exit, SaMSon Monitor)
Page 172
24/12/03
8.5
Internal Event Messages
Following is a description of the SaMSon Internal Event Messages. This kind
of messages are generated automatically by SaMSon based on customer
account card definitions.
Table 8-5: SaMSon Internal Event Messages
EVENT CODE DESCRIPTION
ETC
Early Close
ETO
Early Open
LTC
Late Close
LTO
Late Open
MCL
Manual Close
MOP
Manual Open
SaMSon Security Monitoring Software
EXPLANATION
If a schedule follow-up is defined on the
account card, any Close that arrives
before the predefined Close time
(including deviations) triggers this
internal event.
This internal message is generated only if
the regular close event is of the Close
type.
If a schedule follow-up is defined on the
account card, any Open that arrives
before the predefined Open time
(including deviations) triggers this
internal event.
This internal message is generated only if
the regular open event is of the Open
type.
If a schedule follow-up is defined on the
account card, any Close that arrives after
the predefined Close time (including
deviations) triggers this internal event.
This internal message is generated only if
the regular close event is of the Close
type.
If a schedule follow-up is defined on the
account card, any Open that arrives after
the predefined Open time (including
deviations) triggers this internal event.
This internal message is generated only if
the regular open event is of the Open
type.
This internal message is generated
whenever the operator changes the
customer account status to Close in the
Change Status menu.
This internal message is generated
whenever the operator changes the
customer account status to Open in the
Change Status menu.
Page 173
24/12/03
EVENT CODE DESCRIPTION
NYC
Not Yet Closed
NYO
Not Yet Open
OAC
Open After Closing
FRA
Frozen Account
MRS
Manual Restore
NOR
No Restore
NOT
No Test
TSM
Test Mode
SaMSon Security Monitoring Software
EXPLANATION
This internal event is triggered when a
schedule follow-up is defined on the
account card, if the close event does not
arrive according to schedule (including
deviations).
This internal message is generated only if
the regular open event is of the Close
type.
This internal event is triggered when a
schedule follow-up is defined on the
account card, if the open event does not
arrive according to schedule (including
deviations).
This internal message is generated only if
the regular open event is of the Open
type.
This internal event is triggered when a
schedule follow-up is defined on the
account card, if an open event arrives
after the last close time defined for this
day (including deviations).
This internal message is generated only if
the regular open event is of the Open
type.
Every event that arrives from a customer
defined as “Frozen” (in the Freeze
Account menu) automatically arrives as
this event, irrespective of the actual event.
This internal event is generated whenever
the operator performs a manual Alarm
Restore (in the Un-Restored Event menu).
This internal event is generated when an
expected restore does not arrive and when
a Waiting for Restore is defined on the
account card (in the Zone/User part).
This internal message is generated only if
the event to be restored is of the Alarm
type, and the expected restore is of the
Alarm Restore type.
This internal event is generated if no
event is received during a defined period,
when a Periodic Test follow-up is defined
on the account card (in the Status Details
section).
Every event that arrives from a customer
defined as “Test Mode” (in the
Miscellaneous part of the account card)
automatically arrives as this event,
irrespective of the actual event.
Page 174
24/12/03
EVENT CODE DESCRIPTION
UNA
Undefined Account
UNS
Undefined Signal
UNZ
Unknown Zone/User
SaMSon Security Monitoring Software
EXPLANATION
Any event that arrives from an unknown
customer (for whom no account card is
defined).
Any event that arrives from a customer
for whom no Received Code is defined
(in SaMSon Central in the Protocols
Descriptions menu, or in the Special Code
part, if required, of the account card).
Any event that arrives from a customer,
from a zone for which the Zone/User
number is not defined (in the Zone/User
part of the account card).
Page 175
24/12/03
9
Index
A
About SaMSon, 9
Features, 12, 13
SaMSon Central, 10
SaMSon Monitor, 11
SaMSon User Manual, 15
Account Administration
Features, 13
Account Card
Account Management, 72
Action Log, 88
Approach Path, 93
Change Status, 105
Complete, 74
Create, 72
Disable, 96
Edit, 96
False Alarm Follow-up, 81
Freeze, 97
Graphics, 91
Mailing Fields, 80
Manual Restore, 106
Misc, 80
Notes, 79
Open, 103
Phone, 77
Restore Function, 90
Save, 95, 103
Schedule, 82, 84
Schedule Priorities, 86
Special Code, 94
Special Schedule, 85
Test Mode, 80
Un-freeze, 97
Users, 89, 92
Using a Template, 74
Zone, 89
Account Details
Reports Generator, 123
Account Management
Account Card, 72
SaMSon Monitor, 103
Account Type
Add, 60
Delete, 60
General Definitions, 60
Action Aid
Add, 67
Delete, 67
General Definitions, 67
Action Log
Account Card, 88
Activate
False Alarm Follow-up, 81
False Alarm Identifier, 71
SaMSon Security Monitoring Software
Restore Function, 90
Schedule, 82
Add
Account Type, 60
Action Aid, 67
Approach Path, 93
Event Cause, 60, 62, 65, 66, 67,
71
Event Codes, 34
Global Phone List, 65
Global Phone Number, 78
Group, Equipment, 69
Holiday, 61
Mailing Address, 80
Operator Permission, 56
Part, Equipment, 69
Patrol Personnel, 66
Phone List Type, 62
Phone Number, 77
Protocol, 40
Received Codes, 40
Receiver Settings, 47
Schedule, 84, 85
Special Code, 94
Technical Data, 119
Users, 92
Zone, 89
Administration and Maintenance,
115
Daily Log File, 117
Data Management, 140
Event Exchange, 119
Help, 117, 143
Manual Dialing, 121
Manual Event, 120
Reporting, 121
Reports Generator, 121
Reports Viewer, 139
Reset of Operator’s Log in, 116
SaMSon Monitor, 118
Technical Data, 118
Alternative Hardware
Getting Started, 18
Hardware Installation, 18
Appendix, 147
Contacting KP, 146
Error Messages, 145
Event Codes, 148
Internal Messages, 154
Operator Permission, 153
Shortcut Keys, 147
Troubleshooting, 145
Approach Path
Account Card, 93
Add, 93
Audio Siren
Deactivating, 108
Page 176
24/12/03
Receiving an Event, 108
B
Backing Up Data
Data Management, 140
C
Change
Options, 63, 64
Priority Color Codes, 68
Siren, 64
Change Password
Operator Permission, 57
Change Status
Account Card, 105
Features, 14
Comments
Processing an Event, 109
Complete
Account Card, 74
Computer Hardware
Getting Started, 17
System Requirements, 17
Computer Shut Down, 144
Contacting KP
Appendix, 146
Create
Account Card, 72
Customer Account Details Section
Event Monitoring Window, 52
Features, 13
D
Daily Log File
Administration and Maintenance,
117
SaMSon Central, 117
Daily Operations, 99
Processing an Event, 108
Receiving an Event, 107
SaMSon Central, 100, 101
SaMSon Monitor Account
Management, 103
SaMSon Monitor Event
Management, 107
Data Management
Administration and Maintenance,
140
Backing Up Data, 140
Features, 14
Restoring Data, 142
SaMSon Monitor, 140
Delete
Account Type, 60
Action Aid, 67
Event Cause, 71
Event Codes, 35
SaMSon Security Monitoring Software
Global Phone List, 65
Holiday, 61
Operator Permission, 58
Patrol Personnel, 66
Phone List Type, 62
Phone Number, 77
Protocol, 42
Received Codes, 42
Receiver Settings, 47
Schedule, 84, 86
Special Code, 94
Technical Data, 119
Users, 92
Zone, 89
Deviation
Schedule, Account Card, 83
Set, 83
Dialing
Features, 14
Disable
Account Card, 96
Part, Equipment, 70
Disable Accounts
Features, 14
Disabled Account Details
Reports Generator, 125
E
Edit
Account Card, 96
Event Codes, 35
Holiday, 61
Operator Permission, 57
Part, Equipment, 70
Protocol, 41
Received Codes, 41
Receiver Settings, 47
Equipment
General Definitions, 69
Error Messages
Appendix, 145
Troubleshooting, 145
Event Cause
Add, 60, 62, 65, 66, 67, 71
Delete, 71
General Definitions, 71
Event Codes
Add, 34
Appendix, 148
Delete, 35
Edit, 35
Features, 12
Reports Generator, 137
SaMSon Central, 32
Setup Procedures, 32
Event Codes Window
Exit, 36
Event Exchange
Page 177
24/12/03
Administration and Maintenance,
119
SaMSon Monitor, 119
Event Management
Processing an Event, 108
Receiving an Event, 107
SaMSon Monitor, 107
Event Monitoring
Features, 13
Main Window. See Event
Monitoring Window
SaMSon Monitor, 50
Event Monitoring Window
Customer Account Details Section,
52
Events on Hold for Operator
Section, 54
Incoming Events Section, 52
Events on Hold for Operator
Event Monitoring Window, 54
Features, 13
Processing an Event, 112
Exit
Event Codes Window, 36
Operator Permission, 58
Protocol Properties, 42
Received Codes, 42
Receiver Properties Window, 47
SaMSon Central, 117
SaMSon Monitor, 98, 143
F
False Alarm Follow-up
Account Card, 81
Activate, 81
Features, 14
False Alarm Identifier
Activate, 71
General Definitions, 71
Features
About SaMSon, 12, 13
Account Administration, 13
Change Status, 14
Customer Account Details Section,
13
Data Management, 14
Dialing, 14
Disable Accounts, 14
Event Codes, 12
Event Monitoring, 13
Events on Hold for Operator, 13
False Alarm Follow-up, 14
Freezing Accounts, 14
General Definitions, 13
Heartbeat Protocol, 12
Help Menu, 13, 14
Incoming Events Section, 13
Internal Protocol, 12
Log Files, 13
SaMSon Security Monitoring Software
Main Protocol, 12
Manual Event, 14
Offline, 14
Periodic Test, 14
Protocol Properties, 12
Received Codes, 12
Receiver Settings, 12
Reporting, 14
Restore Function, 14
SaMSon, 12
SaMSon Central, 12
SaMSon Monitor, 13
Scheduling, 14
Secured Access, 12, 13
System Maintenance, 12, 14
Test Mode, 14
Finalizing Setup Procedures
SaMSon Central, 48
SaMSon Monitor, 98
First Time Setup
Getting Started, 25
Hardware Key, 25
Server Name, 26
For All Day Events
Schedule, 85
Freeze
Account Card, 97
Freezing Accounts
Features, 14
G
General Definitions
Account Type, 60
Action Aid, 67
Equipment, 69
Event Cause, 71
False Alarm Identifier, 71
Features, 13
Global Phone List, 65
Holiday, 61
Options, 63
Patrol Personnel, 66
Phone List Type, 62
Priority Color Codes, 68
Reports Generator, 134
SaMSon Monitor, 58
Setup Procedures, 58
Siren, 64
Getting Started, 16
Alternative Hardware, 18
Computer Hardware, 17
First Time Setup, 25
Hardware Installation, 18
Installing SaMSon, 19
Installing the Applications, 21
KP Hardware, 18
Navigating the Installation CD, 20
Receiver, 17
Software, 17
Page 178
24/12/03
Global Phone List
Add, 65
Delete, 65
General Definitions, 65
Global Phone Number
Add, 78
Graphics
Account Card, 91
Group, Equipment
Add, 69
Remove, 69
H
Hardware Installation
Alternative Hardware, 18
Getting Started, 18
KP Hardware, 18
Hardware Key
First Time Setup, 25
Hardware Parameters
SaMSon Central, 31
Setup Procedures, 31
Heartbeat. See Heartbeat Protocol
Heartbeat Protocol
Features, 12
Help
Administration and Maintenance,
117, 143
SaMSon Central, 117
SaMSon Monitor, 143
Help Menu
Features, 13, 14
Holiday
Add, 61
Delete, 61
Edit, 61
General Definitions, 61
I
Incoming Events Section
Event Monitoring Window, 52
Features, 13
Installation. See Installing SaMSon
Installation for a Network
Installing SaMSon, 24
Installation for Stand Alone
Installing SaMSon, 23
Installing SaMSon
Getting Started, 19
Installation for a Network, 24
Installation for Stand Alone, 23
Installing the Applications, 21
Navigating the Installation CD, 20
Network, 19
Stand Alone, 19
Installing the Applications
Getting Started, 21
Installing SaMSon, 21
SaMSon Security Monitoring Software
Internal Messages
Appendix, 154
Internal Protocol
Features, 12
K
KP
Notice, 2
Products, 2
KP Eelectronic Systems Ltd. See
KP
KP Film
SaMSon Installation CD, 21
KP Hardware
Getting Started, 18
Hardware Installation, 18
KP Website
SaMSon Installation CD, 21
L
Lite Statistics
Reports Generator, 131
Log Files
Features, 13
Login
SaMSon Central, 30
SaMSon Monitor, 49
Logout
SaMSon Central, 48
M
Mailing Address
Add, 80
Mailing Fields
Account Card, 80
Main Protocol
Features, 12
Manual Dialing
Administration and Maintenance,
121
SaMSon Monitor, 121
Manual Event
Administration and Maintenance,
120
Features, 14
SaMSon Monitor, 120
Manual Restore
Account Card, 106
Menu Bar
SaMSon Monitor, 51
Misc
Account Card, 80
N
Navigating
Reports Viewer, 139
Page 179
24/12/03
Navigating the Installation CD
Getting Started, 20
Installing SaMSon, 20
Network
Installing SaMSon, 19
New Event Indicator
Deactivate, 108
Receiving an Event, 108
SaMSon Monitor, 52
Notes
Account Card, 79
Notice
KP, 2
O
Offline
Features, 14
Open
Account Card, 103
Open/Closed Time Statistics
Reports Generator, 132
Operator Permission
Add, 56
Appendix, 153
Change Password, 57
Delete, 58
Edit, 57
Exit, 58
SaMSon Monitor, 55
Setup Procedures, 55
Operators
Reports Generator, 126
Options
Change, 63, 64
General Definitions, 63
P
Part, Equipment
Add, 69
Disable, 70
Edit, 70
Remove, 70
Patrol Personnel
Add, 66
Delete, 66
General Definitions, 66
Periodic Test
Features, 14
Phone
Account Card, 77
Phone List Type
Add, 62
Delete, 62
General Definitions, 62
Phone Number
Add, 77
Delete, 77
Priority Color Codes
SaMSon Security Monitoring Software
Change, 68
General Definitions, 68
Processing an Event
Comments, 109
Daily Operations, 108
Event Management, 108
Events on Hold for Operator, 112
Save, 112
Protocol
Add, 40
Delete, 42
Edit, 41
Protocol Descriptions
Reports Generator, 136
Protocol Properties
Exit, 42
Features, 12
SaMSon Central, 36
Setup Procedures, 36
Q
Quick Log
Save, 113
R
Received Codes
Add, 40
Delete, 42
Edit, 41
Exit, 42
Features, 12
SaMSon Central, 36
Setup Procedures, 36
Receiver
Getting Started, 17
System Requirements, 17
Receiver Properties Window
Exit, 47
Receiver Settings
Add, 47
Delete, 47
Edit, 47
Features, 12
Reports Generator, 135
SaMSon Central, 43
Setup Procedures, 43
Receiving an Event
Audio Siren, 108
Daily Operations, 107
Event Management, 107
New Event Indicator, 108
Remove
Group, Equipment, 69
Part, Equipment, 70
Reporting
Administration and Maintenance,
121
Features, 14
Page 180
24/12/03
Reports Generator, 121
SaMSon Monitor, 121
Reports Generator
Account Details, 123
Administration and Maintenance,
121
Disabled Account Details, 125
Event Codes, 137
General Definitions, 134
Lite Statistics, 131
Open/Closed Time Statistics, 132
Operators, 126
Protocol Descriptions, 136
Receiver Settings, 135
Reporting, 121
Statistics, 129
Unrestored Events, 133
Reports Viewer
Administration and Maintenance,
139
Reporting, 139
Reset of Operator’s Log in
Administration and Maintenance,
116
SaMSon Central, 116
Restore Function
Account Card, 90
Activate, 90
Features, 14
Restoring Data
Data Management, 142
S
SaMSon
Features, 12
SaMSon Central
About SaMSon, 10
Daily Log File, 117
Daily Operations, 100, 101
Event Codes, 32
Exit, 117
Features, 12
Finalizing Setup Procedures, 48
Hardware Parameters, 31
Help, 117
Login, 30
Logout, 48
Menu, 51
New Event Indicator, 52
Protocol Properties, 36
Received Codes, 36
Receiver Settings, 43
Reset of Operator’s Log in, 116
Setup Procedures, 29
Shortcut Task Bar, 51
Software Parameters, 31
Warning, 52
SaMSon Installation CD
KP Film, 21
SaMSon Security Monitoring Software
KP Website, 21
SaMSon Monitor
About SaMSon, 11
Account Management, 103
Administration and Maintenance,
118
Data Management, 140
Event Exchange, 119
Event Management, 107
Event Monitoring, 50
Exit, 98, 143
Features, 13
Finalizing Setup Procedures, 98
General Definitions, 58
Help, 143
Login, 49
Manual Dialing, 121
Manual Event, 120
Operator Permission, 55
Reporting, 121
Setup Procedures, 49
Shortcut Keys, 147
Software Messaging, 54
Technical Data, 118
SaMSon Monitor Account
Management
Daily Operations, 103
SaMSon Monitor Event
Management
Daily Operations, 107
SaMSon Security Monitoring
Software. See SaMSon
SaMSon User Manual
About SaMSon, 15
Save
Account Card, 95, 103
Processing an Event, 112
Quick Log, 113
Schedule
Account Card, 82, 84
Activate, 82
Add, 84, 85
Delete, 84, 86
For All Day Events, 85
Schedule Preparation, 87
Schedule Preparation
Schedule, 87
Schedule Priorities
Account Card, 86
Schedule, Account Card
Deviation, 83
Scheduling
Features, 14
Secured Access
Features, 12, 13
Server Name
First Time Setup, 26
Set
Deviation, 83
Setup Procedures, 28
Page 181
24/12/03
Event Codes, 32
General Definitions, 58
Hardware Parameters, 31
Operator Permission, 55
Protocol Properties, 36
Received Codes, 36
Receiver Settings, 43
SaMSon Central, 29
SaMSon Monitor, 49
Software Parameters, 31
Shortcut Keys
Appendix, 147
SaMSon Monitor, 147
Shortcut Task Bar
SaMSon Monitor, 51
Siren
Change, 64
General Definitions, 64
Software
Getting Started, 17
System Requirements, 17
Software Messaging
SaMSon Monitor, 54
Software Parameters
SaMSon Central, 31
Setup Procedures, 31
Sound Alarm. See Siren
Special Code
Account Card, 94
Add, 94
Delete, 94
Special Schedule
Account Card, 85
Stand Alone
Installing SaMSon, 19
Statistics
Reports Generator, 129
System Maintenance
Features, 12, 14
System Requirements
Computer Hardware, 17
Receiver, 17
Software, 17
SaMSon Security Monitoring Software
T
Technical Data
Add, 119
Administration and Maintenance,
118
Delete, 119
SaMSon Monitor, 118
Test Mode
Account Card, 80
Commence, 80
Features, 14
Troubleshooting
Appendix, 145
Error Messages, 145
U
Un-freeze
Account Card, 97
Unrestored Events
Reports Generator, 133
Users
Account Card, 89, 92
Add, 92
Delete, 92
Using a Template
Account Card, 74
W
Warning
SaMSon Monitor, 52
Z
Zone
Account Card, 89
Add, 89
Add graphics, 91
Delete, 89
Delete graphics, 91
Edit, 90
View graphics, 91
Page 182
24/12/03