1
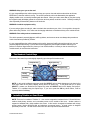
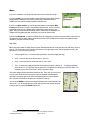
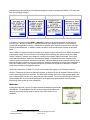
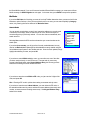
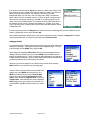
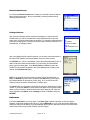
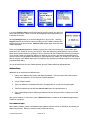
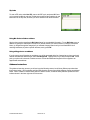
TeleNav v3.7.86
Auto GPS Navigation for Boost Mobile i285, i415, i455, 730, i830, and i860 Java/GPS
Phones
User’s Guide
©2003-5 Televigation, Inc. All rights reserved. TeleNav is a registered trademark of Televigation, Inc. Boost Mobile is a
registered trademark of Nextel Communications, Inc. Nextel is a registered trademark of Nextel Communications, Inc.
All other trademarks or registered trademarks are acknowledged as the exclusive property of their respective owners.
All rights reserved. No part of this manual may be reproduced, transmitted, copied, or stored in any storage medium, for any
purpose, without prior written consent from Televigation, Inc. Televigation, Inc. hereby grants the right to download one copy of
this manual onto a hard drive for personal use. This manual is copyrighted and contains proprietary information that is subject to
change without notice. For more information visit www.telenav.com.
© TELEVIGATION 2003-5
PAGE 1 OF 32
Table of Contents
1. Welcome................................................................................................................................ 5
2. Safety and Legal Notices ...................................................................................................... 5
3. The Handset Control Keys.................................................................................................... 6
4. Installing TeleNav on Your Phone ........................................................................................ 6
5. Access Permissions .............................................................................................................. 7
GPS Privacy ............................................................................................................................. 7
Auto Invocation Permissions ................................................................................................... 8
6. Using TeleNav ....................................................................................................................... 8
Launching the Application........................................................................................................ 8
Logging In ................................................................................................................................. 9
Initial Content Loading ...................................................................................................... 9
TeleNav Main Menu............................................................................................................... 10
GPS Tools .............................................................................................................................. 10
Compass ......................................................................................................................... 10
Mark waypoint ................................................................................................................. 11
View waypoint ................................................................................................................. 11
Maps ....................................................................................................................................... 12
Friend Finder .......................................................................................................................... 13
Find Friend(s) .................................................................................................................. 13
Where Am I...................................................................................................................... 14
Send GPS->Friend ......................................................................................................... 15
Send GPS->Website ...................................................................................................... 16
Block Requests ............................................................................................................... 16
Refresh Requests ........................................................................................................... 16
Edit Friend List................................................................................................................. 16
Locator Help .................................................................................................................... 17
© TELEVIGATION 2003-5
PAGE 2 OF 32
GPS Navigation...................................................................................................................... 17
Driving Directions from a Different Origin ...................................................................... 18
GPS Origin Refinement .................................................................................................. 18
GPS Guidance ................................................................................................................ 18
Audible Messages........................................................................................................... 18
Miss a turn? ..................................................................................................................... 18
Biz Finder................................................................................................................................ 19
Search Point.................................................................................................................... 19
Category Search ............................................................................................................. 20
Business Name Search .................................................................................................. 21
Picking a Business .......................................................................................................... 21
Preferences ............................................................................................................................ 21
Address Entry......................................................................................................................... 22
Voice Address Input........................................................................................................ 22
Web address entry.......................................................................................................... 23
Address entry from the phone ........................................................................................ 24
Voice Call......................................................................................................................... 24
New City/State................................................................................................................. 24
Street Name Input........................................................................................................... 25
Address validation........................................................................................................... 25
Using an Airport as an address ...................................................................................... 25
Zip Code .......................................................................................................................... 26
Using Biz finder to find an address................................................................................. 26
Using a Waypoint as an address ................................................................................... 26
Guidance Instructions ............................................................................................................ 26
Navigation guidance ....................................................................................................... 27
Non-GPS mode or Driving Directions ............................................................................ 28
Activity Messages................................................................................................................... 28
© TELEVIGATION 2003-5
PAGE 3 OF 32
Taking an Incoming Call ........................................................................................................ 28
7. Personalizing .......................................................................................................................28
8. Error Conditions...................................................................................................................29
Unable to reach server........................................................................................................... 29
TeleNav not available............................................................................................................. 29
GPS Access Restricted ......................................................................................................... 29
GPS Signal Weak .................................................................................................................. 29
Low battery ............................................................................................................................. 29
9. Exiting TeleNav ...................................................................................................................29
10. The TeleNav Web Site........................................................................................................30
Account Management............................................................................................................ 30
Personalization....................................................................................................................... 30
Preplanning............................................................................................................................. 30
Customer Service................................................................................................................... 30
11. FAQ’s ...................................................................................................................................30
12. Customer Support ...............................................................................................................32
13. TeleNav Services Warranty ................................................................................................32
© TELEVIGATION 2003-5
PAGE 4 OF 32
1. Welcome
TeleNav™ 3.7 utilizes the integration of GPS position determination technology, the Java™ programming
environment, and access to Boost Mobile’s packet data network that are all built-in to the Motorola i710, i730, i733,
i736, and i830 mobile phones. TeleNav 3 .7 offers basic free services, and one level of enhanced paid subscription
services.
The free services (GPS Tools) include:
1.
A compass-like indicator presenting your direction of travel, location, and speed.
2.
The ability to mark your current location as a waypoint that you can label.
3.
A viewer that allows you to see your current location relative to a selected waypoint, and to navigate
relative to that selected waypoint.
None of these basic GPS services require you to have Boost Mobile packet data service. They all operate solely
within the mobile phone itself.
The paid TeleNav GPS services include all basic services and the additional services noted below:
1. GPS navigation than punctually guides you turn-by-turn to any destination address in the Continental
US. If you miss a turn or get off-track, TeleNav will calculate a new route for you. You can enter one or
more destination addresses by calling an automatic voice recognition system, entering them on the
TeleNav website, or keying them directly into the phone. Optionally, the user can input a remote origin
and receive Driving Directions from that origin address to a selected destination address.
2. A Biz Finder look up feature that allows you to find businesses or points of interest near your current
location, around a waypoint, around an entered address, or around an airport. You can call the
business first to check availability of an item, or get a reservation, and then navigate to it; or you can
save the address for use later in the day.
3. Maps of the area around your current location; a marked waypoint; or an address you enter manually,
or have previously entered. You can pan (adjust left/right or up/down) the map, or zoom in or out. You
can also mark a point under the cursor as a waypoint.
4. A suite of Locator functions that allow you to: a) see your current location as an approximate street
address rather than latitude and longitude; b) send your location to a friend; c) request and receive the
locations of one or more friends and d) send your location to the TeleNav website so someone with
the access control PIN you provide can find you.
TeleNav’s servers support each of these services via the Boost Mobile packet data network.
2. Safety and Legal Notices
Please read this section carefully before using TeleNav
Televigation will not accept any responsibility whatsoever for accidents resulting from failure to observe common
sense precautions. Your personal judgment, traffic regulations, and common sense must always take precedence
over any driving direction produced by TeleNav.
© TELEVIGATION 2003-5
PAGE 5 OF 32
WARNING: Keep your eyes on the road.
It is your responsibility as the vehicle operator to keep your eyes on the road and be an alert driver at all times,
ESPECIALLY when the vehicle is moving. The vehicle operator should not be distracted by the application
displays, audible cues, or manually interacting with the controls. When you need to enter data on your phone using
the keypad or study the display, please do so while the vehicle is parked, not while in motion. Should your ability to
drive responsibly be decreased, please turn off the device.
WARNING: Install the equipment safely.
If you are using a phone mounting kit, make sure that it does not obscure your vision. You may wish to charge the
phone while using TeleNav. If so, make sure the charging cable does not interfere with any of the vehicle controls.
WARNING: Drive safely and use common sense.
The vehicle operator’s personal judgment, traffic regulations, and common sense must always take precedence
over the instructions provided by TeleNav.
It is your responsibility as the vehicle operator to drive safely, observe all traffic rules and above all use your own
personal judgment while driving. If you feel that a route suggested by the navigation software instructs you to
perform an unsafe or illegal maneuver, places you in an unsafe situation, or routes you into an area which you
consider unsafe, do not follow the instructions.
3. The Handset Control Keys
Placement of the control keys varies slightly depending upon the specific handset model.
Left Option Key
Right Option Key
4-way Navigation Key
Menu Key
OK Key
End/Home Key
Send Key
NOTE: In this guide, boldfaced upper-case words like SELECT refer to labels that appear in the lower left or
lower right corner of the phone’s display directly above an Option Key. If this guide asks you to press
SELECT, it means you should find the Option Key below the SELECT label on the display, and press it.
TeleNav 3.7 is operated using the Option Keys. If you are to press the OK key shown above, it will be
expressly called the OK key.
4. Installing TeleNav on Your Phone
NOTE: There are four variants of TeleNav 3.7. One version is targeted to handsets like the i730 and i830 have
medium sized primary screens, and a secondary screen on the outside of the cover. Another version is
targeted to handsets with a single medium size screen. A third version is targeted to handsets with a large
primary screen, like the i850 and i860, and also have an external screen. A fourth version is designed
specifically for the i285. The i285 version does NOT have the map features described herein.
© TELEVIGATION 2003-5
PAGE 6 OF 32
Follow these steps to download the TeleNav program to your phone:
a) Launch the WAP browser on your phone. To do this, press the MENU key and then highlight the WEB
entry, and press the OK button.
b) Select 'Downloads & Services'
c) Select 'Application - download'
d) Select 'Browse' or 'Search' to find TeleNav
e) Go to the app detail screen and follow through with a purchase
f)
Exit the WAP browser by holding down the MENU key, and selecting EXIT BROWSER
g) From the main screen, press the MENU key
h) Select 'Java Apps' from the menu
i)
Select 'Download' or 'Download Apps'
j)
Select 'New Purchases'
k) Find TeleNav 3.7 and then click on 'Get it'
l)
Wait while TeleNav downloads to your phone. This may take 1 to 2 minutes.
m) Once TeleNav is downloaded, you will see a screen with further instructions. Please read the instructions
carefully, and then press EXIT.
Follow these steps to install the TeleNav Java program:
a) From the main screen, press the MENU key, scroll down until Java Apps is highlighted and press the OK
key, or the Option key labeled “Select”. This opens the Java Apps folder.
b) Highlight TeleNav 3.7 and press the OK key or the Option key labeled “Install” to start software
installation.
c) As the TeleNav software installs, a check mark appears to the left of each row on the display. When
installation is complete, press DONE and you will be taken back to the main Menu.
If during the installation process the phone reports that it does not have enough space to install TeleNav, you
may have to remove one of the other Java programs to create space for TeleNav. You can remove any
program except Java System.
NOTE: If you accidentally remove Java System, you must take your phone to a Boost Mobile service center to
have the software reinstalled!
To remove a program, highlight the program you want to uninstall, press the Menu key, highlight Deinstall (or
Remove) and press the OK key or the Option key labeled “Select” to remove the program. You will be asked
to confirm the removal. Follow the steps on the screen until the program has been removed then perform the
above steps.
5. Access Permissions
GPS Privacy
Your phone restricts access to its GPS location data. The phone’s GPS receiver can be in one of three modes: 1)
Restricted, 2) Unrestricted or 3) By Permission. To allow TeleNav to access the GPS data may require changing
the Privacy Settings.
First, press the Menu key, highlight GPS (or the satellite icon) and press the OK key. (If you do not find it in the first
page of Menu items, select MORE to expose more menu entries). From the GPS menu, select Privacy, and press
the OK key, or the Option key labeled “Select”. In the Privacy menu, scroll down until Unrestricted or By
© TELEVIGATION 2003-5
PAGE 7 OF 32
Permission is highlighted, and press the OK key, or the Option key labeled “Select”. Then, press BACK twice to
return to the main screen. “Unrestricted” means that any application can access GPS data, and “By Permission”
means that only those applications you allow to do so can access GPS data. We recommend setting the control to
By Permission.
Second, if you set the Privacy control to By Permission, you have to grant the TeleNav application access to the
GPS data. This activity only occurs the first time you use TeleNav after changing the privacy setting to By
Permission.
1. To do this press the Menu key and then select Java Apps, and press the OK key or the Option key that
reads “Select”..
2. Once in the Java Apps menu highlight TeleNav 3.7 and press the OK key, or the Option key that reads
“Run”.
3. Because the phone has not tested the Privacy Settings for TeleNav before, it will challenge this action, and
ask if you want to grant permission. You should press GRANT. Then, it will ask you to chose from three
options, highlight ALWAYS, and press the OK key.
4. TeleNav will then auto-resume so that the handset system can present its request for Auto Invocation
permissions.
Future invocations of the TeleNav application only require you to press the Menu key, select Java Apps, highlight
TeleNav, and press the OK key. You may wish to use the Personalize feature of your phone to promote TeleNav
to one of the option keys as described in Section 9.
Auto Invocation Permissions
As explained above, TeleNav resumes after you deal with the GPS privacy issues, and will then ask you about
Auto Invocation permission. This feature allows TeleNav’s servers to awaken TeleNav even though it is turned off
so that it can report your location to a requestor to whom you have granted location access. If you want this
capability to work, you should GRANT this permission ALWAYS.
6. Using TeleNav
Launching the Application
To launch TeleNav on your phone: press the Menu key, scroll until Java Apps (or the Java Apps icon) is
highlighted, and press the OK key or the Option key that reads “Select”. In the Java Apps menu, highlight
TeleNav (or the TeleNav icon), and press the OK key or the Option key that reads “Run”. From this point on in
this guide, key presses refer to the Option Keys below the screen labels bearing the key functional names.
After starting TeleNav, the banner screen will appear for a few seconds. The first time TeleNav is used, the next
screens will explain what it is, and how to get signed up for TeleNav service.
© TELEVIGATION 2003-5
PAGE 8 OF 32
1
Logging In
During first use, you must agree to the TeleNav software license and terms of use by pressing YES.
NOTE: If after you press OK, the TeleNav application indicates that it cannot reach the TeleNav servers, the most
likely reason is that your Boost Mobile Data Access/Total Connect packet data service plan is not yet active. If the
application reaches the TeleNav servers, the server will cause your phone to store the account information so that
you will not need to enter it again.
NOTE: If your TeleNav account is expired, you will be notified at this point, and will be directed to go to
www.telenav.net to extend your service agreement. You will not be able to progress beyond this point until your
account is returned to current status. You may also see an important message from TeleNav regarding upgrades,
scheduled downtime, pending account expiration, etc.
Initial Content Loading
During your first time use of TeleNav subscription services, it will be necessary for
the handset to obtain the audible and graphical content needed to build the
displays and produce the audible messages you will hear. The following Alert
screen will advise you this is about to take place.
Press Done to start the content download and installation process.
From time to time, TeleNav may update this content, and will advise you
accordingly.
1
The Boost Mobile icon and “where you at” logo shown here is a service mark of Boost Mobile.
© TELEVIGATION 2003-5
PAGE 9 OF 32
TeleNav Main Menu
After the application launches, you will be taken to the TeleNav Home menu.
This menu packages the free basic services under GPS Tools. Except for
Preferences, the rest of the services require a TeleNav subscription, and Boost
Mobile Data Access/Total Connect packet data service. Highlight your choice,
and press OK.
You EXIT TeleNav from this menu screen. If you are elsewhere in the TeleNav
application, press BACK until you see this screen, or press MENU, and select
TeleNav Home to return to this screen. To avoid inadvertently leaving TeleNav,
you must confirm your desire to exit by pressing YES on the exit confirmation
screen.2
GPS Tools
None of the GPS Tools require Boost Mobile packet data service or a TeleNav
subscription. If you select GPS Tools from the main menu, you will be taken to
the GPS Tools submenu. You can make a choice by highlighting the item, and
pressing OK. Otherwise, press BACK to return to the main menu.
Compass
If you choose Compass, you will see a display similar to a nautical compass, but
more correctly it actually displays course over ground, the direction you are traveling
if you are moving. The screen also provides current latitude, longitude, and speed.
Using the main menu Preferences, you can select the format of the speed as miles
per hour or kilometers per hour. Press BACK to return to the GPS basic submenu.
If no GPS data is available, “No GPS” appears instead of latitude and longitude.
Otherwise, a GPS satellite count indicator occupies the area below the speed value.
Add three (3) to the number of bars shown to determine the number of satellites
being tracked by the GPS receiver. When the indicator shows that 7 satellites are
being tracked (which is good), the receiver may actually be tracking even more
(which is even better).
Marking a Waypoint. The left MARK Option Key allows you to mark a waypoint (as described below) directly from
the Compass view.
2
Color variations in the screen shots are due to the different emulators used.
© TELEVIGATION 2003-5
PAGE 10 OF 32
Mark waypoint
This menu option (also available from Compass view) allows you to mark and label
your current location for future reference. If you choose Mark waypoint, there will
be brief activity to determine the GPS position, and then you will need to enter a
label of at least 3 characters length, or you can accept the default label based on the
current date.
View waypoint
Selecting View waypoint allows you to see the spatial relationship of a selected waypoint relative to your current
location. If you have not marked any waypoints, you will simply get a message “No waypoints” and you should
press OK to return to the submenu. Otherwise, you will see a list of waypoint labels to pick from. After you pick
one, you will see the waypoint’s latitude and longitude. The next display teaches you the key functions that allow
you to manipulate the following screen that shows you the relationship of your current position to the waypoint. The
Smiley Face is your location, and the other end of the vector is the waypoint icon. The view is North oriented, and
the approximate distance to the waypoint is shown, along with your current speed and the GPS signal quality
indicator.
In the last display above, the waypoint is southwest of your current location. To see
its position relative to your current direction of travel (provided you are moving at
least 5 MPH), press NAV to produce the view to the right.
This example view shows that you are traveling toward the northeast, and the
selected waypoint (indicated by the green circle) is almost directly behind you in the
southwest direction. The display also shows your speed, and the distance to the
waypoint. The Navigate view updates as you move. Press View to return to the
prior screen. Press BACK to return to the submenu.
© TELEVIGATION 2003-5
PAGE 11 OF 32
Maps3
If you are a subscriber, you will get the map location menu shown to the right.
If you choose Here (your current location), there will be brief activity while TeleNav
employs GPS to determine your location, followed by a transaction with the
TeleNav server to retrieve the data needed to draw the map.
If you choose Enter address, you will be presented with a screen labeled Map
location that allows you to enter a new address, refresh the list, or pick a recently
used address from the list. Address entry is described in a later section of this
guide. After you have entered an address and the TeleNav server validates it, the
TeleNav server prepares the data needed for your phone to draw the map.
If you choose Waypoints, you will be provided with a list of waypoints you have previously marked, if there are any.
You select the one you want, and the coordinates are sent to the TeleNav server to that it can prepare the data
needed for your phone to draw the map.
Map View
Before the map is drawn, a helper screen is shown that describes how to move (pan) the map, and how to zoom in
and out. The current zoom level is shown as a fraction in the upper right corner of the map (shown as 4/9 in the
figure below). Here are the key functions –
•
4-way navigation key – moves the map up and down, and left and right (panning)
•
4 key – zooms in (this key is also the letter “I’, as in “In”)
•
6 key – zooms out (this key is also the letter “O’, as in “Out”)
•
The 2, 5, and 8 keys rapidly change the zoom level (the range is 1 through 9). To rapidly go between
levels, press 2, 5, or 8, and then one key press of 4 or 6 will take you exactly to the level you desire. For
example, to go to level 3 from level 7, press 2 and then 6 (Out).
The map is always oriented with North towards the top. Every time you move (pan)
or zoom, there will be brief server activity to fetch the updated map depicted by
animation in the upper right corner of the map replacing the zoom level indicator.
Give TeleNav 15 seconds to complete your request for a change.
You can press MARK to create a new waypoint based on the current position of the
map cursor. You can change the zoom level, and move the map around using the
4-way key prior to pushing the MARK Option Key.
3
This feature is not available on the i285 handset owing to the small size of its screen.
© TELEVIGATION 2003-5
PAGE 12 OF 32
Friend Finder
The Friend Finder allows you to share your location, and ask your friends for their
locations. You can:
a) Request the location of another TeleNav subscriber (who may or may not
agree to send it to you).
b) Ask the TeleNav server to convert the latitude and longitude you see on the
Compass view to a more conventional approximate street address.
c) Send your location to someone else via e-mail or the short messaging
service (SMS). This transmission may also be within the TeleNav service
allowing the recipient to drive to the sent address.
d) Post your location to the TeleNav servers so that someone else can go to
the TeleNav website to see where you are located.
e) Edit the list of friends you wish to locate.
f)
Block Requests for your location.
g) Refresh Requests to pull in any location requests that occurred while
TeleNav was not running.
h) Review the Requests History of TeleNav’s response to location requests
from others.
i)
See some Helpful information about these services.
Find Friend(s)
You can find “friends” who are also TeleNav subscribers, and have been listed in your local Friends list. After
selecting Find Friend, a coaching screen is presented. To select friends, highlight their names, and press the OK
key. Each time you press the OK key, the selection checkmark to the left of the name will change state. Use the
up/down Navigation key to scroll through the friends list. When done selecting a single or group of friends, press
FIND. After you press FIND, a timer screen appears allowing for up to 120 seconds for the request to be honored,
denied, or ignored. If your friends reply promptly, the transaction typically takes less than a minute. If they are not
responding, the transaction may take 2 minutes.
When a TeleNav subscriber attempts to determine the location of another subscriber using the Find Friend feature,
the recipient behavior depends upon whether or not the recipient has TeleNav, and if he has TeleNav which
version he has. This issue is resolved by the TeleNav servers’ knowledge of the installed product type. There is
© TELEVIGATION 2003-5
PAGE 13 OF 32
brief transaction activity before one of the following will appear, unless the recipient has TeleNav 3.7 in which case
there is no qualifying message.4
TeleNav 2.2
TeleNav 2.1 and 2.0
Expired TeleNav
No TeleNav
A TeleNav 2.2 recipient may either DENY or GRANT the request. If the request is granted, the requestor will
receive a reply. Similarly, a TeleNav 3.7 user may selectively Grant Always, Grant Once, or Deny a location
request while the application is running. This selection is recorded within an access control list that is part of the
Friends List described below. In addition, TeleNav can also be set to block all location requests as discussed
below.
Since TeleNav 3.7 registers itself with the handset’s push registry, location requests sent via UDP/IP can awaken it
to process the request. If the local access control settings for the requesting party were previously set to Grant
Always, TeleNav 3.7 awakens, gets a location fix, sends it to the requestor, and then terminates. If the access
control status is unknown or Grant Once, the awakened TeleNav 3.7 will wait for the user to select an access
control list option for 90 seconds, and then terminate itself. If the user allows the location request, a GPS fix will be
taken and sent to the requestor. If the user interacts with TeleNav in any fashion, the access control list selection is
sent to the TeleNav servers. If the requestor was previously denied or all requestors are blocked, the TeleNav
server does not bother to interrogate the handset.
The access control list for a TeleNav 3.7 account can be managed by logging into the TeleNav.net website.
When the TeleNav server has accumulated the responses, or lack thereof, from all requested TeleNav accounts, it
sends a status report back to the requestor This status report includes: a) the name of the requested party, b) the
type of response (GPS, cell site, none), and c) the time of the response. The user can then highlight a response to
get more details such as: a) the latitude and longitude, b) the approximate street address, and c) the relative
temporal age of the location fix of the located party.
Where Am I
Invoking this feature lets you know your approximate street address and the latitude
and longitude. The street address may be a numbered approximate address, the
names of the nearest crossing streets, or just the name of the street if it is not
numbered.
4
The content of these server-generated messages may change at Televigation’s discretion.
© TELEVIGATION 2003-5
PAGE 14 OF 32
Send GPS->Friend
You can send your location to: a) a phone number via SMS provided you know the
wireless carrier, b) an e-mail address, or c) a friend from the friends list. A few of the
most recently used recipient addresses are retained for easy reference. The format
of the location message is described below under Message Format.
To an E-mail - If you choose to send to an e-mail address, you can pick a domain name from one of the major
domains like AOL or MSN, but otherwise, you should select “Enter e-mail in full”. After you make a domain choice,
you enter only that part of the e-mail that precedes the “@” symbol when asked to provide the e-mail account
name. If the recipient’s domain name is not in the list, you will need to enter the complete e-mail address. To
change between alpha, numeric, and symbol input modes, press the Menu key, make a mode selection, and then
key in the characters. You may have to change modes several times to handle numbers, letters, special
characters, and punctuation symbols.
To a Phone – If you choose to use SMS to send your location, first you must select the recipient’s wireless carrier
from a list. Then you provide the phone number. Note that the first carrier listed is TeleNav! If you send your
location to a TeleNav subscriber, the receiving subscriber can use the address you send by saving it as a labeled
waypoint.
To a Friend – If you choose to send your location to a friend who is also a TeleNav subscriber, you simply select
the name of the friend from the local friends list, and press OK.
After you select a routing method for the location report, TeleNav attempts to determine your GPS location for
about 40 seconds. If this fails due to weak GPS signal strength, TeleNav will attempt to use cell site reference
information to determine your approximate location.
Transmission Confirmation – After the address has been input and you press OK, a message stating, “TeleNav
sent your GPS (cell cite) location to <address>. Thanks!”, will appear. Here <address> is either an e-mail or an
SMS address; or a friend’s name. Note that this confirmation does not imply that the recipient has received the
message.
Message Format – The messages sent via SMS or e-mail have the same content:
From: TeleNav_Admin
Subj: Alert
[FR:] <name> @ <m_address>
[MSG:] [GPS] <p_address>
lat: <latitude> lon: <longitude>
<time> <date>
Here, <name> is the first name of the TeleNav account holder (if available), and <m_address> is his phone
number. The <p_address> is the approximate address of the sender determined by looking up the street address
closest to the latitude and longitude produced by the [GPS receiver] or using [Cell site] information. The latitude
and longitude are the values produced by the [GPS receiver] or using [Cell site] information.
© TELEVIGATION 2003-5
PAGE 15 OF 32
Send GPS->Website
This feature allows you to send your current GPS location to the TeleNav.net
website so that another person can use the website to determine where you are.
After you select this feature, you key in a one-time use, 4 digit access control PIN.
After you enter the PIN and press OK, you will see the server confirmation that
includes the street address you’re near.
You tell your assisting party to go to www.telenav.net/sos on the Internet, and enter
your Boost Mobile mobile phone number and the PIN you have just created. They will
see the information presented on the right.
Note: Your prior location is overwritten each time you use this function.
Note: The graphic on the right is vertically extended to show the screen content.
Your current
location is:
<street address>
<city, state>
lat: 33.41231
lon: -78.9121
Tell your assisting
party to go to www.
telenav.net/sos
and enter <PIN> for
your location.
OK
Block Requests
Block Requests applies to ALL requests for your location. After selecting this option,
you decide to answer Yes or No.
Refresh Requests
When another TeleNav user requests your location, you will receive a location request message via SMS. This
way, even though TeleNav is not running, you will be aware that someone else would like to know where you are.
You then invoke the TeleNav application on your phone, go to Locator, select Refresh, and press OK. TeleNav
will then query the TeleNav servers to get the details of the location requests
Edit Friend List
Before you can Find Friend, you must add the friend’s name and phone number to the local friend list. You can
type in a friend’s name and phone number or get the information from your handset’s Contacts list of mobile phone
numbers.5
5
TeleNav only looks for mobile numbers in the Contacts list. If there are none, an advisory screen is presented.
© TELEVIGATION 2003-5
PAGE 16 OF 32
The Update Friend feature allows the user to employ the editor for correcting the spelling of the friend’s name, or
updating his phone number. Delete Friend presents the local list of friends so they can be selectively deleted.
Locator Help
Invoking the Help screen will provide a brief description of the services described above. To see the whole
description, use the 4-way Navigation Key up and down keys.
GPS Navigation
The GPS Navigation feature allows to get real-time navigation guidance from your
current GPS location (origin) to a destination address you select from the list of
existing destination addresses on your handset, or a newly input address. You can
also use this feature to get Driving Directions from a different origin to a selected
destination.
You pick New Address to enter a new destination (or origin if you are using the
Driving Directions feature). The options for address entry are a) voice call, b)
entering a city/state and the remainder of the address from the keypad, c) entering a
Zip code and the remainder of the address from the keypad, d) selecting an airport
by its 3-letter code or location, e) or using the Biz Finder to look up an address. This
is described more completely in a later section of this guide.
If you have defined your home or work address, they will be shown prefixed with “H:” and “W:” respectively. Log
into the TeleNav.net website to set or change these addresses, or use the Voice Address Input system as
discussed later in this guide. Below your home and work addresses is a list of the (up to) 10 most recently entered
or used addresses.
Use Refresh List to get addresses entered telephonically or via the TeleNav.net website. Only the website can be
used to remove addresses from this list. Newer addresses replace older addresses during normal use.
You can also use a previously marked Waypoint as a destination address.
After you input or select your destination address, you will
see an address confirmation screen showing the
destination address and routing type that allows you to
BACK up if you picked the wrong address.
The CHANGE option allows you to use a different routing
type than is specified in the Preferences. If you do not
want to change the routing type, simply wait for the timer
to finish, or press the OK key.
© TELEVIGATION 2003-5
PAGE 17 OF 32
Driving Directions from a Different Origin
After you select or enter a destination address, TeleNav attempts to determine your location using the GPS
receiver. During the brief period of GPS acquisition, you can press the lower left NONGPS Option Key to enter the
Driving Directions submode. After you press NONGPS, you enter the Origin address for the Driving Directions
using the same options as were available to you while entering or picking the destination address.
GPS Origin Refinement
If are using GPS Navigation and you are in a parking lot or similar area where your
location does not exactly map to a specific street, you may see a screen that says:
If you are not on the suggested street, press CHNGE and pick the street you are on
from the displayed list. Otherwise, press OK, or just wait for the timer to count down.
I found you on Cooper Drive
< 5 secs >
OK
CHNGE
NOTE: If you are not sure of the street you’re on, simply select the first street in the list, and start driving. TeleNav
will revise its estimate of your location, and provide you with a new route if needed.
GPS Guidance
Within a few seconds, TeleNav will contact the TeleNav server, obtain an optimal route to your destination, and
display the first instruction telling you how to start your trip from your current location.
NOTE: Unless you are moving, TeleNav will not be aware of your direction of travel. If this is the case, the first few
guidance instructions may be incorrect. However, once you start moving, TeleNav will learn your direction of travel
and provide a corrected set of guidance instructions.
Next you will see the first of the guidance displays that will direct you to your destination. These displays are
described below under Guidance Displays.
Audible Messages
TeleNav delivers one or two audible guidance messages as you approach a turn or junction. The preparatory
message will be heard no less than 30 seconds before you reach the turn, and the action message will be heard no
less than 10 seconds before you reach the turn. The preparatory message may not be heard if the distance to go
only allows time for the action message. The lead-time for these messages is increased proportionally to your
driving speed to allow more time for changing lanes on freeways than on surface streets. Visit the TeleNav website
to turn audible street names on or off.
What’s Next
If you wish to hear the action message for the current route segment without waiting, simply press the Green Send
Key. We call this the “what’s next” feature.
Miss a turn?
Whenever you miss a turn, turn the wrong way, turn too early or too late, or otherwise get off the planned route to
your destination, TeleNav will automatically create a new route to your desired destination, audibly announce, “New
Route”, and give you a new set of instructions. If you realize you have gotten off the route, just keeping going.
TeleNav will detect your “departure” and calculate a new route to get you back on track.
Please note that it takes about 15 seconds for TeleNav to update your route. If during this process you also make
adjustments, TeleNav will probably have to contact its servers for another new route. Rerouting uses substantial
network bandwidth, so it is advisable for you to try to stay on the route. Since TeleNav GPS Navigation requires
© TELEVIGATION 2003-5
PAGE 18 OF 32
the Boost Mobile network, if you are off route and outside of Boost Mobile coverage, you must return to Boost
Mobile coverage for GPS Navigation to work again. In the mean time, press BACK to suspend its operation.
Biz Finder
If you select Biz finder, the first thing you must do is to help TeleNav determine where you want to look for the
business or point of interest. Once you have picked a point or an area, you can search topically by Category
name, or by entering the first few letters of the Business Name.
Search Point
You can search around where you are (Here), around an address you recently used
or entered (a recent stop), within a named city or ZIP code, around an airport, or
around a waypoint you previously marked. You can also enter a new address, and
search around it.
Selecting Here causes the GPS receiver to determine your current location as the
search point.
If you select A recent stop, you will get a list of recently used addresses, but may
need to use Refresh list to update the list with addresses recently entered using the
Voice Address Input System or the TeleNav web site. Once the list is updated, simply
highlight the address you want, and press OK.
If you select to search Within a city by name, you can either use one of the cities
you have used previously, or enter a new one. The state and city name entry
process is described below under Keypad Address Entry, but the entry process
ends before collecting the street name and number.
If you select to search an area Within a ZIP code, you just enter the 5 digits of the
code, and press OK.
Hint – Entering a ZIP code is quicker than entering a new state and city name.
If you select to search around a New Address, you enter either the ZIP code, or
the state abbreviation and city name; and then the street address (street name and
number, or street name and crossing street name). See Keypad Address Entry
below for the details.
© TELEVIGATION 2003-5
PAGE 19 OF 32
Search point
Here
A recent stop
Within a city
Within a ZIP
New Address
Airport
Waypoint
OK
BACK
If you select to search around an Airport, you enter the 3-letter airport code, the first
three letters of the city or market name where the airport is located, or the first three
letters of the airport’s given name. For example, to find John F. Kennedy
International Airport, you can enter “JFK”, the airport code; “NEW”, the first three
letters of New York City, the market it serves; or “KEN”, the prefix of its given name.
After you have entered your search key, press OK. If you enter the prefix of a city
name, you may find multiple matches. For example, entering “NEW” will produce a
list of airports in New York City, Newark, New Orleans, etc. Similarly, if you enter
“DUL” in the name field, you will be able to locate Dulles International Airport outside
of Washington, DC.
If you choose to search around a Waypoint, you will see a list of the named waypoints you have marked to record
location. Highlight the one you want, and press OK.
After you have specified the search point or area, you are offered the choice to search the Categories that TeleNav
uses to group businesses, or using the first few letters of the Business name.
Category Search
If you select categories, TeleNav will contact its servers to get the current category list,
updating it if necessary. The category list spans several displayed pages. To move
to the next page, find the MORE entry, and press OK.
Some categories, particularly Restaurants, will have many subcategories that are
displayed similarly, and will require you to select MORE and press OK to continue
through the subcategory list. The list of categories and subcategories may change as
TeleNav updates the directory. After you have drilled down through the category tree,
you will be presented a list of matching business names.
Whenever you are a few pages into a list like the above screen shows, pressing
BACK will allow you to go back to the preceding page.
However, when you have reached a certain depth in the
category tree, using BACK becomes laborious, so a
MENU is provided to allow you to go One Step Back,
change your search strategy (Biz Categories or Biz
Name), search elsewhere (Chg Search Pt), or return to
TeleNav Home. Note that when this menu is displayed,
BACK simply returns you to where you were when you
pressed MENU, and OK commits the action you want to
take.
© TELEVIGATION 2003-5
PAGE 20 OF 32
Business Name Search
If you select the Business name search method, you will need to enter the first few
letters of the business name. After you press OK, you will be presented a list of
matching business names.
Picking a Business
After you have selected a specific lowest level subcategory, or entered part of a
business name, you will be presented with a list of businesses that are near the
search point, or within the search area you specified. For searches conducted around
a point, the mileage (as the crow flies) from the point to the business is included. For
area searches, no mileage is shown.
Barbecue
KALS BARBECUE 1.36
mi
EL CAMINO
MONGOLIAN BBQ
2.33 mi
DAE SUNG BBQ 2.23
mi
BACK
OK
After you highlight and pick a specific business, you will see a screen that shows: a)
the name of the business, b) the street address, and c) the phone number.
The OPTIONs are: 1) drive to the address, 2) save the business address for later, 3)
obtain a map around the business location, or 4) call it using your Boost Mobile
phone (requires a calling plan). If you Save for later, the address is sent to the
TeleNav servers so that it will appear in the recent addresses list, but first you will
need to use the Refresh list feature.
NOTE: If you enter Biz Finder from another function such as GPS Navigation, or
Maps, the OPTION key shown above is replaced with OK allowing you to employ
the business address for the function you are using. So, if you need to use Biz
Finder to make a call, enter it directly from the TeleNav menu.
The Call it feature is only present in the options list if the prior display shows a phone
number. If you choose Call it, the phone number will appear on your phone’s calling
screen, and you will have to press the Green Send key to place the call. When the
call is completed, press Menu, select Java Apps to return to TeleNav, and press
RESUME.
Preferences
If you select Preferences, you can change; 1) the Route Type to fastest or shortest, or using or avoiding
highways; 2) adjust the speaker audio volume; 3) turn the Backlight on or off; 4) pick the number dialed when
using Voice Call to set an address; 5) set the displayed distance units to either feet and miles or kilometers and
meters; and 6) find out how to reach TeleNav customer support.
© TELEVIGATION 2003-5
PAGE 21 OF 32
If you select Volume control you will be instructed to press the volume up or down key
on the side of the phone. When you do this, the deviation sound will play allowing you
to hear the current level.
Selecting Backlight allows you to turn the backlight ON, or to turn it OFF. Selecting
Support (listed last, and not shown above) provides you with TeleNav’s web site URL
and customer service phone number. Distance Units changes apply across the entire
TeleNav application.
There are two Address Input phone numbers to choose from under Voice Number (#). In some cases, calls
placed to the 877 number do not carry your Caller ID. When this happens you will be asked to enter your Boost
Mobile phone number followed by pressing the “#” key, and then enter your TeleNav PIN followed by pressing the
“#” key so that TeleNav can assign the address you dictate to your account. If the automated attendant asks for
account number in the geographical area where you most frequently use TeleNav, you should try the 408 number.
Ease of using the Voice Address Input system is probably a more important consideration than the minor change in
your Boost Mobile billing.
You can set preferences for other TeleNav features using the TeleNav website as described below.
Address Entry
Addresses can be entered several different ways:
1. Call the Voice Address Input System and dictate the address. This can be done before launching the
TeleNav Java application, or from within the TeleNav application.
2. Use the TeleNav website.
3. Type in the address in the address fields in the Java application on your phone using the keypad
4. Transfer an address from the Biz finder Save for later feature as explained above, or
5. Use a marked Waypoint as an address (provided that it is close enough to street or road to have a valid
address.)
After you use method 1 or 2, be sure to use the Refresh list feature to update the list of addresses appearing on
TeleNav on your phone.
Voice Address Input
Before starting TeleNav, call the Voice Address Input System at 408-523-1429 or 877-886-9762, and dictate your
address as prompted. Below is a sample of what you will hear and say:
© TELEVIGATION 2003-5
PAGE 22 OF 32
TeleNav prompt> Welcome to TeleNav! Powered by Televigation. Say the city and state you want like San
Francisco, California.
Your response> Arlington, Texas
TeleNav prompt> I heard Arlington, Texas. To change this say GO BACK. Say the street you want like WILSON
AVENUE, or say Highway and the route number like Highway 405.
Your response> Oak Street
TeleNav prompt> I heard Oak Street. To change this say GO BACK. Say the street number or say INTERSECTION
to name a cross street.
Your response> 1620
TeleNav prompt> I heard 1620. To change this say GO BACK.
<pause>
TeleNav prompt> Address entered. Please launch TeleNav on your phone
<call is terminated>
The Voice Address Input System may ask you for account number and PIN if caller ID is not working. Simply
dictate the numbers as prompted, or key in your Boost Mobile phone number followed by pressing “#”, and your
TeleNav PIN followed by pressing “#. If this happens, consider using Preferences, Voice Number to change to
the other dialed number.
The recognition system may reply back with an incorrectly recognized input. When this happens, simply say, “Go
Back”, and repeat the data entry. The voice system may advise you that a street number is out of range and
provide the proper range of numbers for you to use. Provide a number that is within the range or nearest the end of
the range that you are sure is valid. If you say Intersection and then provide a crossing street name, the voice
system may advise you that the streets you provided do not actually cross and allow you to change either street
name, or both street names. Select the name you want to change by saying it, and then provide the correct name.
You can also say my Home or my Work to program these addresses for use on the handset. If you want to
change one of these addresses, say my Home or my Work, wait for the current address to be repeated back to
you, and then say Update. You can also say Airport, and then give the name of the airport, its location city or its
market city name.
After the Voice Address Input System has completed its dialog with you, it will advise you to launch the TeleNav
application, and then it will hang up. If TeleNav is running, you should press MENU, RUN Java Apps, press
RESUME, and choose the Refresh list option when you see the list of addresses so that recently dictated
addresses will appear in the list.
Web address entry
Go to the TeleNav website, and log in using your account number and PIN. Then select I have TeleNav and
Preplan my trip. Type in the address you want to go to and click on the submit link. The address will be validated
and appear in the list of addresses further down the web page that will appear in your phone’s TeleNav address list
the next time you use TeleNav and select Refresh list.
© TELEVIGATION 2003-5
PAGE 23 OF 32
Address entry from the phone
To enter a new address you need to first select New address. Next you can select
one of the recently entered cities, or an airport; and you can also enter the new
address using a City/State combination, or a ZIP code followed by entering the
numbered street address or the crossing street names.
Voice Call
If you select Voice call, your phone will go into voice call mode with the Voice Address Input System number
displayed on the screen. Press the green button to dial the number, and dictate your address as described above.
When you are done with the call, press BACK, the Menu key, highlight Java Apps, press OK, highlight
Suspended Apps, press the OK key, highlight TeleNav 3, and press the OK key again. At this point, TeleNav will
resume, and automatically Refresh list so that the called in address appears on your phone. Highlight the newly
entered address, and press OK.
New City/State
If you select New city/state, you will be taken to the State entry page. Here you
first enter the US Postal Service state abbreviation e.g., “CA” for California. First,
you will have to press Menu, highlight Alpha mode, and press Select because it is
hard to enter USPS prefixes in Word mode.
Only the first three (or more) characters are needed to enter the city name. For
example if you were trying to enter “Sunnyvale” as the destination city, you would
enter sun using Alpha mode. Using Word mode will result in run if you press 786.
On the other hand, if you wanted “Santa Clara”, Word mode does produce santa if
you press 72682.
Hint: Use the “*←” key at the lower left corner of the keypad to backspace and remove incorrectly entered letters.
Also note that some keys are marked with alternative characters that they will produce after several key presses.
Pressing the 1 key in alpha or Word mode produces a spectrum of punctuation, most of which is not needed for
address input.
After you enter a city prefix, you will be presented a list of city names to choose from, unless there is only one
unique match. If there are too many matching names, you may be asked to enter more letters. Highlight the city
name you are looking for using the up/down 4-way Navigation Key, and press the OK key. After you pick a name
from the list, or if the name is uniquely matched, you are taken to Street Name Input, see below.
© TELEVIGATION 2003-5
PAGE 24 OF 32
Street Name Input
You enter three or more letters or numbers in the destination street name, or move
down to the highway entry field using the 4-way Navigation Key and enter the
numbers of the route number. For street names, you may have to change the input
mode from Word to Alpha or Numeric mode by pressing Menu, and making a
Selection. For example to enter “223rd Street”, because it is a street name and not
a highway number, you will use the upper field, press Menu, select Numeric mode,
enter 223, press Menu again, select Alpha mode, and enter rd before pressing OK.
As in the city name case above, after you enter part of the street name, you will see: a) the street name list, b) an
advisory that too many matches were found and you should enter more letters, or c) an advisory that no matching
name was found.
Next you will be asked to enter either the address number or intersecting street name. Use the 4-way Navigation
Key to select between address number and intersecting street name input rows.
To enter an intersecting street, navigate down; enter the first few characters of the intersecting street name. For
streets that are numbers, use the number abbreviation input method described above. When you have input the
name or number, press OK.
If you enter a cross street name prefix, you may be presented with a list of street names to choose from. Highlight
the one you want, and press OK.
If you are entering a highway number, use the bottom field, and enter only the numeric part without any alphabetic
prefixes. For example, to enter US-99, simply type in 99.
Address validation
Once you have entered the street address or selected the crossing street name,
TeleNav will check to see if the address you entered can be found. This checking
makes sure that: a) the address (door) number you entered is within the range of
assigned numbers for the named street and b) when crossing street names are
provided, the streets do actually cross. If either condition is false, or the address is
too new to be found in the mapping database, the server will send a message to
your phone requesting you to correct the provided information. For example:
Using an Airport as an address
Simply highlight Airport, and press OK. The label field at the top of the next
display changes depending on the context (destination or origin) you are using.
There are two input fields, one for the airport code, such as IAD for Dulles
International; and one for the airport name, location city or market city prefix.
If you enter “NEW” in the name/city prefix field, the server will produce a list of
airports in NEW York City; NEWark, NJ; NEW Orleans; etc. You simply highlight
the one you want, and press OK.
© TELEVIGATION 2003-5
PAGE 25 OF 32
Zip Code
To enter a ZIP code, select New ZIP, enter a valid ZIP code, and press OK. Once
you’ve entered a valid zip code, the TeleNav servers will find the matching city and
state name for the Zip code, and then you will be asked to enter the street name.
Using Biz finder to find an address
See the above section regarding the Biz finder feature for more detailed information. To use Biz finder to set an
address: a) specify the search point or area first, b) decide whether you want to search by Category or Business
Name, c) navigate through the categories if you selected Category search until you have reached the list of
matching businesses, d) select a specific business, and e) press OK.
Using a Waypoint as an address
If you choose to use a Waypoint as an address, you will be presented with a list of waypoints you have previously
marked and labeled as shown above under View Waypoints. Highlight the one you want, and press OK. At this
point, your phone will contact the TeleNav servers to convert the latitude and longitude of the waypoint to an
approximate street address.
Guidance Instructions
The guidance instruction screens you will see have the following content, but will have different proportions than
those shown below. GPS navigation and Non-GPS directions screens have slightly different content as explained
below. When TeleNav is communicating with the TeleNav servers, a network activity indicator replaces the GPS
indicator shown in the lower right corner of the screen.
© TELEVIGATION 2003-5
PAGE 26 OF 32
Lawrence Expwy
CA CR-9N
Upcoming
turn type
icon
3.4 mi
Current
street
name
Remaining
distance
Upcoming
street
name and
alternate
name
Distance to
next turn
US 101 N
6.2 mi
NW
GPS
satellite
indicator
Direction of
travel
When the turns you will need to make occur in rapid
succession, a second upcoming turn type icon will
appear above the distance to the first turn. This smaller
icon represents the type of turn following the turn
depicted by the larger icon.
Every few seconds, the total remaining distance field on the left side of the screen is
replaced with an estimate of the total time remaining.
Navigation guidance
If you will be traveling on the same roadway for a mile or more, the Upcoming and Current Street names will be the
name of the street you are on, and the turn type icon will be a vertical arrow. As you approach the turn, the
Upcoming Street name will change, and the icon will portray the actual type of turn you should make. As you
move, the distance to turn and the remaining distance will decrease. Visit the TeleNav website to alter this
behavior as described below under Personalization.
Eventually, you will see the destination arrival screen. This screen will show you how far it is to your destination
and whether it is on the left or right side of the street or road.
© TELEVIGATION 2003-5
PAGE 27 OF 32
For TeleNav to work, the GPS receiver must be tracking four or more satellites. When 3 or less are being tracked,
the satellite indicator will be blank. When four satellites are being tracked, one bar will appear. As more satellites
are tracked, more bars appear. If the indicator is blank, you should more to an area with a clearer view of the sky.
When you arrive at your destination, press MENU. The available options will allow you to go back to the TeleNav
menu. You can also press MENU and select a whole route map.
Non-GPS mode or Driving Directions
Using a GPS-based origin for real-time GPS navigaiton, once all of the routing information is delivered to your
phone, you can press the PREVU key to switch to Non-GPS Driving Directions to PREVU the remainder of the
route. This PREVU key is not present if you enter the origin using a newly input or stored address.
Rocking the 4-way Navigation key to the right goes to the next page of directions, and rocking it to the left goes to
the previous page of directions. In this mode, the Direction of Travel indicator is replaced by an indicator reading,
“m/n”, showing that you are viewing page m of a total of n pages. When n and m are the same, you have scrolled
to the end of the route.
The GPS indicator is not relevant or shown when operating in this mode.
Activity Messages
Whenever the TeleNav application on your phone needs server assistance, it uses Boost Mobile packet data
service. While it is using packet data service, other services such as DirectConnect (walkie-talkie), SMS 2-way
messaging, and conventional cellular will not be available. Typically this interruption of other services will last no
more than 20 seconds. When TeleNav is using packet data service to contact the TeleNav servers, it will present a
message like: a) Reading GPS…, b) Waiting …, c) Sending …, d) Receiving…, e) Logging in…, f) Personalizing
…, g) Loading icons…, h) Loading audio, and i) Storing audio. You will also notice a small network activity indicator
in the upper right corner of the map display after you press a key to pan or zoom the map.
Taking an Incoming Call
When your phone receives an incoming call ring, it will ring, and display a screen that allows you to take or ignore
the call. If you take the call, TeleNav will be operating but “suspended”. After the call, press the RED End/Home
Key to end the call, and then press the MENU key. Highlight Java Apps, and press the OK key. The presented
menu will include a “suspended apps” folder. Highlight this folder, and press the OK key. Then, highlight TeleNav
3, and press the OK key again to “awaken” TeleNav. If TeleNav has been suspended for a while from GPS
Navigation, it may ask you to confirm that you are continuing to the same destination.
You can also press the RED End/Home Key while TeleNav is running to force it to suspend. Use the steps
described immediately above to awaken TeleNav.
7. Personalizing
We suggest placing TeleNav as the right softkey option on the main Boost Mobile screen. This allows you to a)
more rapidly start TeleNav when you need it, and b) rapidly resume TeleNav after you have made a voice call to
dictate an address from within TeleNav. To perform this personalization, follow these steps –
1. Press the Menu key on your phone
2. Using the 4-way navigation key, highlight Settings, and then press the OK key.
3. From within the Settings menu, highlight Personalize, and again press the OK key.
© TELEVIGATION 2003-5
PAGE 28 OF 32
4. Scroll down until Right Sftkey is highlighted, and press the OK key.6
5. Scroll up until TeleNav is highlighted, and press the OK key again.
6. Then, press Back until you have returned to the Boost Mobile home screen.
NOTE: The default use for the right softkey is “Messages”, should you wish to change it back.
8. Error Conditions
Unable to reach server
If you see an activity screen for 45 seconds followed by a message that says, “Unable to reach server”, and it is
your first attempt at using TeleNav, you should contact Boost Mobile customer care to resolve this issue. Most
likely, your Data Access/Total Connect packet data service is not provisioned correctly.
If you drive into an area where there is intermittent or no ability to connect to the Boost Mobile wireless network, or
there is a problem within the wire line network between Boost Mobile wireless gateways and the TeleNav servers,
and this problem has persisted for 30 seconds or more, you will get a message stating, “Unable to reach server”.
The TeleNav application on your phone will attempt to reconnect within 7 seconds.
TeleNav not available
If you get an advisory message that TeleNav is not available, you should EXIT the TeleNav application, and then
restart it. If the problem recurs, it may be due to a temporary TeleNav server outage.
GPS Access Restricted
If you get a message stating that TeleNav cannot access the GPS receiver data, you will need to change the
privacy setting. First, EXIT TeleNav, and then follow the directions provided above in the GPS Privacy section.
GPS Signal Weak
If GPS signal reception is weak due to shadowing within the vehicle or due to buildings, trees, overpasses, etc.,
validation will fail, producing a screen that will advise you that the GPS signal is weak and you should move to an
open area. It is suggested that you move to an area with a clear view of the sky, and then click “RETRY”. If you’re
still having problems you can still driving directions by pressing the NONGPS key while the GPS receiver is trying to
determine your current location as the origin point.
Low battery
The GPS will not start if the phone’s battery is very low. This is because the GPS receiver needs the phone battery
to be at least half charged. The phone should be charging using the GPS otherwise the phone battery depletes
very quickly. If you get a low battery warning, connect a charging cable as soon as possible.
9. Exiting TeleNav
If at anytime you wish to exit TeleNav, press the BACK key until you reach the main TeleNav menu, and then
press EXIT. You will then be asked to confirm that you truly do want to exit TeleNav.
6
Another good choice is the UP arrow key that normally is used to activate the basic GPS feature. However, this key does not have a visible
label associated with it.
© TELEVIGATION 2003-5
PAGE 29 OF 32
10. The TeleNav Web Site
Using the features describe below requires you to log into the website using your Boost Mobile phone number
(TeleNav account number), and TeleNav PIN. When you log in, you will be taken to the Account Management
page.
Account Management
Within Account Management, you will find links that allow you to change your e-mail address and PIN, and to set or
change your home and work addresses.
Personalization
Personalization allows you to change server-controlled preferences such as the audible guidance prompting
language, whether or not audible street names are provided, and when the Guidance Instructions display should
transition from the Continue ahead vertical arrow to the next turn’s turn-type arrow.
Preplanning
Click the Preplan My Trip link to enter new addresses for use within TeleNav on your phone. You can also use this
page to remove addresses you no longer need. After you use website preplanning, be sure to use REFRESH LIST
on your phone so that TeleNav can learn about the changes.
Customer Service
If you need to reach customer service, you can use the Contact Us link on the right side of the web page after
signing in, or send e-mail to [email protected]. You can also call us at 88-TeleNav-4 (toll free) for most service
issues.
If you need to migrate your TeleNav account to a different Java phone, please call tier 2 technical support at 888777-8878. For security reasons, you cannot perform this change unassisted.
11. FAQ’s
My phone is not producing audible output during GPS Navigation
The most common cause of this problem is that setting the audio level to VibeAll has defeated the phone speaker.
To change this, with the phone cover closed, adjust the audio volume louder until the level is set at 4 or 5. Press
the MENU key and look for RING TONES. You may find it on the next screen after pressing MORE. Highlight
RING TONES, and press the OK key. The first line is the VibeAll entry. Make sure it is set to OFF.
How do I increase or decrease the voice prompt volume and control the backlighting?
The backlight and speaker volume levels can be controlled from within TeleNav. Just follow the instructions above
under Preferences.
Why do I need the Boost Mobile packet data service?
The Data Access/Total Connect plans allow you to access nationwide maps from the TeleNav server for accurate
turn-by-turn directions using the data communication features of your Java phone. These services are different
from your cellular airtime, and not the same as Boost Mobile Web Online.
© TELEVIGATION 2003-5
PAGE 30 OF 32
How long after I apply for the Boost Mobile packet data service until I can use my TeleNav system?
Generally, it takes until the following business morning before Data Access/Total Connect is fully provisioned.
How much packet data have I used?
Your Boost Mobile phone tracks this usage. Press MENU, and then scroll down to MORE. After selecting MORE,
or if you do not find MORE, select CALL TIMERS. Then, select KBYTES RESET. The next display will show you
approximately how many kilobytes you have used. Divide this number by 1000 to convert it to megabytes, and
compare this with your Data Access/Total Connect plan limit. When you are finished looking, press DONE. If you
want your usage report to correlate with your Boost Mobile bill, press RESET once monthly on the day Boost
Mobile closes your billing cycle.
Does TeleNav use up my voice plan minutes?
TeleNav uses packet data to provide the navigation function. Using packet data does not use any of your voice
minutes. However, calling the Voice Address Input System does use about 70 seconds per address entered, and
this includes the Voice Call feature internal to the TeleNav application.
How accurate is the GPS?
GPS accuracy can range from 20m to 100m, however most of the time the GPS is accurate to less than 50 meters.
Our external GPS receiver also uses WAAS technology to further reduce the error.
What is ideal GPS environment?
The GPS requires an open, clear view of the sky. Buildings, covered parking areas, tunnels and dense foliage can
cause the GPS receiver to either be unable to locate itself (fix) or have extended initialization time (start-up fix).
If you are parked in a covered parking lot or near a tall building, it is recommended that you move away till you have
a clear view of the sky and then begin to use the TeleNav service.
You may need to give the GPS a few minutes to find its location.
How do I know that the GPS has a signal?
The TeleNav application on your phone will alert you if the GPS does not have a valid signal. If this happens, drive
to an area where there is a clear view of the sky so the GPS can find itself. You can also invoke the GPS
application by pressing MENU, highlight GPS or the satellite icon and pressing the OK key. Then, highlight
position, and REFRESH if necessary. If the screen shows SCANNING for more than 60 seconds, you are
probably in a poor GPS reception area.
Why does the GPS not work near buildings and other tall objects?
The GPS uses satellite signals from space to find out where it is. Therefore it needs a clear view of the sky. Tall
buildings and other objects that block the receiver’s view to the sky make it infeasible to determine your location.
Sometimes the satellites are not overhead but near the horizon; in these cases the GPS must have a clear view of
the horizon.
How do I enter my destination?
Your destination can be entered in three ways. The first way is to call 877-886-9762 or 408-523-1429 and “dictate”
your destination address to the Voice Address Input System. Then you launch the TeleNav application on your
Java phone and this address automatically shows up in the recent destinations list.
© TELEVIGATION 2003-5
PAGE 31 OF 32
The second way to enter your destination is to type it in using the keypad. Details are provided above.
The third way is to go to www.telenav.net, log in, and then enter your destination address, or multiple destination
addresses (up to 10 since this is all the phone can display at once).
Why do I have to call in a phone number to enter an address?
There are multiple ways to enter an address: a) Call the Voice Address Input system and dictate the address, b)
preplan it by logging into www.telenav.net, and c) entering directly on the phone keypad.
12. Customer Support
Send an e-mail with your questions or comments to the appropriate company’s Customer Service Department, or
enter a comment through the website. We monitor your e-mails and will promptly reply to your inquiries.
Televigation
265 Santa Ana Court
Sunnyvale, CA 94085-4511
Technical Support
88-TeleNav-4 (toll free)
[email protected]
13. TeleNav Services Warranty
The content and Java application services provided by Televigation is provided “as is” and “as available” without
warranties of any kind, either expressed or implied, including but not limited to any warranties of merchantability or
fitness for particular use, or non-infringement. You acknowledge that your use of the Televigation service is at your
sole risk and you agree that the service and the information provided are without warranty of any kind by
Televigation.
Televigation does not warrant the availability, accuracy, completeness, currentness or reliability of the services
available from Televigation, or the service itself, unavailability, errors, omissions or inaccurate data may result from
unreliable data, due to equipment failure or other technical problems beyond the control of Televigation, and
Televigation does not warrant the services in any respect due to such circumstances beyond its control.
Although certain information provided to you by Televigation may be obtained or compiled from sources
Televigation believes to be reliable, Televigation cannot and does not guarantee the accuracy, validity, kindness or
completeness of any information made available to you for any particular purpose.
Under no circumstances, including negligence, will Televigation or any of its affiliates, directors, officers or
employees, or any third party be liable for any direct, indirect, incidental, special or consequential damages that
results from your use or your inability to use the services. You acknowledge that this limitation applies to all content
information or other services available from Televigation, and whether or not Televigation has notice of the
possibility of such damages, and whether or not to circumstances giving rise to such damages may have been
within the control of Televigation.
Some states do not allow the exclusion of certain warranties, so some of the above exclusions may not apply to
you. In those states, liability is limited to the fullest extent allowed by law
By using the service, you agree to indemnify Televigation and its parents, subsidiaries, affiliates, officers and
employees and hold them harmless from any and all claims and expenses, including reasonable attorney’s fees,
asserted third party due to, or arising out of your use of the service and the site.
© TELEVIGATION 2003-5
PAGE 32 OF 32