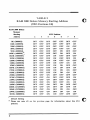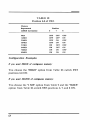
1
~~IVERE
RAM 3000 Deluxe™
(AT Memory
Expansion Board)
OWNER'S MANUAL AND REFERENCE GUIDE
EV-159
(VERSION 2.1)
EVER for EXcellence
MAN-OOI09-21
RAM 3000 Deluxe™
(AT Memory
Expansion Board)
OWNER'S MANUAL AND REFERENCE GUIDE
EV-159
(VERSION 2.1)
EVEREX SYSTEMS, "INC.
48431 MILMONT DRIVE
FREMONT, CA 94538
Notice
Everex Systems, Inc. reserves the right to make improvements in the product described in this manual at any time
and without notice.
DISCLAIMER: While we do our best to avoid such a situation,
Everex Systems will not be responsible for any loss of information resulting from the use of this product.
This manual is copyrighted. All rights are reserved. No
portion of this manual may be copied, photocopied, reproduced, translated, or reduced to any electronic medium or
machine-readable form without prior consent in writing
from Everex Systems, Inc.
(c) Copyright November, 1987
Everex Systems, Inc.
ii
Everex, EVER for EXcellence, RAM 3000 Deluxe and
EDISK are trademarks of Everex Systems, Inc.
IBM PC, A T, PC-DOS and OS/2 are trademarks of
International Business Machines Corp.
Microsoft, MS-DOS and Xenix are trademarks of Microsoft
Corporation.
CS8220 and CHIPSet are trademarks of Chips and Technologies, Inc.
Intel and 80286 are trademarks of Intel Corporation.
Lotus is a trademark of Lotus Development Corporation.
AST and PCnet II are trademarks of AST Research, Inc.
iii
Notes
iv
Table of Contents
CHECKLIST ....................................................................................................
1
SECTION 1: HOW TO USE THIS MANUAL...............................
3
SECTION 2: INTRODUCTION..............................................................
2.1 F ea tures ...........................................................................................................................
2.2 Physical Layout .....................m............................................................................
2.3 Installation Summary ....................................................................................
5
5
6
7
SECTION 3: CONFIGURATION ..........................................................
3.1 Default Settings ............................._...........-.........................-.............................
3.2 Configuring With Software...................................................................
3.3 Configuring Without Software..........................................................
3.3.1 Memory Configuration...................................................................
3.3.2 EMS Mode Configura tion ..........................................................
3.3.3 Setting Chip Speed And
Enabling Parity Checking...........................................................
3.3.4 Setting The A T Motherboard................................................
3.4 Installing The DRAM Chips...............................................................
8
10
12
15
15
19
25
27
29
SECTION 4: INSTALLATION ...............................................................
4.1 Physical Installation........................................................................................
4.2 Testing The RAM 3000 Deluxe........................................................
33
33
37
SECTION 5: RAM 3000 DELUXE SOFTWARE .........................
5.1 EMM.SYS EMS Device Driver .........................................................
5.1.1 Installing EMM.SYS............................................................................
5.1.2 EMM.SYS Parameters ......................................................................
5.1.3 EMM.SYS Examples...........................................................................
5.2 EDISK.SYS RAM Disk Device Driver ..................................
5.2.1 Installing EDISK.SYS.......................................................................
5.2.2 EDISK.SYS Parameters..................................................................
39
40
40
42
43
45
47
49
v
5.2.3 EDISK.SYS ExamplesM..._........M
...............................M...................
5.3 ESPOOL.EXE Print Spooler ...............................................................
5.3.1 Installing ESPOOL.EXE...........................M
......m.........................
5.3.2 ESPOOL.EXE Parameters.........................................................
5.3.3 ESPOOL.EXE Examples.............................................................
51
53
53
54
56
SECTION 6: TROUBLESHOOTING.........._ .......•....•....._.................
6.1 Common Questions And Answers................................................
6.2 How To Get Assistance ......................................M.....................................
58
58
60
APPENDIX 1: MEMORY BASICS.......................................................
Al.1 Description Of Memory........................................................................
A1.2 AT Memory Line..........................................................................................
63
63
65
APPENDIX 2: DIPSWITCH SETTING TABLE...........................
A2.1 Dipswitch SW2.......................M.........................................................................
A2.2 Dipswitch SW3.................................................................................................
67
67
69
APPENDIX 3: EMS TECHNICAL REFERENCE.......................
A3.1 Expanded Memory Definition......................................................
A3.2 Page Frame Addressing And
Register Output...............................................................................................
A3.3 EMS 110 Port Address Selections............................................
A3.4 Mapping Registers.......................................................................................
A3.5 Page Frame Registers ..............................................................................
72
72
APPENDIX 4: REGARDING THE AST PCNET II...................
80
APPENDIX 5: IF SYSTEM BOOT FAILS......................................
81
APPENDIX 6: FOR EXTENDED-MEMORY USERS ..•......_...
82
vi
73
75
76
78
Checklist
The RAM 3000 Deluxe carton should include the following
items:
RAM 3000 Deluxe AT memory expansion board in an
anti-static bag
RAM 3000 Deluxe utility software diskette with the following files:
EVlS9.EXE configuration and diagnostics program
EMMSYS EMS software device driver
EDISKSYS RAM disk software device driver
ESPOOL.EXE print spooler
README text file
FILELIST text file
Owner Registration and Warranty Card
Foam padding and packaging materials
If any of the above items are missing, consult your place of
purchase.
Optional Items:
256-Kilobit DRAM memory chips (150 nanosecond
access time or faster)
1
NOTE 1: Please save all the packaging materials that accompany the RAM 3000 Deluxe board; if you need to return the
board to Everex Systems for any reason without proper
packaging, the warranty may be affected. As with any major
purchase, please keep the sales invoice.
NOTE 2: Circuit boards are easily damaged by static electricity!
You can pick up a static charge in dry weather or walking on
carpeted floors. To prevent static electricity damage to the
RAM 3000 Deluxe board, touch the system chassis before handling the board, and handle the board by the edges only. Also,
move as little as possible when you work on your computer to
avoid static charge buildUp.
NOTE 3: There are two text files named README and
FILELIST on the RAM 3000 Deluxe software diskette. These
files contain the list of files on the RAM 3000 Deluxe software
diskette (FILELIST) and additional information regarding the
RAM 3000 Deluxe (README). To read these files, insert the
RAM 3000 Deluxe utility diskette into drive A and use the DOS
TYPE command to read the files. For example, to read the
README file, type the line:
TYPE A:README
2
[Enter]
Section 1.' How to Use This Manual
Checklist contains a list of items that should be inside the
RAM 3000 Deluxe carton. Please make sure all listed items
are included.
Section 2: Introduction describes the features of the RAM 3000
Deluxe, a detailed illustration, and an installation summary
for experienced users.
Section 3: Configuration contains a list of RAM 3000 Deluxe
default switch and jumper settings in Section 3.1. This
section also tells you how to change the default settings by
using the EV159.EXE program as described in Section 3.2 or
by using the configuration tables in Section 3.3.
provides information on
installing the RAM 3000 Deluxe board into your system; it
also explains how to test the board and how to run the
SETUP program to inform your computer of the RAM 3000
Deluxe's memory expansion.
Section
4:
Physical
Installation
Section 5: RAM 3000 Deluxe Software describes how to install
the EMMSYS, EDISKSYS and ESPOOL.EXE software programs on the RAM 3000 Deluxe software diskette.
6: Troubleshooting gives answers to questions regarding possible problems that can occur when using the
RAM 3000 Deluxe. It also provides information on how to
get assistance.
Section
3
Appendix 1: Memory Basics explains how memory works on an
AT (first-time users should read this appendix).
Appendix 2: Dipswitch Setting Table provides tables on how to
set the amount of contiguous memory defined on the RAM
3000 Deluxe (SW2 dipswitch), and the RAM 3000 Deluxe's
memory starting address (SW3 dipswitch).
Appendix 3: EMS Technical Reference contains information on
how EMS mode works (this appendix is for users who wish
to write EMS-compatible software).
Appendix 4: Regarding The AST PCnet /I provides information
to ensure proper operation when an AST penet II network
adapter board and the RAM 3000 Deluxe (if configured for
EMS mode) are simultaneously installed in your AT or AT
compatible.
Appendix 5: If System Boot Fails tells you how to remedy a
possible problem if the RAM 3000 Deluxe is set for base
memory upgrading.
6: For Extended-Memory Users shows how to
configure and test the RAM 3000 Deluxe if you plan to use
this board with an extended-memory operating system.
Appendix
4
Section 2.' Introduction
2.1 Features
Congratulations on purchasing your new RAM 3000 Deluxe
AT-compatible memory board. This memory board includes
the following features:
Up to 3 megabytes of RAM for base and/or extended
memory upgrading.
Up to 3 megabytes of RAM for memory addressed
under the Lotus/Intel/Microsoft Expanded Memory
Specification (Version 3.20).
Allows simultaneous coexistence of base, extended, and
expanded memory on the same board.
Fully compatible with AT-compatible motherboards
that use the 80286-compatible CS8220 CHIPSet.
16-bit EMS transfer mode available for faster EMS
operation.
A software diskette with the following programs:
EV159.EXE configuration and diagnostics program
EMMSYS expanded memory device driver
EDISKSYS RAM disk device driver
ESPOOL.EXE print spooler
README text file
FILELIST text file
5
2.2 Physical Layout
Below is a diagram of the RAM 3000 Deluxe with all the
jumper and switch locations you need to know. See Section
3.1: Default Settings for an explanation of the dipswitches
and jumpers.
5
4
3
~
"
2
0
f
SW2
SW3
,
........
...
.. .: .......
=>
r.l
1
,
W1
1IIIjllllllllll.llllllllllllllllllllllllllr-
SW1
W2
Figure 1: The RAM 3000 Deluxe
6
2.3 Installation Summary
1.
Make any adjustments to the switches and/or jumpers
on the RAM 3000 Deluxe for your chosen board configuration (see Section 3.2: Configuring With Software or
Section 3.3: Configuring Without Software).
2.
Physically install the DRAM chips on the RAM 3000
Deluxe board (see Section 3.4: Installing The DRAM Chips),
then install the board in the computer (see Section 4.1:
Physical Installation).
3.
Test your RAM 3000 Deluxe board with the EV159.EXE
program and run the SETUP program on the IBM AT
Advanced Diagnostics diskette (or the equivalent program if you have an AT compatible) to inform your
system of the new memory board (see Section 4.2: Testing
The RAM 3000 Deluxe).
4.
If you plan to use the RAM 3000 Deluxe for EMS
mode, RAM disk, or print spooler, install the appropriate software from the RAM 3000 Deluxe software
diskette (see Section 5: RAM 3000 Deluxe Software).
7
Section 3.' Configuration
Please note the following helpful hints for configuring the
dipswitches and jumpers on the RAM 3000 Deluxe.
Helpful Hint 1:
There are several different types of dipswitches installed on
the RAM 3000 Deluxe. The following figure shows how to
turn the dipswitch positions ON and OFF; note that
Positions 1 to 4 are switched ON and Positions 5 to 8 are
switched OFF.
/°1
2
3
4
5
6
7
8
;~~~~~~~~
F
_ _ _ _ _/
~lL
L-/_ _ _--J/
Figure 2A: The Different Types of Switches
8
Helpful Hint 2:
There is a hole at the top of the black plastic jumper shunts
to make the removal of the jumper from the connector pins
easier. To remove or adjust the placement of the jumper
shunts, bend a paper clip, insert the bent end into the hole
and pull the jumper up. The paper clip can also be usee to
insert the jumper onto the pins.
PAPER CLIP
~----
JUMPER
+4--+----~
SHUNTS
OJ
2
JUMPER ON
o
2
JUMPER OFF
Figure 2B: Moving Jumper Shunts
9
3.1 Default Settings
The RAM 3000 Deluxe leaves the factory in this default
configuration (see Table 1 on the following page for the
jumper and dipswitch default settings):
1.
2.
3.
4.
5.
6.
7.
8.
There are no memory chips installed.
It assumes one memory bank of RAM chips are
installed.
There is no memory space defined for base andlor
extended memory upgrading.
The starting memory address is (lOOOOOH*) or 1 MB.
The 2 EMS 110 Ports are set at Y258 and Y268 (where Y
can be 0, 4, 8, or C) port addresses.
The EMS 110 Ports are disabled.
The EMS data transfer size is 8 bits wide.
The memory parity checking mode is enabled.
If you do not want to modify the default configuration, you
can proceed to install your RAM 3000 Deluxe. If you need
to change any settings on the RAM 3000 Deluxe, use either
the EV159.EXE configuration program on your RAM 3000
Deluxe utility diskette (see Section 3.2: Configuring With
Software), or utilize the tables in this manual (see Section 3.3:
Configuring Without Software and Appendix 2: Dipswitch Setting
Tab/e) to help configure this board; we suggest using the
EV159.EXE software program.
*
10
"lOOOOOH" means
hexadecimal.
1 megabyte
memory
address
in
TABLE 1
Jumper/Switch Settings of the RAM 3000 Deluxe
SWITCH!
JUMPER
DEFAULT SETTING AND DEFINITION
W1
This jumper block selects the speed of the 256K DRAM chips
The default setting is
installed on the RAM 3000 Deluxe.
installation of 120 nanosecond or faster chips (no jumper
installed).
W2
This jumper block enables memory parity checking mode.
default setting is parity mode enabled (jumper installed).
SWl
This 10-position dipswitch selects the page frame control port
addresses of EMS 110 ports 1 and 2 and activates EMS mode
The default setting is EMS 1/0 port
for these two ports.
addresses 258 and 268 (Hex) with no EMS mode (SW1 positions
1, 3, 5, 6, 9 and 10 switched ON, positions 2, 4, 7, and 8
switched OFF).
SW2
This 8-position dipswitch selects the amount of contiguous
memory defined on the RAM 3000 Deluxe and the number of
memory banks filled.
The default setting is one bank of
memory installed and no contiguous memory space defined (SW3
positions 1-8 switched OFF).
SW3
This 8-position dipswitch selects the memory starting address of
the RAM 3000 Deluxe and selects between 8-bit and 16-bit EMS
data transfer size. The default setting is starting address at 1
MB (lOOOOOH) and 8-bit EMS data transfer size (SW3 position 5
switched ON, positions 1-4 and 6-8 switched OFF).
The
11
3.2 Configuring With Software
NOTE: If you plan to test your RAM 3000 Deluxe to ensure
you did the board configuration and RAM chip installation
correctly, you should follow this subsection.
1.
Insert the RAM 3000 Deluxe utility diskette in Drive
"A" and type:
A:EV159
<Enter>
2.
You will see ten available menu selections: Amount of
Existing Base Memory, Amount of Existing Extended Memory,
Amount of Base Memory to be Added, Amount of Extended
Memory to be Added, EMS I/O Port Address (For The First
2M (megabytes) of EMS), EMS I/O Port Address (For EMS
Above 2M (megabytes)), EMS Fast Mode (Y/N), Are DRAMs
120 ns (nanoseconds) or Faster (Y/N), and Enable Parity
Checking (Y/N).
3.
Use the up and down cursor keys to select among the
ten menu fields; if you need help on each field when
you do your software board set up, press the [Fl]
function key for a help screen pertaining to that menu
field.
4.
When you finish configuring, press the [F2] function
key for a screen representation of the board; configure
the dipswitches and jumpers according to the screen
representation, and note the number of memory banks
12
you must fill.
5.
Press the [FS] key to save the current configuration.
The EVI59.EXE program will suggest the configuration
file name EVI59.001; press [Enter] to save this configuration file. You will need this saved file later when
you test your RAM 3000 Deluxe board.
6.
Press the [FlO] key to leave the program; proceed to
Section 3.4: Installing The DRAM Chips to install the
DRAM chips, then go to Section 4: Installation to install
the board into your system.
13
A Note About Installing Two Or More RAM 3000
Deluxe Boards:
If you install more than one RAM 3000 Deluxe board and
will use the EV159.EXE program to configure several boards,
please note the following considerations:
1.
You must run the EV159.EXE program separately for
each individual RAM 3000 Deluxe board installed in
your system; when you finish the software configuration for each RAM 3000 Deluxe board, you must
save a unique configuration file for each board in your
system (EV159.001 for the first board, EV159.002 for the
second board, EV159.003 for the third board, and so on).
2.
If your system needs base memory upgrading, make
sure to set only one of your RAM 3000 Deluxe boards
for this function.
3.
If you plan to use the EMS mode on more than one
RAM 3000 Deluxe board, please note that enabling all
four EMS 1/0 ports on two RAM 3000 Deluxe boards
means the installation of any other expanded memory
boards will not be possible.
14
TABLE 2
RAM 3000 Deluxe Memory Starting Address
(SW3 Positions 2-8)
RAM 3000 Deluxe
Memory
Starting
Address
'-OK (OOOOOH)
128K (20000H)
256K (40000H)
384K (60000H)
512K (80000H)_
640K (AOOOOH) •
1024K (100000H)
1152K (120000H)
1280K (140000H)
1408K (160000H)
1536K (180000H)
1664K (1AOOOOH)
1792K (1COOOOH)
1920K (1EOOOOH)
2048K (200000H)
2176K (220000H)
2304K (240000H)
2432K (260000H)
2560K (280000H)
2688K (2AOOOOH)
2816K (2COOOOH)
2944K (2EOOOOH)
3072K (300000H)
~.
3
4
OFF
OFF
OFF
OFF
OFF
OFF
OFF
OFF
OFF
OFF
OFF
OFF
OFF
OFF
OFF
OFF
OFF
OFF
OFF
OFF
OFF
OFF
OFF
OFF
OFF
OFF
OFF
OFF
OFF
OFF
OFF
OFF
OFF
OFF
OFF
OFF
OFF
OFF
OFF
OFF
OFF
OFF
OFF
OFF
OFF
OFF
OFF
OFF
OFF
OFF
OFF
OFF
OFF
OFF
OFF
OFF
OFF
OFF
OFF
OFF
ON
ON
ON
ON
ON
ON
ON
ON
ON
OFF
OFF
OFF
OFF
OFF
OFF
ON
ON
ON
ON
ON
ON
ON
ON
OFF
OFF
OFF
OFF
OFF
OFF
OFF
OFF
ON
OFF
OFF
OFF
OFF
ON
ON
OFF
OFF
OFF
OFF
ON
ON
ON
ON
OFF
OFF
OFF
OFF
ON
ON
ON
ON
OFF
7
8
OFF
OFF
ON
ON
OFF
OFF
OFF
OFF
ON
ON
OFF
OFF
ON
ON
OFF
OFF
ON
ON
OFF
OFF
ON
ON
OFF
OFF
ON
OFF
ON
OFF
ON
OFF
ON
OFF
ON
OFF
ON
OFF
ON
OFF
ON
OFF
ON
OFF
ON
OFF
ON
OFF
Default Setting
Please see note #1 on the previous page for information about this SW3
position.
6
SW3 Position
6
5
2
0
()
0
~
~JI')
3.3 Configuring Without Software
3.3.1 Memory Configuration
Part One: Memory Starting Address
o
The starting address of the RAM 3000 Deluxe can begin at
OK-512K (OOOOOH-80000H) in base memory range or 1024K15232K (lOOOOOH-EEOOOOH) in extended memory range by
adjusting dipswitch SW3. This means you can set the RAM
3000 Deluxe so base and extended memory coexist on the
same board, even if the system motherboard has 0 bytes of
base memory installed. In addition, you can set up the
RAM 3000 Deluxe so it will work with AT-compatible
motherboards using the CS8220 CHIPSet (upgrade base
memory from 512K to 640K (80000H-9FFFFH) and upgrade
extended memory beginning at 1536K (180000H)). Table 2 on
the next page shows the possible starting addresses from OK
to 3072K (OOOOOH-300000H).
NOTES:
o
1.
The "640K" position in Table 2 will upgrade base memory
from 512K-640K (80000H-9FFFFH) and start upgrading
extended memory beginning at 1536K (180000H) ONLY.
2.
If the RAM 3000 Deluxe memory starting address is
higher than 3 M (300000H), see Appendix 2: Dipswitch
Setting Table on how to configure SW3 for higher memory
starting addresses.
1~
Part Two: Amount Of Memory Banks Filled
Positions 1-3 of dipswitch SW2 set the number of banks of
RAM chips installed on the RAM 3000 Deluxe. Although
there are no memory chips installed when the board leaves the
factory, the default setting is for 1 bank of memory chips
installed (SW2 positions 1-3 switched OFF).
Use the following table to configure SW2 to correspond with
the number of memory banks filled on the RAM 3000 Deluxe.
TABLE 3
RAM 3000 Deluxe Memory Banks Installed
(SW2 Positions 1-3)
SW2 Position
1
2
3
OFF
OFF
OFF
OFF
ON
ON
• Default
OFF
OFF
ON
ON
OFF
OFF
OFF
ON
OFF
ON
OFF
ON
Banks Filled
•
1
2
3
4
5
6
Setting
NOTE: Avoid setting SW2 positions 1-3 to any other positions than
those listed in Table 3.
17
Part
Three: RAM 3000 Deluxe Contiguous Memory
Space
SW2 positions 4-8 define the amount of contiguous memory
space used on the RAM 3000 Deluxe for base andlor extended memory upgrading. If the RAM 3000 Deluxe is used
for EMS mode only, do not define any contiguous memory
space. Table 4 shows some of the possible contiguous
memory space definitions:
TABLE 4
RAM 3000 Deluxe Contiguous Memory Space Defined
(SW2 Positions 4-8)
RAM 3000 Deluxe
Contiguous
Memory
Space
Defined
•
OKB
512KB
1024KB
1536KB
2048KB
2560KB
3072KB
•
SW2 Position
4
5
6
7
8
OFF
OFF
OFF
OFF
ON
ON
ON
OFF
OFF
ON
ON
OFF
OFF
ON
OFF
ON
OFF
ON
OFF
ON
OFF
OFF
OFF
OFF
OFF
OFF
OFF
OFF
OFF
OFF
OFF
OFF
OFF
OFF
OFF
Default Setting
NOTE: The contiguous memory space defined can be
configured in 128KB increments; see Appendix 2: Dips witch
Setting Table on this procedure.
18
3.3.2 EMS Mode Configuration
You can configure the RAM 3000 Deluxe for up to three
megabytes of RAM memory under the Lotus/Intel/Microsoft (LIM) Expanded Memory Specification
(Version 3.20). This EMS memory is a special type of
memory that allows specially-written software to access
program data far larger than the 640KB limit imposed by
DOS.
To configure the RAM 3000 Deluxe for EMS mode, you
need to perform the following three-step process.
Step One: Enabling EMS Mode
Before enabling the EMS mode on the RAM 3000 Deluxe,
make sure the contiguous memory space defined in Section
3.3.1: Memory Configuration (Part Three) is less than the
amount of memory chips installed on the RAM 3000
Deluxe.
The RAM 3000 Deluxe has two 110 ports available for EMS
data transfer; since each EMS I/O port accesses up to two
megabytes of EMS memory, enabling both EMS 110 ports
will allow access of up to three megabytes of EMS memory
on the RAM 3000 Deluxe.
To enable the EMS I/O ports, switch OFF either SWl
position 5 (EMS I/O Port 1) and/or SWl position 10 (EMS
I/O Port 2). (See Figure 1 for location of the SWl dipswitch).
19
To determine how many EMS I/O ports you need to enable,
you must know how much memory on the RAM 3000
Deluxe is available for EMS mode. Use the following formula:
T- C=E
T represents the amount of memory in kilobytes installed
on the RAM 3000 Deluxe, C represents the contiguous
memory space defined in kilobytes on the RAM 3000
Deluxe, and E represents the memory in kilobytes available
for EMS mode on the RAM 3000 Deluxe. Use the following
table to determine how many EMS I/O ports you can
enable:
TABLE 5
EMS I/O Port Enabling Options
If E is
20
Then Enable EMS I/O Ports
128-2048KB
1
2049-3072KB
1 and 2
Step Two: Selecting EMS I/0 Port Address
Unlike base memory and extended memory spaces on the
A T, expanded memory space is accessed by mapping each
16KB of EMS-specification memory into a specific memory
address that is usable by the computer. By combining a
large amount of these mapping schemes in a contiguous
manner, we create a 64KB memory address space called a
window, this is how a single 64KB window can access up to
two megabytes of EMS-specification memory.
To determine the memory address where this 64KB EMS
110 port will reside, you switch Positions 1-4 and 5-9 on Dipswitch SW1 to inform the computer where to look for an
open memory area to place the 64KB EMS 110 port. The
RAM 3000 Deluxe is factory configured to use EMS 110
port addresses Y258 (EMS liD Port 1) and Y268 (EMS Port
2), where Y can be 0, 4, 8, or C; you can configure SW1 so
the board will use other port addresses.
Table 6 shows possible EMS I/O port address selections.
21
TABLE 6
EMS I/O Port Selections
(Dipswitch SWI and SW2)
I/O Port
Address
Y2X8
•
Y208
Y218
••
Y258
•••
Y268
Y2A8
Y2B8
Y2E8
+
++
•
...••
22
SWI and SW2 Positions
1
2
3
4+
6
7
8
9++
ON
ON
ON
ON
OFF
OFF
OFF
ON
ON
OFF
OFF
ON
ON
OFF
ON
ON
ON
OFF
OFF
OFF
OFF
ON
OFF
OFF
ON
ON
OFF
ON
Positions 1-4 are for EMS I/O Port 1 (SW1).
Positions 6-9 are for EMS I/O Ports 2 (SW1).
EMS I/O port addresses are selectable and a number of 1/0 ports
have been reserved for EMS with the basic setting being Y2X8. The
X value is a variable that you can select to avoid port address conflicts in your computer. Select the X variable by changing the setting of positions 1-4 and 6-9 of SW1. Y cannot be selected by the
user; it has values of 0, 4, 8, and C.
258 is the factory setting for EMS I/O Port 1.
268 is the factory setting for EMS I/O Port 2.
NOTES:
1.
The factory configuration for the RAM 3000 Deluxe uses
258 and 268 EMS 1/0 port addresses. If you install
another expanded memory board into your system (eg.
another RAM 3000 Deluxe), you must not set the EMS 1/0
port address on your second expanded memory board for
258 or 268 addresses.
2.
If some or all of the EMS 1/0 ports need to be disabled,
disable EMS 1/0 Port 2 FIRST, and EMS 1/0 Port 1 last.
3.
If you install two fully populated RAM 3000 Deluxe boards
and will use them only as expanded memory (for a total of
6 megabytes of expanded memory), please note that four
EMS 1/0 ports are enabled; this means you cannot access
other expanded memory boards installed in your system.
After you use an EMS I/O port address, circle it in pencil in
this manual and avoid using that address for other expanded
memory boards.
23
Step Three: EMS Mode Data Path Size
Normally, the data transfer to and from expanded memory
space is done with 8-bit wide data paths. However, you can
set the RAM 3000 Deluxe using 16-bit data paths for faster
data transfer to and from EMS-specification memory by
switching ON Position 1 of dipswitch SW3.
ON
OFF
~OODODDD
~DODODOD
12345678
12345678
8-bit
• Default
•
16-bit
Setting
Figure 3: EMS Data Path Size Selections
NOTE: The use of the 16-bit EMS transfer mode may not work
on AT's with clock speeds of 8 MHz and higher; we suggest experimenting with the RAM 3000 Deluxe to see if it will work.
For AT compatibles with very high clock speeds (10 MHz and
higher), set the RAM 3000 Deluxe to the 8-bit EMS data transfer mode so EMS memory will work at the higher clock speeds.
24
3.3.3 Setting Chip Speed And Enabling Parity Checking
The RAM 3000 Deluxe is factory-configured for the board
to use 256K-bit DRAM chips with a speed of 120 nanoseconds or faster. If you want to install 150 nanosecond
256K-bit DRAM chips, install a jumper on jumper block W1
TABLE 7A
Selecting DRAM Chip Speed
(WI Jumper)
DRAM Chip Speed
120 nanoseconds
WI Setting
••
•
150 nanoseconds
Default Setting
NOTE: Make sure all the DRAM chips installed on the RAM
3000 Deluxe are of the same speed rating. Also, you must install 120 nanosecond or faster DRAM chips if your machine
has a 10 MHz or faster clock speed.
25
Due to the large amount of DRAM chips on the RAM 3000
Deluxe and the need for parity checking to insure the integrity of the data, please leave the jumper shunt on the W2
jumper block installed. If you do want to disable parity
checking, use the following table:
TABLE7B
Enabling Parity Checking
(W2Jumper)
Parity Mode
•
Enabled
[;]
Disabled
••
Default Setting
26
W2 Setting
•
3.3.4 Setting The AT Motherboard
Your system's motherboard mayor may not have a
switch/jumper which determines the maximum amount of
memory that the motherboard will accept (in the IBM PC
AT the jumper is marked J18). If your system is an AT
compatible, please check your system's manual to see if any
such switch/jumper exists; refer to your owner's manual for
instructions on how to set the switch/jumper to correspond
with the amount of memory on the motherboard.
The motherboard lies on the floor of the system and contains the central processing unit of the computer. To set the
switch, remove the cover of your system (see Section 4.1:
Physical Installation for details on how to remove the system
cover).
If you have an IBM PC AT, please set J18 in the 256K
position if you have 256KB of RAM installed and in the
512K position if you have 512KB of RAM installed
(remember to set the SW3 dipswitch on the RAM 3000
Deluxe board to correspond with the amount of memory on
your motherboard if the RAM 3000 Deluxe is the only
memory expa-nsion board in your system). Refer to the following figure for the position of the J18 jumper block.
27
256K AT
512K AT
Figure 4: The IBM PC AT Motherboard
28
3.4 Installing The DRAM Chips
The process of adding DRAM memory chips to your RAM
3000 Deluxe is called populating. This may have been done
by your dealer, or you can do it yourself.
The RAM 3000 Deluxe uses only 256K-bit DRAM chips
wi th a speed of 120 nanoseconds or faster. When you buy
the chips, make sure to remind the dealer of these specifications.
NOTE: You can use I50-nanosecond 256K-bit DRAM chips,
but don't forget to insert a jumper shunt on jumper block WI
(see Figure 1 for the location of this jumper block).
WARNING: DRAM chips are easily damaged by static electricity! You can pick up a static charge simply by walking on
carpeted floors. To rid yourself of the static charge, touch the
system chassis before handling the RAM chips.
The RAM 3000 Deluxe has six banks (or vertical columns)
of 18 chip sockets marked Bank 0 to Bank 5 going from
right to left. (See Figure 5.)
Each of these banks must be either full or empty. You may
not leave any banks partially filled. For this reason, you
must buy your RAM chips in multiples of 18.
It is not necessary to fill all six banks on the RAM 3000
Deluxe. You can fill some of the banks now and fill the
29
others at a later date. The only consequence will be less
RAM available for base andlor extended memory upgrading.
If you choose to upgrade base memory, you must fill Bank 0
if you have 128KB or more of base memory installed, and
also fill Bank 1 if you have less than 128KB of base memory
installed.
Before you install RAM chips on the RAM 3000 Deluxe,
please note the number of banks you chose to fill on the
board; this is determined by using the EV159.EXE program
(see Section 3.2: Configuring With Software) or by using Table 3
in this manual (see Section 3.3.1: Memory Configuration (Part
Three)).
Begin populating with the bank of chip sockets on the right
side of the board, and move to the left for each subsequent
bank. Do not skip any banks or leave any partially filled.
Any empty banks should be on the far left part of your
RAM 3000 Deluxe.
5
4
t
~
3
t
a
i
........
..........
..
i="
",
c--- - -
~- f - ..
c---
..
:
r---
......
1I1111111111111J 1111111"""111111111111
Figure 5: Populate the Chip Banks in this Order
30
Each 256K-bit DRAM chip has eight metal pins along each
side. Each row of pins goes into a corresponding row of
holes in the socket. The pins and holes must be perfectly
aligned in order for the chip to work. If one pair of pins is
hanging over into the socket next to it, the chip may look
almost right but will not work properly.
Each chip has a notch on one end for orientation purposes
(see Figure 6).
If you look closely at each chip socket on your RAM 3000
Deluxe, you will see a notch on one end of the chip socket.
Be sure the notch on the chip is on the same side as the
chip socket notch. This means the notch on the RAM chip
must face the left side of the board.
Figure 6: Installing A Chip
31
Install the chip by first inserting the tips of the pins into
the chip socket holes and then checking the alignment of
the tips. If chip alignment is correct, press the chip into the
socket; it should go in easily. If you need to press hard, the
chip alignment is probably incorrect and you may have bent
a pin. If this happens, carefully remove the chip, straighten
the bent pin, and try the installation again as gently as
possible.
32
Section 4: Installation
When you finish configuring your RAM 3000 Deluxe, you
can now install your board into your system.
4.1 Physical Installation
1.
Turn OFF the power to the computer and disconnect
all cables attached to the system unit. Make sure NO
power goes to your system.
2.
Remove the retaining screws that hold the cover on
your system. Slide the cover forward. When it stops
sliding, tilt the cover up and lift it away. Refer to the
next figure.
rr ---
111111111i!!!!!!!!!!!!!!!!I!I!!!!!!!!
Figure 7: Removing the System Cover
33
3.
Choose an open 16-bit expansion slot on the motherboard. A 16-bit expansion slot has two sets of gold-edge
connector slots.
8·BIT SLOT
16·BIT SLOT
Figure 8: The Expansion Slots
4.
Take off the expansion slot cover from the back of the
chosen 16-bit expansion slot by first removing the screw
that holds the cover in place. Keep this screw, as you
will use it to secure the RAM 3000 Deluxe into place.
Figure 9: Removing the Slot Cover
34
5.
Carefully insert the RAM 3000 Deluxe all the way into
the expansion slot; remember to slide the board fully
into the card guide on the front of the system chassis
also.
""
Figure 10: Inserting the RAM 3000 Deluxe
6.
Reinstall the expansion slot cover screw to secure the
RAM 3000 Del uxe board.
7.
Reconnect the power cable and boot up your computer
with DOS.
WARNING: DO NOT touch the components inside the
system when it is ON; you might damage the components,
and some parts can produce electrical shock.
NOTE: If you set the RAM 3000 Deluxe to upgrade base
memory and the system will not boot up properly, the
memory chips used to upgrade base memory may be defec-
35
tive. Refer to Appendix 5:
remedy this problem.
8.
If System Boot Fails on how to
Run the EV159.EXE program to check out the board's
memory chips. (See Section 4.2: Testing the RAM 3000
Deluxe for details).
NOTE: Skip step #8 if you did not configure the RAM
3000 Deluxe with the instructions in Section 3.2: Configuring
With Software.
9.
Run the SETUP utility program on the IBM Advanced
Diagnostics diskette (or the equivalent program if you
have an AT compatible) to inform the computer of the
new memory expansion. (See Section 4.2: Testing the
RAM 3000 Deluxe for details).
10. If the board checks out properly, turn the system OFF
and replace the system cover.
11.
If you plan to use the RAM 3000 Deluxe for expanded
memory, RAM disk, or print spooler, install the appropriate software device drivers (see Section 5: RAM 3000
Deluxe Software for details).
12. Congratulations! Your RAM 3000 Deluxe board is now
ready for use.
36
4.2 Testing The RAM 3000 Deluxe
The RAM 3000 Deluxe utility diskette includes a program
that will test the chips on the RAM 3000 Deluxe board.
This program will take several minutes to run and will
ensure that the RAM 3000 Deluxe configuration was done
properly and that all the RAM chips installed are
functional.
To Test The RAM 3000 Deluxe's Memory
1.
Boot your system with DOS; insert the RAM 3000
Deluxe utility diskette into drive "A," and type:
A:EV159
[Enter]
WARNING: DO NOT run the EV159.EXE memory test if
you have valuable data loaded in expanded memory on the
RAM 3000 Deluxe, as this program will overwrite all data
in expanded memory.
2.
Press the [F4] function key to load the configuration
file you stored on disk when you finished the software
board configuration in Section 3.2: Configuring With
Software (make sure you use the right EV159.XXX
configuration file for each RAM 3000 Deluxe board
you will test). Press the [F2] key to bring up the screen
representation, and press the [FS] key to start testing
the board.
37
3.
When the memory test points out the location of any
bad chips (bad chips are shown blinking), check the
chips at the locations represented on the screen to
ensure the chips are installed correctly (did you bend or
break the chip pins or improperly orient the chip?); if
the chips are installed properly, you must replace the
bad chips.
4.
When you finish the testing procedures, press [FlO] to
leave the EVI59.EXE program.
Running the SETUP Program
Once the RAM 3000 Deluxe board testing is completed, run
the SETUP program on the IBM AT Advanced Diagnostics
diskette. This program informs the AT of the new memory
expansion board so application software can access the
board.
1.
Boot up your system with the IBM AT Advanced Diagnostics diskette in drive "A."
2.
Choose the SETUP option.
3.
Follow the instructions as they appear on the screen.
NOTE: AT compatibles have various methods of running the
SETUP program; please check your owner's manual to find out
how to run the SETUP program for your particular machine.
38
Section 5.' RAM 3000 Deluxe Software
Several utility programs are included on your RAM 3000
Deluxe utility software diskette. These programs increase
the productivity of your RAM 3000 Deluxe.
EMM.SYS
Software device driver to allow access
to the expanded memory configured
on the RAM 3000 Deluxe.
EDISK.SYS
Software device driver that sets aside
part of your computer's base, extended
or expanded memory for a RAM disk.
ESPOOL.EXE
Printer spooler program that sets aside
part of your computer's base, extended
or expanded memory for a print
spooler.
NOTE: Please copy these programs from the RAM 3000 Deluxe
utility diskette to your system disk by using the DOS COpy
command; store the original diskette in a safe place.
39
5.1 EMM.8YS EMS Device Driver
Expanded memory did not exist when your PC and its
operating system (DOS) were invented. Because of this,
DOS by itself cannot recognize and use any expanded
memory space defined on your memory expansion board.
In order to use expanded memory space, you need a special
device driver program that must be run each time you boot
up the system. You also need special software that can use
expanded memory space.
On the Everex software diskette that accompanies your
board, there is a file called EMM.8YS that allows you to
access expanded memory space. Regardless of how many
memory boards you have installed that are capable of defining expanded memory space (up to a maximum of eight
megabytes of expanded memory space defined over all your
expansion boards), you only need one EMM.8YS program to
control all the expanded memory space.
Before you install EMM.8YS, copy the file EMM.8YS to the
root directory of your system disk. The following subsections show you how to install EMM.8YS.
5.1.1 Installing EMM.syS
Most systems have a CONFIG.8YS file of "chores" for the
computer to load special software device drivers each time
the system is booted up. You need to add a device == emm.sys
command line to your CONFIG.8YS file.
40
1.
If your system disk already has a CONFIGSYS file, use
a text editor to add the line device == emm.sys to your
CONFIGSYS file.
2.
If a CONFIGSYS file is not on the system disk, type in
the following lines to create one with the EMMSYS
command line in it.
DO NOT do this step if a
CONFIGSYS file already exists on your system disk as it
will overwrite your old CONFIG.SYS file.
cd \
copy con: config.sys
device = emm.sys
[F6]
3.
[Enter]
[Enter]
[Enter]
[Enter]
To confirm that you properly installed EMMSYS, type:
type config.sys
[Enter]
This command should display the line device == emm.sys
on the screen.
4.
Press [Ctrl]-[AIt]-[Del] to reboot your system; if no
problems arise, a message similar to Expanded Memory
Manager Installed will be displayed.
41
5.1.2 EMM.syS Parameters
Though the command line device = emm.sys is fine for most
circumstances, you can also add parameters to your
EMMSYS command line for special needs. The extra
parameters are organized in the following format:
device = [path]emm.sys [/c] [pppp] [port,page]
The items inside H[ ]" designate an optional item. NOTE: Do
not type the !I[ ]H characters themselves.
[path]
This parameter is for users that keep the
EMMSYS file in a subdirectory other than
the root directory. If this is the case, type in
the full path name of the EMMSYS file on
the command line. Most users will keep
EMMSYS in the root directory and will not
use this parameter.
[lc]
This parameter instructs EMMSYS to chain
interrupt vector 67 (Hex). For most users, this
parameter is not needed, but if you have a
AST penet II network adapter board installed (which uses interrupt 67 (Hex)) in addition to your expanded memory boards, you
must add this parameter to be sure both
boards will work simultaneously. See Appendix
4: Regarding the AST PCnet II for more
information about the use of this parameter.
42
[pppp]
This parameter tells EMMSYS where to look
for a valid page frame. The page frame is the
first address of the EMS mapping window.
[pppp] valid values are C400, CBOO, CCOO,
nooo, ncoo and EOOO (Hex). For most users,
C400 (default value if the [pppp] parameter is
not specified) is fine and this parameter is not
needed.
[port,page]
This parameter selects the port address of the
portion of the memory board configured for
expanded memory and the starting logical
page of expanded memory. For the port
option, the valid addresses are 208, 218, 258,
268, 2A8, 2B8, or 2E8 (Hex); the default value
is 258. When you define the port address 258,
it will look for this address first, but will also
look for port addresses 268, 2A8, 2B8 and 2E8
if port address 258 is not found. For the page
portion, the valid values are 00 to 7F (Hex).
5.1.3 EMM.syS Examples
1.
device
= emm.sys
This EMMSYS command line is fine for most users.
2.
device = emm.sys C400
This EMMSYS command line looks for a starting page
43
frame address at C400 (Hex). If the page frame address is
occupied, it will try to look for 64KB address space in ascending order up to EOOO (Hex). If this fails, the "No room
on motherboard for page frame" message will appear, and
the search will terminate.
3.
device = \everex\emm.sys /e e800 268,30
This EMM.syS command line looks for the EMM.syS file in
the \everex subdirectory, enables interrupt 67 (Hex) chaining,
and defines expanded memory at segment address CSOO, port
address 268, page 30. If port address 268 is not found, it will
try to look for port addresses 2A8, 2B8 and 2E8.
4.
device
= emm.sys
258,00 268,00 208,00 218,00
This EMM.syS command line selects 258, 268, 208 and 218
(Hex) port addresses, with all ports assigned with EMS
logical starting page 00 (Hex). Use this command line when
you install two RAM 3000 Deluxe boards, with both boards
set for EMS mode only. NOTE: Make sure the EMS I/O
ports on the first board are 25.8 and 268, and the second board
are 208 and 218.
44
5.2 EDISK.8YS RAM Disk Device Driver
The Everex utility EDISK.syS is a software device driver
that allows you to set aside part of the computer's base, expanded or extended memory for a RAM disk. This RAM
disk is recognizable by DOS in the same manner as a hard
disk or floppy disk: you can create directories and subdirectory paths on it, and can transfer and save your files
just like a standard disk. DOS will assign the next available
logical drive name to each RAM disk defined: for example,
your first RAM disk will be defined as Drive "C" if you
have no hard disks installed and as Drive "D" if you have
one installed.
The RAM disk has the following advantages:
A. Access times are very short because there are no
mechanical access procedures.
B.
The RAM disk can be of any size. It can be made
larger or smaller, deleted and re-created, at will.
c.
You do not need additional hardware to implement a
RAM disk; this means you do not need to pay extra
money in order to implement a hard disk.
The RAM disk has the following disadvantages:
A. None of the data stored in a RAM disk is permanently
saved until you store the data on a real physical disk.
45
The RAM disk consists of RAM only, which is volatile.
Any attempt to reboot the system or loss of power to
the computer will result in a loss of data from the
RAM disk forever. You might forget this fact because
a RAM disk resembles a real physical drive.
B.
The portion of memory defined for RAM disk use is
unavailable for any other use.
Before you can use the EDISK.syS program, you must identify the following memory types:
BASE memory is memory addresses OK-640K (000009FFFFH). Every machine has some amount of base
memory; to find out how much you have, run the DOS
CHKDSK.COM program to get an accurate total.
EXPANDED memory refers to a special memory accessed by
a bank-switching technique that overcomes the OK-640K
(00000-9FFFFH) limitation. If you have memory space
defined under the Lotus/Intel/Microsoft Expanded
Memory Specification (EMS), you can use EDISK.syS to
define a RAM disk in this memory space. EDISK.syS
will work with all EMS-compatible memory boards
used in the IBM PC, AT and compatible computers.
EXTENDED memory exists only on the IBM PC AT and
AT compatibles, where the memory addresses are 1 to
16 M (lOOOOO-FFFFFFH). Since few application software programs run in extended memory, using
46
EDISKSYS is an excellent way for AT owners who
have extended memory available to take advantage of
this memory space.
Identify which types of memory exist in your system, and
decide which one will be used for a RAM disk. EDISKSYS
will allow you to define as many RAM disks as you want in
one or more memory types. You are limited only by the
system's memory capacity.
Please note that each RAM disk defined can ONLY use one
type of memory. You cannot define a single RAM disk to
split over several memory types. However, you can define
two or more RAM disks within one type of memory, as
long as the RAM disks fit within the computer's limit for
that type of memory.
5.2.1 Installing EDISK.syS
Start by copying the file EDISK.syS from the Everex utility
diskette into the root directory of your system disk. If you
prefer not to keep the program file EDISKSYS in your root
directory, you can instead copy it to a subdirectory; in this
case be sure to read Section 5.2.2: EDISK.SYS Parameters for
instructions on setting up the EDISK.syS command line to
run EDISK.syS from a subdirectory. If your computer is
floppy-based, the system disk is the DOS diskette that you
use to boot your system; if you have a hard disk then the
system disk is drive "C". We suggest copying the entire
utility diskette onto another disk, and storing the original in
a safe place.
47
Follow these steps to create a RAM disk with EDISK.syS:
1.
EDISK.syS is called up during the boot-up process from
a special file called CONFIG.syS on your system disk.
CONFIG.syS defines a series of hardware-related
"chores" that you want to perform each time you boot
up the system.
2.
If you already have a CONFIG.syS file on the system
disk, you can add the EDISK.syS command line by
using a text editor or word processor.
3.
If you do not have a CONFIGSYS file in your system,
create the EDISK.syS RAM disk by typing in the following lines. DO NOT do this step if a CONFIGSYS
file already exists on your system disk as it will
overwrite your old CONFIGSYS file.
cd \
copy con: config.sys
device = edisk.sys
[F6]
[Enter]
[Enter]
[Enter]
[Enter]
Type:
type config.sys
[Enter]
to confirm the existence of the EDISK.syS file, then
reboot your system to install the RAM disk.
48
5.2.2 EDISK.8YS Parameters
You can add special parameters to change the RAM disk's
buffer size, sector size, maximum number of root directory
entries and the type of memory where the RAM disk is
located. The EDISK.8YS parameters use this format:
device
= [path]edisk.sys [bbb] [sss] [ddd] [/e:[n]] [Ix] [II]
The values between the "[ ]" symbols are optional and can
be omitted. NOTE: DO NOT type in the "[ ]" symbols themselves.
[path]
This parameter defines the location of the
subdirectory where the EDISK.8YS file will be
stored. If your EDISK.8YS file is in the root
directory, you can omit this parameter.
[bbb]
This parameter defines the buffer size, or
capacity, of the RAM disk. If you do not
define this parameter, the default buffer size
will be 128KB; if you want a larger or smaller
RAM disk, enter the appropriate number in
KB. The smallest RAM disk size is lKB; the
largest RAM disk size is the total amount of
available memory of that type. Please note
that the memory space defined for a RAM
disk will not be available for other uses.
49
If your RAM disk resides in base memory,
you must leave at least 64KB of base memory
free for DOS. EDISK.syS will check that you
have 64KB of free base memory when it is
loaded; if the specified buffer size leaves less
than 64KB for base memory, it will reduce
the buffer size. If this still leaves less than
64KB, EDISK.syS will not load.
[sss]
This parameter defines the sector size. If you
do not define this parameter, the sector size is
512 bytes; if you define this parameter, the
valid choices are 128, 256 and 512.
[ddd]
This parameter defines the maximum number
of entries in the root directory of the RAM
disk. If you do not define this parameter, the
maximum number of entries is 64; if you do
include this parameter, the valid numbers
range from 2 to 512.
[I e[:o]],[lx]
EDISK.syS normally defines the RAM disk in
base memory unless you include the [le[:o]] or
[Ix] parameters on the EDISK.syS command
line. The [Ie] option informs EDISK.syS to
load the RAM disk to AT-only extended
memory.
The value [:n] represents the
number of sectors to transfer in and out of
extended memory at one time. If you omit
[:0], the default transfer size is 8; if you in-
50
elude [:n], the values are 1 to 8. The [Ix]
option informs EDISK.syS to load the RAM
disk in expanded (EMS) memory.
[II]
This parameter allows you to install the
RAM disk with no volume label, which gives
you an extra 32 bytes for other memory uses.
5.2.3 EDISK.syS Examples
device
= edisk.sys
This example gives you the default RAM disk: the buffer
size is 128KB, the sector size is 512 bytes, and the maximum
number of entries in the root directory is 64.
device
= \everex\edisk.sys 512 Ix
This example looks up the EDISKSYS driver in the \everex
subdirectory, then creates a 512KB RAM disk in expanded
memory.
device = \everex \edisk.sys 3072 128 256 I e:6
This example looks up the EDISKSYS driver in the \everex
subdirectory, then creates a RAM disk of 3072KB buffer
size, 128KB sector size, with the maximum number of root
directory entries at 256. It will create the RAM disk with
extended memory, and the memory block transfer size is 6.
51
A Note About Expanded Memory RAM Disks:
If you define your EDISKSYS RAM disk in expanded
memory (using the "Ix" parameter), it is very important that
you define the expanded memory software driver in your
CONFIGSYS file before you define your EDISKSYS RAM
disk.
For expanded memory RAM disks, you create the following
CONFIGSYS file (if you are using the EMM.syS software
device driver on the RAM 3000 Deluxe software diskette):
copy con: config.sys
device = emm.sys
device = edisk.sys Ix
[F6]
[Enter]
[Enter]
[Enter]
[Enter]
This CONFIG.syS file will create the expanded memory
space first, then create the expanded memory RAM disk.
52
5.3 ESPOOL.EXE Print Spooler
One of the most frustrating things about using a computer
is the fact that whenever you send ~ata out to your printer,
your system is often incapable of doing any other tasks
during the printing process. This problem can be especially
intolerable when printing long documents, since all that
time wasted by the computer just to print a long document
can definitely be put to better use.
On the RAM 3000 Deluxe software diskette is a program
called ESPOOL.EXE, which allows your computer to do
other tasks while the printer is printing a long document.
ESPOOL.EXE installs a print buffer of any size from lKB to
15360KB on any type of memory (base, extended, or expanded), and can direct the contents of the print spooler to
any parallel or serial port in your computer.
5.3.1 Installing ESPOOL.EXE
1.
Use the DOS COpy command to copy the file
ESPOOL.EXE from the RAM 3000 Deluxe software
diskette to the root directory of your system disk.
2.
Type:
ESPOOL
[Enter]
That's all you need to do! The print spooler is now
loaded into your system and ready to use.
53
5.3.2 ESPOOL.EXE Parameters
When you install ESPOOL.EXE by typing ESPOOL [Enter],
the resulting print spooler will be 64KB in size, located in
base memory, and direct the contents of the spooler to
parallel port LPT 1. However, you can change these
parameters if you want to change the size of the print
spooler, locate it in another type of memory, or direct the
contents of the spooler to another port besides LPT 1 parallel port. The ESPOOL.EXE command line uses this format:
[path]espool [/b:bbb] [Ie] [Ix] [/p:o] [ls:n[,b,p,d,s,h]] [lr]
Where:
[path]
represents the subdirectory path where the
ESPOOL.EXE program will be located. If
ESPOOL.EXE is located in the root directory,
you can omit this parameter.
[lb:bbb]
represents the size of the print spooler. Valid
sizes are lKB to 15360KB; if you omit this
parameter, the spooler size will be 64KB.
[Ie ],[/x]
represents what type of memory you want to
Normally,
locate your print spooler in.
omitting these parameters will result in the
print spooler located in base memory. Use
the [Ie] parameter if you want the spooler in
extended memory, and use the [Ix] parameter
if you want the spooler in expanded memory.
54
[/p:n]
represents which parallel port the contents of
the print spooler will be directed to. N ormally, not including this parameter will direct
the contents to parallel port LPT 1. If you
include this parameter, [/p:1] means directing
to LPT 1 parallel port, [/p:2] means directing
to LPT 2 parallel port, and [/p:3] means
directing to LPT 3 parallel port. Note that if
you only have one parallel port in your
system, we suggest using [/p:1], or omitting
this parameter altogether.
[/s:o]
represents which serial port the contents of
the print spooler will be directed to. If you
use this parameter, [ls:l] means directing to
COM 1 serial port (port address 3F8-3FF),
[/s:2] means directing to COM 2 serial port
(port address 2F8-2FF), [/s:3] directing to COM
3 serial port (port address 3E8-3EF), and [/s:4]
means directing to COM 4 serial port (port
address 2E8-2EF).
[,b,p,d,s,h]
represents parameters you can add as part of
the [/s:n] parameter. These parameters are: b
(which sets the baud rate; the valid values are
110, 150, 300, 600, 1200, 2400, 4800, and 9600), p
(which sets the parity bit; the valid values are
n for none, 0 for odd, and e for even), d
(which sets the databits; the valid values are 7
and 8), s (which sets the stopbit; valid values
55
are 1 and 2), and h (which enables the
XON/XOFF handshaking protocol to prevent
the sending of spooler contents to a serial
printer if the serial printer is not ready to
accept commands and spooler data).
NOTE: If you have already set the parameters
for the serial port with the DOS MODE.COl\t1
program, we suggest excluding the [b,p,d,s,h]
parameters, as these ESPOOL.EXE parameters
will change the original parameters defined by
MODE.COM.
[lr]
represents a special parameter which allows
you to check on the status of the print
spooler. After you load the ESPOOL.EXE
print spooler, when you type the command:
espool/r
[Enter]
the screen will respond with a status message
on the print spooler.
5.3.3 ESPOOL.EXE Examples
espool /b:32 /p:2
This enables a 32KB print spooler, with its contents directed
to parallel port LPT 2.
56
\util\espool Ib:256 Ix Ip:2
This looks for the ESPOOL.EXE program In the \util subdirectory, then enables a 256KB print spooler in expanded
memory, and directs its contents to parallel port LPT 2.
\everex\espool Ib:1024 Ie 1s:2,1200,e,7,1,h
This looks for the ESPOOL.EXE program in the \everex subdirectory, then enables a 1024KB print spooler in extended
memory, with its contents directed to serial port COM 2.
This ESPOOL.EXE command line tells the COM 2 serial port
to use 1200 baud transfer rate, even parity, 7 data bits and 1
stopbit. The XON/XOFF handshaking protocol is enabled.
57
Section 6: Troubleshooting
If you have trouble using the RAM 3000 Deluxe, this
section contains answers to commonly asked user questions.
In addition, this section tells how to get assistance if this
manual does not solve your problem.
6.1 Common Questions And Answers
Q.
Why is it that I cannot access extended memory defined on
the RAM 3000 Deluxe?
A. In order to access the extended memory on the RAM
3000 Deluxe, you must have at least 512KB of base
memory installed in your system. Also, if you have
extended memory already in your system, make sure the
starting address of the extended memory on the RAM
3000 Deluxe is equal to the amount of extended memory
already in your system (for example, if you have 2
megabytes of extended memory already installed in
your system, set memory starting address at 3072K
(300000H); see Section 3.3.1: Memory Configuration (Part
One) for instructions on adjusting the RAM 3000
Deluxe's memory starting address).
Q.
Why does the system not boot properly when I configure the
RAM 3000 Deluxe to upgrade base memory?
A. There are two possible explanations for this problem:
1
58
You forgot to run the AT SETUP program to
configure the system so it recognizes the memory
on the RAM 3000 Deluxe.
2
Q.
The chips on Bank 0 and Bank 1 (which are used
for base memory upgrading) are either improperly
installed or defective. See Appendix 5: If System Boot
Fails on how to remedy this problem.
I have difficulty in accessing the expanded memory on the
RAM 3000 Deluxe. What should I do?
A. Please make sure you followed the instructions in
Section 3.3.2: EMS Mode Configuration in order to
configure the board properly for EMS mode and the
instructions Section 5.1: EMM.SYS EMS Device Driver to
properly install the EMM.8YS expanded memory device
driver..
59
6.2 How To Get Assistance
If Section 6.1: Common Questions And Answers does not assist
you in solving the problem that occurred when using the
RAM 3000 Deluxe, we suggest using the following steps:
1.
Repeat the procedure that produced the problem, and
see if it happens again. If this is a software procedure
(e.g. using the EV159.EXE program to configure and test
the RAM 3000 Deluxe), press the [Fl] key to see the
help screen for suggestions.
2.
In most cases, this manual is the quickest and least expensive source of help. Make sure you read the manual
carefully, and only seek further avenues of help when the
manual can no longer assist you.
3.
If you cannot resolve the problem yourself, contact the
dealer where you purchased the RAM 3000 Deluxe
board.
4.
In the event the dealer cannot satisfactorily solve the
problem, you can call us directly. Our Technical Support hours are 8 a.m. to 5 p.m. (Pacific Time), Monday
through Friday.
60
5.
In order to simplify the troubleshooting of your RAM
3000 Deluxe, the Technical Support Department suggests you give the following details when you place
your call:
The Owner's Manual you are currently reading
(include the version number).
The name of the operating system you are using
and its version number.
The contents of your AUTOEXEC.BA T file.
The contents of your CONFIG.SYS file.
The brand name and model of the computer you
are using.
The brand name and model of ~ll external peripherals attached to the computer (monitors,
modems, and printers).
The brand name and model of all internal peripherals installed in the computer (internal modems,
multifunction cards, video adapters, etc.).
6.
In addition, you should note any other facts or circumstances that seem strange or relevant to you.
7.
If it determined that the RAM 3000 Deluxe board must
be returned to Everex for service, we will need the following information:
The serial number of the board (Iocated on a small
white sticker on the back side of the board).
A photocopy of the sales invoice.
The date and place of purchase.
61
8.
62
Finally, try to be near your system when you call, so
you can follow the suggestions from Technical Support
while on the phone in order to solve your problem.
Appendix 1: Memory Basics:
AI.I Description Of Memory
The RAM 3000 Deluxe is designed to provide up to three
megabytes of extended memory for AT-compatible machines. In addition, up to three megabytes of memory on
the RAM 3000 Deluxe can be addressed as expanded
memory under the Lotus/Intel/Microsoft EMS specification
(Version 320). This board can also be used to upgrade base
memory to the 640K (9FFFFH) base memory limit imposed
by DOS. If you are not familiar with the distinction
between base, extended and expanded memory, refer to 'the
following explanations.
Base memory - memory from the 0 byte memory address up
to the 640K limit (OOOOOH-9FFFFH). This memory area is
usable by DOS for programs and data.
Extended memory - memory from 1 to 16 megabyte memory
address (lOOOOOH-FFFFFFH). This area can be used by the
A T or AT compatible to store data and programs. DOS
does not recognize this memory space, but certain programs
can use this memory space (notably the EDISK.syS RAM
disk utility and the OS/2 disk operating system).
Expanded memory - memory (specification developed by a
joint project of Lotus, Intel and Microsoft) that can be accessed by specially-modified software in order to overcome
the DOS-imposed OK-640K (OOOOOH-9FFFFH) memory
address limit for program data.
63
This type of memory allows program data to be as large as
eight megabytes in size when several boards that meet this
memory specification are installed in the computer. (See
Appendix 3: EMS Technical Reference for details).
Note that the memory addresses of 640K to 1024K (AOOOOHFFFFFH) cannot be addressed by the user. This area is
reserved for programs used by the system in order for the
computer to function. (It is also used as the 110 port
address area for expanded memory.) Also, the memory addresses of 16256K to 16384K (FEOOOOH-FFFFFFH) are also
reserved for system use.
64
Al.2 AT Memory Line
Figure 11 shows how memory is allocated on the AT and
highlights the locations of base, extended and system
reserved memory.
16MB-------------r----------------~
EXTENDED
MEMORY AREA
(USER MEMORY)
IMB-------------~--------~------~
MEMORY
RESERVED FOR
SYSTEM
640 K - - - - - - - - - - - ~----------_f
BASE MEMORY
AREA
(USER MEMORY)
o
K - - - - - - - - '-------------'
Figure 11: A T Memory Address Line
65
EMS expanded memory space is not linear, but addressed
through 110 port-controlled memory addresses called pages.
This means that on the EMS board, data is divided into
16KB pages, and then mapped into a 64KB address space of
the CPU memory called a window. By varying the page
number register, anyone of the 16KB pages in a 2048KB expanded memory space can be mapped into this window.
Figure 12 shows how this mapping is done.
. . - - - - , 2048 KB
(2 MB)
-m3~
1024 KB
_ _ _ _ _ ~1 ~~) _
64K
l O N E 16-KB
WINDOW
PAGE
_1------;
PHYSICAL
PAGE
640KB
BASE
MEMORY
o
PC ADDRESS
SPACE
L...-_~
MAPPING
REGISTERS
OKB
EMS
MEMORY
Figure 12: EMS Page Frame Addressing
66
Appendix 2.' Dipswitch Setting Table
A2.1 Dipswitch SW2
TABLES
SW2 Functions
POSITION
FUNcrION
1-3
Selects number of 512KB memory banks filled (see
Section 3.3.1: Memory Configuration (Part Two) on setting
these positions).
4-5
Selects contiguous memory space in 1 MB increments.
6-8
Selects contiguous memory space in 128KB increments.
The actual contiguous memory space defined for the RAM
3000 Deluxe will always be the amount represented by
positions 4-5 added to the amount represented in positions 68.
TABLE 9
Position 4-5 of SW2
Memory
Represented
(1 MB increments)
o MB
1 MB
2 MB
3 MB
Position
4
5
OFF
OFF
ON
ON
OFF
ON
OFF
ON
67
TABLE 10
Position 6-8 of SW3
Memory
Represented
(128KB Increments)
6
OKB
I28KB
256KB
384KB
5I2KB
640KB
768KB
896KB
OFF
OFF
OFF
OFF
ON
ON
ON
ON
Position
7
OFF
OFF
ON
ON
OFF
OFF
ON
ON
8
OFF
ON
OFF
ON
OFF
ON
OFF
ON
Configuration Examples
If you want 896KB of contiguous memory:
You choose the 1t896KBIt option from Table 10; switch SW3
positions 6-8 ON.
If you want 2432KB of contiguous memory:
You choose the "2 MBIt option from Table 9 and the "384KBIt
option from Table 10; switch SW3 positions 4, 7, and 8 ON.
68
A2.2 Dipswitch SW3
TABLE 11
SW3 Functions
POSITION
FUNCTION
1
Selects between 8 bit (OFF) and 16 bit (ON) EMS
transfer mode.
2-5
Selects RAM 3000 Deluxe starting address in 1 M increments.
6-8
Selects RAM 3000 Deluxe starting address in 128K
increments.
The actual starting address for the RAM 3000 Deluxe is the
amount represented by positions 2-5 added to positions 6-8.
TABLE 12
Positions 6-8 of SW3
RAM 3000 Deluxe
Starting
Address
(128K Increments)
6
7
8
OK (OOOOOH)
128K (20000H)
256K (40000H)
384K (60000H)
512K (80000H)
640K (AOOOOH)
768K (COOOOH)
896K (EOOOOH)
OFF
OFF
OFF
OFF
ON
ON
ON
ON
OFF
OFF
ON
ON
OFF
OFF
ON
ON
OFF
ON
OFF
ON
OFF
ON
OFF
ON
Position
69
TABLE 13
Positions 2-5 of SW3
RAM 3000 Deluxe
Starting
Address
(1 M Increments)
2
Position
3
4
5
o M (OOOOOOH)
1 M (100000H)
2 M (200000H)
3 M (300000H)
4 M (400000H)
5 M (500000H)
6 M (600000H)
7 M (700000H)
8 M (800000H)
9 M (900000H)
10 M (AOOOOOH)
11 M (BOOOOOH)
12 M (COOOOOH)
13 M (DOOOOOH)
14 M (EOOOOOH)
15 M (FOOOOOH)
OFF
OFF
OFF
OFF
OFF
OFF
OFF
OFF
ON
ON
ON
ON
ON
ON
ON
ON
OFF
OFF
OFF
OFF
ON
ON
ON
ON
OFF
OFF
OFF
OFF
ON
ON
ON
ON
OFF
ON
OFF
ON
OFF
ON
OFF
ON
OFF
ON
OFF
ON
OFF
ON
OFF
ON
OFF
OFF
ON
ON
OFF
OFF
ON
ON
OFF
OFF
ON
ON
OFF
OFF
ON
ON
Configuration Examples
If you have 256KB of base memory on the motherboard:
You choose the ''256K'' option from Table 12; switch SW3
position 7 ON. This will upgrade base memory from 256K
to 640K (40000H-9FFFFH) and upgrade extended memory
from 1024K (100000H).
70
If you have a CS8220-based A T motherboard with 512KB base
and 512KB extended memory installed:
You choose the "640K" option from Table 12; switch SW3
positions 6 and 8 ON. This will upgrade base memory from
512-640K (BOOOOH-9FFFFH) and upgrade extended memory
from 1536K (180000H).
If you have 7680KB of extended memory already installed in your
system:
You choose the "512K" option from Table 12 and the '7 Mil
option from Table 13; switch SW3 positions 3-6 ON. This
will upgrade extended memory from 7680K (780000H).
NOTES:
1.
Avoid configuring SW3 so it will result in starting addresses of 768K (COOOOH) and 896K (EOOOOH); these addresses are reserved for system memory use. The "640K"
position from Table 12 is ONLY for CS8220-based AT
motherboards that split S12KB base and S12KB extended
memory on the motherboard.
2.
Make sure you have at least S12KB of base memory installed in your system, or your system will not be able to
access extended memory space.
71
Appendix 3.' EMS Technz'cal Reference
Applications programmers writing software for the EMS
mode on the RAM 3000 Deluxe should refer to the Lotus/Intel/Microsoft (LIM) specification, Version 3.20, released September 1985. Use of this document will facilitate
portability to all EMS-compatible expanded memory cards.
A3.1 Expanded Memory Definition
Expanded memory is a bank switching technique that increases the memory capacity of the PC up to eight
megabytes beyond the present DOS memory addressing
range of OK-640K (OOOOOH-9FFFFH).
A 64KB window
(called a page frame) is located between the 640K and %OK
(AOOOOH-EFFFFH) reserved area boundaries. The page
frame is divided into four contiguous 16KB pages. The EMS
mode on the RAM 3000 Deluxe is divided into 128 16KB
blocks, totaling two megabytes. By sending commands to
the control circuitry on the RAM 3000 Deluxe, the
EMM.SYS expanded memory manager can map anyone of
these blocks into any of the four pages. Refer to the
Lotus/Intel/Microsoft (LIM) Expanded Memory Specification (Version 3.20), September 1985 if you need a more detailed explanation of expanded memory.
72
A3.2 Page Frame Addressing And
Register Output
"Paging" is a method of memory mapping that allows a
computer to utilize more memory than it can physically address. Paging works because EMS memory divides the
physical memory on an EMS board into pages consisting of
16KB each. These pages are subsequently mapped into an
address space of the CPU; this address is known as a
window. By varying the values of the mapping registers, any
one of the 16KB physical memory pages on the EMS board
can be mapped into the window. The following figure
shows how the mapping is completed.
73
. - - - - . 2048 KB
(2MB)
-m3~
1024 KB
&4K ,- - ~~E-l;Ya~)WINOOW
PAGE
,--_'"
- - - - - i PHYSICAL
PAGE
640KB
BASE
MEMORY
PC ADDRESS
SPACE
MAPPING
REGISTERS
EMS
MEMORY
Figure 13: EMS Page Frame Addressing
74
A3.3 EMS I/O Port Address Selections
EMS uses 110 ports to set up mapping information. These
1/0 ports are selectable and a number of 110 ports have
been reserved for EMS memory. These ports are:
Mapping Registers
Page Frame Registers
02X8:
42X8:
82X8:
C2X8:
02X9
42X9
82X9
page
page
page
page
1
2
3
4
where the variable X is selectable in a range from 0 to E.
The page frame registers determine the starting address of
the EMS window in the CPU addressing space, while the
mapping registers determine which 16K page of physical
memory of the EMS board is to be mapped into the
window.
Each RAM 3000 Deluxe has four 16K pages that map into
the 64K window, yet at anyone time there should not be
more than one active page in the same page location within
the window. By controlling the MSB of the mapping register, one can enable or disable the corresponding page. As a
result, more than one EMS card can be used. According to
specification, EMS can support up to 8MB of memory.
75
A3.4 Mapping Registers
Every page of EMS memory is 16KB in size. By setting the
mapping registers to values from 0 to 127, one of the 16KB
pages in a two-megabyte EMS memory board can be
mapped into the page frame window. With bit 0 to bit 6 accounting for the 0 to 127 range, the last bit (MSB) in the
mapping register can be used as an enable/disable flag for
that particular page. Each mapping register can handle up
to 2 megabytes of EMS memory (16KB x 128 = 2M). Since
each page frame is 64K, four such pages can be mapped into
the window at any time. These four mapping registers are
located in the following addresses:
02X8
42X8
82X8
C2X8
X is the variable selected by dipswitch SW1 and SW2 (EMS
I/O port address select). In theory, SW1 and SW2 can select
X from 0 to F; but in order to avoid conflicts with other I/O
devices, the Everex EMM.SYS device driver will accept only
these X values:
0, 1, 5, 6, A, B, E
76
For those who wish to write their own software to use expanded memory, all 15 values (0 to E) can be used as the X
variable as long as the resulting port addresses do not conflict with other I/O devices. The contents of the mapping
registers can be read by doing an 110 read from the same
address location they were written to.
The following figure represents how the contents of the
mapping registers can be used:
LSB
XXXXXXX
\
Bits
Bit 7
0:
1:
page disabled
page enabled
0-127:
~
maps one of the 128 16K
size pages of EMS memory from
the RAM 3000 Deluxe board
into a window.
Figure 14: Mapping Registers
77
A3.5 Page Frame Registers
The page frame registers are used to store the mapping
values which determine the starting address for the page
frame in the physical memory space of your computer.
These registers are write only. Choose one of the eight possible starting addresses by writing different values to the
page frame registers. Only bit 7 (MSB) is used to set up
these registers. Table 14 gives the values that should be assigned to a particular page frame register with respect to a
page frame starting address.
TABLE 14
Page Frame Registers
Page Frame Register MSB
42X9
02X9
D
Where D is bit 7
D
D
0
0
0
C4000
784K
0
0
1
C8000
800K
0
1
1
0
CCOOO
816K
0
1
832K
1
0
1
0
0
1
1
1
1
1
DOOOO
04000
D8000
DDOOO
EooOO
0
1
NOTE: Bit 0 to Bit 6 are don't cares.
78
Page Frame Starting Address
82X9
848K
864K
880K
896K
Generally, all EMS boards should have the same values in
their page frame registers so that they all use the same 64K
window in the physical memory space of a computer. However, if you wish to write your own software, use the page
register that best suits your specific applications.
The Everex EMM.syS device driver provided to manage
EMS memory automatically tries to find a contiguous 64K
space between C4000 and FOOOO if no user-specified address
is supplied (it will set the page frame register accordingly).
However, if the page frame software registers are to be set
directly with the user's own software, they must be set prior
to accessing any of the mapping registers.
NOTE: Writing to the page frame registers will destroy the
contents of the mapping registers.
79
Appendix 4.' Regarding the AST PCnet II
If you enable the RAM 3000 Deluxe for EMS mode and
also install the AST PC net II network adapter board, a
software conflict will occur involving the use of the interrupt vector 67 (Hex~ The EMM.SYS expanded memory
device driver uses this interrupt vector; however, some
hardware and software applications (notably the penet II
board) will use this interrupt vector also. To prevent this
conflict from happening, the EMMSYS command line in
your CONFIGSYS file includes a "/e" parameter so several
applications (including the AST PCnet II board) can share
the 67 (Hex) interrupt vector.
To ensure the RAM 3000 Deluxe and the penet II boards
will work together in the same system, you should add the
EMMSYS command line with the "/e" parameter as the last
line in your CONFIGSYS file (see Section 5.1.1: Installing
EMM.SYS on how to install the EMMSYS device driver).
However, if you define any special applications in expanded
memory space that require a driver in the CONFIGSYS file,
be sure the command line for the expanded memory
application device driver comes after the EMMSYS
command line in your CONFIGSYS file.
80
Appendix 5: If System Boot Fails
If you have set the RAM 3000 Deluxe to upgrade base
memory and have installed the board, some AT compatibles
may not start up during the bootup process. This is due to
the possibility that the chips used for upgrading base
memory may be improperly installed or are defective.
If this occurs, remove any other extended memory boards
installed in your AT; then set the board's memory starting
address to either 1 M (lOOOOOH), 1408K (l60000H), or 1536K
(l80000H), depending on the design of your AT motherboard.
Reboot the system; if the SETUP program reports a
memory mismatch, inform it of only the base memory
already in your system before you install the RAM 3000
Deluxe board. Then run EV159.EXE to find the location of
any bad chips. Check if the chips are improperly inserted
(did you bend or break the chip pins and/or improperly
orient the chips?); if the chips are properly inserted, the
RAM chips are defective and must be replaced.
81
Appendix 6.. For Extended Memory Users
If you plan to use the RAM 3000 Deluxe in conjunction
with an extended-memory only operating system (for
example OS/2 and Xenix), please note that you cannot use
the EVlS9.EXE configuration and diagnostics program on
the RAM 3000 Deluxe software diskette when running these
operating systems.
In these cases, we suggest doing the following:
1.
Bootup your system with a PC-DOS or MS-DOS
Version 3.x system diskette in drive A.
2
Replace the system diskette with the RAM 3000 Deluxe
software diskette and run the EVlS9.EXE program to
configure and test your board.
This will ensure that the RAM 3000 Deluxe board will work
properly when running extended-memory programs.
82
PRT-00034-99
Addendum
Expanded Memory Manager (EMM.SYS)
Driver to Support EMS Version 4.0
Everex Systems is shipping a new software device driver
that recognizes your computer's expanded memory space,
and conforms to the new Lotus/Intel/Microsoft (LIM)
Expanded Memory Specification 4.0, dated October 20, 1987.
The material in this addendum replaces the information in
the product manual that refers to the software driver
EMM.SYS supporting EMS version 3.20.
The new EMM.SYS device driver that conforms to the EMS
4.0 specification is backward compatible, and can be used
with software designed to make use of expanded memory
written with EMS 3.2 specifications. The main feature of
the new EMM.SYS program conforming to the LIM EMS
4.0 specification is that it recognizes up to 32 megabytes of
expanded memory.
The EMM.SYS program defaults to certain operating
parameters when it is loaded. However, you can explicitly
reconfigure EMM.SYS for your system by specifying
command line parameters within the CONFIG.syS file. For
more details on the EMM.SYS command line, refer to the
last section of this addendum called "EMM.SYS Command
Line Arguments."
If you have an Everex memory board with model numbers
EV-165, EV-165A, or EV-173, you must use the following
EMM.SYS command line:
1
DEVICE
=
EMM.SYS
If you have any other Everex memory board model
numbers, you must use the [port,page] parameter in the
EMM.SYS command line as follows:
DEVICE
=
EMM.SYS [PORT,PAGE]
For the [POR T,P AG E] parameter, type in the port address
of the EMS memory, beginning at a specific logical page
(indicate the port and page in hexadecimal values). For
example, you would type in a command line like the
following:
DEVICE
=
EMM.SYS 258,00
In this example, the port address of the EMS memory
begins at 258, with the logical page starting at 00. All of
these parameters are explained in more detail in the last
section of this addendum called, "EMM.SYS Command Line
Arguments."
NOTE: If you have a combination of Everex memory boards,
for example, an EV-165 and an EV-158A, you would use the
more comprehensive EMM.SYS command line similar to the
following:
DEVICE = EMM.SYS 258,00
2
Installing the EMM.SYS Program
Expanded memory in your computer can only be accessed
when it is managed by the expanded memory manager
program EMM.SYS.
This program is provided on the
Everex Systems utility diskette.
Most systems have a
CONFIG.SYS file of "chores" for the computer to perform
automatically every time it boots up. You need to add the
line device = emm.sys to the CONFIG.SYS file.
1.
Insert the Everex Systems utility diskette into floppy
disk drive A and type:
cd\
copy a:emm.sys c:\
2.
[enter]
[enter]
We recommend using a line editor or your word
processing application program to load the file called
CONFIG.SYS; this file is stored in the root directory of
your system disk. You need to add the device driver
emm.sys into CONFIG.SYS so your expanded memory
will always be accessible. If you do not have a line
editor or word processing program to modify or create
the CONFIG.SYS file, create one now with the DOS
command COPY CON CONFIG.SYS.
3
3.
Once the CONFIG.SYS file is loaded, add the following
line:
For Everex memory boards with model numbers EV165, EV-165A, and EV-173:
device = emm.sys
[enter]
For Everex memory boards with any other model
numbers:
device
=
emm.sys 258,00
[enter]
Where 258 and 00 are the port address, and logical
starting page of the EMS memory.
4.
4
Save the CONFIG.SYS file and reboot the system. The
EMM.SYS program will report the status of the
expanded memory in your computer. If everything is
operating correctly, a message similar to "Expanded
Memory Manager Installed" will be displayed.
Using the DOS COpy CON Command to Create or
Modify the CONFIG.SYS File
We recommend using your editor or word processing
program to create or modify the CONFIG.SYS file.
However, if you do not have an editor or word processing
program, you can use the DOS COpy CON command to
add the EMM.SYS device driver.
1.
Make sure you are in the root directory of your system
disk. At the DOS prompt type:
cd\
type config.sys
[enter]
[enter]
If the message "File not found" appears, go on to step 2.
If one or more command lines appear, get a pencil and
paper and copy down the line(s) exactly as they appear
on your 'Screen.
2.
WARNING:
This step will overwrite any
config.sys file! At the DOS prompt type:
cd\
copy con: config.sys
existing
[enter]
[enter]
5
3.
Type in one of the following EMM.SYS command lines
depending upon which Everex memory board you have:
For Everex memory boards with model numbers EV165, EV-165A, and EV-173 type:
device = emm.sys
[enter]
For Everex memory boards with any other model
numbers type:
device = emm.sys 258,00
[enter]
Where 258 and 00 are the port address, and logical
starting page of the EMS memory.
4.
If you wrote down the contents of a previous config.sys
file, type the previous contents back in now.
[F6]
[enter]
Pressing the [F6] function key and the [enter] key will
save your new config.sys file.
5.
To confirm that "device=emm.sys" is now in the
config.sys file, type: TYPE CONFIG.SYS [ENTER]. This
command will list the contents of your config.sys file.
6.
Reboot your system and the EMM.SYS program will
report the status of the expanded memory.
If
everything is operating correctly, a message similar to
6
"Expanded
displayed.
Memory
Manager
Installed"
will
be
EMM.SYS Command Line Arguments
Although the command line "device=emm.sys" with its
default values is fine for most users, the EMM.SYS
expanded memory manager lets you specify certain
parameters in the CONFIG.SYS command line. The format
of the command line is as follows:
device = [\path]emm.sys [lc] [pppp] [port,page]* [lv(:nnn)] [ld]
[lh(:nnn)]
The [ ] characters are for your reference only; do NOT type in
the [ ] characters.
* Do NOT use the [port,page] parameter in the command
line with Everex memory board model numbers EV-165,
EV-165A, or EV-173. In contrast, the [port,page] parameter
is NOT optional for all the other Everex memory board
model numbers.
7
Where:
\path
defines the location of the directory
where the EMM.SYS program is
stored for those who prefer not to
have the program in their root
directory. If you would like
EMM.SYS in your root directory, omit
the \path option altogether.
Ie
informs EMM.SYS to chain interrupt
vector 67 Hex. If you have another
device that uses interrupt vector 67
Hex, such as AST's PC-NET II
adapter, include the Ie option in your
command line. The LIM EMS
specification defines this vector as a
means of performing EMS service
calls.
pppp
informs EMM.SYS to start searching
for a page frame at a particular
segmen t address. The page frame is
the first valid address of the EMS
memory mapping window. If the
specified page frame is occupied (for
example, by a ROM or a RAM),
EMM.SYS will scan starting from the
next page frame address for an
alternate unused 64 kbyte area. The
8
search will continue up to, and
including, address EOOO. If the search
fails to find an unused 64 kbyte area, a
message is printed and the search
terminated. Valid page frame
addresses are C400, C800, CCOO, and
DOOO. The default value is C400.
NOTE: Four additional page frame
addresses are available and these are
D400, D800, DCOO, and EOOO. However,
these four addresses do not work in AT
computers whose BIOS and BASIC
ROMs occupy address segments below
FOOO.
port,page
communicates to EMM.SYS that an
Expanded Memory board is
addressable at a given port, beginning
at a specific page. Do NOT use this
parameter if you have an Everex
board model number EV-165, EV-165A,
or EV-173. Valid port addresses are
208, 218, 258, 268, 2A8, 2B8, and 2E8.
Valid logical page values range from
00 to 7F (HEX).
NOTE: If you have used an Everex
memory board to upgrade your
computer's system board memory, for
example, from SI2K to 640K, do NOT
9
use logical pages 00-07; these pages are
used for the memory upgrade. The next
available logical page would be 08.
/V:nnn
informs EMM.SYS to use the
Extended Memory found on the IBM
PS/2 2 Megabyte Expansion board and
other compatible cards as Expanded
Memory. nnn is the number of 16
kbyte pages to use for this purpose,
with the pages ranging from 1 to 896.
/D
tells EMM.SYS not to check the
default page frame. As a result, the
page frame will not be checked for a
possible RAM or ROM.
/H:nnn
informs EMM.SYS of the maximum
number of Expanded Memory handles
to support. Using fewer handles
reduces the amount of base memory
the Expanded Memory Manager will
occupy. nnn is the number of handles,
and ranges from 64 to 255. The
default value is 64.
10
Examples of Optional Command Lines:
1.
DEVICE = EMM.SYS CCOO
[ENTER]
This command line locates the page frame address at CCOO.
If the page frame address you specify is occupied (for
example, by a ROM or RAM), EMM.SYS will scan from the
next valid address for an alternate unused 64K area. The
search will continue up to (and including) address EOOO. If
the search does not find a valid 64K area, the message "No
room on motherboard for page frame" will appear, and the
search will terminate.
2.
DEVICE=EMM.SYS DOOO 2A8, 08
[ENTER]
This command line begins page frame addressing at DOOO,
selects the EMS port address at 2AS, and assigns the logical
EMS starting page at OSH. In this example, we assume that
the computer's base memory was 512K, and that the Everex
memory board was used to upgrade the base memory from
512K to 640K. In this case, the first S logical pages from 0007 Hex are already being used. Therefore, we assign the
EMS memory the next available logical page at OSH.
11
EVEREX SYSTEMS INC.
48431 MRMONT DRIVE
FREMONT, CA 94538
SALES: 1-800-821-0806
TECH SUPPORT: (415) 498-1115
FAX: (415) 651-0728
TELEX: 5101000590
MAN-OOI09-21