1
TM-H6000II with
Image Scanner
User’s Manual / Bedienungsanleitung
Gebruikershandleiding / Manuel d’utilisation
Manual do utilizador / Manual del usuario
Manuale dell’utente
401468100
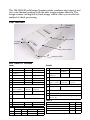
This TM-H6000II with Image Scanner printer combines slip, impact, and
two-color thermal printing with the new image scanner function. The
image scanner can digitize a check image, which offers you an efficient
method of check processing.
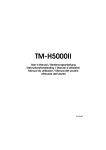
Part Names
1
roll paper
cover
2
5
unit cover
control
panel
3
front cover
4
power switch
DIP Switch Tables
Serial
Parallel
SW Function
ON
OFF
SW
Function
ON
OFF
1-1 Data receive error Ignored
Prints “?”
1-1
Auto line feed
Always disabled
1-2 Receive buffer
capacity
45 bytes
4 KB
Always
enabled
1-2
4 KB
XON/XOFF
DTR/DSR
Receive buffer
capacity
45 bytes
1-3 Handshaking
1-3~ Reserved. Fixed to Off.
1-8
1-4 Data word length 7 bits
8 bits
1-5 Parity check
Enabled
Disabled
1-6 Parity selection
Even
Odd
1-7 Transmission speed (See table below.)
1-8
2-1 Handshaking
(BUSY condition)
Receive
buffer full
Offline or Receive
buffer full
2-2 Customer display
connection
Connected Not connected
2-3 Print density
2-4
See Table A.
2-5 Internal use. Fixed to Off.
2-6
2-1
Handshaking
Receive
(BUSY condition) buffer full
Offline or Receive
buffer full
2-2
Internal use. Do not change setting. Fixed to Off.
2-3
2-4
Print density
2-5
2-6
Internal use. Fixed to Off.
See Table A.
2-7
Reserved (for serial interface) Fixed to Off.
2-8
I/F pin 31 reset signal. Do not change setting.
Fixed to On.
Table A
2-7 I/F pin 6 reset
Enabled
Disabled
Print density/low power
SW 2-3
2-8 I/F pin 25 reset
Enabled
Disabled
1 Print density (Light)
ON
ON
2
OFF
OFF
3
ON
OFF
4 Print density (Dark)
OFF
ON
SW
Transmission speed (bps)-bits per second
4800
9600
192000
38400
1-7
ON
OFF
ON
OFF
1-8
ON
ON
OFF
OFF
SW 2-4
English
All rights reserved. No part of this publication may be reproduced, stored in a retrieval system, or transmitted in any
form or by any means, electronic, mechanical, photocopying, recording, or otherwise, without the prior written
permission of Seiko Epson Corporation. No patent liability is assumed with respect to the use of the information
contained herein. While every precaution has been taken in the preparation of this book, Seiko Epson Corporation
assumes no responsibility for errors or omissions. Neither is any liability assumed for damages resulting from the use
of the information contained herein.
Neither Seiko Epson Corporation nor its affiliates shall be liable to the purchaser of this product or third parties for
damages, losses, costs, or expenses incurred by purchaser or third parties as a result of: accident, misuse, or abuse of
this product or unauthorized modifications, repairs, or alterations to this product, or (excluding the U.S.) failure to
strictly comply with Seiko Epson Corporation’s operating and maintenance instructions.
Seiko Epson Corporation shall not be liable against any damages or problems arising from the use of any options or
any consumable products other than those designated as Original Epson Products or Epson Approved Products by
Seiko Epson Corporation.
EPSON and ESC/POS are registered trademarks of Seiko Epson Corporation.
NOTICE: The contents of this manual are subject to change without notice.
Copyright © 2001 by Seiko Epson Corporation, Nagano, Japan.
EMC and Safety Standards Applied
Product Name: TM-H6000II with Image Scanner
Model Name:
M147D
The following standards are applied only to the printers
that are so labeled. (EMC is tested using the EPSON
power supplies.)
Europe:
CE marking
Safety: EN 60950
North America: EMI: FCC/ICES-003 Class A
Safety: UL 1950/CSA C22.2 No. 950
Japan:
EMC: VCCI Class A
JEIDA-52
Oceania:
EMC: AS/NZS 3548
M147D: Class A
WARNING
M147D is a Class A product. In a domestic environment
this product may cause radio interference in which case
the user may be required to take adequate measures.
FCC Compliance Statement
For American Users
The connection of a non-shielded printer interface cable
to this printer will invalidate the EMC standards of this
device.
You are cautioned that changes or modifications not
expressly approved by SEIKO EPSON Corporation
could void your authority to operate the equipment.
This equipment has been tested and found to comply
with the limits for a Class A digital device, pursuant to
Part 15 of the FCC Rules. These limits are designed to
provide reasonable protection against harmful
interference when the equipment is operated in a
commercial environment.
This equipment generates, uses, and can radiate radio
frequency energy and, if not installed and used in
accordance with the instruction manual, may cause
harmful interference to radio communications.
Operation of this equipment in a residential area is
likely to cause harmful interference, in which case the
user will be required to correct the interference at his
own expense.
CE Marking
FOR CANADIAN USERS
The printer conforms to the following Directives and
Norms:
Directive 89/336/EEC EN 55022
M147D: Class A
EN 55024
IEC 61000-4-2
IEC 61000-4-3
IEC 61000-4-4
IEC 61000-4-5
IEC 61000-4-6
IEC 61000-4-8
IEC 61000-4-11
This Class A digital apparatus complies with Canadian
ICES-003.
WARNING
TM-H6000II with Image Scanner User’s Manual 3
English
Safety Precautions
This section presents important information intended to ensure
safe and effective use of this product. Read this section carefully,
and store it in an accessible location.
WARNING:
Shut down your equipment immediately if it produces smoke, a strange
odor, or unusual noise. Continued use may lead to fire. Immediately
unplug the equipment, and contact your dealer or a SEIKO EPSON
service center for advice.
Never attempt to repair this product yourself. Improper repair work can
be dangerous.
Never disassemble or modify this product. Tampering with this product
may result in injury or fire.
Be sure to use the specified power source. Connection to an improper
power source may cause fire.
Do not allow foreign matter to fall into the equipment. Penetration by
foreign objects may lead to fire.
If water or other liquid spills into this equipment, unplug the power cord
immediately, and then contact your dealer or a SEIKO EPSON service
center for advice. Continued usage may lead to fire.
CAUTION:
Do not connect cables in ways other than those mentioned in this
manual. Different connections may cause equipment damage and
burning.
Be sure to set this equipment on a firm, stable, horizontal surface.
Product may break or cause injury if it falls.
Do not use in locations subject to high humidity or dust levels. Excessive
humidity and dust may cause equipment damage or fire.
Do not place heavy objects on top of this product. Never stand or lean
on this product. Equipment may fall or collapse, causing breakage and
possible injury.
To ensure safety, unplug this product before leaving it unused for an
extended period.
Do not touch the thermal head or paper feed motor. Wait for the head
and the motor to be cool. The head and the motor can be very hot
after printing for a long time. Touching them may cause burns.
4 TM-H6000II with Image Scanner User’s Manual
English
Caution Labels
WARNING:
Do not connect a telephone line to the drawer kick-out connector or
the display module connector; otherwise, the printer and the telephone
line may be damaged.
CAUTION:
The thermal head and paper feed motor for the thermal section are
hot.
Purpose of This Manual
This manual provides information to operators of the TM-H6000II
with Image Scanner to describe basic operations to enable safe and
correct use of the printer.
Unpacking
❏ Printer
❏ Ribbon cassette
❏ Power switch cover
❏ Roll paper
❏ Endorsement ribbon cassette
❏ Two hexagonal millimeter
screws (only for the serial
interface printer)
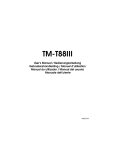
Control Panel (LEDs and Buttons)
POWER LED
Lights when the power is on
and is off when the power is
off.
ERROR LED
Off when the printer is
online, lights when the
printer is offline, and flashes
when an error occurs.
PAPER OUT LED
Lights when roll paper is out
or nearly out.
SLIP LED
Lights when a cut sheet (slip
or check) is being printed or
when a check is being
scanned. Flashes while
waiting for a cut sheet to be
inserted or removed.
FEED button
Feeds the roll paper.
RELEASE button
Releases a cut sheet (slip or
check).
TM-H6000II with Image Scanner User’s Manual 5
English
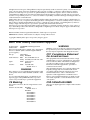
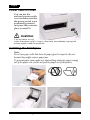
Power Switch Cover
You can use the
enclosed power switch
cover to make sure that
the power switch is not
accidentally pressed.
Just press the cover into
place to install it.
WARNING:
If an accident occurs
when the power switch cover is attached, immediately unplug the
power supply cable to avoid fire.
Installing the Roll Paper
Note:
Do not use paper rolls that have the paper glued or taped to the core
because they might cause a paper jam.
To prevent paper jams, make sure that nothing obstructs paper coming
out of the paper exit, and do not pull the paper out of the printer.
6 TM-H6000II with Image Scanner User’s Manual
English
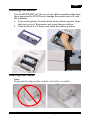
Installing the Ribbon
Use the EPSON ERC-32. The use of any ribbon cassettes other than
those approved by EPSON may damage the printer and will void
the warranty.
1. Turn on the printer. Turn the knob on the ribbon cassette. Open
the front cover of the printer, and insert the new ribbon.
2. Turn the knob 2 or 3 times, and check the ribbon position.
Inserting Slip Paper
Note:
Be sure that the slips are flat, without curls, folds, or wrinkles.
TM-H6000II with Image Scanner User’s Manual 7
English
Troubleshooting
Error light on or blinking.
❏ The print head temperature may be extremely high. Wait until
the print head cools and the printer resumes printing
automatically.
❏ Make sure that the roll paper and unit cover are properly
closed.
❏ Turn off the printer, and check for a paper jam.
❏ The autocutter may be jammed. See the description below.
❏ Turn off the power, wait several seconds, and then turn it on
again. If the error remains, contact your qualified service
person.
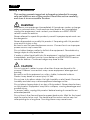
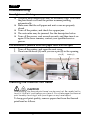
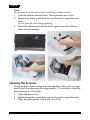
The autocutter is jammed or the roll paper cover will not open.
1. Turn off the printer, and open the unit cover.
2. Then turn the knob (A) until you see a pin (B) in the opening.
pin (B)
knob (A)
Cleaning the Thermal Print Head
CAUTION:
After printing, the thermal print head can be very hot. Be careful not to
touch it. Also let it cool before you clean it. Do not damage the thermal
print head by touching it with your fingers or any hard object.
To keep good print quality, remove paper dust from the thermal
print head as follows.
8 TM-H6000II with Image Scanner User’s Manual
English
Be sure that the printer is turned off. Open the roll paper cover and
clean the thermal element (the green part) of the thermal print head
with a cotton swab moistened with an alcohol solvent (ethanol,
methanol, or IPA).
Clean the thermal print head periodically (generally every 3
months) to maintain receipt print quality.
.
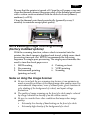
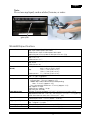
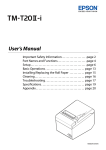
MICR Reading/Image Scanning/Printing
(Factory installed options)
With the scanning function, when a check is inserted into the
printer, the check image is digitized and stored, which saves check
processing time and cost. EPSON recommends the following
sequence for single-pass processing. The single pass eliminates the
need to turn the check paper over.
4. Printing on front
1. MICR reading
5. VOID printing
2. Pre-scanning
3. Endorsement printing
6. Scanning
(printing on back)
Notes on Using the Image Scanner
❏ Be sure to include the pre-scanning step because it can minimize as
much as possible problems of decreasing image data quality caused by
environmental temperature, wear of scanner parts, great variation in
color shading of the background of a check, and input voltage
fluctuation.
❏ The quality of image scanning on the front of a check may be reduced
by a large variation in density of an ink ribbon cassette.
❏ Be sure to consider these other conditions that may reduce image
quality:
• Extremely low density of handwriting on the front of a check.
• Extremely high density of the background of a check.
TM-H6000II with Image Scanner User’s Manual 9
English
•
•
•
•
An extremely large variation in the density and color tone of the
background of a check.
Many folds or wrinkles in a check.
Exposure of the image scanning part of the printer to strong
sunlight.
A foreign object, such as sand, entering the printer and
scratching the glass surface of the scanner.
CAUTION:
Do not insert checks with staples in them. This may cause paper jams,
MICR reading errors, and damage to the MICR head.
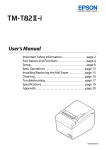
Be sure the checks are flat, without curls, folds, or wrinkles.
1. Wait until the SLIP light blinks. Then insert the check face up
with the right side of the check against the right side of the
paper guide as far as it will go. Be sure that the MICR
characters are on the right.
MICR
characters
on this side
face up
2. The printer will detect the check and start drawing it in. When
the printer starts drawing it in, let go of the check immediately.
When the printer ejects the check and the SLIP light starts
blinking again, remove the check by pulling it straight out; do
not pull it at an angle.
Cleaning the MICR Mechanism
Foreign matter in the mechanism can cause MICR reading errors.
Clean the MICR head with a moistened cleaning sheet
approximately every 12 months.
10 TM-H6000II with Image Scanner User’s Manual
English
Use the following or an equivalent commercially available cleaning
sheet:
PRESAT brand (KIC) “CHECK READER CLEANING CARD”
Note:
Be sure not to use an adhesive cleaning sheet.
Follow the steps below:
1. Load roll paper in the printer, turn off the power, then open the
roll paper cover and turn the power back on while holding
down the RELEASE button.
2. Press the RELEASE button
7 times, then close the roll
paper cover. The printer
prints the following
message on receipt paper,
and the SLIP light flashes.
3. Insert the cleaning sheet like a standard check.
CAUTION:
Be sure that the sheet is inserted with the correct side up and that it
is inserted in the correct direction.
Use a cleaning sheet only one time; then discard it.
4. When the sheet is ejected, press the RELEASE button, and
remove the sheet from the printer.
Notes on using the MICR reader
Do not install the printer near any magnetic fields. Be especially
careful where you install your display device, and be sure to check
the recognition rate of the MICR reader with the display device in
place.
Make sure that the printer is not subjected to any impact or
vibration when it is performing a MICR reading.
Endorsement Printing
If your printer has the optional endorsement printing mechanism,
install the endorsement ribbon following the steps below:
Use the EPSON ERC-41. The use of any ribbon cassettes other than
those approved by EPSON may damage the printer and will void
the warranty.
TM-H6000II with Image Scanner User’s Manual 11
English
Note:
Be sure to turn on the power before installing a ribbon cassette.
1. Turn the ribbon cassette knob. Then open the unit cover.
2. Inside the printer, push the levers backward to open the unit.
Note:
Do not open the unit during printing.
3. Insert the ribbon and turn the knob again to seat the ribbon;
then close the printer.
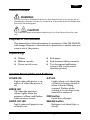
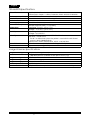
Cleaning the Scanner
The glass part of the scanner may become dirty due to ink or paper
dust, which can decrease the image quality. To avoid this, clean the
glass part every 12 months.
1. Open the unit cover.
2. Inside the printer, push the levers backward to open the unit.
3. Wipe the glass gently with a soft, dry cloth.
12 TM-H6000II with Image Scanner User’s Manual
English
Note:
Do not use any liquid, such as alcohol, benzine, or water.
glass part
TM-H6000II Specifications
Print method
Print font
Columns
Character size
(W × H)
Character sets
Print speed
Paper dimensions
Paper thickness
Copy capability
Thermal paper type
Inked ribbon
Receipt: Thermal line, 180 dpi × 180 dpi
Slip: 9-pin serial impact dot matrix
Endorsement: 8-pin shuttle impact dot matrix
(dpi: dots per inch [number of dots per 25.4 mm {1"}])
Receipt: 12 × 24/9 × 17
Slip: 5 × 9/7 × 9
Endorsement: 5 × 7
Receipt (Standard): 42/56
Slip: 45/60
Endorsement: 40
Receipt:
1.41 × 3.39 mm {0.06 × 0.13"}
0.99 × 2.40 mm {0.04 × 0.09"}
Slip:
1.56 × 3.1 mm {0.06 × 0.12"}
1.24 × 3.1 mm {0.05 × 0.12"}
Endorsement: 1.1 × 2.42 mm {0.04 × 0.10"}
95 alphanumeric, 37 international characters
128 × 11 (slip: 12) graphic
Receipt:
Normal: Max.: 170 mm/s {approx. 6.7"}
Ladder bar code/2-dimensional code printing:
Max.: 114 mm/s {approx. 4.5"}
Two-color printing: Maximum: 75 mm/s {approx. 3.0"}
Slip: Approx. 5.14 lps
Endorsement: Approx. 1.9 lps
(lps: lines per second)
Receipt: Thermal roll paper 79.5 ± 0.5 × 83 mm {3.13 ± 0.02 × 3.27"}
Slip/endorsement: 68 ~ 230 × 68 ~ 297 mm {2.7 ~ 9.1 × 2.7 ~ 11.7"} (W × L)
Note: the minimum size is 68 × 152 mm {2.7 ~ 6.0"}
Slip (single-ply): 0.09 ~ 0.2 mm {0.0035 ~ 0.0079"}
Endorsement: 0.09 ~ 0.2 mm {0.0035 ~ 0.0079"}
Receipt/Endorsement: Single-ply
Slip: 1 original + 3 copies
Monochrome: NTP080-80, Two-color: ENTPB080080
Slip: ERC-32(P), (B) Endorsement: ERC-41(P), (B)
TM-H6000II with Image Scanner User’s Manual 13
English
TM-H6000II Specifications
Ribbon life
Interface (compatible)
Data buffer
D.K.D. function
Power supply
Current consumption
Temperature
Humidity
Reliability
Overall dimensions
Mass
Slip: Purple: 6 million characters, Black: 4 million characters
Endorsement: Purple: 1 million characters, Black: 800,000 characters
RS-232/IEEE 1284 Bidirectional Parallel
Selectable for 45 bytes or 4 KB using DIP switch
2 drives
+24 VDC ± 10%
Slip: Approximately 1.7 A (mean)
Receipt: Approximately 1.9 A (mean)
Operating: 5 to 45°C {41 to 113°F}
Storage: −10 to 50°C {14 to 122°F}
Operating: 10 to 90% RH
Storage: 10 to 90% RH
Receipt: MTBF: 360,000 hours, MCBF: 52 million lines
Slip: MTBF: 180,000 hours
MCBF: 18 million lines (when the printer is used with the MICR and
performs both-sided printing)
Endorsement: MTBF: 180,000 hours, MCBF: 3,300,000 lines
185 × 186 × 298 mm {7.28 × 7.32 × 11.73"} (H × W × D)
Approximately 6.2 kg {13.7 lb}
Image Scanner Specifications
Image scanner type
Resolution
CIS (Contact Image Sensor)
200 dpi × 200 dpi (W × H)
(dpi: dots per inch [number of dots per 25.4 mm {1"}])
Image scanning mode
Black and white
Image scanning area
Width: 100 mm (typ.)
Image scanning speed
120 mm/s
Data compression
CCITT Group 4
Data transmission format TIFF (If data is not compressed, the format is raw data or BMP.)
14 TM-H6000II with Image Scanner User’s Manual